Showing 575 items
matching painted sign
-
 Ballarat Tramway Museum
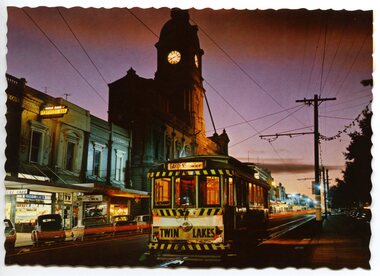
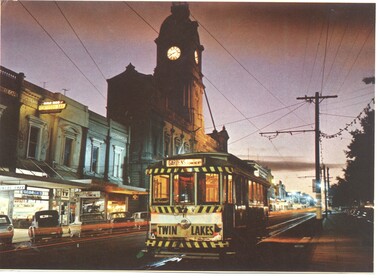
Postcard, Nu-color-vue or Nucolorvue Productions, Ballarat tram No. 11 at dusk
... painted with tram stop sign as well. On rear , printed in dark... sign. Pole painted with tram stop sign as well. On rear ...Colour postcard with serrated edges of Ballarat tram No. 11 at dusk in Sturt St, just west of Lydiard St. with Town Hall in background. Tram has destination of "GARDENS via Drummond Nth", with a "TWIN LAKES" sign on rear driver's apron of tram. On pole in front of tram is tram stop sign and a section sign. Pole painted with tram stop sign as well. On rear , printed in dark green ink is the card details etc. "Ballarat, Victoria, Looking to the City Hall, Sturt Street at sunset." Nucolorvue car, BT 65. \ trams, tramways, ballarat, town hall, sturt st, tram 834 -
 Glenelg Shire Council Cultural Collection
Photograph - Photograph - Model Breakwater, Model Parapet Wall, n.d
... , showing wave action. 4-92e and various numbers painted on tank.... 4-92e and various numbers painted on tank wall. Sign with '4 ...Port of Portland Authority Archivesport of portland archives, model breakwater -
 Lakes Entrance Regional Historical Society (operating as Lakes Entrance History Centre & Museum)
Photograph, Holding M, 2009
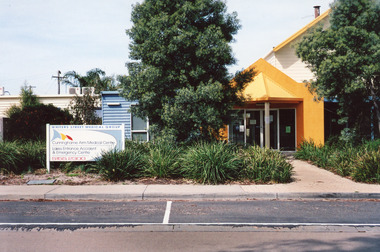
... or concrete slab facade painted bright yellow. Information sign... or concrete slab facade painted bright yellow. Information sign ...Date made September 2009|Site / building was originally (games room) part of caravan park|Also one other colour photograph closer view of front entrance doorway.Colour photograph of the front entry to Cunninghame Arm Medical Centre at 8 Whiters Street. Appears to be brick or concrete slab facade painted bright yellow. Information sign in native plant garden, brick pathways. Lakes Entrance Victoriaentertainment, transport -
 Bendigo Military Museum
Photograph - PHOTOGRAPHS, 1950 - 1956
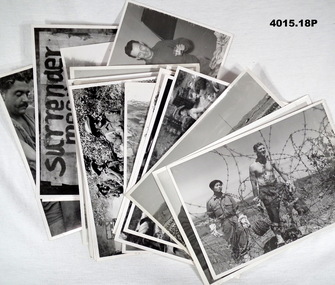
... holding a bottle of beer. (.2) Shows a hand painted sign...) Shows a hand painted sign on a timber boards. (.3) Same sign ...All photos relate to the collection of Francis William (Dinky) DEAN BEM, VX93960 2nd AIF, 3742 1 RAR, 1943 - 1975. Refer Cat No 124.2 for his service history. The photos are believed to be taken during 1 RAR’s 2nd tour of Korea 1954 - 56. BCFK (British Commonwealth Foce Korea)All photos are B & W. (.1) Two soldiers beside a sign holding a bottle of beer. (.2) Shows a hand painted sign on a timber boards. (.3) Same sign on a single board. (.4) An Australian and Korean soldier laying barb wire. (.5) two soldiers in winter clothes holding a box of rations. (.6) Large parade of Australian soldiers with a camp and buildings in the back ground. (.7) Group of men lining up receiving rations. (.8) Three soldiers sitting each with a tin of Golden Circle fruit or juice. (.9) Group of Officers lined up behind sand bags. (.10) Group of soldiers lined up on the ground with explosions in front of them. (.11) Australian soldier in a trench with radio equipment gear on. (.12) Five Australian soldiers on a road with a Jeep in the rear. (.13) Five soldiers silhouetted against a bush back ground. (.14) Australian soldiers in open ground firing mortars. (.15) Nine soldiers in the back of a truck, Frank Dean on the left in front. (.16) two soldiers, one being supported by the other. (.17) Three soldiers, one in white apron cutting up bread. (.18) Soldier in a trench wearing a steel helmet.All photos have on the rear stamped in purple; “Photo No, please credit to Public relations HQ BCFK” military, british common wealth force korea -
Glenelg Shire Council Cultural Collection
Photograph - Photograph - Model Breakwater, Model Parapet Wall, n.d
... breakwater, showing wave action 117, 116, 5 to 1, -3 painted on tank... wave action 117, 116, 5 to 1, -3 painted on tank wall. Sign ...Port of Portland Authority Archivesport of portland archives, model breakwater -
 Ballarat Tramway Museum
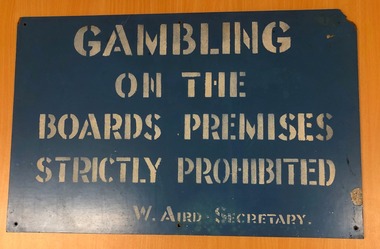
Sign - Gambling on Board's premises, Melbourne and Metropolitan Tramways Board (MMTB), c1960
... Sign - blue paint background with white letters stencil cut... MMTB Depot Signs Personnel Crews Mess Rooms Rules Sign - blue ...Gambling at Tram Depots was common and resulted in the loss of wages. See attached document with notes by Peter Bruce. The MMTB tried to restrict it, but it still took place. W Aird was the Board Secretary.Yields information about gambling at depots by MMTB staff.Sign - blue paint background with white letters stencil cut painted onto a sheet of Masonite, with 3 drilled holes along each of the top and bottom edges with the words "Gambling on the Boards Premises Strictly Prohibited, signed "W. Aird Secretary". Has the word "Masonite" stencilled on the rear.trams, tramways, mmtb, depot, signs, personnel, crews, mess rooms, rules -
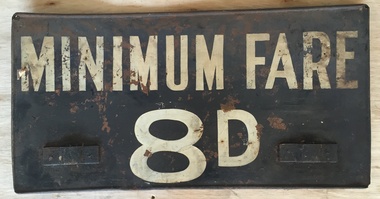 Melbourne Tram Museum
Sign, Melbourne & Metropolitan Tramways Board (MMTB), "Minimum Fare 8d", 1950's
... Sign, painted onto a MMTB auxiliary destination board... Trams tramways Fares Signs Auxiliary Board Sign, painted onto ...Sign, painted onto a MMTB auxiliary destination board of the type that could hang on the front of a Melbourne tram car with the words "Minimum Fare 8d", white letters on black paint. The reverse side has had a number of paper signs glue to it. Not readable. Metal sign, fitted with metal hanging brackets, riveted to sign on both sides. Manufactured by rolling the outer edges over a 4mm diameter steel rod.trams, tramways, fares, signs, auxiliary board -
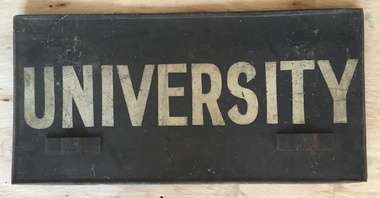 Melbourne Tram Museum
Sign, Melbourne & Metropolitan Tramways Board (MMTB), "University", 1950's
... Sign, painted onto a MMTB auxiliary destination board... Trams tramways Signs Auxiliary Board University Sign, painted ...Sign, painted onto a MMTB auxiliary destination board of the type that could hang on the front of a Melbourne tram car with the words "University", white letters on black painted background. The reverse side has been painted in black and the words "Via Nth Melb" chalked on. Metal sign, fitted with metal hanging brackets, riveted to sign on both sides. Manufactured by rolling the outer edges over a 4mm diameter steel rod.trams, tramways, signs, auxiliary board, university -
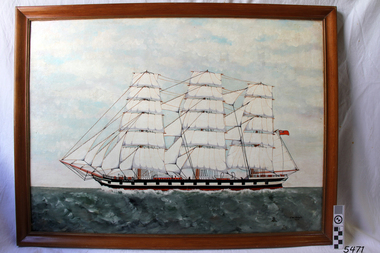 Flagstaff Hill Maritime Museum and Village
Painting - Maritime painting, C. W. Veale, Loch Ard, c. 1978
... . Ship's name is on hull. Artist C. W. Veale, painted in 1978..., painted in 1978, signed on bottom right. Label on back ...This painting is believed to have been created by an amateur artist C W Veale of Colac, who established an early bus service in about 1923, known at the time as the Blue Bus Service, which operated from Colac. This service was available for special trips within the Colac region. The Blue Bus Service became very popular with travellers to Lorne via the Deans Marsh Road. The label on the back of the painting comments on whether the ship would be in full sail at the time of the wreck. History of the Loch Ard: The Loch Ard got its name from "Loch Ard" a loch that lies to the west of Aberfoyle, and the east of Loch Lomond. It means "high lake" in Scottish Gaelic. The vessel belonged to the famous Loch Line which sailed many vessels from England to Australia. The Loch Ard was built in Glasgow by Barclay, Curle & Co. in 1873, the vessel was a three-masted square-rigged iron sailing ship that measured 79.87 meters in length, 11.58 m in width, and 7 m in depth with a gross tonnage of 1693 tons with a mainmast that measured a massive 45.7 m in height. Loch Ard made three trips to Australia and one trip to Calcutta before its fateful voyage. Loch Ard left England on March 2, 1878, under the command of 29-year-old Captain Gibbs, who was newly married. The ship was bound for Melbourne with a crew of 37, plus 17 passengers. The general cargo reflected the affluence of Melbourne at the time. Onboard were straw hats, umbrellas, perfumes, clay pipes, pianos, clocks, confectionery, linen, and candles, as well as a heavier load of railway irons, cement, lead, and copper. There were other items included that were intended for display in the Melbourne International Exhibition of 1880. The voyage to Port Phillip was long but uneventful. Then at 3 am on June 1, 1878, Captain Gibbs was expecting to see land. But the Loch Ard was running into a fog which greatly reduced visibility. Captain Gibbs was becoming anxious as there was no sign of land or the Cape Otway lighthouse. At 4 am the fog lifted and a lookout aloft announced that he could see breakers. The sheer cliffs of Victoria's west coast came into view, and Captain Gibbs realised that the ship was much closer to them than expected. He ordered as much sail to be set as time would permit and then attempted to steer the vessel out to sea. On coming head-on into the wind, the ship lost momentum, the sails fell limp and Loch Ard's bow swung back towards land. Gibbs then ordered the anchors to be released in an attempt to hold their position. The anchors sank some 50 fathoms - but did not hold. By this time the ship was among the breakers and the tall cliffs of Mutton Bird Island rose behind. Just half a mile from the coast, the ship's bow was suddenly pulled around by the anchor. The captain tried to tack out to sea, but the ship struck a reef at the base of Mutton Bird Island, near Port Campbell. Waves subsequently broke over the ship and the top deck became loosened from the hull. The masts and rigging came crashing down knocking passengers and crew overboard. When a lifeboat was finally launched, it crashed into the side of Loch Ard and capsized. Tom Pearce, who had launched the boat, managed to cling to its overturned hull and shelter beneath it. He drifted out to sea and then on the flood tide came into what is now known as Loch Ard Gorge. He swam to shore, bruised and dazed, and found a cave in which to shelter. Some of the crew stayed below deck to shelter from the falling rigging but drowned when the ship slipped off the reef into deeper water. Eva Carmichael a passenger had raced onto the deck to find out what was happening only to be confronted by towering cliffs looming above the stricken ship. In all the chaos, Captain Gibbs grabbed Eva and said, "If you are saved Eva, let my dear wife know that I died like a sailor". That was the last Eva Carmichael saw of the captain. She was swept off the ship by a huge wave. Eva saw Tom Pearce on a small rocky beach and yelled to attract his attention. He dived in and swam to the exhausted woman and dragged her to shore. He took her to the cave and broke the open case of brandy that had washed up on the beach. He opened a bottle to revive the unconscious woman. A few hours later Tom scaled a cliff in search of help. He followed hoof prints and came by chance upon two men from nearby Glenample Station three and a half miles away. In a complete state of exhaustion, he told the men of the tragedy. Tom then returned to the gorge while the two men rode back to the station to get help. By the time they reached Loch Ard Gorge, it was cold and dark. The two shipwreck survivors were taken to Glenample Station to recover. Eva stayed at the station for six weeks before returning to Ireland by steamship. In Melbourne, Tom Pearce received a hero's welcome. He was presented with the first gold medal of the Royal Humane Society of Victoria and a £1000 cheque from the Victorian Government. Concerts were performed to honour the young man's bravery and to raise money for those who lost families in the disaster. Of the 54 crew members and passengers on board, only two survived: the apprentice, Tom Pearce, and the young woman passenger, Eva Carmichael, who lost her family in the tragedy. Ten days after the Loch Ard tragedy, salvage rights to the wreck were sold at auction for £2,120. Cargo valued at £3,000 was salvaged and placed on the beach, but most washed back into the sea when another storm developed. The wreck of Loch Ard still lies at the base of Mutton Bird Island. Much of the cargo has now been salvaged and some items were washed up into Loch Ard Gorge. Cargo and artefacts have also been illegally salvaged over many years before protective legislation was introduced in March 1982. One of the most unlikely pieces of cargo to have survived the shipwreck was a Minton majolica peacock- one of only nine in the world. The peacock was destined for the Melbourne 1880 International Exhibition. It had been well packed, which gave it adequate protection during the violent storm. Today the Minton peacock can be seen at the Flagstaff Hill Maritime Museum in Warrnambool. From Australia's most dramatic shipwreck it has now become Australia's most valuable shipwreck artefact and is one of very few 'objects' on the Victorian State Heritage Register.The shipwreck of the Loch Ard is of significance for Victoria and is registered on the Victorian Heritage Register ( S 417). Flagstaff Hill has a varied collection of artefacts from Loch Ard and its collection is significant for being one of the largest accumulation of artefacts from this notable Victorian shipwreck of which the subject items are a small part. The collection's objects give us a snapshot of how we can interpret the story of this tragic event. The collection is also archaeologically significant as it represents aspects of Victoria's shipping history that allows us to interpret Victoria's social and historical themes of the time. Through is associated with the worst and best-known shipwreck in Victoria's history.Painting in brown-stained wooden frame. Depicts three-masted vessel 'Loch Ard' in full sail on moderate seas. Ship has figurehead, figures on board, and a Union Jack flag on red background. Ship's hull is black with white stripe, and is red on waterline. Ship's name is on hull. Artist C. W. Veale, painted in 1978, signed on bottom right. Label on back of painting has typed description of the Loch Ard and a comment.Signature "C W Veale / 1978" Text on hull "LOCH ARD" Label on back; " "LOCH ARD" / The clipper ship Loch Ard was wrecked on the 1st June 1878. / Of 54 people on board only two survived : Eva Carmichael and Tom Pearce. / Pearce became hero of the wreck for saving Miss Carmichael. / This picture shows the Loch Ard in full sail in moderate seas. / When approaching Cape Otway from the west, she would be in rough water and would presumably not be in full sail."flagstaff hill maritime museum, colac bus services, blue bus service, cw veale, loch ard paintings, loch ard, veale, warrnambool, great ocean road, eva carmichael, tom pearce, thomas pearce, cape otway, cargo ship 1878 -
 Bendigo Historical Society Inc.
Functional object - Sign
... A rectangular metal sign painted dark blue with white... Signs Public health A rectangular metal sign painted dark blue ...A rectangular metal sign painted dark blue with white writing and a white line around the edge which has a quarter circle indentation on each corner. The writing is all in capital letters and states DO NOT SPIT ON FOOTPATHS PENALTY £5. the reverse of the sign is identical. The sign is 30.5 centimetres long and 15.5 centimetres wide. It has a four centimetre by 15,5 centimetre piece at right angles on the end which has three holes in it for mounting. signs, public health -
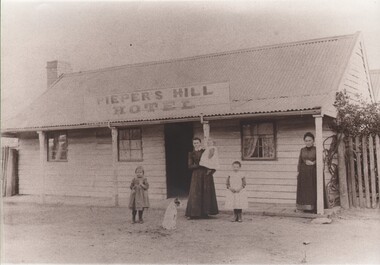 Bendigo Historical Society Inc.
Photograph - HARRY BIGGS COLLECTION: PIEPERS HILL HOTEL
... Hotel, Strathfieldsaye Road,Kennington, is painted on a wooden...,Kennington, is painted on a wooden sign above the veranda. In front ...Photograph of an Iron roofed wooden building. Piepers Hill Hotel, Strathfieldsaye Road,Kennington, is painted on a wooden sign above the veranda. In front of the veranda is a lady wearing a dark coloured long dress, holding a baby. Two small girls standing beside her. An elderly woman is standing on the veranda and there is a dog in the foreground.buildings, commercial, hotel, piepers hill hotel -
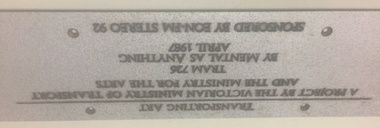 Melbourne Tram Museum
Sign, Preston Workshops, "Tram 726 - By Mental as Anything", Apr. 1987
... . Front of sign painted in silver paint, letters finished in black... Trams tramways Signs Transporting Art Castings tram 726 Cast ...Cast brass with raised capital letters for use on Tram 726, when it was part of the "Transporting Art" program - "Transporting Art a project by the Victorian Ministry of Transport and the Ministry for the Arts / Tram 726 - By Mental as Anything April 1987 Sponsored by EON-FM Stereo 92" Has six mounting holes. Front of sign painted in silver paint, letters finished in black. On rear: 88307, FB, No Holes, paint silver, letters black Red Hot"trams, tramways, signs, transporting art, castings, tram 726 -
Glenelg Shire Council Cultural Collection
Photograph - Photograph - Model Breakwater, Model Parapet Wall, n.d
... on top. 4-91G- various numbers painted on tank wall. Sign with '4...- various numbers painted on tank wall. Sign with '4-91, Before wave ...Port of Portland Authority Archivesport of portland archives, model breakwater -
Glenelg Shire Council Cultural Collection
Photograph - Photograph - Model Breakwater, Model Parapet Wall, n.d
... wall on top. 4-90 and various other numbers painted on glass... and various other numbers painted on glass wall. Sign with '4-90E ...Port of Portland Authority Archivesport of portland archives, model breakwater -
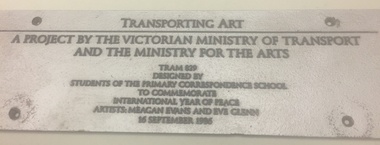 Melbourne Tram Museum
Sign, Preston Workshops, "Tram 829", Sep. 1986
... " Has six mounting holes. Front of sign painted in silver... mounting holes. Front of sign painted in silver paint, letters ...Cast brass with raised capital letters for use on Tram 829, when it was part of the "Transporting Art" program - "Transporting Art a project by the Victorian Ministry of Transport and the Ministry for the Arts / Tram 829 Designed by Students of the Primary Correspondence School to commemorate International Year of Peace Artists Megan Evan and Eve Glenn 16 September 1986" Has six mounting holes. Front of sign painted in silver paint, letters finished in black. Two copies held On rear:trams, tramways, signs, castings, transporting art, tram 829 -
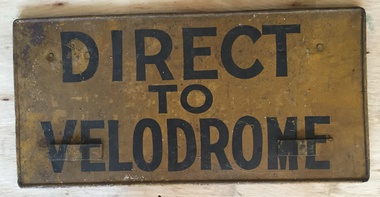 Melbourne Tram Museum
Sign, Melbourne & Metropolitan Tramways Board (MMTB), "Direct to Velodrome", 1950's
... Sign, painted onto a MMTB auxiliary destination board... Trams tramways Signs Auxiliary Board Swan St Olympics Sign ...Sign, painted onto a MMTB auxiliary destination board of the type that could hang on the front of a Melbourne tram car with the words "Direct to Velodrome", black letters on yellow painted background. The reverse side has had a number of paper signs glue to it, only partly readable. The Velodrome is now part of the Olympic Park in Swan St. Metal sign, fitted with metal hanging brackets, riveted to sign on both sides. Manufactured by rolling the outer edges over a 4mm diameter steel rod.trams, tramways, signs, auxiliary board, swan st, olympics -
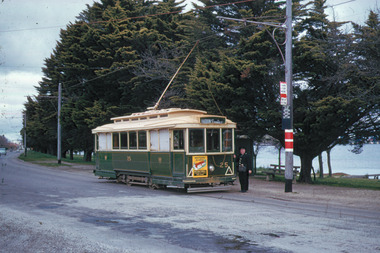
 Ballarat Tramway Museum
Photograph - Illustration/s, Ballarat 11 with Town Hall
... sign. Pole painted with tram stop sign as well. On rear... stop sign and a section sign. Pole painted with tram stop sign ...Illustration that yields information about a Ballarat tram and streetscape mid 1960's - evening photograph and a Ballarat tourist attraction at the time - the shell house.Illustrator with a printed photograph of Ballarat tram No. 11 at dusk in Sturt St, just west of Lydiard St. with Town Hall in background. Tram has destination of "GARDENS via Drummond Nth", with a "TWIN LAKES" sign on rear driver's apron of tram. On pole in front of tram is tram stop sign and a section sign. Pole painted with tram stop sign as well. On rear , printed in dark green ink is the card details etc. "Ballarat, Victoria, Looking to the City Hall, Sturt Street at sunset." See also Reg Item 669 - Nucolorvue car, BT 65 for the same photographs. On rear is a photo of the crown at the Shell house - see also Reg Item 2143 and 3079 for the same photograph. Possibly cut from a Nu-colour-vue publication.trams, tramways, sturt st, town hall -
 Ballarat Tramway Museum
Slide - 35mm slide/s, Travis Jeffrey, c1960
... , section sign, timetable board and painted pole stop sign... and painted pole stop sign (compulsory stop). Tram has a Mutual Homes ...Agfa plastic mount (blue base, white cover) with a photo of No. 25 at Haddon St. with conductor standing at the back of the tram. Note terminal arrangements on the pole, tram stop sign, section sign, timetable board and painted pole stop sign (compulsory stop). Tram has a Mutual Homes dash panel advertisement on rear panel. Slide rescanned at 3200 dpi 24-10-2020, jpg replaced, tiff file retained. This file was scanned in 2003 and may show colour changes."BAS 5" in penciltramways, trams, wendouree parade, haddon st, tram 25 -
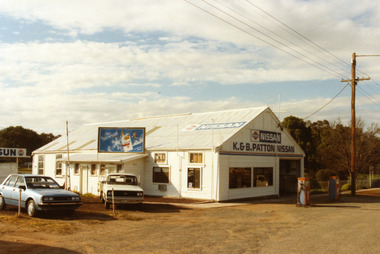 Charlton Golden Grains Museum Inc
Patton's Garage West Charlton c. 1987
... and there is a NISSAN sign painted on the roof. There is a sign for Peter... and there is a NISSAN sign painted on the roof. There is a sign for Peter ...The garage was established in the 1930s by Mr Gamble. Other proprietors were Perc Kimberley 1943-46, Henderson 1946, Neil Rogers. K. & B. Patton ran the garage from 1960s - 2008Colour photo of K. & B. Patton's Garage. The garage is a white, weatherboard single story building with a corrugated iron roof. There small lean-to on the LH side of the building. There is a large entrance and two large windows on the front. There are two petrol pumps at the front of the building. A blue car and a white utility are parked at the LH side of the garage. The signage on the front of the building reads K. & B. PATTON NISSAN and there is a NISSAN sign painted on the roof. There is a sign for Peter Stuyvesant cigarettes on the roof of the lean-to. A telegraph pole and the entrance to Gordon Park is on the right of the photo.perc kimberley, k & b patton, gamble, henderson, neil rogers -
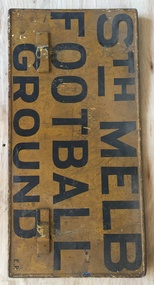 Melbourne Tram Museum
Sign, Melbourne & Metropolitan Tramways Board (MMTB), "Fitzroy Football Ground", "Sth Melb Football Ground", 1950's
... Sign, painted onto a MMTB auxiliary destination board... Board Sign, painted onto a MMTB auxiliary destination board ...Sign, painted onto a MMTB auxiliary destination board of the type that could hang on the front of a Melbourne tram car with the words "Fitzroy Football Ground" and "Sth Melb Football Ground" Black letters on a yellow background. The bottom right hand corner of the Sth Melbourne face has the letters "E.P." indicating the depot that it belonged to - East Preston. South Melbourne Football Ground Metal sign, fitted with metal hanging brackets, riveted to sign on both sides. Manufactured by rolling the outer edges over a 4mm diameter steel rod.trams, tramways, football, fitzroy, south melbourne, signs, auxiliary board -
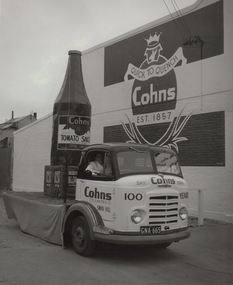 Bendigo Historical Society Inc.
Photograph - COHN BROS TRAY TRUCK, c1957
... painted with advertising sign. Inscriptions: in image on wall... in background painted with advertising sign. Inscriptions: in image ...Black and white photograph in cream folder with card frame inside. Tray truck with display on back, consisting of large model tomato sauce bottle on box. Brick building in background painted with advertising sign. Inscriptions: in image on wall 'Quick to Quench, Cohn's, est. 1857'. On truck 'Say Cohns Please:, '100 years', 'Cohn Limited, Sw3an Hill', 'Cohn's Tomato Sauce', Truck number plate 'GNA 665'. Hand written BR corner 'Reg V Brock'. Rubber stamp front BR corner, 'Reg V Brock of Bendigo'. History: Prev. Acc. No. MP201topic, transport -
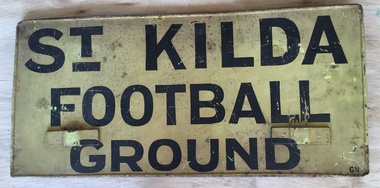 Melbourne Tram Museum
Sign, Melbourne & Metropolitan Tramways Board (MMTB), "St Kilda Football Ground", "Shop Early", 1950's
... Sign, painted onto a MMTB auxiliary destination board... Sign, painted onto a MMTB auxiliary destination board ...Sign, painted onto a MMTB auxiliary destination board of the type that could hang on the front of a Melbourne tram car with the words "St Kilda Football Ground" Black letters on a yellow background. The bottom right hand corner of the St Kilda has the letters "G.H." indicating the depot that it belonged to - East Preston. The reverse side has been painted in black and a "Shop early" for Christmas sing has been pasted onto it. Metal sign, fitted with metal hanging brackets, riveted to sign on both sides. Manufactured by rolling the outer edges over a 4mm diameter steel rod.trams, tramways, football, st kilda, christmas, signs, auxiliary board -
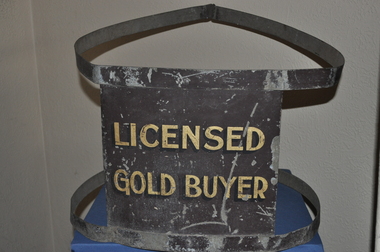 Bendigo Historical Society Inc.
Sign - GOLD BUYER SHOP SIGN
... Hand painted Gold buyers shop sign. Circa 1860. Metal... painted Gold buyers shop sign. Circa 1860. Metal Construction ...Hand painted Gold buyers shop sign. Circa 1860. Metal Construction. Previously on loan to National Museum of Australia. Now located at Specimen Cottage. The sign is constructed of metal (Tin). It consists of a strap attached at the top and bottom of a rectangular plate. The sashes and plate are painted brown with the words 'LICENSED GOLD BUYER' painted in gold lettering on the plate. The sashes are constructed in such a manner as to be attached around a post of tree trunk. -
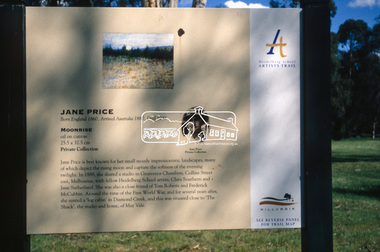 Eltham District Historical Society Inc
Slide - Photograph, Moonrise, Jane Price, Heidelberg School Artists Trail, Diamond Creek, c.Nov. 2001
... in which they were painted. Transcription of sign: Jane Price... in which they were painted. Transcription of sign: Jane Price ...The Heidelberg School Artists' Trail extends from Heidelberg through Eltham and Warrandyte and to the Dandenongs. It features signs depicting paintings of artists in the location in which they were painted. Transcription of sign: Jane Price is best known for her small moody impressionistic landscapes, many of which depict the rising moon and capture the softness of the evening twilight. In 1889, she shared a studio in Grosvenor Chambers, Collins Street east, Melbourne, with fellow Heidelberg School artists, Clara Southern and Jane Sutherland. She was also a close friend of Tom Roberts and Frederick McCubbin. Around the time of the First World War, and for several years after, she rented a ‘log cabin’ in Diamond Creek, and this was situated close to ‘The Shack’, the studio and home, of May Vale. Part of a slide show presentation "A Trip Down the Diamond Creek" by Russell Yeoman to the Eltham District Historical Society meeting of 14 Nov. 200135mm colour positive transparency Mount - Black and Whiteart in public places, diamond creek, heidelberg school artists trail, jane price, moonrise, public art, sign -
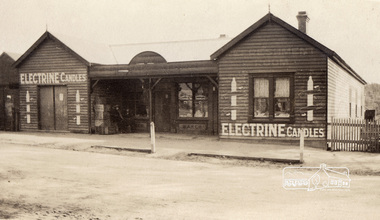 Eltham District Historical Society Inc
Photograph, Lloyd's Store, Main Road, Eltham, c.1916-c.1922, 1920c
... at doorway, signs painted on front of store read: Electrine Candles... at doorway, signs painted on front of store read: Electrine Candles ...Store was located opposite Dudley Street. Note various signs for Electrine Candles, Baker, Cadburys Cocoa, Cadburys Chocolate (in window) and Refreshment Room (faded). Edited version of print/digital file sourced from State Library of Victoria: Title: Lloyd's Store, Eltham, [Vic.] [picture]. Date: [ca. 1916-ca. 1922] Description: 1 photographic print : gelatin silver ; 6.6 x 10.8 cm. Copyright status: This work is out of copyright Terms of use: No copyright restrictions apply. Identifier(s): Accession no:H86.93 Subjects: Eltham (Vic.) -- Buildings, structures, etc; Victoria -- History -- 1901-1922; Gelatin silver prints Index terms: Shops; Victoria Notes: Title inscribed in ink on verso. Photographer unknown. Undated, date range provided by donor. Contents / Summary: Looking across street towards weatherboard store with porch at doorway, signs painted on front of store read: Electrine Candles. Source / Donor: Gift; Mrs. Nancy Graham; 1986.Copy of sepia photographbaker, cadburys chocolate, cadburys cocoa, lloyd's store, refreshment room, slv, shops -
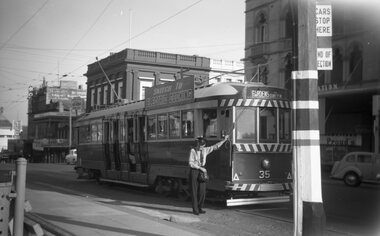 Ballarat Tramway Museum
Negative - Black and white print from negative, Travis Jeffrey, 30/09/1961 12:00:00 AM
... with SEC painted tram stop sign, enamel stop sign and end... of tram obscured by pole with SEC painted tram stop sign, enamel ...Negative No. N383 and black and white print made by a laser printer (stored in folder) of Ballarat No. 35 at the City Terminus in Sturt St, south side with the conductor (appears to be No. 17) standing by the front of the tram. Part of tram obscured by pole with SEC painted tram stop sign, enamel stop sign and end of section sign. Tram has an SEC roof advertisement, "Switch to Electric Cooking" and destination of Gardens via Sturt St. West. In the background is the Commonwealth Bank building, Prouds jewellers and the Odeon Theatre. Date of photo on folder - 30/9/1961. Original negative rescanned 24/5/2020 and image file updated. Paper folder that contained the negative had "NR57A" in red ink, "BA11" in pencil, date stamp of "20 Sep 1961" on front, and on rear date stamps "26 Sep 1962" and "6 Oct 1962".trams, tramways, sturt st, city terminus, odeon theatre, tram 35 -
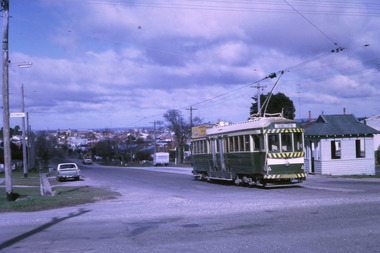 Ballarat Tramway Museum
Photograph - Digital image Set of 10, Tony Smith, 1971
... the tram stop signs - painted pole and enamel sign. .3 -33... stop signs - painted pole and enamel sign. .3 -33 arriving ...Yields information about Ballarat Tramways and trams prior to the closure of the tramway system.Set of 10 digital images of Ballarat trams prior to closure, scanned from original slides by Tony Smith, 1971 prior to closure of the system. .1 - 37 at the Lydiard St North terminus, with the shelter in the background. .2 - 33 at the Mount Pleasant terminus, has the corner store with a "The Sun" advertisement and the general store on the right side of the road in the background. Has signs for Streets Ice Cream and Coca Cola. Also has the tram stop signs - painted pole and enamel sign. .3 -33 arriving at the Mt Pleasant terminus with the conductor stepping off the back step, a lady walking across to the tram. Tram has a Twin Lakes sign. .4 - 11 at Victoria St terminus, with conductor turning the pole. Tram has a Twin Lakes sign. IN the background is the rail bridge over the Eureka line and a shelter. .5 - 11 in bound from Victoria St, shows the bleakness of the street at the time. Tram has Twin Lakes and a SEC Briquettes signs. .6 - 12 outbound to Mt Pleasant in Main St and the corner with Humffray St. Tram has a Twin Lakes sign. .7 - 11 in bound from Victoria St, in Bridge St, with junction in background. Tram has Twin Lakes and a SEC Briquettes signs. In the background are Rodda's, C.W. Pennant wall papers and Gill and O'Keffe footwear stores. .8 - 21 in Wendouree Parade, in bound to Victoria St, with the Lake in the background, near Macarthur St. .9 - 21 ditto, nearing the Macarthur St junction. Has the shelter and tram stop signage for View Point in the background. .10 - 34 sitting on the depot fan, 2 road, ready to run out. Has Mt Pleasant as the destination.trams, tramways, lydiard st north, mount pleasant terminus, victoria st, main st, bridge st, wendouree parade, macarthur st, view point, depot, tram 37, tram 33, tram 11, tram 12, tram 21, tram 34 -
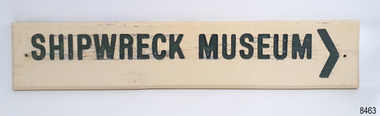 Flagstaff Hill Maritime Museum and Village
Sign - Shipwreck Museum sign, Flagstaff Hill Historic Park Planning Board, Shipwreck Museum, ca. 1975
... This sign is painted on both sides. It was attached... Warrnambool great-ocean-road This sign is painted on both sides ...This sign is painted on both sides. It was attached to the bluestone wall on the western wing of the Lighthouse Keeper's Quarters, the Assistant Keeper's Quarters, at Flagstaff Hill Maritime Museum and Village for almost 50 years. The Complex was opened to the public on December 11, 1975, and officially opened by Victorian Premier Sir Rupert Hamer on July 8th, 1977. The sign's reverse side reads "Loch Ard Peacock & Museum". The three rooms had displays behind glass showing various ships' fittings, cargo and personal belongings recovered from significant shipwrecks along the southwest coast of Victoria. There was also a display of information about the mysterious Mahogany Ship or Ancient Wreck. The shipwreck artefacts were recovered by local divers in the 1960s and early 1970s. Also on display was the famous Loch Ard Peacock, created in 1873, survived the shipwreck in 1878, was purchased by Flagstaff Hill in 1975 and announced as being on display in The Standard of September 15, 1975. In about 1984 the other side of the sign was painted "SHIPWRECK MUSEUM" and re-displayed on the building. The Loch Ard Peacock was by that time on display in the Entrance building; plans were underway on August 31st 1984 to build a Hall for its unique display. In February 2023 the sign was removed from the building, which was undergoing restoration and preparation for use as a new Temporary Exhibition space. The Loch Ard Peacock continued its journey around the Village; it was moved from the Entrance to the Village's newly completed Public Hal in 1986. It also spent a short time in the Stella Maris Tea Rooms. This was likely around 1998, when the Common School had moved from the Chartroom building to what had been the Public Hall. The Loch Ard Peacock was once again moved in around 2001, this time to be the central attraction and meeting place in the Great Circle Gallery, which opened on December 31st 2002. The sign continued to be displayed on the western wing of the Lighthouse Keeper's Quarters until February 2023. This wing has now been restored and re-fitted to become a facility for short-term exhibitions. A section of the original internal wall frame and wallpaper that couldn’t be kept in the building due to preservation issues have been saved and become sort of the Flagstaff Hill Collection. The sign has guided the visitors of Flagstaff Hill Maritime Museum and Village to the exhibits of artefacts from historic and significant shipwrecks. It has connected the current generations to the people and objects of the past, leading to a better understanding of our Colonial history.Sign, wooden, rectangular, with a hole through each short side. The front and reverse have different painted text. Cream paint for the background colour, green paint for the lettering, and the reverse has a white painted border. The front has an arrow painted on the right-hand side. The sign was used at Flagstaff Hill since its opening.Text on front "SHIPWRECK MUSEUM >" Text on back "LOCH ARD PEACOCK / & MUSEUM"flagstaff hill maritime museum and village, warrnambool, great ocean road, shipwreck coast, sign, building sign, shipwreck museum, loch ard peacock & museum, flagstaff hill history, assistant lighthouse keeper's cottage, assistand lighthouse keeper's quarters, public hall, common school -
 Melbourne Legacy
Letter, Tobruk Photos, 1979
... website the signs were painted by South Australian painter, SZ538... website the signs were painted by South Australian painter, SZ538 ...Letters regarding three photos of murals in near Tobruk in Libya. The photos were sent to Melbourne Legacy in 1979 by Legatee Syd Wilson of Yamba NSW. He thought Melbourne Legacy might be able to use them to generate money by selling them for advertising or publicity. He said they were enlargements of snapshots he had found in his old army trunk. Legatee Wilson's letter says the murals were: 'painted on three walls of a white concrete Italian block house (Police Check post I think), some 18/20 miles west of Tobruk, between Tobruk and Derna, and near a captured Italian airfield, somewhere about February 1941. Obviously they were painted by a Victorian Sapper. They were very well done, by a competent Sign-writer/artist, in correct and excellent colours (captured Itie paint no doubt - there was plenty in their Naval Stores at Tobruk).' (NB Itie was slang for Italian) From the AWM website the signs were painted by South Australian painter, SZ538 Sapper Leslie John “Doc” Dawes, 2/3rd Field Company, Royal Australian Engineers. There are several photos on the AWM site including the building the three murals were on.Photos taken by a Legatee when on active service in Libya in World War 2 and donated to Legacy when it was thought they could be used for fundraising, which shows that Legatees were conscious of that Legacy needs to generate funds to continue its work.Black and white enlargement of a photo taken in Libya of Abbotts Lager mural.tobruk, murals -
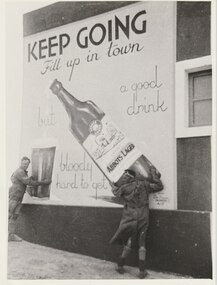 Melbourne Legacy
Photograph, A Mural West of Tobruk, 1941
... website the signs were painted by South Australian painter, SZ538... website the signs were painted by South Australian painter, SZ538 ...A photo of a mural in Libya painted by a South Australian Sapper of a bottle of Abbots Lager. The photo, and two others, were sent to Melbourne Legacy in 1979 by Legatee Syd Wilson of Yamba NSW. He thought Melbourne Legacy might be able to use them to generate money by selling them for advertising or publicity. He said they were enlargements of snapshots he had found in his old army trunk. The text says 'Keep Going. Fill up in town, but a good drink is bloody hard to get'. Legatee Wilson's letter says the murals were: 'painted on three walls of a white concrete Italian block house (Police Check post I think), some 18/20 miles west of Tobruk, between Tobruk and Derna, and near a captured Italian airfield, somewhere about February 1941. Obviously they were painted by a Victorian Sapper. They were very well done, by a competent Sign-writer/artist, in correct and excellent colours (captured Itie paint no doubt - there was plenty in their Naval Stores at Tobruk).' (NB Itie was slang for Italian) From the AWM website the signs were painted by South Australian painter, SZ538 Sapper Leslie John “Doc” Dawes, 2/3rd Field Company, Royal Australian Engineers. There are several photos on the AWM site including the building the three murals were on.Photos taken by a Legatee when on active service in Libya in World War 2. They were donated to Legacy when it was thought they could be used for fundraising, which shows that Legatees were conscious of that Legacy needs to generate funds to continue its work.Black and white enlargement of a photo taken in Libya of Abbots Lager mural.tobruk, soldiers, lager, beer, abbots lager, murals