Showing 1988 items matching "dry-docks"
-
 Warrnambool and District Historical Society Inc.
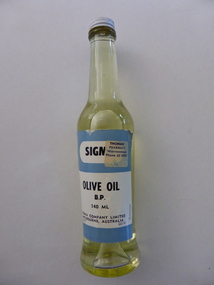
Bottle, Sigma Company Limited, Thomas Pharmacy Olive Oil, Mid 20th century
Thomas' pharmacy operated from Fairy Street in Warrnambool, initially from 90 fairy Street on the corner of Fairy and Koroit Streets then later moving to 140 Fairy Street on the corner of Fairy and Lava Streets. Mrs W L Hobson is noted as the pharmacist in the 1970's. Olive oil in the 1970's was used primarily to moisten and cleanse dry skin.It has also been used as a laxative. It is generally well tolerated and considered safe for skin care for babies. A commonly used product which has multiple uses.Clear glass bottle with long narrowed neck. White screw top and dusty blue and white paper label with black text. Small sticker on right side of label. Filled with olive oil. Thomas' Pharmacy Warrnambool Phone 622907 on sticker. Sigma Company Limited Melbourne Australia on bottom of label. 1270 and crown on the bottom of the bottle.thomas pharmacy, warrnambool, olive oil -
 Whitehorse Historical Society Inc.
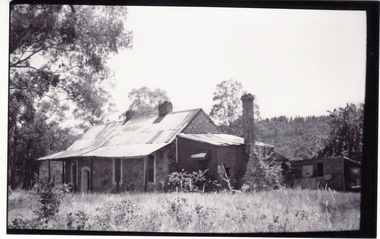
Photograph, Schwerkolt Cottage, 1962
Photo sent to Mary Jack, Pittsburgh USA by Charles Schwerkolt. Accompanying text sent by Charles - 'This is another photo of front side (facing Mitcham township) You see there is a lot of dried grass lying about which is a serious fire risk to the new houses which have been built. The verandah posts on the corner have rotted away and let the verandah down a foot. The roof on the kitchen is in a bad way. You will notice the chimney has a lean of about a foot. Black and white photo of Schwerkolt Cottage showing the Rotting Verandah Posts and Leaning Chimney. Thin Black Border.schwerkolt, charles clarence victor, whalen, rosalie, jackschowsky, mary elizabeth, schwerkolt cottage -
 Surrey Hills Historical Society Collection
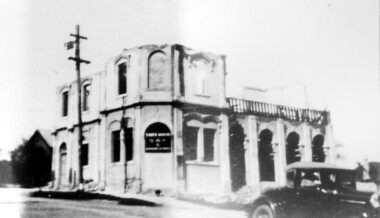
Photograph, Demolition of Tower House Day and Boarding School, Surrey Hills in 1932 (1)
This building dated back to the 1880s and had previously operated as Delany's Hotel and then the Royal Hotel. It was built near the site of the original Delany's Hotel, built in 1856. The Royal Hotel closed in 1921 after the area voted to be a 'dry area' in the local option poll. Tower House Day and Boarding School operated from 1921 until 1932. Norman Carter took many photos of Surrey Hills and Mont Albert from the 1920s; many were associated with events and activities of the Church of England.Black and white photo of a partially demolished building. The roof and part of the second storey are missing. What remains indicates that it has been a large building in the Victorian style. Along one side at ground level there are 4 arches, perhaps entry to a covered veranda, above which is a colonnade, and perhaps an open veranda on the upper level. There is a mixture of treatments to the surrounds of the windows. On the corner, within an arch which may have once been a doorway, is a sign reading: "TOWER HOUSE / DAY / & / BOARDING SCHOOL". There is a car with a retractable hood in the lower RH Corner of the photo.Rear top centre in blue biro "1932" (crossed out); top RH corner "498" in red biro; centre "Demolition of / Tower House Day & Boarding / cr Canterbury & Broughton Rds / previously Tower House Hotel / originally Royal Hotel / See partner photo."; bottom RH cnr "demol (in red biro) / 20-8-32". All in Jocelyn Hall's handwriting.tower house day and boarding school, schools, education, royal hotel, hotels, construction and demolition, dry area, licensing polls, temperance movement, delany's hotel, norman carter -
 Surrey Hills Historical Society Collection
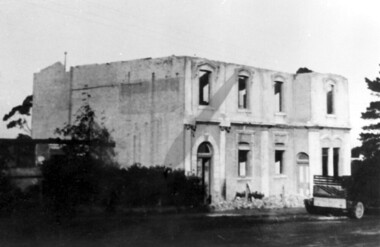
Photograph, Demolition of Tower House Day and Boarding School, Surrey Hills in 1932 (2), 20/08/1932
This building dated back to the 1880s and had previously operated as Delany's Hotel and then the Royal Hotel. It was built near the site of the original Delany's Hotel, built in 1856. The Royal Hotel closed in 1921 after the area voted to be a 'dry area'. Tower House Day and Boarding School operated from 1921 until 1932. Norman Carter took many photos of Surrey Hills and Mont Albert from the 1920s; many were associated with events and activities of the Church of England.Black and white photo of a partially demolished building. The roof is missing and there is a pile of rubble along the front wall. What remains indicates that it has been a large building in the Victorian style. There is a mixture of treatments to the surrounds of the windows. On the RHS part of a truck can be seen.Original: Top LH corner in blue biro "see matching photo"; top RH corner "498 / spare"; bottom LH corner in lead pencil "N Carter"; bottom RH corner in blue biro "20-8-32" - all Jocelyn Hall's handwriting.tower house day and boarding school, schools, education, royal hotel, hotels, construction and demolition, dry area, licensing polls, temperance movement, delany's hotel, norman carter -
 Melbourne Tram Museum
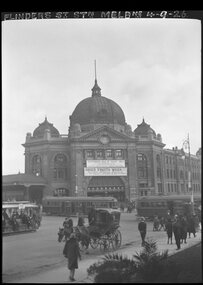
Negative - Copy - Flinders St Station and trams, 4-9-1926
Copy negative of a photograph of Flinders St station building, at Swanston St with two W class trams crossing Flinders St, a cable tram in Flinders St and a horse drawn cab. The Station is advertising Dried Fruits Week and Pasteurised Milk is "Safe" Milk. The top of the negative has written in ink "Flinders St Stn Melbne 4-9-26" . The Swanston cable tram was replaced by an electric tram in Jan. 1926 and Flinders St cable trams during 1927.Yields information about Flinders St station during 1926.Copy negative of a black and white photographtramcars, tramways, flinders st station, flinders st, swanston st, w class, cable trams, milk, dried fruit -
 Flagstaff Hill Maritime Museum and Village
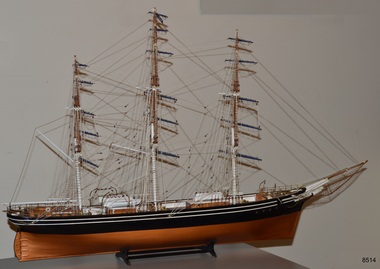
Craft - Ship Model, Billings Boats Denmark Aps, Cutty Sark, 1980s
This ship model of the Cutty Sark was hand-built in the 1980s from a model kit produced by Billings, Denmark. It was on display in the Olde Maritime Motor Inn in Warrnambool until it was refurbished around 2015. The Cutty Sark was a famous clipper ship, launched in 1869 for the tea trade from China to London. The ship was designed for speed, with the ambition to be the fastest ship. In the late 1800s, it competed in the tea clipper races. It was eventually sold to a Portuguese company, Ferreria, and took on the company's name. It was sold again and renamed Maria do Amparo. Finally, the ship's name was returned to the original 'Cutty Sark' when it was purchased by Captain Dowman for use as a cadet training ship. The ship continued trading and in 1922 it became the last operating clipper ship in the world. The ship is now a museum, preserved in a dry dock at Greenwich, England, as part of the British National Historic Fleet. About Barry Williams: - The maker, Barry Williams, worked for the Australian Shipping Line, Huddart Packard Ltd., until it closed down in 1960. Williams then worked for Shaw Savill & Albion Co. Ltd., a substantial British passenger and liner company. and subsequently Furness Withy Ltd. (SS&A's parent company). In the late 1970s Williams and two friends established their own ship chartering company in Melbourne, the Harwood Shipping Co. During the early 1970s Williams and his wife lived in London, near Greenwich, and often walked along the river where the Cutty Sark Maritime Museum is located. The fascination of the Cutty Sark led Williams to build model ships of the same era. At one stage Williams lost the rigging plan for the Cutty Sark but one of his partners, on a visit to London, photographed the Cutty Sark on the river, and Williams used these to complete the rigging on the model. Williams found the making of the model a very demanding but also pleasurable exercise.The model is significant for showing a visual representation of one of the most famous tea clippers, the vessel Cutty Sark. The three-masted ship was built for speed and traded tea between England and China. In 1922 the Cutty Sark became the last operating tea clipper in the world. The craft of ship model building has been popular for centuries, especially with people associated with the sea, such as this model builder, whose career was based around the shipping industry.Ship model; clipper ship, the 'Cutty Sark', a three-masted clipper ship, bare rigging, netting below the bowspit, and fine chains hanging from the bowspit. Black hull with two parallel horizontal stripes below the rail. Lifeboats on board. The white figurehead is below the bowsprit. The model comes with a cradle stand. The ship's name is not visible on the model.flagstaff hill, warrnambool, shipwrecked coast, flagstaff hill maritime museum, maritime museum, shipwreck coast, flagstaff hill maritime village, great ocean road, cunysark, historic sailing ship, tea clipper, sail training vessel, cadet training ship, commercial trading vessel, cargo sail vessel, ship model cutty sark -
 Flagstaff Hill Maritime Museum and Village
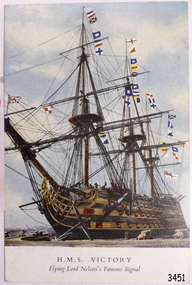
Postcard - Vessel, Sailing Ship, after October 1805
The British Royal Navy’s warship HMS Victory was once Lord Nelson’s flagship. The HMS Victory was built in 1765 and after serving active duty is now, in 2019, still a ship of the Royal Navy, in dry dock undergoing continuous restoration to preserve her for display as a museum ship, due to the vessel’s significant naval history. Battle of Trafalgar: On October 21, 1805, twenty-seven British ships of the line, led by Admiral Lord Nelson aboard HMS Victory, defeated thirty-three French and Spanish ships of the line under French Admiral Villeneuve. The battle took place in the Atlantic Ocean off the southwest coast of Spain, just west of Cape Trafalgar, near the town of Los Caños de Meca. The victory confirmed the naval supremacy Britain had established during the course of the eighteenth century and it was achieved in part through Nelson's departure from the prevailing naval tactical orthodoxy of the day. Conventional practice at the time was for opposing fleets to engage each other in single parallel lines, in order to facilitate signalling and disengagement and to maximise fields of fire and target areas. Nelson instead arranged his ships into two columns to sail perpendicularly into the enemy fleet's line. During the battle, Nelson was shot by a French musketeer and he died shortly before the battle ended. Villeneuve was captured, along with his ship Bucentaure. He later attended Nelson's funeral while a captive on parole in Britain. Admiral Federico Gravina, the senior Spanish flag officer, escaped with the remnant of the fleet. He died five months later from wounds sustained during the battle. It was prior to this battle that Nelson had issued his now-famous final orders to his ships in 12 separate flag-hoists “England expects that every man will do his duty”. This wood sample is historically significant for its association with Admiral Lord Nelson the Battle of Trafalgar. Through Nelson’s leadership and unorthodox battle tactics, he secured not only a victory against the French and Spanish but reaffirmed Britain's naval supremacy opening the way for Britain to continuing the policy of colonisation of many countries including Australia.A coloured postcard of a sailing ship, warship or battleship, deck cannons on the ship and in the foreground, many signal flags flying from the masts. Printed on the front "H.M.S. Victory Flying Lord Nelson Famous Signal". The signal was given by Lord Nelson in 1805.Printed on the front "H.M.S. Victory / Flying Lord Nelson Famous Signal"flagstaff hill, warrnambool, shipwrecked-coast, flagstaff-hill, flagstaff-hill-maritime-museum, maritime-museum, shipwreck-coast, flagstaff-hill-maritime-village, post card, postcard, sailing ship, vice-admiral lord nelson, horatio nelson, lord nelson, oak piece, piece of oak, nelson, battle of trafalgar, maritime technology, ship relics, 18th century warship, british royal navy, sir home popham’s telegraphic code, admiralty official day signal book, october 21, 1805, admiral lord nelson, french and spanish navies, nelson's famous signal, england expects that every man will do his duty, hms victory, nelson collection at lloyd's, lloyd’s of london, lloyd’s patriotic fund, napoleonic battles, british naval history, 18th century warship, 18th century battleship -
 Unions Ballarat
Minutes of meetings of Building Committee, 29 October 1886-15 May 1889
The 1889 London Dock Strike grew from unrest about poor living conditions as a result of the casualised labour force. Money raised in Australia (30,000 pounds) helped to support striking workers to continue the action and feed their families. The strike led to the formation of the General Labourers' Union and strengthened unionism amongst dockers. The 1890 Maritime Strike: marine officers walked out because shipowners would not negotiate terms and conditions of employment whilst the Mercantile Marine Officers' Association was affiliated with the Victorian Trades Hall Council. Union officials proposed to disaffiliate on the condition that employers would agree to meet and reach a compromise with union delegates. The shipowners refusal to meet triggered strike action.The London Dock Labourer's Strike correlates with significant National growth in the trade union movement. The Maritime Strike demonstrates an historical example of an employer's attempt to undermine workplace unionism. Parallels (i.e. employers attempting to weaken union power) have been drawn between this and the Australian waterfront dispute of 1998.Bound, paper, 1 volumebuilding committee, maritime strike, mercantile marine officers' association, general labourers' union, london dock strike, casualisation, strikes, unions, ballarat trades hall -
 Federation University Historical Collection
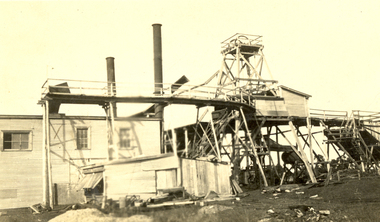
Photograph, Lal Lal Coal and Iron Mine, Victoria, 1923
Lal Lal Coal Mine, 1923. Two black and white photographs of the Lal Lal Coal Mine. .1) A man, Bill Thomas of Talbot, stands high on a timber construction. .2) A mine site with poppet head and two chimneys..1) verso: Lal Lal Coal and [Iron?] Mine 1,000 ton hopper or brown coal Designed and Built by D. Mather 1923 [15?] miles of sapplings in the building [Ci?] called and drying [oval] 120' long 45' x 20' wide Bill Thomas shown in this photo, from Talbot.lal lal, lal lal coal mine, donald mather, mather, bill thomas, talbot, mining -
 Bendigo Historical Society Inc.
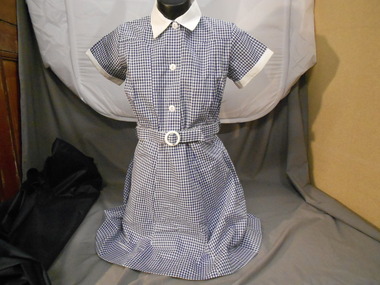
Clothing - SCHOOL UNIFORM DRESS
Blue and white checked gingham waisted girl's school uniform dress. White fabric collar. Short sleeves with fabric cuffs. Skirt has six gored panels. Bodice has front opening with three white plastic buttons. Yoke across front and back. Inverted pleat at centre back. Two pleats on either side of front opening.Matching belt, 11400.261. Two belt keepers at sides.Original cloth label and swing label with care and washing instructions.Inside collar ''Buxwear rgd Quality school wear, Norman W. Buck P/L 12''. Cardboard label stapled to clothing label ''The Beehive'' DC AE 587 $23.99. Blue and white swing tag ''Buxwear Drip dry finish 12 Norman Buck elo P/l.costume, female, gir'ls school uniform dress -
 RMIT Design Archives
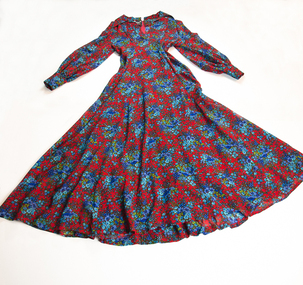
Textile - Woman's dress, Norma Tullo, Garment Designer, Shirley Lyle, Textile Designer, Woman's Dress
This light woollen evening dress is made from Peppinella, a new fabric Norma Tullo introduced into her range in 1973. The fabric was used exclusively by Tullo, and came from the wool of Peppin Merino (first introduced into Australia in 1858 by the Peppin brothers). According to the papers of the day Tullo’s 1973 winter collection featured ‘St. Trinian’s styles to garments dripping lace, in bold plain colours to floral prints.” Shirley Lyle designed the floral fabric. Norma Tullo (1935-2019) was one of the leading fashion designers of her time, establishing her label in 1956. After establishing a business the Old Metropole Arcade in Melbourne in 1956, with three sewing machines, Tullo's ready to wear fashions for young women became sought after, and her business flourished. In 1966 the Japanese department store chain Isetan Co Ltd began to mass-produce her garments for their stores across Japan. Tullo closed her label in 1977, and later worked for Fletcher Jones. Ann Carew, 2020The dress is historically significant as a dress designed by Norma Tullo, a leading fashion designer of the 1960s and 1970s. During this period the Australian Wool Industry strove to promote wool, and to develop light woollen fabrics to compete with new synthetic fibres such as rayon. The garment is historically significant for the use of a merino wool showcasing its versatility for dress fabrics. Full length woman's dress with full skirt and long sleeves, collared with open neck and pleat work on bodice. Material is predominately red with a repeated pattern featuring posie of blue and mauve flowers.Inscribed, black label on back neck left of zip, 'TULLO/IN/PEPPINELLA/AUSTRALIA MERINO WOOL'; Inscribed, white satin label on back neck right of zip, 'DRY CLEAN ONLY'; Inscribed, white satin label underneath above label, 'SIZE 12/To Fit Bust 34"/To Fit Waistwool, rmit design archives, rmit university, woman's dress, textile design, australian fashion -
 Bendigo Military Museum
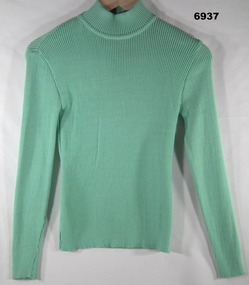
Uniform - JUMPER, SERVICE DRESS, ARMY, Elegant Knitting Co, 1981
Jumper - garment part of a Women's Service Dress Uniform. Possibly issued to "BALAAM" Service No. F320519. Refer also Cat No. 9616.Jumper - light green wool blend ribbed knitwear with polo neck and nylon and metal zipper at back of neck. Long sleeves. Two manufacturers labels sewn to right side seam. White cotton fabric.MANUFACTURER'S INFORMATION - BLACK INK PRINT. First label (folded) "ELEGANT KNITTING CO/ NSW ^ 1981/ 8410-66-096-4840/ SIZE 12 BUST 85 CM/ NAME/ SERVICE NO" On back - details re "LAUNDERING INSTRUCTIONS" Second label - "WARNING/ THIS GARMENT SHOULD/ NOT BE DRIED IN/ DIRECT SUNLIGHT"passchendaele barracks trust, uniform, female jumper, army, balaam -
 Melbourne Tram Museum
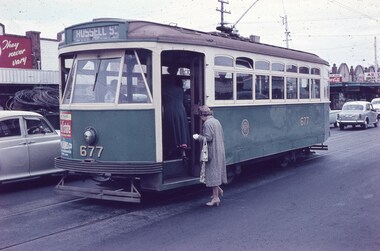
Slide - Set of 7, Keith Caldwell, 10/03/1960 12:00:00 AM
Set of 7 Agfa Colour slide, cardboard mount, by Keith Caldwell of 10 March 1960 - .1 - X2 677 - at the Williamstown Road terminus of the Footscray tram system. Tram photographed in Somerville Road, showing the return destination of Russell St. In the background are a row of shops. .2 - X1 460 turning from Leeds St into Barkly St. Tram has the destination of Ballarat Road. In the background is the bus stop and tram stop and the Trocadero Theatre side wall. See Image i6 for the Theatre. Has a Gant Motors advert. .3 - X1 467 out bound turning into Nicholson St from Irving St. Footscray with the Rockmans Store in the background. This store was later demolished for the Ring Road. Tram has adverts for Gant Motors and Swing Bridge Motors - Holdens. .4 - X1 460 turning from Barkly St into Leeds St, showing the destination of Ballarat Road. Has adverts for Calders watches and Coca Cola - drive safely. In the background is a cafe advertising Oysters, Grey Cigarettes and Vincents Powders. .5 - X1 464 turnings from Nicholson St into Irving St. Footscray with the Rockmans Store in the background. This store was later demolished for the Ring Road. Also is J. Boltons Chemist shop advertising Kodak film and another shop - ? dry cleaners, Footscray Fish Shop and Kings Hotel. Tram has adverts for Gant Motors and Doods Dry cleaning. There is a PMG truck parked outside Rockmans. .6 - X2 677 turning from Barkly St into Leeds St with the Trocadero Theatre in the background. Tram has the destination of Williamstown Road. Tram has an advert for Bridge and Webster. .7 - X1 467 outbound to Williamstown Road, turning from Leeds St into Irving St Footscray. Tram has adverts for Doods dry cleaning and Gant Motors.All hand stamped "10 Mar '60". .1 - marked "Footscray" .2 - "Footscray (NB curves)" .3 - to .7 "Footscray"trams, tramways, footscray, x2 class, russell st, williamstown rd, leeds st, ballarat rd, barkly st, nicholson st, irving st, tram 677, tram 460, tram 467, tram 464 -
 Bendigo Military Museum
Uniform - JACKET AND TROUSERS, SERVICE DRESS, ARMY, Australian Defence Industries, 1980
1. Jacket, khaki colour, wool/polyester fabric, service dress style with gold colour plastic buttons with metal shank and split rings. Buttons have raised emblem RAEME. Collar, shoulder epaulettes, four front pockets, top two with buttons and two metal press studs on flap, lower button down flap. Two lapel badges - metal RAEME. Rank insignia patch on sleeves - crown - Warrant Officer 2nd class. Green colour polyester fabric lining with white cotton manufacturers label. 2. Trousers, khaki colour, wool/polyester fabric, service dress style with fob pocket, two side pockets and one pocket. Green colour polyester fabric lining to waist and pocket with manufacturers white cotton label inside one back pocket.Manufacturers information on labels - black ink print. 1. & 2. "CARBONE APPAREL/ VICTORIA/ ^/ DRY CLEAN ONLY/ RE-PRESS USING IRON AND/ DAMP CLOTH OR MEDIUM/ TO HOT STEAM IRON/ CREASE UPPER HALF OF LAPEL ONLY/ SERVICE NO./ NAME" Handwritten blue ink pen "11.6.80/ ENNST G.A." uniform, army, service dress -
 Warrnambool RSL Sub Branch
Army Uniform, shirt, Fletcher Jones & Staff, 1983
This uniform was worn by Bernie Farley, present secretary of Warrnambool RSL (2019). The uniform was made by Fletcher Jones & Staff, Warrnambool in 1998.Long sleeve Khaki shirt, two long sleeve button down breast pockets, six button fastenersPrinted on collar "SIZE 40 84" Printed on tag"A.G.C.F. VIC 1983 [ARROW MOTIF] 8405.66.088.7064 Size 40/84 SERVICE NO. NAME. DO BOIL OR WRING, MACHINE WASHABLE, DRIP DRY, IRON LIGHTLY WITH WARM IRON Patch on Left shoulder with rising sun, crown and cross. THE AUSTRALIAN ARMY.army uniform, military uniform, warrnambool ex service -
 Beechworth RSL Sub-Branch
Naval Ratings Shirt, 2004
This shirt was manufactured in 2004, and was presumably owned by a Beechworth local service personnel by the name of Cross. This piece of clothing would have been worn as part of the standard Royal Australian Naval Ratings uniform.White short sleeved shirt. Square collar with thin navy blue trim. A curved slit on either side of the lower edge (near the hip area) and an extra piece of fabric within each slit. A white label with inscriptions is stitched to the seam in the middle of the lower back seam. This has n written inscription beneath on the shirt fabric.Inscriptions on the label: CAN'T TEAR 'EM 8405-66-132-3767 R.A.N 2004 SIZE: 117 35% COTTON 65% POLYESTER GENTLE WARM MACHINE WASH. RINSE WELL. WARM IRON. DO NOT SOAK. DO NOT BLEACH. DRY CLEAN (A) MADE IN AUSTRALIA Written inscription under label: CROSSshirt, naval ratings, royal australian navy, navy -
 Bendigo Military Museum
Uniform - SHORTS, ARMY, Australian Defence Industries, 1978, 1979
1. & 2. Shorts - Khaki colour wool/polyester fabric. Waist band, belt loops, fob pocket front, two side pockets, one inset back pocket with button and cover flap. Nylon and metal zipper fly. Green colour plastic buttons. Lining - all pockets, green colour polyester fabric. Manufacturers label - white colour cotton fabric - on back pocket lining.Manufacturer's label - black ink print. 1. "A.G.C.F./ VIC 1978/ ^/ 8405.66.090.0094/ SIZE 95/ NO./ NAME". 2. "A.G.C.F./ VIC 1997/ ^/ SIZE 92.5/ 8405.66.090.0093/ / NO./ NAME". 1. & 2. "DRY CLEANING PREFERABLE/ MAY BE HAND WASHED/ AS FOR WOOL/ CLOSE SLIDE FASTENER/ PRIOR TO PRESSING. REPRESS/ ON ORIGINAL CREASES". passchendaele barracks trust, uniforms, army service dress shorts -
 Bendigo Military Museum
Uniform - JACKET, TROUSERS, BATTLE DRESS, ARMY, Australian Defence Industries, 1. 1977 2. 1968
Uniform issued to "LOCKYER" 114493.Jacket - khaki colour wool serge fabric, Battle dress style, belted at waist with metal buckle. Dark green plastic buttons. Collar, shoulder epaulettes, two front pockets with concealed button down flap and sleeve cuffs. Shoulder epaulettes - rank three pips, red, cream and brown embroidery for Captain. Shoulder sleeve insignia, red fabric with dark blue embroidered lettering. "ROYAL AUSTRALIAN ARMY/ ORDNANCE CORPS". Green colour cotton twill fabric pocket and waist lining, manufacturers white cor=tton label inside pocket lining. 2. Trousers - khaki colour wool serge fabric, Battle Dress style, with fob pocket, two side pockets, one back pocket with concealed button down flap. Green colour polyester fabric lining with manufacturers white cotton label inside on back pocket, 6 button fly. Manufacturers information on labels - black ink print. 1. "A.G.C.F./ VIC 1977/^ /8405.66.025.6423/ SIZE OF CHEST/ SIZE 109/ 112PR/ YARRA FALLS 69/ BATCH, 21657/ DRY CLEAN ONLY/ CREASE UPPER/ HALF OF LAPELS ONLY/ NO./ NAME" Handwritten - blue ink pen - "LOCKYER/ 114493". 2. CONWAY BROS. PTY LTD/ ADELAIDE ^ 1968/ CLASS 8405-66-025-6199/ Y.F. PP2/ SIZE & WAIST 41PR/ MATCHING JACKET 43/44 P.R. / Dry Clean only/ Repress on original seams/ Creases set by Si-ro-set./ mending patch attached/ NAME/ ARMY NO." Handwritten black ink pen "LOCKYER/ 114493"uniform, army, battle dress, lockyer -
 Bendigo Military Museum
Uniform - MESS DRESS - RAAF, 2006
Uniform, Sqd Leader Shane Wrigh. For Service History Refer Cat No. 7877.6.1. Jacket - dark blue colour wool/polyester fabric. Mess Dress style winter collar and long lapels, shoulder epaulettes with Sqn Leader Rank slides - crown and wings. Three rank stripes and "AUSTRALIA" in gold metal and fabric. Gold colour plastic buttons with shank and metal pins. Raised emblem, crown and wings - RAAF. Lining dark blue polyester fabric. White cotton manufacturers label. 2. Trousers - dark blue colour wool/polyester fabric. Fob pocket, two inset side pockets and one back inset pocket. Nylon and metal zipper fly with metal hook closer. Dark blue polyester fabric lining to waistband and pockets. Manufacturers label. 3. Belt - black colour polyester/cotton webbing with metal slide buckle. 4. Cummerbund - dark blue colour elastic fabric, broad sash with hook and loop (Velcro) tape to adjust length. Manufacturers label.Manufacturers information - black ink print. 1. "TRANS TAILORING/ CANBERRA/ EST. 1994/ JOB NO./ RANK/ NAME/ 70% WOOL 30% POLY/ DRY CLEAN ONLY/ REPRESS WITH DAMP CLOTH/ DO NOT SITO SET." 2. "R76/ADA/ 66-2009/ NSN: 8405 66 146 6560/ SIZE: 100S /WAIST: 100 SEAT: 115/ SERVICE NO:/ NAME:/ LAUNDRY INSTRUCTIONS/ 70% WOOL 30% POLYESTER/ DRY CLEAN ONLY/ REPRESS WITH DAMP CLOTH/ WARM IRON/ DO NOT SIRO SET. 4. "ADI/^ /VIC 1992/ 8440.66.035.3818/ SIZE 38" Handwritten black ink pen. 1. "4573/ SQNLDR/ WRIGHT" 2. S. WRIGHT.uniform, raaf, mess dress, winter, s. wright -
 Ballarat Tramway Museum
Photograph - Black & White Photograph/s, Doug Colquhoun, 24/03/1959 12:00:00 AM
Yields information about Ballarat's scrubber tram in early 1960's.Black and white print of Ballarat 32, crossing Lydiard St, in Sturt St with the destination of Gardens via Sturt St West. Has the Commonwealth Bank, Odeon theatre, Mechanics Institute, Ballarat Gas Co, Unicorn Hotel, and Colonial Mutual Life buildings in the background, along with a number of motor vehicles. Photo Doug Colquhoun 24/3/1959. Photo print courtesy of Port Dock Railway Museum, now the National Railway Museum. See worksheet 4311 for letter and details of prints sent to Bill Scott, 19/10/2001. Any photo credit to mention NRM Collection.On rear of copy "SEC Ballarat #32 / Sturt St @ Lydiard / 24/3/59 / Douglas A Colquhoun.trams, tramways, sturt st, lydiard st, tram 32 -
 Ballarat Tramway Museum
Photograph - Black & White Photograph/s, Doug Colquhoun, 23/03/1959 12:00:00 AM
Yields information about the Eaglehawk terminus, tram 18 and the tram liveries in 1963.Black and white print of Ballarat 12, crossing Lydiard St, in Sturt St with the destination of Gardens via View Point. Has the Commonwealth Bank, Odeon theatre, Mechanics Institute, Ballarat Gas Co, Unicorn Hotel, and Colonial Mutual Life buildings in the background. A group of children with bicycles are on the corner and the newspaper seller stand. Photo Doug Colquhoun 23/3/1959. Photo print courtesy of Port Dock Railway Museum, now the National Railway Museum. See worksheet 4311 for letter and details of prints sent to Bill Scott, 19/10/2001. Any photo credit to mention NRM Collection.On rear of copy In top left hand corner "72) No . 71 withdrawn" a yellow label with "24" crossed out over a sticker "Photo No. Reduced to 82% 145x80 see photocopy for masking" and "22" crossed out in the top right hand corner. In the lower left hand corner "SEC Ballarat #12 / Sturt St @ Lydiard / 23/3/59 / Douglas A Colquhoun"trams, tramways, sturt st, lydiard st, tram 12 -
 Flagstaff Hill Maritime Museum and Village
Container - Vial, 20th century
Heamostop is a haemostatic agent, prescribed for the management of blood loss in menorrhagia, and after surgery. It reduces bleeding from very small blood vessels (capillaries). The chemical in this vial is in a powder form. This product is now supplied in the form of tablets and injections. The text on the vial reads "Haemostop stops bleeding. After swabbing the wound, Haemostop should be sprinkled or sprayed on as quickly as possible. Enough should be used to leave a definite dry residue on the wound. Where the blood oozes through the powder, more powder should be applied."This vial is an example of chemicals used with surgery and excessive bleeding in the early 20th century. It is also an example of pharmaceutical manufacturing and packaging.Glass vial with cork stopper and printed paper label that includes instructions. Vial contains Haemostop, a chemical powder used to stop bleeding. This vial was produced by Pharma Chemical Laboratories, NSW. Haemostop. Stops Bleeding. "PHARMA" CHEMICAL LABORATORIES, Drs. G. Bock & H. Goldhammer NSW. (Includes instructions for use.)flagstaff hill, warrnambool, shipwrecked-coast, flagstaff-hill, flagstaff-hill-maritime-museum, maritime-museum, shipwreck-coast, flagstaff-hill-maritime-village, medicine, pharmacy, chemist, haemostatic agent, blood loss management, surgury medication, pharma chemical laboratories nsw, drs g book & h. goldhammer, haemostop -
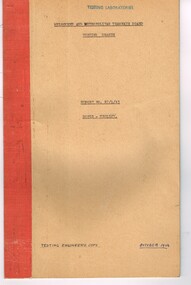 Melbourne Tram Museum
Document - Report, Melbourne & Metropolitan Tramways Board (MMTB), "Ropes - Trolley", Oct. 1955
Report titled "Ropes - Trolley", dated October 1954 though has a date stamp on the first page of the report itself of 26/10/1955, prepared by the MMTB Testing Department, Report No. R7/1/43. Looks at the insulation resistance offered by trolley ropes when dry and wet, new and used ropes and the possibility of causing electric shocks. Gives a reference to a previous August 1952 test. Undertook examination of the ropes, electrical measurements and electrical measurements of the human body. Has a number of appendices and details the test results.Demonstrates a MMTB Laboratory investigation into trolley rope and electrical characteristics.Report - typed carbon copy - 18 foolscap sheets stapled within a brown card folder bound with red adhesive tape. trams, tramways, preston workshops, reports, specification, tramcars, trolley poles, equipment -
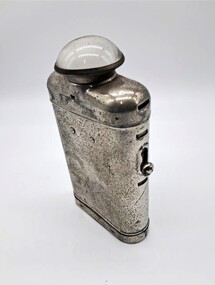 Glenelg Shire Council Cultural Collection
Functional object - Torch, Ever Ready, mid 1900s
In the 1890s, American Ever-Ready Company founder Conrad Hubert invented the electric flash light which worked with his dry cell batteries . The first Ever Ready flash light was patented in 1898. The first portable flashlights were hand-made from crude paper and fibre tubes, with a bulb and a rough brass reflector. Because batteries were weak and bulbs primitive, flashlights of the era produced only a brief flash of light- thus the name. This torch is named a Bullseye because of the glass lens at the top.This torch helps to interpret the development of lighting. The collection of whale oil lamps as well as gas and electric lighting. Silver coloured metal torch. It has a body and a lid/top. The body is hip flask shaped. On the side of the body is a silver coloured metal button which can be slid up and down. On both the front and back of the body and the top centre are tow small raised circles. The top, which can be removed has a glass dome on it. The inside of the body has a small piece of contact metal where the slide button on the outside turn the torch on and off. In the centre at the top there is the light bulb. The base of the body can also be removed. The base has the makers mark EVER READY stamped on it.Lid light: FY (within a diamond shape) / PATENT 40092 Base: EVER READYlight, torch, lighting, portland, glenelg shire -
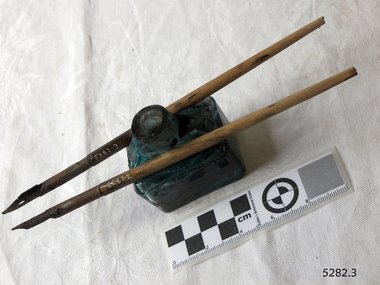 Flagstaff Hill Maritime Museum and Village
Container - Ink Bottle with pens, Early 20th century
This handmade, aqua glass ink bottle's design is sometimes called a ‘boat’ shape. The base was mouth-blown into a rectangular mould, evidenced by the lack of seams, the pontil, crease lies and the uneven thickness of the glass. The shoulder section was mouth-blown into a two-piece mould and then cut off from the blowpipe. The lip is sometimes referred to as a 'burst-lip, which was often filed to be smooth. This method of making bottles was often used in the mid-to-late 19th century. The bottle would then be filled with ink and sealed with a cork. More expensive bottles would have a lip added, which was more time-consuming and costly. The capacity for a bottle such as this was about 3 ½ oz (ounces) equal to about 100 ml. Pens are a common item for that period. Pen and ink have been used for handwriting since about the seventh century. A quill pen made from a bird’s feather was used until the mid-19th century. In the 1850s a steel point nib for the dip pen was invented and could be manufactured on machines in large quantities. The nis only held a small amount of ink so users had to frequently dip the nib into an ink well for more ink. Handwriting left wet ink on the paper, so the blotting paper was carefully used to absorb the excess ink and prevent smudging. Ink could be purchased as a ready-to-use liquid or in powdered form, which needed to be mixed with water. In the 1880s a successful, portable fountain pen gave smooth-flowing ink and was easy to use. In the mid-20th century, the modern ballpoint pen was readily available and inexpensive, so the fountain pen lost its popularity. However, artisans continue to use nib pens to create beautiful calligraphy.The ink bottle is of interest, being made of aqua glass rather than the more common clear glass. This set of ink bottles and pens is significant because of the bottle's method of manufacture, which is representative of a 19th-century handcraft industry that has now been largely replaced by mass production. The bottle and pens are historically significant as tools used for handwritten communication until the mid-20th century when fountain pens and modern ballpoint pens became popular and convenient and mechanical typewriters became part of standard office equipment.Victorian 'Boat' ink bottle, small rectangular, aqua glass ink bottle with grooves along the long sides for pen rests. The base has a pontil, no seams, and the glass is uneven in thickness. The shoulder has two side seams and there is a ridge where it is joined onto the base; there are round indents on each of the shoulder, on the short sides, four in all. The mouth has rough edges. The neck leans to one side. The glass has impurities, crease lines and bubbles. There is dried ink in the bottle. Two pens with metal nibs are included with the ink bottle. flagstaff hill, warrnambool, maritime museum, maritime village, great ocean road, shipwreck coast, ink, nib pen, writing ink, writing, copying, banks, lawyers, commerce, student, permanent ink, stationery, record keeping, handwriting, writing equipment, writing accessory, office supply, cottage bottle, boat bottle, mouth-blown bottle, two-part mould, sheer-lip bottle, burst-lip, cork seal, copy ink, aqua glass -
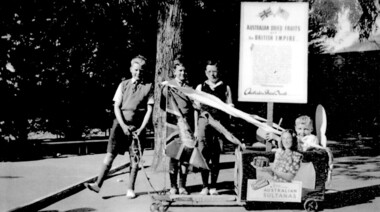 Surrey Hills Historical Society Collection
Photograph, Chatham students support the Empire, Surrey Hills, c 1947, 1947
The billycart was possibly decorated for celebrations associated with Empire Day. Image was originally copied by Chatham Primary School for inclusion in their pictorial history "A Patchwork of People - Chatham Past and Present" [ISBN 0 646 29370 2], by Susan Barnett and Julia Ashby, published in 1996 for the school's 70th anniversary. Copied for the SHNCHC with the school and donor's permission. There is also a laminated copy of it for display purposes.Black and white image of four boys and their billycart. Two are identified as Bruce Hansen, standing behind the flag and Jimmy Boyd, seated in the billycart, which is decorated with streamers, an English flag and advertising signs promoting Australian sultanas and the export of Australian dried fruit to the [British] Empire. The photo was taken in the grounds of Chatham Primary School. In the background can be seen some of the cypress trees that were planted along the side of the oval, a remnant eucalypt from the time when the land was part of J B Maling's farm and part of the shelter shed.chatham primary school, billycarts, advertising signs, empire day, bruce hansen, jimmy boyd -
 Bendigo Historical Society Inc.
Newspaper - LONG GULLY HISTORY GROUP COLLECTION: FIVE TRUSCOTT BROTHERS
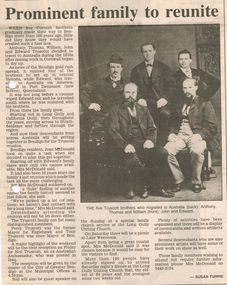
Five Truscott brothers came to Bendigo from Cornwall and after seven years mining Anthony Truscott opened a grocery store in 30 Havilah Street, Long Gully. Anthony Truscott (Bap 24/2/1856, Cornwall - 21/9/1913). At the age of 18 Anthony went to America but soon returned to England. At about the age of 24 he came to Victoria c. 1880.. He worked in several mines for the next 7 years before opening his grocery shop. In 1907 he was the president of the Bendigo ANA. In 1915 he was the secretary of the Long Gully fire brigade. He died of dropsy and Brights disease. Edward Truscott ( 2/6/1844 - 9/10/1916) Edward and his wife Ellen lived in Smalley Street, California Gully and at 30 Dowding Street, Eaglehawk. He is buried at Eaglehawk. William Truscott (c. 1853 - 14/10/1911) William was a JP. He was also the first President of the California Gully Progress Association in 1910 John Truscott (1/2/1837 - 6/8/1919) John went to America as a young man where he married Christina Grigg and had several children. He arrived in Australia in 1862 with his family. His wife died shortly after the birth of her baby, and John quickly remarried to Catherine Alice Willis and had more children. He was the mining manager at the Hercules and Energetic Mine at Long Gully from 1877. he still held this position in 1882.Newspaper cutting titled Prominent family to reunite written by Susan Turpie. No date. Five Cornish brothers Anthony, Thomas, William, John and Edward Truscott made their way to Australia after mining work in Cornwall began to dry up. They settled in Long Gully and California Gully and later spread out to Strathfieldsaye and further through the region. Jean McDonald organised a family reunion which had activities at the Long Gully Uniting Church, the Long Gully Uniting Church Hall and Lake Weeroona. Article has a photo of the five brothers.bendigo, history, long gully history group, the long gully history group - five truscott brothers, anthony truscott, thomas truscott, william truscott, john truscott, edward truscott, jean mcdonald, percy truscott, tony truscott, neil truscott, city of greater bendigo, long gully uniting church, susan turpie -
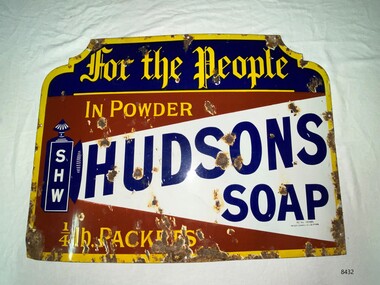 Flagstaff Hill Maritime Museum and Village
Sign - Hudson's Soap Enamel Advertising Sign, Patent Enamel Co Ltd, c. late 19th century- early 20th century
Hudson's Soap Powder, was the first satisfactory and commercially successful soap powder and was made in Liverpool by Robert Spear Hudson. He was also an innovator in using advertising, commissioning striking images from professional artists and paid for publicity , something which few other businesses did, and as such Hudson's soap became a household name. Horse, steam and electric tramcars, print periodicals and chemist shops carried his advertisements. This sign was manufactured by Patent Enamel Co Ltd was a company built in 1889 at Selly Oak, Borough of Birmingham, West Midlands, England, United Kingdom. The business was the first factory specifically devoted to enameled iron sign making. It had twelve furnaces for fusing the enamel, two scaling furnaces, and a large printing room, plus a huge area for steampipe drying. The company also smelted its own enamels and colour oxides. It is believed that the factory was decommissioned and demolished in the 1960's.the first factory specifically devoted to enameled iron sign making. It had twelve furnaces for fusing the enamel, two scaling furnaces, and a large printing room, plus a huge area for steampipe drying. The company also smelted its own enamels and colour oxides.The factory was decommissioned and demolished in the 1960s.The signage demonstrates the increasing demand for domestic soap products and new forms of advertising. The soap business was apart of the flourishing export trade between Australia and Britain during the height of the British Empire.Enamel advertising sign for Hudson's soapflagstaff hill, warrnambool, maritime museum, hudson's soap, advertising signage, patent enamel co ltd, selly oak, borough of birmingham, robert spear hudson -
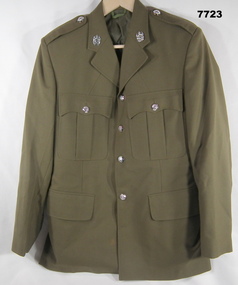 Bendigo Military Museum
Uniform - JACKET, SERVICE DRESS, ARMY, Australian Defence Industries, 1990
Jacket - khaki colour, wool/polyester fabric, Service Dress style. Silver colour plastic buttons with shank and metal split ring. Buttons have raised emblem, with Armoured Corps Badge logo. Collar, shoulder epaulettes, four front pockets, top two with buttons and two metal press studs on flap, lower with flap. Two lapel badges, metal, Armoured Corps Badge logo. Green colour polyester fabric lining with white polyester fabric manufacturers label, inside left.Manufacturers information on labels - black ink print, "ADI/ VIC 1990^ / 8405.66.019.8465/ SIZE 102. 5R/ MATCHING TRS/ SIZE 87.5R/ SHADE NO. D/ ARMY NO/ NAME" "DRY CLEANING ONLY/ RE-PRESS USING IRON AND/ DAMP CLOTH OR MEDIUM/ TO HOT STEAM IRON/ CRESE UPPER HALF OF LAPELS ONLY".uniform, army, service dress, gittins -
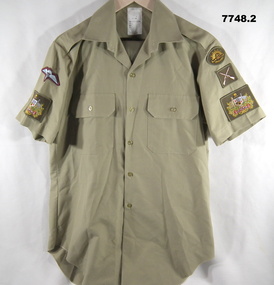 Bendigo Military Museum
Uniform - SHIRT, TROUSERS, SERVICE DRESS - ARMY, 2006
1. Shirt - light khaki colour cotton/polyester fabric - short sleeves, shoulder epaulettes, two front pockets with button down flap. Plastic buttons. Left sleeve - oval fabric patch, embroidered "Rising Sun Badge" "THE AUSTRALIAN ARMY" - fabric patch, embroidered, crossed rifles. Right sleeve - fabric patch, embroidered, Australian Coat of Arms - Warrant Officer 1st Class. White cotton manufacturers label, back, below collar - illegible. 2. Trousers, Khaki colour wool/polyester fabric. Service Dress style with fob pocket, two side pockets, one back pocket with button down flap. Plastic buttons, metal zipper fly, khaki colour polyester fabric waist and pocket linng. White manufacturers label back pocket lining. Manufacturers information on label: black ink print. 2. "ADA 4500299219/ 2005/ NSN: 8405 66 140 7088/ size w.82il 78/ name/ service no./ 50% wool 50%/ dry clean only (P)/ repress on original/ creases, damp cloth/ or medium to hot/ steam iron/ MADE IN AUSTRALIA"uniform, army, service dress