Showing 226 items
matching door signs
-
 Ballarat Tramway Museum
Photograph - Digital image, John Ward, 1/01/1972 12:00:00 AM
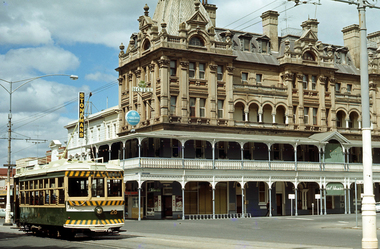
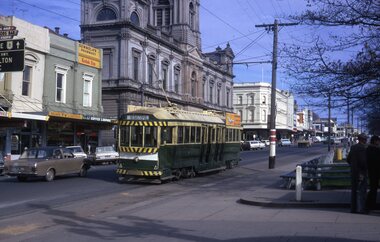
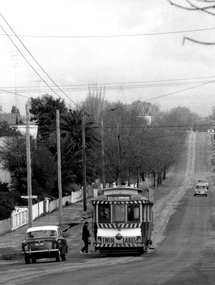
... in the background. Has signs for Carlton Draught beer. A Stonemasons signs... beer. A Stonemasons signs is next door. Photo by John Ward 1 ...Digital image of Bendigo 28, with a Lake Weeroona destination, at the corner will Williamson St with the Shamrock Hotel in the background. Has signs for Carlton Draught beer. A Stonemasons signs is next door. Photo by John Ward 1 January 1972 Slide title "00890 010172 SEC Birney tram 28 Pall Mall at Williamson St outside Shamrock Hotel Bendigo Vic"trams, tramways, bendigo, pall mall, lake weeroona, tram 28 -
 Ballarat Tramway Museum
Slide - 35mm slide/s - set of 32, Noel Simons, 25/02/1971 12:00:00 AM
Set of 31 transparencies taken on 25/2/1972 on Kodak mounts. 1201.1 - Bendigo No. 26 in Bond St. just after leaving Long Gully en route for Quarry Hill. Has Norris Supermarket in background. Has two SEC roof ads. 1201.2 - No. 26 climbing View St. from Charing Cross en route to Eaglehawk. Has ANZ bank and AMOCO service station in background. 1201.3 - as for 1201.3, but after tram has passed photographer. Has buildings west of Mackenzie St. in photograph. 1201.4 - Tram stop and centre of the road pole with two "CARS STOP BY REQUEST" signs mounted on pole at the corner of Mackenzie St. 1201.5 - same position as for 1201.3, but with No. 5 descending the street. 1201.6 - same position as for 1201.2, but with No. 5 descending the street. Photo taken after tram has passed photographer. 1201.7 - No. 7 in Nolan St. from across the park at Lake Weeroona. 1201.8 - No. 7 entering McCrae St from Nolan St. - distant view. Note "TRAM "sign on left hand side under tree and overhead in McCrae St. from former track that once was in this street. 1201.9 - No. 7 in High St. with Cathedral in background. Tram en route to North Bendigo. Note scaffolding around Cathedral main spire area. 1201.10 - No. 7 crossing Bendigo Creek bridge in High St. near Golden Square. Has a Caltex Service station in the background. 1201.11 - No. 7 at Golden Square terminus with Sunburst Fruit Juices and a Peters Ice cream delivery vans alongside. 1201.12 - as for 1201.11 but photo taken from behind tram, with the end of the rails in the photograph. 1201.13 - No. 7 and 21 in Pall Mall at Charing Cross with No. 5 in the background. Taken some distance away from the location. 1201.14 - No. 7 at Golden Square terminus, taken a short distance from the tram terminus. Shows Milk Bar on right hand side and the hotel on the left hand side. Taken from the south side of the roadway. 1201.15 - as from 1201.14 but taken from the north side of the roadway. 1201.16 - No 5 waiting at California Gully loop. Distant photo showing surrounds 1201.17 - No. 5 en route for Quarry Hill crossing No. 26 at California Gully. 1201.18 - No. 26 at Eaglehawk terminus with Eaglehawk Town Hall and Post Office in background. 1201.19 - No. 21 arriving at Charing Cross en route to North Bendigo. Has Alexandra Fountain in the background, ANZ bank RACV building, and other buildings on the north side of Pall Mall or Nolan St. 1201.20 - No. 26 en route for Quarry Hill at Charing Cross, with crew standing by front door. Has Colonial Mutual life building, Armstrong Tyre Service (Firestone) and a sign for Cohns Drinks in the background. 1201.21 - as for 1201.20 but with No. 5 en route to Eaglehawk now in photograph. 1201.22 - No. 26 at Quarry Hill terminus. 1201.23 - No. 26 at Quarry Hill terminus, view of front portion of tram only from a gate at the Bendigo cemetery. 1201.24 - Track at the end of the Quarry Hill line showing the point blades of the former "Y" terminus and the overhead for this. 1201.25 - No. 2 at the Quarry Hill terminus, looking along the former Trackwork. 1201.26 - as for 1201.25 1201.27 - number not used. 1201.28 - Golden Square terminus from some distance from the actual terminus, showing the Warning sign "TRAM" for motorists from the south. No. 7 at the terminus. 1201.29 - No. 7 passing through the Golden Square shopping centre. Numerous cars and pedestrians. Tram en route for North Bendigo. 1201.30 - No. 7 in High St. Golden Square, en route for North Bendigo. Photo taken after tram has passed photographer. 1201.31 - No. 7 in High St. just past Wattle St. with the Cathedral in the background. Tram has two SEC roof ads good side on photo, 'Everything's fine in my all electric kitchen' and 'Electrical cooking - clean, quick, economical'. 1201.32 - No. 7 in High St. nearing Wattle St. Has Cathedral in the background. Photo taken after tram has passed photographer.Information written on in black ink and date stamped on purple ink. 1201.1 - "No. 26 in Bond St just after leaving Long Gully" 1201.2 - "No. 26 climbing View St. from Charing Cross" 1201.3 - "No. 26 ascending View St. from Charing Cross (At Mackenzie St.)" 1201.4 - "View St. & Mackenzie St." 1201.5 - "No. 5 in View St. near Mackenzie St." 1201.6 - "No. 5 in View St. nearing Charing Cross." 1201.7 - "No. 7 in Nolan St. seen from Lake Weeroona Park." 1201.8 - "No. 7 entering McRae St. from Nolan St. Note "TRAM" warning sign on left. 1201.9 - "No. 7 in High St. passing Short St." 1201.10 - "No. 7 crossing Bendigo Creek bridge in High St. near Golden Square." 1201.11 - "No. 7 at Golden Square terminus" 1201.12 - "No. 7 at Golden Square terminus" 1201.13 - "No 7, 21 and 5 at Charing Cross" 1201.14 - "No. 7 at Golden Square terminus" 1201.15 - "No. 7 at Golden Square terminus" 1201.16 - "No 5 waiting at California Gully loop." 1201.17 - "Nos. 5 and 26 crossing at California Gully loop" 1201.18 - "No. 26 at Eaglehawk terminus" 1201.19 - "No. 21 arriving at Charing Cross from Golden Square" 1201.20 - "No. 26 at Charing Cross" 1201.21 - "Nos. 5 and 26 at Charing Cross." 1201.22 - "No. 26 at Quarry Hill terminus" 1201.23 - "No. 26 at Quarry Hill terminus seen through the gates of the Bendigo Cemetery." 1201.24 - "Quarry Hill terminus showing remains for former double track layout abandoned before 1964." 1201.25 - "No. 2 at Quarry Hill terminus" 1201.26 - "No. 2 at Quarry Hill terminus" 1201.28 - "The Southern approach to Golden Square with No. 7 standing at the terminus, "TRAM" warning sign on the left. 1201.29 - "No. 7 passing through Golden Square Shopping Centre" 1201.30 - "No. 7 in High St. Golden Square" 1201.31 - "No. 7 in High St. passing Wattle St." 1201.32 - "No. 7 in High St. nearing Wattle St."tramways, trams, bendigo, bond st., view st., nolan st., high st., eaglehawk, california gully, charing cross, quarry hill, trackwork, tram 2, tram 5, tram 7, tram 21, tram 26 -
 Ballarat Tramway Museum
Photograph - Black & White Photograph/s, B. Prentice, Dec. 1969
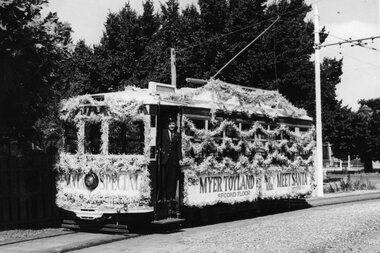
Black and white photograph of Bendigo Birney SEC No. ? decorated for the 1969 Myer's Christmas Tram. Photographed on the depot entry track by Bob Prentice, December 1969. Tram heavily decorated with standard Christmas decorations, two large boards on the sides "see Myer Toyland Second Floor" and "hey kids Meet Santa at Myer Bendigo" and on the front of the tram, the front panel has been painted with the words "Santa Special". A crew member is standing in the door way. See Reg. No. 1894 for 1970 version, same signs, more simple decorations.On rear in black ink " Bob Prentice Photo / Bendigo Xmas Tram December 1969 / Bob Prentice Photo "trams, tramways, myers, decorated trams, santa tram, christmas trams -
 Ballarat Tramway Museum
Photograph - Black & White Photograph/s - set of 2, State Electricity Commission of Victoria (SECV), 1930's
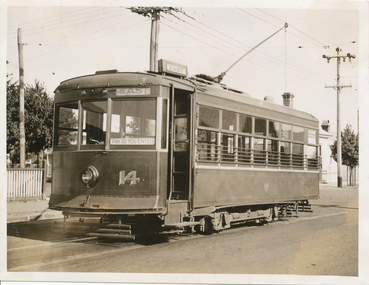
1019.1 and 1019.2 - Black and white photograph of SEC Tram 14 involved with a collision with a Ford truck during 1939 on the corner of Drummond St. North and Webster St. Ford truck registration 277.745 . Both vehicles have windows smashed and other damage. Tram painted in 1930's colour scheme with a small "Pay as You Enter" sign adjacent to the open door. Known to be SEC photos originally. See SEC Photo collection item. Was reprinted in the Ballarat News during the early to mid 1980's. Other photos of this accident gave close up details of lining used in the tram paint scheme. This was used as the basis of lining done on No. 27. The tramcar body card shows it was repaired following an accident June 1939. (Note added 2-2-19). Photocopy made 4/1999 for display purposes. See Reg Item 1365.1 > .5 for the larger prints of this photograph. See also Reg Item 3904 for a mounted set of these photographs along with that of Reg Item. 580, 1366 and 1365. The vehicle is a 1928 Model A Ford type AA. See also Reg Item 6210 for a BTM printed postcard.On rear stamped on both photos "Copyright / The Ballarat News"trams, tramways, drummond st. nth, accidents, webster st, tram 14 -
 Ballarat Tramway Museum
Document - Letter/s, Lardner family, Apr. 2000
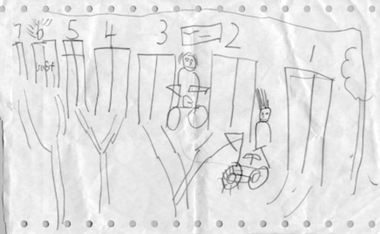
A complimentary letter from a child of the Lardner Family that arrived at the depot (placed under the door) on 12 April 2000, with drawings and a note on computer printer paper with perforated holes on the sides. 1429.1 - Drawing of the depot building with tracks outside, with No. 6 road highlighted and with a note "best". Two people with bikes in from of the shed, shows sign and a tree. 1429.2 - two sheets of same computer paper, addressed "Dear the Tramline People" on one side, a sketch of tram 13, and two written notes, from the "Lardner family"BTM letter Date stamp and item no. - arrived at the depot 12 Apr 2000 and given the item No. "9136" in black ink.trams, tramways, children, btm, complimentary, drawings -
 Ballarat Tramway Museum
Slide - 35mm slide/s, Peter Moses, Aug. 1971
Photo of SEC Ballarat Tram No. 35 leaving the Sturt St. south side "City" terminus. No. 35 has "Everything's under control in my all electric kitchen" SEC roof advertisement panel. Tram has destination of "Sebastopol". Photo has building on the south side of Sturt St., including the Town Hall in the background. Kodak sign on the shop next door to the Town Hall. Kodak cardboard mount slide, taken by Peter Moses August 1971.On back of slide in blue ink "N35 / Ballarat / Sturt St. terminus" and in bottom right hand corner in black ink "P. Moses".tramways, trams, sturt st, town hall, tram 35 -
 Ballarat Tramway Museum
Photograph - Colour Photograph/s, Travis Jeffrey, 6/11/1962 12:00:00 AM
... . Tram has destination of City and "Pay as you enter sign... destination of City and "Pay as you enter sign" by the front door ...Colour photograph of Ballarat No. 18 at the Junction between the View Point tram line and Sturt St. at Ripon St. North. Tram has destination of City and "Pay as you enter sign" by the front door. Tram has two roof advertisements, SEC "Electric Cooking" and Whites Florist Sturt St. shop advertisement. In the background is the Ripon St. tram line. Photo dated 6/11/1962. On Kodacolor paper."66Ed" in blue ink, date stamp 6 Nov 1962" in red ink.view point, sturt st, ripon st, tram 18 -
 Ballarat Tramway Museum
Photograph - Black & White Photograph/s - set of 2, State Electricity Commission of Victoria (SECV), 1935
Yields information about the rehabilitation of the Ballarat ESCo trams and new trams acquired and refurbished by the SEC from Melbourne and the interiors of these trams.Two Black and White photographs contained within Reg. Item 3000 - Photo Album produced by the SEC in 1935 titled "Photographs of Ballarat Tramways Rolling Stock & Track Reconditioning Works". Two photographs of the front of a ex Melbourne M class car (one of the 30 - 33 series, most likely No. 30) given the seat behind the driver showing the re-arranged doors etc of these cars, following conversion. Shows the arrangement of the signs behind the driver, bells, doorways etc. Have an officer with hat sitting in the drivers position. Caption to the photograph typed on a piece of paper and adhered to the sheet under the two photographs is "Interior Views M.M.T.B. Car showing arrangement of entrances." tramways, trams, mmtb, secv, tramcars, ballarat, tram 30? -
 Ballarat Tramway Museum
Photograph - Black & White Photograph/s, John Webster, early 1950's
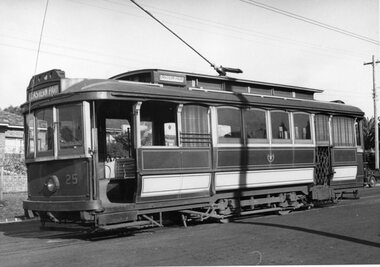
... enter" sign by the open door.... enter" sign by the open door. Photograph Black & White ...Yields information about the appearance of one of Geelong trams early 1950's with a little information about the background.Black and white photograph of Geelong No. 25 at Eastern Park. Photograph shows excellent detail the general arrangements of the body, signs, seats . Little background information. Tram has the destination of Eastern Park and a "Pay as you enter" sign by the open door.On rear in ink "SEC Geelong #25 @ Eastern Park" and "W. John Webster".tramways, trams, geelong, eastern park, tram 25 -
 Ballarat Tramway Museum
Slide - 35mm slide/s, Dave Macartney, Apr. 1968
White cardboard mount, 35mm slide, from the Association of Railway Enthusiast's film strip titled "Provincial Tramway Film Strip" of No. 14 alongside the Royal Mail Hotel, Sebastopol. Night photo. Tram has a "Twin Lakes" sign and the hotel a "Victoria Bitter" sign. The film strip notes (Reg. Item 2560), provided the following caption details: "The doors of the ROYAL MAIL have long since closed for the night, whilst No. 14 waits to return from an almost deserted Sebastopol terminus. - Apr. '68 (Dave Macartney)" See image btm2578p.tif for high level scan of image. Stamped on base of slide "11788" and written in ink on top edge "No. 14 Sebastopol Ballarat"tramways, trams, are, film strip, albert st, sebastopol, royal mail hotel, tram 14 -
 Ballarat Tramway Museum
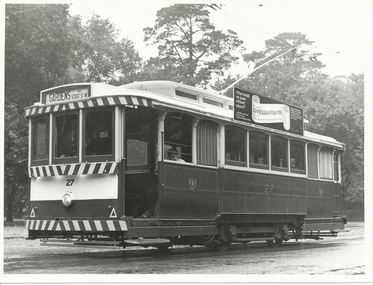
Photograph - Black & White Photograph/s, c1975
Yields information about the appearance of 27 in the early days of the operation of the BTPS at depot junction and has a strong association with Barry McCandlish.Black and white print of Ballarat No. 27 at possibly at Depot Junction, with the Australian Paper Mill Ballarat roof sign. Has a person in the front of the tram, with the door opened on the wrong side. Location to be confirmed. Has Barry McCandlish in the front cabin. Tram has the destination of Gardens via Sturt St West.trams, tramways, btps, wendouree parade, tram 27 -
 Ballarat Tramway Museum
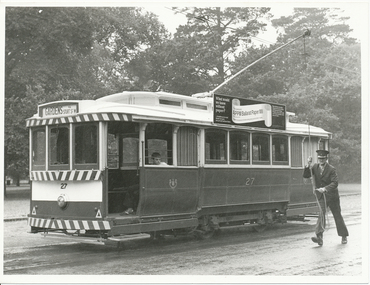
Photograph - Black & White Photograph/s, c1975
Yields information about the appearance of 27 in the early days of the operation of the BTPS at depot junction.Black and white print of Ballarat No. 27 at possibly at Depot Junction, with the Australian Paper Mill Ballarat roof sign. Has a person in the front of the tram, with the door opened on the wrong side. Location to be confirmed. Has Barry McCandlish turning the trolley pole. Tram has the destination of Gardens via Sturt St West.trams, tramways, btps, wendouree parade, trolley poles, tram 27 -
 Ballarat Tramway Museum
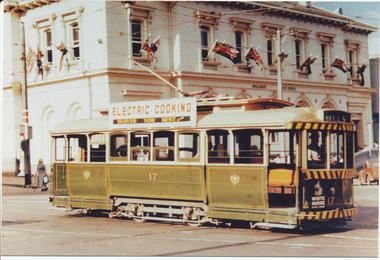
Postcard, Ron Scholten, SEC Ballarat tram 17
Yields information about the use of Special trams and the Ballarat railway station level crossing.Colour photograph, printed on a postcard back format of SEC Ballarat tram 17 crossing Sturt St from Lydiard St north with the Ballarat Post Office in the background. Doors have been changed over for the Sturt St central median strip. Note the lady with the walking stick behind the tram and the tram stop sign. Tram has an SEC Electric Cooking advertisement and the destination of Bell St.trams, tramways, lydiard st north, sturt st, post office, tram 26 -
 Ballarat Tramway Museum
Photograph - Digital image Set of 10, Tony Smith, 1971
Yields information about Ballarat Tramways and trams prior to the closure of the tramway system.Set of 10 digital images of Ballarat trams prior to closure, scanned from original slides by Tony Smith, 1971 prior to closure of the system. .1 - 42 in Barkly St - at top of hill, outbound to Mt Pleasant. Note the fire alarm on the right hand side of the photo. .2 - 42 and 21 crossing at Grant St Loop, Barkly St, Mt Pleasant. 42 outbound, 21 inbound. .3 - 34 and 21 crossing at Parker St Loop, with Ballarat College in the background. 42 in bound to City and Mt Pleasant, 21 showing Sturt St. West. .4 - 21, Wendouree Parade at the south end of the old parking loop. .5 - 42 and 21 crossing at Gardens Loop. 42 showing Mt Pleasant, 21 Gardens via Sturt St West. .6 - ditto .7 - 41 showing Special at intersection of Ripon St and Sturt St with a single trucker tram ex View Point waiting to turn into Sturt St. 41 has two Johnnie Walker Whiskey roof advertisements. .8 - Two single truckers - not well focused - 21? and 13? crossing at Mill St loop, has the hospital in the background. Conductor leaning out of the door on the outbound tram. .9 - 42, bogie tram and a single trucker at the City terminus (Sturt and Lydiard Sts). Has a group of SEC trammies standing alongside the tram. Has Racey's store and the SEC offices in the background. 42 has a briquettes roof advert. .10 - 34 in Sturt St, at the City terminus, with passengers getting onto the tram. Has the Town Hall, Myers store, Gemmola's Pharmacy in the background. Tram has the destination of Gardens via Drummond St. Nth. Has two trammies (crews) standing alongside the tram stop sign.trams, tramways, sturt st west, barkly st, grant st, parker st loop, sturt st, view point, ripon st, mill st loop, crews, town hall, tram 42, tram 21, tram 34, tram 41, tram 42 -
 Ballarat Tramway Museum
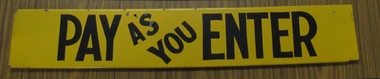
Sign, State Electricity Commission of Victoria (SECV), "Pay as you Enter", 1960's
Demonstrates how the SEC used painted signs to advise passengers about fare payment arrangements.Folded metal and painted "Pay as you Enter" sign used on Ballarat single truckers until 1971. Black lettering on a yellow front with a Yellow back. Sign has been manufactured to fit the timber holders that were provided on each side of each door. Painted by the SEC Ballarat painter George Wright at the tram depot. (Advised by Bill Llewellyn to Richard Gilbert at the time of donation)trams, tramways, signs, sec, tramcars -
 Ballarat Tramway Museum
Photograph - Digital image, 1970s
Yields information about the Mt Pleasant route and Barkly St.Digital image, black and white, of No. 30 in bound along Barkly St, Mt Pleasant. Tram has a Twin Lakes sign and destination of Gardens via Drummond Nth. Tram picking up passenger at rear door, while a Vanguard motor car waits. Photo taken by Peter Bruce 1970's and 1971, prior to the closure of the Ballarat tramway system. Peter's Title of image: "No. 31 and Vanguard"trams, tramways, barkly st, mt pleasant, tram 31 -
 Ballarat Tramway Museum
Photograph - Black & White Photograph/s, Wal Jack, 1940
... of East and has a "Pay as you Enter" sign on the door. i1..." sign on the door. i1 - scan of print in the album i2 - rear ...Black and White print contained within the Wal Jack Bendigo and Geelong Album, see Reg Item 5003 for more details. Photo of Geelong Birney 14 at the Chilwell terminus, 1940. Wal notes it is No. 11 on the Bendigo system. The tram has the destination of East and has a "Pay as you Enter" sign on the door. i1 - scan of print in the album i2 - rear of image i3 - scan of negative at 3200dpi added 18/6/2020.On the rear in ink "Geelong Tramways No. 14 Birney Car, bought new 1924"trams, tramways, geelong, chilwell, birney, tram 14 -
 Bendigo Historical Society Inc.
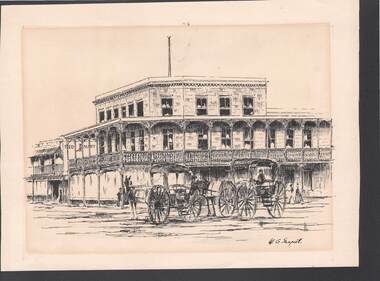
Artwork,other - SHAMROCK HOTEL BY W G SHAPCOT
Ink sketch on cream card of an earlier Shamrock Hotel by W. G. Shapcot. Sketch shows the building and the Red Mart building next door. It has three stories and there are two horse drawn vehicles in front of it and some people on the footpath. Signed by W. G. Shapcot.artwork, shamrock hotel, w g shapcot, derek ? augwin -
 Bendigo Historical Society Inc.
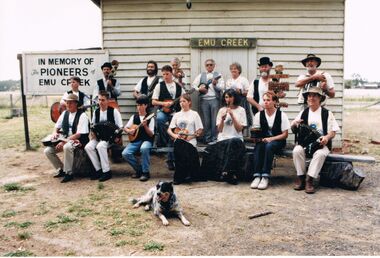
Photograph - PETER ELLIS COLLECTION: EMU CREEK BUSH BAND
... outside a small weatherboard building with a sign over the door... the door with Emu Creek painted on it. To the left is a sign ...Colour photo of the Emu Creek Bush Band sitting or standing outside a small weatherboard building with a sign over the door with Emu Creek painted on it. To the left is a sign with - In Memory of the Pioneers of Emu Creek - painted on it. The band members are playing their instruments. A heeler dog is sitting on the ground in front of them.photo, group, emu creek bush band, peter ellis collection, emu creek bush band -
 Bendigo Historical Society Inc.
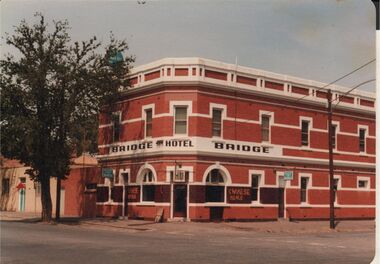
Photograph - BENDIGO HOTEL COLLECTION: BRIDGE HOTEL, BRIDGE STREET, BENDIGO
Colour photograph: Bridge Hotel,Bridge Street, Cnr Cemetery Street, Bendigo. Two storey red brick hotel, no verandah. White trim around windows and across top pediment. Large tree on LH side of image. Formerly called the Hibernia. Sign out front 'Chinese Meals' Hotel situated next door to Bendigo Chinese Association rooms, just visible on LH side of image.bendigo, hotel, bridge hotel -
 Bendigo Historical Society Inc.
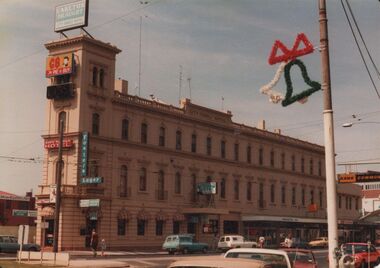
Photograph - BENDIGO HOTEL COLLECTION: CITY FAMILY HOTEL
Colour photograph: image shows City Family Hotel, High Street, Bendigo, opposite Alexandra Fountain. Three storey building, portico over front door facing High Street. Awnings over lower level windows. Carlton Draught and GB Pies sign on front Early 1980's ?.bendigo, hotel, city family hotel -
 Bendigo Historical Society Inc.
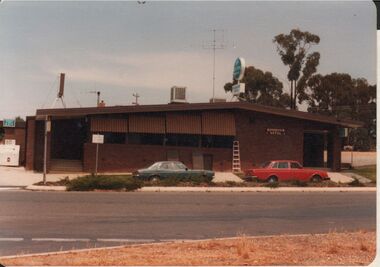
Photograph - BENDIGO HOTEL COLLECTION: RESERVOIR HOTEL, CONDON STREET, KENNINGTON
... Hotel, Kennington, on small sign near front door. Could... on wall. Reservoir Hotel, Kennington, on small sign near front ...Colour photograph: Reservoir Hotel, Condon Street, Kennington. Image shows brown brick modern structure, brown and taupe awnings over windows, ladder leaning on wall. Reservoir Hotel, Kennington, on small sign near front door. Could be early 1980's?bendigo, hotel, reservoir hotel -
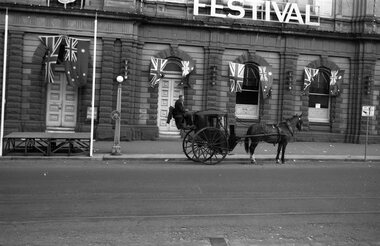 Ballarat Tramway Museum
Negative, Wal Jack, 1954
Yields information about the type of public transport used in Ballarat in the late 1800's - a Hansom Cab.Negative and Digital images of the Wal Jack Ballarat Negative file of horse drawn cab outside the Ballarat Town Hall with a dais set up on front of the doors. Note the lamp post alongside and the flags on the door. In the building windows are signs for "The Commercial Bank of Australasia Limited - Ballarat Branch". Most likely for the 1954 Begonia Festival. Photographed at the time of the event. trams, tramways, town hall, begonia festival, cabs, horse cabs -
 Ballarat Tramway Museum
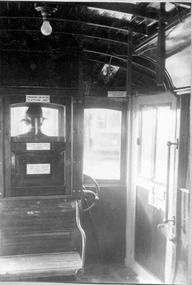
Photograph - Interior photo of a Geelong Pengelley tram, Keith Kings, 1955
Digital image scan of a Keith Kings slide showing the interior of a Geelong Pengelley tram in particular the detail of the end seat arrangement, doors, pay as you enter sign and the location of the builders plate.Yields information about the interior of a Geelong Pengelley tram.Digital image - Keith Kings number K(f)(83),geelong, pengelley, trams, tramways, builders plate -
 Ballarat Tramway Museum
Sign - Warning Sign - Pay as you enter, State Electricity Commission of Victoria (SECV), "PAY AS YOU ENTER", 1960's
Sheet steel folded to give a top & bottom strengthening. With SEC green paint on back, yellow painted face & lettered PAY AS YOU ENTER in black paint. Used on each tram to indicate to boarding passengers, to pay the motorman as they entered the tram. If not in use was turned to face away from boarding passengers. Ballarat trams fitted with wooden slides on either side of drivers windows, so that they could face the respective open door. Also use by the BTM for similar purposes. Has been repainted by SEC - can see where painted over previous chips.trams, tramways, secv, fares, tramcar operations -
 Ballarat Tramway Museum
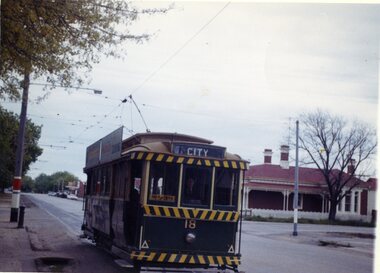
Slide - 35mm slide/s, Keith Kings, 8/01/1961 12:00:00 AM
... buildings and Mobilgas sign. By front door of tram 30 is a 'Safety... and Mobilgas sign. By front door of tram 30 is a 'Safety Zone' sign ...Bendigo, Charing Cross, 8-1-1961. Trams 30 (large white bumper) and 19 (top and bottom safety stripes, but no lighting) on Eaglehawk/Quarry Hill run, and trams 29, 28 on North Bendigo/Golden Square. Both Birneys have had bumpers painted white. Large white painted traffic island on North side. Ezywalkin, Beehive buildings and Mobilgas sign. By front door of tram 30 is a 'Safety Zone' sign. Tram 19, has a 'Briquette' ad on front panel. Photo by Keith Kings.Stamped 'K.S.Kings etc' and in blue ink, 'K(r)(335)m, Bendigo, 1/250. f4.5, 8/1/61, 29, 28, 19 and 30 at Charing Cross'tramways, trams, bendigo, birney, charing cross, tram 19, tram 29, tram 28, tram 30 -
 Kew Historical Society Inc
Photograph, Entrance to ‘Southesk’, Cotham Road, 1970
... sign above the door was added during the period when... on the veranda and the typically arched doorway. The neon sign above ...Colour enlargement of a photograph (slide) of Southesk (formerly Ordsall) in Cotham Road, Kew (demolished 1970).Rare colour photograph of the exterior of SoutheskA colour enlargement of the entrance to ‘Southesk’. Formerly known as ‘Ordsall’, the house was built for John Halfey in 1882 on the corner of Cotham Road and Charles Street. This Italianate mansion was built in the Renaissance villa style on a bluestone plinth. The picture provides photographic evidence of the tiling on the veranda and the typically arched doorway. The neon sign above the door was added during the period when it was owned by the City of Kew (1948-70).david carnegie, john halfey, southesk - cotham road - kew (vic), ordsall - cotham road - kew (vic) -
 Kew Historical Society Inc
Photograph - Royal Hotel, Sunbury, C.H.R. Christianson, 1890s
This item is part of a larger collection donated to the Kew Historical Society by Anna French. The collection includes personal items from the donor's family, as well as items given to the donor and her mother by a family friend, Lucy Merritt (Jean) Hornby. The item is from that part of the collection inherited or assembled by Jean Hornby. The collection is significant given Jean Hornby's mother's descent from Robert Hornby (1854-1935) and Eva Merritt (1865-1959); her mother the chid of a family who settled in Kew in the 1850s, this providing a chain of provenance for items dating to the mid-nineteenth century, when her maternal forebears arrived in Melbourne. Other items represent Jean Hornby's contribution to her local and wider community.This 19th century photograph includes significant architectural details of an important hotel in Sunbury, Victoria. Additionally, it was taken by a local photographer - CHR Christianson - who operated the Sunbury [photographic] Studio. Silver albumen print, mounted on board, of the original Royal Hotel on the corner of Brook and Evans Streets, Sunbury, Victoria.The single-storey, rendered brick building with a corrugated galvanised iron roof includes a number of pieces of information that may assist in dating the photograph. The licensee's name above the door appears to be M.A. Williams. To the left of the door on the external wall is a painted sign: 'BILLIARDS". Another painted sign on the front of the building reads "ROYAL HOTEL [illegible] BILLIARDS." An attached building at right may be the residence of the licensee. Specific architectural features of the building include a corner doorway with a lamp above, three sash windows and a larger square lead-light window to the right of the doorway. The latter identifies the space behind as the "BAR". On the footpath in front of this building is a grill set into the footpath to enable deliveries to a cellar. At least four figures can be identified in the photograph: a woman in the doorway, a man to her right, leaning against the wall, and two other men at the right hand side of the building. Beyond the boundary of the building is a sloping footpath to a bluestone edged gutter. An elm [sic] within a protective, picketed surround is in front of the building. C.H.R. Christianson is identified on the reverse as the photographer. Reverse in pencil: Royal Hotel Billards Sunbury / CHR Christianson photographerroyal hotel -- sunbury (vic.), chr christianson -- photographer, hotels -- sunbury (vic.), recreation -- billiards -
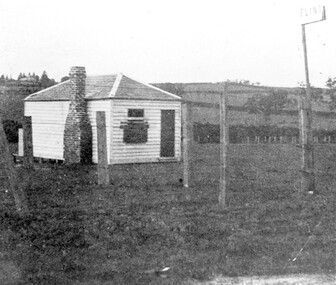 Surrey Hills Historical Society Collection
Photograph, The gate-keeper's shed, Surrey Hills Golf Club
Reproduced by permission of Mr John Arnold from his book: "The Riversdale Golf Club - a history, 1892-1977." Copyright to book: Riversdale Golf Club. Surrey Hills Golf Club operated from 1892-1908 then moved and became Riversdale Golf Club. The game was played across paddocks from Trafalgar Street, Mont Albert to Whitehorse Road and down Victoria Crescent to where Box Hill TAFE is now located in Elgar Road. There were problems with cows eating the tee flags! The clubhouse still exists as 30 Trafalgar Street.Apart from it association with the Surrey Hills Golf Club which is long gone, this image documents the landscape of pre-urban Surrey Hills.Black and white photo of a rectangular timber building with a slate hip roof and brick chimney on the LHS. The one visible window appears to be boarded up and has a door to its right. The building is fenced by posts and wire. A (?) street sign bearing the letters FLINT is at the right of the picture."The gate-keeper's shed was used as a clubhouse from 1895-1900."sports grounds, surrey hills golf club, riversdale golf club, timber building, john arnold -
 Surrey Hills Historical Society Collection
Photograph - Photograph (Copy), Charles Leslie Mitton's Surrey Hills pharmacy, c1933
REF: SHNN article Oct/Nov 1991: Pharmacy was purchased from Mr Nye by C L Mitton in 1933; later moved to 139 Union Road. Research: Stanley Morris Nye (born Ballarat in 1889, son of a Methodist minister; served AIF in WW1) moved to Surrey Hills from Auburn after 1922. He was the first occupant of 131 Union Road which was built in 1924. He is listed in the 1924,1927 and 1931 electoral rolls at 86 Canterbury Road, Surrey Hills. He died aged 44 years in December 1933 and Charles Leslie Mitton took over the business. Charles Leslie Mitton was practising in Newmarket prior to taking over the pharmacy in 1933, the year he also married Ethel Sylvia Stevenson. They lived at 65 Union Road until c1940 when they moved to Kenmare Street, Box Hill North. The pharmacy passed to his son John and daughter Rosalind Lorraine (1937-1997)Black & white photo of a man in a white coat, identified as Charles Leslie Mitton, standing outside his pharmacy in Union Road, Surrey Hills. There is a step up to a central door with glass panels in the top half. The display windows are angled to either side of the door. Within these are shelves displaying many products. The surrounds of the windows are tiled.Note sign for Ipana toothpaste.mitton's pharmacy, businesses, pharmacies, pharmacists, union road shops, mr charles leslie mitton, mr stanley morris nye