Showing 13444 items matching "brown"
-
 Melbourne Tram Museum
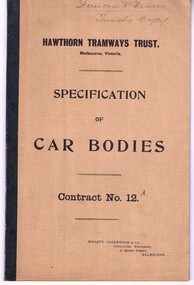
Document - Specification, McCarty Underwood & Co, "Hawthorn Tramways Trust Specification of Car Bodies Contract No. 12", 1915
1579.1 - Bound specification - 20 sheets - stapled within brown paper covers and sealed with black tape on the left hand side. Titled "Hawthorn Tramways Trust Specification of Car Bodies Contract No. 12". Gives the General conditions of the contract, specifications and forms for tendering. Prepared by McCarty Underwood & Co. Consulting Engineers 31 Queen St Melbourne. Contains completed tender forms, prices and some minor initialled alterations to the tender. The document is the HTT or Trusts copy of the tender and it has been signed by Duncan and Fraser and the HTT and on the rear sheet has the seal of the Trust. Gives prices and dates for delivery of 10 bogie and 9 combination (4 wheel) tramcar bodies. .2 - letter - typed on quarto paper - from Duncan & Fraser dated 13/4/1915 - advising that they had posted their tender document and questioning the type of "Ash" timber to be used. Has been endorsed on the left hand margin as item G referred to in the tender document. .3 - letter - typed on quarto paper - from Duncan & Fraser dated 13/4/1915 - advising that they had instructed the National Bank of Australasia to hand you the fixed deposit, but it had been sent to Adelaide in error. Letter enclosed the deposit receipt. .4 - Receipt on pre-printed receipt paper with a South Australian Government duty stamped impressed into the paper on the right hand edge, with an adhesive strip on the rear of the left hand side. Dated 26 May 1916 - received from the Hawthorn Tramways Trust the Fixed Deposit and interest.On the top cover in ink or pencil "Duncan & Fraser / Tramcar contract / Trusts Copy"trams, tramways, htt, hawthorn, duncan fraser, tramcars, bogie trams -
 Melbourne Tram Museum
Ephemera - Ticket Blocks, Public Transport Corporation (PTC), Set of 11 blocks of The Met Daily or hourly tickets, 1989
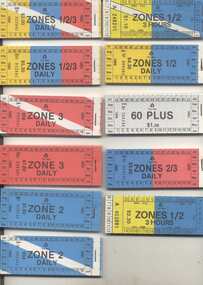
Set of 11 blocks of The Met Daily or hourly tickets for use between July 1989 and June 1990 All blocks of 20 tickets. Each block stapled at the top to one or two staples, to a stub and heavy brown cardboard backing. Two blocks of each ticket held except for sub items 7 and 11 where four blocks held. Prices printed on the tickets. Hourly tickets printed on paper and available for Jan and Feb. 1990 1. Zones 1/2/3 Concession - 2 No. – B313041 to 060 and B312841 to 860 2. Zones 1/2/3 Daily – 2 No. – A912141 to 160, A912841 to 860 3. Zone 3 daily Concession - 2 No. – A992041 to 060, A992061 to 180 4. Zone 3 daily – 2 No – A528121 to 140, A528161 to 180 5. Zone 2 daily – 2 No. – B478721 to 740, B478741 to 760 6. Zone 2 daily Concession – 2 No – A989441 to 460, A989461 to 480 7. Zones 1 and 2 - 3 hours Concession – 4 No. – A247221 to 240, A247241 to 260, A247261 to 280 and A248201 to 220. 8. Zones 1 and 2 daily – 2 No. – A969481 to 500 and A972081 to 100 9. 60 Plus – 2 No – E756141 to 160, E757381 to 400 10. Zones 2 and 3 daily – 2 No. – A314021 to 040, A314101 to 120 11. Zones 1 and 2 - 3 hours – 4 No. A463861 to 880, A463881 to 900, A463916 to 980 and A463981 to 4000. See also Reg item 21 for other examples.trams, tramways, tickets, the met, ptc -
 Bendigo Historical Society Inc.
Photograph - LA TROBE UNIVERSITY BENDIGO COLLECTION: BENDIGO TEACHERS' COLLEGE STAFF AND STUDENTS 1929
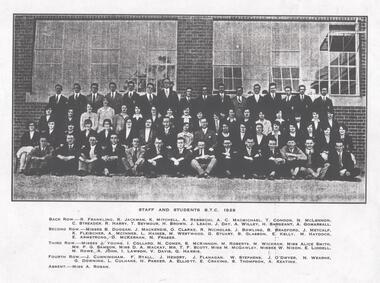
A very dark copy of a photo of the staff and students at Bendigo Teachers' College 1929. They are all dressed formally - the men with suits or jackets with ties.The women in frocks or skirts and all with short hair. The staff and students are listed in order from the back to the front row. Back row - R. Frankling, R. Jackman, K. Mitchell, A. Rebbechi, A.C. Macmichael, T. Condon, N. McLennon, C. Streader, R. Harry, T. Seymour, H. Brown, J. Leach, J. Day, A. Willey, H. Sergeant, A. Gomarsall. Second row - Misses B. Duggan, J. Mackenzie, O. Clarke, R. Nicholas, J. Bowling, B. Bradford, J. Metcalf, K. Fleischer, A. McInnes, L. Haines, M. Westwood, G. Stuart, B. Glasson, E. Kelly, M. Haydock, E. Armstrong, D. McKernan, N. Fraser. Third row - Misses J. Young, I. Collard, N. Comer, S. McKinnon, M. Roberts, M. Wickham, Miss Alice Smith, Mr. P. G. Samson, Miss D.A. Mackay, Mr. T. F. Scott, Miss M. McGawley, Misses W. Nixon, E. Liddell, M. Rowe, A. John, I. Lawson, V. Davis, G. Harris. Fourth row - J. Cunningham, F. Ryall, J. Hendry, J. Flanagan, W. Stephens, J.O'Dwyer, N. Wearne, G. Downing, L. Culhane, H. Parker, A. Elliott, E. Craving, S. Thompson, A. Keating. Absent - Miss A. Rosan. See 3320.100bendigo, education, bendigo teachers' college, la trobe university bendigo collection, collection, bendigo, education, tertiary education, teaching, teacher training, bendigo teachers' college, photo, photos, photograph, photographs, photography, history miss j.c. burnett, mr. geoff. pryor, history, staff, students, r. frankling, r. jackman, k. mitchell, a. rebbechi, a.c. macmichael, t. condon, n. mclennon, c. streader, r. harry, t. seymour, h. brown, j. leach, j. day, a. willey, h. sargeant, a. gomarshall b. duggan, j. mackenzie, o. clarke, r. nicholas, j. bowling, b. bradford, j. metcalf, k. fleischer, a. mcinnes, l. haines, m. westwood, g. stuart, b. glasson, e. kelly, m. haydock, e. armstrong, d. mckernan, n. fraser, j. young, i. collard, n. comer, s. mckinnon, m. roberts, m. wickham, alice smith, p. g. samson, d.a. mackay, t. f. scott, m. mcgawley, w. nixon, e. liddell, m. rowe, a. john, i. lawson, v. davis, g. harris, j. cunningham, f. ryall, j. hendry, j. flanagan, w. stephens, j. o'dwyer, n. wearne, g. downing, l. culhane, h. parker, a. elliott, e. cravino, s. shompson, a. keating, a. rosan -
 Melbourne Tram Museum
Book, Jack Richardson, "Electric Tramways of Essendon", "The Essendon Tramways", 1963
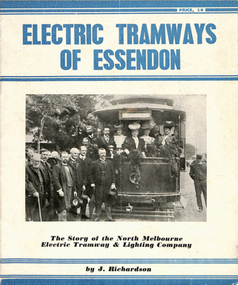
Book - 16 pages including card covers on semi gloss paper titled "The Essendon Tramways" written by Jack Richardson, published by Traction Publications, Historical Series No. 3 in 1956. The story of the North Melbourne and Electric Tramway and Lighting Company. Foreword on page 2 gives the background to the book and the persons who assisted with it. Details the historical background, a map of the tramway in 1906, relationship with the Victorian Railways, construction, rolling stock, carbarn, (depot) power station, overhead, takeover by the MMTB, connection to the City, 1956 map, expansion under the MMTB, services at the time of publication, Rolling Stock Roster, notes on some of the personnel of the tramway, junction details and dates of the various extensions etc. Includes a number of photographs, a list of railway and tramway books published by Traction Publications on the rear cover a short biography on the author. 2nd copy - from the H. S. McComb collection - stored in the original box - Items 2027 to 2030 and 1309 copy 2 contained within box 72.3 in a brown folder marked "Historical Data regarding Essendon Tramways and their services to the City" PDF copy of 1309.1 - the 1956 version added 25-2-2021 PDF copy of 1309.2 - the 1963 version added 16-3-2017. 1309.2 - 2nd edition, 1963, Historical Series No. 153, with a photo of J. Richardson on rear cover. Has notes on the edition and publisher notes. Revised to pick up errors and other photographs. Added 16-3--2017.1309.2 - has "L. W. Rogers" in ink on the top right hand corner of page 3.trams, tramways, essendon, nmetl, tramcars, depots, moonee ponds, north melbourne -
 Royal Australian and New Zealand College of Obstetricians & Gynaecologists (RANZCOG)
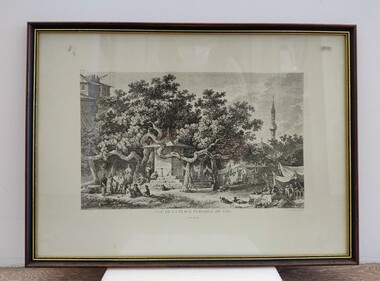
Print - Reproduction print, Carl William Weisbrod (active 1770s) et al, Vue de la Place Publique de Cos, c. late 18th century
This is an image of a public square on the island of Kos in Greece. Kos was the home of Hippocrates, and the tree in this image is reputedly the plane tree under which Hippocrates sat as he taught his pupils medicine. Hippocrates is known as the "Father of Medicine" for his revolutionary impact on the field of medicine. The letters 'A.P.D.R' printed below the title on this artwork refer to the copyright granted to engravers in France.Black and white engraving of a market square scene on the island of Kos in Greece. A large tree dominates the scene. Below the tree sits a roofed structure with a series of small steps. Water appears to be coming out of a channel of each of the visible sides of the structure, suggesting a fountain. To the left, an array of human figures, horses and a dog sit or stand beneath the tree and on the steps of the fountain. To the right, there are shaded platforms on which people are sitting in groups. There are three dogs in front of the group sitting on a platform at bottom right. Text printed below image reads 'VUE DE LA PLACE PUBLIQUE DE COS/A.P.D.R.' Small printed text below bottom left corner of image is partly illegible, but references the original creator of the artwork, Jean-Baptiste Hilair. Small printed text below bottom right corner of image reads ' Gravé à l'eau forte par C. Weisbrod/ el terminé au burin par J. Aliamet'. Small printed text above top left hand corner of image reads 'Pl. 59.' The print has been framed in a brown wooden frame with gold trim. An old display label is affixed to the back of the object. A card from Professor Franco Crainz is affixed to the back of the object, thanking the unnamed receiver for a reprint of their "interesting paper on D.D.Davis' Obstetric Atlas". The front of the card carries a print of the Temple of Esculapia, located in the Villa Borghese in Rome. A wire and two hooks have been attached to the rear of the work for hanging. -
 Bendigo Historical Society Inc.
Document - LA TROBE UNIVERSITY BENDIGO COLLECTION: BENDIGO TEACHERS' COLLEGE GRADUATION CEREMONY
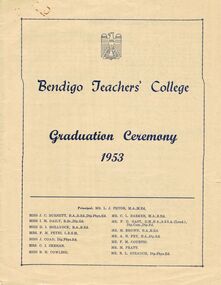
A light brown document titled "Bendigo Teachers' College Graduation Ceremony 1953". Also on the front cover is a list of the staff at the college. On the inside cover is the Significance of the Graduation Ceremony and the Order of the Ceremony. Mr. F. M. Courtis gave the welcome to visitors and the Principal gave the College Charge to the Graduands. The 'Graduation Book' was presented to Mr. E. C. Krieger Inspector of Schools by Miss J. C. Burnett. Mr. C. L. Barker called the Roll of Graduands for 1953 and Mr. E. B. Pederick Chief Inspector of Primary Schools gave the Occasional Address. The following page has the list of graduands and on the back cover is "The Principal's Charge to the Graduands". Within the book are some loose typewritten sheets with the following headings, - Graduation Ceremony, Occasional Address Delivered to the Graduands, and Graduation Ceremony 1953. Bolton Bros. Pty. Ltd. Bendigo. The staff named are Miss J. C. Burnett, Miss I. M. Daily, Miss D. I. Hollyock, Mrs. F. M. Petri, Miss J. Coad, Mrs. C. I. Skehan, Miss B. H. Cowling, Mr. L. J. Pryor (Principal), Mr. C. L. Barker, Mr. F. G. East, Mr. M. Brown, Mr. A. H. Fry, Mr. F. M. Courtis, Mr. M. Pratt and Mr. R. L. Strauch. The Graduands named are Alexander Douglas Alexander, Elva Joan Alford, Lynette Estelle Athorn, Joyce Elizabeth Baker, Eileen Merle Barbour, Jeffrey John Berryman, Neil Edward Brisbane, Noel Bruce Cerda-Pavia, Margaret Catherine Charlton, Neil Richard Clements, Kathleen Veronica Comer, Meredith Rose Crawford, Barbara Joan Ceceilia Custerson, Joyce May Dann, John William Doble, Loretto Denyse Veronica Donohue, Pamela Mary Druce, Richard Francis Edwards, Marion Ellen Gaw, Eileen Mary Gellion, Diana Mary Girling, Ian Henry Godden, Neville Fyfe Gray, Brian William Harvey, Joan Therese Hickey, Wendy Irene Higgins, Ruth Hopper, Merle Elwyn Marie Jobling, Doreen Mary Jones, Daphne Lorna Klippel, Harold James Lawry, Elizabeth Ellen Lowe, Flora Doreen McCalman, Robert Bernard McCarthy, Phyllis Patricia McIntevy, Norman James McLean, Stuart John Magee, Margaret Fay Mapson, Reginald James Mason, Margaret Evelyn Menzies, Dino Joseph John Munari, Joan Elizabeth Murdoch, Shirley Nash, Valma Nelson, Elizabeth Lillian Newnham, Doreen Beverley Niemann, Margaret Joyce O'Brien, Edward Michael Oliver, Thomas McJannett Orde, Patricia Louise Pearce, Denis Thomas Potter, Barrie Jamieson Price, Colin Leslie Quinlivan, Lawrence Francis Raeburn, John Trevor Ratcliffe, Kevin Stewart Robins, Kathleen Joan Ryan, Therese Ellen Ryan, Norah Margaret Sheahan, Joyce Elaine Sidebottom, Barry George Smith, Elaine Violet Spencely, Francis James Henry Steminger, Nancy Elizabeth Stevens, Desmond Alfred Strauch, Beatrice Dawn Tonkin, William Alan Wales, Neil Wilson, Brian Wise, Max Woollard and Laurence John Wright.bendigo, education, bendigo teachers' college graduatio, la trobe university bendigo collection, collection, bendigo, education, students, teachers, teaching, bendigo teachers' college, bendigo teachers' college students, tertiary education, teacher training, history, book, graduation, graduands, graduation ceremony, bendigo teachers' college staff -
 Southern Sherbrooke Historical Society Inc.
Textile - Helen Gibson collection - material, cottons, etc
-
 Flagstaff Hill Maritime Museum and Village
Domestic object - Bowl, Late 19th or early 20th Century
The Process of Making Pottery Decorating, Firing, Glazing, Making, Technical There is a rhythm and flow to clay. It can’t be done all at once! Even the making process! It can take weeks to get everything done, especially if you can only work on your pottery once a week! Even though we have three hour classes, it’s often just not enough time! Here is an overview of some of the processes so you have a bit more grasp on some of the technical stuff! Step One – Design There are SO many ideas out there for making stuff in clay! From delicate porcelain jewellery, through to heavy sculptural work and everything in between. Deciding your direction is sometimes not that easy – when you first start, try everything, you will naturally gravitate to the style that you enjoy! The options and variations are endless and can get a wee bit overwhelming too! Check in with me before you start to ensure your ideas will work, what order you might do things, how you could achieve the look you are seeking and any other technical data required! Step Two – Making Clay is thixotropic. This means that as you work with it, the clay first gets sloppier and wetter, before is begins to dry in the atmosphere. For most things, you simply can’t do all parts of the project at once. An example of work order might look like: Get last weeks work out from the shelves Prepare clay for today’s work – roll your clay, prepare balls for throwing, make the first stage of a pinch pot) Clean up last week’s work and put it on the shelf for bisque firing Check that you have any glazing to do – and do enough of it that you will have time to finish your main project Do the next step of your next project – there might be a further step that can’t be complete immediately, in that case, wrap your work well and put onto the shelves. Letting your work rest for a while can really help keep your work clean and professional looking. Many things require bagging under plastic to keep it ready for work the next week – put your name on the outside of the bag so you can find your work easily. We have stickers and markers. Consider how you want to decorate your work – coloured slip can be applied at a fairly wet stage (remembering that it will make your work even wetter!). Trying to apply slip to dry clay won’t work! If you want to do sgraffito – you will need to keep the work leather hard (a state of dryness where you can still work the clay with a little effort and a little water and care). Step Three – Drying Most of the time your work can go into the rack uncovered to let it dry out for the following week. If you want to continue forming or shaping you will need to double bag your work – put your work on a suitable sized bat and put the bat in a bag so the base of the bag is under the bat, then put another bag over the top of the work and tuck the top of the bag under the bat. If you want to trim (or turn) your thrown work the following week, it should also be double bagged. If your work is large, delicate, or of uneven thicknesses, you should lightly cover your work for drying. When considering the drying process, bare in mind the weather, humidity and wind! The hotter and dryer, the faster things dry and work can dry unevenly in the shelves – this can lead to cracking – another time to lightly cover your work for drying. Step Four – Trimming and Cleaning Up Your work is dry! It is called greenware now and it is at it’s most fragile! Handle everything with two hands. I often refer to soft hands – keep everything gentle and with your fingers spread as much as possible. Try to not pick up things like plates too much, and always with both hands! Before your work can be bisque fired it should be “cleaned up”. You work won’t go into the kiln if it has sharp edges – when glazed, sharp edges turn into razor blades! Use a piece of fly wire to rub the work all over – this will scratch a little so be light handed. Use a knife or metal kidney to scrape any areas that require a bit more dynamic treatment than the fly wire offers! Finally, a very light wipe over with a slightly damp sponge can help soften and soothe all of your edges and dags! Trimming thrown work: If you are planning to trim (or turn) your thrown work (and you should be), make sure you bag it well – your work should be leather hard to almost dry for easiest trimming. Use this step to finish the work completely – use a metal kidney to polish the surface, or a slightly damp sponge to give a freshly thrown look. Wipe the sponge around the rim after trimming, and check the inside of the pot for dags! Trimming slip cast work: Usually I will trim the rims of your work on the wheel the following day to make that stage easier, however you will still need to check your work for lumps and bumps. Last but not least – check that your name is still clearly on the bottom of your work. Step Five – Bisque Firing When the work is completely dry it can go into the bisque kiln. The bisque kiln is fired to 1000°C. This process burns off the water in the clay as well as some of the chemically bound water. The structure of the clay is not altered that much at this temperature. Inside the bisque kiln, the work is stacked a little, small bowl inside a larger bowl and onto a heavy plate. Smaller items like decorations or drink coasters might get stacked several high. Consideration is paid to the weight of the stack and shape of the work. A bisque kiln can fire about one and a half times the amount of work that the glaze kiln can fire. The firing takes about 10 hours to complete the cycle and about two days to cool down. Once it has been emptied the work is placed in the glaze room ready for you to decorate! Step Six – Glazing Decorating your work with colour can be a lot of fun – and time consuming! There are three main options for surface treatment at this stage: Oxide Washes Underglazes Glazes Washes and underglazes do not “glaze” the work – It will still need a layer of glaze to fully seal the clay (washes don’t need glaze on surfaces not designed for food or liquid as they can gloss up a little on their own). Underglazes are stable colourants that turn out pretty much how they look in the jar. They can be mixed with each other to form other colours and can be used like water colours to paint onto your work. Mostly they should have a clear glaze on top to seal them. Oxides are a different species – the pink oxide (cobalt) wash turns out bright blue for instance. They don’t always need a glaze on top, and some glazes can change the colour of the wash! The glazes need no other “glaze” on top! Be careful of unknown glaze interactions – you can put any combination of glaze in a bowl or on a plate, but only a single glaze on the outside of any vertical surface! Glazes are a chemical reaction under heat. We don’t know the exact chemicals in the Mayco glazes we use. I can guess by the way they interact with each other, however, on the whole, you need to test every idea you have, and not run the test on a vertical surface! Simply put, glaze is a layer of glass like substance that bonds with the clay underneath. Clay is made of silica, alumina and water. Glaze is made of mostly silica. Silica has a melting point of 1700°C and we fire to 1240°C. The silica requires a “flux” to help it melt at the lower temperature. Fluxes can be all sorts of chemicals – a common one is calcium – calcium has a melting point of 2500°C, however, together they both melt at a much lower temperature! Colourants are metal oxides like cobalt (blue), chrome (green through black), copper (green, blue, even red!), manganese (black, purple and pink) iron (red brown), etc. Different chemicals in the glaze can have dramatic effects. for example, barium carbonate (which we don’t use) turns manganese bright pink! Other elements can turn manganese dioxide brown, blue, purple and reddish brown. Manganese dioxide is a flux in and of itself as well. So, glazes that get their black and purple colours, often interact with other glazes and RUN! Our mirror black is a good example – it mixes really well with many glazes because it fluxes them – causes them to melt faster. It will also bring out many beautiful colours in the glazes because it’s black colouring most definitely comes from manganese dioxide! Glaze chemistry is a whole subject on it’s own! We use commercial Mayco glazes on purpose – for their huge range of colour possibilities, stability, cool interactions, artistic freedom with the ability to easily brush the glazes on and ease of use. We currently have almost 50 glazes on hand! A major project is to test the interactions of all glazes with each other. That is 2,500 test tiles!!!! I’m going to make the wall behind the wheels the feature wall of pretty colours! Step Seven – Glaze (Gloss or sometimes called “Glost”) Firing Most of the time this is the final stage of making your creation (but not always!) The glaze kiln goes to 1240°C. This is called cone 6, or midrange. It is the low end of stoneware temperatures. Stoneware clays and glazes are typically fired at cone 8 – 10, that is 1260 – 1290°C. The energy requirement to go from 1240°C to 1280°C is almost a 30% more! Our clay is formulated to vitrify (mature, turn “glass-like”) at 1240°, as are our glazes. A glaze kiln take around 12 hours to reach temperature and two to three days to cool down. Sometimes a third firing process is required – this is for decoration that is added to work after the glaze firing. For example – adding precious metals and lustres. this firing temperature is usually around 600 – 800°C depending upon the techniques being used. There are many students interested in gold and silver trims – we will be doing this third type of firing soon! After firing your work will be in the student finished work shelves. Remember to pay for it before you head out the door! There is a small extra charge for using porcelain clay (it’s more than twice the price of regular clay), and for any third firing process! Once your work has been fired it can not turn back into clay for millennia – so don’t fire it if you don’t like it! Put it in the bucket for recycling. https://firebirdstudios.com.au/the-process-of-making-pottery/ The bowl is an example of kitchenware used in the 19th century and still in use today.Bowl white ceramic. Crack on side. Badly stained.Backstamp very faint and unable to be read.flagstaff hill, warrnambool, shipwrecked-coast, flagstaff-hill, flagstaff-hill-maritime-museum, maritime-museum, shipwreck-coast, flagstaff-hill-maritime-village, mixing bowl, food preparation, kitchen equipment, ceramic -
 Flagstaff Hill Maritime Museum and Village
Domestic object - Bowl
The Process of Making Pottery Decorating, Firing, Glazing, Making, Technical There is a rhythm and flow to clay. It can’t be done all at once! Even the making process! It can take weeks to get everything done, especially if you can only work on your pottery once a week! Even though we have three hour classes, it’s often just not enough time! Here is an overview of some of the processes so you have a bit more grasp on some of the technical stuff! Step One – Design There are SO many ideas out there for making stuff in clay! From delicate porcelain jewellery, through to heavy sculptural work and everything in between. Deciding your direction is sometimes not that easy – when you first start, try everything, you will naturally gravitate to the style that you enjoy! The options and variations are endless and can get a wee bit overwhelming too! Check in with me before you start to ensure your ideas will work, what order you might do things, how you could achieve the look you are seeking and any other technical data required! Step Two – Making Clay is thixotropic. This means that as you work with it, the clay first gets sloppier and wetter, before is begins to dry in the atmosphere. For most things, you simply can’t do all parts of the project at once. An example of work order might look like: Get last weeks work out from the shelves Prepare clay for today’s work – roll your clay, prepare balls for throwing, make the first stage of a pinch pot) Clean up last week’s work and put it on the shelf for bisque firing Check that you have any glazing to do – and do enough of it that you will have time to finish your main project Do the next step of your next project – there might be a further step that can’t be complete immediately, in that case, wrap your work well and put onto the shelves. Letting your work rest for a while can really help keep your work clean and professional looking. Many things require bagging under plastic to keep it ready for work the next week – put your name on the outside of the bag so you can find your work easily. We have stickers and markers. Consider how you want to decorate your work – coloured slip can be applied at a fairly wet stage (remembering that it will make your work even wetter!). Trying to apply slip to dry clay won’t work! If you want to do sgraffito – you will need to keep the work leather hard (a state of dryness where you can still work the clay with a little effort and a little water and care). Step Three – Drying Most of the time your work can go into the rack uncovered to let it dry out for the following week. If you want to continue forming or shaping you will need to double bag your work – put your work on a suitable sized bat and put the bat in a bag so the base of the bag is under the bat, then put another bag over the top of the work and tuck the top of the bag under the bat. If you want to trim (or turn) your thrown work the following week, it should also be double bagged. If your work is large, delicate, or of uneven thicknesses, you should lightly cover your work for drying. When considering the drying process, bare in mind the weather, humidity and wind! The hotter and dryer, the faster things dry and work can dry unevenly in the shelves – this can lead to cracking – another time to lightly cover your work for drying. Step Four – Trimming and Cleaning Up Your work is dry! It is called greenware now and it is at it’s most fragile! Handle everything with two hands. I often refer to soft hands – keep everything gentle and with your fingers spread as much as possible. Try to not pick up things like plates too much, and always with both hands! Before your work can be bisque fired it should be “cleaned up”. You work won’t go into the kiln if it has sharp edges – when glazed, sharp edges turn into razor blades! Use a piece of fly wire to rub the work all over – this will scratch a little so be light handed. Use a knife or metal kidney to scrape any areas that require a bit more dynamic treatment than the fly wire offers! Finally, a very light wipe over with a slightly damp sponge can help soften and soothe all of your edges and dags! Trimming thrown work: If you are planning to trim (or turn) your thrown work (and you should be), make sure you bag it well – your work should be leather hard to almost dry for easiest trimming. Use this step to finish the work completely – use a metal kidney to polish the surface, or a slightly damp sponge to give a freshly thrown look. Wipe the sponge around the rim after trimming, and check the inside of the pot for dags! Trimming slip cast work: Usually I will trim the rims of your work on the wheel the following day to make that stage easier, however you will still need to check your work for lumps and bumps. Last but not least – check that your name is still clearly on the bottom of your work. Step Five – Bisque Firing When the work is completely dry it can go into the bisque kiln. The bisque kiln is fired to 1000°C. This process burns off the water in the clay as well as some of the chemically bound water. The structure of the clay is not altered that much at this temperature. Inside the bisque kiln, the work is stacked a little, small bowl inside a larger bowl and onto a heavy plate. Smaller items like decorations or drink coasters might get stacked several high. Consideration is paid to the weight of the stack and shape of the work. A bisque kiln can fire about one and a half times the amount of work that the glaze kiln can fire. The firing takes about 10 hours to complete the cycle and about two days to cool down. Once it has been emptied the work is placed in the glaze room ready for you to decorate! Step Six – Glazing Decorating your work with colour can be a lot of fun – and time consuming! There are three main options for surface treatment at this stage: Oxide Washes Underglazes Glazes Washes and underglazes do not “glaze” the work – It will still need a layer of glaze to fully seal the clay (washes don’t need glaze on surfaces not designed for food or liquid as they can gloss up a little on their own). Underglazes are stable colourants that turn out pretty much how they look in the jar. They can be mixed with each other to form other colours and can be used like water colours to paint onto your work. Mostly they should have a clear glaze on top to seal them. Oxides are a different species – the pink oxide (cobalt) wash turns out bright blue for instance. They don’t always need a glaze on top, and some glazes can change the colour of the wash! The glazes need no other “glaze” on top! Be careful of unknown glaze interactions – you can put any combination of glaze in a bowl or on a plate, but only a single glaze on the outside of any vertical surface! Glazes are a chemical reaction under heat. We don’t know the exact chemicals in the Mayco glazes we use. I can guess by the way they interact with each other, however, on the whole, you need to test every idea you have, and not run the test on a vertical surface! Simply put, glaze is a layer of glass like substance that bonds with the clay underneath. Clay is made of silica, alumina and water. Glaze is made of mostly silica. Silica has a melting point of 1700°C and we fire to 1240°C. The silica requires a “flux” to help it melt at the lower temperature. Fluxes can be all sorts of chemicals – a common one is calcium – calcium has a melting point of 2500°C, however, together they both melt at a much lower temperature! Colourants are metal oxides like cobalt (blue), chrome (green through black), copper (green, blue, even red!), manganese (black, purple and pink) iron (red brown), etc. Different chemicals in the glaze can have dramatic effects. for example, barium carbonate (which we don’t use) turns manganese bright pink! Other elements can turn manganese dioxide brown, blue, purple and reddish brown. Manganese dioxide is a flux in and of itself as well. So, glazes that get their black and purple colours, often interact with other glazes and RUN! Our mirror black is a good example – it mixes really well with many glazes because it fluxes them – causes them to melt faster. It will also bring out many beautiful colours in the glazes because it’s black colouring most definitely comes from manganese dioxide! Glaze chemistry is a whole subject on it’s own! We use commercial Mayco glazes on purpose – for their huge range of colour possibilities, stability, cool interactions, artistic freedom with the ability to easily brush the glazes on and ease of use. We currently have almost 50 glazes on hand! A major project is to test the interactions of all glazes with each other. That is 2,500 test tiles!!!! I’m going to make the wall behind the wheels the feature wall of pretty colours! Step Seven – Glaze (Gloss or sometimes called “Glost”) Firing Most of the time this is the final stage of making your creation (but not always!) The glaze kiln goes to 1240°C. This is called cone 6, or midrange. It is the low end of stoneware temperatures. Stoneware clays and glazes are typically fired at cone 8 – 10, that is 1260 – 1290°C. The energy requirement to go from 1240°C to 1280°C is almost a 30% more! Our clay is formulated to vitrify (mature, turn “glass-like”) at 1240°, as are our glazes. A glaze kiln take around 12 hours to reach temperature and two to three days to cool down. Sometimes a third firing process is required – this is for decoration that is added to work after the glaze firing. For example – adding precious metals and lustres. this firing temperature is usually around 600 – 800°C depending upon the techniques being used. There are many students interested in gold and silver trims – we will be doing this third type of firing soon! After firing your work will be in the student finished work shelves. Remember to pay for it before you head out the door! There is a small extra charge for using porcelain clay (it’s more than twice the price of regular clay), and for any third firing process! Once your work has been fired it can not turn back into clay for millennia – so don’t fire it if you don’t like it! Put it in the bucket for recycling. https://firebirdstudios.com.au/the-process-of-making-pottery/ This bowl is an example of kitchenware used in the 19th century and still in use today.Bowl white ceramic plain that has two sets of edging around lip. Inside bowl has plaster designed to look like cooking mixture.flagstaff hill, warrnambool, shipwrecked-coast, flagstaff-hill, flagstaff-hill-maritime-museum, maritime-museum, shipwreck-coast, flagstaff-hill-maritime-village, kitchen equipment, ceramic -
 Flagstaff Hill Maritime Museum and Village
Domestic object - Bowl, J & G Meakin, Late 19th or early 20th Century
The Process of Making Pottery Decorating, Firing, Glazing, Making, Technical There is a rhythm and flow to clay. It can’t be done all at once! Even the making process! It can take weeks to get everything done, especially if you can only work on your pottery once a week! Even though we have three hour classes, it’s often just not enough time! Here is an overview of some of the processes so you have a bit more grasp on some of the technical stuff! Step One – Design There are SO many ideas out there for making stuff in clay! From delicate porcelain jewellery, through to heavy sculptural work and everything in between. Deciding your direction is sometimes not that easy – when you first start, try everything, you will naturally gravitate to the style that you enjoy! The options and variations are endless and can get a wee bit overwhelming too! Check in with me before you start to ensure your ideas will work, what order you might do things, how you could achieve the look you are seeking and any other technical data required! Step Two – Making Clay is thixotropic. This means that as you work with it, the clay first gets sloppier and wetter, before is begins to dry in the atmosphere. For most things, you simply can’t do all parts of the project at once. An example of work order might look like: Get last weeks work out from the shelves Prepare clay for today’s work – roll your clay, prepare balls for throwing, make the first stage of a pinch pot) Clean up last week’s work and put it on the shelf for bisque firing Check that you have any glazing to do – and do enough of it that you will have time to finish your main project Do the next step of your next project – there might be a further step that can’t be complete immediately, in that case, wrap your work well and put onto the shelves. Letting your work rest for a while can really help keep your work clean and professional looking. Many things require bagging under plastic to keep it ready for work the next week – put your name on the outside of the bag so you can find your work easily. We have stickers and markers. Consider how you want to decorate your work – coloured slip can be applied at a fairly wet stage (remembering that it will make your work even wetter!). Trying to apply slip to dry clay won’t work! If you want to do sgraffito – you will need to keep the work leather hard (a state of dryness where you can still work the clay with a little effort and a little water and care). Step Three – Drying Most of the time your work can go into the rack uncovered to let it dry out for the following week. If you want to continue forming or shaping you will need to double bag your work – put your work on a suitable sized bat and put the bat in a bag so the base of the bag is under the bat, then put another bag over the top of the work and tuck the top of the bag under the bat. If you want to trim (or turn) your thrown work the following week, it should also be double bagged. If your work is large, delicate, or of uneven thicknesses, you should lightly cover your work for drying. When considering the drying process, bare in mind the weather, humidity and wind! The hotter and dryer, the faster things dry and work can dry unevenly in the shelves – this can lead to cracking – another time to lightly cover your work for drying. Step Four – Trimming and Cleaning Up Your work is dry! It is called greenware now and it is at it’s most fragile! Handle everything with two hands. I often refer to soft hands – keep everything gentle and with your fingers spread as much as possible. Try to not pick up things like plates too much, and always with both hands! Before your work can be bisque fired it should be “cleaned up”. You work won’t go into the kiln if it has sharp edges – when glazed, sharp edges turn into razor blades! Use a piece of fly wire to rub the work all over – this will scratch a little so be light handed. Use a knife or metal kidney to scrape any areas that require a bit more dynamic treatment than the fly wire offers! Finally, a very light wipe over with a slightly damp sponge can help soften and soothe all of your edges and dags! Trimming thrown work: If you are planning to trim (or turn) your thrown work (and you should be), make sure you bag it well – your work should be leather hard to almost dry for easiest trimming. Use this step to finish the work completely – use a metal kidney to polish the surface, or a slightly damp sponge to give a freshly thrown look. Wipe the sponge around the rim after trimming, and check the inside of the pot for dags! Trimming slip cast work: Usually I will trim the rims of your work on the wheel the following day to make that stage easier, however you will still need to check your work for lumps and bumps. Last but not least – check that your name is still clearly on the bottom of your work. Step Five – Bisque Firing When the work is completely dry it can go into the bisque kiln. The bisque kiln is fired to 1000°C. This process burns off the water in the clay as well as some of the chemically bound water. The structure of the clay is not altered that much at this temperature. Inside the bisque kiln, the work is stacked a little, small bowl inside a larger bowl and onto a heavy plate. Smaller items like decorations or drink coasters might get stacked several high. Consideration is paid to the weight of the stack and shape of the work. A bisque kiln can fire about one and a half times the amount of work that the glaze kiln can fire. The firing takes about 10 hours to complete the cycle and about two days to cool down. Once it has been emptied the work is placed in the glaze room ready for you to decorate! Step Six – Glazing Decorating your work with colour can be a lot of fun – and time consuming! There are three main options for surface treatment at this stage: Oxide Washes Underglazes Glazes Washes and underglazes do not “glaze” the work – It will still need a layer of glaze to fully seal the clay (washes don’t need glaze on surfaces not designed for food or liquid as they can gloss up a little on their own). Underglazes are stable colourants that turn out pretty much how they look in the jar. They can be mixed with each other to form other colours and can be used like water colours to paint onto your work. Mostly they should have a clear glaze on top to seal them. Oxides are a different species – the pink oxide (cobalt) wash turns out bright blue for instance. They don’t always need a glaze on top, and some glazes can change the colour of the wash! The glazes need no other “glaze” on top! Be careful of unknown glaze interactions – you can put any combination of glaze in a bowl or on a plate, but only a single glaze on the outside of any vertical surface! Glazes are a chemical reaction under heat. We don’t know the exact chemicals in the Mayco glazes we use. I can guess by the way they interact with each other, however, on the whole, you need to test every idea you have, and not run the test on a vertical surface! Simply put, glaze is a layer of glass like substance that bonds with the clay underneath. Clay is made of silica, alumina and water. Glaze is made of mostly silica. Silica has a melting point of 1700°C and we fire to 1240°C. The silica requires a “flux” to help it melt at the lower temperature. Fluxes can be all sorts of chemicals – a common one is calcium – calcium has a melting point of 2500°C, however, together they both melt at a much lower temperature! Colourants are metal oxides like cobalt (blue), chrome (green through black), copper (green, blue, even red!), manganese (black, purple and pink) iron (red brown), etc. Different chemicals in the glaze can have dramatic effects. for example, barium carbonate (which we don’t use) turns manganese bright pink! Other elements can turn manganese dioxide brown, blue, purple and reddish brown. Manganese dioxide is a flux in and of itself as well. So, glazes that get their black and purple colours, often interact with other glazes and RUN! Our mirror black is a good example – it mixes really well with many glazes because it fluxes them – causes them to melt faster. It will also bring out many beautiful colours in the glazes because it’s black colouring most definitely comes from manganese dioxide! Glaze chemistry is a whole subject on it’s own! We use commercial Mayco glazes on purpose – for their huge range of colour possibilities, stability, cool interactions, artistic freedom with the ability to easily brush the glazes on and ease of use. We currently have almost 50 glazes on hand! A major project is to test the interactions of all glazes with each other. That is 2,500 test tiles!!!! I’m going to make the wall behind the wheels the feature wall of pretty colours! Step Seven – Glaze (Gloss or sometimes called “Glost”) Firing Most of the time this is the final stage of making your creation (but not always!) The glaze kiln goes to 1240°C. This is called cone 6, or midrange. It is the low end of stoneware temperatures. Stoneware clays and glazes are typically fired at cone 8 – 10, that is 1260 – 1290°C. The energy requirement to go from 1240°C to 1280°C is almost a 30% more! Our clay is formulated to vitrify (mature, turn “glass-like”) at 1240°, as are our glazes. A glaze kiln take around 12 hours to reach temperature and two to three days to cool down. Sometimes a third firing process is required – this is for decoration that is added to work after the glaze firing. For example – adding precious metals and lustres. this firing temperature is usually around 600 – 800°C depending upon the techniques being used. There are many students interested in gold and silver trims – we will be doing this third type of firing soon! After firing your work will be in the student finished work shelves. Remember to pay for it before you head out the door! There is a small extra charge for using porcelain clay (it’s more than twice the price of regular clay), and for any third firing process! Once your work has been fired it can not turn back into clay for millennia – so don’t fire it if you don’t like it! Put it in the bucket for recycling. https://firebirdstudios.com.au/the-process-of-making-pottery/This bowl was made by renowned pottery company J & G Meakin of England. The firm was established in the mid-1800's. The bowl is an example of kitchenware used in the 19th century and still in use today.Bowl; white ceramic, round and tapering inwards towards base. Made by J and G Meakin England.On base, 'Ironstone China Reg SOL 391413' with symbolflagstaff hill, flagstaff hill maritime museum and village, warrnambool, maritime museum, maritime village, great ocean road, shipwreck coast, mixing bowl, food preparation, j & g meakin, pottery, stoke-on-trent, kitchen equipment, ceramic -
 Flagstaff Hill Maritime Museum and Village
Domestic object - Plate
The Process of Making Pottery Decorating, Firing, Glazing, Making, Technical There is a rhythm and flow to clay. It can’t be done all at once! Even the making process! It can take weeks to get everything done, especially if you can only work on your pottery once a week! Even though we have three hour classes, it’s often just not enough time! Here is an overview of some of the processes so you have a bit more grasp on some of the technical stuff! Step One – Design There are SO many ideas out there for making stuff in clay! From delicate porcelain jewellery, through to heavy sculptural work and everything in between. Deciding your direction is sometimes not that easy – when you first start, try everything, you will naturally gravitate to the style that you enjoy! The options and variations are endless and can get a wee bit overwhelming too! Check in with me before you start to ensure your ideas will work, what order you might do things, how you could achieve the look you are seeking and any other technical data required! Step Two – Making Clay is thixotropic. This means that as you work with it, the clay first gets sloppier and wetter, before is begins to dry in the atmosphere. For most things, you simply can’t do all parts of the project at once. An example of work order might look like: Get last weeks work out from the shelves Prepare clay for today’s work – roll your clay, prepare balls for throwing, make the first stage of a pinch pot) Clean up last week’s work and put it on the shelf for bisque firing Check that you have any glazing to do – and do enough of it that you will have time to finish your main project Do the next step of your next project – there might be a further step that can’t be complete immediately, in that case, wrap your work well and put onto the shelves. Letting your work rest for a while can really help keep your work clean and professional looking. Many things require bagging under plastic to keep it ready for work the next week – put your name on the outside of the bag so you can find your work easily. We have stickers and markers. Consider how you want to decorate your work – coloured slip can be applied at a fairly wet stage (remembering that it will make your work even wetter!). Trying to apply slip to dry clay won’t work! If you want to do sgraffito – you will need to keep the work leather hard (a state of dryness where you can still work the clay with a little effort and a little water and care). Step Three – Drying Most of the time your work can go into the rack uncovered to let it dry out for the following week. If you want to continue forming or shaping you will need to double bag your work – put your work on a suitable sized bat and put the bat in a bag so the base of the bag is under the bat, then put another bag over the top of the work and tuck the top of the bag under the bat. If you want to trim (or turn) your thrown work the following week, it should also be double bagged. If your work is large, delicate, or of uneven thicknesses, you should lightly cover your work for drying. When considering the drying process, bare in mind the weather, humidity and wind! The hotter and dryer, the faster things dry and work can dry unevenly in the shelves – this can lead to cracking – another time to lightly cover your work for drying. Step Four – Trimming and Cleaning Up Your work is dry! It is called greenware now and it is at it’s most fragile! Handle everything with two hands. I often refer to soft hands – keep everything gentle and with your fingers spread as much as possible. Try to not pick up things like plates too much, and always with both hands! Before your work can be bisque fired it should be “cleaned up”. You work won’t go into the kiln if it has sharp edges – when glazed, sharp edges turn into razor blades! Use a piece of fly wire to rub the work all over – this will scratch a little so be light handed. Use a knife or metal kidney to scrape any areas that require a bit more dynamic treatment than the fly wire offers! Finally, a very light wipe over with a slightly damp sponge can help soften and soothe all of your edges and dags! Trimming thrown work: If you are planning to trim (or turn) your thrown work (and you should be), make sure you bag it well – your work should be leather hard to almost dry for easiest trimming. Use this step to finish the work completely – use a metal kidney to polish the surface, or a slightly damp sponge to give a freshly thrown look. Wipe the sponge around the rim after trimming, and check the inside of the pot for dags! Trimming slip cast work: Usually I will trim the rims of your work on the wheel the following day to make that stage easier, however you will still need to check your work for lumps and bumps. Last but not least – check that your name is still clearly on the bottom of your work. Step Five – Bisque Firing When the work is completely dry it can go into the bisque kiln. The bisque kiln is fired to 1000°C. This process burns off the water in the clay as well as some of the chemically bound water. The structure of the clay is not altered that much at this temperature. Inside the bisque kiln, the work is stacked a little, small bowl inside a larger bowl and onto a heavy plate. Smaller items like decorations or drink coasters might get stacked several high. Consideration is paid to the weight of the stack and shape of the work. A bisque kiln can fire about one and a half times the amount of work that the glaze kiln can fire. The firing takes about 10 hours to complete the cycle and about two days to cool down. Once it has been emptied the work is placed in the glaze room ready for you to decorate! Step Six – Glazing Decorating your work with colour can be a lot of fun – and time consuming! There are three main options for surface treatment at this stage: Oxide Washes Underglazes Glazes Washes and underglazes do not “glaze” the work – It will still need a layer of glaze to fully seal the clay (washes don’t need glaze on surfaces not designed for food or liquid as they can gloss up a little on their own). Underglazes are stable colourants that turn out pretty much how they look in the jar. They can be mixed with each other to form other colours and can be used like water colours to paint onto your work. Mostly they should have a clear glaze on top to seal them. Oxides are a different species – the pink oxide (cobalt) wash turns out bright blue for instance. They don’t always need a glaze on top, and some glazes can change the colour of the wash! The glazes need no other “glaze” on top! Be careful of unknown glaze interactions – you can put any combination of glaze in a bowl or on a plate, but only a single glaze on the outside of any vertical surface! Glazes are a chemical reaction under heat. We don’t know the exact chemicals in the Mayco glazes we use. I can guess by the way they interact with each other, however, on the whole, you need to test every idea you have, and not run the test on a vertical surface! Simply put, glaze is a layer of glass like substance that bonds with the clay underneath. Clay is made of silica, alumina and water. Glaze is made of mostly silica. Silica has a melting point of 1700°C and we fire to 1240°C. The silica requires a “flux” to help it melt at the lower temperature. Fluxes can be all sorts of chemicals – a common one is calcium – calcium has a melting point of 2500°C, however, together they both melt at a much lower temperature! Colourants are metal oxides like cobalt (blue), chrome (green through black), copper (green, blue, even red!), manganese (black, purple and pink) iron (red brown), etc. Different chemicals in the glaze can have dramatic effects. for example, barium carbonate (which we don’t use) turns manganese bright pink! Other elements can turn manganese dioxide brown, blue, purple and reddish brown. Manganese dioxide is a flux in and of itself as well. So, glazes that get their black and purple colours, often interact with other glazes and RUN! Our mirror black is a good example – it mixes really well with many glazes because it fluxes them – causes them to melt faster. It will also bring out many beautiful colours in the glazes because it’s black colouring most definitely comes from manganese dioxide! Glaze chemistry is a whole subject on it’s own! We use commercial Mayco glazes on purpose – for their huge range of colour possibilities, stability, cool interactions, artistic freedom with the ability to easily brush the glazes on and ease of use. We currently have almost 50 glazes on hand! A major project is to test the interactions of all glazes with each other. That is 2,500 test tiles!!!! I’m going to make the wall behind the wheels the feature wall of pretty colours! Step Seven – Glaze (Gloss or sometimes called “Glost”) Firing Most of the time this is the final stage of making your creation (but not always!) The glaze kiln goes to 1240°C. This is called cone 6, or midrange. It is the low end of stoneware temperatures. Stoneware clays and glazes are typically fired at cone 8 – 10, that is 1260 – 1290°C. The energy requirement to go from 1240°C to 1280°C is almost a 30% more! Our clay is formulated to vitrify (mature, turn “glass-like”) at 1240°, as are our glazes. A glaze kiln take around 12 hours to reach temperature and two to three days to cool down. Sometimes a third firing process is required – this is for decoration that is added to work after the glaze firing. For example – adding precious metals and lustres. this firing temperature is usually around 600 – 800°C depending upon the techniques being used. There are many students interested in gold and silver trims – we will be doing this third type of firing soon! After firing your work will be in the student finished work shelves. Remember to pay for it before you head out the door! There is a small extra charge for using porcelain clay (it’s more than twice the price of regular clay), and for any third firing process! Once your work has been fired it can not turn back into clay for millennia – so don’t fire it if you don’t like it! Put it in the bucket for recycling. https://firebirdstudios.com.au/the-process-of-making-pottery/Ceramics have evolved over thousands of years.White earthenware dinner plate. Crazing evident all over.Backstamped ‘Made in England S LTD’flagstaff hill, warrnambool, shipwrecked-coast, flagstaff-hill, flagstaff-hill-maritime-museum, maritime-museum, shipwreck-coast, flagstaff-hill-maritime-village, ceramics, tableware -
 Flagstaff Hill Maritime Museum and Village
Domestic object - Plate, Johnson Bros
The Process of Making Pottery Decorating, Firing, Glazing, Making, Technical There is a rhythm and flow to clay. It can’t be done all at once! Even the making process! It can take weeks to get everything done, especially if you can only work on your pottery once a week! Even though we have three hour classes, it’s often just not enough time! Here is an overview of some of the processes so you have a bit more grasp on some of the technical stuff! Step One – Design There are SO many ideas out there for making stuff in clay! From delicate porcelain jewellery, through to heavy sculptural work and everything in between. Deciding your direction is sometimes not that easy – when you first start, try everything, you will naturally gravitate to the style that you enjoy! The options and variations are endless and can get a wee bit overwhelming too! Check in with me before you start to ensure your ideas will work, what order you might do things, how you could achieve the look you are seeking and any other technical data required! Step Two – Making Clay is thixotropic. This means that as you work with it, the clay first gets sloppier and wetter, before is begins to dry in the atmosphere. For most things, you simply can’t do all parts of the project at once. An example of work order might look like: Get last weeks work out from the shelves Prepare clay for today’s work – roll your clay, prepare balls for throwing, make the first stage of a pinch pot) Clean up last week’s work and put it on the shelf for bisque firing Check that you have any glazing to do – and do enough of it that you will have time to finish your main project Do the next step of your next project – there might be a further step that can’t be complete immediately, in that case, wrap your work well and put onto the shelves. Letting your work rest for a while can really help keep your work clean and professional looking. Many things require bagging under plastic to keep it ready for work the next week – put your name on the outside of the bag so you can find your work easily. We have stickers and markers. Consider how you want to decorate your work – coloured slip can be applied at a fairly wet stage (remembering that it will make your work even wetter!). Trying to apply slip to dry clay won’t work! If you want to do sgraffito – you will need to keep the work leather hard (a state of dryness where you can still work the clay with a little effort and a little water and care). Step Three – Drying Most of the time your work can go into the rack uncovered to let it dry out for the following week. If you want to continue forming or shaping you will need to double bag your work – put your work on a suitable sized bat and put the bat in a bag so the base of the bag is under the bat, then put another bag over the top of the work and tuck the top of the bag under the bat. If you want to trim (or turn) your thrown work the following week, it should also be double bagged. If your work is large, delicate, or of uneven thicknesses, you should lightly cover your work for drying. When considering the drying process, bare in mind the weather, humidity and wind! The hotter and dryer, the faster things dry and work can dry unevenly in the shelves – this can lead to cracking – another time to lightly cover your work for drying. Step Four – Trimming and Cleaning Up Your work is dry! It is called greenware now and it is at it’s most fragile! Handle everything with two hands. I often refer to soft hands – keep everything gentle and with your fingers spread as much as possible. Try to not pick up things like plates too much, and always with both hands! Before your work can be bisque fired it should be “cleaned up”. You work won’t go into the kiln if it has sharp edges – when glazed, sharp edges turn into razor blades! Use a piece of fly wire to rub the work all over – this will scratch a little so be light handed. Use a knife or metal kidney to scrape any areas that require a bit more dynamic treatment than the fly wire offers! Finally, a very light wipe over with a slightly damp sponge can help soften and soothe all of your edges and dags! Trimming thrown work: If you are planning to trim (or turn) your thrown work (and you should be), make sure you bag it well – your work should be leather hard to almost dry for easiest trimming. Use this step to finish the work completely – use a metal kidney to polish the surface, or a slightly damp sponge to give a freshly thrown look. Wipe the sponge around the rim after trimming, and check the inside of the pot for dags! Trimming slip cast work: Usually I will trim the rims of your work on the wheel the following day to make that stage easier, however you will still need to check your work for lumps and bumps. Last but not least – check that your name is still clearly on the bottom of your work. Step Five – Bisque Firing When the work is completely dry it can go into the bisque kiln. The bisque kiln is fired to 1000°C. This process burns off the water in the clay as well as some of the chemically bound water. The structure of the clay is not altered that much at this temperature. Inside the bisque kiln, the work is stacked a little, small bowl inside a larger bowl and onto a heavy plate. Smaller items like decorations or drink coasters might get stacked several high. Consideration is paid to the weight of the stack and shape of the work. A bisque kiln can fire about one and a half times the amount of work that the glaze kiln can fire. The firing takes about 10 hours to complete the cycle and about two days to cool down. Once it has been emptied the work is placed in the glaze room ready for you to decorate! Step Six – Glazing Decorating your work with colour can be a lot of fun – and time consuming! There are three main options for surface treatment at this stage: Oxide Washes Underglazes Glazes Washes and underglazes do not “glaze” the work – It will still need a layer of glaze to fully seal the clay (washes don’t need glaze on surfaces not designed for food or liquid as they can gloss up a little on their own). Underglazes are stable colourants that turn out pretty much how they look in the jar. They can be mixed with each other to form other colours and can be used like water colours to paint onto your work. Mostly they should have a clear glaze on top to seal them. Oxides are a different species – the pink oxide (cobalt) wash turns out bright blue for instance. They don’t always need a glaze on top, and some glazes can change the colour of the wash! The glazes need no other “glaze” on top! Be careful of unknown glaze interactions – you can put any combination of glaze in a bowl or on a plate, but only a single glaze on the outside of any vertical surface! Glazes are a chemical reaction under heat. We don’t know the exact chemicals in the Mayco glazes we use. I can guess by the way they interact with each other, however, on the whole, you need to test every idea you have, and not run the test on a vertical surface! Simply put, glaze is a layer of glass like substance that bonds with the clay underneath. Clay is made of silica, alumina and water. Glaze is made of mostly silica. Silica has a melting point of 1700°C and we fire to 1240°C. The silica requires a “flux” to help it melt at the lower temperature. Fluxes can be all sorts of chemicals – a common one is calcium – calcium has a melting point of 2500°C, however, together they both melt at a much lower temperature! Colourants are metal oxides like cobalt (blue), chrome (green through black), copper (green, blue, even red!), manganese (black, purple and pink) iron (red brown), etc. Different chemicals in the glaze can have dramatic effects. for example, barium carbonate (which we don’t use) turns manganese bright pink! Other elements can turn manganese dioxide brown, blue, purple and reddish brown. Manganese dioxide is a flux in and of itself as well. So, glazes that get their black and purple colours, often interact with other glazes and RUN! Our mirror black is a good example – it mixes really well with many glazes because it fluxes them – causes them to melt faster. It will also bring out many beautiful colours in the glazes because it’s black colouring most definitely comes from manganese dioxide! Glaze chemistry is a whole subject on it’s own! We use commercial Mayco glazes on purpose – for their huge range of colour possibilities, stability, cool interactions, artistic freedom with the ability to easily brush the glazes on and ease of use. We currently have almost 50 glazes on hand! A major project is to test the interactions of all glazes with each other. That is 2,500 test tiles!!!! I’m going to make the wall behind the wheels the feature wall of pretty colours! Step Seven – Glaze (Gloss or sometimes called “Glost”) Firing Most of the time this is the final stage of making your creation (but not always!) The glaze kiln goes to 1240°C. This is called cone 6, or midrange. It is the low end of stoneware temperatures. Stoneware clays and glazes are typically fired at cone 8 – 10, that is 1260 – 1290°C. The energy requirement to go from 1240°C to 1280°C is almost a 30% more! Our clay is formulated to vitrify (mature, turn “glass-like”) at 1240°, as are our glazes. A glaze kiln take around 12 hours to reach temperature and two to three days to cool down. Sometimes a third firing process is required – this is for decoration that is added to work after the glaze firing. For example – adding precious metals and lustres. this firing temperature is usually around 600 – 800°C depending upon the techniques being used. There are many students interested in gold and silver trims – we will be doing this third type of firing soon! After firing your work will be in the student finished work shelves. Remember to pay for it before you head out the door! There is a small extra charge for using porcelain clay (it’s more than twice the price of regular clay), and for any third firing process! Once your work has been fired it can not turn back into clay for millennia – so don’t fire it if you don’t like it! Put it in the bucket for recycling. https://firebirdstudios.com.au/the-process-of-making-pottery/Ceramics have evolved over thousands of years.A white earthenware side plate with a gadroon edge. Has water marks and chips on front.‘Johnson Bros England Reg No 15587’flagstaff hill, warrnambool, shipwrecked-coast, flagstaff-hill, flagstaff-hill-maritime-museum, maritime-museum, shipwreck-coast, flagstaff-hill-maritime-village, johnson bros, ceramics, tableware -
 Flagstaff Hill Maritime Museum and Village
Domestic object - Plate, Alfred Meakin
The Process of Making Pottery Decorating, Firing, Glazing, Making, Technical There is a rhythm and flow to clay. It can’t be done all at once! Even the making process! It can take weeks to get everything done, especially if you can only work on your pottery once a week! Even though we have three hour classes, it’s often just not enough time! Here is an overview of some of the processes so you have a bit more grasp on some of the technical stuff! Step One – Design There are SO many ideas out there for making stuff in clay! From delicate porcelain jewellery, through to heavy sculptural work and everything in between. Deciding your direction is sometimes not that easy – when you first start, try everything, you will naturally gravitate to the style that you enjoy! The options and variations are endless and can get a wee bit overwhelming too! Check in with me before you start to ensure your ideas will work, what order you might do things, how you could achieve the look you are seeking and any other technical data required! Step Two – Making Clay is thixotropic. This means that as you work with it, the clay first gets sloppier and wetter, before is begins to dry in the atmosphere. For most things, you simply can’t do all parts of the project at once. An example of work order might look like: Get last weeks work out from the shelves Prepare clay for today’s work – roll your clay, prepare balls for throwing, make the first stage of a pinch pot) Clean up last week’s work and put it on the shelf for bisque firing Check that you have any glazing to do – and do enough of it that you will have time to finish your main project Do the next step of your next project – there might be a further step that can’t be complete immediately, in that case, wrap your work well and put onto the shelves. Letting your work rest for a while can really help keep your work clean and professional looking. Many things require bagging under plastic to keep it ready for work the next week – put your name on the outside of the bag so you can find your work easily. We have stickers and markers. Consider how you want to decorate your work – coloured slip can be applied at a fairly wet stage (remembering that it will make your work even wetter!). Trying to apply slip to dry clay won’t work! If you want to do sgraffito – you will need to keep the work leather hard (a state of dryness where you can still work the clay with a little effort and a little water and care). Step Three – Drying Most of the time your work can go into the rack uncovered to let it dry out for the following week. If you want to continue forming or shaping you will need to double bag your work – put your work on a suitable sized bat and put the bat in a bag so the base of the bag is under the bat, then put another bag over the top of the work and tuck the top of the bag under the bat. If you want to trim (or turn) your thrown work the following week, it should also be double bagged. If your work is large, delicate, or of uneven thicknesses, you should lightly cover your work for drying. When considering the drying process, bare in mind the weather, humidity and wind! The hotter and dryer, the faster things dry and work can dry unevenly in the shelves – this can lead to cracking – another time to lightly cover your work for drying. Step Four – Trimming and Cleaning Up Your work is dry! It is called greenware now and it is at it’s most fragile! Handle everything with two hands. I often refer to soft hands – keep everything gentle and with your fingers spread as much as possible. Try to not pick up things like plates too much, and always with both hands! Before your work can be bisque fired it should be “cleaned up”. You work won’t go into the kiln if it has sharp edges – when glazed, sharp edges turn into razor blades! Use a piece of fly wire to rub the work all over – this will scratch a little so be light handed. Use a knife or metal kidney to scrape any areas that require a bit more dynamic treatment than the fly wire offers! Finally, a very light wipe over with a slightly damp sponge can help soften and soothe all of your edges and dags! Trimming thrown work: If you are planning to trim (or turn) your thrown work (and you should be), make sure you bag it well – your work should be leather hard to almost dry for easiest trimming. Use this step to finish the work completely – use a metal kidney to polish the surface, or a slightly damp sponge to give a freshly thrown look. Wipe the sponge around the rim after trimming, and check the inside of the pot for dags! Trimming slip cast work: Usually I will trim the rims of your work on the wheel the following day to make that stage easier, however you will still need to check your work for lumps and bumps. Last but not least – check that your name is still clearly on the bottom of your work. Step Five – Bisque Firing When the work is completely dry it can go into the bisque kiln. The bisque kiln is fired to 1000°C. This process burns off the water in the clay as well as some of the chemically bound water. The structure of the clay is not altered that much at this temperature. Inside the bisque kiln, the work is stacked a little, small bowl inside a larger bowl and onto a heavy plate. Smaller items like decorations or drink coasters might get stacked several high. Consideration is paid to the weight of the stack and shape of the work. A bisque kiln can fire about one and a half times the amount of work that the glaze kiln can fire. The firing takes about 10 hours to complete the cycle and about two days to cool down. Once it has been emptied the work is placed in the glaze room ready for you to decorate! Step Six – Glazing Decorating your work with colour can be a lot of fun – and time consuming! There are three main options for surface treatment at this stage: Oxide Washes Underglazes Glazes Washes and underglazes do not “glaze” the work – It will still need a layer of glaze to fully seal the clay (washes don’t need glaze on surfaces not designed for food or liquid as they can gloss up a little on their own). Underglazes are stable colourants that turn out pretty much how they look in the jar. They can be mixed with each other to form other colours and can be used like water colours to paint onto your work. Mostly they should have a clear glaze on top to seal them. Oxides are a different species – the pink oxide (cobalt) wash turns out bright blue for instance. They don’t always need a glaze on top, and some glazes can change the colour of the wash! The glazes need no other “glaze” on top! Be careful of unknown glaze interactions – you can put any combination of glaze in a bowl or on a plate, but only a single glaze on the outside of any vertical surface! Glazes are a chemical reaction under heat. We don’t know the exact chemicals in the Mayco glazes we use. I can guess by the way they interact with each other, however, on the whole, you need to test every idea you have, and not run the test on a vertical surface! Simply put, glaze is a layer of glass like substance that bonds with the clay underneath. Clay is made of silica, alumina and water. Glaze is made of mostly silica. Silica has a melting point of 1700°C and we fire to 1240°C. The silica requires a “flux” to help it melt at the lower temperature. Fluxes can be all sorts of chemicals – a common one is calcium – calcium has a melting point of 2500°C, however, together they both melt at a much lower temperature! Colourants are metal oxides like cobalt (blue), chrome (green through black), copper (green, blue, even red!), manganese (black, purple and pink) iron (red brown), etc. Different chemicals in the glaze can have dramatic effects. for example, barium carbonate (which we don’t use) turns manganese bright pink! Other elements can turn manganese dioxide brown, blue, purple and reddish brown. Manganese dioxide is a flux in and of itself as well. So, glazes that get their black and purple colours, often interact with other glazes and RUN! Our mirror black is a good example – it mixes really well with many glazes because it fluxes them – causes them to melt faster. It will also bring out many beautiful colours in the glazes because it’s black colouring most definitely comes from manganese dioxide! Glaze chemistry is a whole subject on it’s own! We use commercial Mayco glazes on purpose – for their huge range of colour possibilities, stability, cool interactions, artistic freedom with the ability to easily brush the glazes on and ease of use. We currently have almost 50 glazes on hand! A major project is to test the interactions of all glazes with each other. That is 2,500 test tiles!!!! I’m going to make the wall behind the wheels the feature wall of pretty colours! Step Seven – Glaze (Gloss or sometimes called “Glost”) Firing Most of the time this is the final stage of making your creation (but not always!) The glaze kiln goes to 1240°C. This is called cone 6, or midrange. It is the low end of stoneware temperatures. Stoneware clays and glazes are typically fired at cone 8 – 10, that is 1260 – 1290°C. The energy requirement to go from 1240°C to 1280°C is almost a 30% more! Our clay is formulated to vitrify (mature, turn “glass-like”) at 1240°, as are our glazes. A glaze kiln take around 12 hours to reach temperature and two to three days to cool down. Sometimes a third firing process is required – this is for decoration that is added to work after the glaze firing. For example – adding precious metals and lustres. this firing temperature is usually around 600 – 800°C depending upon the techniques being used. There are many students interested in gold and silver trims – we will be doing this third type of firing soon! After firing your work will be in the student finished work shelves. Remember to pay for it before you head out the door! There is a small extra charge for using porcelain clay (it’s more than twice the price of regular clay), and for any third firing process! Once your work has been fired it can not turn back into clay for millennia – so don’t fire it if you don’t like it! Put it in the bucket for recycling. https://firebirdstudios.com.au/the-process-of-making-pottery/Ceramics have evolved over thousands of years.Earthenware dessert plate, cream colour. Made by Alfred Meakin, England. Backstamped ‘Alfred Meakin England’. flagstaff hill, warrnambool, shipwrecked-coast, flagstaff-hill, flagstaff-hill-maritime-museum, maritime-museum, shipwreck-coast, flagstaff-hill-maritime-village, alfred meakin, ceramics, earthenware, kitchenware -
Federation University Historical Collection
Books, Ballarat Junior Technical School Attendance Rolls, 1922-1935, 1922-1935
The Ballarat Junior Technical School was established in 1913 and was a division of the Ballarat School of Mines. Fourteen Department of Education books covering attendance at the Ballarat Junior Technical School from 1922 to 1935. Some of the rolls also include classification and ages of pupils enrolled at the Ballarat Junior Technical School, as well as quarterly returns. Names of students are handwritten onto the roll, and each student's age at 01 January is given.ballarat junior technical school, enrollment, roll, ballarat junior technical school enrollment book, attendance, truancy, nicholas gervasoni, haymes, callister, brittain, capuano, ellis, wilson, vogel, wemyss, costello, longhurst, rands, calaby, burt, sara, tresize, andwin, ford, allen, davis, myers, nylander, powell, pattie, menhennet, crawley, bernaldo, vogelbadenhope, furlong, jeffs, waller, warnock, wilkie, hassell, page, lynch, strachan, tait, brown, hocking, swingler, brophy, cornish, orr, lepp, greenaway, brandenburg, kittelty, bird, middleton, blomeley, tonkin, saunders, white, nice, goode, coad, quick, dixon, vickers, clack, cannane, foo, liebhardt, searle, trethowen, henderson, bedggood, webster -
 Eltham District Historical Society Inc
Photograph, Peter Pidgeon, Grave of George and Mary Knapman. Eltham Cemetery, Victoria, 5 April 2021
George Knapman was born c.1851 in Ashburton, Devon, England, the son of George Knapman and Elizabeth Grant nee Wyatt. George, his mother and three sisters arrived in the Port of Melbourne, 28 Jul 1857 aboard the ship, Mindoro from Plymouth, his father having preceded them some eighteen months earlier. George married Mary Jane Williams in 1877 and they settled in Eltham where they had five children; Percival George (1878), Florence Maud (1880), Laura Blanche (1882), Alfred Edgar (1886) and Gladys Victoria (1897). In 1879 George was elected a vestryman for St Margaret’s Church, a position he would be re-elected to for many years. Both he and Mary were active members of the church and social activities. In 1884 George was also engaged in collecting funds for the renovation of the St Helena church George was also a member of the Eltham Cricket Club. In May 1884 following completion of the cricket season, several players banded together to form a group holding fortnightly meetings for the purpose of giving readings, recitations, etc to relieve the dullness of the long winter evenings. Charles Wingrove was elected President, Rev. J.B. Gason Treasurer and George along with Messrs Evans, Bourke, D. McColl, C. Jarrold, George Hill and William Brown, members of the Committee. In 1885, George advertised two horses had strayed from his premises (reward £2) and in 1891 he had a cultivator for sale (price £7/10/-). In 1902 he was treasurer of the Eltham Rifle Club. His children attended Eltham Primary School. In 1904 he was a member of the school's Board of Advice and addressed children at an Arbor Day planting activity. In 1907 he was elected president of the Eltham Progressive League, calling for public toilets to be erected at a local picnic spot. George along with William John Taylor and Isaac Hill was also appointed a Trustee of the Eltham Rechabite Hall in Henry Street on behalf of the Hope of Eltham Tent No. 195 Victoria District Independent Order of Rechabites from December 1901 until its sale to the community in December 1921 for use as a public hall. George ‘Snowy’ Knapman was a blacksmith by trade. He owned and operated a shoeing forge and wheelwright workshop, known as Snowy Knapman’s Forge, in Main Road Eltham, next door to the Eltham Court House. The location was well chosen. Mail coaches from Melbourne passed through Eltham enroute to Christmas Hills and Yarra Glen, with another heading to Kingstown (now Panton Hill). It was common practice for horses to be changed at Eltham. Two photos taken June 4, 1907, captioned ‘Election Day Eltham’, show a large crowd of men assembled in Main Road outside Knapman's premises. They are waiting to vote at the Court House. There are no women in the crowd; they were not empowered to vote. George's brothers William and John were also blacksmiths at Heidelberg, continuing the business established by their father George, who had died in 1900. After William died in 1909, George moved to Heidelberg to take over from him. George died at his residence, ‘Devon’, Yarra Street, Heidelberg on March 16, 1923, and is buried in Eltham Cemetery with his wife Mary who died July 16, 1935, at Kew. Their former house at Eltham was located near where the WW1 Monument was erected in 1919, after they had moved to Heidelberg, at the corner of Bridge Street and Main Road and occupied by Mr. R. Trevena at the time of Mary’s death. Mary was sister to E.J. Williams, W. Williams and Mrs Fawkner, all residents of Eltham. In Loving Memory of George Knapman Died 15th March 1923 Also his wife Mary Jane Died 16th July 1935 Sadly Missed Born Digitaleltham cemetery, gravestones, george knapman, mary jane knapman (nee williams) -
 Ballarat Tramway Museum
Album - Photo Album, Keith Kings, Jul. 1970
Album comprises heavy cardboard covers with brown Rexene covers, with inside papers of heavy dark grey photo album paper, 36 leaves of dark grey photo paper and two brass interscrews within black grommets. See Condition Details re damage to back cover. Album contains 32 photos - personal prints of Keith Kings. Title page has been hand written to Les Denmead, dated 6/7/1970, thanking Mr. Denmead for his assistance over the years. Photos divided into the three SEC Provincial Tramway cities, each with a typed name proceeding the set of photos. Two further photos of Geelong were at the rear of the album, but were not in position when catalogued. One of these photos may be Reg. Item 1874 - photo of Geelong scrubber tram. Each of the photographs have been separately registered, as shown in the table below. Scanned images made of front and back of the photos. Back has Keith Kings ID number, description, notes and date of photo. Conservation Notes prepared - within the cataloguing sheet - see related documents. Folio Reg. Notes Item No. 1 Handwritten note to Mr. L. J. Denmead from Keith Kings. 2 Title sheet – “BALLARAT” 3 1903 Small photo of SEC Monogram from Geelong No. 1 1904 Photo of SEC plaques etc at Wendouree office 4 1905 Photo of front of Wendouree Parade depot – 1957 - with trams 40 and 25 in photo. 5 1906 Photo of Ballarat 23 at depot 6 1907 Photo of Ballarat 29 in depot. 7 1908 Photo of Ballarat 17 in Wendouree Parade 8 1909 Photo of Ballarat 21 at depot. 9 1910 Photo of Ballarat 15 and 31 in Sturt St. 10 1911 Photo of Ballarat No. 40 Sturt St. 11 1912 Photo of Ballarat No. 38 – Wendouree Parade 12 1913 Photo of Scrubber car in depot. 13 Title sheet – “BENDIGO” 14 1914 Photo of Bendigo depot 15 1915 Photo of Bendigo No. 17, 1949. 16 1916 Photo of Bendigo 22 and 4 at Eaglehawk. 17 1917 Photo of Bendigo 12 at Golden Square. 18 1918 Photo of Bendigo 13 and 26 at Eaglehawk terminus. 19 1919 Photo of Bendigo 17 (bogie) at Quarry Hill terminus. 20 1920 Photo of Bendigo 18 at Charing Cross 21 1921 Photo of Bendigo Birneys 28 and 29 at Charing Cross 22 1922 Photo of original sprinkler and track cleaning car in Bendigo depot 23 1923 Photo of Bendigo 2nd track cleaning car 24. 1924 Photo of trams at Manchester Loop, 1958. 25. Title sheet – “GEELONG” 26 1925 Photo of Geelong 19 in front of the depot. 27 1926 Photo of Geelong depot 28 1927 Photo of Geelong No. 3 at East terminus 29 1928 Photo of Geelong No. 23 outside depot. 30 1929 Photo of Geelong No. 16 at Eastern Park terminus. 31 1930 Photo of Geelong No. 28 at depot 32 1931 Photo of Geelong Birney No. 14 at Eastern Park terminus. 33 1932 Photo of Geelong No. 32 at Moorabool St. 34 1933 Photo of Geelong No. 37 outside depot 35 1934 Photo of Geelong No. 39 at West terminus 36. No photo – marks of four corners remained. 37 – back cover No photo – marks of four corners remained. Photos not to be taken out of the album unless for photographic copying. Use image files. Photo Album - The Commercial Photo Album - No. 1 - 36 leaves. See hand written note from Keith Kings to Mr. L. J. Denmead. Dated 6/7/70.trams, tramways, ballarat, bendigo, geelong, photo album -
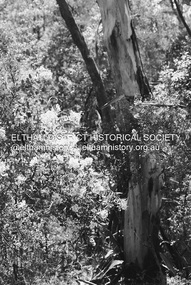 Eltham District Historical Society Inc
Photograph - Digital Photograph, Alan King, Sweet Bursaria, 2008
Published: Nillumbik Now and Then / Marguerite Marshall 2008; photographs Alan King with Marguerite Marshall.; p181 The rare Eltham Copper Butterfly, Paralucia pyro-discus, was saved from near extinction by a community campaign in the late 1980s. Thanks to that effort, the butterfly, a form of the Fiery Copper Butterfly, with a wing span of only 2.5cm, can be seen in parts of Eltham and Greensborough from late November to April. As late as 1987 the butterfly was thought to be near extinction. But that year, entomologist, Michael Braby, found several colonies, including two major ones in natural bushland on Diosma Road, Eltham. However these were threatened with destruction, as their habitat was to be destroyed by a development of 71 houses. The colonies were on a 14 hectare subdivision owned by Esanda Finance, an ANZ Bank subsidiary. It would cost around $5 million, to reimburse the bank for the land. The butterfly, which depends on woodland, a stunted form of the Sweet Bursaria bush, and the Notoncus ant, was considered too fragile to relocate. Braby’s discovery led to a sometimes fiery two-year campaign, which even became an election issue. It involved the local community, local and state governments and the developer, before a compromise was reached. The larvae have an intricate relationship with the small black ant, Notoncus. During the day, the larvae shelter in nests made by the ants around the base of the trunk and roots of the Sweet Bursaria (Bursaria spinosa). The ants are thought to protect the larvae from predators and parasites, as they attend them from the nests to feed on the Bursaria leaves at night. In return, the larvae excrete a sugar solution, which the ants love to eat. The butterfly was first recorded in Victoria in 1893, and first collected scientifically from Eltham in 1931. But it was only officially named in 1951, by Victoria’s then top butterfly expert, David Crosby.2 However, from 1970, rapid housing development in Eltham destroyed much of the butterfly’s habitat. The discovery of several major colonies in 1987 met with great excitement, and 250 people attended the first local public meeting. The State Government commissioned Crosby to investigate how to protect the butterfly, and the council froze development for three weeks. Then Esanda agreed to suspend development for several months, until a compromise was reached. Crosby recommended that 62 of the 71 lots be kept to ensure the butterflys’ survival. However this would cost $1 million to $1.5million in compensation to Esanda. Greensborough MP Pauline Toner, launched a $1million fundraising campaign and many artists donated their works to the appeal. Toner offered Clifton Pugh’s painting Eltham Copper Country to millionaire Alan Bond for $1 million, after having heard that he had offered $6 million for the Van Gough painting Sunflowers. However Bond did not accept. The butterfly was considered a ‘hot’ election issue during the by-election, following Pauline Toner’s resignation. Liberal party candidate, Margaret Brown, was accused of falsely saying she had been involved in the butterfly campaign so as to win votes. Sadly, the $1million appeal fell short at $426,000, so a compromise was reached. The State Government donated the Education Department site on Eucalyptus Road, but only nine lots of the Diosma site were bought, and the rest of the development went ahead. On March 3, 1989, Ms Toner died, and the Eucalyptus Road site was named in her honour. Around 2000 the butterfly was further threatened by proposed developments on Pitt Street, facing the Pauline Toner Reserve and between Diosma and Nyora Roads. Fortunately the Friends of the ECB, with the Shire of Nillumbik, ensured that more habitat was made available. The butterfly now survives in seven sites in Eltham and Greensborough, including the main sites at the Pauline Toner Reserve on Eucalyptus Road, the Western and Eastern colonies on Diosma Road, and the Yandell Reserve in Greensborough.The butterfly survives also in Castlemaine and in the Kiata and Salisbury areas. However, it remains endangered.This collection of almost 130 photos about places and people within the Shire of Nillumbik, an urban and rural municipality in Melbourne's north, contributes to an understanding of the history of the Shire. Published in 2008 immediately prior to the Black Saturday bushfires of February 7, 2009, it documents sites that were impacted, and in some cases destroyed by the fires. It includes photographs taken especially for the publication, creating a unique time capsule representing the Shire in the early 21st century. It remains the most recent comprehenesive publication devoted to the Shire's history connecting local residents to the past. nillumbik now and then (marshall-king) collection, eltham copper butterfly, sweet bursaria -
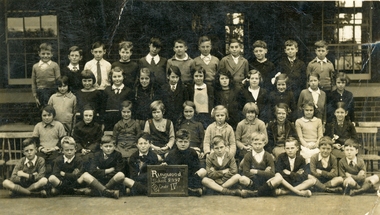 Ringwood and District Historical Society
School Photographs, 1933 and 1935 Ringwood State School photos, 1933-35
Two photographs of the students at the Ringwood State School in 1933 (grade 2) and 1935 (grade 4) 1935 Photograph (7002a) L to R Back Row - Norm Brown, Milton Blood, Ken Ward, Athol Tilson, Ken Hill, Doug Highland, Bob Green, Jack Reynolds, David Allen, Graeme Morcom. 3rd Row - , , Hazel Morgan, Betty Adolpherson, Lorna Hill, , Elvie Hansy, Betty Reed, Valma Bassett, ? Hancock, Betty Stoney. 2nd Row ? Kelly, , , , , Valerie Anderson, Bernice Dixon, Betty Broadbent, , . Front row - Eddie Jackson, , Nally Hazelwood, Ron Ansell, Tom Young, Rupert Shearer, Eddie Flynn, Frank Lloyd, Lloyd Home, John Silby 1933 Photograph (7002b) L to R Back Row - Eddie Jackson, , Bob Green, Ken Manning, David Allen, Ron Hansel. 4th Row - Ken Ward, Tom young, Wally Hazelwood, Ken Thomas, Jack Reynolds, , Eddie Flynn, Graeme Morcom, Frank Lloyd. 3rd Row - Betty Walters, , , Helen Bond, Hazel Morgan, , , Elvie Hansy. 2nd Row - Milton Blood, Betty Stoney, Valma Bissett, Bernice Dixon, Jean Wright, Valerie Anderson, , , Betty Adolpherson, Lorna Hill. Front Row - Ken Hill, Lloyd Home, , Norman Windsor, Alan Knopp, , , Athol Tilson. Note 2/1/2019: Jan Adolphson emailed "Just wanted to say that my Auntie Betty is in both these pictures, 1933 and 1935 but her name is incorrectly spelt. should be Betty Adolphson ". (Rear of photographs state name as Betty Adolpherson). Both photographs are in post card form, made by Kodak. One is addressed "David Allen, Canterbury Road, Ringwood", the donor of the photographs. -
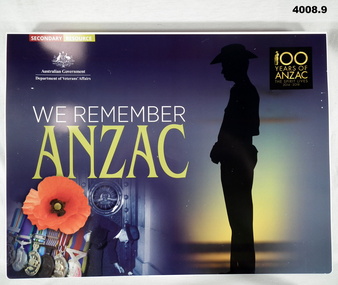 Bendigo Military Museum
Education kit, Department of Veterans Affairs, WE REMEMBER ANZAC, 2) 2014, .4) 2014, .5) 2014, .6) 2014
WE REMEMBER ANZAC - 100 years of ANZAC - THE SPIRIT LIVES 2014-2018 - SECONDARY RESOURCE .1) .2) 'WE REMEMBER ANZAC' .3) 'COMMEMORATIVE CEREMONY' .4) 'Memories & Memorabilia - Recognising and Preserving Australia's War Heritage' .5) 'Candour. Stories in the words of those who served 1914-1918.' .6) Over a Century of Service 2015 (Calendar) .7) 'ANZAC CENTENARY' .8) 'ANZAC PORTAL' .9) '2015 Anzac Day School's Awards'.1) Box folder - cardboard, white & gold print front, spine, back. Illustrated - collage colour photographs - medals, poppy, rising sun badge, soldier in silhouette. .2) Softcover, cardboard with fold in front flap, white & gold print, spiral bound, colour collage photographs - poppy, medals, troops. Pages - 86 pages, cut, plain, white, illustrated black & white, colour photographs, work sheets. .3) DVD inside cover flap. .4) Soft cover, cardboard, spiral bound, black, print front, illustrated sepia photograph soldier with letter and slouch hat. Pages - 88 pages, cut, plain, white, illustrated black & white, colour photographs, posters. .5) Soft cover, cardboard, white print front & back, illustrated - collage colour and sepia photographs of service personnel, letters, pens, brooch. Pages - 56 pages, cut, plain, white, illustrated colour, black & white photographs, medals, paintings. .6) Calender - soft cover, cardboard, light brown and black print front and back. Illustrated - sepia and colour - in silhouette - Troops of 1st Australian Division and members of 4 RAR. Pages - cut, plain, white, illustrated colour, black & white photographs from Boer War to Afghanistan. .7) .8) Card, cardboard with Webkey attached. Card - white & dark red print, small colour, sepia illustrations. .8) Key - metal with words printed - 'ANZAC PORTAL'. In plastic pocket. .9) Leaflet - lightweight cardboard black, white, yellow print front and back. Illustrated - black & white photograph of troop ship dockside. educational kit, anzac centenary -
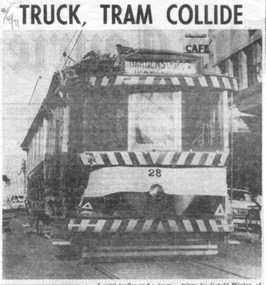 Ballarat Tramway Museum
Newspaper, Herald & Weekly Times Ltd, "Truck, tram collide", "Group charters tram", "Ballarat plans tram museum", 1971
Set of three newspaper clippings pasted onto a single sheet of paper with two Punch holes on the left hand side. First clipping from The Courier, Ballarat, 2/4/1971 with photo of tram 28 after is collision the previous day with a semi-trailer at the intersection of Princes and Victoria Streets. Gives names of the vehicle drivers and cost of the damage. Photo is of the tram returning to the depot under its own power. Tram passenger named as Margaret Foley, tram driven by James Mason and the truck driven by Gerald Winter of Gordon. See Reg Item 672.1 for a print of the Courier Photograph. Second is from The Courier, Ballarat, 15/4/1971 of the Brown Hill Progress Association chartering a tram to create interest in the project for the retention of Ballarat's trams. The tram was to leave Drummond and Sturt St. intersection the following Sunday at 1245. Item mentions the election of an interim executive and expression of interest of people outside the city. Third is from The Sun, Melbourne, 31/5/1971 about Ballarat 'tram-lovers' deciding to have a working tramway museum. Quotes Mr. Paul Nicholson, a member of the Ballarat Tramway Preservation Society. Notes that Museum will have eight trams using two miles of existing track around Lake Wendouree. Also notes that the SEC had received 88 applications for the 44 trams in both Ballarat and Bendigo.Image of the 3rd item added 28/3/2011 - see i1 and for the actual cutting i4. Original of newspaper of item 1 - also has items about the future of the railway workshops following a cost review and a story of page 1 of a submission to the Victorian Land Transport enquiry.In red ink on first cutting in top left hand corner "2/4/71" and in blue ink in top right hand corner on second cutting "15/4/71".trams, tramways, accidents, closure, charters, museum establishment -
Ballarat Tramway Museum
Newspaper, The Courier Ballarat, takeover of the Ballarat Electric supply by the SEC, Jul. 1927
Set of four newspaper clippings July 1927 from the Ballarat Courier regarding the possible takeover of the Ballarat Electric supply by the SEC. See also Reg. Item 1973 for other background to these clippings. 1974.1 - Courier 14/7/1927 - Reply by Sir John Monash of the SEC to Mr Pringle's (ESCo) speech - regarding price of power supplies, load factors, distance of supply, tariffs, tramway services. 346H x 57W 1974.2 - Courier 13/7/1927 - Large item in the Courier with statements by Sir John Monash and Mr. P. Pringle of ESCo each stating their case and various points regarding the cost of electricity to the various communities. 631H x 305W. 1974.3 - Single sheet of paper reprint from the Ballarat Courier - dated 14/7/1927 - titled "The Electric Supply Problem / Read this Leader from the 'Ballarat Courier' of 14th July 1927". Editorial address various issues of the problem - SEC takeover of the company, Council's power to franchise, dividends going overseas, loss of income to Council. Newspaper was seeking an independent report to Council. 303h x 206W 1974.4 - Courier 19/7/1927 - report of City of Ballaarat Council's 1927 consideration of the SEC's offer to takeover ESCo the previous night. Very detailed report of the discussions. Also a report on the City of Bendigo's decision to accept the SEC's position subject to the trams being kept, report on Electricity to farms and a long letter regarding the issue by W. B. Grose. 631H x 173W. Within the envelope containing this item, is the brown file that contained Reg. Items 1971 to 1977 by the Roneo London company.Dates of the newspaper clippings in pencil -plain or blueelectricity supply, sec, esco, city of ballarat, city of bendigo -
 Ballarat Tramway Museum
Manual, Bell Punch Co, "The Automaticket Bell Punch System of Fare Collection and Control", c1935
Yields information about the method that the State Electricity Commission of Vic undertook interviews for staff appointments. Gave advice of the era for such interviews and objectives of the interview.Thirty page book printed on heavy light brown paper, stapled with an folded card cover titled "The Automaticket Bell Punch System of Fare Collection and Control". Describes the Automaticket system, has samples of traffic tickets pasted in the book, diagrams, drawings, gives details of the components and method of operation in particular ticket inspection, ticket and checking back office functions. Published by the Bell Punch Company of London early to mid 1930's? Cover and each page headed "Confidential Information for Executives". Has a photo of South Western Roadlines double deck bus with a conductor. See also Reg. Item 3629 for another version of the pamphlet for this machine. In the rear cover of the book, folded and stapled to give a pocket, are listed three forms that would have been provided with the book - not with the collected copy. -However in the pocket were eleven 11 "Ticket Issue Machine" or "TIM" tickets - eg City of South Melbourne library fine, packing slips, sample meal tickets, Army canteen beer tickets, and sample bus tickets - including one pinned to a business card - John Bolland of Eastern Suburbs Omnibus Service who were the agents for the TIM machines. (image btm3645i3) Card has date of "4-1-50". Also three sample Bell punch tickets and one ultimate machine ticket - two 1d tickets. As well at the time of acquisition were a SEC Special Pass - to Reg Item 3648 and a SEC Staff Pass ticket - to Reg item 3649. Full scan of document added as a pdf file 5/6/2019. trams, tramways, tickets, ticket machines, buses, bell punch -
 Bendigo Historical Society Inc.
Document - PETER ELLIS COLLECTION: DEBUTANTE BALL, 12th July, 1985
White Cooloured card. Red writing. St. Clement's Anglican Debutante Ball Huntly Firday, July 12th 1985. Debutantes Partners Alison Popple Mark Edwards Kerran Franken Colin Boyd Allison Strauch Glen Backway Wendy Pollard Robert Borserio Lynne Holland Raymond Brown Amelia Chittick Brendan Allen Jacqueline Wilson Stephen Collins Donna Jacobs Jamie Creely Sally Rothenberger Jason Boston Ann Dyer David Sizeland Helen Yates Dean Yates Anne Borserio Trevor Monti Jenny Mills Glenn Peatling Susanne Rea Brett Adamson Anita Read Mathew Gee Sharon Thorburn Jason Byron Leanne Thorburn Andrew Dunne Fiona Mudford Andrew Shotton Presented to The Chancellor, Bendigo Diocese Mr.B. Phillips and Mrs. Phillips 9.15 p.m. Flower Girl Laura Strauch Page boy Simon Wells Flower girl Melissa Tuddenham Page boy Ben Chalkley Chaperone Mrs. Pam Luxford Trainers: Mr. Peter Ellis & Mrs. Mary Smith Pianist Mrs J.Grotto Announcer Mrs. M. Pitson MC Mr. Colin Silk 1 Foxtrot 2 St. Bernard Waltz 3 Maxina 4 Evening Three Step 5 Foxtrot 6 Pride of Erin 7 Progressive Barn Dance 8 Modern Waltz 9 Tangoette 10 Waltz Cotillion 11 Foxtrot 12 Valetta Waltz 13 Gay Gordons/ High Schottische 14 Foxtrot 15 Alberts 16 Parma Waltz 17 Charmaine 18 Swing Waltz 19 Foxtrot 20 Auld Lang Syne Presentation Dance: Fitzroy Quadrille. Autographs.person, individual, peter ellis oam -
 Bendigo Military Museum
Photograph - AUTOMAP 1 Production – Army Survey Regiment, Fortuna, Bendigo, c1978-1980
This collection of 17 photos was most likely taken in c1978-1980. The AUTOMAP 1 computer assisted cartography and mapping system was introduced in 1975. The components of AUTOMAP 1 were the Input Sub-System of four Wild B8s stereoplotters and three Gradicon digitising tables, the Optical Line Following Sub-System – Gerber OLF, the Verification Sub-System – Gerber 1442 drum plotter, the General Purpose Sub-system – HP21MX computer and the Output Sub-System – Gerber 1232 flatbed plotter). The first map was published in 1978 (Strickland 3665-3, 1:50,000). AUTOMAP 1 was the first computer assisted cartography and mapping system utilised by the Survey Corps and was the first system used by Australian mapping organisations. The history of the AUTOMAP 1 system is covered in more detail with additional historic photographs, in pages 116-118 of Valerie Lovejoy’s book 'Mapmakers of Fortuna – A history of the Army Survey Regiment’ ISBN: 0-646-42120-4. See items 6122.20P, 6410.24P, 6183.19P, 6184.20P, and 6200.5P for additional photographs of the AUTOMAP 1 system.This is a set of 17 photographs of Air Survey Squadron military and civilian personnel operating AUTOMAP 1 equipment at the Army Survey Regiment at Fortuna, Bendigo, c1978-1980. The photographs were on 35mm colour slides and were scanned at 96 dpi. They are part of the Army Survey Regiment’s Collection. .1) - Photo, colour, c1978-1980, Gerber 1442 verification drum plotter. .2) - Photo, colour, c1978-1980, Gerber 1442 verification drum plotter, SPR Garry Ames. In background - Hewlett Packard (HP) 2100A Minicomputer Input Subsystem controlling Wild B8 Aviograph stereo plotters. .3) - Photo, colour, c1978-1980, Gerber 1442 verification drum plotter. .4) - Photo, colour, c1978-1980, digitising topographic features with a Wild B8 Aviograph stereo plotter, CPL Adrian Rynberk. .5) to .6) - Photo, colour, c1978-1980, Wild PEB8 stereo profiler. .7) - Photo, colour, c1980, HP 9640A Programming System. .8) - Photo, colour, c1980, HP 9640A Programming System, L to R: unidentified, SGT Alan Toogood. .9) - Photo, colour, c1978-1980, Gerber Optical Line Follow (OLF), CAPT Rob Bridge. .10) - Photo, colour, c1978-1980, Gerber OLF. .11.) to .12) - Photo, colour, c1978-1980, Gerber OLF, SPR Gerry Gunn. .13) - Photo, colour, c1978-1980, Gerber OLF. .14) - Photo, colour, c1979, Gradicon edit table. .15) to .16) - Photo, colour, c1981, Gradicon edit table, SPR Chris Gordon. .17) - Photo, colour, c1981, Gradicon edit table, L to R: SPR Chris Brown, unidentified..1P to .17P - Some of the equipment is annotated on the frame of the 35mm slides.royal australian survey corps, rasvy, army survey regiment, army svy regt, fortuna, asr, automap 1 -
 Bendigo Military Museum
Book - AS YOU WERE SERIES, 1946 -1950, The Australian Military Forces by Australian War Memorial Canberra, A.C.T, "R.A.N., A.M.F. and R.A.A.F.", 1946-1950
For this series - refer to Cat No's, 9546.7, 9547.4, 9548.4, 9549.5. Items in the collection of "William John Sullivan" VX 57829. Refer Cat No. 9523P for his service details.1. - 5. Hard cover book with dust cover. Hardcover - cardboard with green buckram. Dark blue print on front and spine. All pages - cut, plain off white colour paper. Illustrated in black and white, and colour photographs, paintings, maps, sketches and diagrams. 172-202 pages. Dust cover - paper. All end papers illustrated. 1. "AS YOU WERE!/ A CAVALCADE OF EVENTS/ WITH THE AUSTRALIAN/ SERVICES FROM 1788/ TO 1946" 1946 Hard cover illustration - silhouette of three servicemen. Dust cover - white colour print front and spine. Illustrated - five rows of service personnel in various uniforms. 2. "AS YOU WERE/ with the / AUSTRALIAN SERVICES/ FROM 1788 TO/ 1947", 1947. Hardcove4r illustration - silhouette portrait of three servicemen. Dust cover - front gold colour print on front, beige colour print on spine. Illustrated - six service personnel in various uniforms in colour. Back - painting and information "AUSTRALIAN WAR MEMORIAL, ANZAC DAY 1947". 3. "AS YOU WERE/ WITH THE AUSTRALIAN/ SERVICES FROM 1788 TO/ 1948", 1948. Dust cover, white, black and yellow print on front and spine. Illustrated - colour - various service personnel in montage collection. 4. "AS YOU WERE/ 1949", 1949. Hardcover - print on spine only. Dust cover - yellow and blue print on front and spine. Illustrated - stylised colour sketch of three service personnel. 5. "AS YOU WERE/ 1950", 1950. Hardcover - small silhouette illustration of two servicemen, Navy and Army with two aircraft above. Dust cover - black and green print on front and spine. Background horizontal lines, green, white and brown. Illustrated - sepia tones drawing of a group of service personnel. book series, as you were, military history, biographies, william john sullivan -
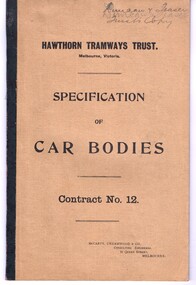 Melbourne Tram Museum
Document - Specification, McCarty Underwood & Co, "Hawthorn Tramways Trust Specification of Car Bodies Contract No. 12A", 1916
1580.1 - Bound specification - 20 sheets - stapled within brown paper covers and sealed with black tape on the left hand side. Titled "Hawthorn Tramways Trust Specification of Car Bodies Contract No. 12A". Gives the General conditions of the contract, specifications and forms for tendering. Prepared by McCarty Underwood & Co. Consulting Engineers 31 Queen St Melbourne. Document originally printed for the first contract for tramcar bodies. This document has been changed as a result of negotiations by Duncan and Fraser and the HTT, which have been initially by both parties. Contains completed tender forms, prices and some minor initialled alterations to the tender. The document is the HTT or Trusts copy of the tender and it has been signed by Duncan and Fraser and the HTT and on the rear sheet has the seal of the Trust. Gives prices and dates for delivery of 8 bogie and 7 combination (4 wheel) tramcar bodies. .2 - letter - typed on quarto paper - two sheets - from Duncan & Fraser dated 10/7/1916 advising of changes in materials and equipment that was being offered, partly due to availability due to World War 1. Has been endorsed on the left hand margin as item referred to in the tender document. .3 - copy letter - typed on quarto paper - two sheets, dated 26/7/1916 to Robert Duncan of Duncan & Fraser c/- of the Grand Hotel in Spring St., advising of the acceptance of the tender, the price, modifications to bogie trams and combination trams. .4 - letter - typed on quarto paper - from Duncan & Fraser - dated 5/8/1916, concerning the payment of the contract deposit.On the top cover in ink or pencil "Duncan & Fraser / Trusts Copy"trams, tramways, htt, hawthorn, duncan fraser, tramcars, bogie trams -
 Bendigo Historical Society Inc.
Clothing - ANDREW - MONSANT COLLECTION: LADIES DRESS - BODICE AND SKIRT, 1909
BHS CollectionWaist length dark green cotton bodice. Fabric has alternating stripes of pulled thread pattern and wider stripes of small dot pattern. Front opening with deep V to waist with lined lace insert extending from throat to waist. LHS of bodice fastened to lace insert with five press studs. Stand up collar of lined black lace (%cm) fastened with two hook and eyes. The bodice is made from five pieces. The two front sections have three knife pleats facing out and falling from the shoulder. The pleats are stitched down for twenty cms from the shoulders. On either side of the front opening is decorative embroidered black lace that extends across the shoulders to the back of the collar. There are two side panels from under the arm. The back section has three box pleats falling from the collars and tapering to the waist. The hem of the bodice is fastened with black cotton tape. Leg of mutton sleeves are trimmed with black embroidered brais at elbow and wrist. Lower sleeves have pintucks from elbow to wrist. The sleeves are lined with black cotton fabric. The back of the bodice is lined with black cotton fabric almost to the hem. A three cm piece of white and blue cotton tape is attached across the lower back with cotton ties at either end. The underarm panels are lined with brown cotton fabric and green satin inserted sections. The front has a separate lining with front opening and shaped with darts. Fastened with six buttons and buttonholes. Two shoulder pads on each side- one white piece under the shoulder and a green satin piece under the gathered section of each sleeve. Dark green full length skirt. Cotton fabric with alternating stripes of pulled thread pattern and wider stripe of small dot pattern. Skirt is made of three sections. Centre front panel widens slightly to hemline. Side panels continue around to join at centre back. Darts at both hips to shape sides. Panels widen to hemline. Inverted pleats at either side of back opening create fullness. Back opening(30cm) has insert of black satin joined to LHS of opening to enlarge the opening. Insert attached to waist band with two press studs. Two other press studs attach skirt to RHS of insert. Brown cotton waistband hand stitched to skirt. Ties attached to waistband at back opening- one cotton tape, one satin ribbon. Front centre panel has a piece of black satin stitched as lining from eighteen cm below waist (57cm deep). Stitched across and attached to side seams. Lower edge trimmed with black lace. Second piece of satin lining stitched to centre seam and stitched around the hip to partway across back.(Looks like a nylon petticoat cut in two pieces and stitched inside skirt as a lining). Hemline has fifteen cm piece of cotton lining attached and lower edge of hem has fringed cotton binding attached.. Side seams of front panel have decorative trim of embroidered braid extending seventy-six cms from waist. Braid then turned ninety degrees and continued in a horizontal zig zag line around to centre back seam (both sides) twenty cms above hem. Hand and machine stitched.costume, female, ladies dress- bodice. -
 Eltham District Historical Society Inc
Photograph, Opening of the Railway Line; The arrival of the Governor-General, 6 June, 1902, 1902
Published: The opening of the railway line by His Excellency The Governor General, The Weekly Times, June 14, 1902, p10. Governor General was John Hope, Earl of Hopetoun THE HEIDELBERG TO ELTHAM RAILWAY. OPENING CEREMONY. The opening of the railway line from Heidelberg to Eltham took place on the 6th inst. The special train, containing a large number of members of Parliament, including Mr Trenwith, the Minister for Railways, left Prince's Bridge at half-past eleven, and arrived at Eltham at twenty minutes past twelve. The party was accompanied by Mr Fitzpatrick, Acting Commissioner for Railways; Mr Lockhead, the Traffic Manager; and Mr Norman, Engineer for Existing Lines. On arrival, the visitors were entertained at a banquet in the marquee, of which a photograph is given, erected close to the railway station. Mr E. H. Cameron, M.L.A., the member for the district, occupied the chair, and, seated on his right, was Mr Mason, the Speaker of the Legislative Assembly, and on his left the Minister of Rail-ways. After the banquet His Excellency the Governor-General arrived, and was received and welcomed by Mr Cameron, the local State school children singing the National Anthem. The Governor-General, in declaring the line open, said that he felt highly honored at being asked to perform the opening ceremony, and he trusted that the railway would be a source of great convenience to the inhabitants of the district. He was sorry to say that this would be the last opportunity he would have of seeing them. It cost him a great deal to leave them. (Hear, hear.) He had a great many friends amongst all sections of the community, and he could hardly bear to trust himself to speak about leaving them. (Hear, hear.) He was sorry Lady Hopetoun was on the high seas, and unable to accompany him that day. Mr Cameron thanked his Excellency for performing the opening ceremony, and hoped the trip home would have the effect of restoring His Excellency to good health again. In replying. Lord Hopetoun thanked them sincerely for the cordial vote of thanks. He hoped Providence would shower her blessings over them, and that they would have a series of good seasons. He would always keep a warm corner in his heart for the people of Victoria. (Loud cheers.) THE COUNTRY. In our illustrations, views are given of a couple of sections of the new line, and glimpses of the surrounding country are shown. The line is eight miles in length, and cost £51,000 in construction. Eltham, which is the terminus, possesses many of the features that go to make a favorite holiday resort. It is a quiet picturesque little hamlet, snugly ensconced on the slope of one of many sombre-tinted hills by which it is sur-rounded. Even when viewed under ad-verse conditions one could not fail to be-impressed with the natural, rugged beauty of the place. It is situated about sixteen miles from Melbourne, and the line takes a circuitous course through a continuation of pretty undulating country. At intervals on the slopes of the surrounding green-mantled hills, patches of brown, freshly tilled soil indicate that for all its serene reposeful-ness Eltham possesses its phases of industrial life as well. Looking down into this valley from the main road which skirts the slope of a hill, distant something less than a quarter of a mile from the railway station is one of the prettiest pieces of scenery in the district. Verdure-clad hills ascend on all sides, whilst beneath stretches a broad expanse of carpet-like green sward, dotted here and there with picturesque homesteads, each with its patches of tilled soil. In the township itself the dwelling-houses are comparatively few, the larger portion of the inhabitants residing in the scattered homesteads. Eltham is as yet only in its youth, but energetic and un-tiring public men can effect wonders in a community's prosperity, and Eltham, whatever other real or imaginary advantages it may lay claim to, certainly possesses this one. The railway is the result of their endeavor. 1902 'THE HEIDELBERG TO ELTHAM RAILWAY.', Weekly Times (Melbourne, Vic. : 1869 - 1954), 14 June, p. 14. , viewed 26 Sep 2018, http://nla.gov.au/nla.news-article221230719This photo forms part of a collection of photographs gathered by the Shire of Eltham for their centenary project book,"Pioneers and Painters: 100 years of the Shire of Eltham" by Alan Marshall (1971). The collection of over 500 images is held in partnership between Eltham District Historical Society and Yarra Plenty Regional Library (Eltham Library) and is now formally known as the 'The Shire of Eltham Pioneers Photograph Collection.' It is significant in being the first community sourced collection representing the places and people of the Shire's first one hundred years.Digital image Negative black and white film 120 6x9 format 2 stripsAgfa APX 100sepp, shire of eltham pioneers photograph collection, eltham, heidelberg-eltham railway extension, earl of hopetoun, john hope, opening day, railway line construction -
 Eltham District Historical Society Inc
Photograph - Digital Photograph, Alan King, Pauline Toner Butterfly Reserve, 2008
One of seven sites in Eltham and Greensborough where the butterfly survives. Published: Nillumbik Now and Then / Marguerite Marshall 2008; photographs Alan King with Marguerite Marshall.; p181 The rare Eltham Copper Butterfly, Paralucia pyro-discus, was saved from near extinction by a community campaign in the late 1980s. Thanks to that effort, the butterfly, a form of the Fiery Copper Butterfly, with a wing span of only 2.5cm, can be seen in parts of Eltham and Greensborough from late November to April. As late as 1987 the butterfly was thought to be near extinction. But that year, entomologist, Michael Braby, found several colonies, including two major ones in natural bushland on Diosma Road, Eltham. However these were threatened with destruction, as their habitat was to be destroyed by a development of 71 houses. The colonies were on a 14 hectare subdivision owned by Esanda Finance, an ANZ Bank subsidiary. It would cost around $5 million, to reimburse the bank for the land. The butterfly, which depends on woodland, a stunted form of the Sweet Bursaria bush, and the Notoncus ant, was considered too fragile to relocate. Braby’s discovery led to a sometimes fiery two-year campaign, which even became an election issue. It involved the local community, local and state governments and the developer, before a compromise was reached. The larvae have an intricate relationship with the small black ant, Notoncus. During the day, the larvae shelter in nests made by the ants around the base of the trunk and roots of the Sweet Bursaria (Bursaria spinosa). The ants are thought to protect the larvae from predators and parasites, as they attend them from the nests to feed on the Bursaria leaves at night. In return, the larvae excrete a sugar solution, which the ants love to eat. The butterfly was first recorded in Victoria in 1893, and first collected scientifically from Eltham in 1931. But it was only officially named in 1951, by Victoria’s then top butterfly expert, David Crosby.2 However, from 1970, rapid housing development in Eltham destroyed much of the butterfly’s habitat. The discovery of several major colonies in 1987 met with great excitement, and 250 people attended the first local public meeting. The State Government commissioned Crosby to investigate how to protect the butterfly, and the council froze development for three weeks. Then Esanda agreed to suspend development for several months, until a compromise was reached. Crosby recommended that 62 of the 71 lots be kept to ensure the butterflys’ survival. However this would cost $1 million to $1.5million in compensation to Esanda. Greensborough MP Pauline Toner, launched a $1million fundraising campaign and many artists donated their works to the appeal. Toner offered Clifton Pugh’s painting Eltham Copper Country to millionaire Alan Bond for $1 million, after having heard that he had offered $6 million for the Van Gough painting Sunflowers. However Bond did not accept. The butterfly was considered a ‘hot’ election issue during the by-election, following Pauline Toner’s resignation. Liberal party candidate, Margaret Brown, was accused of falsely saying she had been involved in the butterfly campaign so as to win votes. Sadly, the $1million appeal fell short at $426,000, so a compromise was reached. The State Government donated the Education Department site on Eucalyptus Road, but only nine lots of the Diosma site were bought, and the rest of the development went ahead. On March 3, 1989, Ms Toner died. Thee Eucalyptus Road site was named in her honour. Around 2000 the butterfly was further threatened by proposed developments on Pitt Street, facing the Pauline Toner Reserve and between Diosma and Nyora Roads. Fortunately the Friends of the ECB, with the Shire of Nillumbik, ensured that more habitat was made available. The butterfly now survives in seven sites in Eltham and Greensborough, including the main sites at the Pauline Toner Reserve on Eucalyptus Road, the Western and Eastern colonies on Diosma Road, and the Yandell Reserve in Greensborough.5 The butterfly survives also in Castlemaine and in the Kiata and Salisbury areas. However, it remains endangered.This collection of almost 130 photos about places and people within the Shire of Nillumbik, an urban and rural municipality in Melbourne's north, contributes to an understanding of the history of the Shire. Published in 2008 immediately prior to the Black Saturday bushfires of February 7, 2009, it documents sites that were impacted, and in some cases destroyed by the fires. It includes photographs taken especially for the publication, creating a unique time capsule representing the Shire in the early 21st century. It remains the most recent comprehenesive publication devoted to the Shire's history connecting local residents to the past. nillumbik now and then (marshall-king) collection, eltham copper butterfly, pauline toner butterfly reserve -
 Melbourne Tram Museum
Ephemera - Jungle Scrapbook, "MMTB #2", 1987 to 2003
Collection of newspaper clippings pasted into the scrapbook by the donor. Covers the period 1987 to 2003 when the Melbourne tram system underwent large changes. Contains the following cuttings: 1 - Our trams keep rolling along - Herald Sun 9/8/1991 2 - Old trams will stay on track - The Sun - 8/8/1991 - featuring Joan Kirner at the front of tram 3 - Getting our bid on track - Olympic bid tram - Z4, - The Sun 9/3/1990 4 - Tram tours lead tourist bid - using a Y class - The Sun, 8/6/1992 5 - Spring St - city circle trackwork - The Sun 17/9/1993 6 - Track tokens mark tram trial - Bendigo battery tram - Bendigo Advertiser 11/4/1990 7 - $184 million commitment to build new vehicles - B2 class, 130 trams, Comeng 8 - The light rail project - Gail Moody - The Sun 1/7/1987 9 - Bet and shop on trams - Trust - Herald Sun 17/8/1993 10 - A clean sweep by star Paul - Paul Hudson and X 217 - Herald Sun 20/11/1991 11 - Tramway lines up 75th Anniversary - Progress Press 20-11-1991 12 - Public Notice - Spring and Bourke track works - The Met - Herald Sun 17/9/1993 13 - in the Heart of Hawthorn - Progress Press March 1993 14 - Peak hour boost pledge - Alan Brown - Herald Sun 9/7/1993 15 - Photo of Gas and Fuel buildings under construction - 1966, Herald sun 31/12/1993 16 - Drive brings comic relief - Victor Borge - Herald Sun 19/2/1994 17 - City circle tram loop - two cuttings - 28/4/1994 18 - Trust slams new-look trams - Herald Sun 8/2/1994 19 - Public notice - track works - Nicholson and Victoria - Herald Sun 18/2/1994 20 - Free trams draw fire - Herald Sun 12/4/1994 21 - Tram launce chaos - 29/4/1994 22 - Life and love as the tram trundles on - Ted Hopkins - Weekend - 15/4/1995 23 - Tram city Dan McDonnell - Weekend - 15/4/1995 24 - Favorites out for tram day - three associated cuttings tram parade - Herald Sun 19/4/1995 25 - The A to Z of Melbourne's trams - Herald Sun 19/4/1995 26 - Trams out for a night on the town - Box Hill testing - Whitehorse leader 23/4/2003 27 - Trams rolling - Box Hill opening - Whitehorse leader 7/5/2003 28 - Bracks launches tram route and residents riled about bottleneck - Whitehorse leader 7/5/2003 29 - A century of trams in Bendigo (Kym Smith) - Bendigo Advertiser 14/4/2003 30 - MP calls for fair go for old tramways (Medicals) - Bendigo Advertiser - 12/4/2003 31 - House of the rising tram - Mentone tramcar bodies 32 - Back on track - Sydney trams - Daily Telegraph 11/8/1997 33 - New look trams just the ticket - Sydney - Daily Telegraph 11/8/1997 34 - Dark ages end for light rail - Daily Telegraph 1997 35 - A trip down memory lane - Sydney - The Age 21/8/1997 36 - End of the Line - sale of Elwood bus depot - New Home 6/12/1996 37 - Bidders line up for tram and train - The Age 17/5/1999 38 - Holding the line - The Herald Sun 8/3/1998 39 - Advert - Who will be Melbourne's tram museum operator - Weekend Australian 16-9-1995 40 - Trams take to sport - new Melbourne park route - Herald Sun 4/6/1999Yields information about the Melbourne tram network in the 1990sScrap book - Tudor - 32 plain sheets + printed card covers, centre stapled.tramways, melbourne, bendigo, newspapers, tram 4, olympics, joan kirner, tourist tram, city circle, w class, tram, box hill, elwood bus depot, tmsv, museums, tram museums, batman ave, victor borge