Showing 2117 items matching " bendigo south"
-
 Ballarat Tramway Museum
Document - Letter/s, Melbourne and Metropolitan Tramways Board (MMTB), 16/03/1934 12:00:00 AM
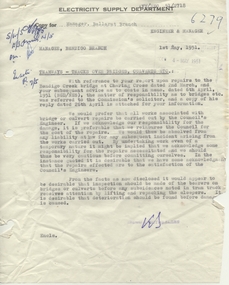
Yields information about the setting the height of overhead in Melbourne.Memo from T. Strickland, Chief Engineer, MMTB to GM, ESCo, Bendigo, dated 16/3/1934 regarding the height of overhead in Melbourne. Received 21/3/1934 and acknowledged 20/3/1934. Sheet has a watermark.trams, tramways, overhead, trolley wire, esco -
 Ballarat Tramway Museum
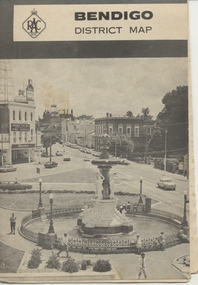
Map, Royal Automobile Club of Victoria, "Bendigo District Map - RACV", c1971
Printed street map titled "Bendigo District Map", published by the RACV, showing the central part of Bendigo, Bendigo Outlets, streets, principal attractions, Bendigo and district maps and information, and a list of sporting and entertainment facilities. Has the tram lines shown dotted, only shows the full extent of the Golden Square line. The main map has the number "0171" in the bottom left hand corner, indicating the publication date.in ink on the Bendigo Outlet map, "3/4" along bottom edge.trams, tramways, map, bendigo, racv, railways -
 Ballarat Tramway Museum
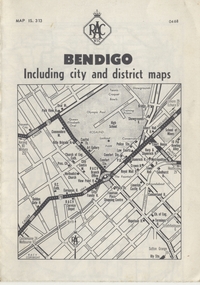
Map, Royal Automobile Club of Victoria, "Bendigo Including city and district maps - RACV", c1968
Printed street map titled "Bendigo Including city and district maps", published by the RACV, showing the central part of Bendigo on the front cover, Bendigo Outlets and notes on the city itself. Has the tram lines shown dotted, only shows the full extent of the Golden Square line. Inside has a district road map. The front cover has the number "0468" in the bottom left hand corner, indicating the publication date.in ink on the Bendigo Outlet map, has various notes showing the location of crossing loops on and off the map and the location of the tram depot itself.trams, tramways, map, bendigo, racv, railways -
 Ballarat Tramway Museum
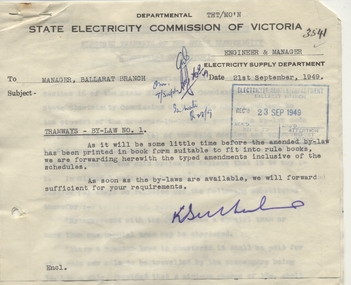
Document - Letter/s, State Electricity Commission of Victoria (SECV), "Tramways By-Law No. 1 ", Sep. 1949
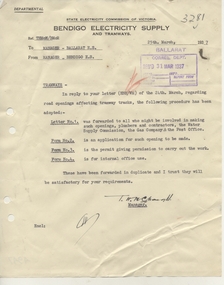
Yields information about the distribution of the SEC tramway by-laws to workers and alterations to them in 1949 in a temporary format.Correspondence concerning the alterations to By-Law No. 1, in Sept. 1949. .1 - covering letter forwarding the typed amendments to the Manager Ballarat, dated 21/9/1949. Has a date stamp of 23/9/1949.. type on Quarto paper with SEC letter head. .2 - 6 pages - foolscap - carbon copy of the alterations to the By Law, re special trams, fares in Ballarat, Bendigo and Geelong and transfer checks. Dated under seal of the SEC 18/8/1949. trams, tramways, by laws, sec -
 Ballarat Tramway Museum
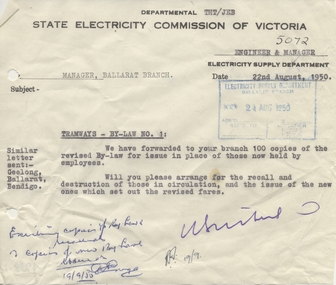
Document - Letter/s, State Electricity Commission of Victoria (SECV), "Tramways By-Law No. 1", Aug; 1950
Yields information about the distribution of the SEC tramway by-laws to workers in 1950.Carbon copy of memo on white demi foolscap paper dated 22/8/1950 to the Manager Ballarat, regarding forwarding 100 copies of the new By Laws. Has ink notes dated 19/9/1950. Note in Margin about similar letter to Ballarat, Bendigo and Geelong. Has date stamp of 24/8/1950.trams, tramways, by laws, sec -
 Ballarat Tramway Museum
document - Correspondence, State Electricity Commission of Victoria (SECV), "Tramways", Mar. 1937
Yields information about the correspondence between the SEC Ballarat and Bendigo offices about the opening of tram tracks for underground services.Carbon copy of a typed letter on quarto green paper, written by the Manager, Mr H. Hornabrook, to the Manager Bendigo ES, copy to Ballarat Manager Electricity Supply seeking information about Bendigo's procedures when excavation for services are made under tram track. Has an SEC date stamp of 15 April 1937.Various initials and notes in red pencil or ink.tram, trams, letters, sec, bendigo, tram track -
 Ballarat Tramway Museum
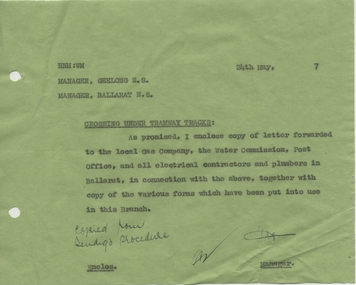
Document - Letter/s, State Electricity Commission of Victoria (SECV), "Crossing Under Tramway Tracks", 1937
Yields information about the correspondence that was sent to various parties about the opening of tram tracks for underground services in Bendigo.Set of four documents: .1 - Letter on SECV letterhead, "Bendigo Electricity Supply and Tramways", not dated, gives phone number, address, duplicated in black ink, titled "Crossing Under Tramway Tracks", consisting of one foolscap sheet. Would have been written as a base letter to go various bodies, has the word "Manager" on the very bottom of the page. Outlines the processes that have to be undertaken in order to install pipelines under tram tracks. Allows for Emergency installations, gives depths and installation requirements. .2 quarto sheet, as a blank form - application form to install the service. .3 - cut sheet - blank form - Permit for Crossings under Tramway Tracks .4 - cut sheet - blank form - "Pipe crossings under tramway tracks" See Reg Item 4945 for Ballarat, possibly used as a model for the Ballarat document, given Reg Item 4943 correspondence and see Reg Item 4947 for cover letter for these documents.in ink "1" and "2" "3" and "4" on sheets in ink and on sheet 4 - change noted re "Technical Assistant"trams, tramways, letters, sec, tram track -
 Ballarat Tramway Museum
Document - Letter/s, State Electricity Commission of Victoria (SECV), "Tramways", 1937
Yields information about the correspondence that was sent to Ballarat from Bendigo about underground services under tram tracks.Departmental letter from the Manager Bendigo to Ballarat, dated 25/3/1937, typed on quarto paper forward four documents as requested regarding opening for services under tramway tracks. Signed by the manager. Has various stamps and initials. See Reg Item 4945 for Ballarat, 4946 for Bendigo documents possibly used as a model for the Ballarat document, given Reg Item 4943 correspondence.Has various stamps and initials.trams, tramways, letters, sec, tram track -
 Ballarat Tramway Museum
Document - Letter/s, State Electricity Commission of Victoria (SECV), "Crossing Under Tramway Tracks", May. 1937
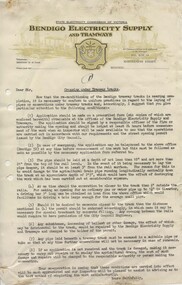
Yields information about the correspondence that was sent from Ballarat from Geelong about underground services under tram tracks.Carbon copy of a letter on demi foolscap green paper (1 sheet) dated 24/5/1937 from the Ballarat SEC Manager to the Managers ES of Geelong and a copy to the Ballarat ES, forwarding correspondence regarding installation of services under tram tracks. Titled "Crossing Under Tramway Tracks", notes who received the documents locally.Has various initials and a note in ink "copied now Bendigo procedure"trams, tramways, letters, sec, tram track, geelong -
 Ballarat Tramway Museum
Document - Letter/s, State Electricity Commission of Victoria (SECV), "Crossing Under Tramway Tracks", 1937
Yields information about the correspondence that was sent to Ballarat from Bendigo about underground services under tram tracks, the changes and the list of the people it was sent to.Set of five documents: Documents 2 and 5 same as Reg Item 4946, but marked up to show changes to the Bendigo docs for the Ballarat situation - in pencil. Cover sheet pinned to the four sheets is a handwritten ink foolscap ruled sheet showing all the addressees that the letter was to be sent to. Other sheets are: Letter on SECV letterhead, "Bendigo Electricity Supply and Tramways", not dated, gives phone number, address, duplicated in black ink, titled "Crossing Under Tramway Tracks", consisting of one foolscap sheet. quarto sheet, as a blank form - application form to install the service. cut sheet - blank form - Permit for Crossings under Tramway Tracks cut sheet - blank form - "Pipe crossings under tramway tracks" See Reg Item 4945 for Ballarat, possibly used as a model for the Ballarat document, given Reg Item 4943 correspondence and see Reg Item 4947 for cover letter for these documents and Reg Item 4946 for the original Bendigo docs.in ink "1" and "2" "3" and "4" on sheets in ink and on sheet 4 - change noted re "Technical Assistant" changed to "Tramway Inspector"trams, tramways, letters, sec, tram track, bendigo -
 Ballarat Tramway Museum
Document - Letter/s, State Electricity Commission of Victoria (SECV), "Tramways - Tracks over bridges, culverts etc.", Aug. 1957
Yields information about the correspondence that was involving damage to the Charing cross bridge in Bendigo and responsibilities for repair.Memo with attached letter dated 1/5/191, titled "Tramways - Tracks over bridges, culverts etc." regarding repairs to the Bendigo Creek Bridge at Charing Cross and responsibility of costs for repairs - SEC or City of Bendigo. Letter from Dooley and Breen Solicitors, dated 26/4/1951 regarding responsibilities, refer to original agreements. Was pinned the top left hand corner.Has initials in ink.trams, tramways, letters, sec, tram track, pmg -
 Ballarat Tramway Museum
Photograph - Digital image Set of 20, Dec. 1970
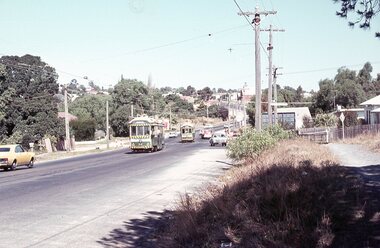
Set of 20 digital images of Bendigo Tramways December 1970 by Stuart Lodington. .1 - Bendigo track gang renewing a joint, McCrae St, with welding truck alongside and Birney No. 29. .2 - No. 5 at Quarry Hill terminus? .3 - No. 24 at the depot .4 - No. 2 on the Quarry Hill line .5 - No. 5 approaching the Eaglehawk terminus .6 - No. 29? at the Golden Square Terminus with Bill Rodda's Golden Square hotel in the background. .7 - No. 3 inbound on the Quarry Hill line. .8 - trams crossing on the Eaglehawk line, through the window of one tram. .9 - side on view of a B23D controller in a bogie tram .10 - No. 5 at the Eaglehawk terminus .11 - No. 21 at No. 21 crossing on the Golden Square line. No. 29 showing special, No.21 - North Bendigo, Fire Station Loop? .12 - No. 29 and another tram - near work site? .13 - interior view from Birney looking at the front of another tram parked behind. .14 - No. 29, No. 6 crossing at .15 - No. 6, showing special at Charing Cross. .16 - No. 5 and another tram at North Bendigo on a Special .17 - No. 28 at Charing Cross .18 - No. 5 on Special at a Loop on the Eaglehawk line .19 - No. 28, and two other trams at the Myrtle St Loop .20 - No. 18 showing Quarry Hill and two other trams on View St.trams, tramways, bendigo, trackwork, mccrae st, depot, quarry hill, eaglehawk, golden square, controllers, north bendigo, view st, tram 29, tram 5, tram 24, tram 2, tram 3, tram 6, tram 28, tram 18 -
 Ballarat Tramway Museum
Photograph - Digital image Set of 20
Set of 20 digital images of Bendigo Tramways, 1972 at or before closure while on a tram tour by Stuart Lodington. .1 - No. 28 and 5 at Eaglehawk terminus .2 - No. 28 leaving Charing Cross and travelling into View St with Armstrong Type Service building in background and Firestone Advertisements. .3 - No. 29 with Eaglehawk Town Hall and Post Office in background. .4 - No. 26 and 29 at start of double track, High St Eaglehawk .5 - No. 29 leaving Eaglehawk with shops in the background, Foodland, J. Bests .6 - No. 29 and 23 crossing Manchester Loop with Manchester Arms Hotel in the background and an old poppet head. .7 - No. 29 at ditto with poppet head in the background. .8 - No. 28 and two other trams at the Quarry Hill terminus. .9 - No. 29 in High St Bendigo with the Cathedral and Golden Gate Hotel in the background. .10 - No. 3 with destination Eaglehawk, in bound Carpenter St? .11 - No. 29 following a single trucker through a loop or the end of the double track near the depot. .12 - No. 23?, at Eaglehawk terminus, with Eaglehawk Town Hall in the background. .13 - Birney tram crossing the bridge at the Depot entrance - No. 29 .14 - No. 29 on the Eaglehawk line? .15 - as for .13 .16 - No. 29 entering the depot. .17 - No. 23, inbound from Eaglehawk, at Jobs Gully Loop with the railway overbridge in the background. .18 - No. 28 and two other trams (see also Reg Item 4982) for the same tram tour at Myrtle St. Loop. .19 - No. 21 with North Bendigo on the destination approaching the Golden Square terminus. .20 - No. 7 at Golden Square terminustrams, tramways, bendigo, eaglehawk, quarry hill, golden square, depot, tram 5, tram 29, tram 28, tram 26, tram 23, tram 7, tram 21 -
 Ballarat Tramway Museum
Photograph - Digital image Set of 20, 1971-72
Set of 20 digital images of Bendigo Tramways, 1972 at or before closure while on a tram tour by Stuart Lodington. .1 - No. 7 at Golden Square terminus .2 - ditto .3 - No. 26 in bound on the Eaglehawk line with a crossing loop behind. .4 - Birney crossing the bridge by the tram depot. .5 - No. 29 running a special on the Eaglehawk line with a HBA billboard in the background. .6 - No. 29 with a driver walking in front of the tram at the above location. .7 - No. 29 on the Eaglehawk line .8 - ditto waiting for a tram at Manchester Loop with poppet head in the background. .9 - No. 29 on the Eaglehawk line .10 - Eaglehawk Town Hall at night. .11 - No. 7 at the depot junction in McCrae St, with Golden Square destination. .12 - No. 29 with the Camp Hotel Eaglehawk in the background. Also a Newsagent with The Sun, The Bendigo Advertiser and The Age signs on the building, High St .13 - No. 29 Mt Korong Rd, with the railway overbridge in the background. .14 - interior photo of Birney tram roof .15 - interior view of controls of Birney at Eaglehawk .16 - No. 29 outbound at the Depot Junction McCrae St. .17 - No. 18 at the Eaglehawk terminus .18 - close up view of No. 29 front. .19 - No. 29 in Nolan St, crossing the bridge, outbound. .20 - No. 18 at the Eaglehawk terminus with the Eaglehawk Town Hall, Post Office in the background. Has a circus banner on the side.trams, tramways, bendigo, eaglehawk, quarry hill, golden square, depot, mccrae st, nolan st, tram 7, tram 26, tram 29, tram 18 -
 Ballarat Tramway Museum
Photograph - Digital image Set of 20, 1971-72
Set of 20 digital images of Bendigo Tramways, 1972 at or before closure while on a tram tour by Stuart Lodington. .1 - No. 29 at the North Bendigo terminus .2 - No. 29 just past the Bendigo end of the double track in High St Eaglehawk, with a BP dealer in the background. .3 - Night photo of No. 18 at a terminus, showing "Eaglehawk" .4 - ditto .5 - Night photo of No. 24 at Eaglehawk with Leo A Hughes Photographer in the background. The Tram has "Johnnie Walker whiskey" roof adverts. .6 - No. 29 outbound in Thunder St with a train passing over the bridge in the background. .7 - view from the front window of a tram on the Eaglehawk line with a large "display event float" in the foreground and tram approaching a crossing loop. .8 - No. 29 at North Bendigo .9 - view of High St Eaglehawk looking east from the terminus, showing the track and centre poles. .10 - No. 29 outbound on the North Bendigo line turning from either Nolan St or Caledonia St, running a special. .11 - No. 7 departing North Bendigo for Golden Square. .12 - No. 3 and 18 at Charing Cross. No. 3 has two SEC roof Advertisements .13 - No. 7 at North Bendigo with the trolley pole being reversed. .14 - No. 24 at Quarry Hill with Northern Terrazzo in the background with the driver alongside .15 - No. 7 and No.6 at Charing Cross with the Beehive buildings in the background. .16 - No. 7 at North Bendigo terminus .17 - ditto .18 - No. 24 at Quarry Hill with Northern Terrazzo in the background with the conductor alongside. .19 - ditto .20 - No. 26 and other bogie tram in View St near Charing Cross with the Armstrong Tyre Service building and signs for Cohn's Drinks and T&G in the view.trams, tramways, bendigo, eaglehawk, quarry hill, golden square, depot, north bendigo, charing cross, tram 29, tram 18, tram 24, tram 3, tram 7, tram 6, tram 26 -
 Ballarat Tramway Museum
Photograph - Digital image Set of 20, 1971-72
Set of 22 digital images of Bendigo Tramways, 1972 at or before closure while on a tram tour by Stuart Lodington. .1 - No. 7 arriving at North Bendigo .2 - No. 5 departing Charing Cross along View St, with a Firestone tyres in the background. .3 - front view of a tram in View St with a blurred background image. .4 - No. 24 showing Eaglehawk destination .5 - No 26 and 3 in View St, with the Armstrong Tyre Service building in the background and signs for T&G and Cohn's Drinks. .6 - ditto .7 - No. 3 arriving at Charing Cross from Eaglehawk in View St, with a Quarry Hill destination. .8 - No. 3 and 18 at Charing Cross. .9 - No. 24 on the Quarry Hill line. .10 - No 26 in View St, with the Armstrong Tyre Service building in the background and signs for T&G and Cohn's Drinks. .11 - ditto, with fountain in view, Colonial Mutual building and a newsagent with a Herald sign on the building. .12 - No. 7 at North Bendigo terminus .13 - ditto with pole being reversed. .14 - No. 18 at Quarry Hill terminus with Northern Terrazzo sign in the background. .15 - No. 24 at Quarry Hill terminus .16 - No. 18 arriving at Charring Cross, with Fountain Plaza and Bendigo Pharmacy in the background. .17 - No. 3 and 18 at Charing Cross. .18 - No. 7 at North Bendigo terminus with pole being placed on the overhead. .19 - No. 26 in View St inbound, with Sandhurst Trustees sign in the background. .20 - No. 6 leaving Charing Cross in Pall Mall with Myer and other buildings in the background. .21 - No. 7 at North Bendigo .22 - Single trucker with two roof Advertisements crossing View St with fountain in view, Colonial Mutual building and a newsagent with a Herald sign on the building.trams, tramways, bendigo, eaglehawk, quarry hill, north bendigo, charing cross, view st, tram 7, tram 5, tram 24, tram 26, tram 5, tram 3, tram 18, tram 6 -
 Ballarat Tramway Museum
Photograph - Digital image Set of 20, 9/12/1972 12:00:00 AM
Set of 21 digital images of Bendigo Tramways, at the re-opening of the Bendigo tramways by the Bendigo Trust on 9/12/1972by Stuart Lodington. All trams in the first Bendigo Trust colours. .1 - No. 25 with Gas and Myer roof advertisements .2 - No. 30 with 3BO roof advert and a BP service station in the background. .3 - SEC single trucker at the Mine with a large "Tram Tours" sign on the front of the tram .4 - ditto .5 - No. 19 with a large group of passengers, Bendigo Motor Co and Sandhurst roof advertisements .6 - No. 30 in McCrae St .7 - view of opening march with band .8 - No. 19 in opening parade .9 - Opening Parade in High St with cathedral in the background .10 - No. 30 in Nolan St crossing bridge .11 - ditto .12 - No. 25 at the mine .13 - No. 30 leaving the mine .14 - No. 30 ditto with BCTV roof advert. .15 - Charing Cross with cenotaph, The Beehive building and Ezywalkin shoes and Coca Cola adverts .16 - No. 19 southbound in High St with City Centre Motel building in the background. .17 - No. 30 returning from North Bendigo .18 - No 25 in High St after leaving Gold Mine .19 - No. 30 at the Mine .20 - No. 30 in Nolan St .21 - No. 30 with 3BO roof advert and a BP service station in the background.trams, tramways, bendigo, north bendigo, charing cross, bendigo trust, central deborah, tram 25, tram 30, tram 19 -
 Ballarat Tramway Museum
Photograph - Digital image Set of 20, 16/04/1972 12:00:00 AM
Set of 20 digital images of Bendigo Tramways, of the last running day of the Eaglehawk to Quarry Hill line 16 April 1972, .1 - No. 24 outbound to Eaglehawk .2 - No. 3? at Manchester Loop .3 - No. 24 outbound to Eaglehawk .4 - bogie tram crossing the rail over bridge from Eaglehawk .5 - No. 18 in View St .6 - No. 24 outbound to Eaglehawk .7 - No 18 at Eaglehawk with destination roll being changed, and shopping centre in the background. .8 - No. 24 crossing the railway overbridge, going to Eaglehawk .9 - No. 3 outbound to Eaglehawk .10 - No. 24 crossing the railway overbridge, going to Eaglehawk .11 - No. 3 and 24 crossing at Long Gully .12 - No. 18 at Eaglehawk with Leo A Hughes photographer building in the background and a CFA truck passing the tram. Tram SEC roof advertisement and a banner for "German -?- Circus" at Eaglehawk and dates. .13 - No. 3 inbound on the Eaglehawk line. .14 - No. 18 outbound to Eaglehawk .15 - ditto .16 - No. 18 at Eaglehawk terminus with the Mechanics Institute in the background. .17 - No. 24 at the Eaglehawk terminus .18 - No 24 at the intersection with Taylor St .19 - No. 24 at the Eaglehawk terminus .20 - dittotrams, tramways, bendigo, eaglehawk, long gully, manchester loop, tram 24, tram 18, tram 3 -
 Ballarat Tramway Museum
Photograph - Digital image Set of 20, 16/04/1972 12:00:00 AM
Set of 22 digital images of Bendigo Tramways, of the last running day of the Eaglehawk to Quarry Hill line 16 April 1972, .1 - No. 3 and 24 crossing at Long Gully .2 - No. 3 turning at the Cricket ground, Barnard and View Sts, inbound to the City and Quarry Hill .3 - No. 3 in bound to the City and Quarry Hill, Long Gully area .4 - No. 18 inbound to the City and Quarry Hill crossing the railway bridge from Eaglehawk. .5 - Manchester Loop .6 - No. 18 inbound to the City and Quarry Hill crossing the railway bridge from Eaglehawk. .7 - No. 18 about to enter Jobs Gully Loop .8 - No. 3 about to turn at the Cricket ground, Barnard and View Sts inbound to the City and Quarry Hill .9 - No. 3 turning at the Cricket ground, Barnard and View Sts, inbound to the City and Quarry Hill .10 - No. 18 at Eaglehawk terminus with the Mechanics Institute in the background. .11 - No. 3 in bound, Ironbark area. .12 - No. 3 at Long Gully Loop .13 - No. 3 outbound to Eaglehawk. .14 - No. 18 at Eaglehawk with German circus banner on tram .15 - No. 18 on the Eaglehawk line at Jobs Gully Loop .16 - No. 24 outbound to Eaglehawk at Taylor St .17 - No. 18 inbound to the City and Quarry Hill crossing the railway bridge from Eaglehawk. .18 - No. 3 at Manchester Loop .19 - No. 18 at Eaglehawk terminus .20 - No. 18 at Eaglehawk with German circus banner on tram .21 - bogie tram at Long Gully Loop. .22 - No. 24 outbound to Eaglehawk at Taylor Sttrams, tramways, bendigo, eaglehawk, long gully, jobs gully, manchester loop, tram 24, tram 18, tram 3 -
 Ballarat Tramway Museum
Album - Photo Album, Wal Jack, Bendigo and Geelong, 1950's
An album of photographs with some postcards compiled by Wal Jack, a Ballarat tram and rail enthusiast of Bendigo and Geelong tram photographs. Some photographs are duplicated in the Museum's holdings.Has a strong association with Wal Jack and tramway developments until 1964. Given their extent are of particular significance to the Museum and the Provincial tramways. Features Bendigo and Geelong tramcars. Black binder cloth covered folder, two brass screw binders with grey paper inside covers holding some 40 grey colour foolscap size sheets of card on which photos have been mounted using photo corners so various types, captions in blue or black ink. Some 111 Bendigo and 94 Geelong black and white photographs with some postcards. For details of each photograph, layouts and BTM Reg Item Nos. see - Detail description of photos in Reg Item 5003 - listed.pdf trams, tramways, sec, tramcars, geelong, bendigo, wal jack -
 Ballarat Tramway Museum
Ephemera - Ticket/s, Wal Jack, Australia Worldwide tickets - Wal Jack Collection, 1950's
Has tickets from:, ESCo Ballarat, Form TYE 1-37 re acceptance of breach of regulations - to Reg Item 5017, Geelong tramways – 1, Bendigo ESCo – 3, SEC – weekly, tourist and parcel / newspaper, scholars, SEC – various, also for Ballarat, Bendigo and Geelong and small packet of loose tickets., Prahran and Malvern Tramways Trust, MTT Adelaide including a small packet of loose tickets, MMTB – 2 sheets including two loose sheets with tickets and a Pensioners Fare Concession Certificate for 61 – 62 with some loose tickets, NSW – Sydney two pages, NSW – Newcastle one page + 2 tickets, and four tickets for the Yass to Yass Junction tram Brisbane – two pages with one Rockhampton ticket, VR St Kilda Brighton, Parramatta steam tram – Sydney ferries limited, Hobart, Launceston, Wellington NZ – two pages, Christchurch, Wanganui, Auckland, New Plymouth - 1, Invercargill - 1, Johannesburg, Cape town, Pretoria – 1, Liverpool, Sheffield, London – 3 pages + loose 7 day go as you please issued in 1963 to Wal Larsen, Manchester, Newcastle and Gateshead, Bolton, South Lancashire Transport – 1, Oldham, Barry Corporation – Lancs, Birmingham, Llandudno, Salford, Stockport, Sunderland, South shields, Edinburgh, Glasgow, Leeds, Darwen Corporation – 1, Dublin, Belfast, Blackpool – 1, South Wales – 1, Bradford, Dundee, Southampton, Plymouth, Leicester, Douglas, Southend on Sea, Croydon, Naples and other Italian ones, Antwerp – 1, Istanbul, St Quentin, Vevey Switzerland, Dusseldorf, Bombay, Calcutta, Karachi, Bangkok, Penang, Milwaukee Electric Railway, Los Angeles Railway – loose on page was a Tram pass for American Fleet celebration, 2/9/1908 to Eaglehawk - to Reg Item 5017, Market St Railway, Loose San Francisco Municipal railway, Puget Sound, St Louis Public Service Co., Sandwich, Tacoma Railway, Capital Transport Little Rock, Pittsburgh, Connecticut – New Haven, Twin City Lines, Chicago and West Towns, Chicago Aurora and Elgin, Elgin and Belvidere, Chicago Rapid Transits, Chicago Surface, ClevelandFeatures tickets from Australian and Overseas tramway systems. Collected by Wal Jack. Light brown paper covered album with dark red binding band, with off-white paper inside covers holding some 40 sheets of card on which tickets have been mounted using stamp hinges, captions in blue or black ink. Three supplementary sheets have been glued in as well. Has some 750 tickets including loose tickets. Reg Items 5017 (ESCo Employee Report outcome) and 5018 (Bendigo Tramways ticket for the visit of the personnel from the American Fleet - 1908) were loose in the album and have been separately collected. Some tickets in envelopes of clipped into the sheets.Individual captions for each group of tickets from a city.trams, tramways, tickets, ballarat, melbourne, usa, uk trams, esco -
 Ballarat Tramway Museum
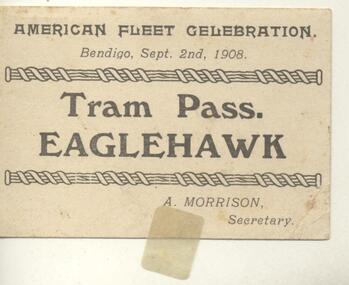
Ephemera - Ticket, State Electricity Commission of Victoria (SECV), American Fleet Celebration, Bendigo - Wal Jack Collection, 1908
Historically significant for Bendigo, yields information about the visit of crews to Bendigo during the visit of the American Fleet.Printed card ticket or pass for Eaglehawk at the time of the American Fleet Celebration, Bendigo 2/9/1908. Has the name "A. Morrison, Secretary", Was found loose within item 5015 - Ticket album and collected.trams, tramways, tickets, bendigo, esco -
 Ballarat Tramway Museum
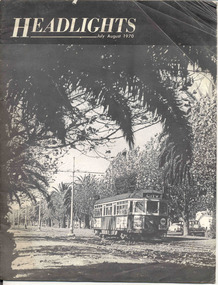
Magazine, John and Andrew Ward, "Headlights, July - August 1970", Jul. 1971
Yields information about the Melbourne tramway system from a USA viewpoint in 1970 and includes reference to Ballarat and Bendigo systemsTwenty four page (24) printed black and white magazine, titled "Headlights, July - August 1970" with a photo of Melbourne 944 on the front cover. Contains an article on the Melbourne Transport Plan for 1985 and "The Tramways of Melbourne" written by John and Andrew Ward. Contains maps, photographs, tramcar roster, drawing of the Melbourne W2, details of the W7's, the St. Kilda Junction project. Also notes other Australian operations including Ballarat and Bendigo. Published July 1971 by the Electric Railroaders Association of New York.trams, tramways, melbourne, mmtb, planning -
 Ballarat Tramway Museum
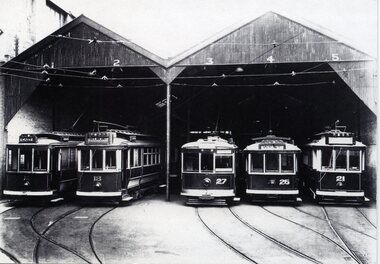
Photograph - Black & White Photograph/s, c1942
Yields information about the appearance of Bendigo Birney trams mid 1950's.Black and white photograph, printed onto card (inkjet printer?) of the Geelong depot with five trams parked - Nos. 2, 13, 27, 26 and 21 in the front. Roads marked 1 to 5. c1942"28 / Geelong publicity view taken about 1929 (crossed out), 1936 (crossed out) 1942? with WFS Collection in bottom left hand corner and "William Scott" address label in bottom right hand corner.trams, tramways, geelong, depot, tram 2, tram 13, tram 27, tram 26, tram 21 -
 Ballarat Tramway Museum
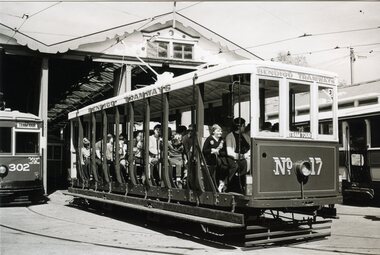
Photograph - Black & White Photograph/s, William. F. Scott, 3/04/1983 12:00:00 AM
Yields information about the appearance of Bendigo Birney trams at the time of the opening of the tram services and Eaglehawk Town Hall.Black and white photograph, of Toastrack, Bendigo 17, with passengers outside the Bendigo Depot, photo by William F Scott 3/4/1983."22" in pencil in top left hand corner, and along bottom edge in ink "Bendigo Trust, car on tour 3/4/1983, William F. Scott photo".trams, tramways, bendigo, depot, tram 17 -
 Ballarat Tramway Museum
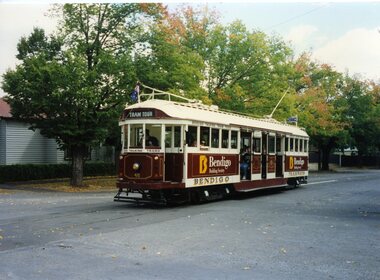
Photograph - Colour Photograph/s, William. F. Scott, Easter 1991
Colour photograph, of W2, 470, painted in Bendigo tram tour colours, advertising the Bendigo Bank, Tramways Ave Bendigo, before turning into McCrae St, Bendigo, Easter 1991. Photograph by William F Scott."79" in blue ink in top left hand corner, and a "Bendigo Trust / Car 470 in Tramways Ave, heading for McCrae, William F. Scott photo". and in bottom right hand corner "Easter 91 / WFS".trams, tramways, bendigo, depot, tramways ave, mccrae st, tram 470 -
 Ballarat Tramway Museum
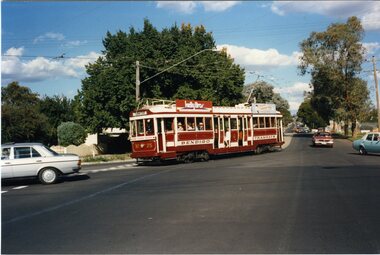
Photograph - Colour Photograph/s, William. F. Scott, Easter 1991
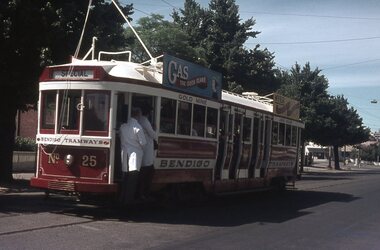
Colour photograph, of Bendigo 25, advertising Kelly Bros and Gillies Pies, turning a corner on the North Bendigo Route, Easter 1991. Photograph by William F Scott.In the bottom right hand corner in ink "Bendigo Trust / Easter 1991 / William F. Scott photo".trams, tramways, bendigo, north bendigo, tram 25 -
 Ballarat Tramway Museum
Photograph - Black & White Photograph/s, mid 1900's
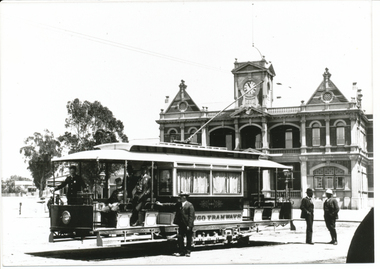
Yields information about the appearance of Bendigo trams early 1970's and the Charing Cross area.Black and white photograph of an ESCo combination tramcar at the Eaglehawk terminus, with the Eaglehawk Town Hall in the background. Driver at the controls, with a number of men standing alongside and the conductor (2 No.) in the front portion of the tramcar. Note the curtains in the tramcar, taken during a summers day. Photo taken early mid 1900's. Creative Images Photographic Collection. High Resolution image added 31/8/2012In pencil, top left hand corner, "Eaglehawk early 1900's and in the bottom right hand corner / Bendigo / Creative Image Photographic Collection".trams, tramways, bendigo, eaglehawk, esco -
 Ballarat Tramway Museum
Photograph - Black & White Photograph/s, Keith Kings, 30/01/2956 12:00:00 AM
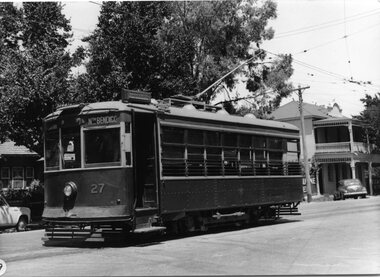
Black and White Photograph of SEC Bendigo Birney 27 in McCrae St and Arnold St, 30/1/1956. Has destination of North Bendigo, and the hotel in the background. Photo Keith Kings, number R(q)(8) Stamp in top right hand corner and handwritten number with "K.S. Kings No. R(q)(8) Copyright reserved". In black ink "Bendigo / Birney 27 in McCrae St and Arnold St, (Now Tramways Avenue) 30/1/1956. On front of photograph in bottom left hand corner, white dot with number "19"trams, tramways, bendigo, birney, mccrae st, tram 27 -
 Ballarat Tramway Museum
Photograph - Black & White Photograph/s, Chris Wurr, early 1970's
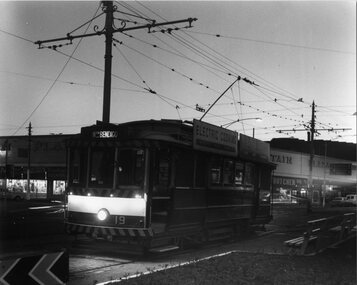
Yields information about the appearance of Bendigo Birney trams early 1970's and the North Bendigo area.Black and White Photograph of SEC Bendigo 19, late evening photograph, at Charing Cross with the Fountain Plaza building in the background. Tram has the destination of Nth Bendigo and SEC Electric Cooking roof advertisements. Photo Chris Wurr, early 1970's. "Photo by Chris Wurr" stamped on the rear.trams, tramways, bendigo, charing cross, night photo, tram 19