Showing 2385 items
matching golden bendigo
-
 Bendigo Historical Society Inc.
Document - LYDIA CHANCELLOR COLLECTION; LAYING OF ST. MARK'S SUNDAY SCHOOL FOUNDATION STONE
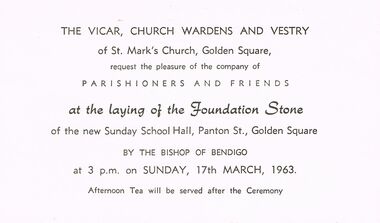
A white card with the words, ' The Vicar, Church Wardens and Vestry of St. Mark's Church, Golden Square, request the pleasure of the company of parishioners and friends at the laying of the Foundation Stone of the new Sunday School Hall, Panton St., Golden Square by The Bishop of Bendigo at 3 p.m. on Sunday, 17th March, 1963. Afternoon Tea will be served after the Ceremony.'church, diocese of bendigo, celebration, lydia chancellor, collection, church, st. mark's church, invitation, celebration, foundation stone -
 Bendigo Historical Society Inc.
Document - THE AUSTRALIAN SKETCHER 1873 - LAYING THE FOUNDATION STONE OF THE SANDHURST MASONIC HALL
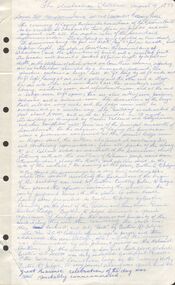
Handwritten account of the laying of the Foundation Stone of the Sandhurst Masonic Hall. Dimensions and architectural style are also mentioned as well as the laying of a cylinder containing a scroll in a cavity beneath the stone. Architects were Vahland and Getzschmann.document, names of bendigo pioneers, the australian sketcher, the australian sketcher 1873, laying the foundation stone of the sandhurst masonic hall, mr vahland, mr gotzchmann, brother j mcintyre w m, brother buckley, brother connolly, golden and corinthian grand united lodge, rev j c mccallagh, brother g p joseph -
 Bendigo Art Gallery
Painting, Carl Hoff, The Golden Wedding, 1883
Signed and dated, l.r.,brown oil, "Carl Hoff/83". -
 City of Ballarat
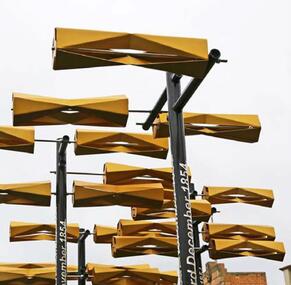
Artwork, other - Public Artwork, Aaron Robinson et al, Flow by Holly Grace and Aaron Robinson, 2014
Water is key to a thriving community and it is through the representation of water Flow enlivens the space at Bakery Hill. Historically ‘water races’ ran through the valleys of the Greater Ballarat area unearthing the minerals that forged prosperity and wealth. This water still flows today unearthing new possibilities for the community. Possibilities focusing on sustainability, ecology, health and prosperity. Flowing over the site a series of kinetic turbines flutter in the wind creating a contemporary water race. The interactive elements offer visual stimulation enticing people to connect with the artwork and in turn the surrounding spaces. Bakery Hill has great historical significance. It’s connection to the Eureka Stockade and the series of events that were to unfold during the 1850’s was to become the turning point in Australian political history. The placement of each turbine is to mirror a point of history in the timeline of events that occurred during the Eureka Stockade. The Water Race is a symbol of possibilities, the ones created by history and those of modern society. It is a visual timeline that can be read by traversing the site. The connecting turbines that flow and turn in sync are a representation of time passing and the interconnectedness of history with the community that surrounds it. The gateway to Bridge Mall is framed through the placement of each turbine allowing the sense of prosperity and wealth to flow through to the surrounding community. This gateway also references the significance of Bakery Hill reinvigorating the historical site by reconnecting it back to its town centre. The artwork is of aesthetic and historical significance to the people of BallaratTwelve steel turbines set on poles with dates attached and a large bronze 'timeline' plaqueFLOW/ Plotting the motion of Wind, Water, History and Time/ by Holly Grace and Aaron Robinson/ This site has great historical significance. It’s connection to the Eureka Stockade and the series of events that unfolded in the 1850’s was to become the turning point in Australian history. The placement of each turbine within this artwork mirrors a point of history in the events that led up to the Eureka Stockade. It is a visual timeline that can be read by traversing the site. The connecting turbines that flow and turn in sync are a representation of time passing. They are a symbol of the community’s connection to their history. 1851 June James Esmond makes the first discovery of gold in Victoria at Clunes./ 1st July The Port Phillip District separates from New South Wales and becomes the Colony of Victoria. It is still subject to British rule./ August Gold is discovered at Buninyong and at Golden Point, Ballarat. Lt-Governor La Trobe introduces the Gold Licence system in an attempt to reduce the colony’s debt./ 20th September First gold licences issued in Ballarat. / 1852 August/ Eureka Lead discovered on the Ballarat goldfields. December Charles La Trobe resigns as Lt-Governor but he is not relieved until 1854/ July – December/ Unrest builds on the various goldfields with protest meetings held in Bendigo and Castlemaine. Bendigo’s Red Ribbon Movement is active on the goldfields and the Bendigo Petition is presented to Lt-Governor./ December/ Charles Hotham is appointed Lt-Governor/ 1854 March/ A bill to extend the Elective Franchise is passed by the Legislative Council and sent to London for the assent of the British Parliament. 22nd June/ Lt-Governor Sir Charles Hotham arrives in Victoria. The colony faces mounting debt and Hotham orders weekly licence hunts in an attempt to increase income./ August/ Hotham is acclaimed during his visit to the Ballarat goldfield./ 13th September? Hotham orders twice-weekly licence hunts to further increase revenue./ September – October/ Miners are experiencing problems – no shafts bottomed on the Eureka Lead for five weeks./ 7th October/ James Scobie is murdered outside the Eureka Hotel. Many diggers believe that publican James Bentley is responsible./ 9th October/ At Scobie’s inquest, Bentley is acquitted, despite strong evidence of his guilt./ 10th October/ Father Smythe’s servant is beaten up by authorities and falsely arrested for not holding a licence./ 15th October/ Mass meeting of miners on Bakery Hill. Catholic miners meet after Mass. // 17th October/ A meeting of up to 10,000 Diggers is held near the Eureka Hotel to protest against Bentley’s acquittal. The meeting results in the burning of the hotel. Three diggers, Westerby, Fletcher and McIntyre, are arrested. Hotham dispatches 400 soldiers to Ballarat. 22nd October/ Another large meeting is held to address grievances. The Catholics send their leaders, Hayes, Kennedy and Manning to meet Rede. The Government Camp is under siege 11th November/ A public meeting on Bakery Hill results in the formal establishment of the Ballarat Reform League and adoption of the League’s proposals./ 21st November/ The enquiry into the Bentley affair is published. It recommends the dismissal of the judge and the establishment of a Royal Commission. 23rd November/ Westerby, Fletcher and McIntyre are convicted of burning the hotel. The Ballarat Reform League demands their release. 27th November/ A deputation from The Ballarat Reform League, including Humffray, Black and Kennedy, meet with Hotham to demand the release of the three prisoners. Hotham does not believe the diggers have the right to “demand anything”, Rede requests reinforcements in Ballarat. 28th November/ Miners attack the troop reinforcements and wagons passing near the Eureka diggings. A drummer boy is seriously wounded. 29th November/ A “Monster Meeting” attended by more than 10,000 diggers is held on Bakery Hill. The Southern Cross flag is flown for the first time. Peter Lalor addresses the miners and a number of diggers burn their licences. 30th November/ A licence hunt occurs in the morning at the order of Commissioner Rede. Another meeting of radical miners is held on Bakery Hill. Peter Lalor becomes leader of the diggers and calls for volunteers. Many diggers wear an oath to defend their rights and liberties under the Southern Cross flag. A number of diggers move to the Eureka Lead and start to erect a stockade. 3rd December In the early hours of Sunday morning 296 soldiers and police led by Captain Thomas proceed from the Government Camp to the Eureka Lead and attack the Stockade. 22 diggers and 7 military are officially listed as being killed. Many others are wounded. Approximately 120 diggers are arrested and marched to the Government Camp. 4th December/ Funeral of some of the fallen diggers and soldiers. Martial Law is proclaimed in Ballarat. Henry Seekamp, editor of the Ballarat Times is charged with seditious libel. 6th December/ Major General Sir Robert Nickle, commander-in-chief of the military forces in the Australian colonies, arrives in Ballarat. 9th December/ General Nickle repeals martial law. 14th December/ The Gold Fields Commission sits for the first time. 18th December/ The first Ballarat sitting of the Gold Fields Commission is held at Bath’s Hotel. 1855 23rd January/ Henry Seekamp is found guilt of sedition and sentenced to three months in prison. 22nd February/ The Eureka trials starts in Melbourne. February to March/ 13 prisoners are tried and acquitted amid great public rejoicing. 27th March Report of the Royal Commission recommends miners’ rights and significant reforms. 10th November/ Peter Lalor and John Basson Humffray are nominated for seats in the legislative Council. 31st December Sir Charles Hotham dies before his resignation takes effect. flow, aaron robinson, holly grace, public art, eureka stockade, bakery hill -
 Ballarat Tramway Museum
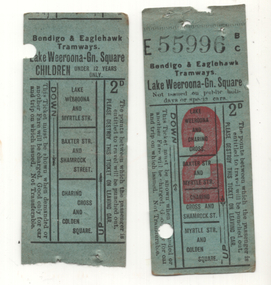
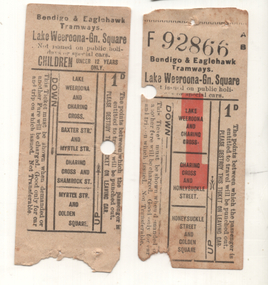
Ephemera - Tram ticket, Lake Weeroona - Golden Square line - 2d, c1903
... tramways. Bendigo tramways Lake Weeroona Golden Square tickets ...Ticket printed for use between Lake Weeroona and Golden Square with the various sections noted. Headed "Bendigo & Eaglehawk Tramways". Priced 2d - Children under 12.Demonstrates an early ticket on the Bendigo tramways.Ticket - printed with a blue background, black text and red value. Was stapled to a block.bendigo, tramways, lake weeroona, golden square, tickets -
 Ballarat Tramway Museum
Ephemera - Tram ticket, Lake Weeroona - Golden Square line - 1d, c1903
... tramways. Bendigo tramways Lake Weeroona Golden Square tickets ...Ticket printed for use between Lake Weeroona and Golden Square with the various sections noted. Headed "Bendigo & Eaglehawk Tramways". Priced 1d - Children under 12.Demonstrates an early ticket on the Bendigo tramways.Ticket - printed on an off white paper, black text and red value. Was stapled to a block.bendigo, tramways, lake weeroona, golden square, tickets -
 Ballarat Tramway Museum
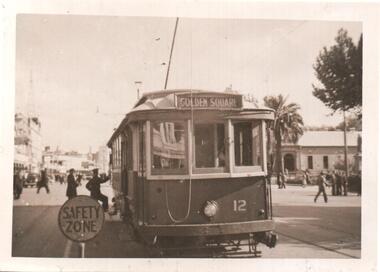
Photograph - Black & White Photograph/s, Lee A Ratten, late 1940's to early to mid 1950's
Black and white photograph of Bendigo 12 in Pall Mal, the stop before Charing Cross. Tram stop has a safety zone sign and two crew members at the front of the tram. Photograph late 1940's to early to mid 1950's. Tram has the destination of Golden Square. Photo possibly Lee A Ratten - see related document and Reg Item 7185.trams, tramways, bendigo, pall mall, safety zone, tram 12 -
 Ballarat Tramway Museum
Album - Photo prints, Brian Andrews, "By Birney to Golden Square", 1968
Prints of photos used in the production by Brian Andrews of the book "By Birney to Golden Square" - item 8533 See items 8637 to 8642 for negatives and prints of the Ballarat and Bendigo photos and related image files held on the BTM See btm8799 - Brian Andrews Photos - Bendigo listing.pdf for listing of the photographs. Demonstrates the work of the photographer.Set of 65 Black and white prints contained within Archival sleeves within an Archival binder.trams, tramways, bendigo, brian andrews, sec tranways -
 Ballarat Tramway Museum
Slide - 35mm slide/s - set of 5, Noel Simons, 19/11/1962 12:00:00 AM
... mounts. 1186.1 - Bendigo 21 bound for Golden Square at Charing... - "No. 19 in High St., Bendigo, leaving Charing Cross for Golden ...Set of 5 transparencies taken on 19/11/1962 on Kodak mounts. 1186.1 - Bendigo 21 bound for Golden Square at Charing Cross with The Beehive buildings and shops in Pall Mall in the background. Trams has an ad for Cohns drinks on front bumper, SEC Best for Cooking roof ad. and Mamouney's furniture roof ad. Two women passengers boarding. 1186.2 - Bendigo 26 crossing Pall Mall from Mitchell St. bound for Eaglehawk with "Ezywalkin" shop in background. Tram has an SEC 'Electric Cooking' roof ad and a 'Streets Ice cream' ad on front dash. 1186.3 - Bendigo 7 arriving at the Charing Cross stop, bound for North Bendigo. Has a Huttons dash panel ad, a Castrol roof ad. Buildings as for 1186.1. Passengers waiting at the stop. 1186.4 - Bendigo 19 leaving Charing Cross for Golden Square with City Club Hotel alongside and other buildings as for 1186.1 in the background. Tram has Briquettes ad on front dash and SEC 'Electric Cooking' roof ad. 1186.5 - Bendigo 21in High St. at corner of Short St. heading for Charing Cross. Destination half way between Depot and Railway Station. Tram has ads for Cohns Drinks on dash panel, SEC 'Cook with Electricity' and a Sandhurst Milk roof ads.Information written on in black ink and date stamped in purple ink. 1186.1 - "No. 21 in Pall Mall at Charing Cross, Bendigo" 1186.2 - "No. 26 arriving at Alexandra Fountain, Charing Cross, Bendigo" 1186.3 - "No. 7 in Pall Mall at Charing Cross, Bendigo" 1186.4 - "No. 19 in High St., Bendigo, leaving Charing Cross for Golden Square" 1186.5 - "No. 21 in High St. Bendigo, at corner of Short St." tramways, trams, bendigo, charing cross, pall mall, high st., tram 7, tram 19, tram 21, tram 26 -
 Ballarat Tramway Museum
Slide - 35mm slide/s - set of 17, Noel Simons, 20/11/1962 12:00:00 AM
Set of 17 transparencies taken on 20/11/1962 on Kodak mounts. 1187.1 - Bendigo No. 2 at the Quarry Hill terminus, showing destination of Quarry Hill. Has Cohns Drinks and Streets Ice Cream ads on dash panel, a SEC 'electric cooking' roof ad and another roof ad. Shows the Y terminus at this location, but tram standing just before it. Overhead in position. 1187.2 - as above, but closer up. 1187.3 - as above, but from the north side, showing cemetery in the background. 1187.4 - Bendigo No.3 at Eaglehawk terminus. Tram showing destination of Quarry Hill. Has the various buildings at Eaglehawk in the background including the Foodland store. Has Streets Ice cream and White Horse Whiskey ads on the dash panel. 1187.5 - Bendigo No. 18 at Garden Gully crossing loop, in bound, with destination of Eaglehawk. Passengers waiting for an Eaglehawk tram at the stop. Has a white horse whiskey ad on dash panel and SEC roof ads. Conductor standing in doorway looking out. 1187.6 - Bendigo No. 7 inbound in Nolan St. at cnr of McCrae St. showing destination of Golden Square. Has Streets Ice cream ad on dash panel and a Castrol Roof ad. 1187.7 - Bendigo No. 19 at the North Bendigo terminus with railway level crossing in background. Tram has a Cohns Drinks ad and an SEC 'Electric Cooking' roof ad. 1187.8 - Bendigo No. 2 at the Quarry Hill terminus, looking back into Bendigo, showing destination of Eaglehawk. 1187.9 - Bendigo No. 21 in McCrae St, near Nolan St outbound for North Bendigo. Photo taken after tram has passed photographer. 1187.10 - Bendigo Nos. 4 and 26 at Charing Cross in View St. with fountain alongside and the Beehive, Ezywalkin Buildings in the background. No. 26 has a Sandhurst Milk and SEC 'Electric Cooking' roof ad. 1187.11 - close up of 22E maximum traction truck and folded footstep. 1187.12 - Bendigo No. 19 at Charing Cross terminus, after tram has passed photographer, showing destination of North Bendigo, with the Beehive building in the background and passengers boarding tram. 1187.13 - Bendigo No. 11, turning from View St. into Pall Mall, showing Special with the conductor holding point bar. Has the Beehive and Ezywalkin Buildings in the background. 1187.14 - No. 7 at Charing Cross terminus, in Pall Mall, bound for Golden Square. Has the Beehive and Ezywalkin buildings in the background and passengers waiting at the tram stop. 1187.15 - No. 18 at the Charing Cross terminus, bound for Eaglehawk. Has the Beehive and Ezywalkin buildings in the background and passengers waiting at the tram stop. Also has the 'Safety Zone' sign in the photograph. 1187.16 - No. 2 at Quarry Hill terminus, night or dusk photo. Tram showing destination of Depot. 1187.17 - No. 26 at Charing Cross, night photo. Tram has destination of Quarry Hill, but is on the line for Eaglehawk. Photo looks along Mitchell St. Also shows Safety Zone sign. Information written on in black ink and date stamped on purple ink. 1187.1 - "No. 2 at Quarry Hill terminus Bendigo" 1187.2 - "No. 2 at Quarry Hill terminus Bendigo" 1187.3 - "No. 2 at Quarry Hill terminus Bendigo" 1187.4 - "No. 3 at Eaglehawk terminus" 1187.5 - "No. 18 in Mt Korong Road, Long Gully at cnr of Havilah Road (Eaglehawk Route)" 1187.6 - "No. 7 in Nolan St. Bendigo, at Cnr of McCrae St., near lake Weeroona, (North Bendigo Route)' 1187.7 - "No. 19 at North Bendigo terminus" 1187.8 - "No. 2 at Quarry Hill terminus" 1187.9 - "No. 21 in McCrae St. Bendigo, near Nolan St. (North Bendigo Route) 1187.10 - "4 and 26 at Alexandra Fountain, Charing Cross Bendigo" 1187.11 - "Truck of Bogie Car, Bendigo Tramways" 1187.12 - "No. 19 in Pall Mall at Charing Cross, Bendigo" 1187.13 - "Birney car No. 11 entering Pall Mall from View St. at Charing Cross Bendigo" 1187.14 - "No. 7 in Pall Mall at Charing Cross, Bendigo" 1187.15 - "No. 18 at Alexandra Fountain, Charing Cross, Bendigo" 1187.16 - "No. 2 at Quarry Hill terminus, Bendigo" 1187.17 - "No. 26 at Alexandra Fountain, Charing Cross, Bendigo" tramways, trams, bendigo, quarry hill, eaglehawk, north bendigo, maximum traction, night photo, tram 2, tram 3, tram 4, tram 7, tram 11, tram 18, tram 19, tram 21, tram 26 -
 Ballarat Tramway Museum
Slide - 35mm slide/s - set of 4, Noel Simons, Apr. 1967
Set of 2 slides made from the Association of Railway Enthusiast Provincial Tramways film strip, possibly during April 1967. 1192.1 and 1192.3 mounted in Kodak Ready Mounts. The others in plain white mounts. Slides dated Dec. 1968. 1192.1 - No. 21 out bound to Golden Square in High St., between Wattle and Vine Streets. Photo taken after tram has passed photographer. Has a sign for "Reid's Furnituorium" in the background. 1192.2 - Bendigo No. 28 dressed up as Myers Christmas tram, passing the Post Office and Courts in Pall Mall. 1192.3 - Bendigo No. 23 at Needle Loop en route to Eaglehawk. Tram has two SEC roof ads, one "Electric Cooking" and the other "Everything fine in my all electric kitchen". 1192.4 - Bendigo scrubber parked at the end of the main depot lead, alongside the depot office buildings.Details in blue ink, date hand stamped in purple ink. 1192.1 - "No. 21 heads along High St for Golden Square between Wattle and Vine Streets." 1192.2 - "Birney No. 28 in Christmas Garb, traverses Pall Mall en route to North Bendigo". 1192.3 - "No. 23 at Needle Loop on its run to Eaglehawk". 1192.4 - "Scrubber car at Bendigo Depot".tramways, trams, north bendigo, bendigo, bridge st loop, depot, tram 21, tram 23, tram 28, tram scrubber -
 Ballarat Tramway Museum
Slide - 35mm slide/s - set of 24, Noel Simons, 20/05/1971 12:00:00 AM
... on purple ink. 1195.1 - "No. 19 arrives at Charing Cross Bendigo... Parade Ballarat Ballarat goldfields Tramways trams Bendigo ...Set of 24 transparencies taken on 20/5/1971 on Kodak mounts. 1195.1 - Bendigo 19 arriving at Charing Cross en route to North Bendigo with Fountain Plaza and the City Family Hotel in the background. No. 19 has two roof ads for the SEC. -'Electricity better for cooking' and 'Everything's under control in my all electric kitchen' 1195.2 - as above, but standing at the Charing cross stop, with the Beehive Stores and other buildings along the east side of Pall Mall in the background. 1195.3 - No 21 ex Golden Square crossing View St. trackwork in front of No. 25 waiting to depart for Quarry Hill. No.21 has two roof ads (as for No.19 in 1195.1) and No.25 has one SEC roof ad and another. Ezywalkin sign in the background, and Fountain Plaza. 1195.4 - as for 1195.3, but after 21 has arrived and 25 left for Quarry Hill. Has Ezywalkin store and the Beehive store in the background. 1195.5 - No. 5 at the Eaglehawk terminus. Photo taken with a cannon in foreground looking along High St. Eaglehawk. Has shops on the west side of High St. in the background. 1195.6 - No. 5 at the Eaglehawk terminus, close up of the rear of the tram - note tow bar arrangement. Has destination of Quarry Hill. 1195.7-Nos.25 and 5 crossing at the Thorpe St. Loop, California Gully. No. 25 bound for Eaglehawk (has SEC Briquette and electric cooking roof ads) and 5 en route for Quarry Hill with a SEC and Cinzano roof ad. 1195.8 - as for 1195.7, but after trams have passed each other. Has Borough Auto Service building in the background. 1195.9 - No. 5 in Mt Korong Road, towards Bamard Street, photo taken after tram has passed photographer. 1195.10 - No. 30 at the Golden Square terminus with the Milk Bar on the right hand side of the photograph. 1195.11 - No. 30 inbound at Fire Station Loop, High St. Golden Square. Has old fire station in the background. Passengers are boarding the tramcar. 1195.12 - No. 30 in High St, bound for North Bendigo between Vine and Wattle Streets. 1195.13 - No. 5 bound for Eaglehawk waits at Iron Bark Gully Loop, at Hayes St. 1195.14 - No. 5 and No. 2 crossing at Iron Bark Gully Loop. 1195.15 - No. 5 bound for Eaglehawk leaving the Manchester Loop, Long gully. 1195.16 - No. 5 passing William Street, Long Gully en route to Eaglehawk. 1195.17 - No. 5 just before the California Gully Crossing Loop. 1195.18 - Nos. 5 and 26 crossing at California Gully crossing Loop. No. 5 heading to Eaglehawk, 26, Quarry Hill. 1195.19 - No. 5 in High St. Eaglehawk with Bob Moyle's Victoria Hotel and the TAB in the background. 1195.20 - No. 5 in High St. Eaglehawk approaching the terminus. Photo taken after the tram has passed the photographer. Has Foodland store and J. Best Fruit supply in the background, along with Eaglehawk Town Hall. 1195.21 - No. 5 at the Eaglehawk terminus, photo taken along seldom used track along High St. 1195.22 - as for 1195.22 - but at the very end of the track. 1195.23 - No. 5 en route for Quarry Hill climbs High St. Eaglehawk with the Victoria Hotel and Eaglehawk Town Hall in the background. 1195.24 - No. 5 and 25 crossing at Jobs Gully Loop. Note 25 has a black on white destination roll, while No. 5 has a white on black destination roll. Information written on in black ink and date stamped on purple ink. 1195.1 - "No. 19 arrives at Charing Cross Bendigo from Golden Square" 1195.2 - "No. 19 about to leave Charing Cross for North Bendigo" 1195.3 - "No. 25 awaiting departure for Quarry Hill, watches No. 21 arrive at Charring Cross from Golden Square" 1195.4 - "No. 21 on North Bendigo service and No. 25 on Quarry Hill run await departure at Charing Cross" 1195.5 - "No. 5 at Eaglehawk terminus" 1195.6 - "No. 5 at Eaglehawk terminus" 1195.7 - "Nos. 5 and 25 crossing at Thorpe St. Loop, California". 1195.8 - "Nos. 25 and 5 crossing Thorpe St. Loop, California Gully". 1195.9 - "No. 5 descending Mt Korong Rd. towards Bamard St." 1195.10 - "Birney car No. 30 at Golden Square terminus" 1195.11 - "Birney car No. 30 in High Street near Thistle Street (Fire Station Loop)" 1195.12 - "No. 30 in High St. between vine and Wattle Streets" 1195.13 - "No. 25 at Hayes Street Loop Iron Bark". 1195.14 - "Nos. 2 and 5 crossing at Hayes Street Loop Iron Bark" 1195.15 - "No. 5 at Manchester Loop opposite Havilah Road, Long Gully" 1195.16 - "No. 5 passing William Street, Long Gully". 1195.17 - "No. 5 at California Gully" 1195,18 - "Nos. 26 and 5 at Thorpe St. Loop, California Gully". 1195.19 - "No. 5 in High St. Eaglehawk". 1195.20 - "No. 5 approaching Eaglehawk terminus" 1195.21 - "No. 5 at Eaglehawk terminus" 1195.22 - "No. 5 at Eaglehawk terminus" 1195.23 - "No. 5 in High St. Eaglehawk" tramways, trams, bendigo, charing cross, eaglehawk, california gully, golden square, iron bark gully, jobs gully, tram 2, tram 5, tram 19, tram 21, tram 25, tram 26, tram 30 -
 Ballarat Tramway Museum
Slide - 35mm slide/s - set of 2, Noel Simons, 20/05/1971 12:00:00 AM
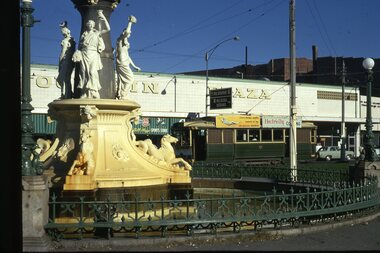
Set of 2 slides mounted in Kodak Ready Mounts. Slides dated 20 May 1971. 1196.1 - Bendigo No. 21 arriving at Charing Cross from Golden Square with the Alexandria Fountain in the foreground. In the background is the Fountain Plaza building. Tram has 2 SEC roof ads. 1196.2 - No. 30 at Charing Cross from North Bendigo. On a pole in front of the tram are two signs "All cars stop here" in white printing on a red background and "Cars Stop by Request" in white lettering on a black background.1196.1 - "No. 21 passing Alexandra Fountain on arrival at Charing Cross from Golden Square" 1196.2 - "No. 30 at Charing Cross"tramways, trams, charing cross, bendigo, alexandra fountain, tram stops, tram 21, tram 30 -
 Ballarat Tramway Museum
Slide - 35mm slide/s - set of 20, Noel Simons, 21/05/1971 12:00:00 AM
Set of 20 transparencies taken on 21/5/1971 on Kodak mounts. 1197.1 - Bendigo No. 5 en route to Eaglehawk at Creeth St Long Gully. Tram has a SEC roof ad and Cinzano roof ad. 1197.2 - No 5 approaching Needle Loop between Long Gully and California Gully. On left hand side is the City of Bendigo sign, indicating city boundary. 1197.3 - As for 1197.2 but actually entering loop. Photo taken after tram has passed photographer. 1197.4 - No. 26 bound for Eaglehawk descending the railway bridge near Eaglehawk, at Jobs Gully. 1197.5 - as for 1197.4, but after crossing bridge, now ascending a hill. Photo taken after tram has passed photographer. 1197.6 - No. 26 climbing High St. hill Eaglehawk, nearing end of Double track, bound for Quarry Hill. Shows centre of the road poles. 1197.7 - As for 1197.6, with tram entering single track section. Photo taken after tram has passed photographer. Has a BP service station in the background. 1197.8 - No. 26 (bound for Quarry Hill) crossing No. 17 (Eaglehawk) at Job's Gully Loop. 1197.9 - No. 17 climbing railway bridge at Job's Gully, en route to Eaglehawk. Photo taken after tram has passed photographer. 1197.10 - No.26 bound for Quarry Hill, leaving Long Gully Loop? Has the Creeth St. church in l197.l in the far background. Photo taken after tram has passed photographer. 1197.11 - Tramway Point work at the northern end of Long Gully Loop. 1197.12 - No. 17 en route for Quarry Hill turning into View St. from Bamard St. Tram has SEC roof ads "Everything fine in my all electric Kitchen' and 'Electric Cooking is Matchless'. 1197.13 - as for 1197.12, but tram has turned into View St and about to enter the double line track. Photo taken after tram has passed photographer. 1197.14 - No. 21 enters Nolan St after turning from MacRae St. en route to Bendigo. Note sign on its own post noting tram turns "Beware Tram Turns" and stop sign on adjacent pole "Trams stop on Request". No. 21 has two SEC roof ads. 1197.15 - No. 21 in Nolan St. after turning from Bridge St. (White Hills Road). Note signal light for Bridge St. loop on pole corner of street. Photo taken after tram has passed photographer. 1197.16 - No. 2 bound for Eaglehawk at unknown location. 1197.17 - Tram stop sign on a pole "CARS STOP BY REQUEST" 1197.18 - No. 5 in Carpenter St.? en route to Quarry Hill. 1197.19 - No. 28 has just arrive at Golden Square terminus, passengers are disembarking and the trolley pole is being turned. Golden Square Hotel in the background. 1197.20 - No. 28 at Golden Square terminus. Has a "Nothing beats Briquettes for hear roof ad. Information written on in black ink and date stamped on purple ink. 1197.1 - "No. 5 at Creeth St. Long Gully" 1197.2 - "No. 5 approaching Needle Loop between Long Gully and California Gully" 1197.3 - "No. 5 at Needle Loop between Long Gully and California Gully" 1197.4 - "No. 26 crossing railway bridge at Job's Gully near Eaglehawk" 1197.5 - "No. 26 just after crossing railway bridge at Job's Gully near Eaglehawk/ 1197.6 - "No. 26 in High St. Eaglehawk" 1197.7 - "No. 26 at end of double track in High St. Eaglehawk" 1197.8 - "Nos. 26 and 17 crossing at Job's Gully Loop" 1197.9 - "No. 17 crossing railway bridge at Job's Gully near Eaglehawk". 1197.10 - "No. 26 at Long Gully" 1197.11 - 'Northern end of points at Long Gully Loop". 1197.12 - "No. 17 turning into View St. from Bamard St. Bendigo". 1197.13 -'No. 17 at beginning of double track in View St. after leaving Bamard St. Bendigo. 1197.14 - "No. 21 enters Nolan St. from MacRae St. Bendigo." 1197.15 - "No. 21 in Nolan St. Bendigo just after leaving White Hills Road." 1197.16 - "No. 2" 1197.18 - "No. 5" 1197.19 - "Birney car No. 28 at Golden Square Terminus" 1197.20 "Birney car No. 28 at Golden Square Terminus" tramways, trams, bendigo, long gully, railway bridge, jobs gully, trackwork, nolan st, quarry hill, tram stops, golden square, tram 2, tram 5, tram 17, tram 21, tram 26, tram 28 -
 Ballarat Tramway Museum
Slide - 35mm slide/s - set of 13, Noel Simons, 24/05/1971 12:00:00 AM
Set of 13 transparencies taken on 24/5/1971 on Kodak mounts. 1200.1 - No. 7 en route to Golden Square turning from Bridge St. into Nolan St. Photo taken after tram has passed photographer. Tram has a briquettes roof ad. 1200.2 - No. 21 in McCrae St. just before Nolan St. Photo taken after tram has passed photographer. 1200.3 - No. 7 in Nolan St at corner with McCrae St. Passenger boarding tram at a tram stop. 1200.4 - No 7 turning from Nolan into McCrae St. with Golden Fleece service station in background. 1200.5 - No. 7 in Thunder St en route to North Bendigo. Photo taken after tram has passed photographer. 1200.6 - No. 5 en route to Eaglehawk just after leaving Needle Loop between Long Gully and California Gully. 1200.7 - No. 5 at the start of the double track in High St. Eaglehawk. 1200.8 - No. 5 at Eaglehawk terminus showing "Depot" with Leo A Hughes Photographer advertisement on building in background. 1200.9 - No. 5 at Eaglehawk terminus. Has two SEC roof ads 'Everything's fine in my all electric kitchen' and 'Electricity best for cooking'. 1200.10 - No. 5 at Eaglehawk terminus, with canon, war memorial outside Town Hall and Leo A Hughes Photographer advertisement on building in background. 1200.11 - No. 5 in McCrae St. about to enter Arnold St. and depot. Tram showing depot, has driver changing points. 1200.12 - No. 5 in Arnold St. Photo taken looking up the centre of the access track - shows the overhead at depot junction. 1200.13 - Depot entrance with signage at depot entrance and depot building in background.Information written on in black ink and date stamped on purple ink. 1200.1 - "No. 7 entering Nolan St. from Bridge St." 1200.2 -"No. 21 in McRae St. about to turn into Nolan St." 1200.3 - "No. 7 in Nolan St. at corner of McRae St." 1200.4 - "No. 7 turning from Nolan St. into McRae St." 1200.5 - "No. 7 in Thunder St. just after turning from Caledonia St." 1200.6 - "No. 5 just after leaving Needle Loop between Long Gully and California Gully. 1200.7 - "No. 5 in High St. Eaglehawk at start of double track." 1200.8 - "No. 5 at Eaglehawk terminus" 1200.9 - "No. 5 at Eaglehawk terminus" 1200.10 - "No. 5 at Eaglehawk terminus."\ 1200.11 - "No. 5 in McCrae St. about to enter Arnold St." 1200.12 - "No. 5 in Arnold St." 1200.13 - "Entrance to Bendigo Tram Depot, No. 5 running into shed."tramways, trams, bendigo, mccrae st, north bendigo, california gully, eaglehawk, depot, tram 5, tram 7, tram 21 -
 Ballarat Tramway Museum
Slide - 35mm slide/s - set of 32, Noel Simons, 25/02/1971 12:00:00 AM
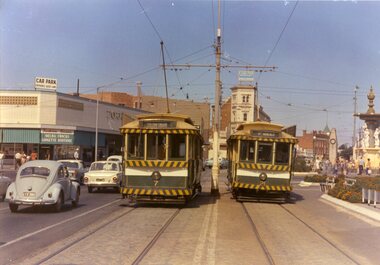
Set of 31 transparencies taken on 25/2/1972 on Kodak mounts. 1201.1 - Bendigo No. 26 in Bond St. just after leaving Long Gully en route for Quarry Hill. Has Norris Supermarket in background. Has two SEC roof ads. 1201.2 - No. 26 climbing View St. from Charing Cross en route to Eaglehawk. Has ANZ bank and AMOCO service station in background. 1201.3 - as for 1201.3, but after tram has passed photographer. Has buildings west of Mackenzie St. in photograph. 1201.4 - Tram stop and centre of the road pole with two "CARS STOP BY REQUEST" signs mounted on pole at the corner of Mackenzie St. 1201.5 - same position as for 1201.3, but with No. 5 descending the street. 1201.6 - same position as for 1201.2, but with No. 5 descending the street. Photo taken after tram has passed photographer. 1201.7 - No. 7 in Nolan St. from across the park at Lake Weeroona. 1201.8 - No. 7 entering McCrae St from Nolan St. - distant view. Note "TRAM "sign on left hand side under tree and overhead in McCrae St. from former track that once was in this street. 1201.9 - No. 7 in High St. with Cathedral in background. Tram en route to North Bendigo. Note scaffolding around Cathedral main spire area. 1201.10 - No. 7 crossing Bendigo Creek bridge in High St. near Golden Square. Has a Caltex Service station in the background. 1201.11 - No. 7 at Golden Square terminus with Sunburst Fruit Juices and a Peters Ice cream delivery vans alongside. 1201.12 - as for 1201.11 but photo taken from behind tram, with the end of the rails in the photograph. 1201.13 - No. 7 and 21 in Pall Mall at Charing Cross with No. 5 in the background. Taken some distance away from the location. 1201.14 - No. 7 at Golden Square terminus, taken a short distance from the tram terminus. Shows Milk Bar on right hand side and the hotel on the left hand side. Taken from the south side of the roadway. 1201.15 - as from 1201.14 but taken from the north side of the roadway. 1201.16 - No 5 waiting at California Gully loop. Distant photo showing surrounds 1201.17 - No. 5 en route for Quarry Hill crossing No. 26 at California Gully. 1201.18 - No. 26 at Eaglehawk terminus with Eaglehawk Town Hall and Post Office in background. 1201.19 - No. 21 arriving at Charing Cross en route to North Bendigo. Has Alexandra Fountain in the background, ANZ bank RACV building, and other buildings on the north side of Pall Mall or Nolan St. 1201.20 - No. 26 en route for Quarry Hill at Charing Cross, with crew standing by front door. Has Colonial Mutual life building, Armstrong Tyre Service (Firestone) and a sign for Cohns Drinks in the background. 1201.21 - as for 1201.20 but with No. 5 en route to Eaglehawk now in photograph. 1201.22 - No. 26 at Quarry Hill terminus. 1201.23 - No. 26 at Quarry Hill terminus, view of front portion of tram only from a gate at the Bendigo cemetery. 1201.24 - Track at the end of the Quarry Hill line showing the point blades of the former "Y" terminus and the overhead for this. 1201.25 - No. 2 at the Quarry Hill terminus, looking along the former Trackwork. 1201.26 - as for 1201.25 1201.27 - number not used. 1201.28 - Golden Square terminus from some distance from the actual terminus, showing the Warning sign "TRAM" for motorists from the south. No. 7 at the terminus. 1201.29 - No. 7 passing through the Golden Square shopping centre. Numerous cars and pedestrians. Tram en route for North Bendigo. 1201.30 - No. 7 in High St. Golden Square, en route for North Bendigo. Photo taken after tram has passed photographer. 1201.31 - No. 7 in High St. just past Wattle St. with the Cathedral in the background. Tram has two SEC roof ads good side on photo, 'Everything's fine in my all electric kitchen' and 'Electrical cooking - clean, quick, economical'. 1201.32 - No. 7 in High St. nearing Wattle St. Has Cathedral in the background. Photo taken after tram has passed photographer.Information written on in black ink and date stamped on purple ink. 1201.1 - "No. 26 in Bond St just after leaving Long Gully" 1201.2 - "No. 26 climbing View St. from Charing Cross" 1201.3 - "No. 26 ascending View St. from Charing Cross (At Mackenzie St.)" 1201.4 - "View St. & Mackenzie St." 1201.5 - "No. 5 in View St. near Mackenzie St." 1201.6 - "No. 5 in View St. nearing Charing Cross." 1201.7 - "No. 7 in Nolan St. seen from Lake Weeroona Park." 1201.8 - "No. 7 entering McRae St. from Nolan St. Note "TRAM" warning sign on left. 1201.9 - "No. 7 in High St. passing Short St." 1201.10 - "No. 7 crossing Bendigo Creek bridge in High St. near Golden Square." 1201.11 - "No. 7 at Golden Square terminus" 1201.12 - "No. 7 at Golden Square terminus" 1201.13 - "No 7, 21 and 5 at Charing Cross" 1201.14 - "No. 7 at Golden Square terminus" 1201.15 - "No. 7 at Golden Square terminus" 1201.16 - "No 5 waiting at California Gully loop." 1201.17 - "Nos. 5 and 26 crossing at California Gully loop" 1201.18 - "No. 26 at Eaglehawk terminus" 1201.19 - "No. 21 arriving at Charing Cross from Golden Square" 1201.20 - "No. 26 at Charing Cross" 1201.21 - "Nos. 5 and 26 at Charing Cross." 1201.22 - "No. 26 at Quarry Hill terminus" 1201.23 - "No. 26 at Quarry Hill terminus seen through the gates of the Bendigo Cemetery." 1201.24 - "Quarry Hill terminus showing remains for former double track layout abandoned before 1964." 1201.25 - "No. 2 at Quarry Hill terminus" 1201.26 - "No. 2 at Quarry Hill terminus" 1201.28 - "The Southern approach to Golden Square with No. 7 standing at the terminus, "TRAM" warning sign on the left. 1201.29 - "No. 7 passing through Golden Square Shopping Centre" 1201.30 - "No. 7 in High St. Golden Square" 1201.31 - "No. 7 in High St. passing Wattle St." 1201.32 - "No. 7 in High St. nearing Wattle St."tramways, trams, bendigo, bond st., view st., nolan st., high st., eaglehawk, california gully, charing cross, quarry hill, trackwork, tram 2, tram 5, tram 7, tram 21, tram 26 -
 Ballarat Tramway Museum
Slide - 35mm slide/s - set of 19, Noel Simons, 26/02/1972 12:00:00 AM
Set of 18 transparencies taken on 26/2/1972 on Kodak mounts. 1203.1 - Bendigo 5 at Eaglehawk terminus - with new traffic works. 1203.2 - No. 5 climbing the High St. hill Eaglehawk with the buildings on the east side in the photo. 1203.3 - No 2 descending the road over rail bridge at Job's Gully, heading for Quarry Hill. 1203.4 - as for 1202.3, but more side on. Tram has two SEC roof ads. 1203.5 - as for 1202.4 1203.6 - No. 26 entering Garden Gully Loop, Mt. Korong Road, Ironbark. Tram en route to Eaglehawk. Water column on right hand side of photograph. 1203.7 - No. 2 on the Eaglehawk route, Iron Bark area?, bound for Quarry Hill. 1203.8 - as for 1202.7, but photo taken after tram has past photographer. 1203.9 - No. 5 at Eaglehawk terminus, night photo. Tram has arrived at terminus, showing Quarry Hill, pole turned, but the tram lights have yet to be turned around. 1203.10 - as for 1202.9, but lights have been turned around. 1203.11 - No. 26 climbing the View St. Hill near the Commodore Hotel. Has Campbells Electrical Services building in the background. Photo taken after the tram has passed the photographer. 1203.12 - No. 7 end on photograph, at Golden Square, destination showing Golden Square - night photo. 1203.13 - number not used. 1203.14 - as for 1202.12, but partially side on, has a passenger looking out the tram. 1203.15 - as for 1202.12, but with hotel in the background. 1203.16 - No. 26 and 2 at Charing Cross, night photo. Tram 26 en route to Quarry Hill, 2 to Eaglehawk. 1203.17 - Interior photo of No. 26, at night. 1203.18 - No. 26 at the Quarry Hill terminus as night. 1203.19 - as for 1202.18, but central portion of the tramcar.Information written on in blue ink and date stamped on purple ink. 1203.1 - "No. 5 at Eaglehawk terminus" 1203.1 - "No. 5 in High St. Eaglehawk" 1203.3 - "No. 2" 1203.4 - "No. 2" 1203.5 - "No. 2" 1203.6 - "No. 26 at Garden Gully Loop Mt Korong Rd., Ironbark" 1203.7 - "No. 2" 1203.8 - "No. 2" 1203.9 - "No. 5 at Eaglehawk terminus" 1203.10 - "No. 5 at Eaglehawk terminus" 1203.11 - "No. 26 in View St. Near the Commodore Motel" 1203.12 - "No. 7 at Golden Square Terminus" 1203.14 - "No. 7 at Golden Square Terminus" 1203.15 - "No. 7 at Golden Square Terminus" 1203.16 - "Nos. 26 and 2 at Charing Cross" 1203.17 - "Interior of No. 26" 1203.18 - "No. 26 at the Quarry Hill terminus" 1203.19 - "No. 26 at the Quarry Hill terminus "tramways, trams, bendigo, eaglehawk, bridges, iron bark gully, night photo, quarry hill, golden square, tram 2, tram 5, tram 7, tram 26 -
 Ballarat Tramway Museum
Slide - 35mm slide/s - set of 25, Noel Simons, 26/02/1972 12:00:00 AM
Set of 25 transparencies taken on 26/2/1972 on Kodak mounts. 1204.1 - Bendigo No. 5 - just arrived at Manchester Loop near Havilah Road, Long Gully. Photo taken after tram has passed photographer. 1204.2 - No. 26 in Backhaus St. Long Gully passing William St, en route to Quarry Hill. Photo taken after tram has passed photographer. 1204.3 - No. 5 climbing the High St. Hill Eaglehawk, heading for Quarry Hill with the buildings on the West side of High St. in the background, including the Eaglehawk Town Hall. 1204.4 - as for 1204.3, but tram close up. 1204.5 - as for 1204.3, but after tram has passed photographer. 1204.6 - No. 5 at intersection of Mt Korong Road Ironbark and Calder Highway, with the AMPOL service 'station in the background. Photo taken after tram has passed photographer. 1204.7 - No. 26 en route to Quarry Hill shortly after leaving Needle Loop, passing William St., Long Gully. 1204.8 - No. 5 at California Gully Loop, picking up a passenger, with the shops at Long Gully in the background. Photo taken after tram has passed photographer. 1204.9 - No. 5 in Long Gully, en route to Quarry Hill. Photo taken after tram has passed photographer. 1204.10 - No. 2 at Eaglehawk terminus with the Eaglehawk Town Hall and Post Office in the background. Tram has two SEC roof ads. 1204.11 - No. 2 at Eaglehawk terminus, close up. 1204.12 - as for 1204.11, but through the park gates. 1204.13 - as for 1204.11, but with tram stop shelters in the foreground and buildings on the West side of High St in the background. 1204.14 - No. 2 in Mt. Korong Rd, midway between California Gully Loop and Needle Loop. Photo taken after tram has passed photographer. 1204.15 - No. 5 in Long Gully, en route to Quarry Hill. 1204.16 - as for 1204.15, but with trams departed loop. Has an ESSO service station in the background. 1204.17 - No. 26 leaves Charing Cross up View St.. Photo taken after tram has passed photographer. Has Armstrong Tyre Service, Cohns Drinks ad on a building and the T&G building in the background. Also Firestone ads on the tyre service building. 1204.18 - No. 5 waits at Charing Cross with the Alexandra Fountain in the background. Tram has two SEC roof ads, 'Everything s fine in my all electric kitchen' and 'Electricity Best for Cooking'. Has RACV, Colonial Mutual Life buildings in the background and the planting areas around Charing Cross gardens in the foreground. 1204.19 - No. 21 en route to North Bendigo arrives at Charing Cross, with passengers waiting to board. No. 5 in the background. In the background is the Fountain Gate Plaza building and the City Family Hotel. 1204.20 - as for 1204.19, but with No. 7 en route to Golden Square. 1204.21 - as for 1204.19, but closer up. 1204.22 - as for 1204.18 1204.23 - No. 25 in Nolan St. near the crossing of Bendigo Creek, running a special tram tour. 1204.24 - No. 25 on a special charter, in Weeroona Ave. at Cnr of Caledonia St. passing the Gas works. 1204.25 - Nos. 25 (showing Golden Square), 7 and 26 at Charing Cross. Has fountain in the background.Information written on in blue ink and date stamped on purple ink. 1204.1 - "No. 5 at Manchester Loop, near Havilah Rd. Long Gully." 1204.2 - "No. 26 in Backhaus St. Long Gully passing William St." 1204.3 - "No. 5 in High St. Eaglehawk." 1204.4 - "No. 5 in High St. Eaglehawk." 1204.5 - "No. 5 in High St. Eaglehawk." 1204.6 - "No. 5 in Mt. Korong Rd., Ironbark, passing Calder Highway Junctn." 1204.7 - "No. 26 shortly after leaving Needle Loop, passing William St., Long Gully. No. 5 cresting hill in distance." 1204.8 - "No. 5 at California Gully Loop." 1204.9 - "No. 5 in Long Gully" 1204.10 - "No. 2 at Eaglehawk terminus." 1204.11 - "No. 2 at Eaglehawk terminus." 1204.12 - "No. 2 at Eaglehawk terminus." 1204.13 - "No. 2 at Eaglehawk terminus." 1204.14 - "No. 2 in Mt. Korong Rd, midway between California Gully Loop and Needle Loop. 1204.15 - "Nos. 2 and 26 crossing at Long Gully." 1204.16 - "No. 26 leaves Long Gully loop for Eaglehawk as No. 2 pulls out of the far end towards Bendigo" 1204.17 - "No. 26 beginning the climb up View St. from Charing Cross." 1204.18 - "No. 5 at Charing Cross." 1204.19 - "No 21 arrives at Charing Cross from Golden Square while No. 5 awaits departure time for Eaglehawk." 1204.20 - "Nos. 7, 21, and 2 (behind which is No. 5) at Charing Cross." 1204.21 - "Nos. 7, 21, and 2 at Charing Cross." 1204.22 - "No. 5 at Charing Cross." 1204.23 - "No. 25 in Nolan St. near Bendigo creek crossing" 1204.24 - "No. 25 in Weeroona Ave. at cnr of Caledonia St." 1204.25 - "Nos. 25, 7, 26 and 2 (behind 26) at Charing Cross."tramways, trams, bendigo, eaglehawk, long gully, california gully, charing cross, north bendigo, tram 2, tram 5, tram 7, tram 21, tram 25, tram 26 -
 Ballarat Tramway Museum
Slide - 35mm slide/s - set of 6, Noel Simons, 28 Feb. 1972
Set of 6 transparencies taken on 28/2/1972 on Kodak mounts. 1206.1 - Bendigo No. 5 at Hayes St. Loop, en route for Quarry Hill. 1206.2 - No. 5 at Garden Gully Loop, Mt. Korong road, Ironbark. en route to Quarry Hill. Note the water column in the background. 1206.3 - No. 5 in View St. Bendigo, with the Commodore Motel in the background. 1206.4 - No. 6 en route for Golden Square in Fire Station loop, with the fire station building in the background. Photo taken after tram has passed photographer. 1206.5 - No. 6 in High St., running through Golden Square Shopping Centre, en route for Golden Square. Photo taken after tram has passed photographer. 1206.6 - No. 6 arriving at Charing Cross, bound for North Bendigo, with the City Family Hotel, ANZ bank and the Cenotaph (war memorial) in the background.Information written on in blue ink and date stamped on purple ink. 1206.1 - "No. 5 at Hayes Loop, Ironbark." 1206.2 - "No. 5 at Garden Gully Loop, Mt. Korong road, Ironbark." 1206.3 - "No. 5 in View St. just after start of double track near Barnard St." 1206.4 - "No. 6 in High St. at Fire Station loop." 1206.5 - "No. 6 in High St. running through Golden Square shopping centre." 1206.6 - "No. 6 arriving at Charing Cross from Golden Square."tramways, trams, bendigo, hayes st. loop, garden gully loop, view st., golden square, charing cross, tram 5, tram 6 -
 Ballarat Tramway Museum
Slide - 35mm slide/s - set of 12, Noel Simons, 28 Feb. 1972
Set of 12 transparencies taken on 28/2/1972 on Kodak mounts. 1207.1 - Bendigo 26 and 2 at Charing Cross. 26 en route for Eaglehawk, 2 for Quarry Hill. Has the Colonial Mutual Life, Armstrong Tyre Service, and Australian Mutual Provident Society buildings and a Cohns Drinks ad. in the background. 1207.2 - as for 1207.1 but with Alexandra fountain in the foreground. 1207.3 - No. 2 in Mitchell St. heading for Quarry Hill. Photo taken after tram has passed photographer. Has buildings on either side of Mitchell St. in the background, including the Plaza Theatre. 1207.4 - No. 6 en route for Golden Square departing Charing Cross. Has the RACV and ANZ bank in the background. 1207.5 - No. 2 crossing Pall Mall to enter Charing Cross ex Quarry Hill, with the Fountain Plaza in the background. 1207.6 - No. 6 arriving Charing Cross ex Golden Square with No. 21 alongside. No. 21 has the SEC ad. 'Everything's fine in my all electric kitchen.' Has the City Family Hotel and the Fountain Plaza shopping centre in the background. 1207.7 - No. 5 at Charing Cross en route for Quarry Hill with No. 2 behind. No. 2 has two SEC roof ads, 'Everything s fine in my all electric kitchen' and 'Electricity best for cooking'. RACV building in the background. Tram crews are discussing the day in the front of the tram. 1207. 8 - No. 21 in High St. Bendigo with the Cathedral in the background. No. 21 has two SEC roof ads, 'Everything's fine in my all electric kitchen' and 'Electricity best for cooking'. 1207.9 - No. 6 in High St. Bendigo with the Cathedral in the background. 1207.10 - No. 6 in High St. Bendigo, just past Wattle St. Photo taken after the tram has passed the photographer from within the Highway Car Sales yard. 1207.11 - No. 26 bound for Eaglehawk at the end of the double track in View St., note signal contactors, tram stop and section signs mounted on pole. 1207.12 - No. 26 turning from View St. into Barnard St.Information written on in blue ink and date stamped on purple ink. 1207. 1- "Nos. 26 and 2 at Charing Cross." 1207.2 - "Nos. 26 and 2 at Charing Cross." 1207.3 - "No. 2 in Mitchell St. just after leaving Charing Cross." 1207.4 - "No.6 leaving Charing Cross for Golden Square." 1207.5 - "No. 2 arriving at Charing Cross from Quarry Hill." 1207.6 - "No. 21 waits at Charing Cross as No. 6 arrives from Golden Square." 1207.7 - "No 5 at Charing Cross with No. 2 lurking behind." 1207.8 - "No. 21 in High St. at cnr of Wattle St." 1207.9 - "No. 6 in High St. at cnr of Wattle St." 1207.10 - "No. 6 in High St. between Wattle and Vine Sts." 1207.11 - "No. 26 at end of double track in View St. near Barnard. St. 1207.12 - "No. 26 seen at dusk turning from View St. into Barnard St."tramways, trams, bendigo, charing cross, high st, view st., tram 2, tram 5, tram 6, tram 21, tram 26 -
 Ballarat Tramway Museum
Slide - 35mm slide/s - set of 4, Noel Simons, Apr. 1972
... Parade Ballarat Ballarat goldfields Tramways trams Bendigo ...Set of 4 transparencies - copy slides - possibly ARE film strip dated March 1972. 1209.2 and 1209.4 on Kodak Readymount mounts. 1209.1 - Bendigo 5, 6 and 28 on a special tram service in bound to the City on a tour in Caledonia St. about to enter Lucan St, or White Hills Road or Weeroona Ave. (mis match in names in various maps). Gas works in the background. No. 5 has a white disk on the rear of the tram. 1209.2 - Nos 2 and 26 at Charing Cross with the Fountain Plaza in the background. Both trams have the destination of Quarry Hill, though 26 is on the Eaglehawk bound track. 1209.3 - No. 19 at the Golden Square terminus, with the conductor or driver swinging the pole and Billy Rodda's Golden Square hotel in the background. 1209.4 - No. 7 at Fire Station loop, en route to North Bendigo, picking up a passenger with a pram. Part of a set of 20 slides made by the Association of Railway Enthusiast Provincial Tramways film strip. Reference Item 2560 details the ARE Film Strip and provide references to other slides.Information written on in blue ink and date stamped on purple ink. 1209.1 - "Nos 5, 6 and 28 in Caledonia St. about to enter Weeroona Ave." 1209.2 - "Nos 2 and 26 at Charing Cross." 1209.3 - "Swinging the pole on No. 19 at Golden Square Terminus." 1209.4 - "No. 7 inward bound from Golden Square stops at Fire Station Loop."tramways, trams, bendigo, charing cross, golden square, gas works, special trams, tram 2, tram 5, tram 6, tram 7, tram 19, tram 28 -
 Ballarat Tramway Museum
Slide - 35mm slide/s set of 7, Noel Simons, 1972
... of Mitchell St. in the background. 1212.3 - No. 7 (North Bendigo... (North Bendigo) and 29 (Golden Square) crossing. Actual location ...Set of 7 transparencies undated on PAKON mounts - appear to be early 1970's. 1212.1 - No. 18 about to enter the Long Gully loop with ESSO service station on the right hand side. 1212.2 - No. 6 in Mitchell Street bound for Charing Cross. Tram has destination of "Rly Station". Has buildings on the east side of Mitchell St. in the background. 1212.3 - No. 7 (North Bendigo) and 29 (Golden Square) crossing. Actual location? 1212.4 - "No 6 showing 'SPECIAL' at Eaglehawk terminus. Has the Foodland store and Fruit shop in the background. 1212.5 - No. 19 at Eaglehawk terminus, on the extension to the normal Eaglehawk terminus. Tram has showing 'Eaglehawk'. Tram has two SEC roof ads. 1212.6 - No. 25 and another Bogie car at Quarry Hill terminus on last day. 1212.7 - No. 18 and 29 at Quarry Hill terminus. No.. 18 showing 'Quarry Hill' - has two SEC roof ads 'Electric Cooking - Matchless' and 'Everything's fine in my all electric kitchen' and No. 29 has a briquettes roof ad.Information typed onto a white label stuck on the slide. 1212.1 - "No. 18 at Long Gully" 1212.2 - "No. 6 in Mitchell Street." 1212.3 - "7 and 29 Lake View Hotel" 1212.4 - "No. 6 at Eaglehawk" 1212.5 - "No. 19 at Eaglehawk Term." 1212.6 - "Last cars Quarry Hill." 1212.7 - "18 & 29 Quarry Hill"tramways, trams, bendigo, long gully, mitchell st., eaglehawk, quarry hill, last tram, tram 6, tram 7, tram 18, tram 19, tram 25, tram 29 -
 Ballarat Tramway Museum
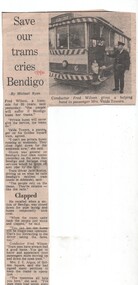
Newspaper, Michael Ryan, "Save our trams cries Bendigo", 17/09/1970 12:00:00 AM
Newspaper Clipping possibly from a newspaper dated 17/9/70 - written by Michael Ryan, reporting on the 'love' of Bendigo's trams by its passengers and crews. Features a photo of Bendigo No. 6, of Conductor Fred Wilson giving a hand to Mrs. Valda Towers. Quotes from Valda Towers, driver Jack Boston, Fred Wilson and a Mrs. J. E. Argus of Golden Square."17/9/70" in red ink adjacent to photo.trams, tramways, bendigo, closure, fred wilson, buses -
 Ballarat Tramway Museum
Album - Photo Album, Keith Kings, Jul. 1970
... Photo of Bendigo 12 at Golden Square. 18 1918 Photo of Bendigo... at Golden Square. 18 1918 Photo of Bendigo 13 and 26 at Eaglehawk ...Album comprises heavy cardboard covers with brown Rexene covers, with inside papers of heavy dark grey photo album paper, 36 leaves of dark grey photo paper and two brass interscrews within black grommets. See Condition Details re damage to back cover. Album contains 32 photos - personal prints of Keith Kings. Title page has been hand written to Les Denmead, dated 6/7/1970, thanking Mr. Denmead for his assistance over the years. Photos divided into the three SEC Provincial Tramway cities, each with a typed name proceeding the set of photos. Two further photos of Geelong were at the rear of the album, but were not in position when catalogued. One of these photos may be Reg. Item 1874 - photo of Geelong scrubber tram. Each of the photographs have been separately registered, as shown in the table below. Scanned images made of front and back of the photos. Back has Keith Kings ID number, description, notes and date of photo. Conservation Notes prepared - within the cataloguing sheet - see related documents. Folio Reg. Notes Item No. 1 Handwritten note to Mr. L. J. Denmead from Keith Kings. 2 Title sheet – “BALLARAT” 3 1903 Small photo of SEC Monogram from Geelong No. 1 1904 Photo of SEC plaques etc at Wendouree office 4 1905 Photo of front of Wendouree Parade depot – 1957 - with trams 40 and 25 in photo. 5 1906 Photo of Ballarat 23 at depot 6 1907 Photo of Ballarat 29 in depot. 7 1908 Photo of Ballarat 17 in Wendouree Parade 8 1909 Photo of Ballarat 21 at depot. 9 1910 Photo of Ballarat 15 and 31 in Sturt St. 10 1911 Photo of Ballarat No. 40 Sturt St. 11 1912 Photo of Ballarat No. 38 – Wendouree Parade 12 1913 Photo of Scrubber car in depot. 13 Title sheet – “BENDIGO” 14 1914 Photo of Bendigo depot 15 1915 Photo of Bendigo No. 17, 1949. 16 1916 Photo of Bendigo 22 and 4 at Eaglehawk. 17 1917 Photo of Bendigo 12 at Golden Square. 18 1918 Photo of Bendigo 13 and 26 at Eaglehawk terminus. 19 1919 Photo of Bendigo 17 (bogie) at Quarry Hill terminus. 20 1920 Photo of Bendigo 18 at Charing Cross 21 1921 Photo of Bendigo Birneys 28 and 29 at Charing Cross 22 1922 Photo of original sprinkler and track cleaning car in Bendigo depot 23 1923 Photo of Bendigo 2nd track cleaning car 24. 1924 Photo of trams at Manchester Loop, 1958. 25. Title sheet – “GEELONG” 26 1925 Photo of Geelong 19 in front of the depot. 27 1926 Photo of Geelong depot 28 1927 Photo of Geelong No. 3 at East terminus 29 1928 Photo of Geelong No. 23 outside depot. 30 1929 Photo of Geelong No. 16 at Eastern Park terminus. 31 1930 Photo of Geelong No. 28 at depot 32 1931 Photo of Geelong Birney No. 14 at Eastern Park terminus. 33 1932 Photo of Geelong No. 32 at Moorabool St. 34 1933 Photo of Geelong No. 37 outside depot 35 1934 Photo of Geelong No. 39 at West terminus 36. No photo – marks of four corners remained. 37 – back cover No photo – marks of four corners remained. Photos not to be taken out of the album unless for photographic copying. Use image files. Photo Album - The Commercial Photo Album - No. 1 - 36 leaves. See hand written note from Keith Kings to Mr. L. J. Denmead. Dated 6/7/70.trams, tramways, ballarat, bendigo, geelong, photo album -
 Ballarat Tramway Museum
Photograph - Colour Photograph/s, 1960's
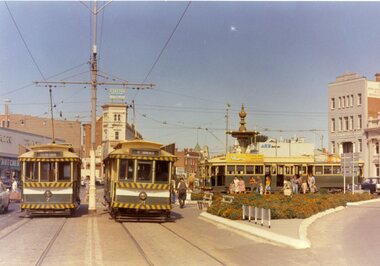
... Bendigo" and 7 showing "Golden Square" destinations. Photo has... showing "North Bendigo" and 7 showing "Golden Square" destinations ...Colour postcard size print of an SEC Bendigo trams 7 and 21 at Charing Cross. Printed on AGFA paper. Photo taken during last years of Bendigo. Trams have dash canopy lighting and large white strip under the driver's windows. Tram 21 showing "North Bendigo" and 7 showing "Golden Square" destinations. Photo has Cenotaph, fountain and buildings on the south east corner of Mitchell St and Pall Mall in background.bendigo, pall mall, charing cross, tram 7, tram 21 -
 Ballarat Tramway Museum
Photograph - Colour Photograph/s, 1960's
... windows. Tram 21 showing "North Bendigo" and 7 showing "Golden... Parade Ballarat Ballarat goldfields Bendigo Pall Mall Charing ...Colour postcard size print of an SEC Bendigo trams 7 and 21 at Charing Cross with two bogie trams by fountain. Printed on AGFA paper. Photo taken during last years of Bendigo. Trams have dash canopy lighting and large white strip under the driver's windows. Tram 21 showing "North Bendigo" and 7 showing "Golden Square" destinations. Taken at same time as 971. Photo has Cenotaph, fountain and buildings on the south side Charing Cross in the background, including ANZ bank and RACV office.bendigo, pall mall, charing cross, tram 7, tram 21 -
 Ballarat Tramway Museum
Photograph - Black & White Photograph/s, early 1960's
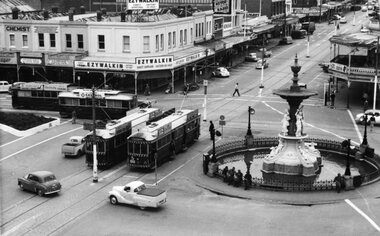
Black and White print of Bendigo SECV Bendigo tram 18 at Charing Cross terminus for the Eaglehawk route with a single truck car crossing behind heading for Golden Square. Trams have dash canopy lights, but no large white strip under the drivers windows. Photo not dated but appears to be at during early 1960's. Tram 18 has White Horse Whiskey ad on front dash panel, SEC Roof ad "Electricity best for Cooking" and a "CASTROL" ad, and showing destination of "Eaglehawk". Single truck car has SEC roof ad "You'll Cook better electrically" and a roof ad for "B.J. Osborn Plumbing Service" ad. Has City Club Hotel and Plaza Theatre buildings in background. Single truck could be No. 20, based on roof ads, see 986.trams, tramways, charing cross, bendigo, tram 18, tram 20 -
 Ballarat Tramway Museum
Photograph - Black & White Photograph/s, John Buckland, 23/12/1946 12:00:00 AM
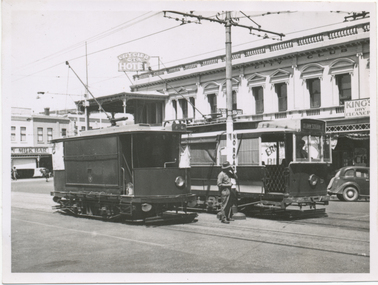
Black and white photograph of Bendigo track cleaner/sprinkler and ESCo No. 9 at the Pall Mall tram stop just to the south of the Fountain at Charing Cross. ESCo 9 has been modified (See Kings Bendigo Tramways p54). Sprinkler car has trolley pole facing Golden Square, as has No. 9. Pole by the trams have signs "ALL CARS STOP HERE" and a "NO ROAD" sign. Photo taken 23/12/1946. 676.1 - Black and White print contained within the Wal Jack Bendigo and Geelong Album, see Reg Item 5003 for more details. Added 2/7/2013. See The Bendigo Tramways, K.S.Kings On rear typed is "SECV Bendigo Tramways Car 9 and Track Grinder at Charing Cross 23/12/1946" and stamped in but rh corner "Photograph by John Buckland" trams, tramways, bendigo, esco, work trams, tram sprinkler, scrubber, tram 9 -
 Ballarat Tramway Museum
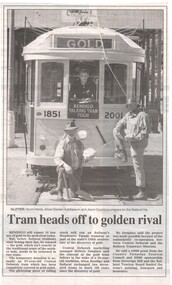
Newspaper, Bendigo Advertiser, "Tram heads off to golden rival", 1/03/2001 12:00:00 AM
... Parade Ballarat Ballarat goldfields Gold tram Bendigo BTM Gold ...Newspaper Clipping from Bendigo Advertiser, March 1, 2001, page 7, titled "Tram heads off to golden rival" with story and photo about Bendigo tram No. 18, being painted in a gold colour scheme for the 150th anniversary of the discovery of gold and to operate for the Ballarat Tramway Museum. Photo features Central Deborah staff Norm Harris and Jason Dunstone as miners and Darren Hutchesson as the driver. Tram has number covered, destination of "GOLD" and numbers "1851 - 2001" on front dash with the "Bendigo Talking Tram Tour" sign under the driver. Photographed at the mine terminus on 28 Feb. 2001.gold tram, bendigo, btm, gold -
 Ballarat Tramway Museum
Memorabilia - Exhibition Material, Warren Doubleday, "gold!, Gold!, GOLD! and Trams", 29/01/2003 12:00:00 AM
Two photos and thirty captions or label cards used in the Museum's exhibition entitled "gold!, Gold!, GOLD! and Trams". Printed on a colour laser jet, 200 gsm card, unless noted otherwise. Most cards have two Velcro dots on rear, except larger ones which may have three or four. .1 151 x 210 Opening Tram Leonora Tramways - supplied by the Perth Electric Tramway Society .2 210 x 292 Kalgoorlie Electric Tramways Limited trams No. 19 and 13 - ex PETS .3 210 x 297 Gold and Tramways of Ballarat - text card.. .4 210 x 297 text card - 2nd card. .5 130 x 210 Acknowledgements card. .6 - .8 97 x 297 - "GOLD!" on each card, with a heavier font each time. .9 172 x 297 "and trams" .10 136 x 297 "Painted to Celebrate" .11 383 x 80 "At first horses" .12 62 x 472 "Then came Electric" - Two pieces of card joined together, stored folded. .13 65 x 557 "and other Golden Cities" - Two pieces of card joined together, stored folded. .14 68 x 550 "For the City of Ballarat" - Two pieces of card joined together, stored folded. .15 47 x 385 "To Ballarat East as well" .16 45 x 90 "Main St" / "Photo Wal Jack 1963 btm362" .17 46 x 194 "Main and Victoria Sts" / "Photo Ron Fluck 1950 btm870" .18 69 x 126 "1964 Sebastopol" / "Photo Tramway Museum Society of Victoria" .19 66 x 99 "1951 Ballarat / Photo Keith Kings btm1378" .20 45 x 102 "Bendigo N.J. Simons Collection btm 1205.7" .21 68 x 106 "2001 Ballarat / Photo Warren Doubleday" .22 43 x 157 "To Sebastopol / From E.D. Jenkins book, Sebastopol Victoria 1864-1964 btm1090" .23 43 x 158 "From the City / Charles Rudd photograph, State Library of Victoria btm 1113i" .24 43 x 271 "Electric Power for Industry / BTM Collection btm 698i" .25 47 x 160 "To the Gardens / From Geo Rose stereo pair. Donated by Bacchus Marsh Blacksmith Cottage and Forge btm1257" .26 41 x 96 "Leonora / Courtesy Perth Electric Tramway Society" .27 45 x 117 "Bridge St / Postcard from Norm DePomeroy collection btm 841" .28 46 x 169 "Transport for all / Postcard from Norm DePomeroy collection btm837" .29 44 x 89 "Main St / Photo Ron Fluck 1962 btm867" .30 41 x 117 "Kalgoorlie / Courtesy Perth Electric Tramway Society" .31 46 x 150 "1905 Opening / BTM Collection btm482" .32 52 x 404 "Ballarat Trams are Ballarat History"trams, tramways, btm, exhibitions, gold!, gold!, gold! and trams, gold tram