Showing 939 items
matching bendigo life
-
 Bendigo Military Museum
Postcard - POSTCARD PHOTOGRAPH, Whitney Bros Electric Studio, C.1940
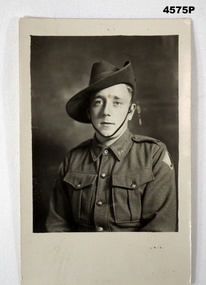
The photo is Douglas Niven Dean VX32652 2nd AIF, enlisted 15/7/1940, age 23 years, posted 7th Div A.A.S.Corp, served in siege of Tobruk, Middle East, New Guinea and Borneo, discharged on 7.12.1945. He was a member of the Bendigo Rats of Tobruk Association, served as secretary 1978 - 87 incl, Jnr V Pres 1992 - 95 and was a life Member of the Association.Postcard photo, portrait, B & W, shows a soldier in uniform, slouch hat, Rising sun collar badges, diamond shape colour patch showing on left arm, rear re post card has space for stamp, address and correspondence, faint makers stamp.On rear in blue ink, “Doug Dean”tobruk, 7th div, aasc, -
 Bendigo Military Museum
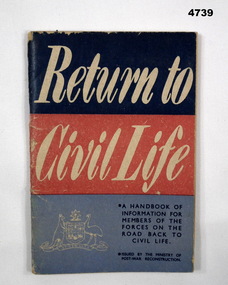
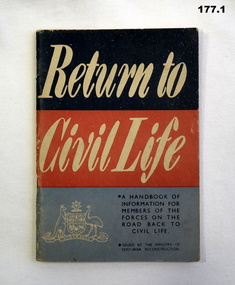
Book, Ministry of Post War reconstruction, Return to Civil Life, 1.9.1949
The table of ten contents covers 65 items relating to returning to civilian life.Book, “Return to Civil Life” cardboard covers with dark and light blue and red colours, text in white & blue, Coat of Arms in LH corner, 55 pages with 10 main content table all print in black.book, civil life -
 Bendigo Military Museum
Mixed media - BOOKLETS & LETTER, 1) 1.9.1945 .3) 30.9.1945 .4) 14.6. 1946
Items belonged to Arnold Oakley JORDAN TX3528 (Tasmanian) POW. Refer Cat No 176 for his service history..1) Book. 'Return to Civil Life.' Paperback, white writing on dark blue, red, and light blue cover. .2) Document 'Discharged Servicemen's Clothing Priority Form.' No. 41233 re TX3528, Jordan, A.O. .3) Booklet. 'Information for Forces in the Far East on Recovery’. Dated 30th Sept. 1945 - light brown in colour. .4) Document, relating to 'Grant of Proficiency Pay' from 15.8.45 re Mr. A.O.Jordanbooks-military, documents-letters -
 Bendigo Military Museum
Administrative record - COMPENDIUM WW1 - WW2, 4) A H Pettifer, Government Printer et al, 2) 14.2.1946; .3) 1.3.1919; .4) 30.11.1954 .5) 24.11.19? - WWI; .6) 31.10.1917; .7) 12.6.1917; .8) Page 1: 20.12.1915, Page 2: 10.12.1915, Page 6: 19.1915; .9) 10.9.1918; .10) 18.4.1919; .11) c.2.3.19?; .12) 18.9.1920; .14) post WWI; .15) 24.4.1920; .17) 18.4.1942; .18) 19.6.1943; .19) 18.3.1947; .20) 1944; .21) 1944; .23) 22.10.1941; .26) 13.9.1944; .27) 1.1944; .30) 7.3.1950; .31) 31.7.1944; .32) 16.4.1942; .33) 13.6.1946; .34) 6.5.1946; .36) a) & b) 3.11.1947; .37) 24.10.1951; .38) 24.9.1957; .39) 9.10.1957; .40) 19.2.1958; .41) 26.2.1958; .42) 1.3.1958; .43) & .44) 7.3.1958; .45) 25.2.1958; .46) 3.1.1948; .47) 26.2.1948; .48) 22.4.1958; .49) 24.2.1958; .50) 12.3.1958; .51) 6.1958; .52) c.Mar/Apr 1958; .53) 5.4.1958; .54) c.end WWII; .55) a.b. 13.6.1967; .56) 26.5.1967; .57) 18.2.1954
Herbert Trangmar Allan, refer 2755.4 for his extensive service history and wards. .2) Details gifting of a pair of Japanese binoculars to Col H T ALLAN by Pacific Island Regiment. .3) Certificate issued by Winston Churchill, Secretary of State for War (The War of 1914-1918), awarded to Capt H T ALLAN MC. .4) Herbert Trangman ALLAN born 5.1.1895 at Woolwich, NSW. Middle name misspelled, should be Trangmar not Trangman. .6) Congratulating H T ALLAN on receiving the Military Cross award for leading 2 companies which had lost officers during action on Passchendaele Ridge on 9.10.1917. .7) Describes life behind the lines whilst H T ALLAN's battalion has been resting for a month. Daily life consisted of training drills, sport & entertainment. Writer takes time to describe the countryside & weather. .8) Relate to H T ALLAN's military exam results & his promotion to 2nd Lieutenant in 1915. .9) To Herbert Allan's father, Mr P Allan detailing the citation for awarding of the Military Cross to Herbert ALLAN. Original citation appeared in the London Gazette,5.4.1918. .10) Form addressed to Capt H ALLAN MC, 17th Battalion stating his period of enlistment in the 1st AIF was to expire 26.5.1919. .11) Letter from Lord BIRDWOOD (General) to Herbert ALLAN in response to a letter received 19.11.19?. General BIRDWOOD expresses his opinions on difficulties the allied troops face in their fight against the Japanese. .12) Letter to Capt H T ALLAN advising of MID oak leaves sent to him. Details guidelines for attaching oak leaves to both the larger Victory Medal & the small service dress medal. .13) Form details H T ALLAN's WWII Army No, Rank, Unit & Decorations & Medals held. The form has not been signed & dated. .14) Details service record of Lt Col H T ALLAN NX12229. Includes military service from 1912 - 1944, schools & courses attended, decorations, promotions & overseas service. .16) Form issued to H T ALLAN on 15.12.1939 granting permission to leave New Guinea for Australia & return within a period of 12 months. Issued by Customs Office in Salamaua. Lists H T ALLAN's age as 44, height 5' 10" & occupation. .17) Letter from Major General MORSHEAD GOC, AIF (ME) to Major H T ALLAN, OBE, MC congratulating him on being awarded the OBE for outstanding service at Tobruch. .18) Letter from Major General MORSHEAD to Major H T ALLAN, OBE, MC replying to ALLAN's letter of 15.6.1943. MORSHEAD is congratulating ALLAN on his appointment to New Guinea Force, also acknowledges his excellent service record. .19) Letter acknowledges H T ALLAN's resignation from the Office of Production Member of the Australian New Guinea Production Control Board, effective from 28.8.1946. .20) Major General WINDEYER commanded the 20th Brigade from 1942-1946. .22) Card sent from the CO of the 3rd Australian Anti-Tank Regiment. .23) Menu for Farewell Dinner held in the Officer's Mess of the 20th Infantry Brigade, Tobruch on 22.10.1941. .24) Menu & Toast list for Farewell Dinner to Brigadier J J MURRAY DSO MC VD. Attended by H T ALLAN & held in the Officers Mess, 2/17 Australian Infantry Battalion on 22.12.1941. .25) Invitation to Col H T ALLAN by Lady Gowrie (wife of Governor General Baron Gowrie) to attend a Luncheon at Government House, Canberra, ACT. .26) Letter to Major (T/Lt Col) H T ALLAN from Major W A JENNER advising him of his secondment to 2/17 Australian Infantry Battalion & appointment to command 5 Aust Base Sub Area. .27) Application for Africa Star with Eighth Army Clasp signed by H T ALLAN & approved by Lt Colonel of 2/17 Australian Infantry Battalion. H T ALLAN held the rank of Major (substantive) at the time of qualification, 1.3.1942 - 11.1942. He held the rank of Lt Colonel at the time of application in 2.1944. .28) Detailing changes in command & promotions including that of Lt Col H T ALLAN, dated 1.4.19? .29) For Lt Col H T ALLAN detailing movements required by First Australian Army command. .30) Acknowledgement & confirmation of Col H T ALLAN's application for campaign awards for WWII. .31) Letter addressed to Lt Col H T ALLAN from Lt Gen Stanley Sauige requesting information on New Britain for a forthcoming visit. .32) Certificate was presented to H T ALLAN on 16.4.1942 when he was awarded an OBE by King George VI. .33) Document details H T ALLAN's relinguishing of Command of the HQ of Pacific Islands Regiment. ALLAN also relinguished the rank of temporary Colonel & was transferred to the Reserve of Officers with rank of substantive Lt Colonel. .35) Official letter to Colonel H T ALLAN from Joseph Francis, Minister for the Army. The letter acknowledges Col ALLAN's long & distinguished career during both peace & wartime. .36) a) & b) From H T ALLAN (assumed) to Prime Minister J B CHIFFLEY referring to the production of copra in New Guinea, the actions of the Commonwealth Bank in relation to planters & the collaboration of New Guinea natives with the Japanese. Assumed to be a copy of original. .37) Letter to H T ALLAN indicating he had been placed on the Retired List with the rank of Honorary Colonel. .38) Letter invites H T ALLAN to officially open the State Conference in Lae in late March or early April 1958. Invitation was extended due to H T ALLAN for distinguished service in PNG. .39) Letter to H T ALLAN thanking him for accepting the invitation to open the Papua & New Guinea State Conference in late March or early April 1958. .40) Letter from H T ALLAN to Lt Gen Sir Henry WELLS, Chief of the General Staff, Victoria Barracks, Melbourne. ALLAN requests permission to wear his uniform for official engagements during his upcoming visit to New Guinea. ALLAN also offers advice on how to deal with native troops including serving time with them, learning their language & studying their customs. He suggests that this would help quell & dissent & revolt. .41) Reply from Major General DALY to HT ALLAN thanking him for his offer to spend time with the CO of the Pacific Island Regiment to address concerns with that unit. This meeting would coincide with ALLAN's upcoming visit to PNG. .42) HT ALLAN's reply to Major General T J DALY's letter of 26.2.1958. ALLAN requests an opportunity to discuss PIR issues with Major General DALY prior to his visit to PNG. .43) Major General T J DALY's reply to HT ALLAN's request for a meeting to discuss ongoing issues with the Pacific Island Regiment. .44) Letter from HT ALLAN to Brigadier D M CLELAND notifying him that he will be staying in Port Moresby on his way to the RSS&AILA Congress in Lae. .45) Lieutenant Colonel MCGUINN writes to invite Colonel ALLAN to visit the PIR during his visit to New Guinea at the end of March of the beginning of April 1959. .46) Letter of appreciation to H T ALLAN thanking him for his efforts in presenting the case for the Territory of New Guinea during the post WWII transition period. .47) Letter to H T ALLAN from New Guinea Citizens Association, Lae Branch, thanking him for his service on behalf of the people of the Territory of New Guinea. The association offered to send ALLAN a suitable present in recognition of his service. .48) Major General T J DALY's reply to HT ALLAN's suggestions for handling disquiet amongst the native troops in the Pacific Island Regiment. .49) Reply from Lieutenant General WELLS to H T ALLAN granting him permission to wear his uniform on his forthcoming visit to New Guinea. WELLS also notes that he has passed other requests made by ALLAN to Major General DALY. .50) Copy of H T ALLAN's reply to Lieutenant General WELL's letter of 24.2.1958 [.49)]. .51) A written account of Colonel H T Blue ALLAN's visit to New Guinea in 3.1958. Article appeared on p.65 & 67 of the 6.1958 edition of Pacific Islands Monthly. .52) Newspaper account of Colonel H T Blue ALLAN's opening of the Rabaul Branch of the Native Ex Servicemen's Association. Colonel ALLAN spoke of the involvement of the Pacific Islands Regiment during WWII. .53) The Rabaul Times account of Colonel H T Blue ALLAN's opening of the Rabaul Branch of Native Ex Servicemen's Club. Featured on p1, concluded p3. .54) Biographical account of Colonel H T ALLAN's service in WWI & WWII. In addition an account of his success in New Guinea between the wars is included. .55) a.b. Biography of Colonel H T ALLAN written by R W Robson who was the founder of the Pacific Islands Monthly. Article was written following ALLAN's death on 23.5.1967 aged 72. This item is a pre publication copy of Robson's article which appeared in the Pacific Islands Monthly. .56) Text of a valedictory given at the funeral of Colonel Herbert Trangmar ALLAN OBE, MC, ED, NX12229 held 26.5.1967 following his death on 23.5.1967. The speech summarized his life in both wars & civilian life. 57) Invitation issued to Colonel H T & Mrs ALLAN to attend a Garden Party at Government House on 18.2.1954. At this function Colonel H T & Mrs ALLAN were to be presented to her Majesty Queen Elizabeth II.Herbert T ALLAN Collection. The contents are all of various size, the Album is the size documented. .1) Large teal green album containing 16 plastic pockets each with white card insert. Various documents & photos contained in each pocket. .2) Typed letter, black type on cream paper. .3) Certificate mounted on fawn card backed with dark brown veneer. Presented to Capt H T ALLAN MC for being mentioned in despatches on 7.11.1917. .4) New South Wales Birth Certificate extract, printed on pink paper with watermark. .5) Telegram on tissue paper to a sheet of cream paper. Pin located top L corner. Requests the attendance of Lt Herbert ALLAN, Russell Hotel, Russell Square. .6) Typed letter mounted on grey cardboard. .7) 2 page letter on foolscap paper, secured by pin top L corner. Written from France by Herbert (Bert) ALLAN & addressed to his father. .8) 11 pages secured with a clip top L corner. 1st document typed, 2nd handwritten, remainder printed. Relate to H T ALLAN's military exam results. .9) Typed letter from Department of Defence Base Records Office to P ALLAN. .10) Document, printed form to inform the recipient that their period of enlistment in the 1st AIF had expired. .11) 4 page handwritten letter on 2 sheets of paper. 1st page has a printed letterhead. .12) BR Form No 20. Typed formal letter from AIF Base Records Office to accompany Mentioned in Despatches oak leaves sent to the recipient. .13) Form AAFA36 used for recommending the awarding of an Efficiency Decoration. Form details service record & details of a serving soldier. .14) 1 large / 1 small page, numbered, detailing the service record of Lt Col H T ALLAN. Black type on cream paper. 2 pages are loose but evidence of attachment visible. .15) Bachelor of Arts Degree Certificate (testamur) granted by the University of Sydney, awarded to Herbert Trangmar ALLAN. Printed on cream parchment. .16) Proforma document issued by the Territory of New Guinea permitting leave & return to the Territory. Printed 2 sides, black type on cream paper. .17) Letter on Australian Imperial Force letterhead from Major General MORSHEAD to Major H T ALLAN. .18 Letter on HQ2 Aust Corps letterhead from Major General MORSHEAD to Major H T ALLAN. .19) Typed letter on External Territories letterhead from J R Halligan to H T ALLAN. .20) Cream Christmas card folded in 2, sent to H T ALLAN. On front in black lettering is HQ 20th Australian Infantry Brigade below black Rising Sun emblem. Inside in black lettering is With Best Wishes for Christmas and New Year. Christmas 1944. .21) Cream card folded in 2. Front illustration depicts a devil figure riding a platypus & carrying a pennant with 2/13 on it. The devil is depicted attacking a German & Japanese soldier. Below the devil is a boomerang with Greetings Xmas 1944 printed on it. Illustration is in green & black. Inside on LHS is a message from 2/13 Battalion. On RHS is a list of 2/13 battle honours from 1940-1943. On back in black print is 1944-1945 New Guinea Australia. .22) Cream Christmas card folded in 2. Front illustration in brown with word Greetings in green. RHS inside printing in green & brown letters. Artillery badge on back in brown. .23) Cream card folded in 2. Typed menu on cream paper attached inside. Front cover illustrated with 20th Infantry Brigade colour patch & a rat over a scroll with words - So What? .24) Cream card folded in 2. On front black printing accompanied by 2/17 Battalion colour patch that is black over green diamond shape. Inside a list of Toasts & Dinner Menu printed in black. Back page for autographs. .25) Cream invitation card. Black cursive script printing below gold crown on front. .26) Typed letter on cream paper. .27) Typed foolscap application form to claim the Africa Star. .28) & .29) Message form filled with typed orders. .30) Typed letter acknowledging an application for campaign medals & listing eligible awards. .31) Typed letter on bond paper. .32) Certificate on cream parchment. Black print in cursive script. Text details the awarding of an OBE to the recipient. .33) Typed text on Australian Military Forces letterhead. Cream paper. .34) Typed text. Temporary note for H T ALLAN's discharge from AMF. .35) Typed letter on Commonwealth of Australia, Minister for the Army letterhead. .36) a) & b) 2 page letter in black type on cream paper. Pages are loose, letter unsigned. .37) 1 page typed letter on Australian Military Forces letterhead. .38) & .39) 1 page typed letter on Return Sailors, Soldiers & Airmen's Imperial League of Australia, Papua & New Guinea Branch letterhead. .40) 1 page typed letter, unsigned. .41) Single sided typed letter on Australian Military Forces letterhead on cream paper. .42) 1 page typed letter, unsigned on cream paper. .43) Single sided typed letter on Australian Military Forces, Northern Command, Victoria Barracks, Brisbane letterhead on cream paper. .44) Single sided typed letter on cream paper. .45) 2 page typed letter on folded cream paper bearing the letterhead of the Pacific Islands Regiment. .46) 1 page typed letter on cream, lined paper. .47) 1 page typed letter on cream paper. .48) 1 page typed letter on Australian Military Forces, Northern Command Headquarters, Victoria Barracks, Brisbane letterhead on cream paper. .49) 1 page typed letter on Chief of General Staff, Australian Military Forces, Army Headquarters, Victoria Barracks, Melbourne letterhead on cream paper. .50) 1 page copy of an unsigned letter on cream paper. .51) Magazine article: Building a New Nation in New Guinea : Some advice from Colonel Blue ALLAN. Black & white article with a 2nd small section stapled to the main page. Large page features a black & white captioned photo of a group listening to a uniformed Officer deliver a speech. Also features advertising front & back. .52) Newspaper article: Official Opening of Native Ex Servicemen's Club. Black & white typed newspaper article featuring a captioned black & white photo of a uniformed Australian Officer & a group of New Guinea Ex Servicemen. .53) a. b. c. Newspaper article: Master Blue Came Back to the Islands: 4000 Attend Club Opening. 3 Section article cut from a newspaper. One part is the banner of the newspaper with date published. Other sections contain the text of the article. The larger section features a black & white photo of an Australian Army Officer in uniform. .54) Newspaper article, untitled. Black & white typed newspaper article with black & white caricature of an Australian Army Officer featured. .55) a. b. Magazine article: The Story of a Big Man who Loved Soldiering. 2 page black & white typed article with sub headings. .56) Text of a Speech. 2 page typed text written for a valedictory given at a funeral. Pages connected with a staple in the top L corner. .57) Printed, cream card invitation to a Garden Party for the recipient to meet Queen Elizabeth II & The Duke of Edinburgh. Text is in cursive script under the Coat of Arms of Her Majesty. .2) Signature ? Capt S C PIR. .4) Date of issue typed: 30.11.1954 Name of recipient: Herbert Trangman Allan Stamped: T Wells, Registrar General NSW .5) Handwritten: To Lt Herbert Allan, Russell Hotel, Russell Square. Typed: Buckingham Palace OHS. Your attendance is required at Buckingham Palace on Wednesday next the Twentyeighth inst (28.11.19?) at ten o'clock am service dress please telegraph acknowledgement Lord Chamberlain London. Stamped: Central District 24 NO 19. .6) Signed in pencil: W Birdwood. In pencil on back: 15 x 12. .8) p1: Handwritten signature. Copy dated 29.12.1915. p2 Handwritten in ink: P Allan Esq, Mount Hunter Hill. Military Examination. Copy dated 29.12.1915. Handwritten in pencil: Results: H T Allan. Tactics - Distinction 92% HE Barff p3 Underlined in ink: 38th Infantry Herbert Trangmar Allan to be 2nd Lieutenant (provisionally). Dated 16 June 1914. p5 Handwritten: Total 139. Lieut Allan tied with 15 others for 20 place. p7, 9, 10 & 11underlined in ink: H T Allan. p8 Underlined in ink: Allan HT. .9) & .10) Signature in black ink. .12) Handwritten signature in black ink: On back handwritten signature in black ink: Clive Wilkinson, Buddong, Robinson St, Chatswood. Also ? Rd, Cremorne Pt. .13) Handwritten in black ink: Details of HT Allan's Commission Service from 16.6.1914 - 18.2.1946. .15) Handwritten signature of the University Chancellor, Dean of Faculty of Arts & Registrar. Handwritten name of recipient. Seal of the University of Sydney imprinted bottom LHS. .16) Handwritten in black ink: Details of recipient. Stamped in red ink: New Guinea Customs. Stamped in blue ink: H M Customs, Cooktown, dated 17.12.1939. Handwritten on reverse: Signature. Stamped on reverse in red ink: New Guinea Customs, dated 15.12.1939. .17) & .18) Handwritten signature: Major General Morshead. .19) Handwritten signature in black ink: J R Halligan. .20) Handwritten inside in blue ink: Lt Col Allan. Good wishes from your many friends here. Signed by Major General Windeyer. .21) Inside LHS handwritten in blue ink: Lt Col Allan & an indecipherable signature. .22) Inside RHS handwritten: To Major (Blue) Allan OBE MC from Lt Col? .23) On front handwritten in blue ink: H T Allan?. Inside in black ink & pencil are 19 signatures. .24) On front: 3 signatures in black ink & pencil. On back: 36 signatures in black & blue ink & pencil. .25) On back handwritten in black ink: Colonel H T Allan OBE MC, with 3 ink lines below name. .26) Handwritten in blue/black ink: Signature. Handwritten in blue pencil top R corner: A32/3477. Handwritten in black ink bottom L corner: Cond (?) 15/9A. Handwritten in black ink: Signature. .27) Stamped top R corner: 2/17 Bn Received 9.2.1944. Signature in black ink: H T Allan. Signature in black ink: ? Lt Col 2/17 Aust Inf Bn 10.2.1944 Page bottom in pencil: Blue will keep 1 1/4 for you? .30) Handwritten: Details of eligible medals. Handwritten signature: J C K Miller Capt 7.3.50. Handwritten bottom L corner: Col H T Allan Bottom R corner: OBE, MC, 1914-19, Victory, ED, MID 1914-18, MID 1939-45 On back: Steak & Kidney Morris ) Clark ) Vowood ) 10/- 70215 Maughan ) Allan ) .31) Top of page: Imprinted Coat of Arms Top LHS in black ink: TOP SECRET AND PERSONAL Handwritten signature: Stanley Sauige .32) Embossed top L corner: Seal of the Most Excellent Order of the British Empire. Handwritten: Mary R. .32) Signed: Queen Mary, mother of George VI. .33) Handwritten signature. .34) Handwritten in blue ink: HERBERT TRANGMAR ALLAN 6 MAY 46 Handwritten signature. .35) Handwritten signature in blue ink: Joseph Francis, Minister for the Army. .37) Handwritten signature. .38) & .39) Handwritten signature: J W Knight. .41), .43) & .45) Handwritten signature in blue ink. .46) & .47) Handwritten signature in black ink: Henry G Eckhoff. .48) Handwritten signature in blue ink: With best wishes Yours sincerely T J Daly. .49) Handwritten signature in black ink: Yours sincerely H Wells. .57) Handwritten in black ink: Colonel & Mrs H T Allan.certificates, records, awards, administrative, compendium -
 Bendigo Military Museum
Booklet - BOOKLETS SOUTH AFRICA WW1, c.1915
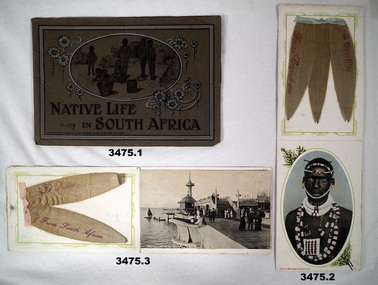
Items collected by Bert HEWSTON on the way to England WW1, refer Cat No 2759.2 for his service history. Part of the HEWSTON collection re WW1 & WW2.3 x Souvenir booklets from South Africa. .1) Dark grey/brown cover with illustration of native children within an oval shape. Contains colour prints of native people & places. 15 pages. .2) A coloured reproduction of a Zulu in marriage costume. Cream card cover with pale brown printing. Contains 3 x dried silver leaves fromTable Mountain fused to the inside back cover. .3) Photo post card of Promenade Pier, Cape Town which has 2 x dried silver leaves from Table Mountain fused to the inside the back cover..1) Printed: “Native life in South Africa” .2) Printed: “Zulu in marriage costume SA” .3) Printed: “From South Africa”documents - booklets, military history - souvenirs, africa -
 Bendigo Military Museum
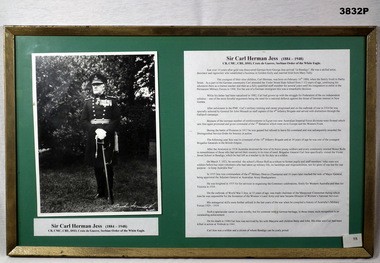
Photograph - PHOTOGRAPH, FRAMED, Post WW1
Black / white photo of Sir Carl Herman JESS.on LHS. Life history in black / white print on white background on RHS. Both mounted on green backgorund with gold painted wooden frame, glass front, fawn cardboard backing. White sticker with black print front bottom RHS, bottom front & bottom back LHS: “73”framed, jess, passchendaele barracks trust -
 Bendigo Military Museum
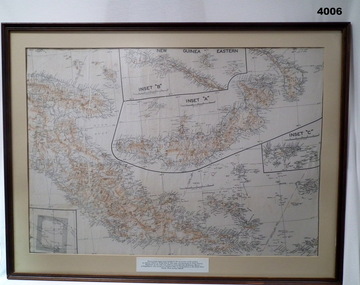
Map - MAP, FRAMED
Printed on border under map: These escape maps were carried in the zip pockets of life jackets by fighter pilots in WW2. This map was presented to A.S.R on the 12/7/79 by Councillor Ian McKenzie, Mayor of Eaglehawk who served as a fighter pilot in 78 Sqn. in Sth. W. Pacific are during 1943-44.Map of eastern section of New Guinea. Black print on white background with mountain ridges in tan. Inset 'A' is New Britain. Inset 'B' is New Ireland. Inset 'C' is Manus Island. Map is mounted with cream border, brown wooden frame with glass front and fawn wooden backing.maps, ww2 -
 Bendigo Military Museum
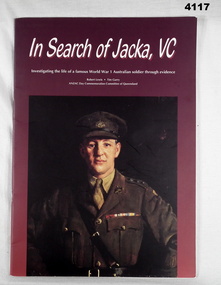
Book - MILITARY BOOK, ANZAC Day Commemoration Committee QLD, In Search of Jacka, VC, 2002
In search 0f JACKA VC. Investigating the life of famous WW1. Australian Soldier through evidence, a biography for education.Book, soft cover cardboard, white print on dark red back ground, front has copy of an Oil painting of “Captain Albert Jacka” by George Coates, back cover colour illustration enlist poster depicting Lieut Jacka VC, 24 pages, plain white, illustrated in B & W photographs, maps and medals.albert jacka vc, investigating albert jacka -
 Bendigo Military Museum
Card - CARD, SYMPATHY
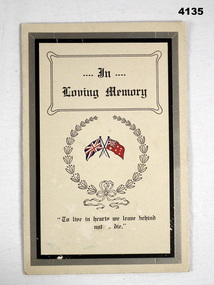
Photo No 1 details written, “Arthur Jefferson Lane Private, Croix de Guerre Belgium and Mentioned in Dispatches Killed in France April 25th 1918 age 21 years, beloved eldest son of Mr T.J Lane and the late Mrs Bertha Lane”. Photo No 2 details written, “And their second eldest son, William Gladstone Lane Private - Killed in Action France April 27th 1918 age 20 years - United in life and death”Card, Sympathy, folding, the front has a central wreath in black with crossed flags in colour, at the top “In Loving Memory”, inside has two pages with a photo each page, each with their military details, on the rear a note from the “Lane Family”.sympathy cards, croix de guerre -
 Bendigo Military Museum
Map - MAP, NEW GUINEA FRAMED, 1941 onwards
Map of Western section of New Guinea. Black print on white background with mountain ridges in tan. Mounted with green border & brown wooden frame, glass front & white cardboard backing with wire hanging strap on back. Inset LHS bottom: A: Aroe Island B: KIA Island C: Taniimba IslandPrinted in black at top centre: “NEW GUINEA WESTERN’ Printed on border under map: “These escape maps were carried in the zip pockets of life jackets by fighter pilots in WW2. This map was presented to A.S.R. on the 12/7/79 by Councillor Ian McKenzie, Mayor of Eaglehawk, who served as a fighter pilot in 78th SQN in S.W. Pacific area during 1943-44.”map, new guinea, western, raaf -
 Bendigo Military Museum
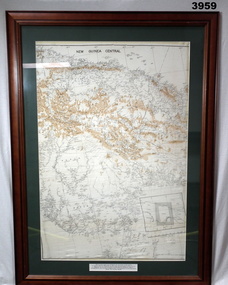
Map - MAP, NEW GUINEA FRAMED, C. 1941 onwards
Map of central section of New Guinea. Black print on white background with mountain ridges in tan. Map is mounted with green border. Brown wooden frame, glass front, white cardboard backing with wire hanging strap on back. Map prepared under the direction of RAAF Headquarters.Printed in black top centre: “NEW GUINEA CENTRAL” Printed on border under map: “These escape maps were carried in the zip pocket of life jackets by fighter pilots in WW2. This map was presented to A.S.R. on 12.7.79 by Councillor Ian McKenzie, Mayor of Eaglehawk, who served as a fighter pilot in 78th SDN in the SW Pacific area during 1943-44.”map, new guinea, central, raaf -
 Bendigo Military Museum
Letter - LETTER WW2, 10.11.1945
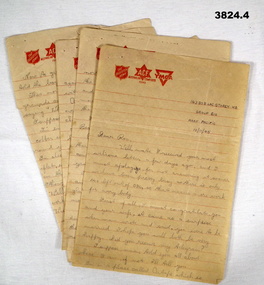
The letter is to Ron from Henry Stewart STOREY about life in the islands after the war & their desire to get home. STOREY enlisted on 4.8.1943 aged 18 years & was discharged on 13.2.1946 with the rank of LAC in No 100 SQD RAAF.Letter, 4 pages, yellowed, red lined with logos at top re Salvation Army, Australian Comfort Fund & YMCA. Letter is from H S STOREY.“143808 LAC STOREY. H S Group 610 RAAF Pacific 10.11.1945”letter, islands, raaf -
 Bendigo Military Museum
Certificate - CERTIFICATE, FRAMED, C.2002
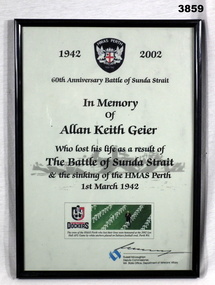
A.K. Geier, refer Cat No 601 for his service history.Certificate, black print on white background commemorating the 60th Anniversary of the Battle of Sunda Strait. Presented in memory of Allan Keith GEIER who lost his life in that battle during the sinking of HMAS Perth on 1st March 1942. Black plastic frame, glass front, fawn cardboard backing with support.Bottom of certificate: “Freemantle Dockers photo of white anchors on the Subiaco Football Oval, representing crew of HMAS Perth who lost their lives in the above battle” Bottom of certificate: “Signed by WA State Office of DVA”hmas, perth, geier -
 Bendigo Military Museum
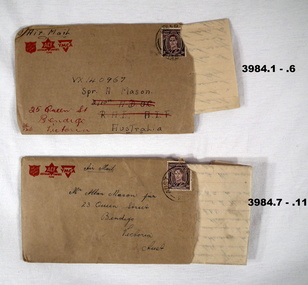
Letter - LETTERS & ENVELOPES
.1) - .5) The letter is from VX137222 Allan Frederick Hutson 28 Aust INF BN AIF Aust dated 9 Dec 1945 to VX 140967 Alan Mason of 25 Queen St Bendigo .6) The letter is written from Rabaul re life there, what’s happening while waiting to come home. .7) - .10) The letter is to Alan Mason from a mate, no name mentioned from his unit “GDD” in Morotai on 12.12.1945. “GDD” meaning General Details depot. The letter is mostly about complaints re food, conditions and organising a March and protest to the unit “CO”. Two senior Officers are mentioned, “Col Barrett and Col Wade”. The letter quotes up to 5000 marched to Land HQ. Mason and Hutson were mates from Bendigo. Refer Cat No 3979.2 for Alan Masona service details..1) - .5) Letter on yellowed paper, all lettering and logo’s and lines in red from a combined group being “YMCA”, “Aust Comforts Fund” and “The Salvation Army”. At the bottom is information regarding security.Five pages written on one side only in blue pen. .6) Envelope, brown colour, Air Mail with the same 3 Logo’s as in .1) - .5) Addressed to A Mason. .7) - .10) Letter on yellowed paper, all lettering, logo’s and lines in red from the same 3 organisations as in .1) - 6) This letter does not have the security warning. Four pages, on one side except page 4 on both sides, written in blue pen. .11) Envelope, brown colour, AIR MAIL with the same 3 Logo’s, addressed to A Mason from a mate.letters, personal, stationary -
 Bendigo Military Museum
Literary work - ADVERTISING LEAFLETS, 9) 5.8.1944. .10) 23.6.1945
This collection of leaflets were enclosed in various Volumes of the First to the Sixth years of the war in pictures. Refer Cat No 4184.6.1)- .2) Leaflet, Life and times of Winston Churchill, folded, exterior orange colour, B & W print, interior white with black & orange print with white photo. .3) .4) Leaflet, The Sun News Pictorial, folded, white paper with black print. .5) - .6) Leaflet, The first year, the second year of the war in pictures, .5) cream colour, .6) green colour both B & W print. .7) - .8) Envelopes, paper, beige colour stamped “Inscriptions”. .9 - .10) War map Section. Page of a newspaper, folded, beige colour black print. .7) & .8) Hand written on both slightly different, “Reg RUNCIMAN Rutherford St Swanhill”, .8) has “8 JL 42”leaflets, advertising -
 Bendigo Military Museum
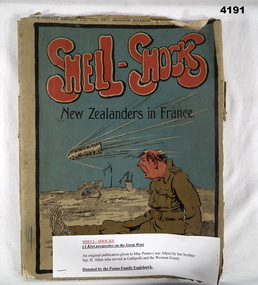
Book, The Empire Press, Jerrold and Sons LTD, Shell - Shocks
The story covers the typical life at the front near a Northern French town in WW1 of members of the New Zealand Division and NZ expeditionary Force. An original copy given to May Penno (nee Allen) by her brother Sgt H Allen who served at Gallipoli and the Western front.Shell - Shocks, the cover consists of heavier paper in colour showing a soldier mouth agape watching a shell fly past, inside 68 white pages, black print with illustrations in brown shading.shell - shocks, new zealand division -
 Bendigo Military Museum
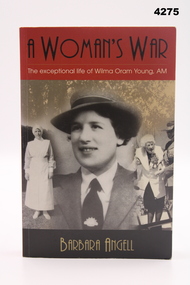
Book - BOOK, NURSES BIOGRAPHY, New Holland Publishers (Australia) PTY LTD, A Woman’s War, 2002
Biography, the exceptional life of Wilma Oram Young AM, an Australian Nurse, a captive of the Japanese during WW2. After the War following her return to Australia she was inspired to help her fellow ex POW’s and war veterans through her tireless work with the RSL. Wilma Oram enlisted 0n 12.3 1941 age 24 years VFX58783 in the AANS, embarked for Singapore 2.9.1941, evacuated from Singapore on 12.2.1942 on the Vyner Brooke which was then sunk by the Japanese of Banka Island, they made it to shore on Banka Isl and taken POW for the duration of the War and finally arrived home in Australia on 24.10.1945.Soft cover cardboard, black, white and gold print on front, spine and back, front cover has a collage of B & W photographs of Nurse Wilma Oram Young AM, red, black and gold background colours, 328 pages, white paper, illustrated with B & W photographs.books, biography, nurses, pow’s, ww2 -
 Bendigo Military Museum
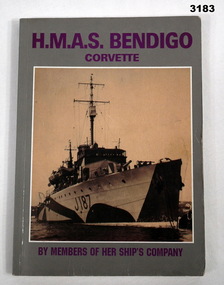
Book - BOOK, NAVY, Wally Evens & Members of Her Ships Company, HMAS Bendigo Corvette
A story of HMAS Bendigo, a literacy sketch comprised of contributions from some of the men who served in her; contributions that reflect the humour, frustration, tragedy and discomfort of life at in war time.Soft cardboard cover, purple print on front & spine, red & black print on back. Sepia colour photo on front of HMAS Bendigo in camouflage paint. Back cover has a coloured photo of HMAS Bendigo banner which includes The Bendigo City Crest of the places served during WWII. 126 pages, cut plain paper, illustrated with black & white photos & maps.Hand written in black ink on notepaper attached with clear sticky tape to front end paper: “WK, DAVID INGRAM BORN IN BENDIGO”books-military/history/navy, hmas, bendigo -
 Bendigo Military Museum
Book - BOOK, AUTOBIOGRAPHY, Bradley A Chalmers, Next to Impossible, 2015
Biography. Next To Impossible - The remarkable life of Albert Chalmers Borella VC. Bushman, farm hand, artist, metropolitan fireman, decorated soldier, soldier settler, POW Commandant. At ease in the company of the King or the common man, Albert Chalmers Borella VC did it all. This is his remarkable story. Hard cardboard cover, black print over mid green background on front, spine & back. Sepia portrait photo on front. Colour portrait photo & colour photo of service medals on back. End pages illustrated in black & white battle maps. 510 pages, cut plain paper, illustrated with black & white photos & maps. books - biography/military, vc -
 Bendigo Military Museum
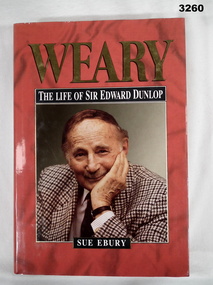
Book - BOOK, AUTOBIOGRAPHY, Weary - The Life of Sir Edward Dunlop, 1994
Pamphlet Sir Edward Dunlop Medical Research Foundation included with book.Biography. Hard cardboard cover, black coloured buckram with gold print on spine. Dust cover red coloured background with gold & white print on front & spine. Colour portrait photo of Sir Edward Dunlop on front & 3 black & white photos of Sir Edward Dunlop on back. 709 pages, cut plain white paper, illustrated black & white photos, maps & illustrations. Front fly leaf contains handwritten dedication.Handwritten in black ink of front fly leaf: "Donated in memory of Joyce & Edward Baker WWW2, Jan Pavich Sebastian 7.11.2012" "Weary Dunlop saved by life when my mother was 6 months pregnant with me as no other Doctor would operate on her goiter. Weary saved my life because of this. Long live his memory. Jan Pavich"books-biography, dunlop, weary -
 Bendigo Military Museum
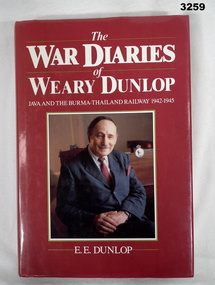
Book, The War Diaries of Weary Dunlop, 1986
Please note: A newspaper article & handwritten note included with book.Hard cardboard cover, red colour buckram with gold print on spine. Dust cover is red background with white print on front, spine & back. Colour portrait photo of Weary Dunlop on front, colour copy of a Jack Chalker water colour illustration of Weary Dunlop operating in a jungle hospital on back. 401 pages cut plain white paper, illustrated with black & white photos of illustrations, diagrams & photos. Auto biography diary. Fawn paper fly leaf front & first title page contain handwritten dedications.Handwritten in black in on front fly leaf: Donated in memory of Joyce & Edward Baker WWW2 Jan Pavich Sebastian 7/11/2012. Weary Dunlop saved my life when my mother was 6 months pregnant with me as no other Doctor would operate on her goiter. Weary saved my life because of this. Long live his memory Jan Pavich. Handwritten in blue ink on first title page: Joyce Baker with all possible good wishes Weary E E Dunlopbooks-diaries, military history-army -
 Bendigo Military Museum
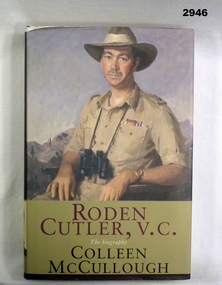
Book - BOOK, BIOGRAPHY, Colleen McCullough, Roden Cutler, V.C. The Biography, 1998
Biographic account of Roden Cutler's life as soldier & citizen. Includes an account of his action leading to the award of the Victoria Cross during WWII.Book, hard cover in black buckram. Title on spine in gold lettering. Illustrated dust cover depicting image of Roden Cutler. Black & white photographic illustrations & black & white maps. 418 pages with cut edges.book, autobiography, cutler -
 Bendigo Military Museum
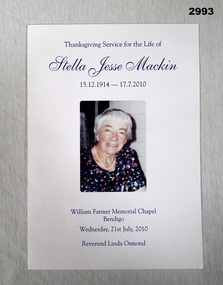
Memorabilia - CARD, MEMORIAL, Late July 2010
Refer Cat No 2578 for her service history in the Australian Army Nursing Corp 2nd AIF. Part of the HEWSTON collection re WW1 & WW2.White memorial card, coloured photo of Stella Jesse Mackin, blue printed text. Rear cover, black & white photo.“Thanksgiving for the life of Stella Jesse Mackin 15.12.1914 - 17.7.2010”documents - cards / memorials, military history, thanksgiving -
 Bendigo Military Museum
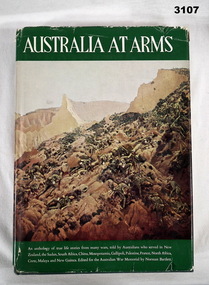
Book - BOOK, MILITARY HISTORY, Norman Bartlett, Australia at Arms, 1962
An anthology of true life stories as told by Australians who served in New Zealand, South Africa, World War I & II.Hard, green, buckram cover embossed with gold shield surrounded by laurel wreath. Dust jacket with colour illustration on front. Title in white print on green background. Title in gold print on spine. End papers illustrated in green with maps & figure of soldiers. 265 pages with cut edges & black & white photos & drawings.books-biography, military history, photography, illustrations -
 Bendigo Military Museum
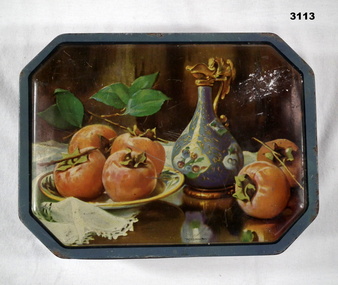
Container - BISCUIT TIN, c.1939 - 1945
Tin contains large quantity of RAF, RAAF badges of rank. Trade badges. Buttons, brass & dark. Belt buckles plain brass, British coat of arms, darkened. Stored in a biscuit tin, rectangular shaped with corners flattened to make an octagonal. The lid has a still life scene of 6 tomatoes & a blue patterned, gold topped jug. Sides have a wavy mesh appearance of two tone blue.Printed in small black letters on lid near bottom edge: “Persimmons”numismatics-badges-military, containers - domestic, metalcraft, raf, raaf -
 Bendigo Military Museum
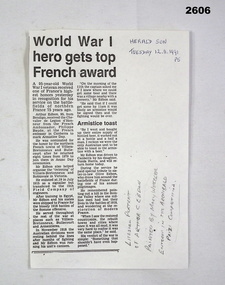
Newspaper - NEWSPAPER CUTTING, Herald Sun, 12.11.1991
See also: 2605.2, 2607, 2608.3 Article details the awarding of the French Chevallier de Legion d'Honneur (Legion of Honour) to ARTHUR EBDON and the reason of awarding.Newspaper article reporting the awarding of the Legion of Honour to ARTHUR EBDON.Top RH corner: "Herald Sun Tuesday 12.11.1991 p5" Bottom RH corner: Life size portrait of "ARTHUR C EBDON painted by Mary Wheeler. Entered in Archibald prize Competition"documents - newspapers, military history, passchendaele barracks trust -
 Bendigo Military Museum
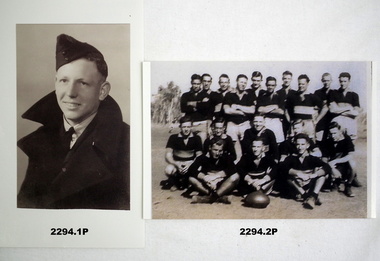
Photograph - PHOTOGRAPHS, RAAF WW2, c.WWII
.1) Arthur John Gorsuch Hando No 116921 enlisted in the RAAF on 19.7.1942 age 18 years. At discharge on 12.4.1946 he held the rank of LAC in No 6 Transport Movement Office RAAF. .2) - .5) Photographs reflect service life in Darwin during World War II..1) Portrait of WWII Airmen - copy of original. .2) Group photograph of a football team - copy of original. .3) Group sitting on truck - copy of original. .4) x 2 Trucks - copy of original. .5) Group of 3 - copy of original..1) ARTHUR HANDO, Air Force 2nd World War. .2) A HANDO 4th from top, 5 RC Air Force footy team. .3) 2nd World War, Darwin, ARTHUR J HANDO. Pop 1st one sitting on car, no hat. .5) A HANDO.photography-photographs, military history- army - airforce, raaf -
 Bendigo Military Museum
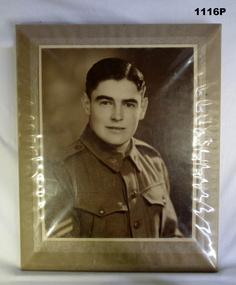
Photograph - PHOTOGRAPH WW2, 1941
Francis Alan BURCHNALL VX58285, 2/10 Ord W/shops enlisted 24.6.41, promoted to Cpl, possibly embarked with his father on 10.1.42. Taken P.O.W he lost his life on the Sandakan Death march in Borneo 4.6.45. His father also lost his life in Borneo. Refer Cat No 1117P for his WW1 and WW2 service details.Photo, Sepia tone, protrait of a soldier in uniform no hat, photo is on a light brown paper material over a metal frame all has a plastic coating over. Photo is re CPL F.A Burchnall. photography- photgraph, military history, sandakan -
 Bendigo Military Museum
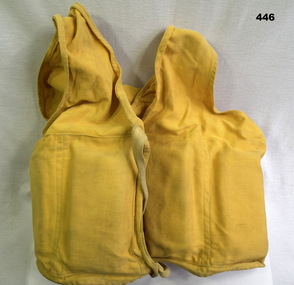
Accessory - LIFE VEST, C.1941 - 45
Mae west vest given to A.R (Dave) GROAT 2nd AIF at the Tarakan landings in 1945 by an American. Refer Cat No 457 for his service details.8 float sections, mae west vest marked on rear top "mae west" from an American to D. Groat 1945.maritime technology - survival equipment, mae west, -
 Bendigo Military Museum
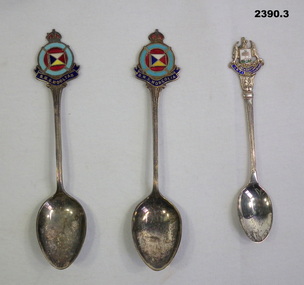
Memorabilia - TEASPOONS, SOUVENIR, c.1914 possible
.1) Metal spoon, silver, enamelled design at top, surmounted by a crown. The motif has a light blue life buoy surrounding a square signal flag. The flag is divided 2 ways diagonally with colours of dark blue, white, red, & yellow. Dark blue banner at the bottom of the motif with encryption. .2) Same as above except the inscription on the banner. .3) Silver metal tea spoon, silver & enamel badge on top. The motif has a small shield in center with a tree on the shield. The shield is supported with a fish on each side, blue enamel worded banner at the bottom..1) “PMS MOOLTAN” .2) “RMS MONGOLIA” .3) “LET GLASGOW FLOURISH”domestic items-cutlery, military history - souvenirs