Showing 656 items
matching post office bendigo
-
 Bendigo Historical Society Inc.
Document - LONG GULLY HISTORY GROUP COLLECTION: PHOTO HANRO STAFF & WORKERS APPROX 1933
... Bendigo Post Office... and Workers taken on the steps of Bendigo Post Office appros 1933... T Lund Moreen Betts (Marchingo) Bendigo Post Office Vincent ...Photocopy of a photo by Vincent Kelly of the Hanro Staff and Workers taken on the steps of Bendigo Post Office appros 1933. Names on the back are: Allan Crossley, G Evely,T Hall, M ?sen, M Owens, I Hutchinson, L Ash, C Tyers, L Thornton, R Dixon, I Newson, Phill Ipson, E Kent, L Comte, D Pinnell, M Thomas, C Washington, K Bowman, M Kelly, M Tussup, R Shaw, ? Henson, C Washington, E Rodgers, S Brown, P Pearce, D Thornton, L Rielly, L Truscott, R Brereton, P Taylor, Norris, D Miller, C Enderlin, D Harward, J Lockyer, D Butters, Marc Curnow, B Organ, E Lindsay, L Smart, E Ogilvie, G Crossley, M Newwand, Newmand, Truscott, C Ildae, O Richards, B Richards, C Kingsley, ?, F Mylon, Z Wallen, J Thom, P Trehair, E Crawford, F Chandler, E Hogan, G Blandthorn, J Thom, L Henson, E Stephens, J Gerrand, L Doney, M Williams, C Brauman, R Shaw, L Rushmeyer, R F Wr, L Wright, L - R, A McCormack, S Swalling, I West, J Bolger, L Swalling,B Patterson, T Williams, M Shepherd, J Aitken, A Phillips, M Smith, M Williams, S Ross, J Punch, S Dunne, P Warren, E Keck, J Pinder, W Stock, V Akers, J Neate, M Doyle, M Neate, M Marchingo, C Collard, Iris Dobie, M Irvine, D Nalder, M McPherson, Marg, Alma Rank, D Edwards, Z Excell, M McGuiness, A Christie, ? Beer, Male R. J Preston, J Mueller, F Harris, T Robertson, R Hiscock and T Lund. Names by Moreen Betts (Marchingo). Two pages are the same and one only has part of a photo on it. Written beside it is: Hanro Mills, Bendigo. Photo of Staff & Employers. Approx 1933 - 34. Picture with Allan Crossley. x On last page is Alans Sister.Vincent Kellybendigo, history, long gully history group, the long gully history group - photo hanro staff & workers approx 1933, vincent kelly, hanro mills bendigo, allan crossley, g evely, t hall, m ?sen, m owens, i hutchinson, l ash, c tyers, l thornton, r dixon, i newson, phill ipson, e kent, l comte, d pinnell, m thomas, c washington, k bowman, m kelly, m tussup, r shaw, ? henson, c washington, e rodgers, s brown, p pearce, d thornton, l rielly, l truscott, r brereton, p taylor, norris, d miller, c enderlin, d harward, j lockyer, d butters, marc curnow, b organ, e lindsay, l smart, e ogilvie, g crossley, m newwand, newmand, truscott, c ildae, o richards, b richards, c kingsley, ?, f mylon, z wallen, j thom, p trehair, e crawford, f chandler, e hogan, g blandthorn, j thom, l henson, e stephens, j gerrand, l doney, m williams, c brauman, r shaw, l rushmeyer, r f wr, l wright, l - r, a mccormack, s swalling, i west, j bolger, l swalling, b patterson, t williams, m shepherd, j aitken, a phillips, m smith, m williams, s ross, j punch, s dunne, p warren, e keck, j pinder, w stock, v akers, j neate, m doyle, m neate, m marchingo, c collard, iris dobie, m irvine, d nalder, m mcpherson, marg, alma rank, d edwards, z excell, m mcguiness, a christie, ? beer, male r. j preston, j mueller, f harris, t robertson, r hiscock, t lund, moreen betts (marchingo), bendigo post office -
 Bendigo Historical Society Inc.
Document - PETER ELLIS COLLECTION: ORDER OF AUSTRALIA
... , the Bendigo Post Office, the Shamrock Hotel and the opening of the new..., the Bendigo Post Office, the Shamrock Hotel and the opening of the new ...4 page A4 printed document. Achievements of Peter Ellis (for consideration for the Order of Australia) Peter is regarded as one of the leading collectors and presenters of traditional dance tunes, dances and musical instruments in Australia. At the 2005 National Folk Festival it was announced by Robyn Holmes that he has the largest selection of dance related material collected in the National Library Archives in Canberra. Peter has been collecting for many years and has collected with the late John Meredith (AM), Shirley Andrews (AM), Rob Willis and Dave Di Santi amongst others. Peter has literally travelled Australia collecting over the past thirty years. He has extensive field recordings from Western Australia and Tasmania in addition to his Victorian collection, for example. Most of his recording has been in North Western and Central Victoria. Peter collected a lot of his material from Harry McQueen ( Castlemaine), which led to a double CD of Harry's music. Harry had played in dance bands for over sixty years in Central Victoria. Harry had a number of tunes from Bill McGlashan who had taken Harry under his wing as a young man. Through Peter's efforts much valuable material and knowledge from almost a century ago was saved for posterity. Founder, Charter member and life member of the Bush Dance and Music Club of Bendigo. Life Member of the Victorian Folk Music Club. Recipient of the Graham Squance award (for the person who has done the most to promote folk dance and music in Victoria)) from the Folk Song and Dance Society of Victoria. Member of the famous Wedderburn Old Timers Band for over twenty-eight years (two platinum and several gold recordings in that time). Founder and leader of the Emu Creek Bush Band (twenty-nine years old in 2010) Emu Creek has made many CDs of dance music as listed. Friday Night at the Spring Gully Hop, Three double CDs called 'Quadrille Mania' which contain many rare dances and tunes which have been learnt and recorded, under Peter's guidance, so they would not be lost to posterity. A triple CD called 'Take Me Back To Bendigo' with heritage songs and music from the Gold Rush to Federation (solely organised and financed by Peter) These CDs show the multicultural heritage in Bendigo and include music and groups from the Koorie, Chinese, Cornish, German, Irish, Italian, Scots, English and Welsh communities of Bendigo and district. Upon his recovery of costs Peter has handed over copyright to the Bendigo Community so future profits go back into the community. Three double CDs called 'The Merry Country Dance' with dances and tunes going back to the time of Governor Lachlan Macquarie's Ball in 1804. Most of the tracks are performed by Emu Creek Following much practice under Peter's tutelage. For further authenticity Peter liaised with other musicians to record some tracks which were revived from almost two hundred years ago and have now been recorded using the instruments of the time. A three volume set of Bush Concert recordings (Vol 1 Goornong (launched Australia Day 2006 with any profits going to the Soldier's Memorial Hall Committee), Vol 2 Heywood and Vol 3 Maldon/Sutton Grange, already recorded and to be released as money from other projects becomes available. NOTE: None of these CDs have led to any profit. All money raised is put back into the community and further heritage recordings, books and videos through the Bush Dance and Music Club of Bendigo Inc. In 2009 a full collection of all Peter's book and CDs was donated to the John Gorton Library as part of the recognition of the fifty year career of the Gay Charmers Dance Band from Lake Charm. 'Music of the Diggings' (4 tracks by Peter or Emu Creek). In addition the Emu Creek Band, under Peter's leadership, has appeared on a CD backing Bruce Watson on his song, 'The Old Bush Dance'. Emu Creek has performed at National Folk Festivals in four states and several times at the National Folk Festival in Canberra. They have also been mainstays of the Maldon Folk Festival for over twenty years as well as doing dance programs for the Port Fairy Folk Festival on two occasions. Peter has written and published many books related to traditional music and dance. These include Three volumes of 'Collectors Choice' which is musical notation for bush dances coupled with much dance history which would have been lost without Peter's efforts. 'Two Hundred Dancing Years - How to run a Colonial Ball: (co-authored with Shirley Andrews (A.M.), 'Music Makes Me Smile - The Music of the Nariel Valley' (co-authored with Harry Gardner). The Merry Country Dance' (292 pages) a companion to the three double CDs. He has also been a contributor to Verandah Music' authors Rob Willis and Graham Seal and 'The Oxford Companion to Australia Folklore' Ed Graham Seal. Peter is also a regular contributor to 'Trad and Now' Magazine. His latest completed book is titled 'The Merry Country Dance' and is over three hundred pages of social history, recipes and dance instructions. It was completed with the assistance of a Victorian Government Heritage Grant. The first edition sold out in only a few weeks. Peter has taught many children about old time musicianship through the junior bands which have functioned over the years with many children joining Emu Creek and then going on to follow their own musical inclinations. He has trained several young concertina and button accordion players over the years. Peter has been a regular tutor with Continuing Education in tin whistle, harmonica and old time dancing for many years. Peter has conducted workshops in music dance at National Folk Festivals in Perth, Alice Springs, Maleny, Melbourne, Adelaide, Kuranda and more recently at several Canberra National folk Festivals. He has also done this at Maldon for many years, Port Fairy, Glen Innes, Jamberoo and Kiama Festivals. For over thirty years Peter has been a guest player and MC for the dances at the Nariel Folk Festival (Australia's oldest continuing Folk Festival) Peter is very well known in the Corryong area as a collector and the co-author of the book, Music Makes Me Smile, about the Klippel/Simpson dynasty in the Nariel Creek Band. This book is currently being revised for re-issue as more material has come to light since the original publication. For many years Peter trained Debutante Sets in the Bendigo District. Peter was an instigator of the annual Dinki Di Ball held each September in Eaglehawk for the past thirteen years. At this ball three bands play for a quarter of the night and then join together for the final part of the evening. The bands are Emu Creek, The Wedderburn Old Timers and the Gay Charmers. Up to four hundred dancers, many in heritage costumes have attended this dance. The ball also pays tribute to, and involves, the old MC's. Through this example their skills have been passed down to a younger generation of MC's. All profits are returned to the Dance Club to foster our musical heritage. Each Ball includes presentations designed to promote social dancing in Australia. Over the years several young musicians have been presented with musical instruments at the Ball, libraries have been given copies of Peter's books and CDs and one year a keen young dancer was presented a pair of dancing shoes. Peter is a trained ballroom dancer and has gained gold medal status in this field. Peter is an accomplished musician and is one of Australia's foremost button accordion players. He is also highly accomplished on the tin whistle, bones and harmonica. He is the only exponent of the Swanee whistle that I have seen. Peter also plays the piano and ukulele. Thirty six years membership of the Bendigo Field Naturalists Club, Secretary in the 1970s and actively involved in campaigns to save Lake Pedder and establish the Whipstick and Kamarooka State Parks (now part of the Bendigo National Park). Peter was also extremely active in the establishment of the Salomon's Gully and Jackass Flat Flora Reserves in Bendigo which have now been saved for posterity. Peter has also been involved in efforts to save One Tree Hill and this area has now been included in the Greater Bendigo National Park. He has discovered and named new plant species in the Whipstick Forest and propagates Australian plants. Peter takes regular guided tours of interested people through the Whipstick each Spring on wild flower educational tours. He is a keen and gifted photographer of local plant species. Life member of the Bendigo Field Naturalists. Peter contributed text and photographs to their publication 'Wildflowers of Bendigo'. When the Victorian State Parliament had its first historical sitting outside Melbourne Emu Creek played during lunch for the guests and public. They have also played at functions such as the Centenaries of Federation, the Bendigo Post Office, the Shamrock Hotel and the opening of the new Melbourne Museum and the Federation Museum in Bendigo. The band regularly plays for Seniors week and at homes for the aged such as Bethlehem, Mirridong, Bignold Park, Bendigo Village and others. Peter has been instrumental in getting the band to play for fundraisers such as schools, scouts and environmental groups. The band plays many charitable 'gigs'. The band supports the Bendigo Easter Fair and the Eaglehawk Fair when able and has appeared in several parades over the years. The above list shows the invaluable contribution that Peter Ellis has made towards the collecting and distributing of Australia's musical and dance heritage. No one has done more than Peter in this area. He has also been active locally and nationally in his endeavours towads saving the natural environment. He has put many years of time and energy into both area's and has many on going projects in mind for the years ahead. The awarding of an honour from Australia would be just reward for a man who has preserved so much of our musical and dance heritage for future generations. Knowing Peter I have no doubt he would treasure such an honour as he has given so much to preserve Australia's music and dance heritage over most of his sixty plus years. Compiled by John Williams. Handwritten notes at bottom of last page reads: Referees Jacinta Allan MLA Steve Gibbons MHR Willie Carney ex Mayor of Bendigo Supporting letter Mary Smith Sec. Bush Dance + Music Club.person, individual, peter ellis oam -
 Ringwood and District Historical Society
Photograph, Civic Place, Ringwood in 2008, near the corner of Ringwood Street. Showing Bendigo Bank and Ringwood Post Office cross the road
... Street. Showing Bendigo Bank and Ringwood Post Office cross the... the corner of Ringwood Street. Showing Bendigo Bank and Ringwood Post ...Photographic record by Russ Haines, RDHS, in 2008. -
 Bendigo Military Museum
Equipment - WATER BOTTLE WW2
Number stamped on leather strapping around the bottle is “435891” This matches Flying Office Mervyn Albert Henry Schramm who enlisted 8/10/43 and was discharged 20/12/45 and was posted to RAF Station Gampston. The name written on the felt bottle cover possible “lowein” ?? Does not match any on the DVA rolls.Military Issued Water Bottle. Bottle in blue tin metal but is fully bound in brown felt material. Wrapped around felt is a leather strap that hooks over the shoulder. The water bottle is capped by a cork top with a metal hook into a wooden top on the cork. Lid is attached to the case by a piece of string. Written on the felt case cover in black pen a name appears to be "Denis Lowein". Stamped on leather strap No. “435891”, also on side strap "R.A.A.F K.W (over)194?"raaf, gampston -
 Bendigo Military Museum
Postcard - POSTCARD, ASH, U.K, F. Frith and Co, c. WW1
Cards collected by R.H. Baron when visiting his Uncle who lived near the village of ASH, UK. c.Nov 1918. Part of the "Robert H. Baron", No. 3596 and Cooper Collections. See Catalogue No. 1981P for details of Baron's service.1. Coloured photograph of a street featuring building including a Post Office. 2. Coloured photograph of a house fronting a gravel road. 3. Sepia toned photograph of a gravel road, vegetation and trees. 4. Sepia toned photograph of a row of houses fronting a gravel road. 5. Sepia toned photograph of a row of houses. Man standing next to a horse and cart. Large pond in foreground. 6. Sepia toned photograph of a row of houses. Man standing next to a horse and cart. Large pond in foreground. 7. Sepia toned photograph of a river with boats moored on bank. Buildings on far side of river. 8. Sepia toned photograph of a row of houses fronting a road. 9. Sepia toned photograph featuring people on a wharf. Row of houses in back ground.1. Pinewood Post Office, Ash. Handwritten in faded black ink on back: 'This is the road Uncle lives in. he live just about opposite the cross (or house in middle) I made on the card, Bob'. 2. York House, Ash. Handwritten in black ink on back: 'Just near my Uncle's place in Ash, Bob.' 3. Fox Hills, Ash. Handwritten in faded black ink on back: 'Letter from R.H. Baron to his brother Freddy - no date.' 4. Ash Common, Victoria Hall, etc. Handwritten in faded black ink on back: ' Of course you will know Ash as you have wrote it bit when writing to Uncle, Bob'. 5. Ash Village & Pond: Handwritten in faded black ink on back: 'This is Ash Village - is about 1 mile from where Uncle lives. Bob.' 6. Ash Village and Pond: Handwritten in faded black ink on back: 'Letter to Elsie from R.H. Baron - no date.' 7. Ash Vale. The Wharf. Handwritten in faded black ink on back: 'Letter to Elsie from R.H. Baron - no date.' 8. Ash Vale. The Wharf. Handwritten in faded black ink on back: 'Partial letter to R.H. Baron's brother - c.Armistice Day. 9. Ash Vale. Handwritten in faded black ink on back: 'Another view of Ash, Bob.'robert h. baron, cooper collection, postcards, ash uk, ww1 -
 Warrnambool and District Historical Society Inc.
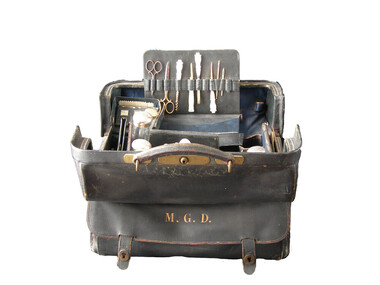
Domestic object - Dressing bag, Mary Glass Dickson, Circa1885
John Glass Cramond 1829 and James Dickson 1831-1910 were founders of a large drapery store. Both were Scots and both came separately to Australia in 1852. Cramond initially came for gold but soon opened a store in St Kilda with a post Office attached and he was the first post master there. Dickson was a farmer’s son but became a draper and while he was unsuccessful on the Bendigo diggings and then returned to Melbourne where he met Cramond and soon after they opened a store on Lonsdale Street. They opened their business in Warrnambool in 1855 as a general store with groceries, drapery and ironmongery. Both partners were involved with the community and James Dickson was an original director of the Warrnambool Woollen Mill 1909 and the Warrnambool Cheese and butter factory. He also served on the committee of management of Warrnambool Base Hospital. This case was a wedding gift from James Dickson Jnr to his wife Mary Glass Cramond on the occasion of their wedding. This item has significance on a number of levels. It belonged to a member of one of Warrnambool’s earliest pioneering families and it marks the occasion when the two families of Cramond and Dickson were linked through the marriage of James Dickson jnr and Mary Glass Cramond. The firm played a significant part in the development of the city and traded for nearly 150 years. It therefore has social significance to Warrnambool. The item is well provenance with the case initialed and items within the case monogrammed. The case and its items are aesthetically quite beautiful as well as being typical of travelling or dressing cases of the more well to do, of the time. Mappin & Webb were manufacturers of some standing with the Mappin name appearing in manufacturing as early as 1775.The company has held a royal warrant as silversmiths since 1897 to the present day and as crown jeweler since 2012. Throughout this time, they have manufactured quality items for the luxury market. It provides an insight into the way ladies travelled and the items which they considered essential. This consists of a black leather with leather handle attached with brass fittings. Middle opening with side pocket on one side with metal catches. Inside has removable sections for holding the numerous containers and items belonging to the case. Interior of the case is dark blue satin. The items contained within the case are as follows: 321.1 Luggage case 321.2 Glass bottle rectangular, silver monogrammed lid, empty. 321.3 Tall round glass bottle, silver monogrammed lid, empty. 321.4 Small glass bottle with pink powder, silver monogrammed lid. 321.5 Small multi sided bottle with stopper and brass hinged lid. 321.6 Tall round bottle with silver monogrammed lid. 321.7 Tall thin multi sided bottle with brass lid. 321.8 Cream coloured monogrammed jar cotton wool inside. 321.9 Clothes brush rectangular cream back. 321.10.1Glove stretcher bone coloured .10.2 Case black leather. 321.11.1 hair comb cream with silver edge .11.2 Case black leather 321.12 Hair brush cream handle 321.13Spatula cream monogrammed 321.14 Mirror, silver round with handle. 321.15 Writing compendium .1 Case black leather .2 Pen with nib .3 Lead pencil .4 Navy satin covered blotting book 321.16 Inkwell glass bottle in small black leather case. 321.17 Match striker in leather case. 321.18 Mirror in black leather case rectangular 321.19 Small case for visiting cards. 321.20Sewing kit rectangular, contains threads and needles pkts x 3 321.21Container, small, hinged tortoise shell patterned. 321.22.1 Manicure set .2 Scissors small .3 Scissors large .4Corkscrew with Mother of pearl handle .5 Pocket knife with Mother of pearl handle .6Tweezers with Mother of pearl handle .7 File with Mother of pearl handle .8 Fine hook Mother of pearl handle .9 Bodkin .10 Bodkin 321.23 Hairbrush oval silver backed 321.24 Mirror silver handled hand mirror. 321.25 Hairbrush wooden handled with Mother of pearl inlay. 321.26 Cylinder, silver with removable lid and small phial of iodine labelled Felton’s pocket iodine. 321.27 Phial small glass with gold decorations. 321.28 Inhaler with insert 321.29 Thimble, metal. 321.30 Silver backed hair brush 321.31 silver backed clothes brushEngraved on side pocket: M.G.D. Mappin and Webb Sheffield and London. Some of the items are monogrammed as per the list above. A number of the glass bottles have lids hallmarked Mappin & Webb London and Sheffield makers stamped inside lid with hall marks history of warrnambool, cramond and dickson, mary glass cramond, dressing bag, woman's toiletry bag 1880 -
 Warrnambool and District Historical Society Inc.
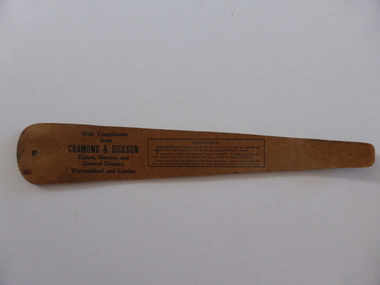
Artefact, Cardboard tie preserver. Cramond & Dickson, Circa 1930's
John Glass Cramond 1829 and James Dickson 1831-1910 were founders of a large drapery store. Both were Scots and both came separately to Australia in 1852. Cramond initially came for gold but soon opened a store in St Kilda with a post Office attached and he was the first post master there. Dickson was a farmer’s son but became a draper and while he was unsuccessful on the Bendigo diggings and then returned to Melbourne where he met Cramond and soon after they opened a store on Lonsdale Street. They opened their business in Warrnambool in 1855 as a general store with groceries, drapery and ironmongery. Both partners were involved with the community and James Dickson was an original director of the Warrnambool Woollen Mill 1909 and the Warrnambool Cheese and Butter Factory. He also served on the committee of management of Warrnambool Base Hospital. The business in the late 1970's. This shape preserver would have been an item given to customers to maintain their tie in good condition. The shape would indicate that it would have been used around mid 20th century.A common object from one of Warrnambool's longest established businesses.Brown cardboard in the shape of a gentleman's tie with a hanging hole on one end and black text with company details and instructions for use. front surface is smooth while the back is coarse.With Compliments from Cramond & Dickson Tailors, Mercers and general Drapers. Warrnambool and London. warrnambool, cramond & dickson -
 Warrnambool and District Historical Society Inc.
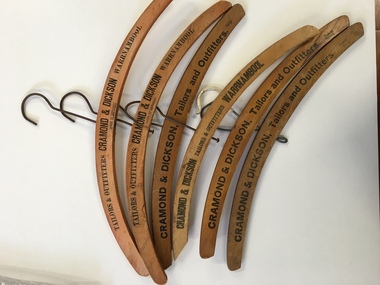
Coat Hanger, Cramond & Dickson Coat Hangers
John Glass Cramond 1829 and James Dickson 1831-1910 were founders of a large drapery store. Both were Scots and both came separately to Australia in 1852. Cramond initially came for gold but soon opened a store in St Kilda with a post Office attached and he was the first post master there. Dickson was a farmer’s son but became a draper and while he was unsuccessful on the Bendigo diggings and then returned to Melbourne where he met Cramond and soon after they opened a store on Lonsdale Street. They opened their business in Warrnambool in 1855 as a general store with groceries, drapery and ironmongery. Both partners were involved with the community and James Dickson was an original director of the Warrnambool Woollen Mill 1909 and the Warrnambool Cheese and butter factory. He also served on the committee of management of Warrnambool Base Hospital. These coathangers were an everyday item from their store. A common item which provides a link to one of Warrnambool’s largest and longest running businesses.Wooden hangers with rounded corners and metal hooks, one plastic coated. Printed names engraved and painted in black with business name.Cramond & Dickson Tailors & Outfitters Warrnambool. 2 made on America and 3 made in Germany. 1 unmarkedcramond and dickson store, warrnambool -
 Warrnambool and District Historical Society Inc.
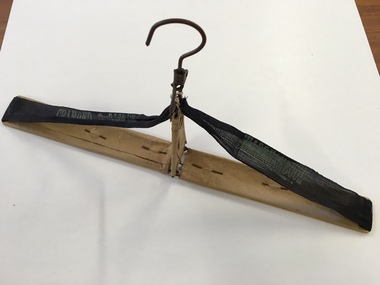
Coat Hanger, Cramond & Dickson Folding
John Glass Cramond 1829 and James Dickson 1831-1910 were founders of a large drapery store. Both were Scots and both came separately to Australia in 1852. Cramond initially came for gold but soon opened a store in St Kilda with a post Office attached and he was the first post master there. Dickson was a farmer’s son but became a draper and while he was unsuccessful on the Bendigo diggings and then returned to Melbourne where he met Cramond and soon after they opened a store on Lonsdale Street. They opened their business in Warrnambool in 1855 as a general store with groceries, drapery and ironmongery. Both partners were involved with the community and James Dickson was an original director of the Warrnambool Woollen Mill 1909 and the Warrnambool Cheese and butter factory. He also served on the committee of management of Warrnambool Base Hospital. This coathanger would have been used in their store. An everyday item linked to one of Warrnambool’s earliest and longest running businesses.Folding coathanger with metal frame covered in brown paper with black cotton tape. Cramond & Dickson Warrnambool stamped on the cotton tape.cramond and dickson, warrnambool -
 Warrnambool and District Historical Society Inc.
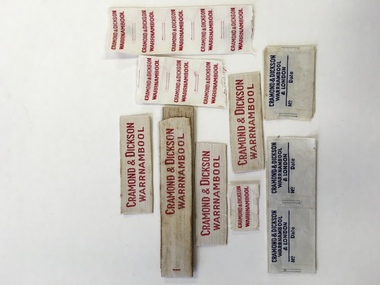
Label, Name labels Cramond & Dickson
John Glass Cramond 1829 and James Dickson 1831-1910 were founders of a large drapery store. Both were Scots and both came separately to Australia in 1852. Cramond initially came for gold but soon opened a store in St Kilda with a post Office attached and he was the first post master there. Dickson was a farmer’s son but became a draper and while he was unsuccessful on the Bendigo diggings and then returned to Melbourne where he met Cramond and soon after they opened a store on Lonsdale Street. They opened their business in Warrnambool in 1855 as a general store with groceries, drapery and ironmongery. Both partners were involved with the community and James Dickson was an original director of the Warrnambool Woollen Mill 1909 and the Warrnambool Cheese and butter factory. He also served on the committee of management of Warrnambool Base Hospital. These labels would have been used to sew to garments sold by Cramond & Dickson. A common item for many decades with which many people would identify.Eleven cloth name tag labels. White cotton fabric. Some are embroidered in navy blue and others in red.Those embroidered in red state Cramond & Dickson Warrnambool and the ones embroidered in navy blue state Cramond & Dickson Warrnambool & London.cramond & dickson, john glass cramond, warrnambool, james dickson -
 Eltham District Historical Society Inc
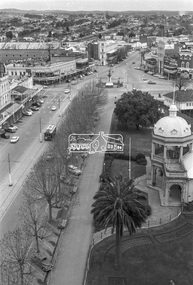
Photograph, View of Bendigo from Post Office Tower, c.Aug. 1963
... View of Bendigo from Post Office Tower... and white negative transparency View of Bendigo from Post Office ...View looking southwest along the Midland Highway (Pall Mall) from the top of the Post Office tower, present day Post Office Gallery and Visitor Centre. In the immediate foreground is Soldiers Memorial Institute Military Museum.Digital TIFF file Scan of 35mm Ilford FP3 black and white negative transparencybendigo, george coop collection, pall mall, post office tower, soldiers memorial institute military museum -
 Bendigo Military Museum
Letter - LETTER, AIR MAIL
See Cat 5109PThis is a foldable Air Mail letter card. The cover is printed in blue ink. It has a One Penny stamp attached with a Post Office Stamp. The stamp is Australian with the image of the Queen. On the front is the censor's stamp "Australian Military Forces. Passed by censor 537". Signed by unknown. Inside the letter is addressed to "My Darling Loved One" From VX25591 Pte E H Hildebrandt, 13th A.D.B. N.T. Forces. It ends with "From your loving Sweetheart & Husband. First Line he mentions receiving a letter 4-3-45. Tex xxxww2, romance, civilian life -
 Bendigo Military Museum
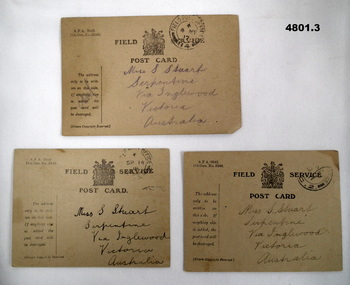
Postcard - POSTCARD, FIELD SERVICE, British Army, c.WW2
See Cat 4799 for data. All these 3 cards are addressed to Miss s. Stuart of Serpentine, via Inglewood, Vic, Aust. They are stamped by the "Field Post Office, various dates.These are Army postcards, document NA A.F.A 2042. They have simple messages printed on the rear, of which the sender chooses to use.1. States Rtd letter dated 24/2/17. Signed J Stuart 25.4.19. 2. States he is well - received no letters lately. Signed J Stuart. 3. States he is well - he has received a letter. Signed J Stuart 10.7.17.ww1, aif, family, sister -
 Bendigo Military Museum
Letter - LETTER AND ENVELOPE WW1, c, 1916
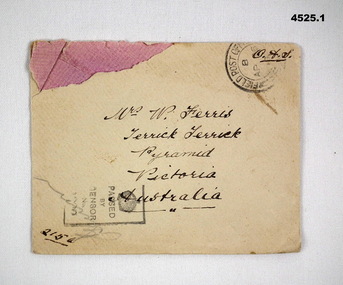
Letters written by Alfred G Ferris No 2156 AIF from a training camp near Codford England to his family in Australia. refer cat No 4183.3P for his service details. .1) Envelope, rectangular shape, off white colour, stamped "Field Post Office", stamped "Passed by Censor", hand written address in black ink." .2) Letter, Ünited Navy and Army Board Soldiers Church and Institute" letterhead, all print in black, hand writing in black ink, dated. .3) letter, "YMCA" letterhead, print in black and red, hand written in ink and pencil, dated..1)"Mrs W Ferris Terrick Terrick Via Pyramid Victoria Australia" .2) Main items, "4.10.16", "Dear Marian and all at home" .3) "4.11.1916"letters, envelopes, codford, ww1 -
 Bendigo Military Museum
Letter - LETTER AND ENVELOPE WW1, 13.8.1916
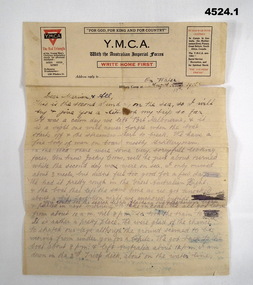
Letter written by Alfred G Ferris No 2156 AIF while on his way to England. Refer cat No 4138.3P for his service details..1) Letter with YMCA logo, yellow colour paper, print in red and black, hand written in black pen mostly in pencil. .2) Envelope, YMCA logo, stamped in black RH corner, red oval stamp on left, hand written address to in black pen, a pencil entry unclear.Letter main points, “On Water, Aug 13th 1916”, “Dear Marian & all”. Envelope stamp, “Army Post Office A 14 de 16 S.W.4”. Addressed to, “Mrs W Ferris Terrick Terrick Via Pyramid Victoria Australia” Oval red stamp, “1984” readable.letters, envelopes, ymca -
 Bendigo Military Museum
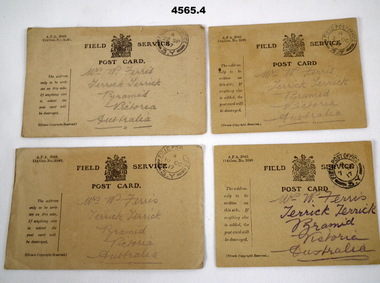
Postcard - FIELD SERVICE POSTCARDS, 1).3) C & Co Grange Hill S.W, C.1917
All cards are from Alf Ferris to his Mother at Terrick Terrick. Refer Cat No 4183.3P.1) - .4) Post cards, Field Service, light khaki colours, all print in black, all stamped “Field Post Office” with date on, three are addressed in black pencil, one in purple pencil, dated on rear.Hand written dates are, .1) ‘20/9/1917”, .2) “29/9/1917”, .3) “6/10/1917”, .4) 2/11/1917”. On front top LH corner all have, “A.F.A 2042 114/GEN 5248”post cards, field service, letters -
 Bendigo Military Museum
Letter - POSTCARDS WW1, c. 1914 - 1917
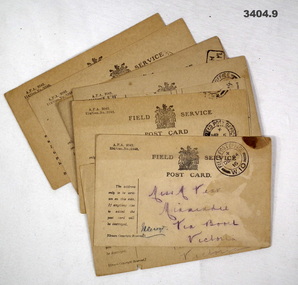
N Graham No 551, refer Cat No 266 for his service details.Nine x Field Service post cards with Field Post Office date stamps on front. On the back of each card is the current health & letter information from sender, Sgt N GRAHAM.Handwritten on each: "On Active Service, Miss M Vear, Minmindie Boort,Victoria Australia" post cards, letters ww1, 38th -
 Bendigo Military Museum
Letter - LETTERCARD WW1, c.1916
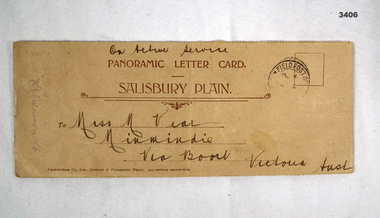
N Graham No 551, refer Cat No 266 for his service details.Cream, light cardboard covered booklet containing black & white photos of army camps & scenes around Salisbury. On front - "Black stamp RHS: Field Post Office" Brown printing: "PANORAMIC LETTER CARD SALISBURY PLAIN" Black handwriting: "On Active Service Miss M Vear Minmindie Via Boort Victoria Australia" Handwritten inside: "Best Wishes from N Graham Lark Hill Salisbury Plains 7/10/16"paorama, letter card, salibury, 38th -
 Bendigo Military Museum
Administrative record - CARD, c.WWII
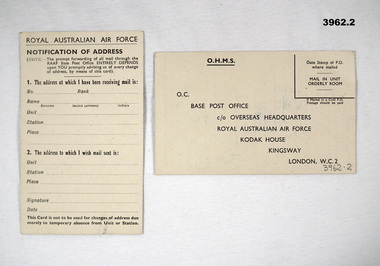
RAAF form used to notify changes of address when absent from unit or station. Item re Frederick Gardner DAVEY DFC No 410533 RAAF. Refer Reg No 3536P for his service details..1) Cream envelope with black type. .2) Proforma card to register change of address, cream with black type front / back. No personal details included..1) Printed in centre: OHMS Q.C. BASE POST OFFICE c/o OVERSEAS HEADQUARTERS ROYAL AUSTRALIAN AIR FORCE KINGSWAY LONGON, W.C.2 .2) Printed at top: ROYAL AUSTRALIAN AIR FORCE Notification of Addressaddress, notification, raaf -
 Bendigo Military Museum
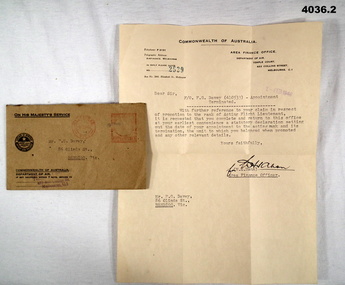
Document - DOCUMENT, PROMOTION, Area Finance Office, Dept of Air, 1-2-1946
Letter written in reply to F.G. Davey's claim in respect of his promotion to Acting Flight Lieutenant. The Area Finance Officer requested details related to his claim. Part of Frederick Gardner Davey DFC No. 410533 RAAF Collection. See Cat. No. 3536P for his service record.Typed letter on Commonwealth of Australia letterhead. Letter is contained in the brown paper envelope with postmark stamped in red. In place of a postage stamp is a red stamped mark..1) Address typed in black ink - "Mr F.G. Davey 86 Olinda St., Bendigo, Vic." Post marked in red ink - "Melbourne 1 Feb 46 Vic". .2) Date stamped in blue - "1-FEB 1946". Handwritten signature in black ink. rank, flight lieutenant, raaf -
 Bendigo Military Museum
Award - NOTICE, MID WW2, c.1944
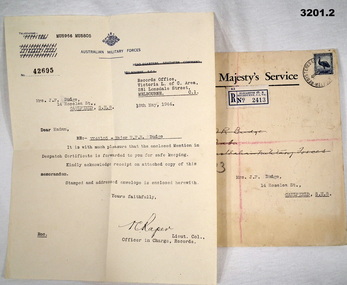
W F R BUDGE VX48105, refer Cat No 2721 for his service details..1) Letter from Australian Military Forces to Mrs J F Budge of Caulfield. It is the cover letter for Mention in Despatches certificate. Quarto size, black typewriting. .2) Envelope, strong paper, black typewriting. Originally addressed to Major Budge 2/24 Bn AIF. It has been redirected to Mrs J F Budge, of Caulfield, Victoria. .2) Envelope marked top centre: "On His Majesty's Service" Rear: "3 post office stamps & a red pencil cross covers both sides"awards, documents, letters, passchendaele barracks trust -
 Bendigo Military Museum
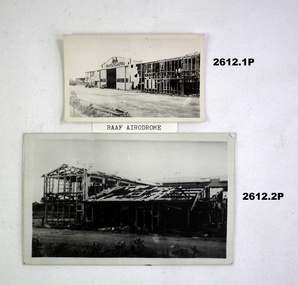
Photograph - PHOTOGRAPHS, DARWIN WW2, 1942
Collection of black & white photographs with typed captions detailing some of the destruction of buildings, shipping & equipment during & after the first attack on Darwin by the Japanese (Feb 19th 1942)..1) Bombed building. .2) Bombed building. .3) Bombed hangar. .4) Bombed store building. .5) Water tower with aircraft in background. .6) Bombed 2 storey building. .7) Sunken ship with 2 ships in background. .8) Scrapped aeroplane. .9) Small steam train..1) On back: More RAAF Drome damage. .2) On back: RAAF Drome. No opposition than couple of Wirraways & Kittyhawks. .3) On back: Hangar RAAF Drome when the Nips finished. .4) On back: First bomb on Post Office Darwin. .5) On back: Jap plane (pos zero) flying around water tower, Darwin loco before arrival of Spitfires at Darwin. .6) On back: Bob Dyers bank Darwin. .7) On back: Neptuna on side alongside wharf & 2 ships on mud at low tide Darwin Harbour. .8) On back: Scrap heap Bathelor field. .9) On back: Fly used on wharf at Darwin before Japs bombed wharf & sunk Neptuna standing there.photography-photographs, military history - war damage, passchendaele barracks trust -
 Bendigo Military Museum
Accessory - ENVELOPE, est 1916
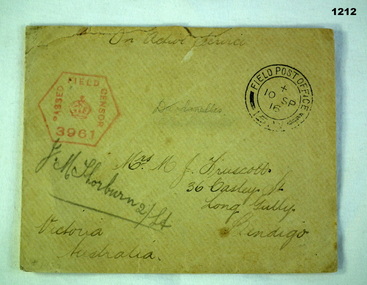
... /Australia" Black post office stamp Red censor stamp..../Victoria/Australia" Black post office stamp Red censor stamp. Beige ...Victor Joseph Truscott No 3629 enlisted in the AIF on 21.7.1915 with 8th reinforcements 21st Batt age 21 years 6 months. Embarked for Egypt on 29.12.1915, transfers to the 60th Batt 26.2.1916, promoted to Sgt 25.3.1916, hospital 30.4.1916 with Influenza, embark for France 19.6.1916, hospital 29.11.1916 with Trench Foot, Died of Disease (DOD) 9.12.1916 listed Trench Foot and Septic Pnuemonia at 7.15am in the morning. Beige paper envelope, no letter inside. Handwritten in black addressed to Mrs MJ Truscott. Also has pencil notes on envelope."From: Victor Truscott" Handwritten: "On Active Service/Mrs MJ Truscott/36 Castey St/Long Gully/Bendigo/Victoria/Australia" Black post office stamp Red censor stamp.documents-envelopes, military history, truscott -
 Federation University Historical Collection
Document, Zelda Martin, Central Victorian Goldmining towns - Boom Towns or Ghost Towns?, c1996
Zelda Martin was a PhD candidate at the University of Melbourne.[.1] 4th item in light blue display book titled Research Approach/Overview of Chapters/Confirmation of Canditure/Chapters1,2,3&4 of proposed thesis. *Twenty-seven page article on Victorian goldfields towns titled: Central Victorian Goldmining Towns - Boom Towns or Ghost Towns. The article was written during the author's PhD study. It outlines the context methodology, and resources and the chapters of the proposed thesis: (1) Central Victorian Goldmining Towns - The Context (2) Contemporary Views of the Factors Necessary for Town Growth (3) Outward Manifestations of Town Growth (4) The Trappings of Government (5-9) The Main Towns and Their Hinterland. [.2] 5th item in Light Blue display book as above item. *Chapter 1 of proposed thesis titled 'Pick, Shovel and Tin Dish Mining.' Covers in Section A: Central Victoria - Pre 1851: Aborigines in Central Victoria, Squatters, and Government. Section B: The years 1851-1854: The Early Gold Rushes, Government Reaction, Township Surveys, Legislation, Town Development, Local Government and Early Settlement. [.3] 6th item in Light Blue display book as above item. *2A of proposed thesis titled 'Contemporary Views of the Factors Necessary for Town Growth'. Similar information to Chapter 1 plus extra re towns and maps. Sections: Introduction, Context of Place - Geographical Towns Listed, The Context of Time - Pre1851 Aborigines, Governance of Port Phillip, The Squatters, The Villages of Central Victorian Highlands, Conclusion, Condensed Version of Chapter2B. [.4] 7th item in Light Blue display book as above item. *Chapter2B of proposed thesis. Sections: Area of Research, Schools, Banks, Newspapers, Progress Association, Town Development - Sandhurst (Bendigo), Ballarat, Castlemaine,, Maryborough, Ararat and Stawell. [.5] 8th item in Light Blue display book as above item. *Chapter 3 of proposed thesis titled 'Outward Manifestations of Town Growth'. Sections: Introduction, Contemporary Writing, Educationalists, The Bankers, The Townsfolk, Current Theory, General Theories of Urban Development, and Conclusion. [.6] 9th item in Light Blue display book as above item. *Chapter 4 of proposed thesis titled 'Trappings of Government' Sections: Introduction, Early Government Attitudes to Mining and Town Development, Law and Order, Township Surveys, Legislation, Local Government, Transport and Communication, The People and Lobbyists. [.7] 10th item in Light Blue display book as above item. *'The Rise and Fall of Central Victorian Goldmining Towns'. Includes a map showing main Goldfields, a table showing towns and villages at two points in time - 1857 and 1871; a Bibliography of Primary and Secondary Sources. [.8] Resource No1. Black display book titled Local Towns 1 : Alma: *Brief history *Directory *Maps Amphitheatre / Mountain Hut: *Brief History Post Office Directory Ararat: *Brief History *Post Office Directory 1869 - Alphabetical Listing by Occupation *Ararat - Prominent Citizens of 1858 *Langi-Morgala Museum Avoca: *Brief History *Excerpts from 'Avoca The Early Years', Margery and Betty Beavis; pg1 - Beginnings; pg11 - The Midas Touch; pg25 - Local Gold Escorts; pg27 - A Town is Born; pg51- The Administration of Justice; pg53 - The Ways of the Law; pg61 - News of the Day; pg65 - A Time to Play; pg72 - Land Ownership *Post Office Directory (Bailliere's) 1869 *Tourism Map and Information of area *Historic Avoca - A 5.5km Tour *Avoca & the Pyrenees Region - information pamphlet Ballarat: *Early History of Ballarat - Ballarat Historical Society, Publication No.1: origin of the name; Ballaarat - the Beginning; Fabulous Yields from the Ballaarat Goldfield; *Streetscape Lydiard Street. *Hand drawn map showing Leigh River, Old Portland Bay Road, plaque on road to Colac; etc. *Newspaper article re 'The Theatre Royal' ( which stood in the vicinity of the current Owen Williams store) - 'The News'15/04/1998 *Article - 'Ballarat's Mechanics' Institute Lives On' Ballarat Courier, 14/09/1985 *Article - Standing the Test of Time' The News 17/11/1993 re The Mechanics Institute & picture of the Reading Room *'Ballarat a Study of a City, Phyllis Reichl, pub. Nelson, 1968; no.3 place, time and people field studies series *Investigator Vol.33 No.2, 1998 Geelong Historical Society. Article on pg75 describes Ballarat in 1861 *Folded poster - 'Ballarat 100' a history of telegraph communication, pub. Telecom. Beaufort (Fiery Creek): *Brief history *Post Office Directory [.9] Resource No.2 Black Folder Titled Towns cont.No2 Bendigo (Sandhurst): *'Family & Local History at the Bendigo Library - 1851-2001 150 years of gold'. *Bendigo Government Camp in 1853 illustration; key to sketch and names of Government officers stationed there *Excerpts from 'Bendigo and Vicinity' Adolph Haman *The Bendigo Goldfield Registry - pgs 1-7 Introduction *Excerpt: 'Breaking the Grip' *Excerpt: The Most Go-Ahead Place *Excerpts from 'History of Bendigo' - anti license agitation; laying out of town; proposed railway; gold calls and dividends; the Sandhurst Municipality; journalism *Bibliography Blackwood: *Excerpts from 'Aspects of Early Blackwood - The Goldfield, the Landmarks, the Pioneers' Alan J Buckingham and Margaret F Hitchcock, JG Publishing,1980 Buninyong: *A Brief History *Investigator Vol1 No.2 Feb 1966 Geelong Historical Society. Pg3 - Article re gold escort route - Mt Alexander to Adelaide - (see a simple monument on the Western Highway a few miles out of Horsham. Pg 15 - Ballarat Excursion - re the finding of gold. *Three articles published by Buninyong and District Historical Society Inc: (Magpie Exploration; Finding Gold In The Green Hills; Magpie Exploration; Burnt Bridge to Cargarie to Mt Mercer) *Copies of newspaper articles/items *Buninyong Street Directory Carisbrook: *In the Beginning There Was Carisbrook *The History of the Carisbrook Racecourse Carngham / Snake Valley: *Brief History *Directory Castlemaine: *Directory 1865-1866 - Alphabetical and Street *Poster - Castlemaine A Contemporary Guide "The Great Centre" 1866 - A Contemporary Guide to the Fascinating Past *Pamphlet - Castlemaine District Community Hospital *Map - Castlemaine, Maldon & Surrounding Districts *Map and Information - The Dry Diggings Track - a 55kl walk among historic goldfields relics ( Castlemaine Fryerstown Vaughan Mt Franklin Hepburn Daylesford) *Postcard - Former Court House *Directory 1867 - Alphabetical, Trade [.10] Resource No.3 Grey folder Titled Towns 3 Creswick to Maryborough Creswick: *Brief History *Booklet - "Creswick Cemetery Walk" *Booklet - The Buried Rivers of Gold Heritage Trail Creswick *Creswick Historical Museum Information Sheet *Chronological History of Creswick *Alphabetical Directory of the Borough of Creswick *Creswick's Creek Directory 1856 *Historic Creswick Walking Tour *A Brief Account of the Schools of Creswick - Past and Present *100 Years of Railway Travel in Creswick *The Berry Deep Leads *The Spence Home at Jackass Gully in the Creswick State Forest ( William Guthrie Spence - Pioneer) *The New Australian Mine and the 1882 Disaster *Creswick District News, Issue 7, July August 1999 *The Creswick Miners Walk - Information and Map *Maps Chewton: *Brief History *Directory Clunes: *Brief History *Clunes Street Directory Daylesford: *Brief History *Notable Bushfires in Daylesford District Over More Than a Century - "Black Thursday" 1851; 1862; 1899; the Disastrous Hepburn Fire of 1906; 1939; 1944; 1969. *Post Office Directory -Daylesford and Hepburn Dunolly / Inkerman: *Brief History *Directory *Pamphlet - Goldfields Historical Museum *Pamphlet - Historic Dunolly - Victoria's Best Kept Secret *Map of Gold Workings at Dunolly Area - showing where the main gold rushes occurred *Brief History - Inglewood *Directory - Inglewood - Name Occupation, Dwelling Kingower: *Brief History *Directory - Name / Ocupation / Dwelling Linton / Happy Valley / Piggoreet: *Brief History *Directory - Lintons McIvor: *"A History of the Shire and the Township of Heathcote" by J.O. Randell Majorca: *Brief History *Official Post Office Directory 1869 - Name / Occupation/ Address Maldon (Tarrangower): *Brief History Part 1 *Brief History Part 2 *Post Office Directory *List - Alphabetical Order by Names plus Business and Trade (Tarrangower Times Oct/1858) *List - Alphabetical Order by Trade plus Name and Business *Directory - Name / Occupation / Dwelling Maryborough: *Worsley Cottage - built by Arthur Worsley, a contractor in stonework in 1894 [.11] Resource No. 4 Blue Display Book titled Towns 4 Moliagul to Stawell Moliagul: *Brief History *Moligul Legislative Assembly (Voting?) List - Names and Occupations *Moliagul Victorian Post Office Directory 1868 - Name / Ocupation / Address / Comments *"The Welcome Stranger" gold nugget *The Sunday School *The Welcome Stranger Discovery Walk - information and map Moonambel (Mountain Creek) Redbank *Brief History *List of names extracted from advertisments of the Pioneer and Mountain Creek Advertiser 16/02/1861. *Bailliere's Directory 1869 - Alphabetical List of Name / Occupation / Place St Arnaud: *Brief History Sebastapol: *Brief History *Directory 1869 - Alphabetical by Name; plus occupation and address. Browns and Scarsdale: *Brief History *Browns Street Directory - Name and Occupation Smythesdale: *Brief Description *Smythesdale Street Directory -Name and Occupation Stawell (Pleasant Creek) *Brief History *Victorian Official Post Office Directory - Name /Occupation / Dwelling *Chronology - 1841-1920 *Production of gold statistics - 1879 - 1900 *Big Hill *Extracts from "The Golden Years of Stawell". Chapt 1 - Stawell's Coming Out. Capt. 2 - The Gold Rush. Caapt.3 - Cradle of Democracy. Chapt.4 - The Reefs Becomes Stawell. Chapt. 5 - Rushing In. Chapt.6 - The Pioneers. Chapt 7 - The Decade of Optimism. [.12] Resource No. 5: Blue Display Book titled 'Towns Steiglitz to the The Golden Triangle. Steiglitz: Brief History Victorian Post Office Directory 1869 *Map of Steiglitz *List of maps relevant to Steiglitz history *Information 6 tables of data from "Reports of Mining Surveyors Talbot (Back Creek) Brief History Taradale: Post office Directory 1869 - Name/Occupation/Street. Also list in alphabetical order by Occupation Taradale *Chronological Reference to Taradale Mines *Water - The Coliban System of Waterworks *Joseph Brady *The Syphon Tarnagulla (Sandy Creek) *Brief History *Tarnagulla Businessmen Cameos to give depth to advertisments in 'The Tarnagulla Courier' various issues 1864-1871 *Directory - Name/Occupation /Address *List - Name/Business/Trade Wedderburn (Koorong) *Brief History *List - Name/Occupation The Golden Triangle: *The Early Rushes - Wedderburn / Moliagul / Sandy Creek - Tarnagulla / Jones Creek - Waanyarra / Kingower / Dunolly - Goldsborough / Inglweood *Census of 1857 - Population / Occupations *1858-1871 - A Time of Consolidation- Wedderburn / Moliagul / Sandy Creek- Tarnagulla / Arnold *Census 1871 - Population *Information gleaned from the census data - Demographics / Population / Occupations / marital / Birthplace / Religion / Literacy/ Occupation and Housing Cameos *Graphs - Birthplace of settlers /Male-Female Ratio / Married males / Children under 15 as Percentage of Population / Religion *Census 1857 - Statistical data *Maps *Bibliography [.13] Resource No. 6 - Black Display Book Information and Research in Central Victoria including: *Banking - Research from ANZ Bank Archives *Institutions - also includes articles listed from the Ballarat Times Newspaper *Australian mining History Association - A.M.H.A. Bibliography *Australia's Mining History * Bibliography - Land Surveys Victoria - *1853 Administration (Statistics and Other) includes: schools / ministers of religion / police / military / local administration / licences for sale of spirits / distances between various Victorian gold fields. * Victoria Government Gazette (Copy) - N0. 116, 12/12/1854 includes: Gold Felds Commission of Enquiry & No. 85, 15/09/1854 - Addresses presented to the Lieutenant Governor (Sir Charles Hotham) during his tour through the Gold Fields of Victoria,1854. Addresses on behalf of : the people of Bendigo; Members of the Church of England, Bendigo; Members of the Wesleyan Church on the Bendigo Gold Fields; Bendigo Gold District General Hospital; the Bendigo Prospecting Association; Committee of the Bendigo Local Exhibition; Bendigo District Medical Association; Coloured Americans Resident at Bendigo; German Inhabitants of Bendigo; Landowners, Inhabitants, and Miners of Castlemaine; Inhabitants of Forest Creek; Inhabitants of Heathcote and Gold Miners of McIvor; Residents and landholders of the District of Bacchus Marsh; Inhabitants of Kilmore and Vicinity. *Gold Fields Correspondence 1853: letter from Lieutenant Colonel Valiant, (Officer commanding the Troops in Victoria) to the Lieutenant Governor re threatened disturbance at Sandhurst (Bendigo) regarding the Gold License Fee. * Extracts from a book "Victoria" re Gold Fields Commission of Enquiry involving mainly Ballarat and Castlemaine and a chapter titled 'A Tour to the Victorian Gold-Fields' *Lists of central Victorian newspapers - listed by date published 1851to 1874; by first date available to State Library. *A list of cities and towns showing County, population in 1861 &1871, and municipal status. [.14] Resource no.7. Black display book. *Reference: Papers presented to Parliament Victoria - 1859-1860 4 volumes - relevant sections copied. Contains information on Branches of Government. General / Finance / Gold / Gazette / Commission and Warrant / Statistic. *Gold Fields Act. In accordance with the Act the gold fields are divided into six districts - Ballaarat, Castlemaine , Sandhurst, Avoca, Ararat, and Beechworth.. Official staff in each gold district consists of a Resident Warden, Wardens, Wardens' Clerks, Bailiffs, Chinese Protectors, Chinese Interpreters, and Mining Surveyors. *Gold Receiver *Gaols *Police magistrates and Clerks of Petty Sessions, etc. *Field Branch *Immigration and Emigration Overland - Chinese - 1859 *Population on the Goldfields *The Geological Survey - The Government Geologist is assisited by staff from four branches - the office Branch; the Publishing Branch; the Field Branch and the Museum Branch. *Commission to Enquire Into Sludge dated 10/02/1859 (Some sections copied) - Report to the Honorable Chief Commissioner of Public Works, Melbourne re the mode of carrying the sludge from the puddling mills in Sandhurst without interfering with the drainage of the town and the roads in the neighbourhood. [.15] Resource No.8: Camel display book titled Resource No. 8. Aborigines *Lists of book titles - +"Readings in Victorian prehistory" +"The Aborigines of Port Phillip" +Aboriginal languages and clans" +"A History of the Port Phillip District" +"Langi Ghiran 1: Aboriginal Rock...." +"Koorie History: sources for aboriginal studies in the State Library of Victoria", ed. Tom Griffiths, Melb. Friends of the State Library, 1989 +"The Public Lands of Australia Felix"; settlement and land appraisal in Victoria1834-91 with special reference to the Western Plains", J.M.Powell, Melb. Oxford University Press 1970 +*Bibliography of the Victorian Aborigines' from the earliest manuscripts to 31st December 1970, Massoa, Aldo, Melb. Hawthorn Press, 1971 +"Aborigines in Colonial Victoria, 1836-1886", M.F. Christie, Sydney University Press, 1979 +"Urban and Industrial Australia: readings in Human Geography" ed J.M. Powell, Melb. Sorrett Pub. 1974 *Extracts: -Processes of Pioneer Settlement - The Squatting Occupation of Victoria, 1834-60. J.M. Powell -Areal Variations in the Class Structure of the Central-Place Hierarchy. P. Scott - Volume1 and Volume 2: Notes Relating to the Habits of the Natives of Other Parts of Australia and Tasmania. Compiled from various sources for the Government of Victoria by R Brough Smyth. John Curry, O'Neil, Melb. 1st pub. Melb. 1876. p31-45 - Numbers and Distribution of the Aborigines in Victoria -Victorian Aborigines 1835-1901 - A Resource Guide to the Holdings of the Public Record Office, Victoria; published by the Government Information Centre 1984. *History of the Aboriginal Artefacts Displayed in the Daylesford Museum. F. G. Powell (4 page pamphlet) *Letter to Zelda Martin from Peter Lovett, Cultural Officer, Ballarat & District Aboriginal Co- Operative, 05/02/1997 *Map: Ian Clarke Victorian Tribunal Boundary Map - Clans of Central Victoria. *Victorian Rock Art and Mythology - Article about Mount Langhi Ghiran and myths of the Tjapwarong people. *Two Aboriginal myths relating to the Grampians - 'The Monster Emu' / 'The Aquisition of Fire', by the Aborigines in the Grampians Areas *Article titled (chapter 8) Ballarat - information re camping sites in the region. Lake Wendouree / Lake Burrumbeet (includes a myth) / Mt Bunninyong / Lal Lal / Pitfield / Mount Elephant / Mount Egerton / Meredith / Lake Goldsmith / Lake Learmonth / Ercildoune *Notes on the Aborigines of the Wider Ballarat Region plus European names=Aboriginal names. John Morris 26/07/1995 *Role of Aborigines in Town Development in Central Victoria. Mentions Native Police Force est. in Port Phillip 1842 and Central Board for Aborigines est. 1860 *The Grave of King Billy. (Frank Wilson) Pamphlet. *Camping Places in Central and Northern Victoria. Article re Lake Burrumbeet site. *Programme for the Unveiling of Memorial Cairn for Edward Stone Parker 1802-1865. Note portrait not accurate. Accurate portrait is available in the book "A Successful Failure A Trilogy The Aborigines and Early Settlers", Edgar Morrison, Graffiti Publications, 2002. * Large envelope addressed to Mr G Netherway containing newspaper cuttings regarding the life of Edward Stone Parker, the unveiling of the Memorial Cairn as mentioned above, articles titled 'Episodes from Our Early Days' (Edgar Morrison, Yandoit)- The Black's School, A School At Last and The Final years. Also a typed page titled 'Historical Background to E.S.Parker's Career. Includes an interesting tale titled 'When the cat lay doggo' re laying power leads for the unveiling ceremony at the memorial site. [.16] green display folder titled 'Research Aids' *List of references to Commissioners' & W'ardens' Reports (formerly held at La Trobe Library Archives, now at Public Records Office [PRO]). Indicates town referred to / date of report / name of camp if different to town. * Archive information re Anglican Records *Movement around the Goldfields - Miners and Storekeepers - usefulness of newspapers in providing information - areas covered - Castlemaine, Maldon, Ararat, Stawell, Tarnagulla, Dunolly. *Port Phillip /Victoria Directories 1839/1867 - Chronological list of Directories included in this series. *"Notes on the History of Local Government in Victoria" A.W. Greig Melb. University Press 1925 - Photo-copied extract p5-p40. (Source - Deakin University Library) - Introduction by W.Harrison Moore. Section 1 - Development in New South Wales Before Separation. Section 2 - Development in Victoria After Its Separation from New South Wales. Hand written notations: 'roads, markets, and local government 1855 on' ;'opportunity of squatters in parliament' and 'opportunities of matters in parliament p33' * Notes on the Establishment of Surveyor General's Department 1851and Commissioner of Crown Lands and Survey. * Newspaper articles from The Argus, 1849, re the discovery of gold in the Pyrenees region. * Excerpt - a report on schools - A.B.Orlebar, Inspector; re the need for permanent school buildings rather than tents. *Excerpt from - 'Approaches to Urban History', Sean Glynn: The Case for Caution * Except from - 'The Urban Sprinkle', Weston Bate: Country Towns and Australian Regional History *Reference- 'The History of Land Tenure in the Colony of Victoria', John Quick. References the Haines Land Bill, land tenure and Land Leagues. [.17] Light blue envelope folder titled 'Birtchnell's Ballarat, etc. Directory 1862 *Contains various directories for Smythesdale, Buninyong, Clunes, Brown's and Creswick. [.18] Red envelope folder no.2 titled Victorian Gazetteer *Selected pages from 1869 Victorian Gazetteer on A4 paper (with a handwritten note questioning if some pages are from 1868 Victorian Gazetteer as appears to be different sizes - A3 pages.) Information includes locations and descriptions of towns, hotels, banks, communications and populations. (Does not include names, residences and occupations) [.19] Red Envelope folder titled Bailliere's Official Post Office Directory 1868 (or1869 or a mixture of both?) *Preface *Contains a selection of pages of towns highlighted in yellow in the the index *Work on this directory was commenced in 1867. *Information includes: Municipalities - mayors and councilors; lists of towns naming male inhabitants and their occupations. [.20]Yellow manila folder titled Post Grad Seminar Presentation 1996 *Gives some background to Zelda Martin's proposed thesis and why she chose the topic Gold Mining Towns Boom or Bust [.21] A3 display book - No. 1A * A list of 'Relevant Newspapers collected: The Tarrangower Times and Maldon Advertiser (first published 1858) Includes dates 1858-1867. The Mount Alexander Mail. Includes dates 1854-1866 The Tarnagulla Courier. Includes dates from1864-1871 Dunolly and Burnt Creek Express. Includes dates from 1862-1871 * Selection of newspaper pages from The Mount Alexander Mail 1854 to 1856, mostly showing advertisements for businesses and services provided to that community. [.22] A3 display book - No. 1B * Selection of newspaper pages from The Mount Alexander Mail 1857 to 1866, mostly showing advertisements for businesses and services provided to that community. [.23] A3 display book -No. 2 * Selection of newspaper pages from The Tarnagulla Courier 1864 to 1871, mostly showing advertisements for businesses and services provided to that community. [.24] A3 display book - No. 3 *Selection of newspaper pages from The Tarrangower Times (and Maldon and Newstead) Advertiser 1858 to1867, mostly showing advertisements for businesses and services provided to that community. [.25] A3 display book - No.4 * Selection of newspaper pages from The Dunolly and Burnt Creek Express; and The Dunolly and Betbetshire Express 1862 to 1871, mostly showing advertisements for businesses and services provided for that community. [.26] A3 display book - No.5 Includes: * Bryce Ross's Diggings Directory. Includes instructions for using this directory. This directory was used by "all persons having connexion or desiring to communicate with 'working parties, private friends, or Stores at the Diggings." As a directory for each area wwas completed it was published in each month's issue of Bonwick's "Digger's Magazine." Years c1852/1853. This Directory commences first at the head of Forest Creek. Includes a directory for Bendigo and Ballarat. Of interest at the end of the Bendigo and Ballarat directory is a list of the number of storekeepers, butchers, doctors, smiths, eating houses, lemonade sellers and chapels. * The Castlemaine Directory and Book of General Information Comprehending Glass's Model Calendar for the Two Years 1862 and1863. "zelda martin, victorian goldfield towns, bendigo, castlemaine, ballarat, maldon, stawell, ararat, maryborough, creswick, avoca, heathcote, banks, bank of australasia, union bank of australia, government camp, sandhurst, water supply, tarnagulla, talbot, back creek, mountain creek, police court, carisbrook, dunolly, thompson's foundry, charles clacy, anthony trollope, robert cecil, mount alexander, urbanisation, national schools, education, govenrment, industry, railway, transport, settlement, land settlement in central victoria, steiglitz, joseph brady, the new australian mine, berry deep leads, william guthrie spence, creswick state forest, arthur worsley, worsley cottage, the welcome stranger, moliagul, moonambel, redbank, st arnaud, sebastapol, brown's, scarsdale, clunes, chewton, daylesford, bushfires, inkerman, inglewood, kingower, lintons, happy valley, piggoreet, mcivor, majorca, tarrangower, taradale, the coliban system, the syphon, sandy creek, wedderburn, koorong, arnold, jones creek, waanyarra, the golden triangle, census 1857, blackwood, buninyong, durham lead, magpie, carngham, snake valley, alma, amherst, daisy hill, amphitheatre, mountain hut, beaufort, fiery creek, counties, population, gold fields commission of enquiry1854, william westgarth, gold license fee, lieutenant colonel valiant, administration of the victorian gold fields, commission to enquire into sludge 1859, e.s. parker, edward stone parker, edgar morrison, mount franklin protectorate, dja dja wurrung, memorial cairn, franklinford, mt franklin memorial cairn, jajowurrong, dja dja wurung, tjaowarong, wothowurong, assistant protectors, daylesford museum, buluk, rock art - grampians, aboriginal mythology - grampians, aborigines, first nations people, mount franklin, aboriginal artifacts, lake burrumbeet, native police force, central board of aborigines, yandoit, commissioners' reports, wardens' reports, port phillip/victoria directories 1839-1867, local government - victoria 1853/1854, surveyor general's department - 1850's, victorian schools 1850's, a.b.orlebar, haines land bill, william charles haines, wilson gray, land tenure, land leagues, victorian gazetteer, the tarrangower times and maldon advertiser - 1858-1867, the mount alexander mail 1854-1866, the tarnagulla courier 1864, dunolly and burnt creek express 1862-1871, bryce rose's diggings directory, the castlemaine directory 1862-1863 -
 Federation University Historical Collection
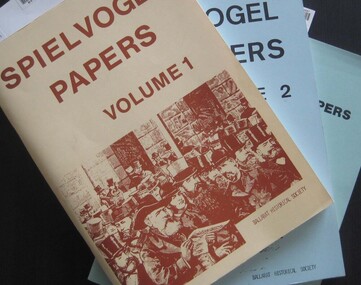
Booklets, Ballarat Historical Society, Spievogel Papers, volumes 1,2, & 3
Nathan Spielvogel was a local historian. The Spielvogel Papers consist of the articles he prepared for a series of weekly talks on Radio 3BA in 1936 and 1937. According to Alex Barnett there is a reference in the Spielvogel Papers to the moving of the bodies of diggers killed at the Eureka Stockade to the old cemetery on 26 November 1857.3 soft covered books with text relating to the history of Ballarat. .1) yellow cover .2) blue cover .3) green cover .1) includes topics such as Gold discovery, Eureka, Main Road, Ballarat Fire Brigade, Ballarat Benevolent Home, Buninyong, Burke and Wills Monument, Chinese in Ballarat, Dana Street School, Ballarat Hospital, Lost Trades of Ballarat, Ballarat Military, Mount Pleasant, Old Colonists' Club, Phoenix Foundry, Ballarat Post Office, Railways, Ballarat School of Mines, South Street Society, Martin Hosking, Charles Curnow Phillips, James Sainsbury, and William Cross Yuille. .2) includes topics such as Ballarat streets, bowls, cricket, football, hotels, Little Bendigo, Lake Wendouree, Ballarat Quartz Mines, Sebastopol, Ballarat Turf Club, Ballarat Zoo, water supply. .3) includes topics such as the Kohinoor Nugget, Eureka, Black Hill, Sebastopol, oddietown, Joe the bellman, Trades Hall, Lal Lal Iron, Ballarat Library, Yuille Creek, Martin Hosking, Stonewall Jackson, steeplechase, Lemonade Paddock, Ivey's Flour Mill, Salvation Army, Stick Jaw Davey, Unicorn Hotel, doctors, Alfred Bells, Ballarat School of Mines Museum (War Museum), Joseph Orange, Ballarat East Post Office.ballarat, speilvogel, nathan spielvogel -
 Federation University Historical Collection
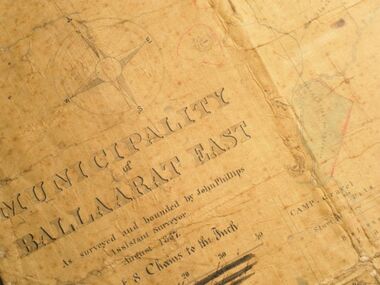
Map, Municipality of Ballarat East, 1857
Gold was discovered in Ballarat in 1851. This plan was created six years later and names some of the great gold locations of Ballarat East. It also shows the locality of the Eureka Stockade (1854) and the walking tracks and roads on the Ballarat East Goldfield.In 2007 this map was listed on the inaugural Ballarat Treasure's Register.Large map backed onto linen. The map has read and blue highlights, and identifies areas such as Mount Pleasant, Golden Point, White Flat, Nightingale, Malekoff, Old Post Office Hill, Red streak, Gumtree Flat, Old Gravelpits, Bakery Hill, Ballaarat Flat, The Camp, Specimen Gully, Pennyweight Hill, Warrenheip Gully, Gays Gully, Pennyweight Flat, Eureka, Black Hill, Pinchgut, Crocodile, Hit or Miss, Little Bendigo, Brown Hill, Mopoke, Cricket Reserve, Canadian Hotel, Ballarat Eastmount pleasant, golden point, white flat, nightingale, malekoff, old post office hill, red streak, gumtree flat, old gravelpits, bakery hill, ballaarat flat, the camp, specimen gully, pennyweight hill, warrenheip gully, gays gully, pennyweight flat, eureka, black hill, pinchgut, crocodile, hit or miss, little bendigo, brown hill, mopoke, cricket reserve, canadian hotel, ballarat eastm phillips, john phillips, field draughtsman, ballarat east, ballarat east map -
 Flagstaff Hill Maritime Museum and Village
Document - Building Specifications, Bank of Australasia, Specifications Bank of Australasia Warrnambool, before March 18, 1860
These specifications were for the Bank of Australasia building on the corner of Timor and Kepler Streets in Warrnambool. The two-storey stone Regency building was built by Roberts & Co. in 1859 and it still stands today, a hundred and sixty years later. Above the doorway, the words "BANK OF AUSTRALASIA" were etched into the stone. In 1856 Roberts & Co. built the Warrnambool Post Office on Timor Street, and in 1858 purchased land on Timor Street. The Bank of Australasia was incorporated by the Royal Charter of England in March 1834. The bank began in Australia on 14th December 1835, opening in Sydney. The Acting Superintendent of the bank at that time was David Charters McArthur. He was Superintendent from 1867-to 1876. The Melbourne branch opened on 28th August 1838 in a two-roomed brick cottage on the north side of Little Collins Street, where two huge mastiff dogs were used at night to guard the bank. The government also provided an armed military sentinel. Due to the bank's rapid growth, a new building for the Melbourne branch was opened in 1840 at 75 Collins Street West. By 1879 the bank had been upgraded to a magnificent two-storey building on the corners of Collins and Queens Streets, with the entry on Collins Street. In 1951 the Bank of Australasia amalgamated with the Union Bank to form Australia and New Zealand Bank, now known as the ANZ. Then in 1970, the ANZ merged with both the ES&A and the London Bank of Australia to form the ANZ Banking Group Limited. The ANZ Banking Group Ltd kindly donated a variety of historic items from the Bank of Australasia. BANK of AUSTRALASIA, WARRNAMBOOL – In 1854 Warrnambool had two banks, the Union Bank and the Bank of Australasia. Later, completely different bank businesses opened; in 1867 the National Bank of Australasia, then in 1875 the Colonial Bank of Australasia. The original Warrnambool branch of the Bank of Australasia was established in July 1854, and operated from a leased cottage on Merri Street, close to Liebig Street. The bank later bought a stone building previously erected by drapers Cramond & Dickson on the corner of Timor and Gibson Streets. Samuel Hannaford was a teller and then Manager at the Warrnambool branch from 1855 to 1856 and the Warrnambool Council chose that bank for its dealings during 1856-57. In 1859 Roberts & Co. was awarded the contract to build the new Bank of Australasia branch for the sum of £3,000. The land was on a sand hill on the northeast corner of Timor and Kepler Streets and had been bought in 1855 from investor James Cust. The new building opened on May 21, 1860. The bank continued to operate there until 1951 when it merged with the Union Bank to form the ANZ Bank, which continued operating from its Liebig Street building. Warrnambool City Council purchased the former Bank of Australasia building in 1971 and renovated it, then on 3rd December 1973 it was officially opened as the Art Gallery by Cr. Harold Stephenson and Gallery Director John Welsh. The Gallery transferred to the purpose-built building in Liebig Street in 1986 and the old bank building is now the Gallery club. Staff at the Bank of Australasia in Warrnambool included the following men but others were also involved: Samuel Hannaford, Teller then Manager from 1855-1856; W H Palmer, Manager from January 1857 until November 1869 when the Teller Basil Spence was promoted to Manager; H B Chomley, Manager from April 1873 and still there in 1886; A Butt, Manager in 1895-1904; J R McCleary Accountant and Acting Manager for 12 months, until 1900; A Kirk, Manager 1904; J Moore, staff until his transfer to Bendigo in December 1908; J S Bath was Manager until 1915; C C Cox, Manager until April 1923; Richard C Stanley, Manager 1923 to April 1928. The document with the building specifications for the Bank of Australasia, Warrnambool has historical significance as it was the basis for the building housing the Bank from early 1860. The document is also a historical record of the specifications and the builders of the mid-1800s in Warrnambool. The document is also significant for its association with Roberts & Co. which also built the Warrnambool Post Office. The document is significant for its association with the Bank of Australasia in Warrnambool, the first bank in Warrnambool, established in 1854. The bank continued to operate until its merger in 1951 when it became the ANZ Bank, which is still in operation today. The Bank was an integral part of the establishment and growth of commerce in Colonial Warrnambool and throughout Australia.Building Specifications; five large cream-coloured pages, folded in half to make a book. Handwritten text in black ink. Rectangular paper sheets were folded in half parallel to the short sides then stapled together near the fold A remnant of green tape suggests it was used to seal the binding. The specifications relate to the Bank of Australasia's Timor Street branch in Warrnambool, 1860.Handwritten in pencil on front cover "Completion date 18th March 1860" "Cost £2,860 sterling" Script handwriting, black ink on cover "Specifications / Bank of Australasia / Warrnambool"flagstaff hill, warrnambool, flagstaff hill maritime museum, maritime museum, commerce, banking, bank of australasia, australia & new zealand bank, anz bank, david charters mcarthur, 1860, regency building, specifications, bank building, roberts & co. -
 Bendigo Historical Society Inc.
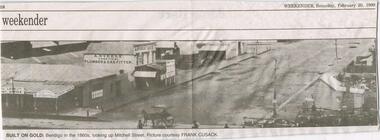
Newspaper - JENNY FOLEY COLLECTION: BUILT ON GOLD
Bendigo Weekender from Saturday, February 20, 1999. Built on gold: Bendigo in the 1860s, looking up Mitchell Street. Bottom left corner shows a loan office and a saddler,AQ. Steele practical Plummer And Gas Fitter, A. Steele 'AGE', rooms,Timber Yard. Middle front is horse and cart with roof. person. Right of centre, tall post with sign, building with gable roof and annex with chimney, part of another building with a fence, bottom part of another post. Picture courtesy of Frank Cusack.newspaper, bendigo, bendigo weekender -
 Bendigo Historical Society Inc.
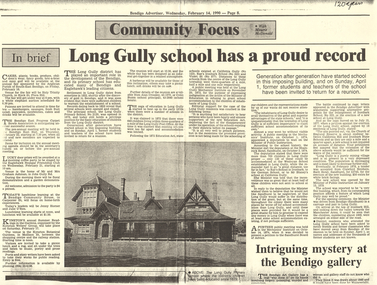
Document - LONG GULLY HISTORY GROUP COLLECTION: LONG GULLY SCHOOL HAS A PROUD RECORD
Copy of a Bendigo Advertiser article titled Community Focus with Maurie McDonald. This article is titled Long Gully school (No 2120) has a proud record. The school was having a reunion on April 1. The article mentions history of the school which was opened in 1879. The Advertiser is dated February 14, 1990. Written in the top right corner is 120 years.bendigo, history, long gully history group, the long gully history group - long gully school has a proud record, bendigo advertiser 14/2/1990, maurie mcdonald, long gully primary school no 2120, alan crossley, colin buzza, long gully post office, 1872 education act, california gully no 123, rae's ironbark school no 323, violet st no 877, long gully mechanics' institute, shamrock hotel sandhurst, wesleyan school, german school, mr blaney's school, sandhurst board of advice, the church of england reserve, crawford bros, bath hotel sandhurst, ironbark hill, manchester arms -
 Bendigo Historical Society Inc.
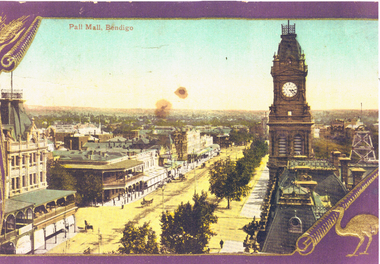
Photograph - LONG GULLY HISTORY GROUP COLLECTION: PALL MALL, BENDIGO
Enlarged photo of a coloured postcard of Pall Mall, Bendigo. The photo shows a tree lined Pall Mall with some horse drawn vehicles and pedestrians. Myers have their name on the veranda and there is a sign with Abbott next to it. On the right side is the Post Office clock tower and behind is the poppet legs of a mine. The photo has a purple and gold border. In the bottom right corner beside a rolled corner is an emu and in the top left corner is a scroll and part of a head of wheat.bendigo, history, long gully history group, the long gully history group - pall mall bendigo, morley johnson's, myers, abbott