Showing 250 items matching "shelves"
-
 Mont De Lancey
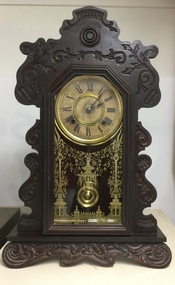
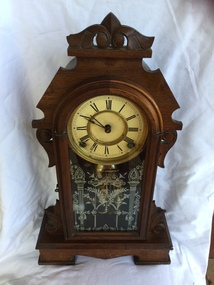
Domestic object - Mantel Clock, Circa 1900
The mantel clock has a rich history that dates back to the 18th century. These smaller clocks were designed during an age when people wanted elegant timepieces that fit on mantels or shelves. Their compact size and decorative designs made them a popular choice for homes of the time. They graced the mantelpieces or tables in homes, serving as both functional timepieces and sophisticated decorations. These clocks often feature ornate wooden carvings and intricate designs, with their gentle ticking and chimes adding a cozy ambiance to living spaces. It was owned by Lance Sebire.A black wooden cased mantel clock with Roman classical design on the front and sides. It has a hinged brass and glass face cover. The face has a blue floral decoration.mantel clocks, clocks, timepieces -
 Flagstaff Hill Maritime Museum and Village
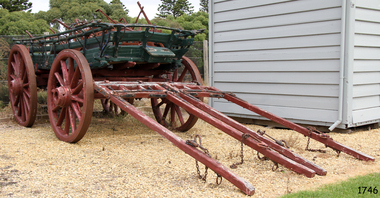
Vehicle - Wagon, Early 20th Century
This wagon is linked to Mr Stanley James Bell via his father Mr John Bell, who owned "Warrumyea" at Wangoom. It is believed that Stanley grew up and worked for his father at this property, eventuality inheriting his father's death in 1920. This wagon was likely used at Mr Stanley Bell's property “Warrumyea” at Wangoom around 1920-1940. The wagon was donated in 1984, at which time it was noted as having a brass plate inscribed "Jas", which name Stanley was known by. Also, a painted on the wage was “S J Bell Wangoom”. Remnants of the original paint colours of blue and yellow show on the photograph, which was taken at the time of cataloguing. Mr John Bell Snr from Plymouth, England, arrived in Portland, Victoria, around 1860. He had served in the British navy as a lad for a number of years. On arriving in Australia he travelled to the Wangoom district where he lived for many years. Mr J Bell worked for 20 years as herd manager at “Wangoom Park”., for Mr F Tozer (1843-1954), one of the original pioneers of the western district. He went on to pursue dairying and general farming at his property “Warrumyea” Wangoom. Bell’s son Stanley James Bell went to the Wangoom School. His first reader from this school, published in 1909, has his name inscribed in the flyleaf “Stanley J. Bell, Warrumyea, Wangoom” and is now in the collection of the Warrnambool & District Historical Society. Stanley went on working the property “Warrumyea” and eventually purchased “Wangoom Park” in 1956, where his father had been employed years before. Mr S J Bell died in 1968.The wagon is significant for its association with the farming history of Wangoom and the Warrnambool area in general. Also, the wage is significant for its association with one of the early families that settled in the Warrnambool area and their contribution to the dairying and general farming industries that sprang from their efforts. The wagon has a good provenance linking it to Mr Stanley James Bell and is also a good example of how goods were transported using horse-drawn vehicles at the beginning of the 20th century.Four-wheeled wagon or cart,12 spokes in each wheel, wooden axle with rear hub brake. Hinged and chained tailboard. Wheels have metal rims. Metal frame and wooden superstructure. Wagon has two pairs of staves. Wooden shelves, one missing with turntable. Small toolbox in front. Made by Kelly and Preston of Ballarat. Metal nameplate of the owner attached, "Jas" (S J Bell of Wangoom).. Original inscription, now obscured, was painted “Kelly and Preston Builders Ballarat”. Metal plate inscribed "Jas", and "S J Bell Wangoom". flagstaff hill, warrnambool, shipwrecked-coast, flagstaff-hill, flagstaff-hill-maritime-museum, maritime-museum, shipwreck-coast, flagstaff-hill-maritime-village, wagon, sj bell, stanley james bell, wangoom park, warrumyea, first reader, john bell 1830-1920, stanley james bell 1904-1968, warrnambool pioneers, f tozer, western district, kelly and preston of ballarat -
 Bendigo Historical Society Inc.
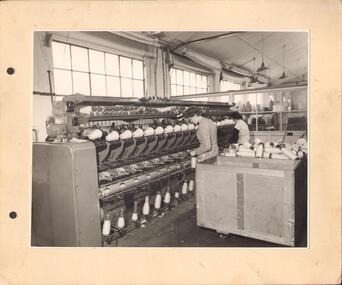
Photograph - HANRO COLLECTION: TWO LADIES AT SPINNING MACHINE
Black and white photograph of two ladies at spinning machine at Hanro factory. Boxes of cones wound behind them. Shelves to right also containing various sizes of spools of thread. Inscriptions: on back - 'On corner (TML) Winding room Hanro. Mrs Dorothy (Gooding) Arichald (sic). Mrs Moroni;, 'Bendigo Historical Society, 'Glad Davis'. "Bendigo Historical Society' (ballpoint pen). 'Glad Davis' TR corner.person, group, employees -
 Flagstaff Hill Maritime Museum and Village
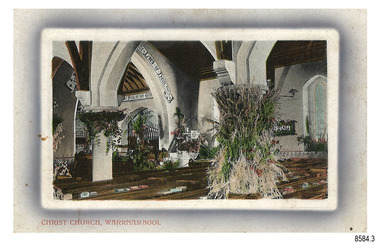
Postcard - Historical, Flagstaff Hill, Christ Church, Warrnambool, Early 20th century
The nine postcards in this set were donated together and date to the early 1900s. All but one postcard in this set shows images of Warrnambool, in the Western District of Victoria; the other has a London image. The postcards were all printed in Great Britain according to that country’s postal regulations. The fronts of all cards have titles printed in red. Most of the images on the cards are attributed to photographer Joseph Jordan and belong to the Jordan Series. The back of these cards has an outline for a postage stamp, a vertical dividing line and a heading on each side of the line to separate the Correspondence from the Address. Postcards or ‘correspondence cards’ appeared in Britain in 1894. They were plain cards with a space for the message on one side and an address on the other; regulations didn’t allow anything but the address to be written on the ‘address’ side. In 1902 the British regulations then allowed a picture to be printed on the front and the address on the back, so messages had to be written on the picture side. Soon, the regulations changed and the back was divided for a message and the address. Christ Church Warrnambool – The image on this card shows Christ Church, a stone building built in 1856. The Anglican church is in Henna Street, Warrnambool. The church, outer buildings and grounds are heritage-listed. Its bell tower harbours German bells. Joseph Jordan - Joseph Jordan was born in 1841 in Leicester England. When he was 16 he joined the 7th Queen's Own Hussars and was sent to India at the outbreak of the mutiny. He took part in the relief of Lucknow and remained in India for eleven years. It was during this time, he became interested in photography. He was posted to New Zealand and later came to Victoria, becoming a sergeant major of the Mounted Rifles. In the mid-1880s he came to the Western district where he was responsible for establishing units of the Mounted Rifles in various country towns such as Dunkeld, Mortlake, Panmure, Bushfield, Koroit etc. He resigned from the army in 1889 and set up a professional photography studio in Liebig Street, Warrnambool. He became very well known in the Western District for family photographs, official photographs of local councillors and groups as well as views of local scenery. In 1891 he photographed the wrecked barque ‘Fiji’ at ‘Wrecks Beach’ near Princetown. His business was taken over by his son Arthur around 1917. Joseph was a keen rifle shot and in 1924 he donated the "Jordan Shield" as a prize to the Victorian Rifle Association. He was made a "Life Honorary Member" of the Warrnambool Returned Soldiers League and in 1933 he was recognised as being the oldest living soldier in Victoria. Joseph died in 1935 aged 95.This card is the only one of the nine cards with the location of Warrnambool added to the name 'Joseph Series'. It is also the only one that has text within the outline for the postage stamp. The font used for the test of the headings is slightly different to the other cards. Joseph Jordan is a significant figure in Warrnambool history as he helped to establish early units of the Mounted Rifles (G Company) in local towns during the late 1880's and later, photographed local scenes, groups and citizens of early Warrnambool. This postcard of Christ Church Warrnambool is significant for its connection to the church. The early building of the church in 1856, within the first decade of Warrnambool being proclaimed a town, shows the strong religious desire of the community. The church is part of Warrnambool's life events and the historical significance of the building,Postcard, one of nine, landscape orientation, coloured print within an oval border and mauve-toned shading. The cameo image is of the Interior of the church chapel, with exposed timber beams, white arches decorated with flowers, pews with books on shelves, and organ pipes. There is text on the image. The title is in red print on the front of the card. The back has inscriptions and outlines for a postage stamp. There is no correspondence written on the card. Jordan Series, printed in Great Britain.Front, in red: “CHRIST CHURCH, WARRNAMBOOL” Back in black: “Jordan Series” “POST CARD” “PRINTED IN GREAT BRITAIN” “For correspondence” “The Address only to be written here” Text on the arch: "THE LORD OF HOSTS"flagstaff hill maritime museum, flagstaff hill maritime village, flagstaff hill maritime museum and village, maritime museum, warrnambool, great ocean road, warrnambool and district, warrnambool scenes, local scenes, views of warrnambool, joseph jordan, jordan series, jordan photography, postcard, souvenir, correspondence, cameo postcard, landscape, christ church, bell tower, german bells, warrnambool church, religious building, stone building, anglican church, parish of warrnambool, arch pillars -
 Ballarat Clarendon College
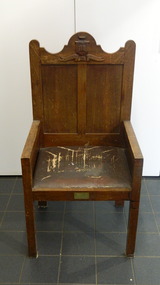
Furniture, Chair
This librarian's chair was given to the school by the family of Joy Chapman who had died during 1948. The chair was part of a number of furnishings supplied by donation for the new library which was opened in 1949. These included blackwood shelves, tables and chairs and a new set of Encycopedia Britannica supplied by the Parents and Friend's Association, a grooved periodical table given by Old Collegians Younger Set, a librarian's desk supplied by the E M Bell estate and more than 200 books supplied by the Old Collegians. (see 'A lamp burns brightly' p. 61). This item is a significant example of the degree to which the school relied on donations from the community to develop the school during the post-war years. Solid wood chair with high solid back and solid arm rests. Carved CPLC crest attached to neck rest. Padded seat. Bronze plaque at front of seat. Plaque: In memory of / JOY CHAPMAN / 1947 - 1948 - The Gift of Her / Father, Mother & Ruthc-p-l-c, younger-set, parents-and-friends-association, clarendon-presbyterian-ladies-college, library, joy-chapman -
 Melbourne Legacy
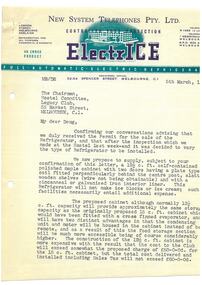
Letter - Document, letter, 5 /3/1943
In furnishing Holmbush, Legacy needed to be granted a wartime permit to purchase a refrigerator. On getting the permit the firm of New System Telephones Pty Ltd inspected the property and revised the recommended model. Of note is that the shelves were to be made of wood as wire was not obtainable due to the war. The cabinet was custom made in wood. Legacy was offered a significant reduction in cost as New System Telephones Pty Ltd ElecctrICE offers a 12 1/2 c.ft.refrigerator delivered and installed for not more than sixty pounds, where the list price would normally be £137. See also 00496.Despite it being war time, Legacy was evidently held in sufficient regard to be sold items which may have been in short supply at a very reduced price. The letter head itself is of interest as an example of the current telephone numbers and a designated telegram address.Letter outlining the provision of a refrigerator for the Legacy hostel. White quarto letter head, green and navy printing, black type, two punched filing holesSigned in black ink by M. Butler, Managerresidences, holmbush, holmbush administration -
 Mont De Lancey
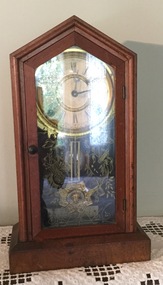
Domestic object - Mantel Clock
The mantel clock has a rich history that dates back to the 18th century. These smaller clocks were designed during an age when people wanted elegant timepieces that fit on mantels or shelves. Their compact size and decorative designs made them a popular choice for homes of the time. They graced the mantelpieces or tables in homes, serving as both functional timepieces and sophisticated decorations. These clocks often feature ornate wooden carvings and intricate designs, with their gentle ticking and chimes adding a cozy ambiance to living spaces. It was used by the Manders family. Peter Mander.A wooden steeple cased mantel clock with a hinged highly decorative glass front, black roman numerals and metal hands on the enclosed white face. It has a decorative brass pendulum with an eight sided star with a woman's face design on the star. Brass trimmings are seen throughout the mechanism.mantel clocks, clocks, timepieces, shelf clocks -
 Bendigo Historical Society Inc.
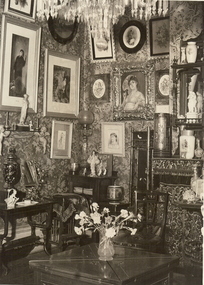
Photograph - LANCEWOOD HOUSE: MCLAREN ST. BENDIGO
black and white photo; Lancewood House, home of Ernest Mueller and family. Corner of a sitting room with plant, flower motif wall paper. Pictures cover much of the upper walls, small tables and furniture pieces around the wall, drops of a chandelier visible, a vase of carnations on square table in foreground. A chimney breast and elaborate mirrored over mantle visible on the rift. Ornaments and vases on shelves of overmantle. UI 589.3 on front bottom left.buildings, fittings & materials, lancewood house -
 Whitehorse Historical Society Inc.
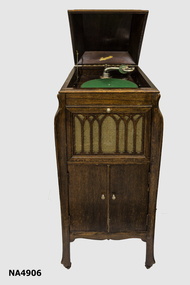
Functional object - Gramophone
Brown stained wood with lift-up to for access to gramophone turntable, arm & fittings of metal green baize on turntable. Underneath is fold out compartment. Lattice work in Cathedral style with new material backing. Bottom of cabinet has 2 cupboard doors opening to 3 shelves Small metal handles on doors Legs have casters. Label inside lid Rexonola and in front of turntable Rexonola pat 29/3/12 4455Rexonola pat 29/3/12 4455audio-visual technology, audio - visual appliances -
 Mont De Lancey
Domestic object - Mantel Clock, The Ansonia Clock Co. Manufacturers USA, 1880's - 1920's
The mantel clock has a rich history that dates back to the 18th century. These smaller clocks were designed during an age when people wanted elegant timepieces that fit on mantels or shelves. Their compact size and decorative designs made them a popular choice for homes of the time. They graced the mantelpieces or tables in homes, serving as both functional timepieces and sophisticated decorations. These clocks often feature ornate wooden carvings and intricate designs, with their gentle ticking and chimes adding a cozy ambiance to living spaces. It is from the home of Mr and Mrs Parker. It belonged to Mr Parker senior.A very ornately carved dark timber mantel pendulum clock with a white face and a brass clock face surround. It has black roman numerals and black metal hands. The Ansonia Clock Co. Manufacturers USA Trademark A is printed on the face. It has an ornate brass pendulum and the internal workings are visible. The very ornately embossed in gold decorated glass front door opens. There are two spirit plumb levels inside, one is aluminium metal and is attached to the wall, the other is brass with Wm Hunt Level Co with a triangle on top stamped on it. There is a brass key No.7 with two holes on the top of the winder handle. The Ansonia Clock Co. Manufacturers USA Trademark A. printed on the dial. Wm Hunt Level Co. stamped on the level.mantel clocks, clocks, timepieces, shelf clocks -
 Flagstaff Hill Maritime Museum and Village
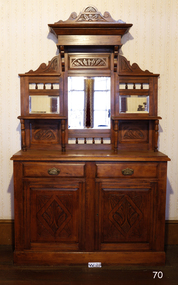
Furniture - Sideboard, Circa 1880
This sideboard was from the home of Henry and Mary Jane Giles, who lived in Mailor's Flat, Wangoom, and Purnim West, Victoria, and is part of the many 19th century items of furniture, linen, and crockery donated to Flagstaff Hill Maritime Village by, Vera and Aurelin Giles. The items are associated with Warrnambool and the Giles Family history. Items donated by the family have come to be known as the “Giles Collection”. Many items in the Lighthouse Keeper’s Cottage were donated by Vera and Aurelin Giles and mostly came from the home of Vera’s parents-in-law, Henry Giles, and his wife Mary Jane (nee Freckleton) who married in 1880 and whose photos are on display in the parlour. Henry was born at Tower Hill in 1858, and was a labourer on the construction of the Warrnambool Breakwater before leaving in 1895 for around seven years to build bridges in NSW. Mary Jane was born in 1860 at Cooramook and she attended Mailor’s Flat State School and where she eventually was to become a student-teacher. After which she became a governess at “Injemiara” where her grandfather, Francis Freckleton, had once owned land. Henry and Mary’s family consisted of six, some of the children were born at Mailor’s Flat, and later some children at Wangoom. They lived with their parents at Wangoom and Purnim west, and this is where Henry died in 1933 and Mary Jane in 1940.The Giles family collection is of social significance at a local level, because it not only illustrates the level of material support the Warrnambool community gave to Flagstaff Hill during it’s establishment. But the Giles collection also gives us today a snapshot into what domestic life was like in early colonial times prior to Federation.Kauri Pine Mirror Backed Sideboard, two drawers and two doors to the base, the doors being carved in the traditional manner with a leaf design, brass swing handles are fitted to each of the drawers. The back has two shelves each supported on two turned columns, three mirrors are fitted into carved panels matching design as doors.The pediment is also carved in the same manner finishing with scrolled edges. Circa 1880. This item is part of the Giles Collection.Marked "Villa Rica" "Ambassadors" "Claro" "50" In pencilflagstaff hill, warrnambool, shipwrecked coast, flagstaff hill maritime museum, shipwreck coast, flagstaff hill maritime village, sideboard, furniture, dresser, giles collection, henry giles, vera giles, tower hill, cooramook, mailor’s flat, wangoom, 19th century furniture, purnim west, 1880s furniture -
 Royal District Nursing Service (now known as Bolton Clarke)
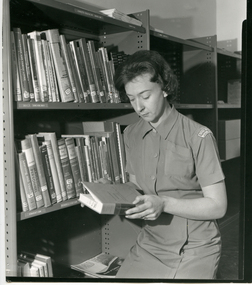
Photograph - Photograph, black and white, c.1967
Sister Rignall is undergoing In-service education at RDNS and is wearing the grey RDNS uniform of that era.Education was an integral part of Melbourne District Nursing Society (MDNS), from its inception in 1885, later, in 1966, called Royal District Nursing Service, (RDNS). From 1885, only Trained Nurses who trained through the Hospital training system were employed by the Society, and on visits to patients they taught the necessity of hygiene and cleanliness, as well as the need for a good diet, to bring about good health. Doctor’s lectures were later given at the MDNS home to instruct patients and their families on prevention of disease. Education to patients continued throughout the years regarding health care and the use of equipment in the home. In 1961, Education programs commenced at MDNS with nurses receiving In-service education. Sr. Pat (Paddy) Rowley was a leader in this In-service Education and established the MDNS, later called RDNS, Department of Community Nursing Education in 1962. Staff could also apply for scholarships to further their education outside of RDNS. Many of their senior trained nurses received Postgraduate diplomas from the College of Nursing in Community Health Nursing, Education, and Administration, and several travelled overseas visiting nursing organizations viewing their public health and district nursing systems. Many programs were run at RDNS, including: a Post Basic Course, Cardiac Rehabilitation Nursing, Haematology/Oncology Nursing, Palliative Care program, Diabetic Stabilization Program, Leg Ulcer Management Program, Wound Care Specialist Program, HIV/AIDS Nursing Care, Cystic Fibrosis Home Support, Veterans Home Care Program, Breast Cancer Support Program, Continence Management Program, Stomal Therapy Program, In-Home Lactation Support Program and the Homeless Persons Program. RDNS staff attended several hospitals to observe and learn special care needed to some clients, e.g. to the Austin Hospital to learn the care required for paraplegic and quadriplegic clients at home, and to Mount Royal Hospital to observe the care of clients in the Rehabilitation ward. A Community Nursing Education Program was extended to student nurses from hospitals and to other nursing organizations. These Education programs kept the RDNS Sisters abreast of new techniques, such as changes in technology for e.g. new testing methods in detecting glucose levels in Diabetic patients. Sr. Nan Deakin did a Post Basic Course in Psychiatric Nursing and included this area in her education lectures. Sr. Daphne Geldard specialized in the area of Alzheimer’s disease and Dementia. These Sisters visited patients in District areas with the regular RDNS Sister when required. Every member of staff, both professional and non professional staff, received regular education in the Education Department. Black and white photograph showing Royal District Nursing Service (RDNS), Sister J. Rignall using the Library facilities at RDNS. Sister Rignall has short curly hair and is wearing her short sleeve grey uniform frock; the RDNS insignia is seen at the top of her left sleeve. She is standing and looking down at a book she is holding. Shelves of library books are seen running behind her on her left hand side.Photographers Stamp and Quote No. GW 94melbourne district nursing society, mdns, royal district nursing service, rdns, rdns education, rdns library, sister j. rignall -
 Ballarat Clarendon College
Book, Cook's voyages Vols 1-2
H P MacKenzie donated these books to the Ballarat College library in the year that his wife donated money to the school in memory of her parents, Mr and Mrs W Weatherly. The money was used to purchase book shelves and furnishings for a new library and a call was made to old collegians and membersof the school community to donate books to stock the new library. Harold Ponsonby MacKenzie served on Ballarat College council 1925 - 1946. His sons Alastair and Kenneth also attended the school. Alastair served on councils also - BC Council 1957-73, BCC Council 1974-80. Alastair's daughter Mia attended the school 1983-4. Large cloth bound books with gold lettering and patterns on spine and coversBook plate inside front cover: Crest / Ballarat College Library / PRESENTED BY / Eng Com H D MacKenzie 1936 / ...h-p-mackenzie, harold-ponsonby-mackenzie, gladys-dalziel-mackenzie, william-weatherly, weatherly-library, library, 1936, alastair-mackenzie, mia-mackenzie -
 Mont De Lancey
Functional object - Mantel Clock, Late 19th Century
The mantel clock has a rich history that dates back to the 18th century. These smaller clocks were designed during an age when people wanted elegant timepieces that fit on mantels or shelves. Their compact size and decorative designs made them a popular choice for homes of the time. They graced the mantelpieces or tables in homes, serving as both functional timepieces and sophisticated decorations. These clocks often feature ornate wooden carvings and intricate designs, with their gentle ticking and chimes adding a cozy ambiance to living spaces. It was used by Henry and Martha Sebire at Mont De Lancey. It was part of the original furnishings of the dining room. Marie Colling (Sebire) is the great granddaughter of Henry and Martha Sebire.A dark brown wooden carved cased pendulum mantel clock with a highly decorated floral and column transfer design on the hinged glass front and black roman numerals and hands on the white face. It chimes on the hour.Marked inside "Ansonia Clock Co"clocks, mantel clocks, shelf clocks -
 Bendigo Historical Society Inc.
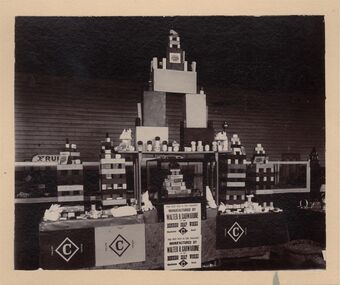
Photograph - CARWARDINE COLLECTION: WALTER H.CARWARDINE BENDIGO SOAP WORKS DISPLAY
Black and white photo, mounted on grey board. Image shows soap displayed on a series of shelves and boxes. In centre of display a large poster ' The best soap is the cheapest. Manufactured by Walter H. Carwardine at the Bendigo Soap works, Charleston Road' (repeated twice on poster) Carwardine trade mark 'C' enclosed in a diamond shape also displayed alongside poster. Some display items are 'Borax Soap', 'Austral Magic Soap and 'Soft Soap' Written on back of photo ' Grandpa's products' Receipt number 355/16bendigo, business, carwardine soap and candle -
 Mont De Lancey
Furniture - Dressing table, Mr Franz Streizel, Unknown
The dressing table is part of the Franz Streizel Collection. It was given to Mrs Dorothy Adamson on the occasion of her wedding. It is part of a special bequest to the Mont De Lancey Museum of hand carved furniture and items made by Mr Franz Striezel by his grandaughter Mrs Dorothy Adamson. Dorothy was a friend of Nella Lord (nee Sebire). Dorothy passed away in 2007. It was to be known as The Franz Striezel Collection. Franz Streizel came from Germany in 1886 and was one of the three recognised craftsmen (Art Carvers) in Australia who contributed to the wood carvings in public buildings and honour boards throughout Australia. The National Gallery at their request had two small panels and a tobacco jar (some of his work), donated by Mrs D Adamson. They considered these pieces highly valuable.An ornately carved rosewood dressing table with a moveable mirror which moves backwards and forwards for use. It has two ornately carved small shelves at the sides attached to the mirror, one small central drawer, shaped sides above the top of the lower dressing table top. There are two small and two large drawers below with ornate brass handles. There is an inlaid pattern on the front of the drawers. There are three framed photographs - 1. A portrait of Dorothy Adamson. 2. A portrait of Karl Adamson. 3. A wedding photograph of Dorothy with two bridesmaids. Ornaments and a doiley are displayed on the dressing table.dressing tables, tables, furniture, photographs -
 Orbost & District Historical Society
jar, 1993
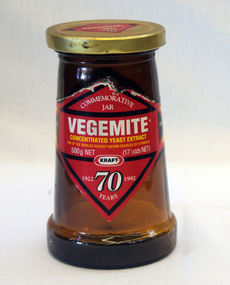
A young chemist named Dr. Cyril P Callister, hired by the Fred Walker Company, developed a new spread from brewer’s yeast. It was claimed as the richest known sources of natural Vitamin B. Labelled as ‘Pure Vegetable Extract’, it was sold in a two ounce amber glass jar and capped with what was known as a Phoenix seal, to keep the contents fresh. A competition inviting the Australian public to create a name for the new spread offered a prize of 50 pounds. finalists. Hundreds of people entered and Fred Walker’s daughter selected the winning name: VEGEMITE. The name of the winning entrant was never placed on record. VEGEMITE spread was then sold from grocers’ shelves. In April 1984, a 115-gram jar of vegemite became the first product in Australia to be electronically scanned at a checkout A commemorative jar was produced to celebrate the occasion of 70 years - 1922-1997.Vegemite is possibly Australia's most iconic food brand. Since the 1930s it has been a major part of this country's cuisine. Yet unlike other Australian icons the attraction of Vegemite has remained local. A tapered brown glass jar with a gold metal lid. The label o the front is red with yellow, white and black print. there is a similar smaller label on the lid. with black writing.On base: a spiral with 10 in centre circle 13573 underneath the spiral above is letter A with raised dots insidevegemite jar -
 Stawell Historical Society Inc
Photograph, BIARRI members
7146: TWO MEN SEATED, THE MAN ON RIGHT IN A DARK WINDCHEATER, THE MAN ON LEFT IN A CREAM PATTERNED JUMPER. 7146-1: FOUR PEOPLE TWO MEN, TWO WOMEN, BOTH MEN SEATED, WOMAN ON RIGHT ELEANOR MUSUMECI. 7146-2 FOUR PEOPLE THREE MEN ONE WOMAN, ONE MAN SEATED, ELEANOR MUSUMECI ON FAR RIGHT. 7146-:3 : FOUR PEOPLE TWO MEN, TWO WOMEN, BOTH MEN SEATED, WOMAN ON RIGHT ELEANOR MUSUMECI. 7146-4: THREE PEOPLE TWO MEN AND ONE WOMAN. ELEANOR MUSUMECI ON RIGHT. 7146-5: THREE PEOPLE TWO MEN AND ONE WOMAN. ELEANOR MUSUMECI ON RIGHT. 7146-6: THREE PEOPLE TWO WOMEN AND A SEATED MAN, THE MAN IS READING. 7146-7: TWO SEATED MEN, TALKING, SHELVES WITH FOLDERS AND OTHER ITEMS BEHIND THEM. Eight Colour photographs of people.biarri -
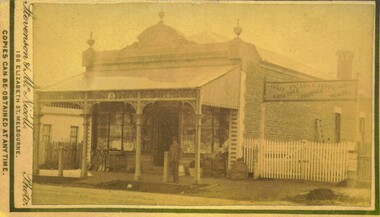 Bacchus Marsh & District Historical Society
Photograph, Pearce Brothers Store Main Street Bacchus Marsh 1883
This store was built in 1881 and opened as a branch of Pearce Brothers main store which was further along in Main Street, Bacchus Marsh. The store in this image opened around early June 1881 and was described in the Bacchus Marsh Express as "quite above the usual standard of stores in towns of a similar or even much larger size. The building is most substantially built of brick, and measures 58 feet by 26 feet, with walls fourteen feet high inside. The interior is most elaborately fitted with shelves and glass cases covering both side walls and two ends formed by small offices separated from the main store by glass and wood panelled partitions, with a passage way between to the storeroom at the rear", Express, (Bacchus Marsh, 11 June, 1881, page 2). The building was designed by one of its proprietors T. G. Pearce and was entirely constructed by local contractors and workers.Small sepia unframed photograph on card with gold border framing photograph. Housed in the album, 'Photographs of Bacchus Marsh and District in 1883 by Stevenson and McNicoll'. The image depicts a general store with a double-front of windows. Goods such as spades, shovels, tubs and wringers are arrayed on the footpath in front of the store. At the front of the shop under a verandah stands a man, possibly one of the Pearce brothers who owned this business. Next to the store is a vacant block of land with a white picket fence. A sign erected above the fence advertises: “ Pearce Bros. Chaff. Hay & Oats. Produce. Dealer. “On the front: Stevenson & McNicoll. Photo. 108 Elizabeth St. Melbourne. COPIES CAN BE OBTAINED AT ANY TIME. On the back: LIGHT & TRUTH inscribed on a banner surmounted by a representation of the rising sun. Copies of this Portrait can be had at any time by sending the Name and Post Office Money Order or Stamps for the amount of order to STEVENSON & McNICOLL LATE BENSON & STEVENSON, Photographers. 108 Elizabeth Street, MELBOURNE. pearce family bacchus marsh, general stores bacchus marsh, shops bacchus marsh, pearce brothers general store bacchus marsh, stevenson and mcnicoll 1883 photographs of bacchus marsh and district -
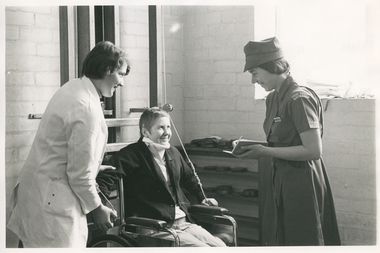 Royal District Nursing Service (now known as Bolton Clarke)
Photograph - Photograph, black and white, Barry Sutton, circa 1965
Sister Short is writing down information being given by patient Sue Rowley who will be discharged from the Hospital. It will be phoned through to the appropriate RDNS Centre where it is recorded by the Clerical staff and passed to the RDNS Sister who will visit Sue on her discharge. Liaison had occurred between Doctors and the Trained nurses of the Melbourne District Nursing Society (MDNS), from its inception in 1885. This increased when Midwifery was introduced in 1893 with close liaising with the Women’s Hospital. As District nursing grew it was recognized that closer liaising between many Public Hospitals would be beneficial, for not only the MDNS, later called Royal District Nursing Service (RDNS), nursing staff, but also for the patients and the hospitals. In August 1964 a Liaison Officer commenced at the Alfred Hospital. This soon increased to Liaison Officers working full time at several Public Hospitals. They facilitated the smooth transition from hospital to home for many patients who required ongoing nursing care. Liaison Sisters regularly attended discharge planning meetings, interviewed prospective clients, co-ordinated discharge and booked the first visit by the visiting RDNS staff. At the time of a patient’s discharge, the Liaison Sister forwarded information on their diagnosis and instructions regarding the care required at home to the appropriate RDNS Centre, and in turn the attending District Sister wrote a report of progress and any queries to the hospital doctor, via the Liaison Sister, at the time the patient was attending outpatients. Any new instructions were then sent back to the District Sister. Liaising also occurred between District Sisters in the field and Doctors when patients were referred by General Practitioners and did not attend a hospital. A Physiotherapist worked under contract to teach transfer techniques to RDNS Sisters before RDNS employed there own Physiotherapist who taught staff the correct techniques, not only for safety of the patient, but to reduce physical strain on RDNS nursing staff and patient’s family members. The Physiotherapist made home visits with the attending RDNS Sister when required.Standing to the left of the black and white photograph is hospital Physiotherapist, Anne Radford, who has short dark hair and is wearing a white coat. She is side on and has her hands placed on the upper and lower right arm of Sue Rowley, who is sitting in a wheelchair. Sue has short dark hair and is wearing a neck brace and her left hand is holding a pulley rope. She is wearing a white top under a dark jacket and light coloured slacks. To her right is Royal District Nursing Service (RDNS), Liaison Sister, Margaret Short who is facing Sue. She has her left hand extended supporting an open book and has a pen in her right hand which is poised on a page in the book. Sister Short is wearing her RDNS grey short sleeve uniform dress and grey peaked hat over her short dark hair. The RDNS insignia is seen on the top of her left sleeve. Behind the wheelchair are some wooden bars, two upright and two vertical, which are attached to a brick wall, the pulley rope is through a wheel attached to the right hand upright. The brick wall joins another which has part of a window visible. Behind the Sister and wheelchair are four shelves attached to this brick wall. Several round weights are on the shelves.Photographer stamp. Hand written informationroyal district nursing service, rdns, rdns liaison, rdns uniform, ms sue rowley, physiotherapist anne radford, sister margaret short -
 Port Melbourne Historical & Preservation Society
Photograph - Interior, former grocery shop, 175 Stokes Street, Port Melbourne, Russell Polson, 1991
Shop due for demolition was purchased by artist Helen ..... and restored keeping most of it intact. These pictures were taken at the time of sale by Russell POLSON, a descendant of the Bellions. They were brought in for copying in 1991 by the Bellion's granddaughter, Margaret BRIDE.24 photos taken by Russell POLSON in 1991 of Benjamin Henry BELLION (original builder) and Elzabeth Sarah WALKER's shop and shipping business at 175 Stokes Street.. 1870 to 1959. (.01) cash drawer. (.02) windows. (.03) stables (.04) backyard (.05) back house (.06) bathroom (.07) fireplace (.08) bedroom (.09) stairs (.10) cupboard (.11) shelves (.12) drawers (.13) bench (.14) bench 2 (.15) under windows (.16) bench and door (.17) under stairs (.18) windows 2 (.19) door (.20) stables and yard (.21) backwindow (.22) sideway (.23) kitchen (.24) upstairsbusiness and traders - grocers and supermarkets, built environment - commercial, benjamin bellion, william j bellion, helen leitch, a peterson -
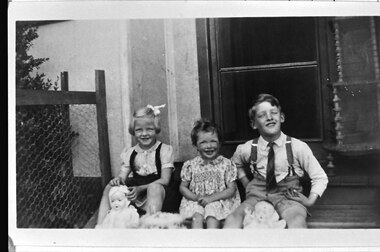 Southern Sherbrooke Historical Society Inc.
Photograph - Joy, Lynette and John Hermon on the occasion of Lynette's 2nd birthday
B&W photo of Joy, Lynette and John Hermon at Menzies Creek on the occasion of Lynette's 2nd birthday. Photo shows the children sitting on the front door step. There is a wooden framed chicken wire fence to the left, a screen door behind them, and on the right is what appears to be a wooden display stand with two shelves and turned legs. Joy is wearing a dark skirt with shoulder straps over a light, collared blouse, and a bow in her hair. She is holding a doll in front of her. Lynette is dressed in a smocked patterned dress. John has a shirt and tie, and shorts with braces. A doll is also sitting on the ground in front of him. Dated 24th November 1952. -
 Bendigo Historical Society Inc.
Administrative record - Stock Book
The item is a hard cover book recording stock in 1890 for T.J. Connolly, Ironmongers, Sandhurst. Each handwritten page lists goods by location, quantity, description, prices with price total at the bottom of each page. Locations include shelves, floor, yard, factory, paint shop. Pages 1 to 164 have been numbered by hand. An alphabetical index list types of stock on unnumbered pages after page 165, followed by blank pages. The hard cover is patterned and shows some wearing at the corners and front and minimal wear on the back. The spine edge is red with considerable wear at the top and bottom. The pages are bound together with string. This item is part of the Margaret Roberts Collection.There are ink spots on the front and back cover. A list of numbers, titled "Prices required" is handwritten inside the back cover. A piece of paper is stuck inside the back cover, listing items to be added.margaret roberts collection, ironmongers, forest street, bendigo businesses -
 Parks Victoria - Gabo Island Lightstation
Locker, flag
Probably used in the past to house the Signal Flag set at the lightstation. Appears to have been stored in the old stables for a number of years.The rectangular wooden cabinet has the distinctive features of a flag locker, comprising numerous open compartments of the same size each for storing a signal flag of a unique design. It has three internal shelves and a bench top, and is painted grey, a colour that is used for many of the wooden utilitarian furnishings in the six lightstations Parks Victoria manages. The cabinet, without its flag contents, was found in storage in the old stone stable building and is highly likely to be original to the lightstation. A wooden flag locker is held at Wilsons Promontory Lightstation. A wooden locker comprising two sections of 16 pigeon holes and four cupboard doors is held at Cape Otway The two flag lockers at Cape Nelson Lightstation are included in Victorian Heritage Register for contributing to the significance of the lightstation. The Nelson, Otway and Promontory lockers have associated sets of flags which are original to the lightstations. The Gabo Island cabinet has second level contributory significance for its provenance to the lightstation.Timber cabinet painted grey, partitioned with numerous open compartments of the same size . -
 Flagstaff Hill Maritime Museum and Village
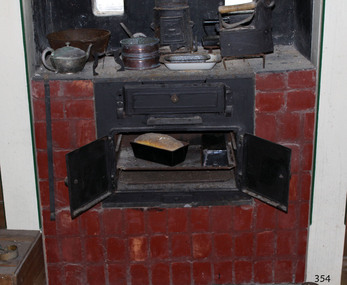
Domestic object - Stove, Cox and Rizzetti Stove Works, ca. 1918-1930s
Cast iron stoves burn solid fuel such as wood or coal, and are used for cooking and warmth. The stoves have a firebox with a grate where the fuel is burned. The hot air flows through flues and baffles that heat the stove top and the oven. Before cast iron stoves were invented, cooking and heating were carried out in outdoor open fires, and later, in fireplaces inside the home. In 1642 the first cast iron stove was manufactured in Lynn, Massachusetts, where molten cast iron was poured into a sand mould to make rectangular plates that were then joined together to make a box. Benjamin Franklin invented the more efficient Pennsylvania stove in 1744, and this efficient design is still used today. After the mid-19th century cast iron stoves were produced with burners in different positions, giving varied temperatures, so a wide variety of foods could be cooked at the same time at the most suitable heat, from slow cooking to baking scones. In contemporary times people the new wood-burning stoves had to meet the anti-pollution standards now in place to protect our environment. By the 1920s gas cookers were being introduced for domestic use, and by the 1930s electric home cookers were being offered to householders. PLANET STOVES In August 1925 the firm Cox and Rizzetti, Stove Works, and also Sydney Road, South Melbourne, advertised in the Brunswick and Coburg Leader of November 11, 1925 as "formerly with Harnwell and Sons" and as "specialists in solid cast iron Planet stoves ... which merit an inspection from builders and householders". The firm continued in business and was mentioned as sponsors in the King Island News in 1971. Harnwell and Sons was listed in the Victorian Government Gazette of 1894. It is curious that the firm was mentioned in an article in the Sunrasia Daily of June 14, 1934 titled 'Planet Stoves' as a manufacturer of Planet Stoves. This Planet No 3 stove is an uncommon example of cooking equipment used in kitchens in the early 20th century, as the firebox is above the oven rather than beside it. The cast iron combustion stove is significant as part of the evolution of domestic cooking. Previously cooking was mostly carried out in outdoors in open fires, and later in fireplaces indoors. Cast iron stoves are still used today and have additional features such as thermostats to monitor and maintain temperature, water heating pipes connected, and environmentally approved anti-pollution fittings. Stove; a compact, blackened cast iron combustion cooker, installed within a fireplace and enclosed by bricks on both sides. The upright rectangular stove has a flat top with three round, removable cook plates and a flue connected at the back. The front has three doors with round knob handles; a swing-down firebox door above a sliding ashtray, and two side-hinged oven doors above a sliding opening. Inside on the side walls are two pairs of runners. Behind the pair of doors is an oven with two pairs of rails and two removable metal shelves. The stove has cast inscriptions on the chimney flue and on the front of the right hand side stove door. The model of the stove is The Planet No 3, made in Melbourne.Chimney flue, "[within rectangle] THE / PLANET" Stove door, "(within oval) PLANET / No 3"flagstaff hill, flagstaff hill maritime museum and village, warrnambool, maritime museum, maritime village, great ocean road, shipwreck coast, stove, cast iron stove, combustion stove, wood-burning stove, wood stove, wood oven, solid fuel stove, cooker, the planet, planet, planet no. 3, kitchen equipment, baking, domestic cooking, cooking equipment, food preparation, planet stove, planet cooker, cooking range, slow combustion stove, antique, range cooker, cox and rizzetti, harnwell and sons, melbourne manufacturer -
 Bendigo Historical Society Inc.
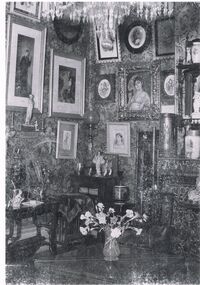
Photograph - FORTUNA COLLECTION: BLACK AND WHITE PHOTOGRAPH OF A ROOM AT FORTUNA VILLA
Black and white photograph of a room at Fortuna Villa. This room is highly decorated with framed photographs, small figurines, tall ornate lamp with bulbous glass, glass fuel container, left is a small carved table with small figurine, tray and container, next is another table covered with a decorated cloth, in the corner is a taller cabinet style cupboard with glass panels in the door, and a number of small items with a framed photo at the rear, next is a short standard light with artistically decorated shade, to the right is very decorative shelving unit, with small figurines on the shelves, large decorated cylinder with lid, smaller jar with painted decoration and deep lid, foreground has a table made up of 4 triangular pieces and a glass vase and flowersindustries -
 Ballarat Clarendon College
Framed items
The original Weatherly Library was situated in the space immediately on the left of the archway. The fittings and furnishing of the library was a generous gift in 1936 of Mrs H P Mackenzie of Trawalla in honour of her pioneer parents, Mr and Mrs William Weatherly. The library was panelled with blackwood and fitted with shelves intended to eventually house 3000 books. Specially made solid blackwood chairs, upholstered in genuine hide, two long reading tables, an upholstered bench seat under the north window and an ornate carved mantelpiece topped by a classical broken pediment framing a carved head of Minerva were also donated. In 1971 this library was no longer large enought o serve the growing number of boys at the college; it was replaced by a bigger, separate building, also known as the Weatherly Library. This building is currently in use, and recently renovated, as the senior staff room. In 1993 a third library building was opened and named Erindale in recognition of property associated with Clarendon PLC. In 2012 the school opened the Fraser Library on the senior campus in honour of old collegian and school council chair, Darrell J Fraser. Wooden frames with mounts and glass; both include printed descriptions; one includes a black and white photographh p mackenzie, weatherly library -
 Flagstaff Hill Maritime Museum and Village
Furniture - Cabinet
This cabinet would have been made in the early 20th century for as office or home office furniture. It's neat brass lock and key gives the contents some basic security but could be easily tampered with. At some stage there were two additional divisions in the top row of pigeon holes, which would make fifteen compartments of equal size available. A cabinet such as this could be used to classify or sort items, for example, mail for different people, or categories of business papers such as bills, orders, receipts, pay book, bank book and so on.This cabinet represents the type of furniture available for offices and businesses in the early 20th century. It shows the hardware in use and the design detail such as the raised edges around the top of the cabinet.Cabinet or cupboard, stained dark brown and lacquered. Secure office storage with a lock and a key. Hinged, lift-up front panel door folds back against the lid. The inside is divided into thirteen compartments or pigeon holes. Inscribed in black painted script writing underneath. Once the property of Mrs Cambell.Hand-painted on the base in black script writing "Mrs Cambell"flagstaff hill, warrnambool, shipwrecked coast, flagstaff hill maritime museum, maritime museum, shipwreck coast, flagstaff hill maritime village, great ocean road, cabinet, cupboard, shelves, pigeon holes, office cabinet, office furniture, mail sorting cabinet, mail sorting shelves, vintage office furniture, antique office furniture, office administration, mail sorting, small business furniture -
 Kiewa Valley Historical Society
Case for G.P. Multimeter, Circa 1950
This leather case holder for a general purpose Multi-meter( KVHS 0307 (A)) was manufactured after 1950 and used by the SEC Vic (Kiewa Hydro Electricity Scheme) from that date until late 1900's. It was used to measure very small voltages associated with the operation of the various Hydro Generators. The readings were able to be shown by the resistor in use in the current circuit. During this time period, high quality testing instruments were either sourced from Europe or England. This particular carry case was manufactured in the Netherlands. This carry case for an analog General Purpose multi-meter which is quite a large (for a handheld mobile) apparatus.The bag however permits the easy monitoring of electrical variations within the large SEC Victoria Hydro Scheme's electrical generators. These generators are powered by the hydro force of "stored" water at a higher altitude. The establishment of both the NSW and Victorian Hydro schemes was achieved from the mid 1900's to the 1960's. At this point in time the need for additional power sources to quench both an industrial and domestic demand for electricity was purely an economic and not and environmental (carbon reduction) factor. This hydro scheme was instigated by "the Government of the day" as a bold move and was the major force of the World War II refugee and "technical" workforce inclusion of skilled and unskilled migration into the Australian environment. Although this mass "invasion" of workers with families was thought of in some circles as intrusive, the expansion of population post war years and its integration into the Australian rural sector, produced the multi- lingual multi-cultural diversity of later years.This leather case is to provide protection for this mobile G.P. Multimeter, therefore it is made from thick leather. It has a carrying strap from a thick "D" chromed link. This link is fastened to the main cover by a looped leather strip with a black coloured rivet. All the fasteners are either chrome or black coloured rivets. The front, which when opened back exposes fully the inside of the case. It is clip fastened to the lower section of the front piece which also can be pushed back allowing the meter to be removed from the frontal position. There is a strip retaining strap slightly higher from the mid point. This is fasted by a black press stud. There are two "L" shaped tin protrusions allowing the meter to slide only down the case until it rests on these shelves. This provides for an empty space for minimal storage,.On the front bottom and below the clasp is a tag "STATE ELECTRICITY COMMISSION OF VICTORIA TRANSMISSION DEPT."sec vic kiewa hydro scheme, alternate energy supplies, alpine population growth -
 Flagstaff Hill Maritime Museum and Village
Functional object - Safe, W. Marr, Circa 1855
This strong, heavy bank safe was made by W. Marr in London. It was formerly owned by the ANZ Bank in Portland, Victoria. Portland’s ANZ Bank was originally a branch of the Bank of Australasia, which first came to Australia in 1835, opening in Sydney. Portland’s Bank of Australasia began in a bluestone building built on the north corner of Julia and Bentinck Streets by stonemason William Robb in 1855, around the time of Australia’s Gold Rush. Eventually, in 1951, the Bank of Australasia merged with the Union Bank to become the Australia & New Zealand Bank, known as the ANZ. Portland’s branch of the Bank of Australasia then moved into the old Union Bank building at 44 Percy Streets; both bank buildings were built around the same. The maker of this safe, W. (William) Marr, obtained a patent in 1834 for what is believed to be the first fire-retarding patent, building this into the lining of strong boxes. Others made further design improvements such as hardening the metal plates used to make the boxes. In about 1840 Thomas Milner, a Sheffield tinsmith, made the earliest safes that could safely protect their contents from a surrounding fire. This was achieved by including tubes of a substance between the inner and outer walls of the safe that would react to the heat and the contents would put the fire out. In 1851 an Exhibition at London’s Crystal Palace included fire-proof safes from different vendors. William Marr was listed under Fireproof Box Makers in the 1842 London Trades Directory, at 33 Broad Street, and 52 Cheapside. William Marr & Son were appointed to supply Her Majesty’s National Debt Office and other departments in 1860, with the address 9 Walbrook, Vulcan Safe Works, Skin Yard, Bankside, Southwark, London. 1n 1870 the address for William Marr listed under Safe Makers and Agents in the London Trades Directory was 67 Cannon Street. The manufacturer, W Marr, is significant as an inventor of a way to make a strong box fireproof, then patented his secure safe. This invention indicates that security of money was of great importance in the mid-1800s as it continues to be today. The secure safe would have given much comfort to those with investments and savings, as well as to the bank itself, the custodian of other people's money. This safe was made in London and exported to colonial Australia, giving significance to the safe as an item that was high in the list of the needs of the early Australians and their businesses. The safe has local historical significance as it was used by the original Bank of Australasia in Portland, which was built in 1855 and went on to become the ANZ Bank, still in operation today. The bank was an integral part of the establishment and growth of commerce in Colonial Victoria.Safe; heavy metal bank safe, painted green. Double doors each have top and bottom external hinges, and two front panels; the top panels are arched. The thick doors have five sliding locks. Inside is a fixed metal compartment with a locked sliding metal drawer, and several fitted shelves plus some temporary removable shelving. Both doors have a decorative brass knob near the centre opening. Left door has an oval artificial keyhole and a space where another fitting has been attached. The right door has a second brass knob and an oval keyhole. The top panels of the left door has an oval plaque with an inscription; the right door has evidence that there was an oval attachment. Made by W. Marr, London.Text embossed on plaque: "W. MARR / PATENTEE & MANUFACTURER / 52 / /CHEAPSIDE / LONDON" flagstaff hill, warrnambool, shipwreck coast, flagstaff hill maritime museum, flagstaff hill maritime village, maritime museum, great ocean road, shipwreck artefact, safe, bank safe, vault, security, finances, anz bank, portland bank, w marr, william w marr, financial institution, savings, gold exchange, loans, investments, safety, safe maker, lock maker, iron box, strong-room