Showing 1941 items
matching decorations.
-
 Kew Historical Society Inc
Book, Stories They Tell : A history of Kew through objects, 2022
'Stories They Tell : A history of Kew through objects' explores diverse narratives from European settlement to the first decades of the twenty-first century. These stories use as their starting point artworks, texts and artefacts from the nationally significant collection of the Kew Historical Society. Limited to 100 copies.117 pp : illustrated : Appendices Chapters: Preface / Robert Baker p4. The collection / Robert Baker p5. Cartwheel penny / Robert Baker p6. Creek and old watering stage / David White p10. John Carson: Mayor 1863–4 1 / Julie King p4. Wedding dress / Suzanne McWha p18. Back to Kew 1875 / Judith Scurfield p22. Barnard’s clock / Margaret Robinson p26. Denbigh quilt / Suzanne McWha p28. Fragments of art decoration / Robert Baker p32. Mr Richardson’s sock / Felicity Renowden p36. Kew Volunteer Fire Brigade / David White p38. Kew Where We Live / Judith Scurfield p42. [MMBW} Detail Plan No. 1580 / Judith Scurfield p46. Adeney Avenue / Suzanne McWha p50. Young Workers’ Patriotic Guild / Margaret Robinson p54. Roll of Honor [Thomas Rand] / Robert Baker p56. Alice Anderson in her tourer / Felicity Renowden p60. Kew War Memorial / David White p62. Beaded dance dress / Suzanne McWha p 66. The great flood of 1934 / Desley Reid p68. Depression-era toolbox / Robert Baker p72. War Savings Street / Julie King p74. Kew Public L.ibrary / Suzanne McWha p78. Signature supper cloth / Desley Reid p82. View from the garden of Rockingham / Desley Reid p86. Cr Marie Dalley / Felicity Renowden p90. Centenary of Kew / Robert Baker p94. Doris Dickinson’s gown / Julie King p98. [Model Dairy] Milk bottles / Robert Baker p100. Kew Civic Centre / David White p102. Bicentennial tapestries / Margaret Robinson p106. Crest of the City of Kew / Desley Reid p110. Town Crier [outfit] / Desley Reid p112. Acknowledgements p114. List of works p115.non-fiction'Stories They Tell : A history of Kew through objects' explores diverse narratives from European settlement to the first decades of the twenty-first century. These stories use as their starting point artworks, texts and artefacts from the nationally significant collection of the Kew Historical Society. Limited to 100 copies.collection -- kew historical society, museum catalogues, henty family, cartwheel pennies, kew lunatic asylum, patchwork quilts, john carson, george bouchier richardson, gb richardson, coombs family, james dannock, back to kew 1875, francis barnard, denbigh family, cullis hill & co, ordsall, southesk, kew volunteer fire brigade, jfc farquhar, henry kellett, mmbw detail plan 1580, william nicholls anderson, young workers patriotic guild, roll of honor -- town of kew, alice anderson, kew war memorial, flapper dresses, fairfield bridge, chandler highway bridge, warren trestrail, furniture -- 1930s, war savings streets, kew library, children's libraries, voluntary aid detachments - kew (vic.), rockingham, james govett, centenary of kew, mayoresses -- kew (vic.), model dairy -- kew (vic.), doris dickinson, crests -- city of kew (vic.), town criers -- kew (vic.), joy stewart, australian bicentennial -- kew (vic.), kew civic centre, ak lines mcfarlane marshall, adeney avenue -- kew, wwi -
 Flagstaff Hill Maritime Museum and Village
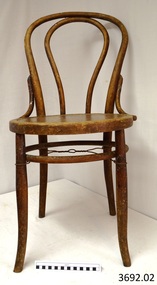
Furniture - Chair, early 29th century
The Bentwood chair has been called ‘the world’s most popular chair’. The original Bentwood chair, was designed by German-Austrian cabinet maker and Master Joiner, Michael Thonet (b.1796 - d.1871) and introduced to the market in 1859. Thonet started his business in his home town of Boppard as an independent cabinet maker in 1819. In the 1830’s he began trying to make furniture from glued (laminated) and bent wooden slats. Over the next few years his attempts to patent this process failed in Germany, Great Britain, France, and Russia. He then began using lightweight, strong wood and bending it into elegant, comfortable furniture. The Bentwood technology took Thonet years to perfect. In simple terms, the wooden rods or lengths were wet by soaking or steaming, bent into shape and then held in place until they hardened into the moulded curved shape or pattern. The wood usually chosen for the bentwood chairs was maple or beech. Thonet had revolutionised an older process by industrialising the process. The dowels of wood were cut and prepared as components of furniture, treated by the ‘bentwood’ process, then ready immediately for assembling with very little extra workmanship needed. Thonet held 2 patents for this process, the second one ended on 10th July 1869 and was non-renewable. At the Trade Fair at Koblenz of 1841 Prince Klemens Wenzel von Mettemich was very impressed with Thonet’s furniture, especially the chairs. In 1842 Thonet sold his Boppard business and emigrated to Vienna, and began working, along with his sons, on the interior decoration of the Palais Leichtenstein, for the Carl Leistler establishment. In 1849 he began his own business again, the Gebruder Thonet to include his sons (translated “Brothers Thonet”). He produced the “No. 1” Bentwood chair. He received a bronze medal for his Vienna bentwood chairs at the World Fair in London in 1851, and a silver medal in Paris in 1855. In 1856 he opened a new factory in Koritchan (Moravia), where there were extensive woods of beech trees available for his enterprise. In the next years, five more Eastern European production sites were established in Bystritz (1862), Nagy-Ugrócz (1866), Wsetin (1867), Hallenkau(1867) and Nowo-Radomsk(1880). Thonet’s 1859 No. 14 “chair of chairs” (or “Konsumstuhl Nr. 14” – coffee shop chair no. 14) was the most famous of all of Thonet’s Bentwood chairs. In 1867 he received a gold medal at the Paris World Fair. This new style of furniture making became very popular. Up until 1830 50 million of these chairs had been produced. By the 1870’s Thonet owned offices in almost 20 countries, with sales locations across Europe, in Chicago and New York. In 1889 he set Thonet set up a head office in Frankenberg, Hesse. Bentwood models designed in the mid to late 19th century featured hand-caned or laminated wood seats and were usually stamped with the country of origin. The Bentwood elements were the backrest, seat rim and legs. Typically the seat was covered with ‘bucket’ leather. After the Patent ran out in 1869, companies such as Jacob & Josef Kohn began the production of bentwood furniture.The popularity of the Bentwood chair that was introduced by Michael Thonet in the 1850s is due to its versatility and timeless quality. Its style, whether varnished or painted, suits any room in the house. The lightweight chairs are also popular for café and restaurant seating, as well as for public gatherings. They can be easily moved around and grouped in a variety of ways to suit any occasion.Chair, bentwood, pair of two. Backrest has full length inverted U inside frame. Support rail and wire reinforcing between legs. 3692.01 seat has floral pattern pressed into wood 3692.02 seat is plain (replacement seat). Made by Harnison & Co.3692.01 chair's marks; Label ""HARNISON & CO./ NEUSOL / BUDAPEST" and "WIENER NOBEL" and "(symbol) N inside circle, under Crown" flagstaff hill, warrnambool, shipwrecked coast, flagstaff hill maritime museum, maritime museum, shipwreck coast, flagstaff hill maritime village, great ocean road, domestic furniture, dining furniture, bentwood chair, harnison & co., neusol, budapest, wiener nobel -
 Bendigo Military Museum
Administrative record - COMPENDIUM WW1 - WW2, 4) A H Pettifer, Government Printer et al, 2) 14.2.1946; .3) 1.3.1919; .4) 30.11.1954 .5) 24.11.19? - WWI; .6) 31.10.1917; .7) 12.6.1917; .8) Page 1: 20.12.1915, Page 2: 10.12.1915, Page 6: 19.1915; .9) 10.9.1918; .10) 18.4.1919; .11) c.2.3.19?; .12) 18.9.1920; .14) post WWI; .15) 24.4.1920; .17) 18.4.1942; .18) 19.6.1943; .19) 18.3.1947; .20) 1944; .21) 1944; .23) 22.10.1941; .26) 13.9.1944; .27) 1.1944; .30) 7.3.1950; .31) 31.7.1944; .32) 16.4.1942; .33) 13.6.1946; .34) 6.5.1946; .36) a) & b) 3.11.1947; .37) 24.10.1951; .38) 24.9.1957; .39) 9.10.1957; .40) 19.2.1958; .41) 26.2.1958; .42) 1.3.1958; .43) & .44) 7.3.1958; .45) 25.2.1958; .46) 3.1.1948; .47) 26.2.1948; .48) 22.4.1958; .49) 24.2.1958; .50) 12.3.1958; .51) 6.1958; .52) c.Mar/Apr 1958; .53) 5.4.1958; .54) c.end WWII; .55) a.b. 13.6.1967; .56) 26.5.1967; .57) 18.2.1954
Herbert Trangmar Allan, refer 2755.4 for his extensive service history and wards. .2) Details gifting of a pair of Japanese binoculars to Col H T ALLAN by Pacific Island Regiment. .3) Certificate issued by Winston Churchill, Secretary of State for War (The War of 1914-1918), awarded to Capt H T ALLAN MC. .4) Herbert Trangman ALLAN born 5.1.1895 at Woolwich, NSW. Middle name misspelled, should be Trangmar not Trangman. .6) Congratulating H T ALLAN on receiving the Military Cross award for leading 2 companies which had lost officers during action on Passchendaele Ridge on 9.10.1917. .7) Describes life behind the lines whilst H T ALLAN's battalion has been resting for a month. Daily life consisted of training drills, sport & entertainment. Writer takes time to describe the countryside & weather. .8) Relate to H T ALLAN's military exam results & his promotion to 2nd Lieutenant in 1915. .9) To Herbert Allan's father, Mr P Allan detailing the citation for awarding of the Military Cross to Herbert ALLAN. Original citation appeared in the London Gazette,5.4.1918. .10) Form addressed to Capt H ALLAN MC, 17th Battalion stating his period of enlistment in the 1st AIF was to expire 26.5.1919. .11) Letter from Lord BIRDWOOD (General) to Herbert ALLAN in response to a letter received 19.11.19?. General BIRDWOOD expresses his opinions on difficulties the allied troops face in their fight against the Japanese. .12) Letter to Capt H T ALLAN advising of MID oak leaves sent to him. Details guidelines for attaching oak leaves to both the larger Victory Medal & the small service dress medal. .13) Form details H T ALLAN's WWII Army No, Rank, Unit & Decorations & Medals held. The form has not been signed & dated. .14) Details service record of Lt Col H T ALLAN NX12229. Includes military service from 1912 - 1944, schools & courses attended, decorations, promotions & overseas service. .16) Form issued to H T ALLAN on 15.12.1939 granting permission to leave New Guinea for Australia & return within a period of 12 months. Issued by Customs Office in Salamaua. Lists H T ALLAN's age as 44, height 5' 10" & occupation. .17) Letter from Major General MORSHEAD GOC, AIF (ME) to Major H T ALLAN, OBE, MC congratulating him on being awarded the OBE for outstanding service at Tobruch. .18) Letter from Major General MORSHEAD to Major H T ALLAN, OBE, MC replying to ALLAN's letter of 15.6.1943. MORSHEAD is congratulating ALLAN on his appointment to New Guinea Force, also acknowledges his excellent service record. .19) Letter acknowledges H T ALLAN's resignation from the Office of Production Member of the Australian New Guinea Production Control Board, effective from 28.8.1946. .20) Major General WINDEYER commanded the 20th Brigade from 1942-1946. .22) Card sent from the CO of the 3rd Australian Anti-Tank Regiment. .23) Menu for Farewell Dinner held in the Officer's Mess of the 20th Infantry Brigade, Tobruch on 22.10.1941. .24) Menu & Toast list for Farewell Dinner to Brigadier J J MURRAY DSO MC VD. Attended by H T ALLAN & held in the Officers Mess, 2/17 Australian Infantry Battalion on 22.12.1941. .25) Invitation to Col H T ALLAN by Lady Gowrie (wife of Governor General Baron Gowrie) to attend a Luncheon at Government House, Canberra, ACT. .26) Letter to Major (T/Lt Col) H T ALLAN from Major W A JENNER advising him of his secondment to 2/17 Australian Infantry Battalion & appointment to command 5 Aust Base Sub Area. .27) Application for Africa Star with Eighth Army Clasp signed by H T ALLAN & approved by Lt Colonel of 2/17 Australian Infantry Battalion. H T ALLAN held the rank of Major (substantive) at the time of qualification, 1.3.1942 - 11.1942. He held the rank of Lt Colonel at the time of application in 2.1944. .28) Detailing changes in command & promotions including that of Lt Col H T ALLAN, dated 1.4.19? .29) For Lt Col H T ALLAN detailing movements required by First Australian Army command. .30) Acknowledgement & confirmation of Col H T ALLAN's application for campaign awards for WWII. .31) Letter addressed to Lt Col H T ALLAN from Lt Gen Stanley Sauige requesting information on New Britain for a forthcoming visit. .32) Certificate was presented to H T ALLAN on 16.4.1942 when he was awarded an OBE by King George VI. .33) Document details H T ALLAN's relinguishing of Command of the HQ of Pacific Islands Regiment. ALLAN also relinguished the rank of temporary Colonel & was transferred to the Reserve of Officers with rank of substantive Lt Colonel. .35) Official letter to Colonel H T ALLAN from Joseph Francis, Minister for the Army. The letter acknowledges Col ALLAN's long & distinguished career during both peace & wartime. .36) a) & b) From H T ALLAN (assumed) to Prime Minister J B CHIFFLEY referring to the production of copra in New Guinea, the actions of the Commonwealth Bank in relation to planters & the collaboration of New Guinea natives with the Japanese. Assumed to be a copy of original. .37) Letter to H T ALLAN indicating he had been placed on the Retired List with the rank of Honorary Colonel. .38) Letter invites H T ALLAN to officially open the State Conference in Lae in late March or early April 1958. Invitation was extended due to H T ALLAN for distinguished service in PNG. .39) Letter to H T ALLAN thanking him for accepting the invitation to open the Papua & New Guinea State Conference in late March or early April 1958. .40) Letter from H T ALLAN to Lt Gen Sir Henry WELLS, Chief of the General Staff, Victoria Barracks, Melbourne. ALLAN requests permission to wear his uniform for official engagements during his upcoming visit to New Guinea. ALLAN also offers advice on how to deal with native troops including serving time with them, learning their language & studying their customs. He suggests that this would help quell & dissent & revolt. .41) Reply from Major General DALY to HT ALLAN thanking him for his offer to spend time with the CO of the Pacific Island Regiment to address concerns with that unit. This meeting would coincide with ALLAN's upcoming visit to PNG. .42) HT ALLAN's reply to Major General T J DALY's letter of 26.2.1958. ALLAN requests an opportunity to discuss PIR issues with Major General DALY prior to his visit to PNG. .43) Major General T J DALY's reply to HT ALLAN's request for a meeting to discuss ongoing issues with the Pacific Island Regiment. .44) Letter from HT ALLAN to Brigadier D M CLELAND notifying him that he will be staying in Port Moresby on his way to the RSS&AILA Congress in Lae. .45) Lieutenant Colonel MCGUINN writes to invite Colonel ALLAN to visit the PIR during his visit to New Guinea at the end of March of the beginning of April 1959. .46) Letter of appreciation to H T ALLAN thanking him for his efforts in presenting the case for the Territory of New Guinea during the post WWII transition period. .47) Letter to H T ALLAN from New Guinea Citizens Association, Lae Branch, thanking him for his service on behalf of the people of the Territory of New Guinea. The association offered to send ALLAN a suitable present in recognition of his service. .48) Major General T J DALY's reply to HT ALLAN's suggestions for handling disquiet amongst the native troops in the Pacific Island Regiment. .49) Reply from Lieutenant General WELLS to H T ALLAN granting him permission to wear his uniform on his forthcoming visit to New Guinea. WELLS also notes that he has passed other requests made by ALLAN to Major General DALY. .50) Copy of H T ALLAN's reply to Lieutenant General WELL's letter of 24.2.1958 [.49)]. .51) A written account of Colonel H T Blue ALLAN's visit to New Guinea in 3.1958. Article appeared on p.65 & 67 of the 6.1958 edition of Pacific Islands Monthly. .52) Newspaper account of Colonel H T Blue ALLAN's opening of the Rabaul Branch of the Native Ex Servicemen's Association. Colonel ALLAN spoke of the involvement of the Pacific Islands Regiment during WWII. .53) The Rabaul Times account of Colonel H T Blue ALLAN's opening of the Rabaul Branch of Native Ex Servicemen's Club. Featured on p1, concluded p3. .54) Biographical account of Colonel H T ALLAN's service in WWI & WWII. In addition an account of his success in New Guinea between the wars is included. .55) a.b. Biography of Colonel H T ALLAN written by R W Robson who was the founder of the Pacific Islands Monthly. Article was written following ALLAN's death on 23.5.1967 aged 72. This item is a pre publication copy of Robson's article which appeared in the Pacific Islands Monthly. .56) Text of a valedictory given at the funeral of Colonel Herbert Trangmar ALLAN OBE, MC, ED, NX12229 held 26.5.1967 following his death on 23.5.1967. The speech summarized his life in both wars & civilian life. 57) Invitation issued to Colonel H T & Mrs ALLAN to attend a Garden Party at Government House on 18.2.1954. At this function Colonel H T & Mrs ALLAN were to be presented to her Majesty Queen Elizabeth II.Herbert T ALLAN Collection. The contents are all of various size, the Album is the size documented. .1) Large teal green album containing 16 plastic pockets each with white card insert. Various documents & photos contained in each pocket. .2) Typed letter, black type on cream paper. .3) Certificate mounted on fawn card backed with dark brown veneer. Presented to Capt H T ALLAN MC for being mentioned in despatches on 7.11.1917. .4) New South Wales Birth Certificate extract, printed on pink paper with watermark. .5) Telegram on tissue paper to a sheet of cream paper. Pin located top L corner. Requests the attendance of Lt Herbert ALLAN, Russell Hotel, Russell Square. .6) Typed letter mounted on grey cardboard. .7) 2 page letter on foolscap paper, secured by pin top L corner. Written from France by Herbert (Bert) ALLAN & addressed to his father. .8) 11 pages secured with a clip top L corner. 1st document typed, 2nd handwritten, remainder printed. Relate to H T ALLAN's military exam results. .9) Typed letter from Department of Defence Base Records Office to P ALLAN. .10) Document, printed form to inform the recipient that their period of enlistment in the 1st AIF had expired. .11) 4 page handwritten letter on 2 sheets of paper. 1st page has a printed letterhead. .12) BR Form No 20. Typed formal letter from AIF Base Records Office to accompany Mentioned in Despatches oak leaves sent to the recipient. .13) Form AAFA36 used for recommending the awarding of an Efficiency Decoration. Form details service record & details of a serving soldier. .14) 1 large / 1 small page, numbered, detailing the service record of Lt Col H T ALLAN. Black type on cream paper. 2 pages are loose but evidence of attachment visible. .15) Bachelor of Arts Degree Certificate (testamur) granted by the University of Sydney, awarded to Herbert Trangmar ALLAN. Printed on cream parchment. .16) Proforma document issued by the Territory of New Guinea permitting leave & return to the Territory. Printed 2 sides, black type on cream paper. .17) Letter on Australian Imperial Force letterhead from Major General MORSHEAD to Major H T ALLAN. .18 Letter on HQ2 Aust Corps letterhead from Major General MORSHEAD to Major H T ALLAN. .19) Typed letter on External Territories letterhead from J R Halligan to H T ALLAN. .20) Cream Christmas card folded in 2, sent to H T ALLAN. On front in black lettering is HQ 20th Australian Infantry Brigade below black Rising Sun emblem. Inside in black lettering is With Best Wishes for Christmas and New Year. Christmas 1944. .21) Cream card folded in 2. Front illustration depicts a devil figure riding a platypus & carrying a pennant with 2/13 on it. The devil is depicted attacking a German & Japanese soldier. Below the devil is a boomerang with Greetings Xmas 1944 printed on it. Illustration is in green & black. Inside on LHS is a message from 2/13 Battalion. On RHS is a list of 2/13 battle honours from 1940-1943. On back in black print is 1944-1945 New Guinea Australia. .22) Cream Christmas card folded in 2. Front illustration in brown with word Greetings in green. RHS inside printing in green & brown letters. Artillery badge on back in brown. .23) Cream card folded in 2. Typed menu on cream paper attached inside. Front cover illustrated with 20th Infantry Brigade colour patch & a rat over a scroll with words - So What? .24) Cream card folded in 2. On front black printing accompanied by 2/17 Battalion colour patch that is black over green diamond shape. Inside a list of Toasts & Dinner Menu printed in black. Back page for autographs. .25) Cream invitation card. Black cursive script printing below gold crown on front. .26) Typed letter on cream paper. .27) Typed foolscap application form to claim the Africa Star. .28) & .29) Message form filled with typed orders. .30) Typed letter acknowledging an application for campaign medals & listing eligible awards. .31) Typed letter on bond paper. .32) Certificate on cream parchment. Black print in cursive script. Text details the awarding of an OBE to the recipient. .33) Typed text on Australian Military Forces letterhead. Cream paper. .34) Typed text. Temporary note for H T ALLAN's discharge from AMF. .35) Typed letter on Commonwealth of Australia, Minister for the Army letterhead. .36) a) & b) 2 page letter in black type on cream paper. Pages are loose, letter unsigned. .37) 1 page typed letter on Australian Military Forces letterhead. .38) & .39) 1 page typed letter on Return Sailors, Soldiers & Airmen's Imperial League of Australia, Papua & New Guinea Branch letterhead. .40) 1 page typed letter, unsigned. .41) Single sided typed letter on Australian Military Forces letterhead on cream paper. .42) 1 page typed letter, unsigned on cream paper. .43) Single sided typed letter on Australian Military Forces, Northern Command, Victoria Barracks, Brisbane letterhead on cream paper. .44) Single sided typed letter on cream paper. .45) 2 page typed letter on folded cream paper bearing the letterhead of the Pacific Islands Regiment. .46) 1 page typed letter on cream, lined paper. .47) 1 page typed letter on cream paper. .48) 1 page typed letter on Australian Military Forces, Northern Command Headquarters, Victoria Barracks, Brisbane letterhead on cream paper. .49) 1 page typed letter on Chief of General Staff, Australian Military Forces, Army Headquarters, Victoria Barracks, Melbourne letterhead on cream paper. .50) 1 page copy of an unsigned letter on cream paper. .51) Magazine article: Building a New Nation in New Guinea : Some advice from Colonel Blue ALLAN. Black & white article with a 2nd small section stapled to the main page. Large page features a black & white captioned photo of a group listening to a uniformed Officer deliver a speech. Also features advertising front & back. .52) Newspaper article: Official Opening of Native Ex Servicemen's Club. Black & white typed newspaper article featuring a captioned black & white photo of a uniformed Australian Officer & a group of New Guinea Ex Servicemen. .53) a. b. c. Newspaper article: Master Blue Came Back to the Islands: 4000 Attend Club Opening. 3 Section article cut from a newspaper. One part is the banner of the newspaper with date published. Other sections contain the text of the article. The larger section features a black & white photo of an Australian Army Officer in uniform. .54) Newspaper article, untitled. Black & white typed newspaper article with black & white caricature of an Australian Army Officer featured. .55) a. b. Magazine article: The Story of a Big Man who Loved Soldiering. 2 page black & white typed article with sub headings. .56) Text of a Speech. 2 page typed text written for a valedictory given at a funeral. Pages connected with a staple in the top L corner. .57) Printed, cream card invitation to a Garden Party for the recipient to meet Queen Elizabeth II & The Duke of Edinburgh. Text is in cursive script under the Coat of Arms of Her Majesty. .2) Signature ? Capt S C PIR. .4) Date of issue typed: 30.11.1954 Name of recipient: Herbert Trangman Allan Stamped: T Wells, Registrar General NSW .5) Handwritten: To Lt Herbert Allan, Russell Hotel, Russell Square. Typed: Buckingham Palace OHS. Your attendance is required at Buckingham Palace on Wednesday next the Twentyeighth inst (28.11.19?) at ten o'clock am service dress please telegraph acknowledgement Lord Chamberlain London. Stamped: Central District 24 NO 19. .6) Signed in pencil: W Birdwood. In pencil on back: 15 x 12. .8) p1: Handwritten signature. Copy dated 29.12.1915. p2 Handwritten in ink: P Allan Esq, Mount Hunter Hill. Military Examination. Copy dated 29.12.1915. Handwritten in pencil: Results: H T Allan. Tactics - Distinction 92% HE Barff p3 Underlined in ink: 38th Infantry Herbert Trangmar Allan to be 2nd Lieutenant (provisionally). Dated 16 June 1914. p5 Handwritten: Total 139. Lieut Allan tied with 15 others for 20 place. p7, 9, 10 & 11underlined in ink: H T Allan. p8 Underlined in ink: Allan HT. .9) & .10) Signature in black ink. .12) Handwritten signature in black ink: On back handwritten signature in black ink: Clive Wilkinson, Buddong, Robinson St, Chatswood. Also ? Rd, Cremorne Pt. .13) Handwritten in black ink: Details of HT Allan's Commission Service from 16.6.1914 - 18.2.1946. .15) Handwritten signature of the University Chancellor, Dean of Faculty of Arts & Registrar. Handwritten name of recipient. Seal of the University of Sydney imprinted bottom LHS. .16) Handwritten in black ink: Details of recipient. Stamped in red ink: New Guinea Customs. Stamped in blue ink: H M Customs, Cooktown, dated 17.12.1939. Handwritten on reverse: Signature. Stamped on reverse in red ink: New Guinea Customs, dated 15.12.1939. .17) & .18) Handwritten signature: Major General Morshead. .19) Handwritten signature in black ink: J R Halligan. .20) Handwritten inside in blue ink: Lt Col Allan. Good wishes from your many friends here. Signed by Major General Windeyer. .21) Inside LHS handwritten in blue ink: Lt Col Allan & an indecipherable signature. .22) Inside RHS handwritten: To Major (Blue) Allan OBE MC from Lt Col? .23) On front handwritten in blue ink: H T Allan?. Inside in black ink & pencil are 19 signatures. .24) On front: 3 signatures in black ink & pencil. On back: 36 signatures in black & blue ink & pencil. .25) On back handwritten in black ink: Colonel H T Allan OBE MC, with 3 ink lines below name. .26) Handwritten in blue/black ink: Signature. Handwritten in blue pencil top R corner: A32/3477. Handwritten in black ink bottom L corner: Cond (?) 15/9A. Handwritten in black ink: Signature. .27) Stamped top R corner: 2/17 Bn Received 9.2.1944. Signature in black ink: H T Allan. Signature in black ink: ? Lt Col 2/17 Aust Inf Bn 10.2.1944 Page bottom in pencil: Blue will keep 1 1/4 for you? .30) Handwritten: Details of eligible medals. Handwritten signature: J C K Miller Capt 7.3.50. Handwritten bottom L corner: Col H T Allan Bottom R corner: OBE, MC, 1914-19, Victory, ED, MID 1914-18, MID 1939-45 On back: Steak & Kidney Morris ) Clark ) Vowood ) 10/- 70215 Maughan ) Allan ) .31) Top of page: Imprinted Coat of Arms Top LHS in black ink: TOP SECRET AND PERSONAL Handwritten signature: Stanley Sauige .32) Embossed top L corner: Seal of the Most Excellent Order of the British Empire. Handwritten: Mary R. .32) Signed: Queen Mary, mother of George VI. .33) Handwritten signature. .34) Handwritten in blue ink: HERBERT TRANGMAR ALLAN 6 MAY 46 Handwritten signature. .35) Handwritten signature in blue ink: Joseph Francis, Minister for the Army. .37) Handwritten signature. .38) & .39) Handwritten signature: J W Knight. .41), .43) & .45) Handwritten signature in blue ink. .46) & .47) Handwritten signature in black ink: Henry G Eckhoff. .48) Handwritten signature in blue ink: With best wishes Yours sincerely T J Daly. .49) Handwritten signature in black ink: Yours sincerely H Wells. .57) Handwritten in black ink: Colonel & Mrs H T Allan.certificates, records, awards, administrative, compendium -
 Federation University Historical Collection
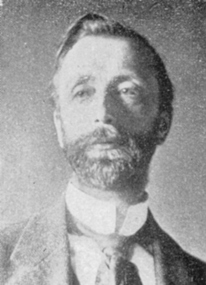
Photograph - Black and White, Ponsonby May Carew Smyth, 1906
Ponsonby Carew Smyth, A.R.C.A. London, was Victorian Art Inspector of Technical Schools. "Ponsonby May Carew-Smyth (1860-1939), educationist, was born on 7 August 1860 at Cork, Ireland, son of Emmanuel Uniacke Smyth, gentleman, and his wife Catherine Giles, née Carew. Carew-Smyth's initial art training and teaching was at the Belfast Government School of Art and Design. In 1885 he entered the National Art Training School at South Kensington, London, where he remained as student and teacher for five years. He also taught at Rugby School, studied at the Royal School of Wood Carving and the Guild School of Handicrafts, London, and was sent by the Department of Science and Art to study art, art education and museum procedures in Paris. Testimonials to his career in England affirm his ability and dedication as an educationist and his integrity as a man. On 23 December 1890 Carew-Smyth married Marie Reynolds of Brixton; they migrated to Australia next January. In September Carew-Smyth applied from Melbourne for the position of master of the school of art and design, established under the auspices of the Ballarat Fine Art Gallery. Opening in November, the school offered day classes and a broad curriculum, and under Carew-Smyth's guidance, established a sound reputation. In November 1899 he was appointed inspector of drawing in the Department of Education. Carew-Smyth saw drawing as a crucial link between primary and technical education, insisting on it as a 'mental process quite as much as a manual'; he believed strongly in the utilitarian value of drawing to the artisan class and of art as 'craftmanship'. By his emphasis on teacher-training, by his role in the Teachers' Training College, and by his constant travels, writing and lecturing, he upgraded both the standard and importance of drawing early in the century. His meticulous mind formulated the Austral Drawing Books which provided the basis of instruction in the subject in Victoria until 1927. Although he gave his occupation as 'artist', Carew-Smyth was primarily an educationist. He was actively involved in the early years of Prahran and Swinburne Technical colleges, and especially the Working Men's College which held his interest even after his retirement. In 1906 he was appointed chairman of the Victorian State Schools' Equipment and Decoration Society, and he was important in the organization of the state schools' exhibition that year. He designed the commemorative wall plaques installed in state schools after World War I, and the art teachers' certificate. He was prominent in bringing about the 1922 Jubilee Exhibition, and the 1926 showing of work of overseas schools, and especially the 1934 Melbourne centenary 'Early Victorian Art' exhibition. In the 1930s he wrote wide-ranging, informative and sometimes humorous articles for the Argus on various aspects of the decorative arts. In mid-1936 he was acting director of the National Gallery of Victoria. To students his single-mindedness sometimes suggested sternness, but Carew-Smyth was always held in the highest regard both professionally and personally. His colleagues recalled a man of kindness, unstinting devotion to work, and humour; he was considered quite a raconteur. Survived by his wife, a son and a daughter, he died in his home at South Yarra on 9 October 1939, and was cremated." (Margot Lethlean, 'Carew-Smyth, Ponsonby May (1860–1939)', Australian Dictionary of Biography, National Centre of Biography, Australian National University, http://adb.anu.edu.au/biography/carew-smyth-ponsonby-may-5501/text9359, accessed 4 June 2013.)Image of the face and shoulders of a bearded man - Ponsonby Carew Smyth. The image was originally published from the State Schools Exhibition Catalogue, 1906. (Cat. No. 401)carew smyth, inspector, technical schools, art. -
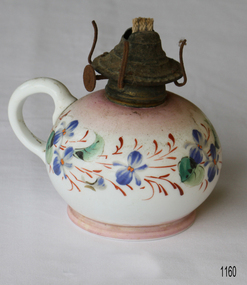 Flagstaff Hill Maritime Museum and Village
Functional object - Lamp, Probably second half of 19th century
OIL LAMPS Oil had been burnt in lamps at least since the Palaeolithic age, and the cheapest light fittings used in Victorian homes had changed little since then, with a simple wick protruding from a small container of whale oil or vegetable oil. However, much brighter and more sophisticated lamps had emerged late in the 18th century, the most important being the Argand oil lamp. This lamp had a broad flat wick held between two metal cylinders to form a circular wick, with air drawn through it and around it. This in itself was a revolutionary idea, but its inventor, Aimé Argand also discovered that by placing a tube or 'chimney' over the flame, the hot gases from the flame rose rapidly creating a draught and drawing air in from below. Fanned by a draught from both inside and outside the circular wick, the poor spluttering flame of early lamps was transformed into a bright, efficient light source (see illustration). The one disadvantage for the Argand oil lamp and its many imitators in the early Victorian period was that the best oil then available, colza, was so thick and viscous that it had to be fed to the wick either by gravity from a reservoir above, or pumped up from below. Most colza oil lamps have a reservoir often shaped like a classical urn to one side which in some fittings obstructed the light. The Sinumbra lamp got around the problem by having a circular reservoir around the base of the glass light shade. One of the most significant improvements of the Victorian period was the introduction of paraffin. Patented in 1850, the price of the new fuel fell dramatically following the discovery of oil in Pennsylvania, USA. As paraffin was much lighter than colza the reservoir could be placed below the flame, enabling many new designs of light fittings. One of the most successful paraffin lamps was the Duplex burner introduced in 1865 which had two wicks side by side and, like the Argand lamp, a clear glass chimney with air drawn from below. Most lamps also had a larger shade around the chimney often of opaque glass to diffuse the light. The shades or diffusers provided an opportunity for decoration, and a variety of shapes, colours and patterns were used. The amount of light which can be produced by a wick is limited by the surface area of the wick and the amount of fuel and air able to reach it. As fuel burns at the tip of the wick only. The gas mantle, on the other hand, provides a much larger three-dimensional surface, and is far more effective as a result. Invented by Carl Aur von Wesbach in 1885, the incandescent mantle was the last major breakthrough in oil and gas lighting of the period, before both succumbed to electric lighting. The mantle consists of a skirt of silk or cotton impregnated with a non-inflammable mixture (thorium and cerium), suspended over a fierce flame. When first ignited, the cotton burns away leaving fine, brittle filaments of non-combustible material in its place which glow white hot or 'incandescent'. The mantle works best with either gas or a fine mist of paraffin produced by a pressurised reservoir which is still widely used in camping lamps today, producing a bright, warm light to rival an electric bulb. https://www.buildingconservation.com/articles/lighting/lighting.htm http://www.artandarchitecture.org.uk/stories/lighting/lighting4.html#:~:text=Oil%20had%20been%20burnt%20in,whale%20oil%20or%20vegetable%20oil.An item of great importance in any home before gas or electricity was available.Kerosene lamp, ceramic, with metal top and wick. Has handle at side and floral hand painting around the body. Glass cover. Metalwork is rusty.Noneflagstaff hill, warrnambool, flagstaff-hill, flagstaff-hill-maritime-museum, maritime-museum, shipwreck-coast, flagstaff-hill-maritime-village, oil lamp, heating, lighting, ceramics -
 Hepburn Shire Council Art and Heritage Collection
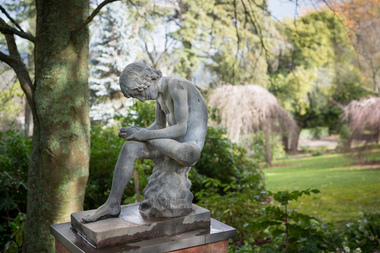
Public Art Work, Boy with a thorn - 'Lo Spinario', c. 1900
Boy with a Thorn Though the classical bronze that the figure was modeled has become known as Lo Spinario, both Stuart Rattle and Kevin O’Neill referred to it as The Boy with a Thorn. Information from the late Stuart Rattle and John Graham, the late Kevin O’Neill’s partner. The statue was bought by Kevin O’Neill from a South Yarra antique dealer in the 1980s. She had bought it in Europe. Stuart believed that it was cast in Berlin by Moritz Geiss who had pioneered the popular process of zinc casting of classical statues. Schinkel, the architect of early 19th Century Prussian public buildings used the process extensively. I assume that the decorations that can be seen in Berlin currently are copies of those copies, given the comprehensive destruction of the city in 1945. Unless there is a date stamped on the statue, and there might well be, there is no firm indication of its age, although Stuart and Kevin believed it was “turn of the century”. It was given to Stuart by John Graham after the death of Kevin O’Neill. Prior to its installation at Musk Farm, it was “by the dam” at Marnarnie, O’Neill’s property at Mt Macedon. It became a much photographed focal point in the sunken garden at Musk Farm. The statue is a gift from the Rattle family to The Friends of Wombat Hill Botanic Gardens who intend to give it, in turn, to Hepburn Shire to be placed in the Botanic Gardens. Both the family and the Friends see it as a memorial to Stuart’s tireless work to raise funds for the Gardens and to raise the profile of the Gardens so that their considerable significance could be more broadly acknowledged. The CMP notes that statuary has been a feature of most botanic gardens (and a notable feature of the Ballarat Botanical Gardens) and James Lowe, the head of Parks for the Shire has also commented that it is an area that could well be developed in the Gardens. This comes from his attendance at meetings of the BGANZ, the “peak professional body” for the development and maintenance of registered botanic gardens in Aus and NZ. Given the lack of funds that the Shire has been able to allocate to the Gardens, a donation of this calibre is a welcome addition to the cultural asset that the Gardens represent. A very large number of residents of the Shire are members of the Friends, have visited Musk Farm and are appreciative of the Gardens. There is a current feeling that the Gardens are undergoing a dynamic revival as a result of the success of the Café and also because of the extraordinary improvement and enhancement of the amenity that has been undertaken over the past two years by the Friends. The installation of the Boy with the Thorn is another move forward for the Gardens. The statue is cast zinc. It is sometimes referred to a white bronze. As can be seen in the photographs, it is in very good condition with no damage or apparent degeneration of the metal. The Smithsonian Institution has a lengthy document relating to the deterioration and repair of similar casts in the US where urban pollution has taken its toll but for the most part it deals with inappropriate repair rather than maintenance protocols. One of the properties of zinc that is appreciated in Australia is its ability to withstand the elements and given that the artwork has been either on Mt Macedon or at Musk for the last 30 years or more, its relocation to Wombat Hill seems to be an appropriate one. The Friends are prepared to organise and pay for the relocation of the statue. The issue of security from the point of view of theft, malicious damage and environmental impact will need to be addressed. The Ballarat Botanical Gardens have recently reinstalled statuary which has been damaged and which had been removed from the Gardens on account of this. They have used Rockworks Ballarat and Wilson’s Memorials to make plinths, secure artworks with steel pins and to provide especially robust fixings to ensure the safety of the various sculptures. The CMP (2007) makes a number of recommendations regarding security in the Gardens ranging from the installation of lighting to the locking of the gates overnight and the repair/reinstatement of appropriate fencing – not done as yet to my knowledge. Paul Bangay has also agreed to act as a consultant in the process of installing the Boy. John Graham estimates its value at $20,000 The preferred location for the work would be at the entrance to the Fernery from the lawn. The paths form an intersection at that point that could be modified to fit the statue. But this is currently a suggested location only. The statue is a gift from the Rattle family to The Friends of Wombat Hill Botanic Gardens who have gifted it to the Hepburn Shire to be placed in the Botanic Gardens. Both the family and the Friends of the Wombat Hill Botanical Gardens Daylesford see it as a memorial to Stuart’s tireless work to raise funds for the Gardens and to raise the profile of the Gardens so that their considerable significance could be more broadly acknowledged. Lo Spinario (Boy with a thorn) c. 1900 copy after the Greco-Roman Hellenistic antique bronze in Rome. c. 1900 copy after the Greco-Roman Hellenistic antique bronze in Rome (Palazzo dei Conservatori, Musei Capitolini, Rome) Manufacturer M. Geiss, Berlin Nonedaylesford, wombat hill botanical gardens, stuart rattle, kevin o'neill, john graham, boy with a thorn, lo spinario, classical sculpture, zinc, classical nude, hepburn shire, public art, sculpture, art -
 Eltham District Historical Society Inc
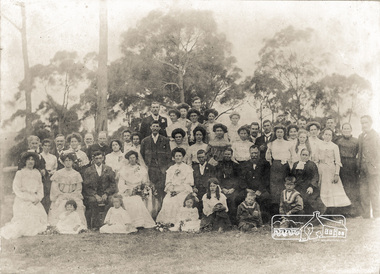
Photograph, Wedding of Sarah Ann Bird (b.1881) to Edward Ernest Pepper (b.1874) held at the Bird family home of "View Hill', Eltham, 1904
Sarah Bird 4th from left (seated) and Edward Pepper on her left (standing). George Bird, 2nd from right (seated). George Bird her great-grandfather and Sarah Bird and Edward Pepper, her grandparents. [from Evelyn Observer and Bourke East Record, morning edition, 18 November 1904, p. 3:] ORANGE BLOSSOM. The marriage of Miss Sarah A. Bird, eldest daughter of Mr George Bird, of "View Hill," Eltham, to Mr Ernest Edward Pepper, of Diamond Creek, was celebrated at the residence of the bride's parents on Wednesday, 9th November, 1904. The ceremony took place at 4 p.m. and was performed by the Rev Percey Knight, B.A., of Alphington. The bride entered the drawing room with her father who gave her away, and the Wedding March, was nicely played by Miss Wild. The bride was prettily dressed in creme voile nicely tucked and gathered, trimmed with guipure lace and silk ruching, sprays of orange blossom, wreath and veil, and she carried a shower bouquet. Her travelling dress was a very pretty blue. The brides-maids were Miss Ethel Barker dressed in pale green voile trimmed with creme guipure lace and silk ruching; and Miss Button in creme voile, guipure lace, silk ruching; both carried pretty bouquets. The groomsmen were Mr Lorimer, of Diamond Creek, and Mr George Bird, brother of the bride. Between forty and fifty relatives and friends partook of a bountifully provided and nicely laid out breakfast. The usual toasts were honored, and congratulations were freely tendered "to the happy couple". The decorations were very tastefully executed by Miss Beatrice Nelson, and Mr Sayers. The evening was very pleasantly spent in singing, recitations, games, and other suitable pastimes, while others "tipped the light fantastic toe". About 10 p.m., "while all was merry as a marriage bell", the bride and bridegroom departed secretly "to cheat surprise and prying eyes". The presents were numerous and handsome:– Parents of the bride, sewing machine; Miss A. Bird, silver breakfast cruet; Miss N. Bird, bread board and knife; Master A. Bird, pair glass dishes; Master R. Bird, pair photo frames; Mr Sayers, tea set; Miss Kidd, silver jam dish and spoon; Miss Wilkinson, carpet; Mr J. Kilpatrick, cheque; Mr W. Kilpatrick, clock; Miss Kilpatrick, silver butter knife; Mr J. H. Kilpatrick, hand painted mirror; Mrs Kerwin, pictures; Mrs Gilsenan, the handsome wedding cake; Mrs Nelson, Japanese occasional table; Misses Nelson, jugs and candlestick; Mrs Bunker, silver cruet stand; Miss Bunker, hand-painted vases; Miss E. Bunker, epergne; Mr E. Bunker, crumb tray and brush; Miss Jessie Gilsenan, cake stand; Mr Harold Gilsenan, auger basin and ornaments; Mr Lorimer, silver breakfast cruet; Mr A. Collins and Miss Jones, epergne; Miss Cassie Sweeney, jardiniere; Miss Ida and Ollie Cooper, silver butter dish; Miss Mills, large vases; Misses M. and F. Shillinglaw, handsome oak clock; Misses C. and E. Shillinglaw, pair large pictures; Mr Lucas and Miss Sutton, silver butter dish and knife, and silver jam dish and spoon; Miss M. and A. Short, teapot, cheese dish, and tumblers; Mr and Mrs J. Anderson, butter dish; Miss Williams, pen tray; Miss Griffiths, vases; Mr I. Hill, cheque; Miss Wild, biscuit barrel; Mr, Mrs and Miss Brown, trifle bowl and crystal jug; Mrs Weller, water jug and glasses; Mrs Hadfield, pair glass dishes and butter dish; Mr and Mrs Blackney, photo frames; Mr Wilson, beaded basket pin cushion; Mr Linsy, cheque; Mrs Linsy, fruit dish; Mrs Stebbing, pair candle sticks; Mrs Blanchard, pictures.Digital copy of framed sepia photographanderson, bird, blanchard, blackney, bunker, collins, cooper, edward ernest pepper, george bird, george bird jnr, gilsenan, griffiths, hadfield, hill, jones, kerwin, kidd, kilpatrick, linsy, mills, nelson, sarah ann bird, sayers, shillinglaw, short, stebbing, sutton, sweeney, view hill, wedding, weller, wild, wilkinson, williams, wilson, brown -
 Federation University Historical Collection
Books, H.E. Daw Government Printer, Ballarat School of Mines and Industries Departmental Papers, 1914-1950
Used at the Ballarat School of Mines and the Ballarat Technical Art SchoolThis collection of examinations is significant because of its completeness with the full range of examinations between 1914 and 1950.Large leather bound books, with leather spine, containing all examinations held at the Ballarat School of Mines (including the Ballarat Technical Art School and Ballarat Junior Technical School). The examination papers were supplied and printed by the Education Department, Victoria. Examinations include: Agriculture, Algebra, Architecture, Arithmetic, Applied Mechanics, Assaying, Biology, Botany, Boilermaking, Building Design, Blacksmithing, Bricklaying, Carpentry and Joinery, Coachbuilding, Cabinet Making, Civil Engineering, Cabinet Making, Commercial, Chemistry, Engineering Drawing, Economics, English, Electrical technology, Electricity and Magnetism, Electric Wiring, Electric Welding, Electrical Fitting, Electrical Trades, Food Analysis, Geology, Geological Mapping, Graphics, Geometry, Heat Engines, Heat Treatment, Hydraulics, Hand Railing, Instrument Making, Millinery, Milling and Gearouting, Machine Shop Practice. Metal Founding, Mining, Metallurgy, Mineralogy, Mathematics, Motor Mechanics, Mine Surveying, Mining Mechanics, Petrology, Physics, Painting and Decorating, Pattern Making, Plastering, Plumbing and Gasfitting, Printing, Refrigeration, Spelling, Science , Shorthand, Surveying. Signwriting. Sheet Metalwork, Toolmaking, Ladies Tailoring, Trigonometry, Typewriting, Welding, Commercial Geography. Millinery, Dressmaking, Needlework, Decorative Needlework, Architecture, Building Design and Construction, Art (Composition in Form and Colour), Art (Casting Clay MOdels) Art (Drapery), Art (Drawing the Human Figure From Casts), Art (Drawing the Antique from Memory), Art (Drawing from Memory); Art (Drawing Plant Forms from Nature, Art (Drawing Plant Forms From Memory), Art (Drawing from Models and Objects), (Drawing From a Flat Example). Art (Drawing in Light and Shade from a Cast of Ornament or Lower Nature), Art (Drawing Ornament from the Cast), Art (Drawing from Models or Objects), Art (Drawing fro Dressmakers' and Milliners' Fashions), Art (Drawing With the Brush), Art (Drawing from a Flat Example); Art (Modelled Design), Art (General Design), Art (Embossed Leatherwork), Art (Practical Plane Geometry), Art (Practical Solid Geometry), Art (Geometrical Drawing), Carpentry and Joinery, Art (Human Anatomy), Art (Historic Ornament), Art (House Decoration), Art (LEttering), Signwriting, Art (Light Metalwork), Art (Modelling), Art (Modelling the Human Figure from a Life), Art (Stencilling); Art (Wood Carving) Refrigeration, Teaching, Boilermaking, Blacksmithing, Carpentry and Joinery, Coachbuilding and Carriage Drafting, Electric Wiring, Electrical Fitting, Graining and Marbling, Instrument Making , Machine Shop Practice, Metal Founding, Milling and Gear Cutting, Motor Mechanics, Painting and Decorating, Sheet Metalwork, Toolmaking, Printing, Pattern Making, Plumbing and gasfitting, examinations, ballarat school of mines, ballarat technical art school, trades, education department victoria, agriculture, algebra, architecture, arithmetic, applied mechanics, assaying, biology, botany, boilermaking, building design, blacksmithing, bricklaying, carpentry and joinery, coachbuilding, cabinet making, civil engineering, commercial, chemistry, engineering drawing, economics, english, electrical technology, electricity and magnetism, electric wiring, electric welding, electrical fitting, electrical trades, food analysis, geology, geological mapping, graphics, geometry, heat engines, heat treatment, hydraulics, hand railing, instrument making, millinery, milling and gearouting, machine shop practice, metal founding, mining, metallurgy, mineralogy, mathematics, motor mechanics, mine surveying, mining mechanics, petrology, physics, painting and decorating, pattern making, plastering, plumbing and gasfitting, printing, refrigeration, spelling, science, shorthand, surveying, signwriting, sheet metalwork, toolmaking, ladies tailoring, trigonometry, typewriting, welding., dressmaking, needlework, decorative needlework, architecture, building design and construction, art (composition in form and colour), art (casting clay models), art (drapery), art (drawing the human figure from casts), art (drawing the antique from memory), art (drawing from memory), art (drawing plant forms from nature, art (drawing plant forms from memory), art (drawing from models and objects), (drawing from a flat example), art (drawing in light and shade from a cast of ornament or lower nature), art (drawing ornament from the cast), art (drawing from models or objects), art (drawing for dressmakers' and milliners' fashions), art (drawing with the brush), art (drawing from a flat example), art (modelled design), art (general design), art (embossed leatherwork), art (practical plane geometry), art (practical solid geometry), art (geometrical drawing), art (human anatomy), art (historic ornament), art (house decoration), art (lettering), art (light metalwork), art (modelling), art (modelling the human figure from a life, art (stencilling), art (wood carving), teaching, coachbuilding and carriage drafting, graining and marbling, milling and gear cutting, commercial geography, exams, examination book -
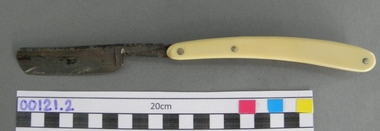 Upper Yarra Museum
Razor, Cut throat
Sharped Edged instrument used for cleaning hair from the skin. http://en.wikipedia.org/wiki/Straight_razor A straight razor is a razor with a blade that can fold into its handle.[1] They are also called open razors and cut-throat razors. HISTORY The first modern straight razor complete with decorated handles and hollow ground blades was constructed in Sheffield, England, by Benjamin Huntsman in 1740. Huntsman's process was adopted by the French sometime later. The English manufacturers were even more reluctant than the French to adopt the process and only did so after they saw its success in France.[5] Straight razors were the most common form of shaving before the 20th century and remained that common in many countries until the 1950s. TODAY Straight razors are still manufactured. DOVO, of Solingen, Germany, and Thiers Issard of France are two of the most well-known European manufacturers. Feather Safety Razor Co. Ltd. of Osaka, Japan makes a razor with the same form as a traditional straight, but featuring a disposable blade that can be installed through an injector-type system. Modern straight razor users are known to favor them for a variety of reasons. Some are attracted to the nostalgia of using old and traditional methods of shaving. It is a masculine ritual comparable to pipe smoking. Others profess an interest in reducing the waste of disposable blades.[11][22] Still others agree that straight razors provide a superior shave through a larger blade and greater control of the blade including the blade angle. Straight razors cover a much greater area per shaving stroke because their cutting edge is much longer than any of the multiblade razors. Ivory cut throat razor, with cream case 00121.3.Known as a straight razor.Razor with square point, full hollow ground 5/8” blade and double transverse stabiliser. The centre pin adds stability and rigidity to the handle---I think this is it ROM Parts The narrow end of the blade pivots on a pin, between 2 pieces of ivory forms the handle. LONG EXTRACT FROM WIKI _ SHORTEN to describe 00121 The parts of a straight razor and their function are described as follows: The narrow end of the blade rotates on a pin called the pivot, between two protective pieces called the scales or handle. The upward curved metal end of the narrow part of the blade beyond the pivot is called the tang and acts as a lever to help raise the blade from the handle. One or two fingers resting on the tang also help stabilize the blade while shaving. The narrow support piece between the tang and the main blade is called the shank, but this reference is often avoided because it can be confusing. The shank sometimes features decorations and the stamp of the country of origin. The top side and the underside of the shank can sometimes exhibit indentations known as fluting, or jimps for a more secure grip.[8] The curved lower part of the main blade from the shank to the cutting edge is called the shoulder.[9] The point where the shoulder joins the cutting edge is called the heel. A thick strip of metal running transversely at the junction where the main blade attaches to the shank is called the stabiliser. The stabiliser can be double,[10] single or can be absent in some razor models. The first stabiliser is usually very narrow and thicker and runs at the shank to blade junction, covering the shank and just spilling over to the shoulder. The second stabiliser can be distinguished since it is considerably wider and narrower, appearing after the first stabiliser and running lower into the shoulder. The non-cutting top of the blade is called the back or the spine while the cutting part of the blade opposite the back is called the cutting edge.[11] Finally the other free end of the blade, at the opposite end of the tang, is called the point and, sometimes, the head or the nose.[9][12] There are two to three pins in any handle. The middle pin, if present, is plastic coated and is called the plug.[13] Its function is to stabilise the sides of the handle so that they cannot be squeezed in the middle. When folded into the scales, the blade is protected from accidental damage, and the user is protected from accidental injury. During folding, the back of the blade, being thick and normally with a curved cross-section, acts as a natural stopper and prevents further rotation of the blade out of the handle from the other side shaving, lever, handle, blade, pivot, razor, tang -
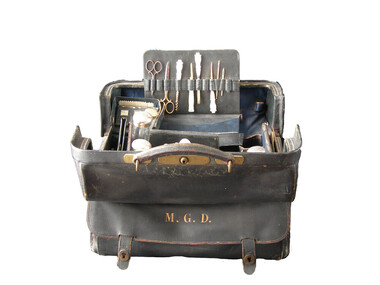 Warrnambool and District Historical Society Inc.
Domestic object - Dressing bag, Mary Glass Dickson, Circa1885
John Glass Cramond 1829 and James Dickson 1831-1910 were founders of a large drapery store. Both were Scots and both came separately to Australia in 1852. Cramond initially came for gold but soon opened a store in St Kilda with a post Office attached and he was the first post master there. Dickson was a farmer’s son but became a draper and while he was unsuccessful on the Bendigo diggings and then returned to Melbourne where he met Cramond and soon after they opened a store on Lonsdale Street. They opened their business in Warrnambool in 1855 as a general store with groceries, drapery and ironmongery. Both partners were involved with the community and James Dickson was an original director of the Warrnambool Woollen Mill 1909 and the Warrnambool Cheese and butter factory. He also served on the committee of management of Warrnambool Base Hospital. This case was a wedding gift from James Dickson Jnr to his wife Mary Glass Cramond on the occasion of their wedding. This item has significance on a number of levels. It belonged to a member of one of Warrnambool’s earliest pioneering families and it marks the occasion when the two families of Cramond and Dickson were linked through the marriage of James Dickson jnr and Mary Glass Cramond. The firm played a significant part in the development of the city and traded for nearly 150 years. It therefore has social significance to Warrnambool. The item is well provenance with the case initialed and items within the case monogrammed. The case and its items are aesthetically quite beautiful as well as being typical of travelling or dressing cases of the more well to do, of the time. Mappin & Webb were manufacturers of some standing with the Mappin name appearing in manufacturing as early as 1775.The company has held a royal warrant as silversmiths since 1897 to the present day and as crown jeweler since 2012. Throughout this time, they have manufactured quality items for the luxury market. It provides an insight into the way ladies travelled and the items which they considered essential. This consists of a black leather with leather handle attached with brass fittings. Middle opening with side pocket on one side with metal catches. Inside has removable sections for holding the numerous containers and items belonging to the case. Interior of the case is dark blue satin. The items contained within the case are as follows: 321.1 Luggage case 321.2 Glass bottle rectangular, silver monogrammed lid, empty. 321.3 Tall round glass bottle, silver monogrammed lid, empty. 321.4 Small glass bottle with pink powder, silver monogrammed lid. 321.5 Small multi sided bottle with stopper and brass hinged lid. 321.6 Tall round bottle with silver monogrammed lid. 321.7 Tall thin multi sided bottle with brass lid. 321.8 Cream coloured monogrammed jar cotton wool inside. 321.9 Clothes brush rectangular cream back. 321.10.1Glove stretcher bone coloured .10.2 Case black leather. 321.11.1 hair comb cream with silver edge .11.2 Case black leather 321.12 Hair brush cream handle 321.13Spatula cream monogrammed 321.14 Mirror, silver round with handle. 321.15 Writing compendium .1 Case black leather .2 Pen with nib .3 Lead pencil .4 Navy satin covered blotting book 321.16 Inkwell glass bottle in small black leather case. 321.17 Match striker in leather case. 321.18 Mirror in black leather case rectangular 321.19 Small case for visiting cards. 321.20Sewing kit rectangular, contains threads and needles pkts x 3 321.21Container, small, hinged tortoise shell patterned. 321.22.1 Manicure set .2 Scissors small .3 Scissors large .4Corkscrew with Mother of pearl handle .5 Pocket knife with Mother of pearl handle .6Tweezers with Mother of pearl handle .7 File with Mother of pearl handle .8 Fine hook Mother of pearl handle .9 Bodkin .10 Bodkin 321.23 Hairbrush oval silver backed 321.24 Mirror silver handled hand mirror. 321.25 Hairbrush wooden handled with Mother of pearl inlay. 321.26 Cylinder, silver with removable lid and small phial of iodine labelled Felton’s pocket iodine. 321.27 Phial small glass with gold decorations. 321.28 Inhaler with insert 321.29 Thimble, metal. 321.30 Silver backed hair brush 321.31 silver backed clothes brushEngraved on side pocket: M.G.D. Mappin and Webb Sheffield and London. Some of the items are monogrammed as per the list above. A number of the glass bottles have lids hallmarked Mappin & Webb London and Sheffield makers stamped inside lid with hall marks history of warrnambool, cramond and dickson, mary glass cramond, dressing bag, woman's toiletry bag 1880 -
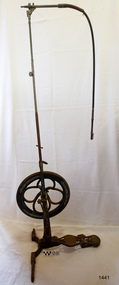 Flagstaff Hill Maritime Museum and Village
Equipment - Dentist Drill, Late 19th century
The design of this and other similar treadle powered dental engine (or dentist drill) was in common use by dentists from the 1870’s into the 1920's. When electricity became accessible to most communities the electrically powered dental engines began to take over from the treadle power. Over the ages teeth were extracted using picks and scissors and other gouging instruments. Bow drills, hand drills and even a "bur thimble" drill were later used to prepare cavities for filling. Some drills were made bendable by attaching flexible shanks between the metal bur and the handle, giving access to the teeth at the back of the mouth. Other mechanical devices were introduced along the way, such as clockwork drills, but they were hard to handle and inefficient. Over the centuries “dentistry has been performed by priests, monks and other healers. This was followed by barbers; the barber’s chair may well have been the precursor to the dental chair. “(SA Medical Heritage Society Inc.) In 1871 James Morrison patented the first commercially manufactured 'foot treadle dental engine', the first practica dental engine although others had been introduced as early as 1790 (by John Greenwood). Handmade steel burs or drills were introduced for dental handpieces, taking advantage of the significant increase in the speed of the drill. In 1891 the first machine-made steel burs were in use. The treadle drill reduced the time to prepare a cavity from hours to less than ten minutes. In 1876 the Samuel S. White Catalogue of Dentist Instruments listed a 12 ½ inch wheel diameter dental engine, with 14 bright steel parts, for sale at US $55 In today’s market, this is the equivalent to US $1200 approx. The specifications of that dental engine are very similar to the this one in our Flagstaff Hill Maritime Village’s collection. It is interesting to note that workings of a similar treadle dentist drill were used and modified to power a treadle spinning wheel of one of the volunteer spinners at Flagstaff Hill Maritime Village. The foot treadle dental engine was a milestone in dental history. “Historic importance of treadle powered machines; they made use of human power in an optimal way” (Lowtech Magazine “Short history of early pedal powered machines”) The invention of a machine to speed up the process of excavation of a tooth lead to the invention of new burs and drills for the handpieces, improving speed and the surgical process of dentistry. They were the fore-runner of today’s electrically powered dental engines. This treadle-powered dentist drill, or dentist engine, is made of iron and steel and provides power for a mechanical dental hand-piece that would be fitted with a dental tool. The drill has a three footed cast iron base, one foot being longer than the other two. A vertical C shaped frame is joined into the centre of the base, holding an axle that has a driving-wheel (or flywheel) and connecting to a crank. A slender, shoulder height post, made from telescoping pipes, joins into the top of this frame and is height adjusted by a hand tightened screw with a round knob. On the post just above the frame is a short metal, horizontal bar (to hold the hand-piece when it is not in use). A narrow tubular arm is attached to the top of the stand at a right angle and can move up and down. At the end of the arm is a firmly fixed, flexible rubber hose protected for a short distance by a sheath of thin metal. At the end of the hose there is a fitting where the drill’s hand-piece would be attached; a small, silver coloured alligator clip is also at the end. A treadle, or foot pedal, is hinged to the heel to the long foot of the base, and joined at the toe to the crank that turns the driving-wheel. There is a spring under the toe of the treadle. The metal driving-wheel has a wide rim. Touching the inside of the rim are four tubular rings that bulge towards the outside of the driving-wheel, away from the pole, and all meet at the hub of the axle. The axle is bulbous between the inside of the driving-wheel and the frame then passes through the frame and is attached on the other side. The driving-wheel has a groove around which a belt would sit. The belt would also fit around a pulley on the arm, at the top of the post. The pulley is joined to a rod inside the arm and this spins the drill's hand-piece and dental tool holder. The two shorter feet of the base are made from a long metal bar that has been curved outwards, and its centre is bolted to the base of the pole. Under the ends of the curved legs of the base are wedge shaped feet. The driving-wheel is decorated in light coloured paint on both sides, each side having three sets of floral decals evenly spaced around them, and each about a sixth of the wheel's circumference. Similar decoration is along the sides of the frame. The foot pedal has decorative cutout patterns in the centre of the foot and at the toe. On the long foot of the stand is some lettering with a fine, light coloured border around it. The lettering is hard to read, being a dark colour and flaking off. There are also remnants of fine, light coloured flourishes. The foot pedal has lettering of the maker’s trade mark cast into the metal at the ball of the foot. Lettering on the base is peeling and difficult to read. The foot pedal has a trade mark cast into it that looks like a combination of ‘C’ , ‘S’ , ‘A’, ‘R’. flagstaff hill, warrnambool, shipwrecked coast, flagstaff hill maritime museum, maritime museum, shipwreck coast, flagstaff hill maritime village, great ocean road, dentist, teeth, dental drill, dental engine, treadle drill, foot powered drill, treadle engine, orthodontics, dental surgery, james morrison -
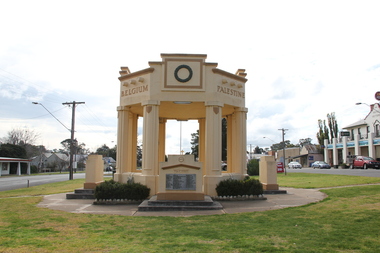 Ballarat Heritage Services
Photograph - Photograph - Colour, L.J. Gervasoni, Avoca War Memorial, 2011, 06/08/2011
The monument commemorates those from Avoca who have served in the various conflicts in which Australia has been involved. It was dedicated on18 November 1921. The memorial was later rededicated in 1988 to also remember those who served in the Second World War. During the First World War, 137 men from the Avoca area volunteered for the armed services and of this number 29 were killed. A plaque, unveiled in 1984, commemorates Sergeant Lewis McGee V.C who enlisted from Avoca in World War One. Colour photograph of the Avoca World War One. The Memorial is an octagonal building of rendered brick supported on eight columns with rounded engaged columns on the central section of each. At the top of the rounded section is a shield decoration. World War One Fallen Auls A. Beavis J. Beer C. Brown J.A. Brown J.N. Burns W. Dobley L. Driver W.H. Evans C.G.H. Fish W. Harrowfield N. Henderson J.H. Henry C.A. Howell T.P. Kiehl A. Lambert S. Lansdell H. Livingstone J. McArdle J.E.F. McDowell W.R. Oppy W. Rowlands W. Rowlands H. Smith S.W. Summers D.L. Templeton C. Turpin H. Willmott C. Wrigley F. Yates L.R. World War One Honour Roll Anderson N.W. Armstrong H.M. Barry R.E. Beavis JOHN. Blain J. Bowen L. Bradley H.J. Brazil F. Brereton W.C. Brereton C. Brown H. Burke J.F. Burke P. Burnett W. Cain H.C. Calnan C. Chandler R.W. Chandler H. Chaplan W. Coates E. Cross F. Cross C. Crute A.T. Cullip C. Daly J. Derrick E.A. Diamond C.P. Doodt D. Doodt C. Douglas J.O. Ebeling C. Elliot T. Elliot N. Elliot W.N. Ford H. Fraser D.C. French W. French W.H. French C. Garner J. Gee J. Gee F.R. Gibson C.A. Golder A. Golder F. Gollop H. Gouce W. Greenwood H. Greenwood W. Harbour H.J.H. Harris N. Harrow R. Harrowfield B. Hellings D. Henderson C. Henderson J.J. Henderson T.A. Hilderbrand W. Holland H.S. Hughes W. Jardine J.W. Jardine W.E. Jardine J.A. Johnson G. Johnson W. Johnson REG. Johns Kitchen G.R. Laidlow R.T. Larkins James. Leyden J.M. Leyden P.J. Lindsay F. Lyons P.L. McEwan F. McVicar F.C. McVicar A.A. Mitchell T.T. Moodie A. Nicholson E. Porter A.B. Randall W. Redpath S. Reeves H. Reid E. Resuggan A. Robinson R.W. Samers V. Scott R.V. Sims H.L. Stavely W. Torney S. Williams H. Willmott H. Wilmott D. Wilson B.C. Wilson A. Wiltshire C. Witherden T. Witherden D. Yates J.O. Young F. Johnson F. Kitchell P. Kitchen A.L.avoca, avoca war memorial -
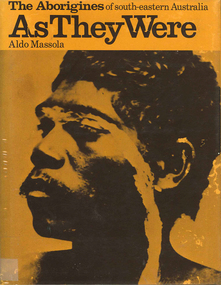 Victorian Aboriginal Corporation for Languages
Book, Aldo Massola, The Aborigines of south-eastern Australia : as they were, 1971
Contents: p.1-3; Origins, arrival in Australia; p.4-9; How they lived - camp sites, dating (including carbon dating); p.10-27; Physical appearance, skin colour, hair, clothing, body ornaments, cicatrization; exchange system, distribution of food, marriage &? sexual relations; the tribe - structure, relationship to land, territory, gives map showing locations of tribes, New South Wales, Victoria &? eastern South Australia, leadership, government, division of labour, status of women, estimated population at white settlement, density of population (Victoria); p.28-31; Language - names &? naming, reproduces Wembawemba vocabulary, notes use of secret languages, gives 12 rules for pronounciation; p.32-53; Religion, spirit beliefs, totemism, moieties, phratries, marriage rules; mythology, gives eaglehawk &? crow myth from Lake Victoria &? other myths illustrating origins of fire &? natural rock formations, mythical beasts (Bunyip, Mindie), stellar beliefs; magic, medicine men, powers, native remedies for sickness, describes ceremony held in Melbourne, 1847 to avert evil, sorcery, pointing bone, love magic, rain makers; messengers, appearance, etiquette, message sticks; p.54-71; Rock art, motifs, colours, decorative art, engraving of utensils, rock engravings, manufacture &? use of pigments, engraving techniques; trade system, objects bartered, meeting places for trade (Victoria), map shows possible routes (south east Australia); corroborees, purpose, body ornaments &? decorations, musical instruments; p.72-93; Ceremonial life, marriage, punishment for infidelity, birth, childhood, games &? amusements, initiation, etiquette of visiting tribes, details of ceremony, womens role, earth figures &? ground designs, bull roarers, female puberty ceremonies; p.94-133; Shelters, fire making, cooking, construction of canoes, wooden implements, use of reeds, animal skins &? sinews, shells; stone tools, cylindro conical stones, scrapers, knives &? microliths; hunting weapons, spear, other methods pits, nets; fishing methods &? spears, traps; food sharing, womens responsibilities for collecting, digging stick, cooking methods, insect foods, plant foods, water resources; manufacture &? use of spears, spear throwers, shields, clubs, boomerangs; inter- &? intratribal fighting; p.134-147; Death, disposal of body - eating of the dead, burial, cremation, platform exposure, dendroglyphs (N.S.W.), Aboriginal burial grounds (Darling &? Murray Rivers), mourning, widowhood, kopi caps (N.S.W.), causes of death, inquest ceremonies, revenge expedition, after death beliefs; p.148-157; The end of the tribes white settlement &? its impact on Aboriginal life, friction between natives &? settlers, establishment of Protectorates; copiously illustrated throughout.maps, b&w illustrations, b&w photographswemba wemba, murray river, darling river, lake victoria -
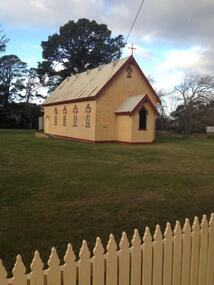 Ballarat and District Irish Association
Photograph - digital, Shane Dunne, St Patrick's, Elaine, 2013
St Patrick's Catholic Church Elaine closed in 2013. Originally known as "Stony Rises" Elaine could once claim the largest Catholic church congregation in the Meredith parish, due to the extensive mining activity in the area. At the time the population of the district supported three hotels and 4 churches and the town was served by a water supply from a reservoir at Lal Lal. Elaine in common with other rural communities has lost many of the services that were once available, but it still retains a well maintained Catholic church and Public Hall as well as a Hotel, Post Office, General Store and Service Station. (http://www.parishofmeredith.org.au/elaine_h.html, accessed 04/03/2014) The St Patrick‘s Church at Elaine was opened on Sunday 28th, November, 1909 and a report appeared in the Advocate on December 4th, 1909. "On Sunday last the Very Rev.Dean Phelan, V.G., blessed a new church at Elaine, in the parish of Meredith. The church, which was built by a local firm, Messrs. Smith Bros, is a weather-board building on brick foundations, and gives a clear seating accommodation of 50 feet by 25 feet, independent of sanctuary, sacristy, and porch. After the ceremony, which commenced at 11 o‘clock, the pastor of the parish, Rev.M.Murphy, celebrated Mass, and the choir from St.Joseph‘s, Meredith, sang in a highly creditable manner portions of Weber‘s Mass, also a hymn to St.Patrick, under whose patronage the church is placed. The financial statement made by Fr.Murphy showed that the entire cost of the building, alter, seats, etc, was $1103.10; that $620 had been subscribed previous to the opening, and over $140 received on Sunday, including $20 from his Grace the Archbishop, and $10 each from the Dean and Fr.Murphy. After Communion the Very Rev.Dean Phelan preached on the necessity of a church as a dwelling place for God in His Eucharist Presence. Taking for his text, “Behold the tabernacle of God with men: He shall dwell with them, and they shall be His people; and He Himself with them shall be their God.” In doing this work, I am pleased to learn that you have not only received material assistance from some who do not kneel at this altar, but that the authorities of the Presbyterian Church have given you their organ for the Mass today. This generous action deserves our special thanks and is in striking contrast with the anti-Catholic prejudice shown in other quarters. It reminds me of the action of Hiram, King of Tyre, when he heard that Solomon was about to build a house to the God of Israel. Not only did he offer cedar-trees from Libanus, but skilled men to carve the wood, and sent his trained sailors to assist in bringing from the mines of Ophir four hundred and twenty talents of gold for internal decoration. May that spirit of Christian charity ever dwell in your midst! (http://www.parishofmeredith.org.au/elaine_h.html, accessed 04/03/2014) The stained glass window of St Patrick was consecrated in 1928. According to The Geelong Advertiser on 25 July 1928: One of the largest congregations that has ever been in St.Patrick‘s Church attended on Sunday last, the occasion being the consecration of a memorial window to the memory of James Connell, who died in his 25th year in February last. Deceased was the youngest son of Mr. and Mrs. John Connell, respected residents of Elaine. He was loved and respected by all sections of the community, and was closely connected with all sporting bodies. Friends of the deceased and the family were present from Ararat, Stawell, Ballarat, Melbourne, Geelong and all the surrounding districts, also members of other denominations. A few noticed were Cr.C.C.Austin, Mr.H.Young, Mrs.A.Bowers, Mrs.Gray, Mr.and Mrs.R.Norgate and others. The stained window was made by Brookes Robinson in Melbourne, bearing the image of St.Patrick and the inscription thereon “To the undying memory of James Connell, who died 3.2.28 R.I.P.” The beautiful window was kindly placed in position by Mr.Bill Smith, Meredith. High Mass with full ceremonies was offered by Rev.Fr.F.Conlon,P.P., Meredith, with six alter attendants from St.Josephs School, Meredith. The Meredith choir, with Mrs.R.Grant organist, assisted by Miss K.Johnson (violin) rendered beautiful music, the principal parts of the singing being capably handled by Mrs.Thos Brady, Father Conlon took as his text, “Blessed are the dead who die in the Lord. From henceforth now, said the spirit, that they may rest from their labors, for their works follow them.” With well chosen remarks Fr.Conlon touched feelingly on the many qualities of the late member. First as a good son; secondly as a good citizen and sportsman; thirdly as a good child of the church. The choir conducted an impressive ceremony with “Nearer my God to Thee.” (http://www.parishofmeredith.org.au/elaine_h.html, accessed 04/03/2014) Five colour photographs of St Patrick's Elaineelaine, st patrick, st patrick's elaine, . catholic, stained glass, james connell, james joseph connell -
 Red Cliffs Military Museum
Discharge Paper WW1, Copy of WW1 Discharge Paper in cover, (estimated); 1921
This is a part of the A.J. Roddy Collection. The Family have glued a piece on the envelope which says, "Dad's Discharge Paper/ Royal Irish Rifles & Royal Flying Corps./ 7-1-1915 to Dec 1921. Copy a the Discharge paper of Pte2 James Roddy, Royal Irish Rifles & Royal Flying Corps RAF 7-1-1915 to Dec 1921 and CoverCover: Cover for Certificates/ and other Documents of a/ soldier on Demobilization or Transfer to the Reseve/ or Discharge.// Front of Paper: Top right: Form 2067/ Royal Air Force/ Serial No/ Character Certificate of No 133458/ Rank Pte2 Name Roddy James/ Royal Flying Corp (Regiment (crossed out))/ Born in the Parish of / near the Town of South in the / County of ......... on the / Date 11.7.1897/ Trade as stated by him on Enlistment Postman/ 2 parallel lines/ * Description on Leaving the Colours/ Heoght 5ft 6in. Identification Marks:-/ Complexion Fresh Scar above 1st Lumbar/ Eyes Grey. Vertibrae/ Hair Brown/ Signature of Soldier/ (was signed J. Roddy/ * To prevent impersonation/ In the event of any doubt arising as to the bona fidis of the/ bearer, the above description and signature should be carefully compared with present appearance and hand writing. (16:957) WT 3183C/1875 5m.17/18. P&P Ltd/ Photostat copy of Original Opening the paper inside: The character here given is based on continous records of the holder's conduct and / employment throughout his Military Career./ This is to Certify that No 133458 Rank Pte2 Name Roddy James/ has served with the colours in the Royal Irish Rifles & Royal Flying Corps for 3 83/365 years. 1915-18/ Serving in the Royal Flying Corps as a Batman, and during/ the whole of this period carrying out his duites in a/ satisfactory manner/ There is no record of him having incurred any service/ entries on his conduct sheet during this period./ for service in the R.A.F. see form 280/ Signature ..... Squadron Leader/ Date December 1921 Commanding R.A.F. Records Ruislip/ If further particulars as to his character and record of service are required within three years of above date, apply to/ where he is registered for Civil Employment,/ afterwards to the Officer in Charge of Records./ * This space is intended to be filled in by any organisation which has registered the man's name and is prepared to/ supply further information.// Back of paper: Particulars of Service/ Date of Enlistement 7.1.15/ Preceeded on Furlough pending Transfer to the Army/ Reserve, or Discharge on... passed medically fit for the Army Reserve on/ Due for Final Discharge on../ Cause of Transfer or Discharge - Transferred to R.A.F. 1-4-18. under the provisions of the/ Air Force (Constitution) Act Oct. 1917./ Campaigns, Medals and Decorations/ France from 15.6.15 to 3.12.16/ 1914-15 Star, British War & Victory/ Medals. /Education and other Certificates and dates/corps, ww1, collection, royal, a j, roddy, flying, irish, rifles, pte2, james, 1915 -
 Flagstaff Hill Maritime Museum and Village
Domestic object - Plate
The Process of Making Pottery Decorating, Firing, Glazing, Making, Technical There is a rhythm and flow to clay. It can’t be done all at once! Even the making process! It can take weeks to get everything done, especially if you can only work on your pottery once a week! Even though we have three hour classes, it’s often just not enough time! Here is an overview of some of the processes so you have a bit more grasp on some of the technical stuff! Step One – Design There are SO many ideas out there for making stuff in clay! From delicate porcelain jewellery, through to heavy sculptural work and everything in between. Deciding your direction is sometimes not that easy – when you first start, try everything, you will naturally gravitate to the style that you enjoy! The options and variations are endless and can get a wee bit overwhelming too! Check in with me before you start to ensure your ideas will work, what order you might do things, how you could achieve the look you are seeking and any other technical data required! Step Two – Making Clay is thixotropic. This means that as you work with it, the clay first gets sloppier and wetter, before is begins to dry in the atmosphere. For most things, you simply can’t do all parts of the project at once. An example of work order might look like: Get last weeks work out from the shelves Prepare clay for today’s work – roll your clay, prepare balls for throwing, make the first stage of a pinch pot) Clean up last week’s work and put it on the shelf for bisque firing Check that you have any glazing to do – and do enough of it that you will have time to finish your main project Do the next step of your next project – there might be a further step that can’t be complete immediately, in that case, wrap your work well and put onto the shelves. Letting your work rest for a while can really help keep your work clean and professional looking. Many things require bagging under plastic to keep it ready for work the next week – put your name on the outside of the bag so you can find your work easily. We have stickers and markers. Consider how you want to decorate your work – coloured slip can be applied at a fairly wet stage (remembering that it will make your work even wetter!). Trying to apply slip to dry clay won’t work! If you want to do sgraffito – you will need to keep the work leather hard (a state of dryness where you can still work the clay with a little effort and a little water and care). Step Three – Drying Most of the time your work can go into the rack uncovered to let it dry out for the following week. If you want to continue forming or shaping you will need to double bag your work – put your work on a suitable sized bat and put the bat in a bag so the base of the bag is under the bat, then put another bag over the top of the work and tuck the top of the bag under the bat. If you want to trim (or turn) your thrown work the following week, it should also be double bagged. If your work is large, delicate, or of uneven thicknesses, you should lightly cover your work for drying. When considering the drying process, bare in mind the weather, humidity and wind! The hotter and dryer, the faster things dry and work can dry unevenly in the shelves – this can lead to cracking – another time to lightly cover your work for drying. Step Four – Trimming and Cleaning Up Your work is dry! It is called greenware now and it is at it’s most fragile! Handle everything with two hands. I often refer to soft hands – keep everything gentle and with your fingers spread as much as possible. Try to not pick up things like plates too much, and always with both hands! Before your work can be bisque fired it should be “cleaned up”. You work won’t go into the kiln if it has sharp edges – when glazed, sharp edges turn into razor blades! Use a piece of fly wire to rub the work all over – this will scratch a little so be light handed. Use a knife or metal kidney to scrape any areas that require a bit more dynamic treatment than the fly wire offers! Finally, a very light wipe over with a slightly damp sponge can help soften and soothe all of your edges and dags! Trimming thrown work: If you are planning to trim (or turn) your thrown work (and you should be), make sure you bag it well – your work should be leather hard to almost dry for easiest trimming. Use this step to finish the work completely – use a metal kidney to polish the surface, or a slightly damp sponge to give a freshly thrown look. Wipe the sponge around the rim after trimming, and check the inside of the pot for dags! Trimming slip cast work: Usually I will trim the rims of your work on the wheel the following day to make that stage easier, however you will still need to check your work for lumps and bumps. Last but not least – check that your name is still clearly on the bottom of your work. Step Five – Bisque Firing When the work is completely dry it can go into the bisque kiln. The bisque kiln is fired to 1000°C. This process burns off the water in the clay as well as some of the chemically bound water. The structure of the clay is not altered that much at this temperature. Inside the bisque kiln, the work is stacked a little, small bowl inside a larger bowl and onto a heavy plate. Smaller items like decorations or drink coasters might get stacked several high. Consideration is paid to the weight of the stack and shape of the work. A bisque kiln can fire about one and a half times the amount of work that the glaze kiln can fire. The firing takes about 10 hours to complete the cycle and about two days to cool down. Once it has been emptied the work is placed in the glaze room ready for you to decorate! Step Six – Glazing Decorating your work with colour can be a lot of fun – and time consuming! There are three main options for surface treatment at this stage: Oxide Washes Underglazes Glazes Washes and underglazes do not “glaze” the work – It will still need a layer of glaze to fully seal the clay (washes don’t need glaze on surfaces not designed for food or liquid as they can gloss up a little on their own). Underglazes are stable colourants that turn out pretty much how they look in the jar. They can be mixed with each other to form other colours and can be used like water colours to paint onto your work. Mostly they should have a clear glaze on top to seal them. Oxides are a different species – the pink oxide (cobalt) wash turns out bright blue for instance. They don’t always need a glaze on top, and some glazes can change the colour of the wash! The glazes need no other “glaze” on top! Be careful of unknown glaze interactions – you can put any combination of glaze in a bowl or on a plate, but only a single glaze on the outside of any vertical surface! Glazes are a chemical reaction under heat. We don’t know the exact chemicals in the Mayco glazes we use. I can guess by the way they interact with each other, however, on the whole, you need to test every idea you have, and not run the test on a vertical surface! Simply put, glaze is a layer of glass like substance that bonds with the clay underneath. Clay is made of silica, alumina and water. Glaze is made of mostly silica. Silica has a melting point of 1700°C and we fire to 1240°C. The silica requires a “flux” to help it melt at the lower temperature. Fluxes can be all sorts of chemicals – a common one is calcium – calcium has a melting point of 2500°C, however, together they both melt at a much lower temperature! Colourants are metal oxides like cobalt (blue), chrome (green through black), copper (green, blue, even red!), manganese (black, purple and pink) iron (red brown), etc. Different chemicals in the glaze can have dramatic effects. for example, barium carbonate (which we don’t use) turns manganese bright pink! Other elements can turn manganese dioxide brown, blue, purple and reddish brown. Manganese dioxide is a flux in and of itself as well. So, glazes that get their black and purple colours, often interact with other glazes and RUN! Our mirror black is a good example – it mixes really well with many glazes because it fluxes them – causes them to melt faster. It will also bring out many beautiful colours in the glazes because it’s black colouring most definitely comes from manganese dioxide! Glaze chemistry is a whole subject on it’s own! We use commercial Mayco glazes on purpose – for their huge range of colour possibilities, stability, cool interactions, artistic freedom with the ability to easily brush the glazes on and ease of use. We currently have almost 50 glazes on hand! A major project is to test the interactions of all glazes with each other. That is 2,500 test tiles!!!! I’m going to make the wall behind the wheels the feature wall of pretty colours! Step Seven – Glaze (Gloss or sometimes called “Glost”) Firing Most of the time this is the final stage of making your creation (but not always!) The glaze kiln goes to 1240°C. This is called cone 6, or midrange. It is the low end of stoneware temperatures. Stoneware clays and glazes are typically fired at cone 8 – 10, that is 1260 – 1290°C. The energy requirement to go from 1240°C to 1280°C is almost a 30% more! Our clay is formulated to vitrify (mature, turn “glass-like”) at 1240°, as are our glazes. A glaze kiln take around 12 hours to reach temperature and two to three days to cool down. Sometimes a third firing process is required – this is for decoration that is added to work after the glaze firing. For example – adding precious metals and lustres. this firing temperature is usually around 600 – 800°C depending upon the techniques being used. There are many students interested in gold and silver trims – we will be doing this third type of firing soon! After firing your work will be in the student finished work shelves. Remember to pay for it before you head out the door! There is a small extra charge for using porcelain clay (it’s more than twice the price of regular clay), and for any third firing process! Once your work has been fired it can not turn back into clay for millennia – so don’t fire it if you don’t like it! Put it in the bucket for recycling. https://firebirdstudios.com.au/the-process-of-making-pottery/Ceramics have evolved over thousands of years.White earthenware dinner plate. Crazing evident all over.Backstamped ‘Made in England S LTD’flagstaff hill, warrnambool, shipwrecked-coast, flagstaff-hill, flagstaff-hill-maritime-museum, maritime-museum, shipwreck-coast, flagstaff-hill-maritime-village, ceramics, tableware -
 Flagstaff Hill Maritime Museum and Village
Domestic object - Plate, Johnson Bros
The Process of Making Pottery Decorating, Firing, Glazing, Making, Technical There is a rhythm and flow to clay. It can’t be done all at once! Even the making process! It can take weeks to get everything done, especially if you can only work on your pottery once a week! Even though we have three hour classes, it’s often just not enough time! Here is an overview of some of the processes so you have a bit more grasp on some of the technical stuff! Step One – Design There are SO many ideas out there for making stuff in clay! From delicate porcelain jewellery, through to heavy sculptural work and everything in between. Deciding your direction is sometimes not that easy – when you first start, try everything, you will naturally gravitate to the style that you enjoy! The options and variations are endless and can get a wee bit overwhelming too! Check in with me before you start to ensure your ideas will work, what order you might do things, how you could achieve the look you are seeking and any other technical data required! Step Two – Making Clay is thixotropic. This means that as you work with it, the clay first gets sloppier and wetter, before is begins to dry in the atmosphere. For most things, you simply can’t do all parts of the project at once. An example of work order might look like: Get last weeks work out from the shelves Prepare clay for today’s work – roll your clay, prepare balls for throwing, make the first stage of a pinch pot) Clean up last week’s work and put it on the shelf for bisque firing Check that you have any glazing to do – and do enough of it that you will have time to finish your main project Do the next step of your next project – there might be a further step that can’t be complete immediately, in that case, wrap your work well and put onto the shelves. Letting your work rest for a while can really help keep your work clean and professional looking. Many things require bagging under plastic to keep it ready for work the next week – put your name on the outside of the bag so you can find your work easily. We have stickers and markers. Consider how you want to decorate your work – coloured slip can be applied at a fairly wet stage (remembering that it will make your work even wetter!). Trying to apply slip to dry clay won’t work! If you want to do sgraffito – you will need to keep the work leather hard (a state of dryness where you can still work the clay with a little effort and a little water and care). Step Three – Drying Most of the time your work can go into the rack uncovered to let it dry out for the following week. If you want to continue forming or shaping you will need to double bag your work – put your work on a suitable sized bat and put the bat in a bag so the base of the bag is under the bat, then put another bag over the top of the work and tuck the top of the bag under the bat. If you want to trim (or turn) your thrown work the following week, it should also be double bagged. If your work is large, delicate, or of uneven thicknesses, you should lightly cover your work for drying. When considering the drying process, bare in mind the weather, humidity and wind! The hotter and dryer, the faster things dry and work can dry unevenly in the shelves – this can lead to cracking – another time to lightly cover your work for drying. Step Four – Trimming and Cleaning Up Your work is dry! It is called greenware now and it is at it’s most fragile! Handle everything with two hands. I often refer to soft hands – keep everything gentle and with your fingers spread as much as possible. Try to not pick up things like plates too much, and always with both hands! Before your work can be bisque fired it should be “cleaned up”. You work won’t go into the kiln if it has sharp edges – when glazed, sharp edges turn into razor blades! Use a piece of fly wire to rub the work all over – this will scratch a little so be light handed. Use a knife or metal kidney to scrape any areas that require a bit more dynamic treatment than the fly wire offers! Finally, a very light wipe over with a slightly damp sponge can help soften and soothe all of your edges and dags! Trimming thrown work: If you are planning to trim (or turn) your thrown work (and you should be), make sure you bag it well – your work should be leather hard to almost dry for easiest trimming. Use this step to finish the work completely – use a metal kidney to polish the surface, or a slightly damp sponge to give a freshly thrown look. Wipe the sponge around the rim after trimming, and check the inside of the pot for dags! Trimming slip cast work: Usually I will trim the rims of your work on the wheel the following day to make that stage easier, however you will still need to check your work for lumps and bumps. Last but not least – check that your name is still clearly on the bottom of your work. Step Five – Bisque Firing When the work is completely dry it can go into the bisque kiln. The bisque kiln is fired to 1000°C. This process burns off the water in the clay as well as some of the chemically bound water. The structure of the clay is not altered that much at this temperature. Inside the bisque kiln, the work is stacked a little, small bowl inside a larger bowl and onto a heavy plate. Smaller items like decorations or drink coasters might get stacked several high. Consideration is paid to the weight of the stack and shape of the work. A bisque kiln can fire about one and a half times the amount of work that the glaze kiln can fire. The firing takes about 10 hours to complete the cycle and about two days to cool down. Once it has been emptied the work is placed in the glaze room ready for you to decorate! Step Six – Glazing Decorating your work with colour can be a lot of fun – and time consuming! There are three main options for surface treatment at this stage: Oxide Washes Underglazes Glazes Washes and underglazes do not “glaze” the work – It will still need a layer of glaze to fully seal the clay (washes don’t need glaze on surfaces not designed for food or liquid as they can gloss up a little on their own). Underglazes are stable colourants that turn out pretty much how they look in the jar. They can be mixed with each other to form other colours and can be used like water colours to paint onto your work. Mostly they should have a clear glaze on top to seal them. Oxides are a different species – the pink oxide (cobalt) wash turns out bright blue for instance. They don’t always need a glaze on top, and some glazes can change the colour of the wash! The glazes need no other “glaze” on top! Be careful of unknown glaze interactions – you can put any combination of glaze in a bowl or on a plate, but only a single glaze on the outside of any vertical surface! Glazes are a chemical reaction under heat. We don’t know the exact chemicals in the Mayco glazes we use. I can guess by the way they interact with each other, however, on the whole, you need to test every idea you have, and not run the test on a vertical surface! Simply put, glaze is a layer of glass like substance that bonds with the clay underneath. Clay is made of silica, alumina and water. Glaze is made of mostly silica. Silica has a melting point of 1700°C and we fire to 1240°C. The silica requires a “flux” to help it melt at the lower temperature. Fluxes can be all sorts of chemicals – a common one is calcium – calcium has a melting point of 2500°C, however, together they both melt at a much lower temperature! Colourants are metal oxides like cobalt (blue), chrome (green through black), copper (green, blue, even red!), manganese (black, purple and pink) iron (red brown), etc. Different chemicals in the glaze can have dramatic effects. for example, barium carbonate (which we don’t use) turns manganese bright pink! Other elements can turn manganese dioxide brown, blue, purple and reddish brown. Manganese dioxide is a flux in and of itself as well. So, glazes that get their black and purple colours, often interact with other glazes and RUN! Our mirror black is a good example – it mixes really well with many glazes because it fluxes them – causes them to melt faster. It will also bring out many beautiful colours in the glazes because it’s black colouring most definitely comes from manganese dioxide! Glaze chemistry is a whole subject on it’s own! We use commercial Mayco glazes on purpose – for their huge range of colour possibilities, stability, cool interactions, artistic freedom with the ability to easily brush the glazes on and ease of use. We currently have almost 50 glazes on hand! A major project is to test the interactions of all glazes with each other. That is 2,500 test tiles!!!! I’m going to make the wall behind the wheels the feature wall of pretty colours! Step Seven – Glaze (Gloss or sometimes called “Glost”) Firing Most of the time this is the final stage of making your creation (but not always!) The glaze kiln goes to 1240°C. This is called cone 6, or midrange. It is the low end of stoneware temperatures. Stoneware clays and glazes are typically fired at cone 8 – 10, that is 1260 – 1290°C. The energy requirement to go from 1240°C to 1280°C is almost a 30% more! Our clay is formulated to vitrify (mature, turn “glass-like”) at 1240°, as are our glazes. A glaze kiln take around 12 hours to reach temperature and two to three days to cool down. Sometimes a third firing process is required – this is for decoration that is added to work after the glaze firing. For example – adding precious metals and lustres. this firing temperature is usually around 600 – 800°C depending upon the techniques being used. There are many students interested in gold and silver trims – we will be doing this third type of firing soon! After firing your work will be in the student finished work shelves. Remember to pay for it before you head out the door! There is a small extra charge for using porcelain clay (it’s more than twice the price of regular clay), and for any third firing process! Once your work has been fired it can not turn back into clay for millennia – so don’t fire it if you don’t like it! Put it in the bucket for recycling. https://firebirdstudios.com.au/the-process-of-making-pottery/Ceramics have evolved over thousands of years.A white earthenware side plate with a gadroon edge. Has water marks and chips on front.‘Johnson Bros England Reg No 15587’flagstaff hill, warrnambool, shipwrecked-coast, flagstaff-hill, flagstaff-hill-maritime-museum, maritime-museum, shipwreck-coast, flagstaff-hill-maritime-village, johnson bros, ceramics, tableware -
 Flagstaff Hill Maritime Museum and Village
Domestic object - Plate, Alfred Meakin
The Process of Making Pottery Decorating, Firing, Glazing, Making, Technical There is a rhythm and flow to clay. It can’t be done all at once! Even the making process! It can take weeks to get everything done, especially if you can only work on your pottery once a week! Even though we have three hour classes, it’s often just not enough time! Here is an overview of some of the processes so you have a bit more grasp on some of the technical stuff! Step One – Design There are SO many ideas out there for making stuff in clay! From delicate porcelain jewellery, through to heavy sculptural work and everything in between. Deciding your direction is sometimes not that easy – when you first start, try everything, you will naturally gravitate to the style that you enjoy! The options and variations are endless and can get a wee bit overwhelming too! Check in with me before you start to ensure your ideas will work, what order you might do things, how you could achieve the look you are seeking and any other technical data required! Step Two – Making Clay is thixotropic. This means that as you work with it, the clay first gets sloppier and wetter, before is begins to dry in the atmosphere. For most things, you simply can’t do all parts of the project at once. An example of work order might look like: Get last weeks work out from the shelves Prepare clay for today’s work – roll your clay, prepare balls for throwing, make the first stage of a pinch pot) Clean up last week’s work and put it on the shelf for bisque firing Check that you have any glazing to do – and do enough of it that you will have time to finish your main project Do the next step of your next project – there might be a further step that can’t be complete immediately, in that case, wrap your work well and put onto the shelves. Letting your work rest for a while can really help keep your work clean and professional looking. Many things require bagging under plastic to keep it ready for work the next week – put your name on the outside of the bag so you can find your work easily. We have stickers and markers. Consider how you want to decorate your work – coloured slip can be applied at a fairly wet stage (remembering that it will make your work even wetter!). Trying to apply slip to dry clay won’t work! If you want to do sgraffito – you will need to keep the work leather hard (a state of dryness where you can still work the clay with a little effort and a little water and care). Step Three – Drying Most of the time your work can go into the rack uncovered to let it dry out for the following week. If you want to continue forming or shaping you will need to double bag your work – put your work on a suitable sized bat and put the bat in a bag so the base of the bag is under the bat, then put another bag over the top of the work and tuck the top of the bag under the bat. If you want to trim (or turn) your thrown work the following week, it should also be double bagged. If your work is large, delicate, or of uneven thicknesses, you should lightly cover your work for drying. When considering the drying process, bare in mind the weather, humidity and wind! The hotter and dryer, the faster things dry and work can dry unevenly in the shelves – this can lead to cracking – another time to lightly cover your work for drying. Step Four – Trimming and Cleaning Up Your work is dry! It is called greenware now and it is at it’s most fragile! Handle everything with two hands. I often refer to soft hands – keep everything gentle and with your fingers spread as much as possible. Try to not pick up things like plates too much, and always with both hands! Before your work can be bisque fired it should be “cleaned up”. You work won’t go into the kiln if it has sharp edges – when glazed, sharp edges turn into razor blades! Use a piece of fly wire to rub the work all over – this will scratch a little so be light handed. Use a knife or metal kidney to scrape any areas that require a bit more dynamic treatment than the fly wire offers! Finally, a very light wipe over with a slightly damp sponge can help soften and soothe all of your edges and dags! Trimming thrown work: If you are planning to trim (or turn) your thrown work (and you should be), make sure you bag it well – your work should be leather hard to almost dry for easiest trimming. Use this step to finish the work completely – use a metal kidney to polish the surface, or a slightly damp sponge to give a freshly thrown look. Wipe the sponge around the rim after trimming, and check the inside of the pot for dags! Trimming slip cast work: Usually I will trim the rims of your work on the wheel the following day to make that stage easier, however you will still need to check your work for lumps and bumps. Last but not least – check that your name is still clearly on the bottom of your work. Step Five – Bisque Firing When the work is completely dry it can go into the bisque kiln. The bisque kiln is fired to 1000°C. This process burns off the water in the clay as well as some of the chemically bound water. The structure of the clay is not altered that much at this temperature. Inside the bisque kiln, the work is stacked a little, small bowl inside a larger bowl and onto a heavy plate. Smaller items like decorations or drink coasters might get stacked several high. Consideration is paid to the weight of the stack and shape of the work. A bisque kiln can fire about one and a half times the amount of work that the glaze kiln can fire. The firing takes about 10 hours to complete the cycle and about two days to cool down. Once it has been emptied the work is placed in the glaze room ready for you to decorate! Step Six – Glazing Decorating your work with colour can be a lot of fun – and time consuming! There are three main options for surface treatment at this stage: Oxide Washes Underglazes Glazes Washes and underglazes do not “glaze” the work – It will still need a layer of glaze to fully seal the clay (washes don’t need glaze on surfaces not designed for food or liquid as they can gloss up a little on their own). Underglazes are stable colourants that turn out pretty much how they look in the jar. They can be mixed with each other to form other colours and can be used like water colours to paint onto your work. Mostly they should have a clear glaze on top to seal them. Oxides are a different species – the pink oxide (cobalt) wash turns out bright blue for instance. They don’t always need a glaze on top, and some glazes can change the colour of the wash! The glazes need no other “glaze” on top! Be careful of unknown glaze interactions – you can put any combination of glaze in a bowl or on a plate, but only a single glaze on the outside of any vertical surface! Glazes are a chemical reaction under heat. We don’t know the exact chemicals in the Mayco glazes we use. I can guess by the way they interact with each other, however, on the whole, you need to test every idea you have, and not run the test on a vertical surface! Simply put, glaze is a layer of glass like substance that bonds with the clay underneath. Clay is made of silica, alumina and water. Glaze is made of mostly silica. Silica has a melting point of 1700°C and we fire to 1240°C. The silica requires a “flux” to help it melt at the lower temperature. Fluxes can be all sorts of chemicals – a common one is calcium – calcium has a melting point of 2500°C, however, together they both melt at a much lower temperature! Colourants are metal oxides like cobalt (blue), chrome (green through black), copper (green, blue, even red!), manganese (black, purple and pink) iron (red brown), etc. Different chemicals in the glaze can have dramatic effects. for example, barium carbonate (which we don’t use) turns manganese bright pink! Other elements can turn manganese dioxide brown, blue, purple and reddish brown. Manganese dioxide is a flux in and of itself as well. So, glazes that get their black and purple colours, often interact with other glazes and RUN! Our mirror black is a good example – it mixes really well with many glazes because it fluxes them – causes them to melt faster. It will also bring out many beautiful colours in the glazes because it’s black colouring most definitely comes from manganese dioxide! Glaze chemistry is a whole subject on it’s own! We use commercial Mayco glazes on purpose – for their huge range of colour possibilities, stability, cool interactions, artistic freedom with the ability to easily brush the glazes on and ease of use. We currently have almost 50 glazes on hand! A major project is to test the interactions of all glazes with each other. That is 2,500 test tiles!!!! I’m going to make the wall behind the wheels the feature wall of pretty colours! Step Seven – Glaze (Gloss or sometimes called “Glost”) Firing Most of the time this is the final stage of making your creation (but not always!) The glaze kiln goes to 1240°C. This is called cone 6, or midrange. It is the low end of stoneware temperatures. Stoneware clays and glazes are typically fired at cone 8 – 10, that is 1260 – 1290°C. The energy requirement to go from 1240°C to 1280°C is almost a 30% more! Our clay is formulated to vitrify (mature, turn “glass-like”) at 1240°, as are our glazes. A glaze kiln take around 12 hours to reach temperature and two to three days to cool down. Sometimes a third firing process is required – this is for decoration that is added to work after the glaze firing. For example – adding precious metals and lustres. this firing temperature is usually around 600 – 800°C depending upon the techniques being used. There are many students interested in gold and silver trims – we will be doing this third type of firing soon! After firing your work will be in the student finished work shelves. Remember to pay for it before you head out the door! There is a small extra charge for using porcelain clay (it’s more than twice the price of regular clay), and for any third firing process! Once your work has been fired it can not turn back into clay for millennia – so don’t fire it if you don’t like it! Put it in the bucket for recycling. https://firebirdstudios.com.au/the-process-of-making-pottery/Ceramics have evolved over thousands of years.Earthenware dessert plate, cream colour. Made by Alfred Meakin, England. Backstamped ‘Alfred Meakin England’. flagstaff hill, warrnambool, shipwrecked-coast, flagstaff-hill, flagstaff-hill-maritime-museum, maritime-museum, shipwreck-coast, flagstaff-hill-maritime-village, alfred meakin, ceramics, earthenware, kitchenware -
 Flagstaff Hill Maritime Museum and Village
Domestic object - Bowl, J & G Meakin, Late 19th or early 20th Century
The Process of Making Pottery Decorating, Firing, Glazing, Making, Technical There is a rhythm and flow to clay. It can’t be done all at once! Even the making process! It can take weeks to get everything done, especially if you can only work on your pottery once a week! Even though we have three hour classes, it’s often just not enough time! Here is an overview of some of the processes so you have a bit more grasp on some of the technical stuff! Step One – Design There are SO many ideas out there for making stuff in clay! From delicate porcelain jewellery, through to heavy sculptural work and everything in between. Deciding your direction is sometimes not that easy – when you first start, try everything, you will naturally gravitate to the style that you enjoy! The options and variations are endless and can get a wee bit overwhelming too! Check in with me before you start to ensure your ideas will work, what order you might do things, how you could achieve the look you are seeking and any other technical data required! Step Two – Making Clay is thixotropic. This means that as you work with it, the clay first gets sloppier and wetter, before is begins to dry in the atmosphere. For most things, you simply can’t do all parts of the project at once. An example of work order might look like: Get last weeks work out from the shelves Prepare clay for today’s work – roll your clay, prepare balls for throwing, make the first stage of a pinch pot) Clean up last week’s work and put it on the shelf for bisque firing Check that you have any glazing to do – and do enough of it that you will have time to finish your main project Do the next step of your next project – there might be a further step that can’t be complete immediately, in that case, wrap your work well and put onto the shelves. Letting your work rest for a while can really help keep your work clean and professional looking. Many things require bagging under plastic to keep it ready for work the next week – put your name on the outside of the bag so you can find your work easily. We have stickers and markers. Consider how you want to decorate your work – coloured slip can be applied at a fairly wet stage (remembering that it will make your work even wetter!). Trying to apply slip to dry clay won’t work! If you want to do sgraffito – you will need to keep the work leather hard (a state of dryness where you can still work the clay with a little effort and a little water and care). Step Three – Drying Most of the time your work can go into the rack uncovered to let it dry out for the following week. If you want to continue forming or shaping you will need to double bag your work – put your work on a suitable sized bat and put the bat in a bag so the base of the bag is under the bat, then put another bag over the top of the work and tuck the top of the bag under the bat. If you want to trim (or turn) your thrown work the following week, it should also be double bagged. If your work is large, delicate, or of uneven thicknesses, you should lightly cover your work for drying. When considering the drying process, bare in mind the weather, humidity and wind! The hotter and dryer, the faster things dry and work can dry unevenly in the shelves – this can lead to cracking – another time to lightly cover your work for drying. Step Four – Trimming and Cleaning Up Your work is dry! It is called greenware now and it is at it’s most fragile! Handle everything with two hands. I often refer to soft hands – keep everything gentle and with your fingers spread as much as possible. Try to not pick up things like plates too much, and always with both hands! Before your work can be bisque fired it should be “cleaned up”. You work won’t go into the kiln if it has sharp edges – when glazed, sharp edges turn into razor blades! Use a piece of fly wire to rub the work all over – this will scratch a little so be light handed. Use a knife or metal kidney to scrape any areas that require a bit more dynamic treatment than the fly wire offers! Finally, a very light wipe over with a slightly damp sponge can help soften and soothe all of your edges and dags! Trimming thrown work: If you are planning to trim (or turn) your thrown work (and you should be), make sure you bag it well – your work should be leather hard to almost dry for easiest trimming. Use this step to finish the work completely – use a metal kidney to polish the surface, or a slightly damp sponge to give a freshly thrown look. Wipe the sponge around the rim after trimming, and check the inside of the pot for dags! Trimming slip cast work: Usually I will trim the rims of your work on the wheel the following day to make that stage easier, however you will still need to check your work for lumps and bumps. Last but not least – check that your name is still clearly on the bottom of your work. Step Five – Bisque Firing When the work is completely dry it can go into the bisque kiln. The bisque kiln is fired to 1000°C. This process burns off the water in the clay as well as some of the chemically bound water. The structure of the clay is not altered that much at this temperature. Inside the bisque kiln, the work is stacked a little, small bowl inside a larger bowl and onto a heavy plate. Smaller items like decorations or drink coasters might get stacked several high. Consideration is paid to the weight of the stack and shape of the work. A bisque kiln can fire about one and a half times the amount of work that the glaze kiln can fire. The firing takes about 10 hours to complete the cycle and about two days to cool down. Once it has been emptied the work is placed in the glaze room ready for you to decorate! Step Six – Glazing Decorating your work with colour can be a lot of fun – and time consuming! There are three main options for surface treatment at this stage: Oxide Washes Underglazes Glazes Washes and underglazes do not “glaze” the work – It will still need a layer of glaze to fully seal the clay (washes don’t need glaze on surfaces not designed for food or liquid as they can gloss up a little on their own). Underglazes are stable colourants that turn out pretty much how they look in the jar. They can be mixed with each other to form other colours and can be used like water colours to paint onto your work. Mostly they should have a clear glaze on top to seal them. Oxides are a different species – the pink oxide (cobalt) wash turns out bright blue for instance. They don’t always need a glaze on top, and some glazes can change the colour of the wash! The glazes need no other “glaze” on top! Be careful of unknown glaze interactions – you can put any combination of glaze in a bowl or on a plate, but only a single glaze on the outside of any vertical surface! Glazes are a chemical reaction under heat. We don’t know the exact chemicals in the Mayco glazes we use. I can guess by the way they interact with each other, however, on the whole, you need to test every idea you have, and not run the test on a vertical surface! Simply put, glaze is a layer of glass like substance that bonds with the clay underneath. Clay is made of silica, alumina and water. Glaze is made of mostly silica. Silica has a melting point of 1700°C and we fire to 1240°C. The silica requires a “flux” to help it melt at the lower temperature. Fluxes can be all sorts of chemicals – a common one is calcium – calcium has a melting point of 2500°C, however, together they both melt at a much lower temperature! Colourants are metal oxides like cobalt (blue), chrome (green through black), copper (green, blue, even red!), manganese (black, purple and pink) iron (red brown), etc. Different chemicals in the glaze can have dramatic effects. for example, barium carbonate (which we don’t use) turns manganese bright pink! Other elements can turn manganese dioxide brown, blue, purple and reddish brown. Manganese dioxide is a flux in and of itself as well. So, glazes that get their black and purple colours, often interact with other glazes and RUN! Our mirror black is a good example – it mixes really well with many glazes because it fluxes them – causes them to melt faster. It will also bring out many beautiful colours in the glazes because it’s black colouring most definitely comes from manganese dioxide! Glaze chemistry is a whole subject on it’s own! We use commercial Mayco glazes on purpose – for their huge range of colour possibilities, stability, cool interactions, artistic freedom with the ability to easily brush the glazes on and ease of use. We currently have almost 50 glazes on hand! A major project is to test the interactions of all glazes with each other. That is 2,500 test tiles!!!! I’m going to make the wall behind the wheels the feature wall of pretty colours! Step Seven – Glaze (Gloss or sometimes called “Glost”) Firing Most of the time this is the final stage of making your creation (but not always!) The glaze kiln goes to 1240°C. This is called cone 6, or midrange. It is the low end of stoneware temperatures. Stoneware clays and glazes are typically fired at cone 8 – 10, that is 1260 – 1290°C. The energy requirement to go from 1240°C to 1280°C is almost a 30% more! Our clay is formulated to vitrify (mature, turn “glass-like”) at 1240°, as are our glazes. A glaze kiln take around 12 hours to reach temperature and two to three days to cool down. Sometimes a third firing process is required – this is for decoration that is added to work after the glaze firing. For example – adding precious metals and lustres. this firing temperature is usually around 600 – 800°C depending upon the techniques being used. There are many students interested in gold and silver trims – we will be doing this third type of firing soon! After firing your work will be in the student finished work shelves. Remember to pay for it before you head out the door! There is a small extra charge for using porcelain clay (it’s more than twice the price of regular clay), and for any third firing process! Once your work has been fired it can not turn back into clay for millennia – so don’t fire it if you don’t like it! Put it in the bucket for recycling. https://firebirdstudios.com.au/the-process-of-making-pottery/This bowl was made by renowned pottery company J & G Meakin of England. The firm was established in the mid-1800's. The bowl is an example of kitchenware used in the 19th century and still in use today.Bowl; white ceramic, round and tapering inwards towards base. Made by J and G Meakin England.On base, 'Ironstone China Reg SOL 391413' with symbolflagstaff hill, flagstaff hill maritime museum and village, warrnambool, maritime museum, maritime village, great ocean road, shipwreck coast, mixing bowl, food preparation, j & g meakin, pottery, stoke-on-trent, kitchen equipment, ceramic -
 Flagstaff Hill Maritime Museum and Village
Domestic object - Bowl, Late 19th or early 20th Century
The Process of Making Pottery Decorating, Firing, Glazing, Making, Technical There is a rhythm and flow to clay. It can’t be done all at once! Even the making process! It can take weeks to get everything done, especially if you can only work on your pottery once a week! Even though we have three hour classes, it’s often just not enough time! Here is an overview of some of the processes so you have a bit more grasp on some of the technical stuff! Step One – Design There are SO many ideas out there for making stuff in clay! From delicate porcelain jewellery, through to heavy sculptural work and everything in between. Deciding your direction is sometimes not that easy – when you first start, try everything, you will naturally gravitate to the style that you enjoy! The options and variations are endless and can get a wee bit overwhelming too! Check in with me before you start to ensure your ideas will work, what order you might do things, how you could achieve the look you are seeking and any other technical data required! Step Two – Making Clay is thixotropic. This means that as you work with it, the clay first gets sloppier and wetter, before is begins to dry in the atmosphere. For most things, you simply can’t do all parts of the project at once. An example of work order might look like: Get last weeks work out from the shelves Prepare clay for today’s work – roll your clay, prepare balls for throwing, make the first stage of a pinch pot) Clean up last week’s work and put it on the shelf for bisque firing Check that you have any glazing to do – and do enough of it that you will have time to finish your main project Do the next step of your next project – there might be a further step that can’t be complete immediately, in that case, wrap your work well and put onto the shelves. Letting your work rest for a while can really help keep your work clean and professional looking. Many things require bagging under plastic to keep it ready for work the next week – put your name on the outside of the bag so you can find your work easily. We have stickers and markers. Consider how you want to decorate your work – coloured slip can be applied at a fairly wet stage (remembering that it will make your work even wetter!). Trying to apply slip to dry clay won’t work! If you want to do sgraffito – you will need to keep the work leather hard (a state of dryness where you can still work the clay with a little effort and a little water and care). Step Three – Drying Most of the time your work can go into the rack uncovered to let it dry out for the following week. If you want to continue forming or shaping you will need to double bag your work – put your work on a suitable sized bat and put the bat in a bag so the base of the bag is under the bat, then put another bag over the top of the work and tuck the top of the bag under the bat. If you want to trim (or turn) your thrown work the following week, it should also be double bagged. If your work is large, delicate, or of uneven thicknesses, you should lightly cover your work for drying. When considering the drying process, bare in mind the weather, humidity and wind! The hotter and dryer, the faster things dry and work can dry unevenly in the shelves – this can lead to cracking – another time to lightly cover your work for drying. Step Four – Trimming and Cleaning Up Your work is dry! It is called greenware now and it is at it’s most fragile! Handle everything with two hands. I often refer to soft hands – keep everything gentle and with your fingers spread as much as possible. Try to not pick up things like plates too much, and always with both hands! Before your work can be bisque fired it should be “cleaned up”. You work won’t go into the kiln if it has sharp edges – when glazed, sharp edges turn into razor blades! Use a piece of fly wire to rub the work all over – this will scratch a little so be light handed. Use a knife or metal kidney to scrape any areas that require a bit more dynamic treatment than the fly wire offers! Finally, a very light wipe over with a slightly damp sponge can help soften and soothe all of your edges and dags! Trimming thrown work: If you are planning to trim (or turn) your thrown work (and you should be), make sure you bag it well – your work should be leather hard to almost dry for easiest trimming. Use this step to finish the work completely – use a metal kidney to polish the surface, or a slightly damp sponge to give a freshly thrown look. Wipe the sponge around the rim after trimming, and check the inside of the pot for dags! Trimming slip cast work: Usually I will trim the rims of your work on the wheel the following day to make that stage easier, however you will still need to check your work for lumps and bumps. Last but not least – check that your name is still clearly on the bottom of your work. Step Five – Bisque Firing When the work is completely dry it can go into the bisque kiln. The bisque kiln is fired to 1000°C. This process burns off the water in the clay as well as some of the chemically bound water. The structure of the clay is not altered that much at this temperature. Inside the bisque kiln, the work is stacked a little, small bowl inside a larger bowl and onto a heavy plate. Smaller items like decorations or drink coasters might get stacked several high. Consideration is paid to the weight of the stack and shape of the work. A bisque kiln can fire about one and a half times the amount of work that the glaze kiln can fire. The firing takes about 10 hours to complete the cycle and about two days to cool down. Once it has been emptied the work is placed in the glaze room ready for you to decorate! Step Six – Glazing Decorating your work with colour can be a lot of fun – and time consuming! There are three main options for surface treatment at this stage: Oxide Washes Underglazes Glazes Washes and underglazes do not “glaze” the work – It will still need a layer of glaze to fully seal the clay (washes don’t need glaze on surfaces not designed for food or liquid as they can gloss up a little on their own). Underglazes are stable colourants that turn out pretty much how they look in the jar. They can be mixed with each other to form other colours and can be used like water colours to paint onto your work. Mostly they should have a clear glaze on top to seal them. Oxides are a different species – the pink oxide (cobalt) wash turns out bright blue for instance. They don’t always need a glaze on top, and some glazes can change the colour of the wash! The glazes need no other “glaze” on top! Be careful of unknown glaze interactions – you can put any combination of glaze in a bowl or on a plate, but only a single glaze on the outside of any vertical surface! Glazes are a chemical reaction under heat. We don’t know the exact chemicals in the Mayco glazes we use. I can guess by the way they interact with each other, however, on the whole, you need to test every idea you have, and not run the test on a vertical surface! Simply put, glaze is a layer of glass like substance that bonds with the clay underneath. Clay is made of silica, alumina and water. Glaze is made of mostly silica. Silica has a melting point of 1700°C and we fire to 1240°C. The silica requires a “flux” to help it melt at the lower temperature. Fluxes can be all sorts of chemicals – a common one is calcium – calcium has a melting point of 2500°C, however, together they both melt at a much lower temperature! Colourants are metal oxides like cobalt (blue), chrome (green through black), copper (green, blue, even red!), manganese (black, purple and pink) iron (red brown), etc. Different chemicals in the glaze can have dramatic effects. for example, barium carbonate (which we don’t use) turns manganese bright pink! Other elements can turn manganese dioxide brown, blue, purple and reddish brown. Manganese dioxide is a flux in and of itself as well. So, glazes that get their black and purple colours, often interact with other glazes and RUN! Our mirror black is a good example – it mixes really well with many glazes because it fluxes them – causes them to melt faster. It will also bring out many beautiful colours in the glazes because it’s black colouring most definitely comes from manganese dioxide! Glaze chemistry is a whole subject on it’s own! We use commercial Mayco glazes on purpose – for their huge range of colour possibilities, stability, cool interactions, artistic freedom with the ability to easily brush the glazes on and ease of use. We currently have almost 50 glazes on hand! A major project is to test the interactions of all glazes with each other. That is 2,500 test tiles!!!! I’m going to make the wall behind the wheels the feature wall of pretty colours! Step Seven – Glaze (Gloss or sometimes called “Glost”) Firing Most of the time this is the final stage of making your creation (but not always!) The glaze kiln goes to 1240°C. This is called cone 6, or midrange. It is the low end of stoneware temperatures. Stoneware clays and glazes are typically fired at cone 8 – 10, that is 1260 – 1290°C. The energy requirement to go from 1240°C to 1280°C is almost a 30% more! Our clay is formulated to vitrify (mature, turn “glass-like”) at 1240°, as are our glazes. A glaze kiln take around 12 hours to reach temperature and two to three days to cool down. Sometimes a third firing process is required – this is for decoration that is added to work after the glaze firing. For example – adding precious metals and lustres. this firing temperature is usually around 600 – 800°C depending upon the techniques being used. There are many students interested in gold and silver trims – we will be doing this third type of firing soon! After firing your work will be in the student finished work shelves. Remember to pay for it before you head out the door! There is a small extra charge for using porcelain clay (it’s more than twice the price of regular clay), and for any third firing process! Once your work has been fired it can not turn back into clay for millennia – so don’t fire it if you don’t like it! Put it in the bucket for recycling. https://firebirdstudios.com.au/the-process-of-making-pottery/ The bowl is an example of kitchenware used in the 19th century and still in use today.Bowl white ceramic. Crack on side. Badly stained.Backstamp very faint and unable to be read.flagstaff hill, warrnambool, shipwrecked-coast, flagstaff-hill, flagstaff-hill-maritime-museum, maritime-museum, shipwreck-coast, flagstaff-hill-maritime-village, mixing bowl, food preparation, kitchen equipment, ceramic -
 Flagstaff Hill Maritime Museum and Village
Domestic object - Bowl
The Process of Making Pottery Decorating, Firing, Glazing, Making, Technical There is a rhythm and flow to clay. It can’t be done all at once! Even the making process! It can take weeks to get everything done, especially if you can only work on your pottery once a week! Even though we have three hour classes, it’s often just not enough time! Here is an overview of some of the processes so you have a bit more grasp on some of the technical stuff! Step One – Design There are SO many ideas out there for making stuff in clay! From delicate porcelain jewellery, through to heavy sculptural work and everything in between. Deciding your direction is sometimes not that easy – when you first start, try everything, you will naturally gravitate to the style that you enjoy! The options and variations are endless and can get a wee bit overwhelming too! Check in with me before you start to ensure your ideas will work, what order you might do things, how you could achieve the look you are seeking and any other technical data required! Step Two – Making Clay is thixotropic. This means that as you work with it, the clay first gets sloppier and wetter, before is begins to dry in the atmosphere. For most things, you simply can’t do all parts of the project at once. An example of work order might look like: Get last weeks work out from the shelves Prepare clay for today’s work – roll your clay, prepare balls for throwing, make the first stage of a pinch pot) Clean up last week’s work and put it on the shelf for bisque firing Check that you have any glazing to do – and do enough of it that you will have time to finish your main project Do the next step of your next project – there might be a further step that can’t be complete immediately, in that case, wrap your work well and put onto the shelves. Letting your work rest for a while can really help keep your work clean and professional looking. Many things require bagging under plastic to keep it ready for work the next week – put your name on the outside of the bag so you can find your work easily. We have stickers and markers. Consider how you want to decorate your work – coloured slip can be applied at a fairly wet stage (remembering that it will make your work even wetter!). Trying to apply slip to dry clay won’t work! If you want to do sgraffito – you will need to keep the work leather hard (a state of dryness where you can still work the clay with a little effort and a little water and care). Step Three – Drying Most of the time your work can go into the rack uncovered to let it dry out for the following week. If you want to continue forming or shaping you will need to double bag your work – put your work on a suitable sized bat and put the bat in a bag so the base of the bag is under the bat, then put another bag over the top of the work and tuck the top of the bag under the bat. If you want to trim (or turn) your thrown work the following week, it should also be double bagged. If your work is large, delicate, or of uneven thicknesses, you should lightly cover your work for drying. When considering the drying process, bare in mind the weather, humidity and wind! The hotter and dryer, the faster things dry and work can dry unevenly in the shelves – this can lead to cracking – another time to lightly cover your work for drying. Step Four – Trimming and Cleaning Up Your work is dry! It is called greenware now and it is at it’s most fragile! Handle everything with two hands. I often refer to soft hands – keep everything gentle and with your fingers spread as much as possible. Try to not pick up things like plates too much, and always with both hands! Before your work can be bisque fired it should be “cleaned up”. You work won’t go into the kiln if it has sharp edges – when glazed, sharp edges turn into razor blades! Use a piece of fly wire to rub the work all over – this will scratch a little so be light handed. Use a knife or metal kidney to scrape any areas that require a bit more dynamic treatment than the fly wire offers! Finally, a very light wipe over with a slightly damp sponge can help soften and soothe all of your edges and dags! Trimming thrown work: If you are planning to trim (or turn) your thrown work (and you should be), make sure you bag it well – your work should be leather hard to almost dry for easiest trimming. Use this step to finish the work completely – use a metal kidney to polish the surface, or a slightly damp sponge to give a freshly thrown look. Wipe the sponge around the rim after trimming, and check the inside of the pot for dags! Trimming slip cast work: Usually I will trim the rims of your work on the wheel the following day to make that stage easier, however you will still need to check your work for lumps and bumps. Last but not least – check that your name is still clearly on the bottom of your work. Step Five – Bisque Firing When the work is completely dry it can go into the bisque kiln. The bisque kiln is fired to 1000°C. This process burns off the water in the clay as well as some of the chemically bound water. The structure of the clay is not altered that much at this temperature. Inside the bisque kiln, the work is stacked a little, small bowl inside a larger bowl and onto a heavy plate. Smaller items like decorations or drink coasters might get stacked several high. Consideration is paid to the weight of the stack and shape of the work. A bisque kiln can fire about one and a half times the amount of work that the glaze kiln can fire. The firing takes about 10 hours to complete the cycle and about two days to cool down. Once it has been emptied the work is placed in the glaze room ready for you to decorate! Step Six – Glazing Decorating your work with colour can be a lot of fun – and time consuming! There are three main options for surface treatment at this stage: Oxide Washes Underglazes Glazes Washes and underglazes do not “glaze” the work – It will still need a layer of glaze to fully seal the clay (washes don’t need glaze on surfaces not designed for food or liquid as they can gloss up a little on their own). Underglazes are stable colourants that turn out pretty much how they look in the jar. They can be mixed with each other to form other colours and can be used like water colours to paint onto your work. Mostly they should have a clear glaze on top to seal them. Oxides are a different species – the pink oxide (cobalt) wash turns out bright blue for instance. They don’t always need a glaze on top, and some glazes can change the colour of the wash! The glazes need no other “glaze” on top! Be careful of unknown glaze interactions – you can put any combination of glaze in a bowl or on a plate, but only a single glaze on the outside of any vertical surface! Glazes are a chemical reaction under heat. We don’t know the exact chemicals in the Mayco glazes we use. I can guess by the way they interact with each other, however, on the whole, you need to test every idea you have, and not run the test on a vertical surface! Simply put, glaze is a layer of glass like substance that bonds with the clay underneath. Clay is made of silica, alumina and water. Glaze is made of mostly silica. Silica has a melting point of 1700°C and we fire to 1240°C. The silica requires a “flux” to help it melt at the lower temperature. Fluxes can be all sorts of chemicals – a common one is calcium – calcium has a melting point of 2500°C, however, together they both melt at a much lower temperature! Colourants are metal oxides like cobalt (blue), chrome (green through black), copper (green, blue, even red!), manganese (black, purple and pink) iron (red brown), etc. Different chemicals in the glaze can have dramatic effects. for example, barium carbonate (which we don’t use) turns manganese bright pink! Other elements can turn manganese dioxide brown, blue, purple and reddish brown. Manganese dioxide is a flux in and of itself as well. So, glazes that get their black and purple colours, often interact with other glazes and RUN! Our mirror black is a good example – it mixes really well with many glazes because it fluxes them – causes them to melt faster. It will also bring out many beautiful colours in the glazes because it’s black colouring most definitely comes from manganese dioxide! Glaze chemistry is a whole subject on it’s own! We use commercial Mayco glazes on purpose – for their huge range of colour possibilities, stability, cool interactions, artistic freedom with the ability to easily brush the glazes on and ease of use. We currently have almost 50 glazes on hand! A major project is to test the interactions of all glazes with each other. That is 2,500 test tiles!!!! I’m going to make the wall behind the wheels the feature wall of pretty colours! Step Seven – Glaze (Gloss or sometimes called “Glost”) Firing Most of the time this is the final stage of making your creation (but not always!) The glaze kiln goes to 1240°C. This is called cone 6, or midrange. It is the low end of stoneware temperatures. Stoneware clays and glazes are typically fired at cone 8 – 10, that is 1260 – 1290°C. The energy requirement to go from 1240°C to 1280°C is almost a 30% more! Our clay is formulated to vitrify (mature, turn “glass-like”) at 1240°, as are our glazes. A glaze kiln take around 12 hours to reach temperature and two to three days to cool down. Sometimes a third firing process is required – this is for decoration that is added to work after the glaze firing. For example – adding precious metals and lustres. this firing temperature is usually around 600 – 800°C depending upon the techniques being used. There are many students interested in gold and silver trims – we will be doing this third type of firing soon! After firing your work will be in the student finished work shelves. Remember to pay for it before you head out the door! There is a small extra charge for using porcelain clay (it’s more than twice the price of regular clay), and for any third firing process! Once your work has been fired it can not turn back into clay for millennia – so don’t fire it if you don’t like it! Put it in the bucket for recycling. https://firebirdstudios.com.au/the-process-of-making-pottery/ This bowl is an example of kitchenware used in the 19th century and still in use today.Bowl white ceramic plain that has two sets of edging around lip. Inside bowl has plaster designed to look like cooking mixture.flagstaff hill, warrnambool, shipwrecked-coast, flagstaff-hill, flagstaff-hill-maritime-museum, maritime-museum, shipwreck-coast, flagstaff-hill-maritime-village, kitchen equipment, ceramic -
 Flagstaff Hill Maritime Museum and Village
Domestic object - Jug
The Process of Making Pottery Decorating, Firing, Glazing, Making, Technical There is a rhythm and flow to clay. It can’t be done all at once! Even the making process! It can take weeks to get everything done, especially if you can only work on your pottery once a week! Even though we have three hour classes, it’s often just not enough time! Here is an overview of some of the processes so you have a bit more grasp on some of the technical stuff! Step One – Design There are SO many ideas out there for making stuff in clay! From delicate porcelain jewellery, through to heavy sculptural work and everything in between. Deciding your direction is sometimes not that easy – when you first start, try everything, you will naturally gravitate to the style that you enjoy! The options and variations are endless and can get a wee bit overwhelming too! Check in with me before you start to ensure your ideas will work, what order you might do things, how you could achieve the look you are seeking and any other technical data required! Step Two – Making Clay is thixotropic. This means that as you work with it, the clay first gets sloppier and wetter, before is begins to dry in the atmosphere. For most things, you simply can’t do all parts of the project at once. An example of work order might look like: Get last weeks work out from the shelves Prepare clay for today’s work – roll your clay, prepare balls for throwing, make the first stage of a pinch pot) Clean up last week’s work and put it on the shelf for bisque firing Check that you have any glazing to do – and do enough of it that you will have time to finish your main project Do the next step of your next project – there might be a further step that can’t be complete immediately, in that case, wrap your work well and put onto the shelves. Letting your work rest for a while can really help keep your work clean and professional looking. Many things require bagging under plastic to keep it ready for work the next week – put your name on the outside of the bag so you can find your work easily. We have stickers and markers. Consider how you want to decorate your work – coloured slip can be applied at a fairly wet stage (remembering that it will make your work even wetter!). Trying to apply slip to dry clay won’t work! If you want to do sgraffito – you will need to keep the work leather hard (a state of dryness where you can still work the clay with a little effort and a little water and care). Step Three – Drying Most of the time your work can go into the rack uncovered to let it dry out for the following week. If you want to continue forming or shaping you will need to double bag your work – put your work on a suitable sized bat and put the bat in a bag so the base of the bag is under the bat, then put another bag over the top of the work and tuck the top of the bag under the bat. If you want to trim (or turn) your thrown work the following week, it should also be double bagged. If your work is large, delicate, or of uneven thicknesses, you should lightly cover your work for drying. When considering the drying process, bare in mind the weather, humidity and wind! The hotter and dryer, the faster things dry and work can dry unevenly in the shelves – this can lead to cracking – another time to lightly cover your work for drying. Step Four – Trimming and Cleaning Up Your work is dry! It is called greenware now and it is at it’s most fragile! Handle everything with two hands. I often refer to soft hands – keep everything gentle and with your fingers spread as much as possible. Try to not pick up things like plates too much, and always with both hands! Before your work can be bisque fired it should be “cleaned up”. You work won’t go into the kiln if it has sharp edges – when glazed, sharp edges turn into razor blades! Use a piece of fly wire to rub the work all over – this will scratch a little so be light handed. Use a knife or metal kidney to scrape any areas that require a bit more dynamic treatment than the fly wire offers! Finally, a very light wipe over with a slightly damp sponge can help soften and soothe all of your edges and dags! Trimming thrown work: If you are planning to trim (or turn) your thrown work (and you should be), make sure you bag it well – your work should be leather hard to almost dry for easiest trimming. Use this step to finish the work completely – use a metal kidney to polish the surface, or a slightly damp sponge to give a freshly thrown look. Wipe the sponge around the rim after trimming, and check the inside of the pot for dags! Trimming slip cast work: Usually I will trim the rims of your work on the wheel the following day to make that stage easier, however you will still need to check your work for lumps and bumps. Last but not least – check that your name is still clearly on the bottom of your work. Step Five – Bisque Firing When the work is completely dry it can go into the bisque kiln. The bisque kiln is fired to 1000°C. This process burns off the water in the clay as well as some of the chemically bound water. The structure of the clay is not altered that much at this temperature. Inside the bisque kiln, the work is stacked a little, small bowl inside a larger bowl and onto a heavy plate. Smaller items like decorations or drink coasters might get stacked several high. Consideration is paid to the weight of the stack and shape of the work. A bisque kiln can fire about one and a half times the amount of work that the glaze kiln can fire. The firing takes about 10 hours to complete the cycle and about two days to cool down. Once it has been emptied the work is placed in the glaze room ready for you to decorate! Step Six – Glazing Decorating your work with colour can be a lot of fun – and time consuming! There are three main options for surface treatment at this stage: Oxide Washes Underglazes Glazes Washes and underglazes do not “glaze” the work – It will still need a layer of glaze to fully seal the clay (washes don’t need glaze on surfaces not designed for food or liquid as they can gloss up a little on their own). Underglazes are stable colourants that turn out pretty much how they look in the jar. They can be mixed with each other to form other colours and can be used like water colours to paint onto your work. Mostly they should have a clear glaze on top to seal them. Oxides are a different species – the pink oxide (cobalt) wash turns out bright blue for instance. They don’t always need a glaze on top, and some glazes can change the colour of the wash! The glazes need no other “glaze” on top! Be careful of unknown glaze interactions – you can put any combination of glaze in a bowl or on a plate, but only a single glaze on the outside of any vertical surface! Glazes are a chemical reaction under heat. We don’t know the exact chemicals in the Mayco glazes we use. I can guess by the way they interact with each other, however, on the whole, you need to test every idea you have, and not run the test on a vertical surface! Simply put, glaze is a layer of glass like substance that bonds with the clay underneath. Clay is made of silica, alumina and water. Glaze is made of mostly silica. Silica has a melting point of 1700°C and we fire to 1240°C. The silica requires a “flux” to help it melt at the lower temperature. Fluxes can be all sorts of chemicals – a common one is calcium – calcium has a melting point of 2500°C, however, together they both melt at a much lower temperature! Colourants are metal oxides like cobalt (blue), chrome (green through black), copper (green, blue, even red!), manganese (black, purple and pink) iron (red brown), etc. Different chemicals in the glaze can have dramatic effects. for example, barium carbonate (which we don’t use) turns manganese bright pink! Other elements can turn manganese dioxide brown, blue, purple and reddish brown. Manganese dioxide is a flux in and of itself as well. So, glazes that get their black and purple colours, often interact with other glazes and RUN! Our mirror black is a good example – it mixes really well with many glazes because it fluxes them – causes them to melt faster. It will also bring out many beautiful colours in the glazes because it’s black colouring most definitely comes from manganese dioxide! Glaze chemistry is a whole subject on it’s own! We use commercial Mayco glazes on purpose – for their huge range of colour possibilities, stability, cool interactions, artistic freedom with the ability to easily brush the glazes on and ease of use. We currently have almost 50 glazes on hand! A major project is to test the interactions of all glazes with each other. That is 2,500 test tiles!!!! I’m going to make the wall behind the wheels the feature wall of pretty colours! Step Seven – Glaze (Gloss or sometimes called “Glost”) Firing Most of the time this is the final stage of making your creation (but not always!) The glaze kiln goes to 1240°C. This is called cone 6, or midrange. It is the low end of stoneware temperatures. Stoneware clays and glazes are typically fired at cone 8 – 10, that is 1260 – 1290°C. The energy requirement to go from 1240°C to 1280°C is almost a 30% more! Our clay is formulated to vitrify (mature, turn “glass-like”) at 1240°, as are our glazes. A glaze kiln take around 12 hours to reach temperature and two to three days to cool down. Sometimes a third firing process is required – this is for decoration that is added to work after the glaze firing. For example – adding precious metals and lustres. this firing temperature is usually around 600 – 800°C depending upon the techniques being used. There are many students interested in gold and silver trims – we will be doing this third type of firing soon! After firing your work will be in the student finished work shelves. Remember to pay for it before you head out the door! There is a small extra charge for using porcelain clay (it’s more than twice the price of regular clay), and for any third firing process! Once your work has been fired it can not turn back into clay for millennia – so don’t fire it if you don’t like it! Put it in the bucket for recycling. https://firebirdstudios.com.au/the-process-of-making-pottery/The form of the jug has been in use for many centuries.Stoneware jug. Two tone brown glaze with pierced lip behind spout. Spout chipped.None.flagstaff hill, warrnambool, shipwrecked-coast, flagstaff-hill, flagstaff-hill-maritime-museum, maritime-museum, shipwreck-coast, flagstaff-hill-maritime-village, jug, ceramic jug -
 Lara RSL Sub Branch
Flag, Australian Flag (Union Jack) 1900
There is a Union Jack brought back from South Africa by 1229 Trooper Fredrick James Smith. Between 1899 and 1902, around 16,500 Australians served in South Africa during the Boer War. This was the largest international deployment of troops from the Australian Colonies before Australian Federation. Of the 16,500 men who served in South Africa, 606 were killed in action or died of diseases. The Australian War Memorial records that the fighting conditions in South Africa extremely hard on men and horses. Australians fighting in South Africa were doing so as part of Colony based Regiments such as the Victorian Mounted Rifles, New South Wales Lancers, Queensland Mounted Infantry as well as units from the other states. Australians were awarded six Victoria Crosses during the campaign along with many other decorations. In May of 1902 the treaty of Vereeniging was signed officially ending the Boer War. The Boer War is commemorated in many Towns and Cities around Australia. The Lara RSL Sub Branch holds some memorabilia from the Boer War. There is a Union Jack brought back from South Africa by 1229 Trooper Fredrick James Smith. He was a resident of Lara and was a member of the 5th Victorian Mounted Rifles. It was reported that he carried this flag into battle. The Lara RSL also holds the flag staff of the China, South African and Old Veterans Association. Both these items are of national significance. Both the flag and flag staff were used in marches in Geelong each year until 1916 when Anzac Day commenced. The flag and flag staff were donated to the Lara RSL sub Branch when he joined in 1928. Fredrick James Smith was born at Lara in 1879, the son of Mr/Mrs Smith from Lara. He was a farm hand from Horton Vale, Anakie when he joined F Company of the 5th Victorian Mounted Rifles at the beginning of February 1901. Two weeks later, he left for South Africa on the 15th February. Before leaving, he purchased the flag from W. Libby & Son Geelong. Frederick Left for South Africa on the 15 February 1901 on the Orient. He saw service between March 1901 - March 1902 in east Transvaal and Natal frontier under the British Major General S. Beatson then Pulteney, including the defeat at Wilmansrust where 18 soldiers were killed and 42 wounded (12th June 1901 - heaviest casualties of any Australian contingent,); and the successful intervention at Onverwacht on the 4th January 1902. The 5th Victorian Mounted Rifles suffered: 36 killed or died of wounds, 13 died of disease of a contingent of 46 Officers, 971 Other Ranks and 1099 horses. They returned to Australia on the 26th April 1902 on the Custodian after sailing from Point Natal in South Africa on the 5th April. On his return, Tropper Smith (Saddler Private) joined the South African Soldiers Association of Victoria – Geelong Branch, and after 1928, he joined the Lara RSL. He was buried in Western Cemetery on the 19th June 1968 at the age of 89. Enrolled February 1901 Departed for South Africa on 15 February 1901 Establishment: 46 Officers, 971 Other Ranks with 1099 horses Mobilised at Pretoria: 24 March -- 4 April 1901 Typical company: 1 Captain, 4 Lieutenants, 1 company sergeant-major, 1 company quartermaster-sergeant, 1 sergeant-farrier, 1 sergeant-saddler, 5 sergeants, 6 corporals, 3 shoeing-smiths, 3 saddlers, 1 bugler, 99 privates. Total in company: 126 with 131 horses. Engagements: Rhenoster Kop, Klippan, Kornfontein, Drivelfontein, Wilmansrust, Kambuladraai, H'Lobane, Luchiel's Nek, Loch's Kraal, Vryheid, Onverwacht, Johnston Hoek Killed in action (or died): six Officers, 48 Other Ranks VC Winner: Lieut. L. C. Maygar News article Leader (Melbourne) Saturday 31st May 1902, page 42 - Dear Cinderella. — This is the second time I have written to you. I was very sorry at not seeing my first letter in "The Leader". But I hope to say, that this one will be in. The last time I wrote to you I told you that my brother (Fredrick Smith) went to the Boer War in South Africa, and that he was supposed to be killed in the Wilmansrust disaster. But this time I am going to tell you about his return, and the grand welcome he got from the residents of Lara. Mother, Father, and my Brother, went down to Melbourne, to meet the boat. You can just imagine how rejoiced we all were to see him back again. The railway station was decorated some thing beautiful with flags of all description all the colours you could think of. He has bought a lot of Boer curios home and some Kaffir bracelets. They are such funny looking things. The residents of Lara, also gave my brother a grand social and ball there were over four hundred people present, They presented him with a hand some gold chain, and locket suitably inscribed, and a pair of gold sleeve links, they were magnificent. The ball was very nice. . I had a few dances. I enjoyed myself grand. I think this is all I can tell you this time. I must conclude with love. I remain yours sincerely - BESSIE SMITH. Age 14-years. This flag is of national significance as it was used in the Boer War by Private Fredrick James Smith (SN:1229) of the 5th Victorian Mounted Rifles, F Company in their deployment to South Africa between 1901 and 1902. The flag was taken into the Wilmansrust engagement in which 19 soldiers died and 41 were wounded. On return to Australia, the flag was used in marches by the South Africa, China Old Veterans Association - Geelong. This flag represents a unique part of Australian history from which the movie, Breaker Morant was taken. It is of spiritual significance as the Boer War was where the first Australian received the Imperial Victoria Cross, and the spirit of Anzac was conceived, giving birth in World War 1. The Flag represents the spirit of Australians who fought and died in South Africa.Cotton Union Jack flag approx 221cm wide by 109cm tall with small repair patches and center section cotton deteriorated.Has the word "Lara" inscribed in black on bottom part of the flag heading. Has the flag makers name "W.Libby & Son" on the top part of the flag heading.boer war, union jack flag, south africa, wilmansrust, 5th victorian mounted rifles, f coy, private fredrick james smith, service number 1229, february 1901, april 1902, south africa china old veterans association -
 Flagstaff Hill Maritime Museum and Village
Vehicle - Wagon, Circa 1930s - 1940s
This baker’s wagon (or cart) was used to transport and deliver bread and other baked goods in the Warrnambool area. It is currently decorated with signwriting advertising H.H. Smith, Baker who owned and operated his Warrnambool bakery in the late 19th and early 20th century. The design of this baker’s wagon is similar to others dating around the 1930’s and 1940’s and was likely to have been built around that time for Stephenson’s Bakery in Warrnambool. The wagon’s original internal shelves were removed due to it being used in the early days at Flagstaff Hill to give children rides around the Village. BAKERS’ HISTORY There were many bakeries in Warrnambool in the 19th to mid-20th century. Each bread bakery made bread deliveries by horse and wagon in their appointed delivery zone. This wagon has sign writing representing Smith’s bakery although it is most likely the delivery wagon of Stephenson’s bakery. SMITH’S BAKERY – as shown on the wagon’s signage Henry Huntington Smith (1857-1941) was born and educated in Warrnambool. He worked at Davis’ steam biscuit factory in Timor Street before he started his own bakery business in 1885 at a premises near the corner of Fairy and Koroit Streets. A few years later Smith built his new bakery on the corner of Fairy and Lava Street where it still stands today as Monaghan’s Pharmacy. The building was designed by James McLeod in 1892 as a bakehouse, shop and residence for Smith The address was known locally as Smith’s corner. Next door to the bakery, at 136 Fairy Street, were Stables built by Jobbins and McLeod in 1886 for William Cust. A photograph in the archives of the Warrnambool and District Historical Society shows the 1892 building with four fancy horse-drawn wagons on the street with white clad drivers and a promotional stand erected with 5 bakers in uniform and the signage “H H Smith & Co, Pastry Cooks and Confectioners”. One of the wagons appears to have “H H Smith” painted on the side. H.H. Smith & Co. placed an Advertisement in the Weekly Times in December 1896 promoting its business as bakers, confectioners and pastry cooks, praising their shop as an ‘ornament to the town’ with ‘neat appointments’ and ‘dainty decorations’. It also boasted that the business supplied a large number of customers within a twelve mile radius of Warrnambool. In November 1919 The Warrnambool Standard announced the marriage of Henry H Smith, Mayor of Warrnambool, to Jeannie Samson-Goodman in East Adelaide. In the same newspaper was a notice that Frank Crossley was to open as baker and pastry cook in H.H. Smith’s premises. As well as being the proprietor of the H.H. Smith Bakery, Henry Huntington Smith was a Councillor for the Warrnambool Municipality from 1913 – 1937 and Mayer for two terms. In December 1919 during his first term as Mayor he was honoured for the work he had done with returning soldiers after World War I, receiving a document in recognition of this work, presented by the Mothers, Wives and Sisters of returned soldiers. Smith was very interested and involved in the community in many roles, including being the Vice President of the first Warrnambool and District Historical Society. STEPHENSON’S BAKERY – believed to be the past owner of the wagon The last owner of the bakery was Harold Stephenson. Stephenson was enlisted in the A.I.F. and was invalided home in 1943 before the end of the Second World War. He also served as a Councillor 1958-1976, during which time he served six terms as Mayor for the City of Warrnambool (1966-1973) while he had the bakery. He was very involved in many local organisations including the Warrnambool Surf Life Saving Club and the Road Race Committee. He died in 1985, lauded as being one of Warrnambool’s “most distinguished civic leaders”. It has been said that the baker injured in World War II invented a special contraption to enable him to get up into the wagon and that he alerted his customers that he was in their vicinity by blowing a whistle. The customers would come out and choose their own bread from the back of his wagon then pay him for it. However another account is given by a man who once earned pocket money by helping the baker on his rounds. He says that it was Stephenson, the owner and manager of the bakery, and not the delivery baker who received a significant injury during the war, making him unable to climb the stairs of his upstairs accommodation at the bakery, therefore causing him to sleep downstairs. At this time in the early to late 1940’s Stephenson’s bakery had three wagons, one for each of the delivery rounds. The wagons were painted black and yellow. Two of the drivers were Stan Lake and Ali (Alec) Dean who both had wagons with the covered cabin design. The third driver was Bill Lake who had a flat wagon. Stan Lake delivered in the area around Lava and Koroit Streets, Ali Dean had another round and Bill Lake had the Dennington area. Bread continued to be delivered into the 1960’s but by this time the delivery vehicles were motorised. The goods produced at Stephenson’s bakery included breads baked in different shaped tins such as High Tin, Sandwich and Vienna. Some shapes were easily divided into half by breaking them apart, therefore the baker could make two quarter loaves from a half loaf, satisfying different needs. There was the option of white or brown bread, sweet buns, fruit buns and Boston buns. The baker’s assistant was known to take great delight in ‘trimming’ the broken halves of excess bread and crust, enjoying his treat. THE BAKERY PREMISES – South east corner of Fairy and Lava Streets, Warrnambool The building retains the original cast iron veranda. Above the veranda a motif of a wheat sheaf in ornamental plaster can be seen. Inside the building there are still has some of the original fittings. The building was classified by the National Trust in August 1979. After the Second World War an official system of zoning was introduced as a fair way for the baking industry to operate. In 1949 different pricing was introduced by the Government for either delivered or retail purchased bread. Many of the small local bakeries went out of business after the Government banned zoning. The way was made open for the larger bread manufacturers to enter the local market with cheaper prices. Some of those companies were Mc Queens, Tip Top, Twisties, Sunicrust, (Mc Queens ‘new’ bakery building was where the current Toyworld shop now stands, is, in the Ozone carpark.) O’Grady’s Bakery, later changing hands and known as Burkes Bakery, was in Fairy Street near Timor Street intersection, on the North West side. There was also a bakery named Almay. The baker’s wagon is significant because of its association with H.H. Smith’s Bakery in Warrnambool.. The H.H. Smith’s Bakery building on the corner of Fairy and Lava Streets, built in 1892, is classified by the National Trust, August 1979. Smith Street Warrnambool was named after Henry Huntington Smith, who was a Warrnambool Councillor 1913 – 1937 and Mayor 1919 – 1921. Baker’s wagon, often referred to as a baker’s cart. Four wheeled horse-drawn delivery wagon, front wheels smaller than rear wheels. Wagon is clad with metal sheets and lined with varnished timber panels. Wheels have metal rims, wooden spokes and rear wheels have wooden brake pads. Horse shaft is timber with metal fittings. Front has a metal lamp holder, brake lever, metal hand grips and decorative metal foot plates. The wagon has suspension leaves on back and sides and double suspension leaves on the front. Driver’s area at front has a roof, glass side windows and wooden box seat with hinged compartment accessing wagon storage area. Door above back of seat has buckled leather handgrip strap attached, door slides open for access to wagon area. Back of wagon has a wooden step and a split door; top door has ventilation louvers, both doors have metal latches. Wagon is painted cream with brown trim and signage and green step. Remnants of red and green paint are visible; underside of seat panel is painted grey. Wagon advertises H.H. Smith & Co. Baker, a Warrnambool business established in 1885, but is of a more modern design seen around 1930’s and 1940’s and most likely belonging to Stephenson's bakery. Brown signwriting on sides of wagon “H.R. SMITH & CO. / BAKER” Brown signwriting across front of wagon “BAKER” warrnambool, shipwrecked-coast, flagstaff-hill, flagstaff-hill-maritime-museum, maritime-museum, shipwreck-coast, flagstaff-hill-maritime-village, shipwrecked-artefact, great ocean road, baker’s wagon, h.h. smith baker, warrnambool, henry h smith, jeannie samson-goodman, frank crossley, mayor of city of warrnambool, vice president of warrnambool and district historical society, stephenson’s bakery warrnambool, harold stephenson, warrnambool surf life saving club, road race committee, national trust building, stan lake, bill lake, ali dean, 19th and 20th century bakers, davies steam biscuit factory warrnambool, james mcleod building designer, jobbins and mcleod, william cust, h h smith & co, pastry cooks and confectioners, bakery trade, bread delivery wagon -
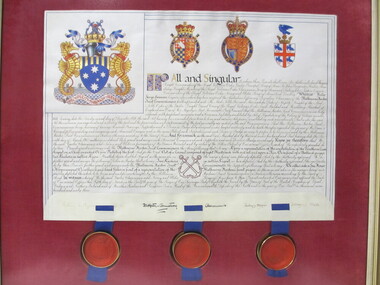 Seaworks Maritime Museum
Document
Large paper document including colour illustrations of Melbourne Harbor Trust shield and other shields. Includes three wax seals attached to document with blue ribbon."To All and Singular to whom these presents shall come, Sire Anthony Richard Wagner/ Knight Commander of the Royal Victorian Order Garter Principal King of Arms. Sir John Lunamace Heaton Arm/ Strong Knight, Member of the Royal Victorian Order. Clarenceux King of Arms an Aubrey John Toppin Esquire/ Commander of the Royal Victorian Order. Norroy and Ulster King of Arms Send Greeting! Whereas Victor/ George Swanson. Esquire upon whom has been conferred the Australian Efficiency Decoration Chairman of the Melbourne Harbor/ Trust Commissioners hath represented unto The Most Noble Bernard Marmaduke, Duke of Norfolk, Knight of the Most/ Noble Order of the Garter Knight Grand Cress of the Royal Victorian Order, Earl Marshal and Hereditary Marshal of/ England and one of Her Majesty's Most Honourable Privy Council that the Melbourne Harbor Trust Commissioners is a body/ corporate with perpetual succession and a Common Seal duly constituted by Act of Legislature of the Colony of Victoria number/ DLII bearing date Twenty second day of December 1876 the said Act having been amended from time to time and various Acts passed consolidating such amendments that under the said/ Act the exclusive management and control of the port and the preservation and improvement of the port generally as vested in the said Commissioners. That the Melbourne Harbour Trust/ Commissioners being desirous of having Armorial Bearings, Supporters and a Device or Badge duly assigned under lawful authority and he hath therefore requested the favour of His Grace's/ Warrant for Ouigranting and assigning such Armorial Ensigns and in the same Patent such Supporters and such Device or Badge as may be proper to be borne and used by the Melbourne/ Harbor Trust Commissioners on Seals otherwise accoding to the Laws of Arms. And forasmuch as the said Earl Marshal did by warrant under his hand and Seal bearing date the Sev-/ enth day of March 1962 authorize and direct Us to grant and assign such Armorial Ensigns and such Supporters and such Device or Badge Accordingly. Know ye therefore that we/ the said Garter Clarenceux and Norroy and Ulster in pursuance of His Grace's warrant and by virtue of the Letters of Patent of Our several offices to each of us respectively granted do/ by these Presents grant and assign unto the Melbourne Harbor Trust Commissioners the Arms following that is to say: Azure a representation of the constellation of the Southern Cross/ Argent on a Chief enarched on five Pallets of the first. And for the Crest Out of a Coronet composed of eight Masts each with sail set and upon Rim Or in front of a Bollard proper/ two Anchors in saltire Azure Mantled figure doubled Argent as the same are in the margin here of more plainly depicted. And by the Authority aforesaid We do/ further grant and assign the following Device or Badge that is to say: Two Anchors in saltire Argent as here depicted And by the Authority aforesaid the said Garter/ do by these Presents further grant and assign unto the Melbourne Harbor Trust Commissioners the Supporters following that is to say : On either side a Sea Horse/ (Hippocampus) or collared and lined Gules in front of a representation of the Melbourne Harbour front proper as the same are also in the margins here of more/ arms plainly depicted the whole to be borne and used forever hereafter by the Melbourne Harbour Trust Commissioners on seals otherwise according to the laws of/ Arms. In witness whereof we the said Garter Clarenceux and a Norroy and Ulster Kings of Arms have to these presents subscribed Our names and affixed the seals/ Of our Several offices this fith day of March in the Twelfth Year of the reign of our Soveriegn Lady Elizabeth the Second by the Grace of God of the United Kingdom of Great/ Britain and Northern Ireland and of Her other Realms and Territories Queen head of the Commonwealth Defender of the Faith and in the years of Our Lord One Thousand nine/ hundred and sixty three" "Prosperity Through Service" -
 Flagstaff Hill Maritime Museum and Village
Marble Tile, circa 1878
The artefact is a white marble tile raised from the wreck of the LOCH ARD (1878). The cargo manifest of the sunken vessel has the entry “Marble £400”. This is placed directly following the entry “Glass (604 cases)”. This conjunction suggests the marble tile was originally part of a consignment intended for use in a ‘high end’ residential or public building project in the gold and wool rich Colony of Victoria. Traditionally, white or cream marble was imported into Britain from the Mediterranean region of Europe, where beds of sedimentary limestone (calcium and magnesium carbonate) had been buried over a long geological period of time. Deep in the earth’s crust, it had been subjected to immense pressures and high temperatures, sufficient to completely re-crystallise the original deposits. Marble beds began as layers of sediment at the bottom of ancient tropical seas, forming from the skeletal remains of calcareous fossils, shell, and coral fragments. The metamorphic process of prolonged compression and heating recrystallised this skeletal material, destroying all signs of the original sedimentary fabric. The resulting ‘true’ marbles of, for example, White Carrara (Tuscany, Italy), Verdi (green) Antico (Thessaly, Greece), and Rouge (red) Languadoc (Carcassone, France), were highly prized in classical decoration (sculpture and friezes) and architecture (temples and arches). Marble was found in nineteenth century Australia, but in small, uneconomic deposits, not suitable for commercial quarrying. The comparative expense of imported marble restricted its use in colonial buildings to carved fireplaces and mantel pieces, or outdoor ornaments such as fountains, statuary and grave stones. If Carrara marble floor tiles were used, they were used sparingly, as an arresting feature in entrance halls for instance. However, most prominent private and public construction used timber flooring, waxed or ‘japanned’, with carpet runners and rugs (for example the Austin’s Barwon Park Mansion, 1871), or laid tessellated and ceramic tiles of baked clay infused with colour (for example the Chirnside’s Werribee Park Mansion, 1878). HISTORY OF THE LOCH ARD The LOCH ARD belonged to the famous Loch Line which sailed many ships from England to Australia. Built in Glasgow by Barclay, Curdle and Co. in 1873, the LOCH ARD was a three-masted square rigged iron sailing ship. The ship measured 262ft 7" (79.87m) in length, 38ft (11.58m) in width, 23ft (7m) in depth and had a gross tonnage of 1693 tons. The LOCH ARD's main mast measured a massive 150ft (45.7m) in height. LOCH ARD made three trips to Australia and one trip to Calcutta before its final voyage. LOCH ARD left England on March 2, 1878, under the command of Captain Gibbs, a newly married, 29 year old. She was bound for Melbourne with a crew of 37, plus 17 passengers and a load of cargo. The general cargo reflected the affluence of Melbourne at the time. On board were straw hats, umbrella, perfumes, clay pipes, pianos, clocks, confectionary, linen and candles, as well as a heavier load of railway irons, cement, lead and copper. There were items included that intended for display in the Melbourne International Exhibition in 1880. The voyage to Port Phillip was long but uneventful. At 3am on June 1, 1878, Captain Gibbs was expecting to see land and the passengers were becoming excited as they prepared to view their new homeland in the early morning. But LOCH ARD was running into a fog which greatly reduced visibility. Captain Gibbs was becoming anxious as there was no sign of land or the Cape Otway lighthouse. At 4am the fog lifted. A man aloft announced that he could see breakers. The sheer cliffs of Victoria's west coast came into view, and Captain Gibbs realised that the ship was much closer to them than expected. He ordered as much sail to be set as time would permit and then attempted to steer the vessel out to sea. On coming head on into the wind, the ship lost momentum, the sails fell limp and LOCH ARD's bow swung back. Gibbs then ordered the anchors to be released in an attempt to hold its position. The anchors sank some 50 fathoms - but did not hold. By this time LOCH ARD was among the breakers and the tall cliffs of Mutton Bird Island rose behind the ship. Just half a mile from the coast, the ship's bow was suddenly pulled around by the anchor. The captain tried to tack out to sea, but the ship struck a reef at the base of Mutton Bird Island, near Port Campbell. Waves broke over the ship and the top deck was loosened from the hull. The masts and rigging came crashing down knocking passengers and crew overboard. When a lifeboat was finally launched, it crashed into the side of LOCH ARD and capsized. Tom Pearce, who had launched the boat, managed to cling to its overturned hull and shelter beneath it. He drifted out to sea and then on the flood tide came into what is now known as LOCH ARD Gorge. He swam to shore, bruised and dazed, and found a cave in which to shelter. Some of the crew stayed below deck to shelter from the falling rigging but drowned when the ship slipped off the reef into deeper water. Eva Carmichael had raced onto deck to find out what was happening only to be confronted by towering cliffs looming above the stricken ship. In all the chaos, Captain Gibbs grabbed Eva and said, "If you are saved Eva, let my dear wife know that I died like a sailor". That was the last Eva Carmichael saw of the captain. She was swept off the ship by a huge wave. Eva saw Tom Pearce on a small rocky beach and yelled to attract his attention. He dived in and swam to the exhausted woman and dragged her to shore. He took her to the cave and broke open case of brandy which had washed up on the beach. He opened a bottle to revive the unconscious woman. A few hours later Tom scaled a cliff in search of help. He followed hoof prints and came by chance upon two men from nearby Glenample Station three and a half miles away. In a state of exhaustion, he told the men of the tragedy. Tom returned to the gorge while the two men rode back to the station to get help. By the time they reached LOCH ARD Gorge, it was cold and dark. The two shipwreck survivors were taken to Glenample Station to recover. Eva stayed at the station for six weeks before returning to Ireland, this time by steamship. In Melbourne, Tom Pearce received a hero's welcome. He was presented with the first gold medal of the Royal Humane Society of Victoria and a £1000 cheque from the Victorian Government. Concerts were performed to honour the young man's bravery and to raise money for those who lost family in the LOCH ARD disaster. Of the 54 crew members and passengers on board, only two survived: the apprentice, Tom Pearce and the young woman passenger, Eva Carmichael, who lost all of her family in the tragedy. Ten days after the LOCH ARD tragedy, salvage rights to the wreck were sold at auction for £2,120. Cargo valued at £3,000 was salvaged and placed on the beach, but most washed back into the sea when another storm developed. The wreck of LOCH ARD still lies at the base of Mutton Bird Island. Much of the cargo has now been salvaged and some was washed up into what is now known as LOCH ARD Gorge. Cargo and artefacts have also been illegally salvaged over many years before protective legislation was introduced. One of the most unlikely pieces of cargo to have survived the shipwreck was a Minton porcelain peacock - one of only nine in the world. The peacock was destined for the Melbourne International Exhibition in 1880. It had been well packed, which gave it adequate protection during the violent storm. Today, the Minton peacock can be seen at the Flagstaff Hill Maritime Museum in Warrnambool. From Australia's most dramatic shipwreck it has now become Australia's most valuable shipwreck artefact and is one of very few 'objects' on the Victorian State Heritage Register. The wreck of the LOCH ARD is of State significance — Victorian Heritage Register S417 Flagstaff Hill’s collection of artefacts from LOCH ARD is significant for being one of the largest collections of artefacts from this shipwreck in Victoria. It is significant for its association with the shipwreck, which is on the Victorian Heritage Register (VHR S417). The collection is significant because of the relationship between the objects, as together they have a high potential to interpret the story of the LOCH ARD. The LOCH ARD collection is archaeologically significant as the remains of a large international passenger and cargo ship. The LOCH ARD collection is historically significant for representing aspects of Victoria’s shipping history and its potential to interpret sub-theme 1.5 of Victoria’s Framework of Historical Themes (living with natural processes). The collection is also historically significant for its association with the LOCH ARD, which was one of the worst and best known shipwrecks in Victoria’s history. A square marble tile retrieved from the wreck of the LOCH ARD. Most of its surface is covered by a thin layer of limestone and marine growth encrustation that is stained rust-red. The tile is ‘rough-worked’, cut to shape and size, but not smoothed or polished. There is a companion tile in similar condition in the Flagstaff Hill collection. From visual observation of the original surface (at low magnification) the tile appears to be of white Carrara-type marble.flagstaff hill, warrnambool, shipwrecked coast, flagstaff hill maritime museum, maritime museum, shipwreck coast, flagstaff hill maritime village, great ocean road, loch line, loch ard, captain gibbs, eva carmichael, tom pearce, glenample station, mutton bird island, loch ard gorge, white marble, marble tile, carrara marble, imported marble, colonial architecture, victorian building materials -
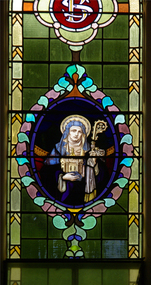 Ballarat Heritage Services
Photograph, Lisa Gervasoni, St Brigid Stained Glass Window, Crossley, 18/08/2013
"LARGE GATHERINGNG AT - CROSSLEY DEDICATION AND OPENING SERVICES. SERMON BY DR. MANNIX. Yesterday was an important and historic day for the Roman Catholic community of Crossley and Koroit, in as much as it will be always associated in the memories of all con cerned with the opening of the new St. Brigid's Church, Crossley. This building is far above the average standard of sacred edifices in country towns, and is certainly superior to any ercted in this district outside the churches in the two larger centres - Warrnambool and Koroit. The style of architecture chosen is a free treatment of the Romanesque, which is something quite original in the Western District. This noble style, from which, with its near re lative the Byzantine, spring the great Gothic school of architecture, is characterised by a special charm of its own, one of its chief features being graceful and sweeping circular curves in roof, window heads and in the ar rangenent of the ground plan. The building is of brick finished off with true Romanesqiue pillared pinnacles in concrete and plaster, the brick and concrete producing a pleasing contrast. The main characteristic of the front is a large rose window filled with Romlanesque circular tracery, and below a bold porch and entrance. The two sides are pierced with long circular-headed windows between graceful buttresses and the wall line is pleasingly broken by the projecting bays of the confessionals and also by the vestries. The main building is 80 feet by 30 feet' and the Sanctuary is spacious and semi-circular in shape, and lighted by three windows. The interior of the church is most artistic. The ceiling is semi-circular and of fibrous plaster in ornate designs. All the windows are lead lighted, throwing a rich and mellow harmony of' color throughout the interior and the white wails, mouldings, architraves and other fibrous plaster decorations: are further relieved by the rich coloring: in the stations of.the Cross arrranged around the nave. The central window of the Sanctuary contains a splendidly executed stained glass representation of St. Brigid. At.the western end is a room gallery. The altar is a choice piece of Gothic woodwork, in light, soft coloring, and there are two altars on either side of the Sanctuary in oak, and above whlch are very fine colored figures of Christ; and the Madonna. On either side of the altar are life-size figures of angels holding high brass candalabra. The whole of the furnishings of the church are on a sumptuous scale, and the edifice reflects credit on all concerned. The church can seat nearly 500 people. The architect was Mr. A. A. Fritsch. of Melbourne, and the contractors Messrs F. and E. Deagne, of North Fitzroy. The contract price for the building was £5,500. THE OPENING SERVICE. After the cereimony of solemnly blesssing the church was performed by His Lordship the Bishop of the Diocese, Dr. Higgins, assisted by His Grace the Coadjutor Archbishop of Melbourne. Dr. Mannix, the great gatheiring from all parts of the district entered the church, which was soon completely filled. The members of the H.A.C.B.S. attended wearing their green and gold regalia, and acted as a 'guard of honor' to the Co-adjlutor Arclhbishop and Bishop. Mass was celebrated by the Rev. Father Phelan, of Koroit, and a feature of the solemn service was the singing of a choir which consisted of picked voices from St. Carthage's choir, with friends from Warrnam bool and assisted by some of the mem bers of the Koroit choir, with Miss Logan as organist and Mr. Arthur H. Renwick as conductor. They rendered the music in splendid style throghonut. The "Kyrie," "Gloria." "Agnus Dei' and Dona Nobis" were from Farmer's Mass in B flat, and the "Credo" and "Sanctus" from Webbe's Mass in G. The soloists in the Mass were Mrs. Ryan, the Misses McEntee. Miss Katie O'Brien. and Messrs. J. M. Crowley, W. J. Callaghan; B. McEntee and W. Mahony. The chorus sang with great precision, special attention being paid to at tack. At the offertory Mrs. Dan Ryan gave a beautiful rendering of Gounod's "Ava Maria." After the Elevation that fine duet "Tantum Ergo." by Rossi, was sung by Messrs. Crowley and Renwick in an artistic manner, their fine voices blending splendidly. During the collection, Mr. Renwick sang with much feeling that devotional solo, "Lead Thou Me On,", after which Mr Crowley gave .an ex cellent rendering of Weissi's "0 Salu taris Hostia;" and the choir sang several hymns." It might here be mentioned that at the request of Fa ther Kerin, the same choir will repeat the music.at the Koroit Church on Sunday next, on the occasion of the ceremnly of laying the foundation stone of the cormpletion of the church. Dr. Mannix preachled the sermon for the occasion, taking his text from St. Luke first 11 verses. He re viewed the Gospel story of Christ preaching to the multitude from a boat on Lake Gennesaret and the miraculous draught of fish. The obedi ence of the poor fishermen in casting their nets at Christ's bidding was richly rewarded, and the miraculous occurrence was a striking example of what was to happen when Christ established His Church and built it up on those twelve apostles. When they came to think of it, nothing so re markable and marvellous had happened before or since in the history of mankind. The world at that time was for the most part a Pagan world steeped in iniquity and sin. The chosen people of God had God's re velation, but they worshipped with their lips and not with their hearts. When Christ was to establish His Church upon earth and leave an or gantisation that would continue His work, did He select learned men, powerful men, rich men, or a time that would seem propituous? No. He selected twelve poor, igorant simple fishermen, without money, power, learning or anything calculated to enable them to do anything striking in the world's history. The success of the first morning after pentecost was not confined to those first days when the plentitude of the Holy Ghost sat upon the .Apostles, but it continued age after age until the whole world was brought within the sphere of ac tion of the Church. Greece, Rome Europe Asia and America, and now Australia had been brought into the net. This must be a consolation to them all as well as it was to him (the preacher), when they remembered that they came from a land which of all others had been faithful to the Gospel of Jesus Christ. It was a consolation to them that in that great work that had been accomplished in bringing men into the meshes of the Church, and bringing them to God the nation to which they belontged had taken so great a part. Their religion flourished in England, Scotland, America and Australia. Surely it was due to the sons of St. Patrick, the sons and daughters of Ireland to find consolation in these great facts might It might seem hard that so many had to leave their native-land for England, Scotland, America and Australia. But if hard it was the means of keeping the Catholic faith living in England and Scotland. If to-day the Irish Catholics and Catholics of Irish de scent were taken out of the English and Scotch population there would be little left of the true Church of God. It seemed hard to emigrate to distant lands, but the result had been the new magnificent church in the United States, the flourishing churches in Canada and South Africa. Those Irish emigrants were a cornparatively small band. Perhaps they had not the learning of other nations. Certainly they had not the wealth and it did not fall to their lot to have the power of the sword, but God was with them, and the faith they took from Ireland flourished in those distant lands. In this fair land of Australia they had a glorious herit age handed down from the pioneer Irish Catholics, who came to this fair Austral land. There was a time when those who were opposed to God and God's Church,thought that Australia should be a wholly Protestant land. They had lived to see whether God or His enemies were the stronger. They had lived to see that those who in distant days would have stamped out the Catholic religion in Australia, had not prevailed. Their names had been forgotten because of their persecution of the Catholic Church, and they had lived - to see the glorious success that now, in every part of the Common wealth, rested upon the Catholic Church in Australia. Might God bless that Church and those Irish people, and the people of Irish descent, who had built it up. In that locality, and there was no place in.the Common wealth where the Catholic Church was held in higher esteem, the people would always be faithful to God and His Church. That beautiful building, and all it signified in loyalty and faithfulness, was a credit and a consolation to the Bishop and people of the diocese, to the architect who had done his work so artistically and skil fully. to the priests and the zealous administration of the parish. There was surely hope and inspiration in that day's celebration, that as time went on the Catholic faith would sink deeper and deeper into ther coming generation, and that the Catholic progress of the past 50 years would be small in comparison to the great progress of the future. He congratulated the Bishop priests and people who had raised that temple. He congratulated the people of Crossley; upon their generosity and self-sacrifice, and he prayed that God's blessing and the blessing of St. Brigid would rest upon them; their children and children's children. And when those who had received the sacraments and had been instructed in that Church were called before the Judgment Seat he pray ed that not one would be missing, and St. Peter aind St. Brigid would be able to count them all into the en joyment .of Eternal bliss. THE CELEBRATION The Rev. Father Kerin, Adninistra tor of the Parish, after the collection, read a lengthy list of the principal donations, headed by the Bishop, Dr. Higgins, with £250. All the furnish ings of the Church were also donations, and the Coadjutor-Archbishop added £5 to the list. The Rev. Father Kerin stated that the total to hand was £1245/10/7, which was an other proof of the generosity of the Crossley and district people. The amount previously received in donations was £1077/3. They started buildiing with a credit balance of £262 10/5 and ther now had a debit balance of £2,728/18/5. The total cost of the Church was £6,250, so that they would see the greater part of the indebtedness had already been wiped out. The Bishop (Dr. Higgins) delivered a brief address, in the course of which he congratulated the priests and people upon the completion of their magnificent Church. He congratulated the people on their magnificent generosity. He expressed his of deep indebtedness to the Coadjutor Archbishop of Melbourne for the services he had rendered to them. He had attended at considerable sacrifice to himself, and they were extremely grateful for the presence of so distinguished a champion who had shown such zeal and interest in their Church in this new land. He (the Bishop) trusted that his splendid talents would long be devoted to the defence of the Church." (Warrnambul Standard, 02 July 1914)Colour photograph of a portrait of St Brigid in stained glass. The depiction of St Brigid is located at St Brigid's former Catholic Church, Crossley.st brigid, stained glass, st brigid's crossley -
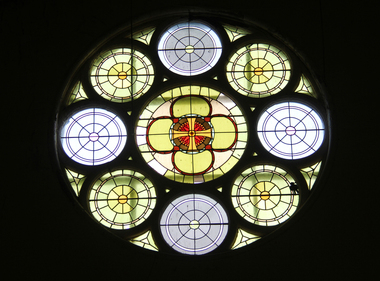 Ballarat Heritage Services
Digital photographs, St Brigid's Crossley stained glass windows, last weekend June 2014
"LARGE GATHERINGNG AT - CROSSLEY DEDICATION AND OPENING SERVICES. SERMON BY DR. MANNIX. Yesterday was an important and historic day for the Roman Catholic community of Crossley and Koroit, in as much as it will be always associated in the memories of all con cerned with the opening of the new St. Brigid's Church, Crossley. This building is far above the average standard of sacred edifices in country towns, and is certainly superior to any ercted in this district outside the churches in the two larger centres - Warrnambool and Koroit. The style of architecture chosen is a free treatment of the Romanesque, which is something quite original in the Western District. This noble style, from which, with its near re lative the Byzantine, spring the great Gothic school of architecture, is characterised by a special charm of its own, one of its chief features being graceful and sweeping circular curves in roof, window heads and in the ar rangenent of the ground plan. The building is of brick finished off with true Romanesqiue pillared pinnacles in concrete and plaster, the brick and concrete producing a pleasing contrast. The main characteristic of the front is a large rose window filled with Romlanesque circular tracery, and below a bold porch and entrance. The two sides are pierced with long circular-headed windows between graceful buttresses and the wall line is pleasingly broken by the projecting bays of the confessionals and also by the vestries. The main building is 80 feet by 30 feet' and the Sanctuary is spacious and semi-circular in shape, and lighted by three windows. The interior of the church is most artistic. The ceiling is semi-circular and of fibrous plaster in ornate designs. All the windows are lead lighted, throwing a rich and mellow harmony of' color throughout the interior and the white wails, mouldings, architraves and other fibrous plaster decorations: are further relieved by the rich coloring: in the stations of.the Cross arrranged around the nave. The central window of the Sanctuary contains a splendidly executed stained glass representation of St. Brigid. At.the western end is a room gallery. The altar is a choice piece of Gothic woodwork, in light, soft coloring, and there are two altars on either side of the Sanctuary in oak, and above whlch are very fine colored figures of Christ; and the Madonna. On either side of the altar are life-size figures of angels holding high brass candalabra. The whole of the furnishings of the church are on a sumptuous scale, and the edifice reflects credit on all concerned. The church can seat nearly 500 people. The architect was Mr. A. A. Fritsch. of Melbourne, and the contractors Messrs F. and E. Deagne, of North Fitzroy. The contract price for the building was £5,500. THE OPENING SERVICE. After the cereimony of solemnly blesssing the church was performed by His Lordship the Bishop of the Diocese, Dr. Higgins, assisted by His Grace the Coadjutor Archbishop of Melbourne. Dr. Mannix, the great gatheiring from all parts of the district entered the church, which was soon completely filled. The members of the H.A.C.B.S. attended wearing their green and gold regalia, and acted as a 'guard of honor' to the Co-adjlutor Arclhbishop and Bishop. Mass was celebrated by the Rev. Father Phelan, of Koroit, and a feature of the solemn service was the singing of a choir which consisted of picked voices from St. Carthage's choir, with friends from Warrnam bool and assisted by some of the mem bers of the Koroit choir, with Miss Logan as organist and Mr. Arthur H. Renwick as conductor. They rendered the music in splendid style throghonut. The "Kyrie," "Gloria." "Agnus Dei' and Dona Nobis" were from Farmer's Mass in B flat, and the "Credo" and "Sanctus" from Webbe's Mass in G. The soloists in the Mass were Mrs. Ryan, the Misses McEntee. Miss Katie O'Brien. and Messrs. J. M. Crowley, W. J. Callaghan; B. McEntee and W. Mahony. The chorus sang with great precision, special attention being paid to at tack. At the offertory Mrs. Dan Ryan gave a beautiful rendering of Gounod's "Ava Maria." After the Elevation that fine duet "Tantum Ergo." by Rossi, was sung by Messrs. Crowley and Renwick in an artistic manner, their fine voices blending splendidly. During the collection, Mr. Renwick sang with much feeling that devotional solo, "Lead Thou Me On,", after which Mr Crowley gave .an ex cellent rendering of Weissi's "0 Salu taris Hostia;" and the choir sang several hymns." It might here be mentioned that at the request of Fa ther Kerin, the same choir will repeat the music.at the Koroit Church on Sunday next, on the occasion of the ceremnly of laying the foundation stone of the cormpletion of the church. Dr. Mannix preachled the sermon for the occasion, taking his text from St. Luke first 11 verses. He re viewed the Gospel story of Christ preaching to the multitude from a boat on Lake Gennesaret and the miraculous draught of fish. The obedi ence of the poor fishermen in casting their nets at Christ's bidding was richly rewarded, and the miraculous occurrence was a striking example of what was to happen when Christ established His Church and built it up on those twelve apostles. When they came to think of it, nothing so re markable and marvellous had happened before or since in the history of mankind. The world at that time was for the most part a Pagan world steeped in iniquity and sin. The chosen people of God had God's re velation, but they worshipped with their lips and not with their hearts. When Christ was to establish His Church upon earth and leave an or gantisation that would continue His work, did He select learned men, powerful men, rich men, or a time that would seem propituous? No. He selected twelve poor, igorant simple fishermen, without money, power, learning or anything calculated to enable them to do anything striking in the world's history. The success of the first morning after pentecost was not confined to those first days when the plentitude of the Holy Ghost sat upon the .Apostles, but it continued age after age until the whole world was brought within the sphere of ac tion of the Church. Greece, Rome Europe Asia and America, and now Australia had been brought into the net. This must be a consolation to them all as well as it was to him (the preacher), when they remembered that they came from a land which of all others had been faithful to the Gospel of Jesus Christ. It was a consolation to them that in that great work that had been accomplished in bringing men into the meshes of the Church, and bringing them to God the nation to which they belontged had taken so great a part. Their religion flourished in England, Scotland, America and Australia. Surely it was due to the sons of St. Patrick, the sons and daughters of Ireland to find consolation in these great facts might It might seem hard that so many had to leave their native-land for England, Scotland, America and Australia. But if hard it was the means of keeping the Catholic faith living in England and Scotland. If to-day the Irish Catholics and Catholics of Irish de scent were taken out of the English and Scotch population there would be little left of the true Church of God. It seemed hard to emigrate to distant lands, but the result had been the new magnificent church in the United States, the flourishing churches in Canada and South Africa. Those Irish emigrants were a cornparatively small band. Perhaps they had not the learning of other nations. Certainly they had not the wealth and it did not fall to their lot to have the power of the sword, but God was with them, and the faith they took from Ireland flourished in those distant lands. In this fair land of Australia they had a glorious herit age handed down from the pioneer Irish Catholics, who came to this fair Austral land. There was a time when those who were opposed to God and God's Church,thought that Australia should be a wholly Protestant land. They had lived to see whether God or His enemies were the stronger. They had lived to see that those who in distant days would have stamped out the Catholic religion in Australia, had not prevailed. Their names had been forgotten because of their persecution of the Catholic Church, and they had lived - to see the glorious success that now, in every part of the Common wealth, rested upon the Catholic Church in Australia. Might God bless that Church and those Irish people, and the people of Irish descent, who had built it up. In that locality, and there was no place in.the Common wealth where the Catholic Church was held in higher esteem, the people would always be faithful to God and His Church. That beautiful building, and all it signified in loyalty and faithfulness, was a credit and a consolation to the Bishop and people of the diocese, to the architect who had done his work so artistically and skil fully. to the priests and the zealous administration of the parish. There was surely hope and inspiration in that day's celebration, that as time went on the Catholic faith would sink deeper and deeper into ther coming generation, and that the Catholic progress of the past 50 years would be small in comparison to the great progress of the future. He congratulated the Bishop priests and people who had raised that temple. He congratulated the people of Crossley; upon their generosity and self-sacrifice, and he prayed that God's blessing and the blessing of St. Brigid would rest upon them; their children and children's children. And when those who had received the sacraments and had been instructed in that Church were called before the Judgment Seat he pray ed that not one would be missing, and St. Peter aind St. Brigid would be able to count them all into the en joyment .of Eternal bliss. THE CELEBRATION The Rev. Father Kerin, Adninistra tor of the Parish, after the collection, read a lengthy list of the principal donations, headed by the Bishop, Dr. Higgins, with £250. All the furnish ings of the Church were also donations, and the Coadjutor-Archbishop added £5 to the list. The Rev. Father Kerin stated that the total to hand was £1245/10/7, which was an other proof of the generosity of the Crossley and district people. The amount previously received in donations was £1077/3. They started buildiing with a credit balance of £262 10/5 and ther now had a debit balance of £2,728/18/5. The total cost of the Church was £6,250, so that they would see the greater part of the indebtedness had already been wiped out. The Bishop (Dr. Higgins) delivered a brief address, in the course of which he congratulated the priests and people upon the completion of their magnificent Church. He congratulated the people on their magnificent generosity. He expressed his of deep indebtedness to the Coadjutor Archbishop of Melbourne for the services he had rendered to them. He had attended at considerable sacrifice to himself, and they were extremely grateful for the presence of so distinguished a champion who had shown such zeal and interest in their Church in this new land. He (the Bishop) trusted that his splendid talents would long be devoted to the defence of the Church." (Warrnambul Standard, 02 July 1914)Digital images of the stained glass windows at St Brigid's Crossleyst brigid's crossley, st brigid's, catholic church, catholic, church, religion, centenary, celebrations, 100, anniversary, commemoration, stained glass, windows -
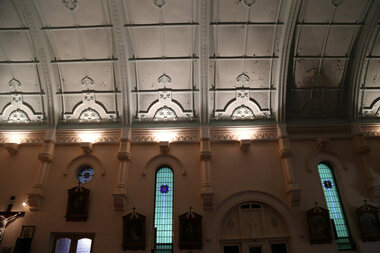 Ballarat Heritage Services
Digital photographs, St Brigid's Crossley - Christmas Carols, 2016, Christmas 2016
"LARGE GATHERINGNG AT - CROSSLEY DEDICATION AND OPENING SERVICES. SERMON BY DR. MANNIX. Yesterday was an important and historic day for the Roman Catholic community of Crossley and Koroit, in as much as it will be always associated in the memories of all con cerned with the opening of the new St. Brigid's Church, Crossley. This building is far above the average standard of sacred edifices in country towns, and is certainly superior to any ercted in this district outside the churches in the two larger centres - Warrnambool and Koroit. The style of architecture chosen is a free treatment of the Romanesque, which is something quite original in the Western District. This noble style, from which, with its near re lative the Byzantine, spring the great Gothic school of architecture, is characterised by a special charm of its own, one of its chief features being graceful and sweeping circular curves in roof, window heads and in the ar rangenent of the ground plan. The building is of brick finished off with true Romanesqiue pillared pinnacles in concrete and plaster, the brick and concrete producing a pleasing contrast. The main characteristic of the front is a large rose window filled with Romlanesque circular tracery, and below a bold porch and entrance. The two sides are pierced with long circular-headed windows between graceful buttresses and the wall line is pleasingly broken by the projecting bays of the confessionals and also by the vestries. The main building is 80 feet by 30 feet' and the Sanctuary is spacious and semi-circular in shape, and lighted by three windows. The interior of the church is most artistic. The ceiling is semi-circular and of fibrous plaster in ornate designs. All the windows are lead lighted, throwing a rich and mellow harmony of' color throughout the interior and the white wails, mouldings, architraves and other fibrous plaster decorations: are further relieved by the rich coloring: in the stations of.the Cross arrranged around the nave. The central window of the Sanctuary contains a splendidly executed stained glass representation of St. Brigid. At.the western end is a room gallery. The altar is a choice piece of Gothic woodwork, in light, soft coloring, and there are two altars on either side of the Sanctuary in oak, and above whlch are very fine colored figures of Christ; and the Madonna. On either side of the altar are life-size figures of angels holding high brass candalabra. The whole of the furnishings of the church are on a sumptuous scale, and the edifice reflects credit on all concerned. The church can seat nearly 500 people. The architect was Mr. A. A. Fritsch. of Melbourne, and the contractors Messrs F. and E. Deagne, of North Fitzroy. The contract price for the building was £5,500. THE OPENING SERVICE. After the cereimony of solemnly blesssing the church was performed by His Lordship the Bishop of the Diocese, Dr. Higgins, assisted by His Grace the Coadjutor Archbishop of Melbourne. Dr. Mannix, the great gatheiring from all parts of the district entered the church, which was soon completely filled. The members of the H.A.C.B.S. attended wearing their green and gold regalia, and acted as a 'guard of honor' to the Co-adjlutor Arclhbishop and Bishop. Mass was celebrated by the Rev. Father Phelan, of Koroit, and a feature of the solemn service was the singing of a choir which consisted of picked voices from St. Carthage's choir, with friends from Warrnam bool and assisted by some of the mem bers of the Koroit choir, with Miss Logan as organist and Mr. Arthur H. Renwick as conductor. They rendered the music in splendid style throghonut. The "Kyrie," "Gloria." "Agnus Dei' and Dona Nobis" were from Farmer's Mass in B flat, and the "Credo" and "Sanctus" from Webbe's Mass in G. The soloists in the Mass were Mrs. Ryan, the Misses McEntee. Miss Katie O'Brien. and Messrs. J. M. Crowley, W. J. Callaghan; B. McEntee and W. Mahony. The chorus sang with great precision, special attention being paid to at tack. At the offertory Mrs. Dan Ryan gave a beautiful rendering of Gounod's "Ava Maria." After the Elevation that fine duet "Tantum Ergo." by Rossi, was sung by Messrs. Crowley and Renwick in an artistic manner, their fine voices blending splendidly. During the collection, Mr. Renwick sang with much feeling that devotional solo, "Lead Thou Me On,", after which Mr Crowley gave .an ex cellent rendering of Weissi's "0 Salu taris Hostia;" and the choir sang several hymns." It might here be mentioned that at the request of Fa ther Kerin, the same choir will repeat the music.at the Koroit Church on Sunday next, on the occasion of the ceremnly of laying the foundation stone of the cormpletion of the church. Dr. Mannix preachled the sermon for the occasion, taking his text from St. Luke first 11 verses. He re viewed the Gospel story of Christ preaching to the multitude from a boat on Lake Gennesaret and the miraculous draught of fish. The obedi ence of the poor fishermen in casting their nets at Christ's bidding was richly rewarded, and the miraculous occurrence was a striking example of what was to happen when Christ established His Church and built it up on those twelve apostles. When they came to think of it, nothing so re markable and marvellous had happened before or since in the history of mankind. The world at that time was for the most part a Pagan world steeped in iniquity and sin. The chosen people of God had God's re velation, but they worshipped with their lips and not with their hearts. When Christ was to establish His Church upon earth and leave an or gantisation that would continue His work, did He select learned men, powerful men, rich men, or a time that would seem propituous? No. He selected twelve poor, igorant simple fishermen, without money, power, learning or anything calculated to enable them to do anything striking in the world's history. The success of the first morning after pentecost was not confined to those first days when the plentitude of the Holy Ghost sat upon the .Apostles, but it continued age after age until the whole world was brought within the sphere of ac tion of the Church. Greece, Rome Europe Asia and America, and now Australia had been brought into the net. This must be a consolation to them all as well as it was to him (the preacher), when they remembered that they came from a land which of all others had been faithful to the Gospel of Jesus Christ. It was a consolation to them that in that great work that had been accomplished in bringing men into the meshes of the Church, and bringing them to God the nation to which they belontged had taken so great a part. Their religion flourished in England, Scotland, America and Australia. Surely it was due to the sons of St. Patrick, the sons and daughters of Ireland to find consolation in these great facts might It might seem hard that so many had to leave their native-land for England, Scotland, America and Australia. But if hard it was the means of keeping the Catholic faith living in England and Scotland. If to-day the Irish Catholics and Catholics of Irish de scent were taken out of the English and Scotch population there would be little left of the true Church of God. It seemed hard to emigrate to distant lands, but the result had been the new magnificent church in the United States, the flourishing churches in Canada and South Africa. Those Irish emigrants were a cornparatively small band. Perhaps they had not the learning of other nations. Certainly they had not the wealth and it did not fall to their lot to have the power of the sword, but God was with them, and the faith they took from Ireland flourished in those distant lands. In this fair land of Australia they had a glorious herit age handed down from the pioneer Irish Catholics, who came to this fair Austral land. There was a time when those who were opposed to God and God's Church,thought that Australia should be a wholly Protestant land. They had lived to see whether God or His enemies were the stronger. They had lived to see that those who in distant days would have stamped out the Catholic religion in Australia, had not prevailed. Their names had been forgotten because of their persecution of the Catholic Church, and they had lived - to see the glorious success that now, in every part of the Common wealth, rested upon the Catholic Church in Australia. Might God bless that Church and those Irish people, and the people of Irish descent, who had built it up. In that locality, and there was no place in.the Common wealth where the Catholic Church was held in higher esteem, the people would always be faithful to God and His Church. That beautiful building, and all it signified in loyalty and faithfulness, was a credit and a consolation to the Bishop and people of the diocese, to the architect who had done his work so artistically and skil fully. to the priests and the zealous administration of the parish. There was surely hope and inspiration in that day's celebration, that as time went on the Catholic faith would sink deeper and deeper into ther coming generation, and that the Catholic progress of the past 50 years would be small in comparison to the great progress of the future. He congratulated the Bishop priests and people who had raised that temple. He congratulated the people of Crossley; upon their generosity and self-sacrifice, and he prayed that God's blessing and the blessing of St. Brigid would rest upon them; their children and children's children. And when those who had received the sacraments and had been instructed in that Church were called before the Judgment Seat he pray ed that not one would be missing, and St. Peter aind St. Brigid would be able to count them all into the en joyment .of Eternal bliss. THE CELEBRATION The Rev. Father Kerin, Adninistra tor of the Parish, after the collection, read a lengthy list of the principal donations, headed by the Bishop, Dr. Higgins, with £250. All the furnish ings of the Church were also donations, and the Coadjutor-Archbishop added £5 to the list. The Rev. Father Kerin stated that the total to hand was £1245/10/7, which was an other proof of the generosity of the Crossley and district people. The amount previously received in donations was £1077/3. They started buildiing with a credit balance of £262 10/5 and ther now had a debit balance of £2,728/18/5. The total cost of the Church was £6,250, so that they would see the greater part of the indebtedness had already been wiped out. The Bishop (Dr. Higgins) delivered a brief address, in the course of which he congratulated the priests and people upon the completion of their magnificent Church. He congratulated the people on their magnificent generosity. He expressed his of deep indebtedness to the Coadjutor Archbishop of Melbourne for the services he had rendered to them. He had attended at considerable sacrifice to himself, and they were extremely grateful for the presence of so distinguished a champion who had shown such zeal and interest in their Church in this new land. He (the Bishop) trusted that his splendid talents would long be devoted to the defence of the Church." (Warrnambul Standard, 02 July 1914)Digital images of the interior of St Brigid's, Crossley.st brigid's crossley, st brigid's, catholic church, catholic, church, religion, celebrations, christmas, christmas carols, carols, stained glass, window -
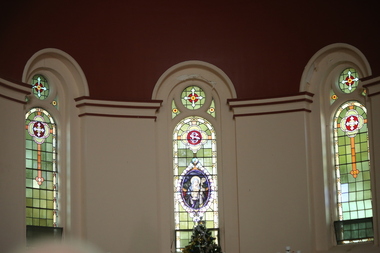 Ballarat Heritage Services
Photograph - Digital photographs, L.J. Gervasoni, St Brigid's Crossley - stained glass window, 2016
"LARGE GATHERINGNG AT - CROSSLEY DEDICATION AND OPENING SERVICES. SERMON BY DR. MANNIX. Yesterday was an important and historic day for the Roman Catholic community of Crossley and Koroit, in as much as it will be always associated in the memories of all con cerned with the opening of the new St. Brigid's Church, Crossley. This building is far above the average standard of sacred edifices in country towns, and is certainly superior to any ercted in this district outside the churches in the two larger centres - Warrnambool and Koroit. The style of architecture chosen is a free treatment of the Romanesque, which is something quite original in the Western District. This noble style, from which, with its near re lative the Byzantine, spring the great Gothic school of architecture, is characterised by a special charm of its own, one of its chief features being graceful and sweeping circular curves in roof, window heads and in the ar rangenent of the ground plan. The building is of brick finished off with true Romanesqiue pillared pinnacles in concrete and plaster, the brick and concrete producing a pleasing contrast. The main characteristic of the front is a large rose window filled with Romlanesque circular tracery, and below a bold porch and entrance. The two sides are pierced with long circular-headed windows between graceful buttresses and the wall line is pleasingly broken by the projecting bays of the confessionals and also by the vestries. The main building is 80 feet by 30 feet' and the Sanctuary is spacious and semi-circular in shape, and lighted by three windows. The interior of the church is most artistic. The ceiling is semi-circular and of fibrous plaster in ornate designs. All the windows are lead lighted, throwing a rich and mellow harmony of' color throughout the interior and the white wails, mouldings, architraves and other fibrous plaster decorations: are further relieved by the rich coloring: in the stations of.the Cross arrranged around the nave. The central window of the Sanctuary contains a splendidly executed stained glass representation of St. Brigid. At.the western end is a room gallery. The altar is a choice piece of Gothic woodwork, in light, soft coloring, and there are two altars on either side of the Sanctuary in oak, and above whlch are very fine colored figures of Christ; and the Madonna. On either side of the altar are life-size figures of angels holding high brass candalabra. The whole of the furnishings of the church are on a sumptuous scale, and the edifice reflects credit on all concerned. The church can seat nearly 500 people. The architect was Mr. A. A. Fritsch. of Melbourne, and the contractors Messrs F. and E. Deagne, of North Fitzroy. The contract price for the building was £5,500. THE OPENING SERVICE. After the cereimony of solemnly blesssing the church was performed by His Lordship the Bishop of the Diocese, Dr. Higgins, assisted by His Grace the Coadjutor Archbishop of Melbourne. Dr. Mannix, the great gatheiring from all parts of the district entered the church, which was soon completely filled. The members of the H.A.C.B.S. attended wearing their green and gold regalia, and acted as a 'guard of honor' to the Co-adjlutor Arclhbishop and Bishop. Mass was celebrated by the Rev. Father Phelan, of Koroit, and a feature of the solemn service was the singing of a choir which consisted of picked voices from St. Carthage's choir, with friends from Warrnam bool and assisted by some of the mem bers of the Koroit choir, with Miss Logan as organist and Mr. Arthur H. Renwick as conductor. They rendered the music in splendid style throghonut. The "Kyrie," "Gloria." "Agnus Dei' and Dona Nobis" were from Farmer's Mass in B flat, and the "Credo" and "Sanctus" from Webbe's Mass in G. The soloists in the Mass were Mrs. Ryan, the Misses McEntee. Miss Katie O'Brien. and Messrs. J. M. Crowley, W. J. Callaghan; B. McEntee and W. Mahony. The chorus sang with great precision, special attention being paid to at tack. At the offertory Mrs. Dan Ryan gave a beautiful rendering of Gounod's "Ava Maria." After the Elevation that fine duet "Tantum Ergo." by Rossi, was sung by Messrs. Crowley and Renwick in an artistic manner, their fine voices blending splendidly. During the collection, Mr. Renwick sang with much feeling that devotional solo, "Lead Thou Me On,", after which Mr Crowley gave .an ex cellent rendering of Weissi's "0 Salu taris Hostia;" and the choir sang several hymns." It might here be mentioned that at the request of Fa ther Kerin, the same choir will repeat the music.at the Koroit Church on Sunday next, on the occasion of the ceremnly of laying the foundation stone of the cormpletion of the church. Dr. Mannix preachled the sermon for the occasion, taking his text from St. Luke first 11 verses. He re viewed the Gospel story of Christ preaching to the multitude from a boat on Lake Gennesaret and the miraculous draught of fish. The obedi ence of the poor fishermen in casting their nets at Christ's bidding was richly rewarded, and the miraculous occurrence was a striking example of what was to happen when Christ established His Church and built it up on those twelve apostles. When they came to think of it, nothing so re markable and marvellous had happened before or since in the history of mankind. The world at that time was for the most part a Pagan world steeped in iniquity and sin. The chosen people of God had God's re velation, but they worshipped with their lips and not with their hearts. When Christ was to establish His Church upon earth and leave an or gantisation that would continue His work, did He select learned men, powerful men, rich men, or a time that would seem propituous? No. He selected twelve poor, igorant simple fishermen, without money, power, learning or anything calculated to enable them to do anything striking in the world's history. The success of the first morning after pentecost was not confined to those first days when the plentitude of the Holy Ghost sat upon the .Apostles, but it continued age after age until the whole world was brought within the sphere of ac tion of the Church. Greece, Rome Europe Asia and America, and now Australia had been brought into the net. This must be a consolation to them all as well as it was to him (the preacher), when they remembered that they came from a land which of all others had been faithful to the Gospel of Jesus Christ. It was a consolation to them that in that great work that had been accomplished in bringing men into the meshes of the Church, and bringing them to God the nation to which they belontged had taken so great a part. Their religion flourished in England, Scotland, America and Australia. Surely it was due to the sons of St. Patrick, the sons and daughters of Ireland to find consolation in these great facts might It might seem hard that so many had to leave their native-land for England, Scotland, America and Australia. But if hard it was the means of keeping the Catholic faith living in England and Scotland. If to-day the Irish Catholics and Catholics of Irish de scent were taken out of the English and Scotch population there would be little left of the true Church of God. It seemed hard to emigrate to distant lands, but the result had been the new magnificent church in the United States, the flourishing churches in Canada and South Africa. Those Irish emigrants were a cornparatively small band. Perhaps they had not the learning of other nations. Certainly they had not the wealth and it did not fall to their lot to have the power of the sword, but God was with them, and the faith they took from Ireland flourished in those distant lands. In this fair land of Australia they had a glorious herit age handed down from the pioneer Irish Catholics, who came to this fair Austral land. There was a time when those who were opposed to God and God's Church,thought that Australia should be a wholly Protestant land. They had lived to see whether God or His enemies were the stronger. They had lived to see that those who in distant days would have stamped out the Catholic religion in Australia, had not prevailed. Their names had been forgotten because of their persecution of the Catholic Church, and they had lived - to see the glorious success that now, in every part of the Common wealth, rested upon the Catholic Church in Australia. Might God bless that Church and those Irish people, and the people of Irish descent, who had built it up. In that locality, and there was no place in.the Common wealth where the Catholic Church was held in higher esteem, the people would always be faithful to God and His Church. That beautiful building, and all it signified in loyalty and faithfulness, was a credit and a consolation to the Bishop and people of the diocese, to the architect who had done his work so artistically and skil fully. to the priests and the zealous administration of the parish. There was surely hope and inspiration in that day's celebration, that as time went on the Catholic faith would sink deeper and deeper into ther coming generation, and that the Catholic progress of the past 50 years would be small in comparison to the great progress of the future. He congratulated the Bishop priests and people who had raised that temple. He congratulated the people of Crossley; upon their generosity and self-sacrifice, and he prayed that God's blessing and the blessing of St. Brigid would rest upon them; their children and children's children. And when those who had received the sacraments and had been instructed in that Church were called before the Judgment Seat he pray ed that not one would be missing, and St. Peter aind St. Brigid would be able to count them all into the en joyment .of Eternal bliss. THE CELEBRATION The Rev. Father Kerin, Adninistra tor of the Parish, after the collection, read a lengthy list of the principal donations, headed by the Bishop, Dr. Higgins, with £250. All the furnish ings of the Church were also donations, and the Coadjutor-Archbishop added £5 to the list. The Rev. Father Kerin stated that the total to hand was £1245/10/7, which was an other proof of the generosity of the Crossley and district people. The amount previously received in donations was £1077/3. They started buildiing with a credit balance of £262 10/5 and ther now had a debit balance of £2,728/18/5. The total cost of the Church was £6,250, so that they would see the greater part of the indebtedness had already been wiped out. The Bishop (Dr. Higgins) delivered a brief address, in the course of which he congratulated the priests and people upon the completion of their magnificent Church. He congratulated the people on their magnificent generosity. He expressed his of deep indebtedness to the Coadjutor Archbishop of Melbourne for the services he had rendered to them. He had attended at considerable sacrifice to himself, and they were extremely grateful for the presence of so distinguished a champion who had shown such zeal and interest in their Church in this new land. He (the Bishop) trusted that his splendid talents would long be devoted to the defence of the Church." (Warrnambul Standard, 02 July 1914)Digital images of the stained glass windows at St Brigid's, Crossley.victoria, crossley, st brigid's crossley, st brigid's, catholic church, catholic, church, religion, stained glass, window