Showing 221 items
matching the black chapel
-
 Victorian Harness Racing Heritage Collection at Lord's Raceway Bendigo
Document - Record, Harness Horse, Chapel Elect
... document in black and red ink. Chapel Elect Document Record ...Stephen Spark compiled horses performance records starting in 1983 on his typewriter. Chapel Elect raced from 1974 (3yo) through to 1978 (7yo). Career: 17 wins 9 seconds 8 thirds 79 starts.Typed document in black and red ink.harness racing, australasian harness racing, horse career, performance records, bendigo harness racing club, bhrc, chapel elect, k pocock, ken pocock, a robinson, alan robinson, ke pocock -
Victorian Harness Racing Heritage Collection at Lord's Raceway Bendigo
Document - Record, Harness Horse, Bay Chapel
Stephen Spark compiled horses performance records starting in 1983 on his typewriter. Bay Chapel raced from 1973 (2yo) through to 1979 (8yo). Career: 23 wins 14 seconds 17 thirds 132 starts.Typed document in black and red ink.harness racing, australasian harness racing, horse career, performance records, bendigo harness racing club, bhrc, bay chapel, vin knight, vj knight, rv knight, bob knight -
 Ballarat Heritage Services
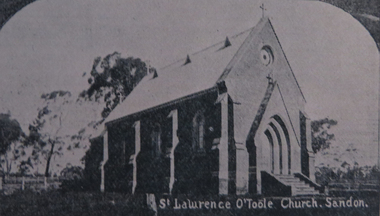
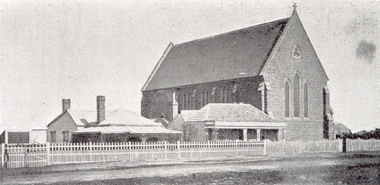
Photograph - Photograph - Colour, St Laurence O'Toole Catholic Church, Sandon
A small wooden school (22' x 14') was erected in Sandon by Father Patrick Smyth in 1859 (and at Golden Point) which was used for Mass and came to be regarded as a chapel. Twenty-three years later, a brick church was built by Father Allen at a cost of 1,000 pounds. The Church was blessed by Archbishop Goold on May 6th 1883 and dedicated to St Laurence. The 1940s saw some refurbishment and in 2002 a major restoration project was undertaken. St Laurence's was restored from roof to footings, by a dedicated band of volunteers and trades people. Work was completed mid 2003 and in November 2003 St Laurence's was re-dedicated with the celebration of Mass and a picnic tea. Black and white photograph of a brick church at Sandon, Victoria. sandon, sandon cemetery, st laurence o'toole catholic church, sandon -
 St Kilda Historical Society
Ephemera - Program - religious service, St George's Uniting Church East St Kilda Memorial Service, 1996
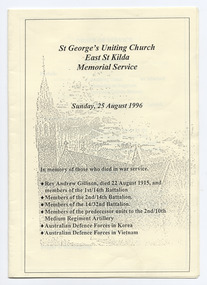
Annual memorial service in memory of those who died in war service, including former minister Rev Andrew Gillison, MA, who served as Chaplain for overseas service in World War I and died at Gallipoli in 1915 while attempting to rescue a wounded soldier. Held on 25 August 1996.The memorial service was followed by a lunch, a tour of the Army Depot, 2nd/10th Medium Regiment Artillery, 8 Chapel Street, East St Kilda, and then a concert back at the church later in the afternoon.Pamphlet of three cream coloured pages, folded and printed on both sides in black. Unbound. Illustration of the church on the front. rev andrew gillison, 14th battalion aif, 2/14th army battalion -
 St Kilda Historical Society
Document - Newsletter, St. George's Monthly Centenary Edition, 1977
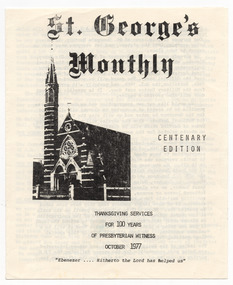
St George's Presbyterian Church is at 4 Chapel Street, St Kilda East. It is substantial red brick Gothic Revival building with distinctive 33.5-metre banded octagonal belltower and attractive contrasting cream brickwork and freestone dressings. The facade is dominated by a double entrance surmounted by a triangular rose window. It was designed by Albert Purchas. It opened on 1 October 1877 and the newsletter discusses the celebrations of the centenary in 1977. It is now St George's Uniting Church.Folded white paper printed in black on both sides, with a photograph of St George's Presbyterian Church, St KildaHandrwritten corrections to the typed text.st george's east st kilda uniting church, st george's presbyterian church st kilda, st george's monthly -
 Bendigo Historical Society Inc.
Container - BOTTLES COLLECTION: PEPPERMINT CORDIAL BY CHAS GLOVER BENDIGO
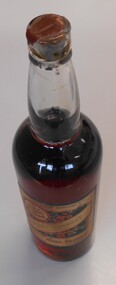
Charles John Glover (1881-1965) began his career driving a cordial cart for Mr Phillips. By 1906 he was operating in a partnership with Charles Runting as soft drink manufacturers in Chapel Street. This partnership was dissolved in 1907 and Glover continued alone.Glass bottle. Brown with black edges label: compound cordial at the top, and in pencil 15-20 yo old. underneath in an oval the trademark symbol of two bulls a coat of arms, a crown and a flag. The main part of the label has a flower symbol and the words ''flavored peppermint approx 26 ozs.'' diagonally across. Manufactured by Chas Glover Bendigo, phone 343. The bottle is full, cork in position with wax cover.bendigo, business, chas glover -
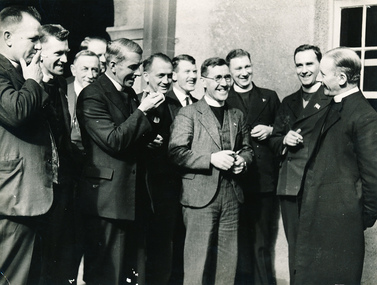 Mission to Seafarers Victoria
Photograph - Digital copy, Black and white, Herald Weekly Times, September 1936
This photograph was taken at the Triennial Congress, Melbourne. Frank Leslie Oliver served as chaplain at the Mission to Seafarers Melbourne for 30 years from 1930 - 1960. He is in this photograph, second from right, with a cigarette in his hand. Also in this photograph, at the far right, is the Most Reverend F. Head, Archbishop of Melbourne. The photograph is a record of a historic conference of MTS representatives from Australia and New Zealand. , September 1-3 , 1936: Revd Wm Hoog (Brisbane) Revd W.H. Terry (Port Pirie) Revd H.C Cuthbertson (Adelaide) Revd W.R. Tyler (Melbourne) Mr J.W. Neill (Melbourne) Revd. F. J. Evans (Sydney) Revd Frank L. Oliver ( Melbourne MTS) F W Melbourne (Archbishop F W Head 1929- 1942) Mr J.C. Grahame (Hobart) Rev B.J. Williams ((Wellington NZ) Rev J.C. Clift (Fremantle)Frank Leslie Oliver served as chaplain at the Mission to Seafarers Melbourne for 30 years from 1930 - 1960, including time served as chaplain with the Royal Australia Navy aboard HMAS Australia. He was a live-in chaplain and was supported by his entire family, including wife Moira, for whom a memorial window exists in the chapel. The Chaplains' Conference was held in 1936.Black and white photograph of a group of chaplains outside the Mission to Seafarers building in Flinders Street, Melbourne. Frank Oliver is second from right holding a cigarette in his right hand.Top left in blue ink (written by Padre Oliver): Australian MTS, Chaplains gathered in Triennal Congress, with most Rev.J Head, Abp of Melbourne. Top right corner in black ink: prior to 1939 In black and blue ink some names: Archbishop Head, Dad, Bill Tyler Port Melbourne, Padre Williams Wellington, Pat Neil Layreader Faded stamp in pink ink: Herald Feature Service, Melbourne A sticker with: Ret to B Kentroyal australian navy, mission to seafarers, anglican, frank leslie oliver, archbishop head, triennial conference, chaplains, herald newspaper, cigarette, robin kent, beverley kent nee oliver, chaplains conference, padre oliver, new zealand, pat neil, lay reader, bill tyler, port melbourne, reverend william wellington, chaplains group -
Clunes Museum
Book, PETER SPARK, CLUNES CEMETERY VICTORIA, HEADSTONE REGISTER 1861-2021VOLUME 4 METHODIST SECTION
SHORT HISTORY OF THE METHODIST CHURCH, CLUNES CEMETARY HEADSTONE REGISTER 1861-2021 METHODIST CHURCHHARDCOVER - PHOTOGRAPH OF CHAPEL/REGISTRY ON FRONT AND BACK COVERS 295 PAGES WITH BLACK AND WHITE PHOTOGRAPHS INCLUDED IS A SHORT HISTORY OF THE METHODIST CHURCHES HEADSTONE REGISTER 1861 TO 2021 CLUNES CEMETARY VOLUME 4, METHODIST SECTIONnon-fictionSHORT HISTORY OF THE METHODIST CHURCH, CLUNES CEMETARY HEADSTONE REGISTER 1861-2021 METHODIST CHURCHclunes cemetary, headstone register, methodist church headstone register, peter spark -
 Federation University Historical Collection
Booklet - Church, Harry Brown and Co, St Peter's Church, Ballarat, 1961
St Peter's Church was established in 1861 in the school house. In 1864 the question of building a church was seriously discussed. A foundation stone for the church was laid on 16 November 1864 by Bendan S. Hassell. The architect was Charles Davenport Cuthbert; the trustees were Somerville Learmonth, W.P. Whitcombe, Robert Wynne and J.B. McQuie. The church building committee consisted of Horace walker, J.S. Carver, John M. Fisher, Robert Williams, Thomas Gibson, John E. Hodgson and W. Lindisay Richardson. The foundation stone of the Soldier's Chapel was laid on 06 April 1917. The beautiful stained glass in the chapel was donated by Mrs W. Tunbridge and H.C. Curwen-Walker, in memory of their sons who were killed during World War One. In 1929 a new three manual organ by London's Hill, Norman and Beard was installed. It was the first in Ballarat with electro-pneumatic action.White soft covered booklet outlining the first 100 years of St Peter's Anglican Church, Ballarat. The book includes information on each of the ministers until 1961, a programme of the Centenary Celebrations, and black and white photographs of the exterior and interior of the church. Images include the Pittard Memorial Windows, the Crocker Memorial Windows and baptistry, and H.W.H. Adeney.st peter's anglican church ballarat, churches, religion, charles d. cuthbert, stained glass, w. tunbridge, h.c. curwen-walker -
Linton Mechanics Institute and Free Library Collection
Book - Novel, Hepple, Anne (Anne Hepple Dickinson, nee Batty), The house of Gow, [n.d] [1948?]
Romantic fiction set in provincial Scotland.284 p. : dark green/black cover. Section of original dust jacket was pasted to front, but most of it has been removed. Title and author's name printed on spine, publisher's name embossed on lower rhs of front cover.fictionRomantic fiction set in provincial Scotland.fiction, romance, anne hepple -
 Melbourne Tram Museum
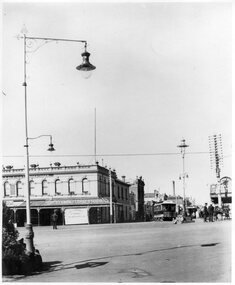
Photograph - Black and White - St Kilda Junction c1900 looking along Wellington Street
The photograph shows St Kilda Junction c1900, looking towards Wellington Street from the centre of the junction. A Windsor (Chapel Street to Ackland Street) cable tram is turning the corner while another is approaching. There is a cable tram uniformed person (with his hands on his hips) watching the tram - possible an Inspector. In the view is: AA Sleight Undertaker, Miss Nichols St Kilda Floral Studio, street lights, and a number of pedestrians standing on the roadways.Yields information about cable trams and St Kilda Junction.Photograph - Black and White - St Kilda Junction c1900 looking along Wellington Streettramways, trams, cable trams, st kilda junction, inspectors -
 Melbourne Tram Museum
Album - Charles Craig - part 1 of 2, 1950s to 1970s
Photo - see pdf file for further information. Number Brief Description CC1 S178 at Elsternwick level crossing track works CC2 Building East Preston Depot 1955 CC3 Camberwell depot – post WW2 – lots of trams and a black cat CC4 W2 584 and SW6 958 northbound – Chapel St and Brighton Road CC5 W2 357 – southbound, Chapel St Brighton Road CC6 Pascoe Vale Road, Raceday working – note the signal CC7 The Preston Workshops - The Argus, post WW2, 223, 647 et al CC8 923 or is it 922 being built at Preston – The Argus photo - CC8A 832 being positioned onto trucks at Preston after an overhaul – Argus Photo – see also CC306 CC9 Footscray depot` CC10 W5 797 in St Kilda Road during track works – 1950s CC11 W2 457 at Kew Post Office CC12 Wellington Parade – W2 432, 492 and 337 – special event CC13 Swan St line up of trams – football? Or other special event – Sinclair’s bus on the right side. CC14 W2 630 being washed at a depot – The Argus photo CC15 Royal Park line at Flemington Road – W2 355 and W5 786 CC16 Nicholson St track construction from a tram cab CC17 T181 on tour at Gordon St CC18 T181 on Maribyrnong Bridge CC19 Ditto at River St just off bridge CC20 As for CC18 CC21 At Raleigh Rd CC22 T181 at Footscray depot CC23 Track construction, Nicholson, just north of Gertrude CC24 Commissioning overhead Bourke St tram 988 CC25 Queens Parade – 997 and 994 CC26 Swapping trolley wheel to skid – commissioning CC27 Track construction in Gertrude St CC28 985 in Queens Parade running special CC29 997 in Queens Parade CC30 1033 at North Fitzroy – AETA Special CC31 Bourke St at Elizabeth St – has passengers on board CC32 W6 985, 996 Queens Parade, Mk 3 bus 333 CC33 As above CC34 Showing construction at Nicholson & Gertrude – Bourke St CC35 W2 223 on Burnley temporary bridge – VR track expansion CC36 W5 823 – ditto CC37 Tram on old bridge prior to removal CC38 W2 433 on temporary bridge with new bridge beams and old track CC39 Looking down showing temporary single track – Swan St CC40 Tait train passing under tram bridge CC41 SW6 on single line – off loading CC42 W2 547 at City Road Junction CC43 City Road Jtn – 1969 – 596 and 771 CC44 City Road Jtn – 1969 – 596 and 771 (same as CC45 438 in Flinders St CC46 355 somewhere CC47 552 somewhere CC47A 364 at Preston Workshops? CC48 W2 334 on Traverser – Preston Workshops CC49 Wellington pade – large line up of trams, c1950 925, and 611 CC50 W2 493 Franklin st – advertising for Savings Certificates CC51 Possibly 551 with advertising for fund raising for Blind institute CC52 249 at Hawthorn – Riversdale Junction – with a Tally Ho and Village Fair Aux. board CC53 MMTB Postcard of 511 CC54 Wattle Park terminus with Single line warning sign CC55 Wattle Park Duplication CC56 36 at Domain Junction – 833 CC57 36 at Domain Junction CC58 36 at Domain Junction with 810 and 833 CC59 36 in Swanston by Flinders St Station CC60 36 in Spencer St at A’Beckett CC61 36 crossing Collins St CC62 36 crossing Collins St CC63 36 northbound in St Kilda Road with Shrine in background CC64 36 northbound in Swanston St at Flinders St CC65 Postcard – Ballarat 36 in Domain Road CC66 Postcard - Stampshow – Hawthorn Horse tram CC67 Postcard - Stampshow – Peace cable tram CC68 Postcard - 1041 and cable car set 1 at Preston CC69 Postcard - Colins & Elizabeth – greetings from old Melbourne CC70 Postcard - Cable car set at Preston CC71 Postcard - Twentyman’s cable cars CC72 Postcard - Nu-color-vue – horse tram 256 CC73 Cable car set – Market & Flinders CC74 Cable trams at Twentymans’ in their shed CC75 Cable tram track at Bourke & Spencer prior to removal CC76 Cable tram bogie at Preston Workshops – used as a dolly CC77 Cable trams at Twentymans’ CC78 Postcard - Valentines – Bourke looking west from Swanston CC79 Postcard - Rose 3938 – Bourke at Swanston – the Leviathan building CC80 Postcard - Valentines – Elizabeth St looking south from Collins – No. 19 CC81 Postcard - Rose P4765 – Bourke St Melbourne CC82 Postcard - Rose 4090 – cable tram passing Parliament house CC83 Postcard - Valentines – GPO Elizabeth St CC84 Interior of cable trailer with clothing on a set CC85 Elizabeth St looking north CC86 Cigarette card - Collins St No. 41- WD HO Wills CC87 Postcard - Rialto building with cable set CC88 Postcard - Valentines - Swanston at Flinders looking north CC89 CC90 Q 150 Hanna St – dated on rear CC91 176 turning – photo ex Alan Jungworth CC92 161 on Princes Bridge – minimum fare 4d sign and Inspector CC93 459 at Point Ormond CC94 158 at Gordon St – side on view CC95 X 217 in Swanston St CC96 X 217 in Swanston St with an East Brighton destination CC97 T177 CC98 T177 Peel St – no destination roll – being transferred? CC99 X1 462 in Glenhuntly Road to Point Ormond CC100 X1 462 in Glenhuntly Road to Elsternwick Rly Station CC101 X1 462 in Glenhuntly Road to Point Ormond CC102 Q 150 Hanna St CC103 190 at Camberwell Depot CC104 T182 at Footscray CC105 X1 466 and W2 at Footscray CC106 190 at Camberwell Depot CC107 X1 467 Barkly St Footscray CC108 X2 679 turning into William St from La Trobe St CC109 X2 677 Glenhuntly Road with Point Ormond Destination CC110 Postcard T180 CC111 Postcard format – X1 467 on a truck – see also CC178 CC112 Postcard format – X1 467 at Wantirna South CC113 Q200 and SW6 896 at Thornbury – has labels on rear CC114 T177, Ballarat Road – has labels on rear CC115 T178 at Point Ormond CC116 Postcard X1 465 and 466 CC117 Postcard – X2 676 CC118 Postcard – TMSV X2 217 CC119 810 on temporary bridging – 24-12-67 CC120 W2 575 – Queens Parade junction in, still temporary bridging, substation under construction CC121 Forming Queens Parade Junction base slab CC122 W2 596 prior to tramway works – all tracks still in position CC123 It’s a mass of reinforcing – bridging being formed CC124 Looking north with substation being built CC125 Looking east with some rather tight curves, Wellington St still in use CC126 SW6 958 ex Wellington St with all tracks and signal box and buildings. CC127 Victoria Pde at Gisborne looking east – at least 4 cars CC128 SW6 893? With dash canopy lights and SW6 862 and a man with a newspaper CC129 SW6 894 on the S curves, with tram in Wellington St CC130 Similar photo CC131 W2 564 turning into Wellington St – the concrete tracks are not that old CC132 W2 552 running out of Wellington St CC133 W5 732 from Fitzroy St into St Kilda Road with next iteration in position – very wonky CC134 W5 764 turning into Fitzroy St CC135 SW6 947 turning from Wellington St CC136 W2 586 running out of High St CC137 W2 500 turning into Wellington St CC138 W2 543 in Wellington St inbound CC139 L103 with St Kilda Junction destination, and a tower truck on right CC140 Workmen – new track in Queensway in use CC141 Ditto CC142 L103 in Queensway, and another car in bound CC143 Looking east along Wellington St which has been taken out of use. Also a MMTB Roller CC144 W5 824 and a W2 and all types of wobbly temporary track CC145 W2 354 to High St CC146 Sw6 947 on the S bends CC147 W2 500 looking north – tram on the S bends CC148 SW6 896 leaving the S bend CC149 W2 357 and a MMTB City bus with trees/gardens on the side CC150 W5 817 Elliot Ave – see also CC302 CC151 W2 552 – note the large trolley bridge CC152 W2 550 at depot or workshops CC153 1B truck CC154 SW2 432 CC155 W2 155 at Glenhuntly CC156 SW6 937 on AETA tour? CC157 X2 677 on Footscray service – Ballarat Rd? CC158 W2 641 – High St Kew? CC159 SW6 847 – Power St Hawthorn CC160 Simpson St – big line up CC161 W2 546 truck No. 1? CC162 W2s at Glenhuntly depot CC163 No. 15 truck under 899 CC164 206 and other junk at Preston Workshops CC165 W in Swanston St Melbourne – Rose series card CC166 Y1 613 Batman Ave?? or William St at Collins CC167 Tram plans CC168 X 217 Swanston St – see also 95 and 96 CC169 217 in Swanston St – same as 95 CC169A 192 in St Kilda Road at Princes bridge CC170 192 in St Kilda Road at Princes bridge CC171 Bendigo 3 arriving Malvern depot – being unloaded CC172 Ditto CC173 T180 at a depot CC174 X1 463 wheel set CC175 C30 – dog car side view – close up CC176 C30 dog car CC177 206 and 30 at Preston Workshops CC178 X1 467 on a truck – see CC111 also CC179 42 CC180 42 at a depot, no destination box CC181 W2 556 1A type truck CC182 Flinders St Station – Rose Series CC183 W7 1035 Spring – Nicholson St CC184 W7 1022 MMTB Post Card CC185 Adelaide 178 – has on rear – R. Lilburn 4/82 CC186 Adelaide 175 – has on rear – R. Lilburn 4/82 CC187 Y1 610 on AETA tour CC188 Y1 610 on AETA tour with large group – Point Ormond CC189 AETA display – has GH55-32 in pencil on rear CC190 AETA display – has GH55-29 in pencil on rear CC191 Y1 610 on AETA tour with large group – Point Ormond CC192 VR 53 at Footscray CC193 VR cars 40 and 34 at Elwood wash dock CC194 W7 1024 as the 1970 Christmas tram CC195 Geelong – loading a set of 22E trucks CC196 Geelong 10 and 23 running an AETA special CC197 Geelong – AETA special CC198 Geelong 7 at Junction CC199 Geelong 10, in the city CC200 Geelong 33 with Belmont destination CC201 Geelong 15 Eastern Park destination 29-3-1948 CC202 Geelong 23 at Railway Station – 29-3-1948 CC203 Geelong 23 at Railway Station – 29-3-1948 CC204 Geelong – loading a bogie tram CC205 Geelong – loading a bogie tram CC206 Geelong 40 – loaded on truck CC207 Geelong 40 – on jacks CC208 Geelong 40 on jacks – 19 behind CC209 Geelong 38 with two workers on either side CC210 – 214 Australian Historic Tramways stamp folder and set CC215 Bendigo 17 at depot – has dup JBS on rear CC216 Bendigo 20, 29 bogie and straight sill car at Charing Cross CC217 Bendigo one man bogie Pall Mall CC218 Bendigo – Bogie 23, other cars and welding truck at depot CC219 Bendigo 7 with Quarry Hill destination CC220 Bendigo 21 with Lake Weerona destination CC221 ESCo 18 Ballarat CC222 Ballarat bogie 22 on AETA special CC223 Ditto CC224 Ballarat 34 at Stones Corner – R Lilburn CC225 Ballarat 15 in Bridge St – R Lilburn CC226 Ballarat 40 at Gardens – R Lilburn CC227 Ballarat 37 running out of depot – R Lilburn CC228 Postcard – Valentines – Sturt St with loaded horse tram trailer CC229 AETA Geelong tram tour ticket – 29-3-1948 CC230 Postcard – Geelong – Valentine 2114 – T&G building CC231 Postcard – PMTT ! – High St Malvern CC232 Postcard – Empire – Glenferrie Road, Malvern at Wattletree Rd CC233 Postcard Y469, MMTB CC234 Postcard Z2 Spring St CC235 Postcard – Z1 MMTB CC236 Postcard – Stamp Show W1 431 CC237 Postcard – Stamp show B2005 CC238 Postcard – Stamp show W6 982 CC239 Postcard – Valentines 1264 – Johnstone Park with tram in distance CC240 Postcard – Rose 10711 – Swanston and Lonsdale – Hospital and W232 CC241 Postcard – Rose 4827 – Fitzroy St St Kilda W2 362 and 548 CC242 Postcard – Valentines – 939 – St Kilda War Memorial, W and a R? CC243 Postcard – Valentines – 572 – St Kilda War Memorial, W 413 and 140? CC244 Postcard – Valentines – 938 – Uper and Lower Esplanade – L 104 CC245 Postcard – St Kilda Rd at Princes Bridge Y1 and W CC246 Postcard – Biscay BG82 – W5 814 - CC247 Postcard – Biscay 796112 – Bourke St looking west CC248 Postcard – Biscay 796109 – Bourke St looking east CC249 Postcard – Biscay 2AUS58 – Z5 Bourke St CC250 Postcard – Biscay BG 249 – Swanston St CC251 Postcard – National View – St Kilda Rd – shrine and Prince Henrys W2 405 CC252 Postcard – Nu color vue – 11 ML 156 – St Kilda Rd CC253 Postcard – Nu color vue – 11 ML 153 – Swanston St CC254 Postcard – Nu Color vue – Collins St 442 CC255 Postcard – Pitt card – Adelaide – H 364 at Victoria St CC256 Postcard – SPER L/P 154 CC257 Postcard – BTMS – 550 CC258 Postcard – SPER – Brisbane 295 CC259 Adelaide 131 at Burnside – has R Lilburn on card, c1911 CC260 Adelaide 194 CC261 Adelaide 235, with two crew, The News photo CC262 Rockhampton, outside post office – has source of photo details CC263 Sydney – 2086 and 2062 arriving Circular Quay CC264 Sydney – P class – Pitt St? CC265 Sydney – 1610 at Circular Quay CC266 Brisbane 99 and 468 CC267 Sydney with bridge behind CC268 Steam tram Paramatta Park – 103 CC269 Sydney – Museum Station =- Elizabeth St CC270 Sydney – weed burner 137S at a loop Demonstrates the work of Charles Craig in photography and collection of prints.Assembled album in a black presentation folder of 270 photographs from the Charles Craig Collection - 86 sleeves - part 1 of 2. All photographs have been scanned and placed on the Museum's G drive. A list of all photographs with details where possible has been compiled. Victorian Provincial, Launceston, Hobart and Sydney tram photos have been transferred to other Museums, image files retained.melbourne, tramways, tramcars, trams, charles craig, st kilda junction, trackworks -
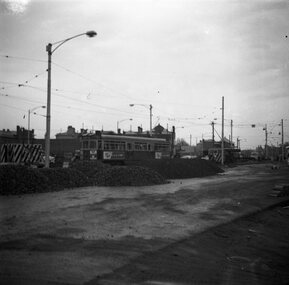 Melbourne Tram Museum
Photograph - Commissioning Queensway tram line, Warren Doubleday, 18-10-1968
Photos show the commissioning or testing of the tram track between Chapel St and St Kilda Junction by W7 940 on 18-10-1968. The first tram travelled on the outbound or down line, rather than the inbound or up line. 1 - At Chapel St 2 - climbing up to St Kilda Junction 3 - At St Kilda Junction with the track on the left side of the photograph being the track in use at the time to bypass the new work.Yields information the commissioning of new track at St Kilda Junction.Set of three Black and white photographs of the commissioning of tram tracks between Chapel St and St Kilda Junction.Has details on rear in blue ink.tramways, trams, tram 940, new tramway, track work, st kilda junction, chapel st, commissioning -
 Melbourne Tram Museum
Album - David Frost Slide Collection, David Frost
Photo - see pdf file for further information. Number Brief Description date DFC1 A general view from the former railway platform at Port Melb Station looking towards Station Pier on opening day 20-12-1987 DFC2 A2 285 in the Tramway Platform at Port Melbourne Station on opening Day 20-12-1987 DFC3 A2 285 in the Tramway Platform at Port Melbourne Station on opening Day 20-12-1987 DFC4 A2 285 in the Tramway Platform at Port Melbourne Station on opening Day 20-12-1987 DFC5 A2 273 at St Kilda Tramway Station on opening day 22-11-1987 DFC6 A2 273 turning from Fitzroy St into St Kilda Tramway Station on opening day 22-11-1987 DFC7 B1 2001 at St Kilda Tramway Station turning into Fitzroy St on opening day 22-11-1987 DFC8 B1 2002 enters St Kilda Tramway Station on opening day 22-11-1987 DFC9 An A2 approaches St Kilda Tramway Station on opening day 22-11-1987 DFC10 Concreting the connecting curve from Fitroy St into St Kilda Station c July 1987 DFC11 An MTA AEC MKVI bus in Grey St St Kilda at Dalgety St with Tramway works in the background c July 1987 DFC12 Grey St St Kilda at Dalgety St with Tramway works in the background in Fitzroy St c July 1987 DFC13 Concreting the connecting curve from Fitroy St into St Kilda Station c July 1987 DFC14 Restaurant Tram 442 in Fitzroy St at Grey St Passing MTA bus 59 outside St Kilda Station c1986 DFC15 Former VR tram stop sign painted on a pole at Glenhuntly Rd & Broadway DFC16 Former VR Elwood Tram Depot under demolition 1996 DFC17 Former VR Elwood Tram Depot under demolition 1996 DFC18 Former VR Elwood Tram Depot under demolition 1996 DFC19 Former VR Elwood Tram Depot under demolition 1996 DFC20 Former VR Elwood Tram Depot under demolition 1996 DFC21 Former VR Elwood Tram Depot under demolition 1996 DFC22 Former VR Elwood Tram Depot under demolition 1996 DFC23 Former VR Elwood Tram Depot under demolition 1996 DFC24 MTS Tower waggon in use at the former VR Elwood Tram Depot under demolition 1996 DFC25 A Sign advertising the sale of the Former VR Elwood Tram Depot – 10/8/1996 1996 DFC26 Former VR Elwood Tram Depot under demolition 1996 DFC27 Interior of a shed at the former VR Elwood Tram Depot under demolition 1996 DFC28 Former VR Elwood Tram Depot under demolition 1996 DFC29 Former VR Elwood Tram Depot under demolition 1996 DFC30 Former VR Elwood Tram Depot under demolition 1996 DFC31 VR 20, former breakdown car in Bob Prentice’s Back Yard Jan 1974 DFC32 VR 20 on a low loader en route to Bob Prentice’s for preservation 1959 DFC33 VR 20 as the breakdown car on the St Kilda Electric Street Railway c1955 DFC34 VR 39 waits in St Kilda St as breakdown car 20 enters Elwood Depot c1955 DFC35 VR 54 and 50 in the rear yard of Elwood Depot c1958 DFC36 VR 50 in the rear yard of Elwood Depot c1958 DFC37 VR 50 in the rear yard of Elwood Depot c1958 DFC38 VR 28 in St Kilda St outside Elwood depot after the line had been cut back to this point c1958 DFC39 VR 29 in St Kilda St outside Elwood depot after the line had been cut back to this point c1958 DFC40 VR 35 passes 28 on the St Kilda Electric Street Railway c1955 DFC41 VR 39 on the St Kilda Electric Street Railway c1955 DFC42 Y1 613 on a tour c1970 DFC43 VR 54 in St Kilda St outside Elwood Depot c1955 DFC44 VR 28 at Brighton Beach Terminus c1955 DFC45 VR 33 being washed in the wash bay at the rear of Elwood Depot c1955 DFC46 VR 20 breakdown car running into Elwood Depot c1955 DFC47 VR 3 in the rear yard at Elwood Depot c1955 DFC48 VR 51 on an AETA Tour running out of Elwood Depot c1958 DFC49 VR 28 on the St Kilda Electric Street Railway c1955 DFC50 VR 28 with crew in St Kilda St outside Elwood depot after the line had been cut back to this point 1959 DFC51 VR 52 in Grey St near Fitzroy St c1958 DFC52 VR 51 on a AETA Tour passes 33 in Grey St near Fitzroy St c1958 DFC53 VR 29 in Grey St near Fitzroy St c1958 DFC54 VR51 on an AETA Tour shunts as 52 waits on the St Kilda Electric Street Railway c1958 DFC55 VR 51 on the Black Rock Electric Street Railway c1955 DFC56 VR 28 in St Kilda St outside Elwood depot after the line had been cut back to this point c1958 DFC57 Combined Rail-Tram Tickets of the Black Rock Electric Street Railway Feb 1975 DFC58 Combined Rail-Tram Tickets of the St Kilda Electric Street Railway Feb 1975 DFC59 Electric Street Railway & Motor Coach Paper Tear off Tickets Feb 1975 DFC60 VR 52 & 53 on Rt 82 pass in Cordite Ave near Wests Rd Sept 1975 DFC61 Z 68 & 52 in East Preston Depot in M&MTB Livery c1977 DFC62 Copy photo of VR 18 in Elwood Depot c1910 DFC63 VR 51 as a one man car at Black Rock Terminus c1955 DFC64 VR 53 on Rt 82 in Droop St Footscray Jan 1974 DFC65 B2 2027 on Rt 96 in South Melb Station c1988 DFC66 VR 20 as preserved in Bob Prentice’s backyard High St Prahran Jan 1974 DFC67 VR 700 on Rt 82 in Droop St Footsray c1978 DFC68 VR 28 as the last car from ST Kilda Station 28-2-1959 DFC69 VR 700 at the Rt 82 Moonee Ponds Terminus c1978 DFC70 VR 52 waiting time at the Rt 82 Footscray Terminus, the driver intently stares at the bundy clock as the Braid and the Connie gossip Jul 1972 DFC71 VR 54 shunting outside Elwood Depot to return to St Kilda Station 1959 DFC72 SW6 969 in MTA Livery blocking the entrance to South Melb Depot presumably during the scratch ticket dispute Jan 1990 DFC73 VR 52 & 53 on Rt 82 pass in Droop St Footscray Sept 1975 DFC74 VR 700 after withdrawl in the Newport Railway museum in the process of a repaint c1985 DFC75 VR 700 after withdrawl in the Newport Railway museum in the process of a repaint c1985 DFC76 VR 700 on Rt 82 in Droop St Footsray at The Cresent c1978 DFC77 VR 700 on Rt 82 in Droop St Footsray c1978 DFC78 Former VR tram depot in use as an MTA Bus depot c1990 DFC79 VR 52 waiting time at the Rt 82 Footscray Terminus Jul 1972 DFC80 VR 52 waiting time at the Rt 82 Footscray Terminus with Connie changing the pole Jul 1972 DFC81 VR 52 at the Rt 82 Moonee Ponds Terminus with the crew chatting 7-12-1974 DFC82 VR 52 on Rt 82 on the reserved track in Raleigh Rd Ascot Vale Jan 1974 DFC83 VR 53 on Rt 82 in Leeds St Footscray about to turn into Hopkins St April 1976 DFC84 VR 53 on Rt 82 in Droop St Footsray Jan 1974 DFC85 VR 700 on Rt 82 in Droop St Footsray at Hopkins St c1978 DFC86 Z 52 in MTA livery on Rt 19 in Elizabeth St near Bourke St c1985 DFC87 VR 52 at the Rt 82 Moonee Ponds Terminus Jul 1972 DFC88 VR 53 at the Rt 82 Footscray Terminus Jan 1974 DFC89 VR 52 freshly outshopped from the workshops and W7 1011 at the Bourke St Terminus with 52 on display for the 1968 railway exhibition 1968 DFC90 Painting of W class 369 in Chocolate & Cream c1930 DFC91 Charing Cross, Bendigo at night c1965 DFC92 Ballarat ? c1965 DFC93 Bendigo 18 on an AETA tour in McCrae St near Tramway Ave c1965 DFC94 View from the roof of a tram in the body shop at Preston Workshops 1977 DFC95 View from the roof of a tram in the body shop at Preston Workshops 1977 DFC96 View from the roof of a tram in the body shop at Preston Workshops showing the panto on 546 1977 DFC97 Interior view of Carlton Control Centre showing desk and wall panel c1968 DFC98 W2 493 on Rt 55 in Kingsway outside South Melb Depot Aug 1973 DFC99 W2 496 in Sturt St at Kingsway on Rt 1 Jul 1973 DFC100 Z class truck c1975 DFC101 Z3 116 in Bourke St at King St as new c1979 DFC102 Bob Prentice on tour c1968 DFC103 SW6 900 as an advertising tram for Newsday at night 1969 DFC104 597 Jul 1973 DFC105 W2 480 on Rt 3 passing under the railway bridge at Caulfield Oct 1972 DFC106 Interior view of Carlton Control Centre showing desk c1968 DFC107 SW6 856 on Rt 77 at night Jul 1973 DFC108 W2 496 in Sturt St at Kingsway on Rt 1 Jul 1973 DFC109 PCC 980 on a tour at South Melb Depot c1968 DFC110 SW6 856 on Rt 77 at night Jul 1973 DFC111 View from the roof of a tram in the body shop at Preston Workshops showing the panto on 546 1977 DFC112 Dandenong Rd from Chapel St Nov 1968 DFC113 A Z class car turns from Gertrude into Nicholson St c1990 DFC114 SW6 900 as an advertising tram for Newsday at night 1969 DFC115 Port Melbourne Station showing Centennial bridge and station building prior to closure. 10-1987 DFC116 Port Melbourne station with train prior to closure, looking south 10-1987 Demonstrates the work of David Frost in photography and or collecting slides.Assembled album in a black presentation folder of 116 colour slides, 6 slide sleeves, collected or photographed by David Frost. Many are TMSV or Windsor Publications slides. All photographs have been scanned and placed on the Museum's G drive. A list of all photographs with details has been compiled. melbourne, tramways, trams, vr trams, elwood, st kilda light rail, port melbourne, opening, elwood depot, buses -
 Melbourne Tram Museum
Photograph - Gertrude St engine house and Nicholson St, c1940
Photos show the Nicholson Street winding or engine house at the corner of Gertrude St. Fitzroy and a view looking north along Nicholson St, possibly late 1930s. In the second photograph are Grantown House, and a church, now Ursula Frayne Memorial Chapel. One building has "Staffa" written on the side of it.Yields information about Nicholson St near Gertrude St and the engine house.Set of two Black and white photographs on plain paper.nicholson st, gertrude st, fitzroy, engine house -
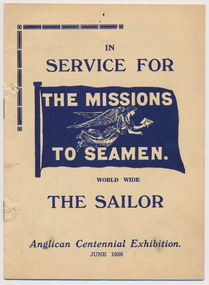 Mission to Seafarers Victoria
Booklet, In Service of the Sailor - Anglican Centennial Exhibition June 1936, June 1936
20 pages blooklet from the Mission to Seamen Adelaide in South Australia with black and white photographs printed in clack ink on creamy paper. The booklet has two staplesmission to seamen, south australia, adelaide, port pirie, anglican centennial exhibition, port adelaide, outer harbour, todd street, st nicholas chapel, port lincoln -
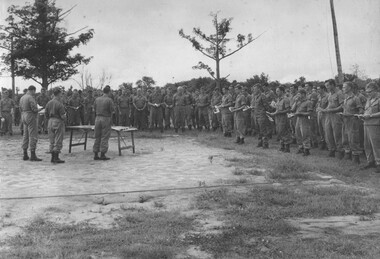 National Vietnam Veterans Museum (NVVM)
Photograph, Gibbons, Denis, Assembled Diggers
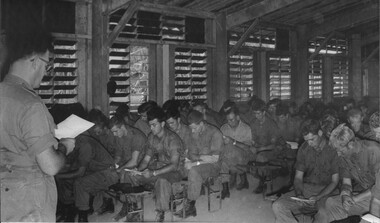
Denis Gibbons (1937 – 2011) Trained with the Australian Army, before travelling to Vietnam in January 1966, Denis stayed with the 1st Australian Task Force in Nui Dat working as a photographer. For almost five years Gibbons toured with nine Australian infantry battalions, posting compelling war images from within many combat zones before being flown out in late November 1970 after sustaining injuries. The images held within the National Vietnam Veterans Museum make up the Gibbons Collection. A black and white photograph of assembled Diggers at 1 Australian Task Force Base, Nui Dat, Phuoc Tuy Province, attending an open air multi - denominational church service conducted by Padres, from three religious donimations: Church of England, Catholic and other denominations.photograph, padre, 1 atf base, nui dat, phuoc tuy province, non demoninational chapel, church of england, catholic, gibbons collection catalogue, denis gibbons, photographer, vietnam war, diggers -
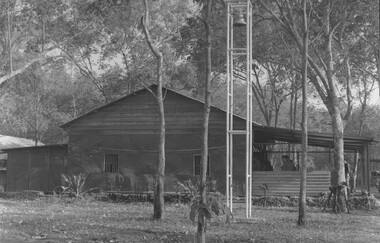 National Vietnam Veterans Museum (NVVM)
Photograph, Gibbons, Denis, Burgess Bell
Denis Gibbons (1937 – 2011) Trained with the Australian Army, before travelling to Vietnam in January 1966, Denis stayed with the 1st Australian Task Force in Nui Dat working as a photographer. For almost five years Gibbons toured with nine Australian infantry battalions, posting compelling war images from within many combat zones before being flown out in late November 1970 after sustaining injuries. The images held within the National Vietnam Veterans Museum make up the Gibbons Collection. A black and white photograph of the non-denominational chapel at 1st Australian Task Force Headquarters, Nui Dat, Phuoc Tuy Province, South Vietnam. The bell, located in the tower, was donated by war correspondant Pat Burgess - an Australian War correspondent, simply called "Burgess Bell" by all.photograph, 1st atf base, nui dat, phuoc tuy province, non demoninational chapel, pat burgess - australian war correspondent, burgess bell, gibbons collection catalogue, denis gibbons, photographer, vietnam war -
 National Vietnam Veterans Museum (NVVM)
Photograph, Gibbons, Denis, Congregation of Diggers
Denis Gibbons (1937 – 2011) Trained with the Australian Army, before travelling to Vietnam in January 1966, Denis stayed with the 1st Australian Task Force in Nui Dat working as a photographer. For almost five years Gibbons toured with nine Australian infantry battalions, posting compelling war images from within many combat zones before being flown out in late November 1970 after sustaining injuries. The images held within the National Vietnam Veterans Museum make up the Gibbons Collection.A black and white photograph of the congregation of diggers, following lesson being read by the Church of England Padre at the combined service in the non-denominational chapel. The Padre gave outstanding service to all spending as much time in the field as at Base.photograph, pardre, church of england, church service, digger, non demoninational chapel, gibbons collection catalogue, denis gibbons, photographer, vietnam war, padre, diggers -
 National Vietnam Veterans Museum (NVVM)
Photograph, Gibbons, Denis, Four Padres
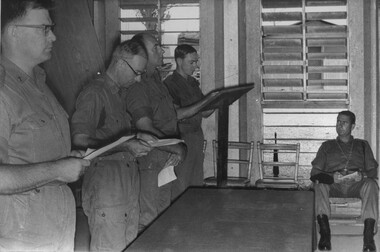
Denis Gibbons (1937 – 2011) Trained with the Australian Army, before travelling to Vietnam in January 1966, Denis stayed with the 1st Australian Task Force in Nui Dat working as a photographer. For almost five years Gibbons toured with nine Australian infantry battalions, posting compelling war images from within many combat zones before being flown out in late November 1970 after sustaining injuries. The images held within the National Vietnam Veterans Museum make up the Gibbons Collection.A black and white photograph of four denominations of 1st Australian Task Force Padres conducting a combined service at the non-denominational chapel, whilst an Armoured Corps digger is engrossed in the service. All Padres were available to all units, 24 hours a day.photograph, 1st atf base, non demoninational chapel, padre, digger, armoured corps, gibbons collection catalogue, denis gibbons, photographer, vietnam war, diggers -
 Ringwood and District Historical Society
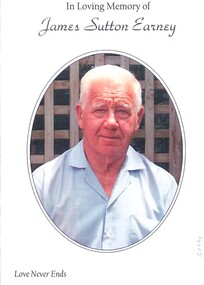
Document, Obituary James Sutton Earney 23 November 1920 - 31 July 2008 at Lilydale Memorial Park Chapel 6 August 2008
White bifold card with photograph on front and black printing.Founder of Methven Real Estate , Mooroolbark hand written on back in blue ink. -
 Melbourne Tram Museum
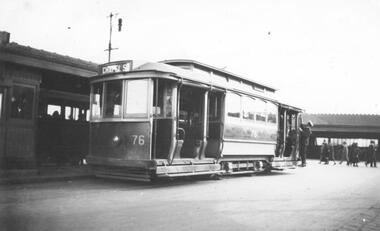
Photograph - Black & White Photograph/s, Lee A Ratten, c1925
Black and white photograph of tramcar 76 at Batman Avenue terminus in 1925. The tram is a single-truck California combination tram, one of 20 built for the P&MTT in 1915. The photo was taken at Batman Avenue in 1925 and shows a driver or conductor adjusting the trolley pole. The photo shows the Batman Ave terminus and Flinders St station in the background. Tram 76 was built in 1915 by the Meadow Manufacturing Co in Sydney for the Prahran and Malvern Tramways Trust before transferring to the MMTB in 1920. The J-class tram was bought by the SECV in 1931 and moved to Ballarat as tram No. 19. It operated in Ballarat until it was transferred to Bendigo in 1960 as tram No. 7, operating as public transport until 1972. It is now in operating condition at the Tramway Museum Society of Victoria in Bendigo. Tram 76 has the destination of Chapel St. Tram 76 was allocated at the Glenhuntly depot as at 24 March 1928.trams, tramways, batman ave, pmtt, secv, ballarat, bendigo, shelters, chapel st, tram 76, j class, mmtb -
 Melbourne Tram Museum
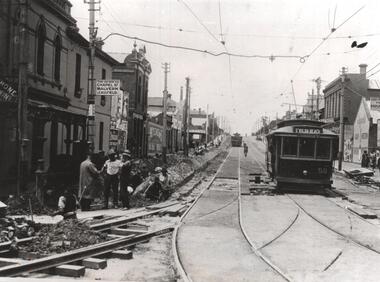
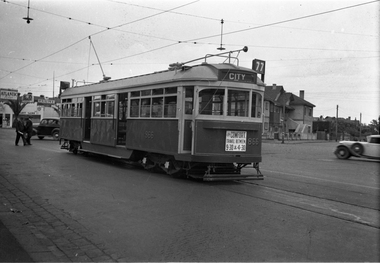
Photograph - Black and white - SW6 850 Chapel St - Brighton Road Prahran, c1939
Photograph of SW6 850 (Route 77) at the Prahran terminus, Chapel St and Brighton Road, probably soon after its construction and entry into traffic on 31-3-1939, although the roof appears weathered. The tram has a sign promoting off peak travel, dash canopy lights and a tail light. In the background are the shops at this location. The tram was the first of its class and was considered a luxurious car compared to the W2's and W5s.Yields information about SW6 850 and the Prahran terminus.Black and white photograph on paper.trams, tramways, chapel st, prahran, brighton road, sw6 class, tram 850 -
 Melbourne Tram Museum
Photograph - Set of 8 Black & White Photograph/s, Melbourne & Metropolitan Tramways Board (MMTB), 1966
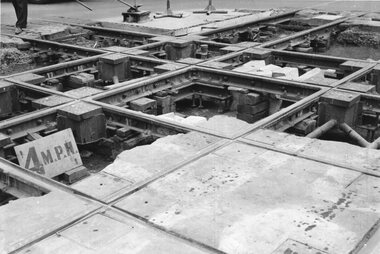
Series of 8 black and white photographs of the trackwork used at H crossings (where two tracks cross another two tracks at right angles.) .1 - H crossing being renewed. .2 - New H crossing laide out in a yard .3 - H crossing being completed at Queensway / Chapel and Dandenong Road, early 1968 with the All Saints church in the background. .4 - being renewed .5 - ditto .6 - ditto with a tram crossing. .7 - as for .4 .8 - showing extensive fish plating on a wooden longitudinal sleepers, plates bolted to the wood or timbers.trams, tramways, trackwork, rails, track materials, track repairs, sleepers, equipment, queensway, chapel st, dandenong road -
 Melbourne Tram Museum
Photograph - Black & White Photograph/s, Melbourne & Metropolitan Tramways Board (MMTB), 1926
Black and white photograph of MMTB No. 58 in Wellington St. St Kilda, about to enter St Kilda Junction and continue to St Kilda beach via Fitzroy St St Kilda, late 1925 or early 1926 - Wellington St electric line opened 27/12/1925. Note the sign on the left hand pole about travel to Malvern and St Kilda Beach, the workmen and that another tram has left heading outwards. On the right hand side is part of a sign advising people to catch cars to the Esplanade. Photo from the Collection of the Department of Infrastructure now with the Public Records Office - image number H102. Note: this photo is now out of copyright and was not an original VR photograph, but one copied from another source and collected as their Heritage series. See Image 3673i2 for a digital image of the card photograph at the PRO on 7/1/2019 that this photograph comes from. Further notes from Rod Atkins: Note the Electrical box at base of the pole on left hand side of the photo. No section insulators yet as power would have been stretched from Dandenong Road / Chapel Street right through to Fitzroy Street to run the first services. Great shot of the "H" car. Malvern bound is a another Californian combo car, but with original destination boxes and PPTT style "No" on the left side of the apron but cant make out the number.Has Department of Infrastructure copy right stamp on rear and number "H 102" in ink on rear and "2-3"trams, tramways, mmtb, st kilda junction, wellington st, trackwork, st kilda beach, tram 58 -
 Melbourne Tram Museum
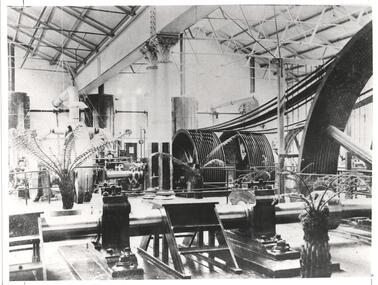
Photograph - Black and White photograph, c1900
Black and white photograph of the interior of the engines and rope drive in the Toorak Engine House - see page 5 of Reg Item 2299, for an article on the engine house and photograph details. State Library of Vic image M5 15304/1, Page 20 Image 1. 2nd copy added 18/3/2021On rear in pencil and ink various dimensions and instructions regarding printing of the image. In the top left hand corner "Latrobe". Stamped on rear "Photofix Photographic 15 Latrobe St Melbourne Phone 662 3904"trams, tramways, cable trams, toorak rd, winding houses, chapel st -
 Melbourne Tram Museum
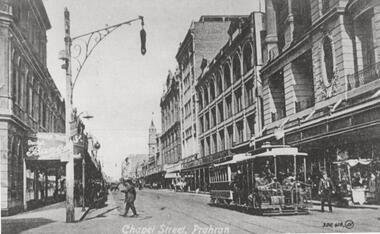
Photograph - Black and White photograph, c1900
Black and white photograph of Chapel St Prahran from near Malvern Road, looking south. Has an city bound cable tram in the photograph. Taken from a postcard.in ink in the corners "Postcard" and number 51326trams, tramways, cable trams, chapel st -
 Melbourne Tram Museum
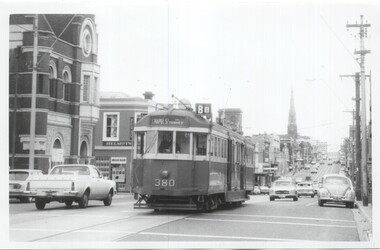
Photograph - Set of 4 Black & White Photograph/s, Clive Gibson?, c1975
Set of four Black and White photographs of W2 380. Photos not dated, c1975. .1 - Toorak Road, just past Osborne St, South Yarra, with the South Yarra Post Office in the view. Also Helmuts Milk Bar? Tram has the destination of Chapel St, route 8B. .2 - Turning from Park St South Yarra into Toorak Road. Tram has the destination of Toorak, route 8. Note the Bundy clock on the left hand pole. .3 - In St Kilda Road, at the Arts Centre, with destination of Elsternwick, Route 4E. .4 - turning from Toorak Road into Park St, route 8. See image i5 for envelope which has the names of Clive Gibson, Dave Menzies and date 1975 which could be the date the photos were sent to Dave Menzies for some reason.trams, tramways, w2 class, bundy clock, route 8b, toorak road, south yarra, park st, route 8, st kilda rd, route 4e, elsternwick, tram 380 -
 Melbourne Tram Museum
Negative, Wal Jack, 16/02/1941 12:00:00 AM
Black and white negative, by Wal Jack, of No. SW6 866 at the route 77 terminus Chapel St and Brighton Road. Tram has dash canopy lighting. In the background is a service station, selling Atlantic Petrol, Plume and Pax. Also visible is a Beauty Salon. Photo dated 16-2-1941 in the Wal Jack album along with details of the location.trams, tramways, sw6 class, route 77, chapel st, brighton road, tram 866 -
 Melbourne Tram Museum
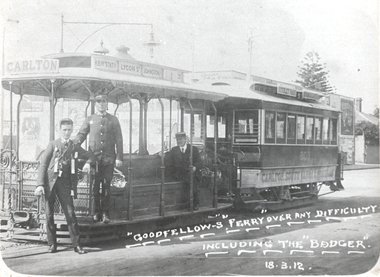
Photograph - Cable car set - Chapel St, 1912
... unions Joesph Badger gripmen conductors brisbane chapel St Black ...Black and white photograph of a cable tram set (trailer 203) with gripman and conductor at the Chapel St terminus. The photo has written on it in white ink "Goodfellows "Ferry" over any difficulty including the "Badger" " and date of 18.3.12. which is a reference to the General Strike in Brisbane of Jan 1912 by Brisbane Tramway Company workers over the wearing of Union badges which was strongly opposed by the Company Manager Joesph 'Boss' Badger. See also item 6170 for a similar-themed photograph about the Badger. At the time there was a major industrial or arbitration case before Mr Justice Higgins regarding Australian tramways employees and their working conditions. Demonstrate cable tram uniforms and cable tram trip slips that were used to account for fare collection and has a close association with an event in Brisbane that led to a General Strike.Black and white print block mounted onto thick card.tramways, tramcars, tram 203, cable trams, crews, unions, joesph badger, gripmen, conductors, brisbane, chapel st