Showing 1291 items
matching bendigo hotels
-
 Waverley RSL Sub Branch
Print Gentlemen The Queen, Gentlemen The Queen
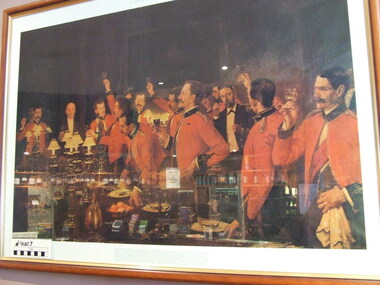
... . i The painting is on loan to the hotel from the Bendigo Art.... i The painting is on loan to the hotel from the Bendigo Art ...Original Painting in Bendigo Art Gallery PAINTING WON'T HANG IN MESS BENDIGO intends to keep its big oil painting, "Gentlemen - the Queen," hanging in the Shamrock Hotel in Pall Mall. i The painting is on loan to the hotel from the Bendigo Art Gallery. And It's badly wanted at the officers' mess of the Royal Australian Artillery, 3rd Div., in Batman av., Melbourne. A formal application for It was made, In writing, to the Art Gallery by Brigadier W. Hall, commanding offlfncer. But Art Gallery members at their meeting yesterday said "No." Lending it or giving it away would "create a dan- gerous precedent for the Gallery," they decided. . "Any anyway," said Mr. W. Little, the Gallery's curator, "Brig. Hall has erred in thinking the men depicted in the painting are artillerymen. "They're offlfflcers In the Duke of Connaught's Light Infantry." But in Melbourne last night Brigadier Hall, keenly disappointed, said: VI have been told the picture was painted in the Royal Artil- lery mess at Woolwich, In England. "I have never dauhted the men are artillerymen, be- cause they wear the gun- ners' blue mess Jacket, scar- let cuffs and scarlet waist- coat." The Argus Tuesday 8 September 1953 Digitalised http://trove.nla.gov.au/ndp/del/article/23307813/1762840?zoomLevel=3Colour print of a painting by Albert Chevallier Taylor in wooden frame Glass frontedCopy by Survey Regiment 1986gentlemen the queen, argus newspaper, bendigo art gallery. -
 Federation University Historical Collection
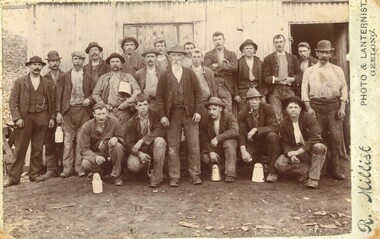
Photograph, R. Millist, Hanlon Consols Mine Rokewood, 1901
The photo depicts one shift of mine hands at Hanlon Consols Mine Rokewod in 1901. ist on the left is George Edgar Yung. George was born in Ararat the son of Yohann Godlip and Christina (b Weller)Yung. They lived at Happy Valley near Linton. and Piggoreet. Yohann was a miner and died in the All Nations Mine collapse at Derwnt Jack's in 1877. Interesting to note in the following information that the Hanlon Consol mamager, William Maughan was also the manager of the Try Again Mine in Piggoreet. He was also on the six man school committee of Piggoreet Common School No. 726. (Is this why George Yung ended up working in Rokewood because of a previous connection at Piggoreet? George married Clara Emma Smith from Happy Valley and worked in a mine at Allendale. They later moved to Yendon) About the Hanlon gold mining company near Rokewood. 1901 - Information Bendigo Prospecting Club, 21/08/2020. Information provided once again by Peter McCarthy. Christopher Hanlon had put down a line of bores south of the Rokewood main street, looking for a continuation of the Break O’Day lead which had been worked for two or three miles with highly payable results, though in a primitive manner. Ground was being paddocked 30 feet deep and made to pay. The bores suggested the sinking would be about 70 feet and a shaft site was selected at the back of Stanbrook’s Hotel. The Hanlon Gold Mining Company was formed in March 1895 and the shaft was bottomed at 68 feet, getting just over an ounce of gold from the shaft bottom. By January 1896, the poppet heads were up, and steam plant was nearly ready. The mine produced 846 oz by September, which was not as good as expected, but they installed a second puddling machine. The mine was profitable for the next three years, with periods of prospecting and the need to install steam pumps in 1897. A second shaft was sunk in 1899, which bottomed at 86 feet on good wash and was sunk on to 109 feet. 1743 oz of gold had been produced in six months to September 1899, but the No1 shaft was let on tribute as the No2 workings were opened and machinery installed the following year. The No1 shaft tributors broke even in 1900 and in 1901 the shaft was shut down, with the No1 shaft machinery sold late in 1902. By September 1901, the mine had produced gold worth £66,124 and the No2 shaft main drive was in 346 feet, with gold being found mainly in crevices in the hard floor. Mining continued, but once the No2 shaft workings met up with the old No1 shaft workings at the end of 1902 there was not much wash remaining. The mine was let on tribute in June 1903 and a drive was put in to test deeper ground. The company was wound up in February 1904 and the plant sold. From what they discovered, the manager concluded that the mine sat at the edge of an ancient coastline and the gold was in a beach deposit. The total gold production from the mine was worth £73,294. J Lee Archer JP, shareholder, was the manager of the Bank of Victoria in Ballarat. Born in Tasmania, he came to Victoria with his parents and first came to Ballarat in 1855 as a junior clerk with the bank. He died in 1902 aged 64. Alexander J. Peacock was a legal manager and a share broker. In 1897 Peacock, born in Creswick, had been elected as one of the Victorian delegates to the Constitutional Convention which wrote the Australian Constitution. He later became a politician, state treasurer and three times state premier of Victoria and was knighted KCGM. He died in 1933 aged 72. William Maughan, director, was an English miner who came to Victoria in the 1850s and became a mine manager, managing the Try Again at Piggoreet, Ryan’s Freehold and the Madam Berry, among others. He died in Williamstown in 1915 aged 85. Sepia photographRhs front of photo: R. Millist Phto & Lanternist Geelong Verso (upside down): ONE SHIFT OF MINE HANDS HANLON CONSOLS MINE ROKEWOOD 1901 Grandfather Yung 1st on left rokewood, hanlon consols mine, shift of mine workers 1901, gold mines, george edgar godlip yung, william maughan -
 Bendigo Military Museum
Ceramic - TEA SET, MILITARY
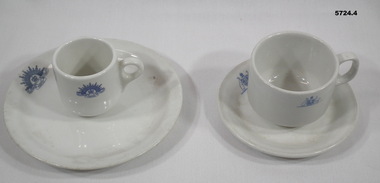
Army mess of various units would have own issued crockery and cutlery sets for use by NCO's and Officers. Refer Cat 638P for service details of Geoff Murray No.3411521.1. Small china side plate, white in colour with blue Rising Sun emblem. 2. Small china saucer, white in colour with small blue Commonwealth Govt emblem. 3. Small coffee cup with handle with blue Rising Sun emblem. 4. China teacup with handle with small blue Commonwealth Govt emblem.1. Back says "Bristile Hotel China" - made for Australia. 2. Back says "Steelite" Made in England. 3. Bottom says "Bristile" 10/82 Made in Australia. 4. Bottom says "Bristile" Made in Australia - Hotel Chinacrockery, china, tea set -
 Bendigo Military Museum
Document - TELEGRAM, 15th March 1956
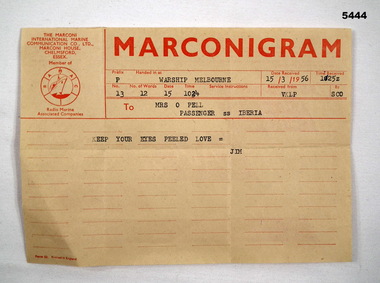
Message from James LesliePELL RAN no 35213 ref Cat 5455 for service records.Apricot coloured telegram (Marconigram) with one line message (7 words)From the warship Melbourne. “15/3/56 at 10.25. To Mrs O.Pell- Passenger SS Iberia. Message “ Keep your eyes peeled love = Jim” on the back conditions of message and add for Savoy Hotel London.hmas melbourne, telegrams -
 Bendigo Military Museum
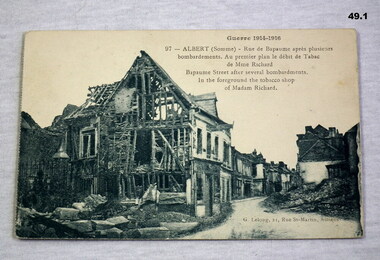
Postcard - PHOTO POSTCARDS, c.1914 - 19
.1) War damage Albert .2) War damage Albert .3) War damage Albert .4) Village scene Native .5) British soldiers in dug outs, colour .6) War damage Hotel De Ville Arras The cards are part of a collection re J S HOWLETT. Refer 41 medals, 48.4P photos..1) - .6) Photo cards of war damage at various sites in different theatres of war.Postcards written in either ink or pencil.documents, postcards, military history, bombardment damage, ruins -
 Bendigo Military Museum
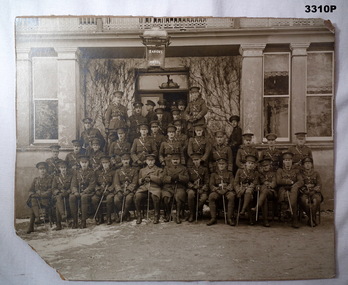
Photograph - PHOTOGRAPH, OFFICERS WW1, 1914 - 1918
Sepia photo of a group of possibly 37 Australian Officers outside Barons Hotel. Attached to heavy cardboard backing.Name of hotel in white; “Barons Hotel”photography, officers -
 Bendigo Military Museum
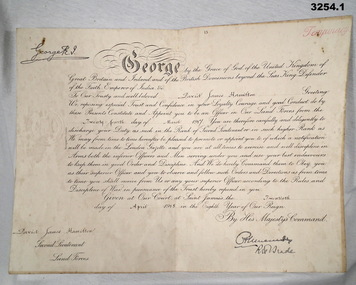
Certificate - CERTIFICATE, OFFICER WW1, 1) 24.3.1917
Items re David James Wallace HAMILTON No 329 . KIA 7.6.1917. Refer Cat No No 2351.5P for his service details..1) Certificate, cardboard, yellowed, folded re David James HAMILTON being for his appointment to 2nd Lieutenant. Printed in black with black pen writing ornate. Stamped seal on one side. .2) Envelope for .1) Paper yellowed with black print..1) Bottom L: "D J Hamilton Second Lieutenant Land Forces Australian Machine Gun Corps" .2) Printed top centre: "ON HIS MAJESTY'S SERVICE" Printed bottom L: "DEPT OF DEFENCE MELBOURNE" Handwritten centre: "Mrs L Hamilton Royal Hotel Williamstown Vic"certificate, officer -
 Bendigo Military Museum
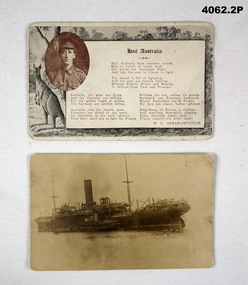
Postcard - POSTCARDS, PHOTOGRAPHIC WW1, C.WW1
.1) Postcard photo with a poem "Hail Australia" central, photo inset oval shape with soldier in peak hat, background has a kangaroo and bush. .2) Postcard photo, sepia tone with boat central and a tugboat alongside. .1) On rear in pencil: "Mrs C Brown, New York Hotel, Bourke St Melbourne 26/7/18" .2) On rear in blue pen: " A warship First World War, My brother sailed on it to war - Lilian Holding (Donaldson)post cards, poetry, warship -
 Federation University Historical Collection
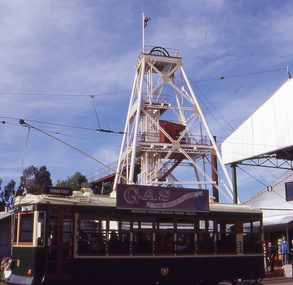
Photograph, Central Deborah Gold Mine, Bendigo, c1990
... E.J. Barker Library (top floor) Mount Helen goldfields bendigo ...Colour photograph of a poppet head and tram in Bendigo.bendigo, shamrock hotel -
 Federation University Historical Collection
Photograph, Bendigo Tourist Tram, c1990
... E.J. Barker Library (top floor) Mount Helen goldfields bendigo ...Colour photograph of a tam conductor and two children with a tram. bendigo, shamrock hotel -
 Bendigo Military Museum
Photograph - PHOTOGRAPHS - CARDS WW1, 1) Aust Card Co, 1) C.post 1917, other pre 1917
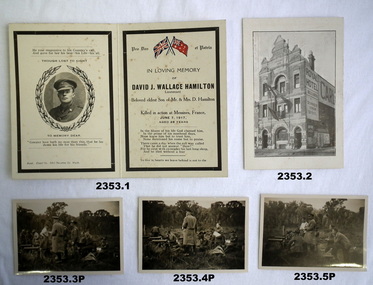
David James Wallace Hamilton No 329 AIF. Refer Cat No 2351.5P for his service history..1) Card, folds in half, 'In Loving Memory - For His Country'. Inside small insert photo D.J.W. HAMILTON with details & poem re HAMILTON's death at Messines 7.6.17 aged 28 years. .2) Card, business style re Hamiltons Royal Hotel, Williamstown with black & white photo. .3) - .9) Photos, black & white all very similar relating to machine gunners practising out in the fields.photographs, duty done, loving memory -
 Bendigo Military Museum
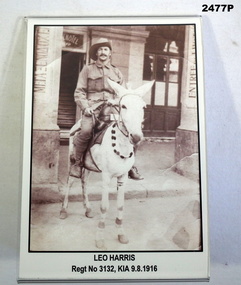
Memorabilia - PHOTOGRAPH, Est 1916
Leo Harris No 3132. Refer 2478 for service history also 2476, 2479.3.Photograph in sepia tone showing a soldier in slouch hat mounted on a donkey, in the background is a hotel. Photo is in a plastic stand."Leo Harris Regt No 3132 KIA 9.8.1916"photography, military, kia -
 Bendigo Military Museum
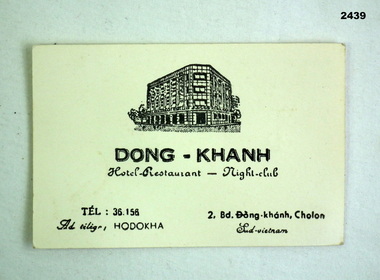
Card - RESTARAUNT CARD, c.1971
The card was souvenired by Peter James Dodd No 217842 in South Vietnam. Refer 2436.2P for his service history.Card, cream colour, black print re the Dong Khanh Hotel Restaurant - Night Club, South Vietnam. The rear is in Vietnamese.cards, advertising, hotel, nightclub -
 Bendigo Military Museum
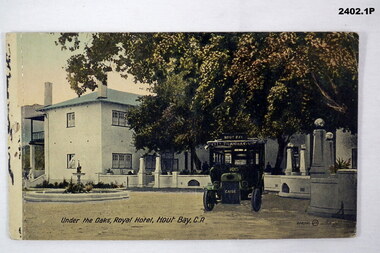
Postcard - POSTCARDS, SOUTH AFRICA, The Valentine & Sons Publishing Co Ltd, c.1916
Sent by FRANK BARNES (AIF 4156) to UNA FRANKLING of Harcourt. Refer Cat No 2380 for details re Frank Barnes service.Rectangular postcards, hand coloured photographs of South Africa.2402.1 “Under the Oaks, Royal Hotel, Hout Bay CA” 2402.2 “Birds, Groote Schour, CP” 2402.3 “Clifton-on-Sea, CP”documents - photographs, postcards -
 Bendigo Military Museum
Memorabilia - PHOTOGRAPHS, c.1916
LEO HARRIS 3132 - KIA 9.8.16. Refer 2478 for service history also 2476, 2447P, 2479.3..1) Sepia photo of Soldier in uniform on a donkey outside a hotel re L HARRIS .2) Sepia photo of a group of 7 Soldiers, 4 standing, 3 kneeling, tents in background.1) LEO HARRISphotography-photographs, military history-army -
 Bendigo Military Museum
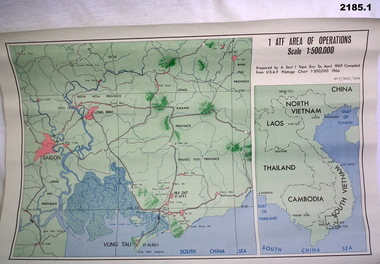
Map - MAPS, VIETNAM, April 1969
1.) Paper map, colour with black print, scale 1:500,000 area covers Saigon, Long Bin, Nui Dat, Vung Tau. .2) Laminated paper map showing city of Vung Tau with details of tourist destinations, hotels, churches, black & red print, scale 1:12,500 approx.documents - maps - military & tourist, vietnam -
 Bendigo Military Museum
Memorabilia - TRAVEL DOCUMENTS WW2, 1939 - 1940
the items belonged to Benjanin Thomas Roy Chadd No's 10594, VX20311, 1st and 2nd AIF. Refer Cat No 2039 for service history also 2034P..1) Ceremony of crossing the line (equator). Humorous certificate. .2) Receipt from Taj Mahal Hotel, Bombay. Both in name of Lt. Col. B. R. CHADD2044.1) Name at bottom “Lt. Col. B. T. R. CHADD” 2044.2) Name at top: “Lt. Col. B. R. CHADD, Date 10 Nov 40”documents - certificates, personal effects-travel goods -
 Federation University Historical Collection
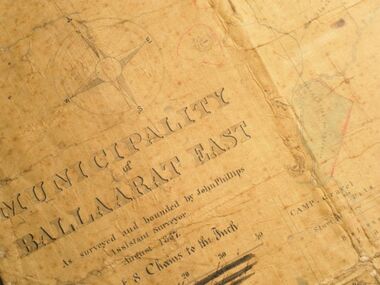
Map, Municipality of Ballarat East, 1857
Gold was discovered in Ballarat in 1851. This plan was created six years later and names some of the great gold locations of Ballarat East. It also shows the locality of the Eureka Stockade (1854) and the walking tracks and roads on the Ballarat East Goldfield.In 2007 this map was listed on the inaugural Ballarat Treasure's Register.Large map backed onto linen. The map has read and blue highlights, and identifies areas such as Mount Pleasant, Golden Point, White Flat, Nightingale, Malekoff, Old Post Office Hill, Red streak, Gumtree Flat, Old Gravelpits, Bakery Hill, Ballaarat Flat, The Camp, Specimen Gully, Pennyweight Hill, Warrenheip Gully, Gays Gully, Pennyweight Flat, Eureka, Black Hill, Pinchgut, Crocodile, Hit or Miss, Little Bendigo, Brown Hill, Mopoke, Cricket Reserve, Canadian Hotel, Ballarat Eastmount pleasant, golden point, white flat, nightingale, malekoff, old post office hill, red streak, gumtree flat, old gravelpits, bakery hill, ballaarat flat, the camp, specimen gully, pennyweight hill, warrenheip gully, gays gully, pennyweight flat, eureka, black hill, pinchgut, crocodile, hit or miss, little bendigo, brown hill, mopoke, cricket reserve, canadian hotel, ballarat eastm phillips, john phillips, field draughtsman, ballarat east, ballarat east map -
 Bendigo Historical Society Inc.
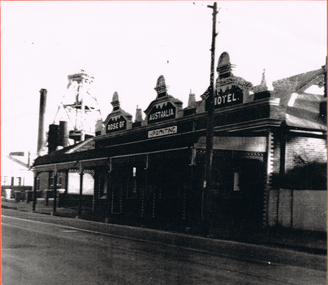
Photograph - LONG GULLY HISTORY GROUP COLLECTION; ROSE OF AUSTRALIA HOTEL
Black and white photo of the Rose of Australia Hotel. It has the name painted across three decorative pediments at roof level. The licensee's name, H. Paynting, is painted beneath the centre pediment. The building is brick with white bricks at the corners and around the windows and doors. It has a bull-nosed veranda with iron lace and decorated veranda posts. The photo is quite dark beneath the veranda. There is a house next door and behind that is a poppet legs, a tall chimney, what looks like two smaller chimneys and a mine building. It is situated on Eaglehawk Road. The photo is mounted on an orange card which is mounted on a tan card and laminated.bendigo, history, long gully history group, the long gully history group - rose of australia hotel, h paynting -
 Bendigo Historical Society Inc.
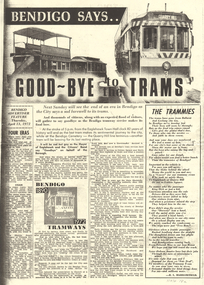
Newspaper - LONG GULLY HISTORY GROUP COLLECTION: BENDIGO SAYS GOOD-BYE TO THE TRAMS
Copy (2 pages) of a Bendigo Advertiser Feature dated Thursday, April 13, 1972 titled Bendigo Says. Good-bye to the Trams. Article contains photos of trams, a photo of a conductor assisting an elderly lady with a shopping jeep and a photo of trams and people at the Alexander Fountain. The article mentions Four Eras of Trams, a poem titled 'The Trammies' by R L Harrowfield, some men who worked on the trams and tasks they did, some accidents, local identities, and some of Tom Griffiths memories.bendigo, history, long gully history group, the long gully history group - bendigo says good-bye to the trams, the electric supply company of victoria, state electricity commission of victoria, cr d e elliott, the city council, bendigo trust, sandhurst and eaglehawk tramway company, bendigo tramway company, battery trams, steam trams, electric trams, r l harrowfield, tom griffiths, baby health centre, miss tavenor's sweet shop, needle mine, the robbie burns hotel, eaglehawk wine saloon, town hall hotel, hooley's dress fabrics, kevin anstee, bert knight, bendigo curtain service, graham o'donahoo, john henderson, the english electric traction company, princess theatre, upper reserve, five lions, hercules mine, needle loop (needle mine), jim collins, arch robinson's seat, st liborius church, virginia mine, upper reserve (qeo), bendigo tram history, gibson's, blum's, powney's, view point newsagency, city offices, hopetoun hotel, ?ob & dorothy mills' concern, gillies bros pty ltd -
 Bendigo Historical Society Inc.
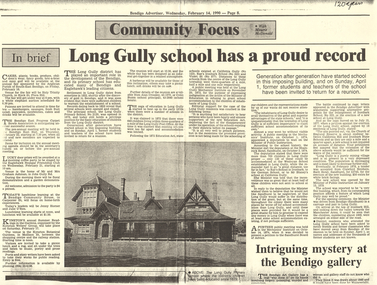
Document - LONG GULLY HISTORY GROUP COLLECTION: LONG GULLY SCHOOL HAS A PROUD RECORD
Copy of a Bendigo Advertiser article titled Community Focus with Maurie McDonald. This article is titled Long Gully school (No 2120) has a proud record. The school was having a reunion on April 1. The article mentions history of the school which was opened in 1879. The Advertiser is dated February 14, 1990. Written in the top right corner is 120 years.bendigo, history, long gully history group, the long gully history group - long gully school has a proud record, bendigo advertiser 14/2/1990, maurie mcdonald, long gully primary school no 2120, alan crossley, colin buzza, long gully post office, 1872 education act, california gully no 123, rae's ironbark school no 323, violet st no 877, long gully mechanics' institute, shamrock hotel sandhurst, wesleyan school, german school, mr blaney's school, sandhurst board of advice, the church of england reserve, crawford bros, bath hotel sandhurst, ironbark hill, manchester arms -
 Bendigo Historical Society Inc.
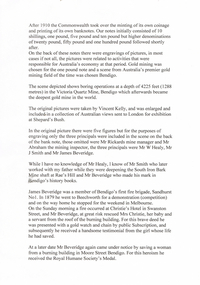
Document - LONG GULLY HISTORY GROUP COLLECTION: BANKNOTES AND JAMES BEVERAGE
Typed copy of what appears to be a speech. Mentioned is that after 1910 the Commonwealth took over the minting it's own money. Gold mining was chosen for the one pound note and a Bendigo scene was chosen. The scene chosen shows boring operations in the Victoria Quartz Mine. The picture was taken by Vincent Kelly of the five figures but for engraving only three were shown. They were Mr W Healy, Mr J Smith and Mr James Beverage. James Beverage was a member of Bendigo's first fire brigade. He went to Beechworth for a demonstration and on the way home stopped at Christie's Hotel in Swanston Street. There was a fire at the hotel and Mr Beverage rescued Mrs Christie, her baby and a servant. At a later date Mr Beverage saved a woman from a burning building in Moore Street in Bendigo. He received the Royal Humane Society's Medal which is now housed at the Bendigo Fire Station in Hargreaves Street. In the City's formative years the area that deposited its rain water into the Long Gully Creek was considered to be in Long Gully and for many years the Victoria Quartz Mine deposited many thousands of gallons of water into the Long Gully Creek. Mr Steve Gibbons unveiled the plaque.bendigo, history, long gully history group, the long gully history group - banknotes and james beverage, victoria quartz mine, vincent kelly, shepard's bush, mr rickards, mr abraham, mr w healy, mr j smith, mr james beverage, south iron bark mine, rae's hill, sandhurst no 1 fire brigade, christie's hotel, mrs christie, royal humane society's medal, bendigo fire station, long gully history group, mr steve gibbons, department of environment water heritage, arts commnmoration of historic events and famous persons -
 Bendigo Historical Society Inc.
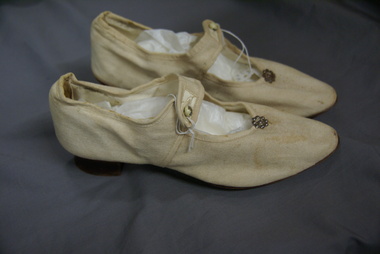
Clothing - SHOES ONE PAIR, 1902
Clothing. One pair of shoes. Ivory coloured cotton canvas. Size 3, marked on sole of right shoe. Instep straps fastened by buttonhole to shanked round metal buttons. Low wooden heels. Decorative ''button'' stitched centre front of shoe.Wedding dress and shoes were worn by Mary Smith for the marriage to John Keane 6th August 1902, at the Roman Catholic Church, Wycheproof. Mary Smith was the daughter of Felix Smith. He built the Wycheproof Court House, Post Office and Royal Mail Hotel. Mary and John Keane lived in a mud brick house after their marriage. See also 11400.76 & 11400.75costume, female, wedding shoes -
 Bendigo Historical Society Inc.
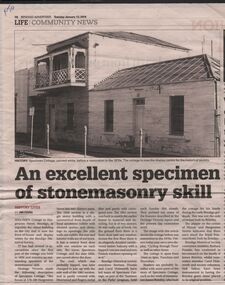
Document - BARBARA MAMOUNEY COLLECTION: NEWSPAPER ARTICLE ON SPECIMEN COTTAGE
Newspaper feature from Bendigo Advertiser Tues January 12 2016 and image of Specimen Cottage before restoration in 1970s It was built by stonemason James Brierley for his family Is now the front of house and display centre for The Bendigo Historical Society and is arguably the oldest building in the city with 1856 shown above the front door Near the corner of Hargreaves and Mundy St The building has two parts The 1856 section is single storey with front façade of locally sourced sandstone rubble with dressed quoins and dressings to openings, side walls are of rubble the rear and interior walls are of red brick a central front door a window on either side The roof which was probably hipped, was later joined to the next wall of the 1861 section and is partly covered with Morewood and Rogers metal tiles with partly corrugated iron The 1861 section was built to match the earlier one Across the first floor of the 1861 section is an elegantly detailed cantilevered timber balcony with a hived concave roof and two French windows opening onto it Bendigo Historical Society members Barbara Poustie and Carol Holsworth have led tours of the cottage as part of the 'Summer in the parks' program A plaque on the corner of Hargreaves and Mundy indicates that there once stood the Royal Princess Hotel, also built by Brierley, Bendigo Historical Society members have continued research on the Brierley familyhistory, australian, bendigo, architecture, specimen cottage royal princess hotel built by james brierly in 1856 barbara proustie carol holsworth -
 Bendigo Historical Society Inc.
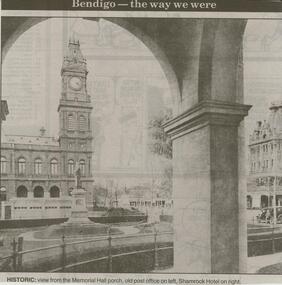
Newspaper - JENNY FOLEY COLLECTION: MEMORIAL HALL
Bendigo Advertiser ''The way we were'' from 2000. View from Memorial Hall porch, old post office on left, Shamrock Hotel on right. The clip is in a folder.newspaper, bendigo advertiser, the way we were -
 Bendigo Historical Society Inc.
Newspaper - JENNY FOLEY COLLECTION: LAND BILL
Bendigo Advertiser ''The way we were'' from 2000. Land Bill - The main purpose of the Bendigo Land Bill was to authorise the sale of land at the corner of Mitchell and High streets for 9000 Pounds. In 1870 the site was a gold mine on which a Bendigo councillor, Dr Boyd, had erected buildings, one of these buildings was the City Club Hotel. The clip is in a folder.newspaper, bendigo advertiser, the way we were -
 Bendigo Historical Society Inc.
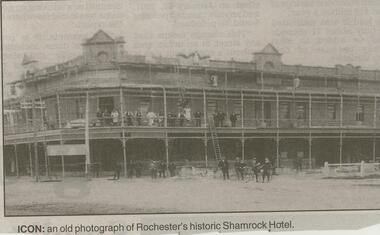
Newspaper - JENNY FOLEY COLLECTION: ICON
Bendigo Advertiser from 2000. Two photos of the Shamrock Hotel. The first black and white under titled Icon: an old photograph of Rochester's historic Shamrock Hotel. The second is a colored photo of the Shamrock Hotel with scaffolding aroundnewspaper, bendigo advertiser, the way we were -
 Bendigo Historical Society Inc.
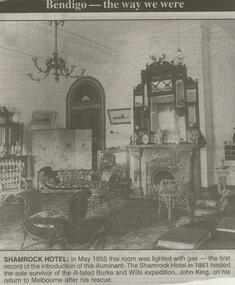
Newspaper - JENNY FOLEY COLLECTION: SHAMROCK HOTEL
Bendigo Advertiser ''The way we were'' from 2000. Shamrock Hotel: in May 1855 this room was lighted with gas - the first record of the introduction of this illuminant. The Shamrock Hotel in 1861 hosted the sole survivor of the ill-fated Burke and Wills expedition, John King, on his return to Melbourne after his rescue. The clip is in a folder.newspaper, bendigo advertiser, the way we were -
 Bendigo Historical Society Inc.
Newspaper - JENNY FOLEY COLLECTION: UNDERTAKERS
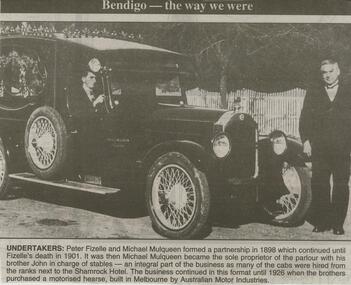
Bendigo Advertiser ''The way we were'' from 2000. Undertakers: Peter Fizelle and Michael Mulqueen formed a partnership in 1898 which continued until Fizelle's death in 1901. It was then that Michael Mulqueen became the sole proprietor of the parlour with his brother John in charge of stables - an integral part of the business as many of the cabs were hired from the ranks next to the Shamrock Hotel. The business continued in this format until 1926 when the brothers purchased a motorised hearse, built in Melbourne by Australian Motor Industries. The clip is in a folder.newspaper, bendigo advertiser, the way we were -
 Bendigo Historical Society Inc.
Newspaper - JENNY FOLEY COLLECTION: IMPOSING
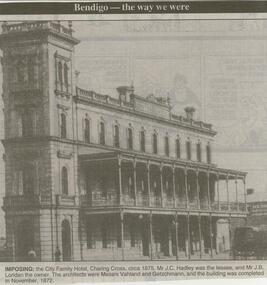
Bendigo Advertiser ''The way we were'' from 2000. Imposing: the City Family Hotel, Charing Cross, circa 1875. Mr. J.C. Hadley was the lessee, and Mr. J.B. Loridan the owner. The architects were Messrs Vahland and Getzschmann, and the building was completed in November 1872. the clip is in a folder.newspaper, bendigo advertiser, the way we were