Showing 1045 items matching "general view"
-
 Wodonga & District Historical Society Inc
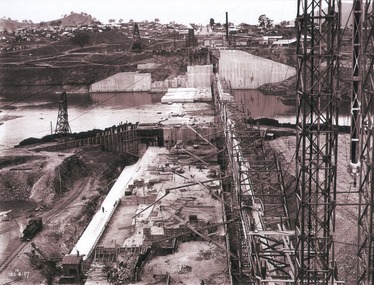
Album - Hume Reservoir Australia Album - View of concrete dam from top of tall tower pillar, August 1927
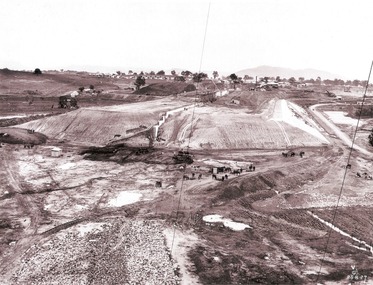
... . This gives a general view of the New South Wales Township. The Quarry.... This gives a general view of the New South Wales Township. The Quarry ...This set of photos is from a leather bound album bearing the inscription "HUME RESERVOIR AUSTRALIA" plus 'The Rt. Hon. L. C. M. S. Amery, P. C., M .P.' all inscribed in gold. It was presented to The Rt. Hon. L. C. M. S. Amery, P. C., M. P, Secretary of State for Dominion Affairs on the occasion of his visit to the Hume Reservoir on 2nd November 1927. This album is of local and national significance as it documents the planning and development of the Hume Reservoir up to 1927. It was the largest water reservoir in the British Empire. The album records the pioneering engineering work that went into its construction.DEPARTMENT OF PUBLIC WORKS, N.S.W. RIVER MURRAY WATERS SCHEME. HUME RESERVOIR. 29. View from Top of Tail Tower Pillar - Concrete Dam. This was taken from the top of the Tower described in the preceding photograph looking towards New South Wales. (WHS 00722) First is the part of the spillway being built inside the Coffer Dam, then over the Coffer Dam the submerged portion of the Spillway and outlet sections for the river diversion, beyond that the situation for the hydro-electric turbo passages bounded by the North Wing Wall. The gap may be seen in wing wall for the passage of the belt conveyor and half of the concrete mixer house behind. This gives a general view of the New South Wales Township. The Quarry is on the side of the hill showing up beyond the Township. New South Wales, August 1927.hume reservoir australia, river murray waters scheme, hume reservoir construction -
 Kiewa Valley Historical Society
Photograph - Folder of Photographs (KVHS 1150 A - F) – Photocopied set of black and white photographs from the display folder (pages 1 - 8) put together by KVHS to document life on the Kiewa Valley Hydro-electric Scheme
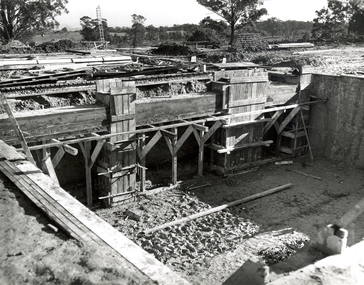
... Kiewa Hydro Electric Works. Sawmill – General View Page number 3... Electric Works. Sawmill – General View Page number 3 6- STATE ...Although the Kiewa Hydro-Electric Scheme was first proposed in 1911, construction did not commence until 1938. As part of the push to cut electricity costs and diversify supply, the Victorian Government (circa 1930) initiated the conversion from primarily brown coal supply to hydro – electricity. Field investigations during the 1940’s resulted in a new proposal for a scheme that had more than double the capacity of the 1938 scheme. The Kiewa Hydroelectric Scheme became the largest scheme of its kind in the State Of Victoria and the second largest scheme in Australia. The number of personnel involved in the planning and construction of the scheme increased dramatically. During the late 1940’s, most activity centred around the construction of the West Kiewa Power Station, Rocky Valley Reservoir, McKay Creek Power Station and the Bogong Creek Aqueduct.A common thread across all the larger hydro scheme constructions was the need for workers, both qualified and unqualified who came from around the world seeking a new life for themselves and their families. New accommodation and facilities were required for the army of workers engaged in construction in often remote and wild areas. The SEC had a high demand for timber, and set up the first of a number of sawmills at Bogong Creek in 1939 and set up the first hardwood logging in the headwaters of the Kiewa River. These new ‘towns’ such as Mt Beauty and Bogong, survived, serving the needs of operational personnel and their families, and expanding with growth of new industries. Mount Beauty, and to a lesser extent Bogong, are among these places. Large A3 size spiral bound display folder containing 21 of 58 pages of photocopied black and white photographs of various aspects of the early days of the Kiewa Valley Hydro-electric scheme including equipment, various work sites and photographs of workers and their families. 1-Front page; 2-Security gate at Mt Beauty Camp; 3-Channel 1 on East Kiewa River; 4-Junction Dam – Diversion Tunnel Inlet; 5-Sawmill; 6- Homan’s Gap Sawmill; 7 Junction Dam: 8-Homan Dam Site-Diamond Drilling on River Buttress; 9- Homan Dam Site View Upstream 10-Homan Dam Investigation Camp 1-Windsor & Newton Visual Diary 60 sheet (120 pages) 11’ x 14’ 280 x 356mm 110 GSM Acid Free Drawing Paper 2-1940-Security Gate on Mt Beauty side of Kiewa River bridge. Part of old Mt Beauty camp and mess in background 3- STATE ELECTRICITY COMMISSION OF VICTORIA Date; 11.3.40 Time: 10.30am No K35 Kiewa Hydro Electric Works. Diverting East Kiewa River into Channel Page number 1 4-STATE ELECTRICITY COMMISSION OF VICTORIA Date: 5.4.40 Time: Noon No K58 Kiewa Hydro Electric Works. Junction Dam – Diversion Tunnel Inlet – Normal Flow Page number 2 5- STATE ELECTRICITY COMMISSION OF VICTORIA Date: 19.8.42 Time: 2.30pm No K883 Kiewa Hydro Electric Works. Sawmill – General View Page number 3 6- STATE ELECTRICITY COMMISSION OF VICTORIA Date: 12.1.42 Time: 2.00pm No K540 Kiewa Hydro Electric Works. Homan’s Gap Sawmill – General View Page number 4 7- STATE ELECTRICITY COMMISSION OF VICTORIA Date: 12.1.42 Time: 2.00pm No K540 Kiewa Hydro Electric Works. Junction Dam – General View looking upstream Page number 5 8- STATE ELECTRICITY COMMISSION OF VICTORIA Date: 16.11.45 Time: 10.32amm No K52153 Kiewa Hydro Electric Works Homan Dam Site – Diamond Drilling on River Buttress Page number 6 9-STATE ELECTRICITY COMMISSION OF VICTORIA Date: 15.1.45 Time: 4.10pm No K1781 Kiewa Hydro Electric Works Homan Dam Site – View Upstream Page number 7 10- STATE ELECTRICITY COMMISSION OF VICTORIA Date: 15.1.45 Time: 4.10pm No K1781 Kiewa Hydro Electric Works Homan Dam Investigation Camp 1944 – 1945 Page number 8 secv; kiewa hydro electric scheme; mt beauty; bogong; construction work; -
 Federation University Historical Collection
Photograph, N.l. Harvey & Son, Mount Helen Campus, 1968, 1969
... and foundations .3) Aerial View from south west. Earthworks, general view... View from south west. Earthworks, general view .4) Aerial View ...The Federation University campus at Mount Helen was first used by students in 1970.Seven photographs of the Mt Helen Campus Stage one development. .1) Aerial view of foundation work, from west, towards Green Hill .2) Aerial View from South. Earthworks and foundations .3) Aerial View from south west. Earthworks, general view .4) Aerial View from above the South West corner of E building. .5) Aerial View from North East. Gear Avenue in background .6) Aerial View from North West. Earthworks extend from Gear Avenue .7) Ground level view. First columns of E building. .13) Mt Helen development Stage One, Engineering Diploma Buildings. This image shows the wall beam and pier construction to the East Wall of the Fluid Mechanics Laboratory adjacent to the pump chamber, 17 June 1968. .18) Flume Pit and Pump Chamber, 15 July 1968. .28) East Wing Pit Looking North, 26 August 1968 .40) Construction as of 04 November 1968federation university, federation university australia, feduni, university of ballarat, ballarat college of advanced education, ballarat institute of advanced education, building, earthworks, foundation, early development, soil testing laboratory -
 Melbourne Tram Museum
Photograph - Set of 7 Black & White Photograph/s, Keith Kings, Jun. 1948
... the equipment, photo no. 24-12 .5 - general view of room from the entry... - general view of room from the entry point - photo no. 24-13 (2 ...Set of 7 Black and white photographs of the then "new" driver training school at Hawthorn Depot. All taken 17/11/1967 unless noted otherwise. .1 - RC2 and K35 training stands - photo number 24-7 (2 copies) .2 - Part of the equipment - photo no. 24-8 .3 - RC2 board, lit at the 8th notch - photo no. 24-9 .4 - photo looking along the "skeleton" W2 car showing the equipment, photo no. 24-12 .5 - general view of room from the entry point - photo no. 24-13 (2 copies) .6 - ditto - photo dated 14/6/1968 - photo no. 40-38 .7 - view of the front of the W2 - photo no. 24-11 Rear of each photo has been scanned. Printed on Kodak Xralife paper.trams, tramways, hawthorn tram depot, training -
 Melbourne Tram Museum
Photograph - Black and White photograph, mid to late 1970's
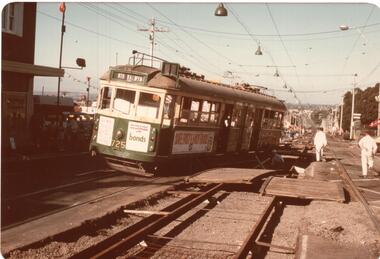
... - General view of the scene looking back towards Kew Junction. .5... - close up view of the damaged truck. .4 - General view ...Set of five colour prints of tram W5 725 derailed in High St Kew during track reconstruction work at the corner of Derby St Kew. Tram was bound for North Balwyn when it derailed on a section of track that had been dismantled, possibly when it hit or dislodged a track crossover. Tram has advertisements for Bonds, Tollana Wines, Park Drive cigarettes, .1 - tram derailed at the top of the hill down to Kew Cemetery. .2 - with workmen setting up the tram and place on the temporary transport wheels. The second axle box towards the drop centre is on an angle compared to the nearest axle box. .3 - close up view of the damaged truck. .4 - General view of the scene looking back towards Kew Junction. .5 - view of the damaged crossover section. Date: during the 1970's.trams, tramways, accidents, derailments, kew, high st, north balwyn, route 48, temporary track, tram 725 -
 Melbourne Tram Museum
Photograph - Set of 5 Black & White Photograph/s, Melbourne & Metropolitan Tramways Board (MMTB), late 1964
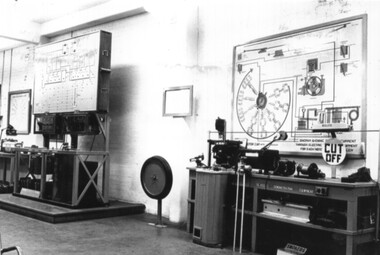
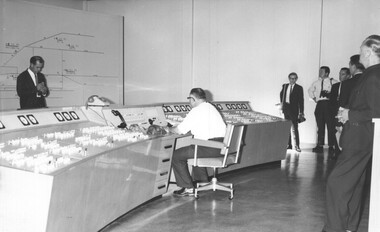
... at the time of the implementation late 1964 .1 - General view... at the time of the implementation late 1964 .1 - General view ...Series of five black and white photographs of the Electrical Control room supervisory panel, that was located in Bouverie St and Queensberry St Carlton known as Carlton Control at the time of the implementation late 1964 .1 - General view with the Press standing around. .2 - View of the operators control desk .3 - ditto with the operator at "work" .4 - The room and map without the chair etc. .5 - ditto but a side view. The MMTB News - 1721.4 - Vol. 1, No. 4 - 20 pages, November - December 1964, with a colour photo of the new Supervisory control room at Carlton on the front cover. Has articles on; chairman's message, tramway band, Carlton Control - Supervisory Centre, safe electrical working, Christmas celebrations, the old power control centre, a obituary for H. H. Bell, Remembrance day. Printed on gloss white paper.Items .4 and .5 are stamped on the rear.trams, tramways, carlton, substation, electrical equipment, electrical switching, carlton control -
 Federation University Historical Collection
Booklet, Views of the Michigan College of Mines, c1906
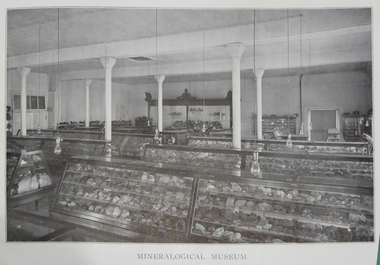
... of the Michigan College of Mines. * General View * Hubbell Hall... with views of the Michigan College of Mines. * General View ...Charcoal grey soft covered booklet with views of the Michigan College of Mines. * General View * Hubbell Hall * Mechanical Engineering Building * Mining and Metallurgy Buildings, with Stamp Mill in the Distance * Chemistry Building * College Club and Gymnasium Building * Architects Sketch of Library and Museum Building * Metallurgy Building * Mining Engineering Building * Assaying Course G1 * General Chemistry Course F1 * Inspecting Drill Operations * Mineralogy - COurses W1 and W2 * Railroad Surveying - Course Q1 * Field Geology * Reporting on Power PLants at Tamarack No. 5 Hoist * Sketching Ore Pockets * Pattern Shop * Physics Course * Underground in Champion Mine * QUalitative Chemistry * Field Surveying * Ore Dressing * HYdraulics Course * Machine Shop * Palaeontology and Historical Geology * Just Up from Lake Angeline Mine, Ishpeming Mineralogical Museum * Gymnasium, College Club Building * Lounging Room of College Club Buildingmichigan college of mines, school of mines, michigan, houghton, michigan, f.w. mcnair, united states of america, schools of mines, michigan school of mines -
 Bendigo Historical Society Inc.
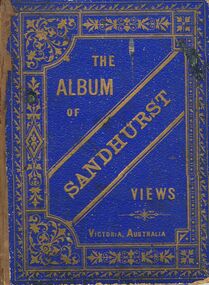
Book - MERLE HALL COLLECTION: THE ALBUM OF SANDHURST VIEWS
... , Bishop's Palace, General View - New Chum Line, Koch's ''Pioneer... Palace, General View - New Chum Line, Koch's ''Pioneer'' Crushing ...A bound book of 16 drawings B&W (lithographs?) in ''photographic'' detail of well-known Sandhurst Views - Town Hall, Mechanics Institute, Masonic Hall, Bendigo Hospital, Bendigo Benevolent Asylum, Post and Telegraph Offices, Mining Exchange, View from Post Office Tower looking East, View from Post Office Tower looking West, Central State School, Alexandra Fountain, Upper Lake,Rosalind Park, Fernery Rosalind Park, St Pauls Church, Bishop's Palace, General View - New Chum Line, Koch's ''Pioneer'' Crushing Works, Quartz Crushing batteries, Town Hall - Eaglehawk, Railway Station. Appended with two pages summarizing Sandhurst history; current councillors and officers, brief review of five places - Bendigo Hospital, Benevolent Asylum, Mechanics Institute and Free Library, School of Mines and Industries, Masonic Hall. Date is given as ''The present (1888) occupants are ....'' -
 Wodonga & District Historical Society Inc
Album - Hume Reservoir Australia Album - Earth embankment on Victorian side from Top of Tail Tower Pillar, August 1927
... - Earth Embankment, Victoria. This is a general view..., Victoria. This is a general view of the embankment which is being ...This set of photos is from a leather bound album bearing the inscription "HUME RESERVOIR AUSTRALIA" plus 'The Rt. Hon. L. C. M. S. Amery, P. C., M .P.' all inscribed in gold. It was presented to The Rt. Hon. L. C. M. S. Amery, P. C., M. P, Secretary of State for Dominion Affairs on the occasion of his visit to the Hume Reservoir on 2nd November 1927. This album is of local and national significance as it documents the planning and development of the Hume Reservoir up to 1927. It was the largest water reservoir in the British Empire. The album records the pioneering engineering work that went into its construction.DEPARTMENT OF PUBLIC WORKS, N.S.W. RIVER MURRAY WATERS SCHEME. HUME RESERVOIR. 31. View from Top of Tail Tower Pillar - Earth Embankment, Victoria. This is a general view of the embankment which is being constructed by the Victorian Constructing Authority. The bank at its base is about 650 feet wide and it is about half its ultimate height. In the middle is the reinforced concrete core wall. At about the natural surface a tunnel for drainage and inspection purposes is built along the downstream side of the core wall but this cannot be seen. The Victorian workshops and township are located on the high ground beyond the embankment. The embankment curves round to the left at the side of the valley and will eventually block the gulley where the bushy tree stands. Access to one of the cuttings from which material is being got for the embankment is gained by means of this gulley at present. Part of another cutting may be seen on the right hand side at the back. August 1927.hume reservoir australia, river murray waters scheme, hume reservoir construction -
 Ballarat Tramway Museum
Photograph - B&W print of donated negative - set of 4, State Electricity Commission of Victoria (SECV), late 1930's
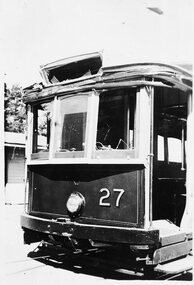
... 's. 1367.1 - general view of the end cab showing the damage... at the bumper bar level. Thought to be late 1930's. 1367.1 - general ...Yields information about an accident or collision between a tramcar and a vehicle late 1930's. Gives information about the damage to the tramcar and livery detailsSet of four Black and white photo prints from collected negative of Ballarat (SEC) No. 27 photographed in the depot yard after a collision with motor vehicle or possibly another tram, as the damage is at the roof line, where the two trams tend to hit before hitting at the bumper bar level. Thought to be late 1930's. 1367.1 - general view of the end cab showing the damage to the roof level, destination box and beading. 1367.2 - close up of the damage from one side. 1367.3 - side on view showing how the driver's windows have been pushed back. 1367.4 - close up of the damage from the opposite side to that of 1367.2 Copy 2 - of all above photos - large format prints (253H x 203W) - added 30/7/2007, ex Alan Bradley holding of prints, received 5/2007. See also Reg Item 3905 for a mounted set of these photographs along with that of Reg Item. 1364. .Negatives rescanned 17/5/2020 and image updated.tramways, trams, accidents, collision, damage, tram 27 -
 Melbourne Tram Museum
Slide - Set of 30, Mike Ryan, Nov. 1998
... - W4 interior .13 - general view inside depot .14 - not used... - general view inside depot .14 - not used .15 - interior of 902 ...Slide - set of 29 - 35mm - white plastic mount of various heritage trams at Bylands. .1 - Recovered A class ? body stored at Bylands .2 - front of 980 .3 - interior of 52? or 980? .4 - Recovered A class ? body stored at Bylands .5 - VR52 .6 - Ballarat Jelbart Roller .7 - Ex U class car as a stores delivery form. .8 - Interior .9 - Interior W3 or W2 .10 - W3 667 .11 - W3 667 .12 - W4 interior .13 - general view inside depot .14 - not used .15 - interior of 902 .16 - VR car .17 - ditto .18 - ditto interior .19 - ditto interior .20 - sign about not travelling on running boards .21 - VR car .22 - W2 .23 - interior of 844 .24 - interior of W1 427 .25 - ditto .26 - W1 427 .27 - interior of X1 467 .28 - X1 467 .29 - Grinder .30 - W3 667trams, tramways, bylands, w1 class, w2 class, w3 class, w4 class, w6 class, pcc, vr trams, jelbart, tram 667, tram 673, tram 980, tram 52, tram 902, tram 467, tram 427, tram 844 -
 Melbourne Legacy
Postcard, Postcards of Egypt
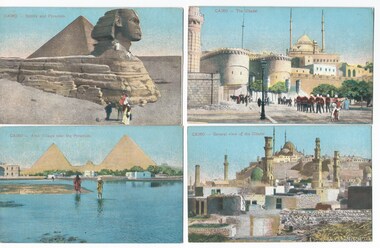
... Cairo - General View of the Citadel 01137.5 Cairo - Sebil... 01137.4 Cairo - General View of the Citadel 01137.5 Cairo - Sebil ...Postcards were a common form of souvenirs for soldiers who were travelling either during World War 1, or just after, or while returning to Australia. These postcard scenes include the Sphinx, the Pyramids, Cairo, Alexandria, and Suez including mosques and marketplaces. The Suez Canal was used by troop ships, so this was often the first time soldiers from Australia saw Egyptians. Many troops in World War 1 were stationed first in Egypt (including near Cairo) to train before heading to Gallipoli, Turkey or on to the Western Front. These were with other World War 1 memorabilia that has come from Private John Basil McLean, 2nd Reinforcements, 37th Battalion, A.I.F. There was a large collection of postcards so he may have been collecting them as souvenirs (none of these have been written on or posted). He also had a vesta (match) case from Belfast, so it is likely he visited there. J.B. McLean (Service No. 13824) was from near Maffra, Victoria and enlisted on 22 January 1916. He embarked on 16 December 1916 for Europe. His full war record is available from AWM. He spent time with the Australian Field Artillery (Pack Section). At the end of the war he worked for a year at the A.I.F. Headquarters in London before returning to Australia on the 'Ceramic', arriving Portsea in 1920.Postcards were a very common form of communication in the first World War. Postcards as souvenirs or as correspondence would have been familiar to the first Legatees as they had served in World War 1. These places in Egypt could have been visited by the first Legatees when they were soldiers in World War 1.Postcards x 16 with images from Cairo, Alexandria and Suez in Egypt and a purple card holder that once contained 12 views of Suez (only 3 here).01137.1 Cairo - Sphinx and Pyramids 01137.2 Cairo - Arab Village near the Pyramids 01137.3 Cairo - The Citadel 01137.4 Cairo - General View of the Citadel 01137.5 Cairo - Sebil of Abbassia 01137.6 Cairo - Barrage Bridge 01137.7 Cairo - Native Woman 01137.8 Suez - Market Street 01137.9 Alexandria - San Stefano Casino 01137.10 Alexandria - Native Bazaar new Napoleon's Fort 01137.11 Alexandria - Mohamed Aly Place 01137.12 Alexandria - The Light House 01137.13 Alexandria - Column of Menasce 01137.14 Alexandria - Ramleh Boulevard 01137.15 Suez - The Port -Twefik Quay 01137.16 Suez - Railway Station Each one has the word POST CARD on the reverse with room for an address and an area for Correspondence. Different makers.souvenir, world war one -
 Eltham District Historical Society Inc
Photograph, Montsalvat
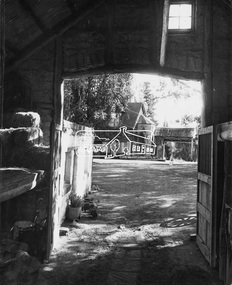
... Image 2E General view of Montsalvat mud brick buildings...Image 2E General view of Montsalvat mud brick buildings ...Image 2E General view of Montsalvat mud brick buildings including two storied studio The Alistair Knox Collection The Alistair Knox Collection is a series of mounted enlarged photos of mud brick houses and related subjects. The collection is understood to have been put together by Alistair Knox although it is the work of several unacknowledged photographers. For some years it was held by the Building Department of the former Eltham Shire Council and was then passed to our Society for safekeeping. Some of the photos have been used in Knox's books and from time to time some of them have been part of various historical displays. As far as we know there has not been a public display of the whole collection which numbers about forty photographs. The collection has been copied on to slides for the purpose of this meeting and to be retained as part of the Society's pictorial collection. Alistair Knox 1912 - 1986 is acknowledged as the founder of Eltham's mud brick building movement. Many of the buildings shown in the collection are of his design and he was also involved with the construction of several of them. Others are the work of his contemporaries and associates such as Peter Glass, Gordon Ford, and John Harcourt. (EDHS Newsletter No. 145 July 2002)Handwritten notes in pencil re details of building, year of construction, owner, designer, builder, etcmontsalvat, houses, mud brick construction, alistair knox collection -
 Melbourne Tram Museum
Photograph - Illustration/s, Melbourne & Metropolitan Tramways Board (MMTB), 1950's?
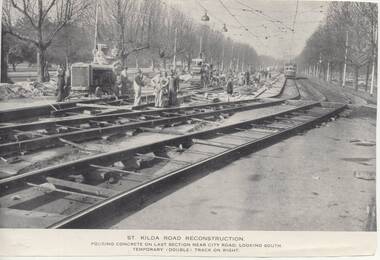
... Victoria Barracks. .3 - "General view from just south of City... Barracks. .3 - "General view from just south of City Road ...Series of three Black and white Illustrations, reproduction of a MMTB report of photographs of the reconstruction of St Kilda Road, near City Road c1955. .1 Photo titled "St Kilda Road Reconstruction Pouring concrete on last section near City Road, looking south. Temporary (double) track on right. Shows a large group of men working, including some looking at the camera. Shows the construction of temporary track. Has a wide bodied W outbound. Has the Shrine of Remembrance in the far distance. .2 - showing "New Work and some temporary work" - shows the "shoo fly" temporary track link between the side temporary track and the new track. Has a tram in the far distance. Photograph taken near Victoria Barracks. .3 - "General view from just south of City Road, looking south - temporary (double) track in foreground. Similar to .l Originally reproduced in a possibly an MMTB report - not a mid 50's annual. Entry revised 7/7/2017 following addition of items .2 and .3trams, tramways, mmtb, st kilda rd, trackwork, reconstruction -
 Ballarat Tramway Museum
Negative, Bruce Herbert, "Bendigo and Ballarat Trams (AETA Convention) 30 Mar 1975", 30/03/1975 12:00:00 AM
... members standing at the front of the tram. 2 - distant view of 27... - 14 leaving loop 10 - General view showing cars and 40 ...Negative folder - made by ROW1 International of West Germany containing 40 No. 35 mm negatives of the AETA 1975 Convention visit to Ballarat and Bendigo on 30-3-1975. 17 photos of Ballarat and 23 of Bendigo. Ballarat photos: 1 - 40 at the Wendouree Parade crossing loop showing trams stop signage and AETA members standing at the front of the tram. 2 - distant view of 27 in the loop and the "wide roadway" 3 - view of 40 northbound about to nearing loop with various cars in the view. 4 - 40 about to enter loop with 27 in background. 5 - 40 and 27 at loop 6 - 40 at St Aidans Drive 7 - 14 and 27 at loop with 40 in the background 8 - 27 leaving loop 9 - 14 leaving loop 10 - General view showing cars and 40 in the loop, looking north. 11 - as for 1 12 - ditto 13 - 40 northbound, 27 southbound at loop 14 - 27 at loop 15 - 26, 14 and 28 at depot including 1 road. 16 - ditto with people viewing the trams - shows the overhead on 1 road. 17 - X41 and B80 on train at Spencer St, probably the train the group travelled on. trams, tramways, btps, ballarat, aeta, bendigo, bendigo trust, wendouree parade, depot, gardens loop, motor vehicles, tram 40 tram 27 tram 26 tram 14 tram 28 -
 Ballarat Tramway Museum
Negative, Bruce Herbert, "Bendigo and Ballarat Trams (AETA Convention) 30 Mar 1975", 30/03/1975 12:00:00 AM
... - general view with 24 and other bogie trams 8 - ditto 9 - Four... - scrubber and other bogie trams. 7 - general view with 24 and other ...Negative folder - made by ROW1 International of West Germany containing 40 No. 35 mm negatives of the AETA 1975 Convention visit to Ballarat and Bendigo on 30-3-1975. 17 photos of Ballarat and 23 of Bendigo. Bendigo photos: 1 - No. 28 at the depot 2 - ditto 3 - 24 and another bogie tram in side the depot 4 - No. 3? inside the depot 5 - 12, scrubber - 17 and two bogie trams 6 - scrubber and other bogie trams. 7 - general view with 24 and other bogie trams 8 - ditto 9 - Four trams at the Gold Mine, lead by 28. 10 - 19 at the Gold Mine 11 - single trucker with "tram tours" sign on the front 12 - 28 and two other cars at the Joss House, North Bendigo 13 - 19 and two other cars at the Joss House 14 - 30 at depot junction and loop 15 - 28 and 18 16 - 18 in the loop 17 - 28 and 18 McCrae St 18 - 28, 18 and 30 ditto 19 - 19 20 - No. 18 and 28 in Pall Mall with The Beehive in the background. Outside the building is an American Doughnut Kitchen van. The junction trackwork for the Eaglehawk lines remain in position. 21 - No. 30 northbound, with the City Family Hotel and other shops in the background. 22 - ditto and the cenotaph, 23 - B74 on a train at Spencer St. trams, tramways, btps, ballarat, aeta, bendigo, bendigo trust, depot, mccrae st, tram 28 tram 19 tram 30 tram 18 tram 24 tram 3 tram 12 tram 17 tram scrubber -
 Ballarat Tramway Museum
Postcard - Folder set, Viewpoint Scenic Production, "In Scenic Colour Ballarat, Vic", early 1950's
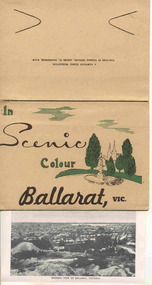
... . General View of Ballarat, Victoria 3. Bridge Street Ballarat 4... Grenville St. - see btm675i - 1940's) 2. General View of Ballarat ...Set of 12 views of Ballarat printed with six colour photos on one side and six black and white photos on the other side, printed onto a folded strip of paper glued within an embossed paper folder. On rear cover has publisher details "A Viewpoint Scenic Production"., titled "In Scenic Colour Ballarat, Vic". Front cover has title and small sketch showing a fountain, trees and church in the background. Would appear to be a generic cover for other cities as well. The rear cover has two sets of cut slits with black lines around the cuts to enable the folder to be closed. Pictures are: Black and White 1. Sturt St Ballarat. (Well known photo taken from Grenville St. - see btm675i - 1940's) 2. General View of Ballarat, Victoria 3. Bridge Street Ballarat 4. Mt Warrenheip from Buninyong (note wrong spelling of Warrenheip) 5. View from Mt. Buninyong 6. Ballarat Gardens showing Wallace Memorial Colour photos - generally out of register. 7. The Town Hall, Ballarat Victoria - with tram in foreground (see image i8 for a hi res version) 8. Sturt and Bridge Streets, Ballarat - with tram in view 9. The Gardens, Ballarat Victoria 10. The Eureka Stockade Memorial, Ballarat 11. Lake Wendouree, Ballarat Victoria 12. The of Victory, Ballarat Vic. trams, tramways, ballarat, postcards, sturt st, bridge st, gardens -
 Bendigo Military Museum
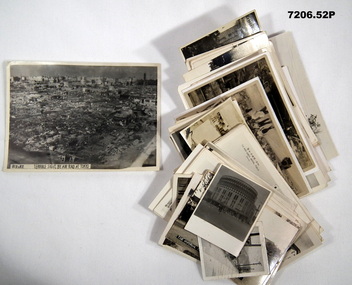
Photograph - PHOTOGRAPHS BCOF, TOKYO, JAPAN, 1946 - 47
... on some none at all. Eight re British, American general Hospital..., Theatres and Buildings. Sixteen, General Buildings and views ...Items in the collection re Clarence Shearing, refer Cat No 7089.16P for his service details.Photographs B & W various sizes, some have inscriptions on some none at all. Eight re British, American general Hospital buildings. Eight re bombing of Tokyo. Two of Tokyo. One, BCOF House. One, Ebasui Camp Tokyo. Three, Places in Meijo, Two, Ginza Crossing & Tokyo PX Three, Hibiya area. Three, Imperial Buildings. Seven, Theatres and Buildings. Sixteen, General Buildings and views, no text.photographs, bcof, tokyo -
 Stawell Historical Society Inc
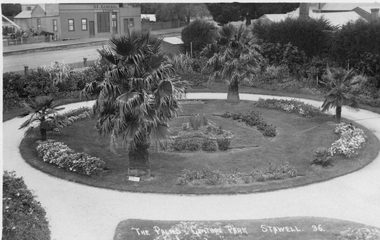
Photograph, Central Park Gardens --- 2 Photos 1920's, c1910 - 1920
... removed with view of general store across Lower Main St. c1910... No36. View from Grandstand with Palms and C.E. General, store ...Central Park Gardens. T R G Williams of Ararat Postcard No36. View from Grandstand with Palms and C.E. General, store in Main Street in Background. Additional later similar photograph with two men near palm tree. John Straton's Wool Skin Store, Commission Agent, in background, later purchased by N. Godfrey who came from Rupanyup but lived in St. George St. Stawell. Photo from Ivan Hodder in 1988. Note Picket fence. Black & white Post card by photographer T.R.G. Williams Ararat of The Palms Central Park Stawell 36. Note Cypress hedge removed with view of general store across Lower Main St. c1910-1920 Second photograph taken from the same position c1920 - 1930 with 2 gentleman in lower left of photograph. John Straton's wool & skin store visible in background.Photograph by T.R.G. Williams Ararat stawell, streetscape -
 Kiewa Valley Historical Society
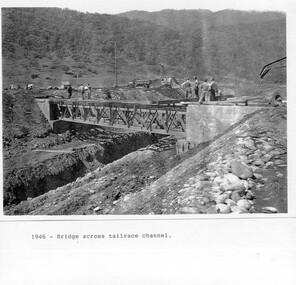
Photograph - Folder of Photographs – Photocopied set of black and white photographs (pages 9 - 18) from the display folder put together by KVHS to document life on the Kiewa Valley Hydro-electric Scheme
... Works General view of No.4 Headrace Tunnel Page number 15 8... General view of No.4 Headrace Tunnel Page number 15 8-STATE ...Although the Kiewa Hydro-Electric Scheme was first proposed in 1911, construction did not commence until 1938. As part of the push to cut electricity costs and diversify supply, the Victorian Government (circa 1930) initiated the conversion from primarily brown coal supply to hydro – electricity. Field investigations during the 1940’s resulted in a new proposal for a scheme that had more than double the capacity of the 1938 scheme. The Kiewa Hydroelectric Scheme became the largest scheme of its kind in the State Of Victoria and the second largest scheme in Australia. The number of personnel involved in the planning and construction of the scheme increased dramatically. During the late 1940’s, most activity centred around the construction of the West Kiewa Power Station, Rocky Valley Reservoir, McKay Creek Power Station and the Bogong Creek Aqueduct.A common thread across all the larger hydro scheme constructions was the need for workers, both qualified and unqualified who came from around the world seeking a new life for themselves and their families. New accommodation and facilities were required for the army of workers engaged in construction in often remote and wild areas. The SEC had a high demand for timber, and set up the first of a number of sawmills at Bogong Creek in 1939 and set up the first hardwood logging in the headwaters of the Kiewa River. These new ‘towns’ such as Mt Beauty and Bogong, survived, serving the needs of operational personnel and their families, and expanding with growth of new industries. Mount Beauty, and to a lesser extent Bogong, are among these places. PHYSICAL: Large A3 size spiral bound display folder containing 21 pages of photocopied black and white photographs of various aspects of the early days of the Kiewa Valley Hydro-electric scheme including equipment, various work sites and photographs of workers and their families. 1-Bridge across Tailrace Channel 1946 2-New Mess building, Mt Beauty 3-Homan’s Gap Saw Mill 4- Diamond Drilling Plant – Big Hill 5-Rocky Valley Camp-Mess Building 6-Parlimentary Party at Rocky Valley 7-No.4 Headrace Tunnel 8- Allis-Chalmers Tractor School 9- SECV Heavy Machinery lined up by road 10- No. 5 Raceline – Balasting Track with improvised truck 1-1946 – Bridge across tailrace channel Page number 9 2-New mess building, Mt Beauty 6.4.46 Page number 10 3- STATE ELECTRICITY COMMISSION OF VICTORIA Date: 10.1.47 Time: 11.40am No K2271 Kiewa Hydro Electric Works Homan’s Gap Saw Mill – Rip Saw Page number 11 4- STATE ELECTRICITY COMMISSION OF VICTORIA Date: 5.10.47 Time: 11am No K4111 Kiewa Hydro Electric Works Diamond Drilling Plant – Big Hill Page number 12 5- STATE ELECTRICITY COMMISSION OF VICTORIA Date: 11.2.48 Time: 3pm No K4277 Kiewa Hydro Electric Works Rocky Valley Camp-Mess Building Page number 13 6- STATE ELECTRICITY COMMISSION OF VICTORIA Date: 15.4.48 Time: 4.30pm No K4397 Kiewa Hydro Electric Works Parlimentary Party at Rocky Valley Page number 14 7- STATE ELECTRICITY COMMISSION OF VICTORIA Date: 22.8.48 Time: 9am No K4668 Kiewa Hydro Electric Works General view of No.4 Headrace Tunnel Page number 15 8-STATE ELECTRICITY COMMISSION OF VICTORIA Date: 5.9.49 Time: 10am No K5180 Kiewa Hydro Electric Works Allis-Chalmers Tractor School – HD 19, Mr I Crossthwaite at Controls Page number 16 9- No markings Page number 17 10- STATE ELECTRICITY COMMISSION OF VICTORIA Date: 7,12.49 Time: 4pm No K5423 Kiewa Hydro Electric Works No. 5 Raceline – Balasting Track with improvised truck. Page number 18 secv; kiewa hydro electric scheme; mt beauty; bogong; construction area -
 Bendigo Military Museum
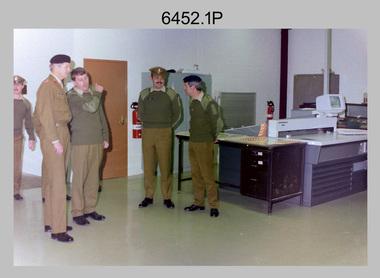
Photograph - Visit by General to the Army Survey Regiment, Fortuna, Bendigo, c1991
... Bogumil, Litho OC MAJ Bob Coote, unidentified visiting General..., Litho OC MAJ Bob Coote, unidentified visiting General, 2IC MAJ ...These photographs were most likely taken circa 1991 during an Australian Army General’s visit to the Army Survey Regiment, Fortuna, Bendigo. As there are no annotations on the photos, the names of the General and the aide de camp officer are unknown.This is a set of four photographs taken on the occasion of an Australian Army General’s visit to the Army Survey Regiment, Bendigo circa 1991. Colour photographs are on 35mm negative film and scanned at 96 dpi. They are part of the Army Survey Regiment’s Collection. .1) - Photo, black & white, c1991. L to R: WO2 Rob Bogumil, Litho OC MAJ Bob Coote, unidentified visiting General, 2IC MAJ Duncan Burns, CO LTCOL Rene van den Tol. .2) - Photo, black & white, c1991. L to R: Litho OC MAJ Bob Coote, unidentified visiting General, WO2 Rob Bogumil, CO LTCOL Rene van den Tol, WO2 Jeff Willey, unidentified aide de camp officer, CPL Lance Strudwick on top of Speedmaster printing press. .3) - Photo, black & white, c1991. L to R: unidentified aide de camp officer, CO LTCOL Rene van den Tol, unidentified visiting General take in views of Fortuna’s surrounds and Bendigo. .4) - Photo, black & white, c1991. L to R: unidentified visiting General, CO LTCOL Rene van den Tol, unidentified aide de camp officer on Fortuna’s 1st floor balcony..1P to .4P – There are no annotations.royal australian survey corps, rasvy, army survey regiment, army svy regt, fortuna, asr, litho -
 Ballarat Tramway Museum
Photograph - Digital image Set of 8, George Coop, 1968 - 1970
... (Temperance and General) building in the view. .8 - No. 31 moves over... out of view. Has the T&G (Temperance and General) building ...Yields information about the City Loop area and its operation. Eight (8) Digital images taken by George Coop during the period 1968 - 1970, of trams at the City Loop. .1 - 33, 17 and two other single truckers parked in the loop with motor vehicles and parking meters. No. 33 has an Eureka Roofing Tile Advert. .2 - 28? passing two track workers cleaning the west end points with a bogie car and three single truckers in the loop. In the background are Patersons and Dickins Food Store. .3 - No. 12 parked at the east end of the loop, hard up against the tram in front. Shows the Section Insulator. .4 - As for .1, front on photo with the destination of City and a "Pay as You Enter". The Dickins sign can be seen. .5 - as for .2, No. 35 leads the queue. Has the Woolworths Big W store in the background. .6 - view from the rear (12, 30, 17) with No. 33 being driven out of the loop. .7 - View from the rear, 33 has moved out of view. Has the T&G (Temperance and General) building in the view. .8 - No. 31 moves over the points at the west end of the loop. The tram has the Destination of Gardens via Drummond North, a Twin Lakes advert and a SEC Electric Cooking Advert.trams, tramways, city loop, sturt st, trackwork, overhead, tram 33, tram 17, tram 26, tram 12, tram 35, tram 31 -
 Melbourne Tram Museum
Album - David Frost Slide Collection, David Frost
... Description date DFC1 A general view from the former railway platform... Description date DFC1 A general view from the former railway platform ...Photo - see pdf file for further information. Number Brief Description date DFC1 A general view from the former railway platform at Port Melb Station looking towards Station Pier on opening day 20-12-1987 DFC2 A2 285 in the Tramway Platform at Port Melbourne Station on opening Day 20-12-1987 DFC3 A2 285 in the Tramway Platform at Port Melbourne Station on opening Day 20-12-1987 DFC4 A2 285 in the Tramway Platform at Port Melbourne Station on opening Day 20-12-1987 DFC5 A2 273 at St Kilda Tramway Station on opening day 22-11-1987 DFC6 A2 273 turning from Fitzroy St into St Kilda Tramway Station on opening day 22-11-1987 DFC7 B1 2001 at St Kilda Tramway Station turning into Fitzroy St on opening day 22-11-1987 DFC8 B1 2002 enters St Kilda Tramway Station on opening day 22-11-1987 DFC9 An A2 approaches St Kilda Tramway Station on opening day 22-11-1987 DFC10 Concreting the connecting curve from Fitroy St into St Kilda Station c July 1987 DFC11 An MTA AEC MKVI bus in Grey St St Kilda at Dalgety St with Tramway works in the background c July 1987 DFC12 Grey St St Kilda at Dalgety St with Tramway works in the background in Fitzroy St c July 1987 DFC13 Concreting the connecting curve from Fitroy St into St Kilda Station c July 1987 DFC14 Restaurant Tram 442 in Fitzroy St at Grey St Passing MTA bus 59 outside St Kilda Station c1986 DFC15 Former VR tram stop sign painted on a pole at Glenhuntly Rd & Broadway DFC16 Former VR Elwood Tram Depot under demolition 1996 DFC17 Former VR Elwood Tram Depot under demolition 1996 DFC18 Former VR Elwood Tram Depot under demolition 1996 DFC19 Former VR Elwood Tram Depot under demolition 1996 DFC20 Former VR Elwood Tram Depot under demolition 1996 DFC21 Former VR Elwood Tram Depot under demolition 1996 DFC22 Former VR Elwood Tram Depot under demolition 1996 DFC23 Former VR Elwood Tram Depot under demolition 1996 DFC24 MTS Tower waggon in use at the former VR Elwood Tram Depot under demolition 1996 DFC25 A Sign advertising the sale of the Former VR Elwood Tram Depot – 10/8/1996 1996 DFC26 Former VR Elwood Tram Depot under demolition 1996 DFC27 Interior of a shed at the former VR Elwood Tram Depot under demolition 1996 DFC28 Former VR Elwood Tram Depot under demolition 1996 DFC29 Former VR Elwood Tram Depot under demolition 1996 DFC30 Former VR Elwood Tram Depot under demolition 1996 DFC31 VR 20, former breakdown car in Bob Prentice’s Back Yard Jan 1974 DFC32 VR 20 on a low loader en route to Bob Prentice’s for preservation 1959 DFC33 VR 20 as the breakdown car on the St Kilda Electric Street Railway c1955 DFC34 VR 39 waits in St Kilda St as breakdown car 20 enters Elwood Depot c1955 DFC35 VR 54 and 50 in the rear yard of Elwood Depot c1958 DFC36 VR 50 in the rear yard of Elwood Depot c1958 DFC37 VR 50 in the rear yard of Elwood Depot c1958 DFC38 VR 28 in St Kilda St outside Elwood depot after the line had been cut back to this point c1958 DFC39 VR 29 in St Kilda St outside Elwood depot after the line had been cut back to this point c1958 DFC40 VR 35 passes 28 on the St Kilda Electric Street Railway c1955 DFC41 VR 39 on the St Kilda Electric Street Railway c1955 DFC42 Y1 613 on a tour c1970 DFC43 VR 54 in St Kilda St outside Elwood Depot c1955 DFC44 VR 28 at Brighton Beach Terminus c1955 DFC45 VR 33 being washed in the wash bay at the rear of Elwood Depot c1955 DFC46 VR 20 breakdown car running into Elwood Depot c1955 DFC47 VR 3 in the rear yard at Elwood Depot c1955 DFC48 VR 51 on an AETA Tour running out of Elwood Depot c1958 DFC49 VR 28 on the St Kilda Electric Street Railway c1955 DFC50 VR 28 with crew in St Kilda St outside Elwood depot after the line had been cut back to this point 1959 DFC51 VR 52 in Grey St near Fitzroy St c1958 DFC52 VR 51 on a AETA Tour passes 33 in Grey St near Fitzroy St c1958 DFC53 VR 29 in Grey St near Fitzroy St c1958 DFC54 VR51 on an AETA Tour shunts as 52 waits on the St Kilda Electric Street Railway c1958 DFC55 VR 51 on the Black Rock Electric Street Railway c1955 DFC56 VR 28 in St Kilda St outside Elwood depot after the line had been cut back to this point c1958 DFC57 Combined Rail-Tram Tickets of the Black Rock Electric Street Railway Feb 1975 DFC58 Combined Rail-Tram Tickets of the St Kilda Electric Street Railway Feb 1975 DFC59 Electric Street Railway & Motor Coach Paper Tear off Tickets Feb 1975 DFC60 VR 52 & 53 on Rt 82 pass in Cordite Ave near Wests Rd Sept 1975 DFC61 Z 68 & 52 in East Preston Depot in M&MTB Livery c1977 DFC62 Copy photo of VR 18 in Elwood Depot c1910 DFC63 VR 51 as a one man car at Black Rock Terminus c1955 DFC64 VR 53 on Rt 82 in Droop St Footscray Jan 1974 DFC65 B2 2027 on Rt 96 in South Melb Station c1988 DFC66 VR 20 as preserved in Bob Prentice’s backyard High St Prahran Jan 1974 DFC67 VR 700 on Rt 82 in Droop St Footsray c1978 DFC68 VR 28 as the last car from ST Kilda Station 28-2-1959 DFC69 VR 700 at the Rt 82 Moonee Ponds Terminus c1978 DFC70 VR 52 waiting time at the Rt 82 Footscray Terminus, the driver intently stares at the bundy clock as the Braid and the Connie gossip Jul 1972 DFC71 VR 54 shunting outside Elwood Depot to return to St Kilda Station 1959 DFC72 SW6 969 in MTA Livery blocking the entrance to South Melb Depot presumably during the scratch ticket dispute Jan 1990 DFC73 VR 52 & 53 on Rt 82 pass in Droop St Footscray Sept 1975 DFC74 VR 700 after withdrawl in the Newport Railway museum in the process of a repaint c1985 DFC75 VR 700 after withdrawl in the Newport Railway museum in the process of a repaint c1985 DFC76 VR 700 on Rt 82 in Droop St Footsray at The Cresent c1978 DFC77 VR 700 on Rt 82 in Droop St Footsray c1978 DFC78 Former VR tram depot in use as an MTA Bus depot c1990 DFC79 VR 52 waiting time at the Rt 82 Footscray Terminus Jul 1972 DFC80 VR 52 waiting time at the Rt 82 Footscray Terminus with Connie changing the pole Jul 1972 DFC81 VR 52 at the Rt 82 Moonee Ponds Terminus with the crew chatting 7-12-1974 DFC82 VR 52 on Rt 82 on the reserved track in Raleigh Rd Ascot Vale Jan 1974 DFC83 VR 53 on Rt 82 in Leeds St Footscray about to turn into Hopkins St April 1976 DFC84 VR 53 on Rt 82 in Droop St Footsray Jan 1974 DFC85 VR 700 on Rt 82 in Droop St Footsray at Hopkins St c1978 DFC86 Z 52 in MTA livery on Rt 19 in Elizabeth St near Bourke St c1985 DFC87 VR 52 at the Rt 82 Moonee Ponds Terminus Jul 1972 DFC88 VR 53 at the Rt 82 Footscray Terminus Jan 1974 DFC89 VR 52 freshly outshopped from the workshops and W7 1011 at the Bourke St Terminus with 52 on display for the 1968 railway exhibition 1968 DFC90 Painting of W class 369 in Chocolate & Cream c1930 DFC91 Charing Cross, Bendigo at night c1965 DFC92 Ballarat ? c1965 DFC93 Bendigo 18 on an AETA tour in McCrae St near Tramway Ave c1965 DFC94 View from the roof of a tram in the body shop at Preston Workshops 1977 DFC95 View from the roof of a tram in the body shop at Preston Workshops 1977 DFC96 View from the roof of a tram in the body shop at Preston Workshops showing the panto on 546 1977 DFC97 Interior view of Carlton Control Centre showing desk and wall panel c1968 DFC98 W2 493 on Rt 55 in Kingsway outside South Melb Depot Aug 1973 DFC99 W2 496 in Sturt St at Kingsway on Rt 1 Jul 1973 DFC100 Z class truck c1975 DFC101 Z3 116 in Bourke St at King St as new c1979 DFC102 Bob Prentice on tour c1968 DFC103 SW6 900 as an advertising tram for Newsday at night 1969 DFC104 597 Jul 1973 DFC105 W2 480 on Rt 3 passing under the railway bridge at Caulfield Oct 1972 DFC106 Interior view of Carlton Control Centre showing desk c1968 DFC107 SW6 856 on Rt 77 at night Jul 1973 DFC108 W2 496 in Sturt St at Kingsway on Rt 1 Jul 1973 DFC109 PCC 980 on a tour at South Melb Depot c1968 DFC110 SW6 856 on Rt 77 at night Jul 1973 DFC111 View from the roof of a tram in the body shop at Preston Workshops showing the panto on 546 1977 DFC112 Dandenong Rd from Chapel St Nov 1968 DFC113 A Z class car turns from Gertrude into Nicholson St c1990 DFC114 SW6 900 as an advertising tram for Newsday at night 1969 DFC115 Port Melbourne Station showing Centennial bridge and station building prior to closure. 10-1987 DFC116 Port Melbourne station with train prior to closure, looking south 10-1987 Demonstrates the work of David Frost in photography and or collecting slides.Assembled album in a black presentation folder of 116 colour slides, 6 slide sleeves, collected or photographed by David Frost. Many are TMSV or Windsor Publications slides. All photographs have been scanned and placed on the Museum's G drive. A list of all photographs with details has been compiled. melbourne, tramways, trams, vr trams, elwood, st kilda light rail, port melbourne, opening, elwood depot, buses -
 The Beechworth Burke Museum
Photograph - Lantern Slide, c1900
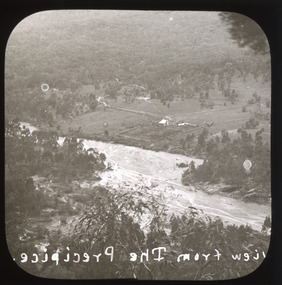
This image shows a semi-aerial view of a property along a river adjacent to Beechworth in approximately 1900. The photographer has capitalised words in the label, indicating that 'The Precipice' may have suggested a particular rather than a general vantage point to local people at the time. Although the exact location of the photograph is yet to be determined, Beechworth Gorge is popular today with hikers and nearby Mt Stanley is noted for its views. Lantern slides, sometimes called 'magic lantern' slides, are glass plates on which an image has been secured for the purpose of projection. Glass slides were etched or hand-painted for this purpose from the Eighteenth Century but the process became more popular and accessible to the public with the development of photographic-emulsion slides used with a 'Magic Lantern' device in the mid-Nineteenth Century. Photographic lantern slides comprise a double-negative emulsion layer (forming a positive image) between thin glass plates that are bound together. A number of processes existed to form and bind the emulsion layer to the base plate, including the albumen, wet plate collodion, gelatine dry plate and woodburytype techniques. Lantern slides and magic lantern technologies are seen as foundational precursors to the development of modern photography and film-making techniques.This glass slide is significant because it provides insight into Beechworth's built environment and natural landscape in the early Twentieth Century, around the time of Australia's Federation. It is also an example of an early photographic and film-making technology in use in regional Victoria in the time period.Thin translucent sheet of glass with a square image printed on the front and framed in a black backing. It is held together by metals strips to secure the edges of the slide.Obverse: Image from The Precipice. /burke museum, beechworth, lantern slide, slide, glass slide, plate, burke museum collection, photograph, monochrome, views, landscapes, farmsteads, rivers, beechworth gorge, mt stanley, emulsion, the precipice -
 The Beechworth Burke Museum
Photograph - Photograph Reproduction, 1870
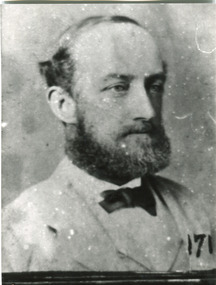
The photograph is a copy of the original one, with the latter been captured in 1870. The man depicted is Doctor Thomas Thomson Dick, who was the first Medical Superintendent at Mayday Hills Hospital. He was born in Scotland in 1840 and he died in East Malvern in 1919. He obtained his degree of Doctor of Medicine from Melbourne University in 1864 and, later in his career, he became Inspector-General of the mentally ill. Dr Dick promoted the hospital`s self-sufficiency by engaging patients in various forms of work, such as clothing alterations and cultivation of the farm. He also introduced monthly balls, which could be attended by patients, staff and guests, and they were later replaced by concerts. The Mayday Hills Hospital was constructed between 1864 and 1867, with buildings created in a number of periods. It formally opened on 24 October 1867 and, along with the Ovens Hospital and the Benevolent Asylum, made Beechworth a prominent social welfare centre in Victoria. The need for an institution of this kind was arisen due to the increased number of people with mental disturbances (induced by the harsh living conditions on the goldfields) and the remoteness of the district from Melbourne. The site was chosen for its panoramic view of the countryside, the hilltop atmosphere and the native fauna, all contributing to the cure of patients.The Hospital was originally named the “Ovens Lunatic Asylum” but, during the centenary celebrations in 1967, the name was officially changed to “Mayday Hills Hospital”, showing the gradual shift in the perception and understanding of mental health conditions over the last decades. The Hospital lies on the traditional land of the Kulin Nation.This photograph is historically significant as it provides information about the staff served at the Mayday Hills Hospital when it first opened. It also contributes to the understanding of the district`s development and its importance to the course of Victoria`s history and adds valuable information about the changing approaches to the treatment of mental health conditions.Black and white rectangular photograph printed on paper.Obverse: (7)/ Reverse: 1997.2452/ Dr Dick/No(7) Pioneer Board/doctor thomas thomson dick, superintendent, mayday hills hospital, scotland, east malvern, doctor of medicine, melbourne university, inspector-general, clothing alterations, cultivation of the farm, self-sufficiency, balls, concerts, ovens hospital, benevolent asylum, beechworth, goldfields, kulin nation, panoramic view, mental health conditions -
 Flagstaff Hill Maritime Museum and Village
Photograph
HISTORY OF THE LOCH ARD The LOCH ARD belonged to the famous Loch Line which sailed many ships from England to Australia. Built in Glasgow by Barclay, Curdle and Co. in 1873, the LOCH ARD was a three-masted square rigged iron sailing ship. The ship measured 262ft 7" (79.87m) in length, 38ft (11.58m) in width, 23ft (7m) in depth and had a gross tonnage of 1693 tons. The LOCH ARD's main mast measured a massive 150ft (45.7m) in height. LOCH ARD made three trips to Australia and one trip to Calcutta before its final voyage. LOCH ARD left England on March 2, 1878, under the command of Captain Gibbs, a newly married, 29 year old. She was bound for Melbourne with a crew of 37, plus 17 passengers and a load of cargo. The general cargo reflected the affluence of Melbourne at the time. On board were straw hats, umbrella, perfumes, clay pipes, pianos, clocks, confectionary, linen and candles, as well as a heavier load of railway irons, cement, lead and copper. There were items included that intended for display in the Melbourne International Exhibition in 1880. The voyage to Port Phillip was long but uneventful. At 3am on June 1, 1878, Captain Gibbs was expecting to see land and the passengers were becoming excited as they prepared to view their new homeland in the early morning. But LOCH ARD was running into a fog which greatly reduced visibility. Captain Gibbs was becoming anxious as there was no sign of land or the Cape Otway lighthouse. At 4am the fog lifted. A man aloft announced that he could see breakers. The sheer cliffs of Victoria's west coast came into view, and Captain Gibbs realised that the ship was much closer to them than expected. He ordered as much sail to be set as time would permit and then attempted to steer the vessel out to sea. On coming head on into the wind, the ship lost momentum, the sails fell limp and LOCH ARD's bow swung back. Gibbs then ordered the anchors to be released in an attempt to hold its position. The anchors sank some 50 fathoms - but did not hold. By this time LOCH ARD was among the breakers and the tall cliffs of Mutton Bird Island rose behind the ship. Just half a mile from the coast, the ship's bow was suddenly pulled around by the anchor. The captain tried to tack out to sea, but the ship struck a reef at the base of Mutton Bird Island, near Port Campbell. Waves broke over the ship and the top deck was loosened from the hull. The masts and rigging came crashing down knocking passengers and crew overboard. When a lifeboat was finally launched, it crashed into the side of LOCH ARD and capsized. Tom Pearce, who had launched the boat, managed to cling to its overturned hull and shelter beneath it. He drifted out to sea and then on the flood tide came into what is now known as LOCH ARD Gorge. He swam to shore, bruised and dazed, and found a cave in which to shelter. Some of the crew stayed below deck to shelter from the falling rigging but drowned when the ship slipped off the reef into deeper water. Eva Carmichael had raced onto deck to find out what was happening only to be confronted by towering cliffs looming above the stricken ship. In all the chaos, Captain Gibbs grabbed Eva and said, "If you are saved Eva, let my dear wife know that I died like a sailor". That was the last Eva Carmichael saw of the captain. She was swept off the ship by a huge wave. Eva saw Tom Pearce on a small rocky beach and yelled to attract his attention. He dived in and swam to the exhausted woman and dragged her to shore. He took her to the cave and broke open case of brandy which had washed up on the beach. He opened a bottle to revive the unconscious woman. A few hours later Tom scaled a cliff in search of help. He followed hoof prints and came by chance upon two men from nearby Glenample Station three and a half miles away. In a state of exhaustion, he told the men of the tragedy. Tom returned to the gorge while the two men rode back to the station to get help. By the time they reached LOCH ARD Gorge, it was cold and dark. The two shipwreck survivors were taken to Glenample Station to recover. Eva stayed at the station for six weeks before returning to Ireland, this time by steamship. In Melbourne, Tom Pearce received a hero's welcome. He was presented with the first gold medal of the Royal Humane Society of Victoria and a £1000 cheque from the Victorian Government. Concerts were performed to honour the young man's bravery and to raise money for those who lost family in the LOCH ARD disaster. Of the 54 crew members and passengers on board, only two survived: the apprentice, Tom Pearce and the young woman passenger, Eva Carmichael, who lost all of her family in the tragedy. Ten days after the LOCH ARD tragedy, salvage rights to the wreck were sold at auction for £2,120. Cargo valued at £3,000 was salvaged and placed on the beach, but most washed back into the sea when another storm developed. The wreck of LOCH ARD still lies at the base of Mutton Bird Island. Much of the cargo has now been salvaged and some was washed up into what is now known as LOCH ARD Gorge. Cargo and artefacts have also been illegally salvaged over many years before protective legislation was introduced. One of the most unlikely pieces of cargo to have survived the shipwreck was a Minton porcelain peacock - one of only nine in the world. The peacock was destined for the Melbourne International Exhibition in 1880. It had been well packed, which gave it adequate protection during the violent storm. Today, the Minton peacock can be seen at the Flagstaff Hill Maritime Museum in Warrnambool. From Australia's most dramatic shipwreck it has now become Australia's most valuable shipwreck artefact and is one of very few 'objects' on the Victorian State Heritage Register. Flagstaff Hill’s collection of artefacts from LOCH ARD is significant for being one of the largest collections of artefacts from this shipwreck in Victoria. It is significant for its association with the shipwreck, which is on the Victorian Heritage Register (VHR S417). The collection is significant because of the relationship between the objects, as together they have a high potential to interpret the story of the LOCH ARD. The LOCH ARD collection is archaeologically significant as the remains of a large international passenger and cargo ship. The LOCH ARD collection is historically significant for representing aspects of Victoria’s shipping history and its potential to interpret sub-theme 1.5 of Victoria’s Framework of Historical Themes (living with natural processes). The collection is also historically significant for its association with the LOCH ARD, which was one of the worst and best known shipwrecks in Victoria’s history. Photograph of Loch Ard Gorge. Photograph taken some distance from the Gorge. Three men in the Gorge and outlines of steps can be seen. Right hand side of the photograph is written "Loch Ard Gorge"flagstaff hill, warrnambool, shipwrecked coast, flagstaff hill maritime museum, maritime museum, shipwreck coast, flagstaff hill maritime village, great ocean road, loch line, loch ard, captain gibbs, eva carmichael, tom pearce, glenample station, mutton bird island, loch ard gorge, photograph of loch ard gorge, photograph -
 Flagstaff Hill Maritime Museum and Village
Painting
HISTORY OF THE LOCH ARD The LOCH ARD belonged to the famous Loch Line which sailed many ships from England to Australia. Built in Glasgow by Barclay, Curdle and Co. in 1873, the LOCH ARD was a three-masted square rigged iron sailing ship. The ship measured 262ft 7" (79.87m) in length, 38ft (11.58m) in width, 23ft (7m) in depth and had a gross tonnage of 1693 tons. The LOCH ARD's main mast measured a massive 150ft (45.7m) in height. LOCH ARD made three trips to Australia and one trip to Calcutta before its final voyage. LOCH ARD left England on March 2, 1878, under the command of Captain Gibbs, a newly married, 29 year old. She was bound for Melbourne with a crew of 37, plus 17 passengers and a load of cargo. The general cargo reflected the affluence of Melbourne at the time. On board were straw hats, umbrella, perfumes, clay pipes, pianos, clocks, confectionary, linen and candles, as well as a heavier load of railway irons, cement, lead and copper. There were items included that intended for display in the Melbourne International Exhibition in 1880. The voyage to Port Phillip was long but uneventful. At 3am on June 1, 1878, Captain Gibbs was expecting to see land and the passengers were becoming excited as they prepared to view their new homeland in the early morning. But LOCH ARD was running into a fog which greatly reduced visibility. Captain Gibbs was becoming anxious as there was no sign of land or the Cape Otway lighthouse. At 4am the fog lifted. A man aloft announced that he could see breakers. The sheer cliffs of Victoria's west coast came into view, and Captain Gibbs realised that the ship was much closer to them than expected. He ordered as much sail to be set as time would permit and then attempted to steer the vessel out to sea. On coming head on into the wind, the ship lost momentum, the sails fell limp and LOCH ARD's bow swung back. Gibbs then ordered the anchors to be released in an attempt to hold its position. The anchors sank some 50 fathoms - but did not hold. By this time LOCH ARD was among the breakers and the tall cliffs of Mutton Bird Island rose behind the ship. Just half a mile from the coast, the ship's bow was suddenly pulled around by the anchor. The captain tried to tack out to sea, but the ship struck a reef at the base of Mutton Bird Island, near Port Campbell. Waves broke over the ship and the top deck was loosened from the hull. The masts and rigging came crashing down knocking passengers and crew overboard. When a lifeboat was finally launched, it crashed into the side of LOCH ARD and capsized. Tom Pearce, who had launched the boat, managed to cling to its overturned hull and shelter beneath it. He drifted out to sea and then on the flood tide came into what is now known as LOCH ARD Gorge. He swam to shore, bruised and dazed, and found a cave in which to shelter. Some of the crew stayed below deck to shelter from the falling rigging but drowned when the ship slipped off the reef into deeper water. Eva Carmichael had raced onto deck to find out what was happening only to be confronted by towering cliffs looming above the stricken ship. In all the chaos, Captain Gibbs grabbed Eva and said, "If you are saved Eva, let my dear wife know that I died like a sailor". That was the last Eva Carmichael saw of the captain. She was swept off the ship by a huge wave. Eva saw Tom Pearce on a small rocky beach and yelled to attract his attention. He dived in and swam to the exhausted woman and dragged her to shore. He took her to the cave and broke open case of brandy which had washed up on the beach. He opened a bottle to revive the unconscious woman. A few hours later Tom scaled a cliff in search of help. He followed hoof prints and came by chance upon two men from nearby Glenample Station three and a half miles away. In a state of exhaustion, he told the men of the tragedy. Tom returned to the gorge while the two men rode back to the station to get help. By the time they reached LOCH ARD Gorge, it was cold and dark. The two shipwreck survivors were taken to Glenample Station to recover. Eva stayed at the station for six weeks before returning to Ireland, this time by steamship. In Melbourne, Tom Pearce received a hero's welcome. He was presented with the first gold medal of the Royal Humane Society of Victoria and a £1000 cheque from the Victorian Government. Concerts were performed to honour the young man's bravery and to raise money for those who lost family in the LOCH ARD disaster. Of the 54 crew members and passengers on board, only two survived: the apprentice, Tom Pearce and the young woman passenger, Eva Carmichael, who lost all of her family in the tragedy. Ten days after the LOCH ARD tragedy, salvage rights to the wreck were sold at auction for £2,120. Cargo valued at £3,000 was salvaged and placed on the beach, but most washed back into the sea when another storm developed. The wreck of LOCH ARD still lies at the base of Mutton Bird Island. Much of the cargo has now been salvaged and some was washed up into what is now known as LOCH ARD Gorge. Cargo and artefacts have also been illegally salvaged over many years before protective legislation was introduced. One of the most unlikely pieces of cargo to have survived the shipwreck was a Minton porcelain peacock - one of only nine in the world. The peacock was destined for the Melbourne International Exhibition in 1880. It had been well packed, which gave it adequate protection during the violent storm. Today, the Minton peacock can be seen at the Flagstaff Hill Maritime Museum in Warrnambool. From Australia's most dramatic shipwreck it has now become Australia's most valuable shipwreck artefact and is one of very few 'objects' on the Victorian State Heritage Register. Flagstaff Hill’s collection of artefacts from LOCH ARD is significant for being one of the largest collections of artefacts from this shipwreck in Victoria. It is significant for its association with the shipwreck, which is on the Victorian Heritage Register (VHR S417). The collection is significant because of the relationship between the objects, as together they have a high potential to interpret the story of the LOCH ARD. The LOCH ARD collection is archaeologically significant as the remains of a large international passenger and cargo ship. The LOCH ARD collection is historically significant for representing aspects of Victoria’s shipping history and its potential to interpret sub-theme 1.5 of Victoria’s Framework of Historical Themes (living with natural processes). The collection is also historically significant for its association with the LOCH ARD, which was one of the worst and best known shipwrecks in Victoria’s history. Painting of The Loch Ard oil on board depicting wreck. It shows stormy sea and coastline in background. Ship appears to be capsized.flagstaff hill, warrnambool, shipwrecked coast, flagstaff hill maritime museum, maritime museum, shipwreck coast, flagstaff hill maritime village, great ocean road, loch line, loch ard, captain gibbs, eva carmichael, tom pearce, glenample station, mutton bird island, loch ard gorge, painting -
 Flagstaff Hill Maritime Museum and Village
Photograph
HISTORY OF THE LOCH ARD The LOCH ARD belonged to the famous Loch Line which sailed many ships from England to Australia. Built in Glasgow by Barclay, Curdle and Co. in 1873, the LOCH ARD was a three-masted square rigged iron sailing ship. The ship measured 262ft 7" (79.87m) in length, 38ft (11.58m) in width, 23ft (7m) in depth and had a gross tonnage of 1693 tons. The LOCH ARD's main mast measured a massive 150ft (45.7m) in height. LOCH ARD made three trips to Australia and one trip to Calcutta before its final voyage. LOCH ARD left England on March 2, 1878, under the command of Captain Gibbs, a newly married, 29 year old. She was bound for Melbourne with a crew of 37, plus 17 passengers and a load of cargo. The general cargo reflected the affluence of Melbourne at the time. On board were straw hats, umbrella, perfumes, clay pipes, pianos, clocks, confectionary, linen and candles, as well as a heavier load of railway irons, cement, lead and copper. There were items included that intended for display in the Melbourne International Exhibition in 1880. The voyage to Port Phillip was long but uneventful. At 3am on June 1, 1878, Captain Gibbs was expecting to see land and the passengers were becoming excited as they prepared to view their new homeland in the early morning. But LOCH ARD was running into a fog which greatly reduced visibility. Captain Gibbs was becoming anxious as there was no sign of land or the Cape Otway lighthouse. At 4am the fog lifted. A man aloft announced that he could see breakers. The sheer cliffs of Victoria's west coast came into view, and Captain Gibbs realised that the ship was much closer to them than expected. He ordered as much sail to be set as time would permit and then attempted to steer the vessel out to sea. On coming head on into the wind, the ship lost momentum, the sails fell limp and LOCH ARD's bow swung back. Gibbs then ordered the anchors to be released in an attempt to hold its position. The anchors sank some 50 fathoms - but did not hold. By this time LOCH ARD was among the breakers and the tall cliffs of Mutton Bird Island rose behind the ship. Just half a mile from the coast, the ship's bow was suddenly pulled around by the anchor. The captain tried to tack out to sea, but the ship struck a reef at the base of Mutton Bird Island, near Port Campbell. Waves broke over the ship and the top deck was loosened from the hull. The masts and rigging came crashing down knocking passengers and crew overboard. When a lifeboat was finally launched, it crashed into the side of LOCH ARD and capsized. Tom Pearce, who had launched the boat, managed to cling to its overturned hull and shelter beneath it. He drifted out to sea and then on the flood tide came into what is now known as LOCH ARD Gorge. He swam to shore, bruised and dazed, and found a cave in which to shelter. Some of the crew stayed below deck to shelter from the falling rigging but drowned when the ship slipped off the reef into deeper water. Eva Carmichael had raced onto deck to find out what was happening only to be confronted by towering cliffs looming above the stricken ship. In all the chaos, Captain Gibbs grabbed Eva and said, "If you are saved Eva, let my dear wife know that I died like a sailor". That was the last Eva Carmichael saw of the captain. She was swept off the ship by a huge wave. Eva saw Tom Pearce on a small rocky beach and yelled to attract his attention. He dived in and swam to the exhausted woman and dragged her to shore. He took her to the cave and broke open case of brandy which had washed up on the beach. He opened a bottle to revive the unconscious woman. A few hours later Tom scaled a cliff in search of help. He followed hoof prints and came by chance upon two men from nearby Glenample Station three and a half miles away. In a state of exhaustion, he told the men of the tragedy. Tom returned to the gorge while the two men rode back to the station to get help. By the time they reached LOCH ARD Gorge, it was cold and dark. The two shipwreck survivors were taken to Glenample Station to recover. Eva stayed at the station for six weeks before returning to Ireland, this time by steamship. In Melbourne, Tom Pearce received a hero's welcome. He was presented with the first gold medal of the Royal Humane Society of Victoria and a £1000 cheque from the Victorian Government. Concerts were performed to honour the young man's bravery and to raise money for those who lost family in the LOCH ARD disaster. Of the 54 crew members and passengers on board, only two survived: the apprentice, Tom Pearce and the young woman passenger, Eva Carmichael, who lost all of her family in the tragedy. Ten days after the LOCH ARD tragedy, salvage rights to the wreck were sold at auction for £2,120. Cargo valued at £3,000 was salvaged and placed on the beach, but most washed back into the sea when another storm developed. The wreck of LOCH ARD still lies at the base of Mutton Bird Island. Much of the cargo has now been salvaged and some was washed up into what is now known as LOCH ARD Gorge. Cargo and artefacts have also been illegally salvaged over many years before protective legislation was introduced. One of the most unlikely pieces of cargo to have survived the shipwreck was a Minton porcelain peacock - one of only nine in the world. The peacock was destined for the Melbourne International Exhibition in 1880. It had been well packed, which gave it adequate protection during the violent storm. Today, the Minton peacock can be seen at the Flagstaff Hill Maritime Museum in Warrnambool. From Australia's most dramatic shipwreck it has now become Australia's most valuable shipwreck artefact and is one of very few 'objects' on the Victorian State Heritage Register. Flagstaff Hill’s collection of artefacts from LOCH ARD is significant for being one of the largest collections of artefacts from this shipwreck in Victoria. It is significant for its association with the shipwreck, which is on the Victorian Heritage Register (VHR S417). The collection is significant because of the relationship between the objects, as together they have a high potential to interpret the story of the LOCH ARD. The LOCH ARD collection is archaeologically significant as the remains of a large international passenger and cargo ship. The LOCH ARD collection is historically significant for representing aspects of Victoria’s shipping history and its potential to interpret sub-theme 1.5 of Victoria’s Framework of Historical Themes (living with natural processes). The collection is also historically significant for its association with the LOCH ARD, which was one of the worst and best known shipwrecks in Victoria’s history. Photograph of Loch Ard Gorge c1900flagstaff hill, warrnambool, shipwrecked coast, flagstaff hill maritime museum, maritime museum, shipwreck coast, flagstaff hill maritime village, great ocean road, loch line, loch ard, captain gibbs, eva carmichael, tom pearce, glenample station, mutton bird island, loch ard gorge, photograph of loch ard gorge, photograph -
 Flagstaff Hill Maritime Museum and Village
Calendar
HISTORY OF THE LOCH ARD The LOCH ARD belonged to the famous Loch Line which sailed many ships from England to Australia. Built in Glasgow by Barclay, Curdle and Co. in 1873, the LOCH ARD was a three-masted square rigged iron sailing ship. The ship measured 262ft 7" (79.87m) in length, 38ft (11.58m) in width, 23ft (7m) in depth and had a gross tonnage of 1693 tons. The LOCH ARD's main mast measured a massive 150ft (45.7m) in height. LOCH ARD made three trips to Australia and one trip to Calcutta before its final voyage. LOCH ARD left England on March 2, 1878, under the command of Captain Gibbs, a newly married, 29 year old. She was bound for Melbourne with a crew of 37, plus 17 passengers and a load of cargo. The general cargo reflected the affluence of Melbourne at the time. On board were straw hats, umbrella, perfumes, clay pipes, pianos, clocks, confectionary, linen and candles, as well as a heavier load of railway irons, cement, lead and copper. There were items included that intended for display in the Melbourne International Exhibition in 1880. The voyage to Port Phillip was long but uneventful. At 3am on June 1, 1878, Captain Gibbs was expecting to see land and the passengers were becoming excited as they prepared to view their new homeland in the early morning. But LOCH ARD was running into a fog which greatly reduced visibility. Captain Gibbs was becoming anxious as there was no sign of land or the Cape Otway lighthouse. At 4am the fog lifted. A man aloft announced that he could see breakers. The sheer cliffs of Victoria's west coast came into view, and Captain Gibbs realised that the ship was much closer to them than expected. He ordered as much sail to be set as time would permit and then attempted to steer the vessel out to sea. On coming head on into the wind, the ship lost momentum, the sails fell limp and LOCH ARD's bow swung back. Gibbs then ordered the anchors to be released in an attempt to hold its position. The anchors sank some 50 fathoms - but did not hold. By this time LOCH ARD was among the breakers and the tall cliffs of Mutton Bird Island rose behind the ship. Just half a mile from the coast, the ship's bow was suddenly pulled around by the anchor. The captain tried to tack out to sea, but the ship struck a reef at the base of Mutton Bird Island, near Port Campbell. Waves broke over the ship and the top deck was loosened from the hull. The masts and rigging came crashing down knocking passengers and crew overboard. When a lifeboat was finally launched, it crashed into the side of LOCH ARD and capsized. Tom Pearce, who had launched the boat, managed to cling to its overturned hull and shelter beneath it. He drifted out to sea and then on the flood tide came into what is now known as LOCH ARD Gorge. He swam to shore, bruised and dazed, and found a cave in which to shelter. Some of the crew stayed below deck to shelter from the falling rigging but drowned when the ship slipped off the reef into deeper water. Eva Carmichael had raced onto deck to find out what was happening only to be confronted by towering cliffs looming above the stricken ship. In all the chaos, Captain Gibbs grabbed Eva and said, "If you are saved Eva, let my dear wife know that I died like a sailor". That was the last Eva Carmichael saw of the captain. She was swept off the ship by a huge wave. Eva saw Tom Pearce on a small rocky beach and yelled to attract his attention. He dived in and swam to the exhausted woman and dragged her to shore. He took her to the cave and broke open case of brandy which had washed up on the beach. He opened a bottle to revive the unconscious woman. A few hours later Tom scaled a cliff in search of help. He followed hoof prints and came by chance upon two men from nearby Glenample Station three and a half miles away. In a state of exhaustion, he told the men of the tragedy. Tom returned to the gorge while the two men rode back to the station to get help. By the time they reached LOCH ARD Gorge, it was cold and dark. The two shipwreck survivors were taken to Glenample Station to recover. Eva stayed at the station for six weeks before returning to Ireland, this time by steamship. In Melbourne, Tom Pearce received a hero's welcome. He was presented with the first gold medal of the Royal Humane Society of Victoria and a £1000 cheque from the Victorian Government. Concerts were performed to honour the young man's bravery and to raise money for those who lost family in the LOCH ARD disaster. Of the 54 crew members and passengers on board, only two survived: the apprentice, Tom Pearce and the young woman passenger, Eva Carmichael, who lost all of her family in the tragedy. Ten days after the LOCH ARD tragedy, salvage rights to the wreck were sold at auction for £2,120. Cargo valued at £3,000 was salvaged and placed on the beach, but most washed back into the sea when another storm developed. The wreck of LOCH ARD still lies at the base of Mutton Bird Island. Much of the cargo has now been salvaged and some was washed up into what is now known as LOCH ARD Gorge. Cargo and artefacts have also been illegally salvaged over many years before protective legislation was introduced. One of the most unlikely pieces of cargo to have survived the shipwreck was a Minton porcelain peacock - one of only nine in the world. The peacock was destined for the Melbourne International Exhibition in 1880. It had been well packed, which gave it adequate protection during the violent storm. Today, the Minton peacock can be seen at the Flagstaff Hill Maritime Museum in Warrnambool. From Australia's most dramatic shipwreck it has now become Australia's most valuable shipwreck artefact and is one of very few 'objects' on the Victorian State Heritage Register. Flagstaff Hill’s collection of artefacts from LOCH ARD is significant for being one of the largest collections of artefacts from this shipwreck in Victoria. It is significant for its association with the shipwreck, which is on the Victorian Heritage Register (VHR S417). The collection is significant because of the relationship between the objects, as together they have a high potential to interpret the story of the LOCH ARD. The LOCH ARD collection is archaeologically significant as the remains of a large international passenger and cargo ship. The LOCH ARD collection is historically significant for representing aspects of Victoria’s shipping history and its potential to interpret sub-theme 1.5 of Victoria’s Framework of Historical Themes (living with natural processes). The collection is also historically significant for its association with the LOCH ARD, which was one of the worst and best known shipwrecks in Victoria’s history. Calendar printed by Terang Express for December 1923 with picture of Loch Ard Gorge and survivors of wreck and also story of the episode. Has some large tears in it.flagstaff hill, warrnambool, shipwrecked coast, flagstaff hill maritime museum, maritime museum, shipwreck coast, flagstaff hill maritime village, great ocean road, loch line, loch ard, captain gibbs, eva carmichael, tom pearce, glenample station, mutton bird island, loch ard gorge, calendar, terang express -
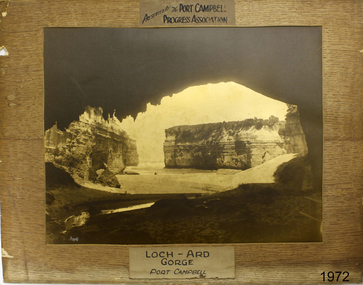 Flagstaff Hill Maritime Museum and Village
Photograph - Coastal Scene, Foyle Photographic Studio, Loch Ard Gorge Port Campbell, 1889-1919
The photograph shows the popular tourist attraction, Loch Ard Gorge, which is located along the Great Ocean Road in Victoria, near Port Campbell. The gorge is named after the famous sailing ship, the LOCH ARD, that was wrecked there in 1878. Only two of the 54 passengers and crew survived. FOYLE “Foyle” written on the photograph is the name of Foyle’s Photographic studio. At the time of the photograph, the studio was owned by both Charles and Lilian Foyle (sometimes known as Lillian or Lily), either of whom could have taken this photograph. They also worked together at a later date on the photographs, sketches and paintings of the famous and historical Pioneers’ Honour Board, which is currently on view in the Warrnambool Library. Foyles Photography was the studio of James Charles Foyle. He owned “Foyle’s Photo Card Studios” in Liebig St, Warrnambool, which operated between 1889 – 1919. A letter to the editor (by Mr Edward Vidler) in the Melbourne Argus, 3rd August 1907, mentions that in that year Warrnambool would celebrate the 60th anniversary of its proclamation as a town, and that talented local artist Miss Lily Foyle would paint 200 portraits in watercolour of the pioneers who settled in the district prior to 1860. The Pioneer Honour Board can still be seen on display in the Warrnambool Library. In the Warrnambool Standard, Dec. 1917, “Mr Foyle’s studio was awarded the contract to decorate rail cars on newly opened Trans-Continental railway, assisted by his sister, Miss Findlay.” HISTORY OF THE LOCH ARD The LOCH ARD belonged to the famous Loch Line which sailed many ships from England to Australia. Built-in Glasgow by Barclay, Curdle and Co. in 1873, the LOCH ARD was a three-masted square-rigged iron sailing ship. The ship measured 262ft 7" (79.87m) in length, 38ft (11.58m) in width, 23ft (7m) in depth and had a gross tonnage of 1693 tons. The LOCH ARD's main mast measured a massive 150ft (45.7m) in height. LOCH ARD made three trips to Australia and one trip to Calcutta before its final voyage. LOCH ARD left England on March 2, 1878, under the command of Captain Gibbs, a newly married, 29-year-old. She was bound for Melbourne with a crew of 37, plus 17 passengers and a load of cargo. The general cargo reflected the affluence of Melbourne at the time. Onboard were straw hats, umbrella, perfumes, clay pipes, pianos, clocks, confectionary, linen and candles, as well as a heavier load of railway irons, cement, lead and copper. There were items included that intended for display in the Melbourne International Exhibition in 1880. The voyage to Port Phillip was long but uneventful. At 3 am on June 1, 1878, Captain Gibbs was expecting to see land and the passengers were becoming excited as they prepared to view their new homeland in the early morning. But LOCH ARD was running into a fog which greatly reduced visibility. Captain Gibbs was becoming anxious as there was no sign of land or the Cape Otway lighthouse. At 4 am the fog lifted. A man aloft announced that he could see breakers. The sheer cliffs of Victoria's west coast came into view, and Captain Gibbs realised that the ship was much closer to them than expected. He ordered as much sail to be set as time would permit and then attempted to steer the vessel out to sea. On coming head-on into the wind, the ship lost momentum, the sails fell limp and LOCH ARD's bow swung back. Gibbs then ordered the anchors to be released in an attempt to hold its position. The anchors sank some 50 fathoms - but did not hold. By this time LOCH ARD was among the breakers and the tall cliffs of Mutton Bird Island rose behind the ship. Just half a mile from the coast, the ship's bow was suddenly pulled around by the anchor. The captain tried to tack out to sea, but the ship struck a reef at the base of Mutton Bird Island, near Port Campbell. Waves broke over the ship and the top deck was loosened from the hull. The masts and rigging came crashing down knocking passengers and crew overboard. When a lifeboat was finally launched, it crashed into the side of LOCH ARD and capsized. Tom Pearce, who had launched the boat, managed to cling to its overturned hull and shelter beneath it. He drifted out to sea and then on the flood tide came into what is now known as LOCH ARD Gorge. He swam to shore, bruised and dazed, and found a cave in which to shelter. Some of the crew stayed below deck to shelter from the falling rigging but drowned when the ship slipped off the reef into deeper water. Eva Carmichael had raced onto the deck to find out what was happening only to be confronted by towering cliffs looming above the stricken ship. In all the chaos, Captain Gibbs grabbed Eva and said, "If you are saved Eva, let my dear wife know that I died like a sailor". That was the last Eva Carmichael saw of the captain. She was swept off the ship by a huge wave. Eva saw Tom Pearce on a small rocky beach and yelled to attract his attention. He dived in and swam to the exhausted woman and dragged her to shore. He took her to the cave and broke and opened the case of brandy, which had washed up on the beach. He opened a bottle to revive the unconscious woman. A few hours later Tom scaled a cliff in search of help. He followed hoof prints and came by chance upon two men from nearby Glenample Station three and a half miles away. In a state of exhaustion, he told the men of the tragedy. Tom returned to the gorge while the two men rode back to the station to get help. By the time they reached LOCH ARD Gorge, it was cold and dark. The two shipwreck survivors were taken to Glenample Station to recover. Eva stayed at the station for six weeks before returning to Ireland, this time by steamship. In Melbourne, Tom Pearce received a hero's welcome. He was presented with the first gold medal of the Royal Humane Society of Victoria and a £1000 cheque from the Victorian Government. Concerts were performed to honour the young man's bravery and to raise money for those who lost family in the LOCH ARD disaster. Of the 54 crew members and passengers on board, only two survived: the apprentice, Tom Pearce and the young woman passenger, Eva Carmichael, who lost all of her family in the tragedy. Ten days after the LOCH ARD tragedy, salvage rights to the wreck were sold at auction for £2,120. Cargo valued at £3,000 was salvaged and placed on the beach, but most washed back into the sea when another storm developed. The wreck of LOCH ARD still lies at the base of Mutton Bird Island. Much of the cargo has now been salvaged, and some of it was washed up into what is now known as LOCH ARD Gorge. Cargo and artefacts have also been illegally salvaged over many years before protective legislation was introduced. One of the most unlikely pieces of cargo to have survived the shipwreck was a Minton porcelain peacock - one of only nine in the world. The peacock was destined for the Melbourne International Exhibition in 1880. It had been well packed, which gave it adequate protection during the violent storm. Today, the Minton peacock can be seen at the Flagstaff Hill Maritime Museum in Warrnambool. From Australia's most dramatic shipwreck it has now become Australia's most valuable shipwreck artefact and is one of very few 'objects' on the Victorian State Heritage Register.Flagstaff Hill’s collection of artefacts from LOCH ARD is significant for being one of the largest collections of artefacts from this shipwreck in Victoria. It is significant for its association with the shipwreck, which is on the Victorian Heritage Register (VHR S417). The collection is significant because of the relationship between the objects, as together they have a high potential to interpret the story of the LOCH ARD. The LOCH ARD collection is archaeologically significant as the remains of a large international passenger and cargo ship. The LOCH ARD collection is historically significant for representing aspects of Victoria’s shipping history and its potential to interpret sub-theme 1.5 of Victoria’s Framework of Historical Themes (living with natural processes). The collection is also historically significant for its association with the LOCH ARD, which was one of the worst and best-known shipwrecks in Victoria’s history. Foyle's photographs date from the late 19th century to the early 20th century, representing a time of growth in the Warrnambool district and a time when the still relatively new technology of photography was more available to the community.Photograph of Loch Ard Gorge. This sepia coloured rectangular photograph is mounted on a brown cardboard backing that has a wood grain pattern. The photograph has an inscription above it, below it, and in the bottom left corner. It was made for the purpose of a presentation by the Port Campbell Progress Association. Printed above the photograph "PRESENTED BY THE PORT CAMPBELL / PROGRESS ASSOCIATION". Printed below the photograph "LOCH ARD GORGE / PORT CAMPBELL". Hand written on bottom left corner "Foyle". flagstaff hill, warrnambool, shipwrecked coast, flagstaff hill maritime museum, maritime museum, shipwreck coast, flagstaff hill maritime village, great ocean road, loch line, loch ard, captain gibbs, eva carmichael, tom pearce, glenample station, mutton bird island, loch ard gorge, photograph, port campbell, port campbell progress association, foyle photograph, foyle photographic studio warrnambool, warrnambool photo studio