Showing 731 items
matching high fire
-
 Orbost & District Historical Society
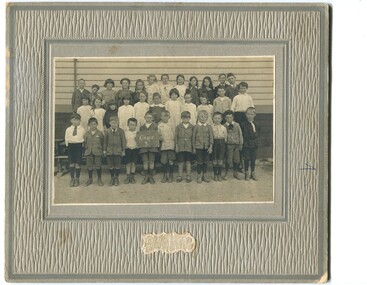
black and white photograph, Wilson, Les G, C1919
This photograph shows students of Grades 5 and 6. The 19th of March 1886 proved an important day in the lives of many early settlers in the Orbost area, because on this day the Orbost State School opened. The fact that the school had first operated temporarily in a leased building, and on a half-time basis with SS2745 Jarrahmond, did not dampen the enthusiasm of the local inhabitants as they saw their offspring commence their education under the guidance of HT Campbell Mackay. However he remained in charge only until 12th of May 1886. The second HT, John Rowe, served until 1908. On 30th of June 1887, a portable room was provided; it being brought to the area by schooner. The school now had accommodation for 30 pupils; the teacher's welfare was considered because quarters of two rooms were attached. As the population increased so did the needs of the school. This was reflected in the provision of a larger classroom in 1898. During 1910-11 the first approaches were made to the Department for the establishment of a HES in Orbost and this became a reality in 1912. Orbost HES supplied post-primary education in the district until a high school was built in 1948. When fire destroyed the school in 1941 local halls were used as classrooms until a new school was built. Work was quite rapid and a new brick structure was opened by the Hon. A. E. Lind, MLA, on 13th of February 1942. This new building was a fine type of school of which both the pupils and the HT Leslie Collins were indeed proud. But Orbost continued to develop and the new school was soon overtaxed. This resulted in the erection of two Bristol classrooms in 1947. By 1950, when the school population had reached 500 pupils the opening of the new school at Orbost North was welcomed by all concerned. In 1963 the Department purchased land diagonally opposite the school and developed it as a playing area. In 1965 two LTCs were opened in November, and in October 1968 the Brodribb School building was moved to SS2744 Orbost for use as a general purpose room. (info. from Schools East Gippsland) This item is associated with the history of education in Orbost.A black / white photograph framed by a grey buff card with the photographer's label in the RH bottom corner. The photograph shows a group of students outside their school. building.education -orbost orbost-state-school -
 Orbost & District Historical Society
black and white photograph, C1900
The 19th of March 1886 proved an important day in the lives of many early settlers in the Orbost area, because on this day the Orbost State School opened. The fact that the school had first operated temporarily in a leased building, and on a half-time basis with SS2745 Jarrahmond, did not dampen the enthusiasm of the local inhabitants as they saw their offspring commence their education under the guidance of HT Campbell Mackay. However he remained in charge only until 12th of May 1886. The second HT, John Rowe, served until 1908. On 30th of June 1887, a portable room was provided; it being brought to the area by schooner. The school now had accommodation for 30 pupils; the teacher's welfare was considered because quarters of two rooms were attached. As the population increased so did the needs of the school. This was reflected in the provision of a larger classroom in 1898. During 1910-11 the first approaches were made to the Department for the establishment of a HES in Orbost and this became a reality in 1912. Orbost HES supplied post-primary education in the district until a high school was built in 1948. When fire destroyed the school in 1941 local halls were used as classrooms until a new school was built. Work was quite rapid and a new brick structure was opened by the Hon. A. E. Lind, MLA, on 13th of February 1942. This new building was a fine type of school of which both the pupils and the HT Leslie Collins were indeed proud. But Orbost continued to develop and the new school was soon overtaxed. This resulted in the erection of two Bristol classrooms in 1947. By 1950, when the school population had reached 500 pupils the opening of the new school at Orbost North was welcomed by all concerned. In 1963 the Department purchased land diagonally opposite the school and developed it as a playing area. In 1965 two LTCs were opened in November, and in October 1968 the Brodribb School building was moved to SS2744 Orbost for use as a general purpose room. ( info. Schools East Gippsland) This item is associated with the history of education in Orbost.A black / white photograph framed by a grey buff card. It shows grade three students standing in front of a wooden school building.education-orbost orbost-state-school -
 Orbost & District Historical Society
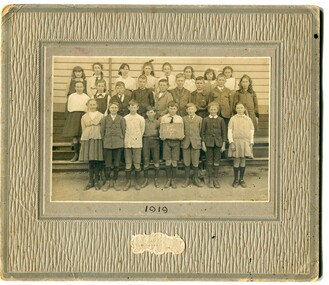
black and white photograph, Wilson, Les G, 1919
The 19th of March 1886 proved an important day in the lives of many early settlers in the Orbost area, because on this day the Orbost State School opened. The fact that the school had first operated temporarily in a leased building, and on a half-time basis with SS2745 Jarrahmond, did not dampen the enthusiasm of the local inhabitants as they saw their offspring commence their education under the guidance of HT Campbell Mackay. However he remained in charge only until 12th of May 1886. The second HT, John Rowe, served until 1908. On 30th of June 1887, a portable room was provided; it being brought to the area by schooner. The school now had accommodation for 30 pupils; the teacher's welfare was considered because quarters of two rooms were attached. As the population increased so did the needs of the school. This was reflected in the provision of a larger classroom in 1898. During 1910-11 the first approaches were made to the Department for the establishment of a HES in Orbost and this became a reality in 1912. Orbost HES supplied post-primary education in the district until a high school was built in 1948. When fire destroyed the school in 1941 local halls were used as classrooms until a new school was built. Work was quite rapid and a new brick structure was opened by the Hon. A. E. Lind, MLA, on 13th of February 1942. This new building was a fine type of school of which both the pupils and the HT Leslie Collins were indeed proud. But Orbost continued to develop and the new school was soon overtaxed. This resulted in the erection of two Bristol classrooms in 1947. By 1950, when the school population had reached 500 pupils the opening of the new school at Orbost North was welcomed by all concerned. In 1963 the Department purchased land diagonally opposite the school and developed it as a playing area. In 1965 two LTCs were opened in November, and in October 1968 the Brodribb School building was moved to SS2744 Orbost for use as a general purpose room. ( Info. from Schools East Gippsland) This item is associated with the history of education in Orbost.A black / white photograph on a grey buff cardboard frame. It is of a group of students standing outside the Orbost State School building. One child holds a sign reading "Form F". There is a photographer's label at the bottom.on back - "Alen Roach" on front - "1919" education-orbost orbost-state-school -
 Orbost & District Historical Society
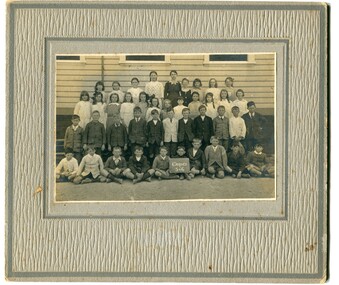
black and white photograph, Wilson, Les G, 1919
The 19th of March 1886 proved an important day in the lives of many early settlers in the Orbost area, because on this day the Orbost State School opened. The fact that the school had first operated temporarily in a leased building, and on a half-time basis with SS2745 Jarrahmond, did not dampen the enthusiasm of the local inhabitants as they saw their offspring commence their education under the guidance of HT Campbell Mackay. However he remained in charge only until 12th of May 1886. The second HT, John Rowe, served until 1908. On 30th of June 1887, a portable room was provided; it being brought to the area by schooner. The school now had accommodation for 30 pupils; the teacher's welfare was considered because quarters of two rooms were attached. As the population increased so did the needs of the school. This was reflected in the provision of a larger classroom in 1898. During 1910-11 the first approaches were made to the Department for the establishment of a HES in Orbost and this became a reality in 1912. Orbost HES supplied post-primary education in the district until a high school was built in 1948. When fire destroyed the school in 1941 local halls were used as classrooms until a new school was built. Work was quite rapid and a new brick structure was opened by the Hon. A. E. Lind, MLA, on 13th of February 1942. This new building was a fine type of school of which both the pupils and the HT Leslie Collins were indeed proud. But Orbost continued to develop and the new school was soon overtaxed. This resulted in the erection of two Bristol classrooms in 1947. By 1950, when the school population had reached 500 pupils the opening of the new school at Orbost North was welcomed by all concerned. In 1963 the Department purchased land diagonally opposite the school and developed it as a playing area. In 1965 two LTCs were opened in November, and in October 1968 the Brodribb School building was moved to SS2744 Orbost for use as a general purpose room. (info. Schools east Gippsland) This item is associated with the history of education in Orbost.A black / white photograph on a grey buff cardboard frame. It is of students outside the Orbost State School. A child in the centre bottom row is holding a sign reading " Grades 5 & 6".on back - "Mary Gilbert"education-orbost orbost-state-school -
 Orbost & District Historical Society
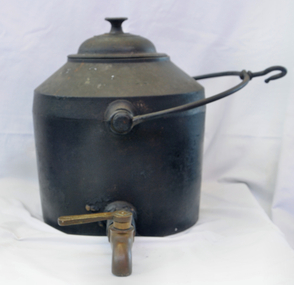
water fountain, late 19th century
Iron fountain used on open fires etc. Donated by Mrs Norah Osborne, wife of Bruce , principal of High School. Early homes often had an open fire containing a fountain, buckets and kettles that hung from a hook in the fireplace. These containers supplied hot water for cooking, washing and cups of tea. Fountain was placed on hob until needed and then hung over fire.This kettle is an example of a common domestic item used in early Orbost before electricity was widespread.Large black iron fountain with swing handle and hook for using over a fire. Large brass tap and handle. Lid - Clark & Co * 4 Galls. Bottom - Clark & Co - 4 Gallons FINEST QUALITY T & C CLARK & COcooking domestic kettle fountain-iron ironware -
 Orbost & District Historical Society
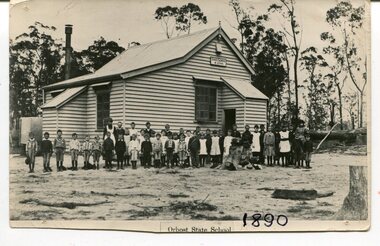
black and white photograph, 1890
This photograph is part of the Mary Gilbert Collection. This photo shows the first Orbost State School which is now known as Ruskin Street Primary School. "The 19th of March 1886 proved an important day in the lives of many early settlers in the Orbost area, because on this day the Orbost State School opened. The fact that the school had first operated temporarily in a leased building, and on a half-time basis with SS2745 Jarrahmond, did not dampen the enthusiasm of the local inhabitants as they saw their offspring commence their education under the guidance of HT Campbell Mackay. However he remained in charge only until 12th of May 1886. The second HT, John Rowe, served until 1908. On 30th of June 1887, a portable room was provided; it being brought to the area by schooner. The school now had accommodation for 30 pupils; the teacher's welfare was considered because quarters of two rooms were attached. As the population increased so did the needs of the school. This was reflected in the provision of a larger classroom in 1898. During 1910-11 the first approaches were made to the Department for the establishment of a HES in Orbost and this became a reality in 1912. Orbost HES supplied post-primary education in the district until a high school was built in 1948. When fire destroyed the school in 1941 local halls were used as classrooms until a new school was built. Work was quite rapid and a new brick structure was opened by the Hon. A. E. Lind, MLA, on 13th of February 1942. This new building was a fine type of school of which both the pupils and the HT Leslie Collins were indeed proud. But Orbost continued to develop and the new school was soon overtaxed. This resulted in the erection of two Bristol classrooms in 1947. By 1950, when the school population had reached 500 pupils the opening of the new school at Orbost North was welcomed by all concerned. In 1963 the Department purchased land diagonally opposite the school and developed it as a playing area. In 1965 two LTCs were opened in November, and in October 1968 the Brodribb School building was moved to SS2744 Orbost for use as a general purpose room." (re.f Schools East Gippsland")This item is associated with education in Orbost.A black / white photograph showing a group of children posed in front of a wooden school building. A sign on the building has "STATE SCHOOL No. 2744"3127.1 - "front row left is W.J. Cameron" 3127.2 - "Teachers, Mr Rowe, Miss Lucy Watt (sewing) back row Mrs Kerr (Hilda Temple) Miss Hofen back left W. Roadknight 4 from left back Annie Cameron 1 left centre row" 3127.3 - as per above education-orbost state-school-orbost -
 Orbost & District Historical Society
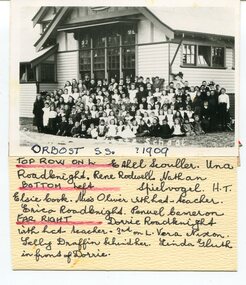
black and white photograph, 1909
This item is part of the Mary Gilbert Collection. Top Row on Left - Ethel Scouller; Una Roadknight; Rene Rodwell; Nathan Spielvogel (Head Teacher) Bottom Left - Elsie Cook; Miss Olivier with hat (teacher); Erica Roadknight, Penuel Cameron Far Right - Dorrie Roadknight;with hat (teacher); 3rd from left Vera Nixon; Sally Draffin behind her; Linda Gluth in front of Dorrie Tthe Orbost State School opened on19th of March 1886. The school had first operated temporarily in a leased building, and on a half-time basis with SS2745 Jarrahmond, The head teacher was Campbell Mackay who remained in charge only until 12th of May 1886. The second head teacher, John Rowe, served until 1908. On 30th of June 1887, a portable room was provided; it being brought to the area by schooner. The school now had accommodation for 30 pupils; the teacher's welfare was considered because quarters of two rooms were attached. As the population increased so did the needs of the school. This was reflected in the provision of a larger classroom in 1898. During 1910-11 the first approaches were made to the Department for the establishment of a Higher Elementary School in Orbost and this became a reality in 1912. Orbost. The Higher Elementary School supplied post-primary education in the district until a high school was built in 1948. When fire destroyed the school in 1941 local halls were used as classrooms until a new school was built, opened by the Hon. A. E. Lind, MLA, on 13th of February 1942. But Orbost continued to develop and the new school was soon overtaxed. This resulted in the erection of two Bristol classrooms in 1947. By 1950, when the school population had reached 500 pupils the opening of the new school at Orbost North was welcomed by all concerned. In 1963 the Department purchased land diagonally opposite the school and developed it as a playing area. This item is associated with education in Orbost.A black / white photograph with a list of names attached to the bottom. It shows a group of students and teachers in front of a wooden school building.on label - Orbost S.S. 1909 with a list of identifying nameseducation-orbost orbost-state-school -
 Orbost & District Historical Society
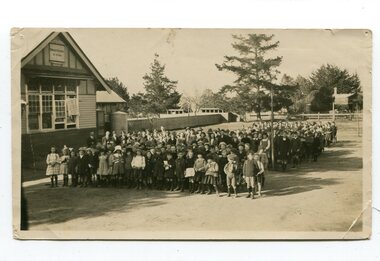
black and white photograph, C 1922
DESCRIPTIONA black / white photograph on a grey buff cardboard frame. It is of a group of students standing outside the Orbost State School building. One child holds a sign reading "Form F". There is a photographer's label at the bottom.SIZEH-199mm W-028mmOBJECT REGISTRATION890KEYWORDSeducation-orbost orbost-state-schoolHISTORICAL INFORMATIONThe 19th of March 1886 proved an important day in the lives of many early settlers in the Orbost area, because on this day the Orbost State School opened. The fact that the school had first operated temporarily in a leased building, and on a half-time basis with SS2745 Jarrahmond, did not dampen the enthusiasm of the local inhabitants as they saw their offspring commence their education under the guidance of HT Campbell Mackay. However he remained in charge only until 12th of May 1886. The second HT, John Rowe, served until 1908. On 30th of June 1887, a portable room was provided; it being brought to the area by schooner. The school now had accommodation for 30 pupils; the teacher's welfare was considered because quarters of two rooms were attached. As the population increased so did the needs of the school. This was reflected in the provision of a larger classroom in 1898. During 1910-11 the first approaches were made to the Department for the establishment of a HES in Orbost and this became a reality in 1912. Orbost HES supplied post-primary education in the district until a high school was built in 1948. When fire destroyed the school in 1941 local halls were used as classrooms until a new school was built. Work was quite rapid and a new brick structure was opened by the Hon. A. E. Lind, MLA, on 13th of February 1942. This new building was a fine type of school of which both the pupils and the HT Leslie Collins were indeed proud. But Orbost continued to develop and the new school was soon overtaxed. This resulted in the erection of two Bristol classrooms in 1947. By 1950, when the school population had reached 500 pupils the opening of the new school at Orbost North was welcomed by all concerned. In 1963 the Department purchased land diagonally opposite the school and developed it as a playing area. In 1965 two LTCs were opened in November, and in October 1968 the Brodribb School building was moved to SS2744 Orbost for use as a general purpose room. ( Info. from Schools East Gippsland)This item is associated with the history of education in Orbost.A black / white photograph of a large group of children standing outside a school building - " Orbost State School No. 2744". The younger students are standing in the front. High School students are at the back.on back - "Mr C. Connor S.M. Mr Tipper H.M. State & H.E.s. about 1922"education-orbost orbost-state-school orbost-higher-elementary-school -
 Orbost & District Historical Society
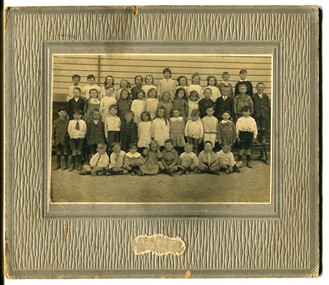
black and white photograph, C 1920
Phyllis May Waller was born Orbost in 1912. Her father-was Frank Hale Waller and her mother -Sarah Elizabeth Clancy. Phyllis married Clive Howell Crawford Pasco in 1934 (Clive was born 1908 at Prahran, and died in 1971 at South Melbourne). "The 19th of March 1886 proved an important day in the lives of many early settlers in the Orbost area, because on this day the Orbost State School opened. The fact that the school had first operated temporarily in a leased building, and on a half-time basis with SS2745 Jarrahmond, did not dampen the enthusiasm of the local inhabitants as they saw their offspring commence their education under the guidance of HT Campbell Mackay. However he remained in charge only until 12th of May 1886. The second HT, John Rowe, served until 1908. On 30th of June 1887, a portable room was provided; it being brought to the area by schooner. The school now had accommodation for 30 pupils; the teacher's welfare was considered because quarters of two rooms were attached. As the population increased so did the needs of the school. This was reflected in the provision of a larger classroom in 1898. During 1910-11 the first approaches were made to the Department for the establishment of a HES in Orbost and this became a reality in 1912. Orbost HES supplied post-primary education in the district until a high school was built in 1948. When fire destroyed the school in 1941 local halls were used as classrooms until a new school was built. Work was quite rapid and a new brick structure was opened by the Hon. A. E. Lind, MLA, on 13th of February 1942. This new building was a fine type of school of which both the pupils and the HT Leslie Collins were indeed proud. But Orbost continued to develop and the new school was soon overtaxed. This resulted in the erection of two Bristol classrooms in 1947. By 1950, when the school population had reached 500 pupils the opening of the new school at Orbost North was welcomed by all concerned. In 1963 the Department purchased land diagonally opposite the school and developed it as a playing area. In 1965 two LTCs were opened in November, and in October 1968 the Brodribb School building was moved to SS2744 Orbost for use as a general purpose room."This item is associated with the history of education in Orbost. It is also associated with the Waller family, early settlers in Orbost.A black / white photograph on grey card. Against a wooden building are four rows of young children. The front row of the youngest children is sitting with crossed legs.The back three rows are tiered. the children appear to be dressed in their best clothes with many of the boys wearing ties. There is a photographer's label at the bottom.on back written by older son -"Orbost State School Approx. 1920 Mum (Phyllis May Waller) 6th from left 2nd back row"waller-phyllis-may -
 Orbost & District Historical Society
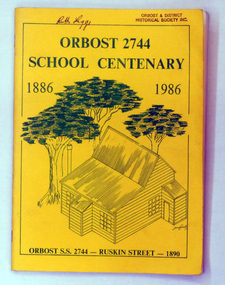
book, Orbost 2744 School Centenary 1886 1986, 1986
2228.1 belonged to Ruth Legge. 2228.2 belonged to Mary Gilbert. This book was produced as a souvenir history of Orbost Primary School. The Orbost State School opened on 19th of March 1886 .The school had first operated temporarily in a leased building, and on a half-time basis with SS2745 Jarrahmond. The first head teacher was HT Campbell Mackay. However he remained in charge only until 12th of May 1886. The second HT, John Rowe, served until 1908. On 30th of June 1887, a portable room was provided; it being brought to the area by schooner. The school then had accommodation for 30 pupils; the teacher's welfare was considered because quarters of two rooms were attached. As the population increased so did the needs of the school. This was reflected in the provision of a larger classroom in 1898. During 1910-11 the first approaches were made to the Department for the establishment of a HES in Orbost and this became a reality in 1912. Orbost HES supplied post-primary education in the district until a high school was built in 1948. When fire destroyed the school in 1941 local halls were used as classrooms until a new school was built. Work was quite rapid and a new brick structure was opened by the Hon. A. E. Lind, MLA, on 13th of February 1942. The head teacher then was Leslie Collins. Orbost continued to develop and the new school was soon overtaxed. This resulted in the erection of two Bristol classrooms in 1947. By 1950, when the school population had reached 500 pupils the opening of the new school at Orbost North was welcomed by all concerned. In 1963 the Department purchased land diagonally opposite the school and developed it as a playing area. In 1965 two LTCs were opened in November, and in October 1968 the Brodribb School building was moved to SS2744 Orbost for use as a general purpose room. This book is a useful research resource.Two copies of a yellow paper book book. On the front cover is a sketch of some trees beneath the title which is in green print ( these are the school colours) . This is a souvenir record of the history of Orbost Primary School.2228.1 has autographs on the back fly.orbost-primary-school book orbost-history -
 Orbost & District Historical Society
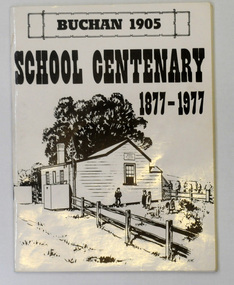
letter book, James Yeates & Sons (Printing) Pty Ltd, 1977
This book was prepared for the Buchan School centenary. In the Buchan District itinerant teaching was conducted in buildings with log walls and a bark roof typical of the mid 19th century. Not until 1878 was the first State school built on the same general site as the present school, on the Orbost Rd, ⅓ of a mile from the bridge over the Buchan River. This original school building must have been constructed from high quality timber, because it still serves as the shelter pavilion. On 11th of July 1878 William Scott opened the first school of approximately 40 pupils ranging from Grade 1 - 8. A larger weatherboard school was erected in 1914. A residence was provided for the HT in 1934 and in 1956 a second classroom erected and attached to the 1914 building. Unfortunately, all records of the Committee were lost in a fire when the homestead of Alex Cameron, then serving as Committee Secretary, was burnt to the ground, but it is well known to local citizens that Frank Moon, local prospector, explorer and discoverer of the famous Buchan Limestone Caves, attended school at SS1905 Buchan. (ref SCHOOLS EAST GIPPSLAND - John Phillips)This book is a useful research tool on the history of Buchan.Two copies of a 273 pp paper covered booklet. The cover is white with the title in black print. On the front is a sketch of an old school building. On the back is a black/white photograph of children running downhill. A book on the history of the Buchan school no.1905. Includes photographs, maps and lists of school students and staff.book buchan-history buchan-school -
 Learmonth and District Historical Society Inc.
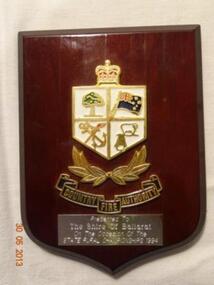
Plaque, Circa 1994
This Plaque was presented to the Shire Of Ballarat to mark the occasion of the Rural Fire Authority's State Rural Championships in 1994.Dark brown rectangular "shield" with shaped lower edge.To the top is a coloured enamel piece dived into four sections,with a tree,flag,anchor and animals,with a Crown placed at the top .Below this is a decorative leaf formation.Below is Country Fire Authority inscribed on "flowing "ribbon"and a silver inscribed plaque at the base.COUNTRY FIRE AUTHORITY.Presented to The Shire Of Ballarat On The Occasion Of The STATE RURAL CHAMPIONSHIPS 1994. -
 Learmonth and District Historical Society Inc.
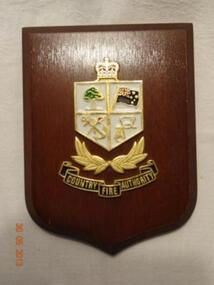
Plaque, Circa 19th century
The reason this was presented to the Shire of Ballarat is unknown.Rectangular Plaque with shaped bottom of brown wood,on which is a shield with the crown on top and on a white enamelled background divided into four by gold lines, are symbols of a tree, Australian flag, an Anchor and firemans helmet. Under this are leaves in gold in the form of a part wreath,and beneath this are the words COUNTRY FIRE AUTHORITY on a flowing ribbon.COUNTRY FIRE AUTHORITY.plaque.country fire authority -
 Learmonth and District Historical Society Inc.
Plaque Country Fire Authority, Nil, Circa 1994
The Shire of Ballarat in 1994 sponsored the V.R.F.B.A.State Championships of the Victorian Rural Fire Brigades Association and in appreciation was presented with this plaque.Given in appreciation of sponsorship.Rectangular wooden base with brass plates for the inscriptions.In the middle is the Victorian Rural Fire Brigade Badge, above which is inscribed VICTORIAN RURAL FIRE BRIGADES ASSOCIATION on a long rectangular brass plate,and below on a wider rectangular plate which is inscribed REGION 16 HOST COMMITTEE thanks The Shire Of Ballarat For Your Generous Sponsorship Of V.R.F.B.A. State Championship 1994 VICTORIAN RURAL FIRE BRAGADES ASSOCIATION.REGION16 HOST COMMITTEE THANKS The Shire Of Ballarat For Your Generous Sponsorship Of V.R.F.B.AState Championships 1994.shire of ballarat, vrfba championships 1994.victorian rural fire brigades association -
 Flagstaff Hill Maritime Museum and Village
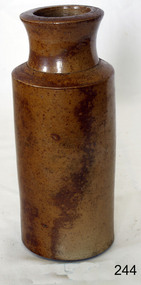
Ceramic - Stoneware Bottle, 1890-1940
... ceramics that is fired at a relatively high temperature. A modern... for pottery or other ceramics that is fired at a relatively high ...Stoneware is a rather broad term for pottery or other ceramics that is fired at a relatively high temperature. A modern technical definition is a vitreous or semi-vitreous ceramic made primarily from stoneware clay or non-refractory fire clay. Whether vitrified or not, it is non-porous, it may or may not be glazed. Historically, across the world, it has been developed after earthenware and before porcelain and has often been used for high-quality as well as utilitarian wares. As a rough guide, modern earthen wares are normally fired in a kiln at temperatures in the range of about 1,000°C (1,830 °F) to 1,200 °C (2,190 °F); stoneware's at between about 1,100 °C (2,010 °F) to 1,300 °C (2,370 °F); and porcelains at between about 1,200 °C (2,190 °F) to 1,400 °C (2,550 °F). Historically, reaching high temperatures was a long-lasting challenge, and temperatures somewhat below these were used for a long time. Earthenware can be fired effectively as low as 600°C, achievable in primitive pit firing, but 800 °C was more typical. Stoneware also needs certain types of clays, more specific than those able to make earthenware, but can be made from a much wider range than porcelain. A domestic item used to store food products as glazing makes the container non-porous, often used for pickling. Or larger containers for kitchen flour. Items age is difficult to determine given the same techniques for making stoneware are in use today. Stoneware containers were made by many potteries in Australia and England. They were in common domestic use before plastics were invented around 1940 to store goods so this subject item is probably from around 1900 to the 1940s.Item's significance is difficult to determine given it is not associated with a place, person, historic event, or manufacturer. Its significance lies with its use as a domestic object giving today a view into our social past.Brown salt glaze stoneware bottle None (possibly made by Royal Doulton UK)flagstaff hill, warrnambool, flagstaff hill maritime museum, maritime museum, flagstaff hill maritime village, great ocean road, bottle, stoneware bottle, storage, kitchen ware, salt glazed, stoneware, shipwreck coast -
 Flagstaff Hill Maritime Museum and Village
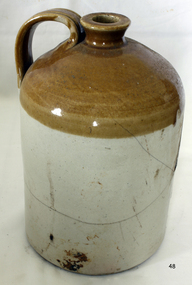
Ceramic - Jug, 1900 - 1940
... ceramics that is fired at a relatively high temperature. A modern... for pottery or other ceramics that is fired at a relatively high ...Stoneware is a rather broad term for pottery or other ceramics that is fired at a relatively high temperature. A modern technical definition is a vitreous or semi-vitreous ceramic made primarily from stoneware clay or non-refractory fire clay. Whether vitrified or not, it is non-porous, it may or may not be glazed. Historically, across the world, it has been developed after earthenware and before porcelain and has often been used for high-quality as well as utilitarian wares. As a rough guide, modern earthen wares are normally fired in a kiln at temperatures in the range of about 1,000°C (1,830 °F) to 1,200 °C (2,190 °F); stoneware's at between about 1,100 °C (2,010 °F) to 1,300 °C (2,370 °F); and porcelains at between about 1,200 °C (2,190 °F) to 1,400 °C (2,550 °F). Historically, reaching high temperatures was a long-lasting challenge, and temperatures somewhat below these were used for a long time. Earthenware can be fired effectively as low as 600°C, achievable in primitive pit firing, but 800 °C was more typical. Stoneware also needs certain types of clays, more specific than those able to make earthenware, but can be made from a much wider range than porcelain. A domestic item used to store food products as glazing makes the container non-porous, often used for pickling. Or larger containers for kitchen flour. Items age is difficult to determine given the same techniques for making stoneware are in use today. Stoneware containers were made by many potteries in Australia and England. They were in common domestic use before plastics were invented around 1940 to store goods so this subject item is probably from around 1900 to the 1940s.Item's significance and origin of manufacture is difficult to determine given it is not associated with a place, person, historic event, or manufacturer. Its significance lies with its use as a domestic object giving today a view into our social past. Stoneware jug badly cracked and repaired with handle and short neckNoneflagstaff hill, warrnambool, shipwrecked coast, flagstaff hill maritime museum, maritime museum, shipwreck coast, flagstaff hill maritime village, great ocean road, jug, stoneware jug, earthenware jug, kitchen storage -
 Flagstaff Hill Maritime Museum and Village
Ceramic - Jug, 1920-1940
... ceramics that is fired at a relatively high temperature. A modern... for pottery or other ceramics that is fired at a relatively high ...Stoneware is a rather broad term for pottery or other ceramics that is fired at a relatively high temperature. A modern technical definition is a vitreous or semi-vitreous ceramic made primarily from stoneware clay or non-refractory fire clay. Whether vitrified or not, it is non-porous, it may or may not be glazed. Historically, across the world, it has been developed after earthenware and before porcelain and has often been used for high-quality as well as utilitarian wares. As a rough guide, modern earthenwares are normally fired in a kiln at temperatures in the range of about 1,000°C (1,830 °F) to 1,200 °C (2,190 °F); stoneware's at between about 1,100 °C (2,010 °F) to 1,300 °C (2,370 °F); and porcelains at between about 1,200 °C (2,190 °F) to 1,400 °C (2,550 °F). Historically, reaching high temperatures was a long-lasting challenge, and temperatures somewhat below these were used for a long time. Earthenware can be fired effectively as low as 600°C, achievable in primitive pit firing, but 800 °C was more typical. Stoneware also needs certain types of clays, more specific than those able to make earthenware, but can be made from a much wider range than porcelain. A domestic item used to store food products as glazing makes the container non-porous, often used for pickling. Or larger containers for kitchen flour. Items age is difficult to determine given the same techniques for making stoneware are in use today. Stoneware containers were made by many potteries in Australia and England. They were in common domestic use before plastics were invented around 1940 to store goods so this subject item is probably from around 1900 to the 1940s. Item's significance is difficult to determine given it is not associated with a place, person, historic event, or manufacturer. Its significance lies with its use as a domestic object giving today a view into our social past.Brown Stoneware jug with short neckThe number "1" under neck flagstaff hill, warrnambool, shipwrecked coast, flagstaff hill maritime museum, shipwreck coast, flagstaff hill maritime village, great ocean road, jug, stoneware jug, salt glaze -
 Flagstaff Hill Maritime Museum and Village
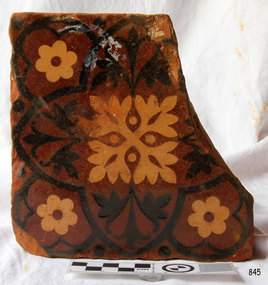
Ceramic - Tile, circa 1878
This Minton floor tile is from the wreck of the LOCH ARD along with other examples of this manufacture recovered from the wreck site and form part of the collection at Flagstaff Hill. The iron-hulled clipper ship from the Loch Line was heading for Port Phillip from London when it ran into the cliffs of Mutton Bird Island near Port Campbell and was wrecked on June 1st, 1878. The LOCH ARD was laden with high-value cargo including luxury goods intended for display at the Melbourne International Exhibition in 1880. One notable survivor from the ship’s freight manifest was the well-packed Minton porcelain peacock, a two-metre-high ceramic masterpiece of vivid glazed colours. The almost total loss of life and property from the LOCH ARD registered as a shocking tragedy for the Colony of Victoria, at a time when social confidence and economic optimism were otherwise high. The wealth generated from Gold and Wool was increasingly being spent on grandiose private residences and imposing public buildings. The demand for quality furnishings and fittings was therefore strong. Among the products consigned to burgeoning colonial markets by the Milton Pottery at Stoke upon Trent, were their new range of colourfully patterned but very durable floor tiles – ideal for the high-traffic spaces in the large civic buildings then being constructed in Australia and America. These new floor tiles were “encaustic”, meaning that their designs and colours were encased “within” the depth of the tile. Rather than their decorative patterns being glazed onto the surface of the tile, their inlaid designs were created during the manufacturing process, as “coloured slips” (or liquid clay) were poured into a deep pre-moulded casting. When fired, the resulting tile was colour-fast and design-fast. A brief history of the Loch Ard (1873-1878): - The sailing ship Loch Ard was one of the famous Loch Line ships that sailed from England to Australia. Barclay, Curdle and Co. built the three-masted iron vessel in Glasgow in 1873. It had sailed three trips to Australia and one trip to Calcutta before its fateful voyage. Loch Ard left England on March 2, 1878, under the command of recently married, 29-year-old Captain Gibbs. It was bound for Melbourne with a crew of 37, plus 17 passengers. The general cargo reflected the affluence of Melbourne at the time. Onboard were straw hats, umbrellas, perfumes, clay pipes, pianos, clocks, confectionery, linen and candles, and a heavier load of railway irons, cement, lead and copper. Other cargo included items intended for display in the Melbourne International Exhibition of 1880. The Loch Ard had been sailing for three months and was close to its destination on June 1, 1878. Captain Gibbs had expected to see land at about 3 am but the Loch Ard ran into a fog that greatly reduced visibility and there was no sign of land or the Cape Otway lighthouse. The fog lifted at 4 am and the sheer cliffs of Victoria's west coast were much closer to them than Captain Gibbs expected. He tried to manage the vessel but failed and the ship struck a reef at the base of Mutton Bird Island, near Port Campbell. The top deck loosened from the hull, and the masts and rigging crashed down, knocking passengers and crew overboard. The lifeboat was launched by Tom Pearce but crashed into the side of Loch Ard and capsized. He clung onto its overturned hull and sheltered under it. He drifted out to sea and the tide brought him back to what is now called Loch Ard Gorge. He swam to shore and found a cave for shelter. A passenger, Eva Carmichael, had raced onto the deck to find out what was happening and was confronted by towering cliffs above the ship. She was soon swept off the ship by a huge wave. Eva saw Tom Pearce on a small rocky beach and yelled to attract his attention. He swam out and dragged her to the shelter of the cave. He revived her with a bottle of brandy from a case that had washed up on the beach. Tom scaled a cliff in search of help and followed some horse hoof prints. He came from two men from Glenample Station, three and a half miles away. He told the men of the tragedy and then returned to the gorge while the two men rode back to the station to get help. They reached Loch Ard Gorge and took the two shipwreck survivors to Glenample Station to recover. Eva stayed at the station for six weeks before returning to Ireland by steamship. In Melbourne, Tom Pearce received a hero's welcome and was presented with a medal and some money. Of the 54 crew members and passengers on board, only two survived: the apprentice, Tom Pearce and the young woman passenger, Eva Carmichael, who lost her family in the tragedy. One of the most unlikely pieces of cargo to have survived the shipwreck was a Minton porcelain peacock - one of only nine in the world. The peacock was destined for the Melbourne International Exhibition in 1880. It had been well packed, which gave it adequate protection during the violent storm. Today, the Minton peacock can be seen at the Flagstaff Hill Maritime Museum in Warrnambool. From Australia's most dramatic shipwreck, it has now become Australia's most valuable shipwreck artefact and is one of very few 'objects' on the Victorian State Heritage Register. The Minton floor tile is significant for its hard-wearing yet attractive design. The shipwreck of the LOCH ARD is of State significance. Victorian Heritage Register S417. Flagstaff Hill’s collection of artefacts from LOCH ARD is significant for being one of the largest collections of artefacts from this shipwreck in Victoria. It is significant for its association with the shipwreck, which is on the Victorian Heritage Register (VHR S417). The collection is significant because of the relationship between the objects, as together they have a high potential to interpret the story of the LOCH ARD. The LOCH ARD collection is archaeologically significant as the remains of a large international passenger and cargo ship. The LOCH ARD collection is historically significant for representing aspects of Victoria’s shipping history and its potential to interpret sub-theme 1.5 of Victoria’s Framework of Historical Themes (living with natural processes). The collection is also historically significant for its association with the LOCH ARD, which was one of the worst and best-known shipwrecks in Victoria’s history. A square Minton floor tile with a black and apricot pattern against a chocolate brown background. There is a large chip missing. This decorative floor tile was recovered from the shipwreck of the LOCH ARD. On the back, or base, of the tile is inscribed the number “46” and the letters “Minton & Co Patent Stoke upon Trent”.flagstaff hill, warrnambool, shipwrecked coast, flagstaff hill maritime museum, maritime museum, shipwreck coast, flagstaff hill maritime village, great ocean road, loch line, loch ard, captain gibbs, eva carmichael, tom pearce, glenample station, mutton bird island, loch ard gorge, encaustic tile, melbourne international exhibition, floor tile, minton floor tile -
 Flagstaff Hill Maritime Museum and Village
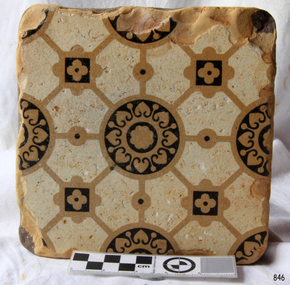
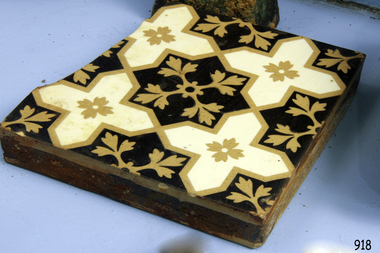
Ceramic - Tile, circa 1878
This Minton floor tile is from the wreck of the LOCH ARD. Other examples of this manufacture have been recovered from the wreck site and form part of the collection at Flagstaff Hill. The iron-hulled clipper ship from the Loch Line was heading for Port Phillip from London when it ran into the cliffs of Mutton Bird Island near Port Campbell and was wrecked on the early morning of June 1, 1878. The LOCH ARD was laden with high-value cargo including luxury goods intended for display at the Melbourne International Exhibition in 1880. One notable survivor from the ship’s freight manifest was the well-packed Minton porcelain peacock, a two-metre-high ceramic masterpiece of vivid glazed colours. The almost total loss of life and property from the LOCH ARD registered as a shocking tragedy for the Colony of Victoria, at a time when social confidence and economic optimism were otherwise high. The wealth generated from gold and wool was increasingly being spent on magnificent private residences and imposing public buildings. The demand for quality furnishings and fittings was therefore strong. Among the products consigned to burgeoning colonial markets by the Milton Pottery at Stoke upon Trent were their new range of colourfully patterned but very durable floor tiles – ideal for the high-traffic spaces in the large civic buildings then being constructed in Australia and America. These new floor tiles were “encaustic”, meaning that their designs and colours were encased within the depth of the tile. Rather than their decorative patterns being glazed onto the surface of the tile, their inlaid designs were created during the manufacturing process, as “coloured slips” (or liquid clay) that were poured into a deep pre-moulded casting. When fired, the resulting tile was colour-fast and design-fast.The Minton encaustic floor tile is significant for its method of manufacture which makes it durable as well as decorative. The shipwreck of the LOCH ARD is of State significance. Victorian Heritage Register S417. Flagstaff Hill’s collection of artefacts from LOCH ARD is significant for being one of the largest collections of artefacts from this shipwreck in Victoria. It is significant for its association with the shipwreck, which is on the Victorian Heritage Register (VHR S417). The collection is significant because of the relationship between the objects, as together they have a high potential to interpret the story of the LOCH ARD. The LOCH ARD collection is archaeologically significant as the remains of a large international passenger and cargo ship. The LOCH ARD collection is historically significant for representing aspects of Victoria’s shipping history and its potential to interpret sub-theme 1.5 of Victoria’s Framework of Historical Themes (living with natural processes). The collection is also historically significant for its association with the LOCH ARD, which was one of the worst and best-known shipwrecks in Victoria’s history.A square Minton floor tile with a black and beige pattern against a white base. This encaustic floor tile was recovered from the shipwreck of the LOCH ARD. On the back, or base, of the tile is inscribed the number “46” and the letters “Minton & Co Patent Stoke upon Trent”.flagstaff hill, warrnambool, shipwrecked coast, flagstaff hill maritime museum, maritime museum, shipwreck coast, flagstaff hill maritime village, great ocean road, loch line, loch ard, mutton bird island, loch ard gorge, minton floor tile, encaustic tile, melbourne international exhibition, floor tile -
 Flagstaff Hill Maritime Museum and Village
Ceramic - Floor Tile, circa 1878
This Minton floor tile is from the wreck of the Loch Ard and is currently on display in the Great Circle Gallery at Flagstaff Hill. The iron hulled clipper ship from the Loch Line was heading for Port Phillip from London, when it ran into the cliffs of Mutton Bird Island near Port Campbell. The Loch Ard was laden with a high value cargo including luxury goods intended for display at the Melbourne International Exhibition in 1880. One notable survivor from the ship’s freight manifest was the well packed Minton porcelain peacock, a two meter high ceramic masterpiece of vivid glazed colours. (This is also on display in the Great Circle Gallery). The almost total loss of life and property from the Loch Ard registered as a shocking tragedy for the Colony of Victoria, at a time when social confidence and economic optimism were otherwise high. Wealth generated from Gold and Wool was increasingly being spent on grandiose private residences and imposing public buildings. The demand for quality furnishings and fittings was therefore strong. Among the products consigned to burgeoning colonial markets by the Milton pottery at Stoke upon Trent, were their new range of colourfully patterned but very durable floor tiles ideal for the high-traffic spaces in the large civic buildings then being constructed in Australia and America. These new floor tiles were “encaustic”, meaning that their designs and colours were encased “within” the depth of the tile. Rather than their decorative patterns being glazed onto the surface of the tile, their inlaid designs were created during the manufacturing process, as “coloured slips” (or liquid clay) were poured into a deep pre-molded casting. When fired, the resulting tile was colours-fast and design-fast. The Minton floor tile is significant for its hard-wearing yet attractive design. The shipwreck of the Loch Ard is of significance for Victoria and is registered on the Victorian Heritage Register ( S 417). Flagstaff Hill has a varied collection of artefacts from Loch Ard and its collection is significant for being one of the largest accumulations of artefacts from this notable Victorian shipwreck of which the subject items are a small part. The collections of objects give us a snapshot of how we can interpret the story of this tragic event. The collection is also archaeologically significant as it represents aspects of Victoria's shipping history that allows us to interpret Victoria's social and historical themes of the time. Through is associated with the worst and best-known shipwreck in Victoria's history. A square Minton floor tile with a dark brown, beige and white pattern. The tile has a piece broken off along one side and some chipping along the edges. This ‘encaustic’ floor tile was recovered from the shipwreck of the LOCH ARD. Branded "... MINTON&CO Patent ..."flagstaff hill, warrnambool, flagstaff hill maritime museum, shipwreck coast, flagstaff hill maritime village, great ocean road, loch line, loch ard, captain gibbs, eva carmichael, tom pearce, glenample station, mutton bird island, minton floor tile, encaustic tile, melbourne international exhibition, floor tile -
 Flagstaff Hill Maritime Museum and Village
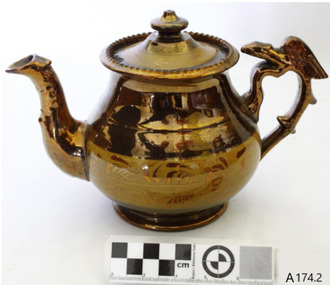
Ceramic - Teapot, First half of the 20th century
Lusterware is a type of pottery or porcelain with a metallic glaze that gives the effect of iridescence. The technique on pottery was first developed in Mesopotamia (modern Iraq) in the early 9th century. It is produced by metallic oxides in an overglaze finish, which is given a second firing at a lower temperature in a "muffle kiln", or a reduction kiln, excluding oxygen. The Lusterware effect is a final coating applied over the ceramic glaze, and fixed by a light second firing, applying small amounts of metallic compounds (generally of silver or copper) mixed with something to make it paintable (clay or ochre). This is then fired in a reducing atmosphere at a temperature high enough to "soften" the glaze from the first firing, and break down the metallic compounds, leaving a very thin ("perhaps 10 or 20 atoms thick") layer that is fused with the main glaze, but is mainly metal. Lusterware normally only uses one colour per piece, and the range is limited a "gold" derived from silver compounds was historically the most common. The process has always been expensive and rather unpredictable, always requiring two firings, and often the use of expensive materials such as silver and platinum. The very thin layer of luster is often delicate, and many types of Lusterware are easily damaged by scratching removing the metallic layer, or by contact with acids. Lusterware has therefore always been for display and occasional use, although by the 19th century it could be relatively cheap. Many pieces show the luster effect only working correctly on parts of the surface, or not at all. An item probably made in Staffordshire UK where this type of pottery was popular in the late 19th century by unknown pottery as the subject item has no marks. The teapot at this time cannot be associated with a historical event, person, or place, provenance regards manufacture is unknown, item assessed as a collection asset given it was produced before 1950.Teapot ceramic ornate copper lusterware abstract floral design handle has a protruding sculptured bird for thumb grip. Nonewarrnambool, flagstaff-hill, flagstaff-hill-maritime-museum, maritime-museum, shipwreck-coast, flagstaff-hill-maritime-village, teapot, tea set, kitchen ware, ceramic, lusterware, pottery, staffordshire uk, pottery finishes -
 Flagstaff Hill Maritime Museum and Village
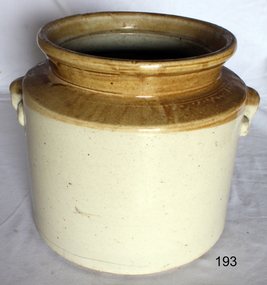
Ceramic - Stoneware Container, 1900 to 1940
... ceramics that is fired at a relatively high temperature. A modern... for pottery or other ceramics that is fired at a relatively high ...Stoneware is a rather broad term for pottery or other ceramics that is fired at a relatively high temperature. A modern technical definition is a vitreous or semi-vitreous ceramic made primarily from stoneware clay or non-refractory fire clay. Whether vitrified or not, it is non-porous, it may or may not be glazed. Historically, across the world, it has been developed after earthenware and before porcelain and has often been used for high-quality as well as utilitarian wares. As a rough guide, modern earthen wares are normally fired in a kiln at temperatures in the range of about 1,000°C (1,830 °F) to 1,200 °C (2,190 °F); stoneware's at between about 1,100 °C (2,010 °F) to 1,300 °C (2,370 °F); and porcelains at between about 1,200 °C (2,190 °F) to 1,400 °C (2,550 °F). Historically, reaching high temperatures was a long-lasting challenge, and temperatures somewhat below these were used for a long time. Earthenware can be fired effectively as low as 600°C, achievable in primitive pit firing, but 800 °C was more typical. Stoneware also needs certain types of clays, more specific than those able to make earthenware, but can be made from a much wider range than porcelain. A domestic item used to store food products as glazing makes the container non-porous, often used for pickling. Or larger containers for kitchen flour. Items age is difficult to determine given the same techniques for making stoneware are in use today. Stoneware containers were made by many potteries in Australia and England. They were in common domestic use before plastics were invented around 1940 to store goods so this subject item is probably from around 1900 to the 1940s. Item's significance is difficult to determine given it is not associated with a place, person, historic event, or manufacturer. Its significance lies with its use as a domestic object giving today a view into our social past.Stoneware circular container with wide opening, brown top and off white base. Handholds moulded on each side glazed finish, cracks in base.Noneflagstaff hill, warrnambool, shipwrecked coast, flagstaff hill maritime museum, shipwreck coast, flagstaff hill maritime village, great ocean road, container, stoneware container, kitchen storage, kitchen ware -
 Flagstaff Hill Maritime Museum and Village
Domestic object - Bowl, Late 19th or early 20th Century
The Process of Making Pottery Decorating, Firing, Glazing, Making, Technical There is a rhythm and flow to clay. It can’t be done all at once! Even the making process! It can take weeks to get everything done, especially if you can only work on your pottery once a week! Even though we have three hour classes, it’s often just not enough time! Here is an overview of some of the processes so you have a bit more grasp on some of the technical stuff! Step One – Design There are SO many ideas out there for making stuff in clay! From delicate porcelain jewellery, through to heavy sculptural work and everything in between. Deciding your direction is sometimes not that easy – when you first start, try everything, you will naturally gravitate to the style that you enjoy! The options and variations are endless and can get a wee bit overwhelming too! Check in with me before you start to ensure your ideas will work, what order you might do things, how you could achieve the look you are seeking and any other technical data required! Step Two – Making Clay is thixotropic. This means that as you work with it, the clay first gets sloppier and wetter, before is begins to dry in the atmosphere. For most things, you simply can’t do all parts of the project at once. An example of work order might look like: Get last weeks work out from the shelves Prepare clay for today’s work – roll your clay, prepare balls for throwing, make the first stage of a pinch pot) Clean up last week’s work and put it on the shelf for bisque firing Check that you have any glazing to do – and do enough of it that you will have time to finish your main project Do the next step of your next project – there might be a further step that can’t be complete immediately, in that case, wrap your work well and put onto the shelves. Letting your work rest for a while can really help keep your work clean and professional looking. Many things require bagging under plastic to keep it ready for work the next week – put your name on the outside of the bag so you can find your work easily. We have stickers and markers. Consider how you want to decorate your work – coloured slip can be applied at a fairly wet stage (remembering that it will make your work even wetter!). Trying to apply slip to dry clay won’t work! If you want to do sgraffito – you will need to keep the work leather hard (a state of dryness where you can still work the clay with a little effort and a little water and care). Step Three – Drying Most of the time your work can go into the rack uncovered to let it dry out for the following week. If you want to continue forming or shaping you will need to double bag your work – put your work on a suitable sized bat and put the bat in a bag so the base of the bag is under the bat, then put another bag over the top of the work and tuck the top of the bag under the bat. If you want to trim (or turn) your thrown work the following week, it should also be double bagged. If your work is large, delicate, or of uneven thicknesses, you should lightly cover your work for drying. When considering the drying process, bare in mind the weather, humidity and wind! The hotter and dryer, the faster things dry and work can dry unevenly in the shelves – this can lead to cracking – another time to lightly cover your work for drying. Step Four – Trimming and Cleaning Up Your work is dry! It is called greenware now and it is at it’s most fragile! Handle everything with two hands. I often refer to soft hands – keep everything gentle and with your fingers spread as much as possible. Try to not pick up things like plates too much, and always with both hands! Before your work can be bisque fired it should be “cleaned up”. You work won’t go into the kiln if it has sharp edges – when glazed, sharp edges turn into razor blades! Use a piece of fly wire to rub the work all over – this will scratch a little so be light handed. Use a knife or metal kidney to scrape any areas that require a bit more dynamic treatment than the fly wire offers! Finally, a very light wipe over with a slightly damp sponge can help soften and soothe all of your edges and dags! Trimming thrown work: If you are planning to trim (or turn) your thrown work (and you should be), make sure you bag it well – your work should be leather hard to almost dry for easiest trimming. Use this step to finish the work completely – use a metal kidney to polish the surface, or a slightly damp sponge to give a freshly thrown look. Wipe the sponge around the rim after trimming, and check the inside of the pot for dags! Trimming slip cast work: Usually I will trim the rims of your work on the wheel the following day to make that stage easier, however you will still need to check your work for lumps and bumps. Last but not least – check that your name is still clearly on the bottom of your work. Step Five – Bisque Firing When the work is completely dry it can go into the bisque kiln. The bisque kiln is fired to 1000°C. This process burns off the water in the clay as well as some of the chemically bound water. The structure of the clay is not altered that much at this temperature. Inside the bisque kiln, the work is stacked a little, small bowl inside a larger bowl and onto a heavy plate. Smaller items like decorations or drink coasters might get stacked several high. Consideration is paid to the weight of the stack and shape of the work. A bisque kiln can fire about one and a half times the amount of work that the glaze kiln can fire. The firing takes about 10 hours to complete the cycle and about two days to cool down. Once it has been emptied the work is placed in the glaze room ready for you to decorate! Step Six – Glazing Decorating your work with colour can be a lot of fun – and time consuming! There are three main options for surface treatment at this stage: Oxide Washes Underglazes Glazes Washes and underglazes do not “glaze” the work – It will still need a layer of glaze to fully seal the clay (washes don’t need glaze on surfaces not designed for food or liquid as they can gloss up a little on their own). Underglazes are stable colourants that turn out pretty much how they look in the jar. They can be mixed with each other to form other colours and can be used like water colours to paint onto your work. Mostly they should have a clear glaze on top to seal them. Oxides are a different species – the pink oxide (cobalt) wash turns out bright blue for instance. They don’t always need a glaze on top, and some glazes can change the colour of the wash! The glazes need no other “glaze” on top! Be careful of unknown glaze interactions – you can put any combination of glaze in a bowl or on a plate, but only a single glaze on the outside of any vertical surface! Glazes are a chemical reaction under heat. We don’t know the exact chemicals in the Mayco glazes we use. I can guess by the way they interact with each other, however, on the whole, you need to test every idea you have, and not run the test on a vertical surface! Simply put, glaze is a layer of glass like substance that bonds with the clay underneath. Clay is made of silica, alumina and water. Glaze is made of mostly silica. Silica has a melting point of 1700°C and we fire to 1240°C. The silica requires a “flux” to help it melt at the lower temperature. Fluxes can be all sorts of chemicals – a common one is calcium – calcium has a melting point of 2500°C, however, together they both melt at a much lower temperature! Colourants are metal oxides like cobalt (blue), chrome (green through black), copper (green, blue, even red!), manganese (black, purple and pink) iron (red brown), etc. Different chemicals in the glaze can have dramatic effects. for example, barium carbonate (which we don’t use) turns manganese bright pink! Other elements can turn manganese dioxide brown, blue, purple and reddish brown. Manganese dioxide is a flux in and of itself as well. So, glazes that get their black and purple colours, often interact with other glazes and RUN! Our mirror black is a good example – it mixes really well with many glazes because it fluxes them – causes them to melt faster. It will also bring out many beautiful colours in the glazes because it’s black colouring most definitely comes from manganese dioxide! Glaze chemistry is a whole subject on it’s own! We use commercial Mayco glazes on purpose – for their huge range of colour possibilities, stability, cool interactions, artistic freedom with the ability to easily brush the glazes on and ease of use. We currently have almost 50 glazes on hand! A major project is to test the interactions of all glazes with each other. That is 2,500 test tiles!!!! I’m going to make the wall behind the wheels the feature wall of pretty colours! Step Seven – Glaze (Gloss or sometimes called “Glost”) Firing Most of the time this is the final stage of making your creation (but not always!) The glaze kiln goes to 1240°C. This is called cone 6, or midrange. It is the low end of stoneware temperatures. Stoneware clays and glazes are typically fired at cone 8 – 10, that is 1260 – 1290°C. The energy requirement to go from 1240°C to 1280°C is almost a 30% more! Our clay is formulated to vitrify (mature, turn “glass-like”) at 1240°, as are our glazes. A glaze kiln take around 12 hours to reach temperature and two to three days to cool down. Sometimes a third firing process is required – this is for decoration that is added to work after the glaze firing. For example – adding precious metals and lustres. this firing temperature is usually around 600 – 800°C depending upon the techniques being used. There are many students interested in gold and silver trims – we will be doing this third type of firing soon! After firing your work will be in the student finished work shelves. Remember to pay for it before you head out the door! There is a small extra charge for using porcelain clay (it’s more than twice the price of regular clay), and for any third firing process! Once your work has been fired it can not turn back into clay for millennia – so don’t fire it if you don’t like it! Put it in the bucket for recycling. https://firebirdstudios.com.au/the-process-of-making-pottery/ The bowl is an example of kitchenware used in the 19th century and still in use today.Bowl white ceramic. Crack on side. Badly stained.Backstamp very faint and unable to be read.flagstaff hill, warrnambool, shipwrecked-coast, flagstaff-hill, flagstaff-hill-maritime-museum, maritime-museum, shipwreck-coast, flagstaff-hill-maritime-village, mixing bowl, food preparation, kitchen equipment, ceramic -
 Flagstaff Hill Maritime Museum and Village
Domestic object - Bowl
The Process of Making Pottery Decorating, Firing, Glazing, Making, Technical There is a rhythm and flow to clay. It can’t be done all at once! Even the making process! It can take weeks to get everything done, especially if you can only work on your pottery once a week! Even though we have three hour classes, it’s often just not enough time! Here is an overview of some of the processes so you have a bit more grasp on some of the technical stuff! Step One – Design There are SO many ideas out there for making stuff in clay! From delicate porcelain jewellery, through to heavy sculptural work and everything in between. Deciding your direction is sometimes not that easy – when you first start, try everything, you will naturally gravitate to the style that you enjoy! The options and variations are endless and can get a wee bit overwhelming too! Check in with me before you start to ensure your ideas will work, what order you might do things, how you could achieve the look you are seeking and any other technical data required! Step Two – Making Clay is thixotropic. This means that as you work with it, the clay first gets sloppier and wetter, before is begins to dry in the atmosphere. For most things, you simply can’t do all parts of the project at once. An example of work order might look like: Get last weeks work out from the shelves Prepare clay for today’s work – roll your clay, prepare balls for throwing, make the first stage of a pinch pot) Clean up last week’s work and put it on the shelf for bisque firing Check that you have any glazing to do – and do enough of it that you will have time to finish your main project Do the next step of your next project – there might be a further step that can’t be complete immediately, in that case, wrap your work well and put onto the shelves. Letting your work rest for a while can really help keep your work clean and professional looking. Many things require bagging under plastic to keep it ready for work the next week – put your name on the outside of the bag so you can find your work easily. We have stickers and markers. Consider how you want to decorate your work – coloured slip can be applied at a fairly wet stage (remembering that it will make your work even wetter!). Trying to apply slip to dry clay won’t work! If you want to do sgraffito – you will need to keep the work leather hard (a state of dryness where you can still work the clay with a little effort and a little water and care). Step Three – Drying Most of the time your work can go into the rack uncovered to let it dry out for the following week. If you want to continue forming or shaping you will need to double bag your work – put your work on a suitable sized bat and put the bat in a bag so the base of the bag is under the bat, then put another bag over the top of the work and tuck the top of the bag under the bat. If you want to trim (or turn) your thrown work the following week, it should also be double bagged. If your work is large, delicate, or of uneven thicknesses, you should lightly cover your work for drying. When considering the drying process, bare in mind the weather, humidity and wind! The hotter and dryer, the faster things dry and work can dry unevenly in the shelves – this can lead to cracking – another time to lightly cover your work for drying. Step Four – Trimming and Cleaning Up Your work is dry! It is called greenware now and it is at it’s most fragile! Handle everything with two hands. I often refer to soft hands – keep everything gentle and with your fingers spread as much as possible. Try to not pick up things like plates too much, and always with both hands! Before your work can be bisque fired it should be “cleaned up”. You work won’t go into the kiln if it has sharp edges – when glazed, sharp edges turn into razor blades! Use a piece of fly wire to rub the work all over – this will scratch a little so be light handed. Use a knife or metal kidney to scrape any areas that require a bit more dynamic treatment than the fly wire offers! Finally, a very light wipe over with a slightly damp sponge can help soften and soothe all of your edges and dags! Trimming thrown work: If you are planning to trim (or turn) your thrown work (and you should be), make sure you bag it well – your work should be leather hard to almost dry for easiest trimming. Use this step to finish the work completely – use a metal kidney to polish the surface, or a slightly damp sponge to give a freshly thrown look. Wipe the sponge around the rim after trimming, and check the inside of the pot for dags! Trimming slip cast work: Usually I will trim the rims of your work on the wheel the following day to make that stage easier, however you will still need to check your work for lumps and bumps. Last but not least – check that your name is still clearly on the bottom of your work. Step Five – Bisque Firing When the work is completely dry it can go into the bisque kiln. The bisque kiln is fired to 1000°C. This process burns off the water in the clay as well as some of the chemically bound water. The structure of the clay is not altered that much at this temperature. Inside the bisque kiln, the work is stacked a little, small bowl inside a larger bowl and onto a heavy plate. Smaller items like decorations or drink coasters might get stacked several high. Consideration is paid to the weight of the stack and shape of the work. A bisque kiln can fire about one and a half times the amount of work that the glaze kiln can fire. The firing takes about 10 hours to complete the cycle and about two days to cool down. Once it has been emptied the work is placed in the glaze room ready for you to decorate! Step Six – Glazing Decorating your work with colour can be a lot of fun – and time consuming! There are three main options for surface treatment at this stage: Oxide Washes Underglazes Glazes Washes and underglazes do not “glaze” the work – It will still need a layer of glaze to fully seal the clay (washes don’t need glaze on surfaces not designed for food or liquid as they can gloss up a little on their own). Underglazes are stable colourants that turn out pretty much how they look in the jar. They can be mixed with each other to form other colours and can be used like water colours to paint onto your work. Mostly they should have a clear glaze on top to seal them. Oxides are a different species – the pink oxide (cobalt) wash turns out bright blue for instance. They don’t always need a glaze on top, and some glazes can change the colour of the wash! The glazes need no other “glaze” on top! Be careful of unknown glaze interactions – you can put any combination of glaze in a bowl or on a plate, but only a single glaze on the outside of any vertical surface! Glazes are a chemical reaction under heat. We don’t know the exact chemicals in the Mayco glazes we use. I can guess by the way they interact with each other, however, on the whole, you need to test every idea you have, and not run the test on a vertical surface! Simply put, glaze is a layer of glass like substance that bonds with the clay underneath. Clay is made of silica, alumina and water. Glaze is made of mostly silica. Silica has a melting point of 1700°C and we fire to 1240°C. The silica requires a “flux” to help it melt at the lower temperature. Fluxes can be all sorts of chemicals – a common one is calcium – calcium has a melting point of 2500°C, however, together they both melt at a much lower temperature! Colourants are metal oxides like cobalt (blue), chrome (green through black), copper (green, blue, even red!), manganese (black, purple and pink) iron (red brown), etc. Different chemicals in the glaze can have dramatic effects. for example, barium carbonate (which we don’t use) turns manganese bright pink! Other elements can turn manganese dioxide brown, blue, purple and reddish brown. Manganese dioxide is a flux in and of itself as well. So, glazes that get their black and purple colours, often interact with other glazes and RUN! Our mirror black is a good example – it mixes really well with many glazes because it fluxes them – causes them to melt faster. It will also bring out many beautiful colours in the glazes because it’s black colouring most definitely comes from manganese dioxide! Glaze chemistry is a whole subject on it’s own! We use commercial Mayco glazes on purpose – for their huge range of colour possibilities, stability, cool interactions, artistic freedom with the ability to easily brush the glazes on and ease of use. We currently have almost 50 glazes on hand! A major project is to test the interactions of all glazes with each other. That is 2,500 test tiles!!!! I’m going to make the wall behind the wheels the feature wall of pretty colours! Step Seven – Glaze (Gloss or sometimes called “Glost”) Firing Most of the time this is the final stage of making your creation (but not always!) The glaze kiln goes to 1240°C. This is called cone 6, or midrange. It is the low end of stoneware temperatures. Stoneware clays and glazes are typically fired at cone 8 – 10, that is 1260 – 1290°C. The energy requirement to go from 1240°C to 1280°C is almost a 30% more! Our clay is formulated to vitrify (mature, turn “glass-like”) at 1240°, as are our glazes. A glaze kiln take around 12 hours to reach temperature and two to three days to cool down. Sometimes a third firing process is required – this is for decoration that is added to work after the glaze firing. For example – adding precious metals and lustres. this firing temperature is usually around 600 – 800°C depending upon the techniques being used. There are many students interested in gold and silver trims – we will be doing this third type of firing soon! After firing your work will be in the student finished work shelves. Remember to pay for it before you head out the door! There is a small extra charge for using porcelain clay (it’s more than twice the price of regular clay), and for any third firing process! Once your work has been fired it can not turn back into clay for millennia – so don’t fire it if you don’t like it! Put it in the bucket for recycling. https://firebirdstudios.com.au/the-process-of-making-pottery/ This bowl is an example of kitchenware used in the 19th century and still in use today.Bowl white ceramic plain that has two sets of edging around lip. Inside bowl has plaster designed to look like cooking mixture.flagstaff hill, warrnambool, shipwrecked-coast, flagstaff-hill, flagstaff-hill-maritime-museum, maritime-museum, shipwreck-coast, flagstaff-hill-maritime-village, kitchen equipment, ceramic -
 Flagstaff Hill Maritime Museum and Village
Domestic object - Bowl, J & G Meakin, Late 19th or early 20th Century
The Process of Making Pottery Decorating, Firing, Glazing, Making, Technical There is a rhythm and flow to clay. It can’t be done all at once! Even the making process! It can take weeks to get everything done, especially if you can only work on your pottery once a week! Even though we have three hour classes, it’s often just not enough time! Here is an overview of some of the processes so you have a bit more grasp on some of the technical stuff! Step One – Design There are SO many ideas out there for making stuff in clay! From delicate porcelain jewellery, through to heavy sculptural work and everything in between. Deciding your direction is sometimes not that easy – when you first start, try everything, you will naturally gravitate to the style that you enjoy! The options and variations are endless and can get a wee bit overwhelming too! Check in with me before you start to ensure your ideas will work, what order you might do things, how you could achieve the look you are seeking and any other technical data required! Step Two – Making Clay is thixotropic. This means that as you work with it, the clay first gets sloppier and wetter, before is begins to dry in the atmosphere. For most things, you simply can’t do all parts of the project at once. An example of work order might look like: Get last weeks work out from the shelves Prepare clay for today’s work – roll your clay, prepare balls for throwing, make the first stage of a pinch pot) Clean up last week’s work and put it on the shelf for bisque firing Check that you have any glazing to do – and do enough of it that you will have time to finish your main project Do the next step of your next project – there might be a further step that can’t be complete immediately, in that case, wrap your work well and put onto the shelves. Letting your work rest for a while can really help keep your work clean and professional looking. Many things require bagging under plastic to keep it ready for work the next week – put your name on the outside of the bag so you can find your work easily. We have stickers and markers. Consider how you want to decorate your work – coloured slip can be applied at a fairly wet stage (remembering that it will make your work even wetter!). Trying to apply slip to dry clay won’t work! If you want to do sgraffito – you will need to keep the work leather hard (a state of dryness where you can still work the clay with a little effort and a little water and care). Step Three – Drying Most of the time your work can go into the rack uncovered to let it dry out for the following week. If you want to continue forming or shaping you will need to double bag your work – put your work on a suitable sized bat and put the bat in a bag so the base of the bag is under the bat, then put another bag over the top of the work and tuck the top of the bag under the bat. If you want to trim (or turn) your thrown work the following week, it should also be double bagged. If your work is large, delicate, or of uneven thicknesses, you should lightly cover your work for drying. When considering the drying process, bare in mind the weather, humidity and wind! The hotter and dryer, the faster things dry and work can dry unevenly in the shelves – this can lead to cracking – another time to lightly cover your work for drying. Step Four – Trimming and Cleaning Up Your work is dry! It is called greenware now and it is at it’s most fragile! Handle everything with two hands. I often refer to soft hands – keep everything gentle and with your fingers spread as much as possible. Try to not pick up things like plates too much, and always with both hands! Before your work can be bisque fired it should be “cleaned up”. You work won’t go into the kiln if it has sharp edges – when glazed, sharp edges turn into razor blades! Use a piece of fly wire to rub the work all over – this will scratch a little so be light handed. Use a knife or metal kidney to scrape any areas that require a bit more dynamic treatment than the fly wire offers! Finally, a very light wipe over with a slightly damp sponge can help soften and soothe all of your edges and dags! Trimming thrown work: If you are planning to trim (or turn) your thrown work (and you should be), make sure you bag it well – your work should be leather hard to almost dry for easiest trimming. Use this step to finish the work completely – use a metal kidney to polish the surface, or a slightly damp sponge to give a freshly thrown look. Wipe the sponge around the rim after trimming, and check the inside of the pot for dags! Trimming slip cast work: Usually I will trim the rims of your work on the wheel the following day to make that stage easier, however you will still need to check your work for lumps and bumps. Last but not least – check that your name is still clearly on the bottom of your work. Step Five – Bisque Firing When the work is completely dry it can go into the bisque kiln. The bisque kiln is fired to 1000°C. This process burns off the water in the clay as well as some of the chemically bound water. The structure of the clay is not altered that much at this temperature. Inside the bisque kiln, the work is stacked a little, small bowl inside a larger bowl and onto a heavy plate. Smaller items like decorations or drink coasters might get stacked several high. Consideration is paid to the weight of the stack and shape of the work. A bisque kiln can fire about one and a half times the amount of work that the glaze kiln can fire. The firing takes about 10 hours to complete the cycle and about two days to cool down. Once it has been emptied the work is placed in the glaze room ready for you to decorate! Step Six – Glazing Decorating your work with colour can be a lot of fun – and time consuming! There are three main options for surface treatment at this stage: Oxide Washes Underglazes Glazes Washes and underglazes do not “glaze” the work – It will still need a layer of glaze to fully seal the clay (washes don’t need glaze on surfaces not designed for food or liquid as they can gloss up a little on their own). Underglazes are stable colourants that turn out pretty much how they look in the jar. They can be mixed with each other to form other colours and can be used like water colours to paint onto your work. Mostly they should have a clear glaze on top to seal them. Oxides are a different species – the pink oxide (cobalt) wash turns out bright blue for instance. They don’t always need a glaze on top, and some glazes can change the colour of the wash! The glazes need no other “glaze” on top! Be careful of unknown glaze interactions – you can put any combination of glaze in a bowl or on a plate, but only a single glaze on the outside of any vertical surface! Glazes are a chemical reaction under heat. We don’t know the exact chemicals in the Mayco glazes we use. I can guess by the way they interact with each other, however, on the whole, you need to test every idea you have, and not run the test on a vertical surface! Simply put, glaze is a layer of glass like substance that bonds with the clay underneath. Clay is made of silica, alumina and water. Glaze is made of mostly silica. Silica has a melting point of 1700°C and we fire to 1240°C. The silica requires a “flux” to help it melt at the lower temperature. Fluxes can be all sorts of chemicals – a common one is calcium – calcium has a melting point of 2500°C, however, together they both melt at a much lower temperature! Colourants are metal oxides like cobalt (blue), chrome (green through black), copper (green, blue, even red!), manganese (black, purple and pink) iron (red brown), etc. Different chemicals in the glaze can have dramatic effects. for example, barium carbonate (which we don’t use) turns manganese bright pink! Other elements can turn manganese dioxide brown, blue, purple and reddish brown. Manganese dioxide is a flux in and of itself as well. So, glazes that get their black and purple colours, often interact with other glazes and RUN! Our mirror black is a good example – it mixes really well with many glazes because it fluxes them – causes them to melt faster. It will also bring out many beautiful colours in the glazes because it’s black colouring most definitely comes from manganese dioxide! Glaze chemistry is a whole subject on it’s own! We use commercial Mayco glazes on purpose – for their huge range of colour possibilities, stability, cool interactions, artistic freedom with the ability to easily brush the glazes on and ease of use. We currently have almost 50 glazes on hand! A major project is to test the interactions of all glazes with each other. That is 2,500 test tiles!!!! I’m going to make the wall behind the wheels the feature wall of pretty colours! Step Seven – Glaze (Gloss or sometimes called “Glost”) Firing Most of the time this is the final stage of making your creation (but not always!) The glaze kiln goes to 1240°C. This is called cone 6, or midrange. It is the low end of stoneware temperatures. Stoneware clays and glazes are typically fired at cone 8 – 10, that is 1260 – 1290°C. The energy requirement to go from 1240°C to 1280°C is almost a 30% more! Our clay is formulated to vitrify (mature, turn “glass-like”) at 1240°, as are our glazes. A glaze kiln take around 12 hours to reach temperature and two to three days to cool down. Sometimes a third firing process is required – this is for decoration that is added to work after the glaze firing. For example – adding precious metals and lustres. this firing temperature is usually around 600 – 800°C depending upon the techniques being used. There are many students interested in gold and silver trims – we will be doing this third type of firing soon! After firing your work will be in the student finished work shelves. Remember to pay for it before you head out the door! There is a small extra charge for using porcelain clay (it’s more than twice the price of regular clay), and for any third firing process! Once your work has been fired it can not turn back into clay for millennia – so don’t fire it if you don’t like it! Put it in the bucket for recycling. https://firebirdstudios.com.au/the-process-of-making-pottery/This bowl was made by renowned pottery company J & G Meakin of England. The firm was established in the mid-1800's. The bowl is an example of kitchenware used in the 19th century and still in use today.Bowl; white ceramic, round and tapering inwards towards base. Made by J and G Meakin England.On base, 'Ironstone China Reg SOL 391413' with symbolflagstaff hill, flagstaff hill maritime museum and village, warrnambool, maritime museum, maritime village, great ocean road, shipwreck coast, mixing bowl, food preparation, j & g meakin, pottery, stoke-on-trent, kitchen equipment, ceramic -
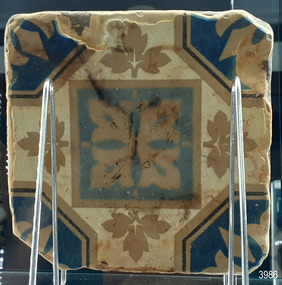 Flagstaff Hill Maritime Museum and Village
Ceramic - Floor Tile, circa 1878
This Minton floor tile is from the wreck of the Loch Ard. The iron-hulled clipper ship from the Loch Line was heading for Port Phillip from London, when it ran into the cliffs of Mutton Bird Island near Port Campbell. The Loch Ard was laden with high-value cargo including luxury goods intended for display at the Melbourne International Exhibition in 1880. One notable survivor from the ship’s freight manifest was the well-packed Minton porcelain peacock, a two-meter high ceramic masterpiece of vivid glazed colours. (This is also on display in the Great Circle Gallery). The almost total loss of life and property from the Loch Ard registered as a shocking tragedy for the Colony of Victoria, at a time when social confidence and economic optimism were otherwise high. The wealth generated from Gold and Wool was increasingly being spent on grandiose private residences and imposing public buildings. The demand for quality furnishings and fittings was therefore strong. Among the products consigned to burgeoning colonial markets by the Milton Pottery at Stoke upon Trent, were their new range of colourfully patterned but very durable floor tiles ideal for the high-traffic spaces in the large civic buildings then being constructed in Australia and America. These floor tiles were “encaustic”, meaning that their designs and colours were encased “within” the depth of the tile. Rather than their decorative patterns being glazed onto the surface of the tile, their inlaid designs were created during the manufacturing process, as “coloured slips” (or liquid clay) were poured into a deep pre-moulded casting. When fired, the resulting tile was colour-fast and design-fast. The Minton floor tile is significant for its hard-wearing yet attractive design. The shipwreck of the Loch Ard is of significance for Victoria and is registered on the Victorian Heritage Register ( S 417). Flagstaff Hill has a varied collection of artefacts from Loch Ard and its collection is significant for being one of the largest accumulations of artefacts from this notable Victorian shipwreck of which the subject items are a small part. The collections of objects give us a snapshot of how we can interpret the story of this tragic event. The collection is also archaeologically significant as it represents aspects of Victoria's shipping history that allows us to interpret Victoria's social and historical themes of the time. Through is associated with the worst and best-known shipwreck in Victoria's history. A square Minton floor tile with a white background, and beige, dark blue, light blue and black geometric pattern as well as leaves in the design. The tile has corner broken off and some chipping along the edges. The reverse has five rows of five evenly spaced holes. The back of the tile has inscriptions. Made by Minton & Co. at Stoke upon Trent. This encaustic floor tile was recovered from the shipwreck of the LOCH ARD. Branded "... MINTON&CO / PATENT / STOKE UPON TRENT"flagstaff hill, warrnambool, flagstaff hill maritime museum, shipwreck coast, flagstaff hill maritime village, great ocean road, loch line, loch ard, captain gibbs, eva carmichael, tom pearce, glenample station, mutton bird island, minton floor tile, encaustic tile, melbourne international exhibition, floor tile, minton tile, minton & co., stoke upon trent -
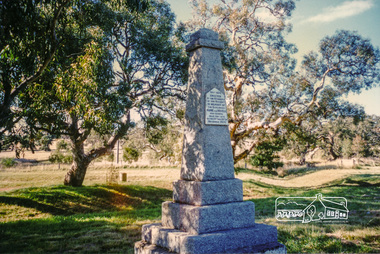 Eltham District Historical Society Inc
Photograph, Hume and Hovell Monument, Broadford, Autumn Excursion, Hume and Hovell's 1824 expedition, 26 May 1996, 26/05/1996
[article by Bettina Woodburn in EDHS Newsletter No. 109, July 1996:] ON THE TRAIL OF HUME AND HOVELL - REPORT ON THE AUTUMN EXCURSION - On a green and fresh morning (Sunday 26th May 1996) the Cobb and Co coach (driven by the most obliging Peter Tampion) set off in a north easterly direction from Eltham to connect with Hume and Hovell's route on their 1824 explorations of central Victoria. The Society would follow a series of monuments erected for the 1924 centenary of the expedition from King Parrot Creek (Tuesday 7th December 1824), through Strath Creek, over Sunday Creek (Sunday 12th December 1824) at Broadford, Tullamarine, St Albans, Deer Park, through Werribee, skirting east of the You Yangs to Lara and Avalon Beach. Because their distance-measuring wheel had broken and a one degree mistake was made in calculations, the two leaders of the original group of six convict-companions arrived at Corio Bay, instead of the expected Western Port, discovered earlier by Flinders. From below Mt. Disappointment (Hume and Hovell's difficulties in "scrambling over brush and rock", "leeches in forest, as well as no water", "cutting grass 4-5 ft. high", dreadful scrub", "devil flies") we took an easier route, saw the Strath Creek memorial in ground fog and a wonderful "field of dreams", the Hume-Hovell privately owned cricket ground with its white picket boundary fence. Now, after a steep climb, in sunshine under gums we stretched and viewed magnificent rolling hills and fog-filled valleys - not "smoke from Aborigines' bush fires". After morning tea at Broadford we followed the Sunday Creek valley beside the Hume Freeway, passed the Wallan Wallan Rest Area (more appropriately Hume and Hovell Rest Area) to tum right at Beveridge. In Gellibrand Hill Park, near the headwaters of the Moonee Ponds Creek, we experienced the landscape the first European settlers saw - huge river red gums and rolling pastures. The gardens and sheltered courtyard of the 1840s, timber, brought from .....[?] prefabricated Woodlands Homestead, provided a pleasant lunch stop. We enjoyed a private tour, panoramic views over Melbourne and surroundings and the excitement of arriving and departing aircraft. Our next river crossing was at Werribee, "in a vast treeless plain", then we drove on by-ways no coach had previously travelled, to find "an immense sheet of water" salty Corio Bay, off-course to the west. In late afternoon of a super, calm, late autumn day we headed homewards. Back at Eltham we were rather surprised to find that we had travelled a total of 347 km. Thanks again to Russell Yeoman for his research and organization. What a wonderful day! Colour photographactivities, broadford, hume and hovell, monument -
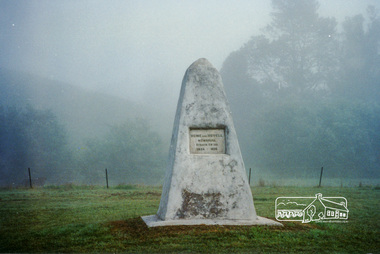 Eltham District Historical Society Inc
Photograph, Strath Creek, Autumn Excursion, Hume and Hovell's 1824 expedition, 26 May 1996, 26/05/1996
[article by Bettina Woodburn in EDHS Newsletter No. 109, July 1996:] ON THE TRAIL OF HUME AND HOVELL - REPORT ON THE AUTUMN EXCURSION - On a green and fresh morning (Sunday 26th May 1996) the Cobb and Co coach (driven by the most obliging Peter Tampion) set off in a north easterly direction from Eltham to connect with Hume and Hovell's route on their 1824 explorations of central Victoria. The Society would follow a series of monuments erected for the 1924 centenary of the expedition from King Parrot Creek (Tuesday 7th December 1824), through Strath Creek, over Sunday Creek (Sunday 12th December 1824) at Broadford, Tullamarine, St Albans, Deer Park, through Werribee, skirting east of the You Yangs to Lara and Avalon Beach. Because their distance-measuring wheel had broken and a one degree mistake was made in calculations, the two leaders of the original group of six convict-companions arrived at Corio Bay, instead of the expected Western Port, discovered earlier by Flinders. From below Mt. Disappointment (Hume and Hovell's difficulties in "scrambling over brush and rock", "leeches in forest, as well as no water", "cutting grass 4-5 ft. high", dreadful scrub", "devil flies") we took an easier route, saw the Strath Creek memorial in ground fog and a wonderful "field of dreams", the Hume-Hovell privately owned cricket ground with its white picket boundary fence. Now, after a steep climb, in sunshine under gums we stretched and viewed magnificent rolling hills and fog-filled valleys - not "smoke from Aborigines' bush fires". After morning tea at Broadford we followed the Sunday Creek valley beside the Hume Freeway, passed the Wallan Wallan Rest Area (more appropriately Hume and Hovell Rest Area) to tum right at Beveridge. In Gellibrand Hill Park, near the headwaters of the Moonee Ponds Creek, we experienced the landscape the first European settlers saw - huge river red gums and rolling pastures. The gardens and sheltered courtyard of the 1840s, timber, brought from .....[?] prefabricated Woodlands Homestead, provided a pleasant lunch stop. We enjoyed a private tour, panoramic views over Melbourne and surroundings and the excitement of arriving and departing aircraft. Our next river crossing was at Werribee, "in a vast treeless plain", then we drove on by-ways no coach had previously travelled, to find "an immense sheet of water" salty Corio Bay, off-course to the west. In late afternoon of a super, calm, late autumn day we headed homewards. Back at Eltham we were rather surprised to find that we had travelled a total of 347 km. Thanks again to Russell Yeoman for his research and organization. What a wonderful day! Colour photographactivities, monument, hume and hovell, murchison valley, strath creek -
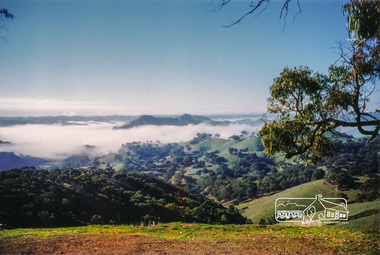 Eltham District Historical Society Inc
Photograph, Murchison Gap viewed from Strath Creek, Autumn Excursion, Hume and Hovell's 1824 expedition, 26 May 1996, 26/05/1996
[article by Bettina Woodburn in EDHS Newsletter No. 109, July 1996:] ON THE TRAIL OF HUME AND HOVELL - REPORT ON THE AUTUMN EXCURSION - On a green and fresh morning (Sunday 26th May 1996) the Cobb and Co coach (driven by the most obliging Peter Tampion) set off in a north easterly direction from Eltham to connect with Hume and Hovell's route on their 1824 explorations of central Victoria. The Society would follow a series of monuments erected for the 1924 centenary of the expedition from King Parrot Creek (Tuesday 7th December 1824), through Strath Creek, over Sunday Creek (Sunday 12th December 1824) at Broadford, Tullamarine, St Albans, Deer Park, through Werribee, skirting east of the You Yangs to Lara and Avalon Beach. Because their distance-measuring wheel had broken and a one degree mistake was made in calculations, the two leaders of the original group of six convict-companions arrived at Corio Bay, instead of the expected Western Port, discovered earlier by Flinders. From below Mt. Disappointment (Hume and Hovell's difficulties in "scrambling over brush and rock", "leeches in forest, as well as no water", "cutting grass 4-5 ft. high", dreadful scrub", "devil flies") we took an easier route, saw the Strath Creek memorial in ground fog and a wonderful "field of dreams", the Hume-Hovell privately owned cricket ground with its white picket boundary fence. Now, after a steep climb, in sunshine under gums we stretched and viewed magnificent rolling hills and fog-filled valleys - not "smoke from Aborigines' bush fires". After morning tea at Broadford we followed the Sunday Creek valley beside the Hume Freeway, passed the Wallan Wallan Rest Area (more appropriately Hume and Hovell Rest Area) to tum right at Beveridge. In Gellibrand Hill Park, near the headwaters of the Moonee Ponds Creek, we experienced the landscape the first European settlers saw - huge river red gums and rolling pastures. The gardens and sheltered courtyard of the 1840s, timber, brought from .....[?] prefabricated Woodlands Homestead, provided a pleasant lunch stop. We enjoyed a private tour, panoramic views over Melbourne and surroundings and the excitement of arriving and departing aircraft. Our next river crossing was at Werribee, "in a vast treeless plain", then we drove on by-ways no coach had previously travelled, to find "an immense sheet of water" salty Corio Bay, off-course to the west. In late afternoon of a super, calm, late autumn day we headed homewards. Back at Eltham we were rather surprised to find that we had travelled a total of 347 km. Thanks again to Russell Yeoman for his research and organization. What a wonderful day! Colour photographactivities, hume and hovell, murchison valley, murchison gap, strath creek -
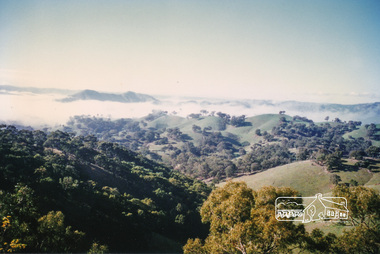 Eltham District Historical Society Inc
Photograph, Murchison Gap viewed from Strath Creek, Autumn Excursion, Hume and Hovell's 1824 expedition, 26 May 1996, 26/05/1996
[article by Bettina Woodburn in EDHS Newsletter No. 109, July 1996:] ON THE TRAIL OF HUME AND HOVELL - REPORT ON THE AUTUMN EXCURSION - On a green and fresh morning (Sunday 26th May 1996) the Cobb and Co coach (driven by the most obliging Peter Tampion) set off in a north easterly direction from Eltham to connect with Hume and Hovell's route on their 1824 explorations of central Victoria. The Society would follow a series of monuments erected for the 1924 centenary of the expedition from King Parrot Creek (Tuesday 7th December 1824), through Strath Creek, over Sunday Creek (Sunday 12th December 1824) at Broadford, Tullamarine, St Albans, Deer Park, through Werribee, skirting east of the You Yangs to Lara and Avalon Beach. Because their distance-measuring wheel had broken and a one degree mistake was made in calculations, the two leaders of the original group of six convict-companions arrived at Corio Bay, instead of the expected Western Port, discovered earlier by Flinders. From below Mt. Disappointment (Hume and Hovell's difficulties in "scrambling over brush and rock", "leeches in forest, as well as no water", "cutting grass 4-5 ft. high", dreadful scrub", "devil flies") we took an easier route, saw the Strath Creek memorial in ground fog and a wonderful "field of dreams", the Hume-Hovell privately owned cricket ground with its white picket boundary fence. Now, after a steep climb, in sunshine under gums we stretched and viewed magnificent rolling hills and fog-filled valleys - not "smoke from Aborigines' bush fires". After morning tea at Broadford we followed the Sunday Creek valley beside the Hume Freeway, passed the Wallan Wallan Rest Area (more appropriately Hume and Hovell Rest Area) to tum right at Beveridge. In Gellibrand Hill Park, near the headwaters of the Moonee Ponds Creek, we experienced the landscape the first European settlers saw - huge river red gums and rolling pastures. The gardens and sheltered courtyard of the 1840s, timber, brought from .....[?] prefabricated Woodlands Homestead, provided a pleasant lunch stop. We enjoyed a private tour, panoramic views over Melbourne and surroundings and the excitement of arriving and departing aircraft. Our next river crossing was at Werribee, "in a vast treeless plain", then we drove on by-ways no coach had previously travelled, to find "an immense sheet of water" salty Corio Bay, off-course to the west. In late afternoon of a super, calm, late autumn day we headed homewards. Back at Eltham we were rather surprised to find that we had travelled a total of 347 km. Thanks again to Russell Yeoman for his research and organization. What a wonderful day! Colour photographactivities, hume and hovell, murchison valley, murchison gap, strath creek