Showing 299 items
matching bridge section
-
 Ballarat Tramway Museum
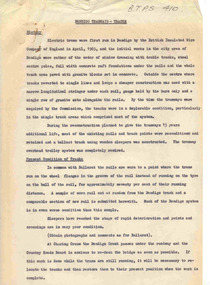
Document - Report, State Electricity Commission of Victoria (SECV), "Bendigo Tramways Track", 1960's
Yields historical notes about the method of track construction in Bendigo, the poor condition of the rails at the time of the report and the need to do work at Charing Cross.Typed foolscap sheet note or report titled "Bendigo Tramways - Tracks". Gives notes on the track construction methods of ESCo and reconstruction by the SEC. In the section titled 'Present Condition of Tracks". Note says need to obtain photographs and comments as for Ballarat. Also mentions that the CRB is anxious to re-deck the bridge running under Charing Cross - written date? Probably written for a report into the tramways by the SEC as part of a recommendation to close them. Appears to have been written in Ballarat, no mention of Geelong, so assume sometime in the 1960's.'BTPS 410" in top right hand corner.trams, tramways, bendigo, sec, esco, history, track, charing cross -
 Ballarat Tramway Museum
Film - Movie Film & Box, Kodak, 1960
Yields information in movie film format of Ballarat trams in 1960, how the system operated and was used by people., Yields information in movie film format of Ballarat trams in 1960, how the system operated and was used by people.Movie film - 8mm, approx. 30mins, with leader strip on a plastic reel, within a black and white plastic box, titled "Ballarat No. 1. 1960". Has been transferred to DVD - see Reg item 4100 as Segment No. 2. Made by Ben Parle. Also transferred to DVD by Rod Cook Oct. 2015, via Roger Greenwood for use in his DVD, "The City of Ballarat Trams, Gardens & Gold" of 2016. See Reg Item 6883. Synopsis: based on time. 0:00 View of typed introduction, noting that this is a pictorial record of Ballarat. 0:10 Title “The Tramways of Ballarat 1960, Part 1” 0:16 13, showing “View Point” at Stones Corner, Bridge St, east end, with trolley pole being turned, while another single trucker heads out towards Mt Pleasant. 0:25 13 leaving Stones Corner, short approach and then longer trailing shot of the tram going towards the City in Bridge St. 0:44 View out of front of tram in Bridge St heading towards the City, with cars in the photo, then passing through city Loop, no trams in the loop and running up to Lydiard St Nth and crossing the road. 1:22 Running up Sturt St from Armstrong St, passes over Dawson St X-over and up to the next intersection, Lyons St. 1:54 Title “The View Point Line” 1:59 19 inbound, in Ripon St, from crossing Mair St, towards camera and then passing away and turning into Sturt St. 2:49 View of a “Warning Oncoming Trams” sign 2:52 19 in Ripon St, going to View Point, crossing Webster St towards camera, then going away through the disconnected Victoria Ave loop, pass the “Warning Oncoming Trams” sign. Note very windy scene with people running across roads. 3:17 19 in Wendouree Parade, in bound, though showing destination View Point, going away from the camera, past the View Point Hotel. 3:39 19 coming towards camera near Excerpt or Devon St and then going away towards the terminus. 4:04 19 at the terminus, stationary, with a single trucker 3?, passing from Macarthur St into Wendouree Parade, behind 19. 4:20 33 coming towards camera in Wendouree Parade from St Aidans Drive, stopping to pick up passenger at Forest St and then going away towards the City, photographed from near the depot, on a wet and windy day. 4:54 35 in Wendouree Parade, coming towards the Camera from St Aidans Drive and then going away with the Gardens Loop area in the background. Tram stops at stop to let a passenger off. 5:28 21 leaving Gardens Loop for the City via the Depot, green light in signal can be seen. 5:43 28?, closely followed by 26 turn from Drummond St South into Sturt St. 6:18 Scene opens with shot of “Sebastopol” destination on a bogie tram. 6:21 Title “The Sebastopol Line” 6:24 21 turning from Sturt St into Drummond St Sth with destination of Bell St and then going away from the camera. 6:55 38 in Drummond St Sth, coming towards the camera and then passing the camera with Sturt St just in the view. 7:10 21, showing Gregory St, in Drummond St Sth, approaching and then going away, entering the Urquhart St Loop, 7:39 34 in Drummond St Sth (location check required (Latrobe?)), approaches camera, picks up passengers and the goes away. 8:09 39 at ? Street, turns from Drummond St Sth into Skipton St, after picking up and setting down passengers, bound for Sebastopol 8:55 35 inbound in Skipton St passes through the Bell Street Loop, and then goes away from the camera. 9:33 42 outbound in Skipton St, approaches the camera, passes and then crosses over the half the road into Albert St. 10:00 39 inbound in Albert St – location? 10:31 34 outbound for Sebastopol, approaches camera and just starts to pass by. 10:36 34 in Grey St crossing loop, crosses 42 inbound. 10:59 39 outbound in Albert St, with shopping centre in bound, approaches camera, passes and then crosses over Albert St. Mid morning scene. 11:39 39 inbound, Albert St south, approaches camera and then passes and the crosses over Albert St. 12:16 41 outbound in Albert St passes the camera, and pulls into the terminus with the conductor getting out on the back bumper to pull the pole down as the tram stops and a passenger walks into the Royal Hotel. 12:39 Title “The Lydiard Street North Line” 12:44 Filmed from the Hotel balcony, 21 inbound in Lydiard St Nth passes over Mair St, stops while 33 passes in the other direction. 13:18 With the red light showing on the Seymour St loop signal, 33 inbound for Sebastopol stops and picks up many passengers, passes the camera and runs past the VRI building in the background and through the loop. Possibly filmed on a Sunday given the ladies dresses and quieter streets. 14:01 30 outbound, passes the camera and stops at Macarthur St. Filmed alongside the brick wall of the cutting. 14:28 30 inbound arrives, passes through the Gregory St loop and then proceeds past the camera, making a stop to pick up passengers. 15:14 28 in Lydiard St Nth – location?, approaches and goes away from the camera, north of Gregory St. 15:34 28 ditto location? 15:53 21 arrives at the terminus with passengers getting on and off. 16:11 View of the a vertical positioned “End of Section” sign on a pole at the terminus and then lifting the camera to see the timetable board and the stop sign. 16:33 31 in Bridge St passing Morseheads and then turning into Sturt St, stops at the Grenville St stop, while another single trucker comes down to the stop from the City. 16:58 31 outbound in Bridge St, with destination of Victoria St. 17:14 Title “The Victoria Street Line” 17:18 31 outbound to Victoria St from Stones Corner. Starts with an overhead shot, shows clock at the Caltex service station,. 17:37 31 inbound approaching Bakery Hill and then descending to the junction after it passes camera. 18:09 25 climbing outbound in Victoria St, passing the camera, to then pass through the King St loop. 18:47 25 inbound in Victoria St, passing the camera, then pass through the King St loop, with St Alypius Church in the background. 19:36 14 approaching the rail bridge in Victoria St and stopping at the 2nd last stop to left of passengers. 20:01 14 leaving the terminus and approaching the camera and the a short sequence going away, to the next stop to pick up quite a few passengers. 20:14 “Trams Stop Here” sign, metal wrap around on a steel pole. 20:16 Title “The Mount Pleasant Line” 20:21 11 inbound in Main St, with a passenger leaping off the tramcar and another getting off just before the junction. 20:45 11 passes the junction and then proceeds away from the camera in Bridge St. 21:04 30 outbound in Main St, then turns into Barkly St, a bus (Eclipse Motors) passes in Main St just before the sequence ends. 21:31 30 inbound near Steinfield St. (exact location?) 21:49 25 approaches the camera, then proceeds away and passes through the Grant St. loop. 22:29 25 inbound, windy day, between Grant and Cobden, (exact location?), with a horse drawn bread van in the view and the breadman walking behind the tram as it passes. 23:02 11 outbound in Barkly St, (exact location?) 23:37 11 inbound in Barkly St (exact location?) 23:44 Mt Pleasant terminus signage 23:50 30 approaches the terminus and then stops with the conductor alighting turning the pole, passengers getting on and off and the driver appearing at the other end. 24:32 Title “The Gardens Via Sturt St. West Line” 24:35 21 outbound in Sturt St near Raglan St, approaches and passes the Camera. 25:09 12, showing City Oval, approaches and passes the camera, outbound near Windermere St. 25:33 13 showing View Point, goes away from the camera – location? 25:44 12 comes from St. West, inbound passes the camera and then stop as the next stop next Talbot St? 26:21 Short sequence of a “Warning Oncoming Trams” sign 26:28 42 inbound in Sturt St West, just before Ripon St, view coming towards camera and then going away to cross Ripon St. 27:10 34 passes through the Parker St loop 27:25 35 or 39 inbound past the college in Sturt St West 28:04 41 outbound at the Russell St curve, passes away from the camera. 28:11 35? inbound passes away from the camera through the Victoria Park or Morrison St loop, swinging out into the roadway. 28:29 View of timetable sign at Hamilton Ave. 28:37 35 turning from Sturt St West into Hamilton Ave, can see the conductor changing over the barrier rails. 29:11 42 inbound, crosses another bogie tram (35?) at Carlton St loop then passes the camera and goes past the Olympic rings monument. 29:42 12 approaches the Carlton St gates. 30:07 12 outbound, crosses a bogie tram in the loop with both trams then leaving the loop. 30:20 Title “End of Part One” Written labels giving title information on outside of box.trams, tramways, ballarat, sebastopol, lydiard st north, victoria st, mt pleasant, sturt st west -
 Ballarat Tramway Museum
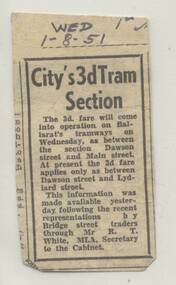
Newspaper, The Courier Ballarat, "City's 3d Tram Section", 1/08/1951 12:00:00 AM
Yields information about the introduction of the 3d city section ticket in 1951.Newspaper clipping dated 1-8-51, re introduction of 3d City Section between Dawson St and Main St. to come into use on Wednesday 1-8-51??, requested by Bridge St. traders. From The Courier, titled "City's 3d Tram Section". Record updated and images added 21/8/2013.In ink "Wed 1-8-51"trams, tramways, 3d city section, ballarat trams, tickets -
 Ballarat Tramway Museum
Book, State Electricity Commission of Victoria (SECV), "Electric Tramways Amendment to By-Law June 1963", Jun. 1963
Demonstrates aspects of the SEC governance system in issuing By-laws for the travelling public, as part of their Act. Yields information about fares charged for tram services in Ballarat and Bendigo. Issued to crews.Booklet with orange card cover and 12 pages, numbered 1 to 10, side stapled, off set printed giving details of fares, revised in June 1963 for both Ballarat and Bendigo, to come into force on 1/8/1963. Has details of sections etc. Was shown as being approved by the Governor in Council on 25/6/1963. Adjust the City Section fares only. See Alan Bradley notes in references re this. Full pdf copy added 28/5/2019. Alan Bradley advised 25/4/2005. In the "Courier" of 26/6/1963, the adjustments to fares from 1/8/1963 were announced. They were only for adjustments to city section fares. Fares outside the city area remained unchanged. The SEC promoted these as being cheaper city section fares. Tom Evans gave me a copy of a poster showing a Scotsman boarding a tram. The caption was: "Now! It's cheaper to travel by tram! Beats walking every time!" New economy city fares. From Dawson St to the Railway Station return, & from Dawson St to the east end of Bridge St or return, 4d. From the intersection of Lydiard & Sturt Sts - To Dawson St, east end Bridge St, to Railway Station 3d. trams, tramways, secv rules, by-laws, tickets, fares -
 Kew Historical Society Inc
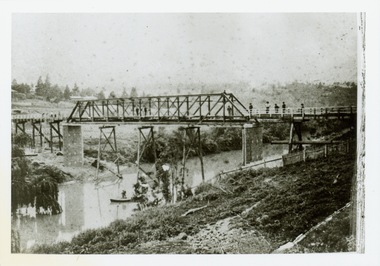
Print - Walmer Street Foot Bridge
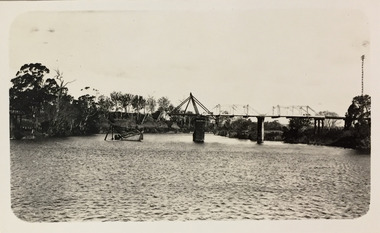
A bridge to Walmer Street, Kew, from Abbotsford was located at the northern end of Burnley Street. It was a foot bridge.Photographic print of the Walmer Street Bridge. The view of the Bridge is from the Abbotsford side of the Yarra. A section of pipe on the near side of the bridge is a remnant of the irrigation pipes that carried water from above Dight's falls to the Melbourne Botanic Gardens. The former bridge, constructed in 1896 was swept away in the 1901 Flood. It has two major brick piers while the remainder of the trestle supports are metal. The original photograph from which this copy was made was taken after 1901 as it shows the second bridge under construction. Houses in Young Street, Kew, can be seen on the far side of the river.Written on reverse: "Walmer St. Bridge. Erected 1896. Being rebuilt after 1901 flood damaged it. Houses on left are in Young St."bridges -- kew (vic.), walmer street bridge, melbourne botanic gardens -
 Kew Historical Society Inc
Print - Walmer Street Foot Bridge, 1901
Photographic print of the Walmer Street Bridge. The view of the Bridge is from the Abbotsford side of the Yarra. A section of pipe on the near side of the bridge is a remnant of the irrigation pipes that carried water from above Dight's falls to the Melbourne Botanic Gardens. The former bridge, constructed in 1896 was swept away in the 1901 Flood. It has two major brick piers while the remainder of the trestle supports are metal. The original photograph from which this copy was made was taken after 1901 as it shows the second bridge under construction. Houses in Young Street, Kew, can be seen on the far side of the river.Reverse: " Walmer St footbridge 1901 being repaired after flood / Constructed 1892 substantially renewed in 1901 and in 1928 / Rebuilt in 1977 by Kew Council aided by State funding. Won for designer Martin Aylard a New Zealand award presented by the timber Research & Development Assoc / Site of Simpsons Road passenger foot ferry". bridges - yarra river -- kew (vic.), walmer street bridge -- kew (vic.) -
 Kew Historical Society Inc
Plan - Charteris Estate, Ivanhoe [East], 1927
Subdivision plans and real estate flyers/brochures reveal a number of aspects of urban development and history. The Kew Historical Society's collection of these plans, as well as advertisements extracted from magazines, cover key aspects of community development and architectural history of Kew and Kew Eat as well as surrounding suburbs. While most of the plans in the collection were gifted to the Society by the former City of Kew, a number of other plans and advertisements have been donated by individuals, of which this is an example.Original 4-page bifold handout advertising 43 residential lots for sale in the Charteris Estate subdivision in Ivanhoe [now classified as Ivanhoe East]. This brochure was created to sell the third section of the estate which it labels as 'The Most Superb Section'. Streets within the subdivision include: Burke Road North, McArthur Road, Castella Street, and the Government Boulevard. In addition to the overall plan spread across pages 2 and 3, each page includes a number of interesting photographs including: a number of the new Burke Road Bridge, a sports ground, Hoyts Picture Theatre in Ivanhoe, a croquet ground, and Ivanhoe shopping centre [named Motor Cross Junction].charteris estate - east ivanhoe (vic), subdivision plans -- ivanhoe east (vic.), d.c. mcarthur, charterisville -
 Kew Historical Society Inc
Photograph - Victorian Canoe Club, Salvaging wrecked canoe, 1930–35
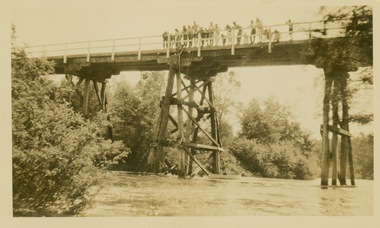
Canoeing on the River Yarra at Melbourne was an important and widespread recreational pursuit for Melbournians, especially in the first half of the twentieth century. The Victorian Canoe Club was formed in 1912 at a meeting in Melbourne and its first committee elected in the same year. Records indicate that the Club continued into at least the 1950s .The photos in this album are historically and socially significant as a record of recreational activities in the first half of the twentieth century. A number of photographs in the album provide views of sections of the Yarra, as well as areas in regional Victoria, that may otherwise be unavailable.One of 12 sepia [faded] photographs of members of the Victorian Canoe Club. This photo was taken by a member of the club showing club members on a canoeing trip standing on a trestle bridge, with others, attempting to salvage a wrecked canoe."Salvaging wrecked canoe"victorian canoe club, travel -- 1930s, canoeing -
 Kew Historical Society Inc
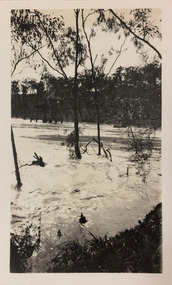
Photograph - Flood, Zig-Zag, Kew, 1924
Henry Beater Christian (1886-1962) , was a descendant of one of the earliest settler families in Kew. Employed at the Kew Asylum as a 'public servant', he was a skilled amateur photographer, photographing numerous scenes in Kew and on his travels around Victoria. The majority of his photographs date from 1916 to 1929. His finest photographs are housed in two photograph albums. Digital copy of a photograph from page 5 of the 47-page photograph album containing 261 gelatinous silver images, loaned by Diane Washfold with permission given to digitise and hold a copy in our collection. This is a photograph of the river at Kew during a flood in January 1924. A section of the Zig-Zag Bridge can be seen in the distance. "Flood / Zig-Zag Kew / 1.24"henry beater christian (1886-1962), landscape photography, kew (vic.) — yarra river, christian-washfold collection, photograph albums, floods -- yarra river -- kew (vic.), zig-zag bridge -
 Kew Historical Society Inc
Photograph - Bridge over the Tambo River, 1926
Henry Beater Christian (1886-1962) , was a descendant of one of the earliest settler families in Kew. Employed at the Kew Asylum as a 'public servant', he was a skilled amateur photographer, photographing numerous scenes in Kew and on his travels around Victoria. The majority of his photographs date from 1916 to 1929. His finest photographs are housed in two photograph albums. Digital copy of a photograph from page 31 of the 47-page photograph album containing 261 gelatinous silver images, loaned by Diane Washfold with permission given to digitise and hold a copy in our collection. John Chapman has written in 'Bushwalking Clubs - A Brief History', about the establishment in Victoria of the first bushwalking club in 1888, and the popularisation of bushwalking during the interwar period. Henry Christian's 'walks' appear to have been undertaken solely or with a companion/s. This black and white photo is part of a group of six photos taken on an 18 kilometre walking trip between Bruthen and Swan Reach in East Gippsland in 1926. The route of the walk followed the Tambo River. The photographer has focussed the view on a ruined bridge, presumably caused by a flood, crossing the river. Sections of the left hand pier and span can be seen in the river."BRUTHEN TO SWAN REACH 1926"henry beater christian (1886-1962), landscape photography, christian-washfold collection, photograph albums, bushwalking, bruthen, swan reach, tambo river, east gippsland -
![The Fairfield Bridge [circa 1891]](/media/collectors/550653872162f11fb04854aa/items/579eab98d0cdd117c4af1c89/item-media/579eac23d0cdd117c4afb1ad/item-fit-380x285.jpg) Kew Historical Society Inc
Kew Historical Society IncPrint, The Fairfield Bridge [circa 1891], c. 1891
This work forms part of the collection assembled by the historian Dorothy Rogers, that was donated to the Kew Historical Society by her son John Rogers in 2015. The manuscripts, photographs, maps, and documents were sourced by her from both family and local collections or produced as references for her print publications. Many were directly used by Rogers in writing ‘Lovely Old Homes of Kew’ (1961) and 'A History of Kew' (1973), or the numerous articles on local history that she produced for suburban newspapers. Most of the photographs in the collection include detailed annotations in her hand. The Rogers Collection provides a comprehensive insight into the working habits of a historian in the 1960s and 1970s. Together it forms the largest privately-donated collection within the archives of the Kew Historical Society.A reproduction of a photograph of the Fairfield Bridge. The bridge was one of the first constructed for the Outer Circle Railway in 1891. Its supervising engineer was [Sir] John Monash. The bridge was later to be repurposed as a road linking the Chandler Highway to Fairfield."Outer Circle Railway Bridge over River Yarra at Fairfield (last section of line opened 1891)"fairfield bridge, chandler highway bridge, dorothy rogers, john monash, outer circle railway -
 Kew Historical Society Inc
Plan, Melbourne & Metropolitan Board of Works : Borough of Kew : Detail Plan No.1302, 1910
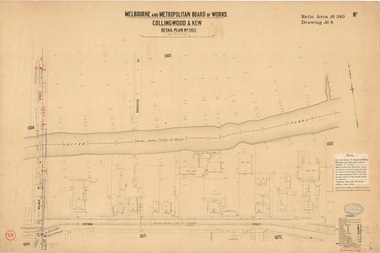
The Melbourne and Metropolitan Board of Works (MMBW) plans were produced from the 1890s to the 1950s. They were crucial to the design and development of Melbourne's sewerage and drainage system. The plans, at a scale of 40 feet to 1 inch (1:480), provide a detailed historical record of Melbourne streetscapes and environmental features. Each plan covers one or two street blocks (roughly six streets), showing details of buildings, including garden layouts and ownership boundaries, and features such as laneways, drains, bridges, parks, municipal boundaries and other prominent landmarks as they existed at the time each plan was produced. (Source: State Library of Victoria)This plan forms part of a large group of MMBW plans and maps that was donated to the Society by the Mr Poulter, City Engineer of the City of Kew in 1989. Within this collection, thirty-five hand-coloured plans, backed with linen, are of statewide significance as they include annotations that provide details of construction materials used in buildings in the first decade of the 20th century as well as additional information about land ownership and usage. The copies in the Public Record Office Victoria and the State Library of Victoria are monochrome versions which do not denote building materials so that the maps in this collection are invaluable and unique tools for researchers and heritage consultants. A number of the plans are not held in the collection of the State Library of Victoria so they have the additional attribute of rarity.Original survey plan, issued by the MMBW to a contractor with responsibility for constructing sewers in the area identified on the plan within the Borough of Kew. The plan was at some stage hand-coloured, possibly by the contractor, but more likely by officers working in the Engineering Department of the Borough and later Town, then City of Kew. The hand-coloured sections of buildings on the plan were used to denote masonry or brick constructions (pink), weatherboard constructions (yellow), and public buildings (grey). The absence of buildings and or property in Kew facing the Yarra is the most notable feature of this plan. Walmer Street and its bridge stretched, then and now, from Studley Park Road to Victoria Street, Richmond. On the Richmond side of the Yarra, there was evidence in 1904 of industry (‘Wool shed’; Soap Works’) and entertainment (‘Skittle Alley’). In reality, another Plan (No.1303) shows Chinese Gardens bordering the Yarra on the Kew side and buildings in Young Street.melbourne and metropolitan board of works, detail plans, mmbw 1302, cartography -
 Kew Historical Society Inc
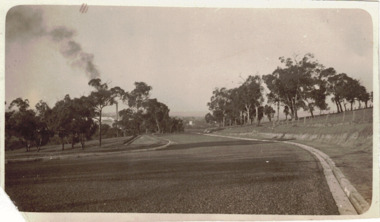
Photograph - The Boulevard at Kew, 1937
The Yarra Scenic Boulevard stretching from Hawthorn to the Chandler Highway was completed as a major project between 1933 and 1936 during a period of significant unemployment. Key dates in the construction this section the road include: 1933 when Kew Council supported the construction of the road from Studley Park to the Kew Asylum; and 1936 when the road from the Johnston Street Bridge to the Chandler Highway was opened. The inscription on the reverse of the photo 'Boulevard Fairfield' is misleading as there is no section of the Boulevard in Fairfield. A more likely interpretation is that it is a photograph of the Kew section of the Yarra Boulevard with the factories of Fairfield in the distance.Rare early photograph of the Yarra Boulevard, taken one year after the opening of the road. The photograph is an important historical record of the results of 'Susso' labor in the creation of major works in Melbourne by the Victorian Government. Original, black and white positive print of the Boulevard at Kew in 1937. Key aspects to note about the photograph is that the road is bituminised; that the gutters are concreted; that the kerb is constructed of concrete blocks; and that there is an unmade footpath on what appears to be the right hand side of the road. The landscape is sparsely treed, and those trees that remain are presumably remnant vegetation. At the right, the land is fenced. The land at the left falls away sharply to the river below. On the horizon, at left, there is an industrial complex including a tall chimney that is burning fuel creating smoke. "Boulevard Fairfield" great depression, susso projects, roads -- kew (vic.), yarra boulevard, yarra valley -
 Sunbury Family History and Heritage Society Inc.
Photograph
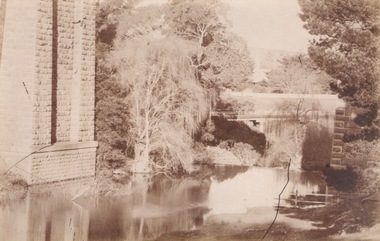
The photograph shows a section go the Jacksons Creek at Sunbury where it is spanned by the high arched Rupertswood railway bridge north of the town on the Bendigo line. The Melbourne to Bendigo rail line has a number of significant bridges along its route, five of which can be seen in Sunbury.A sepia photograph in post card format of a river flowing under a bridge. There is a partial view of the tall pylon on the LHS of the image.jacksons creek, bridges -
 Melton City Libraries
Newspaper, Historic Homestead Vandalised, 1990
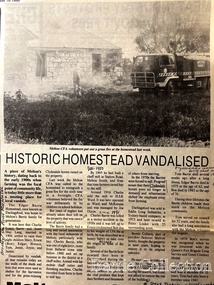
Edna Barrie describes the Darlingsford property. C.E. Barrrie Land developers bought the property from my husband’s brother. It was one big farm and they were a big family. When the father died he left it to be cut up for the family. The youngest son had to reach age 21 before the property could be divided and portioned out to the mother and children, but it was deferred until Jim returned from the war. Eventually it was cut up into two parts, we were married by then and so was Edgar. Part of the land included the block on the other side of Ferris road, which became the quarry, Edgar’s section was on the Toolern Creek end, he was the last one married and lived in the old bluestone house until 1974. The developers bought this section but they could not get permits due to the state of the old bridge due to the cost. Barries had built the bridge across the creek [1926]. It took the big loads of hay and the family kept it maintained. Once the Barries had gone it did not get any upkeep. The developers found the cost of replacing the bridge and developing site with sewerage and drainage power before they sell. The rural land itself is not worth much as the developer has to complete the subdivision before any blocks can be sold. The developer from Sydney had a man living in the house, who let it go the rack and ruin. He managed to buy from the developer 25 acres with the bluestone house. Bernard Coburn had it for a while but is was well out of our hands by then. There were various people who have bought into and tried to develop and have given up. There was a project sometime ago to save the buildings from ruin but nothing has happened as yet, they are six or seven years to late. The buildings continue to deteriorate and were badly damaged vandals and fire. The Shire bought all the rest of it from the developer, where the tip is now, that was also part of Edgars land. Article about a fire at Darlingsford Estate featured in the Telegraphlocal architecture, local identities, emergency services -
 Melton City Libraries
Photograph, Melton Railway Bridge, c.1884
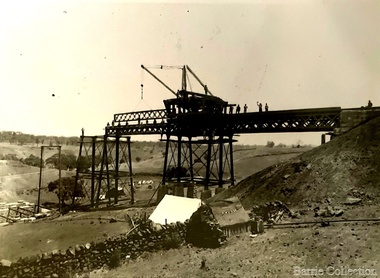
"The Melton Viaduct, opened in 1886, is of State heritage significance as a very large and visually distinctive wrought iron, lattice girder trestle bridge over the Werribee River (now Melton Reservoir). It comprises 18.3 and 9.1 metre spans, in a generally alternate arrangement, of total length 375 metres, and standing 38 metres over the Werribee River. Wrought iron small section iron was used to build tension trussed trestle legs, which supported four lines of rivetted wrought-iron deck-type double lattice trusses. It has bluestone abutments and pier bases of coursed rock-faced bluestone with drafted margins. The larger half-piers, now usually submerged in the Melton Reservoir have sharp tapered cutwaters and curved coping at the tops. While designed to carry two rail tracks it has only ever been used as a single track line. Despite several alterations to its deck structure, it remains an outstanding example of a lighter structural design employing open metal trestle supports and metal truss girders. The direct Melbourne to Ballarat railway link of which the Melton viaduct was the major engineering work contributed significantly to the history and development of Victoria. This new link reflected Ballarat’s diversifying economy as well as the commercial and political influence of the metropolis. Construction of the bridge, and the associated large workers camp, were extensively photographed, documenting an important episode in local history. The railway enabled the development of new industries in the Melton area, notably the timber industry and a chaff industry of national importance, greatly facilitated the later transition of the Shire from a pastoral to a farming economy, and struck a major blow to Melton township’s era as a wayside town servicing Ballarat road (especially coach) traffic". Melton Railway Bridge being built across the Werribee Rivertransport -
Tarnagulla History Archive
Registration of Birth form, 1871
A large lot of papers, including this and many other birth and death registration forms, were apparently found in the ceiling cavity of the Sandy Creek/Tarnagulla Post and Telegraph Office in the later 20th Century, during building works. Donald Clark Collection. Registration of Birth form for: Child's name: William Patterson Date of Birth: 5th Feb, 1871 Place of birth: Arnold's Bridge Father: John Patterson Mother: section lost -
 The Beechworth Burke Museum Research Collection
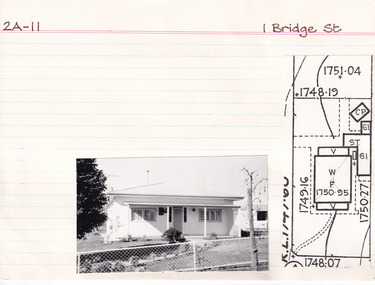
Card (Series) - Index Card, George Tibbits, 1 Bridge Street, Beechworth, 1976
George Tibbits, University of Melbourne. Faculty of Architecture, Building and Town & Regional PlanningIndex system that support the research for Beechworth : historical reconstruction / [by] George Tibbits ... [et al]Arranged by street names of BeechworthEach index card includes: street name and number of property, image of property, allotment and section number, property owners and dates of ownership, description of the property according to rate records, property floor plan with dimensions.beechworth, george tibbitsbeechworth, george tibbits -
 The Beechworth Burke Museum Research Collection
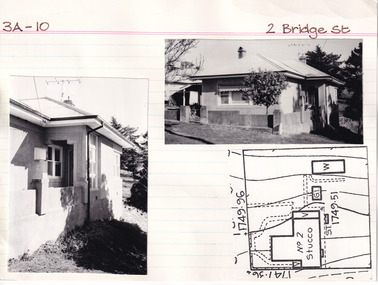
Card (Series) - Index Card, George Tibbits, 2 Bridge Street, Beechworth, 1976
George Tibbits, University of Melbourne. Faculty of Architecture, Building and Town & Regional PlanningIndex system that support the research for Beechworth : historical reconstruction / [by] George Tibbits ... [et al]Arranged by street names of BeechworthEach index card includes: street name and number of property, image of property, allotment and section number, property owners and dates of ownership, description of the property according to rate records, property floor plan with dimensions.beechworth, george tibbitsbeechworth, george tibbits -
 The Beechworth Burke Museum Research Collection
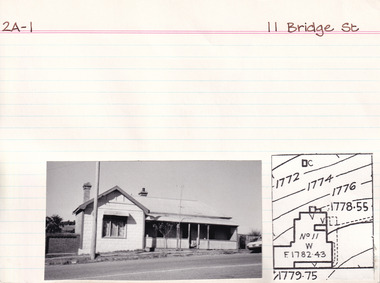
Card (Series) - Index Card, George Tibbits, 11 Bridge Street, Beechworth, 1976
George Tibbits, University of Melbourne. Faculty of Architecture, Building and Town & Regional PlanningIndex system that support the research for Beechworth : historical reconstruction / [by] George Tibbits ... [et al]Arranged by street names of BeechworthEach index card includes: street name and number of property, image of property, allotment and section number, property owners and dates of ownership, description of the property according to rate records, property floor plan with dimensions.beechworth, george tibbitsbeechworth, george tibbits -
 The Beechworth Burke Museum Research Collection
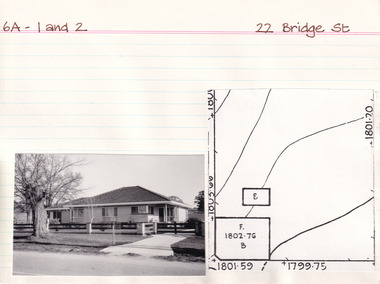
Card (Series) - Index Card, George Tibbits, 22 Bridge Street, Beechworth, 1976
George Tibbits, University of Melbourne. Faculty of Architecture, Building and Town & Regional PlanningIndex system that support the research for Beechworth : historical reconstruction / [by] George Tibbits ... [et al]Arranged by street names of BeechworthEach index card includes: street name and number of property, image of property, allotment and section number, property owners and dates of ownership, description of the property according to rate records, property floor plan with dimensions.beechworth, george tibbitsbeechworth, george tibbits -
 The Beechworth Burke Museum Research Collection
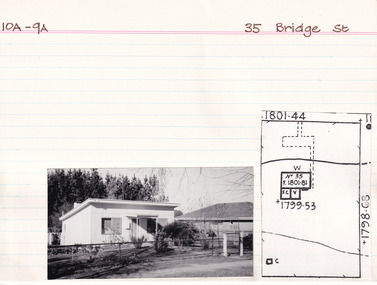
Card (Series) - Index Card, George Tibbits, 35 Bridge Street, Beechworth, 1976
George Tibbits, University of Melbourne. Faculty of Architecture, Building and Town & Regional PlanningIndex system that support the research for Beechworth : historical reconstruction / [by] George Tibbits ... [et al]Arranged by street names of BeechworthEach index card includes: street name and number of property, image of property, allotment and section number, property owners and dates of ownership, description of the property according to rate records, property floor plan with dimensions.beechworth, george tibbitsbeechworth, george tibbits -
 The Beechworth Burke Museum Research Collection
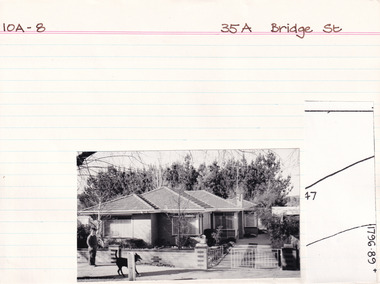
Card (Series) - Index Card, George Tibbits, 35A Bridge Street, Beechworth, 1976
George Tibbits, University of Melbourne. Faculty of Architecture, Building and Town & Regional PlanningIndex system that support the research for Beechworth : historical reconstruction / [by] George Tibbits ... [et al]Arranged by street names of BeechworthEach index card includes: street name and number of property, image of property, allotment and section number, property owners and dates of ownership, description of the property according to rate records, property floor plan with dimensions.beechworth, george tibbitsbeechworth, george tibbits -
 Wodonga & District Historical Society Inc
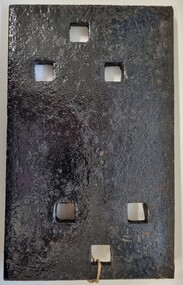
Functional object - Rail fish plate from Cudgewa Line, 1930 - 1960s
Cudgewa Line -The Cudgewa railway line opened in stages between 1889 and 1921. The first section from Wodonga to Huon opened on 10 September 1889. It was extended to Bolga on 18 July 1890, Tallangatta on 24 July 1891, Shelley on 13 June 1916 (the highest station in Victoria), Beetomba on 10 April 1919 and Cudgewa on 5 May 1921. The line had 1 in 30 grades and trestle bridges that have been heritage listed. In 1919, the line was used to carry materials for the construction of Hume Weir, and three years later a spur line connecting Ebden to the weir was opened. In the 1960s, Cudgewa became the railhead of materials for the Snowy Mountains Scheme. The last passenger service from Wodonga to Tallangatta ran on 30 September 1961. The turntable and passenger platform at Cudgewa were abolished in 1976. This fish plate came from the rails of the Cudgewa Line at Gordon Roy's hut which was situated behind Perry's Stump Hotel outside Wodonga. The hut was used as an office with the points lever outside to switch trucks to different tracks on the Bandiana and Cudgewa lines.This item is significant as it was part of the railway line to Cudgewa which played an important role in North east Victoria carrying freight during the construction of the Hume Weir and the Snowy Mountains Scheme.A section of flat plate. These plates were used in pairs to connect the ends of adjacent rails in railway track. victorian railways, cudgewa rail line, railway components -
 Wodonga & District Historical Society Inc
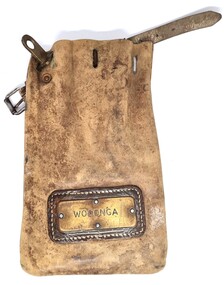
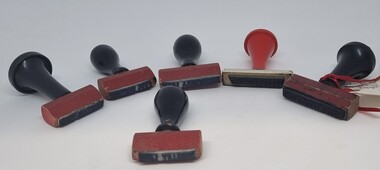
Functional object - Leather pouch and stamps - Cudgewa Railway Line
Cudgewa Line -The Cudgewa railway line opened in stages between 1889 and 1921. The first section from Wodonga to Huon opened on 10 September 1889. It was extended to Bolga on 18 July 1890, Tallangatta on 24 July 1891 and then to Shelley on 13 June 1916. Shelley was the highest station in Victoria. It extended further on to Beetomba on 10 April 1919 and finally reached Cudgewa on 5 May 1921. The line had 1 in 30 grades and trestle bridges that have been heritage listed. In 1919, the line was used to carry materials for the construction of Hume Weir, and three years later a spur line connecting Ebden to the weir was opened. In the 1960s, Cudgewa became the railhead of materials for the Snowy Mountains Scheme. The last passenger service from Wodonga to Tallangatta ran on 30 September 1961. The turntable and passenger platform at Cudgewa were abolished in 1976. These stamps were used by Joh Murray who for many years worked with Victorian Railways based at Wodonga.A leather pouch with belt and lock. It bears a metal name tag inscribed with name of railway station. The pouch contains 3 station stamps, a date stamp and 2 carriage keys.On pouch WODONGA On stamps: BONEGILLA 1470/ EBDEN 1471/ BANDOLIER 1473cudgewa rail line, victorian railways, closed victorian railways, railway stamps -
 Wodonga & District Historical Society Inc
Functional object - Railway Station stamps Cudgewa Line
Cudgewa Line -The Cudgewa railway line opened in stages between 1889 and 1921. The first section from Wodonga to Huon opened on 10 September 1889. It was extended to Bolga on 18 July 1890, Tallangatta on 24 July 1891 and then to Shelley on 13 June 1916. Shelley was the highest station in Victoria. It extended further on to Beetomba on 10 April 1919 and finally reached Cudgewa on 5 May 1921. The line had 1 in 30 grades and trestle bridges that have been heritage listed. In 1919, the line was used to carry materials for the construction of Hume Weir, and three years later a spur line connecting Ebden to the weir was opened. In the 1960s, Cudgewa became the railhead of materials for the Snowy Mountains Scheme. The last passenger service from Wodonga to Tallangatta ran on 30 September 1961. The turntable and passenger platform at Cudgewa were abolished in 1976.6 Rubber and wood stamps used in the stations along the Cudgewa Line. The stamps were primarily used to acknowledge receipt of small freight items carried on the Cudgewa LineOn individual stamps: 1. TALLANGATTA 1476 2. BULLIOH 1477 3. BEETOOMBA 1484 4. KOETONG 1480 5. SHELLEY 1482 6. CORRYONG 1487cudgewa rail line, victorian railways, closed victorian railways -
 Wodonga & District Historical Society Inc
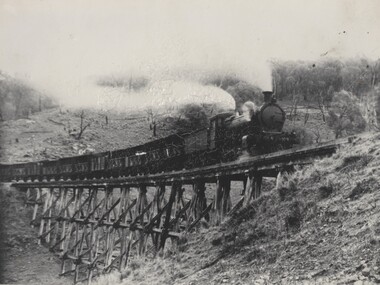
Photograph - Fred Rochow Railways Collection - Livestock Special, C. 1923 - 1940
The Fred Rochow Railways Collection incorporates photos related to the operation of the Wodonga Railway Station including different types of trains and railways staff C. 1930 – 1990. It was donated to the Wodonga Historical Society by Fred Rochow, a railwayman who spent many years based in Wodonga. He joined the Victorian Railways on 17th June l947 and retired in 1988. For some time, he was a member of the Australian Federated Union of Locomotive Enginemen and served a term as a member of the Trades Hall Council. He had an extensive knowledge of the struggles that took place to achieve better conditions for railway workers. Fred worked for many years as a fireman and then worked his way up the ranks to driver, experiencing many changes from the days of steam locomotives through to diesel trains, locomotives and even the modern XPT train. He worked throughout Victoria at different stages of his career, with his final working years focused on the northeast of Victoria and the Albury to Melbourne line. After his retirement, Fred continued to share his love of steam miniature trains with the community.This collection has local and statewide significance as it captures images of trains, locomotives and personnel who operated the railway services in Wodonga and throughout Northeast Victoria. The railways played a critical role in opening up Victoria and connecting Australia for trade, business, social communication and transport.A livestock special being hauled by Locomotive K109 passing over a high trestle bridge between Bullion and Darbyshire on the Cudgewa Line. Cudgewa Line -The Cudgewa railway line opened in stages between 1889 and 1921. The first section from Wodonga to Huon opened on 10 September 1889. It was extended to Bolga on 18 July 1890, Tallangatta on 24 July 1891, Shelley on 13 June 1916 (the highest station in Victoria), Beetomba on 10 April 1919 and Cudgewa on 5 May 1921. The line had 1 in 30 grades and trestle bridges that have been heritage listed. In 1919, the line was used to carry materials for the construction of Hume Weir, and three years later a spur line connecting Ebden to the weir was opened. In the 1960s, Cudgewa became the railhead of materials for the Snowy Mountains Scheme. The last passenger service from Wodonga to Tallangatta ran on 30 September 1961 The turntable and passenger platform at Cudgewa were abolished in 1976. The K class was a branch line steam locomotive that ran on Victorian Railways in Australia from 1922 to 1979 Locomotive K190 entered service on Saturday, 30th June 1923. In 1940 it was renumbered as K149 The locomotive was eventually scrapped on Thursday, 12th October 1967.railways wodonga, fred rochow, wodonga railwaymen, cudgewa rail line, trestle bridges -
 Wodonga & District Historical Society Inc
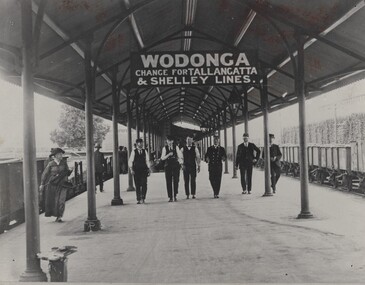
Photograph - Fred Rochow Railways Collection - Wodonga Railway Station, C. 1916 - 1930
The Fred Rochow Railways Collection incorporates photos related to the operation of the Wodonga Railway Station including different types of trains and railways staff C. 1930 – 1990. It was donated to the Wodonga Historical Society by Fred Rochow, a railwayman who spent many years based in Wodonga. He joined the Victorian Railways on 17th June l947 and retired in 1988. For some time, he was a member of the Australian Federated Union of Locomotive Enginemen and served a term as a member of the Trades Hall Council. He had an extensive knowledge of the struggles that took place to achieve better conditions for railway workers. Fred worked for many years as a fireman and then worked his way up the ranks to driver, experiencing many changes from the days of steam locomotives through to diesel trains, locomotives and even the modern XPT train. He worked throughout Victoria at different stages of his career, with his final working years focused on the northeast of Victoria and the Albury to Melbourne line. After his retirement, Fred continued to share his love of steam miniature trains with the community.This collection has local and statewide significance as it captures images of trains, locomotives and personnel who operated the railway services in Wodonga and throughout Northeast Victoria. The railways played a critical role in opening up Victoria and connecting Australia for trade, business, social communication and transport.Railway men walking along the Wodonga Railway Platform. The sign overhead advises of changes to the Tallangatta and Shelley lines. Cudgewa Line -The Cudgewa railway line opened in stages between 1889 and 1921. The first section from Wodonga to Huon opened on 10 September 1889. It was extended to Bolga on 18 July 1890, Tallangatta on 24 July 1891 and then to Shelley on 13 June 1916. Shelley was the highest station in Victoria. It extended further on to Beetomba on 10 April 1919 and finally reached Cudgewa on 5 May 1921. The line had 1 in 30 grades and trestle bridges that have been heritage listed. In 1919, the line was used to carry materials for the construction of Hume Weir, and three years later a spur line connecting Ebden to the weir was opened. In the 1960s, Cudgewa became the railhead of materials for the Snowy Mountains Scheme. The last passenger service from Wodonga to Tallangatta ran on 30 September 1961. The turntable and passenger platform at Cudgewa were abolished in 1976. On sign hanging overhead "WODONGA/ CHANGE FOR TALLANGATTA AND SHELLEY LINES"railways wodonga, fred rochow, wodonga railwaymen, cudgewa rail line, wodonga railway station -
 Wodonga & District Historical Society Inc
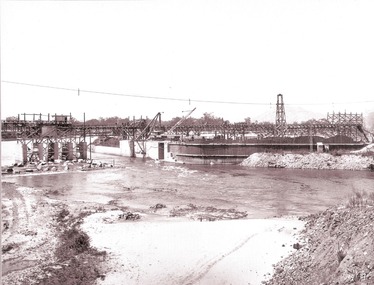
Album - Hume Reservoir Australia Album - Section of completed coffer dam, January 1927
This set of photos is from a leather bound album bearing the inscription "HUME RESERVOIR AUSTRALIA" plus 'The Rt. Hon. L. C. M. S. Amery, P. C., M .P.' all inscribed in gold. It was presented to The Rt. Hon. L. C. M. S. Amery, P. C., M. P, Secretary of State for Dominion Affairs on the occasion of his visit to the Hume Reservoir on 2nd November 1927. This album is of local and national significance as it documents the planning and development of the Hume Reservoir up to 1927. It was the largest water reservoir in the British Empire. The album records the pioneering engineering work that went into its construction.DEPARTMENT OF PUBLIC WORKS, N.S.W. RIVER MURRAY WATERS SCHEME. HUME RESERVOIR. 20. Section of completed coffer dam with river diverted over the concrete foundations of dam that were placed during the first stage of operations. New South Wales. January 1927. Cofferdams are temporary structures used where construction is being carried out in areas submerged in water. They are most commonly used to facilitate the construction or repair of dams, piers and bridges. To divert the river, a Coffer Dam was built across the old bed above and below the Dam site and tying into the end of the concrete wall built inside the levee bank. This completely surrounded the remainder of the site of the Dam and south wing wall, including an area of 12½ acres. hume reservoir australia, river murray waters scheme, hume reservoir construction -
 Wodonga & District Historical Society Inc
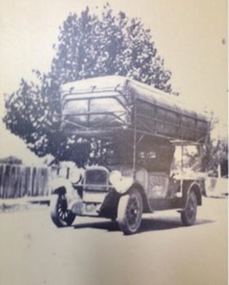
Photograph - John Stanley Cruickshank - The Wodonga Gas Man
This utility truck was one of two used by the Albury Gas Co, from the Gas Works in Kiewa Street, Albury to service the coal gas supply system in Albury during the war years from 1939-1945. The gas bags were installed as petrol was in short supply. One of the trucks was driven by John (Jack) Stanley Cruickshank, also known as Wodonga's Gas Man. Jack became foreman for the Wodonga Branch of the Albury Gas Co. An 80 millimetre galvanised steel pipeline was installed from the Albury Gas Co. in Kiewa Street, Albury, to 26 Church Street, Wodonga. A 40 horsepower pump pushed the gas to holding tanks. Sections of the gas pipeline to Wodonga can still be observed under some of the bridges from Albury to Wodonga. Jack also supervised the laying of the gas pipes in the streets of Wodonga, being hand dug by a gang of 15- 20 men. He was Wodonga's first Gas Fitter, both fitting gas appliances and overseeing their maintenance. Jack Cruickshank passed away in 1979 and is buried at the Wodonga Cemetery.This image is significant because it represents the installation of gas supply to Wodonga, Victoria.A black and white photo of a large van with a gas-filled bag on top of it and also a portrait of Jack Cruickshank. Photos are mounted together with text in a wooden frame.jack cruickshank, wodonga gas supply co.