Showing 339 items
matching set square
-
 Ballarat Tramway Museum
Slide - 35mm slide/s - set of 19, Noel Simons, 26/02/1972 12:00:00 AM
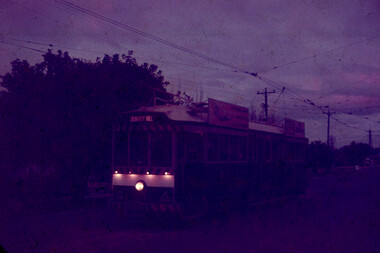
Set of 18 transparencies taken on 26/2/1972 on Kodak mounts. 1203.1 - Bendigo 5 at Eaglehawk terminus - with new traffic works. 1203.2 - No. 5 climbing the High St. hill Eaglehawk with the buildings on the east side in the photo. 1203.3 - No 2 descending the road over rail bridge at Job's Gully, heading for Quarry Hill. 1203.4 - as for 1202.3, but more side on. Tram has two SEC roof ads. 1203.5 - as for 1202.4 1203.6 - No. 26 entering Garden Gully Loop, Mt. Korong Road, Ironbark. Tram en route to Eaglehawk. Water column on right hand side of photograph. 1203.7 - No. 2 on the Eaglehawk route, Iron Bark area?, bound for Quarry Hill. 1203.8 - as for 1202.7, but photo taken after tram has past photographer. 1203.9 - No. 5 at Eaglehawk terminus, night photo. Tram has arrived at terminus, showing Quarry Hill, pole turned, but the tram lights have yet to be turned around. 1203.10 - as for 1202.9, but lights have been turned around. 1203.11 - No. 26 climbing the View St. Hill near the Commodore Hotel. Has Campbells Electrical Services building in the background. Photo taken after the tram has passed the photographer. 1203.12 - No. 7 end on photograph, at Golden Square, destination showing Golden Square - night photo. 1203.13 - number not used. 1203.14 - as for 1202.12, but partially side on, has a passenger looking out the tram. 1203.15 - as for 1202.12, but with hotel in the background. 1203.16 - No. 26 and 2 at Charing Cross, night photo. Tram 26 en route to Quarry Hill, 2 to Eaglehawk. 1203.17 - Interior photo of No. 26, at night. 1203.18 - No. 26 at the Quarry Hill terminus as night. 1203.19 - as for 1202.18, but central portion of the tramcar.Information written on in blue ink and date stamped on purple ink. 1203.1 - "No. 5 at Eaglehawk terminus" 1203.1 - "No. 5 in High St. Eaglehawk" 1203.3 - "No. 2" 1203.4 - "No. 2" 1203.5 - "No. 2" 1203.6 - "No. 26 at Garden Gully Loop Mt Korong Rd., Ironbark" 1203.7 - "No. 2" 1203.8 - "No. 2" 1203.9 - "No. 5 at Eaglehawk terminus" 1203.10 - "No. 5 at Eaglehawk terminus" 1203.11 - "No. 26 in View St. Near the Commodore Motel" 1203.12 - "No. 7 at Golden Square Terminus" 1203.14 - "No. 7 at Golden Square Terminus" 1203.15 - "No. 7 at Golden Square Terminus" 1203.16 - "Nos. 26 and 2 at Charing Cross" 1203.17 - "Interior of No. 26" 1203.18 - "No. 26 at the Quarry Hill terminus" 1203.19 - "No. 26 at the Quarry Hill terminus "tramways, trams, bendigo, eaglehawk, bridges, iron bark gully, night photo, quarry hill, golden square, tram 2, tram 5, tram 7, tram 26 -
 Ballarat Tramway Museum
Slide - 35mm slide/s - set of 25, Noel Simons, 26/02/1972 12:00:00 AM
Set of 25 transparencies taken on 26/2/1972 on Kodak mounts. 1204.1 - Bendigo No. 5 - just arrived at Manchester Loop near Havilah Road, Long Gully. Photo taken after tram has passed photographer. 1204.2 - No. 26 in Backhaus St. Long Gully passing William St, en route to Quarry Hill. Photo taken after tram has passed photographer. 1204.3 - No. 5 climbing the High St. Hill Eaglehawk, heading for Quarry Hill with the buildings on the West side of High St. in the background, including the Eaglehawk Town Hall. 1204.4 - as for 1204.3, but tram close up. 1204.5 - as for 1204.3, but after tram has passed photographer. 1204.6 - No. 5 at intersection of Mt Korong Road Ironbark and Calder Highway, with the AMPOL service 'station in the background. Photo taken after tram has passed photographer. 1204.7 - No. 26 en route to Quarry Hill shortly after leaving Needle Loop, passing William St., Long Gully. 1204.8 - No. 5 at California Gully Loop, picking up a passenger, with the shops at Long Gully in the background. Photo taken after tram has passed photographer. 1204.9 - No. 5 in Long Gully, en route to Quarry Hill. Photo taken after tram has passed photographer. 1204.10 - No. 2 at Eaglehawk terminus with the Eaglehawk Town Hall and Post Office in the background. Tram has two SEC roof ads. 1204.11 - No. 2 at Eaglehawk terminus, close up. 1204.12 - as for 1204.11, but through the park gates. 1204.13 - as for 1204.11, but with tram stop shelters in the foreground and buildings on the West side of High St in the background. 1204.14 - No. 2 in Mt. Korong Rd, midway between California Gully Loop and Needle Loop. Photo taken after tram has passed photographer. 1204.15 - No. 5 in Long Gully, en route to Quarry Hill. 1204.16 - as for 1204.15, but with trams departed loop. Has an ESSO service station in the background. 1204.17 - No. 26 leaves Charing Cross up View St.. Photo taken after tram has passed photographer. Has Armstrong Tyre Service, Cohns Drinks ad on a building and the T&G building in the background. Also Firestone ads on the tyre service building. 1204.18 - No. 5 waits at Charing Cross with the Alexandra Fountain in the background. Tram has two SEC roof ads, 'Everything s fine in my all electric kitchen' and 'Electricity Best for Cooking'. Has RACV, Colonial Mutual Life buildings in the background and the planting areas around Charing Cross gardens in the foreground. 1204.19 - No. 21 en route to North Bendigo arrives at Charing Cross, with passengers waiting to board. No. 5 in the background. In the background is the Fountain Gate Plaza building and the City Family Hotel. 1204.20 - as for 1204.19, but with No. 7 en route to Golden Square. 1204.21 - as for 1204.19, but closer up. 1204.22 - as for 1204.18 1204.23 - No. 25 in Nolan St. near the crossing of Bendigo Creek, running a special tram tour. 1204.24 - No. 25 on a special charter, in Weeroona Ave. at Cnr of Caledonia St. passing the Gas works. 1204.25 - Nos. 25 (showing Golden Square), 7 and 26 at Charing Cross. Has fountain in the background.Information written on in blue ink and date stamped on purple ink. 1204.1 - "No. 5 at Manchester Loop, near Havilah Rd. Long Gully." 1204.2 - "No. 26 in Backhaus St. Long Gully passing William St." 1204.3 - "No. 5 in High St. Eaglehawk." 1204.4 - "No. 5 in High St. Eaglehawk." 1204.5 - "No. 5 in High St. Eaglehawk." 1204.6 - "No. 5 in Mt. Korong Rd., Ironbark, passing Calder Highway Junctn." 1204.7 - "No. 26 shortly after leaving Needle Loop, passing William St., Long Gully. No. 5 cresting hill in distance." 1204.8 - "No. 5 at California Gully Loop." 1204.9 - "No. 5 in Long Gully" 1204.10 - "No. 2 at Eaglehawk terminus." 1204.11 - "No. 2 at Eaglehawk terminus." 1204.12 - "No. 2 at Eaglehawk terminus." 1204.13 - "No. 2 at Eaglehawk terminus." 1204.14 - "No. 2 in Mt. Korong Rd, midway between California Gully Loop and Needle Loop. 1204.15 - "Nos. 2 and 26 crossing at Long Gully." 1204.16 - "No. 26 leaves Long Gully loop for Eaglehawk as No. 2 pulls out of the far end towards Bendigo" 1204.17 - "No. 26 beginning the climb up View St. from Charing Cross." 1204.18 - "No. 5 at Charing Cross." 1204.19 - "No 21 arrives at Charing Cross from Golden Square while No. 5 awaits departure time for Eaglehawk." 1204.20 - "Nos. 7, 21, and 2 (behind which is No. 5) at Charing Cross." 1204.21 - "Nos. 7, 21, and 2 at Charing Cross." 1204.22 - "No. 5 at Charing Cross." 1204.23 - "No. 25 in Nolan St. near Bendigo creek crossing" 1204.24 - "No. 25 in Weeroona Ave. at cnr of Caledonia St." 1204.25 - "Nos. 25, 7, 26 and 2 (behind 26) at Charing Cross."tramways, trams, bendigo, eaglehawk, long gully, california gully, charing cross, north bendigo, tram 2, tram 5, tram 7, tram 21, tram 25, tram 26 -
 Ballarat Tramway Museum
Slide - 35mm slide/s - set of 23, Noel Simons, 26/02/1972 12:00:00 AM
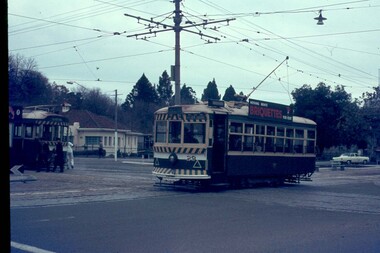
Set of 23 transparencies taken on 26/2/1972 on Kodak mounts. 1205.1 - Bendigo No. 25 on a special tour at Fire Station Loop, en route to Golden Square. 1205.2 - No. 21 and 25 crossing at Fire Station Loop, note photographers on the ground. No. 21 bound for North Bendigo. 1205.3 - as for 1205.3, but with trams departing loop and fire station in the background. 1205.4 - No. 25 at Golden Square Hotel with 'Rodda's Golden Square Hotel' in the background. Tram on a special tour, but showing destination of North Bendigo. 1205.5 - as for 1205.4 - but showing special. Has the end of the track in the photograph. 1205.6 - Nos. 7 and 25 (on a special tour) crossing at Myrtle St. Loop. 1205.7 - No. 7 leaving Myrtle St. loop with the mine poppet head in the background. Photo taken after tram has passed photographer. (Print made of this slide 10/2001 for use in the Gold Gold Gold exhibition of 10/2001 - See Reg. item 1979. 1205.8 - No. 25 entering depot. Tram showing 'special'. Tennis court on right has players. Photo taken after tram has passed photographer. 1205.9 - No. 24 (showing 'special') and No. 20 (showing 'Long Gully') at Bendigo Depot. 1205.10 - No. 24 on a special charter, leaving Bendigo depot. Tram has two 'Johnnie Walker' roof ads. 1205.11 - Bendigo depot with 29, 25 and a bogie car inside the depot doors. 1205.12 - As for 1205.11, but with 28 and 29. 1205.13 - No. 24 standing at front entrance of Bendigo depot with No. 20 in the background. 1205.14 - No. 24 running out into McCrae St showing special, with conductor on front step. 1205.15 - No. 24 in Caledonia St. at corner of Thunder St with the Gasworks in the background. 1205.16 - No. 5 en route for Quarry Hill at Charing cross with No. 26 (en route for Eaglehawk) about to arrive. Has former crossover at this location in the foreground. Has the Ezywalkin building in the background. 1205.17 - No. 5 and 26 at Charing Cross, with the Alexandra Fountain in the foreground and the Beehive and Ezywalkin buildings in the background. No.26 has two SEC roof ads. 1205.18 - Charing Cross looking along Pall Mall with trams 7 and 21 and 26 in the picture. 1205.19 - Charing Cross, with 21 departing for Golden Square and No. 5 heading for Quarry Hill. Has the Ezywalkin and the Beehive buildings in the background. 1205.20 - as for 1205.19, but a few moments later. Adjacent pole has a "NO ROAD" letter in reflectors vertically. 1205.21 - Charing Cross with Nos. 25, 21, 26 and 7, looking south from Pall Mall end. 1205.22 - No. 24 crossing Mitchell St. en route for Golden Square, showing 'special' with the Beehive and Ezywalkin buildings in the background. 1205.23 - Charing Cross with Nos. 24, 21 and 7 in the photo and Fountain Plaza in the background. Print of 1205.7 - stored in box D1.Information written on in blue ink and date stamped on purple ink. 1205.1 - "No. 25 at Fire Station Loop High Street, Golden Square." 1205.2 - "Nos. 25 and 21 crossing at Fire Station Loop, near Golden Square." 1205.3 - "Nos. 25 and 21 crossing at Fire Station Loop, near Golden Square." 1205.4 - "No. 25 at Golden Square terminus." 1205.5 - "No. 25 at Golden Square terminus." 1205.6 - "Nos. 7 and 25 crossing at Myrtle St. Loop." 1205.7 - "No. 7 leaving Myrtle St. Loop." 1205.8 - "No 25, entering Bendigo Depot." 1205.9 - "Nos. 20 and 24 at Bendigo Depot." 1205.10 - "No. 24 at Bendigo Depot." 1205.11 - "Nos. 25 and 29 at Bendigo Depot." 1205.12 - "Birney cars 29 and 28 at Bendigo Depot." 1205.13 - "No. 24 (with 20 beyond) at Bendigo Depot." 1205.14 - "No. 24 entering McCrae St. from Arnold St." 1204.15 - "No. 24 in Caledonia St. at cnr of Thunder St." 1204.16 - "No. 5 waits at Charing Cross as No. 26 arrives from Quarry Hill. Note remains of crossover abandoned on relocation in 1965." 1204.17 - "Nos. 5 and 26 at Charing Cross." 1204.18 - "Nos. 26, 7 and 21 at Charing Cross (No. 5 just visible behind No. 26)." 1204.19 - "No. 21 leaves Charing Cross for Golden Square as No. 5 starts off for Quarry Hill." 1204.20 - "No. 21 swings onto the single track Golden Square line as No. 5 heads into Mitchell St. towards Quarry Hill." 1204.21 - "Nos. 25, 21 and 26 watch No. 7 arrive at Charing Cross from Golden Square." 1204.22 - "No. 24 at Charing Cross crossing Mitchell St." 1204.23 - "Nos. 24, 21 and 7 at Charing Cross."tramways, trams, bendigo, golden square, myrtle st., fire station, depot, charing cross, tram 5, tram 7, tram 20, tram 21, tram 24, tram 25, tram 28, tram 29 -
 Ballarat Tramway Museum
Slide - 35mm slide/s - set of 6, Noel Simons, 28 Feb. 1972
... Golden Square." Set of 6 transparencies taken on 28/2/1972 ...Set of 6 transparencies taken on 28/2/1972 on Kodak mounts. 1206.1 - Bendigo No. 5 at Hayes St. Loop, en route for Quarry Hill. 1206.2 - No. 5 at Garden Gully Loop, Mt. Korong road, Ironbark. en route to Quarry Hill. Note the water column in the background. 1206.3 - No. 5 in View St. Bendigo, with the Commodore Motel in the background. 1206.4 - No. 6 en route for Golden Square in Fire Station loop, with the fire station building in the background. Photo taken after tram has passed photographer. 1206.5 - No. 6 in High St., running through Golden Square Shopping Centre, en route for Golden Square. Photo taken after tram has passed photographer. 1206.6 - No. 6 arriving at Charing Cross, bound for North Bendigo, with the City Family Hotel, ANZ bank and the Cenotaph (war memorial) in the background.Information written on in blue ink and date stamped on purple ink. 1206.1 - "No. 5 at Hayes Loop, Ironbark." 1206.2 - "No. 5 at Garden Gully Loop, Mt. Korong road, Ironbark." 1206.3 - "No. 5 in View St. just after start of double track near Barnard St." 1206.4 - "No. 6 in High St. at Fire Station loop." 1206.5 - "No. 6 in High St. running through Golden Square shopping centre." 1206.6 - "No. 6 arriving at Charing Cross from Golden Square."tramways, trams, bendigo, hayes st. loop, garden gully loop, view st., golden square, charing cross, tram 5, tram 6 -
 Ballarat Tramway Museum
Slide - 35mm slide/s - set of 12, Noel Simons, 28 Feb. 1972
Set of 12 transparencies taken on 28/2/1972 on Kodak mounts. 1207.1 - Bendigo 26 and 2 at Charing Cross. 26 en route for Eaglehawk, 2 for Quarry Hill. Has the Colonial Mutual Life, Armstrong Tyre Service, and Australian Mutual Provident Society buildings and a Cohns Drinks ad. in the background. 1207.2 - as for 1207.1 but with Alexandra fountain in the foreground. 1207.3 - No. 2 in Mitchell St. heading for Quarry Hill. Photo taken after tram has passed photographer. Has buildings on either side of Mitchell St. in the background, including the Plaza Theatre. 1207.4 - No. 6 en route for Golden Square departing Charing Cross. Has the RACV and ANZ bank in the background. 1207.5 - No. 2 crossing Pall Mall to enter Charing Cross ex Quarry Hill, with the Fountain Plaza in the background. 1207.6 - No. 6 arriving Charing Cross ex Golden Square with No. 21 alongside. No. 21 has the SEC ad. 'Everything's fine in my all electric kitchen.' Has the City Family Hotel and the Fountain Plaza shopping centre in the background. 1207.7 - No. 5 at Charing Cross en route for Quarry Hill with No. 2 behind. No. 2 has two SEC roof ads, 'Everything s fine in my all electric kitchen' and 'Electricity best for cooking'. RACV building in the background. Tram crews are discussing the day in the front of the tram. 1207. 8 - No. 21 in High St. Bendigo with the Cathedral in the background. No. 21 has two SEC roof ads, 'Everything's fine in my all electric kitchen' and 'Electricity best for cooking'. 1207.9 - No. 6 in High St. Bendigo with the Cathedral in the background. 1207.10 - No. 6 in High St. Bendigo, just past Wattle St. Photo taken after the tram has passed the photographer from within the Highway Car Sales yard. 1207.11 - No. 26 bound for Eaglehawk at the end of the double track in View St., note signal contactors, tram stop and section signs mounted on pole. 1207.12 - No. 26 turning from View St. into Barnard St.Information written on in blue ink and date stamped on purple ink. 1207. 1- "Nos. 26 and 2 at Charing Cross." 1207.2 - "Nos. 26 and 2 at Charing Cross." 1207.3 - "No. 2 in Mitchell St. just after leaving Charing Cross." 1207.4 - "No.6 leaving Charing Cross for Golden Square." 1207.5 - "No. 2 arriving at Charing Cross from Quarry Hill." 1207.6 - "No. 21 waits at Charing Cross as No. 6 arrives from Golden Square." 1207.7 - "No 5 at Charing Cross with No. 2 lurking behind." 1207.8 - "No. 21 in High St. at cnr of Wattle St." 1207.9 - "No. 6 in High St. at cnr of Wattle St." 1207.10 - "No. 6 in High St. between Wattle and Vine Sts." 1207.11 - "No. 26 at end of double track in View St. near Barnard. St. 1207.12 - "No. 26 seen at dusk turning from View St. into Barnard St."tramways, trams, bendigo, charing cross, high st, view st., tram 2, tram 5, tram 6, tram 21, tram 26 -
 Ballarat Tramway Museum
Slide - 35mm slide/s - set of 4, Noel Simons, Apr. 1972
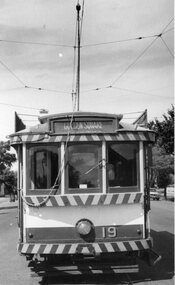
Set of 4 transparencies - copy slides - possibly ARE film strip dated March 1972. 1209.2 and 1209.4 on Kodak Readymount mounts. 1209.1 - Bendigo 5, 6 and 28 on a special tram service in bound to the City on a tour in Caledonia St. about to enter Lucan St, or White Hills Road or Weeroona Ave. (mis match in names in various maps). Gas works in the background. No. 5 has a white disk on the rear of the tram. 1209.2 - Nos 2 and 26 at Charing Cross with the Fountain Plaza in the background. Both trams have the destination of Quarry Hill, though 26 is on the Eaglehawk bound track. 1209.3 - No. 19 at the Golden Square terminus, with the conductor or driver swinging the pole and Billy Rodda's Golden Square hotel in the background. 1209.4 - No. 7 at Fire Station loop, en route to North Bendigo, picking up a passenger with a pram. Part of a set of 20 slides made by the Association of Railway Enthusiast Provincial Tramways film strip. Reference Item 2560 details the ARE Film Strip and provide references to other slides.Information written on in blue ink and date stamped on purple ink. 1209.1 - "Nos 5, 6 and 28 in Caledonia St. about to enter Weeroona Ave." 1209.2 - "Nos 2 and 26 at Charing Cross." 1209.3 - "Swinging the pole on No. 19 at Golden Square Terminus." 1209.4 - "No. 7 inward bound from Golden Square stops at Fire Station Loop."tramways, trams, bendigo, charing cross, golden square, gas works, special trams, tram 2, tram 5, tram 6, tram 7, tram 19, tram 28 -
 Ballarat Tramway Museum
Slide - 35mm slide/s set of 7, Noel Simons, 1972
Set of 7 transparencies undated on PAKON mounts - appear to be early 1970's. 1212.1 - No. 18 about to enter the Long Gully loop with ESSO service station on the right hand side. 1212.2 - No. 6 in Mitchell Street bound for Charing Cross. Tram has destination of "Rly Station". Has buildings on the east side of Mitchell St. in the background. 1212.3 - No. 7 (North Bendigo) and 29 (Golden Square) crossing. Actual location? 1212.4 - "No 6 showing 'SPECIAL' at Eaglehawk terminus. Has the Foodland store and Fruit shop in the background. 1212.5 - No. 19 at Eaglehawk terminus, on the extension to the normal Eaglehawk terminus. Tram has showing 'Eaglehawk'. Tram has two SEC roof ads. 1212.6 - No. 25 and another Bogie car at Quarry Hill terminus on last day. 1212.7 - No. 18 and 29 at Quarry Hill terminus. No.. 18 showing 'Quarry Hill' - has two SEC roof ads 'Electric Cooking - Matchless' and 'Everything's fine in my all electric kitchen' and No. 29 has a briquettes roof ad.Information typed onto a white label stuck on the slide. 1212.1 - "No. 18 at Long Gully" 1212.2 - "No. 6 in Mitchell Street." 1212.3 - "7 and 29 Lake View Hotel" 1212.4 - "No. 6 at Eaglehawk" 1212.5 - "No. 19 at Eaglehawk Term." 1212.6 - "Last cars Quarry Hill." 1212.7 - "18 & 29 Quarry Hill"tramways, trams, bendigo, long gully, mitchell st., eaglehawk, quarry hill, last tram, tram 6, tram 7, tram 18, tram 19, tram 25, tram 29 -
 Ballarat Tramway Museum
Photograph - Black & White Photograph/s set of 19, Mar. 1972
Set of 19 black and white prints, all 89mm square of Bendigo trams, date machine printed on print is "Mar 1972". 981.1 - Tram 21 at North Bendigo terminus, with level crossing in background. Has destination "Golden Square" and two SEC roof ads. 981.2 - tram 2? at Eaglehawk, with destination "Depot", two SEC roof ads and "Leo A. Hughes Photographer" on side of building in background. 981.3 - tram 2? at Eaglehawk, side on view. 981.4 - tram 26 at Quarry Hill terminus looking back into city. 981.5 - tram 7 en route to North Bendigo at the site of the Bridge St. loop. Has a Peters Ice Cream truck and Sandhurst Fruit Juices truck on right side of photograph. 981.6 - tram 2 at Quarry Hill terminus. 981.7 - tram 2? at one of the loops on the Eaglehawk line, inbound? 981.8 - bogie tram at Charing Cross with fountain in background. Side on view looking south. 981.9 -trams 7 and 21 on Golden Square/North Bendigo line with bogie tram in background, at Charing Cross. Same as item 972. 981.10 - bogie tram at Charing Cross - has buildings in south west corner in background, including Colonial Mutual Life and an advertisement for the Herald newspaper. 981.11 - trams 25, 7 and two other trams at Charing Cross. 981.12 - trams 2 and 26 and three others at Charing Cross. 981.13 - tram 25 at Golden Square terminus, with Rodda's Golden Square Hotel in the background. Tram showing destination of "Nth Bendigo" 981.14 - tram 24, showing "Special" on depot access track. Has two Johnnie Walker roof ads on side. 981.15 - as above, but tram on bridge outside depot. 981.16 - trams 25 and 28 at depot 981.17 - tram 24 showing "Special" on depot access track with a single truck car in background. 981.18 - trams 2 and 26 at Charing Cross. Has advertisements for "Armstrong Tyre Service" and "Cohn's drinks" on buildings in background. 981.19 - Bendigo 2 at location?, about to enter a loop or double track section. Has hotel in background. On rear of each photo in the top left hand corner is a print number 1 to 19 in ink and location notes, generally "Bendigo"trams, tramways, charing cross, bendigo, golden square, quarry hill, tram 2, tram 21, tram 7, tram 24, tram 26 -
 Ballarat Tramway Museum
Negative - Set of 2, Geoff Grant, 25/06/1955 12:00:00 AM
Negatives No. N358 and N359 and black and white prints made by a laser printer (stored in folder ) of AETA tour (Australian Electric Traction Association) on 25/6/1955 at Spencer St. terminus. Both trams have AETA tour signs and the slogan. 980 has "Save traffic congestion, Move People not vehicles" 1618.1 - 980 and 1001 at the then new Bourke St. terminal at Spencer St. Carlyon's hotel in the background. 1618.2 - 980 and 1001 with the Mail Exchange in the background See also Reg. item 1611 for other photos at the same time. hi res scan made and image updated 23/5/2020. Two prints or copies of the photograph, 101mm square, added 1/6/03. Photo used in the Melbourne Immigration Museum's "Trammies" Exhibition Feb to May 2003. Prints made by the Immigration Museum for use in the making of the display panels. hi res scan made and image updated 23/5/2020.trams, tramways, melbourne, bourke st, spencer st, aeta tour, tram 980 tram w7 1001 -
 Ballarat Tramway Museum
Photograph - Colour Photograph/s - set of 28, Warren Doubleday, 11/03/2002 12:00:00 AM
Set of 28 photographs of the operation of the BTM during the Begonia Festival, including the loading of the Horse Tram for Melbourne on Sunday 10/3/2002, operation in Melbourne on 11/3/2002 and reloading in Bourke St. Taken by Warren Doubleday, on Kodak paper. 2013.1 - Tram 671, Wendouree Parade, 10/3/2002 at Depot Junction .2 - 33 at Loop .3 - 40 and 33 south of the loop, heading for Carlton St. .4 - ditto .5 - 671 returning to the loop from St. Aidans Drive .6 - 40 returning to the loop from Carlton St. .7 - 33 ditto .8 - Loading horse tram at Depot Junction - Alastair Reither .9 - ditto .10 - in St. Kilda Road, 11/3/2002 at about 7.30am .11 - ditto .12 - Tram in Moomba parade, 11/3/2002 - Reg Smith, Len Millar - horse Bear. .13 - ditto .14 - ditto .15 - ditto, after passing with the Ned Kelly's. .16 - ditto - and John Clowes on rear platform .17 - the line up near Bourke St. with V214 behind the horse tram - "Tram Stop Ahead" sign .18 - the line up from Bourke St. with Hawthorn 8 alongside. .19 - Being photographed - Arthur Cook, Roma Cook, Merle Clowes and John Clowes with other visitors .20 - ditto .21 - Malcolm tram, and BTM ten in the background .22 - BTM and Sydney Tramway Museum tent in the City Square area. .23 - Pushing the horse tram across Bourke St. - John Clowes. .24 - Loaded back on the Crane Heavy Haulage (Associated Towing) truck, looking north along Swanston St. .25 - ditto .26 - ditto, general scene in Swanston St. .27 - The towing truck and tram .28 - Hawthorn 8 and Milan 1692 crossing Bourke St. Negatives held on file with documents list.horse trams, depot junction, moomba, gardens loop, swanston st, tram 1, tram 33, tram 40, tram 671, tram 8, tram 214, tram 1692 -
 Ballarat Tramway Museum
Photograph - Black and White photograph/s - mounted set of 2', John Phillips, late 1960's or early 1970's
Yields information about the vicinity of the Victoria St terminus and the bridge over the Buninyong Railway line.Black and White photograph mounted on heavy cardboard backing. Photo of Ballarat No. 31, just after leaving Victoria St. terminus, late 1960's or early 1970s crossing over the Eureka siding railway bridge. Taken by John Phillips. Tram has destination of Gardens via Sturt St. West, Twin Lakes advertisement on the front. In the background is Meagher's Hotel with Abbots Lager and Victoria Bitter sign. On the bridge is graffiti "Smash US Imperialism". On the Ballarat side of the bridge is a sign directing travellers to the "Eureka Caravan Park". Has 6 Velcro dots on rear and marks where mounting devices have been removed on the rear. Note image scanned in two runs through a scanner, resulting in the shading in the image file. .1 - Second copy with 4 black Velcro squares and 4 dots on rear - wider view on the right hand side with an additional pole - not scanned.trams, tramways, victoria st, eureka, twin lakes, tram 31 -
 Ballarat Tramway Museum
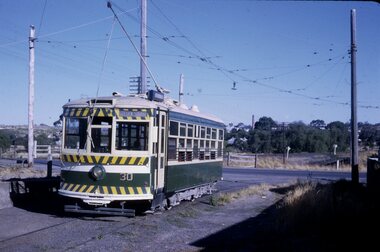
Slide - 35mm slide/s - set of 4, Peter Moses, Jan. 1969
Set of four colour slides taken at Charing Cross Bendigo, Jan. 1969. .1 - Trams 30 and 28 travelling to North Bendigo and Golden Square respectively. Has the Beehive building in the background, along with W.M.I. Jones Chemist, Evelyn Amor shop, Dewars Whiskey rooftop advertisement. 28 has a SEC Briquettes roof advertisement. .2 - As above but with the front or bogie tram in the photo. Also has A. G. Treloar Optician's shop. Kodak cardboard mount slide, taken by Peter Moses, Jan. 1969. .3 - Close up photo of Birney No. 30, with 28 in the background. .4 - No. 28 leaving for Golden Square with the Plaza building, the Cenotaph, and the City Family Hotel in the background. Kodak cardboard mount slide, taken by Peter Moses, Jan. 1969.On the rear of all the slides "P. Moses" in black ink .1 - "Bendigo Charing Cross" and in red ink "19" .2 - "Bendigo three trams / Charing Cross" and in red ink "21" .3 - "Bendigo" and in red ink "23" .4 - "Bendigo Charing Cross" and in red ink "14". tramways, trams, bendigo, tram 28, tram 30 -
 Ballarat Tramway Museum
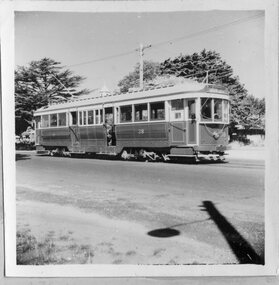
Slide - 35mm slide/s - set of 3, Peter Moses, Jan. 1969
Set of two colour slides taken at the North Bendigo terminus and another in Pall Mall, Bendigo, Jan. 1969. .1 - No. 30 at North Bendigo terminus - has destination "Golden Square" .2 - Interior view of Birney tram with crew members numbers 22, 29 and three seated passengers. .3 - View of Pall Mall looking north from the tram stop - has the Shamrock Hotel in the distance and other buildings on the east side of the street, including a 3BO (Bendigo radio) sign. Kodak cardboard mount slide, taken by Peter Moses, Jan. 1969.On the rear of all the slides "P. Moses" in black ink .1 -"Bendigo / North Bendigo terminus" in blue ink, and in red ink “12” .2 - " Jan 1969 Bendigo / Inside Brill car" in blue ink .3 - "Bendigo Pall Mall" in black ink and in red ink “7”.tramways, trams, bendigo, north bendigo, birney, tram crews, pall mall, tram 30 -
 Ballarat Tramway Museum
Photograph - Black & White Photograph/s, Geoff Grant, 19/06/1955 12:00:00 AM
A set of eight 2 1/4" square photographs mounted onto a sheet of manila cardboard - contact prints of each negative. Numbered from left to right, top to bottom are: 476.1 - SECV Ballarat No. 38, possibly at Victoria St - c1955.; 476.2 - SEC Geelong 8 and 39 at Eastern Park terminus - 2/4/1955 476.3 - SEC Geelong No. 4 out the front of the depot building - 8/1/1956 (Negative No. 368) - See Reg Item 7253 for a large format print. 476.4 - SEC Geelong single trucker and bogie at depot - 8/1/1956 (Negative No. 365) 476.5 - SEC Geelong - No. 18 at East terminus - last day of Chilwell 8/1/56 (Negative No. 366) - See Reg Item 7253 for a large format print. 476.6 - SEC Geelong - No. 1 - at a terminus (see also Reg item No. 485) (Negative 367) (See Reg. Item 2610 for colour slide of this terminus and tram and 5898i6) 476.7 - SEC Geelong - No. 1 - at depot - group of people standing in front. (Negative 364) - See Reg Item 7255 for a large format print. 476.8 - SEC Geelong - No. 1 entering depot portal night shot, 8/1/56 (Negative 369) - See Reg Item 7256 for a large format print. Negative envelope has the typed note "Some six views of Geelong trams on the last day of operations of the Chilwell line and East West line" Re 476.7 - See also Reg Item 5898i2 - photo by Keith Kings for a similar or same photograph. Re 476.8 - See also Reg Item 5899i1 - photo by Keith Kings for a similar or same photograph. hi res scan made and image updated 23/5/2020.Niltrams, tramways, geelong, chilwell, ballarat, east, closure , tram 8, tram 39, tram 4, tram 18, tram 1, tram 38 -
 Ballarat Tramway Museum
Photograph - Black & White Photograph/s, Geoff Grant, 19/06/1955 12:00:00 AM
A set of seven 2 1/4" square photographs mounted onto a sheet of manila cardboard - contact prints of each negative. Numbered from left to right, top to bottom are: 477.1 - Decorated tram at Batman Ave 7/5/1955 477.2 -M&MTB W2 434 at Camberwell depot entry 7/5/1955 477.3 - M&MTB SW2 426 at Camberwell depot entry 7/5/1955 477.4 - M&MTB 727 at Camberwell depot entry 7/5/1955 477.5 - M&MTB Q190 on Camberwell depot fan 7/5/1955 477.6 - M&MTB Y613 on Camberwell depot fan 7/5/1955 477.7 - Caulfield Race day, line up of trams looking towards Crystal Palace Theatre from the railway underpass, 3/9/1955. Image btm477i is of the card itself and individual images higher res scans made 12/12/2020. trams, tramways, melbourne, camberwell depot, prahran centenary, caulfield races , tram 434, 426, 727, 190, 613 -
 Ballarat Tramway Museum
Photograph - Black & White Photograph/s, Geoff Grant, 19/06/1955 12:00:00 AM
A set of seven 2 1/4" square photographs mounted onto a sheet of manila cardboard - contact prints of each negative. Numbered from left to right, top to bottom are: 478.1 - VR Tram No. 51 running on Sandringham Route - 12/55 (Negative No. 370) - see also Reg Item 3622 for the same location and tram. 478.2 -VR tram No. 50 outside Sandringham Stn - side view 12/55 (Negative No. 371) 478.3 - VR tram No. 50 outside Sandringham Stn - 3/4 view 12/55 (Negative No. 372) - see also Reg Item 3621 for a colour print of this image. 478.4 - View of Sandringham tram depot, two door short bus on right (Negative No. 373) 478.5 - M&MTB 1033, Nth Fitzroy - AETA tour - (see Reg No. 490 and item 1620.1 for negative) 478.6 - M&MTB 1033 at East Brunswick (see Reg No. 489 also and item 1620.2 for negative) 476.7 - M&MTB 1033 at Bourke St terminus, AETA tour - 7/4/1956. (See item 1620.3 for negative) . hi res scan made and image updated 23/5/2020 for negatives where held and other images rescanned at higher resolution 12/12/2020. Image btm478i is of the overall card.trams, tramways, vr, sandringham, aeta tour , tram 50. tram 51, tram 1033 -
 Ballarat Tramway Museum
Slide - 35mm slide/s - set of 13, Carolyn Dean, 24/09/1970 12:00:00 AM
Set of photographs of operations, including special tram, track work by SEC prior to the Bendigo system closing closing.Set of 13 Agfa slides, blue and white plastic base of Bendigo trams. Taken 24.9.1970 by Carolyn Dean. .1 - "5" - No. 7 at Golden Square terminus, with Golden Square Hotel in background. .2 - "6" - No. 7 passing SEC workmen replacing a broken joint, in McCrae St. Piece of rail alongside tram. .3 - "7" - No. 7 crossing No. 29 at start of double track with Hotel in background .4 - "8" - No. 29 running special at depot junction. .5 - "9" - No. 29 turning from Nolan into Bridge St. .6 - "10" - ditto, passing old loop .7 - "12" - ditto, turning from Caledonia into Thunder St .8 - "13" - ditto, southbound in Pall Mall near Bull St. .9 - "16" - ditto, crossing bridge into tram depot, with tram depot in background. .10 - "17" - ditto, entering depot. .11 - "18" - No. 26 entering the Eaglehawk terminus, High St. with Leo A Hughes photographer shop in background. .12 - "19" - No. 26 at terminus, showing "Quarry Hill", with High St in the background. .13 - "21" - No. 26 after leaving terminus, travelling in High St with shops n the background.Each slide has in corner a number in pencil and the first one the date of "24-9-70".tramways, trams, bendigo, tram 7, tram 29, tram 26 -
 Ballarat Tramway Museum
Document - Roster, State Electricity Commission of Victoria (SECV), Rosters for Bendigo, 1970
Significant in being a almost complete set of rosters for Bendigo prior to closure - appear to be have been copied for a discussion or information document for management at Ballarat. Need to ascertain whether they line up with the actual last timetable. No Sunday tables given - probably did not change them.Set of photocopies of Rosters for Bendigo. Not sure whether these were actually used or were at the stage of a discussion document - see sheet 30. Photocopied onto foolscap size heat sensitive paper and some loosing information. Sheets have been numbered. Generally dated "HAM/70" Page 1 not location 2 - Eaglehawk - Quarry Hill Weekdays 3 - ditto - continued 4 - Golden Square - North Bendigo Weekdays - two different rosters given on two separate sheets. 5 - Eaglehawk - Quarry Hill Saturdays 6 - ditto continued 7 - Golden Square - North Bendigo - Saturdays 8 - Tables - 1AM, 2AM, 3AM 9 - Tables - 4AM, 5AM, 9AM - second sheet gives slightly different arrangements for 5AM 10 - Tables - 10AM, 11AM, 9Assist - second sheet gives slightly different arrangements for 10 & 11AM 11 - Tables - 2PM, 3PM, 4PM 12 - Tables - 6 run, Meal relief & 1, 11 Assist 13 - Tables - 9PM, 10PM, 16 Assist 14 - Tables - 1AM, 2AM, 3AM Conductors 15 - Tables - 4AM, 5AM, 6 run Conductors 16 - Tables - 2PM, 3PM, 4PM Conductors 17 - Tables - 12 Assist Motorman and 13 Assist Conductor - 2 sheets, can't see a difference. 18 - Tables - Saturday, 1AM, 2AM, 3AM 19 - Tables - Saturday, 4AM, 5AM, 9AM 20 - Tables - Saturday, 10AM, 11AM, 1st relief motorman 21 - Tables - Saturday, 9 Assist, 10 Assist, 14 Assist, 15 Assist 22 - Tables - Saturday, 1PM, 2PM, 3PM 23 - Tables - Saturday, 9PM, 10PM, Gol. Sq. relief Motorman 24 - Tables - Saturday, 1AM, 2AM, 3AM conductors 25 - Tables - Saturday, 4AM, 5AM, 1st Meal relief conductor 26 - Tables - Saturday, 1PM, 2PM, 3PM, conductors 27 - Tables - Saturday, 11 Assist, 12 Assist, 13 Assist - conductor 28 - Standby chart - Weekdays and Saturdays 29 - Rotation Roster for Motorman and Conductors - dated 12/5/1970 30 - Comparisons of Present Roster and proposed roster - includes cost impact analysis - 2 copies held. 31 - folded sheet - Weekday Instructions - poor order photocopied - 2nd copy - minor changes 32 - folded sheet - Saturday Instructions - poor order photocopied 33 - Daily hours of Motorman conductors - Weekdays and Saturday 33A - Hours of Motorman and Conductors - Sunday 34 - Weekly Hours - for motorman and conductors - poor order photocopied and data filled in on photocopy. 39 - Tramways - Motorman and Conductors Rotation Roster - dated 5-3-1970trams, tramways, rosters, timetables, sec, bendigo -
 Ballarat Tramway Museum
Slide - 42mm slide/s - set of 2 - tram 36 being moved to Melbourne, Mrs. Williamson?, 14/09/1971 12:00:00 AM
Yields information through a photograph of the transportation of Ballarat No. 36 for Tourism Week in September 1971, possibly called via the home of the truck driver in Ligar St. Two large format (42mm square approx. colour positive film) within a Kodak Ektachrome Transparency (50mm sq) of Ballarat tram No. 36 enroute to Melbourne, making a house call in Ligar St Ballarat. Has the advertisements for Melbourne in position. See also Reg item 3503 of tram in Melbourne and 3432 for newspaper clipping.On both slides "14/9/71" and "Tram in Ligar St"ballarat, tramways, trams, melbourne, tourism, mmtb, ligar st, tram 36 -
 Ballarat Tramway Museum
Photograph - Black & White Photograph/s - set of 3, George Bishop, Dec. 1971
Black and white photographs of Bendigo No. 7 at Golden Square terminus 12/1971. Photos by George Bishop. .1 - Tram at terminus, with two ladies boarding the tram .2 - ditto without ladies .3 - view rear number of the tram and Billy Rodda's Golden Square Hotel. No. 7 has two SEC roof advertisements for electric cooking.On the back of two of the photos in ink No. 7, Golden Square/ G. Bishop photo" On the rear of .3 is a label "No. 7 at Golden Square Bendigo, December 1971"tramways, trams, bendigo, golden square, tram 7 -
 Ballarat Tramway Museum
Photograph - Black & White Photograph/s - set of 2, George Bishop, Dec. 1971
Black and white photographs of Bendigo No. 7 and 19 at Charing Cross 12/1971. Photos by George Bishop. .1 - 19 and 7 at the Charing Cross stop, with a man getting off the tram. Has a over exposure line across part of No. 19. 3BO sign on the Beehive buildings in the background. .2 - Close up of the ends of the both trams - note both have destinations of "Golden Square". Both trams have two SEC roof advertisements for electric cooking.On the back of two of the photos in ink No. 7 and 19, at Charing Cross Bendigo Dec. 1971 / G. Bishop photo"tramways, trams, bendigo, charing cross, pall mall, tram 7, tram 19 -
 Ballarat Tramway Museum
Photograph - Black & White Photograph/s - set of 4, George Bishop, Dec. 1971
Set of four Black and white photographs of Bendigo No. 19 at or near Golden Square terminus 12/1971. Photos by George Bishop. .1 - End of view of tram at terminus, showing destination "Golden Square" .2 - Tram nearing terminus .3 - Tram arriving at terminus .3 - View of tram at terminus and with conductor about to turn the pole with Billy Rodda's Golden Square Hotel in the background. No. 19 has two SEC roof advertisements for electric cooking.On the back of the photos in ink or pencil in ink are captions regarding No. 19, Golden Square, Bendigo and "George Bishop Photo"tramways, trams, bendigo, golden square, tram 19 -
 Ballarat Tramway Museum
Slide - 35mm slide/s - set of 2, Theo Dunstan, May. 1973
Set of two 35mm slides, square format mounted in a "Kodak " cardboard slide mount with Kodak logos and printing of No. Bendigo No. 25 at the Central Deborah terminus with buildings in background and North Bendigo terminus with the driver standing alongside the front of the tram. No. 25 painted in the Bendigo Trust / ESCo livery. Tram has the destination of Golden Square. Taken May 1973 or earlier.Has date of "May 73" and "18" "19" stamped onto the slide. 3245.1 - "Tourist tram at Deborah Mine Bendigo" in blue ink. 3245.2 - Tourist tram at Joss House, Bendigo".tramways, trams, bendigo, tram 25 -
 Ballarat Tramway Museum
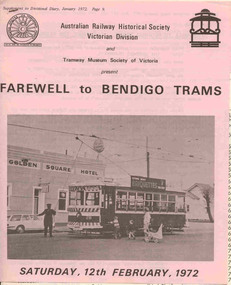
Ephemera - Tour Notes, Victorian Railways et al, "Farewell to Bendigo Trams", Jan. 1972
Set of 5 documents for the "Farewell to Bendigo Trams" tour conducted by the ARHS Vic Div and the TMSV, first scheduled for Sat. 12/2/1972, but delayed to Sat. 4/3/1972 due to SECV Power restrictions on the day. 3277.1 - documents 1 to 3 stapled in top left hand corner. 1. Tour circular, printed on pink paper with a photo of No. 28 at Golden Square terminus. Has logos of ARHS Vic Div and TMSV, part missing - used for booking. Gives details of the purpose of the tour, approx. times, refreshments, a booklet and fares. Organiser Victor Isaacs and Neil Morrow Booking Officer. Printed on foolscap paper in landscape format 2. Victorian Railways S Circular, or special train notice, S.224/72, single page giving train schedules, loads, motive power, carriage numbers and tickets. Signed by J.C. Crute as Chief Traffic Manager. Dated 19/1/1972. Printed on foolscap paper. 3. Ticket circular printed on quarto paper giving times of departure and arrival back, noting its express run to Melbourne. 3277.2 - documents 4 to 5, stapled in top left hand corner. 4. Set of two sheets, one printed on foolscap card paper, the other on foolscap paper, giving a graph of the tram workings, showing the special trams (tours A and B) overlain with the Saturday timetable. Dated 4/3/1972. 5. Victorian Railways S Circular, or special train notice, S.435/72, single page giving train schedules, loads, motive power, carriage numbers and tickets. Signed by J.C. Crute as Chief Traffic Manager. Dated 11/2/1972. Printed on foolscap paper. Noted that the special train of 12/2/1972 is cancelled "Due to SECV Restrictions". Has return train timetabled for 2 hours and five minutes. (Additional copies of item 4 - graph on one sheet only and item 5 - added 3/10/2007 - ex Graeme Breydon materials) 3277.3 - Welcome Aboard Circular - red foolscap paper, giving train time summary, photostops, arrangements in Bendigo, Bendigo line history and tram tours. Images of document added 27-08-12.arhs, special trains, bendigo, tmsv, timetables -
 Ballarat Tramway Museum
Slide - 35mm slide/s - set of 5, 1970's
Series of five 35mm slides in a yellow colour "Peter Fox Collins St. Melbourne" cardboard mounts, of view of Bendigo trams. Each slide along the top edge has the details while the bottom edge, has a number in the details area. 2599.1 - No. 9420, No. 24 at Quarry Hill - photo at dusk, poor quality, has surface damage all over slide. 2599.2 - No. 9421, ditto 2599.3 - No. 10132, No. 19 in Bendigo Trust operation colours at intersection of McCrae St & Nolan St, some surface damage around the top and bottom edges. Has Gillies Pies roof advertisement. Tram has destination of North Bendigo. 2599.4 - No. 10133, No. 25, High St, south of Charing Cross - some surface damage around the top and bottom edges. Tram has roof advertisements for "Gas" and "Myers". Has destination of Joss House 2599.5 - No. 10134, No. 19, Pall Mall, some slight surface damage. Tram has destination of Golden Square and has a roof advertisement for Sandhurst Milk and one other company. In blue ink on each slide; number as above in bottom edge. 2599.1 and .2 - "No. 24 Quarry Hill" 2599.3 & .5 - "No. 19 Nth Bendigo" 2599.4 - "No. 25 Nth Bendigo"tramways, trams, bendigo, pall mall, bendigo trust, nolan st, tram 24, tram 19, tram 25 -
 Ballarat Tramway Museum
Slide - 35mm slide/s - set of 3, Travis Jeffrey, late 1960's or early 1970's
Series of three Agfa plastic mount (blue base, white cover) of photos of Bendigo No. 29 on the Golden Square - North Bendigo route. Photo taken late 1960's early 1970's from the window of another tram. The tram has a SEC Briquettes roof advertisement fitted. 2655.1 - No. 29 leaving Charing Cross for Golden Square with 26 in the background. 2655.2 - No. 29 north bound in Pall Mall with Stonemasons Supermarket and the Stoneman's Shamrock Hotel in the background. 2655.3 - No. 29 leaving a Myrtle St loop, in High St?, with Hardies Fibrolite Pipes yard in the background."BES 49", "50", "51" in pencil.tramways, trams, bendigo, golden square, pall mall, charing cross, high st, tram 29 -
 Ballarat Tramway Museum
Photograph - Black & White Photograph/s - set of 32, Eldon Hogan, 4/06/1965 12:00:00 AM
Yields information about a 1924 Jelbart Engine manufacturing display in Sturt St and the street scene and peoples clothing at the time.Set of 32 black and white photographs of an Association of Railway Enthusiasts tour to Bendigo and trams 4/7/1965. The photos are not necessarily in photographic order. .1 - 30 on the Eaglehawk terminal track, beyond the normal terminus. .2 - 30 & 29 High St Eaglehawk. .3 - ditto with a poppet head in the background. .4 - 30 at one of the crossing loops .5 - 30 at Eaglehawk terminus extension .6 - ditto. .7 - ditto .8 - cleaning out the track .9 - showing the location of the track at Eaglehawk terminus and its extension .10 - cleaning out track .11 - a portable shed adjacent to the track .12 - A view of the two Birneys travelling in the empty country. .13 - ditto .14 - 19 and 18 at Golden Square .15 - Bendigo tram depot - creek crossing .16 - Scrubber at the depot .17 - 28 and 19 at the North Bendigo terminus .18 - 18 and 30 on the Golden Sq line .19 - 28 and 19 at the North Bendigo terminus .20 - ditto. .21 - 28 and 19 near the depot entry. .22 - 28 and 30 Pall Mall .23 - 28 at North Bendigo .24 - 17 and 19 and 6 at Quarry Hill .25 - 28 and 30 Mitchell St .26 - 19, 6 and 21 Quarry Hill .27 - 19 and 6 Quarry Hill .28 - 28 and 6 at the depot entry .29 - ditto .30 - 18 and 30, Golden Sq line .31 - 25 at depot .32 - 6 and 19 Charing Cross. Photographer Eldon Hogan. Printed on Kodak Paper .33 - roll of negatives of some of the above photos - stored in box 83 as well. trams, tramways, are, bendigo, eaglehawk, quarry hill, golden square, north bendigo, tram 30, tram 29, tram 28, tram 6, tram 19, tram 25, tram 17, tram 18 -
 Ballarat Tramway Museum
Photograph - Digital image Set of 20, Dec. 1970
Set of 20 digital images of Bendigo Tramways December 1970 by Stuart Lodington. .1 - Bendigo track gang renewing a joint, McCrae St, with welding truck alongside and Birney No. 29. .2 - No. 5 at Quarry Hill terminus? .3 - No. 24 at the depot .4 - No. 2 on the Quarry Hill line .5 - No. 5 approaching the Eaglehawk terminus .6 - No. 29? at the Golden Square Terminus with Bill Rodda's Golden Square hotel in the background. .7 - No. 3 inbound on the Quarry Hill line. .8 - trams crossing on the Eaglehawk line, through the window of one tram. .9 - side on view of a B23D controller in a bogie tram .10 - No. 5 at the Eaglehawk terminus .11 - No. 21 at No. 21 crossing on the Golden Square line. No. 29 showing special, No.21 - North Bendigo, Fire Station Loop? .12 - No. 29 and another tram - near work site? .13 - interior view from Birney looking at the front of another tram parked behind. .14 - No. 29, No. 6 crossing at .15 - No. 6, showing special at Charing Cross. .16 - No. 5 and another tram at North Bendigo on a Special .17 - No. 28 at Charing Cross .18 - No. 5 on Special at a Loop on the Eaglehawk line .19 - No. 28, and two other trams at the Myrtle St Loop .20 - No. 18 showing Quarry Hill and two other trams on View St.trams, tramways, bendigo, trackwork, mccrae st, depot, quarry hill, eaglehawk, golden square, controllers, north bendigo, view st, tram 29, tram 5, tram 24, tram 2, tram 3, tram 6, tram 28, tram 18 -
 Ballarat Tramway Museum
Photograph - Digital image Set of 20
Set of 20 digital images of Bendigo Tramways, 1972 at or before closure while on a tram tour by Stuart Lodington. .1 - No. 28 and 5 at Eaglehawk terminus .2 - No. 28 leaving Charing Cross and travelling into View St with Armstrong Type Service building in background and Firestone Advertisements. .3 - No. 29 with Eaglehawk Town Hall and Post Office in background. .4 - No. 26 and 29 at start of double track, High St Eaglehawk .5 - No. 29 leaving Eaglehawk with shops in the background, Foodland, J. Bests .6 - No. 29 and 23 crossing Manchester Loop with Manchester Arms Hotel in the background and an old poppet head. .7 - No. 29 at ditto with poppet head in the background. .8 - No. 28 and two other trams at the Quarry Hill terminus. .9 - No. 29 in High St Bendigo with the Cathedral and Golden Gate Hotel in the background. .10 - No. 3 with destination Eaglehawk, in bound Carpenter St? .11 - No. 29 following a single trucker through a loop or the end of the double track near the depot. .12 - No. 23?, at Eaglehawk terminus, with Eaglehawk Town Hall in the background. .13 - Birney tram crossing the bridge at the Depot entrance - No. 29 .14 - No. 29 on the Eaglehawk line? .15 - as for .13 .16 - No. 29 entering the depot. .17 - No. 23, inbound from Eaglehawk, at Jobs Gully Loop with the railway overbridge in the background. .18 - No. 28 and two other trams (see also Reg Item 4982) for the same tram tour at Myrtle St. Loop. .19 - No. 21 with North Bendigo on the destination approaching the Golden Square terminus. .20 - No. 7 at Golden Square terminustrams, tramways, bendigo, eaglehawk, quarry hill, golden square, depot, tram 5, tram 29, tram 28, tram 26, tram 23, tram 7, tram 21 -
 Ballarat Tramway Museum
Photograph - Digital image Set of 20, 1971-72
Set of 20 digital images of Bendigo Tramways, 1972 at or before closure while on a tram tour by Stuart Lodington. .1 - No. 7 at Golden Square terminus .2 - ditto .3 - No. 26 in bound on the Eaglehawk line with a crossing loop behind. .4 - Birney crossing the bridge by the tram depot. .5 - No. 29 running a special on the Eaglehawk line with a HBA billboard in the background. .6 - No. 29 with a driver walking in front of the tram at the above location. .7 - No. 29 on the Eaglehawk line .8 - ditto waiting for a tram at Manchester Loop with poppet head in the background. .9 - No. 29 on the Eaglehawk line .10 - Eaglehawk Town Hall at night. .11 - No. 7 at the depot junction in McCrae St, with Golden Square destination. .12 - No. 29 with the Camp Hotel Eaglehawk in the background. Also a Newsagent with The Sun, The Bendigo Advertiser and The Age signs on the building, High St .13 - No. 29 Mt Korong Rd, with the railway overbridge in the background. .14 - interior photo of Birney tram roof .15 - interior view of controls of Birney at Eaglehawk .16 - No. 29 outbound at the Depot Junction McCrae St. .17 - No. 18 at the Eaglehawk terminus .18 - close up view of No. 29 front. .19 - No. 29 in Nolan St, crossing the bridge, outbound. .20 - No. 18 at the Eaglehawk terminus with the Eaglehawk Town Hall, Post Office in the background. Has a circus banner on the side.trams, tramways, bendigo, eaglehawk, quarry hill, golden square, depot, mccrae st, nolan st, tram 7, tram 26, tram 29, tram 18