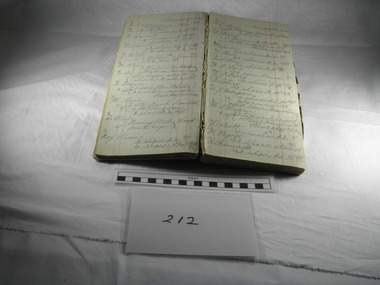
Showing 988 items
matching c hands
-
 Orbost & District Historical Society
iron, 1867
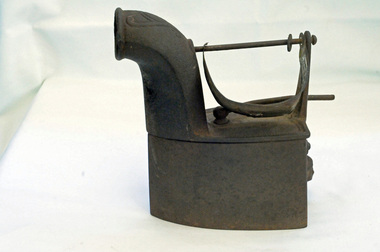
Charcoal irons followed the use of flat irons when the base was made into a box in which to put charcoal which would keep the iron hotter for a longer time.This item is an example of a domestic appliance in common usage before the advent of electricity.Large black ornate charcoal iron with a chimney on the top. It has an ornate metal hand protector. It has a hollow base into which charcoal is placed. The small hole at the back has a sliding cover that was used to regulate the temperature of the iron. ir0n-charcoal domestic -
 Orbost & District Historical Society
household items, 1935-1960s
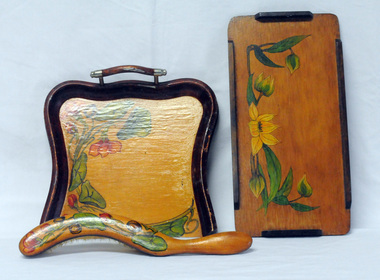
These items are from the estate of Norma Adelaide Scott (nee Johnston) ,January 2, 1925 - May 18, 2018 (93 years old) who died in Orbost. Norma was part of the Morris family who came to Newmerella in 1888, had land on Grandview Road and on the flats. Mr Morris had been a school teacher at Lake Tyers Mission before coming to Orbost. "Bobs y’r Uncle" was a nursery rhyme game designed by Frank H. Simpson for John Waddington Ltd. in 1935. The game was especially designed for children. The cards had scenes from nursery rhymes and six cards were needed to make up each rhyme in a set. Games turned out to become an important part in the progress of Waddingtons, who eventually acquired the rights to Monopoly in the UK, and then published Cluedo, opening the way for their supremacy in the toy industry These items are examples of common household items used in an Orbost family in the first - mid 20th century.3228.1 is a wooden tray with handles. The tray is lacquered and hand - painted with green leaves and orange flowers. 3228.2 is a brush with a curved wooden handle, lacquered and decorated in a similar pattern of green leaves and flowers. 3228.3 is a small wooden tray, lacquered and hand -painted with green leaves and yellow flowers. It is a rectangular shape with raised edging attached on the four sides. 3229.4 is a pack of cards in a red box with a cartoon type drawing of a man wearing a checked coat and hat holding two dogs on leashes.3228.5 is an orange / white cardboard box containing a pair of nylon stockings: box labelled " 'KOLOTEX/ Free-n-eezy" stockings.3228,5 - in orange and white print - "KOLOTEX/ Free-n-eezy/ Clings/ 40 denier/ SEAMLESS/ S-T-R-E-T-C-H" and in black - "NEW guaranteed never to ladder"scott-norma cards-playing hosiery-kolotex-stockings trays-wooden household -
 Orbost & District Historical Society
black and white photographs, 3281.1 : September 1987
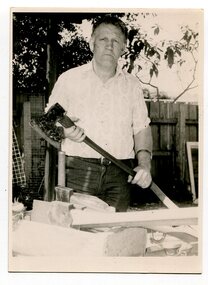
3281.1 is a photograph of Terry Martin. "Terry Martin travelled to Melbourne to Melbourne to display his extensive collection of axes and to demonstrate the art of broadaxe cutting. The axe Terry is holding is over 200 years old and is believed to have been used by ship builders in their trade. Terry makes his own axe handles from district timber." (Snowy River Mail 23 September 1987) 3281.2 is of Erasmo Giove. who came to Australia with his wife, Mina. They eventually settled in Orbost where Erasmo worked as a sleeper cutter withn his wife working alongside him. The Gioves lived with their four children, Tina, Rocco, Benodino and Graziela, in Forest Road, Orbost,These photographs are associated with the timber and sleeper-cutting industry in the Orbost Region. Timber sleepers were superceded by concrete sleepers in c. 1970s. Orbost has historically been based on the timber industry, but that industry has declined considerably over the last 20 years..The number of locals involved in the timber industry has declined and many of the mills have closed. This item reflects a time when that industry was a significant contributor to the economy of the district.3281.1 is of a man standing holding a long handled axe. 3281.2 is of a man holding a cross cut saw and holding in the other hand a framed photograph of a swing saw.woodcutting-tools axe saw-cross-cut saw-swing timber-orbost sleeper-cutting giove-erasmo martin-terry -
 Ringwood and District Historical Society
Clothing - Woollen baby's bonnet, Baby's bonnet Ringwood c. 1940's
Knitted by June Jones (nee Webber) ,Cathy Jones MotherYellow wool hand knitted baby's bonnet. Mostly plain knitting with garter stitch edging .Tie under chin fastened with a button -
 Orbost & District Historical Society
mincer, 1890's
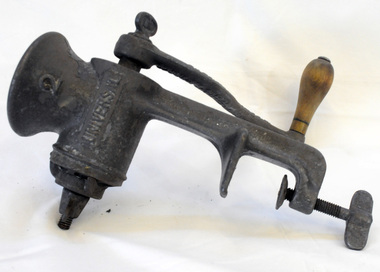
This item was used by Helena Warren (nee McKeown), a well known photographer and local press correspondent. She lived at Newmerella. The meat mincer was a particularly popular kitchen gadget. By means of the mincer left overs and off cuts could be transformed into shepherd's pie or mince steak. Gadgets like this Universal food chopper are typical of domestic inventions designed to reinforce the principles of thrift and labour-saving. Many of these gadgets were imported from the United States. A cast iron metal hand mincer with a long metal body with an opening at one end, inside which is a circular spiral blade and a screw clamp attachment at the other end. On one side of the mincer is a curved metal handle held in place by a metal nut and a wooden bulb shaped knob at the end. There is a metal circular webbed blade held in place by a metal nut and bolt."Universal No. 2 brand; L.F. & C., New Britain, Conn., U.S.A."mincer chopper food-preparation -
 Orbost & District Historical Society
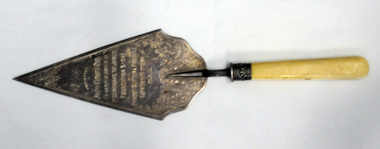
trowel, 1915
This trowel was presented to John Russell, director of Orbost Butter Factory for fiftyyears and Chairman for nine years. John Russell was an early Orbost blacksmith in Orbost, and director of the Orbost Butter Factory for 50 years. He came to Orbost in c. 1890 at the invitation of another early settler, James Nixon, became a blacksmith, and later a farmer and landholder. Many of his descendants still live in the Orbost area.This item is significant because of its association with the Orbost Butter Factory as well as the connection with the Russell family, Orbost pioneers.A silver (plated?) trowel ornately decorated with engravings. It is attached to a bone(?) handle with a silver metal ferule. the trowel is triangular with a scalloped lower edge.Presented to John Russel Esq.; Chairmen of Directors ;To Commemorate the Laying of; Foundation Stone; of the Orbost Butter and Produce; Coy's New Factory; 22.9.15 on right hand side : silver marks - crown, lion H.G.H.russell-john orbost-butter-factory -
 Orbost & District Historical Society
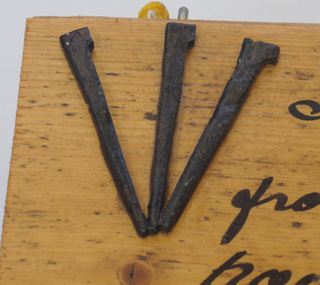
nails on board, 1885
These nails were made for Walter John Mundy (1868-1944). Often imported nails made for the softer English and North American timbers bent when hammered against the harder colonial woods and so The Mundy family were farmers / settlers in the Snowy River area since c. 1880s. The original Mundy family moved to a land "selection" at Betebolong in the early 1880's from Buchan. It's only over the past century or so that the mass-produced nail has become an inexpensive and common way to join materials. These three iron nails were hand made by an early Orbost settler or blacksmith in the 1880's, using iron, forge and anvil. They are examples of the types of nails used in the 19th century. A rectangular, wooden(athel pine?) board with three hand-made nails glued in fan design to top left corner of section of floorboard. There is a short length of yellow cord attached for hanging. To the right of the nails is hand-written text in black. the nails have irregular shanks and hammer marks on both shanks and heads.right of nails - " Flooring & nails from Walter Mundy's house at Jarrahmond built C.1885. Still in use to this day."mundy-walter hand-made-nails -
 Orbost & District Historical Society
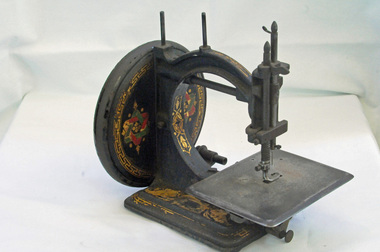
sewing machine, late 1860's - 1870's
The early settlers of Orbost had to be self sufficient making their own clothes, tableware, bed coverings, furnishings and equipment. Many women were skilled dressmakers and craft workers. This item reflects that time.A small black hand-cranked lockstitch sewing machine. It has a backwards C-shaped body. The wheel and base are decorated with a gold pattern. On the end above the needle assembly is a brass plate The balance wheel has a handle. The pattern on the wheel is a gold border with two gold, red and green stars formed by interwoven triangles. On the cloth plate is stamped "Patent March 1867 Heron Gresham" with some indecipherable marks.sewing-machine needlework -
 Learmonth and District Historical Society Inc.
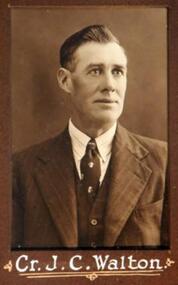
Photo - Walton J.C, Thornton Richards & Co, Walton,J.C. Councilor 1942-43, "Circa 1943"
Councilor J.C.Walton was elected as a member of council in 1940 serving until 1955.He was Shire President in 1945-46 and 1951-52. Original Historic photo of Councilors for the year 1942-43.Sepia photo,(rectangular),in brown mount, of Councilor J.C.Walton,situated left hand side of third row. Part of collection of photos of all councilors for the year 1942-43.Presented to the Ballarat Shire Council by Councilor R.T.White,(J.P.).President 1942-43.walton j c, ballarat shire council 1942 43 -
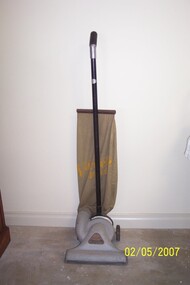 Cheese World Museum
Vacuum cleaner, Scott and Fetzer Co
Used by the Uebergang family of Tooram Park, Allansford.Upright hand-propelled vacuum cleaner has a canvas bag suspended by a spring with stencilled brand name and two rear wheels.Vacuette Special/ Model C Serial number 597887 Distributed by Sole Distributors/Vacuette Distributing Company, London Stores bldg., Melbourne, Australia/Guaranteed service.allansford, uebergang, vacuette, london stores, scott & fetzer, cleaning equipment, vacuum cleaners -
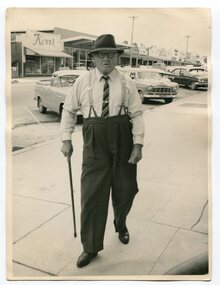 Orbost & District Historical Society
Photograph - Photograph off Albert Trewin
Albert (Abby) Trewin (b.21.03.1876 d. 01.07.1970) was part of the Trewin family who were early settlers at Jarrahmond near Orbost. Albert was born at Kingston near Ballarat, shifted to Jarrahmond where the house was called "Hillview", located 3 miles from Orbost on the B Road. The Trewin selection at Jarrahmond had many big trees on it and because these looked a bit like Jarrah trees from Western Australia, they names their property Jarrahmond (which became the district location and the name of Jarrahmond School). He cleared the land with bullocks, horses, crosscut saws, burned the stumps, burying some logs which were too big to burn. Then they milked cows, planted maize, had pigs, drove the pigs to Bairnsdale or to Waygara (c. 1915 when the train reached Waygara) on a buggy track through the bush. Pigs went to Dandenong Bacon Factory where they were processed into Dandy Ham. This photograph appears to be c.1950s - 1960s.A photograph of one of Jarrahmond's earliest settlers.B/W photograph of a man walking along a footpath. He is wearing a hat and has a walking stick in his right hand. He is wearing braces, white long-sleeved shirt, striped tie, glasses, polished black shoes. Behind him are vehicles and buildings (shops). jarrahmond, farming -
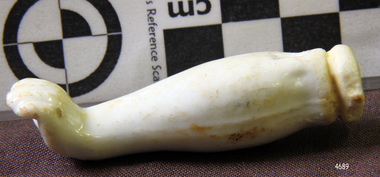 Flagstaff Hill Maritime Museum and Village
Doll's arm, Bisque dolls were being made from the 1860’s
This doll’s arm was part of the cargo from the Fiji and was part of the articles salvaged from the wreck. The three-masted iron barque Fiji had been built in Belfast, Ireland, in 1875 by Harland and Wolfe for a Liverpool based shipping company. The ship departed Hamburg on 22nd May 1891 bound for Melbourne, under the command of Captain William Vickers with a crew of 25. The ship’s manifest shows that she was loaded with a cargo of 260 cases of dynamite, pig iron, steel goods, spirits (whisky, schnapps, gin, brandy), sailcloth, tobacco, coiled fencing wire, concrete, 400 German pianos (Sweet Hapsburg), concertinas and other musical instruments, artists supplies including brushes, porcelain, furniture, china, and general cargo including candles. There were also toys in anticipation for Christmas, including wooden rocking horses, miniature ships, dolls with china limbs and rubber balls. On September 5th, one hundred days out from Hamburg in squally and boisterous south west winds the Cape Otway light was sighted on a bearing differing from Captain Vickers’ calculation of his position. At about 2:30am, Sunday 6th September 1891 land was reported 4-5 miles off the port bow. The captain tried to put the ship on the other tack, but she would not respond. He then tried to turn her the other way but just as the manoeuvre was being completed the Fiji struck rock only 300 yards (274 metres) from shore. The place is known as Wreck Bay, Moonlight Head. Blue lights were burned and rockets fired whilst an effort was made to lower boats but all capsized or swamped and smashed to pieces. Two of the younger crewmen volunteered to swim for the shore, taking a line. One, a Russian named Daniel Carkland, drowned after he was swept away when the line broke. The other, 17 year old able seaman Julius Gebauhr, a German, reached shore safely on his second attempt but without the line, which he had cut lose with his sheath-knife when it become tangled in kelp. He rested on the beach a while then climbed the steep cliffs in search of help. At about 10am on the Sunday morning a party of land selectors - including F. J. Stansmore, Leslie Dickson (or Dixon) and Mott - found Gebauhr. They were near Ryans Den, on their travels on horseback from Princetown towards Moonlight Head, and about 5km from the wreck. Gebauhr was lying in the scrub in a poor state, bleeding and dressed only in singlet, socks and a belt with his sheath-knife, ready for all emergencies. At first they were concerned about his wild and shaggy looking state and what seemed to be gibberish speech, taking him to be an escaped lunatic. They were reassured after he threw his knife away and realised that he was speaking half-English, half-German. They gave him food and brandy and some clothing and were then able to gain information about the wreck. Some of the men took him to Rivernook, a nearby guest house owned by John Evans, where he was cared for. Stansmore and Dickson rode off to try and summon help. Others went down to the site of the wreck. Messages for rescuing the rest of the crew were sent both to Port Campbell for the rocket rescue crew and to Warrnambool for the lifeboat. The S.S. Casino sailed from Portland towards the scene. After travelling the 25 miles to the scene, half of the Port Campbell rocket crew and equipment arrived and set up the rocket tripod on the beach below the cliffs. By this time the crew of the Fiji had been clinging to the jib-boom for almost 15 hours, calling frantically for help. Mr Tregear from the Rocket Crew fired the line. The light line broke and the rocket was carried away. A second line was successfully fired across the ship and made fast. The anxious sailors then attempted to come ashore along the line but, with as many as five at a time, the line sagged considerably and some were washed off. Others, nearly exhausted, had to then make their way through masses of seaweed and were often smothered by waves. Only 14 of the 24 who had remained on the ship made it to shore. Many onlookers on the beach took it in turns to go into the surf and drag half-drowned seamen to safety. These rescuers included Bill (William James) Robe, Edwin Vinge, Hugh Cameron, Fenelon Mott, Arthur Wilkinson and Peter Carmody. (Peter Carmody was also involved in the rescue of men from the Newfield.) Arthur Wilkinson, a 29 year old land selector, swam out to the aid of one of the ship’s crewmen, a carpenter named John Plunken. Plunken was attempting to swim from the Fiji to the shore. Two or three times both men almost reached the shore but were washed back to the wreck. A line was thrown to them and they were both hauled aboard. It was thought that Wilkinson struck his head on the anchor before s they were brought up. He remained unconscious. The carpenter survived this ordeal but Wilkinson later died and his body was washed up the next day. It was 26 year old Bill Robe who hauled out the last man, the captain, who had become tangled in the kelp. The wreck of the Fiji was smashed apart within 20 minutes of the captain being brought ashore, and it settled in about 6m of water. Of the 26 men on the Fiji, 11 in total lost their lives. The remains of 7 bodies were washed onto the beach and their coffins were made from timbers from the wrecked Fiji. They were buried on the cliff top above the wreck. The survivors were warmed by fires on the beach then taken to Rivernook and cared for over the next few days. Funds were raised by local communities soon after the wreck in aid of the sufferers of the Fiji disaster. Captain Vickers was severely reprimanded for his mishandling of the ship. His Masters Certificate was suspended for 12 months. At the time there was also a great deal of public criticism at the slow and disorganised rescue attempt to save those on board. The important canvas ‘breech buoy’ or ‘bucket chair’ and the heavy line from the Rocket Rescue was in the half of the rocket outfit that didn’t make it in time for the rescue: they had been delayed at the Gellibrand River ferry. Communications to Warrnambool were down so the call for help didn’t get through on time and the two or three boats that had been notified of the wreck failed to reach it in time. Much looting occurred of the cargo that washed up on the shore, with nearly every visitor leaving the beach with bulky pockets. One looter was caught with a small load of red and white rubber balls, which were duly confiscated and he was ‘detained’ for 14 days. Essence of peppermint mysteriously turned up in many settlers homes. Sailcloth was salvaged and used for horse rugs and tent flies. Soon after the wreck “Fiji tobacco” was being advertised around Victoria. A Customs officer, trying to prevent some of the looting, was assaulted by looters and thrown over a steep cliff. He managed to cling to a bush lower down until rescued. In 1894 some coiled fencing wire was salvaged from the wreck. Hundreds of coils are still strewn over the site of the wreck, encrusted and solidified. The hull is broken but the vessel’s iron ribs can be seen along with some of the cargo of concrete and pig iron. Captain Vickers presented Bill Robe with his silver-cased pocket watch, the only possession that he still had, as a token for having saved his life and the lives of some of the crew. (The pocket watch came with 2 winding keys, one to wind it and one to change the hands.) Years later Bill passed the watch to his brother-in-law Gib (Gilbert) Hulands as payment of a debt and it has been passed down the family to Gilbert Hulands’ grandson, John Hulands. Seaman Julius Gebauhr later gave his knife, in its hand crafted leather sheath, to F. J. Stansmore for caring for him when he came ashore. The knife handle had a personal inscription on it. A marble headstone on the 200m high cliffs overlooking Wreck Beach, west of Moonlight Head, paying tribute to the men who lost their lives when Fiji ran aground. The scene of the wreck is marked by the anchor from the Fiji, erected by Warrnambool skin divers in 1967. Amongst the artefacts salvaged from the Fiji are bisque (or china) toys, (including miniature animals, limbs from small bisque dolls), rubber balls, a slate pencil, a glass bottle, sample of rope from the distress rocket and a candlestick holder. These items are now part of the Fiji collection at Flagstaff Hill Maritime Museum, along with Captain Vickers’ pocket watch and Julius Gebauhr’s sheath knife. Flagstaff Hill’s Fiji collection is of historical significance at a State level because of its association with the wreck Fiji, which is on the Victorian Heritage Register VHR S259. The Fiji is archaeologically significant as the wreck of a typical 19th century international sailing ship with cargo. It is educationally and recreationally significant as one of Victoria's most spectacular historic shipwreck dive sites with structural features and remains of the cargo evident. It also represents aspects of Victoria’s shipping history and its potential to interpret sub-theme 1.5 of Victoria’s Framework of Historical Themes (living with natural processes). The Fiji collection meets the following criteria for assessment: Criterion A: Importance to the course, or pattern, of Victoria’s cultural history. Criterion B: Possession of uncommon, rare or endangered aspects of Victoria’s cultural history Criterion C: Potential to yield information that will contribute to an understanding of Victoria’s cultural history. Doll’s arm salvaged from the wreck of the Fiji. This moulded arm, made of bisque (sometimes described as china or porcelain) is for a small doll. Its hand has the fingers touching each other with the thumb tucked into the palm. The white coloured arm is finished with glazed paint. The arm is discoloured in places with a tan colour. The arm is solid rather than jointed and goes from hand to upper arm. There is a groove around the top of the arm, which would enable the arm to be attached to the cloth body of a doll.1891, china, shipwrecked coast, flagstaff hill, flagstaff hill maritime museum, maritime museum, shipwrecked artefact, flagstaff hill maritime village, shipwreck coast, warrnambool, porcelain, doll, moonlight head, wreck bay, cargo, bisque, toys, doll's arm, doll's limb -
 Flagstaff Hill Maritime Museum and Village
Domestic object - Bowl, Late 19th or early 20th Century
The Process of Making Pottery Decorating, Firing, Glazing, Making, Technical There is a rhythm and flow to clay. It can’t be done all at once! Even the making process! It can take weeks to get everything done, especially if you can only work on your pottery once a week! Even though we have three hour classes, it’s often just not enough time! Here is an overview of some of the processes so you have a bit more grasp on some of the technical stuff! Step One – Design There are SO many ideas out there for making stuff in clay! From delicate porcelain jewellery, through to heavy sculptural work and everything in between. Deciding your direction is sometimes not that easy – when you first start, try everything, you will naturally gravitate to the style that you enjoy! The options and variations are endless and can get a wee bit overwhelming too! Check in with me before you start to ensure your ideas will work, what order you might do things, how you could achieve the look you are seeking and any other technical data required! Step Two – Making Clay is thixotropic. This means that as you work with it, the clay first gets sloppier and wetter, before is begins to dry in the atmosphere. For most things, you simply can’t do all parts of the project at once. An example of work order might look like: Get last weeks work out from the shelves Prepare clay for today’s work – roll your clay, prepare balls for throwing, make the first stage of a pinch pot) Clean up last week’s work and put it on the shelf for bisque firing Check that you have any glazing to do – and do enough of it that you will have time to finish your main project Do the next step of your next project – there might be a further step that can’t be complete immediately, in that case, wrap your work well and put onto the shelves. Letting your work rest for a while can really help keep your work clean and professional looking. Many things require bagging under plastic to keep it ready for work the next week – put your name on the outside of the bag so you can find your work easily. We have stickers and markers. Consider how you want to decorate your work – coloured slip can be applied at a fairly wet stage (remembering that it will make your work even wetter!). Trying to apply slip to dry clay won’t work! If you want to do sgraffito – you will need to keep the work leather hard (a state of dryness where you can still work the clay with a little effort and a little water and care). Step Three – Drying Most of the time your work can go into the rack uncovered to let it dry out for the following week. If you want to continue forming or shaping you will need to double bag your work – put your work on a suitable sized bat and put the bat in a bag so the base of the bag is under the bat, then put another bag over the top of the work and tuck the top of the bag under the bat. If you want to trim (or turn) your thrown work the following week, it should also be double bagged. If your work is large, delicate, or of uneven thicknesses, you should lightly cover your work for drying. When considering the drying process, bare in mind the weather, humidity and wind! The hotter and dryer, the faster things dry and work can dry unevenly in the shelves – this can lead to cracking – another time to lightly cover your work for drying. Step Four – Trimming and Cleaning Up Your work is dry! It is called greenware now and it is at it’s most fragile! Handle everything with two hands. I often refer to soft hands – keep everything gentle and with your fingers spread as much as possible. Try to not pick up things like plates too much, and always with both hands! Before your work can be bisque fired it should be “cleaned up”. You work won’t go into the kiln if it has sharp edges – when glazed, sharp edges turn into razor blades! Use a piece of fly wire to rub the work all over – this will scratch a little so be light handed. Use a knife or metal kidney to scrape any areas that require a bit more dynamic treatment than the fly wire offers! Finally, a very light wipe over with a slightly damp sponge can help soften and soothe all of your edges and dags! Trimming thrown work: If you are planning to trim (or turn) your thrown work (and you should be), make sure you bag it well – your work should be leather hard to almost dry for easiest trimming. Use this step to finish the work completely – use a metal kidney to polish the surface, or a slightly damp sponge to give a freshly thrown look. Wipe the sponge around the rim after trimming, and check the inside of the pot for dags! Trimming slip cast work: Usually I will trim the rims of your work on the wheel the following day to make that stage easier, however you will still need to check your work for lumps and bumps. Last but not least – check that your name is still clearly on the bottom of your work. Step Five – Bisque Firing When the work is completely dry it can go into the bisque kiln. The bisque kiln is fired to 1000°C. This process burns off the water in the clay as well as some of the chemically bound water. The structure of the clay is not altered that much at this temperature. Inside the bisque kiln, the work is stacked a little, small bowl inside a larger bowl and onto a heavy plate. Smaller items like decorations or drink coasters might get stacked several high. Consideration is paid to the weight of the stack and shape of the work. A bisque kiln can fire about one and a half times the amount of work that the glaze kiln can fire. The firing takes about 10 hours to complete the cycle and about two days to cool down. Once it has been emptied the work is placed in the glaze room ready for you to decorate! Step Six – Glazing Decorating your work with colour can be a lot of fun – and time consuming! There are three main options for surface treatment at this stage: Oxide Washes Underglazes Glazes Washes and underglazes do not “glaze” the work – It will still need a layer of glaze to fully seal the clay (washes don’t need glaze on surfaces not designed for food or liquid as they can gloss up a little on their own). Underglazes are stable colourants that turn out pretty much how they look in the jar. They can be mixed with each other to form other colours and can be used like water colours to paint onto your work. Mostly they should have a clear glaze on top to seal them. Oxides are a different species – the pink oxide (cobalt) wash turns out bright blue for instance. They don’t always need a glaze on top, and some glazes can change the colour of the wash! The glazes need no other “glaze” on top! Be careful of unknown glaze interactions – you can put any combination of glaze in a bowl or on a plate, but only a single glaze on the outside of any vertical surface! Glazes are a chemical reaction under heat. We don’t know the exact chemicals in the Mayco glazes we use. I can guess by the way they interact with each other, however, on the whole, you need to test every idea you have, and not run the test on a vertical surface! Simply put, glaze is a layer of glass like substance that bonds with the clay underneath. Clay is made of silica, alumina and water. Glaze is made of mostly silica. Silica has a melting point of 1700°C and we fire to 1240°C. The silica requires a “flux” to help it melt at the lower temperature. Fluxes can be all sorts of chemicals – a common one is calcium – calcium has a melting point of 2500°C, however, together they both melt at a much lower temperature! Colourants are metal oxides like cobalt (blue), chrome (green through black), copper (green, blue, even red!), manganese (black, purple and pink) iron (red brown), etc. Different chemicals in the glaze can have dramatic effects. for example, barium carbonate (which we don’t use) turns manganese bright pink! Other elements can turn manganese dioxide brown, blue, purple and reddish brown. Manganese dioxide is a flux in and of itself as well. So, glazes that get their black and purple colours, often interact with other glazes and RUN! Our mirror black is a good example – it mixes really well with many glazes because it fluxes them – causes them to melt faster. It will also bring out many beautiful colours in the glazes because it’s black colouring most definitely comes from manganese dioxide! Glaze chemistry is a whole subject on it’s own! We use commercial Mayco glazes on purpose – for their huge range of colour possibilities, stability, cool interactions, artistic freedom with the ability to easily brush the glazes on and ease of use. We currently have almost 50 glazes on hand! A major project is to test the interactions of all glazes with each other. That is 2,500 test tiles!!!! I’m going to make the wall behind the wheels the feature wall of pretty colours! Step Seven – Glaze (Gloss or sometimes called “Glost”) Firing Most of the time this is the final stage of making your creation (but not always!) The glaze kiln goes to 1240°C. This is called cone 6, or midrange. It is the low end of stoneware temperatures. Stoneware clays and glazes are typically fired at cone 8 – 10, that is 1260 – 1290°C. The energy requirement to go from 1240°C to 1280°C is almost a 30% more! Our clay is formulated to vitrify (mature, turn “glass-like”) at 1240°, as are our glazes. A glaze kiln take around 12 hours to reach temperature and two to three days to cool down. Sometimes a third firing process is required – this is for decoration that is added to work after the glaze firing. For example – adding precious metals and lustres. this firing temperature is usually around 600 – 800°C depending upon the techniques being used. There are many students interested in gold and silver trims – we will be doing this third type of firing soon! After firing your work will be in the student finished work shelves. Remember to pay for it before you head out the door! There is a small extra charge for using porcelain clay (it’s more than twice the price of regular clay), and for any third firing process! Once your work has been fired it can not turn back into clay for millennia – so don’t fire it if you don’t like it! Put it in the bucket for recycling. https://firebirdstudios.com.au/the-process-of-making-pottery/ The bowl is an example of kitchenware used in the 19th century and still in use today.Bowl white ceramic. Crack on side. Badly stained.Backstamp very faint and unable to be read.flagstaff hill, warrnambool, shipwrecked-coast, flagstaff-hill, flagstaff-hill-maritime-museum, maritime-museum, shipwreck-coast, flagstaff-hill-maritime-village, mixing bowl, food preparation, kitchen equipment, ceramic -
 Flagstaff Hill Maritime Museum and Village
Domestic object - Bowl
The Process of Making Pottery Decorating, Firing, Glazing, Making, Technical There is a rhythm and flow to clay. It can’t be done all at once! Even the making process! It can take weeks to get everything done, especially if you can only work on your pottery once a week! Even though we have three hour classes, it’s often just not enough time! Here is an overview of some of the processes so you have a bit more grasp on some of the technical stuff! Step One – Design There are SO many ideas out there for making stuff in clay! From delicate porcelain jewellery, through to heavy sculptural work and everything in between. Deciding your direction is sometimes not that easy – when you first start, try everything, you will naturally gravitate to the style that you enjoy! The options and variations are endless and can get a wee bit overwhelming too! Check in with me before you start to ensure your ideas will work, what order you might do things, how you could achieve the look you are seeking and any other technical data required! Step Two – Making Clay is thixotropic. This means that as you work with it, the clay first gets sloppier and wetter, before is begins to dry in the atmosphere. For most things, you simply can’t do all parts of the project at once. An example of work order might look like: Get last weeks work out from the shelves Prepare clay for today’s work – roll your clay, prepare balls for throwing, make the first stage of a pinch pot) Clean up last week’s work and put it on the shelf for bisque firing Check that you have any glazing to do – and do enough of it that you will have time to finish your main project Do the next step of your next project – there might be a further step that can’t be complete immediately, in that case, wrap your work well and put onto the shelves. Letting your work rest for a while can really help keep your work clean and professional looking. Many things require bagging under plastic to keep it ready for work the next week – put your name on the outside of the bag so you can find your work easily. We have stickers and markers. Consider how you want to decorate your work – coloured slip can be applied at a fairly wet stage (remembering that it will make your work even wetter!). Trying to apply slip to dry clay won’t work! If you want to do sgraffito – you will need to keep the work leather hard (a state of dryness where you can still work the clay with a little effort and a little water and care). Step Three – Drying Most of the time your work can go into the rack uncovered to let it dry out for the following week. If you want to continue forming or shaping you will need to double bag your work – put your work on a suitable sized bat and put the bat in a bag so the base of the bag is under the bat, then put another bag over the top of the work and tuck the top of the bag under the bat. If you want to trim (or turn) your thrown work the following week, it should also be double bagged. If your work is large, delicate, or of uneven thicknesses, you should lightly cover your work for drying. When considering the drying process, bare in mind the weather, humidity and wind! The hotter and dryer, the faster things dry and work can dry unevenly in the shelves – this can lead to cracking – another time to lightly cover your work for drying. Step Four – Trimming and Cleaning Up Your work is dry! It is called greenware now and it is at it’s most fragile! Handle everything with two hands. I often refer to soft hands – keep everything gentle and with your fingers spread as much as possible. Try to not pick up things like plates too much, and always with both hands! Before your work can be bisque fired it should be “cleaned up”. You work won’t go into the kiln if it has sharp edges – when glazed, sharp edges turn into razor blades! Use a piece of fly wire to rub the work all over – this will scratch a little so be light handed. Use a knife or metal kidney to scrape any areas that require a bit more dynamic treatment than the fly wire offers! Finally, a very light wipe over with a slightly damp sponge can help soften and soothe all of your edges and dags! Trimming thrown work: If you are planning to trim (or turn) your thrown work (and you should be), make sure you bag it well – your work should be leather hard to almost dry for easiest trimming. Use this step to finish the work completely – use a metal kidney to polish the surface, or a slightly damp sponge to give a freshly thrown look. Wipe the sponge around the rim after trimming, and check the inside of the pot for dags! Trimming slip cast work: Usually I will trim the rims of your work on the wheel the following day to make that stage easier, however you will still need to check your work for lumps and bumps. Last but not least – check that your name is still clearly on the bottom of your work. Step Five – Bisque Firing When the work is completely dry it can go into the bisque kiln. The bisque kiln is fired to 1000°C. This process burns off the water in the clay as well as some of the chemically bound water. The structure of the clay is not altered that much at this temperature. Inside the bisque kiln, the work is stacked a little, small bowl inside a larger bowl and onto a heavy plate. Smaller items like decorations or drink coasters might get stacked several high. Consideration is paid to the weight of the stack and shape of the work. A bisque kiln can fire about one and a half times the amount of work that the glaze kiln can fire. The firing takes about 10 hours to complete the cycle and about two days to cool down. Once it has been emptied the work is placed in the glaze room ready for you to decorate! Step Six – Glazing Decorating your work with colour can be a lot of fun – and time consuming! There are three main options for surface treatment at this stage: Oxide Washes Underglazes Glazes Washes and underglazes do not “glaze” the work – It will still need a layer of glaze to fully seal the clay (washes don’t need glaze on surfaces not designed for food or liquid as they can gloss up a little on their own). Underglazes are stable colourants that turn out pretty much how they look in the jar. They can be mixed with each other to form other colours and can be used like water colours to paint onto your work. Mostly they should have a clear glaze on top to seal them. Oxides are a different species – the pink oxide (cobalt) wash turns out bright blue for instance. They don’t always need a glaze on top, and some glazes can change the colour of the wash! The glazes need no other “glaze” on top! Be careful of unknown glaze interactions – you can put any combination of glaze in a bowl or on a plate, but only a single glaze on the outside of any vertical surface! Glazes are a chemical reaction under heat. We don’t know the exact chemicals in the Mayco glazes we use. I can guess by the way they interact with each other, however, on the whole, you need to test every idea you have, and not run the test on a vertical surface! Simply put, glaze is a layer of glass like substance that bonds with the clay underneath. Clay is made of silica, alumina and water. Glaze is made of mostly silica. Silica has a melting point of 1700°C and we fire to 1240°C. The silica requires a “flux” to help it melt at the lower temperature. Fluxes can be all sorts of chemicals – a common one is calcium – calcium has a melting point of 2500°C, however, together they both melt at a much lower temperature! Colourants are metal oxides like cobalt (blue), chrome (green through black), copper (green, blue, even red!), manganese (black, purple and pink) iron (red brown), etc. Different chemicals in the glaze can have dramatic effects. for example, barium carbonate (which we don’t use) turns manganese bright pink! Other elements can turn manganese dioxide brown, blue, purple and reddish brown. Manganese dioxide is a flux in and of itself as well. So, glazes that get their black and purple colours, often interact with other glazes and RUN! Our mirror black is a good example – it mixes really well with many glazes because it fluxes them – causes them to melt faster. It will also bring out many beautiful colours in the glazes because it’s black colouring most definitely comes from manganese dioxide! Glaze chemistry is a whole subject on it’s own! We use commercial Mayco glazes on purpose – for their huge range of colour possibilities, stability, cool interactions, artistic freedom with the ability to easily brush the glazes on and ease of use. We currently have almost 50 glazes on hand! A major project is to test the interactions of all glazes with each other. That is 2,500 test tiles!!!! I’m going to make the wall behind the wheels the feature wall of pretty colours! Step Seven – Glaze (Gloss or sometimes called “Glost”) Firing Most of the time this is the final stage of making your creation (but not always!) The glaze kiln goes to 1240°C. This is called cone 6, or midrange. It is the low end of stoneware temperatures. Stoneware clays and glazes are typically fired at cone 8 – 10, that is 1260 – 1290°C. The energy requirement to go from 1240°C to 1280°C is almost a 30% more! Our clay is formulated to vitrify (mature, turn “glass-like”) at 1240°, as are our glazes. A glaze kiln take around 12 hours to reach temperature and two to three days to cool down. Sometimes a third firing process is required – this is for decoration that is added to work after the glaze firing. For example – adding precious metals and lustres. this firing temperature is usually around 600 – 800°C depending upon the techniques being used. There are many students interested in gold and silver trims – we will be doing this third type of firing soon! After firing your work will be in the student finished work shelves. Remember to pay for it before you head out the door! There is a small extra charge for using porcelain clay (it’s more than twice the price of regular clay), and for any third firing process! Once your work has been fired it can not turn back into clay for millennia – so don’t fire it if you don’t like it! Put it in the bucket for recycling. https://firebirdstudios.com.au/the-process-of-making-pottery/ This bowl is an example of kitchenware used in the 19th century and still in use today.Bowl white ceramic plain that has two sets of edging around lip. Inside bowl has plaster designed to look like cooking mixture.flagstaff hill, warrnambool, shipwrecked-coast, flagstaff-hill, flagstaff-hill-maritime-museum, maritime-museum, shipwreck-coast, flagstaff-hill-maritime-village, kitchen equipment, ceramic -
 Flagstaff Hill Maritime Museum and Village
Domestic object - Bowl, J & G Meakin, Late 19th or early 20th Century
The Process of Making Pottery Decorating, Firing, Glazing, Making, Technical There is a rhythm and flow to clay. It can’t be done all at once! Even the making process! It can take weeks to get everything done, especially if you can only work on your pottery once a week! Even though we have three hour classes, it’s often just not enough time! Here is an overview of some of the processes so you have a bit more grasp on some of the technical stuff! Step One – Design There are SO many ideas out there for making stuff in clay! From delicate porcelain jewellery, through to heavy sculptural work and everything in between. Deciding your direction is sometimes not that easy – when you first start, try everything, you will naturally gravitate to the style that you enjoy! The options and variations are endless and can get a wee bit overwhelming too! Check in with me before you start to ensure your ideas will work, what order you might do things, how you could achieve the look you are seeking and any other technical data required! Step Two – Making Clay is thixotropic. This means that as you work with it, the clay first gets sloppier and wetter, before is begins to dry in the atmosphere. For most things, you simply can’t do all parts of the project at once. An example of work order might look like: Get last weeks work out from the shelves Prepare clay for today’s work – roll your clay, prepare balls for throwing, make the first stage of a pinch pot) Clean up last week’s work and put it on the shelf for bisque firing Check that you have any glazing to do – and do enough of it that you will have time to finish your main project Do the next step of your next project – there might be a further step that can’t be complete immediately, in that case, wrap your work well and put onto the shelves. Letting your work rest for a while can really help keep your work clean and professional looking. Many things require bagging under plastic to keep it ready for work the next week – put your name on the outside of the bag so you can find your work easily. We have stickers and markers. Consider how you want to decorate your work – coloured slip can be applied at a fairly wet stage (remembering that it will make your work even wetter!). Trying to apply slip to dry clay won’t work! If you want to do sgraffito – you will need to keep the work leather hard (a state of dryness where you can still work the clay with a little effort and a little water and care). Step Three – Drying Most of the time your work can go into the rack uncovered to let it dry out for the following week. If you want to continue forming or shaping you will need to double bag your work – put your work on a suitable sized bat and put the bat in a bag so the base of the bag is under the bat, then put another bag over the top of the work and tuck the top of the bag under the bat. If you want to trim (or turn) your thrown work the following week, it should also be double bagged. If your work is large, delicate, or of uneven thicknesses, you should lightly cover your work for drying. When considering the drying process, bare in mind the weather, humidity and wind! The hotter and dryer, the faster things dry and work can dry unevenly in the shelves – this can lead to cracking – another time to lightly cover your work for drying. Step Four – Trimming and Cleaning Up Your work is dry! It is called greenware now and it is at it’s most fragile! Handle everything with two hands. I often refer to soft hands – keep everything gentle and with your fingers spread as much as possible. Try to not pick up things like plates too much, and always with both hands! Before your work can be bisque fired it should be “cleaned up”. You work won’t go into the kiln if it has sharp edges – when glazed, sharp edges turn into razor blades! Use a piece of fly wire to rub the work all over – this will scratch a little so be light handed. Use a knife or metal kidney to scrape any areas that require a bit more dynamic treatment than the fly wire offers! Finally, a very light wipe over with a slightly damp sponge can help soften and soothe all of your edges and dags! Trimming thrown work: If you are planning to trim (or turn) your thrown work (and you should be), make sure you bag it well – your work should be leather hard to almost dry for easiest trimming. Use this step to finish the work completely – use a metal kidney to polish the surface, or a slightly damp sponge to give a freshly thrown look. Wipe the sponge around the rim after trimming, and check the inside of the pot for dags! Trimming slip cast work: Usually I will trim the rims of your work on the wheel the following day to make that stage easier, however you will still need to check your work for lumps and bumps. Last but not least – check that your name is still clearly on the bottom of your work. Step Five – Bisque Firing When the work is completely dry it can go into the bisque kiln. The bisque kiln is fired to 1000°C. This process burns off the water in the clay as well as some of the chemically bound water. The structure of the clay is not altered that much at this temperature. Inside the bisque kiln, the work is stacked a little, small bowl inside a larger bowl and onto a heavy plate. Smaller items like decorations or drink coasters might get stacked several high. Consideration is paid to the weight of the stack and shape of the work. A bisque kiln can fire about one and a half times the amount of work that the glaze kiln can fire. The firing takes about 10 hours to complete the cycle and about two days to cool down. Once it has been emptied the work is placed in the glaze room ready for you to decorate! Step Six – Glazing Decorating your work with colour can be a lot of fun – and time consuming! There are three main options for surface treatment at this stage: Oxide Washes Underglazes Glazes Washes and underglazes do not “glaze” the work – It will still need a layer of glaze to fully seal the clay (washes don’t need glaze on surfaces not designed for food or liquid as they can gloss up a little on their own). Underglazes are stable colourants that turn out pretty much how they look in the jar. They can be mixed with each other to form other colours and can be used like water colours to paint onto your work. Mostly they should have a clear glaze on top to seal them. Oxides are a different species – the pink oxide (cobalt) wash turns out bright blue for instance. They don’t always need a glaze on top, and some glazes can change the colour of the wash! The glazes need no other “glaze” on top! Be careful of unknown glaze interactions – you can put any combination of glaze in a bowl or on a plate, but only a single glaze on the outside of any vertical surface! Glazes are a chemical reaction under heat. We don’t know the exact chemicals in the Mayco glazes we use. I can guess by the way they interact with each other, however, on the whole, you need to test every idea you have, and not run the test on a vertical surface! Simply put, glaze is a layer of glass like substance that bonds with the clay underneath. Clay is made of silica, alumina and water. Glaze is made of mostly silica. Silica has a melting point of 1700°C and we fire to 1240°C. The silica requires a “flux” to help it melt at the lower temperature. Fluxes can be all sorts of chemicals – a common one is calcium – calcium has a melting point of 2500°C, however, together they both melt at a much lower temperature! Colourants are metal oxides like cobalt (blue), chrome (green through black), copper (green, blue, even red!), manganese (black, purple and pink) iron (red brown), etc. Different chemicals in the glaze can have dramatic effects. for example, barium carbonate (which we don’t use) turns manganese bright pink! Other elements can turn manganese dioxide brown, blue, purple and reddish brown. Manganese dioxide is a flux in and of itself as well. So, glazes that get their black and purple colours, often interact with other glazes and RUN! Our mirror black is a good example – it mixes really well with many glazes because it fluxes them – causes them to melt faster. It will also bring out many beautiful colours in the glazes because it’s black colouring most definitely comes from manganese dioxide! Glaze chemistry is a whole subject on it’s own! We use commercial Mayco glazes on purpose – for their huge range of colour possibilities, stability, cool interactions, artistic freedom with the ability to easily brush the glazes on and ease of use. We currently have almost 50 glazes on hand! A major project is to test the interactions of all glazes with each other. That is 2,500 test tiles!!!! I’m going to make the wall behind the wheels the feature wall of pretty colours! Step Seven – Glaze (Gloss or sometimes called “Glost”) Firing Most of the time this is the final stage of making your creation (but not always!) The glaze kiln goes to 1240°C. This is called cone 6, or midrange. It is the low end of stoneware temperatures. Stoneware clays and glazes are typically fired at cone 8 – 10, that is 1260 – 1290°C. The energy requirement to go from 1240°C to 1280°C is almost a 30% more! Our clay is formulated to vitrify (mature, turn “glass-like”) at 1240°, as are our glazes. A glaze kiln take around 12 hours to reach temperature and two to three days to cool down. Sometimes a third firing process is required – this is for decoration that is added to work after the glaze firing. For example – adding precious metals and lustres. this firing temperature is usually around 600 – 800°C depending upon the techniques being used. There are many students interested in gold and silver trims – we will be doing this third type of firing soon! After firing your work will be in the student finished work shelves. Remember to pay for it before you head out the door! There is a small extra charge for using porcelain clay (it’s more than twice the price of regular clay), and for any third firing process! Once your work has been fired it can not turn back into clay for millennia – so don’t fire it if you don’t like it! Put it in the bucket for recycling. https://firebirdstudios.com.au/the-process-of-making-pottery/This bowl was made by renowned pottery company J & G Meakin of England. The firm was established in the mid-1800's. The bowl is an example of kitchenware used in the 19th century and still in use today.Bowl; white ceramic, round and tapering inwards towards base. Made by J and G Meakin England.On base, 'Ironstone China Reg SOL 391413' with symbolflagstaff hill, flagstaff hill maritime museum and village, warrnambool, maritime museum, maritime village, great ocean road, shipwreck coast, mixing bowl, food preparation, j & g meakin, pottery, stoke-on-trent, kitchen equipment, ceramic -
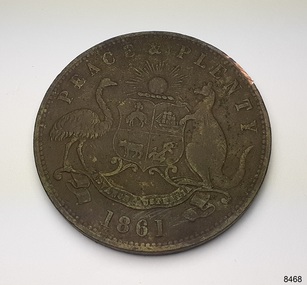 Flagstaff Hill Maritime Museum and Village
Currency - Coin, Robert Hyde & Co. Shipping Merchants, 1861
The donor (a local resident.) of this coin found this penny token coin in the sand dunes of Lady Bay, Warrnambool, in 2023. The coin could have come from a local shipwreck, passengers, or members of the community. Trade was carried out along the southwest coast of Victoria between Melbourne and Portland, with the Port of Warrnambool receiving passengers and goods by coastal traders, the steamboat that set off from ports every few days. One such vessel was the steamship SS Edina that made her first voyage from Melbourne to Portland in 1863. For around a decade or so in the Gold Rush period in Australia there was a shortage of official government currency. It was acceptable during this time to use token coins minted by local businesses to be used within their store, much like the loyalty and rewards cards that businesses give their customers in modern times. The tokens were also a good way to advertise their wares and details. The first token was introduced in Melbourne in 1848 and were used until 1868, when they became illegal in New South Wales. They were minted in Australia and overseas. The token was issued by Robert Hyde & Co. who traded in second-hand goods such as old clothes, sheets, metal items and glass, which they resold to be re-manufactured, or "recycled".A token such as this one identifies businesses existing in the post-Gold Rush period in Australia. Round copper coin. Penny token coin bearing the Australian Coat of Arms and motto. The coin also has the company's name, location, nature of business and motto. The coin has grooves around the edge. It was made in 1861.OBVERSE: Logo: (Australian Coat of Arms), Motto: "PEACE & PLENTY", Date: 1861 REVERSE: "ROBERT HYDE & CO MELBOURNE", "GENERAL MARINE STORE, SHIPPERS OF RAGS GLASS METALS &.C"flagstaff hill maritime museum and village, warrnambool, great ocean road, shipwreck coast, merchant token, melbourne, token, australian token, trade token, coins, merchants, medal, colonisation, gold rush, robert hyde & co., general marine store, shippers of rags glass metals etc., numismatics, second-hand scrap, scrap goods -
 Blacksmith's Cottage and Forge
Book, Day, Day Book, 20 January 1920 to 27 April 1921
This book contains information relating to daily work conducted by Charles Edwards, Blacksmith, during period 20th January 1920 to 27 April 1921. It lists customer names, types of work done and costs involved. The written X indicates whether work was paid in full.This books contains historical information relating to peoples names and industries in the Bacchus Marsh district and the work performed for them by the blacksmith during the period mentioned. Most of work relates to shoeing horses, repairs to horse drawn vehicles, repairs to farm machinery/tools and some work on cars.Cardboard covers - green marbled design with black spine. Account type book with red ruled columns. Hand written names, jobs, charges and dates.On the inner cover - Mrs C Edwards, Main Street, Bacchus Marshbook, blacksmith, day, customers, clients, charles edwards -
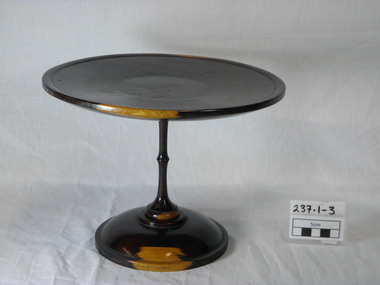 Blacksmith's Cottage and Forge
Cake Stand, Beginning of the 20th Century
This cake stand was hand turned from osage orange wood. The wood was sourced from a grove of osage orange trees in the Fisken/Taverner Street area. This grove was planted by Mr A C Simon, an orchardist, who brought the seeds from North America in the 1860's to create a protective hedge for his plants The wood from these plants produces a beautiful toned affect of dark brown and yellow/orange when turned and polished. The significance of this cake stand is that it has been carved from the osage orange which grows well in Bacchus Marsh although originated in America. Mr Simon made many items from this wood. This gives it local significance.This polished wooden stand would have been used for cake to be displayed It consists of a round 'plate' of wood as the top, with a fine narrow turned wood pedestal and a round base. The stand is made of osage orange giving it the unique tones of dark brown and orange wood.turned wood, osage orange, food stand, food display, brown orange wood, wooden, cake stand, parlour item, table centre piece, polished wood, ornamental stand -
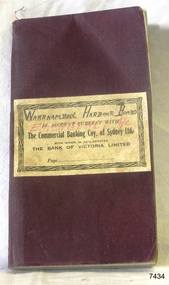 Flagstaff Hill Maritime Museum and Village
Financial record - Bank Transaction Book, Commercial Banking Company of Sydney Limited, before 1931
The financial account book was used by the Warrnambool Harbour Board for its Emergency Account. It records transactions made with The Warrnambool branch of the Commercial Banking Company of Sydney Limited during the year 1931. The Secretary of the Warrnambool Harbour Board would have used this book in 1931. James Menzies, Pilot arid Harbour Master from 1929, was appointed as Acting Secretary for the Board in 1932 and held this office until the Board ceased in 1936. Warrnambool’s CBC Manager during this time was L E Whitney; he was Manager from 1924 to 1939. The Commercial Banking Company of Sydney Limited opened in 1893. On January 1, 1927 the CBC amalgamated with the Bank of Victoria. In 1981 the CBC merged with the National Bank of Australasia Limited and on January 1, 1983 the bank started using the abbreviated name of the National Australia Bank (NAB). Warrnambool Harbour Board- The Warrnambool Harbour Board was constituted by Order of Council on May 29, 1928, under the Harbour Board’s Act of 1927, taking over from the Ports and Harbours Branch of the Public Works Department of Victoria. The Board was then the only body with power to manage and control the whole Port, including shipping, facilities upkeep and improvements of the port. The work it carried out involved dredging, building of port facilities and drafting of port regulations, and collecting taxes, tolls, rates and charges. The Board was officially dissolved on June 30, 1936, at which time the Public Works Department again had control. The Warrnambool Harbour Board had rented out the Lighthouse Keeper’s Quarters from the 1920s until 1936, when the Board closed down. However, rentals continued with other currently unknown landlords until Flagstaff Hill Maritime Village opened in 1975 and began renovating the Cottage, in stages. Text on the fly page of the book is as follows – “The Commercial Banking Company of Sydney Limited with which is Amalgamated THE BANK OF VICTORIA LIMITED. Head Office – SYDNEY. Melbourne Office: 237 COLLINS STREET. BANKING Business of every description transacted. BRANCHES throughout VICTORIA, NEW SOUTH WALES and QUEENSLAND, and ADELAIDE BRANCH, SOUTH AUSTRALIA, and AGENCIES throughout AUSTRALASIA and NEW ZEALAND on which DRAFTS AND LETTERS OF CREDIT Are issued and also on LONDON BRANCH and AGENCIES in all the PRINCIPAL CITIES of the world. Telegraphic Remittances made, Bills Negotiated or Forwarded for Collection, Advances made, Deposits received, Current Accounts kept. FURTHER PARTICULARS ON APPLICATON. “ This bank transaction book is of local and state significance for its association with the Port of Warrnambool and the Warrnambool Harbour Board. The Warrnambool Harbour Board was the only board formed under the 1927 Harbour Boards Acts, even though other Victorian ports were eligible. The book is also significant as an example of bank records used by Australian and overseas branches of the Commercial Banking Company of Sydney Limited, and the Bank of Victoria Limited.Maroon coloured rectangular book with textured cover and cream coloured label attached. Label has a printed title on book plus hand written titles added in black and red. The corners of the book are rounded. The white pages have pre-printed text and lines. The book was used for transactions between the Warrnambool Harbour Board’s Emergency Account and the Commercial Banking Company of Sydney Limited during the year 1931.Handwritten in black “WARRNAMBOOL HARBOUR BOARD “, “EMERGENCY A/C” Printed in black “IN ACCOUNT CURRENT WITH”, “The Commercial Banking Coy. Of Sydney Ltd.”, “WITH WHICH IS AMALGAMATED”, “THE BANK OF VICTORIA LIMITED”, “Page …”warrnambool, shipwrecked-coast, flagstaff-hill, flagstaff-hill-maritime-museum, maritime-museum, shipwreck-coast, flagstaff-hill-maritime-village, warrnambool harbour board, financial account, emergency account, financial record, commercial banking company of sydney limited, 1931 bank book, bank of victoria limited, transaction book, financial management, stationery, deposit book, public works department, ports and harbours, commercial banking company of sydney ltd., james menzies, harbour master, l e whitney, cbc manager warrnambool, harbour board act, port of warrnambool, warrnambool harbour, lady bay, harbour pilot -
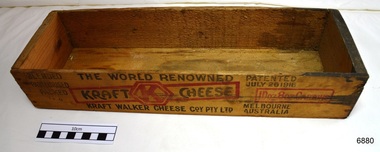 Flagstaff Hill Maritime Museum and Village
Box, 1926 - 1950
The box is made from light weight timber and only joined by nails at the sides and base. It was made for holding 1 Dozen (12) 8 ounce (250g) cartons of cheese. It appears, by the hand written label “POISONS FOR PESTS” that it was later used for storage of pesticides. Kraft Walker Cheese Company Pty. Ltd, was established in Melbourne in 1926 by Fred Walker (creator of Vegemite). In 1934 the company leased the cheese plant of the Warrnambool Cheese Factory at Warrnambool. Fred Walker died in 1935. In 1950 the company changed its name to Kraft Foods Limited. It is likely that this box was locally purchased in Warrnambool by the household of Dr Angus and the cheese used for their personal consumption. This box was donated to Flagstaff Hill Maritime Village by the family of Doctor William Roy Angus, Surgeon and Oculist. It is part of the “W.R. Angus Collection” includes historical medical equipment, surgical instruments and material once belonging to Dr Edward Ryan and Dr Thomas Francis Ryan, (both of Nhill, Victoria) as well as Dr Angus’ own belongings. The Collection’s history spans the medical practices of the two Doctors Ryan, from 1885-1926 plus that of Dr Angus, up until 1969. ABOUT THE “W.R.ANGUS COLLECTION” Doctor William Roy Angus M.B., B.S., Adel., 1923, F.R.C.S. Edin.,1928 (also known as Dr Roy Angus) was born in Murrumbeena, Victoria in 1901 and lived until 1970. He qualified as a doctor in 1923 at University of Adelaide, was Resident Medical Officer at the Royal Adelaide Hospital in 1924 and for a period was house surgeon to Sir (then Mr.) Henry Simpson Newland. Dr Angus was briefly an Assistant to Dr Riddell of Kapunda, then commenced private practice at Curramulka, Yorke Peninsula, SA, where he was physician, surgeon and chemist. In 1926, he was appointed as new Medical Assistant to Dr Thomas Francis Ryan (T.F. Ryan, or Tom), in Nhill, Victoria, where his experiences included radiology and pharmacy. In 1927 he was Acting House Surgeon in Dr Tom Ryan’s absence. Dr Angus had become engaged to Gladys Forsyth and they decided he further his studies overseas in the UK in 1927. He studied at London University College Hospital and at Edinburgh Royal Infirmary and in 1928, was awarded FRCS (Fellow from the Royal College of Surgeons), Edinburgh. He worked his passage back to Australia as a Ship’s Surgeon on the on the Australian Commonwealth Line’s T.S.S. Largs Bay. Dr Angus married Gladys in 1929, in Ballarat. (They went on to have one son (Graham 1932, born in SA) and two daughters (Helen (died 12/07/1996) and Berenice (Berry), both born at Mira, Nhill ) According to Berry, her mother Gladys made a lot of their clothes. She was very talented and did some lovely embroidery including lingerie for her trousseau and beautifully handmade baby clothes. Dr Angus was a ‘flying doctor’ for the A.I.M. (Australian Inland Ministry) Aerial Medical Service in 1928 . Its first station was in the remote town of Oodnadatta, where Dr Angus was stationed. He was locum tenens there on North-South Railway at 21 Mile Camp. He took up this ‘flying doctor’ position in response to a call from Dr John Flynn; the organisation was later known as the Flying Doctor Service, then the Royal Flying Doctor Service. A lot of his work during this time involved dental surgery also. Between 1928-1932 he was surgeon at the Curramulka Hospital, Yorke Peninsula, South Australia. In 1933 Dr Angus returned to Nhill and purchased a share of the Nelson Street practice and Mira hospital (a 2 bed ward at the Nelson Street Practice) from Dr Les Middleton one of the Middleton Brothers, the current owners of what previously once Dr Tom Ryan’s practice. Dr Tom and his brother had worked as surgeons included eye surgery. Dr Tom Ryan performed many of his operations in the Mira private hospital on his premises. He had been House Surgeon at the Nhill Hospital 1902-1926. Dr Tom Ryan had one of the only two pieces of radiology equipment in Victoria during his practicing years – The Royal Melbourne Hospital had the other one. Over the years Dr Tom Ryan had gradually set up what was effectively a training school for country general-practitioner-surgeons. Each patient was carefully examined, including using the X-ray machine, and any surgery was discussed and planned with Dr Ryan’s assistants several days in advance. Dr Angus gained experience in using the X-ray machine there during his time as assistant to Dr Ryan. When Dr Angus bought into the Nelson Street premises in Nhill he was also appointed as the Nhill Hospital’s Honorary House Surgeon 1933-1938. His practitioner’s plate from his Nhill surgery is now mounted on the doorway to the Port Medical Office at Flagstaff Hill Maritime Village, Warrnambool. When Dr Angus took up practice in the Dr Edward and Dr Tom Ryan’s old premises he obtained their extensive collection of historical medical equipment and materials spanning 1884-1926. A large part of this collection is now on display at the Port Medical Office at Flagstaff Hill Maritime Village in Warrnambool. In 1939 Dr Angus and his family moved to Warrnambool where he purchased “Birchwood,” the 1852 home and medical practice of Dr John Hunter Henderson, at 214 Koroit Street. (This property was sold in1965 to the State Government and is now the site of the Warrnambool Police Station. and an ALDI sore is on the land that was once their tennis court). The Angus family was able to afford gardeners, cooks and maids; their home was a popular place for visiting dignitaries to stay whilst visiting Warrnambool. Dr Angus had his own silk worm farm at home in a Mulberry tree. His young daughter used his centrifuge for spinning the silk. Dr Angus was appointed on a part-time basis as Port Medical Officer (Health Officer) in Warrnambool and held this position until the 1940’s when the government no longer required the service of a Port Medical Officer in Warrnambool; he was thus Warrnambool’s last serving Port Medical Officer. (Masters of immigrant ships arriving in port reported incidents of diseases, illness and death and the Port Medical Officer made a decision on whether the ship required Quarantine and for how long, in this way preventing contagious illness from spreading from new immigrants to the residents already in the colony.) Dr Angus was a member of the Australian Medical Association, for 35 years and surgeon at the Warrnambool Base Hospital 1939-1942, He served as a Surgeon Captain during WWII1942-45, in Ballarat, Victoria, and in Bonegilla, N.S.W., completing his service just before the end of the war due to suffering from a heart attack. During his convalescence he carved an intricate and ‘most artistic’ chess set from the material that dentures were made from. He then studied ophthalmology at the Royal Melbourne Eye and Ear Hospital and created cosmetically superior artificial eyes by pioneering using the intrascleral cartilage. Angus received accolades from the Ophthalmological Society of Australasia for this work. He returned to Warrnambool to commence practice as an ophthalmologist, pioneering in artificial eye improvements. He was Honorary Consultant Ophthalmologist to Warrnambool Base Hospital for 31 years. He made monthly visits to Portland as a visiting surgeon, to perform eye surgery. He represented the Victorian South-West subdivision of the Australian Medical Association as its secretary between 1949 and 1956 and as chairman from 1956 to 1958. In 1968 Dr Angus was elected member of Spain’s Barraquer Institute of Barcelona after his research work in Intrasclearal cartilage grafting, becoming one of the few Australian ophthalmologists to receive this honour, and in the following year presented his final paper on Living Intrasclearal Cartilage Implants at the Inaugural Meeting of the Australian College of Ophthalmologists in Melbourne In his personal life Dr Angus was a Presbyterian and treated Sunday as a Sabbath, a day of rest. He would visit 3 or 4 country patients on a Sunday, taking his children along ‘for the ride’ and to visit with him. Sunday evenings he would play the pianola and sing Scottish songs to his family. One of Dr Angus’ patients was Margaret MacKenzie, author of a book on local shipwrecks that she’d seen as an eye witness from the late 1880’s in Peterborough, Victoria. In the early 1950’s Dr Angus, painted a picture of a shipwreck for the cover jacket of Margaret’s book, Shipwrecks and More Shipwrecks. She was blind in later life and her daughter wrote the actual book for her. Dr Angus and his wife Gladys were very involved in Warrnambool’s society with a strong interest in civic affairs. He had an interest in people and the community They were both involved in the creation of Flagstaff Hill, including the layout of the gardens. After his death (28th March 1970) his family requested his practitioner’s plate, medical instruments and some personal belongings be displayed in the Port Medical Office surgery at Flagstaff Hill Maritime Village, and be called the “W. R. Angus Collection”. This box is of local and state significant for its association with the W.R. Angus Collection and with the local Kraft Walker Cheese Company in Allansford, and for being a company that began in Melbourne. The W.R. Angus Collection is significant for still being located at the site it is connected with, Doctor Angus being the last Port Medical Officer in Warrnambool. The collection of medical instruments and other equipment is culturally significant, being an historical example of medicine from late 19th to mid-20th century. Dr Angus assisted Dr Tom Ryan, a pioneer in the use of X-rays and in ocular surgery. Box, wooden, part of the W.R. Angus Colleciton. Small wooden rectangular box without a lid, sides and base joined by nails. It once contained Kraft Cheese, as per the stenciled printing on the sides of the box in red and black. Later a hand written label has been attached to one end indicating that it was used for storing poisons. C. 1926 - 1950Label, hand written, attached to end; "POISONS FOR PESTS". Stencils printed in red and black "THE WORLD RENOWNED / KRAFT WALKER CHEESE COY PTY LTD" "PATENTED JULY 26 1916", "GUARANTEED TO COMPLY WITH ALL THE FOOD LAWS", "1Doz 8oz CARTONS", "BLENDED / PASTURISED / PACKED"flagstaff hill, warrnambool, shipwrecked coast, flagstaff hill maritime museum, maritime museum, shipwreck coast, flagstaff hill maritime village, great ocean road, dr w r angus, kraft walker cheese company pty ltd, cheese box, cheese crate, kraft cheese crate, cheese box 1926 - 1950, kraft cheese, kraft walker cheese co allansford, kraft walker cheese co warrnambool, fred walker, label poisons for pests, poison storage -
Glen Eira Historical Society
Document - Glen Eira Road, 258, Elsternwick, E.K. Motors
This file contains three items about this porperty, previously numbered 244 Glen Eira Road, Elsternwick: 1/Photocopied photo of Tudor Style garage, c. 1954 taken by Laurie Richards Studio 1954; source unknown Hand written research notes of names of occupiers at number 244 then 258, and neighbours, from Sands and McDougal’s directories Research note dated 09/08/2013 by Claire Barton concerning some of the residents and identifying the change in street numberglen eira road, elsternwick, laurie richards studio, photographic studio, garages, tudor, architectural styles, warburton a.p, shepard geo.r, seward norman h, glover robert e, tudor service station, landvogt j.h, ruddal albt., barrett a.m, goonan and barrett, macey r.h, miller g.t, bennett e and c, evan l.p, petalas t, goracz j, huggins t, doval american dry cleaning, dry cleaners, delicatessens, boot makers, estate agents, dairy products, butchers, service stations -
Glen Eira Historical Society
Document - Ormond Amateur Football Club
2 articles on Ormond Amateur Football Club, 1933 – 1973: 1/A 12 page document including 3 photocopied photos. Article documents the Premiership coaches for the 1933/34 seasons, a break till 1950 when article then continues to 1973 season. A brief description on the coaches success and mentions successful players who competed in the various team divisions over these years in the document. 2/A pamphlet for season 1935 Ormond Amateur Football Club listing office bearers, patrons, AGM details of business to be discussed, nominations for 1936 and income and expenditure account details.ormond amateur football club, clubs and associations, anthony mick, bentleigh amateur, bols lou, coaches (people), farrell ted, farrell edwin, farrell greg, wood roger, bourne bruce, moran graeme, chisholm andrew, patterson michael, blight bernie, cameron ian m., ferrari brian, kingston jack, foulsham clyde, burdekin e. f., moran graeme f., farrell e. j., graham a., russ jeff, cameron s. m., mcinerney peter j., finlayson brian, grace john, rowse ken, lepage neil, joachim nick, purcell ken, corben bruce f., stock jack, gillespie rob, mcdonald colin, humphries andrew, christie graham, graer david, craig beryl, smith thelma, stock val, johnston j. r., rogers s. w., wood r. j., cameron robert, ladd kevin j., pierce greg, ladd clarrie, meeking john, fitts clive, doble alan, cooper stephen, mclean alan, english graeme, andrew graham, purcell peter, rose mark, borland norm, wood andrew, farrell e. j., logan r. j., morgan peter, faulkner alan, slatter mick, burney cal, stock jack, norris mick/micheal, beecroft barry, crump wayne, humphreys andrew, cameron robert, morris steve, anstee laurie, spence phillip, hand robert, curtis noelene, murphy p. m. peter, foulsham d. a. david, finlayson r. j., roberts r. c., grumpton t. r.-terry, jenkins r. c. ron, mortimer j. i., wood r. j. roger, morgan p. j., graham a. m. alan, curtis r. s., grace j. m., johnston j. r., marshall l. j., logan r. j., jackson d. w., bourne b. k., farrell e. j., sierakowski d. d. peter, dexter p. d., russ j. i., scott d. h., joachim nick, hardham leigh, chapman ray, smith stephen, sterling greg, cramer dean, anstee laurie, barnes ted, barwick john, russell geoff, kozlowski i. a., pearce g. w., roberts r. c., swan g. m., graham a. m., curtis r. s., blight b. f., fitzroy r. m, jackson d. w., farrell e. j., pierce greg, scott david, holman greg, russ steve, mcdonald david, fisher s., o’reilly pat, borland norm, thomas g. t., naylor alan r., lewis m., szylit m., dove s. w., mooney d. j., bevers f. h., gunn e. e., stevens r. a., ellis h., fancett w., grainger v., rermezel y., dawson p., smith r. a., pascoe h., chisholm l. a., jones j. a., juniper p., anderson a. e., ellis r., o’dwyer f., pope a., handcock c., hatton c. h., anthony m., dunbar h., jones w., mckechnie h. j., jennings s., jennings a., porter j. r. dr., hogan j. f., frew g., hassed m. j., ryan rev. father, fethers d. b. dr., hallows bruce, porter j. r., nelson w. t., groves frank, chisholm l. a., vinton j. t., smith w. d., knowling c. h., duus e., evans r. j., smyth l. c., clarke w. j., bishton ja, grant v., tremills f. s., mcfadzean j. d., marley k. j., mckittrick a. e., halkyerd c. s., patience c. e., lynch k., occleshaw f. r., howard r., chapman c. w., jones j. a., evans j. g., ellsworth g., coaches, dunbar h., jones bill, wright bill, mooney mrs., trophies, bishton j. h., manning j., bray h., smyth l., creighton j., wright w., kirchner s., baker n., bevers mrs., gunn mrs., fancett mrs., creighton mrs., stevens mrs., ellis mrs., hatton mrs., mogan mrs., pascoe mrs., frew mrs., phillips mrs., grainger mrs., massed mrs., stillard miss, matt e. g., matt mrs., tremills mrs., cullen l. mrs., parker f. w. mrs., societal events and activities, flags, ormond park trust, sporting clubs, football clubs, football, australian rules football, sports officials, ormond, bentleigh -
Glen Eira Historical Society
Document - Wallace, John Alston
This file contains four items. Short hand-written notes on Hon. J. Alsten Wallace’s business activities, including a note on his marriage to the second daughter of Thomas Monahan taken from Cooper’s St Kilda Typed notes with hand-written annotations on QUAT QUATTA, the house bought by John Alston Wallace c. 1875-6. The document details the interior and exterior of the house, and mentions renovations and its use for wedding receptions. Also noted is information on Wallace’s place of birth, migration, marriage, number of children and the date of his wife’s death, taken from the Australian Representative Men Vol. 1. A hand-written list of John Alston Wallace’s properties, author and date unknown Hand-written listing and directory notes regarding John Alston Wallace’s properties, taken from MEMOIRS OF A STOCKMAN by Harry Peck. Date and author unknown.wallace john alston, wallace john, wallace j. alston, wallace j.a., wallace theresa, wallace mrs, monahan theresa, quat quatta, glenhuntly road, staniland grove, elsternwick, gold mining, mines and mining, house names, mansions, members of parliament, selwyn street, horne street, dickens street, officials, millar. m, pugh alfred, glen eira road, architectural features, caulfield rate books, davies j.h., riddell mrs c., lawford c.c., young geo, pasco crawford, elsternwick railway station -
Glen Eira Historical Society
Glen Eira Road, 244, Elsternwick
This file contains two items, Photocopied photo of Tudor Style garage, c. 1954 taken by Laurie Richards Studio 1954, Hand written names of occupiers at number 244 and neighbours from Sands and McDougal’s directories, Research note dated 09/08/2013 by Claire Barton concerning some of the residentsglen eira road, elsternwick, laurie richards studio, photographic studio, garages, tudor, architectural styles, warburton, a.p, shepard, geo.r, seward, norman h, glover, robert e, tudor service station, landvogt, j.h, ruddal, albt., barrett, a.m, goonan and barrett, macey, r.h, miller, g.t, bennett, e and c, evan, l.p, petalas, t, goracz, j, huggins, t, doval american dry cleaning, dry cleaners, delicatessens, boot makers, estate agents, dairy products, butchers, service stations -
 Glen Eira Historical Society
Album - Album page, Avoca Grove, 12, Circa 1972
This photograph is part of the Caulfield Historical Album 1972. This album was created in approximately 1972 as part of a project by the Caulfield Historical Society to assist in identifying buildings worthy of preservation. The album is related to a Survey the Caulfield Historical Society developed in collaboration with the National Trust of Australia (Victoria) and Caulfield City Council to identify historic buildings within the City of Caulfield that warranted the protection of a National Trust Classification. Principal photographer thought to be Trevor Hart, member of Caulfield Historical Society. Most photographs were taken between 1966-1972 with a small number of photographs being older and from unknown sources. All photographs are black and white except where stated, with 386 photographs over 198 pages.From Glen Eira Heritage Management Plan (1996) by Andrew Ward and Associates: The house at 12 Avoca Grove, part of "Merton", now demolished, is understood to have been built for and occupied by James Wilberforce Stephens from c.1865. It has aesthetic and historical significance. The building's aesthetic value is derived from the manner in which it demonstrates aspects of the Cottage Orne style, popular among Melboume's gentry during the mid Victorian period. Its historical value is derived from its association with J. W. Stephens, MLA, for East St Kilda and a prominent Caulfield resident.Page 20 of Photograph Album - two black and white exterior photographs of a house with both photographs on the right hand side of the page, the top in landscape mode and the bottom portrait. Hand written: 12 Avoca Grove [top right of page] / 20 [bottom right]trevor hart, avoca grove, church, caulfield north, merton, james wilberforce stephens, cottage orne style, j w stephens (mla) -
 Glen Eira Historical Society
Album - Album page, St Aloysius Roman Catholic Church (Balaclava Road), Circa 1972
This photograph is part of the Caulfield Historical Album 1972. This album was created in approximately 1972 as part of a project by the Caulfield Historical Society to assist in identifying buildings worthy of preservation. The album is related to a Survey the Caulfield Historical Society developed in collaboration with the National Trust of Australia (Victoria) and Caulfield City Council to identify historic buildings within the City of Caulfield that warranted the protection of a National Trust Classification. Principal photographer thought to be Trevor Hart, member of Caulfield Historical Society. Most photographs were taken between 1966-1972 with a small number of photographs being older and from unknown sources. All photographs are black and white except where stated, with 386 photographs over 198 pages.From: Glen Eira Heritage Management Plan (1996) by Andrew Ward and Associates St Aloysius is architecturally important as an exceptionally imposing red brick church in the Early English Gothic Style from the inter-war period. Its significance, however, is compromised by the recent removal of its Pyrmont stone spire. It is locally important as a focus of Catholic worship in Caulfield.Page 23 of Photograph Album with two black and white photographs of front views of a church. There is also a photo missing on the bottom left. Hand written: 233 [above top right photo] / St Aloysius R C Church [under top right photo] / 23[bottom left]trevor hart, caulfield north, balaclava road, st aloysius, early english gothic, inter-war period, catholic church, towers, red brick -
 Federation University Historical Collection
Equipment - Stereoscope, Keystone, KEYSTONE PARAGON BIRDSEYE & TIGER MAPLE STEREOSCOPE, c1895
The 'Paragon' was Keystone's first patented stereoscope. Keystone View Company of Meadville, Pa., was the world's largest producer of stereographs and was in business from 1892 to 1970 on a limited basis. The company was founded by Benneville L. Singley who at one time worked for Underwood. Singley photographed many of the views sold by Keystone. Keystone would eventually purchase almost all of their competitors. The remains of the Keystone Company are housed at the University of California. Singley filed for 2 patents for stereoscopes, the first in 1898, about the time Keystone started producing them. C. L. Pappenhagen, an employee of the company filed for 4 patents for a total of 6 for the company. Here are some examples of the many forms of hand held stereoscopes produced by Keystone. (http://home.centurytel.net/s3dcor/Keystone/Keystone.htm) Timber stereoscope reader with brass fittings, used for viewing stereoscopes (Stereoscope cards contain two separate images printed side-by-side to create three-dimensional illusion)stereoscope, photography, illusion -
 Federation University Historical Collection
Book, Selection of Geological Publications, 09/1866
This book was owned and used by Professor Ferdinand M. Krause of the Ballarat School of Mines.Ferdinand Krause was a renowned teacher at the Ballarat School of Mines. He also produced many important Geological Maps. This book has seven reports that Krause had bound together for his own use. Half black leather bound book with hand marbled paper cover. Marbling on cover is grey, maroon and darker grey with gold bands on black leather spine. The book contains 7 papers on various subjects associated with ores. The book includes: 1. Auriferous, Leads, & Silver Ores at Upper Hungary - G.H.F. Ulrich, 1868 2. Nuggetty Reef, Maldon, Victoria - G.H.F. Ulrich, 1866 3. Internal Communication - Lieut. Amsinck, 1856 4. Roads for Victoria - William Macredie, 1856 5. Mining & Mineral Statistics of Victoria - Robert Brough Smyth, 1866 6. Physical Geography & Geology of Victoria - R.C. Selwyn, 1866 7. Mineralogy of Victoria - G.H.F. Ulrich, 1866 Leather component is black with gold bands on spine with "Silver Ores etc" written on spine. 'G" on square cream paper at top of spine; "2" on square cream paper on middle of spine; and "3" on square cream paper on bottom of spine. Inside front cover on red paper rectangle near spine "bound by W. PAUL 17 Lydiard St BALLARAT" "Ferdinand M Krause C E" handwritten in black ink on title page of first paper (right hand side)treatment, auriferous, lead, silver ores, nuggetty reef, maldon, victoria, internal communication, roads for victoria, mining, mineral statistics, geography, geology, mineralogy, ulrich, amsinck, selwyn, ferdinand krause, macredie -
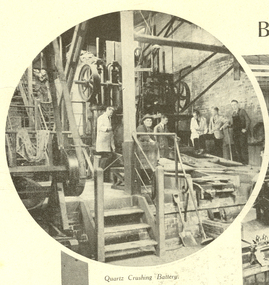 Federation University Historical Collection
Photograph - Newspaper, Ballarat School of Mines and Industries and Junior Technical School double page newspaper article, 25/08/1934
The Ballarat School of Mines was the first school of technical education in Australasia.Double page, double sided, newspaper article from The Weekly Times with 10 images and captions depicting scenes within the School of Mines and Industries, Ballarat Technical Art School and Junior Technical School, Ballarat. Verso: Top Half page: 5 photographs on Callawadda, A pastoral district near Glenorchy Verso Bottom Half page: large photograph of boys attending the Junior technical school at Ballarat Verso Right hand page: 7 "Intersting photographs from England, Scotland and The United StatesSide A: Magazine- Section 8, The Weekley Times, Heading and captions, torn lower left corner to centre, small tears throughout especially left hand side and centre fold, Side B: the weekly times, school of mines and industries, scientific instruments, junior technical school, ballarat, smb, ballarat school of mines, university of ballarat, 1934, callawadda, glenorchy, boys, hutchings, mr j. c. hutchings j.p., state school, bryn avon homestead, broadcasting, mrs hutchings, sheep, xray, cancer treatment, northern belle, loch lomond, oxford college, red lion brewery, aldershot tattoo, siege of namur, battleship, idianapolis battleship, new york, quartz crushing battery, machine shop, pottery, electrical engineering, art department, dressmaking, building, woodwork, assaying, laboratory, architectural drawing, engineering drawing, drawing, assay, drawing from the antique, plaster casts, assay room, ballarat technical art school, bicycles -
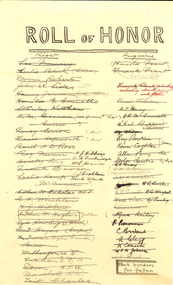 Federation University Historical Collection
Document, Roll of Honor School of Mines Ballarat (rough), 1915, 1915
These pages are the rough notes and compilation of the Ballarat School of Mines World War One honour board..1) Roll of Honor for School of Mines Ballarat - original listing on blue feint lined cream foolscap paper. Handwritten names (lines through) with ROLL of HONOR printed at top. .2) Handwritten names on blue feint lined foolscap paper .3) A5 cream sheet of paper with handwritten names.1) ROLL OF HONOR printed on top of page .2)Revised list 12.10.15 at bottom right hand corner .3) Joined Expeditionary Forces handwritten on top of paperroll of honor, roll of honour, honour roll, honor roll, ballarat, ballarat school of mines, smb, university of ballarat, expeditionary forces, soldiers, world war one, wwi, 1st world war, killed in action, virgil tucker, alexander fraser, a.g. campbell, herbert hawkesworth, william e. figgis, stanley hepburn, robert m. serjeant, milton williamson, e. sleep an anderson, p. sinclair anderson, john h.s. thomas, leslie de jersey grut, ralph moore, louis g. buchner, william williams, thomas rhys williams, leslie w. mathews, leigh simpson, john bolton, martell, stanley kitchner, william henry o'brien, reginald callister, theodore serjeant, les kemp, basil ross, carl janssen, fred hepworth, percy levison, alfred mica smith, les mounsey, leslie blick, john r. sides, henry jerman, harold g counell, stanley kitchen, h.m. connan, reg nunn, hedley long, frank dawson, leslie kemp, mcnamee, g.h. winckler, h.j. hibbins, arthur w. hughes, syd rawlings, bent hayes, trevan ruglen, brew, w. wilberforce, e.t.a. zuabour, t.t.w. dixon, r.r. marshall, charles tait, j.j. hibbins, d.r. tunbridge, w.s. davies, j. coglan, frank clark, harold peart, frank peart, a.t. bury, a.r. mcconnell, sheppard, alf wilson, roy parker, kevin coglan, allan perry, forbes tweedie, c.e. bray, l.w. matthews, robert marshall, a. parry, h.w. preston, alfred wilson, r.w. vickery, alfred bailey, p. besmore, c. bryant, a. clegg, n. cameron, w.f.m. johnson, l.w. quirk, a.c. collins, e.c. doepel, a. gourlig, allan ross, ross allan, samuel ainsworth, les blick, c.c bray, b. beesmerse, calvin briant, h. brown, harry brittain, harold c. connell, kevin j. coglan, ted cannon, e.j. cannon, ray cormack, dixon, arthur dixon, ernest duncan, harold ferguson, n.j. hibbins, bert hayes, heddles long, leslie mournsey, ken moss, arthur w. nicholas, morshead, j.b. morshead, allan t. penny, roy parkin, paulig, paterson, l.w. quick, morris roberts, lindsay ross, a. simmons, percy senior, s. halliburton sheppard, spencer, gerard scarff, trevan, a.a. trahan, percy towly, robert tremain