Showing 395 items
matching eaglehawk tram
-
 Ballarat Tramway Museum
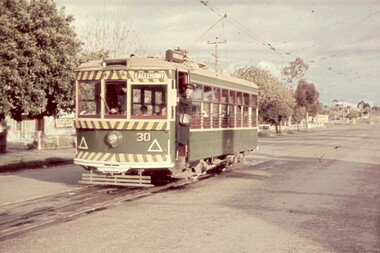
Slide - 35mm slide/s, Travis Jeffrey, c1962
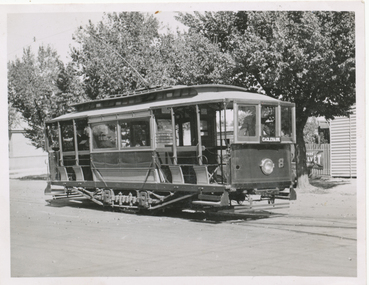
Agfa plastic mount (blue base, white cover) with a photo of Bendigo 30 at the Quarry Hill terminus. Tram has the destination of Eaglehawk . Conductor standing in the doorway for the photographer. In the background is the premises for "Northern Terrazzo"."BES 16" in penciltramways, trams, bendigo, quarry hill, tram 30 -
 Ballarat Tramway Museum
Slide - 35mm slide/s, Travis Jeffrey, c1962
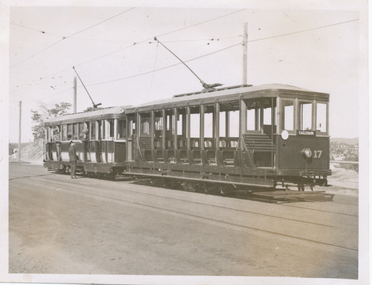
Agfa plastic mount (blue base, white cover) with a photo of Bendigo 30 at Pinder's Loop, Carpenter St. Quarry Hill. Tram has the destination of Eaglehawk ."BES 17" in penciltramways, trams, bendigo, quarry hill, pinders loop, tram 30 -
 Ballarat Tramway Museum
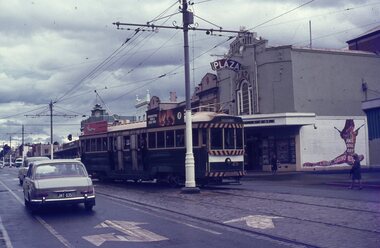
Slide - 35mm slide/s, Travis Jeffrey, late 1960's or early 1970's
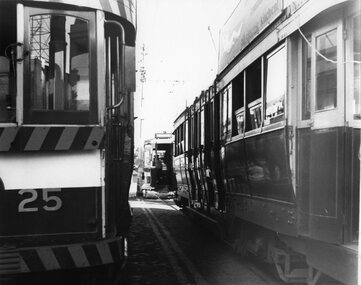
Agfa plastic mount (blue base, white cover) with a photo of Bendigo No. 25 using the crossover in Mitchell St outside the Plaza Theatre. Photo taken late 1960's early 1970's. No. 25 has the destination of Eaglehawk and two SEC roof advertisements, electric cooking and a briquettes ads. The film "James Bond Casino Royale" was being advertised on the side wall of the theatre."BES 37" in penciltramways, trams, bendigo, mitchell st, plaza theatre, tram 25 -
 Ballarat Tramway Museum
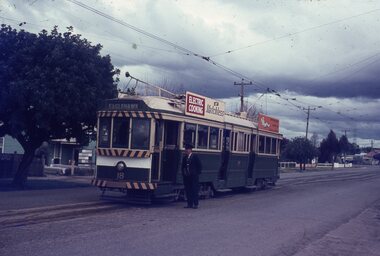
Slide - 35mm slide/s, Travis Jeffrey, late 1960's or early 1970's
Agfa plastic mount (blue base, white cover) with a photo of Bendigo No. 18 at the Quarry Hill terminus, with the conductor standing by the front of the tramcar. Photo taken late 1960's early 1970's. No. 18 has the destination of Eaglehawk and two SEC roof advertisements, "Electric Cooking Matchless" and "Everything's fine in my all electric kitchen"."BES 38" in penciltramways, trams, bendigo, quarry hill, conductors, tram 18 -
 Ballarat Tramway Museum
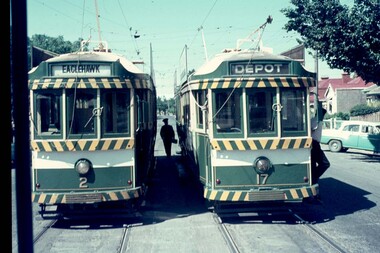
Slide - 35mm slide/s, Travis Jeffrey, late 1960's or early 1970's
Agfa plastic mount (blue base, white cover) with a photo of Bendigo Nos. 2 and 17 at the area of Depot Junction, swapping crews. No. 2 showing Eaglehawk and No. 17, Depot. Note differences in the destination blinds or rolls, white on black, or the later form, black on white. Photo taken late 1960's early 1970's from the window of another tram."BES 42" in penciltramways, trams, bendigo, crews, depot junction, tram 2, tram 17 -
 Ballarat Tramway Museum
Slide - 35mm slide/s, Travis Jeffrey, late 1960's or early 1970's
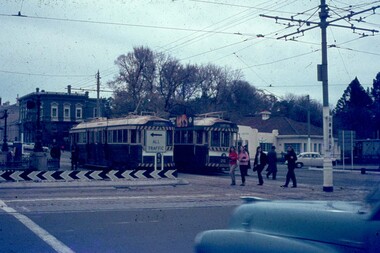
... of Bendigo Nos. 3 and 26 at Charing Cross. The trams are bound... and 26 at Charing Cross. The trams are bound for Eaglehawk ...Agfa plastic mount (blue base, white cover) with a photo of Bendigo Nos. 3 and 26 at Charing Cross. The trams are bound for Eaglehawk, Quarry Hill respectively. Photo shows the traffic arrangements at Charing Cross prior to closure. Photo taken late 1960's early 1970's from the window of another tram. No. 3 has two roof advertisement racks which are empty, while No. 26 has a SEC briquettes roof advertisement."BES 48" in pencil.tramways, trams, bendigo, charing cross, tram 3, tram 26 -
 Ballarat Tramway Museum
Photograph - Illustration/s, Windsor Publications, Bendigo Birney 30
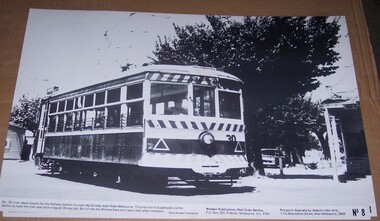
Large print illustration of SEC Bendigo Birney No. 30 ex depot running out to the Railway station on a Sunday prior to running to Eaglehawk. No. 8 of a series of illustrations. Caption notes that Birney's no longer do this job - photo possible mid to late 1960's. Photo Windsor Publications. Two copies held. Printed on heavy cardboard with a gloss sheet.On rear of copy 1, letters "TBT"trams, tramways, birney, bendigo, windsor publications -
 Ballarat Tramway Museum
Photograph - Illustration/s, Stephen Watson, Bendigo tram 10
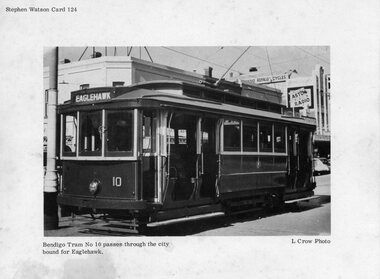
... . Tram has the destination of Eaglehawk. Bendigo tram 10 ...Printed illustration on light weight card, of Bendigo No. 10. Printed by Stephen Watson, as Card No. 124. Photo by L. Crow. Photo taken late 1950's or early 1960 prior to the application of dash canopy lighting and warning stripes. Photo in Mitchell St. Bendigo, with an advertisement for Astor Radio in the background. Tram has the destination of Eaglehawk.trams, tramways, bendigo -
 Ballarat Tramway Museum
Photograph - Digital image Set of 20, Dec. 1970
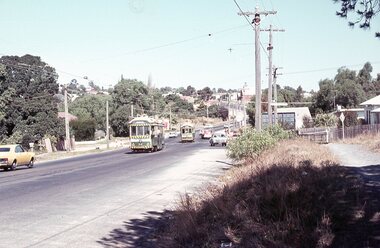
... on the Eaglehawk line, through the window of one tram. .9 - side on view... crossing on the Eaglehawk line, through the window of one tram. .9 ...Set of 20 digital images of Bendigo Tramways December 1970 by Stuart Lodington. .1 - Bendigo track gang renewing a joint, McCrae St, with welding truck alongside and Birney No. 29. .2 - No. 5 at Quarry Hill terminus? .3 - No. 24 at the depot .4 - No. 2 on the Quarry Hill line .5 - No. 5 approaching the Eaglehawk terminus .6 - No. 29? at the Golden Square Terminus with Bill Rodda's Golden Square hotel in the background. .7 - No. 3 inbound on the Quarry Hill line. .8 - trams crossing on the Eaglehawk line, through the window of one tram. .9 - side on view of a B23D controller in a bogie tram .10 - No. 5 at the Eaglehawk terminus .11 - No. 21 at No. 21 crossing on the Golden Square line. No. 29 showing special, No.21 - North Bendigo, Fire Station Loop? .12 - No. 29 and another tram - near work site? .13 - interior view from Birney looking at the front of another tram parked behind. .14 - No. 29, No. 6 crossing at .15 - No. 6, showing special at Charing Cross. .16 - No. 5 and another tram at North Bendigo on a Special .17 - No. 28 at Charing Cross .18 - No. 5 on Special at a Loop on the Eaglehawk line .19 - No. 28, and two other trams at the Myrtle St Loop .20 - No. 18 showing Quarry Hill and two other trams on View St.trams, tramways, bendigo, trackwork, mccrae st, depot, quarry hill, eaglehawk, golden square, controllers, north bendigo, view st, tram 29, tram 5, tram 24, tram 2, tram 3, tram 6, tram 28, tram 18 -
 Ballarat Tramway Museum
Photograph - Digital image Set of 20
... Eaglehawk Quarry Hill Golden Square Depot tram 5 tram 29 tram 28 ...Set of 20 digital images of Bendigo Tramways, 1972 at or before closure while on a tram tour by Stuart Lodington. .1 - No. 28 and 5 at Eaglehawk terminus .2 - No. 28 leaving Charing Cross and travelling into View St with Armstrong Type Service building in background and Firestone Advertisements. .3 - No. 29 with Eaglehawk Town Hall and Post Office in background. .4 - No. 26 and 29 at start of double track, High St Eaglehawk .5 - No. 29 leaving Eaglehawk with shops in the background, Foodland, J. Bests .6 - No. 29 and 23 crossing Manchester Loop with Manchester Arms Hotel in the background and an old poppet head. .7 - No. 29 at ditto with poppet head in the background. .8 - No. 28 and two other trams at the Quarry Hill terminus. .9 - No. 29 in High St Bendigo with the Cathedral and Golden Gate Hotel in the background. .10 - No. 3 with destination Eaglehawk, in bound Carpenter St? .11 - No. 29 following a single trucker through a loop or the end of the double track near the depot. .12 - No. 23?, at Eaglehawk terminus, with Eaglehawk Town Hall in the background. .13 - Birney tram crossing the bridge at the Depot entrance - No. 29 .14 - No. 29 on the Eaglehawk line? .15 - as for .13 .16 - No. 29 entering the depot. .17 - No. 23, inbound from Eaglehawk, at Jobs Gully Loop with the railway overbridge in the background. .18 - No. 28 and two other trams (see also Reg Item 4982) for the same tram tour at Myrtle St. Loop. .19 - No. 21 with North Bendigo on the destination approaching the Golden Square terminus. .20 - No. 7 at Golden Square terminustrams, tramways, bendigo, eaglehawk, quarry hill, golden square, depot, tram 5, tram 29, tram 28, tram 26, tram 23, tram 7, tram 21 -
 Ballarat Tramway Museum
Photograph - Digital image Set of 20, 1971-72
... Eaglehawk Quarry Hill Golden Square Depot McCrae St Nolan St tram 7 ...Set of 20 digital images of Bendigo Tramways, 1972 at or before closure while on a tram tour by Stuart Lodington. .1 - No. 7 at Golden Square terminus .2 - ditto .3 - No. 26 in bound on the Eaglehawk line with a crossing loop behind. .4 - Birney crossing the bridge by the tram depot. .5 - No. 29 running a special on the Eaglehawk line with a HBA billboard in the background. .6 - No. 29 with a driver walking in front of the tram at the above location. .7 - No. 29 on the Eaglehawk line .8 - ditto waiting for a tram at Manchester Loop with poppet head in the background. .9 - No. 29 on the Eaglehawk line .10 - Eaglehawk Town Hall at night. .11 - No. 7 at the depot junction in McCrae St, with Golden Square destination. .12 - No. 29 with the Camp Hotel Eaglehawk in the background. Also a Newsagent with The Sun, The Bendigo Advertiser and The Age signs on the building, High St .13 - No. 29 Mt Korong Rd, with the railway overbridge in the background. .14 - interior photo of Birney tram roof .15 - interior view of controls of Birney at Eaglehawk .16 - No. 29 outbound at the Depot Junction McCrae St. .17 - No. 18 at the Eaglehawk terminus .18 - close up view of No. 29 front. .19 - No. 29 in Nolan St, crossing the bridge, outbound. .20 - No. 18 at the Eaglehawk terminus with the Eaglehawk Town Hall, Post Office in the background. Has a circus banner on the side.trams, tramways, bendigo, eaglehawk, quarry hill, golden square, depot, mccrae st, nolan st, tram 7, tram 26, tram 29, tram 18 -
 Ballarat Tramway Museum
Photograph - Digital image Set of 20, 1971-72
... of a tram on the Eaglehawk line with a large "display event float.... .7 - view from the front window of a tram on the Eaglehawk ...Set of 20 digital images of Bendigo Tramways, 1972 at or before closure while on a tram tour by Stuart Lodington. .1 - No. 29 at the North Bendigo terminus .2 - No. 29 just past the Bendigo end of the double track in High St Eaglehawk, with a BP dealer in the background. .3 - Night photo of No. 18 at a terminus, showing "Eaglehawk" .4 - ditto .5 - Night photo of No. 24 at Eaglehawk with Leo A Hughes Photographer in the background. The Tram has "Johnnie Walker whiskey" roof adverts. .6 - No. 29 outbound in Thunder St with a train passing over the bridge in the background. .7 - view from the front window of a tram on the Eaglehawk line with a large "display event float" in the foreground and tram approaching a crossing loop. .8 - No. 29 at North Bendigo .9 - view of High St Eaglehawk looking east from the terminus, showing the track and centre poles. .10 - No. 29 outbound on the North Bendigo line turning from either Nolan St or Caledonia St, running a special. .11 - No. 7 departing North Bendigo for Golden Square. .12 - No. 3 and 18 at Charing Cross. No. 3 has two SEC roof Advertisements .13 - No. 7 at North Bendigo with the trolley pole being reversed. .14 - No. 24 at Quarry Hill with Northern Terrazzo in the background with the driver alongside .15 - No. 7 and No.6 at Charing Cross with the Beehive buildings in the background. .16 - No. 7 at North Bendigo terminus .17 - ditto .18 - No. 24 at Quarry Hill with Northern Terrazzo in the background with the conductor alongside. .19 - ditto .20 - No. 26 and other bogie tram in View St near Charing Cross with the Armstrong Tyre Service building and signs for Cohn's Drinks and T&G in the view.trams, tramways, bendigo, eaglehawk, quarry hill, golden square, depot, north bendigo, charing cross, tram 29, tram 18, tram 24, tram 3, tram 7, tram 6, tram 26 -
 Ballarat Tramway Museum
Photograph - Digital image Set of 20, 1971-72
... Eaglehawk Quarry Hill North Bendigo Charing Cross View St tram 7 ...Set of 22 digital images of Bendigo Tramways, 1972 at or before closure while on a tram tour by Stuart Lodington. .1 - No. 7 arriving at North Bendigo .2 - No. 5 departing Charing Cross along View St, with a Firestone tyres in the background. .3 - front view of a tram in View St with a blurred background image. .4 - No. 24 showing Eaglehawk destination .5 - No 26 and 3 in View St, with the Armstrong Tyre Service building in the background and signs for T&G and Cohn's Drinks. .6 - ditto .7 - No. 3 arriving at Charing Cross from Eaglehawk in View St, with a Quarry Hill destination. .8 - No. 3 and 18 at Charing Cross. .9 - No. 24 on the Quarry Hill line. .10 - No 26 in View St, with the Armstrong Tyre Service building in the background and signs for T&G and Cohn's Drinks. .11 - ditto, with fountain in view, Colonial Mutual building and a newsagent with a Herald sign on the building. .12 - No. 7 at North Bendigo terminus .13 - ditto with pole being reversed. .14 - No. 18 at Quarry Hill terminus with Northern Terrazzo sign in the background. .15 - No. 24 at Quarry Hill terminus .16 - No. 18 arriving at Charring Cross, with Fountain Plaza and Bendigo Pharmacy in the background. .17 - No. 3 and 18 at Charing Cross. .18 - No. 7 at North Bendigo terminus with pole being placed on the overhead. .19 - No. 26 in View St inbound, with Sandhurst Trustees sign in the background. .20 - No. 6 leaving Charing Cross in Pall Mall with Myer and other buildings in the background. .21 - No. 7 at North Bendigo .22 - Single trucker with two roof Advertisements crossing View St with fountain in view, Colonial Mutual building and a newsagent with a Herald sign on the building.trams, tramways, bendigo, eaglehawk, quarry hill, north bendigo, charing cross, view st, tram 7, tram 5, tram 24, tram 26, tram 5, tram 3, tram 18, tram 6 -
 Ballarat Tramway Museum
Photograph - Digital image Set of 20, 16/04/1972 12:00:00 AM
... Eaglehawk Long Gully Jobs Gully Manchester Loop tram 24 tram 18 tram ...Set of 22 digital images of Bendigo Tramways, of the last running day of the Eaglehawk to Quarry Hill line 16 April 1972, .1 - No. 3 and 24 crossing at Long Gully .2 - No. 3 turning at the Cricket ground, Barnard and View Sts, inbound to the City and Quarry Hill .3 - No. 3 in bound to the City and Quarry Hill, Long Gully area .4 - No. 18 inbound to the City and Quarry Hill crossing the railway bridge from Eaglehawk. .5 - Manchester Loop .6 - No. 18 inbound to the City and Quarry Hill crossing the railway bridge from Eaglehawk. .7 - No. 18 about to enter Jobs Gully Loop .8 - No. 3 about to turn at the Cricket ground, Barnard and View Sts inbound to the City and Quarry Hill .9 - No. 3 turning at the Cricket ground, Barnard and View Sts, inbound to the City and Quarry Hill .10 - No. 18 at Eaglehawk terminus with the Mechanics Institute in the background. .11 - No. 3 in bound, Ironbark area. .12 - No. 3 at Long Gully Loop .13 - No. 3 outbound to Eaglehawk. .14 - No. 18 at Eaglehawk with German circus banner on tram .15 - No. 18 on the Eaglehawk line at Jobs Gully Loop .16 - No. 24 outbound to Eaglehawk at Taylor St .17 - No. 18 inbound to the City and Quarry Hill crossing the railway bridge from Eaglehawk. .18 - No. 3 at Manchester Loop .19 - No. 18 at Eaglehawk terminus .20 - No. 18 at Eaglehawk with German circus banner on tram .21 - bogie tram at Long Gully Loop. .22 - No. 24 outbound to Eaglehawk at Taylor Sttrams, tramways, bendigo, eaglehawk, long gully, jobs gully, manchester loop, tram 24, tram 18, tram 3 -
 Ballarat Tramway Museum
Ephemera - Ticket/s, Wal Jack, Australia Worldwide tickets - Wal Jack Collection, 1950's
Has tickets from:, ESCo Ballarat, Form TYE 1-37 re acceptance of breach of regulations - to Reg Item 5017, Geelong tramways – 1, Bendigo ESCo – 3, SEC – weekly, tourist and parcel / newspaper, scholars, SEC – various, also for Ballarat, Bendigo and Geelong and small packet of loose tickets., Prahran and Malvern Tramways Trust, MTT Adelaide including a small packet of loose tickets, MMTB – 2 sheets including two loose sheets with tickets and a Pensioners Fare Concession Certificate for 61 – 62 with some loose tickets, NSW – Sydney two pages, NSW – Newcastle one page + 2 tickets, and four tickets for the Yass to Yass Junction tram Brisbane – two pages with one Rockhampton ticket, VR St Kilda Brighton, Parramatta steam tram – Sydney ferries limited, Hobart, Launceston, Wellington NZ – two pages, Christchurch, Wanganui, Auckland, New Plymouth - 1, Invercargill - 1, Johannesburg, Cape town, Pretoria – 1, Liverpool, Sheffield, London – 3 pages + loose 7 day go as you please issued in 1963 to Wal Larsen, Manchester, Newcastle and Gateshead, Bolton, South Lancashire Transport – 1, Oldham, Barry Corporation – Lancs, Birmingham, Llandudno, Salford, Stockport, Sunderland, South shields, Edinburgh, Glasgow, Leeds, Darwen Corporation – 1, Dublin, Belfast, Blackpool – 1, South Wales – 1, Bradford, Dundee, Southampton, Plymouth, Leicester, Douglas, Southend on Sea, Croydon, Naples and other Italian ones, Antwerp – 1, Istanbul, St Quentin, Vevey Switzerland, Dusseldorf, Bombay, Calcutta, Karachi, Bangkok, Penang, Milwaukee Electric Railway, Los Angeles Railway – loose on page was a Tram pass for American Fleet celebration, 2/9/1908 to Eaglehawk - to Reg Item 5017, Market St Railway, Loose San Francisco Municipal railway, Puget Sound, St Louis Public Service Co., Sandwich, Tacoma Railway, Capital Transport Little Rock, Pittsburgh, Connecticut – New Haven, Twin City Lines, Chicago and West Towns, Chicago Aurora and Elgin, Elgin and Belvidere, Chicago Rapid Transits, Chicago Surface, ClevelandFeatures tickets from Australian and Overseas tramway systems. Collected by Wal Jack. Light brown paper covered album with dark red binding band, with off-white paper inside covers holding some 40 sheets of card on which tickets have been mounted using stamp hinges, captions in blue or black ink. Three supplementary sheets have been glued in as well. Has some 750 tickets including loose tickets. Reg Items 5017 (ESCo Employee Report outcome) and 5018 (Bendigo Tramways ticket for the visit of the personnel from the American Fleet - 1908) were loose in the album and have been separately collected. Some tickets in envelopes of clipped into the sheets.Individual captions for each group of tickets from a city.trams, tramways, tickets, ballarat, melbourne, usa, uk trams, esco -
 Ballarat Tramway Museum
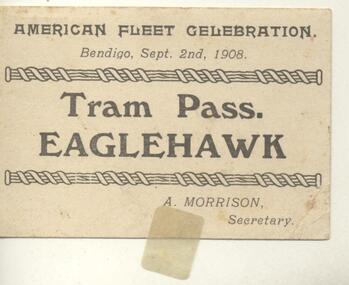
Ephemera - Ticket, State Electricity Commission of Victoria (SECV), American Fleet Celebration, Bendigo - Wal Jack Collection, 1908
Historically significant for Bendigo, yields information about the visit of crews to Bendigo during the visit of the American Fleet.Printed card ticket or pass for Eaglehawk at the time of the American Fleet Celebration, Bendigo 2/9/1908. Has the name "A. Morrison, Secretary", Was found loose within item 5015 - Ticket album and collected.trams, tramways, tickets, bendigo, esco -
 Ballarat Tramway Museum
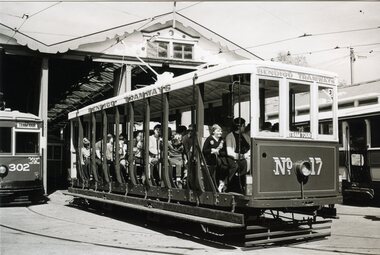
Photograph - Black & White Photograph/s, William. F. Scott, 3/04/1983 12:00:00 AM
... of the tram services and Eaglehawk Town Hall. trams tramways Bendigo ...Yields information about the appearance of Bendigo Birney trams at the time of the opening of the tram services and Eaglehawk Town Hall.Black and white photograph, of Toastrack, Bendigo 17, with passengers outside the Bendigo Depot, photo by William F Scott 3/4/1983."22" in pencil in top left hand corner, and along bottom edge in ink "Bendigo Trust, car on tour 3/4/1983, William F. Scott photo".trams, tramways, bendigo, depot, tram 17 -
 Ballarat Tramway Museum
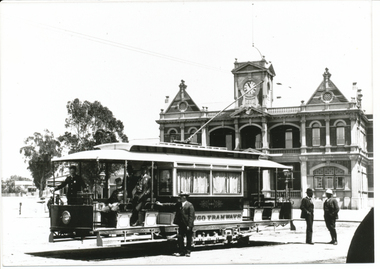
Photograph - Black & White Photograph/s, mid 1900's
... . trams tramways Bendigo Eaglehawk ESCo In pencil, top left hand ...Yields information about the appearance of Bendigo trams early 1970's and the Charing Cross area.Black and white photograph of an ESCo combination tramcar at the Eaglehawk terminus, with the Eaglehawk Town Hall in the background. Driver at the controls, with a number of men standing alongside and the conductor (2 No.) in the front portion of the tramcar. Note the curtains in the tramcar, taken during a summers day. Photo taken early mid 1900's. Creative Images Photographic Collection. High Resolution image added 31/8/2012In pencil, top left hand corner, "Eaglehawk early 1900's and in the bottom right hand corner / Bendigo / Creative Image Photographic Collection".trams, tramways, bendigo, eaglehawk, esco -
 Ballarat Tramway Museum
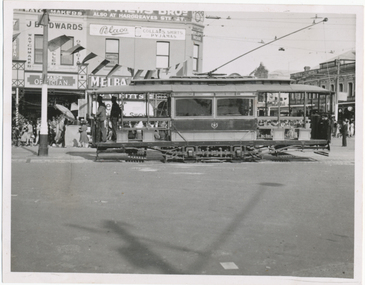
Photograph - Black & White Photograph/s, Chris Wurr, early 1970's
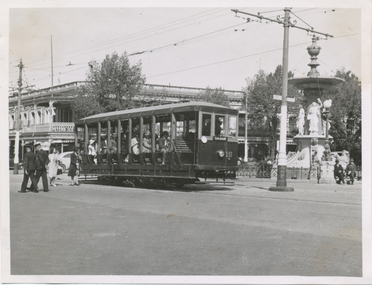
Yields information about the appearance of Bendigo trams early 1970's and the Charing Cross area.Black and White Photograph of three trams at Charing Cross. Photo taken between two bogie cars (25 and one other) on the Eaglehawk line while a Birney crosses in front of them. Possibly No. 29. Photo Chris Wurr, early 1970's. "Photo by Chris Wurr" stamped on the rear.trams, tramways, bendigo, charing cross, tram 25, tram 29 -
 Ballarat Tramway Museum
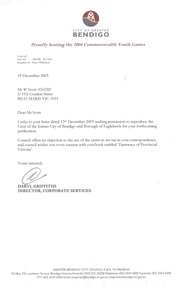
Document - Letter/s, City of Greater Bendigo, 19/12/2003 12:00:00 AM
Yields information about the City of Bendigo and Eaglehawks crests and format of letters 12/2003.Set of four documents - City of Bendigo and Borough of Eaglehawk civic crests/ coat of arms / emblems 4371.1 - Letter dated 19/12/2003, from the City of Greater Bendigo, signed by Daryl Griffiths Director Corporate Services to William F Scott, giving permission to use the City and Borough civic crests in his forthcoming book. .2 - folded piece of paper marked "88") and with a black and white version of the Borough of Eaglehawk Crest and plastic envelope containing three copies of the With Compliments card of the Borough. .3 - City of Bendigo Crest - full colour version on art paper. .4 - City of Bendigo Crest - black and white version.2 - "Bendigo and Eaglehawk coats of arms/emblemstrams, tramways, crests, coat of arms, borough of eaglehawk, city of bendigo, city of greater bendigo -
 Ballarat Tramway Museum
Photograph - Black & White Photograph/s, Doug Colquhoun, 16/05/1971 12:00:00 AM
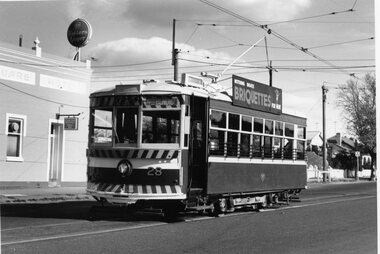
... Bendigo's trams in the early 1970's and the Eaglehawk terminus ...Yields information about Bendigo's trams in the early 1970's and the Eaglehawk terminus.Black and white print of Bendigo 28 at the Golden Square terminus. Two copies. Photo by Doug Colquhoun, 16/5/1971. Trams has the destination of Nth Bendigo and roof advertisements for Briquettes. Also has the Golden Square hotel in the background. Photo print courtesy of Port Dock Railway Museum, now the National Railway Museum. See worksheet 4311 for letter and details of prints sent to Bill Scott, 19/10/2001. Any photo credit to mention NRM Collection.On rear of copy 1 "SEC Bendigo / 28 /Golden Square / 16/5/71 4187 / D.A. Colquhoun" . Copy 2 "DAC" in ink, bottom right hand corner.trams, tramways, golden square, tram 28 -
 Ballarat Tramway Museum
Photograph - Black & White Photograph/s, Wal Jack, 12/04/1959 12:00:00 AM
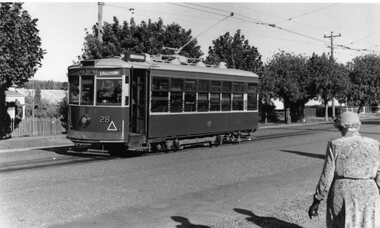
Yields information about Ballarat's trams, and the City centre area and motor vehicles late 1950's.Black and white print of Bendigo 28 at the Quarry Hill terminus, 12/4/1959, photo by Wal Jack. Has a lady walking across to the tram - dressed in gloves and hat. Tram has the destination of Eaglehawk. Photo print courtesy of Port Dock Railway Museum, now the National Railway Museum. See worksheet 4311 for letter and details of prints sent to Bill Scott, 19/10/2001. Any photo credit to mention NRM Collection.On rear of copy "SEC Bendigo #28 / Quarry Hill terminus / 12/4/59 / Wal Jack photo / National Railway Museum.trams, tramways, bendigo, quarry hill, tram 28 -
 Ballarat Tramway Museum
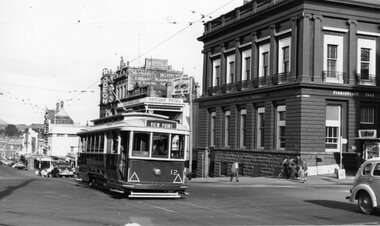
Photograph - Black & White Photograph/s, Doug Colquhoun, 23/03/1959 12:00:00 AM
... the Eaglehawk terminus, tram 18 and the tram liveries in 1963. trams ...Yields information about the Eaglehawk terminus, tram 18 and the tram liveries in 1963.Black and white print of Ballarat 12, crossing Lydiard St, in Sturt St with the destination of Gardens via View Point. Has the Commonwealth Bank, Odeon theatre, Mechanics Institute, Ballarat Gas Co, Unicorn Hotel, and Colonial Mutual Life buildings in the background. A group of children with bicycles are on the corner and the newspaper seller stand. Photo Doug Colquhoun 23/3/1959. Photo print courtesy of Port Dock Railway Museum, now the National Railway Museum. See worksheet 4311 for letter and details of prints sent to Bill Scott, 19/10/2001. Any photo credit to mention NRM Collection.On rear of copy In top left hand corner "72) No . 71 withdrawn" a yellow label with "24" crossed out over a sticker "Photo No. Reduced to 82% 145x80 see photocopy for masking" and "22" crossed out in the top right hand corner. In the lower left hand corner "SEC Ballarat #12 / Sturt St @ Lydiard / 23/3/59 / Douglas A Colquhoun"trams, tramways, sturt st, lydiard st, tram 12 -
 Ballarat Tramway Museum
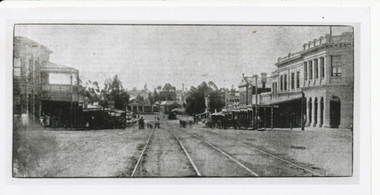
Photograph - Black & White Photograph/s, The Bendigonian, Dec. 1896
... Trams Eaglehawk On rear in ink " S-A962, Bendigo, Steam Motor ...Black and White copy print contained within the Wal Jack Bendigo and Geelong Album, see Reg Item 5003 for more details. Photograph of looking west along High St Eaglehawk, Dec 1896, shows steam tram track, buildings and vehicles. A steam tram and trailer is parked at the terminus. Copied by Keith Kings from The Bendigonian 24/12/1896. See Reg Item 5735 for a similar photograph.On rear in ink " S-A962, Bendigo, Steam Motor and 4 wheel (?) trailer at Eaglehawk terminus. Copied ex "The Bendigonian 24/12/1896."trams, tramways, bendigo, steam trams, eaglehawk -
 Ballarat Tramway Museum
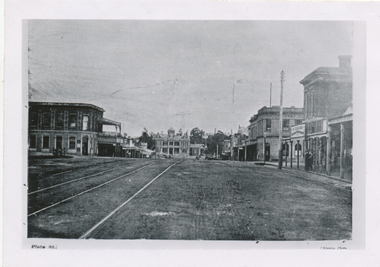
Photograph - Black & White Photograph/s, c1895
... St Eaglehawk Steam Trams .1 - On rear in ink "Steam track ...Black and White copy print contained within the Wal Jack Bendigo and Geelong Album, see Reg Item 5003 for more details. Copy photograph of a photograph from a book (Plate 1) showing a view along High St Eaglehawk, looking west, c1895. Shows buildings on both sides of the street. Has name J. Nimmon? or Ninnis (see btm 4372) in the bottom right hand corner. See also Reg item 5729 for a similar photograph. .1 - On rear in ink "Steam track tracks, Eaglehawk. (So much for the AETA boys who believe steam service did not cross the railway on the level!). In bottom right hand corner is "P. W. Duckett" trams, tramways, bendigo, high st, eaglehawk, steam trams -
 Ballarat Tramway Museum
Photograph - Bendigo No. 1 - Easter Fair, Wal Jack, Easter Saturday 1941
Photograph of ESCo tram No. 1 entering Pall Mall from the Eaglehawk line, side view probably running into the depot. The tram has been modified with bracing and open saloon seats changed from cross bench to longitudinal and has been painted in SEC 1930s colours with an SEC monogram. The conductor is standing in the front saloon. Photo taken Easter Saturday 1941. See item 9100 for a similar photo. In the background are signs or buildings for J. B. Edwards Opticians and Pelaco collars, shirts and Pyjamas. i1 - scan of print in the album i2 - rear of image i3 - scan of negative at 3200dpi added 6/6/2020. Yields information about Bendigo 1 Easter 1941.Black and White print contained within the Wal Jack Bendigo and Geelong Album, see Reg Item 5003 for more details.On rear in ink "T195, Bendigo / No. 1 (Original type), Pall Mall, Easter Saturday 1941. Photo W. Jack.trams, tramways, bendigo, esco, secv, pall mall, tram 1 -
 Ballarat Tramway Museum
Photograph - Black & White Photograph/s, Wal Jack, Easter Saturday 1941
Black and White print contained within the Wal Jack Bendigo and Geelong Album, see Reg Item 5003 for more details. Photograph of ESCo tram No. 8 in Arnold St Bendigo, Easter Saturday, 1941. The tram has been modified with bracing and open saloon seats changed from cross bench to longitudinal. The conductor is standing in the back saloon. Appears the tram is running out of the depot, has the destination of Eaglehawk. See also Reg item 5460i10, for a copy print of this photograph - wider view. i1 - scan of print in the album i2 - rear of image i3 - scan of negative at 3200dpi added 6/6/2020. On rear in ink "T188, Bendigo Tramways / No. 8 Original type, Arnold St, Easter Saturday 1941. Photo W. Jack. trams, tramways, bendigo, esco, secv, arnold st, tram 8 -
 Ballarat Tramway Museum
Photograph - Black & White Photograph/s, Wal Jack, Easter Saturday 1941
... of ESCo tram No. 4 (destination Eaglehawk) with No. 8 Original... Parade Ballarat Ballarat goldfields trams tramways Bendigo ESCo ...Black and White print contained within the Wal Jack Bendigo and Geelong Album, see Reg Item 5003 for more details. Photograph of ESCo tram No. 4 (destination Eaglehawk) with No. 8 Original type., Charing Cross, Easter 1941. Photo by Wal Jack. See also Reg item 5460i4, for a copy print of this photograph - wider view. i1 - scan of print in the album i2 - rear of image i3 - scan of negative at 3200dpi added 6/6/2020. On rear in ink "T189, Bendigo Tramways / No. 4 ex MMTB, No. 8 Original type, Arnold St, Easter Saturday 1941. W. Jack Photo. trams, tramways, bendigo, esco, secv, charing cross, tram 4, tram 8 -
 Ballarat Tramway Museum
Photograph - Black & White Photograph/s, Wal Jack, Easter Saturday, 1941
Black and White print contained within the Wal Jack Bendigo and Geelong Album, see Reg Item 5003 for more details. No. 17 and No. 22 at Mt Korong Road loop - Garden Gully Loop. Photo taken Easter Saturday, 1941. Negative No. T191. No. 17 has the destination of "Eaglehawk" and is carrying a white disk at the front of the tram. i1 - scan of print in the album i2 - rear of image i3 - scan of negative at 3200dpi added 6/6/2020. On rear in ink "T191 State Electricity Commission Bendigo tramways / No. 17 summer car and "No. 22 Ex MMTB G Class standing at Passing Loop in Mt Korong Road, Easter Saturday 1941." In bottom right hand corner "W. Jack Photo".trams, tramways, bendigo, mt korong road, garden gully loop, tram 17, tram 22 -
 Ballarat Tramway Museum
Photograph - Black & White Photograph/s, Wal Jack, Easter 1941, Saturday
Black and White print contained within the Wal Jack Bendigo and Geelong Album, see Reg Item 5003 for more details. Photo of No. 18 at Charing Cross, Easter 1941. Tram has the destination of Eaglehawk and is carrying a white disk. Has the City Club Hotel in the background, with a Peters Ice Cream sign on it. i1 - scan of print in the album i2 - rear of image i3 - scan of negative at 3200dpi added 6/6/2020. On rear in ink "T187, Bendigo Tramways, No. 18 Summer Car at Charing Cross, Easter Saturday" and in bottom right hand corner "Photo by W. Jack"trams, tramways, bendigo, easter fair, charing cross, tram 18