Showing 405 items matching "horse drawn tram"
-
 Ballarat Tramway Museum
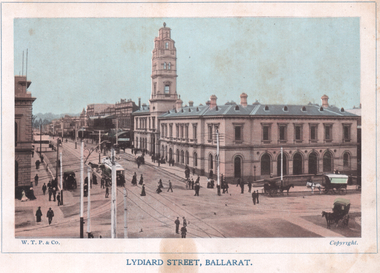
Postcard, Rose Stereograph Co, "Corner of Lydiard and Sturt Streets, Ballarat", c1929
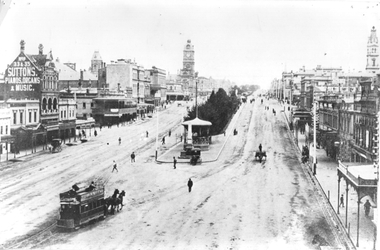
postcard - titled "The Corner of Lydiard and Sturt Streets Ballarat Vic", photo looks southwest from the Post Office steps towards the southwest corner - has Craigs Hotel, National Mutual Life, town hall shops including Anderson Printer and the Town Hall in the picture along with Robbie Burns statue. The Rose Series Postcard No. P 1783. An ESCo tram is parked at the tram stop - No. 5? Several horse-drawn and motor vehicles are in the photograph. Wal Jack has dated the photo about 1930 on the rear of the postcard and about 1929 in his album notes - see item 5126 for the digital image. Yields information the buildings, buildings and scene at the intersection of Sturt and Lydiard St with a number of vehicles in the view.Postcard or copy photograph of Rose Stereograph Co. postcard, No P 1783ballarat, trams, tramways, esco, lydiard st, sturt st, town hall, tram 5 ? -
 Ballarat Tramway Museum
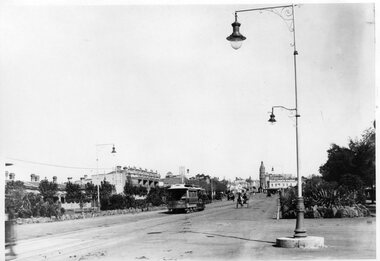
Photograph - Horse Trams Sturt St at Grenville St, c1904
Photograph shows a horse tram leaving the Grenville St terminus to travel on the north side of Sturt St. Photo from the top of the Nicholl and Allan building. In the background are many pedestrians and one horse drawn car. There is a telegraph/telephone pole line on the right hand side of the photo. See items 5103 for a close up reproduction photo of the horse tram, 836 for a black and white reproduction and 2437 for a coloured postcard of the same image.Yields information about Sturt St c1904 and horse trams.Black and white photograph on plain paperhas "3" in a circle and "4" crossed out on the rear.tramcars, trams, horse trams, sturt st, postcards, grenville st. -
 Ballarat Tramway Museum
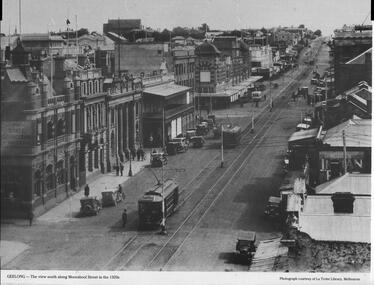
Photograph - Illustration, La Trobe Library, "Geelong - the view south along Moorabool Street", late 1920s
Photograph shows Moorabool St looking south from near Corio St Geelong. Shows the track junction with Malop St. Has Pengelley built tram 22 southbound with a Birney tram in front. The two trams are going from the Wharf to Newtown and South respectively. In the background is the State Savings Bank, The Geelong Library, Solomons store, and a building advert sign for Dr Morses Indian Root Pills. There are many motor cars, some horse-drawn vehicles, and one bus in the view. Photo, late 1920s, sourced from the La Trobe Library Melbourne.Yields information about Moorabool St Geelong late 1920s.Publish Black and white photograph with caption and source printed along bottom edge.ballarat, trams, tramways, geelong, tram 22, birney tramcars, moorabool st -
 Ballarat Tramway Museum
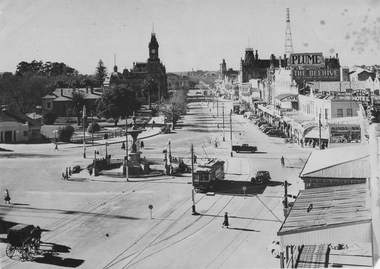
Photograph - Charing Cross Bendigo, National Library, 1958
Photograph of Charing Cross Bendigo from the Family Hotel with an electric tram (possibly No. 13), motor cars and one horse drawn cart. In the view are the Post Office, the Beehive building, and signs for Plume petrol, City Club hotel, and Wanda Inn. Photo from the Collection of the National Library Canberra. The Bendigo Historical Society has dated the image as 1958.Yields information about Charing Cross Bendigo in 1958.Printed black and white illustration.trams, tramways, bendigo, charing cross -
 Victorian Railway History Library
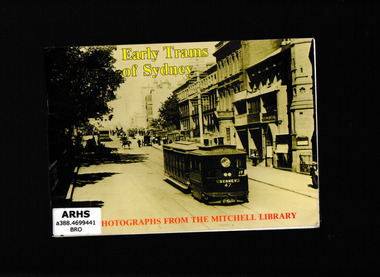
Booklet, Cromarty Press, Early trams of Sydney : photographs from the Field Collection at the Mitchell Library, 1983
... . A photographic essay of the early trams of Sydney - horse drawn, cable ...A photographic essay of the early trams of Sydney - horse drawn, cable, steam and electric.Ill2, p.64.non-fictionA photographic essay of the early trams of Sydney - horse drawn, cable, steam and electric.tramways - sydney, tramways - rolling stock - sydney. -
 Victorian Railway History Library
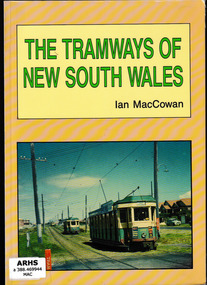
Book, Ian MacCowan, The tramways of New South Wales : a pictorial and detailed history of the horse, steam, cable, and electric passenger tramways in the first formed state of Australia, 1992
An account of the various tramway systems in New South Wales including horse drawn and cable carsIll, maps, p.152.non-fictionAn account of the various tramway systems in New South Wales including horse drawn and cable carstramways - new south wales, steam trams - new south wales, cable tramways - new south wales -
 Victorian Railway History Library
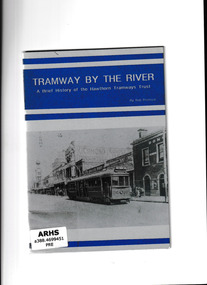
Booklet, Tramway Publications, Tramway by the river : a brief history of the Hawthorn Tramways Trust, 1993
... operated via Bridge Road, Richmond. Horse drawn trams were ...The Hawthorn Tramways Trust was established in 1914, and merged with the Melbourne and Metropolitan Tramways Board in 1920. The Hawthorn line operated via Bridge Road, Richmond. Horse drawn trams were withdrawn in 1916 prior to the introduction of cable trams. The booklet provides technical details about this line, as well as photographs.Ill, maps, p.17.non-fictionThe Hawthorn Tramways Trust was established in 1914, and merged with the Melbourne and Metropolitan Tramways Board in 1920. The Hawthorn line operated via Bridge Road, Richmond. Horse drawn trams were withdrawn in 1916 prior to the introduction of cable trams. The booklet provides technical details about this line, as well as photographs.tramways - melbourne, trams - melbourne - history -
 Ballarat Tramway Museum
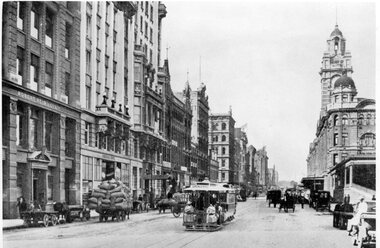
Photograph - Illustration, WTP, "Lydiard Street Ballarat", c1905
Colour Illustration showing the northeast corner of Sturt and Lydiard Streets, post office, tram track, and one tram partially obscured. Has many people in view and some horse-drawn vehicles. Titled "Lydiard Street and Post Office Ballarat, Victoria". Published by WTP. See item 4376 for the related postcard. Yields information about the post office corner at the time of the opening of the tramway and demonstrates colour printing techniques.Colour Illustration cut from a journalOn rear in pencil - "Looking up Lydiard Street North from Marks Corner (Sturt Street) before 1913tramways, trams, sturt st, esco, post office, lydiard st north -
 Ballarat Tramway Museum
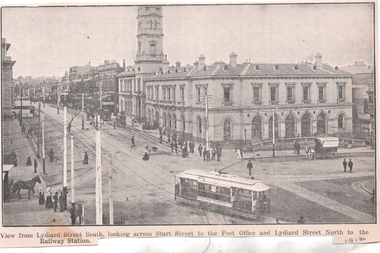
Photograph - Illustration, WTP, "View from Lydiard Street South looking across Sturt St", c1907
Illustration of the intersection of Sturt St and Lydiard St Nth with the Ballarat Post Office being the primary feature. Has an ESCo tram turning from Sturt St into Lydiard St. Shows the trackwork at this location and has several horse-drawn vehicles in the photograph. Note the building in the road space on the left-hand side of the photograph. The caption along the bottom edge "View from Lydiard Street South looking across Sturt Street to the Post Office and Lydiard Street North to the Railway Station. On the rear has an item about Ballarat itself and its history. See also item 6245 for a postcard of this view. Yields information about the post office corner at the time of the opening of the tramway and demonstrates printing techniques.Black and white Illustration cut from a journaltramways, trams, sturt st, esco, post office, lydiard st north -
 Ballarat Tramway Museum
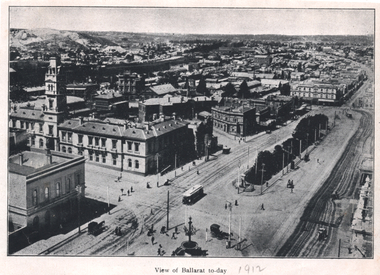
Photograph - Illustration, "View of Ballarat today", c1910
Illustration or photograph taken from the Town Hall, looking North East towards Black Hill. The Post Office, railway yards, Sturt St buildings are in view. Has a tram eastbound at Lydiard St and another waiting to depart Grenville St. There are two horse-drawn cabs in the view. The road surfaces have marks - either from being watered or graded. On the rear is a photograph of R O Henderson's New Furniture warehouse, View Point Bendigo. Yields information of Ballarat c1910.Black and white Illustration cut from a journal"1912" in pencil alongside the image title.tramways, trams, sturt st, esco, grenville st, bridge st, lydiard st north, black hill, post office -
 Ballarat Tramway Museum
Album - Postcards & Photographs - Vic Solomons and others - Australian Tramways, Vic Solomons, 2023
... Newcastle 149 Photo Horse tram at Newtown Station 1894 to 1898 - PTC... Newcastle 149 Photo Horse tram at Newtown Station 1894 to 1898 - PTC ...Contains 184 images of postcards and photographs collected primarily by Vic Solomons of Sydney, with others from the collection of Wal Jack and Warren Doubleday. Covers almost all of Australia's tramway systems. 1 Post Card Hay St Perth Looking East No 3 Unknown Perth 2 Post Card Cars 30 & 90 both on Route 19 pass in Barrack St looking South Perth WA 1935.02.18 Perth 3 Post Card Hay St Looking East Perth WA Unknown Perth 4 Post Card William St Perth WA Unknown Perth 5 Post Card Perth from Shaftsbury Hotel Unknown Perth 6 Post Card Hay St Perth WA Looking East Unknown Perth 7 Post Card Barrack St Perth Unknown Perth 8 Post Card Murray Views No 3 High St Showing Town Hall Fremantle WA Unknown Fremantle 9 Post Card High St Fremantle WA Unknown Fremantle 10 Post Card View of Bolder City Golden Mile in the Background (Section No 1) 1908.08.20 Kalgoolie 11 Post Card Hannan St Kalgoolie 1900.08.19 Kalgoolie 12 Post Card Hannan St Kalgoolie WA (No 2) Unknown Kalgoolie 13 Post Card Intersection Hannan & Maritana Sts Kalgoolie WA Unknown Kalgoolie 14 Post Card Hannan St Kalgoolie Unknown Kalgoolie 15 Post Card Lane Street Bolder City Unknown Kalgoolie 16 Post Card Hobart Double Deck Tram Unknown Hobart 17 Post Card Macquarie St Hobart Unknown Hobart 18 Photo Liverpool Street Hobart Unknown Hobart 19 Photo Hobart 21 Unknown Hobart 20 Photo Hobart 14 in Elizabeth St Hobart Unknown Hobart 21 Post Card Macquarie St Hobart Unknown Hobart 22 Post Card Macquarie St Hobart Tas Unknown Hobart 23 Photo Double Decker Tram 3 at G.P.O. Hobart Tas No 31 Unknown Hobart 24 Post Card Double Decker Tram 19 Hobart Tas A B Series No 24 Unknown Hobart 25 Photo Hobart Municipal Tramways Tas No 95 Unknown Hobart 26 Post Card Elizabeth St Hobart Unknown Hobart 27 Post Card Elizabeth St Hobart Unknown Hobart 28 Post Card Elizabeth St Hobart Unknown Hobart 29 Post Card Elizabeth St Hobart Tas Unknown Hobart 30 Post Card HMT 21 with crew at Beach Road Terminus Unknown Hobart 31 Post Card HMT 9 & another with crew at Beach Road Terminus. Front cover photo of Destination GPO 1921.01.00 Hobart 32 Post Card Cascade Road and Mount Wellington Hobart Unknown Hobart 33 Post Card Elizabeth St Hobart Unknown Hobart 34 Post Card Elizabeth St Hobart Unknown Hobart 35 Post Card Elizabeth St Hobart 1915.04.07 Hobart 36 Post Card Macquarie St Hobart Tas Unknown Hobart 37 Post Card Macquarie St showing Post Office Hobart 1908.03.12 Hobart 38 Post Card Hobart Municipal Tramways 21 Unknown Hobart 39 Post Card Elizabeth St Hobart Tas Unknown Hobart 40 Post Card Liverpool Street Hobart Unknown Hobart 41 Post Card Electric Tram Launceston Tas 446 W J Little Photo 1919.02.08 Launbceston 42 Post Card Launceston Tram no 3 1911.08.30 Launbceston 43 Post Card Launceston Tram no 3 passes tram No 1 Unknown Launbceston 44 Post Card Tram 6 at Trevallyn a popular suburb Launceston Tasmania Unknown Launbceston 45 Post Card Tram 7 at Trevallyn Road Terminus Launceston Tasmania Unknown Launbceston 46 Post Card Tram 4 in Brisbane St Launceston Unknown Launbceston 47 Post Card Tram 9 in Brisbane St Launceston Tasmania Unknown Launbceston 48 Post Card Camerom Street Launceston Tasmania Unknown Launbceston 49 Post Card Murray Views No 15 Jetty Road Glenelg Terminus 1962-02-08 Adelaide 50 Post Card Bay Tram at Jetty Road Terminus Glenelg SA Unknown Adelaide 51 Post Card Tram 3 in King William Street Adelaide S Aust Unknown Adelaide 52 Post Card Valentine Series No 3065 The Old Horse Tram Victor Harbour Unknown Victor Harbour 53 Post Card Bourke Street Melbourne with Cable Car Looking East 1904.04.25 Melbourne 54 Post Card Opening of New Electric Tramway Elsternwick 1913-11-13 Melbourne 55 Post Card Cable trams in Clarendon St Sth Melb Unknown Melbourne 56 Post Card Pall Mall from Charing Cross Bendigo Unknown Bendigo 57 Post Card Tram 4 & 7 pass at The Fountain and Mitchell Street Bendigo Vic Rose Series P 3198 Unknown Bendigo 58 Post Card M&MTB 133 at Charing Cross bound for Eaglehawk Bendigo Vic Murray Views No 45 Unknown Bendigo 59 Post Card Pall Mall Bendigo Vic Unknown Bendigo 60 Post Card Charing Cross & Mitchell St Bendigo Trams passing 1919.00.00 Bendigo 61 Post Card Pall Mall Looking East Unknown Bendigo 62 Post Card Electric Trams and City Hotel Bendigo Vic Unknown Bendigo 63 Post Card Moorabool Street Geelong V 23 Unknown Geelong 64 Post Card Murray Views No 3 Moorabool Street Geelong Vic Unknown Geelong 65 Post Card The Rose Series P 2487 Ryrie Street Geelong Vic Unknown Geelong 66 Post Card Southern Cross Series 2696 Ryrie Stret Geelong Vic Unknown Geelong 67 Post Card The Rose Series P 1490 Ryrie Street Geelong Vic 1920-03-04 Geelong 68 Post Card Valentine Series No 1568 Lower Sturt Street Ballarat Unknown Ballarat 69 Post Card Rose Series P 1710 Sturt Street Ballarat Victoria Unknown Ballarat 70 Post Card Sturt Street Ballarat Victoria Unknown Ballarat 71 Post Card Horse Tram In Sturt Street Ballarat 1905.11.10 Ballarat 72 Post Card Sturt Street Ballarat Looking North-West Unknown Ballarat 73 Post Card Shoppes Square Sturt Street Ballarat Looking North Unknown Ballarat 74 Post Card Junction Sturt and Lydiard Streets Ballarat 1909-09-01 Ballarat 75 Post Card The Electric Supply Co Souvenir Tram Ticket No 3085of the opening of Electric System August 18 1905 1905.08.18 Ballarat 76 Post Card Sturt Street Ballarat Victoria 1907.11.25 Ballarat 77 Post Card Off to the Gardens Electric Tram Ballarat Unknown Ballarat 78 Post Card Sturt Street Ballarat 1907.04.16 Ballarat 79 Post Card Sturt Street Ballarat Looking East Electric tram with Double Deck Trailer 1911.04.17 Ballarat 80 Post Card Sturt Street Ballarat Looking East Unknown Ballarat 81 Post Card Sturt Street Ballarat Looking West 1911.03.01 Ballarat 82 Post Card Town Hall and Sturt Street Ballarat Unknown Ballarat 83 Post Card Lydiard Street Ballarat 1906.11.23 Ballarat 84 Post Card Looking North along Adelaide Street from George Street Brisbane Sidues Series No 764 Unknown Brisbane 85 Post Card Looking South along Queen Street from the Creek Street Intersection Brisbane Qld Sirues Series No 1379 Unknown Brisbane 86 Post Card George Street from near Supreme Court Brisbane Unknown Brisbane 87 Post Card Queen and Eagle Streets Brisbane 1907.07.04 Brisbane 88 Post Card Queen Street showing His Majesty’s Theatre Brisbane Unknown Brisbane 89 Post Card Queen Street Treasury Building 1908.01.20 Brisbane 90 Post Card G P O and Queen Street Brisbane Unknown Brisbane 91 Post Card Queen Street Brisbane Looking from Wharf Street Unknown Brisbane 92 Post Card Customs House Brisbane 1905.02.16 Brisbane 93 Post Card Queen St Brisbane 1905.09.16 Brisbane 94 Post Card Queen St Brisbane 1907.11.19 Brisbane 95 Post Card Treasury Buildings Brisbane Unknown Brisbane 96 Post Card Queen and Eagle Streets Brisbane Unknown Brisbane 97 Post Card The Valley Corner Brisbane Unknown Brisbane 98 Post Card Brisbane Queen Street opposite General Post Office Unknown Brisbane 99 Post Card North Quay and Milton Beach Brisbane Q Unknown Brisbane 100 Post Card Victoria Bridge Brisbane South Side 1907.08.14 Brisbane 101 Post Card Victoria Bridge Brisbane Unknown Brisbane 102 Post Card Breakfast Creek Bridge Brisbane Q Unknown Brisbane 103 Post Card Melbourne Street Station South Brisbane Queensland Unknown Brisbane 104 Post Card General Post Office Queen Street Brisbane 1955.09.23 Brisbane 105 Post Card Customs House Brisbane 1904.11.04 Brisbane 106 Post Card Queen St Brisbane 1919.11.00 Brisbane 107 Post Card Queen St Brisbane Sidues Series No 627 Unknown Brisbane 108 Post Card Creek Street Brisbane Queensland Unknown Brisbane 109 Post Card Customs House and Garden Reach Brisbane Queensland 1910.00.08 Brisbane 110 Post Card Queen and Creek Streets Brisbane 1909.06.07 Brisbane 111 Post Card Queensland National Bank andd Queen Street Brisbane Queensland Unknown Brisbane 112 Post Card Queen Street and Treasury Buildings Brisbane 0000.09.07 Brisbane 113 Post Card Queen Street showing “Courier” Buildings Brisbane Unknown Brisbane 114 Post Card Intersection George & Roma Streets Brisbane Q 1916.05.11 Brisbane 115 Post Card Adelaide Street Brisbane Q Unknown Brisbane 116 Post Card G P O Queen Street Brisbane Q Unknown Brisbane 117 Post Card Treasury Building Brisbane 1906.03-20 Brisbane 118 Post Card Queen and Eagle Streets Brisbane 1907.02.01 Brisbane 119 Post Card Queen St Brisbane Unknown Brisbane 120 Post Card Queen St Brisbane Q Unknown Brisbane 121 Post Card Victoria Bridge Brisbane 1906.07.30 Brisbane 122 Post Card An Unusual View showing Head of Queen Street Victoria Bridge & South SideSuburbs Brisbane Q Unknown Brisbane 123 Post Card Petries Bight Brisbane Q Unknown Brisbane 124 Post Card South End Victoria Bridge Brisbane Q Unknown Brisbane 125 Post Card Customs House Brisbane Unknown Brisbane 126 Post Card Photo of toastrack car circa 1910 Unknown Brisbane 127 Post Card Treasury Buildings Brisbane Unknown Brisbane 128 Post Card East Street Rockhampton with Steam Tram & trailer Unknown Rockhampton 129 Post Card Post Office Rockhampton with steam tram Unknown Rockhampton 130 Post Card East Street Rockhampton with Steam Trams Rose Series P 7154 Unknown Rockhampton 131 Post Card William Street Rockhampton Rose Series P 7156 Unknown Rockhampton 132 Post Card Central East Street Rockhampton Q with Steam Trams Unknown Rockhampton 133 Photo Sturt St Ballarat Unknown Ballarat 134 Photo Bridge Street Ballarat Unknown Ballarat 135 Post Card George St Sydney Unknown Sydney 136 Post Card Elizabeth St Sydney Unknown Sydney 137 Post Card Railway Square Unknown Sydney 138 Post Card Sydney Harbor Bridge - pending receipt 139 Post Card Kings Cross - Mowbray Series with description on rear from C Roy G Field Unknown Sydney 140 Post Card Kings Cross - Mowbray Series with description on rear from C Roy G Field Unknown Sydney 141 Post Card Central Railway Station Sydney - Rose Series P6033 1954-01-26 Sydney 142 Post card William Street Darlinghurst looking towards City - Rose Series P6602 unknown Sydney 143 Post Card Circular Quay Sydney - Rose Series P6680 Unknown Sydney 144 Post Card View at Manly NSW - Rose Series B1003 Unknown Sydney 145 Post Card Hunter St Newcastle NSW - Rose Series P7843 Unknown Newcastle 146 Post Card Bank Corner Newcastle NSW - Mowbray Series No. 155 Unknown Newcastle 147 Post Card Hunter St Newcastle NSW Unknown Newcastle 148 Post Card Criterion Hotel Hunter St Newcastle NSW Unknown Newcastle 149 Photo Horse tram at Newtown Station 1894 to 1898 - PTC photo c1894 Newtown 150 Photo Steam tram motor No 3 at Railway Square 1879 1879 Sydney 151 Photo Railway steam tram c1900 with a horse drawn double deck bus c1900 Sydney 152 Photo Steam motor 5A and doubled deck bus Unknown Sydney 153 Photo Steam motor 53A with detail notes on rear 1922 Sydney 154 Photo Cable tram set at Milsons Point ferry terminal c1900 Sydney 155 Photo Early Sydney electric car - Ocean St - Rose Bay Unknown Sydney 156 Photo George St looking souoth c1905 c1905 Sydney 157 Photo Tram 165 at Circular Quay Unknown Sydney 158 Photo Tramcar ferry or transporter at The Spit Unknown Sydney 159 Photo tram 882 George St at Marti Place, 1937 1937 Sydney 160 Photo Tram 826 Railway Sq area Unknown Sydney 161 Photo Railway Sq in background, Broadway with double decker bus and toastrack car late 1930s Sydney 162 Photo Coupled St Pitt St? - photo Ben Parle Feb. 1950 Sydney 163 Photo Electric tram No. 2 - North Sydney with side trolley pole running Unknown Sydney 164 Photo George St - Horden's Corner Unknown Sydney 165 Photo George St at Martin Place c1920 Sydney 166 Photo Castlereagh St Sydney c1928 c1928 Sydney 167 Photo Railway Sqare c1920 c1920 Sydney 168 Photo Darling St Countereweight Unknown Sydney 169 Photo Trolley bus depot Unknown Sydney 170 Photo Trolley bus No. 14 Unknown Sydney 171 Photo Newcastle Railway Station with steam tram - Wharf Road?? Unknown Newcastle 172 Photo High St West Maitland - steam tram Unknown Maitland 173 Photo High St West Maitland - steam tram Unknown Maitland 174 Post Card Argent St near tram terminal Broken Hill NSW c1900 Broken Hill 175 postcard Argent St looking south Broken Hill - with Ken Magor's notes on rear Unknown Broken Hill 176 Photo Toronto - steam tram 61A Unknown Toronto 177 Photo 124A trial run 1911? Sutherland - Cronulla line 1911 Sutherland 178 Photo 103A at a tram stop Unknown Sydney 179 Photo Cable tram set at Crows Nest terminus grip car 12, trailer 22 Unknown Sydney 180 Photo Cable tram Queens Square Sydney 1903 Sydney 181 Photo cars 2078 and 2077 Chatswood late 1950s Sydney 182 Photo car 1877 Balmain area late 1950s Sydney 183 Photo Trolley bus - Rockdale destination Late 1950s Sydney 184 Photo Broken Hill steam tram - motor 18A North Tram Unknown Broken Hill 185 Photo Millars Point Sydney NSW - ferry/tram interchange, unknown Sydney All items imaged including the rear or back where there was writing of information. All files stored on the Museum's Photo Collections directory. Demonstrates through the medium of many images, Australian tramway systems and Ballarat's place in them.Album - heavy card covers, plastic lined with postcard or 6x4 photo sleeves.australia, tramways, postcards, photographs, steam trams, horse trams, cable trams, trolley buses -
 Melbourne Tram Museum
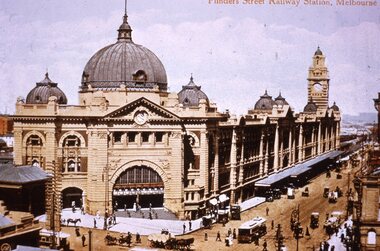
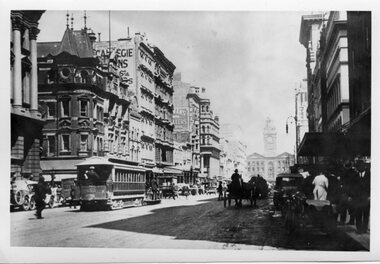
Photograph - Black and white - Flinders St Station c1920's
Shows H class tram number 57, east bound in Flinders St with the Flinders Street Railway station in the background. Has a number of horse drawn vehicles in the view along with motor cars and trucks, some of them doing a hook turn. A policeman is on point duty. Photo taken after Flinders St converted to electric trams from cable trams in 1927. Commercial print from a SLV photo.Yields information about the location, the streetscape and the trams and vehicles in use at the time. Original photo taken from a Rose Series - Southern Cross Series No. 5. See State Library of Victorian Collection - H2011.27DBlack and white photograph of Flinders St Station Melbourne, late 1920's with H class tram 57 in the view."RSCP 327" & "C1929" in pencil and "H57" in red ink on rear.tramways, h class, trams, tram 57, flinders st, flinders st station, horse drawn vehicles, mmtb -
 Melbourne Tram Museum
Photograph - Black and white - Glenferrie Road, Glenferrie c1915
Shows Glenferrie Road, near Linda St looking south, c1915 prior to the construction of the Railway overpass at Glenferrie Railway Station with H class tram 58 in the view. The tram line was constructed in 1913. It would appear that the level crossing gates are closed in the photograph. The building on the right-hand side by the horse-drawn cart was an ANZ bank until 2021. The closer building, a theatre (The Palace) has since been demolished and is now a Coles Supermarket. The level crossing was replaced with an overbridge in April 1916. The church in the background is the Immaculate Conception Church, without the spires - built after WW1. Yields information about the location, the streetscape and the tram, vehicles in use at the time. Black and white photograph of Glenferrie Road Glenferrie with tram H58, looking south near Linda St, c1915."RSCP 327" & "C1920s" in pencil on rear and H58 in red ink.tramways, trams, glenferrie road, hawthorn, streetscapes, h class, tram 58 -
 Melbourne Tram Museum
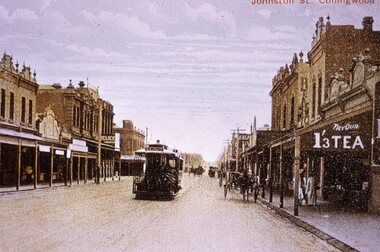
Slide - Colour - reproduction - Johnston St Collingwood c1900
Reproduction slide of a coloured postcard showing a cable tram in Johnston St Collingwood. Tram has the destination of Carlton. Looking west from Hoddle St on a quiet day with some horse drawn vehicles. There are signs for E. Sutcliffe chemist, Havelock Tobacco and sign advertising 1/3d tea. Photo around 1900.Yields information about Johnston St Collingwood.Kodachrome cardboard duplicate slide - Colour slide - reproduction from a postcard - Johnston St Carlton "CB16" in penciltrams, tramways, cable cars, cable trams, carlton, johnston st, collingwood -
 Melbourne Tram Museum
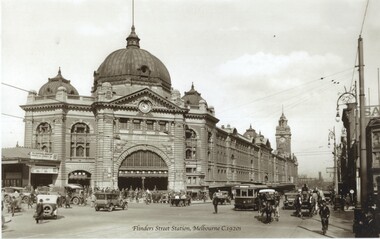
Slide - Colour - reproduction postcard - Flinders Street Station c1910
... . Photo has a number of cable trams in the view, horse drawn... a number of cable trams in the view, horse drawn vehicles ...Reproduction slide of a coloured postcard showing Flinders St station, about 1910 after the completion of construction. Photo has a number of cable trams in the view, horse drawn vehicles, including a horse drawn wagon carrying barrels.Yields information about Flinders St station after the completion of construction in 1910.Kodachrome cardboard duplicate slide - Colour - reproduction postcard - Flinders Street Station c1910 "CB17" in penciltrams, tramways, cable cars, cable trams, flinders st station, horse drawn vehicles -
 Melbourne Tram Museum
Slide - Black and white reproduction photograph - HTT 19 Camberwell Jtn, 1920
Photograph - HTT bogie tram No. 19 crossing Camberwell Junction from Riversdale Road into Camberwell Road. Has the a letter "C" on the rear platform, which was the destination indicator for Camberwell Junction. In the view are a number of horse drawn carts, a motor cycle with a sidecar, Fraser Ironmonger, Dillons, H Evans & Co Real Estate agents advertising Eastern Heights Estate Saturday 20 March and the Commonwealth Bank. Saturday 20 March occurred in 1920. Original photo by Rose Stereograph Co. P 3525 - see reference.Yields information about Commonwealth Junction in 1920.Kodachrome cardboard duplicate slide - Black and white reproduction photograph - HTT 19 Camberwell Jtn 1920 "MP9" in penciltrams, tramways, htt, hawthorn tramways trust, camberwell junction, camberwell road, tram 19 -
 Melbourne Tram Museum
Slide - Black and white reproduction photograph - Elizabeth St Melbourne, 1920c
Photograph - looking south along Elizabeth Street Melbourne to towards Flinders Street station. Has three cable trams in the photo, including one shunting at the terminus. Has signs for the London Cafe and Federal Cafe in the view, along with many horse-drawn vehicles and a few motor cars. There is a telegraph/telephone line on the east side of the street. Original photo by Rose Stereograph Co. P 957 - see reference. Yields information about the south end of Elizabeth St and the cable tram terminus.Kodachrome cardboard duplicate slide - Black and white reproduction photograph - Elizabeth St c1920 "CB9" in penciltrams, tramways, cable trams, elizabeth street, flinders st station -
 Melbourne Tram Museum
Photograph - Black and White - St Kilda Road, looking south to St Kilda Junction
St Kilda Road, looking south to St Kilda Junction from near Peel Street. Photo shows a number of horse drawn vehicles and one cable tram on its way to St Kilda Beach. In the background is the Junction Hotel and the Corner Hotel advertising Black and White whiskey. There are a number of gas street lamps in the view.Yields information about St Kilda Road and St Kilda Junction about 1900.Black and white photograph - St Kilda Road, looking south to St Kilda Junction, c1900.tramways, trams, st kilda road, st kilda junction, cable trams, corner hotel, junction hotel -
 Melbourne Tram Museum
Photograph - Black and White - Elizabeth Street looking south from
Photo of the view looking south to Flinders Street Station, shows a number of motor vehicles and horse-drawn vehicles, along with a motor cycle with a sidecar and one cable tram set hauling a bogie trailer. Note the road surface which appears to be damaged by vehicles. There are a number of puddles showing. Yields information about the view looking south in Elizabeth St. c1920Black and White - Elizabeth Street looking south Little Collins Street, c1920. tramways, trams, cable cars, elizabeth street, traffic, horse drawn vehicles -
 Melbourne Tram Museum
Photograph - Black and White - Flinders St looking east - 1915c
Photo of Flinders St looking east from about Queen Street, c1915. Has many horse drawn vehicles and one cable tram with two ladies riding on the front of the grip car. In the view are Robert Reid & Co, Commerce House, Finks building and Flinders St Station. The station was completed in 1909. Commerce House or the Commercial Travellers Association building was completed in 1913 - see reference.Yields information about Flinders Street between Queen and Elizabeth Streets.Photograph - Black and White - Flinders St looking east - 1915c from near Queen Street.tramways, trams, cable cars, flinders street, commerce house, cta building, flinders street station -
 Melbourne Tram Museum
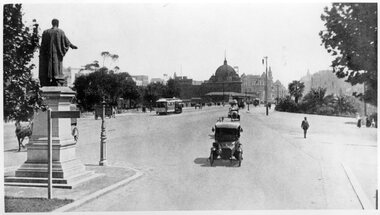
Photograph - Black and White - St Kilda Road near City Road
Photo 1 - looking north from the point where St Kilda Road widened after crossing Princes Bridge. Has the Edmund Fitzgibbon monument on the left. One cable tram set is making its way into the City. Has Flinders St Station in the background, along with a number of motor cars and one horse drawn vehicle behind the monument and another behind a sign. In the far distance is an advertisement for The Herald newspaper. Photo 1910c Photo 2 - looking south from near the end of the bridge, with seven cable cars in the view, along with motors cars and two horse drawn vehicles. Government House can be seen on the left horizon.Yields information about St Kilda Road c1910.Set of two black and white photographs of" .1 - St Kilda Road near City Road looking north - with Edmund FitzGibbon monument .2 - looking southtramways, trams, cable cars, flinders street station, st kilda road, princes bridge, monuments, edmund fitzgibbon -
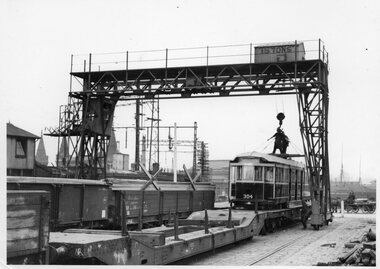 Melbourne Tram Museum
Photograph - Unloading W 304 at Spencer St - Flinders St yard, Victorian Railways (VR), 1924
... loaded onto a horse-drawn jinker. Yields information about ...Photos show W class 304 after delivery from Adelaide being unloaded by the travelling yard crane. The tram was built in Adelaide by the Holden Bodyworks and completed at the Workshops. The tram entered service on 14-8-1924. It was converted to a W2 class tram in Dec. 1932. The second photo shows the tram being loaded onto a horse-drawn jinker. Yields information about the construction and delivery of new W class trams by the Holden Bodyworks.Set of two photographs of W 304 being unloaded at the Flinders St yard 1924In ink of rear of prints "Photo Victorian Railways"tramways, trams, flinders st, railways, w class, tram 304, new trams, holden bodyworks, horse drawn vehicles -
 Melbourne Tram Museum
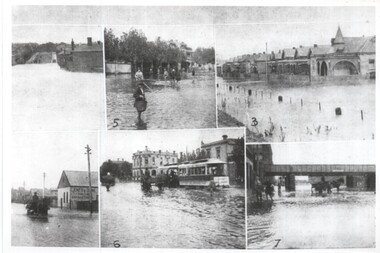
Photograph - Melbourne Flood scenes, 1910c
Composite photograph from a journal showing six flood scenes in the South Melbourne and Port Melbourne area - undated. Photo No. 6 has been identified as Crockford St Port Melbourne. The image with the bridge is possibly Montague St. The photo on the left with a horse drawn cart, has the factory of Jones and Dunn Furniture Manufacturers.Yields information about a flood in the Port Melbourne area.Composite photograph of flood scenes in Melbourne - undated.Melbourne – Floods in the suburbs, No. 6 Crockford St Port Melbourne. Copy neg Mark Plummer collections ex late John Alfred collection.cable trams, melbourne, floods, crockford st, port melbourne, bridges, south melbourne -
 Melbourne Tram Museum
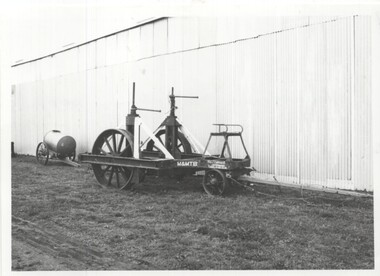
Photograph - MMTB horse drawn cable drum wagon, Keith Kings
Photo shows the horse drawn MMTB cable drum carrying wagon at the TMSV Museum at Bylands, mid 1970s. Has the MMTB identification, address and mass details painted on the vehicle. Behind the wagon is a Furphy water cart. Used to carry and distribute cable including overhead. Photo of the vehicle can be seen on page 68 of the book Destination City 3rd Edition.Yields information about the MMTB cable drum carrying wagon at Bylands.Photograph - MMTB horse drawn cable drum wagon at the TMSV Bylands Museum On rear in ink. TMSV – Horse drawn cable drum wagon at Bylands (Also Furphy water tank), Keith Kings photo. tramways, tmsv, bylands, horse drawn vehicles, overhead, cable drum -
 Melbourne Tram Museum
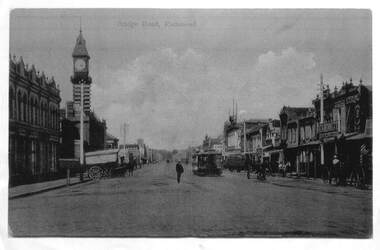
Photograph - Enlargement of a postcard, Bridge Road Richmond, c1900
The first image shows the shops on either side of Bridge Road with horse drawn carts and one cable tram. The second image from the Town Hall tower, shows two cable tram sets, the narrowing of the road. Has in the view Guddon & Selleck Auction House and Property Exchange also advertising Commercial Union Assurance Co. and George Stirling and Sons store.Yields information about Bridge Road, c1900Set of two A3 enlargements of postcards 1 - Looking east along Bridge Road from near Church St 2 - Bridge Road Richmond - from Town Hall looking westcable trams, tramways, richmond, bridge road, -
 Melbourne Tram Museum
Photograph - Black and White, W Class Tram 284 body being transported - Newspaper photo, Early 1920's
... Class Trams Tram 284 Horse drawn jinker The body of MMTB Tram W ...Image shows a newspaper photo of the new W Class 284 tram body being transported by horse drawn jinker from railyards. This tram body was built in Adelaide.The W Class Trams were a highly successful design of trams for Melbourne. The body of MMTB Tram W 284 being delivered by horse drawn jinker from railway yards. The tram was built in Adelaide.tramways, trams, w class trams, tram 284, horse drawn jinker -
 Melbourne Tram Museum
Photograph - Black and White, New W Class Tram body being transported - Newspaper photo, Early 1920's
... The body of a MMTB Tram being delivered by horse drawn... Class Trams Horse drawn jinker The body of a MMTB Tram being ...Image shows a newspaper photo of a new W Class tram body being transported by horse drawn jinker from the body builders. Possibly from J Moore of South Melbourne.The W Class Trams were a highly successful design of trams for Melbourne. The body of a MMTB Tram being delivered by horse drawn jinker from the body builders to a depot.tramways, trams, w class trams, horse drawn jinker -
 Melbourne Tram Museum
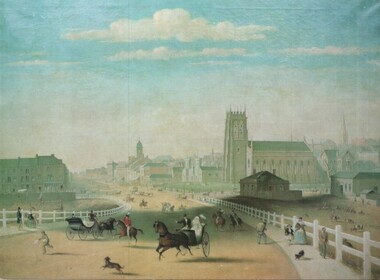
Artwork, other - Swanston Street from Princes Bridge c1861
Colour print of Reproduction of an oil painting - Swanston Street from Princes Bridge c1861 showing Johnson's Bridge Hotel, later Young and Jacksons, the first St Paul's church building, original Town Hall building and the tower of Scots church. Shows pedestrians and horse drawn carriages before the introduction of public omnibus services in 1869. Not known who produced the card.Yields information about early Melbourne after the start of the gold rush.Reproduction of an oil painting - Swanston Street from Princes Bridge c1861 by Henry BurnIn ink on the rear Keith Kings stamp and the initials RG and "Melbourne"melbourne, princes bridge, horse drawn vehicles, st pauls cathedral, hotels -
 Melbourne Tram Museum
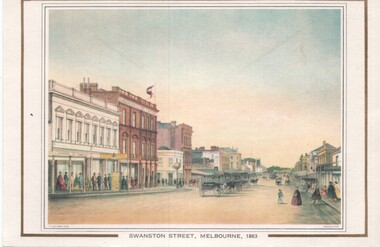
Artwork, other, Swanston Street Melbourne 1863
Colour print of a reproduction of an oil painting - Swanston Street from a point north of Little Bourke St looking south towards the Kings Domain. Reproduced by Kew Cottages and St Nicholas Parent's Association from a original print and lithographed by F Cogne, printed and published by Charles Troedel in his Melbourne Album 1863. Appears to have a number of horse drawn cabs parked in the centre of the street.Yields information about early Melbourne after the start of the gold rush.Reproduction of an oil painting - card - Swanston Street Melbourne 1863melbourne, horse drawn vehicles, swanston st -
 Melbourne Tram Museum
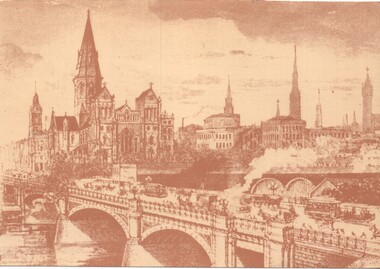
Artwork, other, Princes Bridge from the south bank of the Yarra River, c1900
... trams and horse drawn vehicles on the bridge. The artist has... Cathedral and other buildings. Has a number of cable trams and horse ...Sepia toned print of a drawing of Princes Bridge with St Paul's Cathedral and other buildings. Has a number of cable trams and horse drawn vehicles on the bridge. The artist has taken liberties and drawn the spires onto St Paul's cathedral and other buildings such as Princes Bridge railway station. The spires is most likely based on the proposed design at the time. They were built in 1926 to a changed design - see reference.Yields information about the Princes Bridge precinct.Reproduction of a Lithograph drawing - Princes Bridge from the south bank of the Yarra River.melbourne, princes bridge, horse drawn vehicles, st pauls cathedral, cable trams