Showing 736 items matching " tram 24"
-
 Ballarat Tramway Museum
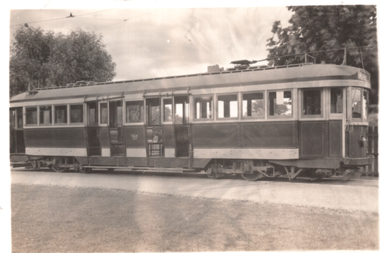
Photograph - Bendigo Tram 24, 1947
... Bendigo Tram 24......tram 24...Photograph of Bendigo Tram 24 in 1947 painted in the SEC colours with a cream rocker panel, the prewar SEC scheme. ...Photograph Bendigo Tram 24 ...Photograph of Bendigo Tram 24 in 1947 painted in the SEC colours with a cream rocker panel, the prewar SEC scheme. The tram is ex Hawthorn Tramways Trust No 32, which became MMTB No. 138 before being sold to the SEC arriving in Bendigo late 1945. Photographer unknown. See item 326, Bendigo Tramways by Keith Kings.Yields information about Bendigo tram 24 appearance in 1947Photograph, black and white, with notes on rear.In ink "No. 24 car Bendigo 1947" and the Ken Magor stamp.tramways, trams, bendigo, bogie trams, tram 24, bendigo tramway -
 Ballarat Tramway Museum
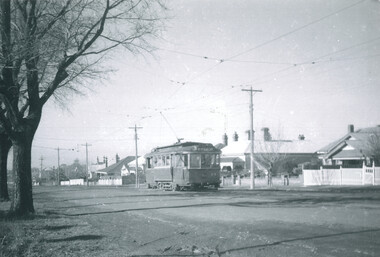
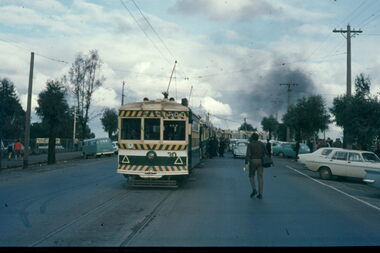
Photograph - SECV Geelong tram 24 in Ryrie St, c1949
... SECV Geelong tram 24 in Ryrie St.......tram 24...Photograph shows Geelong tram 24, showing City, inbound in Ryrie St opposite Eastern Park, on the Eastern Park - City shuttle, late 1940s. ...Photograph SECV Geelong tram 24 in Ryrie St. ...Photograph shows Geelong tram 24, showing City, inbound in Ryrie St opposite Eastern Park, on the Eastern Park - City shuttle, late 1940s. Tram has been "modernised" with wooden doors or gates replacing the folding metal ones, but route indicator lights remain. Photographer unknown, c1949. Photo may be the same photographer and date as that of item 10300.Yields information about Geelong tram 24 and Black and white photograph printed on Kodak Royal paper.geelong, tramways, tram 24, eastern park, ryrie st -
 Ballarat Tramway Museum
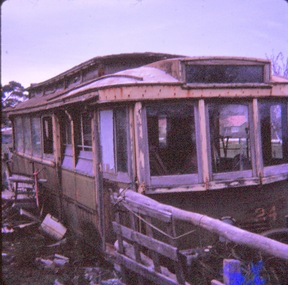
Slide - 35mm slide/s - set of 2, Graham Jordan, former SEC tram 24 at a farm property, c1973
... former SEC tram 24 at a farm property ...... tram 24...Set of 2 Kodachrome white cardboard mount 27mm square slides of former SEC tram 24 at a farm property near Ballarat c1973. ...Yields information about tram 24 following its disposal and how it appeared c1973. ...Yields information about tram 24 following its disposal and how it appeared c1973.Set of 2 Kodachrome white cardboard mount 27mm square slides of former SEC tram 24 at a farm property near Ballarat c1973. Location unknown Advised by Graham Jordan on 21/8/18 by email that the photo was his and that a copy slide was given to John Theodore. Record updated. Various notations by John as to the slide number and the trams in pencil and ink.tramways, trams, tram disposal, scrapped trams, accidents, tram 24 -
 Ballarat Tramway Museum
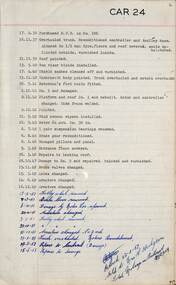
Administrative record - SEC Tramcar record - tram 24, State Electricity Commission of Victoria (SECV), 1937 to 1957
... SEC Tramcar record - tram 24......tram 24...Lists the work carried out by the SEC on tram No. 24. Includes notes on the tram itself, body, brake gear, electrical, and truck. ...Administrative record SEC Tramcar record - tram 24 State Electricity Commission of Victoria (SECV) ...Lists the work carried out by the SEC on tram No. 24. Includes notes on the tram itself, body, brake gear, electrical, and truck. The tram was effectively written off in 1954 after running away and entering the Bucks Head Hotel - body sold in 1957.Demonstrates the SECV practice of maintaining records for the work on the tramcars in Ballarat.Foolscap ruled sheet with stamp tram car number and work category, typed or handwritten entries.tramways, tramcars, ballarat, sec, tramcar maintenance, records, tram 24 -
 Melbourne Tram Museum
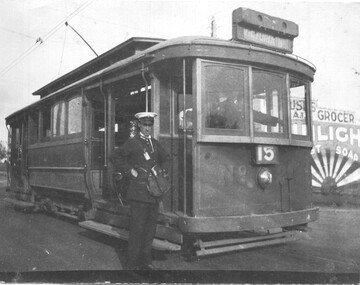
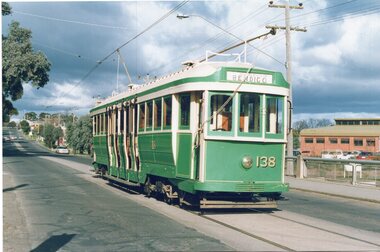
Photograph - "B class tram 24 at Mont Albert", c1922
... "B class tram 24 at Mont Albert"......tram 24...Photograph shows a B class tram No. 24 at the Mont Albert tram terminus with Conductor Bill Simpson standing alongside during 1922. ...Photograph "B class tram 24 at Mont Albert" ...Photograph shows a B class tram No. 24 at the Mont Albert tram terminus with Conductor Bill Simpson standing alongside during 1922. The tram is showing route "15" and the destination of "Victoria Bdg". In the background is a grocer with a Sunlight soap advertisement. Note the white top cap on the conductor, the lapel badges and an item or tickets pinned to his jacket.Yields information about MMTB tram 24, the Mont Albert terminus and conductor Bill Simpson.Photograph - Black and White - with notes on the rear and negative - 35mm with 8311."Mont Albert tram terminus (Union Rd), 1922, me"mmtb, tramways, tram 24, mont albert, conductors, uniforms -
 Ballarat Tramway Museum
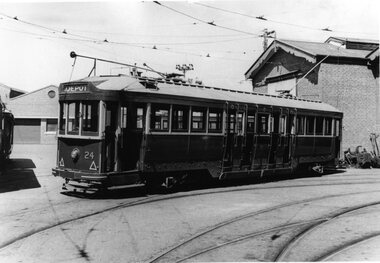
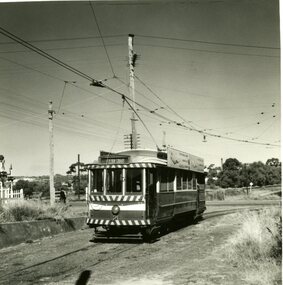
Photograph - SECV Bendigo bogie tram No. 24 at the Bendigo Tram depot, Peter Duckett, 1950's
... SECV Bendigo bogie tram No. 24 at the Bendigo Tram depot...... tram 24...Black and White Photograph of Bendigo bogie tram No. 24 at the Bendigo Tram depot during the 1950's. ...Black and White Photograph of Bendigo bogie tram No. 24 at the Bendigo Tram depot during the 1950's. ...Black and White Photograph of Bendigo bogie tram No. 24 at the Bendigo Tram depot during the 1950's. Has the destination of "Depot". Peter Duckett Collection.Yields information about the appearance of Bendigo's ESCo bogie trams during the 1950's.Black and white print with photographer’s notes on the rear.On rear, stamped in black ink "Photo supplied from P.W. Duckett Collection, All Rights Reserved, 69 Howitt Rd. Nth Caulfield 3161." In the bottom right hand corner, in ink "1950's" and "pic 29" in red ink.trams, tramways, bendigo, depot, secv, tram 24 -
 Ballarat Tramway Museum
Photograph - Colour Photograph/s, 1960's
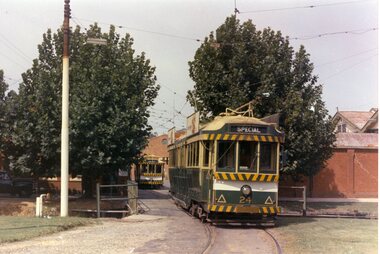
... ... tram 24...Tram 24 has two roof ads, do not appear to be SEC ads. ...Ballarat Tramway Museum South Gardens Reserve Wendouree Parade Ballarat Ballarat goldfields Bendigo Depot tram 24 tram 20 Colour postcard size print of an SEC Bendigo trams 24 and 20 parked on the Bendigo depot access track. ...Colour postcard size print of an SEC Bendigo trams 24 and 20 parked on the Bendigo depot access track. Tram 24 on bridge showing destination "SPECIAL" with 20 in background. Tram 24 has two roof ads, do not appear to be SEC ads. Depot buildings in background. Both trams fitted with dash canopy lighting and large white strip under cabin. Printed on AGFA paper.bendigo, depot, tram 24, tram 20 -
 Ballarat Tramway Museum
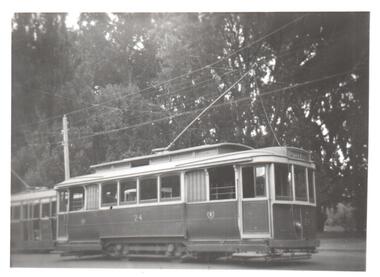
Photograph - Black & White Photograph/s, Lee A Ratten, late 1940's to early to mid 1950's
... ... tram 24...at Gardens Loop, Wendouree Parade, late 1940's to early to mid 1950's. Tram 24 has the destination of City. On the rear has the photo stamp of Lee A Ratten of 51 Cotham Road Kew....Ballarat Tramway Museum South Gardens Reserve Wendouree Parade Ballarat Ballarat goldfields Yields information about tram operations in the Gardens following the introduction of bogie trams and before the scrapping of No. 25 Trams tramways Ballarat Gardens Loop Wendouree Parade tram 24 tram 34 Black and white photograph of Ballarat 24 and 34? ...Yields information about tram operations in the Gardens following the introduction of bogie trams and before the scrapping of No. 25Black and white photograph of Ballarat 24 and 34? at Gardens Loop, Wendouree Parade, late 1940's to early to mid 1950's. Tram 24 has the destination of City. On the rear has the photo stamp of Lee A Ratten of 51 Cotham Road Kew.trams, tramways, ballarat, gardens loop, wendouree parade, tram 24, tram 34 -
 Melbourne Tram Museum
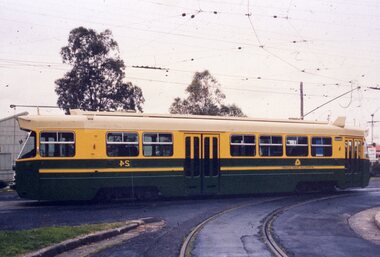
Slide - Z1 24 in The Met livery, June 1983
... ...tram 24...Z class tram 24 in The Met green and yellow livery at Preston Workshops. ...Z class tram 24 in The Met green and yellow livery at Preston Workshops. ...Z class tram 24 in The Met green and yellow livery at Preston Workshops. This was the first Z class tram painted in The Met livery. Vicsig.net records it being painted in May 1983.Yields information about Z class 24 and its repainting in The Met livery following the formation of The Met.Slide - AGFA black/white plastic mountniltramcars, the met, livery, z class, tram 24 -
 Melbourne Tram Museum
Photograph - Set of two Colour Prints, Jeff Bounds, 27/07/1991 12:00:00 AM
... ... tram 24...Colour print of Bendigo Tram 24 dressed as its Melbourne number 138 (P class) operating a tour 27/7/1991 operated by Jeff Bounds, in Nolan St. ...In ink on the back of each print: "Bendigo, Tram tour run by Jeff Bounds on Sat 27/7/91 before 138 (ex Bendigo 24) was exchanged to Melbourne for SW5 808."...Colour print of Bendigo Tram 24 dressed as its Melbourne number 138 (P class) operating a tour 27/7/1991 operated by Jeff Bounds, in Nolan St. ...Colour print of Bendigo Tram 24 dressed as its Melbourne number 138 (P class) operating a tour 27/7/1991 operated by Jeff Bounds, in Nolan St. Bendigo. .1 - In Nolan St at the creek bride. .2 - In Bridge St at Nolan St Corner.In ink on the back of each print: "Bendigo, Tram tour run by Jeff Bounds on Sat 27/7/91 before 138 (ex Bendigo 24) was exchanged to Melbourne for SW5 808."trams, tramways, bendigo, nolan st, tours, p class, tram 138, tram 24 -
 Ballarat Tramway Museum
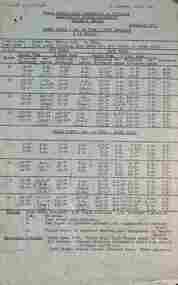
Document - Brake Tests - Air Brake, State Electricity Commission of Victoria (SECV), 1941
... ...tram 24...Document detailing brake testing done with Ballarat trams 24 and 20 dated 30/1/1941 and a summary sheet dated 25/6/1947. ...Ballarat Tramway Museum South Gardens Reserve Wendouree Parade Ballarat Ballarat goldfields Document detailing brake testing done with Ballarat trams 24 and 20 dated 30/1/1941 and a summary sheet dated 25/6/1947. ...Document detailing brake testing done with Ballarat trams 24 and 20 dated 30/1/1941 and a summary sheet dated 25/6/1947. Gives stopping distances for various speeds on level track and a grade. Has notes on the skid distance. These were appended to a report. All documents are copies of the originals typed 15/6/1954. See item 9868 for a Geelong report.Demonstrates SECV report about testing brakes on Ballarat trams.Typed copy - three Foolscap sheetstramways, ballarat, brakes, tram 24, tram 20, reports, tramcar brakes, brake testing -
 Ballarat Tramway Museum
Slide - Bendigo trams - Quarry Hill - Eaglehawk route - set of 4, Warren Doubleday, 12/3/1970
... ...tram 24...Set of four slides of Bendigo trams taken by Warren Doubleday on 27/3/1970 1 - tram 5 at Quarry Hill with the conductor raising the trolley pole. 2 - Tram 4 at the Eaglehawk terminus with the Town Hall Hotel behind. 3 - Tram 24 arriving at Eaglehawk 4 - trams 23 and 4 at the end of the double track, tram 23 has an Eaglehawk banner is running a special....Bendigo Charing Cross tram 24 tram 5 Eaglehawk tram 23 Quarry Hill Have the photographer's slide number written on them. ...Set of four slides of Bendigo trams taken by Warren Doubleday on 27/3/1970 1 - tram 5 at Quarry Hill with the conductor raising the trolley pole. 2 - Tram 4 at the Eaglehawk terminus with the Town Hall Hotel behind. 3 - Tram 24 arriving at Eaglehawk 4 - trams 23 and 4 at the end of the double track, tram 23 has an Eaglehawk banner is running a special.Yields information about the operation of trams Quarry Hill and Eaglehawk.Colour Slide - Kodak plastic mounts - set of 4Have the photographer's slide number written on them.bendigo, charing cross, tram 24, tram 5, eaglehawk, tram 23, quarry hill -
 Ballarat Tramway Museum
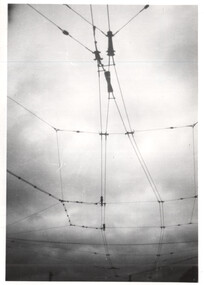
photograph - Set of 4 Black & White - Bendigo tramways, Peter Duckett, late 1940s
... ...tram 24...Set of four photographs of Bendigo trams and infrastructure photographed by Peter Duckett, late 1940s 1 - double trolley wire at a "Y" terminus showing the details of dual trolley wire - Could be either Quarry Hill or Golden Square. 2 - Bendigo trams 24 and 22 at Quarry Hill terminus - note the cream rocker panels. 3 - Bendigo 6 at Charing Cross. 4 - Bendigo 16 - after conversion to one man tram....Yields information about Bendigo trams late 1940s Bendigo tramcars Bendigo Tramways overhead double trolley wire terminals tram 24 tram 22 tram 6 tram 16 Quarry Hill Charing Cross Details the image on the rear of the print in ink. ...Set of four photographs of Bendigo trams and infrastructure photographed by Peter Duckett, late 1940s 1 - double trolley wire at a "Y" terminus showing the details of dual trolley wire - Could be either Quarry Hill or Golden Square. 2 - Bendigo trams 24 and 22 at Quarry Hill terminus - note the cream rocker panels. 3 - Bendigo 6 at Charing Cross. 4 - Bendigo 16 - after conversion to one man tram.Yields information about Bendigo trams late 1940sSet of four black and white photographs by Peter Duckett.Details the image on the rear of the print in ink.bendigo, tramcars, bendigo tramways, overhead, double trolley wire, terminals, tram 24, tram 22, tram 6, tram 16, quarry hill, charing cross -
 Ballarat Tramway Museum
Slide - Bendigo trams - Quarry Hill - Eaglehawk route - set of 6, Warren Doubleday, 13/9/1970
... ...tram 24...Set of six slides of Bendigo trams taken by Warren Doubleday on 13/9/1970 during an ARHS tour to Bendigo - 1 - tram 30 at the head of a long line up at the railway station 2 - tram 19 - part of the convoy 3 - tram 25 - turning into View St 4 - tram 24 leaving a loop on the Eaglehawk line - note the signals on the pole with one showing a green light. 5 - tram 26 outbound to Eaglehawk 6 - tram 3 inbound about to enter a loop - note the red signal on the pole....Bendigo Charing Cross Eaglehawk Quarry Hill tram 30 tram 19 tram 25 tram 24 tram 26 tram 3 Signals Have the photographer's slide number written on them. ...Set of six slides of Bendigo trams taken by Warren Doubleday on 13/9/1970 during an ARHS tour to Bendigo - 1 - tram 30 at the head of a long line up at the railway station 2 - tram 19 - part of the convoy 3 - tram 25 - turning into View St 4 - tram 24 leaving a loop on the Eaglehawk line - note the signals on the pole with one showing a green light. 5 - tram 26 outbound to Eaglehawk 6 - tram 3 inbound about to enter a loop - note the red signal on the pole.Yields information about the Bendigo tram system and the tram used on a tour in Sept. 1970.Colour Slide - Anscochrome GAF plastic mounts - set of 6Have the photographer's slide number written on them.bendigo, charing cross, eaglehawk, quarry hill, tram 30, tram 19, tram 25, tram 24, tram 26, tram 3, signals -
 Ballarat Tramway Museum
Slide - Bendigo trams - Charing Cross - set of 5, Warren Doubleday, 12/3/1970
... ...tram 24...Set of five slides of Bendigo trams taken at Charing Cross - Pall Mall, View St and Mitchell St, taken by Warren Doubleday on 27/3/1970 1 - Tram 21 arriving with the Centotaph, City Family Hotel, and Fountain Plaza in the background. 2 - Tram 24 arriving. 3 - Briney 28 departing, with the Easter Fair headboard and other locations that could be visited by tram 4 - Tram 5 departing with a Cinzano and Electric cooking roof adverts 5 - General view of four trams - 21, 28 bogie cars 4 and 24 with The Beehive building in the background....Bendigo Charing Cross tram 21 tram 24 tram 28 tram 5 tram 4 Have the photographer's slide number written on them. ...Set of five slides of Bendigo trams taken at Charing Cross - Pall Mall, View St and Mitchell St, taken by Warren Doubleday on 27/3/1970 1 - Tram 21 arriving with the Centotaph, City Family Hotel, and Fountain Plaza in the background. 2 - Tram 24 arriving. 3 - Briney 28 departing, with the Easter Fair headboard and other locations that could be visited by tram 4 - Tram 5 departing with a Cinzano and Electric cooking roof adverts 5 - General view of four trams - 21, 28 bogie cars 4 and 24 with The Beehive building in the background.Yields information about the operation of trams at Bendigo's Charing Cross.Colour Slide - Anscochrome GAF plastic mounts - set of 5Have the photographer's slide number written on them.bendigo, charing cross, tram 21, tram 24, tram 28, tram 5, tram 4 -
 Ballarat Tramway Museum
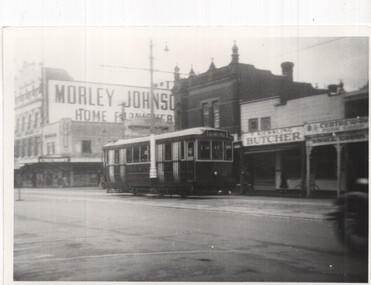
photograph - Set of 5 Black & White - Bendigo tramways, Peter Duckett, early 1950s
... ...tram 24...Kessling Butcher 2 - Tram No. 3 at the depot. 3 - Tram 7 on a Quarry Hill service. 4 - Bogie tram 24 at the depot 5 - Track cleaner - scrubber and another ex Melbourne single trucker at the depot....Yields information about Bendigo trams early 1950s Bendigo tramcars Bendigo Tramways Quarry Hill Charing Cross Mitchell St tram 22 tram 3 tram 7 tram 24 scrubber tram Details the image on the rear of the print in ink. ...Set of five photographs of Bendigo trams photographed by Peter Duckett, early 1950s 1 - Bendigo 22 in Mitchell Street. Tram has the destination of Quarry Hill. In the background is the Morley Johnson Home furnisher and F. Kessling Butcher 2 - Tram No. 3 at the depot. 3 - Tram 7 on a Quarry Hill service. 4 - Bogie tram 24 at the depot 5 - Track cleaner - scrubber and another ex Melbourne single trucker at the depot.Yields information about Bendigo trams early 1950sSet of five black and white photographs by Peter Duckett.Details the image on the rear of the print in ink.bendigo, tramcars, bendigo tramways, quarry hill, charing cross, mitchell st, tram 22, tram 3, tram 7, tram 24, scrubber tram -
 Melbourne Tram Museum
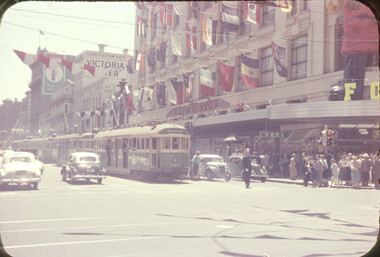
Slide - MMTB, and MTA tramway operations set of 11, Hugh Ballment, 1950s to 1980s
... ...tram 24...HBM190 - MMTB Trams 722, 917, c1986, Swanston St, Art Tram David Larwill - at Flinders St with Young and Jackson in the background with adverts for Peter Stuyvesant, four X, Classic Restaurant and a large advert for Coca Cola. HBM191 - MTA Tram 24, Aug 1988, Bourke St, Cable track removal at Spencer St HBM192 - MMTB Tram 857, 24/05/1954, St Kilda Rd, At Sturt St corner, with the Trocadero building in the background HBM193 - MMTB Tram 651, cMay1968, St Kilda junction, Queensway construction, with a passenger at the tram stop. ...Yields information about Melbourne tram operations, with 1950s to 1980s photos of Melbourne tramways. new tramway Bourke St Spencer St Swanston St Elizabeth St Flinders st tram 377 tram 677 Elsternwick Seattle tram 518 tram 244 tram 722 tram 24 tram 857 St Kilda Road tram 917 Z class X2 class T Class Royal Parade tram 180 Kodachrome cardboard and plastic mounts, with notes - set of 11 Slide MMTB, and MTA tramway operations set of 11 Hugh Ballment ...Set of 11 photos by Hugh Ballment, unless noted, of MMTB, and MTA: HBM185 - MMTB Tram 377, c1954, Swanston St, At Bourke St, with Royal visit decorations along the street. In the background is Foy Gibson, ANZ Bank, Cosmopolitan Hotel and a policeman directing traffic. HBM186 - MMTB Tram 677, late 1950s, Elsternwick, Has the Tram stop sign about tram services, adverts for Dandy Ham and BP Energy fuel and a Cartage Contractor's offices in the background. HBM187 - MMTB Tram 518, cMay 1983, Seattle, Tourist Tram HBM188 - MTA Tram 2, 1987, Bourke St, Spencer St junction construction. Has the MTOCo offices and Spencer St station in the background. HBM189 - MTA Tram 244, cNov1997, Flinders St, At Spencer St, with a ComEng Train on the viaduct. HBM190 - MMTB Trams 722, 917, c1986, Swanston St, Art Tram David Larwill - at Flinders St with Young and Jackson in the background with adverts for Peter Stuyvesant, four X, Classic Restaurant and a large advert for Coca Cola. HBM191 - MTA Tram 24, Aug 1988, Bourke St, Cable track removal at Spencer St HBM192 - MMTB Tram 857, 24/05/1954, St Kilda Rd, At Sturt St corner, with the Trocadero building in the background HBM193 - MMTB Tram 651, cMay1968, St Kilda junction, Queensway construction, with a passenger at the tram stop. HBM194 - MMTB, Z class tram no. 29, cMay 1976, Bourke St, shows the Palladium Entertainment Centre in the background advertising "Barry Lyndon". Photo taken from the Southern Cross Hotel. HBM195 - MMTB, T class No. 180, 9/09/1967, Royal Parade, TMSV Tour - tours data base gives the date of 10/9/1967, confirmed by TMSV tours listing. Yields information about Melbourne tram operations, with 1950s to 1980s photos of Melbourne tramways.Kodachrome cardboard and plastic mounts, with notes - set of 11new tramway, bourke st, spencer st, swanston st, elizabeth st, flinders st, tram 377, tram 677, elsternwick, seattle, tram 518, tram 244, tram 722, tram 24, tram 857, st kilda road, tram 917, z class, x2 class, t class, royal parade, tram 180 -
 Ballarat Tramway Museum
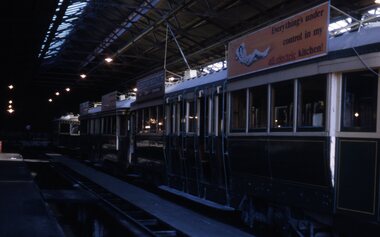
Photograph - Black & White Photograph/s set of 19, Mar. 1972
... ... tram 24...Tram showing destination of "Nth Bendigo" 981.14 - tram 24, showing "Special" on depot access track. ...Tram showing destination of "Nth Bendigo" 981.14 - tram 24, showing "Special" on depot access track. ...Set of 19 black and white prints, all 89mm square of Bendigo trams, date machine printed on print is "Mar 1972". 981.1 - Tram 21 at North Bendigo terminus, with level crossing in background. Has destination "Golden Square" and two SEC roof ads. 981.2 - tram 2? at Eaglehawk, with destination "Depot", two SEC roof ads and "Leo A. Hughes Photographer" on side of building in background. 981.3 - tram 2? at Eaglehawk, side on view. 981.4 - tram 26 at Quarry Hill terminus looking back into city. 981.5 - tram 7 en route to North Bendigo at the site of the Bridge St. loop. Has a Peters Ice Cream truck and Sandhurst Fruit Juices truck on right side of photograph. 981.6 - tram 2 at Quarry Hill terminus. 981.7 - tram 2? at one of the loops on the Eaglehawk line, inbound? 981.8 - bogie tram at Charing Cross with fountain in background. Side on view looking south. 981.9 -trams 7 and 21 on Golden Square/North Bendigo line with bogie tram in background, at Charing Cross. Same as item 972. 981.10 - bogie tram at Charing Cross - has buildings in south west corner in background, including Colonial Mutual Life and an advertisement for the Herald newspaper. 981.11 - trams 25, 7 and two other trams at Charing Cross. 981.12 - trams 2 and 26 and three others at Charing Cross. 981.13 - tram 25 at Golden Square terminus, with Rodda's Golden Square Hotel in the background. Tram showing destination of "Nth Bendigo" 981.14 - tram 24, showing "Special" on depot access track. Has two Johnnie Walker roof ads on side. 981.15 - as above, but tram on bridge outside depot. 981.16 - trams 25 and 28 at depot 981.17 - tram 24 showing "Special" on depot access track with a single truck car in background. 981.18 - trams 2 and 26 at Charing Cross. Has advertisements for "Armstrong Tyre Service" and "Cohn's drinks" on buildings in background. 981.19 - Bendigo 2 at location?, about to enter a loop or double track section. Has hotel in background. On rear of each photo in the top left hand corner is a print number 1 to 19 in ink and location notes, generally "Bendigo"trams, tramways, charing cross, bendigo, golden square, quarry hill, tram 2, tram 21, tram 7, tram 24, tram 26 -
 Ballarat Tramway Museum
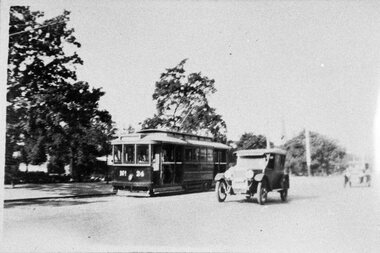
Photograph - Black & White Photograph/s, George Netherway, 1930
... ...Tram 24...Photograph is of, ESCo later SEC tram No. 24 in Sturt St, with motor car alongside. ...Photograph is of, ESCo later SEC tram No. 24 in Sturt St, with motor car alongside. ...Copy photograph of a small photograph contained within item Reg. No. 587. Photograph is of, ESCo later SEC tram No. 24 in Sturt St, with motor car alongside. Print is possibly out of focus. Caption on 687 is "1st New Tram to run to Sebastopol - No. 23 in Sturt St. between Raglan - Errard Sts."trams, tramways, ballarat, new trams, m class, sturt st, esco , tram 24 -
 Ballarat Tramway Museum
Slide - 35mm slide/s - set of 5, Peter Moses, Jan. 1969
... ... tram 24...Set of five colour slides taken the SEC Bendigo depot, Jan. 1969. .1 - inside depot, show two bogies and one Birney on one road and the pit arrangements. .2 - ditto, slightly different exposure .3 - trams 21, 24 and 5 at the front of the depot .4 - Scrubber tram by the depot extension. .5 - Looking across the depot yard with the scrubber in the foreground and depot in the background. ...Tramways trams Bendigo Depot Scrubber Tram tram 21 tram 24 tram 5 On the rear of all the slides "P. ...Set of five colour slides taken the SEC Bendigo depot, Jan. 1969. .1 - inside depot, show two bogies and one Birney on one road and the pit arrangements. .2 - ditto, slightly different exposure .3 - trams 21, 24 and 5 at the front of the depot .4 - Scrubber tram by the depot extension. .5 - Looking across the depot yard with the scrubber in the foreground and depot in the background. Kodak cardboard mount slide, taken by Peter Moses, Jan. 1969. On the rear of all the slides "P. Moses" in black ink .1 - "Jan 1969 Bendigo / Depot" in blue ink and on the opposite side of the slide in red ink “28” .2 - "Jan 1969 Bendigo / Depot" in blue ink and on the opposite side of the slide in red ink “27” .3 - "Jan 1969 Bendigo / Tram Depot" in blue ink and on the opposite side of the slide in red ink “29” .4 - In red ink "31" .5 - "Jan 1969 Bendigo / Depot" in blue ink and on the opposite side of the slide in red ink “30”. tramways, trams, bendigo, depot, scrubber tram, tram 21, tram 24, tram 5 -
 Ballarat Tramway Museum
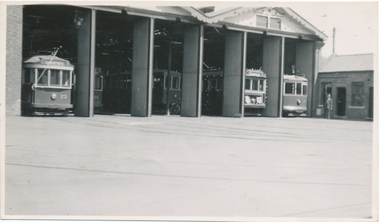
Photograph - SECV Bendigo - depot front, Wal Jack, 7/03/1954
... ... tram 24...Photo of the front of the Bendigo depot, 7-3-1954, by Wal Jack, with bogie trams 23 and 24, "new" scrubber, No. 22 decorated, 28 Birney. ...Photo of the front of the Bendigo depot, 7-3-1954, by Wal Jack, with bogie trams 23 and 24, "new" scrubber, No. 22 decorated, 28 Birney. ...Photo of the front of the Bendigo depot, 7-3-1954, by Wal Jack, with bogie trams 23 and 24, "new" scrubber, No. 22 decorated, 28 Birney. Printed on Ilford paper. Black and White print contained within the Wal Jack Bendigo and Geelong Album, see Reg Item 5003 for more details. See image i2 for rear of photograph. See image i3 for hi res scan of negativeYields information about the front of Bendigo tram depot in 1954.Black and white photograph with photographer's notes on the rear.On the rear in blue ink "SEC Bendigo Nos 23 24)bogies, new scrubber, No. 22 decorated, 28 Birney at depot 7-3-54" with Wal Jack copyright stamp in the top right hand corner and the number "T68PC" written in.trams, tramways, bendigo, depot, tram 24, tram 23, tram 22, tram 28, scrubber -
 Ballarat Tramway Museum
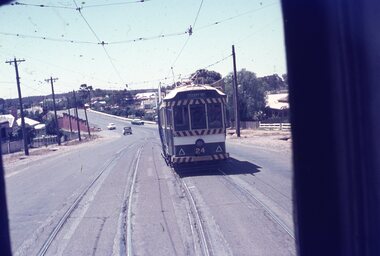
Slide - 35mm slide/s - set of 4, Travis Jeffrey, c1970
... ... tram 24...A set of five plastic mount (black base, white cover) of Bendigo trams, c1970. Photo by Travis Jeffrey. .1 - BE46 - 558 - No. 24 in Jobs Gully Loop from the front window of another bogie tram. ...Tramways trams Bendigo Jobs Gully Charing Cross Mitchell St View St tram 24 tram 25 tram 26 tram 15 tram 17 A set of five plastic mount (black base, white cover) of Bendigo trams, c1970. ...A set of five plastic mount (black base, white cover) of Bendigo trams, c1970. Photo by Travis Jeffrey. .1 - BE46 - 558 - No. 24 in Jobs Gully Loop from the front window of another bogie tram. No. 24 has the destination of Quarry Hill. .2 - BE45 - 557 - No. 25 arriving at Charing Cross, from the window of another tram. .3 - BE61 - 574 - Looking west along View St with two bogie trams in the distance. .4 - BE49 - 561 - No. 26 in Mitchell St, from the front window of another tram with a Newsagent selling The Age, The Sun, The Bendigo Advertiser and The Herald in the background. .5 - BE20 - three trams at a loop, at the top of a hill on the Eaglehawk line - c1960 - 15, 17 and another bogie tram. tramways, trams, bendigo, jobs gully, charing cross, mitchell st, view st, tram 24, tram 25, tram 26, tram 15, tram 17 -
 Ballarat Tramway Museum
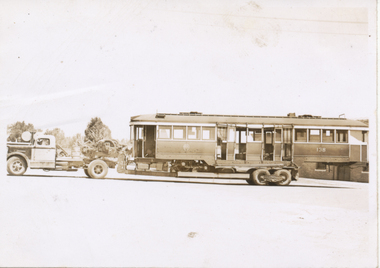
Photograph - MMTB 138 arriving at the Bendigo depot, 1945
... ... tram 24...Photograph of MMTB 138 arriving at the Bendigo depot on a Yellow Transport truck, Sept 1945 - shows the transport arrangement from a side view. Tram became No. 24. No other details available. See Keith Kings "Bendigo Tramways" for the tram number. ...Trams tramways Bendigo Delivery Of Tramcars MMTB tram 138 tram 24 "29" on rear Black and white photograph with a single number on rear. ...Photograph of MMTB 138 arriving at the Bendigo depot on a Yellow Transport truck, Sept 1945 - shows the transport arrangement from a side view. Tram became No. 24. No other details available. See Keith Kings "Bendigo Tramways" for the tram number. Black and White print contained within the Wal Jack Bendigo and Geelong Album, see Reg Item 5003 for more details.Yields information about the transport of tramcars from Melbourne to Bendigo.Black and white photograph with a single number on rear."29" on reartrams, tramways, bendigo, delivery of tramcars, mmtb, tram 138, tram 24 -
 Ballarat Tramway Museum
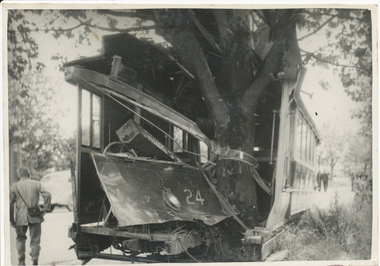
Photograph - SECV Ballarat 24 after a derailment, The Courier Ballarat, 1/12/1941
... ... tram 24...Digital image from the Wal Jack Ballarat Album of an accident involving Ballarat Tram No. 24 running away following a collision with a truck in Drummond St. ...Digital image from the Wal Jack Ballarat Album of an accident involving Ballarat Tram No. 24 running away following a collision with a truck in Drummond St. ...Digital image from the Wal Jack Ballarat Album of an accident involving Ballarat Tram No. 24 running away following a collision with a truck in Drummond St. South and hitting a tree at the corner of Dana St. on 1/12/1941. See also Reg Item 1348 for another photograph and more details. Wal's album notes "No. 24 crashed into tree result of a collision with a motor lorry, Intersection of Drummond and Dana Sts 1-2-41 (8am). Motorman T. Young unhurt. See image i2 for the rear of the photograph with extensive details - the print had been sent to Ken Magor by Wal. See image i3 for high res scan of album photograph. See image i4 for high res scan of negative - on a large format size neg.Yields information about the accident that involved a tram hitting a tree after being derailed and amount of damage done at the time.Set of digital images and a print on Velox paper.Written on rear in blue ink - "1-2-41" on Rear of print extensive details - see image i2trams, tramways, accidents, ballarat, drummond st, runaway, collision, tram 24 -
 Ballarat Tramway Museum
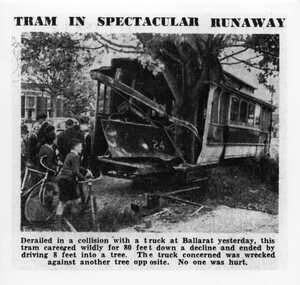
Photograph - Black & White Photograph/s, The Age, 2/12/1941 or 1/12/1941
... ... tram 24...Black and white photographic reproduction print of a photograph that appeared in The Age Newspaper on 3/12/1941 of an accident involving Ballarat Tram No. 24 running away following a collision in Drummond St. ...Ballarat Tramway Museum South Gardens Reserve Wendouree Parade Ballarat Ballarat goldfields Yields information about the accident that involved a tram hitting a tree after being derailed and amount of damage done at the time. trams tramways Accidents Ballarat Drummond St Runaway tram 24 On rear of photograph at the bottom is a sticker - "Reproduction rights reserved - Copied by State Library of Victoria" Black and white photographic reproduction print of a photograph that appeared in The Age Newspaper on 3/12/1941 of an accident involving Ballarat Tram No. 24 running away following a collision in Drummond St. ...Yields information about the accident that involved a tram hitting a tree after being derailed and amount of damage done at the time.Black and white photographic reproduction print of a photograph that appeared in The Age Newspaper on 3/12/1941 of an accident involving Ballarat Tram No. 24 running away following a collision in Drummond St. South and hitting a tree at the corner of Dana St. on 2/12/1941. Photograph has the heading and caption. Made in March 2000 by the State Library of Victoria from a copy of the newspaper held in their collection. A similar photograph also appeared in the Courier. The Age copy was in better condition. Hi Res scan added 25/3/2011. See Reg item 5306 for a different photo, but a very good photo, original print - Wal Jack album and gives date as 1-12-1941.On rear of photograph at the bottom is a sticker - "Reproduction rights reserved - Copied by State Library of Victoria"trams, tramways, accidents, ballarat, drummond st, runaway, tram 24 -
 Melbourne Tram Museum
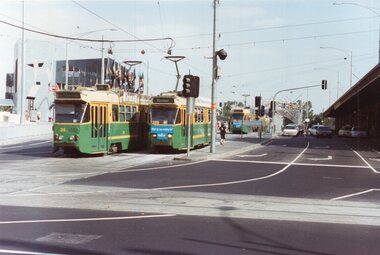
Photograph - Set of 9 Colour Print/s, Colin Rough, 27/01/2002 12:00:00 AM
... ... tram 24...Most trams have the PTC livery, with some as noted in Yarra Trams or M>Tram livery. .1 - Z1 24 southbound in Swanston St / St Kilda Road Route 16 and Z3 223 to Moreland .2 - SW6 888 on City Circle .3 - W7 1021 (City) and B2 2061, (Yarra Trams livery) route 75? ...Melbourne Tram Museum 8 Wallen Road Hawthorn melbourne Trams tramways Flinders St Swanston St Flinders St Station PTC M>Tram Route 16 Route 56 Route 64 Route 121 Advertising trams Z class Z3 class B class C Class W7 class SW6 class City Circle tram 24 tram 223 tram 888 tram 1021 tram 2061 tram 75 tram 126 tram 2108 tram 2032 tram 2059 tram 3008 On rear in ink various notes about the location and date - 30/3/2002. ...Set of 9 colour prints taken on 27/1/2002 by Colin Rough at the intersection of Flinders and Swanston St. have Flinders St Station and, Federation Square. Most trams have the PTC livery, with some as noted in Yarra Trams or M>Tram livery. .1 - Z1 24 southbound in Swanston St / St Kilda Road Route 16 and Z3 223 to Moreland .2 - SW6 888 on City Circle .3 - W7 1021 (City) and B2 2061, (Yarra Trams livery) route 75? .4 - Z1 75, Melbourne University, route 56 with other trams in the background. .5 - Z3 126, in M>Tram livery route 64. .6 - B2 2108, in all over Uncle Tobys advertising. .7 - B2 2032, City Market St, route 121 in Yarra Trams livery followed by an A class tram .8 - B2 2059 as Lead Finger all over advertising tram - City Market St, route 121 .9 - C3008 eastbound in Flinders St.On rear in ink various notes about the location and date - 30/3/2002.trams, tramways, flinders st, swanston st, flinders st station, ptc, m>tram, route 16, route 56, route 64, route 121, advertising trams, z class, z3 class, b class, c class, w7 class, sw6 class, city circle, tram 24, tram 223, tram 888, tram 1021, tram 2061, tram 75, tram 126, tram 2108, tram 2032, tram 2059, tram 3008 -
 Ballarat Tramway Museum
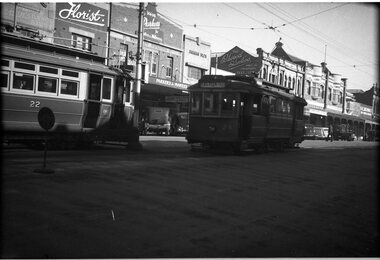
Negative - SECV Geelong 22 & 24 in Ryrie St, Wal Jack, c1950
... ...tram 24... 22 and 24. Trams tramways Geelong Pakington St Chilwell tram 24 tram 22 Negative Negative SECV Geelong 22 & 24 in Ryrie St Wal Jack ...Negative and Digital images from the Wal Jack Geelong Negative file of Geelong 22 and 24 in Ryrie St, immediately west of Moorabool St. No. 24, with the destination of Eastern Park is coming off the crossover at this location. Running The City shuttle between Eastern Park and the City. In the background is a florist shop, Parkers for Mantles and Millinery in the Waverley Building, Jarman Bros, and The Lockwood photographic studios. Photo c1950.Yields information about the use of the Ryrie St crossover and trams 22 and 24.Negativetrams, tramways, geelong, pakington st, chilwell, tram 24, tram 22 -
 Ballarat Tramway Museum
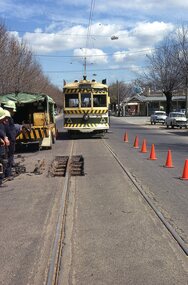
Photograph - Digital image Set of 20, Dec. 1970
... ... tram 24....3 - No. 24 at the depot .4 - No. 2 on the Quarry Hill line .5 - No. 5 approaching the Eaglehawk terminus .6 - No. 29? at the Golden Square Terminus with Bill Rodda's Golden Square hotel in the background. .7 - No. 3 inbound on the Quarry Hill line. .8 - trams crossing on the Eaglehawk line, through the window of one tram. .9 - side on view of a B23D controller in a bogie tram .10 - No. 5 at the Eaglehawk terminus .11 - No. 21 at No. 21 crossing on the Golden Square line. ...Ballarat Tramway Museum South Gardens Reserve Wendouree Parade Ballarat Ballarat goldfields Trams tramways Bendigo Trackwork McCrae St Depot Quarry Hill Eaglehawk Golden Square Controllers North Bendigo View St tram 29 tram 5 tram 24 tram 2 tram 3 tram 6 tram 28 tram 18 Set of 20 digital images of Bendigo Tramways December 1970 by Stuart Lodington. .1 - Bendigo track gang renewing a joint, McCrae St, with welding truck alongside and Birney No. 29. .2 - No. 5 at Quarry Hill terminus? ...Set of 20 digital images of Bendigo Tramways December 1970 by Stuart Lodington. .1 - Bendigo track gang renewing a joint, McCrae St, with welding truck alongside and Birney No. 29. .2 - No. 5 at Quarry Hill terminus? .3 - No. 24 at the depot .4 - No. 2 on the Quarry Hill line .5 - No. 5 approaching the Eaglehawk terminus .6 - No. 29? at the Golden Square Terminus with Bill Rodda's Golden Square hotel in the background. .7 - No. 3 inbound on the Quarry Hill line. .8 - trams crossing on the Eaglehawk line, through the window of one tram. .9 - side on view of a B23D controller in a bogie tram .10 - No. 5 at the Eaglehawk terminus .11 - No. 21 at No. 21 crossing on the Golden Square line. No. 29 showing special, No.21 - North Bendigo, Fire Station Loop? .12 - No. 29 and another tram - near work site? .13 - interior view from Birney looking at the front of another tram parked behind. .14 - No. 29, No. 6 crossing at .15 - No. 6, showing special at Charing Cross. .16 - No. 5 and another tram at North Bendigo on a Special .17 - No. 28 at Charing Cross .18 - No. 5 on Special at a Loop on the Eaglehawk line .19 - No. 28, and two other trams at the Myrtle St Loop .20 - No. 18 showing Quarry Hill and two other trams on View St.trams, tramways, bendigo, trackwork, mccrae st, depot, quarry hill, eaglehawk, golden square, controllers, north bendigo, view st, tram 29, tram 5, tram 24, tram 2, tram 3, tram 6, tram 28, tram 18 -
 Ballarat Tramway Museum
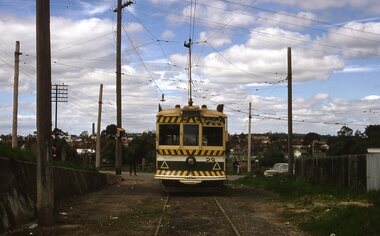
Photograph - Digital image Set of 20, 1971-72
... ... tram 24...Set of 20 digital images of Bendigo Tramways, 1972 at or before closure while on a tram tour by Stuart Lodington. .1 - No. 29 at the North Bendigo terminus .2 - No. 29 just past the Bendigo end of the double track in High St Eaglehawk, with a BP dealer in the background. .3 - Night photo of No. 18 at a terminus, showing "Eaglehawk" .4 - ditto .5 - Night photo of No. 24 at Eaglehawk with Leo A Hughes Photographer in the background. ...Ballarat Tramway Museum South Gardens Reserve Wendouree Parade Ballarat Ballarat goldfields Trams tramways Bendigo Eaglehawk Quarry Hill Golden Square Depot North Bendigo Charing Cross tram 29 tram 18 tram 24 tram 3 tram 7 tram 6 tram 26 Set of 20 digital images of Bendigo Tramways, 1972 at or before closure while on a tram tour by Stuart Lodington. .1 - No. 29 at the North Bendigo terminus .2 - No. 29 just past the Bendigo end of the double track in High St Eaglehawk, with a BP dealer in the background. .3 - Night photo of No. 18 at a terminus, showing "Eaglehawk" .4 - ditto .5 - Night photo of No. 24 at Eaglehawk with Leo A Hughes Photographer in the background. ...Set of 20 digital images of Bendigo Tramways, 1972 at or before closure while on a tram tour by Stuart Lodington. .1 - No. 29 at the North Bendigo terminus .2 - No. 29 just past the Bendigo end of the double track in High St Eaglehawk, with a BP dealer in the background. .3 - Night photo of No. 18 at a terminus, showing "Eaglehawk" .4 - ditto .5 - Night photo of No. 24 at Eaglehawk with Leo A Hughes Photographer in the background. The Tram has "Johnnie Walker whiskey" roof adverts. .6 - No. 29 outbound in Thunder St with a train passing over the bridge in the background. .7 - view from the front window of a tram on the Eaglehawk line with a large "display event float" in the foreground and tram approaching a crossing loop. .8 - No. 29 at North Bendigo .9 - view of High St Eaglehawk looking east from the terminus, showing the track and centre poles. .10 - No. 29 outbound on the North Bendigo line turning from either Nolan St or Caledonia St, running a special. .11 - No. 7 departing North Bendigo for Golden Square. .12 - No. 3 and 18 at Charing Cross. No. 3 has two SEC roof Advertisements .13 - No. 7 at North Bendigo with the trolley pole being reversed. .14 - No. 24 at Quarry Hill with Northern Terrazzo in the background with the driver alongside .15 - No. 7 and No.6 at Charing Cross with the Beehive buildings in the background. .16 - No. 7 at North Bendigo terminus .17 - ditto .18 - No. 24 at Quarry Hill with Northern Terrazzo in the background with the conductor alongside. .19 - ditto .20 - No. 26 and other bogie tram in View St near Charing Cross with the Armstrong Tyre Service building and signs for Cohn's Drinks and T&G in the view.trams, tramways, bendigo, eaglehawk, quarry hill, golden square, depot, north bendigo, charing cross, tram 29, tram 18, tram 24, tram 3, tram 7, tram 6, tram 26 -
 Ballarat Tramway Museum
Photograph - Digital image Set of 20, 1971-72
... ... tram 24...Set of 22 digital images of Bendigo Tramways, 1972 at or before closure while on a tram tour by Stuart Lodington. .1 - No. 7 arriving at North Bendigo .2 - No. 5 departing Charing Cross along View St, with a Firestone tyres in the background. .3 - front view of a tram in View St with a blurred background image. .4 - No. 24 showing Eaglehawk destination .5 - No 26 and 3 in View St, with the Armstrong Tyre Service building in the background and signs for T&G and Cohn's Drinks. .6 - ditto .7 - No. 3 arriving at Charing Cross from Eaglehawk in View St, with a Quarry Hill destination. .8 - No. 3 and 18 at Charing Cross. .9 - No. 24 on the Quarry Hill line. .10 - No 26 in View St, with the Armstrong Tyre Service building in the background and signs for T&G and Cohn's Drinks. .11 - ditto, with fountain in view, Colonial Mutual building and a newsagent with a Herald sign on the building. .12 - No. 7 at North Bendigo terminus .13 - ditto with pole being reversed. .14 - No. 18 at Quarry Hill terminus with Northern Terrazzo sign in the background. .15 - No. 24 at Quarry Hill terminus .16 - No. 18 arriving at Charring Cross, with Fountain Plaza and Bendigo Pharmacy in the background. .17 - No. 3 and 18 at Charing Cross. .18 - No. 7 at North Bendigo terminus with pole being placed on the overhead. .19 - No. 26 in View St inbound, with Sandhurst Trustees sign in the background. .20 - No. 6 leaving Charing Cross in Pall Mall with Myer and other buildings in the background. .21 - No. 7 at North Bendigo .22 - Single trucker with two roof Advertisements crossing View St with fountain in view, Colonial Mutual building and a newsagent with a Herald sign on the building....Ballarat Tramway Museum South Gardens Reserve Wendouree Parade Ballarat Ballarat goldfields Trams tramways Bendigo Eaglehawk Quarry Hill North Bendigo Charing Cross View St tram 7 tram 5 tram 24 tram 26 tram 5 tram 3 tram 18 tram 6 Set of 22 digital images of Bendigo Tramways, 1972 at or before closure while on a tram tour by Stuart Lodington. .1 - No. 7 arriving at North Bendigo .2 - No. 5 departing Charing Cross along View St, with a Firestone tyres in the background. .3 - front view of a tram in View St with a blurred background image. .4 - No. 24 showing Eaglehawk destination .5 - No 26 and 3 in View St, with the Armstrong Tyre Service building in the background and signs for T&G and Cohn's Drinks. .6 - ditto .7 - No. 3 arriving at Charing Cross from Eaglehawk in View St, with a Quarry Hill destination. .8 - No. 3 and 18 at Charing Cross. .9 - No. 24 on the Quarry Hill line. .10 - No 26 in View St, with the Armstrong Tyre Service building in the background and signs for T&G and Cohn's Drinks. .11 - ditto, with fountain in view, Colonial Mutual building and a newsagent with a Herald sign on the building. .12 - No. 7 at North Bendigo terminus .13 - ditto with pole being reversed. .14 - No. 18 at Quarry Hill terminus with Northern Terrazzo sign in the background. .15 - No. 24 at Quarry Hill terminus .16 - No. 18 arriving at Charring Cross, with Fountain Plaza and Bendigo Pharmacy in the background. .17 - No. 3 and 18 at Charing Cross. .18 - No. 7 at North Bendigo terminus with pole being placed on the overhead. .19 - No. 26 in View St inbound, with Sandhurst Trustees sign in the background. .20 - No. 6 leaving Charing Cross in Pall Mall with Myer and other buildings in the background. .21 - No. 7 at North Bendigo .22 - Single trucker with two roof Advertisements crossing View St with fountain in view, Colonial Mutual building and a newsagent with a Herald sign on the building. ...Set of 22 digital images of Bendigo Tramways, 1972 at or before closure while on a tram tour by Stuart Lodington. .1 - No. 7 arriving at North Bendigo .2 - No. 5 departing Charing Cross along View St, with a Firestone tyres in the background. .3 - front view of a tram in View St with a blurred background image. .4 - No. 24 showing Eaglehawk destination .5 - No 26 and 3 in View St, with the Armstrong Tyre Service building in the background and signs for T&G and Cohn's Drinks. .6 - ditto .7 - No. 3 arriving at Charing Cross from Eaglehawk in View St, with a Quarry Hill destination. .8 - No. 3 and 18 at Charing Cross. .9 - No. 24 on the Quarry Hill line. .10 - No 26 in View St, with the Armstrong Tyre Service building in the background and signs for T&G and Cohn's Drinks. .11 - ditto, with fountain in view, Colonial Mutual building and a newsagent with a Herald sign on the building. .12 - No. 7 at North Bendigo terminus .13 - ditto with pole being reversed. .14 - No. 18 at Quarry Hill terminus with Northern Terrazzo sign in the background. .15 - No. 24 at Quarry Hill terminus .16 - No. 18 arriving at Charring Cross, with Fountain Plaza and Bendigo Pharmacy in the background. .17 - No. 3 and 18 at Charing Cross. .18 - No. 7 at North Bendigo terminus with pole being placed on the overhead. .19 - No. 26 in View St inbound, with Sandhurst Trustees sign in the background. .20 - No. 6 leaving Charing Cross in Pall Mall with Myer and other buildings in the background. .21 - No. 7 at North Bendigo .22 - Single trucker with two roof Advertisements crossing View St with fountain in view, Colonial Mutual building and a newsagent with a Herald sign on the building.trams, tramways, bendigo, eaglehawk, quarry hill, north bendigo, charing cross, view st, tram 7, tram 5, tram 24, tram 26, tram 5, tram 3, tram 18, tram 6