Showing 2426 items matching " tram 6"
-
 Melbourne Tram Museum
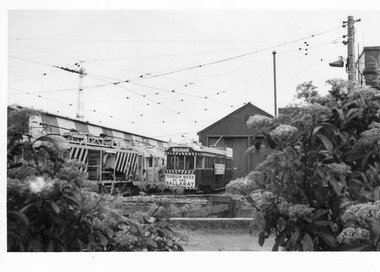
Photograph - VR Tram 6 at Elwood Depot, K McCarthy, 1 January 1951
... VR Tram 6 at Elwood Depot......tram 6...The photograph shows VR tram 6 on an outside track in long grass with trolley pole raised. ...The photograph shows VR tram 6 on an outside track in long grass with trolley pole raised. ...The photograph shows VR tram 6 on an outside track in long grass with trolley pole raised. In the mid ground are cylindrical wooden cable drums, trees and other tramcars.Yields information about the outside yard and VR tramcarsBlack and white photograph with notes on the rear - 2 copies held.In biro and pencil on the rear "#6 at Elwood Depot 1-1-51 Brighton Line Copyright K McCarthy Photo No 783". Second copy - "38 - KMcC", printing size label.tramcars, tram 6, vr tram, elwood depot, outside track -
 Melbourne Tram Museum
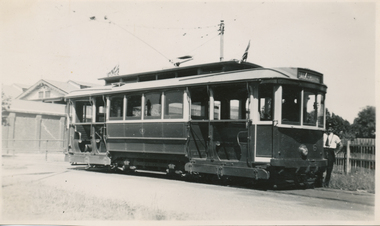
Photograph - VR tram 6 second fleet
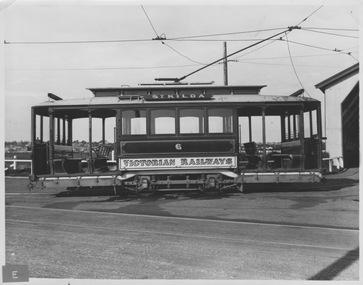
... VR tram 6 second fleet......VR tram 6...Photograph shows single truck VR tram 6 second fleet (with driver windscreen) with destination showing St Kilda. ...Typed note on rear Photograph VR tram 6 second fleet ...Photograph shows single truck VR tram 6 second fleet (with driver windscreen) with destination showing St Kilda. Side-on view outside car shed (at right) with horizon, trees and low rise buildings in background. Yields information of Railways tramcar 6 second fleet and Elwood Depot Black and white photograph with letter E showing in lower left corner of print from previous collection. Typed note on rear 'Photo: Victorian Government Railways: Australia. Single truck tram car 5' 3" gauge'victorian railways, single truck, st kilda, vr tram 6, second fleet, elwood depot -
 Melbourne Tram Museum
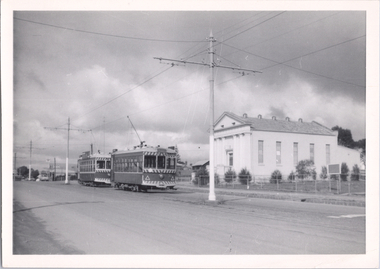
Photograph - Prahran and Malvern Tramways Trust tram 6 on Opening Day, 1910
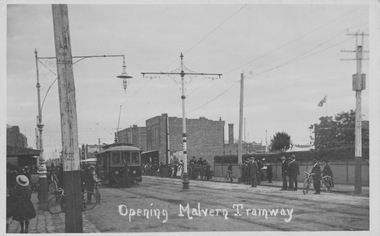
... Prahran and Malvern Tramways Trust tram 6 on Opening Day......tram 6...The photograph shows Prahran and Malvern Tramways Trust tram 6 after using a crossover on Glenferrie Rd or High St, Malvern. ...Photograph Prahran and Malvern Tramways Trust tram 6 on Opening Day ...The photograph shows Prahran and Malvern Tramways Trust tram 6 after using a crossover on Glenferrie Rd or High St, Malvern. The driver raises the trolley pole and is watched by a large crowd of spectators along both footpaths, many with bicycles. Central poles hold the tramway overhead and one carries a Hail Cars Here sign. The photograph bears a handwritten title "Opening Malvern Tramway".Yields information about Glenferries Rd, High St and PMTTSepia photograph with no writing on the rear.glenferrie rd, high st, central poles, crossover, prahran and malvern tramways trust, tram 6, hail cars here -
 Ballarat Tramway Museum
Photograph - ESCo Bendigo tram 6 with advertisements, c1905
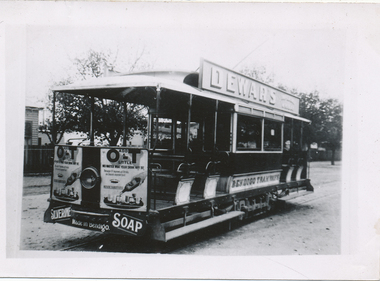
... ESCo Bendigo tram 6 with advertisements...... tram 6...Photo of ESCo tram No. 6 with advertisements for Dewars whiskey, OT additive to drinks and Silverline Soap - possible photographed to show advertising space that could be sold by ESCo. ...Photograph ESCo Bendigo tram 6 with advertisements ...Photo of ESCo tram No. 6 with advertisements for Dewars whiskey, OT additive to drinks and Silverline Soap - possible photographed to show advertising space that could be sold by ESCo. Black and White copy print contained within the Wal Jack Bendigo and Geelong Album, see Reg Item 5003 for more details.Yields information about the use of advertising on ESCo Bendigo trams.Black and white photograph with a plain back.trams, tramways, bendigo, esco, advertisements, tram 6 -
 Melbourne Tram Museum
Photograph - NMETL tram 6, at Brill Factory, J. G. Brill Company, 1906
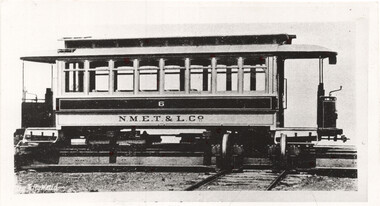
... NMETL tram 6, at Brill Factory......tram 6...Photograph shows NMETL No. 6, a saloon type tram, on the traverser at the J G Brill Factory Philladelphia, prior to being shipped to Melbourne. ...Photograph NMETL tram 6, at Brill Factory J. G. Brill Company ...Photograph shows NMETL No. 6, a saloon type tram, on the traverser at the J G Brill Factory Philladelphia, prior to being shipped to Melbourne. See item 6380 for a photo of a toast rack tram on the traverser. The tram is lettered "NMET & L Co". The tram later became a MMTB U class tram No. 207.Yields information about the Brill built saloon type tramcars used on the North Melbourne Tramways and Lighting Co. Essendon tramways.Black and white photograph with a plain back.trams, tramways, tram 6, nmetl, u class -
 Ballarat Tramway Museum
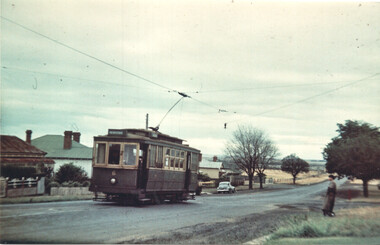
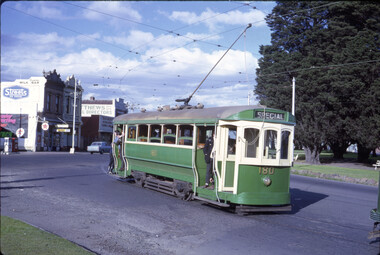
Photograph - SECV Geelong tram 6 at Eastern Park terminus, 1950s
... SECV Geelong tram 6 at Eastern Park terminus......tram 6...Photo of Geelong No. 6 at the Eastern Park terminus corner of Ryrie and Humble Sts, looking North East, showing a few houses and open paddocks. Tram...Yields information about Geelong tram 6 and the Eastern Park terminus. Geelong tramways tram 6 Eastern Park Colour print with the printers marks on the rear. ...Photo of Geelong No. 6 at the Eastern Park terminus corner of Ryrie and Humble Sts, looking North East, showing a few houses and open paddocks. Tram on the Eastern Park to Newtown run. It has been fitted with tail lights and the bumper bar is lowered, dating it to the 1950s. Photographer unknown.Yields information about Geelong tram 6 and the Eastern Park terminus.Colour print with the printers marks on the rear.geelong, tramways, tram 6, eastern park -
 Ballarat Tramway Museum
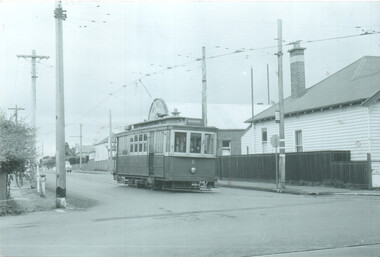
Photograph - SECV Geelong tram 6 Aphrasia St, 1950s
... SECV Geelong tram 6 Aphrasia St ......tram 6...Photo of SECV Geelong No. 6 about to turn from Aphrasia St into Pakington St, Newtown. The tram is in the extension of Aphrasia St made in 1913 to eliminate the original Retreat Road / Pleasant St layout. ...Photograph SECV Geelong tram 6 Aphrasia St ...Photo of SECV Geelong No. 6 about to turn from Aphrasia St into Pakington St, Newtown. The tram is in the extension of Aphrasia St made in 1913 to eliminate the original Retreat Road / Pleasant St layout. Photographer unknown, 1950s.Yields information about Geelong tram 6 and the intersection of Aphrasia St and Pakington St Newtown.Black and white photograph with printers marks on the rear. Printed on Fujichrome paper.geelong, tramways, tram 6, aphrasia st, pakington st -
 Melbourne Tram Museum
Slide - Set of 3 - track cleaning tram No. 6, Keith Caldwell, 17/03/1966 12:00:00 AM
... Set of 3 - track cleaning tram No. 6 ...... tram 6....1 and .2 - set of two Agfa colour slides, blue/white plastic mount, photo by Keith Caldwell of track cleaning tram No. 6 at Haymarket roundabout, Flemington Road, Elizabeth St. 4/1964. .3 - Perutz grey plastic mount colour slide of No.6 at Haymarket Roundabout, 17.3.1966, in the afternoon. ...Slide Set of 3 - track cleaning tram No. 6 Keith Caldwell ....1 and .2 - set of two Agfa colour slides, blue/white plastic mount, photo by Keith Caldwell of track cleaning tram No. 6 at Haymarket roundabout, Flemington Road, Elizabeth St. 4/1964. .3 - Perutz grey plastic mount colour slide of No.6 at Haymarket Roundabout, 17.3.1966, in the afternoon. Has the Ampol building in the background.In ink "Melb #6 4-64" and in pencil "Service car 6 17.3.66" and has a date stamp with the same date.trams, tramways, track cleaner, work trams, haymarket, elizabeth st, flemington rd, tram 6 -
 Ballarat Tramway Museum
Photograph - Bendigo tram No. 6 at depot, Wal Jack, 7/07/1954
... Bendigo tram No. 6 at depot....... tram 6...Photo of No. 6 outside the depot with the bridge and depot building in the background. Has a driver standing by the front of the tram. ...See image i3 for hi-res scan of negative Yields information about Bendigo tram No. 6 trams tramways Bendigo Depot tram 6 On the rear in ink "SEC Bendigo, No. 6 outside depot 7-3-54". ...Photo of No. 6 outside the depot with the bridge and depot building in the background. Has a driver standing by the front of the tram. Tram has the destination of Eaglehawk. Taken by Wal Jack on 7-3-1954. See image i2 for rear of photograph. Two copies held. See image i3 for hi-res scan of negativeYields information about Bendigo tram No. 6Black and White print contained within the Wal Jack Bendigo and Geelong Album, see Reg Item 5003 for more details.On the rear in ink "SEC Bendigo, No. 6 outside depot 7-3-54". Has the Wal Jack copyright stamp in the top right hand corner with number "T69PC" written in.trams, tramways, bendigo, depot, tram 6 -
 Ballarat Tramway Museum
Photograph - SECV Geelong tram depot with five trams, Melbourne Electric Supply Co. (MESCo), late 1920s
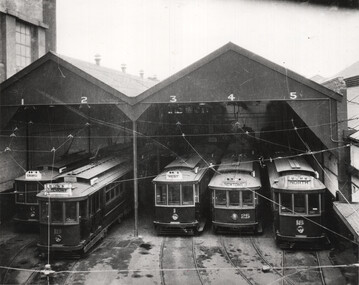
... ...tram 6...Shows trams 6, 19, 1, 25 and 18 at the front of the Geelong tram depot - late 1920's. ...Ballarat Tramway Museum South Gardens Reserve Wendouree Parade Ballarat Ballarat goldfields Shows trams 6, 19, 1, 25 and 18 at the front of the Geelong tram depot - late 1920's. ...Shows trams 6, 19, 1, 25 and 18 at the front of the Geelong tram depot - late 1920's. Each tram has the MESCo destination lights on the roof. See item 8611 for a framed version. Shows Geelong tram depot and some of the trams operated by the Melbourne Electric Supply Co.Black and white photograph with notes on rear. In ink on the rear "page 27 bottom" and in pencil "reduce to 154mm wide, crop head"geelong, tramways, geelong depot, tram 6, tram 1, tram 25, tram 18, tram 19, mesco -
 Ballarat Tramway Museum
Slide - SECV Bendigo trams operations - set of 9, Warren Doubleday, 31/1/1972
... ...tram 6...Set of 9 photos of Bendigo tramway operations taken on 31/1/1972: 1 - tram 3 on the Eaglehawk line for Quarry Hill 2 - Birney 29 on North Bendigo crossing bridge 3 - Charing Cross with trams 29, 6, 3 and 5 4 - Tram 29 at Golden Square with the Golden Square Hotel on the left 5 - tram 29 passing the Fire Station 6 - tram 29 on the North Bendigo line 7 - tram 6 passing the Cathedral 8 - tram 5 on its way to Quarry Hill 9 - tram 18 on its way to Eaglehawk ...Ballarat Tramway Museum South Gardens Reserve Wendouree Parade Ballarat Ballarat goldfields Set of 9 photos of Bendigo tramway operations taken on 31/1/1972: 1 - tram 3 on the Eaglehawk line for Quarry Hill 2 - Birney 29 on North Bendigo crossing bridge 3 - Charing Cross with trams 29, 6, 3 and 5 4 - Tram 29 at Golden Square with the Golden Square Hotel on the left 5 - tram 29 passing the Fire Station 6 - tram 29 on the North Bendigo line 7 - tram 6 passing the Cathedral 8 - tram 5 on its way to Quarry Hill 9 - tram 18 on its way to Eaglehawk Yields information about Bendigo tramways operations in Jan. 1972 tramways Bendigo tram 6 tram 18 tram 5 tram 29 tram 3 Have the photographer's slide number written on them. "2/72/25 to 34" Colour Slide - Kodak cardboard mounts - set of 9 Slide SECV Bendigo trams operations - set of 9 Warren Doubleday ...Set of 9 photos of Bendigo tramway operations taken on 31/1/1972: 1 - tram 3 on the Eaglehawk line for Quarry Hill 2 - Birney 29 on North Bendigo crossing bridge 3 - Charing Cross with trams 29, 6, 3 and 5 4 - Tram 29 at Golden Square with the Golden Square Hotel on the left 5 - tram 29 passing the Fire Station 6 - tram 29 on the North Bendigo line 7 - tram 6 passing the Cathedral 8 - tram 5 on its way to Quarry Hill 9 - tram 18 on its way to Eaglehawk Yields information about Bendigo tramways operations in Jan. 1972Colour Slide - Kodak cardboard mounts - set of 9Have the photographer's slide number written on them. "2/72/25 to 34"tramways, bendigo, tram 6, tram 18, tram 5, tram 29, tram 3 -
 Ballarat Tramway Museum
Photograph - Framed - Geelong tram depot, late 1920s
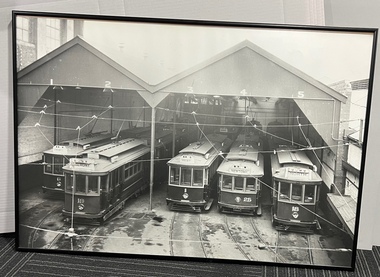
... ...tram 6...Shows trams 6, 19, 1, 25 and 18 at the front of the Geelong tram depot - late 1920's. ...Geelong trams tramways tramcars tram 6 tram 19 tram 1 tram 25 tram 18 MESCo Metal framed photograph with card backing, glazed and hanging cord. ...Shows trams 6, 19, 1, 25 and 18 at the front of the Geelong tram depot - late 1920's. Each tram has the MESCo destination lights on the roof. Printed by the donor from a negative from Lindsay Crow. See item 10594 for a print.Shows Geelong tram depot and some of the trams operated by the Melbourne Electric Supply Co. Metal framed photograph with card backing, glazed and hanging cord. See image i4 for a large size file provided by the donor.geelong, trams, tramways, tramcars, tram 6, tram 19, tram 1, tram 25, tram 18, mesco -
 Ballarat Tramway Museum
Slide - Bendigo tram depot - set of 6, Ron Hood, 12/1970
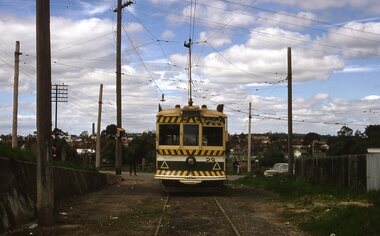
... Bendigo tram depot - set of 6...Set of six colour photographs by Ron Hood December 1970 taken at the Bendigo tram depot: 1 - Bendigo scrubber parked in the depot yard. 2 - tram No. 3 shunting in the yard. 3 - ditto 4 - general view of the front of the depot shed with trams 23 and 30. 5 - scrubber tram 6 - depot entrance...Set of 6 Colour slides in hanimount cardboard mounts. Slide Bendigo tram depot - set of 6 Ron Hood ...Set of six colour photographs by Ron Hood December 1970 taken at the Bendigo tram depot: 1 - Bendigo scrubber parked in the depot yard. 2 - tram No. 3 shunting in the yard. 3 - ditto 4 - general view of the front of the depot shed with trams 23 and 30. 5 - scrubber tram 6 - depot entranceYields information about the Bendigo tram depot and some of the trams at the time - December. 1970Set of 6 Colour slides in hanimount cardboard mounts.Numbered "Bendigo Depot" in ink and slide nos, 12 to 17.tramways, trams, bendigo depot, scrubber, tram 3, tram 23, tram 30 -
 Ballarat Tramway Museum
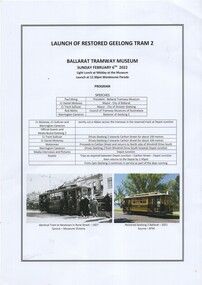
Document, Launch of restored Geelong tram 2 - 6-2-2022
... Launch of restored Geelong tram 2 - 6-2-2022...Prepared for the launch of Geelong Tram No. 2 giving details of the program and the tram itself. Has a list of speakers and timing. Launched on 6/2/2022 at Depot Junction....Trams tramways Geelong Tram 2 BTM Programmes Program Printed A3 sheet, double sided, giving details of the Launch programme 6/2/2022 Launch of restored Geelong tram 2 - 6-2-2022 Document ...Prepared for the launch of Geelong Tram No. 2 giving details of the program and the tram itself. Has a list of speakers and timing. Launched on 6/2/2022 at Depot Junction.Yields information about the program to launch Geelong No. 2 and the tram itself.Printed A3 sheet, double sided, giving details of the Launch programme 6/2/2022trams, tramways, geelong, tram 2, btm, programmes, program -
 Ballarat Tramway Museum
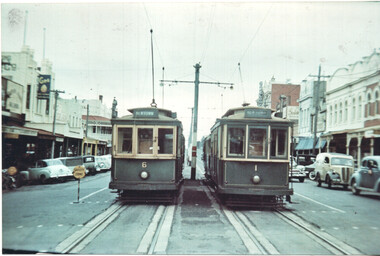
Photograph - SECV Geelong trams 6 & 1 in Ryrie St, 1950s
... ...tram 6...Photo of SECV Geelong trams 6 and 1 in Ryrie St just east of Moorabool St. ...Photo of SECV Geelong trams 6 and 1 in Ryrie St just east of Moorabool St. ...Photo of SECV Geelong trams 6 and 1 in Ryrie St just east of Moorabool St. The eastbound track along Ryrie St was built with railway rail, made by BHP in the early 1920s as grooved rail was not obtainable at the time. Car 1 is on the Newtown - Eastern Park run, as is car 6 with the conductor having forgotten to change the destination. Photographer unknown, 1950s. Note the two safety zones, and the tram stop sign on the centre pole. In the background is the Geelong Gas Co. offices.Yields information about Geelong trams 1 and 6 in Ryrie St.Black and white photograph with printers dates on the rear. on rear in ink "East line built with 80lb railway track not grooved rail 1922"geelong, tramways, ryrie st, tram 1, tram 6 -
 Ballarat Tramway Museum
Photograph - Digital image, Chris Phillips, Sept. 1971
... ... tram 6...Digital image, black and white, of No. 36 at the South Melbourne depot, September 1971, following its visit promoting Ballarat Tourism. Has Vacuum tram No. 6 and another works car alongside....Has Vacuum tram No. 6 and another works car alongside. Photograph Digital image Chris Phillips ...Yields information about the storage of SEC tram 36 at South Melbourne depot when it visited Melbourne following the closure of the SEC system and the advertising of Ballarat Tourism.Digital image, black and white, of No. 36 at the South Melbourne depot, September 1971, following its visit promoting Ballarat Tourism. Has Vacuum tram No. 6 and another works car alongside.trams, tramways, south melbourne depot, melbourne, tourism, mmtb, tram 36, tram 6 -
 Melbourne Tram Museum
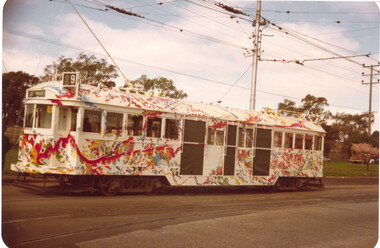
Photograph - Transporting Art and AOA tram - set of 6, Norm Cross, 1970s
... Transporting Art and AOA tram - set of 6...See item 404 for a poster featuring the Transporting Art trams. 1 - Tram W2 336, Transporting Art by Mike Brown in St Georges Road 2 - Tram W2 336, Transporting Art by Mike Brown in Brunswick St. 3 - Tram W2 384, by Howard Arkley, Gilbert Road 4 - Tram 525 by Les Kossatz 5 - Tram 234, by Andrew Southall 6 - Tram W6 990, advertising Big M blueberry milk during 1978....Photograph Transporting Art and AOA tram - set of 6 Norm Cross ...Set of six photographs taken by Norm Cross during the 1970s. See item 404 for a poster featuring the Transporting Art trams. 1 - Tram W2 336, Transporting Art by Mike Brown in St Georges Road 2 - Tram W2 336, Transporting Art by Mike Brown in Brunswick St. 3 - Tram W2 384, by Howard Arkley, Gilbert Road 4 - Tram 525 by Les Kossatz 5 - Tram 234, by Andrew Southall 6 - Tram W6 990, advertising Big M blueberry milk during 1978.Yields information about Transport Art trams and an advertising tram during the 1970s.Set of 6 colour photos, with rounded corners.trams, tramways, w2 class, transporting art, w6 class, tram 336, tram 384, tram 525, tram 234, tram 990, all over advertising -
 Ballarat Tramway Museum
Photograph - Set of 7 photographs of a Bendigo Tram tour with Birney trams, Vance Findlay, c1971
... ...tram 6...This hotel has since been demolished. 5 - Tram 30 on the single-track extension at Eaglehawk. 6 - Tram 6 and another single trucker at Charing Cross - note the sag on the second tram - a spring possibly has failed. 7 - Tram 19 running out the depot lead into McCrae St with an SEC Cooking roof and a Briquettes dash canopy advertisements....This hotel has since been demolished. 5 - Tram 30 on the single-track extension at Eaglehawk. 6 - Tram 6 and another single trucker at Charing Cross - note the sag on the second tram - a spring possibly has failed. 7 - Tram 19 running out the depot lead into McCrae St with an SEC Cooking roof and a Briquettes dash canopy advertisements. ...Set of 7 photographs taken during a tram tour using Birney's 30 and 28. Possibly 1971 or early 1972 prior to closure. 1 - High St Eaglehawk with Primary School hall behind. 2 - Tram 28 from another tram's window - note no driver. 3 - trams 28 and 30 in McCrae St with the Bendigo Technical College building in the background. 4 - Tour trams turning from Bernard St into View St with the Five Lions Hotel in the background with a Fosters Lager advertisement. This hotel has since been demolished. 5 - Tram 30 on the single-track extension at Eaglehawk. 6 - Tram 6 and another single trucker at Charing Cross - note the sag on the second tram - a spring possibly has failed. 7 - Tram 19 running out the depot lead into McCrae St with an SEC Cooking roof and a Briquettes dash canopy advertisements.Yields information about Bendigo tram tours prior to the closure of the SEC operated system.Black and White photographs on Ilford Paper - undated - set of 7trams, tramways, sec, bendigo, tram 28, tram 30, high st, eaglehawk, tram 6, mccrae st, view st, five lions hotel, tram 19, tours, birney tramcars -
 Melbourne Tram Museum
Photograph - MBCTT trams Coburg Depot, The Melbourne, Brunswick and Coburg Tramways Trust (MBCTT), 12/1916
... ...tram 6...Photograph of the front of the Coburg Depot of the MBCTT with trams 11, 10, 6, 3 and 4, with the destinations of Barkers Road, Queensberry St, Bell St E, Moreland Rd, and Bell St respectively. ...Trams tramways Coburg coburg depot tram 11 tram 10 tram 6 tram 3 tram 4 Mounted black and white photograph - onto card Photograph MBCTT trams Coburg Depot The Melbourne, Brunswick and Coburg Tramways Trust (MBCTT) ...Photograph of the front of the Coburg Depot of the MBCTT with trams 11, 10, 6, 3 and 4, with the destinations of Barkers Road, Queensberry St, Bell St E, Moreland Rd, and Bell St respectively. The trams and destinations match those showing in item 9327 and appears to have been taken on the same day. The reference dates the photo as 3 Dec. 1916 - See reference page 7Yields information of MBCTT trams and Coburg Depot in 1916.Mounted black and white photograph - onto cardtrams, tramways, coburg, coburg depot, tram 11, tram 10, tram 6, tram 3, tram 4 -
 Melbourne Tram Museum
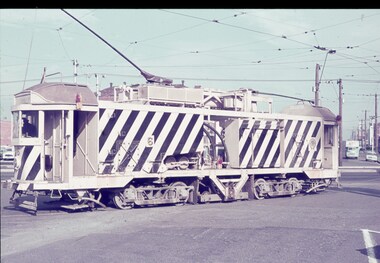
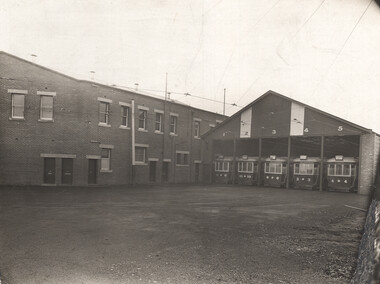
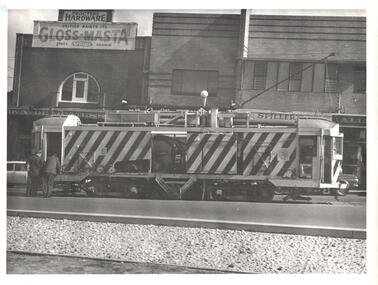
Photograph - Black & White Photograph/s, 1960's?
... ... tram 6...Black and White photograph of MMTB Bogie dust suction tram, No. 6 (3rd works tram to hold this number). at the Tyler St terminus of the East Preston route during the 1960's. ...Melbourne Tram Museum 8 Wallen Road Hawthorn melbourne Trams tramways East Preston Work Trams tram 6 Black and White photograph of MMTB Bogie dust suction tram, No. 6 (3rd works tram to hold this number). at the Tyler St terminus of the East Preston route during the 1960's. ...Black and White photograph of MMTB Bogie dust suction tram, No. 6 (3rd works tram to hold this number). at the Tyler St terminus of the East Preston route during the 1960's. See page 78 of Destination City 5, Norm Cross et al for further details. In the background is Proctors Hardware store advertising Gloss-Masta Paint. Could be a MMTB Photograph. Printed on a stippled paper. Two copies held.trams, tramways, east preston, work trams, tram 6 -
 Melbourne Tram Museum
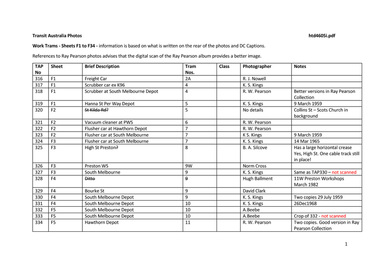
Album - Photo Album, Transit Australia Publishing, "TAP - Part F - Work Trams", 1950's to 1990's
... ... tram 6...Melbourne Tram Museum 8 Wallen Road Hawthorn melbourne Trams tramways Transit Australia Destination City Tramcars Depots Work Trams tram 2A tram 4 tram 5 tram 6 tram 7 tram 8 tram 9W tram 11W tram 9 tram 10 tram 11 tram 16 tram 17 tram 209 tram 18 tram 19 tram 20 tram 30 tram 190 tram 198 tram 199 tram 206 tram 267 tram 485 tram 544 tram 890 tram 24 tram 5 tram 6 tram 233 tram 533 tram 15 tram 221 tram 485 Photo Album - titled "TAP - Part F - Work Trams Sheets F1 to F34", from Transit Australia Publishing. ...Photo Album - titled "TAP - Part F - Work Trams Sheets F1 to F34", from Transit Australia Publishing. Photos used in the Destination City and other publications series. For a detailed list of photographs see htd4605i.pdf. For individual photo images see: \dbtext\hawthtramcoll\photo collections\TAP-, images TAP316 to TAP395. TAP316_2A_Preston_c1927_GJNowell.jpg TAP317_4_Preston_KSKings.jpg TAP318_4_SouthMelbourne_RayPearson.jpg TAP319_5_SouthMelbourne_9Mar1959KeithKings.jpg TAP320_5_CollinsSt.jpg TAP321_First6_Preston_RayPearson.jpg TAP322_7_HawthornDepot_RayPearson.jpg TAP323_7_SouthMelbourne_KeithKings_9Mar1959.jpg TAP324_7_SouthMelbourne_KeithKings_14Mar1965.jpg TAP325_8_HighSt-Preston_BASilcove.jpg TAP326_9W_Preston_NormCross_1979.jpg TAP328_11W_Preston_HughBallment_Mar1982.jpg TAP329_9_BourkeSt_2Sep1969_DavidClark.jpg TAP330_9_SouthMelbourne_KeithKings_29Jul1959.jpg TAP331_10_SouthMelbourne_KeithKings_26Dec1968.jpg TAP332_10_SouthMelbourne_ABeebe.jpg TAP334_First11_Hawthorn_RayPearson.jpg TAP335_11W_Bundoora_28Aug1995_HughWaldron.jpg TAP336_16_Preston_28Sep1961_KeithKings.jpg TAP337_17_HannaSt_29Jan1960_KeithKings.jpg TAP338_17_GleferrieRd_DavidClark_30Jul1969.jpg TAP339_209-18_Preston_RayPearson.jpg TAP340_18_Preston_Mar1948_JackRichardson.jpg TAP341_19_FlemingtonRd_4Jun1970_DavidClark.jpg TAP342_19_HannaSt-perway-yard_ABeebe.jpg TAP343_20_SouthMelbourne-perway-yard_27Mar1964_KeithKings.jpg TAP344_30_DogCar_Camberwell_PWDuckett.jpg TAP345_190_Camberwell_JBStranger.jpg TAP346_198_Preston_27Dec1968_KeithKings.jpg TAP347_199_Preston_15Aug1959_KeithKings.jpg TAP348a_199_HannaSt-perway_ABeebe.jpg TAP348_199_HannaSt-perway_ABeebe.jpg TAP349_206_Preston_1Nov1949_KeithKings.jpg TAP350_267_SouthMelbourne_30Jan1967_KeithKings.jpg TAP351_485_SouthMelbourne_9Mar19641967_KeithKings.jpg TAP352_533_lightrail_DaleBudd.jpg TAP353_890_HawthornDepot_27Apr1992_RJMarsh.jpg TAP354_9-7-8_HannaSt-perway_ABeebe.jpg TAP355_2Grinder_StKildaRd_ABeebe.jpg TAP356_2Grinder_HannaSt-perway_9Mar1959_KeithKings.jpg TAP357_3Grinder_HannaSt-perway_c1960_KeithKings.jpg TAP358_3Grinder_HannaSt-perway_9Mar1959_KeithKings.jpg TAP359_BallastTrailer-24_Preston_PTC.jpg TAP360_BallastTrailer-24_DandenongRd_12April1964_KeithKings.jpg TAP361_BallastTrailer-24_Aerodrome_CharlesCraig.jpg TAP362_LongBallastTrailer_Preston_Mar1948_ABeebe.jpg TAP363-exHTT-trailer_Dwg-R115_KeithKings.jpg TAP364-exNMETLCo-trailer_Dwg-R1452_KeithKings.jpg TAP365-exPMTT-cleaner_Dwg-549_KeithKings.jpg TAP366_3_Preston_1932_RayPearson.jpg TAP367_5_StKildaRd-at-CityRd_WJohnWebster.jpg TAP368_(Second-6_Preston_c1961_PTC.jpg TAP369_7-HighSt-StKilda_Feb1959_JimSeletto.jpg TAP370a_7_SouthMelbourne_1950s_JohnBeckett.jpg TAP370_7_SouthMelbourne_1950s_LMarshallWood.jpg TAP371_7_SouthMelbourne_WJohnWebster.jpg TAP372_7_StKildaRd-into-ParkSt_Feb1978_GaryDavey.jpg TAP373_8_SwanstonSt_LindsayCrow.jpg TAP374_8_StKildaRd-at-CityRd_WJohnWebster.jpg TAP375_8_Preston_MMTB.jpg TAP376_8_PrincesBridge_1954_JimSeletto.jpg TAP377_16W_Preston_1980_RayMarsh.jpg TAP378_First16_Preston_1930s_RayPearson.jpg TAP379_17_ColdbloRd_WJohnWebster.jpg TAP380_17_HannaSt_RayPearson.jpg TAP381_19_Preston_RayPearson.jpg TAP382_233_LineMarker_PTC.jpg TAP383_533_TestTram_MMTB.jpg TAP384_Grinder3_ChapelSt-at-Carlisle_1969_JeffBounds.jpg TAP386_Second6_HighSt_c1962_PTC.jpg TAP387_11_HighSt-StKildaRd_JimSeletto.jpg TAP388_15_PrestonWorkshops_1966_JimSeletto.jpg TAP389_17_SouthMelbourneDepot_DaleBudd.jpg TAP390_221_Derail-trainer_SouthMelbourneDepot_NormCross.jpg TAP391_485-trailer_JimSeletto.jpg TAP392_485-dropcentre_DaleBudd.jpg TAP393_Grinder_SouthMelbourneDepot_MMTB.jpg TAP394_Grinder3_Preston_PTC.jpg TAP395_Trailer-20_Preston_NormCross.jpgtrams, tramways, transit australia, destination city, tramcars, depots, work trams, tram 2a, tram 4, tram 5, tram 6, tram 7, tram 8, tram 9w, tram 11w, tram 9, tram 10, tram 11, tram 16, tram 17, tram 209, tram 18, tram 19, tram 20, tram 30, tram 190, tram 198, tram 199, tram 206, tram 267, tram 485, tram 544, tram 890, tram 24, tram 5, tram 6, tram 233, tram 533, tram 15, tram 221, tram 485 -
 Melbourne Tram Museum
Slide - MMTB, and TMSV Tours - set of 11, Hugh Ballment, 1967 & 1968
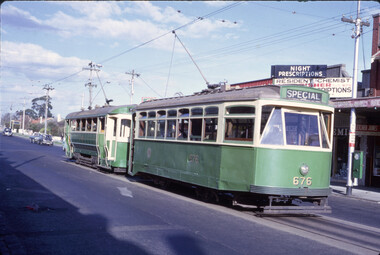
... ...tram 6...HBM238 - MMTB Trams 180, 676, 10/09/1967, South Melbourne Beach, HBM239 - MMTB Trams 7, 6, 10/09/1967, South Melbourne depot, Per way yard HBM240 - MMTB Trams 676, 180, 10/09/1967, Sth Melbourne football ground loop?...Tramways TMSV tram 676 Preston Workshops Traverser victoria parade tram 180 Royal Parade North Coburg tram 104 Holmes Road derailments South Melburne beach south melbourne depot tram 6 tram 928 Caulfield Kodachrome cardboard mounts, with notes - set of 11 Slide MMTB, and TMSV Tours - set of 11 Hugh Ballment ...Set of 11 photos by Hugh Ballment, of MMTB trams and TMSV Tours. HBM231 - MMTB Tram 180, 10/09/1967, Caulfield loop near station? With a Caltex Service station, a Milk Bar selling Streets ice cream, Thews Funeral Director and Quickdry revolving clothes lines in the background., HBM232 - MMTB Trams 180, 676, 10/09/1967, Royal Pde?, HBM233 - MMTB Trams 180, 676, 10/09/1967, Royal Pde?, HBM234 - MMTB Tram 104, 28/07/1968, Preston workshops, On traverser with passengers HBM235 - MMTB Trams 676, 180, 10/09/1967, Royal Parade?, HBM236 - MMTB Trams 180, 676, 10/09/1967, North Coburg, at terminus HBM237 - MMTB Tram 928, 10/09/1967, Holmes St, At Moreland Rd - derailed - tram has adverts for Foster's Lager, and 3DB radio. IN the background are adverts for a hairdresser, Capstan cigarettes, Top 4 dry cleaners, The Age, The Sun, and a butcher. HBM238 - MMTB Trams 180, 676, 10/09/1967, South Melbourne Beach, HBM239 - MMTB Trams 7, 6, 10/09/1967, South Melbourne depot, Per way yard HBM240 - MMTB Trams 676, 180, 10/09/1967, Sth Melbourne football ground loop?, HBM241 - MMTB Tram 928, 10/09/1967, Lygon St, At HolmesSt - derailed. The tram has adverts for Fosters and Britax. In the background is Top 4 dry cleaners, and Farmacia Chemist. Yields information about Melbourne tram operations, TMSV tours during 1967 and 1968 with photos of Melbourne tramways.Kodachrome cardboard mounts, with notes - set of 11tramways, tmsv, tram 676, preston workshops, traverser, victoria parade, tram 180, royal parade, north coburg, tram 104, holmes road, derailments, south melburne beach, south melbourne depot, tram 6, tram 928, caulfield -
 Melbourne Tram Museum
Slide - MMTB, and TMSV Tours - set of 12, Hugh Ballment, 1960s to 1980s
... ...tram 6...HBM243 - MMTB Tram 610, 22/09/1968, Brunswick depot, HBM244 - MMTB Trams 676, 180, 10/09/1967, River St, HBM245 - MMTB Tram 676, 10/09/1967, Dandenong Rd - Caulfield loop. , Has the Hoys theatre in the background HBM246 - MMTB Tram 676, 10/09/1967, Union Rd Ascot Vale, with the Showgrounds in the far background and a building with adverts for Four'n Twenty Pies HBM247 - MMTB, 28/07/1968, Preston workshops, Short traverser HBM248 - MMTB Trams 928 180, 10/09/1967, Holmes St, At Moreland Rd - derailed with TMSV tour trams in the background and now a lot of onlookers' HBM249 - MMTB Tram 928, 10/09/1967, Holmes St, At Moreland Rd - derailed HBM250 - MMTB Trams 7, 6, 10/09/1967, South Melbourne depot, Per way yard HBM251 - MMTB Tram 610, 22/09/1968, Victoria St, Looking east from Elizabeth St, with CUB buildings and an Ampol service station HBM252 - MMTB Trams 676, 180, 10/09/1967, Elizabeth St, At terminus with Flinders St station in the background with an advert for Sitmar line, Hosies Hotel and Damman's sandwich shop HBM253 - MTA Tram 2067, c1988, Albert Park, Light rail level crossing, showing only traffic lights. ...Tramways tram 610 TMSV tram 104 The Zoo tram 676 tram 106 Brunswick Depot Preston Workshops Traverser victoria parade North Coburg Caulfield Dandenon Road Union Road derailment tram 6 tram 7 South Melbourne depot tram 2067 Albert Park level crossing Elizabeth St Victoria St tram 928 Kodachrome cardboard and plastic mounts, with notes - set of 12 Slide MMTB, and TMSV Tours - set of 12 Hugh Ballment ...Set of 12 photos by Hugh Ballment, unless noted, of MMTB trams and TMSV Tours. HBM242 - MMTB Trams 676, 180, 10/09/1967, North Coburg, At terminus. Has a chemist shop in the background that did night prescriptions. HBM243 - MMTB Tram 610, 22/09/1968, Brunswick depot, HBM244 - MMTB Trams 676, 180, 10/09/1967, River St, HBM245 - MMTB Tram 676, 10/09/1967, Dandenong Rd - Caulfield loop. , Has the Hoys theatre in the background HBM246 - MMTB Tram 676, 10/09/1967, Union Rd Ascot Vale, with the Showgrounds in the far background and a building with adverts for Four'n Twenty Pies HBM247 - MMTB, 28/07/1968, Preston workshops, Short traverser HBM248 - MMTB Trams 928 180, 10/09/1967, Holmes St, At Moreland Rd - derailed with TMSV tour trams in the background and now a lot of onlookers' HBM249 - MMTB Tram 928, 10/09/1967, Holmes St, At Moreland Rd - derailed HBM250 - MMTB Trams 7, 6, 10/09/1967, South Melbourne depot, Per way yard HBM251 - MMTB Tram 610, 22/09/1968, Victoria St, Looking east from Elizabeth St, with CUB buildings and an Ampol service station HBM252 - MMTB Trams 676, 180, 10/09/1967, Elizabeth St, At terminus with Flinders St station in the background with an advert for Sitmar line, Hosies Hotel and Damman's sandwich shop HBM253 - MTA Tram 2067, c1988, Albert Park, Light rail level crossing, showing only traffic lights. Yields information about Melbourne tram operations, TMSV tours of the 1960s, and photos of Melbourne tramways.Kodachrome cardboard and plastic mounts, with notes - set of 12tramways, tram 610, tmsv, tram 104, the zoo, tram 676, tram 106, brunswick depot, preston workshops, traverser, victoria parade, north coburg, caulfield, dandenon road, union road, derailment, tram 6, tram 7, south melbourne depot, tram 2067, albert park, level crossing, elizabeth st, victoria st, tram 928 -
 Ballarat Tramway Museum
Photograph - SECV Geelong - tram line closure - set of 6, Keith Kings, 8/01/1956
... SECV Geelong - tram line closure - set of 6....... tram 6...Note some of these photographs are very similar to those of Geoff Grant - See Reg Item 485 and 476i7. 1 - No. 18 last tram to East, leaving city - 8/1/1956 - KSK Photo Q(x)(6) 2 - No. 7, last tram at West at terminus - 8/1/1956 - KSK Photo Q(x)(7) - has a group of people standing in front of the tramcar. 3 - No. 6 - last tram at North terminus, with a very large group of people in front of tram. ...On the rear in ink and with the Keith Kings Copyright stamp: 1 - Geelong - 18 last tam to East leaving city, Sun 8/1/56 - Q(x)(6) 2 - Geelong - 7 - last tram at West at terminus, Sun 8/1/56 - Q(x)(7) 3 - Geelong - 6 - last tram at North terminus, Sun 4/3/56 - T(b)(6) 4 - Geelong - 18 - last tram at Newtown terminus, Sun 22/1/56 - R(y)(3) 5 - Geelong - 19 - last tram to Eastern Park, at terminus on second last trip - Sun 22/1/56 - R(y)(2) 6 - 1 - last regular tram from Beach to Chilwell, leaving Beach terminus, Sun 8/1/56 - Q(x)(5)...Yields information about the closure of the Geelong tram system and the work of Keith Kings Trams tramways Geelong Closure East North Chilwell Beach Newtown Eastern Park Last Tram tram 18 tram 7 tram 6 tram 19 tram 1 On the rear in ink and with the Keith Kings Copyright stamp: 1 - Geelong - 18 last tam to East leaving city, Sun 8/1/56 - Q(x)(6) 2 - Geelong - 7 - last tram at West at terminus, Sun 8/1/56 - Q(x)(7) 3 - Geelong - 6 - last tram at North terminus, Sun 4/3/56 - T(b)(6) 4 - Geelong - 18 - last tram at Newtown terminus, Sun 22/1/56 - R(y)(3) 5 - Geelong - 19 - last tram to Eastern Park, at terminus on second last trip - Sun 22/1/56 - R(y)(2) 6 - 1 - last regular tram from Beach to Chilwell, leaving Beach terminus, Sun 8/1/56 - Q(x)(5) Set of 6 black and white prints with photographer's notes on the rear. ...Black and White print contained within the Wal Jack Bendigo and Geelong Album, see Reg Item 5003 for more details. Set of six black and white photographs from Keith Kings of the staged closures of the Geelong tramways. Note some of these photographs are very similar to those of Geoff Grant - See Reg Item 485 and 476i7. 1 - No. 18 last tram to East, leaving city - 8/1/1956 - KSK Photo Q(x)(6) 2 - No. 7, last tram at West at terminus - 8/1/1956 - KSK Photo Q(x)(7) - has a group of people standing in front of the tramcar. 3 - No. 6 - last tram at North terminus, with a very large group of people in front of tram. Tram has the destination of North. 4/3/1956 - KSK Photo T(b)(6). 4 - No. 18 - last tram at Newtown terminus, with a very large group of people in front of tram. Tram has the destination of Newtown. 22/1/1956 - KSK Photo R(y)(3). 5 - No. 19, last tram to Eastern Park, at terminus on second last trip, with conductor on front step. 22/1/56, KSK Photo R(y)(2). Tram has the destination of Eastern Park. 6 - No. 1 - last regular tram from Beach to Chilwell, leaving Beach terminus - KSK Photo Q(x)(5).Yields information about the closure of the Geelong tram system and the work of Keith KingsSet of 6 black and white prints with photographer's notes on the rear.On the rear in ink and with the Keith Kings Copyright stamp: 1 - Geelong - 18 last tam to East leaving city, Sun 8/1/56 - Q(x)(6) 2 - Geelong - 7 - last tram at West at terminus, Sun 8/1/56 - Q(x)(7) 3 - Geelong - 6 - last tram at North terminus, Sun 4/3/56 - T(b)(6) 4 - Geelong - 18 - last tram at Newtown terminus, Sun 22/1/56 - R(y)(3) 5 - Geelong - 19 - last tram to Eastern Park, at terminus on second last trip - Sun 22/1/56 - R(y)(2) 6 - 1 - last regular tram from Beach to Chilwell, leaving Beach terminus, Sun 8/1/56 - Q(x)(5)trams, tramways, geelong, closure, east, north, chilwell, beach, newtown, eastern park, last tram, tram 18, tram 7, tram 6, tram 19, tram 1 -
 Melbourne Tram Museum
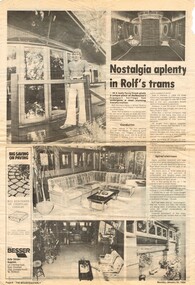
Newspaper, The Mounteasterly, "Nostalgia aplenty in Rolf's trams", 30/01/1984 12:00:00 AM
... ... tram 6...Has five photos which shows the number on one of the trams to be "6". See also Reg Item 1356 for another newspaper cutting which identifies the other tram as No. 1. ...Melbourne Tram Museum 8 Wallen Road Hawthorn melbourne Trams tramways Ferny Creek Tramcars PMTT Melbourne Houses tram 1 tram 6 Newspaper clipping from The Mounteasterly, Monday Jan 30, 1984 with an article titled "Nostalgia aplenty in Rolf's trams". ...Newspaper clipping from The Mounteasterly, Monday Jan 30, 1984 with an article titled "Nostalgia aplenty in Rolf's trams". Advises of the sale of Rolf Herweg's home made from old tramcars in School Road Ferny Creek, details of the houses, tramcars and contact numbers. Has five photos which shows the number on one of the trams to be "6". See also Reg Item 1356 for another newspaper cutting which identifies the other tram as No. 1. Reg item 1833 has a photo of No. 1 in MMTB service with a note about it being a dining room. See Reg Item 4657 for notes on the sale of the property in 1983.trams, tramways, ferny creek, tramcars, pmtt, melbourne, houses, tram 1, tram 6 -
 Ballarat Tramway Museum
Negative - Set of 2, Travis Jeffrey, early 1960's
... ... tram 6...N393 and N394 and black and white print made by a laser printer (stored in folder) of Bendigo tram No. 6 at Golden Square terminus. Tram has the destination of Golden Square. ...N393 and N394 and black and white print made by a laser printer (stored in folder) of Bendigo tram No. 6 at Golden Square terminus. Tram has the destination of Golden Square. ...Negative Nos. N393 and N394 and black and white print made by a laser printer (stored in folder) of Bendigo tram No. 6 at Golden Square terminus. Tram has the destination of Golden Square. Has the Golden Square hotel in the background and an Age advertisement on the dash panel. Note the large overhead pan at the terminus. .1 - tram has arrived and the driver/conductor has place the pole on the overhead after turning the pole. .2 - Driver/conductor standing by front of tram. Date of photo on folder - 26/9/1962?? or 1 Jan 1963. A date on the front of the folder of 1/12/1959 is too early - tram has been painted with tiger stripes and fitted with dash canopy lighting. Same date on Ballarat folders as well - see negative number N392 etc. Crew member wearing a great coat - unusual for Bendigo on a new years day. Photo early 1960's. Original negative rescanned 24/5/2020 and image file updated.BE1 - Paper folder that contained the negative had "NR15A" in red ink, "BE1" in pencil, date stamp of "1 DEC 1959" on front and on inside date stamps "26 Sep 1962" and "26 Sep 1962". BE2 - Paper folder that contained the negative had "NR104A" in red ink, "BE2" in pencil, date stamp of "1 Jan 1963" on front and on inside date stamps "26 Sep 1962". trams, tramways, bendigo, golden square, crews, tram 6 -
 Ballarat Tramway Museum
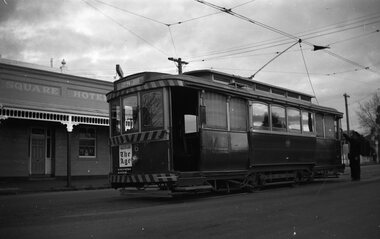
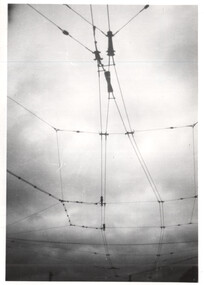
photograph - Set of 4 Black & White - Bendigo tramways, Peter Duckett, late 1940s
... ...tram 6...Set of four photographs of Bendigo trams and infrastructure photographed by Peter Duckett, late 1940s 1 - double trolley wire at a "Y" terminus showing the details of dual trolley wire - Could be either Quarry Hill or Golden Square. 2 - Bendigo trams 24 and 22 at Quarry Hill terminus - note the cream rocker panels. 3 - Bendigo 6 at Charing Cross. 4 - Bendigo 16 - after conversion to one man tram....Yields information about Bendigo trams late 1940s Bendigo tramcars Bendigo Tramways overhead double trolley wire terminals tram 24 tram 22 tram 6 tram 16 Quarry Hill Charing Cross Details the image on the rear of the print in ink. ...Set of four photographs of Bendigo trams and infrastructure photographed by Peter Duckett, late 1940s 1 - double trolley wire at a "Y" terminus showing the details of dual trolley wire - Could be either Quarry Hill or Golden Square. 2 - Bendigo trams 24 and 22 at Quarry Hill terminus - note the cream rocker panels. 3 - Bendigo 6 at Charing Cross. 4 - Bendigo 16 - after conversion to one man tram.Yields information about Bendigo trams late 1940sSet of four black and white photographs by Peter Duckett.Details the image on the rear of the print in ink.bendigo, tramcars, bendigo tramways, overhead, double trolley wire, terminals, tram 24, tram 22, tram 6, tram 16, quarry hill, charing cross -
 Ballarat Tramway Museum
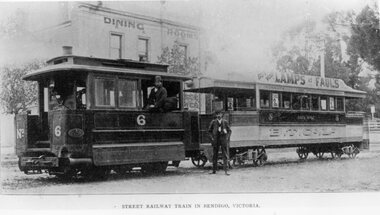
Photograph - Black & White Photograph/s, Peter Duckett, late 1890's?
... ... tram 6...Ballarat Tramway Museum South Gardens Reserve Wendouree Parade Ballarat Ballarat goldfields Yields information about the appearance of Bendigo Birney trams during the 1950's, possibly during enthusiast tour. trams tramways Bendigo Steam Tram Motors Trailers tram 6 tram 5 On the front, top left hand corner of the print "26" in ink within a circle. ...Yields information about the appearance of Bendigo Birney trams during the 1950's, possibly during enthusiast tour.Black and White Photograph of Bendigo steam tram motor No. 2 and bogie trailer No. 5, 1890's?, photographed with a building marked "Dining Rooms" in the background. Has the driver in the steam tram motor and the conductor standing alongside. Trailer marked "B.T.Co. Ltd", possibly around the turn of the century. Earlier photos have the full company name. Trailer has roof advertisement "Buy your Lamps at Faull's" - oil? or electric? Taken from a postcard or a magazine - has the caption "Street Railway Train in Bendigo, Victoria", possibly North American origin given the language. Peter Duckett Collection.On the front, top left hand corner of the print "26" in ink within a circle. On rear, stamped in black ink "Photo supplied from P.W. Duckett Collection, All Rights Reserved, 69 Howitt Rd. Nth Caulfield 3161." On rear in ink "Motor 6 and Trailer 5" and a "William F Scott" address label.trams, tramways, bendigo, steam tram motors, trailers, tram 6, tram 5 -
 Ballarat Tramway Museum
Photograph - Digital image Set of 20, Dec. 1970
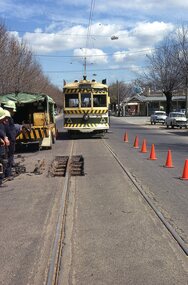
... ... tram 6....13 - interior view from Birney looking at the front of another tram parked behind. .14 - No. 29, No. 6 crossing at .15 - No. 6, showing special at Charing Cross. .16 - No. 5 and another tram at North Bendigo on a Special .17 - No. 28 at Charing Cross .18 - No. 5 on Special at a Loop on the Eaglehawk line .19 - No. 28, and two other trams at the Myrtle St Loop .20 - No. 18 showing Quarry Hill and two other trams on View St....Ballarat Tramway Museum South Gardens Reserve Wendouree Parade Ballarat Ballarat goldfields Trams tramways Bendigo Trackwork McCrae St Depot Quarry Hill Eaglehawk Golden Square Controllers North Bendigo View St tram 29 tram 5 tram 24 tram 2 tram 3 tram 6 tram 28 tram 18 Set of 20 digital images of Bendigo Tramways December 1970 by Stuart Lodington. .1 - Bendigo track gang renewing a joint, McCrae St, with welding truck alongside and Birney No. 29. .2 - No. 5 at Quarry Hill terminus? ...Set of 20 digital images of Bendigo Tramways December 1970 by Stuart Lodington. .1 - Bendigo track gang renewing a joint, McCrae St, with welding truck alongside and Birney No. 29. .2 - No. 5 at Quarry Hill terminus? .3 - No. 24 at the depot .4 - No. 2 on the Quarry Hill line .5 - No. 5 approaching the Eaglehawk terminus .6 - No. 29? at the Golden Square Terminus with Bill Rodda's Golden Square hotel in the background. .7 - No. 3 inbound on the Quarry Hill line. .8 - trams crossing on the Eaglehawk line, through the window of one tram. .9 - side on view of a B23D controller in a bogie tram .10 - No. 5 at the Eaglehawk terminus .11 - No. 21 at No. 21 crossing on the Golden Square line. No. 29 showing special, No.21 - North Bendigo, Fire Station Loop? .12 - No. 29 and another tram - near work site? .13 - interior view from Birney looking at the front of another tram parked behind. .14 - No. 29, No. 6 crossing at .15 - No. 6, showing special at Charing Cross. .16 - No. 5 and another tram at North Bendigo on a Special .17 - No. 28 at Charing Cross .18 - No. 5 on Special at a Loop on the Eaglehawk line .19 - No. 28, and two other trams at the Myrtle St Loop .20 - No. 18 showing Quarry Hill and two other trams on View St.trams, tramways, bendigo, trackwork, mccrae st, depot, quarry hill, eaglehawk, golden square, controllers, north bendigo, view st, tram 29, tram 5, tram 24, tram 2, tram 3, tram 6, tram 28, tram 18 -
 Ballarat Tramway Museum
Photograph - Digital image Set of 20, 1971-72
... ... tram 6...The Tram has "Johnnie Walker whiskey" roof adverts. .6 - No. 29 outbound in Thunder St with a train passing over the bridge in the background. .7 - view from the front window of a tram on the Eaglehawk line with a large "display event float" in the foreground and tram approaching a crossing loop. .8 - No. 29 at North Bendigo .9 - view of High St Eaglehawk looking east from the terminus, showing the track and centre poles. .10 - No. 29 outbound on the North Bendigo line turning from either Nolan St or Caledonia St, running a special. .11 - No. 7 departing North Bendigo for Golden Square. .12 - No. 3 and 18 at Charing Cross. ...Ballarat Tramway Museum South Gardens Reserve Wendouree Parade Ballarat Ballarat goldfields Trams tramways Bendigo Eaglehawk Quarry Hill Golden Square Depot North Bendigo Charing Cross tram 29 tram 18 tram 24 tram 3 tram 7 tram 6 tram 26 Set of 20 digital images of Bendigo Tramways, 1972 at or before closure while on a tram tour by Stuart Lodington. .1 - No. 29 at the North Bendigo terminus .2 - No. 29 just past the Bendigo end of the double track in High St Eaglehawk, with a BP dealer in the background. .3 - Night photo of No. 18 at a terminus, showing "Eaglehawk" .4 - ditto .5 - Night photo of No. 24 at Eaglehawk with Leo A Hughes Photographer in the background. ...Set of 20 digital images of Bendigo Tramways, 1972 at or before closure while on a tram tour by Stuart Lodington. .1 - No. 29 at the North Bendigo terminus .2 - No. 29 just past the Bendigo end of the double track in High St Eaglehawk, with a BP dealer in the background. .3 - Night photo of No. 18 at a terminus, showing "Eaglehawk" .4 - ditto .5 - Night photo of No. 24 at Eaglehawk with Leo A Hughes Photographer in the background. The Tram has "Johnnie Walker whiskey" roof adverts. .6 - No. 29 outbound in Thunder St with a train passing over the bridge in the background. .7 - view from the front window of a tram on the Eaglehawk line with a large "display event float" in the foreground and tram approaching a crossing loop. .8 - No. 29 at North Bendigo .9 - view of High St Eaglehawk looking east from the terminus, showing the track and centre poles. .10 - No. 29 outbound on the North Bendigo line turning from either Nolan St or Caledonia St, running a special. .11 - No. 7 departing North Bendigo for Golden Square. .12 - No. 3 and 18 at Charing Cross. No. 3 has two SEC roof Advertisements .13 - No. 7 at North Bendigo with the trolley pole being reversed. .14 - No. 24 at Quarry Hill with Northern Terrazzo in the background with the driver alongside .15 - No. 7 and No.6 at Charing Cross with the Beehive buildings in the background. .16 - No. 7 at North Bendigo terminus .17 - ditto .18 - No. 24 at Quarry Hill with Northern Terrazzo in the background with the conductor alongside. .19 - ditto .20 - No. 26 and other bogie tram in View St near Charing Cross with the Armstrong Tyre Service building and signs for Cohn's Drinks and T&G in the view.trams, tramways, bendigo, eaglehawk, quarry hill, golden square, depot, north bendigo, charing cross, tram 29, tram 18, tram 24, tram 3, tram 7, tram 6, tram 26