Showing 62 items matching "hard surfacing"
-
 University of Melbourne, Burnley Campus Archives
Photograph - Colour print, James (Jim) Pleasance, Students Building Brick Paths Around Relocatable Buildings, 1985
... hard surfacing...Note in paper catalogue, "Hard surfacing the pathways around the new relocatable buildings erected on the site of the old Lagoon fill (completed 1977). ...On reverse, "13.Sep.1985," and, "Hard surfacing with brick....Students completed most of the work with the central garden area designed by Californian exchange staff member Steve Mullany, 1985." hard surfacing bricks pathways students gardens californian exchange staff steve mullany quad relocatable buildings students working outside On reverse, "13.Sep.1985," and, "Hard surfacing with brick. 2 similar colour photographs. ...Note in paper catalogue, "Hard surfacing the pathways around the new relocatable buildings erected on the site of the old Lagoon fill (completed 1977). Students completed most of the work with the central garden area designed by Californian exchange staff member Steve Mullany, 1985." 2 similar colour photographs. Students building brick paths around relocatable buildings in the Quad. On reverse, "13.Sep.1985," and, "Hard surfacing with brick.hard surfacing, bricks, pathways, students, gardens, californian exchange, staff, steve mullany, quad, relocatable buildings, students working outside -
 Flagstaff Hill Maritime Museum and Village
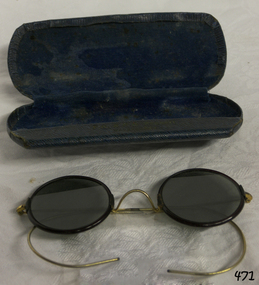
Functional object - Spectacles and case, Fred and Geoff Bennett (F.T. and P.G. Bennett), mid-29th century
... Spectacles, Pince-nez with oval shaped tinted lenses, metal bridge and rubber nose pads. Hard surfaced blue velvet lined spectacle case. ...Bennett Warrnambool" Spectacles, Pince-nez with oval shaped tinted lenses, metal bridge and rubber nose pads. Hard surfaced blue velvet lined spectacle case. ...This pair of spectacles was prescribed and made in Warrnambool by brothers Fred and Geoff Bennet from about 1946 when they established their optometrist business at 192 Liebig Street Warrnambool. The business moved to 152 Liebig Street in 1988, by which time it had already changed hands to become McMahon and Owen Optometrists. Jayson Ward and Mathew Bucks purchased the business in 2012, then changed the name to Warrnambool Eyecare in 2016. They also own and practice at Portland Eyecare.This pair of glasses is significant as an example of locally owned and manufacture red eyewear from the mid 290th century. Spectacles, Pince-nez with oval shaped tinted lenses, metal bridge and rubber nose pads. Hard surfaced blue velvet lined spectacle case. Inscription on case. Made by F.G. & P..G. Bennett in Warrnambool."F.G. & P.G. Bennett Warrnambool"flagstaff hill, warrnambool, shipwrecked-coast, flagstaff-hill, flagstaff-hill-maritime-museum, maritime-museum, shipwreck-coast, flagstaff-hill-maritime-village, pince-nez, glasses, eyewear, seeing aids, vision, optician, f.g. & p.g. bennett warrnambool, eye care, magnifiers, reading glasses, fred and geoff bennett, personal effects -
 Orbost & District Historical Society
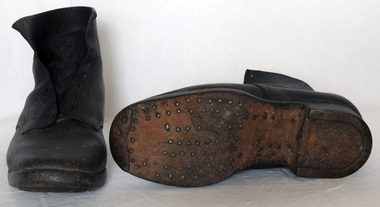
boots
... The hobnails project below the sole and provide traction on soft or rocky ground and snow, but they tend to slide on smooth hard surfaces. They may also have steel toecaps. ...The hobnails project below the sole and provide traction on soft or rocky ground and snow, but they tend to slide on smooth hard surfaces. They may also have steel toecaps. ...Hobnailed boots are boots with hobnails (nails inserted into the soles of the boots), usually installed in a regular pattern, over the sole. They also usually have an iron horseshoe-shaped insert, called a heel iron, to strengthen the heel, and an iron toe-piece. The hobnails project below the sole and provide traction on soft or rocky ground and snow, but they tend to slide on smooth hard surfaces. They may also have steel toecaps. When Army boots were made 100% of leather, to get some grip on the soles hob-nails were hammered into them. These boots are an example of the foot wear worn by the eA dark brown leather pair of very heavy hob-nailed boots. They have nails inserted into the soles of the boots in a regular pattern, over the sole. The toes and the heels have been strengthened with metal. The boots are made to lace up at the front.boots-hobnailed footwear -
 Federation University Historical Collection
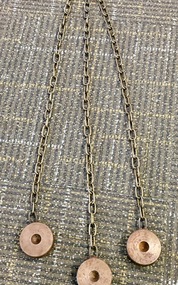
Instrument - Scientific Instruments, Tripod Location Chains
... Used to contain tripod ends on hard smooth surfaces....Used to contain tripod ends on hard smooth surfaces. Tripod Location Chains Instrument Scientific Instruments ...Surveying instrument accessories. Two sets. Used in conjunction with item 4129 - Collapsible leg surveying instrument, tripod. Could also be used with item 4130 - Plane Table which goes with the tripod mentioned.A set of three steel discs, connected in star configuration by three brass chains of equal length. Used to contain tripod ends on hard smooth surfaces.surveying, metal, steel discs, scientific instruments, location chains, plane table -
 Mont De Lancey
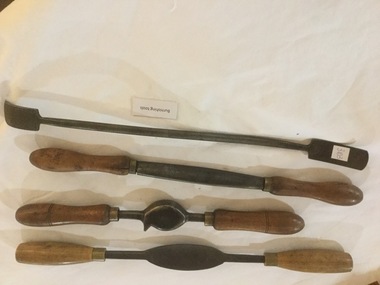
Burnishers
... Implements with a hard smooth roundedend or surface used for smoothing and polishing....Mont De Lancey 71 Wellington Road Wandin North yarra-valley-and-dandenong-ranges Implements with a hard smooth roundedend or surface used for smoothing and polishing. burnishers polishers surface finishing tools L. ...Implements with a hard smooth roundedend or surface used for smoothing and polishing.Set of four burnishing tools used to polish leather. 3 - Metal with wooden handles. 1 - All metal with patterned ends,L. Richter Northampton on wooden handle, double ended tool with round middle.burnishers, polishers, surface finishing tools -
 Glenelg Shire Council Cultural Collection
Accessory - Badge - Back to Portland, November 14th to 21st, 1929, 1929
... Paper image under hard plastic surface. Metal back and pin....Paper image under hard plastic surface. Metal back and pin. Accessory Badge - Back to Portland, November 14th to 21st, 1929 Windsor Manufacturing Company ...Displayed at History House.Metal round badge with faded image of a lifeboat under an open-sided cover shed. Colours: Blue, orange and green. Paper image under hard plastic surface. Metal back and pin.Front: Back to Portland/Nov. 14th to 21st 1929 (green print, around edge) Back: Side: Windsor MFG CB., 6 Albert St., Windsor (white print)back to portland, memorabilia, 1929 -
 Vision Australia
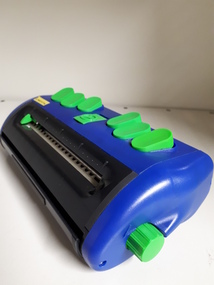
Equipment - Object, Quantum Technology, Jot a Dot Brailler, 2005
... A built-in reading stand keeps the unit stable when resting on hard surfaces. Tactile line and cell indicators show the current location on the page. ...A built-in reading stand keeps the unit stable when resting on hard surfaces. Tactile line and cell indicators show the current location on the page. ...The Jot a Dot Pocket Brailler is a portable, manual Braille writer designed for use by individuals who are blind or have low vision. This small, lightweight brailler has six keys for Braille entry. The keys have high contrast colors for identification by users with low vision. Braille is written from the left hand side of the page to the right, with 20 cells of braille per line. The user can read Braille as it is written by turning the unit over. A built-in reading stand keeps the unit stable when resting on hard surfaces. Tactile line and cell indicators show the current location on the page. The line indicator shows which line is being Brailled, and the cell indicator shows the position of the embossing head on the line. By turning the device over, the user can read the Braille as they write it. This Brailler uses standard photocopy paper in A5 and A6 paper sizes. The unit is constructed in one piece, so there are no parts that can be lost. 1 rectangular blue Braille unit with 6 bright green keys Yellow sticker LN017a on front. On back Jot a Dot F07077 sponsored by Guide Dogs. braille equipment, assistive devices -
 Linton and District Historical Society Inc
Butter mould
... The hollow would be filled with butter, then either the mould would be tapped sharply on a hard surface to remove the square of butter, or a plunger or other device used to push the butter from the mould. ...The hollow would be filled with butter, then either the mould would be tapped sharply on a hard surface to remove the square of butter, or a plunger or other device used to push the butter from the mould. ...To be used for shaping butter into a cube. Mould is constructed of four pieces of wood joined together to form a rectangular central hollow. Small pieces of timber have been nailed in to reinforce the joins. The hollow would be filled with butter, then either the mould would be tapped sharply on a hard surface to remove the square of butter, or a plunger or other device used to push the butter from the mould. Note: Mould is fairly roughly made, suggesting it is home-made, and the absence of grease etc on inside of mould suggests it may never have been used.butter mould -
 Flagstaff Hill Maritime Museum and Village
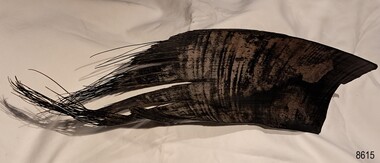
Animal specimen - Baleen
... Its black shiny hard yet flexible surface is slightly rippled and textured. ...Its black shiny hard yet flexible surface is slightly rippled and textured. ...A baleen whale has hard bristly baleen that hangs from its upper jaw inside its mouth instead of teeth. Baleen is made from a protein called keratin, just like human hair and fingernails, and its colour can vary between species, from black to yellow or white. The whale uses the tough, flexible baleen like a sieve to catch its food, filtering the small sea creatures out of the sea water it releases from its mouth. In the19th Century, whales were hunted for the products that could be made from their bodies, such as oil for lubricating machinery, soap making, lamps, heaters and fuel for the lighthouse lights. The flexible baleen was used for whip handles, carriage springs and umbrella ribs. It was also used for the skirt hoops, hat ribs, and rigid ‘stays’ in tightly fitting bodices to enhance their figures. The Southern Right Whales, as well as Blue Whales and Humpback Whales, are baleen whales. The Southern Rights annually visit the ocean off the southwest coast during the breeding season. In the early 1800s whalers hunted along this coastline in their dangerous pursuit of money for the precious cargoes of whale oil and bones. The population of these large animals dwindled quickly and by the late 1840s the whaling industry dwindled. Whaling recommenced from the 1940s to the 1980s when the whale products were used to make margarine and dog food. The baleen sample has been used to educate people about whaling and about the properties of baleen. The baleen sample is significant for its association with 19th century women's fashion. It helps to understand how garments were supported to shape a woman's figure. The baleen sample represents a period when whales were hunted and killed to provide income and products for for the local settlers and for the export industry.Baleen sample from a whale's jaw. Its black shiny hard yet flexible surface is slightly rippled and textured. One end is fringed and the other and a smooth cut edge. The colour varies in places, with stripy brown colouring. flagstaff hill maritime museum and village, great ocean road, shipwreck coast, baleen, whalebone, baleen whale, keratin, 19th century, whaling industry, women's fashion, stays, bodice, women's figures, fashion, clothing, whale oil, baleen colour, whale hunting, whale products, southern right whale, blue whale, humpback whale, southwest victoria, whalers, whale bones -
 Parks Victoria - Wilsons Promontory Lightstation
Anvil
... As quoted from Wikipedia, ‘An anvil is a block with a hard surface on which another object is, struck. ...Parks Victoria - Wilsons Promontory Lightstation Lighthouse track Wilsons Promontory National Park 3960 gippsland As quoted from Wikipedia, ‘An anvil is a block with a hard surface on which another object is, struck. ...As quoted from Wikipedia, ‘An anvil is a block with a hard surface on which another object is, struck. The block is as massive as it is practical, because the higher the inertia of the anvil, the more efficiently it causes the energy of the striking tool to be transferred to the work piece’. The lightstation’s anvil is a red-painted iron block with a conical beak or horn at one end that was used for hammering curved pieces of metal. It would have stood on a heavy free-standing pedestal, such as a large tree stump, to allow complete access to the item being hammered. Some anvils display the manufacturer’s name in the metal on the side, but this is not the case here, and its age, although unknown appears to be quite old, perhaps c.1900. It appears to have had a lot of use, and although no record of this survives, it is presumed that a forge operated on site for hammering, cutting, shaping and repairing tools such as bolts, nails, hooks, chain segments, pulley blocks, hinges, crow bars, picks, chisels, horseshoes and harness hardware. A hames hook (which forms part of the collar worn by a draught horse) survives at the lightstation as do many other heavy metal tools and pieces of equipment. The anvil is an example of the necessary resourcefulness and self sufficiency practiced by lightkeepers working and living in a remotely located workplace and home, and many of the iron items in the collection may have been repaired or even made on its working surface. As a lightstation manager Chris Richter used the anvil to manufacture pulley blocks for sash windows, repair brass door hinges & sharpen cold chisels, crowbars and picks and other lightkeepers have used this anvil for many fabricating jobs such as manufacturing ducting for the generator room ventilation system."The lightship only came in every three months with supplies and there would have been repairs to do between visits from a blacksmith - who would have had to travel on the ship. Also, the ship was only anchored in the bay long enough to unload supplies and collect and deliver lightkeeping staff – probably not enough time to get much smithy work done – especially if the weather packed it in and the ship had to depart. Lightkeepers in our time had to be self sufficient, resourceful and innovative and I imagine that would have been the case in the past." It has second level contributory significance.Red painted blacksmith's anvil. -
 Flagstaff Hill Maritime Museum and Village
Tool - Leg Vice, Mid 19th Century
... The bodies are forged wrought iron or mild steel and they have hard steel surfaces welded into the jaws. The jaws have little or very shallow serrations which are generally worn off.Around the turn of the 20th Century during the hey-day of the blacksmith shop in North America, these tools were considered so standard a commodity that they were sold without reference to the manufacturer. ...The bodies are forged wrought iron or mild steel and they have hard steel surfaces welded into the jaws. The jaws have little or very shallow serrations which are generally worn off.Around the turn of the 20th Century during the hey-day of the blacksmith shop in North America, these tools were considered so standard a commodity that they were sold without reference to the manufacturer. ...The blacksmith leg vise is also called the "solid box vise" and is one of the most important tools in the blacksmith's shop. It firmly holds hot iron while it is hammered, chiseled, or twisted. These are the only vises that are designed to take this kind of use day in and day out. A small 30-pound blacksmith's vise can survive pounding that would wreck a much heavier cast iron bench model. Three things make a blacksmith's vice special. One is that they are forgings, not cast iron or ductile iron. The second is the leg that provides support to the floor or from a sunken post. The last is the hinge, while not a perfect way to construct a vice the pin joint is durable and can take a considerable beating. If sheared it is easy to replace. These things all combine into a tool that can take decades of heavy use and abuse. Most in use is one to two hundred years old.Some of these vises were made by specialists such as Atwood of Stourbridge England, Steel City and Columbian in the U.S. and others were made in anvil manufacturing plants such as "Mousehole Forge" and "Peter Wright" in England and "Fisher-Norris" and others in North America. The design of these vises right down to the last chamfer seems to have been perfected in the 1600s and remained more or less the same until the 20th century. The bodies are forged wrought iron or mild steel and they have hard steel surfaces welded into the jaws. The jaws have little or very shallow serrations which are generally worn off.Around the turn of the 20th Century during the hey-day of the blacksmith shop in North America, these tools were considered so standard a commodity that they were sold without reference to the manufacturer. Very few were even marked with the maker's name. Size is best defined by weight as there is some variation in jaw size from manufacturer to manufacturer. They were sold by the pound and are still best judged by the pound.A vintage tool used in a Blacksmiths shop during the early 19th century to the beginning of the 20th century. Regarded as a significant into social history of the time.Leg Vice attached with screws to bench via a block of wood. Has large metal pole which practically reaches the floor. Also has a metal device to either tighten or slacken vice.flagstaff hill, warrnambool, shipwrecked-coast, flagstaff-hill, flagstaff-hill-maritime-museum, maritime-museum, shipwreck-coast, flagstaff-hill-maritime-village -
 Bendigo Military Museum
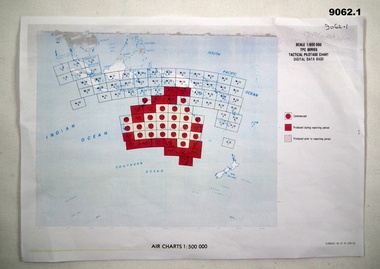
Map - RASvy " Map Makers Exhibition 2025 "- Map display, RAN Hydrographic Office, 1972 - 1992
... The shortest distance between two points on the earth's surface is called a "Great Circle Route" which is a route on a circular path on the surface of the earth where the centre of that circle is also the centre of the earth. Great Circle Routes on a Mercator Projection are however curves and harder to plot. ...The shortest distance between two points on the earth's surface is called a "Great Circle Route" which is a route on a circular path on the surface of the earth where the centre of that circle is also the centre of the earth. Great Circle Routes on a Mercator Projection are however curves and harder to plot. ...All of these Charts / Maps were used for the RSL Museum display " The Mapmakers " ( of RASvy. ) 10 Jun - 10 Aug 2025. .1 Catalogue of Tactical Pilotage Charts, 1:500 000 Scale. Digital Data Base available as at 30Jun 92. This catalogue page shows the extent of the Australian area of responsibility for aeronautical charting. .2 RAAF PLOTTING CHART. NP 22-2 (Navigational Plotting) Tasmania. MERCATOR PROJECTION. This series of charts were used for the training of RAAF Navigators. These charts were produced and printed at the Army Survey Regiment, Bendigo. .3 RAAF PLOTTING CHART AUSTRALIA - SOUTHEAST. NP 27 is Based on LAMBERT CONFORMAL CONIC PROJECTION. This series of charts was used by RAAF Navigators for the planning of RAAF flights. These charts were produced and printed at the Army Survey Regiment, Bendigo. .4 RAAF LONG RANGE PLOTTING CHART. NP 43-4 AUSTRALIA WESTERN. MERCATOR PROJECTION. This series of maps were used for the planning of RAAF flights. Of Particular note these charts were used to plot "Rhumb Lines or loxodromes" where a course crosses all Meridians (Lines of latitude and longitude) at the same angle. On Mercator projection charts Rhumb lines are conveniently shown as straight lines and are also lines of constant compass bearing. Rhumb lines are usually longer than the shortest distance between two points. The shortest distance between two points on the earth's surface is called a "Great Circle Route" which is a route on a circular path on the surface of the earth where the centre of that circle is also the centre of the earth. Great Circle Routes on a Mercator Projection are however curves and harder to plot. These charts were produced and printed at the Army Survey Regiment, Bendigo. .5 RAAF LONG RANGE PLOTTING CHART. NP 43-7 SOLOMON ISLANDS. MERCATOR PROJECTION. Used for the planning of RAAF flights. .6 RAAF AIR STAFF PLANNING CHART NS 137-1 DARWIN NORTH WEST. AZIMUTHAL EQUIDISTANT PROJECTION. This series of charts were used for planning by the staff. The whole chart was produced by joining the four quadrant maps together. The charts are based on a single point of tangency (in this case Darwin) and shows radius (distance) in nautical miles to and from that point. A series of charts were produced centred on each of the major airfields in Northern Australia. These charts were produced and printed at the Army Survey Regiment, Bendigo. .7 RAAF AIR STAFF PLANNING CHART NS 137-2 DARWIN NORTH EAST. AZIMUTHAL EQUIDISTANT PROJECTION. Used for the planning by the staff. The charts are based on a point of tangency and show radius in nautical miles. .8 RAAF AIR STAFF PLANNING CHART NS 137-4 DARWIN SOUTH WEST. AZIMUTHAL EQUIDISTANT PROJECTION. Used for the planning by the staff. The charts are based on a point of tangency and show radius in nautical miles. .9 RAAF AIR STAFF PLANNING CHART NS 137-3 DARWIN SOUTH EAST. AZIMUTHAL EQUIDISTANT PROJECTION. Used for the planning by the staff. The charts are based on a point of tangency and show radius in nautical miles. .10 TACTICAL PILOTAGE CHART. TPC R-13B. LAMBERT CONFORMAL PROJECTION. Used by pilots for flight planning and could be used in flight if necessary for visual navigation using major ground features shown on the chart. These charts also contained aeronautical information such as airfields, radio navigation beacons and obstructions. Contours and height information was shown in feet to be compatible with aircraft altimeters. Each graticule square also contained a Maximum Safe Elevation Figure (MEF) also in feet. Coverage of this series over Australia's area of interest were produced and printed at the Army Survey Regiment, Bendigo. .11 HYDROGRAPHIC CHART. AUS 158. PORT PHILLIP SOUTH and WEST CHANNELS. PROJECTION TRANSVERSE MERCATOR. Used by all people needing to navigate a vessel. Hydrographic charts were printed at the Army Survey Regiment, Bendigo. .12 HYDROGRAPHIC CHART. AUS 157. GEELONG HARBOUR and APPROACHES. PROJECTION TRANSVERSE MERCATOR. Used by all people needing to navigate a vessel. .13 EN ROUTE CHART. AUSTRALIA ERC HIGH. H1 and H2. LAMBERT CONFORMAL CONIC PROJECTION. This series of charts were regularly produced by the RAAF Aeronautical Information Service (AIS) and contained current aeronautical information for pilots. These charts were printed at the Army Survey Regiment, Bendigo..1 Tactical Pilotage Chart Series Catalogue. Current as at 30 Jun 92. .2 Extract of Navigational Plotting Chart " NP22-2 Tasmania " .3 Extract of Navigational Plotting Chart " NP 27 RAAF PLOTTING CHART AUSTRALIA - SOUTHEAST " .4 Extract of Navigational Plotting Chart " RAAF LONG RANGE PLOTTING CHART NP43-4 AUSTRALIA WESTERN " .5 Extract of Navigational Plotting Chart " RAAF LONG RANGE PLOTTING CHART NP43-7 SOLOMON ISLANDS " .6 Extract of Navigational Series " RAAF AIR STAFF PLANNING CHART NS 137-2 DARWIN NORTH WEST " .7 Extract of Navigational Series " RAAF AIR STAFF PLANNING CHART NS 137-1 DARWIN NORTH EAST " .8 Extract of Navigational Series " RAAF AIR STAFF PLANNING CHART NS 137-4 DARWIN SOUTH WEST " .9 Extract of Navigational Series " RAAF AIR STAFF PLANNING CHART NS 137-3 DARWIN SOUTH EAST " .10 Extract of Tactical Pilotage Chart " TPC R-13B " .11 Extract of Hydrographic Chart " PORT PHILLIP SOUTH and WEST CHANNELS " .12 Extract of Hydrographic Chart " GEELONG HARBOUR and APPROACHES " .13 Extract of En Route Chart " AUSTRALIA ERC HIGH " " H1 and H2 " royal australian survey corps, rasvy, fortuna, detachment - army survey regiment, army svy regt, asr -
 Kiewa Valley Historical Society
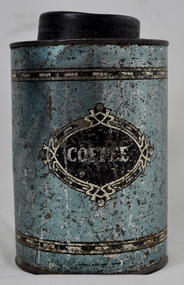
Tin Coffee Cylindrical, circa mid to late 1900's
... hard to get" groceries. This transition was precipitated by the SEC Vic Hydro Scheme of the 1940's to 1960's which increased the valley's population level three fold. kitchen containers domestic food storage bulk stocks of dried condiments "COFFEE" within an elongated spherical "art deco" four pointed banner of silver and black colouring This cylindrical tin has a pull/push lid(for easy access to the contents). The container is labelled for "coffee" however it has no commercial manufacturer's label to establish that it was bought with coffee ingredients in it. The majority of the container's external surface ...This "coffee" tin has by the "art deco" appearance its origins in the late 1950's to 1960's. This time period was one of accelerated growth both in the physical (housing) sense and the mental (new ideas and inventions) changes in "attitudes". These occurred more rapidly in cities but had its effects on the rural environment. The drinking of coffee was spurred on by easier distribution of imported food and drinks. Advertising by stronger radio links and then by television brought the variety of foods and drinks to semi isolated rural regions. The accessibility through greater information channels becoming available brought with it unbelievable ranges of goods and foodstuffs. Rural regions still relied on bulk supplies and relatively larger storage containers than those in cities. This "bulk" buying and storage "syndrome" was a lingering result of many years of "drought" periods when road transports met delays from flooded roadways in supplying population centres in the Kiewa Valley. The construction phases in building the SEC Vic Hydro electricity Scheme in the eastern sections of the Victorian Alps brought many changes to the quiet rural regions in the Kiewa Valley. Changes in population and social mores. The influx of a varied , mostly temporary, and "European flavoured cuisine" changes the "cuppa tea only" flavour to the have a "coffee break". The subliminal influence of the "American" films changed those children growing up in the post 1950s from the "English tea" to the "American coffee". This "Americanisation process has influenced not only rural Australia but also other areas throughout the world.This "insignificant" coffee tin is very significant as it demonstrates that the Kiewa Valley was becoming more accessible to reliable coffee supplies and general food items.The container was part of a "set" of containers that included tea, sugar,biscuits,flour, rice and other family condiments. This type of kitchen storage containers was brought about through changing patterns in tea and coffee useage and overall consumption. Household demands for faster "self help" cooking especially beveridges and the greater choice of kitchen "utensils" was brought on by easier access to products due to a lessening of the area's "isolation" by having a reliable (all weather) road system and an ever increasing population growth. The need for travelling goods/merchant supply caravans to service the area became a diminishing factor, as a result of the establishment of grocery stores in Tawonga and Mount Beauty in the supply of previously "hard to get" groceries. This transition was precipitated by the SEC Vic Hydro Scheme of the 1940's to 1960's which increased the valley's population level three fold.This cylindrical tin has a pull/push lid(for easy access to the contents). The container is labelled for "coffee" however it has no commercial manufacturer's label to establish that it was bought with coffee ingredients in it. The majority of the container's external surface has a "metallic" light blue colour with two sets of silver rings confining black (horizontal spotted) rectangles. "COFFEE" within an elongated spherical "art deco" four pointed banner of silver and black colouringkitchen containers, domestic food storage, bulk stocks of dried condiments -
 Kiewa Valley Historical Society
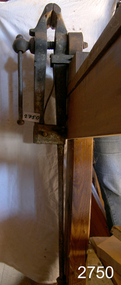
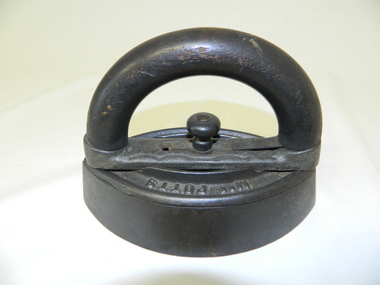
Iron - Flat
... surface of a stove (wood, coal or gas fired). It was mainly used by women in their domestic role, ironing the family's clothes and linen. In the Kiewa Valley the supply of coal or gas was not available or too expensive than the locally cut hard wood trees. ...surface of a stove (wood, coal or gas fired). It was mainly used by women in their domestic role, ironing the family's clothes and linen. In the Kiewa Valley the supply of coal or gas was not available or too expensive than the locally cut hard wood trees. ...This iron was used to press clothes prior to the spirit and electrical irons becoming available circa 1930s - 1950s. The main body of the iron was placed on a flat heated surface of a stove (wood, coal or gas fired). It was mainly used by women in their domestic role, ironing the family's clothes and linen. In the Kiewa Valley the supply of coal or gas was not available or too expensive than the locally cut hard wood trees. Ironing was time consuming as the iron had to be heated, used and then reheated to the required level of application. Kiewa Valley farmers' wives used these irons having heated their stoves with local timber from their farms. This iron is made of cast iron. The handle is a hollow cylinder and is 70 mm above the solid 30 mm base. Presumably the handle was wrapped and/or threaded with cloth to protect the hand from the heat of the iron. The iron would have been heated on the top of a stove.6 Metters KFB Victoriairon, laundry, domestic, antique, pressing clothes, household -
 Kiewa Valley Historical Society
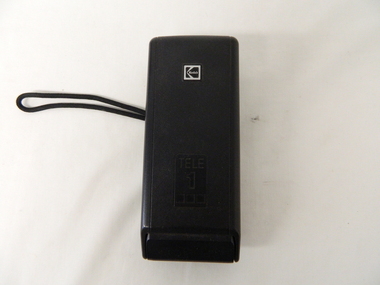
Camera Tele Ektra, Circa 1970s to 1980s
... This Item is dual lens (22mm,44mm) camera comprising of an elongated oblong shape, black hard plastic shell. It has a slightly rough surface(for a better fingers grip), two latches are located at the back, one to release the camera from its hinged protective cover and one to move to the next picture frame (film is within a cartridge)....This type of photography is one of the most effective stimuli to promote the unique qualities of the Kiewa Valley region. kodak two lens camera photographic hobby usa made camera On swing cover "Kodak Tele 1 " on back in small print "MADE IN USA" On camera body "KODAK TELE EKTRA 1" underneath "CAMERA" and on slide switch(front) to change lenses:"Tele" and "Norm" This Item is dual lens (22mm,44mm) camera comprising of an elongated oblong shape, black hard plastic shell. It has a slightly rough surface(for a better fingers grip), two latches are located at the back, one to release the camera from its hinged protective cover and one to move to the next picture frame (film is within a cartridge). ...From the 1970's onward the relative isolation of regional areas was improving in "leaps and bounds". Social amenities, and life styles were changing at a great rate. Items such as this camera (recreational/life style/non professional) capture of the altering socio economic balance of rural based activities provided the catalyst for greater appreciation by city dwellers to the benefits of rural life. The greater levels of communicative avenues, especially the visual (photography, pictures, television and the internet), from the beginning of this period and throughout the time frame (1970 to the 2000s) has cut the major restraints of what was rural "isolationism".The significance of this type of camera, being a small two lens (normal, telescopic) and portable piece of equipment, allowed non professional tourists, locals or visitors to visually display the uniqueness of the Kiewa Valley and Alpine regions. This method of promotional and intimate visual reproduction of not only physical but also through personal involvement, of the photographer to the audience, a greater psychological impact, by the nature of intimacy involved. This type of photography is one of the most effective stimuli to promote the unique qualities of the Kiewa Valley region.This Item is dual lens (22mm,44mm) camera comprising of an elongated oblong shape, black hard plastic shell. It has a slightly rough surface(for a better fingers grip), two latches are located at the back, one to release the camera from its hinged protective cover and one to move to the next picture frame (film is within a cartridge).On swing cover "Kodak Tele 1 " on back in small print "MADE IN USA" On camera body "KODAK TELE EKTRA 1" underneath "CAMERA" and on slide switch(front) to change lenses:"Tele" and "Norm" kodak two lens camera, photographic hobby usa made camera -
 Kiewa Valley Historical Society
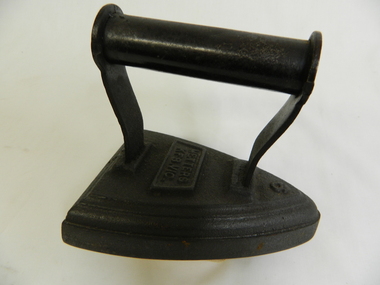
Iron - Flat, Circa early 1900s
... surface of a stove (wood, coal or gas fired). It was mainly used by women in their domestic role, ironing the family clothes and linen. In the Kiewa Valley the supply of coal or gas was not available or too expensive than the locally cut hard wood trees. ...surface of a stove (wood, coal or gas fired). It was mainly used by women in their domestic role, ironing the family clothes and linen. In the Kiewa Valley the supply of coal or gas was not available or too expensive than the locally cut hard wood trees. ...Historically this item was used before the spirit and the electrical iron took over Circa 1930s -1950s. The main body of the iron was placed on a flat heated surface of a stove (wood, coal or gas fired). It was mainly used by women in their domestic role, ironing the family clothes and linen. In the Kiewa Valley the supply of coal or gas was not available or too expensive than the locally cut hard wood trees. This particular iron was an improvement on the fixed handled iron because it allowed (by use of its easily detachable handle) to use multiple bases and thereby allowing a constant heat supply to be maintained and not having to waste time for a base to reheat to the required level of application.The significance of this item was that it allowed for a faster method of ironing clothes and linen. It's invention was a progress towards reducing the time it took to undertake a very labour and intensive domestic function. The reduction of time taken for this household duty provided women great flexibility to undertake other activities. These type of improvements to basic domestic tasks liberated housewives not only physically but also mentally from the isolation of the home environment.This flat iron has a removable, clip-on handle. The handle and its release knob are of wood. The base of the handle together with the heavy flat body are made of cast iron. The body of the iron is oval shaped tapered at each end and is 40mm thick.Underneath the handle frame and on the main body, on one side, in raised lettering is "Mrs Potts" and on the other side "Iron". Both are clearly visible when viewed from an aerial position. Under removable handle and on a plate (screwed onto the main body) is "No 2"iron, antique, household, pressing clothes, domestic, laundry -
 Kiewa Valley Historical Society
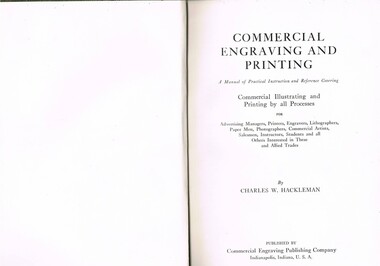
Book - Reference Printing, Charles W. Hackleman, Commercial Engraving and Printing, Circa 1921
... surfaces). Newspapers and other "paper" information publications are still producing "hard copies" but these are slowly being phased out. ...surfaces). Newspapers and other "paper" information publications are still producing "hard copies" but these are slowly being phased out. ...This item relates to methods of reproducing photos on all forms of material in an era of physical offset printing.The offset method is being replaced by digital transfer direct to the final product,(paper or other porous and non porous surfaces). Newspapers and other "paper" information publications are still producing "hard copies" but these are slowly being phased out. This item was used Circa 1920s in the peek period of paper based media. From the 1940s radio and then television stepped into the mass media revolution.This book was produced when all printing, Government and private enterprise, was using the "off set" method. This method was used to a great degree in all schools within the Kiewa Valley. It was in an era before "photo-copying machines" were available. This was a period when printing inks for larger printing machines had to be purchased from specialised outlets and printing presses required to be washed after each "run" of printing before the next plate(aluminium) could be fastened onto the "off sett" machinery. Heat infusion now used in large machines and domestic printers has superseded this task. Faded green cloth covered book with green papered front and back sleeve pages.Photos and sketches are throughout the book. Gloss paper used from page 1 one to page 400. Pages 401 to page 432 are not gloss paper. The type of paper varies throughout the book until final advertisement and index pages, from page 833 to page 846, are on gloss paperThe spine cover is badly worn and wording is faded. Front cover has"Commercial Engraving And Printing" Author and publisher details written by Charles W. Hackleman. Published by Commercial Engraving Publishing Company, "A Manual of Practical Instruction and Reference Covering" Commercial Illustrating and Printing by all Processes.technical book, reference for engraving and printing -
 Bendigo Military Museum
Album - ALBUM, PHOTOGRAPH, C.WWII
... Hard red cover, embossed lumpy surface & string binder. The upper right corner has a 60 mm dia hole. ...Bendigo Military Museum 37 - 39 Pall Mall Bendigo goldfields Album photographs Native Front cover printed: “My Childhood” Hard red cover, embossed lumpy surface & string binder. The upper right corner has a 60 mm dia hole. ...Hard red cover, embossed lumpy surface & string binder. The upper right corner has a 60 mm dia hole. Embossed around this hole are the words My Childhood. The internal pages are black cardboard. Fixed to these are 4 black & white photos per page. Photo description is written in white adjacent to photos. Photo subjects of native people from Egypt, Africa, Thailand, Palestine, Syria & Jerusalem, Tobruk, Gaza & Jerusalem war cemeteries.Front cover printed: “My Childhood”album, photographs, native -
 Kiewa Valley Historical Society
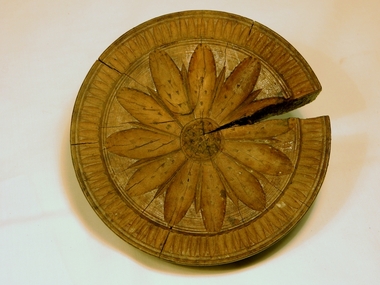
Butter Stamp Block, Circa 1950
... Although the wooden surfaces could be hard to keep clean commercial usage would have been limited and eventually replaced by a non porous and hygienically cleaner material. ...Although the wooden surfaces could be hard to keep clean commercial usage would have been limited and eventually replaced by a non porous and hygienically cleaner material. ...At the time when this shortbread / butter stamp block was used, rural dairies and larger properties who manufactured their own butter used butter stamps blocks for identifying the source of the butter or for decoration.. The patterns stamped into the warmed butter provided for a range of decorative visual enhancement to the "plain" and "boring" straight leveled normal butter surface. Although the wooden surfaces could be hard to keep clean commercial usage would have been limited and eventually replaced by a non porous and hygienically cleaner material. Greater hygiene controls where introduced. from the late 1940s on. These controls were the result of high infectious illnesses due to contaminated milk and dairy handling methods.This shortbread / butter stamp was used by a Kiewa Valley dairy and it presents what the domestic butter beautification processes were available during the mid to latter 1900s was. Their was a pride by rural properties in their produce and its by-products.This shortbread / butter stamp is made from wood, round and fashioned from a flat bed to a dome top. The top has a round moulded hole with screw indentations for fastening a pressure pole. The pattern on the face of the stamp is of an eleven petalled flower pattern around a small circular flower head. Both the head and petals have indentations which are will produce raised points in the pressed butter. Enclosing the flower pattern is a pattern which when pressed against the butter would produce small ridges radiating outward.On the dome stamped in black ink "T. & W. Davies"butter stamp, domestic butter blocks, domestic food preparations., shortbread, stamp, dairy, butter -
 Kiewa Valley Historical Society
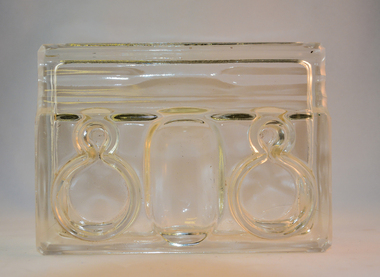
Ink Well Desk Set, circa mid to late 1900's
... surfaces. Ink wells such as those incorporated in this desk set allowed the user to select the colour and "type of ink" required. The nib pen was the only writing pen that could tolerate "Iron gall" ink. Legal documents were at the start of the mid 1980's required by law(in Australia) to be signed by "well" filled pens. The inks used were either "indian" or "iron/oak gall" because their infusion into paper could not be erased and they had a longer "paper" life and were harder...surfaces. Ink wells such as those incorporated in this desk set allowed the user to select the colour and "type of ink" required. The nib pen was the only writing pen that could tolerate "Iron gall" ink. Legal documents were at the start of the mid 1980's required by law(in Australia) to be signed by "well" filled pens. The inks used were either "indian" or "iron/oak gall" because their infusion into paper could not be erased and they had a longer "paper" life and were harder ...The "nib" pen was the preferred scribe method up until the "fountain" pen was produced (1940's), both could use specific inks that had longer life periods on paper surfaces. Ink wells such as those incorporated in this desk set allowed the user to select the colour and "type of ink" required. The nib pen was the only writing pen that could tolerate "Iron gall" ink. Legal documents were at the start of the mid 1980's required by law(in Australia) to be signed by "well" filled pens. The inks used were either "indian" or "iron/oak gall" because their infusion into paper could not be erased and they had a longer "paper" life and were harder to forge. Bottled ink was superior to that supplied in fountain pens or "biro pens" because the user's choice to a greater range of inks covered a variety of scenarios. Forging a nib signature is extremely hard compared to that of a "biro pen" because a nib settles in to the users particular style of pen movement and arm pressure.This desk writing set was typical of those used by administrators, businesses or quasi legal sectors within the Kiewa Valley, before the lifting of the ban on the use of biros "to sign" legal documents. Fountain pens were used extensively before cheaper biros (throw away) writing implements (1940's) came into the market place.This glass ink well desk set has two circular ink wells connected to their respective nib holders. The nib holders are smaller circular receptacles and feed off the larger ink reservoirs. Between the two larger ink wells is a shallow bottomed elongated "oval" sphere able to contain "slide on" clips, two pronged fasteners (require a hole to be punched in papers) or small "bulldog" clips. At the front edge is an elongated and grooved (two) place for writing nibs. The grooves keep each nib or fountain pen separated.The glass structure is made from clear glass and only the outside "boxed" walls of the desk set make contact with the desk surface. The ink wells can also securely accommodate small bottles of ink. This would have been the case for refillable fountain pens.stationery, fountain pens, nib pens, ink receptors, glass ink wells -
 Kiewa Valley Historical Society
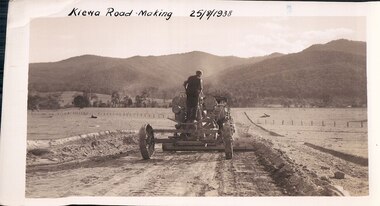
Black and White photograph of Road Making Machinery, Kiewa Road Making, 25/08/1938
... surfaced. The purchase and use of this type of mechanical equipment in road making was a huge investment, as prior to this most of the work would have been done manually with the use of picks and shovels. Not only were many months of hard ...Construction of the main road from South Tawonga to the Bogong High Plains, to provide access to the construction sites for the new Kiewa Hydro Electric Scheme, was commenced early in 1938, the work being undertaken on behalf of the Commission by the Country Roads Board. For the construction work, the Commission purchased three Caterpillar - model R07 - diesel crawler tractors equipped with Kay Brunerei (Brunner) hydraulically operated trailbuilders (angle dozers). This acquisition resulted from a visit to the United States of America in May, 1937 by the Construction Engineer ( Mr. C.H. Kernot) and Assistant Civil Engineer (Mr. J.F. Douglas) where they saw this relatively new type of equipment in use. With the co-operation of the CRB, the Commission demonstrated the operation of these machines at Fishermen's Bend on 6th April, 1938. They were then sent to Kiewa where they commenced operation towards the end of the month. From South Tawonga, the route led immediately across the Western Branch of the Kiewa River necessitating the construction of a bridge 100 feet long. By the end of 1939, the excavation had been 'opened up' for a distance of 19 1/2 miles (approx. 31 km) and of this length, 10 miles (approx. 16 km) had been surfaced.The purchase and use of this type of mechanical equipment in road making was a huge investment, as prior to this most of the work would have been done manually with the use of picks and shovels. Not only were many months of hard manual labour saved, but a very significant amount of time in providing access to the proposed work sites for the new Kiewa Hydro Scheme. This photo is an excellent reminder of how primitive the early machinery was compared to the present but also represents the forward thinking of the State Electricity Commissions engineers in purchasing such innovative equipment . A black and white photograph showing the type of machinery used for road making in the 1930's. It shows a grader being towed by a caterpillar tractor.On the top left hand corner of the photograph , hand written in black ink is the words 'Kiewa Road Making 25/8/1938'. On the right hand side of the photo has been stamped in blue the Number 1. It has been developed on Velox paper (marked on back of photo) with a gloss finish.road making, state electricity commission, caterpillar tractor, kiewa -
 Kiewa Valley Historical Society
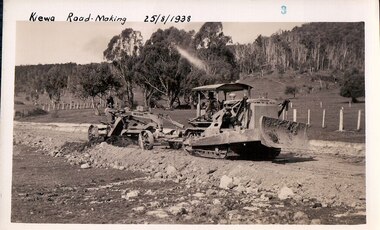
Black and White photograph of Road Making Machinery, Kiewa Road Making 25/08/1938 No. 2, 25/08/1938
... surfaced. (see KVHS 0328) The purchase of this type of mechanical equipment in road making was a huge investment, as prior to this most of the work would have been done manually with the use of picks and shovels. Not only were many months of hard ...Construction of the main road from South Tawonga to the Bogong High Plains, to provide access to the construction sites for the new Kiewa Hydro Electric Scheme, was commenced early in 1938, the work being undertaken on behalf of the commission by the Country Roads Board. For the construction work, the Commission purchased three Caterpillar - model R07 - diesel crawler tractors equipped with Kay Brunerei (Brunner) hydraulically operated trailbuilders (angle dozers). This acquisition resulted from a visit to the United States of America in May, 1937 by the Construction Engineer ( Mr. C.H. Kernot) and Assistant Civil Engineer ( Mr. J.F. Douglas) where they saw this relatively new type of equipment in use. With the co-operation of the CRB, the Commission demonstrated the operation of these machines at Fishermen's Bend on 6th April, 1938. They were then sent to Kiewa where they commenced operation towards the end of the month. From South Tawonga, the route let immediately across the Western Branch of the Kiewa River necessitating the construction of a bridge 100 feet long. By the end of 1939, the excavation had been 'opened up' for a distance of 19 1/2 miles (approx. 31 km.) and of this length, 10 miles (approx. 16 km.) had been surfaced. (see KVHS 0328)The purchase of this type of mechanical equipment in road making was a huge investment, as prior to this most of the work would have been done manually with the use of picks and shovels. Not only were many months of hard manual labour saved, but a very significant amount of time in providing access to the proposed work sites for the new Kiewa Hydro Scheme. This photo is an excellent reminder of how primitive the early machinery was compared to the present but also represents the forward thinking of the State Electricity Commissions engineers in purchasing such innovative equipment.A black and white photograph of road making near Mt. Beauty in 1938. Mount Beauty hills can be seen in the background with cleared land for grazing in the fore ground.Hand printed in black ink at the top of the photograph is 'Kiewa Road Making 25/8/1938'. On the right hand corner has been printed the number 2. It has been printed on gloss Velox paper.road making, state electricity commission, caterpillar tractor, kiewa, secv -
 Kiewa Valley Historical Society
Black and White photograph of Road Making Machinery, Kiewa Road Making 25/8/1938(No. 3 in a series of 8), 25/08/1938
... surfaced. The purchase and use of this type of mechanical equipment in road making was a huge investment, as prior to this most of the work would have been done manually with the use of picks and shovels. Not only were many months of hard ...Construction of the main road from South Tawonga to the Bogong High Plains, to provide access to the construction sites for the new Kiewa Hydro Electric Scheme, was commenced early in 1938, the work being undertaken on behalf of the Commission by the Country Roads Board. For the construction work, the Commission purchased three Caterpillar - model R07 - diesel crawler tractors equipped with Kay Brunerei (Brunner) hydraulically operated trail builders (angle dozers)). This acquisition resulted from a visit to the United States of America in May, 1937 by the Construction Engineer ( Mr. C.H. Kernot) and Assistant Civil Engineer (Mr. J.F. Douglas) where they saw this relatively new type of equipment in use. With the co-operation of the CRB, the Commission demonstrated the operation of these machines at Fishermen's Bend on 6th April, 1938. They were then sent to Kiewa where they commenced operation towards the end of the month. From South Tawonga, the route led immediately across the Western Branch of the Kiewa River necessitating the construction of a bridge 100 feet long. By the end of 1939,the excavation had been 'opened up' for a distance of 19 1/2 miles (approx. 31 km.) and of this length, 10 miles (approx. 16 km) had been surfaced.The purchase and use of this type of mechanical equipment in road making was a huge investment, as prior to this most of the work would have been done manually with the use of picks and shovels. Not only were many months of hard manual labour saved, but a very significant amount of time in providing access to the proposed work sites for the new Kiewa Hydro Scheme. This photo is an excellent reminder of how primitive the early machinery was compared to the present but also represents the forward thinking of the State Electricity Commission's Engineers in purchasing such new and innovative equipment.A black and white photograph of a Caterpillar diesel crawler tractor and a hydraulically operated trailbuilder (angle dozer) making a road in the Mt. Beauty area.Hand written in black ink in the top left hand corner are the words "Kiewa Road Making 25/8/1938". On the upper right hand of the photograph has been stamped the number 3. On the back is stamped the word 'Velox' severaly times, which is the make of the photograhic paper. roadmaking, caterpillar tractor, kiewa, state electricity commission -
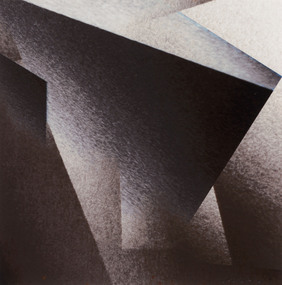 Footscray Community Arts
Lightspace 03, Ian de Gruchy, (exact); 2003
... Hard dark lines which meet with white surfaces, blend into grey....Hard dark lines which meet with white surfaces, blend into grey. ...MEDIUM: Inkjet print on cotton rag. DESCRIPTION: Abstract image, black and pale brown/ivory, black outer frame with glass, white board inner frame under glass. The objects appear to be broken up pieces of something greater. Pieces of a greater machine, here re-assembled in hard angular lines and triangular blocks, in abstracted form. The image is a close up, the ink on cotton comes up in rough grainy scratches of shadow. Shades of grey with highlights of blue. Dark angles with patches and corners of pure black. Hard dark lines which meet with white surfaces, blend into grey.Signed, titled and dated on backing board.de, grouchy, lightspace, inkjet -
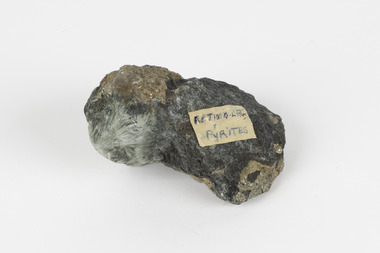 The Beechworth Burke Museum
Geological specimen - Actionlite and Pyrite
... It is named after the Greek "pyr" meaning "fire" because it can be used to create sparks needed for a fire if struck against metal or a hard surface. Due to its gold colour, pyrite can be mistaken for gold and often forms alongside it, causing small amounts of gold to be present in rocks containing pyrite. ...Actinolite is usually found in metamorphic rocks, such as contact aureoles surrounding cooled intrusive igneous rocks. It also occurs as a product of the metamorphism of magnesium-rich limestones. Pyrite is usually found with other sulfides or oxides in quartz veins, sedimentary rock, and metamorphic rock, as well coal beds, and as a replacement mineral in fossils. Actinolite is an amphibole silicate mineral. It is named after the Greek word "aktinos" meaning “ray” in allusion to the mineral's fibrous nature. Fibrous actinolite is a type of asbestos and was once mined along Jones Creek at Gundagai, New South Wales. Pyrite or "Fool's Gold" is the most common sulfide mineral. It is named after the Greek "pyr" meaning "fire" because it can be used to create sparks needed for a fire if struck against metal or a hard surface. Due to its gold colour, pyrite can be mistaken for gold and often forms alongside it, causing small amounts of gold to be present in rocks containing pyrite. Most importantly, pyrite is an ore of gold. Pyrite is sometimes used as a gemstone but is not great for jewellery as it easily tarnishes. In some fossils of ammonites – shelled cephalopods that died ~66 million years ago – pyrite also replaces the shell. This specimen is part of a larger collection of geological and mineral specimens collected from around Australia (and some parts of the world) and donated to the Burke Museum between 1868-1880. A large percentage of these specimens were collected in Victoria as part of the Geological Survey of Victoria that begun in 1852 (in response to the Gold Rush) to study and map the geology of Victoria. Collecting geological specimens was an important part of mapping and understanding the scientific makeup of the earth. Many of these specimens were sent to research and collecting organisations across Australia, including the Burke Museum, to educate and encourage further study. A small-medium-sized solid specimen with the minerals actinolite (dark green fibrous) and pyrite (brassy) with shades of brown, black/grey, and white. Actinolite is an amphibole mineral in the tremolite-actinolite series of calcium, magnesium, and iron silicates. Pyrite is an iron disulfide mineral.geological specimen, geology, geology collection, burke museum, beechworth, indigo shire, geological, mineralogy, pyrite, actinolite, victoria, sewyln, alfred selwyn -
 The Beechworth Burke Museum
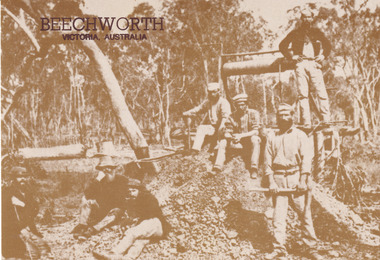
Postcard, George Symons, c.1990
... harder to access. This is a later period in gold history which does not fit into the "gold rush" period. Instead, it occurred after the surface gold had disappeared and therefore, is essential for researchers who are investigating the mining techniques and structures used to reach the alluvial gold which was located deeper under ground in the 1870s. ...The photograph printed on this postcard comes from the collection of the Mitchell Library in Sydney. It is sepia in tone and depicts seven men standing and sitting around a mine shaft in the Beechworth region. The photograph has been dated to approximately 1872. This period in history post-dates the Victorian gold rushes which occurred 1852-1853 in Ballarat, Bendigo and Beechworth. During this period, in the 1870s, the surface alluvial gold had been discovered and removed from location. Therefore, in order to reach the deeper and less accessible alluvial gold, diggers began to dig shafts into the earth. These shafts sunk below the ground level by 20 to 30 feet and required timber structures around the entrance and winches to bring the paydirt to the top. The top of this wooden structure is visible behind the man standing in the upper right of the image. This type of mining was highly dangerous as mines often caved in which injured the minors and often resulted in death. Thus, following this period, in the early 1900s, miners opted instead for hydrolic slucing which cut away the earth without the devastating consequences of a mine cave in. This particular group of miners appear to have been unable to afford a horse (then worth around 50 pounds) which were generally used at mines like this to help pull buckets attached to ropes up and down the mine. Instead, this group brought the buckets up and down by windlass. The windlass was a wooden structure mounted over the mining shaft and fitted with a hand-cranked winch which enabled the bucket attached to the rope to be brought up and down.Gold was first discovered in Beechworth in Spring and Reid's Creek in the summer of 1852-1853. At its popularity, this region had approximately 8000 people on the gold fields searching for gold on the banks of these creeks. These periods did not require the use of heavy machinery or the digging of deep mining shafts like the one depicted in this image. Therefore, this image has important connotations for the technologies associated with mining during the approximated 1870s when gold was harder to access. This is a later period in gold history which does not fit into the "gold rush" period. Instead, it occurred after the surface gold had disappeared and therefore, is essential for researchers who are investigating the mining techniques and structures used to reach the alluvial gold which was located deeper under ground in the 1870s. This period predates the use of big heavy machinery used to mine in the 1900s which include dredges. Images such as this one can also impart essential information as to the wardrobe and fashion of men during this period. It also imparts knowledge about the landscape of Beechworth which is useful for people researching the environment and impact of gold mining in the north-east region of Victoria. In addition, since this image is a postcard reproduction of an early Australian image which may date to approximately 1990 it can impart knowledge as to the interests of people during this time period when there may have been an increase into Australian history.A sepia tone facsimile of an early Australian photograph (circa 1872) printed as a postcard.Obverse: BEECHWORTH / Victoria, Australia / Reverse: GM 2 3275 / CORRESPONDENCE / AUSTRALIAN / YESTERYEAR / CARDS / ADDRESS / Published by George Symons (057) 65 3240 / THE MINEHEAD C. 1872 / The easily gleaned gold of the early fields did / not last very long. In order to reach less / accessible alluvial gold diggers began sinking shafts as much as twenty to thirty feet down / and the mines required timbering and winches / to bring the paydirt to the top. / This syndicate has been unable to afford the / luxury of a horse (about 50 pounds) and so everything / must go up and down by windlass and rawhide / bucket. / Photo: Mitchell Library, Sydney / A sepia tone facsimile of / an early Australian photographmining album, gold mine, beechworth, burke museum, mine shaft, postcard, australian yesteryear cards, george symons, the minehead, gold fields, alluvial gold, early australia, c.1872, 1872, gold diggers, north east victoria -
 Bendigo Historical Society Inc.
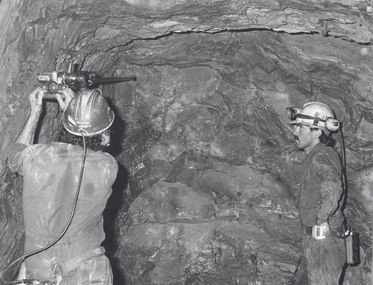
Photograph - AUSTIN COLLECTION: Operating rock drill, Central Deborah Gold Mine, Possibly 1990's
... Two men with hard hats and lights standing in front of underground rock surface at Central Deborah Gold Mine. ...Two men with hard hats and lights standing in front of underground rock surface at Central Deborah Gold Mine. ...Central Deborah Gold Mine history: At its peak, Central Deborah Gold Mine reached a depth of 412 metres. It has 17 separate levels and 15 kilometres of drives and cross cuts (tunnels). The Central Deborah was very much a hands-on mine and the conditions that the miners worked in would be considered shocking by today's standards – being lowered underground in a cage with only two sides, often working ankle to knee deep in water, filling up to 32 ore trucks a shift by hand which were then pushed a mile or more along rails in the drives, working by carbide lamp, breathing in the fumes and rock dust and communication by bells. Geez, they were ironmen. However, at the time working conditions were considered to be among the best on the goldfields at Central Deborah, after all it was one of the only mines that had hot showers. Following Central Deborah Gold Mine's closure, the Bendigo skyline began to noticeably change. Obvious remnants of mining such as poppet heads, engine rooms, service quarters, battery houses and chimneys were steadily disappearing. After intense lobbying by the local community, the Bendigo City Council purchased the still very much intact Central Deborah Gold Mine in 1970 for a mere $6,000 to ensure that a vital link to Bendigo's historic golden past was maintained. The Bendigo Trust was then formed to oversee the operations of the Central Deborah Gold Mine, which led to the surface of the mine being opened to the public in 1971. Initially the surface was open for just 12 hours a week and as the demand for viewing a part of Bendigo's history increased, so did the opening hours. In 1974 the mine was gazetted as a Public Historical Purposes Reserve and attracted such visitors as H.R.H Prince Charles. By far the greatest shortcoming at this stage was that no one could view the underground workings, as these had become flooded. After what could only be described as a monumental effort by everyone involved, Level 2 of the mine was officially opened to the public by the Premier of Victoria, the Honourable John Cain, on 20 June 1986, which brought to fruition a long standing dream.Black and white photograph. Two men with hard hats and lights standing in front of underground rock surface at Central Deborah Gold Mine. Paul Maker on left hand side of image is operating a small rock drill. John Jeffrey on right hand side is observing the procedure. gold mining, central deborah gold mine, rock drill, underground -
 Bendigo Historical Society Inc.
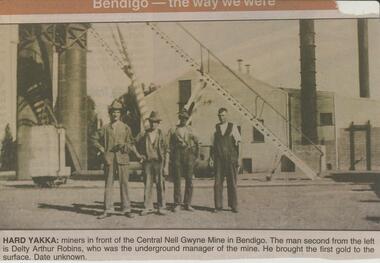
Newspaper - JENNY FOLEY COLLECTION: HARD YAKKA
... Hard yakka: miners in front of the Central Nell Gwyne Mine in Bendigo. The man second from left is Delty Arthur Robins, who was the underground manager of the mine. He brought the first gold to the surface...Hard yakka: miners in front of the Central Nell Gwyne Mine in Bendigo. The man second from left is Delty Arthur Robins, who was the underground manager of the mine. He brought the first gold to the surface ...BHS CollectionBendigo Advertiser ''The way we were'' from 2002. Hard yakka: miners in front of the Central Nell Gwyne Mine in Bendigo. The man second from left is Delty Arthur Robins, who was the underground manager of the mine. He brought the first gold to the surface. Date unknown. The clip is in a folder.newspaper, bendigo advertiser, the way we were -
 Queenscliffe Maritime Museum
Equipment - Hand operated divers air pump
... Standard diving dress (also known as hard-hat or copper hat equipment, or heavy gear) is a type of diving suit that was formerly used for all relatively deep underwater work that required more than breath-hold duration, which included marine salvage, civil engineering, pearl shell diving and other commercial diving work, and similar naval diving applications. Standard diving dress has largely been superseded by lighter and more comfortable equipment. Standard diving dress consists of a diving helmet made from copper and brass or bronze, an air hose from a surface...Queenscliffe Maritime Museum 2 Wharf St Queenscliff geelong-and-the-bellarine-peninsula Standard diving dress (also known as hard-hat or copper hat equipment, or heavy gear) is a type of diving suit that was formerly used for all relatively deep underwater work that required more than breath-hold duration, which included marine salvage, civil engineering, pearl shell diving and other commercial diving work, and similar naval diving applications. Standard diving dress has largely been superseded by lighter and more comfortable equipment. Standard diving dress consists of a diving helmet made from copper and brass or bronze, an air hose from a surface ...Standard diving dress (also known as hard-hat or copper hat equipment, or heavy gear) is a type of diving suit that was formerly used for all relatively deep underwater work that required more than breath-hold duration, which included marine salvage, civil engineering, pearl shell diving and other commercial diving work, and similar naval diving applications. Standard diving dress has largely been superseded by lighter and more comfortable equipment. Standard diving dress consists of a diving helmet made from copper and brass or bronze, an air hose from a surface-supplied manually operated PUMP or low pressure breathing air compressor, a waterproofed canvas suit, a diving knife, and weights to counteract buoyancy, generally on the chest, back and shoes. Later models were equipped with a diver's telephone for voice communications with the surface.Hand operated divers air pump for one or two diversdiving, air pump -
 Bendigo Historical Society Inc.
Functional object - WOODEN KNOB
... It has a name printed into the top surface which is a little hard to read. It is: T. S. N?...It has a name printed into the top surface which is a little hard to read. It is: T. S. N?arpison ? ...Light brown round wooden knob 2.8 H x 4.2. Knob is hollow with a raised circular tapered piece in the middle which has an indentation in it. Centre piece is slightly higher than the edges. Has a small split in one side. It has a name printed into the top surface which is a little hard to read. It is: T. S. N?arpison ? Co. Melbourne.wooden knob, object