Showing 71 items matching hill view station
-
 Eltham District Historical Society Inc
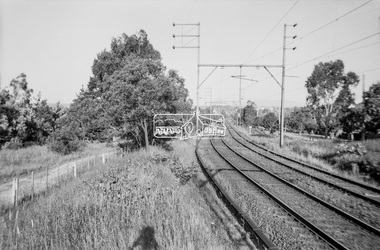
Photograph, George Coop, Railway line from Mont Albert to Box Hill, c.1956
Railway line from Mont Albert to Box Hill, c.1956 - Churchill Street, Mont Albert on right Prior to the Eastern Suburbs Railway Development which added a third set of tracks down the alignment to Box Hill (Dec. 1971). This photo was taken at the same time as the 1956 Mont Albert Railway Station (behind the camera view) See also EDHS_04674-03 both taken from the same location. adjacent to the end of present day Trafalgar StreetDigital TIFF file Scan of Kopdak 620 black and white negative transparencygeorge coop collection, churchill street, mont albert railway station -
 Eltham District Historical Society Inc
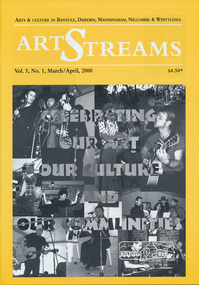
Journal, Peter Doughtery, ArtStreams: Arts & Culture in Banyule, Darebin, Manningham, Nillumbik and Whittlesea; Vol. 5, No. 1, Mar-Apr 2000, 2000
Vol. 5, No. 1, Mar-Apr 2000 CONTENTS ON THE ROAD The Car at Heide 3 ON TOP OF THE WORLD Dandenong Ranges Folk Festival 5 INTERVIEW Felicity Gordon 7 SOUNDS OF HARMONY Gyuto Monks in Eltham 10 BANYULE FESTIVAL 13 WERE ST HILL CLIMB 15 BOROONDARA WRITERS' FESTIVAL 16 WARRANDYTE VILLAGE FESTIVAL 18 DIAMOND CREEK TOWN FAIR 19 TEMPLESTOWE VILLAGE FESTIVAL 20 RECIPES From leading Chefs 21 CAIRO TO CRACOW Middle Eastern Music at Montsalvat 22 POETRY 23 FESTIVAL OF KITES 24 BOOK REVIEW By Michele Lonsdale 25 CD REVIEWS 27 ARTIN ABOUT 28 WINING & DINING 30 ARTISTS SERVICES 32 "Peter Dougherty has been involved in the local art scene for many years. As publisher and editor of the arts magazine Artstreams, his comments on the various branches of the arts are widely respected. His "The Arts" column in the Diamond Valley Leader presents a brief summary for a much wider cross section of the local community. Peter also operates his own gallery and the Artstreams Cafe at the St Andrews market. Peter has a wealth of knowledge about present day and historical aspects of local art and artists." - Eltham District Historical Society Newsletter No. 161, March 2005Colour front and back cover with feature articles and literary pieces with photographs and advertisements printed in black and white. 36 pages, 30 cm. Vol. 1, no. 1 (Nov. 1996) - Vol. 10, no. 5 (summer ed. 2005/06) art streams, carly young, plenty views golf park, dynamic vegies, dandenong ranges folk festival, felicity gordon, sounds of global harmony, banyule festival, rosanna fire station community house, bulleen art & garden centre, were street cafe, were street hill climb, bahnhof cafe, walkers wheels, peter glass, eltham wiregrass gallery, boroondara writers festival, warrandyte festival, diamond creek town fair, templestowe village festival, willy wonkas ice cream, gourmet food, ciaro to cracow, fleur de feliss florist, mia mia gallery, festival of kites, bi-wize quality paints, kinglake gallery, andy cowan, wild dog hill studio, montsalvalt, ian collard, geoff achison, bridget allen, thompsons pharmacy, volumes -
 Eltham District Historical Society Inc
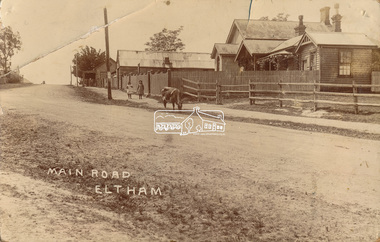
Photograph, J.H. Clark (poss), Main Road, Eltham, c.1910
Original photo from a scrapbook belonging to Heather Jenkins (nee Cone) who lived as a child in the Police Residence at 728 Main Road, Eltham from 1911 to the early 1920s. (Reported in Newsletter No. 98, Sept., 1994). View looking north up Policeman’s Hill across Main Road towards the Police Station, Police Residence and Courthouse, c.1910 prior to Brougham Street being made. The two rails / gap in the fence would be where Brougham Street now enters Main Road. Also visible are Knapman's Forge adjacent to Courthouse and E.J. Andrew's Store on top of the hill At the upper left can be seen the front of the Evelyn Hotel. On the opposite corner was Watsons Hotel. E.J. Andrew's store with its verandah was on the corner of Franklin Street. Behind the picket fence stands the 1860 Court House and Police residence with the weatherboard clad Police office. The enclosed fence is now the end of Brougham Street, opened to Bible Street in 1926. The Evelyn Hotel (formerly Fountain of Friendship) burnt down in the 1930s when it was being used as a boarding house since 1919. A cow is feeding on the grass verge in street. The photo is identified in white lettering typical of the style of Clark Bros., photographers of Windsor, Melbourne (1894-1914). One of the brothers, John Henry Clark, took many early photos around Little Eltham and moved to Eltham in 1916 where he lived at the bottom of the hill. Typically, he would add “J.H. Clark Photo” to his personal work, but this is not evident. There is however some ghost writing, a cheeky inscription in small white lettering in the grass verge in front of where Brougham Street is, which appears to state: “Heather or Hannah was here”. Perhaps J.H. Clark took the photo during a trip to Eltham and gifted it some years later after moving there as a gift to a young Heather Cone. The Police Station sign: E vii R ELTHAM POLICE STATION HEIDELBERG DISTRICT Edward VII ascended the throne in 1901 and died 6 May 1910. He was succeeded by George V.Heather Cone was the daughter of Constable John Thomas Cone (Badge 3935) the local police officer in residence at Eltham, 1 May 1911 to 9 July 1922. Heather McKnight Jenkins (nee Cone) was born 1911, possibly at the Eltham Police Residence and spent her childhood growing up in the Police Residence. Heather was the daughter of John Thomas Cone, Police Constable, and Charlotte Helena Cone (nee Black) who had married in 1906. Constable Cone was transferred to Eltham Police Station from Lauriston (near Kyneton) in May 1911. He retired from the force around September 1922 most likely as a result of significant health concerns experienced earlier that year from 22 April when he was hospitalised. He died 5 October 1922 at Maria Street at age 60 leaving behind a widow and two daughters; his son having pre-deceased him as a result of effects of the war. He is buried in Melbourne General Cemetery . In his probate it states that he owned a piece of land 200 links frontage to Maria Street and a depth of 241 links. It is believed that this is the land opposite the Police Station which Heather Jenkins referred to as being owned by her father and where he agisted the Police horses. Heather, her sister and mother Charlotte remained in Eltham until at least the 1924 Electoral Roll where Charlotte was listed as Home Duties however by 1925 she was listed at 229 Glenferrie Road, Malvern, occupation, Registrar of Births. In the 1934 (and 1936) Electoral Roll, Heather was a Clerk and her mother Charlotte was the Registrar of Births. in 1952 following her mother’s death she made application for Grant of Probate. Heather remains listed in the 1954 Electoral Roll at 13 Ashburton Road under her maiden name Cone however by the 1963 Electoral Roll she is listed at the same address as Heather McKnight Jenkins long with James Gardiner Jenkins. Neither appear listed in the 1958 Electoral Roll. James Gardiner Jenkins (1892-1975) first wife was Fanny Davison Carrucan (1899-1929), daughter of Denis Carrucan and Jane (nee McAleese). They married in 1925. Fanny died 11 November 1929. In the 1934 Electoral Roll he remained listed at John Street, Eltham, Railway Employee however by 1935 Electoral Roll, James Gardiner Jenkins, Railway Employee, was listed at 229 Glenferrie Road, Malvern and he remained living with Charlotte and Heather Cone when they moved to 13 Ashburton Road, Glen Iris. One of Constable Cone’s first investigations upon arriving in Eltham was the accidental fatal shooting in the head with a pea rifle by young Francis August Capewell, aged 11, of John Sutcliffe Deegan, 14, in Maria Street near the Railway. Constable Cone’s replacement was Constable William Charles Sargeant who commenced in charge of the Eltham Police Station from Thursday, 10 August 1922. Constable William Charles Sargeant, and his wife Elizabeth Agnes Sargeant were based at the Eltham Police Station until his transfer to the Police Station in Burwood Road, Hawthorn. He retired at Hawthorn Police Station in 1931, described by Hawthorn Council in 1927 as in a disgraceful condition and unfit for human habitation (Kathryn Griffin family tree – Ancestry) whereupon they moved to 28 Saunders Street, Coburg. Elizabeth died 16 July 1936 in Fitzroy. William then moved to 6 Queen Street Coburg in 1936 and then 1 Queen Street in 1942 where he died 7 August 1944. He is buried at Fawkner Cemetery.Sepia postcard photo glued on a brown paper scrapbook page (torn from scrapbook) along with 8 other black and white/sepia photos of varying sizes, 1 newspaper clipping and handwritten captions in ink.brougham street, constable w.c. sargeant, courthouse, cow, eltham, knapmans forge, little eltham, local history centre, main road, maria street, police residence, police station, policeman's hill, scrapbook, w.b. andrew corn store, j.h. clark photo, andrews store, heather jenkins (nee cone), clark bros. photo -
 Eltham District Historical Society Inc
Photograph, George Coop, A Harris (Blue) electric train at the Station Street crossing, Box Hill, c.Feb. 1964
Viewed from Box Hill Signal Box Waiting at the level crossing is a Ford Zephyr MKII, registation GWH838 manufactured by Ford Australia in Geelong, (1956-1962) Cross Ref EDHS_04674-10 taken within minutes of this image. Digital TIFF file Scan of 35mm Kodachrome positive transparencygeorge coop collection, 515m, box hill, electric train, ford zephyr, gwh838, harris (blue) train, railway crossing, station street, level crossing -
 Eltham District Historical Society Inc
Negative - Photograph, Harry Gilham, Grave of Christopher Watson, Eltham Cemetery, Victoria, 1 Aug 2007
George Bird was born in England in 1845 and arrived in Australia in 1856 as a child of assisted migrants. Soon afterwards he came out to Eltham to live with his uncle George Stebbings, working for him as bricklayer's assistant in building, amongst others, Shillinglaw Cottage and the Anglican and Methodist Churches in Eltham. He later purchased 72 acres at the eastern end of Pitt Street (bounded by Eucalyptus Road, Mount Pleasant Road and present-day Rockliffe Street) and established the property ‘View Hill’, which was worked as a mixed farm and orchard (including berries). In 1878 he married Janet Kilpatrick, who had emigrated from Scotland. They had ten children, three of whom died in infancy. The wedding in 1904 of their eldest surviving daughter Sarah (‘Sis’) to Edward Pepper appears to have been quite a society event. George was a staunch Methodist and was a Church Steward and a Sunday School Superintendent in about 1890. Janet died in 1915 and George died in 1920 (though his gravestone says 1921). George's will stated that his property was to be divided between all his children in equal shares. This necessitated subdivision of the View Hill property, which took place progressively between 1922 and 1926. One son, George Hugh Bird, operated a drapery store in Main Road (near Bridge Street) in around 1915. Later, in the 1920s, he ran a greengrocer's shop (also selling confectionery) in Main Road opposite Eltham Station. It was the first shop in Eltham to have plate glass windows. At the same time, his brother Reg had a grocery store on the station side of Main Road. George and Janet are buried together in a family plot in Eltham Cemetery. Several descendants are also buried in the cemetery. In Loving Memory Of George Bird Died 5 December 1921 aged 76 years And his beloved wife Janet Bird Died 5 Sept 1915 aged 57 years Also their children William James Bird Died 25 Feb 1888 aged 8 years Mary Jane Bird Died 8 Oct 1891 aged 7 years Pte Edwin John Bird Killed in action in the Great War 11 Aug 1918 aged 30 years Buried in France And on the base stone George Hugh Bird Died 26 Feb. 1965. Aged 79 years Arthur Andrew Bird Died 25 Mar. 1970 Aged 75 years To the left In Loving Memory of Dr. J. R. (Roger) Bird 1927 2001 Son of Arthur & Helen (nee Lyon) Bird Husband of Betty Father of Janet & Alison Grandpa of Evan & Helen Scientist & Gentleman To the right In Loving Memory of Harold Edwin Bird OAM 1922 - 2015 Son of Arthur & Helen (nee Lyon) Bird Husband of Yvonne Father of Estell & Russell In our hearts Forever moreeltham cemetery, gravestones, memorials, arthur andrew bird, arthur bird, edwin john bird, george bird, george hugh bird, harold edwin bird, helen bird (nee lyon), j. r. (roger) bird, j.r. (roger) bird, janet bird, janet bird (nee kilpatrick), william james bird, yvonne bird -
 Eltham District Historical Society Inc
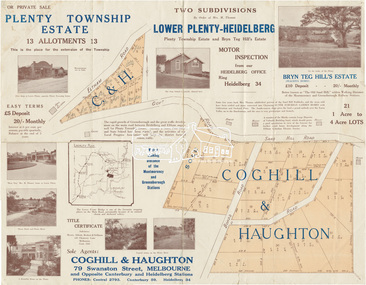
Map (item) - Sales Brochure, Plenty Township Estate and Bryn Teg Hill's Estate, Coghill & Haughton, Melbourne, c.1924
Plenty Township Estate "The rapid growth of Greensborough and the great traffic development on the main road between Heidelberg and Eltham augurs well for Plenty Township Estate. Already a Store, Post Office and State School have been started, and the activities of the Local Progress Association will help the district forward considerably. Within walking distance of the Montmorency and Greensborough stations." Bryn Teg Hill's Estate "Better known as "The Old Sand Hill, "within walking distance of the Montmorency and Greensborough railways stations." "Some few years back Mrs Thomas subdivided portion of the Sand Hill Paddocks, and the areas sold have been settled and many converted into charming outer suburban garden homes with cultivation and orchard plots. The south-eastern slope gives the land a grand outlook over the Yarra Valley on to the Dandenoings, and the are is very picturesque and homely." "A number of the blocks contain large deposits of valuable building sand, which should prove good speculation in view of the forecast for further rapid home development along the Eltham Suburban Electric Service." Sand Hills Road (Old Eltham Road) Date estimated as c.1924 - Electricification of railway line to Eltham referenced on map occured April 1923 and Mrs Mary Thomas died August 1925. Her home Bryn Teg became part of the Heidelberg Golf Club in 1927.The establishment of Lower Plenty as a suburban growth area supported by easy commuting facilitated by the elctrification of the Eltham railway linebonds road, bridge, bryn teg hill's estate, coghill & haughton, eltham road, heidelberg golf club hotel, houses, lower plenty, lower plenty bridge, lower plenty road, main road, plenty hotel, plenty river, plenty township estate, real estate agent, sales brochure, sand hills road, the old sand hill, sand hill paddocks, woodfull road, old eltham road, bryn teg, mrs m thomas -
 Eltham District Historical Society Inc
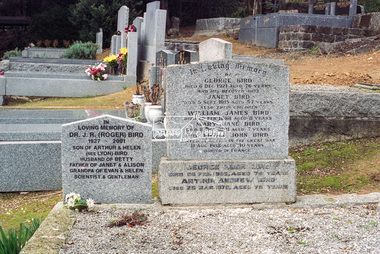
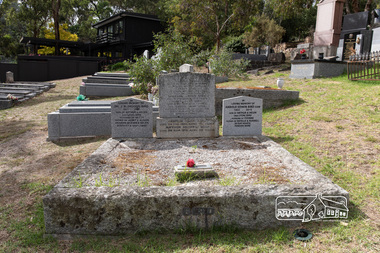
Photograph, Peter Pidgeon, Graves of George and Janet Bird and family, Eltham Cemetery, Victoria, 5 April 2021
George Bird was born in England in 1845 and arrived in Australia in 1856 as a child of assisted migrants. Soon afterwards he came out to Eltham to live with his uncle George Stebbings, working for him as bricklayer's assistant in building, amongst others, Shillinglaw Cottage and the Anglican and Methodist Churches in Eltham. He later purchased 72 acres at the eastern end of Pitt Street (bounded by Eucalyptus Road, Mount Pleasant Road and present-day Rockliffe Street) and established the property ‘View Hill’, which was worked as a mixed farm and orchard (including berries). In 1878 he married Janet Kilpatrick, who had emigrated from Scotland. They had ten children, three of whom died in infancy. The wedding in 1904 of their eldest surviving daughter Sarah (‘Sis’) to Edward Pepper appears to have been quite a society event. George was a staunch Methodist and was a Church Steward and a Sunday School Superintendent in about 1890. Janet died in 1915 and George died in 1920 (though his gravestone says 1921). George's will stated that his property was to be divided between all his children in equal shares. This necessitated subdivision of the View Hill property, which took place progressively between 1922 and 1926. One son, George Hugh Bird, operated a drapery store in Main Road (near Bridge Street) in around 1915. Later, in the 1920s, he ran a greengrocer's shop (also selling confectionery) in Main Road opposite Eltham Station. It was the first shop in Eltham to have plate glass windows. At the same time, his brother Reg had a grocery store on the station side of Main Road. George and Janet are buried together in a family plot in Eltham Cemetery. Several descendants are also buried in the cemetery. In Loving Memory Of George Bird Died 5 December 1921 aged 76 years And his beloved wife Janet Bird Died 5 Sept 1915 aged 57 years Also their children William James Bird Died 25 Feb 1888 aged 8 years Mary Jane Bird Died 8 Oct 1891 aged 7 years Pte Edwin John Bird Killed in action in the Great War 11 Aug 1918 aged 30 years Buried in France And on the base stone George Hugh Bird Died 26 Feb. 1965. Aged 79 years Arthur Andrew Bird Died 25 Mar. 1970 Aged 75 years To the left In Loving Memory of Dr. J. R. (Roger) Bird 1927 2001 Son of Arthur & Helen (nee Lyon) Bird Husband of Betty Father of Janet & Alison Grandpa of Evan & Helen Scientist & Gentleman To the right In Loving Memory of Harold Edwin Bird OAM 1922 - 2015 Son of Arthur & Helen (nee Lyon) Bird Husband of Yvonne Father of Estell & Russell In our hearts Forever moreBorn Digitaleltham cemetery, gravestones, arthur andrew bird, arthur bird, edwin john bird, george bird, george hugh bird, harold edwin bird, helen bird (nee lyon), j. r. (roger) bird, janet bird (nee kilpatrick), william james bird, yvonne bird -
 Eltham District Historical Society Inc
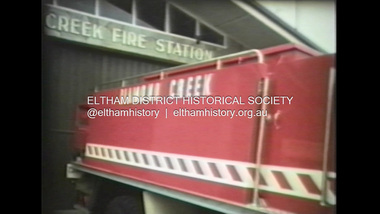
Film - Video (VHS), Diamond Creek Fire Brigade, c.1955-1987
Combination of three movie films. Movie One (1950s): 00:00 – 13:14 Black and white footage of Diamond Creek firemen practising in Diamond Street in the 1950s for forthcoming demonstrations of abilities. Mentions of Gordon Brandy and Joe Hislop Running out hoses from old hose reels along Diamond Street, Diamond Creek Displays from various brigades running out and connecting hoses. Also scenes from the 1950s of Diamond Creek Fire Brigade competing in various locations around Victoria and Tasmania. Mentions of Brigade members Dave Kidd, Bruce Hackett, Ron Kirkbride, Jack Marks, Graham Upton who are prominent in these events. Members of Kyneton Fire Brigade also present. Members competing in running out hose reels, connecting hoses togethers and to hydrants then climbing towers to direct water from hose or at a target hanging above the road. Diamond Creek members identified wearing a diamond on their chest and back. Includes scenes of Scottish pipe bands at the events and significant crowds of spectators. Footage of Mel Stone and Beryl Marks, Stan Redpath and Ron Kirkbride, then Ron Kirkbride and Eric Holt viewing flower displays. Film changes to colour at Diamond Creek oval for practice with fire engine entering oval. Members depicted include Bill May, Jack Sinclair, Jim Cox, Bob Beale, Dave Kidd, Bruce Hackett and Captain Clarrie Stone. Reverts to black and white in the 1950s where the Brigade joins forces with the Diamond Valley Community Hospital for a Gala Day on the Diamond Creek Oval. Changes to colour again, possibly same event and scenes of children on bikes and scooters or with prams and carts racing around the oval. Mention of young lad Brian Laurie who has his own fire truck. Dart throwing, pony rides. Scenes with Dr Don Cordner, Gus Lyons, Vic Cohn (?) and spinning wheel and Diamond Creek School children entertain a large crowd with Maypole dancing. Movie Two (1950s): 13:25 – 19:00 This black and white film was taken by a TV film crew in the 1950s depicts a typical call out for the Diamond Creek Fire Brigade. In this case the careless action of a member of the public throwing a lighted match from a car, which can cause extensive damage. Footage features the Shire of Eltham War Memorial tower at Kangaroo Ground before it was modified with a fire spotter’s cabin. Discusses fire spotting operations from the tower. Shows a fire spotter walking around the top of the tower. A fire is detected, and the information is relayed to the nearest fire station, in this case, Diamond Creek. The telephone call is received, and the alarm sounded. Captain Clarrie Stone and firemen May and Shaw leave their workplaces and prepare for action. Scenes of running across the Main Hurstbridge road showing the shops (Shell service station and Chemist prominent). Scenes entering the fire station which has a pictorial warning covering the entire door “Only you can prevent forest fires – If you’re careless – we’re homeless!” Eric Holt pinpoints the location of the fire while Captain Clarrie Stone and Fireman Shaw take note. The advance vehicle (an FE Holden ute, rego GTE-696) leaves to assess the extent of the fire. Having assessed the fire, Fireman Shaw communicates with base showing radio with call sign VL3JZ. Eric Holt takes the call. In the meantime, Captain Clarrie Stone and Fireman Shaw undertake some limited action to address the fire. Firemen Bill May, Jim Bates and Hugh Bar (?) man the tanker. A photo portrait of Queen Elizabeth is visible hanging on the wall. They are later joined by Firemen Jim Cox, Eric DeBuse (?) and Jack Marks. The tanker is seen departing the station and diverging off before the bridge. Captain Clarrie Stone and Fireman Shaw are seen pumping water on the flames with hand pumps when the tanker arrives. The hose is unreeled, and water turned on the flames. Jack Sinclair joins the action. Jim Cox directs water to the high stuff. The fire put out, Jack Marks and Eric DeBuse wind in the hoses and the team head back to town. It’s peaceful again at the memorial tower. Movie Three (1969-1987): 19:14 – 34:34 Colour film “Fired with Dedication”, Country Fire Authority Victoria, produced by I.L. Wadeson, Commentary by A.M. Hem. Credits with CFA Victoria emblem and then placed over a view of an old-style ladder engine. Opens with the scene of a fire engine outside the Diamond Creek Fire Station then various trophies reflecting the competition success of the brigade in various track and disciplined events. Two trophies shown of particular pride to the brigade were for first place in the Torchlight Procession at the State Championships in Mildura in 1986 and also at Swan Hill in 1981. Still photo scenes of ex Captain Clarrie Stone, Brigade Captain for 21 years; ex Captain Jack Marks, 10 years; ex Captain Ian Douglas, 10 years. Cuts to scene of radio control room, January 1969, and news of a fire on the northern side of the township of Diamond Creek. With scenes of flames in bush, the narration explains that until the early 1960s the area was an orchard district which protected the town against the savagery of bushfires. But due to competition from other areas more suitable for orcharding and easier transport to Melbourne the district could no longer remain competitive, and orchards were replaced by grassed areas, which together with the bush areas were a feeding ground for fire. On 8th January 1969, high temperatures and strong north winds, were, with the carelessness of some individual all that was necessary to produce the worst fire the district had seen. Cuts to scene of blackened fields and cattle - Hundreds of hectares of grass land were blackened, and cattle had to be transported to other areas for agistment. Scene of destroyed buildings in the township – 13 houses and the public hall in the town were destroyed as was the theatre equipment which was owned by the fire brigade. The Church of England Hall and bell tower were badly damaged. The whole town could have been burnt out but for the determination, skill, and courage of the Diamond Creek Fire Brigade. Scenes of all that was left of the home on the hill on the west side of the Church of England. Also, the remains of the old Pisy (?) home on the top of the same hill near Lambert Street, and the ruined Crocker home. Cuts to a scene in the mid-1970s to mid-1980s of a house fire in Haley Street attended by the Diamond Creek Fire Brigade. Although the house was severely damaged, it was saved. Mentions that whilst assistance is appreciated, in some circumstances, those doing so are not properly dressed for fighting fires. Breathing apparatus is a must in structure fire attack. Next scene (either on Mangarook or Coventry oval) showing off four Diamond Creek Fire Brigade efficient and very expensive firefighting units. Features a forward control vehicle Toyota 4WD used for conveying task force personnel to the required areas; a Hino Model 3.2 tanker, diesel powered and carries 3,000 litres of water and has a 16 HP petrol driven pump which delivers 900 litres of water per minute; an International tanker (registration TCM-418) which carries 3,000 litres of water with pumping capacity of 600 litres per minute. The Ford diesel powered pumper (registration MXE-754) is a well-equipped vehicle with a water capacity of 1,000 litres and capable of pumping 1,900 litres of water per minute from the main pump, has many lockers which hose equipment such as breathing apparatus and various types of hose nozzles and foam making equipment. The vehicle carries 360m of 64mm diameter hose which can be laid out from the rear lockers and a portable lighting plant, an Oxy Viva resuscitator to revive smoke inhalation victims and forcible entry tools to gain access to structure fires. Views of the main pump and control panel on the vehicle. As well as the main pump, the vehicle is equipped with an auxiliary pump which allows the facility to pump whilst moving. Fire fighters must undergo constant training and hone their skills, Scenes of a training exercise using the pumper to pump from static water. First, the short lengths of suction hose are coupled, a strainer fitted to ensure debris does not foul the pump. Gauges must be constantly monitored to ensure manageable water pressures are maintained. Pressures are normally controlled to allow two fire fighters to work at each nozzle outlet. Two nozzles are tested, one adjustable jet fog type which is used on flammable gasses or within a structure fire to absorb heat. A straight jet nozzle to project water long distances to protect exposed surfaces close to a fire radiated heat. The pumper is quite a versatile vehicle in handling structure fires, but it also carries specialist equipment needed in containing hazardous chemical incidents. Cuts to scene of parade – the Diamond Creek Fire Brigade has with other neighbouring brigades participated in most town fairs and earns the respect of the watching public. It can be seen why this brigade has been so successful at disciplined contests. Views of Plenty Fire Brigade Road Rescue unit which is equipped with the “Jaws of Life” Scenes of athletic competitions – many neighbouring brigades indulge in friendly but keen competition at the Diamond Creek Town Fair. The young are also encouraged to participate in all aspects of Junior Fire Brigade activities and become tomorrow’s generation of volunteer fire fighters. Scene of the 1986 Diamond Creek Town Fair which was the last time veteran Captain Clarrie Stone BEM marched with the brigade. Clarrie was awarded the British Empire Medal for his service to the Country Fire Authority. Also, scenes of vehicles in the parade. Cuts to scene of brigade members in drill formation for inspection by Acting Chief Harry Rothsay (?) on the occasion of the opening of the new fire station extensions on August 29, 1987. Rudy Libel (?) Captain at the time. Scenes of crowds including many dignitaries of neighbouring brigades present including Lieutenant Gordon Grandy (who came down from Queensland for the occasion) and ex-Secretary David Kidd and wife Betty, also ex Captain Clarrie Stone and Mrs Nel Stone, a life member of the Ladies Auxiliary, the Reverend Jock Ryan, son of J.L Ryan, founder of the Diamond Creek Fire Brigade, Foundation Captain of the fire brigade, Keith Bradbury and Mrs Bradbury. Pauline Dick accepts a community service award for services to the CFA. Recognising over 47 and a half years of service, a presentation is made by Mr Neil Marshall, Acting Chairman of the CFA to ex Captain Clarrie Stone with response by Clarrie. Other members of the official party include Cr. Martin Wright, Shire President Wayne Phillips and local Member of Parliament, Mrs Pauline Toner. Ex foreman John Bennett is presented with a life member’s awards by Captain Rudy Libel. The camera also catches Gwen Cox, Jean Ryan and Bessie Layton (?) Provides historic footage of people, places and equipment and a record of the worst fires expoerienced in Diamond Creek in 1969BASF Standard Quality SQ E-180 VHS dubbing (poor quality) of three films Converted to MP4 file format 0:34:38, 1.85GBOn label: "Donation - August 2000 Diamond Creek Unit Old films made up from Fire Brigade shows at competitions - also Kangaroo Ground Tower being used"video recording, diamond creek fire brigade, 1986 diamond creek town fair, a.m. hem, acting chief harry rothsay, athletic competitions, beryl marks, bessie layton, betty kidd, bill may, bob beale, brian laurie, bruce hackett, captain clarrie stone, chemist, church of england hall, clarrie stone, clarrie stone bem, country fire authority victoria, coventry oval, cr. martin wright, crocker home, dart throwing, dave kidd, david kidd, diamond creek, diamond creek fire station, diamond creek oval, diamond creek school, diamond creek town fair, diamond street, diamond valley community hospital, dr don cordner, eric debuse, eric holt, fe holden ute, fire damage – buildings, fire spotter, fire spotter’s cabin, fire station extension, fired with dedication (film), firefighting units, fireman shaw, firemen jim cox, ford pumper, foundation captain, gala day, gordon brandy, gordon grandy, graham upton, gus lyons, gwen cox, haley street, hino model 3.2 tanker, house fire, i.l. wadeson, ian douglas, international tanker, j.l ryan, jack marks, jack sinclair, january 1969, jaws of life, jean ryan, jim bates and hugh bar, jim cox, joe hislop, john bennett, kangaroo ground, kangaroo ground tower, keith bradbury, kyneton fire brigade, lambert street, main hurstbridge road, mangarook oval, maypole dancing, mel stone, mildura 1986, mrs bradbury, mxe754 vic registration, neil marshall, nel stone, orchard district, oxy viva resuscitator, pauline dick, pauline toner mp, pisy home, plenty fire brigade road rescue unit, pony rides, radio control room, reverend jock ryan, ron kirkbride, rudy libel, shell service station, shire of eltham war memorial, shire president wayne phillips, spinning wheel, stan redpath, state championships, swan hill 1981, tcm418 vic registration, torchlight procession, toyota 4wd, trophies, vic cohn, victorian bushfires - 1969, vl3jz -
 Eltham District Historical Society Inc
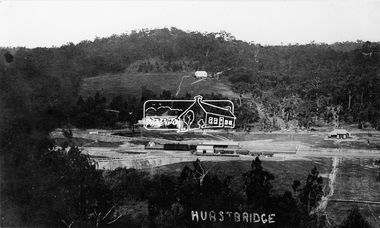
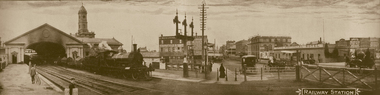
Photograph, Hurstbridge - Showing Railway Station
View overlooking the township and surrounding hills of Hurstbridge. The new railway line and station and accompanying works are central. The extension from Eltham to Hurstbridge opened on 2 January 1912.This photo forms part of a collection of photographs gathered by the Shire of Eltham for their centenary project book, "Pioneers and Painters: 100 years of the Shire of Eltham" by Alan Marshall (1971). The collection of over 500 images is held in partnership between Eltham District Historical Society and Yarra Plenty Regional Library (Eltham Library) and is now formally known as 'The Shire of Eltham Pioneers Photograph Collection.' It is significant in being the first community sourced collection representing the places and people of the Shire's first one hundred years.Digital imagesepp, shire of eltham pioneers photograph collection, diamond creek, hurstbridge, railway station, railroad, railway line -
 Clunes Museum
photograph, KODAK PRINT
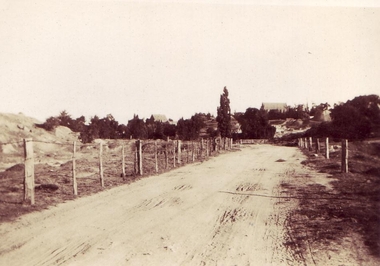
VIEW OF GRAVEL ROAD FROM CLUNES TOWNSHIP TO STATION FLAT. LOWER PART OF PORT PHILLIP MINE ON LEFT OF PHOTO.VIEW OF ROAD LEADING TO STATION FLAT CLUNES. ANGLICAN CHURCH ON HILL IN BACKGROUND.local history, photography, photographs, clunes landscape. -
 Clunes Museum
Photograph
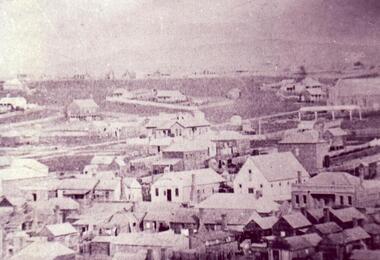
BLOWN UP PHOTO OF VIEW OVER LOOKING FRASER ST. FROM "THE ROCKS". NOTE 2 CHURCHES - ONE C OF E, LATER MOVED TO PRESENT SITE, NEXT TO BLUE STONE ST. PAUL'S. CLUB HOTEL ON LEFT. "METHODIST CHURCH WITHOUT SPIRE AND MARKET NEXT ON PRESENT POLICE STATION PADDOCK OPPOSITE THE METHODIST CHURCH (THEN WESLEYAN) IS THE OLD CEMETERY AND THERE ARE WHITE FORMS LIKE TOMBSTONES SHOWING.BLACK AND WHITE PHOTOGRAPH OF VERY EARLY CLUNES - BUILDINGS, CHURCHES, HOUSESPRIMITIVE METHODIST CHURCH IN HILL ST.local history, photography, photographs, clunes township -
 Ballarat Tramway Museum
Slide - 35mm slide/s - set of 20, Noel Simons, 21/05/1971 12:00:00 AM
Set of 20 transparencies taken on 21/5/1971 on Kodak mounts. 1197.1 - Bendigo No. 5 en route to Eaglehawk at Creeth St Long Gully. Tram has a SEC roof ad and Cinzano roof ad. 1197.2 - No 5 approaching Needle Loop between Long Gully and California Gully. On left hand side is the City of Bendigo sign, indicating city boundary. 1197.3 - As for 1197.2 but actually entering loop. Photo taken after tram has passed photographer. 1197.4 - No. 26 bound for Eaglehawk descending the railway bridge near Eaglehawk, at Jobs Gully. 1197.5 - as for 1197.4, but after crossing bridge, now ascending a hill. Photo taken after tram has passed photographer. 1197.6 - No. 26 climbing High St. hill Eaglehawk, nearing end of Double track, bound for Quarry Hill. Shows centre of the road poles. 1197.7 - As for 1197.6, with tram entering single track section. Photo taken after tram has passed photographer. Has a BP service station in the background. 1197.8 - No. 26 (bound for Quarry Hill) crossing No. 17 (Eaglehawk) at Job's Gully Loop. 1197.9 - No. 17 climbing railway bridge at Job's Gully, en route to Eaglehawk. Photo taken after tram has passed photographer. 1197.10 - No.26 bound for Quarry Hill, leaving Long Gully Loop? Has the Creeth St. church in l197.l in the far background. Photo taken after tram has passed photographer. 1197.11 - Tramway Point work at the northern end of Long Gully Loop. 1197.12 - No. 17 en route for Quarry Hill turning into View St. from Bamard St. Tram has SEC roof ads "Everything fine in my all electric Kitchen' and 'Electric Cooking is Matchless'. 1197.13 - as for 1197.12, but tram has turned into View St and about to enter the double line track. Photo taken after tram has passed photographer. 1197.14 - No. 21 enters Nolan St after turning from MacRae St. en route to Bendigo. Note sign on its own post noting tram turns "Beware Tram Turns" and stop sign on adjacent pole "Trams stop on Request". No. 21 has two SEC roof ads. 1197.15 - No. 21 in Nolan St. after turning from Bridge St. (White Hills Road). Note signal light for Bridge St. loop on pole corner of street. Photo taken after tram has passed photographer. 1197.16 - No. 2 bound for Eaglehawk at unknown location. 1197.17 - Tram stop sign on a pole "CARS STOP BY REQUEST" 1197.18 - No. 5 in Carpenter St.? en route to Quarry Hill. 1197.19 - No. 28 has just arrive at Golden Square terminus, passengers are disembarking and the trolley pole is being turned. Golden Square Hotel in the background. 1197.20 - No. 28 at Golden Square terminus. Has a "Nothing beats Briquettes for hear roof ad. Information written on in black ink and date stamped on purple ink. 1197.1 - "No. 5 at Creeth St. Long Gully" 1197.2 - "No. 5 approaching Needle Loop between Long Gully and California Gully" 1197.3 - "No. 5 at Needle Loop between Long Gully and California Gully" 1197.4 - "No. 26 crossing railway bridge at Job's Gully near Eaglehawk" 1197.5 - "No. 26 just after crossing railway bridge at Job's Gully near Eaglehawk/ 1197.6 - "No. 26 in High St. Eaglehawk" 1197.7 - "No. 26 at end of double track in High St. Eaglehawk" 1197.8 - "Nos. 26 and 17 crossing at Job's Gully Loop" 1197.9 - "No. 17 crossing railway bridge at Job's Gully near Eaglehawk". 1197.10 - "No. 26 at Long Gully" 1197.11 - 'Northern end of points at Long Gully Loop". 1197.12 - "No. 17 turning into View St. from Bamard St. Bendigo". 1197.13 -'No. 17 at beginning of double track in View St. after leaving Bamard St. Bendigo. 1197.14 - "No. 21 enters Nolan St. from MacRae St. Bendigo." 1197.15 - "No. 21 in Nolan St. Bendigo just after leaving White Hills Road." 1197.16 - "No. 2" 1197.18 - "No. 5" 1197.19 - "Birney car No. 28 at Golden Square Terminus" 1197.20 "Birney car No. 28 at Golden Square Terminus" tramways, trams, bendigo, long gully, railway bridge, jobs gully, trackwork, nolan st, quarry hill, tram stops, golden square, tram 2, tram 5, tram 17, tram 21, tram 26, tram 28 -
 Ballarat Tramway Museum
Slide - 35mm slide/s - set of 32, Noel Simons, 25/02/1971 12:00:00 AM
Set of 31 transparencies taken on 25/2/1972 on Kodak mounts. 1201.1 - Bendigo No. 26 in Bond St. just after leaving Long Gully en route for Quarry Hill. Has Norris Supermarket in background. Has two SEC roof ads. 1201.2 - No. 26 climbing View St. from Charing Cross en route to Eaglehawk. Has ANZ bank and AMOCO service station in background. 1201.3 - as for 1201.3, but after tram has passed photographer. Has buildings west of Mackenzie St. in photograph. 1201.4 - Tram stop and centre of the road pole with two "CARS STOP BY REQUEST" signs mounted on pole at the corner of Mackenzie St. 1201.5 - same position as for 1201.3, but with No. 5 descending the street. 1201.6 - same position as for 1201.2, but with No. 5 descending the street. Photo taken after tram has passed photographer. 1201.7 - No. 7 in Nolan St. from across the park at Lake Weeroona. 1201.8 - No. 7 entering McCrae St from Nolan St. - distant view. Note "TRAM "sign on left hand side under tree and overhead in McCrae St. from former track that once was in this street. 1201.9 - No. 7 in High St. with Cathedral in background. Tram en route to North Bendigo. Note scaffolding around Cathedral main spire area. 1201.10 - No. 7 crossing Bendigo Creek bridge in High St. near Golden Square. Has a Caltex Service station in the background. 1201.11 - No. 7 at Golden Square terminus with Sunburst Fruit Juices and a Peters Ice cream delivery vans alongside. 1201.12 - as for 1201.11 but photo taken from behind tram, with the end of the rails in the photograph. 1201.13 - No. 7 and 21 in Pall Mall at Charing Cross with No. 5 in the background. Taken some distance away from the location. 1201.14 - No. 7 at Golden Square terminus, taken a short distance from the tram terminus. Shows Milk Bar on right hand side and the hotel on the left hand side. Taken from the south side of the roadway. 1201.15 - as from 1201.14 but taken from the north side of the roadway. 1201.16 - No 5 waiting at California Gully loop. Distant photo showing surrounds 1201.17 - No. 5 en route for Quarry Hill crossing No. 26 at California Gully. 1201.18 - No. 26 at Eaglehawk terminus with Eaglehawk Town Hall and Post Office in background. 1201.19 - No. 21 arriving at Charing Cross en route to North Bendigo. Has Alexandra Fountain in the background, ANZ bank RACV building, and other buildings on the north side of Pall Mall or Nolan St. 1201.20 - No. 26 en route for Quarry Hill at Charing Cross, with crew standing by front door. Has Colonial Mutual life building, Armstrong Tyre Service (Firestone) and a sign for Cohns Drinks in the background. 1201.21 - as for 1201.20 but with No. 5 en route to Eaglehawk now in photograph. 1201.22 - No. 26 at Quarry Hill terminus. 1201.23 - No. 26 at Quarry Hill terminus, view of front portion of tram only from a gate at the Bendigo cemetery. 1201.24 - Track at the end of the Quarry Hill line showing the point blades of the former "Y" terminus and the overhead for this. 1201.25 - No. 2 at the Quarry Hill terminus, looking along the former Trackwork. 1201.26 - as for 1201.25 1201.27 - number not used. 1201.28 - Golden Square terminus from some distance from the actual terminus, showing the Warning sign "TRAM" for motorists from the south. No. 7 at the terminus. 1201.29 - No. 7 passing through the Golden Square shopping centre. Numerous cars and pedestrians. Tram en route for North Bendigo. 1201.30 - No. 7 in High St. Golden Square, en route for North Bendigo. Photo taken after tram has passed photographer. 1201.31 - No. 7 in High St. just past Wattle St. with the Cathedral in the background. Tram has two SEC roof ads good side on photo, 'Everything's fine in my all electric kitchen' and 'Electrical cooking - clean, quick, economical'. 1201.32 - No. 7 in High St. nearing Wattle St. Has Cathedral in the background. Photo taken after tram has passed photographer.Information written on in black ink and date stamped on purple ink. 1201.1 - "No. 26 in Bond St just after leaving Long Gully" 1201.2 - "No. 26 climbing View St. from Charing Cross" 1201.3 - "No. 26 ascending View St. from Charing Cross (At Mackenzie St.)" 1201.4 - "View St. & Mackenzie St." 1201.5 - "No. 5 in View St. near Mackenzie St." 1201.6 - "No. 5 in View St. nearing Charing Cross." 1201.7 - "No. 7 in Nolan St. seen from Lake Weeroona Park." 1201.8 - "No. 7 entering McRae St. from Nolan St. Note "TRAM" warning sign on left. 1201.9 - "No. 7 in High St. passing Short St." 1201.10 - "No. 7 crossing Bendigo Creek bridge in High St. near Golden Square." 1201.11 - "No. 7 at Golden Square terminus" 1201.12 - "No. 7 at Golden Square terminus" 1201.13 - "No 7, 21 and 5 at Charing Cross" 1201.14 - "No. 7 at Golden Square terminus" 1201.15 - "No. 7 at Golden Square terminus" 1201.16 - "No 5 waiting at California Gully loop." 1201.17 - "Nos. 5 and 26 crossing at California Gully loop" 1201.18 - "No. 26 at Eaglehawk terminus" 1201.19 - "No. 21 arriving at Charing Cross from Golden Square" 1201.20 - "No. 26 at Charing Cross" 1201.21 - "Nos. 5 and 26 at Charing Cross." 1201.22 - "No. 26 at Quarry Hill terminus" 1201.23 - "No. 26 at Quarry Hill terminus seen through the gates of the Bendigo Cemetery." 1201.24 - "Quarry Hill terminus showing remains for former double track layout abandoned before 1964." 1201.25 - "No. 2 at Quarry Hill terminus" 1201.26 - "No. 2 at Quarry Hill terminus" 1201.28 - "The Southern approach to Golden Square with No. 7 standing at the terminus, "TRAM" warning sign on the left. 1201.29 - "No. 7 passing through Golden Square Shopping Centre" 1201.30 - "No. 7 in High St. Golden Square" 1201.31 - "No. 7 in High St. passing Wattle St." 1201.32 - "No. 7 in High St. nearing Wattle St."tramways, trams, bendigo, bond st., view st., nolan st., high st., eaglehawk, california gully, charing cross, quarry hill, trackwork, tram 2, tram 5, tram 7, tram 21, tram 26 -
 Ballarat Tramway Museum
Slide - 35mm slide/s - set of 25, Noel Simons, 26/02/1972 12:00:00 AM
Set of 25 transparencies taken on 26/2/1972 on Kodak mounts. 1204.1 - Bendigo No. 5 - just arrived at Manchester Loop near Havilah Road, Long Gully. Photo taken after tram has passed photographer. 1204.2 - No. 26 in Backhaus St. Long Gully passing William St, en route to Quarry Hill. Photo taken after tram has passed photographer. 1204.3 - No. 5 climbing the High St. Hill Eaglehawk, heading for Quarry Hill with the buildings on the West side of High St. in the background, including the Eaglehawk Town Hall. 1204.4 - as for 1204.3, but tram close up. 1204.5 - as for 1204.3, but after tram has passed photographer. 1204.6 - No. 5 at intersection of Mt Korong Road Ironbark and Calder Highway, with the AMPOL service 'station in the background. Photo taken after tram has passed photographer. 1204.7 - No. 26 en route to Quarry Hill shortly after leaving Needle Loop, passing William St., Long Gully. 1204.8 - No. 5 at California Gully Loop, picking up a passenger, with the shops at Long Gully in the background. Photo taken after tram has passed photographer. 1204.9 - No. 5 in Long Gully, en route to Quarry Hill. Photo taken after tram has passed photographer. 1204.10 - No. 2 at Eaglehawk terminus with the Eaglehawk Town Hall and Post Office in the background. Tram has two SEC roof ads. 1204.11 - No. 2 at Eaglehawk terminus, close up. 1204.12 - as for 1204.11, but through the park gates. 1204.13 - as for 1204.11, but with tram stop shelters in the foreground and buildings on the West side of High St in the background. 1204.14 - No. 2 in Mt. Korong Rd, midway between California Gully Loop and Needle Loop. Photo taken after tram has passed photographer. 1204.15 - No. 5 in Long Gully, en route to Quarry Hill. 1204.16 - as for 1204.15, but with trams departed loop. Has an ESSO service station in the background. 1204.17 - No. 26 leaves Charing Cross up View St.. Photo taken after tram has passed photographer. Has Armstrong Tyre Service, Cohns Drinks ad on a building and the T&G building in the background. Also Firestone ads on the tyre service building. 1204.18 - No. 5 waits at Charing Cross with the Alexandra Fountain in the background. Tram has two SEC roof ads, 'Everything s fine in my all electric kitchen' and 'Electricity Best for Cooking'. Has RACV, Colonial Mutual Life buildings in the background and the planting areas around Charing Cross gardens in the foreground. 1204.19 - No. 21 en route to North Bendigo arrives at Charing Cross, with passengers waiting to board. No. 5 in the background. In the background is the Fountain Gate Plaza building and the City Family Hotel. 1204.20 - as for 1204.19, but with No. 7 en route to Golden Square. 1204.21 - as for 1204.19, but closer up. 1204.22 - as for 1204.18 1204.23 - No. 25 in Nolan St. near the crossing of Bendigo Creek, running a special tram tour. 1204.24 - No. 25 on a special charter, in Weeroona Ave. at Cnr of Caledonia St. passing the Gas works. 1204.25 - Nos. 25 (showing Golden Square), 7 and 26 at Charing Cross. Has fountain in the background.Information written on in blue ink and date stamped on purple ink. 1204.1 - "No. 5 at Manchester Loop, near Havilah Rd. Long Gully." 1204.2 - "No. 26 in Backhaus St. Long Gully passing William St." 1204.3 - "No. 5 in High St. Eaglehawk." 1204.4 - "No. 5 in High St. Eaglehawk." 1204.5 - "No. 5 in High St. Eaglehawk." 1204.6 - "No. 5 in Mt. Korong Rd., Ironbark, passing Calder Highway Junctn." 1204.7 - "No. 26 shortly after leaving Needle Loop, passing William St., Long Gully. No. 5 cresting hill in distance." 1204.8 - "No. 5 at California Gully Loop." 1204.9 - "No. 5 in Long Gully" 1204.10 - "No. 2 at Eaglehawk terminus." 1204.11 - "No. 2 at Eaglehawk terminus." 1204.12 - "No. 2 at Eaglehawk terminus." 1204.13 - "No. 2 at Eaglehawk terminus." 1204.14 - "No. 2 in Mt. Korong Rd, midway between California Gully Loop and Needle Loop. 1204.15 - "Nos. 2 and 26 crossing at Long Gully." 1204.16 - "No. 26 leaves Long Gully loop for Eaglehawk as No. 2 pulls out of the far end towards Bendigo" 1204.17 - "No. 26 beginning the climb up View St. from Charing Cross." 1204.18 - "No. 5 at Charing Cross." 1204.19 - "No 21 arrives at Charing Cross from Golden Square while No. 5 awaits departure time for Eaglehawk." 1204.20 - "Nos. 7, 21, and 2 (behind which is No. 5) at Charing Cross." 1204.21 - "Nos. 7, 21, and 2 at Charing Cross." 1204.22 - "No. 5 at Charing Cross." 1204.23 - "No. 25 in Nolan St. near Bendigo creek crossing" 1204.24 - "No. 25 in Weeroona Ave. at cnr of Caledonia St." 1204.25 - "Nos. 25, 7, 26 and 2 (behind 26) at Charing Cross."tramways, trams, bendigo, eaglehawk, long gully, california gully, charing cross, north bendigo, tram 2, tram 5, tram 7, tram 21, tram 25, tram 26 -
 Ballarat Tramway Museum
Slide - 35mm slide/s - set of 6, Noel Simons, 28 Feb. 1972
Set of 6 transparencies taken on 28/2/1972 on Kodak mounts. 1206.1 - Bendigo No. 5 at Hayes St. Loop, en route for Quarry Hill. 1206.2 - No. 5 at Garden Gully Loop, Mt. Korong road, Ironbark. en route to Quarry Hill. Note the water column in the background. 1206.3 - No. 5 in View St. Bendigo, with the Commodore Motel in the background. 1206.4 - No. 6 en route for Golden Square in Fire Station loop, with the fire station building in the background. Photo taken after tram has passed photographer. 1206.5 - No. 6 in High St., running through Golden Square Shopping Centre, en route for Golden Square. Photo taken after tram has passed photographer. 1206.6 - No. 6 arriving at Charing Cross, bound for North Bendigo, with the City Family Hotel, ANZ bank and the Cenotaph (war memorial) in the background.Information written on in blue ink and date stamped on purple ink. 1206.1 - "No. 5 at Hayes Loop, Ironbark." 1206.2 - "No. 5 at Garden Gully Loop, Mt. Korong road, Ironbark." 1206.3 - "No. 5 in View St. just after start of double track near Barnard St." 1206.4 - "No. 6 in High St. at Fire Station loop." 1206.5 - "No. 6 in High St. running through Golden Square shopping centre." 1206.6 - "No. 6 arriving at Charing Cross from Golden Square."tramways, trams, bendigo, hayes st. loop, garden gully loop, view st., golden square, charing cross, tram 5, tram 6 -
 Ballarat Tramway Museum
Slide - 35mm slide/s - set of 4, Noel Simons, Apr. 1972
Set of 4 transparencies - copy slides - possibly ARE film strip dated April 1972. 1210.3 on Kodak Readymount mount. 1210.1 - No. 3 arriving at Quarry Hill terminus. 1210.2 - Bogie car at Long Gully Loop, in the far distance, with a Hotel and the ESSO service station in between. Has Fosters Lager and Carlton signs on hotel. Note sign on the closet pole - "No standing between Notices" 1210.3 - Nos. 26 (Quarry Hill) and 25 (Eaglehawk) at Jobs Gully Loop. 1201.4 - No. 5 showing Charing Cross in bound for Charing Cross and No. 3 en route for Eaglehawk in View St. near the end of the double track. Appears to be SEC employee at the rear of No. 3. Part of a set of 20 slides made by the Association of Railway Enthusiast Provincial Tramways film strip. Reference Item 2560 details the ARE Film Strip and provide references to other slides.Information written on in blue ink and date stamped on purple ink. 1210.1 - "No. 3 arriving at Quarry Hill terminus." 1210.2 - "Bogie car at Long Gully Loop." 1210.3 - "Nos. 26 and 25 at Jobs Gully Loop." 1210.4 - "Nos 5 and 3 in View St. near the end of the double track."tramways, trams, bendigo, long gully, quarry hill, view st., tram 3, tram 5, tram 25, tram 26 -
 Ballarat Tramway Museum
Newspaper, The Courier Ballarat, The Courier, Christmas Number, 1922, Special Issue, Dec. 1922
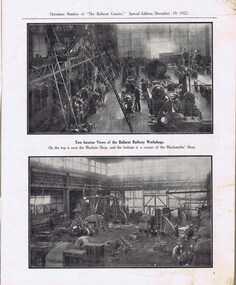
Yields information about Ballarat, it businesses, identifies and its locations or environs through photos and advertisements and articles.The body of the "Christmas Number of the Ballarat Courier, Special Edition - December 1922" = coves missing. See attached listing with worksheet for summary of contents. Contains many advertisement for local business houses, photos and fiction and articles , pages 3 - 94 still existing, stapled. Notes on contents of Christmas Number of The Ballarat Courier Special edition, December 19, 1922. Photos Ballarat Association Cricket Team, winners Country championship - 1922 and photo of dinner at Sth Melb. Town Hall by VCA. - p83 Ballarat Golf club, Arch of Victoria and Club House - p63, 65 Ballarat Imperial Football club - league premier- 1922 - p19 Ballarat Miners Turf Club - showing stands and office bearers - p43 Ballarat North Golf Club - p67 Ballarat Town hall - p87 Ballarat Turf Club Office bearers and race finish - p45 Ballarat Yacht club - opening day and yacht race - p89 Black Hill Progress Association, - members and scenes - p33 Eureka Monument - p79 Finish of a race at Miners RC - p45 Head of the Lake and St. Patrick's the winning crew - p47 1.ake Wendouree - boating on (Gardens side - p] 1 Lake Wendouree, rowing and club houses - p28 Lal Lal waterfalls - p61 Lydiard St. View - Railway Station, Cemetery gates, Mining Exchange, Post Office and Banks - p71 National Federation Conference - 1922 - p39 South city Football club, Ballarat Assoc. Premiers 1922 - p25 Sturt and Lydiard St - top photo Town Hall and T&G building, with ESCo tram (pencil note "Tram No- 3 - Peckham Truck" written in - p75. Bottom photo, looking south from Town Hall. The Western Oval during a football match - p23 Victorian Farmers Union Conference, Ballarat 1922 - p37 Victorian Railway photos of various scenes around Victoria: Pages 3, 5, 7, 55, 59 Views of Victoria Park - p91 VR Ballarat Railway Workshops - p9 Advertisements on even numbered pages, featuring in particular: Ballarat Motor Garage - with photos - p88 C.A.V. Willard - storage battery service Stn - p76 with photo. CA Mitaxa - Builder - includes photos of new homes - p38 Coles & Pullham - stock sales - with photos - p86 ESCo - p70 Geo E. Dibble, machinery merchant - includes photos - p26 Geo. Waller - asphalt and carrier - photos of work and buildings Hanrahan's of Ballarat - Garage and stables - p30 J.L.Ridings - dentists, - photos of surgery p14 Longhurst's Bakeries - Mair and Yuille St. Includes Photos. - P84 Preston Motors, Melbourne - The Maxwell Sep Morse - Motor and Carriage builders - photo - p78 St. Patrick's College - photos of students and buildings - p46 State Savings Bank of Vic. - p20 T-J. Brown house remover and general carrier, photo of traction engines - p90 T.J.Haymes - Wallpaper etc. - p33 The Ballarat Co-Op Distribution Society - includes photos - p44 The Hupmobile - McLean Richards Motors - p22 Wallace Butter Factor - p82 Articles Black Hill Progress Association - p35 Damaged pages - cut outs clippings etc. Page 17/18 - top half bottom 1/3 of page 21/22 Pages: 9, 70, 71, 75, 87 and 90 imaged. Record reviewed and images of some of the pages added 10-9-2013p74. Note re tram 33.trams, tramways, ballarat, commerce, ballarat business, sports, science, esco -
 Ballarat Tramway Museum
Photograph - Digital image Set of 20, Dec. 1970
Set of 20 digital images of Bendigo Tramways December 1970 by Stuart Lodington. .1 - Bendigo track gang renewing a joint, McCrae St, with welding truck alongside and Birney No. 29. .2 - No. 5 at Quarry Hill terminus? .3 - No. 24 at the depot .4 - No. 2 on the Quarry Hill line .5 - No. 5 approaching the Eaglehawk terminus .6 - No. 29? at the Golden Square Terminus with Bill Rodda's Golden Square hotel in the background. .7 - No. 3 inbound on the Quarry Hill line. .8 - trams crossing on the Eaglehawk line, through the window of one tram. .9 - side on view of a B23D controller in a bogie tram .10 - No. 5 at the Eaglehawk terminus .11 - No. 21 at No. 21 crossing on the Golden Square line. No. 29 showing special, No.21 - North Bendigo, Fire Station Loop? .12 - No. 29 and another tram - near work site? .13 - interior view from Birney looking at the front of another tram parked behind. .14 - No. 29, No. 6 crossing at .15 - No. 6, showing special at Charing Cross. .16 - No. 5 and another tram at North Bendigo on a Special .17 - No. 28 at Charing Cross .18 - No. 5 on Special at a Loop on the Eaglehawk line .19 - No. 28, and two other trams at the Myrtle St Loop .20 - No. 18 showing Quarry Hill and two other trams on View St.trams, tramways, bendigo, trackwork, mccrae st, depot, quarry hill, eaglehawk, golden square, controllers, north bendigo, view st, tram 29, tram 5, tram 24, tram 2, tram 3, tram 6, tram 28, tram 18 -
 Ballarat Heritage Services
Photograph - Image - Black and White, Ballarat Railway Station, c1904
The Ballarat to Melbourne Railway line opened in 1862.Black and white panoramic view of the Ballarat Railway Station. A steam train is about to cross Lydiard Street North, and the railway gates are shut to prevent cars crossing the tracks. ballarat railway station, signals, railway track, provincial hotel, railway gates -
 Whitehorse Historical Society Inc.
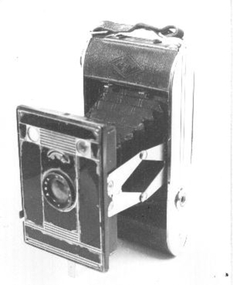
Equipment - Camera, C1939
Purchased by Ted Arrowsmith in 1940 from chemist at 596 Station Street Box Hill, when he lived at 35 Cambridge Street Box Hill. Used by him until the 1960s. Carried throughout Australia and the South West Pacific War Zone in the R.A.A.F between 1942 and 1946.Black folding bellows camera.AGFA 127. Folds back into a narrow case with handle. Instruction book included.|Agfa - Bilinar lens - aperture f11to f22. Two view finders one Portrait and other Landscape. Fixed speed of 1/30th second plus time exposure.AGFA - Bilinar. Made in germany.photography, cameras -
 Ballarat Tramway Museum
Album - Photo Album, c1970
Set of 16 photos of Ballarat tram system taken 1970c on a tour by an unknown Qld based person.Photo album containing 16 colour prints. Photo album has heavy card covers, covered in black textured plastic containing 12 clear plastic photo sleeves held with a white comb binder. Photos of Ballarat prior to closure, c1970. Photographer unknown. Donated by Peter Hyde of Brisbane Tramway Museum to BTM 3/2/2010, from a deceased estate. Photos apparently taken on a tram tour. .1 - No. 42 and a single trucker inbound in Sturt St. .2 - taken from tram ascending Bakery St hill in Victoria St. .3 - End of No. 42, with the destination "Haddon St via Drummond Nth" .4 - No. 11 and 42 in Lydiard St Nth, near the railway station. No. 11 showing special. .5 - photo of three people on the tour. .6 - Trams reversing at the Victoria St terminus .7 - ditto .8 - 11, 42 and 12? in Lydiard St North by railway station. .9 - Three trams at Sebastopol terminus. .10 - View in Albert St Sebastopol looking north along the track on the side of the road. .11 - View of the tram crossing in Albert St. .12 - 27 and 42 crossing Albert St Sebastopol. .13 - View of Albert St from the tram, north of the crossing looking at the reserved track 14. - Lydiard St North looking south .15 - 42 at the railway level crossing. .16 - View south of the railway level crossing, three trams, with passengers alighting.trams, tramways, ballarat, albert st, sebastopol, victoria st, sturt st, lydiard st nth, railway crossing -
 Ringwood and District Historical Society
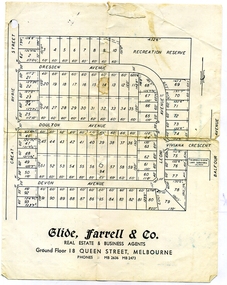
Document, Glen Turnbull, Land Sale Brochure - Heathmont Hills Estate - subdivision of Stan Wieland's Land (undated), 25/2/2008
Small brochure by Glide Farrell & Co, real estate and Business Agents, Melbourne advertising "93 Superb Building Blocks 3Mins Station & Shops", and "Sky-Line Views of Heathmont Hills Estate" , comprising lots in Dresden Ave, Doulton Ave, Devon Ave, Viviana Crescent, Leoni Avenue. -
 Flagstaff Hill Maritime Museum and Village
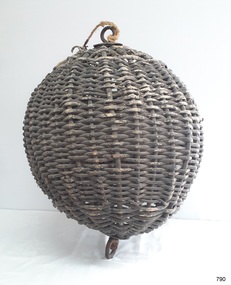
Equipment - Distant Signal, 1897-1931
This three-dimensional Distant Signal is part of a Flagstaff Signal set of ball, cone and drum shapes. It has been woven and then fabricated with strong metal swivel fittings and loops for suspending from a high point on a flagstaff at a signal station or on a ship’s masthead. The cane signal was constructed to withstand all weather and to be visible from a long distance. The gaps between the woven cane allow air to pass through, minimising possible swaying. Similar sets were made from rope or fabric. Warrnambool's Flagstaff was erected in 1854. Its primary use was to display visual signals that could convey messages between land and sea. It was also used to notify the local population of the approach of ships. One of the popular signalling codes in use in the early-to-mid 1800s was the Marryat’s Code but there were others in use as well; there was no one standard code. In 1857 the International Marine Conference adopted an International Code of Signals as a standard communications system for all vessels that could be understood in many different languages. The Normanby Advertiser reported on June 5th 1857 a query from the Post Master General as to whether the request of the Chief Harbour Master would be carried out, in that Warrnambool would receive a new flagstaff and a set of Marryatt’s signal flags. The Table of Codes was published, showing how to use combinations of these flags to send messages. The Code was revised in 1887 to cover situations where distance, light, wind and weather conditions affected the visibility of the flags and prevented clear communication. The first report of the International Code of Signals Committee of 1897 warned signalmen not to rely on ordinary semaphore flags and introduced a Distant Signal Code using either particular semaphore flags or the three-dimensional shapes of a ball, cone and drum that aligned with the semaphore flag shapes of a circle, pennant and square. International Code of Signals In 1931, after World War I’s experiences in using signal codes, the International Code of Signals conference in Washington revised and published the rules for the conduct of signalling. One of the changes was that “the use of the Distant Signals and of fixed semaphore was abandoned”. It is of interest to know that modern marine law in many countries insists that a set of Day Shapes must be carried onboard vessels of a certain size. These highly visible geometric shapes are used at sea in daylight to communicate messages between vessels. They are used in a similar way to the Distant Signals, in that different combinations of shapes represent different messages. The set of shapes includes a ball, cylinder, cone and diamond. The shapes are hung between the top of the vessel’s foremast and the front of the vessel. They are only coloured black and are about 1.5 metres high. The vertical line of shapes can mean messages such as Boat not under command, Fishing, and Under sail and power.Distant Signals were an important means of marine communication from the late 1880s to the early 1930s, including during World War I. They were an advancement to the International Shipping Codes and safety. The cane signals’ shapes appear to be the same from whatever direction they are viewed, removing confusion about the message they convey. The same shapes continue to be used today for the sets of Day Shapes used as marine navigational signals that are mandatory on certain-sized vessels.Distant Signal Ball, part of a Flagstaff signal set. A round woven cane ball, painted black, with a metal rod passing through the centre. The rod has a loop at each end, then a concave, octagonal metal plate that rests on the outside surface of the ball, serving as a washer. The rod has swivels at each end.flagstaff hill, flagstaff hill maritime museum and village, warrnambool, maritime museum, maritime village, great ocean road, shipwreck coast, distant signal, signal, maritime signal, ball signal, signal shape, flagstaff signal, signal station, masthead signal, communications, marine technology, signals, marine signals, flaghoists, international marine conference, international code of signals, signal codes, marine safety, signal flags, day shape, daymark, day symbol, navigation, warrnambool flagstaff, 1854, 1857 1931, 1887, 1897 -
 Flagstaff Hill Maritime Museum and Village
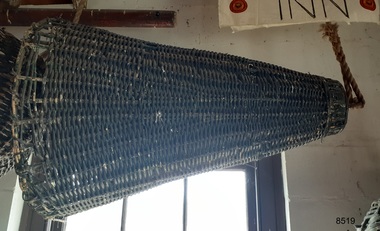
Equipment - Distant Signal, 1897-1931
This three-dimensional Distant Signal is part of a Flagstaff Signal set of ball, cone and drum shapes. It has been woven and then fabricated with strong metal swivel fittings and loops for suspending from a high point on a flagstaff at a signal station or on a ship’s masthead. The cane signal was constructed to withstand all weather and to be visible from a long distance. The gaps between the woven cane allow air to pass through, minimising possible swaying. Similar sets were made from rope or fabric. Warrnambool's Flagstaff was erected in 1854. Its primary use was to display visual signals that could convey messages between land and sea. It was also used to notify the local population of the approach of ships. One of the popular signalling codes in use in the early-to-mid 1800s was the Marryat’s Code but there were others in use as well; there was no one standard code. In 1857 the International Marine Conference adopted an International Code of Signals as a standard communications system for all vessels that could be understood in many different languages. The Normanby Advertiser reported on June 5th 1857 a query from the Post Master General as to whether the request of the Chief Harbour Master would be carried out, in that Warrnambool would receive a new flagstaff and a set of Marryatt’s signal flags. The Table of Codes was published, showing how to use combinations of these flags to send messages. The Code was revised in 1887 to cover situations where distance, light, wind and weather conditions affected the visibility of the flags and prevented clear communication. The first report of the International Code of Signals Committee of 1897 warned signalmen not to rely on ordinary semaphore flags and introduced a Distant Signal Code using either particular semaphore flags or the three-dimensional shapes of a ball, cone and drum that aligned with the semaphore flag shapes of a circle, pennant and square. International Code of Signals In 1931, after World War I’s experiences in using signal codes, the International Code of Signals conference in Washington revised and published the rules for the conduct of signalling. One of the changes was that “the use of the Distant Signals and of fixed semaphore was abandoned”. It is of interest to know that modern marine law in many countries insists that a set of Day Shapes must be carried onboard vessels of a certain size. These highly visible geometric shapes are used at sea in daylight to communicate messages between vessels. They are used in a similar way to the Distant Signals, in that different combinations of shapes represent different messages. The set of shapes includes a ball, cylinder, cone and diamond. The shapes are hung between the top of the vessel’s foremast and the front of the vessel. They are only coloured black and are about 1.5 metres high. The vertical line of shapes can mean messages such as Boat not under command, Fishing, and Under sail and power.Distant Signals were an important means of marine communication from the late 1880s to the early 1930s, including during World War I. They were an advancement to the International Shipping Codes and safety. The cane signals’ shapes appear to be the same from whatever direction they are viewed, removing confusion about the message they convey. The same shapes continue to be used today for the sets of Day Shapes used as marine navigational signals that are mandatory on certain-sized vessels.Distant Signal Cone, part of a Flagstaff signal set. A woven cane cone, painted black, with a metal rod passing through the centre and two crossed metal bars at the base. The central rod has a loop at the top and passes through the bars at the base, finishing in a metal loop. The rod has swivels at each end.flagstaff hill, warrnambool, flagstaff hill maritime museum and village, shipwreck coast, marine navigation, marine communications, communication signal, lifesaving, ship at sea, day shape, masthead signal, day signal, day mark signals, marine technology, safety equipment, navigation equipment, marine day shape, day marker, cane day shape, signal cone, day signal cone, cone signal, cone day shape, distant signal, flagstaff signal, signal station, communications, signals, marine signals, flaghoists, international marine conference, international code of signals, signal codes, marine safety, signal flags, daymark, day symbol, navigation, warrnambool flagstaff, 1854, 1857 1931, 1887, 1897 -
 Flagstaff Hill Maritime Museum and Village
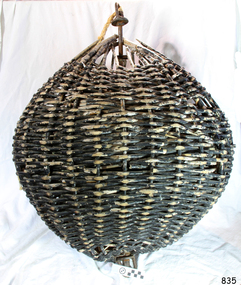
Equipment - Distant Signal, 1897-1931
This three-dimensional Distant Signal is part of a Flagstaff Signal set of ball, cone and drum shapes. It has been woven and then fabricated with strong metal swivel fittings and loops for suspending from a high point on a flagstaff at a signal station or on a ship’s masthead. The cane signal was constructed to withstand all weather and to be visible from a long distance. The gaps between the woven cane allow air to pass through, minimising possible swaying. Similar sets were made from rope or fabric. Warrnambool's Flagstaff was erected in 1854. Its primary use was to display visual signals that could convey messages between land and sea. It was also used to notify the local population of the approach of ships. One of the popular signalling codes in use in the early-to-mid 1800s was the Marryat’s Code but there were others in use as well; there was no one standard code. In 1857 the International Marine Conference adopted an International Code of Signals as a standard communications system for all vessels that could be understood in many different languages. The Normanby Advertiser reported on June 5th 1857 a query from the Post Master General as to whether the request of the Chief Harbour Master would be carried out, in that Warrnambool would receive a new flagstaff and a set of Marryatt’s signal flags. The Table of Codes was published, showing how to use combinations of these flags to send messages. The Code was revised in 1887 to cover situations where distance, light, wind and weather conditions affected the visibility of the flags and prevented clear communication. The first report of the International Code of Signals Committee of 1897 warned signalmen not to rely on ordinary semaphore flags and introduced a Distant Signal Code using either particular semaphore flags or the three-dimensional shapes of a ball, cone and drum that aligned with the semaphore flag shapes of a circle, pennant and square. International Code of Signals In 1931, after World War I’s experiences in using signal codes, the International Code of Signals conference in Washington revised and published the rules for the conduct of signalling. One of the changes was that “the use of the Distant Signals and of fixed semaphore was abandoned”. It is of interest to know that modern marine law in many countries insists that a set of Day Shapes must be carried onboard vessels of a certain size. These highly visible geometric shapes are used at sea in daylight to communicate messages between vessels. They are used in a similar way to the Distant Signals, in that different combinations of shapes represent different messages. The set of shapes includes a ball, cylinder, cone and diamond. The shapes are hung between the top of the vessel’s foremast and the front of the vessel. They are only coloured black and are about 1.5 metres high. The vertical line of shapes can mean messages such as Boat not under command, Fishing, and Under sail and power.Distant Signals were an important means of marine communication from the late 1880s to the early 1930s, including during World War I. They were an advancement to the International Shipping Codes and safety. The cane signals’ shapes appear to be the same from whatever direction they are viewed, removing confusion about the message they convey. The same shapes continue to be used today for the sets of Day Shapes used as marine navigational signals that are mandatory on certain-sized vessels.Distant Signal Cone, part of a Flagstaff signal set. A woven cane cone, painted black, with a metal rod passing through the centre and two crossed metal bars at the base. The central rod has a loop at the top and passes through the bars at the base, finishing in a metal loop. The rod has swivels at each end.flagstaff hill, warrnambool, flagstaff hill maritime museum and village, shipwreck coast, marine navigation, marine communications, communication signal, lifesaving, ship at sea, day shape, masthead signal, day signal, day mark signals, marine technology, safety equipment, navigation equipment, marine day shape, day marker, cane day shape, signal cone, day signal cone, cone signal, cone day shape, distant signal, flagstaff signal, signal station, communications, signals, marine signals, flaghoists, international marine conference, international code of signals, signal codes, marine safety, signal flags, daymark, day symbol, navigation, warrnambool flagstaff, 1854, 1857 1931, 1887, 1897 -
 Flagstaff Hill Maritime Museum and Village
Equipment - Distant Signal, 1897-1931
This three-dimensional Distant Signal is part of a Flagstaff Signal set of ball, cone and drum shapes. It has been woven and then fabricated with strong metal swivel fittings and loops for suspending from a high point on a flagstaff at a signal station or on a ship’s masthead. The cane signal was constructed to withstand all weather and to be visible from a long distance. The gaps between the woven cane allow air to pass through, minimising possible swaying. Similar sets were made from rope or fabric. Warrnambool's Flagstaff was erected in 1854. Its primary use was to display visual signals that could convey messages between land and sea. It was also used to notify the local population of the approach of ships. One of the popular signalling codes in use in the early-to-mid 1800s was the Marryat’s Code but there were others in use as well; there was no one standard code. In 1857 the International Marine Conference adopted an International Code of Signals as a standard communications system for all vessels that could be understood in many different languages. The Normanby Advertiser reported on June 5th 1857 a query from the Post Master General as to whether the request of the Chief Harbour Master would be carried out, in that Warrnambool would receive a new flagstaff and a set of Marryatt’s signal flags. The Table of Codes was published, showing how to use combinations of these flags to send messages. The Code was revised in 1887 to cover situations where distance, light, wind and weather conditions affected the visibility of the flags and prevented clear communication. The first report of the International Code of Signals Committee of 1897 warned signalmen not to rely on ordinary semaphore flags and introduced a Distant Signal Code using either particular semaphore flags or the three-dimensional shapes of a ball, cone and drum that aligned with the semaphore flag shapes of a circle, pennant and square. International Code of Signals In 1931, after World War I’s experiences in using signal codes, the International Code of Signals conference in Washington revised and published the rules for the conduct of signalling. One of the changes was that “the use of the Distant Signals and of fixed semaphore was abandoned”. It is of interest to know that modern marine law in many countries insists that a set of Day Shapes must be carried onboard vessels of a certain size. These highly visible geometric shapes are used at sea in daylight to communicate messages between vessels. They are used in a similar way to the Distant Signals, in that different combinations of shapes represent different messages. The set of shapes includes a ball, cylinder, cone and diamond. The shapes are hung between the top of the vessel’s foremast and the front of the vessel. They are only coloured black and are about 1.5 metres high. The vertical line of shapes can mean messages such as Boat not under command, Fishing, and Under sail and power.Distant Signals were an important means of marine communication from the late 1880s to the early 1930s, including during World War I. They were an advancement to the International Shipping Codes and safety. The cane signals’ shapes appear to be the same from whatever direction they are viewed, removing confusion about the message they convey. The same shapes continue to be used today for the sets of Day Shapes used as marine navigational signals that are mandatory on certain-sized vessels.Distant Signal Ball, part of a Flagstaff signal set. A round woven cane ball, painted black, with a metal rod passing through the centre. The rod has a loop at each end, then a concave, octagonal metal plate that rests on the outside surface of the ball, serving as a washer. The rod has swivels at each end.flagstaff hill, warrnambool, flagstaff hill maritime museum and village, shipwreck coast, marine navigation, marine communications, communication signal, lifesaving, ship at sea, day shape, masthead signal, day signal, day mark signals, marine technology, safety equipment, navigation equipment, marine day shape, day marker, cane day shape, signal ball, day signal ball, ball signal, ball day shape, distant signal, flagstaff signal, signal station, communications, signals, marine signals, flaghoists, international marine conference, international code of signals, signal codes, marine safety, signal flags, daymark, day symbol, navigation, warrnambool flagstaff, 1854, 1857 1931, 1887, 1897 -
 Glenelg Shire Council Cultural Collection
Print - Contact Print - Portland Tennis Club, Kingsley, 1960-1979
Sheet of 2 black and white contact prints for class plate negative. Top: Image shows Portland Tennis Club court in foreground. Hill with trees and 'Kingsley' on top of hill in background. Bottom: View of Bentinck Street, railway tracks, station from Post Office.Front: Top - 'PORTLAND' - in white, on tennis court -
Glenelg Shire Council Cultural Collection
Photograph - Contact Print - Portland, Victoria, 1970s
Set of 3 pairs of stereoscopic contact prints from glass plate negatives. Top: View from hill overlooking homestead and outbuildings. Middle: paddocks, fence, sheep run. Bottom: View from south side Cliff Street - looking north along Bentinck Street railway cutting to station.portland scene, bentinck street, street scene, photography -
Glenelg Shire Council Cultural Collection
Photograph - Sheet of 12 contact prints - Various historic Portland buildings and Landmarks, c. 1970
Sheet of 12 contact prints of rephotographed photographs. Identifying numbers 5711 a, b, c, d, e, f, g, h, i, j, k, l Measurements unframed (a, d, e, g, h, k, l)5 x 3.24.6 x 3 (b, c, f, i, j) Framed (d, g, h, k)5.3 x 3.65 x 3.5 (b, c, f, i, j) (a) All Saints Catholic Church (b) 'Blainslie' (c) Railway Line and Dutton's beach, towards Whalers Bluff (d) Lighthouse, Observatory Hill (e) North side Julia Sreet, looking west, Bank of Australasia (f) Fire station, C of E grounds (g) Julia Street from Percy Street intersection looking towards sea (h) Richmond House - W.M. Learmonth (i) London Inn (j) Julia Street. Hewly and Learmonth Woolstores, Bank of Australasia (k) View from Henty Beach - Old Town Hall (l) Annie Clark's ladies school -
 Ballarat Tramway Museum
Slide - 35mm slide/s - set of 3, Dave Simpson, late 1960's early 1970's
Yields information about Barkly St Mt PleasantSet of three 35mm slides - AGFA dark blue / white plastic mounts or a Anscochrome white plastic slide of trams in Barkly St, Mount Pleasant. .1 - No. 11 inbound to Gardens via Drummond St, with the Ballarat Fire station in the distant background. Tram has a Twin Lakes sign on the rear. On the left hand side is a sign for "Mobil Anti wear" petrol. .2 - No. 11 inbound to Gardens via Drummond St, at the intersection with Grant St. On the left hand side is a Butchers shop and a Milk bar mixed Grocery shop. The shop has a advert for Woman's Weekly. Along side the shop is a letter box and telephone Box. The tram stop sign has a "End of Section" sign. A lady is boarding the tram. .3 - View form the top of the hill looking East towards Main Road with the Fire Station in the Background. Has a tram in the distance.tramways, trams, barkly st, grant st, mt pleasant, fire station, tram 11