Showing 1055 items matching "victorian historical buildings"
-
 Clunes Museum
Booklet - REPORT, HISTORIC BUILDING COUNCIL
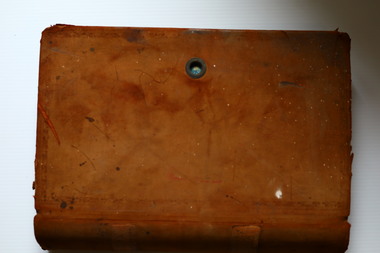
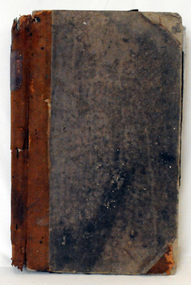
... ...VICTORIAN HISTORICAL BUILDINGS...Clunes Museum 36 Fraser Street enter building through Collins Place Clunes goldfields HISTORIC BUILDINGS COUNCIL PUT OUT BY THE STATE GOVERNMENT OF VICTORIA DOCUMENT REPORT VICTORIAN HISTORICAL BUILDINGS ORGANISATIONAL FUNCTIONALITY SOFT COVER BOOKLET WITH A PEN AND INK DRAWING ON THE BUFF COLOURED (FRAMED BY GREEN) FRONT COVER. ...HISTORIC BUILDINGS COUNCIL PUT OUT BY THE STATE GOVERNMENT OF VICTORIASOFT COVER BOOKLET WITH A PEN AND INK DRAWING ON THE BUFF COLOURED (FRAMED BY GREEN) FRONT COVER. A HISTORIC BUILDINGS COUNCIL REPORT PUBLISHED BY THE STATE GOVERNMENT OF VICTORIA 10 PAGES UNDATEDdocument, report, victorian historical buildings, organisational functionality -
Clunes Museum
Book, PUBLIC AFFAIRS BRANCH DEPARTMENT OF PLANNING & DEVELOPMENT, A GUIDELINE FOR ALTERATIONS AND ADDITIONS TO HISTORIC BUILDINGS, 1993
... ...VICTORIAN HISTORICAL BUILDINGS...Clunes Museum 36 Fraser Street enter building through Collins Place Clunes goldfields THE CARING FOR HISTORIC BUILDINGS LOCAL HISTORY BOOK REFERENCE VICTORIAN HISTORICAL BUILDINGS A GUIDELINE FOR ALTERATIONS AND ADDITIONS TO HISTORIC BUILDINGS A GUIDELINE FOR ALTERATIONS AND ADDITIONS TO HISTORIC BUILDINGS Book BOOK PUBLIC AFFAIRS BRANCH DEPARTMENT OF PLANNING & DEVELOPMENT ...A GUIDELINE FOR ALTERATIONS AND ADDITIONS TO HISTORIC BUILDINGSlocal history, book, reference, victorian historical buildings -
 Warrnambool and District Historical Society Inc.
Archive (Collection) - A.A. Briggs collection of ledgers and personal papers, Arthur Briggs, Personal Papers, 1893-1937
... Historical Society Inc. 2 Gilles Street (south of Merri St) Warrnambool great-ocean-road These nine ledgers and four folders contain handwritten records of A.A. Briggs, a Warrnambool accountant, secretary, real estate agent and insurance and commission agent in the late 19th and early 20th centuries. They include a Cash Book, a Widows' Fund register and an Expiry Register with the handwritten entries of the relevant names and payments to the Atlas Assurance Company and the Widows' Fund and several Letter Books dealing with rent collecting, the Warrnambool Permanent Building Society and the Victorian Alliance (a Temperance Society). ...Administrative records of A. A. Briggs, Warrnambool accountant, real estate agent, insurance and commission agent donated to the Warrnambool and District Historical Society, source and date unknown byadministrative records of a Warrnambool businessmanNine ledgers and four folders of documents held in A3 archival boxesHandwritten administrative records and personal papers of nine ledgers and four foldersa.a. briggs warrnambool, victorian alliance, atlas assurance company, warrnambool hospital, warrnambool permanent building societya.a. briggs warrnambool, victorian alliance, atlas assurance company, warrnambool hospital, warrnambool permanent building society -
 Warrnambool and District Historical Society Inc.
Archive - Door plate with Inscription, Leslie O'Callaghan, 1942
... Victorian dairying industry. Known as 'Mr History', Leslie O'Callaghan was also an important Warrnambool historian, serving as president of the Warrnambool and District Historical Society for 35 years. In later life Les wrote about his time in 28 Spence Street, noting the lay-out of the early building...Victorian dairying industry. Known as 'Mr History', Leslie O'Callaghan was also an important Warrnambool historian, serving as president of the Warrnambool and District Historical Society for 35 years. In later life Les wrote about his time in 28 Spence Street, noting the lay-out of the early building ...This door plate was found at 28 Spence Street, Warrnambool by the builder Ray Hollingsworth, when he was renovating the building for the Warrnambool Presbyterian Church in June 2019. He realized that the inscription had been placed there by Leslie O'Callaghan, probably when he left the premises in 1942 after boarding there for some years. Leslie O'Callaghan (1918-2014) was born in Balmoral and left there at the age of 13 with a scholarship to study at Warrnambool Technical School. He became an industrial chemist, working at the Kraft Walker Cheese Factory in Allansford (Warrnambool Cheese and Butter Factory). His experimental work in cheese cultures over a 45 year period was regarded as cutting edge work in the Victorian dairying industry. Known as 'Mr History', Leslie O'Callaghan was also an important Warrnambool historian, serving as president of the Warrnambool and District Historical Society for 35 years. In later life Les wrote about his time in 28 Spence Street, noting the lay-out of the early building and other boarders at the time. He never mentioned the interesting memento of his time there that he left on the back of a door plate. The Warrnambool and District Historical Society Archives Centre is called 'Les O'Callaghan History House'This door plate with its inscription was found 77 years after the inscription was written. It is of considerable interest because the writer of the inscription was well-known in Warrnambool as a bacteriologist and an historian. He left his own personal historical message and by sheer chance it was found years later. (All the old door plates at the time of the renovation were thrown out and it was fortunate that the builder happened to see the writing on one of them and to recognize who the writer was.)This is a cream-coloured ceramic door plate. It is rectangular-shaped with curved edges at the top and bottom. It has been painted white and has two holes at the top and bottom for the insertion of screws for a5taching the plate to the door. The inside of the plate has handwriting in black pencilLeslie Alexander O'Callaghan lived here for some years 1939-1942 AD. His occupation was as assistant bacteriologist for Kraft-Walker Cheese Coy. at Allansford. Born at Balmoral, 40 miles NORTH of Hamilton, Victorialeslie o'callaghan warrnambool, kraft walker cheese company allansford, 28 spence street warrnambool -
 Warrnambool and District Historical Society Inc.
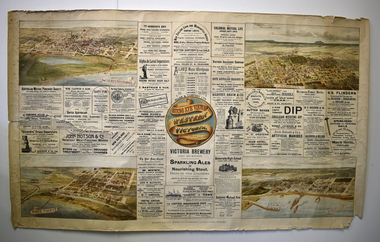
Poster - Print and Lithograph of Western Victorian towns and businesses, McCarron Bird & Co, Birds Eye Views in Western Victoria, c. 1900
... This poster has local historical significance as it has a descriptive drawing of the town of Warrnambool about 1900 and shows the buildings that were existing at that time. Warrnambool 1900 Western Victorian ...This poster has been produced as a saleable item by the firm of McCarron Bird & Co of Melbourne about 1900. This firm was founded in 1872 and is best known for its publication of the two-volume work, 'Victoria and its Metropolis' (1888). The poster was intended to be hung on a wall for decorative and advertising purposes. It contains four attractive lithographs of the towns, Warrnambool, Port Fairy, Portland and Hamilton and a great number of advertisements and illustrations, some from Melbourne and the rest from the Westen District towns mentioned above. One Warrnambool advertisement is for the general merchant business of William Caffin in Kepler Street and two others are advertisements for the coastal ships, Flinders, Dawn and Casino which came into the port of Warrnambool. This poster has local historical significance as it has a descriptive drawing of the town of Warrnambool about 1900 and shows the buildings that were existing at that time.This is a cream-coloured sheet of paper with a coloured centre piece showing the title of the poster, four coloured lithographs of Western Victorian towns and advertisements printed and illustrated in black and white. The edges of the poster are frayed and the paper is torn at the centre left edge.warrnambool 1900, western victorian towns 1900, william caffin general merchant warrnambool -
 Warrnambool and District Historical Society Inc.
Document, Map: Lady Bay 1853, 1853
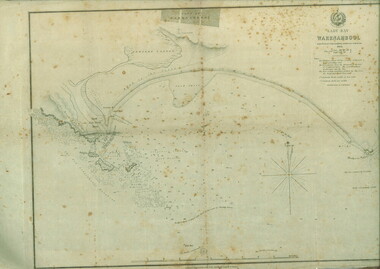
... Victorian Industrial Exhibition. He also worked in the vignettes on the Proeschel Map of Victoria. This map is of high historical and comparitive significance as it shows the Lady Bay area prior to the changes that have occurred in the last 160 years with the building of the breakwater. ...This is one of the earliest surveys and maps of Warrnambool harbor, Lady Bay. Being done in 1853, it shows the depths of the bay area marked in fathoms, currents and directions and areas of rocks around mouth of the Merri and the Western side of the bay as well as a large sand spit to the middle right of the beach region.. It also marks the large areas of seaweed and fuci in the outer bay area. It has the area of Pertobe Lagoon marked and shows the early tracks to the town. The engraving work was done by Tulloch and Brown, with Tulloch being one of the earliest engravers and lithographers in the state of Victoria. He arrived in Melbourne in 1849 and set up business with James Davie Brown in 1853 with Brown being a map engraver. They were awarded bronze and silver medals for their work at the Victorian Industrial Exhibition. He also worked in the vignettes on the Proeschel Map of Victoria.This map is of high historical and comparitive significance as it shows the Lady Bay area prior to the changes that have occurred in the last 160 years with the building of the breakwater. The issue regarding access to Lady Bay remains a current one. The engraver D Tulloch engraved some of the earliest scenes of the goldfields in Ballarat and as such has left a record of a very early and important era in Australian history. Rectangular cream paper with black text. Map area is outlined by fine black lined border. Key in top right hand corner and scale at bottom middle of map.Map is labelled Town of Warrnambool printed at top of map. Small logo at top right corner which has “Hydrographic Department” in circle around an anchor. Lady Bay Warrnambool Surveyed by John Barrow assistant surveyor Engraved by Tulloch & Brown in bottom right corner. Melbourne engraved by order of the legislative Council of Victoria in middle bottom.map, warrnambool, town of warrnambool map 1853, tulloch & brown map 1853, lady bay warrnambool,, warrnambool harbour, warrnambool breakwater, warrnambool beach -
 Warrnambool and District Historical Society Inc.
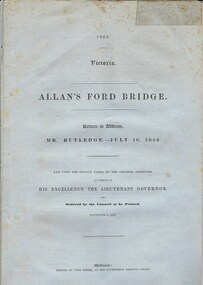
Document, Allan’s Ford Bridge 1852, 1852
... Warrnambool and District Historical Society Inc. 2 Gilles Street (south of Merri St) Warrnambool great-ocean-road This is an original Victorian Government document containing the printed version of 37 reports and letters regarding the building of the first Allansford bridge completed early in 1852. ...This is an original Victorian Government document containing the printed version of 37 reports and letters regarding the building of the first Allansford bridge completed early in 1852. The correspondence dates from October 1850 to February 1852 and includes letters and reports from Melbourne Government employees such as Robert Hoddle, Chief Surveyor, David Lennox, Superintendent of Bridges and Lieutenant – Governor Charles La Trobe. The correspondence from local settlers included the names of William and John Allan, John Davidson and James Coulstock. The correspondence shows that some settlers in the Warrnambool/Port Fairy district wanted a portion of the Government allocated funds spent on the local roads and bridges in other locations. The 1852 Allansford bridge cost £480 and was replaced in 1870. This document has strong historical significance as it relates to one of the earliest State government works in the district and records the public imput into the decision.. It contains opinions and correspondence between a number of early settlers in the district at the time.Grey/blue paper document with black text. 21 pages plus 4 page index at back.allan's ford 1852, allansford bridge, allansford, history of allansford, warrnambool -
 Warrnambool and District Historical Society Inc.
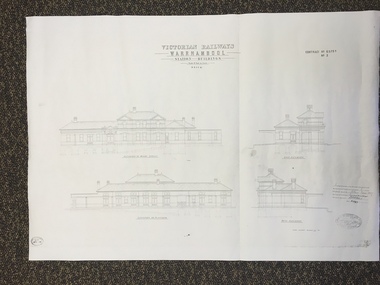
Map, Victorian Railway W'bool No1 & No2, 1897
... Warrnambool and District Historical Society Inc. 2 Gilles Street (south of Merri St) Warrnambool great-ocean-road These two sheets show the 1897 plans drawn up by the Victorian Railways for the erection of the Warrnambool Railway Station building. ...These two sheets show the 1897 plans drawn up by the Victorian Railways for the erection of the Warrnambool Railway Station building. It is a two-storey building still existing today. The railway came to Warrnambool in 1890 and they must have used temporary buildings for seven years before this railway building was erected. It had offices, booking counter and public facilities on the ground floor and housing for the Station Master on the first floor. The building erected was a typical design for country town railway stations and many of similar design were erected in the 1880s and 90s. These plans are important because they show clearly the design of the Warrnambool Railway Station buildings when they were first erected in the 1890s.They will be very useful for researchers. The coming of the railway was a significant event in Warrnambool’s history and did much to make the port and shipping a less viable proposition.These are two architect’s plans and drawings of the Warrnambool Railway Station building (1897). The drawings are black and white and the first plan shows the ground floor plan and the first floor plan and the outbuildings. The second plan shows drawings of the building with its elevation to the platform and its elevation to Merri Street. There are two stamps of the Railways Department, Melbourne. These are copies, not originals. ‘Victorian Railways, Warrnambool, Station Buildings, Scale 8 feet to one inch, Contract No. 6379B (Nos. 1 and 2)’warrnambool, railway station buildings -
 Warrnambool and District Historical Society Inc.
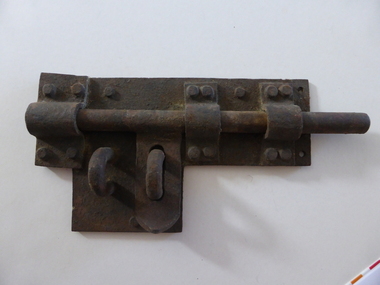
Artefact, Old gaol lock, c.1880
... Historical Society Inc. 2 Gilles Street (south of Merri St) Warrnambool great-ocean-road This lock was once used in the old 19th century gaol in Gilles Street, Warrnambool. The gaol is part of a group of four heritage buildings which comprise a police station, a police residence, police stables as well as the gaol. These were built between 1883 and 1888 from the designs of the Victorian ...This lock was once used in the old 19th century gaol in Gilles Street, Warrnambool. The gaol is part of a group of four heritage buildings which comprise a police station, a police residence, police stables as well as the gaol. These were built between 1883 and 1888 from the designs of the Victorian Public Works Department architect, E.R. Laver. He was responsible for the designs of many 19th century country police stations, post offices and courthouses in Victoria. The four heritage buildings, of which the gaol is one, are important because they are some of the few surviving Warrnambool 19th century bluestone buildings. Today they form part of the South West Tafe Complex. This lock is of considerable interest as one used in the Warrnambool 19th century gaol building. The door on which it was used appears to be walled up now. This is a large iron lock with a base plate with three rivets and a projection piece. There are three curved iron pieces on the plate and these are fixed to the plate with 12 rivets. The bolt is rounded and moves under the three curved pieces across the plate. There are two other curved pieces, part of the bolt locking system. The lock has surface rust. warrnambool police and gaol heritage buildings, history of warrnambool -
 Warrnambool and District Historical Society Inc.
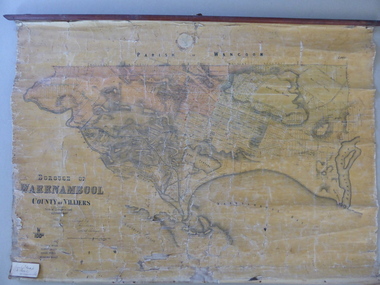
Mao, Borough of Warrnambool, County of Villiers, 1873
... Historical Society Inc. 2 Gilles Street (south of Merri St) Warrnambool great-ocean-road This is an early map of the Borough of Warrnambool (1872/3) showing the central town area of Warrnambool and the surrounding district. Reserves, public buildings and some businesses are marked. The map was photolithographed by John Noone, a Melbourne artist and photographer who claimed in 1858 to have the oldest-existing photographic studio in Melbourne. Photolithography was a process first developed in Melbourne. For several years Noone was the official photographer for the Victorian ...This is an early map of the Borough of Warrnambool (1872/3) showing the central town area of Warrnambool and the surrounding district. Reserves, public buildings and some businesses are marked. The map was photolithographed by John Noone, a Melbourne artist and photographer who claimed in 1858 to have the oldest-existing photographic studio in Melbourne. Photolithography was a process first developed in Melbourne. For several years Noone was the official photographer for the Victorian Crown Lands Office and for the Victorian Public Library and Museum. The map has the stamp of the seller of the map – Charles Hider, the well-known stationer and bookseller in Timor Street, Warrnambool. The owner of the map, Henry George Marfell, (1883-1962) was the son of John and Mary Ann Marfell. The Marfells were well-known in Warrnambool as grain merchants and managers of the Warrnambool Co-Operative Milling Company. It is surmised from the writing on the Marfell label that this map was at some stage given by Henry Marfell to the old Warrnambool MuseumThis map of early Warrnambool is of considerable significance, firstly because its original state and early date (1873) make it of antiquarian and historical interest. Also the connection with the names, Charles Hider and Henry Marfell and the old Museum gives it added provenance and interest.This is a wax paper map mounted on cloth. At the top it is attached by nails to a piece of wood and at the top it has a cloth ring for hanging the map. The map is in black shadings on a yellow background. The map is badly creased and coming away from the cloth at the edges and at other various points. There is some red or pink marking or staining on the township area of the map (originally the sold lands on this map were coloured in brown and the reserves, buildings, etc in pink). On the left hand corner there is a piece of paper glued on with some handwriting in ink (Marfell). There is also the stamp of the seller of the map – Charles Hider, stationer and bookseller, of Timor Street Warrnambool‘Early Map of W’bool, H.G. Marfell’ history of warrnambool, charles hider, henry marfell -
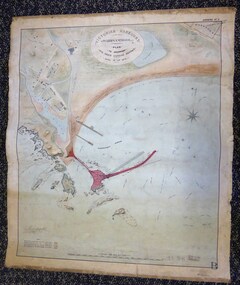 Warrnambool and District Historical Society Inc.
Map - Warrnambool Port 1879, 1879
... Warrnambool and District Historical Society Inc. 2 Gilles Street (south of Merri St) Warrnambool great-ocean-road The port facilities in Warrnambool Bay were in constant use from the first years of Warrnambool’s settlement but there were also difficulties for the shipping trade – a small and unsafe anchorage, the lack of loading facilities and little natural protection from the southerly gales. From the 1870s on there was local agitation for some sort of Breakwater to be built and an Andrew Kerr design was approved by the Warrnambool Council but no funds were made available from the Victorian Government. Throughout the 1870s the building ...The port facilities in Warrnambool Bay were in constant use from the first years of Warrnambool’s settlement but there were also difficulties for the shipping trade – a small and unsafe anchorage, the lack of loading facilities and little natural protection from the southerly gales. From the 1870s on there was local agitation for some sort of Breakwater to be built and an Andrew Kerr design was approved by the Warrnambool Council but no funds were made available from the Victorian Government. Throughout the 1870s the building of a Breakwater was a major political issue in the district with preliminary work being funded and started in 1874. In 1879 the Government agreed to a further inspection of the area and an official report. Sir John Coode (1816-1892) was commissioned to make this report. He had come to Australia in 1872 to advise on harbour construction. Coode recommended a 1800 feet long Breakwater and wharf connected to the shore and it was this proposal that the plan described herein and drawn up in 1879 was to accompany. The original plan was eventually modified because of the cost and a Breakwater was completed in 1890 under the direction of the engineer, Arthur Dudley Dobson, with extensions early in the 20th century. This plan is of great interest as it shows in simple graphic form the original plans proposed by Sir John Coode for the Warrnambool Breakwater. It is therefore of great historical importance. The Breakwater was not the maritime success that it was hoped it would be but it is today a significant feature of our foreshore. This is a Plan drawn up in 1879 by Victorian Harbours to accompany Sir John Coode’s Report on the proposed Warrnambool Breakwater. The chart detail is hand-drawn and hand-tinted on canvas with the names of places, geographical and marine features and local points of interest added in print. The edges of the chart are rubbed and the chart is somewhat faded and dirty but the main colours of red, green and brown are still clearly discernible. The title of the plan is printed in an oval inset at the top of the chart. The plan shows two possible Breakwater designs, one from the Borough Surveyor (Andrew Kerr?) and one from Sir John Coode.Victorian Harbours Warrnambool Plan to accompany Sir John Coode’s report Dated 28th Feby 1879 warrnambool breakwater, andrew kerr, sir john coode, arthur dudley dobson, warrnambool, warrnambool harbour, warrnambool history, warrnambool beach -
 Warrnambool and District Historical Society Inc.
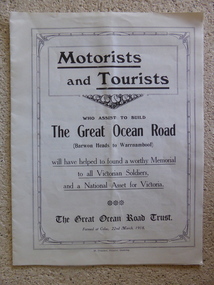
Leaflet, Motorists and Tourists
... Warrnambool and District Historical Society Inc. 2 Gilles Street (south of Merri St) Warrnambool great-ocean-road This leaflet published by The Great Ocean Road Trust in 1918 gives information about the proposed building of the Great Ocean Road from Barwon Heads to Warrnambool as a memorial to Victorian soldiers in World War One. ...This leaflet published by The Great Ocean Road Trust in 1918 gives information about the proposed building of the Great Ocean Road from Barwon Heads to Warrnambool as a memorial to Victorian soldiers in World War One. The President of the Trust, which was a private company seeking donations from the public, was Howard Hitchcock, the Mayor of Geelong. The Memorial Great Ocean Road commenced in 1919 with 3000 ex-servicemen employed to build the road. In 1932 the road was completed to Apollo Bay and in 1936 the road was officially handed into the care of the State Government. This leaflet is of some significance as it shows the initial efforts by Howard Hitchcock of Geelong and a private trust to build the Great Ocean Road in Victoria. This road is today of international significance This is an unbound leaflet of 8 pages (almost A4 size) folded into two insert pages. It has 10 photographs of views along the Great Ocean Road and typed information on the Great Ocean Road Trust and its Building Appeal. It was produced in 1918.great ocean road, great ocean road trust 1918, warrnambool history, memorial great ocean road -
 Kiewa Valley Historical Society
Papers - Falls Creek Tourist Area Management Committee, August 1984
... Historical Society Mount Beauty Information Centre 31 Bogong High Plains Rd Mt Beauty high-country Falls Creek is a ski resort in the north east of Victoria on the Bogong High Plains. Members of business's (accommodation & restaurants) formed the Falls Creek Chamber of Commerce to promote tourism 'under' the Falls Creek Tourist Area Management Committee. The Falls Creek Tourist Area Management Committee under the direction of the State Electric Commission of Victoria came into effect in 1959 and from then on building sites were leased and building and sewerage controls were applied. In 1979 the Victorian ...Falls Creek is a ski resort in the north east of Victoria on the Bogong High Plains. Members of business's (accommodation & restaurants) formed the Falls Creek Chamber of Commerce to promote tourism 'under' the Falls Creek Tourist Area Management Committee. The Falls Creek Tourist Area Management Committee under the direction of the State Electric Commission of Victoria came into effect in 1959 and from then on building sites were leased and building and sewerage controls were applied. In 1979 the Victorian State Government had established the Ski Industry of Victoria working party with a brief report on its operation. These papers give an insight into the business of the Falls Creek Chamber of Commerce in 1984 eg. car parking, noise, closure of the resort due to heavy snow falls, the media and general development of the resort. Local business people are named as attending the meeting indicating many non English surnames. 4 yellowed papers typed on both sides of the first 3 pages. irst paper has 6 items listed re Falls Creek Chamber of Commerce / Sub Committee on General Booking Conditions.Dated 15th August 1984 Next 3 papers dated 13th August 1984 Falls Creek Chamber of Commerce / Minutes of General Meetingfalls creek, ski resort, bogong high plains, falls creek chamber of commerce, snow, ski lodges, -
 Kiewa Valley Historical Society
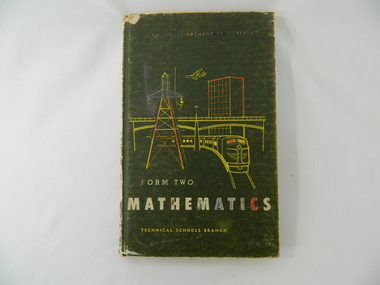
Book - Maths, Wilke and Co P/L, Form Two Mathematics, 1965
... Historical: Comparison of the teaching of Mathematics in Victorian schools. Provenance: Davies family. education. schools. davies family. mathematics. Education Department of Victoria (in white but coloured in) / Form Two / Mathematics / Technical Schools Branch Inside back of cover some scribbled maths. On first page: Kerrie Davies Dark green hard covered book with sketch of power line, bridge, multi storey building ...Educational book for teaching mathematics in Form 2 in Victoria. Kerrie Davies lived in the Kiewa Valley on a dairy farm.Historical: Comparison of the teaching of Mathematics in Victorian schools. Provenance: Davies family.Dark green hard covered book with sketch of power line, bridge, multi storey building and train in yellow and re. Writing in white.Education Department of Victoria (in white but coloured in) / Form Two / Mathematics / Technical Schools Branch Inside back of cover some scribbled maths. On first page: Kerrie Davieseducation. schools. davies family. mathematics. -
 Kiewa Valley Historical Society
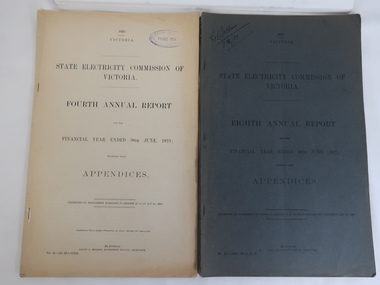
Books - SECV Annual Reports 1920-1948
... Kiewa Valley Historical Society Mount Beauty Information Centre 31 Bogong High Plains Rd Mt Beauty high-country 28 books - SECV Annual Report covering the financial year with Appendices from March 1919 to June 1920 to year ending June 1948. Presented to Parliament pursuant to section 35 (b). The Victorian government owned the electrical company in Victoria supplying electricity for lighting of public buildings ...28 books - SECV Annual Report covering the financial year with Appendices from March 1919 to June 1920 to year ending June 1948. Presented to Parliament pursuant to section 35 (b). The Victorian government owned the electrical company in Victoria supplying electricity for lighting of public buildings, street lighting and electrical trams. Brown coal was the main source of supply. The SECV commenced on 10th January 1921 having earlier been known as the Electricity Commissioners in 1919-1921. The SEC was privatised in the 1990s. The Kiewa Scheme was approved in 1937 but its start was delayed due to WWII. The reports include references to Kiewa Hydro Electric Scheme early on. The papers are a primary source as they were presented to Parliament as true documents and hence valuable for research.Foolscap pages held togeether by 2 or 3 staples at the spine.The cardboard cover is a blue grey with printed black title. Varying number of pages from perhaps 40 to 70. The reports are 'together with Appendices'. Also SEC 1951 logo transferssecv 1951 transfers, secv reports with appendices -
 Kiewa Valley Historical Society
Poster Brochure, Mt Beauty Tawonga Heart Of Victoria's High Country, Circa 1995
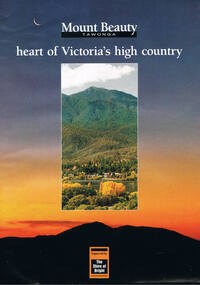
... Historical and the social-economical development at circa 1995 of land usage and residential buildings style.Major social events e.g. Festival of the Bogong Moth and the Mt Beauty Mardi Gras. It is also a good historical record of tourism campaigns of the Alpine Shire and Mt Beauty Chamber of Commerce. Also see "KVHS 0125" tourism mt beauty tawonga photographs victorian ...The Item is a pictorial time piece of the valley and usage, farms,industry,town area, vegetation and winter snow levels Historical and the social-economical development at circa 1995 of land usage and residential buildings style.Major social events e.g. Festival of the Bogong Moth and the Mt Beauty Mardi Gras. It is also a good historical record of tourism campaigns of the Alpine Shire and Mt Beauty Chamber of Commerce. Also see "KVHS 0125"Brochure folds out from a 20.5cm x 29.5cm to 82cm x 29.5cm poster type documentinside panoramic photo of snow tipped alpine mountain range incorporating the Mount Beauty township, farming area of the Kiewa Valley and relevant tourist orientated informationtourism mt beauty tawonga photographs, victorian alps -
 Kiewa Valley Historical Society
Mug Stoneware
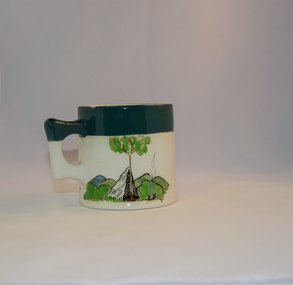
... Kiewa Valley Historical Society Mount Beauty Information Centre 31 Bogong High Plains Rd Mt Beauty high-country This ceramic mug is titled "Bill Bogong's Mug" in honour of one of Australia's Scouting (Rovers) notable office holders, Mr.W.F."Bill" Waters. He was born on 22nd August 1897 in Taralgon, Victoria, Australia and died 8th October 1968 in Fitzroy, Victoria. He was instrumental in the Rovers building two chalets in the Victorian ...This ceramic mug is titled "Bill Bogong's Mug" in honour of one of Australia's Scouting (Rovers) notable office holders, Mr.W.F."Bill" Waters. He was born on 22nd August 1897 in Taralgon, Victoria, Australia and died 8th October 1968 in Fitzroy, Victoria. He was instrumental in the Rovers building two chalets in the Victorian Alps. The Victorian Award of the National Rover Service Award(1980) has been named after Bill Waters. Bill Waters was also the leader of the first team that climbed Mount Bogong in winter in 1929. Also was part of rescue team of what is now know as the Cleve Cole tragedy on Mt Bogong in the mid 1930's. There is also a water fall named after him Waters Falls on the Bogong High Plains. W.F."Bill" Waters aka "Bill Bogong" (Bogong mountain, were his ashes were scattered), was not only a prominent bush walker (Melbourne Walking Club) of the high country (Victorian Alps) but was instrumental in establishing two Chalets. One of these Chalets was the first one to be built on the Bogong High Plains. This item, "Bill Bogong's Mug" is what the Flinders Petrie(famous English Egyptologist/Archaelogist) Rover Crew(formed in 1940) presented newly invested members of the exclusive(200 membership) Alpine Rover Crew. The Melbourne Walking Club has a long history with the Victorian High Plains area, of which the Kiewa Valley is an integral part of the Victorian Alpine Region. Due to the connections Bill Waters has with the Bogong High Plains and Mt Bogong this cup has a lot of significance to the social history of the area.. Round glazed stoneware mug, white in colour, with a heritage green coloured band covering the top rim and handle. Written inscription on the front "Bill Bogong's Mug" in large print and beneath it, in smaller print, "with compliments from Flinders Petrie Rover Crew" The other side of the mug is a free hand landscaped drawing of green bush and blue hills with a tree supporting a tent and a camp fire (with smoke rising from it).To the left of the inscription is the Scout (Rover) emblem coloured black with an unraveled and unwritten signage scroll fowler ceramics, local alpine history, alpine rovers, scouts, mugs, mt bogong, bogong high plains -
 Kiewa Valley Historical Society
Photograph Transmission lines Mount Beauty, 66 KVA Transmission lines from Clover Power Station, Circa 1950
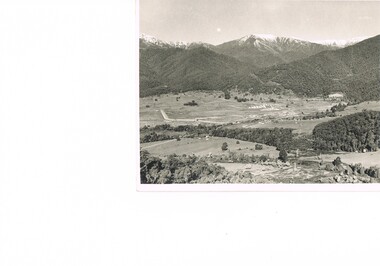
... Kiewa Valley Historical Society Mount Beauty Information Centre 31 Bogong High Plains Rd Mt Beauty high-country This photograph is a "snap shot" in time circa 1950s detailing the rural environmental change and the progressive effects of the Kiewa Valley Hydro Scheme on the basic rural setting of the valley (note the sparsity of rural infrastructure). This photograph shows the beginning of the accommodation and administration buildings for use by the construction workers and auxiliary administration employees of the Victorian ...This photograph is a "snap shot" in time circa 1950s detailing the rural environmental change and the progressive effects of the Kiewa Valley Hydro Scheme on the basic rural setting of the valley (note the sparsity of rural infrastructure). This photograph shows the beginning of the accommodation and administration buildings for use by the construction workers and auxiliary administration employees of the Victorian State Electricity Commission. It also provides a view of the landscape before extensive development of Pondage and other non rural buildings.This photograph details a dramatic period in time which saw an enormous change to the exclusively rural area of the Kiewa Valley region in the mid 1900s (see sparse rural buildings/houses). This change presented both physical and mental challenges to the existing quiet rural inhabitants of the valley. The State of Victoria had to make adjustments to the changing demands imposed by population and industrial expansions. The development of cleaner energy supplies to a growing population has its downside ,which ever way the intrusion into the "natural" landscape is made. The construction of the large Pondage at the centre of the photograph is a good example.This black and white photograph of a panoramic view of the Kiewa Valley (Mount Beauty SEC construction workers village) shows the newly completed transmission line towers delivering electrical power(66KVA) from the Clover Power Station. The photo is on 200gms paper and not on special photographic paper.mount beauty 1940 to 1950s, development of sec kiewa hydro scheme, sec victoria -
 Port of Echuca
Colour photograph, Approx 1979
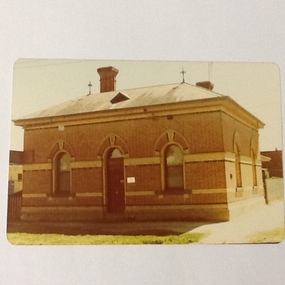
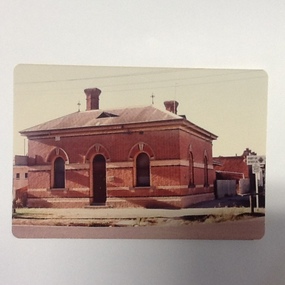
... Building classified B by National Trust. Customs houses, of similar design, were built along the Murray river to collect taxes on goods transported from N. S. W. to Victoria. The taxes were collected up until Federation in 1901. The Victorian railways used it as an office until about the 1960 when it became a private dwelling. The Customs House at Echuca is now owned by The Port of Echuca and has been used to house a wine tasting businesses, cafe and local produce retail and art gallery. customs house, echuca echuca historical ...Customs building: built 1884 to handle goods entering Victoria up to 1901. Building classified B by National Trust.Customs houses, of similar design, were built along the Murray river to collect taxes on goods transported from N. S. W. to Victoria. The taxes were collected up until Federation in 1901. The Victorian railways used it as an office until about the 1960 when it became a private dwelling. The Customs House at Echuca is now owned by The Port of Echuca and has been used to house a wine tasting businesses, cafe and local produce retail and art gallery.Colour photograph of Customs House at Echuca port.In ink on reverse: "8A"customs house, echuca, echuca historical buildings, echuca, port of (customs history) -
 Port of Echuca
Colour Photograph, Approx.1979
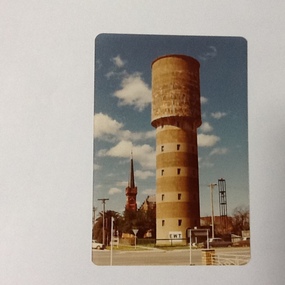
... Victorian State Electricity Commission. Monash University was named after him. The water tower was a revolutionary design in 1915., being constructed of reinforced concrete. It also brought tapped water to people's homes. Sir John Monash made a huge contribution to engineering and social concepts, which was why he was knighted. As well as these contributions to social development, he was also a war hero. echuca, water tower echuca-historical buildings ...The water tower on the corner of Pakenham St and High Street Echuca, was designed by Sir John Monash, who was an innovator in the use of reinforced concrete. The tower cost £2,973 and was completed in 1915. It is 108 feet high and holds 150,000 gallons. it was originally connected to the steam powered pumping plant at Echuca East. John Monash was a war hero at Gallipoli in 1915 and also went on to be the Manager of the Victorian State Electricity Commission. Monash University was named after him.The water tower was a revolutionary design in 1915., being constructed of reinforced concrete. It also brought tapped water to people's homes. Sir John Monash made a huge contribution to engineering and social concepts, which was why he was knighted. As well as these contributions to social development, he was also a war hero. Colour photograph of water tower on the south east corner of High and Pakenham street, Echuca. The St Andrews church tower can be seen in the background.On the front of the photograph on the bottom facade of the water tower is painted "E.W.T." (Echuca Water Trust). Printed on the reverse:" this paper manufactured by Kodak"echuca, water tower, echuca-historical buildings, monash, sir john, reinforced concrete building construction -
 Port of Echuca
Colour photograph, 1977
... Building classified B by National Trust. Customs houses, of similar design, were built along the Murray river to collect taxes on goods transported from N. S. W. to Victoria. The taxes were collected up until Federation in 1901. The Victorian railways used it as an office until about the 1960 when it became a private dwelling. The Customs House at Echuca is now owned by The Port of Echuca and has been used to house a wine tasting businesses, cafe and local produce retail and art gallery. customs house, echuca echuca historical ...Customs building: built 1884 to handle goods entering Victoria up to 1901. Building classified B by National Trust.Customs houses, of similar design, were built along the Murray river to collect taxes on goods transported from N. S. W. to Victoria. The taxes were collected up until Federation in 1901. The Victorian railways used it as an office until about the 1960 when it became a private dwelling. The Customs House at Echuca is now owned by The Port of Echuca and has been used to house a wine tasting businesses, cafe and local produce retail and art gallery.Colour photograph of Customs House at Echuca port.In ink on reverse: Dec.77-M: Print made by Kodak: Kodak. In pencil Customs Housecustoms house, echuca, echuca historical buildings, echuca, port of (customs history) -
4th/19th Prince of Wales's Light Horse Regiment Unit History Room
Book, Military Historical Society of Australia, Victorian Branch, Alfred N Festberg: Australian Army Insignia 1903-1966, 3:MMMM, 1967 (exact)
... 4th/19th Prince of Wales's Light Horse Regiment Unit History Room 4/19 PWLH Regiment, Building 78 Simpson Barracks Macleod melbourne australian army insignia badges alfred n festberg arthur g genders miltary historical society of australia Inscribed by author: "To the Museum Alfred Festberg 9 Nov 78" Illustrations of Australian Army Insignia 1903-1966. Compiled by Alfred N Festberg, Photography by Arthur G Genders Published by Military Historical Society of Australia, Victorian ...Illustrations of Australian Army Insignia 1903-1966. Compiled by Alfred N Festberg, Photography by Arthur G Genders Published by Military Historical Society of Australia, Victorian Branch, 1967.Inscribed by author: "To the Museum Alfred Festberg 9 Nov 78"australian army, insignia, badges, alfred n festberg, arthur g genders, miltary historical society of australia -
 Ararat & District Historical Society (operating the Langi Morgala Museum)
Photograph
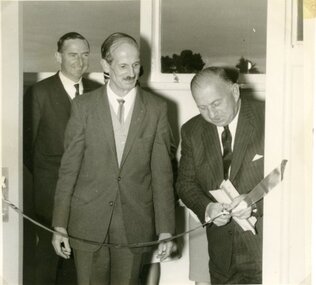
... Ararat & District Historical Society (operating the Langi Morgala Museum) 48 Queen Street Ararat grampians Locally significant because the photo shows then Victorian Premier Henry Bolte opening a building in Ararat Written on back: Henry Bolte, Jack Bunting Black and white photograph of three men. ...Locally significant because the photo shows then Victorian Premier Henry Bolte opening a building in AraratBlack and white photograph of three men. Man on right is cutting a ribbon with a pair of scissorsWritten on back: Henry Bolte, Jack Bunting -
Marysville & District Historical Society
THE TRIANGLE NEWS-VOL 36 NO 15-MAY 1 2009
... Marysville & District Historical Society 39 Darwin Street Marysville yarra-valley-and-the-dandenong-ranges marysville victoria australia postcards from morocco travel diary buxton residents what's on when narbethong & granton community meeting men's breakfast buxton progress assocn alexandra cinema narbethong community & tourism group mobile vet family fishing festival eildon pondage narbethong community old hall site new building ideas narbethong public hall committee free bus service free shoulder bags advertisements triangle distribution & fire relief centre murrindindi shire council councillor comment rebuilding our community first steps church notices welcome back to marysville greaternoosa-virgin blue big sister program victorian bushfire appeal grants marysville medical clinic alexandra community health in buxton temporary relocation opportunities begin buxton rural fire brigade fire restrictions wanted local musicians welcome back flags public health forum men's health merv hughes marysville golfers meet golfer peter thompson community recovery update mayor's chair update on buxton gym suggestion health & wellbeing dangers of isolation p/t vacancy business recovery officer new beginnings fellowship paster conrad & ruth halyburton marysville community facility THE TRIANGLE NEWS-VOL 36 NO 15-MAY 1 2009 ...marysville, victoria, australia, postcards from morocco, travel diary buxton residents, what's on when, narbethong & granton community meeting, men's breakfast, buxton progress assocn, alexandra cinema, narbethong community & tourism group, mobile vet, family fishing festival, eildon pondage, narbethong community, old hall site new building ideas, narbethong public hall committee, free bus service, free shoulder bags, advertisements, triangle distribution & fire relief centre, murrindindi shire council, councillor comment, rebuilding our community first steps, church notices, welcome back to marysville, greaternoosa-virgin blue big sister program, victorian bushfire appeal grants, marysville medical clinic, alexandra community health in buxton temporary relocation, opportunities begin, buxton rural fire brigade, fire restrictions, wanted local musicians, welcome back flags, public health forum men's health, merv hughes, marysville golfers meet golfer peter thompson, community recovery update, mayor's chair, update on buxton gym suggestion, health & wellbeing, dangers of isolation, p/t vacancy business recovery officer, new beginnings fellowship, paster conrad & ruth halyburton, marysville community facility -
 Orbost & District Historical Society
minute book, 24.8.1884 - 19.11.1926
... Victorian Mechanics' Institute was the Melbourne Mechanics' Institute established in 1839. From the 1850s, Mechanics' Institutes quickly spread throughout Victoria wherever a hall or library, or a school was needed. This ledger was used by the Orbost Mechanics' Institute from 1884 until 1926. The item was donated to Orbost & District Historical society from P.R.O.V. as a Place of Deposit (POD) item for safe keeping by a local history group or museum. The Mechanics' Institute was a very early feature of the Orbost community. The building ...A Mechanics’ Institute hall was constructed in 1885 and opened as Orbost's first library. It was situated in Browning Street, Orbost. The hall is still in use today as a community venue. Mechanics' Institutes are the forerunners of public libraries and adult education in Australia. The origin of mechanics' institutes is attributed to Dr George Birkbeck, who in 1799 gave a series of free lectures for the working men of Glasgow. At the time, 'mechanic' meant artisan, tradesman or working man. The movement spread quickly throughout the British Empire. The first Victorian Mechanics' Institute was the Melbourne Mechanics' Institute established in 1839. From the 1850s, Mechanics' Institutes quickly spread throughout Victoria wherever a hall or library, or a school was needed. This ledger was used by the Orbost Mechanics' Institute from 1884 until 1926. The item was donated to Orbost & District Historical society from P.R.O.V. as a Place of Deposit (POD) item for safe keeping by a local history group or museum.The Mechanics' Institute was a very early feature of the Orbost community. The building became a community facility used for a variety of essential civic needs in particular a library. It also provided a suitable venue for community social requirements and functions.A heavy minute book with faded black covers and brown binding. The edges of the pages are marbled as are the end covers. Pages inside are blue with hand-written black ink records. It contains minutes from the Orbost Mechanics Institute.on spine on red leather in gold lettering: "MINUTE BOOK"minute-book orbost-mechanics'-institute -
 Orbost & District Historical Society
framed photo, APFA- Davisigns (PG & ME Davis)
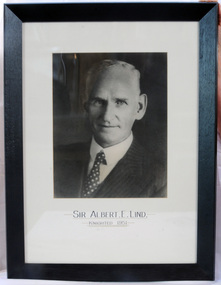
... Historical Society Ruskin Street Orbost gippsland This photo was inherited with the building when the museum was established. Lind was born in 1878 in East Charlton, Victoria, the son of Oliver Nicholas Lind, a farmer from Denmark, and his Welsh wife Mary Ann Clay. In 1882, drought forced the family to move to East Gippsland where Lind was educated at Lucknow, and then to Bairnsdale in 1884 where he attended Bairnsdale state school. In October 1920, he was elected to the Victorian ...This photo was inherited with the building when the museum was established. Lind was born in 1878 in East Charlton, Victoria, the son of Oliver Nicholas Lind, a farmer from Denmark, and his Welsh wife Mary Ann Clay. In 1882, drought forced the family to move to East Gippsland where Lind was educated at Lucknow, and then to Bairnsdale in 1884 where he attended Bairnsdale state school. In October 1920, he was elected to the Victorian Legislative Assembly for the seat of Gippsland East for the Victorian Farmers' Union. Lind was made Minister of Forests, President of the Board of Land and Works and Commissioner of Crown Lands and Survey in Albert Dunstan's cabinet. He was knighted in 1951. In 1926 two national parks east of Orbost were named the Albert and the Lind national parks after him.A framed photo of Sir Albert Eli Lind. It is a black and white head and shoulders photo in a black wooden frame.Sir Albert E. Lind Knighted !951photograph politician lind-albert government -
 Orbost & District Historical Society
bridge spikes, 1922
... Orbost & District Historical Society Ruskin Street Orbost gippsland These spikes are from the old Snowy River bridge (the second) constructed in 1922 alongside the previous suspension bridge. Its building was a combined effort of the Victorian ...These spikes are from the old Snowy River bridge (the second) constructed in 1922 alongside the previous suspension bridge. Its building was a combined effort of the Victorian Railways and the Country Roads Board at a cost of 35,000 pounds. It was replaced in 1976 by the present bridge after several major floods.These items are from a significant piece of infrastructure built in Orbost in the early 20th century. This bridge no longer exists.Twenty-four iron spikes of four different lengths. They are probably hand-made and have round shafts and heads. They are very rusty.snowy-river-bridge bridge-spikes bridge orbost -
Federation University Historical Collection
Document - Victorian Institute of Colleges, Papers collected by E.J Baker related to Victorian Institute of Colleges
... Historical Collection Federation University Australia, Mt Helen Campus Federation University Australia E.J. Barker Library (top floor) Mount Helen goldfields E.J. Barker is a past principal of the School of Mines Ballarat and the Library at the Mt Helen Campus is named after him. School of Mines is a predecessor of Federation University Victorian Institute of Colleges Affiliation School of Mines and industries Ballarat Application for Affiliation Possible Future Building ...E.J. Barker is a past principal of the School of Mines Ballarat and the Library at the Mt Helen Campus is named after him. School of Mines is a predecessor of Federation UniversityVarious documents and reports relating to Victorian Institute of Colleges victorian institute of colleges, affiliation, school of mines and industries ballarat, application for affiliation, possible future building developments, e.j. barker, report to council, r.w. hinkley, vicsac, newsletter, ballarat centenary issue, john sharpham, media information, evan walker, jack barker, western business, bcae fights for its name, sir henry bolte, smb to have high priority, act, report, ballarat college of advanced education -
Federation University Historical Collection
Document - Document - Ballarat School of Mines, Documents relating to Ballarat School of Mines: Collected by Jack Barker, 1960s to 1980s
... Historical Collection Federation University Australia, Mt Helen Campus Federation University Australia E.J. Barker Library (top floor) Mount Helen goldfields E.J. Barker is a past principal of the School of Mines Ballarat and the Library at the Mt Helen Campus is named after him. Papers relate to building extensions. roads, speeches over three decades. E.J. Barker lydiards street south closure staff structure 1970 building developments 1965 regional colleges higher education melbourne university college of advanced education affiliation professor don aitkin address staffing management ballarat teachers college victorian ...E.J. Barker is a past principal of the School of Mines Ballarat and the Library at the Mt Helen Campus is named after him. Papers relate to building extensions. roads, speeches over three decades. Various documents, charts, correspondence collected by E.J. Barkere.j. barker, lydiards street south closure, staff structure 1970, building developments 1965, regional colleges, higher education, melbourne university, college of advanced education, affiliation, professor don aitkin address, staffing, management, ballarat teachers college, victorian institute of colleges, smb personnel, retirements, obituaries, a f heseltine report -
 Federation University Historical Collection
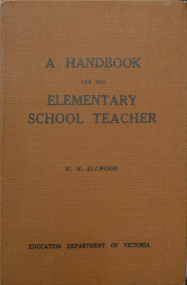
Book, A Handbook for the Elementary School Teacher, 1959, 1959 (reprint)
... Historical Collection Federation University Australia, Mt Helen Campus Federation University Australia E.J. Barker Library (top floor) Mount Helen goldfields w.h. ellwood ballarat teachers' college pre-service teachers elementary school teacher education gazette j.a. seitz speech arts oral expression reading poetry handwriting spelling grammar written expression rural school teacher grounds buildings and furnishings equipment and aids discipline infant department Brown hard covered book by W.H. Ellwood, former Principal of the Ballarat Teachers' College, and Chief Inspector of Schools for the Victorian ...Brown hard covered book by W.H. Ellwood, former Principal of the Ballarat Teachers' College, and Chief Inspector of Schools for the Victorian Education Department. The articles had previously been published in the Victorian Education Gazette.w.h. ellwood, ballarat teachers' college, pre-service teachers, elementary school teacher, education gazette, j.a. seitz, speech arts, oral expression, reading, poetry, handwriting, spelling, grammar, written expression, rural school teacher, grounds, buildings and furnishings, equipment and aids, discipline, infant department