Showing 699 items matching "19 set"
-
 Ballarat Tramway Museum
Photograph - Black & White Photograph/s - set of 4, George Bishop, Dec. 1971
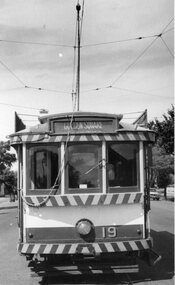
Set of four Black and white photographs of Bendigo No. 19 at or near Golden Square terminus 12/1971. Photos by George Bishop. .1 - End of view of tram at terminus, showing destination "Golden Square" .2 - Tram nearing terminus .3 - Tram arriving at terminus .3 - View of tram at terminus and with conductor about to turn the pole with Billy Rodda's Golden Square Hotel in the background. No. 19 has two SEC roof advertisements for electric cooking.On the back of the photos in ink or pencil in ink are captions regarding No. 19, Golden Square, Bendigo and "George Bishop Photo"tramways, trams, bendigo, golden square, tram 19 -
 Ballarat Tramway Museum
Postcard - Folder set, Murray Views, "Pictorial Souvenir of Ballarat - Views in Colour", 1940's
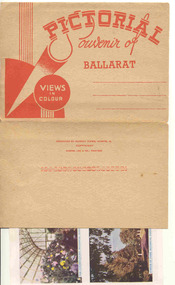
... Of Honour Memorial Gardens Lydiard St Eureka tram 19 Set of 10 small ...Demonstrates pictorial souvenir strips of photographs of Ballarat, both colour and black and white and yields information about Ballarat c 1940.Set of 10 small colour and 5 large black and white views of Ballarat printed on a folded strip, glued within a light brown colour light weight cardboard folder, titled "Pictorial Souvenir of Ballarat - Views in Colour". Booklet printed with an address area with title in red and kookaburras. Produced by Murray View, Gympie Queensland. The rear has a slit surrounded by red dashes on the rear cover that allowed the folder to be secured. Pictures are: Colour: 1. Statutory Pavilion 2. Sturt St looking west - with a tram in the bottom of the photograph 3. Victory Arch 4. Queen Elizabeth Benevolent home 5. Queen Victoria Memorial Gardens 6. Swans on Lake Wendouree 7. The Conservatory 8. Avenue of Fame (Prime Ministers) 9. Eureka Stockade 10. Cnr Sturt and Lydiard St, with a bus in the view Black and White 1. The State Building 2. Panorama from Black Hill 3. Old Curiosity Shop 4. Reflections - Botanical Gardens 5. Sturt St looking east - has a tram in the view, with 1930's SEC colour scheme. trams, tramways, sturt st, town hall, lake wendouree, memorial arch avenue of honour, memorial, gardens, lydiard st, eureka, tram 19 -
 Ballarat Tramway Museum
Photograph - Colour Print/s - set of 3, Carolyn Dean, 19/09/1992 12:00:00 AM
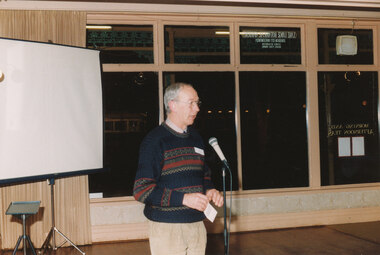
Has a strong association with Neville Gower, one of the Museum founders, Richard Gilbert and a strong supporter, Bob Merchant.Colour print of Neville Gower speaking at the 21st anniversary celebrations of the BTM, 19 September 1992. Printed on Kodak paper. 4114.1 - Same event - Richard Gilbert 4114.2 - Bob Merchant21st anniversary, lake lodge -
 Ballarat Tramway Museum
Photograph - Black and White photograph/s - mounted, State Electricity Commission of Victoria (SECV), c1936
Demonstrates an aspect of tram operations and yields information about the accidents that some trams suffered and how this was presented following the reconstruction era by the SEC of the Ballarat Tramway system.Set of eight black and white prints of accidents to trams 16 and 14, mounted onto a grey light cardboard sheet. Each photo about 65 x 90. Marked as "Series D4" in ink. Produced by the SEC c1939/40 having the accident of 14. The tramcar body card shows it was repaired following an accident June 1939. (Note added 2-2-19). See Reg Items 580, 1019, 1365 and 1366 for larger prints of these photographs of these photographs and further details. trams, tramways, tramcars, accidents, collision, tram 16, tram 14 -
 Ballarat Tramway Museum
Slide - 35mm slide/s - set of 2, Theo Dunstan, May. 1973
Set of two 35mm slides, square format mounted in a "Kodak " cardboard slide mount with Kodak logos and printing of No. Bendigo No. 25 at the Central Deborah terminus with buildings in background and North Bendigo terminus with the driver standing alongside the front of the tram. No. 25 painted in the Bendigo Trust / ESCo livery. Tram has the destination of Golden Square. Taken May 1973 or earlier.Has date of "May 73" and "18" "19" stamped onto the slide. 3245.1 - "Tourist tram at Deborah Mine Bendigo" in blue ink. 3245.2 - Tourist tram at Joss House, Bendigo".tramways, trams, bendigo, tram 25 -
 Ballarat Tramway Museum
Ephemera - Tour Notes, Victorian Railways et al, "Farewell to Bendigo Trams", Jan. 1972
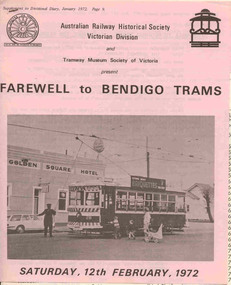
Set of 5 documents for the "Farewell to Bendigo Trams" tour conducted by the ARHS Vic Div and the TMSV, first scheduled for Sat. 12/2/1972, but delayed to Sat. 4/3/1972 due to SECV Power restrictions on the day. 3277.1 - documents 1 to 3 stapled in top left hand corner. 1. Tour circular, printed on pink paper with a photo of No. 28 at Golden Square terminus. Has logos of ARHS Vic Div and TMSV, part missing - used for booking. Gives details of the purpose of the tour, approx. times, refreshments, a booklet and fares. Organiser Victor Isaacs and Neil Morrow Booking Officer. Printed on foolscap paper in landscape format 2. Victorian Railways S Circular, or special train notice, S.224/72, single page giving train schedules, loads, motive power, carriage numbers and tickets. Signed by J.C. Crute as Chief Traffic Manager. Dated 19/1/1972. Printed on foolscap paper. 3. Ticket circular printed on quarto paper giving times of departure and arrival back, noting its express run to Melbourne. 3277.2 - documents 4 to 5, stapled in top left hand corner. 4. Set of two sheets, one printed on foolscap card paper, the other on foolscap paper, giving a graph of the tram workings, showing the special trams (tours A and B) overlain with the Saturday timetable. Dated 4/3/1972. 5. Victorian Railways S Circular, or special train notice, S.435/72, single page giving train schedules, loads, motive power, carriage numbers and tickets. Signed by J.C. Crute as Chief Traffic Manager. Dated 11/2/1972. Printed on foolscap paper. Noted that the special train of 12/2/1972 is cancelled "Due to SECV Restrictions". Has return train timetabled for 2 hours and five minutes. (Additional copies of item 4 - graph on one sheet only and item 5 - added 3/10/2007 - ex Graeme Breydon materials) 3277.3 - Welcome Aboard Circular - red foolscap paper, giving train time summary, photostops, arrangements in Bendigo, Bendigo line history and tram tours. Images of document added 27-08-12.arhs, special trains, bendigo, tmsv, timetables -
 Ballarat Tramway Museum
Slide - 35mm slide/s - set of 5, 1970's
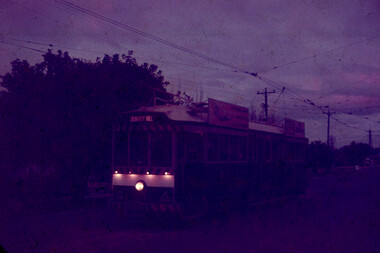
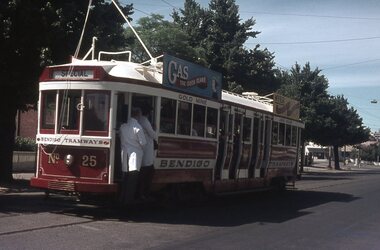
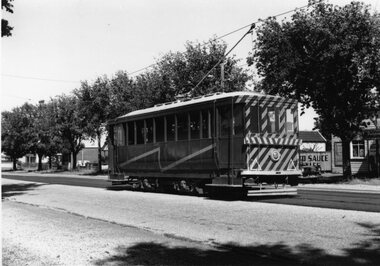
Series of five 35mm slides in a yellow colour "Peter Fox Collins St. Melbourne" cardboard mounts, of view of Bendigo trams. Each slide along the top edge has the details while the bottom edge, has a number in the details area. 2599.1 - No. 9420, No. 24 at Quarry Hill - photo at dusk, poor quality, has surface damage all over slide. 2599.2 - No. 9421, ditto 2599.3 - No. 10132, No. 19 in Bendigo Trust operation colours at intersection of McCrae St & Nolan St, some surface damage around the top and bottom edges. Has Gillies Pies roof advertisement. Tram has destination of North Bendigo. 2599.4 - No. 10133, No. 25, High St, south of Charing Cross - some surface damage around the top and bottom edges. Tram has roof advertisements for "Gas" and "Myers". Has destination of Joss House 2599.5 - No. 10134, No. 19, Pall Mall, some slight surface damage. Tram has destination of Golden Square and has a roof advertisement for Sandhurst Milk and one other company. In blue ink on each slide; number as above in bottom edge. 2599.1 and .2 - "No. 24 Quarry Hill" 2599.3 & .5 - "No. 19 Nth Bendigo" 2599.4 - "No. 25 Nth Bendigo"tramways, trams, bendigo, pall mall, bendigo trust, nolan st, tram 24, tram 19, tram 25 -
 Ballarat Tramway Museum
Photograph - Colour Photograph/s, Sturt Keenan, 21/11/2000 12:00:00 AM
Set of 14 colour prints of the COTMA Conference non-tram events, around the depot, Ballarat Railway Station, Olympic Rings, Lake Wendouree, Ballarat East, Lydiard St. Nth, Royal Mail Hotel Sebastopol, Bungaree Railway Station site and Sovereign Hill. Photos taken by Stuart Keenan. Image taken at Sovereign Hill 19/11/2000. Others - 20 and 21/11/2000. See Reg Item 2704.1 for programme. Printed on Agfa paper.btm, cotma, bungaree, sovereign hill, ballarat railway station, lake wendouree -
 Ballarat Tramway Museum
Photograph - Black & White Photograph/s - set of 22, Eldon Hogan, 8/12/1974 12:00:00 AM
Set of 22 black and white photographs of the first trams along Wendouree Parade, 8 Dec. 1974 (See 1974-75 Annual Report) .1 - Rolf Jinks at depot Junction .2 - 27 entering Wendouree Parade - Clyde Croft .3 -ditto with Richard Gilbert with the flag .4 - 27 crossing the parade .5 - In Wendouree Parade .6 - ditto .7 -At St Aidans Drive .8 - ditto .9 - 27 returning to the depot .10 - ditto .11 - 40 returning to the depot .12 - 40 at the loop - Richard Gilbert and Clyde Croft .13 - ditto .14 -ditto .15 - 40 at St Aidans Drive .16 - ditto .17 - ditto .18 - the dust is flying. .19 - 40 at Gardens Loop .20 - ditto .21 - Wendouree Parade .22 - 40 entering the Parade. Photographer Eldon Hogan. Roll of negatives held - stored with negatives file.trams, tramways, btps, wendouree parade, first tram, testing, tram 27, tram 40 -
 Ballarat Tramway Museum
Pamphlet, The Forest City Electric Co. Limited England, "Forest City" products, 1936
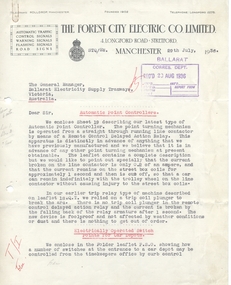
Yields information about the equipment offered to Ballarat at the time of the determining what type of signals to put in to improve safety on the system, following the take over by the SEC of the tramways. Gives details about other tramway equipment available on the market place.A set of documents under cover of a Forest City letter dated 29/7/1936 to the General Manager Ballarat, typed in black and red ink. Has a date received stamp of 20 August 1936. Contains the following items. 4911.1 - Letter from "The Forest City Electric Co. Limited" to ESCo re Point controllers, tramway signals and warning signs, dated 29/7/1936 - 2 pages 4911.2 - Collins Patent Automatic Point Turner - sheet 19 - 4 pages - sheet 19, two copies 4911.2a - ditto, sheet 18 QT - four pages 4911.3 - Electrically operated Point switches, overhead frogs and signals for tramcar depots. - four pages 4911.4 - Automatic Tramway Signals - five pages - sheet ATS1 4911.5 - Universal Insulator - Sheet 17 - 2 pages 4911.6 - Porcelain hangers - sheet 15/1 - 2 pages 4911.7 - Porcelain insulators for cap and cone suspensions - page 11, 1 page. 4911.8 - Motor Bus and Tramcar Stage and Fare Signs in Cast Aluminium - sheet MD2 - 1 page 4911.9 - Flashers and Spellers - Sheet F1 - 2 pages 4911.10 - Forest City Relays - 2 pages 4911.11 - Traffic light - 1 page, sheet 2A Note the letter the price of the non car counting signals is 20 pounds, including freight.On letter notes in margins and margin on page 2 against tramway signals, marked in red. On rear of page 2 is a pencil sketch.trams, tramways, signals, overhead, traffic lights, points -
 Ballarat Tramway Museum
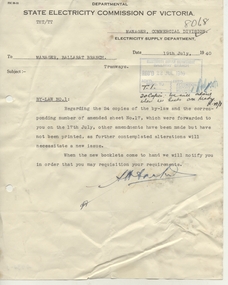
Document - Letter/s, State Electricity Commission of Victoria (SECV), "Tramways By-Law No. 1", Nov. 1940
Yields information about the distribution of the SEC tramway by-laws to workers and need to bring to attention to tramway staff, the rules regarding entering hotels and being intoxicated.Set of three letters or copies that involved the publication of the SEC's "Tramways by-Law No. 1" and Rules Governing Employees in 1940. .1 - From Manager Commercial Division, to Manager Ballarat - regarding amendments to the By-Laws (Sheet 17) and future documents - quarto paper, typed, 19/7/1940. .2 - Engineer and Manager (Head Office) regarding reminding employees of Rule No. 23, Rules Governing Employees - about entering hotels and intoxicating liquors, following up a recent case and asking him to send a memo out. Quarto paper, typed, 15/11/1940. .3 - Copy of Memo re above, dated 19/11/1940. to the Tramway Inspectors, quarto, carbon copy - green paper.trams, tramways, by laws, sec, hotels, rules, alcohol -
 Ballarat Tramway Museum
Photograph - Digital image Set of 10, 19/02/2011 12:00:00 AM
Yields information about the 2011 appearance of Hospital Corner.Set of 10 digital images of Hospital Corner, taken by Warren Doubleday on 19-2-2011 for use in BTM web presentation - Hospital Corner. .1 - SE Corner - La Porchetta's .2 - NE Corner - Shell service station .3 - Looking across to SE corner .4 - Looking across to SW corner - Celebrations store .5 - looking across to NW corner and Hospital .6 - ditto .7 - ditto .8 - Drummond St signage on western side .9 - Celebrations store on SW corner .10 - Davis bus turning from Drummond into Lydiard Sts.trams, tramways, hospital corner, drummond st, sturt st, davis buses -
 Ballarat Tramway Museum
Photograph - Digital image Set of 20, Dec. 1970
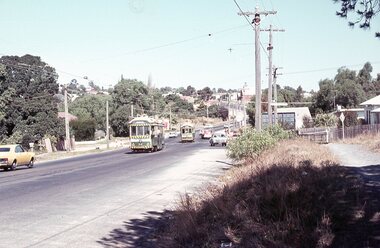
Set of 20 digital images of Bendigo Tramways December 1970 by Stuart Lodington. .1 - Bendigo track gang renewing a joint, McCrae St, with welding truck alongside and Birney No. 29. .2 - No. 5 at Quarry Hill terminus? .3 - No. 24 at the depot .4 - No. 2 on the Quarry Hill line .5 - No. 5 approaching the Eaglehawk terminus .6 - No. 29? at the Golden Square Terminus with Bill Rodda's Golden Square hotel in the background. .7 - No. 3 inbound on the Quarry Hill line. .8 - trams crossing on the Eaglehawk line, through the window of one tram. .9 - side on view of a B23D controller in a bogie tram .10 - No. 5 at the Eaglehawk terminus .11 - No. 21 at No. 21 crossing on the Golden Square line. No. 29 showing special, No.21 - North Bendigo, Fire Station Loop? .12 - No. 29 and another tram - near work site? .13 - interior view from Birney looking at the front of another tram parked behind. .14 - No. 29, No. 6 crossing at .15 - No. 6, showing special at Charing Cross. .16 - No. 5 and another tram at North Bendigo on a Special .17 - No. 28 at Charing Cross .18 - No. 5 on Special at a Loop on the Eaglehawk line .19 - No. 28, and two other trams at the Myrtle St Loop .20 - No. 18 showing Quarry Hill and two other trams on View St.trams, tramways, bendigo, trackwork, mccrae st, depot, quarry hill, eaglehawk, golden square, controllers, north bendigo, view st, tram 29, tram 5, tram 24, tram 2, tram 3, tram 6, tram 28, tram 18 -
 Ballarat Tramway Museum
Photograph - Digital image Set of 20
Set of 20 digital images of Bendigo Tramways, 1972 at or before closure while on a tram tour by Stuart Lodington. .1 - No. 28 and 5 at Eaglehawk terminus .2 - No. 28 leaving Charing Cross and travelling into View St with Armstrong Type Service building in background and Firestone Advertisements. .3 - No. 29 with Eaglehawk Town Hall and Post Office in background. .4 - No. 26 and 29 at start of double track, High St Eaglehawk .5 - No. 29 leaving Eaglehawk with shops in the background, Foodland, J. Bests .6 - No. 29 and 23 crossing Manchester Loop with Manchester Arms Hotel in the background and an old poppet head. .7 - No. 29 at ditto with poppet head in the background. .8 - No. 28 and two other trams at the Quarry Hill terminus. .9 - No. 29 in High St Bendigo with the Cathedral and Golden Gate Hotel in the background. .10 - No. 3 with destination Eaglehawk, in bound Carpenter St? .11 - No. 29 following a single trucker through a loop or the end of the double track near the depot. .12 - No. 23?, at Eaglehawk terminus, with Eaglehawk Town Hall in the background. .13 - Birney tram crossing the bridge at the Depot entrance - No. 29 .14 - No. 29 on the Eaglehawk line? .15 - as for .13 .16 - No. 29 entering the depot. .17 - No. 23, inbound from Eaglehawk, at Jobs Gully Loop with the railway overbridge in the background. .18 - No. 28 and two other trams (see also Reg Item 4982) for the same tram tour at Myrtle St. Loop. .19 - No. 21 with North Bendigo on the destination approaching the Golden Square terminus. .20 - No. 7 at Golden Square terminustrams, tramways, bendigo, eaglehawk, quarry hill, golden square, depot, tram 5, tram 29, tram 28, tram 26, tram 23, tram 7, tram 21 -
 Ballarat Tramway Museum
Photograph - Digital image Set of 20, 1971-72
Set of 20 digital images of Bendigo Tramways, 1972 at or before closure while on a tram tour by Stuart Lodington. .1 - No. 7 at Golden Square terminus .2 - ditto .3 - No. 26 in bound on the Eaglehawk line with a crossing loop behind. .4 - Birney crossing the bridge by the tram depot. .5 - No. 29 running a special on the Eaglehawk line with a HBA billboard in the background. .6 - No. 29 with a driver walking in front of the tram at the above location. .7 - No. 29 on the Eaglehawk line .8 - ditto waiting for a tram at Manchester Loop with poppet head in the background. .9 - No. 29 on the Eaglehawk line .10 - Eaglehawk Town Hall at night. .11 - No. 7 at the depot junction in McCrae St, with Golden Square destination. .12 - No. 29 with the Camp Hotel Eaglehawk in the background. Also a Newsagent with The Sun, The Bendigo Advertiser and The Age signs on the building, High St .13 - No. 29 Mt Korong Rd, with the railway overbridge in the background. .14 - interior photo of Birney tram roof .15 - interior view of controls of Birney at Eaglehawk .16 - No. 29 outbound at the Depot Junction McCrae St. .17 - No. 18 at the Eaglehawk terminus .18 - close up view of No. 29 front. .19 - No. 29 in Nolan St, crossing the bridge, outbound. .20 - No. 18 at the Eaglehawk terminus with the Eaglehawk Town Hall, Post Office in the background. Has a circus banner on the side.trams, tramways, bendigo, eaglehawk, quarry hill, golden square, depot, mccrae st, nolan st, tram 7, tram 26, tram 29, tram 18 -
 Ballarat Tramway Museum
Photograph - Digital image Set of 20, 1971-72
Set of 20 digital images of Bendigo Tramways, 1972 at or before closure while on a tram tour by Stuart Lodington. .1 - No. 29 at the North Bendigo terminus .2 - No. 29 just past the Bendigo end of the double track in High St Eaglehawk, with a BP dealer in the background. .3 - Night photo of No. 18 at a terminus, showing "Eaglehawk" .4 - ditto .5 - Night photo of No. 24 at Eaglehawk with Leo A Hughes Photographer in the background. The Tram has "Johnnie Walker whiskey" roof adverts. .6 - No. 29 outbound in Thunder St with a train passing over the bridge in the background. .7 - view from the front window of a tram on the Eaglehawk line with a large "display event float" in the foreground and tram approaching a crossing loop. .8 - No. 29 at North Bendigo .9 - view of High St Eaglehawk looking east from the terminus, showing the track and centre poles. .10 - No. 29 outbound on the North Bendigo line turning from either Nolan St or Caledonia St, running a special. .11 - No. 7 departing North Bendigo for Golden Square. .12 - No. 3 and 18 at Charing Cross. No. 3 has two SEC roof Advertisements .13 - No. 7 at North Bendigo with the trolley pole being reversed. .14 - No. 24 at Quarry Hill with Northern Terrazzo in the background with the driver alongside .15 - No. 7 and No.6 at Charing Cross with the Beehive buildings in the background. .16 - No. 7 at North Bendigo terminus .17 - ditto .18 - No. 24 at Quarry Hill with Northern Terrazzo in the background with the conductor alongside. .19 - ditto .20 - No. 26 and other bogie tram in View St near Charing Cross with the Armstrong Tyre Service building and signs for Cohn's Drinks and T&G in the view.trams, tramways, bendigo, eaglehawk, quarry hill, golden square, depot, north bendigo, charing cross, tram 29, tram 18, tram 24, tram 3, tram 7, tram 6, tram 26 -
 Ballarat Tramway Museum
Photograph - Digital image Set of 20, 1971-72
Set of 22 digital images of Bendigo Tramways, 1972 at or before closure while on a tram tour by Stuart Lodington. .1 - No. 7 arriving at North Bendigo .2 - No. 5 departing Charing Cross along View St, with a Firestone tyres in the background. .3 - front view of a tram in View St with a blurred background image. .4 - No. 24 showing Eaglehawk destination .5 - No 26 and 3 in View St, with the Armstrong Tyre Service building in the background and signs for T&G and Cohn's Drinks. .6 - ditto .7 - No. 3 arriving at Charing Cross from Eaglehawk in View St, with a Quarry Hill destination. .8 - No. 3 and 18 at Charing Cross. .9 - No. 24 on the Quarry Hill line. .10 - No 26 in View St, with the Armstrong Tyre Service building in the background and signs for T&G and Cohn's Drinks. .11 - ditto, with fountain in view, Colonial Mutual building and a newsagent with a Herald sign on the building. .12 - No. 7 at North Bendigo terminus .13 - ditto with pole being reversed. .14 - No. 18 at Quarry Hill terminus with Northern Terrazzo sign in the background. .15 - No. 24 at Quarry Hill terminus .16 - No. 18 arriving at Charring Cross, with Fountain Plaza and Bendigo Pharmacy in the background. .17 - No. 3 and 18 at Charing Cross. .18 - No. 7 at North Bendigo terminus with pole being placed on the overhead. .19 - No. 26 in View St inbound, with Sandhurst Trustees sign in the background. .20 - No. 6 leaving Charing Cross in Pall Mall with Myer and other buildings in the background. .21 - No. 7 at North Bendigo .22 - Single trucker with two roof Advertisements crossing View St with fountain in view, Colonial Mutual building and a newsagent with a Herald sign on the building.trams, tramways, bendigo, eaglehawk, quarry hill, north bendigo, charing cross, view st, tram 7, tram 5, tram 24, tram 26, tram 5, tram 3, tram 18, tram 6 -
 Ballarat Tramway Museum
Photograph - Digital image Set of 20, 9/12/1972 12:00:00 AM
... 30 tram 19 Set of 21 digital images of Bendigo Tramways ...Set of 21 digital images of Bendigo Tramways, at the re-opening of the Bendigo tramways by the Bendigo Trust on 9/12/1972by Stuart Lodington. All trams in the first Bendigo Trust colours. .1 - No. 25 with Gas and Myer roof advertisements .2 - No. 30 with 3BO roof advert and a BP service station in the background. .3 - SEC single trucker at the Mine with a large "Tram Tours" sign on the front of the tram .4 - ditto .5 - No. 19 with a large group of passengers, Bendigo Motor Co and Sandhurst roof advertisements .6 - No. 30 in McCrae St .7 - view of opening march with band .8 - No. 19 in opening parade .9 - Opening Parade in High St with cathedral in the background .10 - No. 30 in Nolan St crossing bridge .11 - ditto .12 - No. 25 at the mine .13 - No. 30 leaving the mine .14 - No. 30 ditto with BCTV roof advert. .15 - Charing Cross with cenotaph, The Beehive building and Ezywalkin shoes and Coca Cola adverts .16 - No. 19 southbound in High St with City Centre Motel building in the background. .17 - No. 30 returning from North Bendigo .18 - No 25 in High St after leaving Gold Mine .19 - No. 30 at the Mine .20 - No. 30 in Nolan St .21 - No. 30 with 3BO roof advert and a BP service station in the background.trams, tramways, bendigo, north bendigo, charing cross, bendigo trust, central deborah, tram 25, tram 30, tram 19 -
 Ballarat Tramway Museum
Photograph - Digital image Set of 20, 16/04/1972 12:00:00 AM
Set of 20 digital images of Bendigo Tramways, of the last running day of the Eaglehawk to Quarry Hill line 16 April 1972, .1 - No. 24 outbound to Eaglehawk .2 - No. 3? at Manchester Loop .3 - No. 24 outbound to Eaglehawk .4 - bogie tram crossing the rail over bridge from Eaglehawk .5 - No. 18 in View St .6 - No. 24 outbound to Eaglehawk .7 - No 18 at Eaglehawk with destination roll being changed, and shopping centre in the background. .8 - No. 24 crossing the railway overbridge, going to Eaglehawk .9 - No. 3 outbound to Eaglehawk .10 - No. 24 crossing the railway overbridge, going to Eaglehawk .11 - No. 3 and 24 crossing at Long Gully .12 - No. 18 at Eaglehawk with Leo A Hughes photographer building in the background and a CFA truck passing the tram. Tram SEC roof advertisement and a banner for "German -?- Circus" at Eaglehawk and dates. .13 - No. 3 inbound on the Eaglehawk line. .14 - No. 18 outbound to Eaglehawk .15 - ditto .16 - No. 18 at Eaglehawk terminus with the Mechanics Institute in the background. .17 - No. 24 at the Eaglehawk terminus .18 - No 24 at the intersection with Taylor St .19 - No. 24 at the Eaglehawk terminus .20 - dittotrams, tramways, bendigo, eaglehawk, long gully, manchester loop, tram 24, tram 18, tram 3 -
 Ballarat Tramway Museum
Photograph - Digital image Set of 20, 16/04/1972 12:00:00 AM
Set of 22 digital images of Bendigo Tramways, of the last running day of the Eaglehawk to Quarry Hill line 16 April 1972, .1 - No. 3 and 24 crossing at Long Gully .2 - No. 3 turning at the Cricket ground, Barnard and View Sts, inbound to the City and Quarry Hill .3 - No. 3 in bound to the City and Quarry Hill, Long Gully area .4 - No. 18 inbound to the City and Quarry Hill crossing the railway bridge from Eaglehawk. .5 - Manchester Loop .6 - No. 18 inbound to the City and Quarry Hill crossing the railway bridge from Eaglehawk. .7 - No. 18 about to enter Jobs Gully Loop .8 - No. 3 about to turn at the Cricket ground, Barnard and View Sts inbound to the City and Quarry Hill .9 - No. 3 turning at the Cricket ground, Barnard and View Sts, inbound to the City and Quarry Hill .10 - No. 18 at Eaglehawk terminus with the Mechanics Institute in the background. .11 - No. 3 in bound, Ironbark area. .12 - No. 3 at Long Gully Loop .13 - No. 3 outbound to Eaglehawk. .14 - No. 18 at Eaglehawk with German circus banner on tram .15 - No. 18 on the Eaglehawk line at Jobs Gully Loop .16 - No. 24 outbound to Eaglehawk at Taylor St .17 - No. 18 inbound to the City and Quarry Hill crossing the railway bridge from Eaglehawk. .18 - No. 3 at Manchester Loop .19 - No. 18 at Eaglehawk terminus .20 - No. 18 at Eaglehawk with German circus banner on tram .21 - bogie tram at Long Gully Loop. .22 - No. 24 outbound to Eaglehawk at Taylor Sttrams, tramways, bendigo, eaglehawk, long gully, jobs gully, manchester loop, tram 24, tram 18, tram 3 -
 Ballarat Tramway Museum
Photograph - Colour Photograph/s - set of 2, Austin Brehaut, 19/11/2007 12:00:00 AM
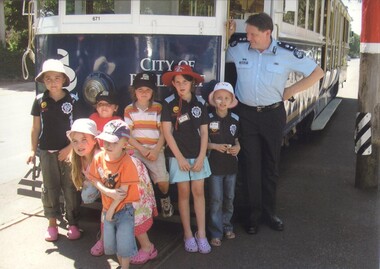
Has a strong association with the BTM and the Cop's n Kids charter of November 2007 and Austin Brehaut and Dave O'Neil.Print of digital Image of a group of kids during the 19/11/2007 charter for the Cops 'n Kids (with cancer) programme. Features Victorian Police Superintendent and Dave O'Neil. Photo taken by Austin Brehaut. also appeared in Fares Please! of the time. Photo was printed by the Gold Museum 2008 for a local exhibition and additional copies given to the Museum by Roger Trudgeon 2009.trams, tramways, btm, charters, cops n kids -
 Ballarat Tramway Museum
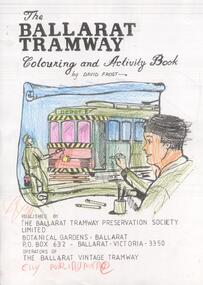
Domestic object - Colouring Book, Ballarat Tramway Museum (BTM), Sep. 2011
Set of 22 sheets featuring sheets from the David Frost colour book (See Reg item ) used on the BTM Family Fun Day on 19/9/2011 - have been coloured in or partly coloured in and some with drawings on rear. Photocopied onto A4 sheets by Richard Gilbert/Neil Lardner for the event. Collected on the day.Niltram, trams, btm, 40th anniversary, family fun day, events -
 Ballarat Tramway Museum
Photograph - Digital prints, The Courier Ballarat, "Family fun day celebrates Ballarat trams", 19/09/2011 12:00:00 AM
Yields information about the BTM Family Fun day and what was published by The Courier on their web site.Set of 11 colour digital prints on A4 sheets from The Courier website, 19/9/2011 with the web story and then 10 sheets each with a photo by Jeremy Bannister. Has two comments. BTM Members in the photographs include Roger Salen, Alan Bradley, Richard Gilbert, Neil Lardner and Christopher Mitchell. Each of the sheets has the caption and people involved at the bottom of the sheet. trams, tramways, btm, family fun day, events -
 Ballarat Tramway Museum
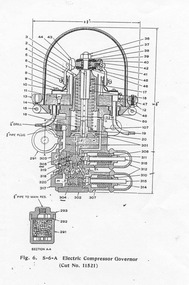
Document - Instruction, Ballarat Tramway Museum (BTM), "S-6-A Electric Compressor Governor", 2009
Yields information about a compressor governor that is fitted to some Ballarat Trams, Westinghouse.Two A4 photocopied sheets, giving a side elevation of the Westinghouse "S-6-A Electric Compressor Governor" and the setting or the regulation and adjustment, installation and maintenance of the Governor. Commonly known as a "Bettleback" Governor. Dates from 1916. See Reg Item 703 for a MMTB drawing. WAD’s thoughts on setting Beetle back compressor Governors – 19/12/2009. Refer to instructions as well. Set both valves to approximately the same tension or thread length If when pumping up, both valves start to chatter, screw down the back valve further. When working satisfactorily, but pressures not right, that is, the governor is cutting out without valves chattering or with excessive range or pressure too high. Adjust the front valve until the desired cut out pressure arrived at. The cap must be on this valve for it to work. Adjust the back valve to adjust the cutting in setting, screw down for high cut in pressure. Adjust both as necessary to obtain your desires! And best of luck, it can be done, but is frustrating!!!!!trams, tramways, governors, westinghouse, air compressors, instructions -
 Ballarat Tramway Museum
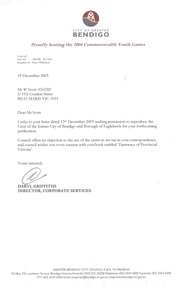
Document - Letter/s, City of Greater Bendigo, 19/12/2003 12:00:00 AM
Yields information about the City of Bendigo and Eaglehawks crests and format of letters 12/2003.Set of four documents - City of Bendigo and Borough of Eaglehawk civic crests/ coat of arms / emblems 4371.1 - Letter dated 19/12/2003, from the City of Greater Bendigo, signed by Daryl Griffiths Director Corporate Services to William F Scott, giving permission to use the City and Borough civic crests in his forthcoming book. .2 - folded piece of paper marked "88") and with a black and white version of the Borough of Eaglehawk Crest and plastic envelope containing three copies of the With Compliments card of the Borough. .3 - City of Bendigo Crest - full colour version on art paper. .4 - City of Bendigo Crest - black and white version.2 - "Bendigo and Eaglehawk coats of arms/emblemstrams, tramways, crests, coat of arms, borough of eaglehawk, city of bendigo, city of greater bendigo -
 Ballarat Tramway Museum
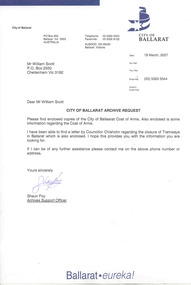
Document - Letter/s, City of Ballarat, 19/03/2007 12:00:00 AM
Yields information about the City of Ballaarat's Coat of Arms and colours.Set of four documents - City of Ballarat civic crests/ coat of arms / emblems 4371.1 - Letter dated 19/3/2007, from the City of Ballarat, signed by Shaun Foy, Archives Support Officer to William F Scott, giving permission to use the City civic crests in his forthcoming book. .2 - City of Ballaarat Crest - full colour version. .3 - City of Ballaarat Crest - black and white version .4 - Colour sheet - explaining the layout of the "Arms of Ballaarat" Letter also notes Mayor's report at the time of closure - see Reg Items 653 and 1829 for these items.trams, tramways, crests, coat of arms, city of ballaarat, city of ballarat -
 Ballarat Tramway Museum
Photograph - Black & White Photograph/s - set of 2, Wal Jack, 28/02/1962 12:00:00 AM
Yields information about Bendigo trams, the Golden Square route in the early 1960's prior to fitting dash canopy lighting.Black and white print of the Ballarat Scrubber tram, at the Bell Street loop, 28/2/1962, Photo by Wal Jack. Two copies. Photo print courtesy of Port Dock Railway Museum, now the National Railway Museum. See worksheet 4311 for letter and details of prints sent to Bill Scott, 19/10/2001. Any photo credit to mention NRM Collection. .1 - same photograph with Doug Colquhoun stamp on rear - see image i2..1 - On rear of copy 1"SEC Ballarat / Scrubber car /Bell St loop / 28/2/62 2125 / Wal Jack " In the top right hand corner "74)" .2 - On rear has Douglas Colquhoun stamp with photograph details - see image i2 trams, tramways, scrubber tram, bell st, tram scrubber -
 Ballarat Tramway Museum
Newspaper, The Courier Ballarat, "Town and Country Journal", 13/07/2009 12:00:00 AM
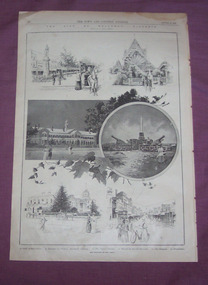
Yields information about Ballarat in 1899 and the way that information communication, style of writing and magazine printing was done at the turn of the century.Newspaper clipping, - set of three pages - from the Town and Country Journal August 19, 1899. 4443.1 - pages 31 and 32 - see images 4431i1, i6 and i7 Page 31 - Australian Insects Page 32 - Illustration of Sturt St, Entrance to fernery, Orphan Asylum, Eureka Stockade, the Hospital, West St (Bridge St). 4443.2 - pages 35 and 36 - see images 4443i2, i3, i8 to i12 Features photos of Hon. Peter Lalor, Ballarat, Batchelor's Newsagency Ballarat, Sumerscales Book and Stationery Depot, Ballarat Mining Exchange, Bradford (UK) steam tram and trailer, New Electric tram for Sydney and article titled "A contrast in Transit Facilities" 4443.3 - pages 33 and 34 - see images 443i5, i6 and i13 to i15 Features an article on the City of Ballarat, with photos by P. Black of Ballarat. Has photos of The Post Office, Sturt St from Town Hall, Sturt St from Grenville St with a horse tram in the photograph, and three photos of the Botanic Gardens.ballarat, sturt st, gardens, horse trams -
 Ballarat Tramway Museum
Slide - 35mm slide/s - set of 6, Campbell Duncan, 19/09/1971 12:00:00 AM
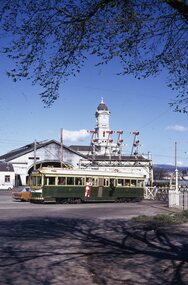
Yields information about the operations of the Ballarat Tramway system on the last day of SEC tramway operations in Ballarat.Set of 6 Kodak - Kodachrome slides - cardboard mounts - all taken on 19/9/1971, last day of operations prior to closure of the SEC operated tramway. .1 - Tram 40, waits at the level crossing gates - the gates are being opened. In the background is the station building and the signal gantry. Tram has the destination of Sebastopol. .2 - No. 42, with destination of Lydiard St north, northbound in Lydiard St, with railway station buildings and VRI in the background. .3 - No. 35 on inbound, Lydiard St North. .4 - No. 35, on inbound service, leaving Skipton St loop with another bogie in the background. .5 - No. 39 on inbound service, Albert St Sebastopol with the Sebastopol boundary sign and Binks Ford in the background. Tram has an everything under control in my all electric kitchen roof advert. .6 - No. 42, with destination of Sebastopol, Albert St Sebastopol.In ink on slide: .1 - Sun 19 Sept 71 - up Lydiard St Nth waits for gates to be opened after fast goods. .2 - Sun 19 Sept 1971, down Lydiard St Nth near VRI. .3 - Sun 19 Sept 1971, Up Lydiard St Nth .4 - Sun 19 Sept 1971, Up Sebastopol (supplementary service) has just crossed down in Skipton St near Drummond St. .5 - Sun 19 Sept 1971, Up Sebas at Ballarat / Sebastopol boundary. .6 - Sun 19 Sept 1971, c5.30pm down Sebas in Sebas shire.tramways, trams, lydiard st nth, railway station, level crossings, skipton st, albert st, sebastopol, closure, last day, tram 40, tram 42, tram 35, tram 39 -
 Ballarat Tramway Museum
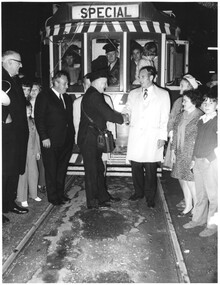
Photograph - Black & White Photograph/s set of 2, Harvey Studios, 19/09/1971 12:00:00 AM
Yields information about the closure of the SEC operated Ballarat tram system and the people involved.Set of two photographs of the last tram leaving the Borough of Sebastopol where the tram keys were handed over to to Cr. J. Chisholm , at the town boundary. Cr. N. Donald, Mr. L. J. Denmead (behind Lew Walker), L. Walker, Cr. Walker, Mrs. Chisholm and Mrs Donald. Photo taken 19/9/1971. For The Courier newspaper photographs of the event see Reg Item 3335.On rear is the Photography stamp - "N.L. Harvey & Son - Photographers - 131 Sturt St, Ballarat" with phone numbertrams, tramways, closure, sebastopol, last tram, city of ballaarat, borough of sebastopol, closure, tram 40