Showing 522 items matching "departing"
-
 Mission to Seafarers Victoria
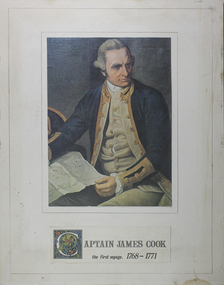
Print - Reproduction of a painting, Captain James Cook - The First Voyage 1768-1771
The first voyage of Lieutenant James Cook was a combined Royal Navy and Royal Society expedition to the south Pacific Ocean aboard HMS Endeavour, from 1768 to 1771. The aims of this first expedition were to observe the transit of Venus across the Sun (3–4 of June 1769). Departing from Plymouth in August 1768, the expedition crossed the Atlantic, rounded Cape Horn and reached Tahiti in time to observe the transit of Venus. In September 1769 the expedition reached New Zealand. In April 1770 they became the first known Europeans to reach the east coast of Australia, making landfall near present-day Point Hicks, and then proceeding north to Botany Bay. The expedition continued northward along the Australian coastline. In October 1770 they reached the port of Batavia in the Dutch East Indies. They resumed their journey on 26 December, rounded the Cape of Good Hope on 13 March 1771, and reached the English port of Deal on 12 July. The voyage lasted almost three years. Voyage 1 (1768–1771): ship Endeavour Route: London – Madiera – Rio de Janeiro – Cape Horn – Tuamotu Island – Tahiti – Society Islands – New Zealand – New Holland (Australia) – East Timor – Java – Batavia – Cape of Good Hope – St Helena – Ascension – LondonCook joined the British merchant navy as a teenager and joined the Royal Navy in 1755.Colour reproduction of portrait of Captain Cook by Nathaniel Dance (1735-1811)Captain James Cook - The First Voyage 1768-1771captain james cook, nathaniel dance (1735-1811), endeavour, navigators, sea voyage -
 Melbourne Legacy
Document, Legatee Doolan's notes on early Legacy Club meetings
Undated anecdotes by an anonymous author (by the handwriting it was Legatee Frank Doolan) about Melbourne Legacy changeover dinners at the Federal Hotel on the corner of Collins and King Streets. These were apparently convivial affairs and the writer shares his memories of three occasions. The first occasion was an impromptu and riotous performance by Legatees (organised by Pat Hanna) after the dinner of the First World War ballad 'Roses of Picardy'. The second occasion concerned a group of 'exuberant' Legatees walking down Collins Street after dinner who spotted Harry Lauder [1870-1950], the famous Scottish comedian, in a taxi which was held up at a street crossing'. They prevailed on him to speak at the Legacy luncheon the following Tuesday. Lauder's subsequent speech at the luncheon not only amused the listeners with his humour, but also reduced them to sadness with an account of how his son had been killed in action in France. The third story refers to 'a vacant hansom cab pulled up in Collins St as the diners were departing', which induced one Legatee to fulfil a lifelong ambition by persuading the cabby to let him drive the cab for the princely sum of one pound. Horse-drawn transport gave way to motor vehicles in the early 1930s so this story must have related to a very early Legacy dinner.A first hand account revealing the social characteristics of early Legatees.Blue ballpoint handwriting on white paper.legatee function, comradeship, changeover dinner, founding legatee -
 Flagstaff Hill Maritime Museum and Village
Ceramic - Soap dish, circa 1883
This ceramic soap dish was recovered from the wreck of the 1882-1883 George Roper between the late 1960’s to early 1970’s. It is one of the shipwreck artefacts in the John Chance Collection. Soap dishes were often part of a wash set that also included a water jug and wash bowl. The holes in the dish allowed water to drain out of the dish, keeping the soap dry for next use. The GEORGE ROPER 1882 - 1883 - The George Roper was a 4-masted iron sailing ship built in Liverpool, England, in 1882 for fast international trade with Australia. The large vessel was launched in February 1883. The ship was on its first trip, departing Liverpool for Melbourne, captained by John Ward and a crew of 31. She had almost reached her destination on July 4 1883, approaching Port Phillip Bay and being towed by the steam tug William. The weather changed to rough with fog and both the George Roper and the William hit the dangerous Lonsdale Reef at Port Phillip Heads. The Captain and crew were eventually rescued and taken to Queenscliff. Salvage syndicates were able to recover a lot of the cargo before the George Roper broke up and sank. Amongst the cargo was soft goods, draperies, household items, spirits of malt and distilled liquors, chemicals, dynamite, and 1,400 tons of steel rails for the Victorian Government. Also in the hold were Russell Stourbridge bricks, as paying ballast. This 1880s soap dish is an example of personal hygiene accessories and may have been part of a set comprising jug, bowl and dish.. The soap dish is also significant as it was recovered by John Chance, a diver from the wreck of the George Roper in the 1960s-70s. Items that come from several wrecks along Victoria's coast have since been donated to the Flagstaff Hill Maritime Village’s museum collection by his family, illustrating this item’s level of historical value. The soap dish is significant for its association with the barque George Roper, which is considered historically and archaeologically significant and as such, is listed on the Victorian Heritage Database, VHR S286. The George Roper is an example of a vessel built specifically for fast travel to and from Australia with a large shipment of cargo. Its cargo of steel rails adds to the historical significance of international trade to the growing colony of Australia and Victoria in particular, with rail transportation soon to become a faster and safer form of transportation between colonial towns. Divers can still access parts of the scattered wreck and other artefacts recovered in the 1970s and 1980s can be viewed in both public and private collections. Soap dish; glazed white porcelain. Round shallow bowl with blue patterned border, resembling butterflies. Two raised, concentric rings are moulded into the base. Six pierced holes are evenly spaced between the rings, five holes are in the centre of the dish.flagstaff hill, warrnambool, flagstaff hill maritime museum, maritime museum, shipwreck coast, flagstaff hill maritime village, great ocean road, john chance, west coast trader, george roper, captain john ward, russell stourbridge bricks, port phillip heads, lonsdale reef, dive wreck, vhr s286, coastal trader, ceramic, vintage, personal hygiene, bathroom accessory, soap dish -
 Kew Historical Society Inc
Slide - Residences, 99 Princess Street, 1 Fellows Street, 1979
One of a group of slides taken by members of the Society of built heritage in Kew in 1979-80. The selection of subject matter reflects the priorities of the period. The colour of some slides has degraded. 99 Princes sStreet (1 Fellows Street) was built by the architects Oakden, Addison and Kemp. The Kew Conservation Study (1988) noted that: Erected By Bennie And Olivers, these Two Attached Houses Attracted An Initial Construction N.A.V. of £260. The houses were originally owned and occupied by the architect Henry Kemp, however Kemp appears not to have lived there long because, while he retained ownership for at least a decade, by 1891 George Martin, merchant and bank manager, was recorded as the tenant of No.1 Fellows Street. At that date the N.A.V. for this individual building was £83 and Kemp remained the owner of both properties until at least 1910. Kemp had arrived in Australia in 1886 and this was therefore one of the first of the many buildings he was to design in Melbourne. While late Victorian in date, the houses are of a unified design that is an interesting precursor of the Edwardian architecture produced by Kemp. Somewhat awkwardly composed with steep gables, a rectangular castellated tower and slated single storeyed verandahs projecting from the overall boxlike form, the house contains features common to the 1880s such as the use of polychromy in the brickwork and slates cladding the roof. The building departs from the norm of the time with the use of terracotta tile ridge cappings, and strapwork to the corbelled chimneys.The slides represent a snapshot in time of built architecture in Kew, much of which has changed in the forty-plus period since they were created.Colour positive transparency (slide) of the pair of residences on the corner of Princess Street and Fellows Street in Kew. The point of view is the Fellows Street frontage.comaques, historic houses -- kew (vic.), glenferrie road -- kew (vic.) -
 Ballarat Tramway Museum
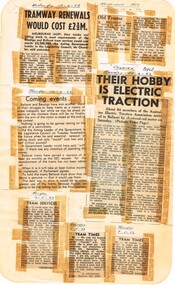
Newspaper, State Electricity Commission of Victoria (SEC) and The Courier Ballarat, Tramway renewals would cost 2.5M pounds', Apr. 1962
Yields information about the view of The Courier, and locals about the mooted closure of the tramway system and reporting on the proposal, an AETA visit and lunch hour services.Foolscap sheet of plain paper, with rounded corners, with 7 newspaper cuttings, concerning the mooted closure of the Ballarat Tram system April and May 1962. All from The Courier, unless noted otherwise. 1 - "Tramway renewals would cost 2.5m" - 18-4-62 - quote from Leader in the Legislative Council the previous day, Mr. Chandler, to upgrade tracks and trams in both Ballarat and Bendigo. 2 - "Old Trams" - The Age - 13/4/62 - about the proposed replacement of trams and their services 3 - "Coming Events" - 19-4-62 - reporting on item 1, six month delay as the motion has not been tabled - use them or loose them attitude. 4 - "Their Hobby is Electric Traction" - 23-4-62 - about the visit of about 84 members of the AETA to Ballarat, visiting Ballarat and Bendigo, 2nd hand trams, met by Mr. Denmead 5 - "Tram Services" - letter 4-5-62 - trams not departing on time at Lunch hour and other issues 6 - "Tram Times" - 5-562 - by R. Courtney local Secretary of the Union, about the lunch hour services - delayed by inspectors to assist the public 7 - "Tram Times" - 8-5-62 - concerning the lunch hour one minute delay and has not be late back to work. closure, letter to the editor, editorial, sec, lunch hour, aeta -
 Wodonga & District Historical Society Inc
Photograph - Fred Rochow Railways Collection - Locomotive 3112, 15 October 1988
The Fred Rochow Railways Collection incorporates photos related to the operation of the Wodonga Railway Station including different types of trains and railways staff C. 1930 – 1990. It was donated to the Wodonga Historical Society by Fred Rochow, a railwayman who spent many years based in Wodonga. He joined the Victorian Railways on 17th June l947 and retired in 1988. For some time, he was a member of the Australian Federated Union of Locomotive Enginemen and served a term as a member of the Trades Hall Council. He had an extensive knowledge of the struggles that took place to achieve better conditions for railway workers. Fred worked for many years as a fireman and then worked his way up the ranks to driver, experiencing many changes from the days of steam locomotives through to diesel trains, locomotives and even the modern XPT train. He worked throughout Victoria at different stages of his career, with his final working years focused on the northeast of Victoria and the Albury to Melbourne line. After his retirement, Fred continued to share his love of steam miniature trains with the community.This collection has local and statewide significance as it captures images of trains, locomotives and personnel who operated the railway services in Wodonga and throughout Northeast Victoria. The railways played a critical role in opening up Victoria and connecting Australia for trade, business, social communication and transport. This locomotive was built for Sydney suburban passenger duties, originally carrying the number S 1240 of the S 636 class and entered service in 1914. It became the (C)30 class in the 1924 renumbering scheme, with S 1240 renumbered to 3112. Locomotive 3112 was one of the last (C)30 class locomotives in NSWGR service when withdrawn in February 1972. In October 1974 it was purchased by the Lachlan Vintage Village, Forbes which was not financially successful. In 1986 it was forced to auction off its locomotives. 3112 was purchased privately by the late Barry Tulloch and subsequently restored for main line duties at Cowra Depot with the assistance of a group of supporting volunteers. 3112 was very active in the NSW steam scene from 1988 onwards As part of the Australian Bicentennial celebrations 3112 attended the AusSteam '88 event in Melbourne, travelling south in the company of 1210. 3112 was supposed to have left Goulburn, bound for Melbourne early on 14 October 1988, but failed with a hot axle box that prevented it from departing on time. The locomotive was repaired and later that day, ran south to join 1210 at Albury on 15 October, to continue the journey to Melbourne. After this Locomotive 3112 saw extensive rail tour use. 3112 changed hands in 2007 and the new owner arranged storage in Canberra on a private siding adjacent to the Canberra Railway Museum. Although nominally operational, it is not currently in use.On side of locomotive "3112" railways wodonga, fred rochow, locomotive 3112 -
 Ballarat Tramway Museum
Slide - 35mm slide/s - set of 23, Noel Simons, 26/02/1972 12:00:00 AM
Set of 23 transparencies taken on 26/2/1972 on Kodak mounts. 1205.1 - Bendigo No. 25 on a special tour at Fire Station Loop, en route to Golden Square. 1205.2 - No. 21 and 25 crossing at Fire Station Loop, note photographers on the ground. No. 21 bound for North Bendigo. 1205.3 - as for 1205.3, but with trams departing loop and fire station in the background. 1205.4 - No. 25 at Golden Square Hotel with 'Rodda's Golden Square Hotel' in the background. Tram on a special tour, but showing destination of North Bendigo. 1205.5 - as for 1205.4 - but showing special. Has the end of the track in the photograph. 1205.6 - Nos. 7 and 25 (on a special tour) crossing at Myrtle St. Loop. 1205.7 - No. 7 leaving Myrtle St. loop with the mine poppet head in the background. Photo taken after tram has passed photographer. (Print made of this slide 10/2001 for use in the Gold Gold Gold exhibition of 10/2001 - See Reg. item 1979. 1205.8 - No. 25 entering depot. Tram showing 'special'. Tennis court on right has players. Photo taken after tram has passed photographer. 1205.9 - No. 24 (showing 'special') and No. 20 (showing 'Long Gully') at Bendigo Depot. 1205.10 - No. 24 on a special charter, leaving Bendigo depot. Tram has two 'Johnnie Walker' roof ads. 1205.11 - Bendigo depot with 29, 25 and a bogie car inside the depot doors. 1205.12 - As for 1205.11, but with 28 and 29. 1205.13 - No. 24 standing at front entrance of Bendigo depot with No. 20 in the background. 1205.14 - No. 24 running out into McCrae St showing special, with conductor on front step. 1205.15 - No. 24 in Caledonia St. at corner of Thunder St with the Gasworks in the background. 1205.16 - No. 5 en route for Quarry Hill at Charing cross with No. 26 (en route for Eaglehawk) about to arrive. Has former crossover at this location in the foreground. Has the Ezywalkin building in the background. 1205.17 - No. 5 and 26 at Charing Cross, with the Alexandra Fountain in the foreground and the Beehive and Ezywalkin buildings in the background. No.26 has two SEC roof ads. 1205.18 - Charing Cross looking along Pall Mall with trams 7 and 21 and 26 in the picture. 1205.19 - Charing Cross, with 21 departing for Golden Square and No. 5 heading for Quarry Hill. Has the Ezywalkin and the Beehive buildings in the background. 1205.20 - as for 1205.19, but a few moments later. Adjacent pole has a "NO ROAD" letter in reflectors vertically. 1205.21 - Charing Cross with Nos. 25, 21, 26 and 7, looking south from Pall Mall end. 1205.22 - No. 24 crossing Mitchell St. en route for Golden Square, showing 'special' with the Beehive and Ezywalkin buildings in the background. 1205.23 - Charing Cross with Nos. 24, 21 and 7 in the photo and Fountain Plaza in the background. Print of 1205.7 - stored in box D1.Information written on in blue ink and date stamped on purple ink. 1205.1 - "No. 25 at Fire Station Loop High Street, Golden Square." 1205.2 - "Nos. 25 and 21 crossing at Fire Station Loop, near Golden Square." 1205.3 - "Nos. 25 and 21 crossing at Fire Station Loop, near Golden Square." 1205.4 - "No. 25 at Golden Square terminus." 1205.5 - "No. 25 at Golden Square terminus." 1205.6 - "Nos. 7 and 25 crossing at Myrtle St. Loop." 1205.7 - "No. 7 leaving Myrtle St. Loop." 1205.8 - "No 25, entering Bendigo Depot." 1205.9 - "Nos. 20 and 24 at Bendigo Depot." 1205.10 - "No. 24 at Bendigo Depot." 1205.11 - "Nos. 25 and 29 at Bendigo Depot." 1205.12 - "Birney cars 29 and 28 at Bendigo Depot." 1205.13 - "No. 24 (with 20 beyond) at Bendigo Depot." 1205.14 - "No. 24 entering McCrae St. from Arnold St." 1204.15 - "No. 24 in Caledonia St. at cnr of Thunder St." 1204.16 - "No. 5 waits at Charing Cross as No. 26 arrives from Quarry Hill. Note remains of crossover abandoned on relocation in 1965." 1204.17 - "Nos. 5 and 26 at Charing Cross." 1204.18 - "Nos. 26, 7 and 21 at Charing Cross (No. 5 just visible behind No. 26)." 1204.19 - "No. 21 leaves Charing Cross for Golden Square as No. 5 starts off for Quarry Hill." 1204.20 - "No. 21 swings onto the single track Golden Square line as No. 5 heads into Mitchell St. towards Quarry Hill." 1204.21 - "Nos. 25, 21 and 26 watch No. 7 arrive at Charing Cross from Golden Square." 1204.22 - "No. 24 at Charing Cross crossing Mitchell St." 1204.23 - "Nos. 24, 21 and 7 at Charing Cross."tramways, trams, bendigo, golden square, myrtle st., fire station, depot, charing cross, tram 5, tram 7, tram 20, tram 21, tram 24, tram 25, tram 28, tram 29 -
 Flagstaff Hill Maritime Museum and Village
Functional object - Ship's nail in wood, Ca. 1855
This ship's nail in a wood sample was part of the construction of the ship SCHOMBERG. About the SCHOMBERG- James Blaine’s Black Ball Line had commissioned the luxury sailing ship, Schomberg, to be built for its fleet of passenger liners The three-masted wooden ship was launched in 1855, designed by the Aberdeen builders to sail faster than the quick clippers designed by North American Donald McKay. The material used for the diagonal planking was British oak with layers of Scottish larch. The Schomberg’s master Captain ‘Bully’ Forbes commanded the ship on its maiden journey between Liverpool and Melbourne, departing on 6 October 1855 with 430 passengers and 3000 tons of cargo including iron rails and equipment intended the build the Geelong Railway and a bridge over the Yarra from Melbourne to Hawthorn. After sailing for 78 days she ran aground on a sand spit at Curdies Inlet near Peterborough, Victoria, on 27 December 1835. At dawn on the next day, the ship’s Chief Officer signalled a passing steamer, SS Queen, for help and all of Schomberg’s passengers were able to disembark safely. The passengers’ baggage and some of the cargo were later collected from the Schomberg. Local merchants Manifold & Bostock bought the wreck and the remaining cargo but did not attempt to salvage the cargo that was still on board. They eventually sold it and after two of the men drowned in the salvage efforts the job was abandoned. In 1975, divers from Flagstaff Hill, including former Director, Peter Ronald, explored the Schomberg wreck site and recovered many artefacts that are now on display at the Museum.The ship's nail in a wood sample is significant for its connection with the Schomberg, which is on the Victorian Heritage Register (VHR S612), has great historical significance as a rare example of a large and fast clipper ship that sailed on the England-to-Australia run, carrying emigrants at the time of the Victorian gold rush. She represents the technical advances made to break sailing records between Europe and Australia. Flagstaff Hill’s collection of artefacts from the Schomberg is significant for its association with the shipwreck. The collection is primarily significant because of the relationship between the objects, as together they can interpret the story of the ship, Schomberg. It is archaeologically significant as the remains of an international passenger Ship. It is historically significant for representing aspects of Victoria’s shipping history and for its association with the shipwreck and the ship, which was designed to be the fastest and most luxurious of its day.Ship's nail in a wood sample. The object was recovered from the wreck of the SCHOMBERG.flagstaff hill, warrnambool, maritime village, maritime museum, shipwreck coast, great ocean road, schomberg, clipper ship, black ball line, 1855 shipwreck, aberdeen clipper ship, captain forbes, peterborough shipwreck, ss queen, ship's nail, ship's wood, wood sample, ship construction -
 Kew Historical Society Inc
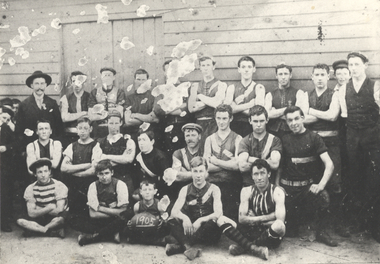
Photograph - Kew Football Club Team, 1905
The first club to have born the name of Kew is known to have been in existence as early as 1879, and to have participated in a number of different competitions, all of junior status, between then and 1891, when it disbanded. Whether the Kew Football Club which emerged at the end of the 1890s should be viewed as a wholly new organisation or a reincarnation of the previous club is a moot matter, and not one that can be satisfactorily resolved here. However, it is at least arguable that the amateur football club which today participates in the VAFA under the name of Kew can trace its origins as far back as 1898. It was during that year that the club was invited by the Metropolitan Junior Football Association (a direct forerunner of the VAFA) to enter its competition as a replacement for St Francis Xavier, which had been forced to withdraw after just a few matches. The idea was that Kew would pick up the departing club’s remaining fixtures, but that these matches would be played with no premiership points at stake. The MJFA appears to have had at least two objectives in mind in doing this: first, to avoid the necessity for a bye in the weekly draw; and secondly, to test Kew’s worthiness for full admission by having it serve a kind of probation. In 1899, having satisfied the MJFA authorities as to its viability, Kew was formally admitted to the MJFA, only to withdraw after two predominantly disappointing seasons. The club later participated in at least three, and possibly more, junior and district competitions, attaining a modest level of success, especially during the late 1920s and early 1930s. Extremely rare photo of the club from this period.This photo of a junior Kew football team dates from 1905. While the team is wearing a range of centre-laced guernseys, at least seven players wear a dark guernsey with a pale sash. Players identified in the photo include: the captain, Jack Allen, middle row, third from left; George Allen on the right in the striped jumper; and Lex Allen in the front row. Alva Allen, who donated the photo in 1986 to the Kew Historical Society, noted on the reverse that ‘most of these boys were killed in World War I’.Reverse: "Kew Football Club 1905 / Jack Allen, captain, 3rd from left in middle row / George Allen on right striped jumper / Lex Allen grandfather in front row / Most of these boys were killed in the First World War."kew football club (vic), jack allen, george allen, lex allen -
 Bendigo Military Museum
Photograph - 4th Field Survey Squadron OC’s Parades and Defence Force Service Medal Presentations, Keswick Barracks, Adelaide SA, 1987
This is a set of 12 photographs of a 4th Field Survey Squadron OC’s parade at Keswick Barracks, Adelaide SA in 1987. The OC - MAJ Peter Cates presented the Defence Force Service Medal to personnel in recognition of 15 years of efficient remunerated service, or the Clasp for 5 years of additional service. This is a set of 12 photographs of a 4th Field Survey Squadron OC’s parade and the presentation of the Defence Force Service Medal, at Keswick Barracks, Adelaide SA in 1987. The colour photographs are on 35mm negative film and are part of the Army Survey Regiment’s Collection. The photographs were scanned at 96 dpi. .1) - Photo, colour, 1987. At left – SSM WO1 Bill Griggs. Front rank L to R: SPR Todd Hayley, CPL Roger Graf, CPL Jamie McRae, CPL Dave Irving, SPR Richard Cocker, LCPL Peter McCurdy, SPR Steve Ellis, CPL John Ratcliffe. Centre rank L to R: CPL Terry ‘TJ’ Wicker, SPR Perry Langeberg, unidentified, CPL Jeff Prince, SPR Bruce Graham. Rear rank L to R: SPR Shaun Hynes, SGT H. ‘Jock’ Young. Supernumerary on right: WO2 Brett ‘Dutchy’ Van Leeuwen. .2) - Photo, colour, 1987. Inspection L to R: SSM WO1 Bill Griggs, 2IC CAPT Terry Lord, OC MAJ Peter Cates. Front rank L to R: CPL Jamie McRae, SPR Richard Cocker, LCPL Peter McCurdy, SPR Steve Ellis. Centre rank L to R: SPR Perry Langeberg, CPL Peter Hardy, SPR Steve Nokes. Rear rank: SPR Damien Killeen. .3) & .4) - Photo, colour, 1987. Presentations: OC MAJ Peter Cates presents the Defence Force Service Medal to WO2 Brett ‘Dutchy’ Van Leeuwen. Background L to R: SSM WO1 Bill Griggs, SPR Todd Hayley, CPL Jamie McRae. .5) - Photo, colour, 1987. WO2 Brett ‘Dutchy’ Van Leeuwen departs with his Defence Force Service Medal. At far left – SSM WO1 Bill Griggs. Front rank L to R: SPR Todd Hayley, CPL Roger Graf, CPL Jamie McRae, CPL Dave Irving, SPR Richard Cocker. Centre rank L to R: CPL Terry ‘TJ’ Wicker, CPL Dave Longbottom, unidentified, Rear rank L to R: SGT Mick Hogan, SGT Stu Symonds. .6) & .7) - Photo, colour, 1987. Presentations: OC MAJ Peter Cates presents the Defence Force Service Medal to SGT H. ‘Jock’ Young. Background L to R: SSM WO1 Bill Griggs, SPR Todd Hayley, CPL Roger Graf, CPL Jamie McRae. .8) - Photo, colour, 1987. SGT H. ‘Jock’ Young departs with his Defence Force Service Medal. At far left – SSM WO1 Bill Griggs. Front rank L to R: SPR Todd Hayley, CPL Roger Graf, CPL Jamie McRae, CPL Dave Irving, SPR Richard Cocker. Centre rank L to R: CPL Terry ‘TJ’ Wicker, CPL Dave Longbottom, unidentified, Rear rank L to R: SGT Mick Hogan, SGT Stu Symonds. 9) - Photo, colour, 1987. Presentations: OC MAJ Peter Cates presents the Defence Force Service Medal to CPL John Ratcliffe. Background L to R: SSM WO1 Bill Griggs, SPR Todd Hayley, CPL Roger Graf, CPL Jamie McRae. 10) - Photo, colour, 1987. Presentations: OC MAJ Peter Cates presents the Defence Force Service Medal to CPL John Ratcliffe. Background L to R: SSM WO1 Bill Griggs, SPR Todd Hayley, CPL Roger Graf. .11) - Photo, colour, 1987. CPL John Ratcliffe departs with his Defence Force Service Medal. At far left – SSM WO1 Bill Griggs. Front rank L to R: SPR Todd Hayley, CPL Roger Graf, CPL Jamie McRae, CPL Dave Irving, SPR Richard Cocker. Centre rank L to R: CPL Terry ‘TJ’ Wicker, CPL Dave Longbottom, unidentified, Rear rank L to R: SGT Mick Hogan, SGT Stu Symonds. .12) - Photo, colour, 1987. Parade handover L to R: 2IC CAPT Terry Lord, OC MAJ Peter Cates. Background L to R: SSM WO1 Bill Griggs, Front rank: SPR Todd Hayley, CPL Roger Graf, CPL Jamie McRae..1P to .12P – There are no personnel identified. ‘Medal Presentation 1987 WO2 VAN LEEUWEN SGT YOUNG CPL RATCLIFFE’ annotated on negatives sleeve.royal australian survey corps, rasvy, 4 fd svy sqn -
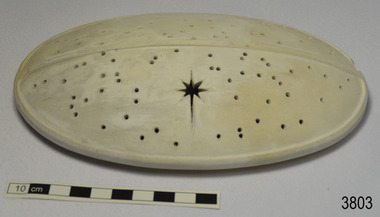 Flagstaff Hill Maritime Museum and Village
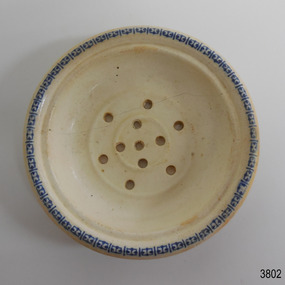
Ceramic - Cover, circa 1883
This ceramic cover was recovered from the wreck of the 1882-1883 George Roper between the late 1960’s to early 1970’s. It is one of the shipwreck artefacts in the John Chance Collection. The purpose of the cover is unclear. The holes could be for ventilation. The cover may have been used to protect food or keep it at an even temperature. It may also have been used for covering fragrant petals, allowing some scent to escape through the holes. The residue around the underside of the holes and their random placement indicate that the cover could be partially handmade. The discolouration could have come from its time in the sea. The GEORGE ROPER 1882 - 1883 - The George Roper was a 4-masted iron sailing ship built in Liverpool, England, in 1882 for fast international trade with Australia. The large vessel was launched in February 1883. The ship was on its first trip, departing Liverpool for Melbourne, captained by John Ward and a crew of 31. She had almost reached her destination on July 4 1883, approaching Port Phillip Bay and being towed by the steam tug William. The weather changed to rough with fog and both the George Roper and the William hit the dangerous Lonsdale Reef at Port Phillip Heads. The Captain and crew were eventually rescued and taken to Queenscliff. Salvage syndicates were able to recover a lot of the cargo before the George Roper broke up and sank. Amongst the cargo was soft goods, draperies, household items, spirits of malt and distilled liquors, chemicals, dynamite, and 1,400 tons of steel rails for the Victorian Government. Also in the hold were Russell Stourbridge bricks, as paying ballast. The ventilated cover is as an example of domestic ceramic ware of the 1880s. The cover also holds significance as it was recovered by John Chance, a diver from the wreck of the George Groper in the 1960s-70s. Items that come from several wrecks along Victoria's coast have since been donated to the Flagstaff Hill Maritime Village’s museum collection by his family, illustrating this item’s level of historical value. The George Roper is considered historically and archaeologically significant and as such, is listed on the Victorian Heritage Database, VHR S286. It is an example of a vessel built specifically for fast travel to and from Australia with a large shipment of cargo. The George Roper’s cargo of steel rails adds to the historical significance of international trade to the growing colony of Australia and Victoria in particular, with rail transportation soon to become a faster and safer form of transportation between colonial towns. Divers can still access parts of the scattered wreck and other artefacts recovered in the 1970s and 1980s can be viewed in both public and private collections. Cover; unglazed white ceramic, oval shape. The cover has holes randomly poked through its surface, one large hole is a six pointed star shape. Underneath there is a narrow rim placed slightly inside the edge. There is residue on the underneath around the holes. There is orange-brown discolouration and areas where the surface is lighter coloured. flagstaff hill, warrnambool, flagstaff hill maritime museum, maritime museum, shipwreck coast, flagstaff hill maritime village, great ocean road, john chance, west coast trader, george roper, w. h. potter & sons, w.t. dickson and son, captain john ward, russell stourbridge bricks, port phillip heads, lonsdale reef, dive wreck, vhr s286, coastal trader, ceramic, vintage, ventilated cover, domestic item -
 Surrey Hills Historical Society Collection
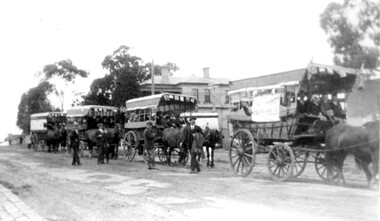
Photograph, Preparing to leave for the St George's Church of England Sunday School picnic, Mont Albert Road, 1922, 1922
The drags would have been leaving St George's Church of England in Mont Albert Road. The foundation stone for St George's Church of England, Mont Albert was laid in 1886 on land donated by Edward Dyer and the first service was preached in January 1887. From 1904 until 1907 it was known as Holy Trinity, Surrey Hills. The original church was weatherboard and replaced by a brick one in the Gothic Revival style which was designed by local architect George J V Blackburne, who also designed the Wesleyan School at Surrey Hills. The building was partly funded by donations, profits from a bazaar and concert, and other people donated furnishings. The church had boundaries along Mont Albert Road and St Georges Road. In 1998 the Church was sold and converted into a complex of units. Its current address is 19 St Georges Avenue, Mont Albert. The annual Sunday School picnic was held at Hampton and drags were the usual mode of transport. 'Lugano' was built in 1893 for William Wilson, a prominent stonemason and importer of marble fireplaces. In 1903 it became the home of William Holmes who was Chief Electrical Engineer for the Victorian Railways. He designed the electrification of the Melbourne suburban network. 'Lugano' stayed in the Holmes family until the 1930s. The annual Sunday School picnic was held at at a variety of locations and drags were the usual mode of transport. Donor information is that this was taken as the congregation prepared to depart for at Hampton on the picnic held on 25/2/1922. There are 2 copies: the original donated print and an enlargement. The original was mounted on card with photo mounts along with 506, 871, 872, and 873. It measures 13 cm x 9 cm.Black and white photo of 4 'drags' (horse-drawn hooded carriages) lined up in Mont Albert Road near the corner of St George's Avenue, in readiness for departure for the Sunday School picnic. The carriages are loaded with people and decorated with flags. The front carriage has a material sign attached to the side; the top line of writing is not decipherable, but the bottom one reads "SURREY HILLS". Four men stand in the road, which has bluestone curb and channelling. In the background is 'Lugano'.On rear in ink: "S.S. picnic to Hampton / 25th. Feb. 1922" and in a different hand in biro: "At Mont Albert. St George's Church"churches, holy trinity church, anglican church, sunday schools, picnics, lugano, horse-drawn vehicles, william wilson, willaim holmes, st george's church of england, mont albert, mont albert road -
 Melbourne Legacy
Document - Document, diary
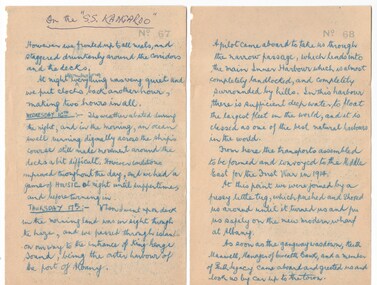
A diary written by Legatee Frank Doolan as he sailed to Perth and then visited Legatee Ivan Davies and his wife Mercy. He mentions docking at King George Sound which was the harbour from which transport assembled to convoy to the Middle East for the first World War. He was greeted by a member of Perth Legacy, Keith Manwell. He mentions visiting Mt Clarence and The Anzac Desert Mounted Monument "which was destroyed by Nasser's Gyppos at Port Said, and of which the pieces were transported back to Australia, stone base and all complete. Where a new model was made by Ray Ewen at Frankston and was sent back to Italy to be melted down and recast. It is double life size and very striking, depicting an Anzac charging from a horse which has been shot down under shellfire, to a new charger - rearing to go." He leaves the SS Kangaroo for a few days to visit a "Legacy pal", Ivan Davies. They toured his farm 'Carngham'. His observation at the end shows the comradeship of Legatees. "time to depart after several glorious days of perfect hospitality. To be accepted spontaneously as one of the family is the test of true friendship, and we received the full treatment from Mercy and Ivan at 'Carngham'". The year is unknown but the trip was in March. It could have been before a Legacy Conference in Perth. Was with other memorabilia that has come from Frank Doolan from both his war service and his time with Legacy. Frank Doolan posted this copy of his diary to Ivan Davies in 1978. Not sure how it and the cover letter (01131) were returned to Legacy's collection. The diary shows that Legatees from different regions of Australia visited each other and had strong friendships over the years. A carbon copy of a diary x 11 pages, written by L/- Frank Doolan on a trip on the SS Kangaroo and a visit to L/- Ivan Davies.Dairy is handwritten. Pages are numbered 67 to 78 in printed numerals in top right of each page.comradeship, frank doolan -
 Ballarat Tramway Museum
Photograph - Digital image Set of 20, 1971-72
Set of 20 digital images of Bendigo Tramways, 1972 at or before closure while on a tram tour by Stuart Lodington. .1 - No. 29 at the North Bendigo terminus .2 - No. 29 just past the Bendigo end of the double track in High St Eaglehawk, with a BP dealer in the background. .3 - Night photo of No. 18 at a terminus, showing "Eaglehawk" .4 - ditto .5 - Night photo of No. 24 at Eaglehawk with Leo A Hughes Photographer in the background. The Tram has "Johnnie Walker whiskey" roof adverts. .6 - No. 29 outbound in Thunder St with a train passing over the bridge in the background. .7 - view from the front window of a tram on the Eaglehawk line with a large "display event float" in the foreground and tram approaching a crossing loop. .8 - No. 29 at North Bendigo .9 - view of High St Eaglehawk looking east from the terminus, showing the track and centre poles. .10 - No. 29 outbound on the North Bendigo line turning from either Nolan St or Caledonia St, running a special. .11 - No. 7 departing North Bendigo for Golden Square. .12 - No. 3 and 18 at Charing Cross. No. 3 has two SEC roof Advertisements .13 - No. 7 at North Bendigo with the trolley pole being reversed. .14 - No. 24 at Quarry Hill with Northern Terrazzo in the background with the driver alongside .15 - No. 7 and No.6 at Charing Cross with the Beehive buildings in the background. .16 - No. 7 at North Bendigo terminus .17 - ditto .18 - No. 24 at Quarry Hill with Northern Terrazzo in the background with the conductor alongside. .19 - ditto .20 - No. 26 and other bogie tram in View St near Charing Cross with the Armstrong Tyre Service building and signs for Cohn's Drinks and T&G in the view.trams, tramways, bendigo, eaglehawk, quarry hill, golden square, depot, north bendigo, charing cross, tram 29, tram 18, tram 24, tram 3, tram 7, tram 6, tram 26 -
 Ballarat Tramway Museum
Photograph - Digital image Set of 20, 1971-72
Set of 22 digital images of Bendigo Tramways, 1972 at or before closure while on a tram tour by Stuart Lodington. .1 - No. 7 arriving at North Bendigo .2 - No. 5 departing Charing Cross along View St, with a Firestone tyres in the background. .3 - front view of a tram in View St with a blurred background image. .4 - No. 24 showing Eaglehawk destination .5 - No 26 and 3 in View St, with the Armstrong Tyre Service building in the background and signs for T&G and Cohn's Drinks. .6 - ditto .7 - No. 3 arriving at Charing Cross from Eaglehawk in View St, with a Quarry Hill destination. .8 - No. 3 and 18 at Charing Cross. .9 - No. 24 on the Quarry Hill line. .10 - No 26 in View St, with the Armstrong Tyre Service building in the background and signs for T&G and Cohn's Drinks. .11 - ditto, with fountain in view, Colonial Mutual building and a newsagent with a Herald sign on the building. .12 - No. 7 at North Bendigo terminus .13 - ditto with pole being reversed. .14 - No. 18 at Quarry Hill terminus with Northern Terrazzo sign in the background. .15 - No. 24 at Quarry Hill terminus .16 - No. 18 arriving at Charring Cross, with Fountain Plaza and Bendigo Pharmacy in the background. .17 - No. 3 and 18 at Charing Cross. .18 - No. 7 at North Bendigo terminus with pole being placed on the overhead. .19 - No. 26 in View St inbound, with Sandhurst Trustees sign in the background. .20 - No. 6 leaving Charing Cross in Pall Mall with Myer and other buildings in the background. .21 - No. 7 at North Bendigo .22 - Single trucker with two roof Advertisements crossing View St with fountain in view, Colonial Mutual building and a newsagent with a Herald sign on the building.trams, tramways, bendigo, eaglehawk, quarry hill, north bendigo, charing cross, view st, tram 7, tram 5, tram 24, tram 26, tram 5, tram 3, tram 18, tram 6 -
 Bendigo Military Museum
Photograph - Royal Australian Survey Corps Surveyors in the Field – Project Cutlass, New Guinea, 1956 – 1957
This is a set of 23 photographs of surveyors and support staff in the field undertaking tasks in New Guinea 1956 – 1957. The surveyors were employed in the establishment of mapping and geodetic control for Project Cutlass, the “Ship-Shore” survey of the New Ireland province. In this survey operation surveyors used theodolites to observe horizontal and vertical angles and chains to measure base line distances between survey stations. Bob Skitch shown in photo .7P was in the 2nd year of his career in the Australian Army. He achieved the rank of Lieutenant-Colonel, and his last appointment was the CO of the Army Survey Regiment from 1976 to 1980.This is a set of 23 photographs of surveyors and support staff in the field undertaking duties during Project Cutlass located in New Ireland, New Guinea 1956 – 1957. The photographs were printed on photographic paper and are part of the Army Survey Regiment’s Collection. The photographs were scanned at 300 dpi. .1) - Photo, colour, 1956. Surveyors travelling main road from Kavieng to Namatanai, New Ireland. .2) - Photo, colour, 1956. Unidentified surveyors assessing recovery of their vehicle after bridge collapsed on west side of New Ireland. .3) - Photo, colour, 1956. Unidentified surveyors assessing recovery of their vehicle after bridge collapsed over flooded creek on west side of New Ireland. .4) - Photo, colour, 1956. Survey personnel L to R: Bev Uwins, John Lambie, Bob Thompson, New Ireland. .5) - Photo, colour, 1956. Survey base camp, New Ireland. .6) - Photo, black & white, 1956-1957. Geoff Helsham with possible human remains, New Ireland. .7) - Photo, black & white, 1956-1957. Bob Skitch undertaking survey observations using Wild T2 theodolite, New Ireland. .8) - Photo, black & white, 1956-1957. Chas Beach undertaking survey observations using Wild T2 theodolite, New Ireland. .9) & .10) - Photo, black & white, 1956-1957. Kev Parker (cook) New Ireland. .11) - Photo, colour, 1957. Brian Berkery taking a break, Top Manor Island, Lihir Island Group off New Ireland. Latitude -2° 46”, Longitude 152° 40”. .12) - Photo, colour, 1957. Survey base camp L to R: Chas Beach, Bev Uwins, Feni Islands, New Ireland. Latitude -4° 05”, Longitude 153° 45”. .13) - Photo, colour, 1957. A Hous Kiap. (Kiaps, known formally as district officers and patrol officers, were travelling representatives of the British and Australian governments), New Ireland. .14) & .15) - Photo, colour, 1957. L to R: Joe Farrington, Tom Royle Bob undertaking survey observations using theodolites from an improvised timber tower, New Ireland. .16) & .17) - Photo, colour, 1957. US Army ship FS216 used for ship-to-shore triangulation docked at Rabaul, New Britain. .18) - Photo, colour, 1957. US Army ship FS216 used for ship-to-shore triangulation docked at Kavieng, New Ireland. Sight target on top of mast. .19) - Photo, colour, 1957. Survey personnel onboard US Army ship FS392, L to R: Peter Frodsham, Bob Thompson, Doc Reid, John Underwood, remainder unidentified, New Ireland. .20) - Photo, colour, 1957. Survey base line party heading ashore, New Ireland. .21) - Photo, colour, 1957. Survey personnel rowing US Army assault boat L to R: Kev Parker, Chas Beach, folded up survey beacons overhanging stern, New Ireland. .22) - Photo, colour, 1957. Les Bailey onboard US Army ship departing Rabaul, New Britain for Brisbane. .23) - Photo, colour, 1957. Ron Newman onboard US Army ship departing Rabaul, New Britain for Brisbane. Active volcano in background..1P to .23P annotated on back – ‘Operation Cutlass’, personnel names, the year and the location. royal australian survey corps, rasvy, army survey regiment, fortuna, a, army svy regt, asr, surveying -
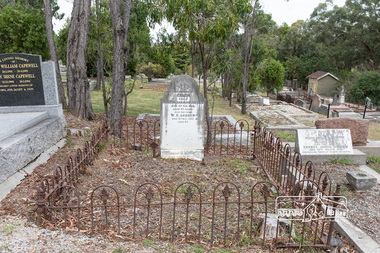 Eltham District Historical Society Inc
Photograph, Peter Pidgeon, Grave of Ellen (nee Clarke) and William Bravery, Eltham Cemetery, Victoria, 5 April 2021
William Bravery Andrew was a native of Surrey, England. He came out to Australia in 1842 and lived in Brighton, Victoria for 14 years. He revisited England for a year, departing July 1856 and returning to Victoria in July 1857. William moved to Eltham around 1859 where he met and married a widow, Ellen Harper (nee Clarke) in 1867 whose husband John, a carpenter, had died in Melbourne the previous November leaving her with four surviving children: Edith Harper (1856 Eltham), Newell Harper (1858 Eltham), Ida Ellen Harper (1862 Eltham) and Lilian Harper (1862 Eltham). Ellen and John had suffered the loss of two children: John (1860-1864 Eltham) and Percy (1865-1866). William and Ellen had three more children of their own: Mabel Andrew (1868 Eltham), William Bravery Andrew (1870 Eltham) and Ernest James Andrew (1873 Eltham) By 1867 William was the registered newsagent for Eltham with a produce store, W.B Andrew Corn Store, on "Policeman's Hill", at the corner of Maria Street (now Main Road) and Franklin Street. He also took a lively interest in the public affairs of the town and district, and with his wife Ellen, continued to run the store for some fifty years. Ellen pre-deceased William on February 9, 1906, after a long and painful illness of some 11 years. William died October 8, 1907 and is buried with Ellen in Eltham Cemetery. Their youngest son, Ernest James took over running the business and became a prominent member of the community and Eltham Shire Councillor for 30 years. The grave of Ernest James and his wife Ellen rests beside William and Ellen. Sacred to The memory of Ellen Wife of William Bravery Andrew Died 9th Feb. 1906 Aged 77 years Also the above W.B. Andrew Died 8th Oct. 1907 Aged 85.Born Digitaleltham cemetery, gravestones, ellen andrew, william bravery andrew, ellen harper andrew (nee clarke), ernest james andrew -
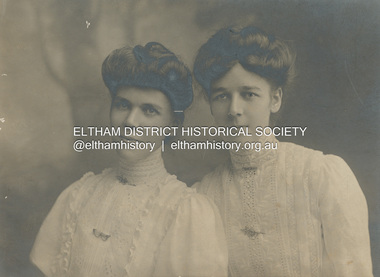 Eltham District Historical Society Inc
Photograph, Stewart & Co, Elizabeth and Mary Shillinglaw, c.1908
Elizabeth (Lizzie) Ann Shillinglaw born August 15, 1879 at Bundoora, Victoria was the fith child of Phillip Shillinglaw and Sarah Ann (nee Kidd). She commenced school at Eltham State School No. 209 (Register No. 391) in 1883 at age 3 years, her final year being 1892. She was engaged to a local Eltham lad who enslisted in the First World War and presented her with a gold ring with Lizzie inscribed on it. He never returned from war and Lizzie never married. Lizzie was quite involved with the local Methodist church where father Phillip was a Lay Preacher. She also had a dress making business in Smitrh Street, Collingwood. At the time of her father's death in 1914 she was living at 18 Stanley Street, Richmond. She returned to Wattle Brae in Eltham where she and her unmarried sisters, Mary and Ada and brother Ernest Samuel continued to live. Mary Shillinglaw born November 5, 1880 at Bundoora, Victoria was the sixth child of Phillip Shillinglaw and Sarah Ann (nee Kidd). She commenced school at Eltham State School No. 209 (Register No. 423) in 1885 at age 4 years. Mary did not marry and spent most of her life at Wattle Brae (Shillinglaw Cottage). In his Will, Phillip Shillinglaw provided that any of his unwed sisters would be able to live at Wattle Brae, rent free. When Eltham Shire Council aquired the property in 1963 to build new Shire Offices, both Mary and her sister Lizzie (also unmarried) were still living at the cottage. Council paid for the women to relocate. Mary moved to Elizabeth House, a nursing home in Ivanhoe but found it very hard to adapt to her new surroundings and living condtions. She died there only a few months after departing Eltham on October 29, 1963 at age 83 years. Lizzie died June 28, 1972 at age 93 years."Mary Shillinglaw"marg ball collection, 1908, elizabeth (lizzie) ann shillinglaw (1879-1972), mary ann shillinglaw (1880-1963), stewart & co photographers bourke st melbourne -
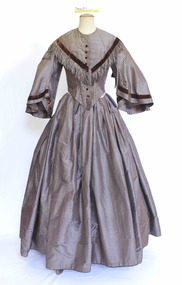 Brighton Historical Society
Clothing - Dress, Day dress, Circa 1850
A dress believed to have belonged to a family member of Mrs. Jessie Somerville Singer (nee Watson), 1849-1935. As the dress dates from circa 1850, it could have belonged to someone from one generation previous, possibly her mother Elizabeth Watson. Jessie Somerville Singer was the second wife of Mr. Edward Singer (1829 – 1904) of 'Somerville', New Street, Brighton Beach. Edward's first wife, Maria, died in 1861; their son William died approximately 12 months later. In the 1861 census of North Bradley England, Edward was recorded as a carpenter journeyman. After these tragedies Edward, then aged 30, left England to start a new life in Australia. He emigrated as an unassisted passenger on the steamship 'Great Britain', departing from Liverpool and arriving in Melbourne in April 1863. Edward worked as a joiner and overseer for a timber merchant in Franklin Street, Melbourne. In December 1869 he bought a property at 1115 Hoddle Street, East Melbourne, between Hotham and George Streets. At some stage he also acquired 1117 Hoddle Street. He also owned another property in Rushall Crescent, North Fitzroy. On 10 July 1873 Edward married Jessie Somerville Watson, the daughter of William Watson and Elizabeth Martin. They lived at Hoddle Street for some years, later moving to Rushall Crescent, North Fitzroy before in the 1880s settling in what was then the semi-rural suburb of Brighton. Edward is recorded as working there as a joiner. The house 'Somerville' was built by the Singers in circa 1880 at 100 (now 78) New Street, Brighton. The family moved there upon Edward's early retirement and lived there until 1941. 'Somerville' was sold, the house demolished and the land subdivided in the 1930s. Edward and Jessie appear to have lived comfortably. Edward died on 30 July 1909. Jessie died on 11 November 1935. Many members of the Singer family have lived in and around Brighton since Edward and Jessie first made their home there. The donor, Mrs Dorothy Constance Cook, was Jessie's granddaughter.A silver and brown striped silk taffeta dress comprising separate bodice (.1) and skirt (.2). The dress features a high round neckline fastening down the centre front with concealed hook and eye closures with ten (two missing) decorative brown silk velvet buttons. The front and back feature a briown silk velvet ribbon that forms a v shape from the shoulder to the centre front just below the bust and centre back below the shoulder blades. From the ribbon falls a brown and silver silk fringe approx seven cms deep. The bodice is shaped and boned into the waist and finishes in a deep v over the stomach. At the back the bodice is shaped to the body finishing in a smaller curved v over the small of the back. The sleeve attaches to the bodice at the true shoulder and falls in a pagoda sleeve to the mid forearm. The sleeve is also trimmed with brown silk velvet ribbon near the base of the sleeve. The full skirt is pleated at the waist, falling to the floor, longer at the back to accommodate the crinoline.somerville, new street brighton, jessie somerville singer, edward singer, elizabeth martin, brighton, 1850s -
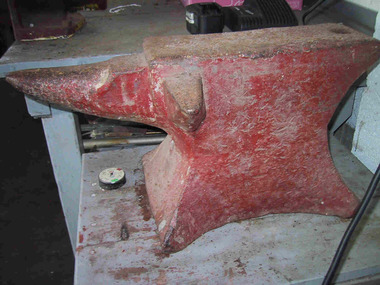 Parks Victoria - Wilsons Promontory Lightstation
Anvil
As quoted from Wikipedia, ‘An anvil is a block with a hard surface on which another object is, struck. The block is as massive as it is practical, because the higher the inertia of the anvil, the more efficiently it causes the energy of the striking tool to be transferred to the work piece’. The lightstation’s anvil is a red-painted iron block with a conical beak or horn at one end that was used for hammering curved pieces of metal. It would have stood on a heavy free-standing pedestal, such as a large tree stump, to allow complete access to the item being hammered. Some anvils display the manufacturer’s name in the metal on the side, but this is not the case here, and its age, although unknown appears to be quite old, perhaps c.1900. It appears to have had a lot of use, and although no record of this survives, it is presumed that a forge operated on site for hammering, cutting, shaping and repairing tools such as bolts, nails, hooks, chain segments, pulley blocks, hinges, crow bars, picks, chisels, horseshoes and harness hardware. A hames hook (which forms part of the collar worn by a draught horse) survives at the lightstation as do many other heavy metal tools and pieces of equipment. The anvil is an example of the necessary resourcefulness and self sufficiency practiced by lightkeepers working and living in a remotely located workplace and home, and many of the iron items in the collection may have been repaired or even made on its working surface. As a lightstation manager Chris Richter used the anvil to manufacture pulley blocks for sash windows, repair brass door hinges & sharpen cold chisels, crowbars and picks and other lightkeepers have used this anvil for many fabricating jobs such as manufacturing ducting for the generator room ventilation system."The lightship only came in every three months with supplies and there would have been repairs to do between visits from a blacksmith - who would have had to travel on the ship. Also, the ship was only anchored in the bay long enough to unload supplies and collect and deliver lightkeeping staff – probably not enough time to get much smithy work done – especially if the weather packed it in and the ship had to depart. Lightkeepers in our time had to be self sufficient, resourceful and innovative and I imagine that would have been the case in the past." It has second level contributory significance.Red painted blacksmith's anvil. -
 Ballarat Tramway Museum
Slide - 35mm slide/s - set of 12, Noel Simons, 28 Feb. 1972
Set of 12 transparencies taken on 28/2/1972 on Kodak mounts. 1207.1 - Bendigo 26 and 2 at Charing Cross. 26 en route for Eaglehawk, 2 for Quarry Hill. Has the Colonial Mutual Life, Armstrong Tyre Service, and Australian Mutual Provident Society buildings and a Cohns Drinks ad. in the background. 1207.2 - as for 1207.1 but with Alexandra fountain in the foreground. 1207.3 - No. 2 in Mitchell St. heading for Quarry Hill. Photo taken after tram has passed photographer. Has buildings on either side of Mitchell St. in the background, including the Plaza Theatre. 1207.4 - No. 6 en route for Golden Square departing Charing Cross. Has the RACV and ANZ bank in the background. 1207.5 - No. 2 crossing Pall Mall to enter Charing Cross ex Quarry Hill, with the Fountain Plaza in the background. 1207.6 - No. 6 arriving Charing Cross ex Golden Square with No. 21 alongside. No. 21 has the SEC ad. 'Everything's fine in my all electric kitchen.' Has the City Family Hotel and the Fountain Plaza shopping centre in the background. 1207.7 - No. 5 at Charing Cross en route for Quarry Hill with No. 2 behind. No. 2 has two SEC roof ads, 'Everything s fine in my all electric kitchen' and 'Electricity best for cooking'. RACV building in the background. Tram crews are discussing the day in the front of the tram. 1207. 8 - No. 21 in High St. Bendigo with the Cathedral in the background. No. 21 has two SEC roof ads, 'Everything's fine in my all electric kitchen' and 'Electricity best for cooking'. 1207.9 - No. 6 in High St. Bendigo with the Cathedral in the background. 1207.10 - No. 6 in High St. Bendigo, just past Wattle St. Photo taken after the tram has passed the photographer from within the Highway Car Sales yard. 1207.11 - No. 26 bound for Eaglehawk at the end of the double track in View St., note signal contactors, tram stop and section signs mounted on pole. 1207.12 - No. 26 turning from View St. into Barnard St.Information written on in blue ink and date stamped on purple ink. 1207. 1- "Nos. 26 and 2 at Charing Cross." 1207.2 - "Nos. 26 and 2 at Charing Cross." 1207.3 - "No. 2 in Mitchell St. just after leaving Charing Cross." 1207.4 - "No.6 leaving Charing Cross for Golden Square." 1207.5 - "No. 2 arriving at Charing Cross from Quarry Hill." 1207.6 - "No. 21 waits at Charing Cross as No. 6 arrives from Golden Square." 1207.7 - "No 5 at Charing Cross with No. 2 lurking behind." 1207.8 - "No. 21 in High St. at cnr of Wattle St." 1207.9 - "No. 6 in High St. at cnr of Wattle St." 1207.10 - "No. 6 in High St. between Wattle and Vine Sts." 1207.11 - "No. 26 at end of double track in View St. near Barnard. St. 1207.12 - "No. 26 seen at dusk turning from View St. into Barnard St."tramways, trams, bendigo, charing cross, high st, view st., tram 2, tram 5, tram 6, tram 21, tram 26 -
 Ballarat Tramway Museum
Film - Movie Film & Box, Kodak, 1960s
Yields information in movie film format of Ballarat trams in 1971 at the time of one of the closure tours and, a enthusiast tour, how the system operated and was used by people., Yields information in movie film format of Ballarat trams in 1971 at the time of one of the closure tours and, a enthusiast tour, how the system operated and was used by people.Movie film - 8mm, approx. 4.14 mins, with white leader strip on a plastic reel, within a Kodak movie yellow plastic container. Has been transferred to DVD - see Reg item 4100 as Segment No. 4. Filmed and made by an unknown person. Synopsis: based on time - Colour film Title "Ballarat trams specials" 0:00 No. 41 and two other bogie trams loading passengers outside the Ballarat railway station. 0:12 Image of R class loco and K class as 2nd loco at the station and train 0:18 Inside a bogie tram looking through saloon door showing the HTT logo. 0:23 From the front of a tram, or 39 turning from Lydiard St Nth into Sturt St and then proceeding along Sturt St. 0:31 Short sequence inside the tram with some passengers in the view 0:39 No. 21, showing Special in Sturt St West and then the two bogie trams following. 1:08 21 turning from Sturt St West into Hamilton Ave, followed by 41, 35 and 37 and then loading photographers. 1:58 As above north of Gardens Loop in Wendouree Parade. 2:07 Interior view of tram moving at speed, then Forest St corner showing church, and Wendouree Parade. 2:24 Drummond St Sth, crossing two trams at Bell St loop 2:29 Sebastopol line, from the window, heading towards the terminus. 2:44 No. 32 at Sebastopol terminus with the pole being turned. 3:01 Single trucker climbing Sturt St hill towards Lydiard St Nth. 3:17 No. 21 turning from Lydiard St Nth into Sturt St 3:31 Bogie tram climbing Sturt St hill towards Lydiard St Nth 3:55 Crossing the railway level crossing in Lydiard St Nth from the window of the tram. 4:02 Train departing from station – very poor sequence – appears to be a K class locomotive. 4:15 end Placed in a blue cardboard box specially made for the item 30/08/2010.trams, tramways, ballarat, vintage train, bell st, level crossings, lydiard st nth, sturt st west, tram 41, tram 39, tram 21, tram 35, tram 37, tram 32 -
 Bendigo Military Museum
Photograph - A Section, 1st Topographic Survey Troop, Vung Tau, Vietnam, 1966
This is a set of 12 photographs of A Section, 1st Topographic Survey Troop taken from the 25th of May to the 12th of June 1966 during their deployment to Vung Tau, Vietnam. Led by OC CAPT Bob Skitch, the ten personnel from A Section 1st Topo Svy Tp and six personnel from supporting units were the first contingent from the Royal Australian Survey Corps deployed to provide topographic support to the Australian Task Force in Vietnam. They arrived in Saigon, Vietnam on the 10th of June 1966 enroute to the Australian Reinforcement Unit (ARU) “back beach” camp in Vung Tau. The ten RA Svy technical personnel from 1st Topo Svy Tp deployed were: WO2 David Christie, SGT Stan Campbell, SGT Dave King, CPL Jim Roberts, CPL Dennis Duquemin, CPL Des Ceruti, SPR Derek Chambers, SPR Brian Firns, SPR Joe O’Connor and SPR Ron Smith. External personnel deployed were: WO2 Snow Rollston from Northern Command Field Survey Unit, T/CPL Peter Clarke – orderly room corporal, T/CPL Alan Carew – Technical Storeman, SPR Stan Johns – Map Storeman, SPR Boots Campbell – batman/driver and PTE BNF Brunning – cook. The ship featured in photos .1P and .2P was the aircraft carrier HMAS Sydney on its 4th voyage to Vietnam. On board were SGT Stan Campbell and SPR Brian Firns, tasked to manage A Section’s stores and equipment. The rest of A Section deployed to Vietnam by air on the chartered Qantas 707B ‘City of Longreach'. A Section’s main tasks were to establish a Theatre Grid, map compilation and map revision; Engineer Survey Support in the camp and to the civil community; give assistance to the Cordon Search Missions by producing large scale plots from aerial photos with every house and fence etc plotted; and then reproduce these by silk screening usually, within a 24-hour period. RA Svy’s support concluded with the withdrawal of Australian troops from Vietnam in 1972. More information on the A Section, 1st Topographic Survey Troop and the Army Survey Regiment’s supporting role is provided in pages 89 to 94 of Valerie Lovejoy’s book 'Mapmakers of Fortuna – A history of the Army Survey Regiment’ ISBN: 0-646-42120-4.This is a set of 12 photographs of A Section, 1st Topographic Survey Troop (1st Topo Svy Tp), taken from the 25th of May to the 12th of June 1966 during their deployment to Vung Tau, Vietnam. The black and white photographs were printed on photographic paper and are part of the Army Survey Regiment’s Collection. The photographs were scanned at 300 dpi. .1) &.2) - Photo, black & white, 1966. HMAS Sydney departing Woolloomooloo wharf en-route to Vietnam. .3) - Photo, black & white, 1966. A Section 1 Topo Svy Tp relaxing in a bar before deployment. OC CAPT Bob Skitch in centre of photo. .4) - Photo, black & white, 1966. Unidentified A Section 1 Topo Svy Tp personnel and troops from other units relaxing in a bar before deployment. .5) - Photo, black & white, 1966. A Section 1 Topo Svy Tp personnel arrival by bus at Saigon (Tan Son Nhut) Airport. OC CAPT Bob Skitch 4th from right. .6) - Photo, black & white, 1966. A Section 1 Topo Svy Tp personnel boarding the USAF Hercules aircraft enroute from Saigon (Tan Son Nhut) Airport to Vung Tau Airfield. OC CAPT Bob Skitch on left. .7) - Photo, black & white, 1966. A Section 1 Topo Svy Tp personnel and troops from other units boarding the USAF Hercules aircraft enroute from Saigon (Tan Son Nhut) Airport to Vung Tau Airfield. .8) & .9) - Photo, black & white, 1966. A Section 1 Topo Svy Tp personnel arrive at the Australian Reinforcement Unit (ARU) “back beach” camp. .10) - Photo, black & white, 1966. A Section 1 Topo Svy Tp personnel in oppressive conditions work on map products. .11) - Photo, black & white, 1966. Group photo of A Section 1 Topo Svy Tp. OC CAPT Bob Skitch on far right. .12) - Photo, black & white, 1966. Group photo of A Section 1 Topo Svy Tp. OC CAPT Bob Skitch 3rd from right.Annotated with the photo set - ‘ DET 1 Topo Svy Tp Vung Tau 25 May to 12 of Jun 66’royal australian survey corps, rasvy, army survey regiment, army svy regt, fortuna, asr, 1st topographical survey troop -
 4th/19th Prince of Wales's Light Horse Regiment Unit History Room
Order of Ceremony, The Royal Australian Amored (sic) Corps the Keeffe Family & Eoghan McDonald Celebrates (sic) the Unveiling of a Commemorative Plaque 16 November 2014, 2014
The 13th Australian Armoured Regiment was a Gippsland militia unit that had been called up for full time duty in December 1941 as a traditional light horse regiment. The early months of 1942 had seen the regiment lose its horses, a conversion to a motor regiment and finally to an armoured regiment in May. During this period there were considerable changes in personnel, however the regiment maintained its strong links to Gippsland and its former identity. Between May and November 1942, individual soldiers had become proficient in their trade training and the regiment changed its focus to troop and squadron activities. On 16 November 1942, the unit was located at the Puckapunyal Army Camp. C Squadron's training program involved a night driving exercise where a column of armoured and B vehicles would depart camp at 0245 hours and proceed to a site to the East of Seymour and set up a bivouac between Whiteheads Creek and Highlands Road. Numerous army camps surrounded the Seymour area; and much of the surrounding farm land had been acquired for military purposes. By November 1942 exercises such as C Squadron's were commonplace and had been repeated on numerous occasions since 1939. At 0400 hrs, C Squadron's vehicles reached O'Sullivan's Paddock on the Kobyboyn Road; prior to reaching the Old Telegraph Road the column turned to the North towards a known crossing point on Whiteheads Creek. The column consisted of seven M3 Medium Tanks and four Universal Carriers. In the case of Corporal McLeod's vehicle, there were seven crewmen rather than the usual five man crew. On arrival at the creek crossing, Captain C.M.I. 'Sandy' Pearson dismounted and with the assistance of Sergeant R.J. Ball began to guide individual tanks across the creek. Four tanks had crossed the creek without difficulty when Corporal McLeod's tank, ARN 24652, began its descent. Captain Pearson stated at the Coroner's Inquiry in December 1942, "Whilst climbing out of the ford the vehicle swerved to the left, apparently striking the tree. It was not the portion of the tank (front) that struck the tree. The tank straightened and appeared to be well under control, suddenly the bank on the left collapsed to the extent of 3ft by 12ft by15ft long causing the vehicle to slide into the creek and turn upside down." Captain Pearson and Sergeant Ball were faced with a nightmarish situation: The Grant had come to rest upside down in soft mud, six crew members were unaccounted for, escape hatches could not be opened and the weight of the tank was settling deeper into the water and mud. Compounding the problem was that the location of the tank did not allow for the other tanks to safely conduct a recovery. It was truly the darkest night.Single A4 card. folded, Contains an account of the raising of 13 Armoured Regiment in December 1941and a tank accident during a night creek crossing in which six crewmen were killed, and, Order of Ceremony for plaque unveiling, Guest of Honour LtCol Stuart Cree CO/CI School of Armour13 armored regiment, tank accident, puckapunyal -
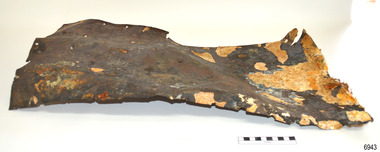 Flagstaff Hill Maritime Museum and Village
Functional object - Copper Sheathing, Ca. 1855
This sheet of copper sheathing or Muntz metal has been recovered from the site of the wrecked ship Schomberg. It has been damaged by the reaction of the metals to the sea, it has encrustations from the sea such as sand, and another damage has caused the edges to break away or fold over. Early sailing ships had a problem of the timber hulls being eaten through by the marine animals called Teredo Worms, sometimes called ‘sea worms’ or ‘termites of the sea’. The worms bore holes into wood that is immersed in seawater and the bacteria inside the worms digest the wood. Early shipbuilders applied coatings of tar, was, lead or pitch onto the timber to prevent this. In the 18th and 19th centuries, the outsides of ships’ hulls were encased in either copper sheathing or Muntz metal, which is a combination of 60 per cent copper and 40 per cent zinc. The ships would be re-metalled periodically to ensure the sheathing would remain effective. In more recent times the ships are protected with a toxic coating. About the SCHOMBERG- James Blaine’s Black Ball Line had commissioned the luxury sailing ship, Schomberg, to be built for its fleet of passenger liners The three-masted wooden ship was launched in 1855, designed by the Aberdeen builders to sail faster than the quick clippers designed by North American Donald McKay. The material used for the diagonal planking was British oak with layers of Scottish larch. The Schomberg’s master Captain ‘Bully’ Forbes commanded the ship on its maiden journey between Liverpool and Melbourne, departing on 6 October 1855 with 430 passengers and 3000 tons of cargo including iron rails and equipment intended the build the Geelong Railway and a bridge over the Yarra from Melbourne to Hawthorn. After sailing for 78 days she ran aground on a sand spit at Curdies Inlet near Peterborough, Victoria, on 27 December 1835. At dawn on the next day, the ship’s Chief Officer signalled a passing steamer, SS Queen, for help and all of Schomberg’s passengers were able to disembark safely. The passengers’ baggage and some of the cargo were later collected from the Schomberg. Local merchants Manifold & Bostock bought the wreck and the remaining cargo but did not attempt to salvage the cargo that was still on board. They eventually sold it and after two of the men drowned in the salvage efforts the job was abandoned. In 1975, divers from Flagstaff Hill, including former Director, Peter Ronald, explored the Schomberg wreck site and recovered many artefacts that are now on display at the Museum.The copper sheathing is significant for its connection with the Schomberg, which is on the Victorian Heritage Register (VHR S612), has great historical significance as a rare example of a large and fast clipper ship that sailed on the England-to-Australia run, carrying emigrants at the time of the Victorian gold rush. She represents the technical advances made to break sailing records between Europe and Australia. Flagstaff Hill’s collection of artefacts from the Schomberg is significant for its association with the shipwreck. The collection is primarily significant because of the relationship between the objects, as together they can interpret the story of the ship, Schomberg. It is archaeologically significant as the remains of an international passenger Ship. It is historically significant for representing aspects of Victoria’s shipping history and for its association with the shipwreck and the ship, which was designed to be the fastest and most luxurious of its day.Copper sheathing; rectangular sheet of copper, shaped for use on a ship's hull, buckled, with fibres protruding from one edge. The object was recovered from the wreck of the SCHOMBERG.flagstaff hill, warrnambool, maritime village, maritime museum, shipwreck coast, great ocean road, schomberg, clipper ship, black ball line, 1855 shipwreck, aberdeen clipper ship, captain forbes, peterborough shipwreck, ss queen, ship construction, copper sheating, sheathing, sea worm, muntz, muntz metal, copper sheathing, teredo worms, sea worms, sea termites, shipbuilding -
 Eltham District Historical Society Inc
Photograph, Murchison Gap, Autumn Excursion, Hume and Hovell's 1824 expedition, 26 May 1996, 26/05/1996
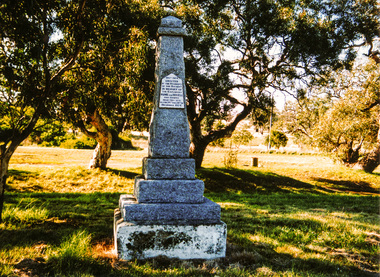
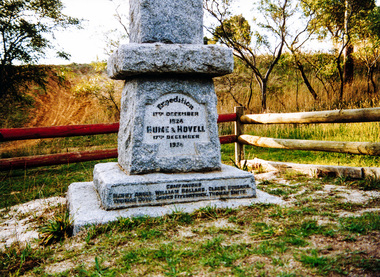
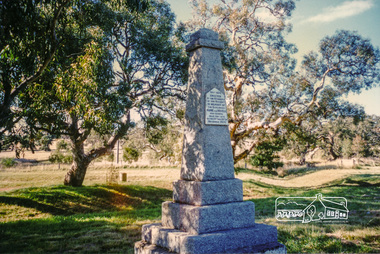
[article by Bettina Woodburn in EDHS Newsletter No. 109, July 1996:] ON THE TRAIL OF HUME AND HOVELL - REPORT ON THE AUTUMN EXCURSION - On a green and fresh morning (Sunday 26th May 1996) the Cobb and Co coach (driven by the most obliging Peter Tampion) set off in a north easterly direction from Eltham to connect with Hume and Hovell's route on their 1824 explorations of central Victoria. The Society would follow a series of monuments erected for the 1924 centenary of the expedition from King Parrot Creek (Tuesday 7th December 1824), through Strath Creek, over Sunday Creek (Sunday 12th December 1824) at Broadford, Tullamarine, St Albans, Deer Park, through Werribee, skirting east of the You Yangs to Lara and Avalon Beach. Because their distance-measuring wheel had broken and a one degree mistake was made in calculations, the two leaders of the original group of six convict-companions arrived at Corio Bay, instead of the expected Western Port, discovered earlier by Flinders. From below Mt. Disappointment (Hume and Hovell's difficulties in "scrambling over brush and rock", "leeches in forest, as well as no water", "cutting grass 4-5 ft. high", dreadful scrub", "devil flies") we took an easier route, saw the Strath Creek memorial in ground fog and a wonderful "field of dreams", the Hume-Hovell privately owned cricket ground with its white picket boundary fence. Now, after a steep climb, in sunshine under gums we stretched and viewed magnificent rolling hills and fog-filled valleys - not "smoke from Aborigines' bush fires". After morning tea at Broadford we followed the Sunday Creek valley beside the Hume Freeway, passed the Wallan Wallan Rest Area (more appropriately Hume and Hovell Rest Area) to tum right at Beveridge. In Gellibrand Hill Park, near the headwaters of the Moonee Ponds Creek, we experienced the landscape the first European settlers saw - huge river red gums and rolling pastures. The gardens and sheltered courtyard of the 1840s, timber, brought from .....[?] prefabricated Woodlands Homestead, provided a pleasant lunch stop. We enjoyed a private tour, panoramic views over Melbourne and surroundings and the excitement of arriving and departing aircraft. Our next river crossing was at Werribee, "in a vast treeless plain", then we drove on by-ways no coach had previously travelled, to find "an immense sheet of water" salty Corio Bay, off-course to the west. In late afternoon of a super, calm, late autumn day we headed homewards. Back at Eltham we were rather surprised to find that we had travelled a total of 347 km. Thanks again to Russell Yeoman for his research and organization. What a wonderful day! Three colour photographsactivities, murchison gap, murchison valley -
 Eltham District Historical Society Inc
Photograph, Hume and Hovell Monument, Broadford, Autumn Excursion, Hume and Hovell's 1824 expedition, 26 May 1996, 26/05/1996
[article by Bettina Woodburn in EDHS Newsletter No. 109, July 1996:] ON THE TRAIL OF HUME AND HOVELL - REPORT ON THE AUTUMN EXCURSION - On a green and fresh morning (Sunday 26th May 1996) the Cobb and Co coach (driven by the most obliging Peter Tampion) set off in a north easterly direction from Eltham to connect with Hume and Hovell's route on their 1824 explorations of central Victoria. The Society would follow a series of monuments erected for the 1924 centenary of the expedition from King Parrot Creek (Tuesday 7th December 1824), through Strath Creek, over Sunday Creek (Sunday 12th December 1824) at Broadford, Tullamarine, St Albans, Deer Park, through Werribee, skirting east of the You Yangs to Lara and Avalon Beach. Because their distance-measuring wheel had broken and a one degree mistake was made in calculations, the two leaders of the original group of six convict-companions arrived at Corio Bay, instead of the expected Western Port, discovered earlier by Flinders. From below Mt. Disappointment (Hume and Hovell's difficulties in "scrambling over brush and rock", "leeches in forest, as well as no water", "cutting grass 4-5 ft. high", dreadful scrub", "devil flies") we took an easier route, saw the Strath Creek memorial in ground fog and a wonderful "field of dreams", the Hume-Hovell privately owned cricket ground with its white picket boundary fence. Now, after a steep climb, in sunshine under gums we stretched and viewed magnificent rolling hills and fog-filled valleys - not "smoke from Aborigines' bush fires". After morning tea at Broadford we followed the Sunday Creek valley beside the Hume Freeway, passed the Wallan Wallan Rest Area (more appropriately Hume and Hovell Rest Area) to tum right at Beveridge. In Gellibrand Hill Park, near the headwaters of the Moonee Ponds Creek, we experienced the landscape the first European settlers saw - huge river red gums and rolling pastures. The gardens and sheltered courtyard of the 1840s, timber, brought from .....[?] prefabricated Woodlands Homestead, provided a pleasant lunch stop. We enjoyed a private tour, panoramic views over Melbourne and surroundings and the excitement of arriving and departing aircraft. Our next river crossing was at Werribee, "in a vast treeless plain", then we drove on by-ways no coach had previously travelled, to find "an immense sheet of water" salty Corio Bay, off-course to the west. In late afternoon of a super, calm, late autumn day we headed homewards. Back at Eltham we were rather surprised to find that we had travelled a total of 347 km. Thanks again to Russell Yeoman for his research and organization. What a wonderful day! Colour photographactivities, broadford, hume and hovell, monument -
 Eltham District Historical Society Inc
Photograph, Hume and Hovell Monument, Autumn Excursion, Hume and Hovell's 1824 expedition, 26 May 1996, 26/05/1996
[article by Bettina Woodburn in EDHS Newsletter No. 109, July 1996:] ON THE TRAIL OF HUME AND HOVELL - REPORT ON THE AUTUMN EXCURSION - On a green and fresh morning (Sunday 26th May 1996) the Cobb and Co coach (driven by the most obliging Peter Tampion) set off in a north easterly direction from Eltham to connect with Hume and Hovell's route on their 1824 explorations of central Victoria. The Society would follow a series of monuments erected for the 1924 centenary of the expedition from King Parrot Creek (Tuesday 7th December 1824), through Strath Creek, over Sunday Creek (Sunday 12th December 1824) at Broadford, Tullamarine, St Albans, Deer Park, through Werribee, skirting east of the You Yangs to Lara and Avalon Beach. Because their distance-measuring wheel had broken and a one degree mistake was made in calculations, the two leaders of the original group of six convict-companions arrived at Corio Bay, instead of the expected Western Port, discovered earlier by Flinders. From below Mt. Disappointment (Hume and Hovell's difficulties in "scrambling over brush and rock", "leeches in forest, as well as no water", "cutting grass 4-5 ft. high", dreadful scrub", "devil flies") we took an easier route, saw the Strath Creek memorial in ground fog and a wonderful "field of dreams", the Hume-Hovell privately owned cricket ground with its white picket boundary fence. Now, after a steep climb, in sunshine under gums we stretched and viewed magnificent rolling hills and fog-filled valleys - not "smoke from Aborigines' bush fires". After morning tea at Broadford we followed the Sunday Creek valley beside the Hume Freeway, passed the Wallan Wallan Rest Area (more appropriately Hume and Hovell Rest Area) to tum right at Beveridge. In Gellibrand Hill Park, near the headwaters of the Moonee Ponds Creek, we experienced the landscape the first European settlers saw - huge river red gums and rolling pastures. The gardens and sheltered courtyard of the 1840s, timber, brought from .....[?] prefabricated Woodlands Homestead, provided a pleasant lunch stop. We enjoyed a private tour, panoramic views over Melbourne and surroundings and the excitement of arriving and departing aircraft. Our next river crossing was at Werribee, "in a vast treeless plain", then we drove on by-ways no coach had previously travelled, to find "an immense sheet of water" salty Corio Bay, off-course to the west. In late afternoon of a super, calm, late autumn day we headed homewards. Back at Eltham we were rather surprised to find that we had travelled a total of 347 km. Thanks again to Russell Yeoman for his research and organization. What a wonderful day! Two colour photographsactivities, hume and hovell, monument -
 Eltham District Historical Society Inc
Photograph, Hume and Hovell Monument, Broadford, Autumn Excursion, Hume and Hovell's 1824 expedition, 26 May 1996, 26/05/1996
[article by Bettina Woodburn in EDHS Newsletter No. 109, July 1996:] ON THE TRAIL OF HUME AND HOVELL - REPORT ON THE AUTUMN EXCURSION - On a green and fresh morning (Sunday 26th May 1996) the Cobb and Co coach (driven by the most obliging Peter Tampion) set off in a north easterly direction from Eltham to connect with Hume and Hovell's route on their 1824 explorations of central Victoria. The Society would follow a series of monuments erected for the 1924 centenary of the expedition from King Parrot Creek (Tuesday 7th December 1824), through Strath Creek, over Sunday Creek (Sunday 12th December 1824) at Broadford, Tullamarine, St Albans, Deer Park, through Werribee, skirting east of the You Yangs to Lara and Avalon Beach. Because their distance-measuring wheel had broken and a one degree mistake was made in calculations, the two leaders of the original group of six convict-companions arrived at Corio Bay, instead of the expected Western Port, discovered earlier by Flinders. From below Mt. Disappointment (Hume and Hovell's difficulties in "scrambling over brush and rock", "leeches in forest, as well as no water", "cutting grass 4-5 ft. high", dreadful scrub", "devil flies") we took an easier route, saw the Strath Creek memorial in ground fog and a wonderful "field of dreams", the Hume-Hovell privately owned cricket ground with its white picket boundary fence. Now, after a steep climb, in sunshine under gums we stretched and viewed magnificent rolling hills and fog-filled valleys - not "smoke from Aborigines' bush fires". After morning tea at Broadford we followed the Sunday Creek valley beside the Hume Freeway, passed the Wallan Wallan Rest Area (more appropriately Hume and Hovell Rest Area) to tum right at Beveridge. In Gellibrand Hill Park, near the headwaters of the Moonee Ponds Creek, we experienced the landscape the first European settlers saw - huge river red gums and rolling pastures. The gardens and sheltered courtyard of the 1840s, timber, brought from .....[?] prefabricated Woodlands Homestead, provided a pleasant lunch stop. We enjoyed a private tour, panoramic views over Melbourne and surroundings and the excitement of arriving and departing aircraft. Our next river crossing was at Werribee, "in a vast treeless plain", then we drove on by-ways no coach had previously travelled, to find "an immense sheet of water" salty Corio Bay, off-course to the west. In late afternoon of a super, calm, late autumn day we headed homewards. Back at Eltham we were rather surprised to find that we had travelled a total of 347 km. Thanks again to Russell Yeoman for his research and organization. What a wonderful day! Colour photographactivities, broadford, hume and hovell, monument -
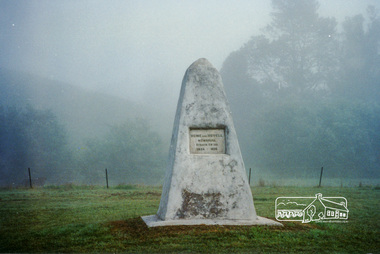 Eltham District Historical Society Inc
Photograph, Strath Creek, Autumn Excursion, Hume and Hovell's 1824 expedition, 26 May 1996, 26/05/1996
[article by Bettina Woodburn in EDHS Newsletter No. 109, July 1996:] ON THE TRAIL OF HUME AND HOVELL - REPORT ON THE AUTUMN EXCURSION - On a green and fresh morning (Sunday 26th May 1996) the Cobb and Co coach (driven by the most obliging Peter Tampion) set off in a north easterly direction from Eltham to connect with Hume and Hovell's route on their 1824 explorations of central Victoria. The Society would follow a series of monuments erected for the 1924 centenary of the expedition from King Parrot Creek (Tuesday 7th December 1824), through Strath Creek, over Sunday Creek (Sunday 12th December 1824) at Broadford, Tullamarine, St Albans, Deer Park, through Werribee, skirting east of the You Yangs to Lara and Avalon Beach. Because their distance-measuring wheel had broken and a one degree mistake was made in calculations, the two leaders of the original group of six convict-companions arrived at Corio Bay, instead of the expected Western Port, discovered earlier by Flinders. From below Mt. Disappointment (Hume and Hovell's difficulties in "scrambling over brush and rock", "leeches in forest, as well as no water", "cutting grass 4-5 ft. high", dreadful scrub", "devil flies") we took an easier route, saw the Strath Creek memorial in ground fog and a wonderful "field of dreams", the Hume-Hovell privately owned cricket ground with its white picket boundary fence. Now, after a steep climb, in sunshine under gums we stretched and viewed magnificent rolling hills and fog-filled valleys - not "smoke from Aborigines' bush fires". After morning tea at Broadford we followed the Sunday Creek valley beside the Hume Freeway, passed the Wallan Wallan Rest Area (more appropriately Hume and Hovell Rest Area) to tum right at Beveridge. In Gellibrand Hill Park, near the headwaters of the Moonee Ponds Creek, we experienced the landscape the first European settlers saw - huge river red gums and rolling pastures. The gardens and sheltered courtyard of the 1840s, timber, brought from .....[?] prefabricated Woodlands Homestead, provided a pleasant lunch stop. We enjoyed a private tour, panoramic views over Melbourne and surroundings and the excitement of arriving and departing aircraft. Our next river crossing was at Werribee, "in a vast treeless plain", then we drove on by-ways no coach had previously travelled, to find "an immense sheet of water" salty Corio Bay, off-course to the west. In late afternoon of a super, calm, late autumn day we headed homewards. Back at Eltham we were rather surprised to find that we had travelled a total of 347 km. Thanks again to Russell Yeoman for his research and organization. What a wonderful day! Colour photographactivities, monument, hume and hovell, murchison valley, strath creek