Showing 937 items matching "peak"
-
 Melbourne Tram Museum
Newspaper, The Age, “Free tram expansion attacked”, 6/06/2019 12:00:00 AM
... Proposal will now be examined along with cheaper off-peak fares....Proposal will now be examined along with cheaper off-peak fares. “Free tram expansion attacked” Newspaper The Age Daniel Bowen, Rod Barton ...Newspaper clippings titled: “Free tram expansion attacked” Newspaper clipping from the Age 6/6/2019 by Benjamin Preiss Melbourne's free tram zone should not be extended according to Public Transport Users Association's Daniel Bowen. He claims it causes overcrowding and loss of revenue. MP Rod Barton has proposed the extension to cover the zoo, Shrine of Remembrance and the MCG, which has been passed in parliament. Proposal will now be examined along with cheaper off-peak fares.trams, tramways, public transport, free tram, ptua -
 Melbourne Tram Museum
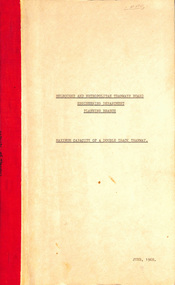
Document - Report, Melbourne & Metropolitan Tramways Board (MMTB), "MMTB Planning Branch - Maximum Capacity of a Double Track Tramway", Jun. 1968
... Report - 9 foolscap sheets - titled "MMTB Planning Branch - Maximum Capacity of a Double Track Tramway", dated June 1968 looking at the capacity of Swanston St in peak hours compared to an underground tramway with bogie or articulated trams. ...Report - 9 foolscap sheets - titled "MMTB Planning Branch - Maximum Capacity of a Double Track Tramway", dated June 1968 looking at the capacity of Swanston St in peak hours compared to an underground tramway with bogie or articulated trams. ...Report - 9 foolscap sheets - titled "MMTB Planning Branch - Maximum Capacity of a Double Track Tramway", dated June 1968 looking at the capacity of Swanston St in peak hours compared to an underground tramway with bogie or articulated trams. Compares different types of trams - SW6 to PCC, headways, time intervals, size of tram stops, traffic lights and comments. 2nd copy - original document - card covers, red binding on the left hand side - with three diagrams,2nd copy has "Lees" in top right corner.trams, tramways, mmtb, tram stops, swanston st, tramcar design, tramcar operations, traffic lights -
 Melbourne Tram Museum
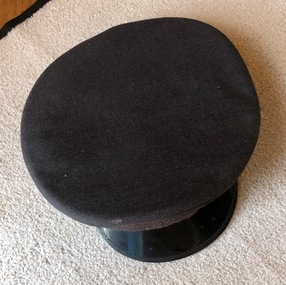
Uniform - Cap, Emerco Australia, early 2000's
... Peaked Cap - MMTB - grey cloth exterior (Yarra Trams grey), red cotton interior lining with brown leather pad on the inside, with a black plastic external peak and green on the inside of the cap. Has a manufacturers lable inside the cap - made by Emerco Australia. ...Melbourne Tram Museum 8 Wallen Road Hawthorn melbourne Trams tramways Uniforms Cap Yarra Trams Peaked Cap - MMTB - grey cloth exterior (Yarra Trams grey), red cotton interior lining with brown leather pad on the inside, with a black plastic external peak and green on the inside of the cap. Has a manufacturers lable inside the cap - made by Emerco Australia. ...Peaked Cap - MMTB - grey cloth exterior (Yarra Trams grey), red cotton interior lining with brown leather pad on the inside, with a black plastic external peak and green on the inside of the cap. Has a manufacturers lable inside the cap - made by Emerco Australia. Has a white size label. Advised by the donor that the cap was specifically made for him by Yarra when he was doing street work as the Malvern Tram Depot Senior Driver Trainer. Size 7 3/8, - 59.trams, tramways, uniforms, cap, yarra trams -
 Musculoskeletal Health Australia (now held by the Glen Eira Historical Society)
Photograph - Group photo, 2000
... They are both wearing navy blue caps embroidered at the front in gold with, "Osteoporosis Victoria Team", each touching the peak of their own cap with one hand. Behind them, there is a table with various printed information sheets on top. ...They are both wearing navy blue caps embroidered at the front in gold with, "Osteoporosis Victoria Team", each touching the peak of their own cap with one hand. Behind them, there is a table with various printed information sheets on top. ...This photo depicts Melinda Spurritt (Arthritis Victoria) with nutritionist and author, Miriam E Nelson at the launch of her book, "Strong Women, Strong Bones" (co-authored with Sarah Wernick). They are both wearing Osteoporosis Victoria Team caps.Colour medium close-up photo of two women standing with their arms around one another. They are both wearing navy blue caps embroidered at the front in gold with, "Osteoporosis Victoria Team", each touching the peak of their own cap with one hand. Behind them, there is a table with various printed information sheets on top. On the wall, there is a banner with the text, "Osteoporosis Victoria in partnership with Arthritis Victoria" (partially obscured), and a framed noticeboard with a poster on it. There is a "Strong Women, Strong Bones" poster on an adjacent wall.arthritis victoria, av, osteoporosis victoria, ov, arthritis foundation of victoria, afv, osteoporosis victoria team, strong women strong bones, miriam e nelson, nutritionist, sarah wernick, authors, book launch, 2000 -
 Halls Gap & Grampians Historical Society
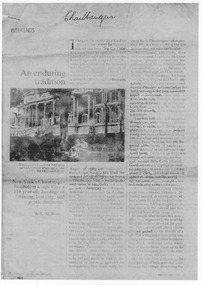
Document - Fax of article (magazine/newspaper)
... The article is c.1993. Chautauqua peak is named after the Chautauquans, who held summer camps in Halls Gap in the 1890s. ...Halls Gap & Grampians Historical Society Centennial Hall 117-119 Grampians Road Halls Gap grampians The article is c.1993. Chautauqua peak is named after the Chautauquans, who held summer camps in Halls Gap in the 1890s. ...The article is c.1993. Chautauqua peak is named after the Chautauquans, who held summer camps in Halls Gap in the 1890s. NOTE: Additional images are second and third pages, and a Microsoft Word file which includes the text of all three pages. A PDF file of an "augmented copy of the fax (with the more difficult to read sections clarified in pencil) is also available in the \Pictures\MP Navigator\2009_09_-02 directory on the computer (as there is not further space to attach it to this record)A copy of a three page National Geographic Traveler article entitled 'An enduring tradition'. The article describes the reporter's trip to Lake Chautauqua where the Chautauqua Institution was founded, and includes historical information about the Chautauquans.Chautauqua written in ball-point pen on top of front page.media, magazine articles -
 Melbourne Tram Museum
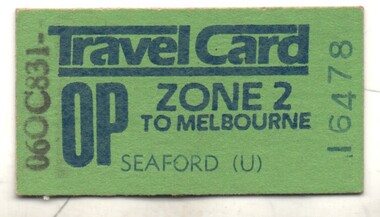
Ephemera - Ticket - "Zone 2 to Melbourne - Off Peak", The Met, 1983
... These tickets were a replacement for the MetroCard Off Peaks introduced in 1980. However, the times of availability were now altered to being valid from 9am weekdays, but more importantly, could be used for return rail travel anytime that day. ...Ephemera Ticket - "Zone 2 to Melbourne - Off Peak" The Met ...These tickets were a replacement for the MetroCard Off Peaks introduced in 1980. However, the times of availability were now altered to being valid from 9am weekdays, but more importantly, could be used for return rail travel anytime that day. Like the MetroCards, they also allowed unlimited MMTB tram and bus travel within the Flinders, Spencer, Latrobe, William, Victoria and Spring Streets grid. No conditions were printed on the rear of these tickets. (Extracted from reference.)Demonstrates the development of Melbourne ticketing system that allowed travel in the CBD grid using trams.Edmondson size ticket, printed on pasteboard, and printed in blue ink on a green background. Has been date stamped 6 Oct. 1983. Purchased from Seaford Railway Station. Ticket No. 16478. Blank plain coloured rear.public transport, tickets, trams, tramways, railways, off peak, the met, melbourne -
 Melbourne Tram Museum
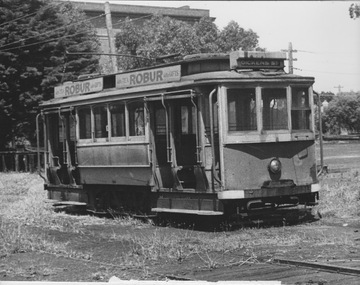
Photograph - Lines of stationary W class tram in St Kilda Road, 1980s-1990s
... The shadow indicate it is the afternoon peak period. Swanston Street and St Kilda Road were then the busiest tramway street in Melbourne and in most parts of the world with this photograph illustrating the level of congestion....W class St Kilda Road Arts Centre Nolan Street congestion afternoon peak period busiest tramway Black and white photograph with nothing on rear Photograph Lines of stationary W class tram in St Kilda Road ...Photograph shows two long lines of stationary W class tramcars on both tracks in St Kilda Road, likely outside the Arts Centre north of Nolan Street. Tram crews and passengers are aboard the trams in the foreground with doors and windows open indicating a warm day. The shadow indicate it is the afternoon peak period. Swanston Street and St Kilda Road were then the busiest tramway street in Melbourne and in most parts of the world with this photograph illustrating the level of congestion.Yields information about tram congestion on Swanston Street and St Kilda Road. Black and white photograph with nothing on rearw class, st kilda road, arts centre, nolan street, congestion, afternoon peak period, busiest tramway -
 Melbourne Tram Museum
Photograph - VR Single truck tram 3 second fleet
... Dickens St was an intermediate crossover about 2 km south of the St Kilda Station terminus and was used as a turnback for short run cars during peak hours....Dickens St was an intermediate crossover about 2 km south of the St Kilda Station terminus and was used as a turnback for short run cars during peak hours. Yields information about VR tram 3 and Elwood Depot Victorian Railways St Kilda Railway Station VR tram 3 second fleet Dickens St Elwood Depot Black and white photograph with surface peeling at bottom of print Photograph VR Single truck tram 3 second fleet ...Photograph shows single truck VR tram 3 second fleet in Elwood Depot yard with trolley pole raised, weather blinds raised and destination Dickens St. The exterior of the tram appears to be in poor condition and it stands amid low grass with trees and a large building at the rear. Dickens St was an intermediate crossover about 2 km south of the St Kilda Station terminus and was used as a turnback for short run cars during peak hours.Yields information about VR tram 3 and Elwood Depot Black and white photograph with surface peeling at bottom of printvictorian railways, st kilda railway station, vr tram 3, second fleet, dickens st, elwood depot -
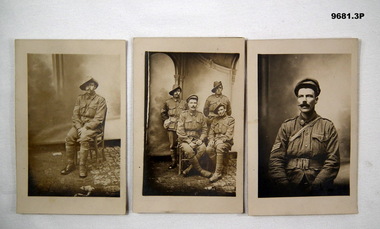
 Bendigo Military Museum
Photograph - PHOTOGRAPHS WW1, 1917 onwards
... Brief letter on rear in pencil and ink. .2) Postcard photo, black & white, soldier sitting, wearing a cap, background clear. .3) Postcard photo, sepia tone, same as .2) but with brief note on rear in pen and pencil. .4) Postcard photo, black & white, portrait of a soldier in great coat and peak cap. .5) Postcard photo, black & white, three rows of soldiers, 24 in total in front of a building. .6) Postcard photo, black & white, 17 soldiers on horseback lined up in a row, trees in background. .7) Postcard photo, sepia tone, portrait of two soldiers in slouch hats. .8) Postcard photo, sepia tone, portrait of two soldiers without hats. .9) Postcard photo, colour, eagle at top, centre has oval frame with soldier centre, American, brown background, writing at bottom. .10) Photo, black & white, soldier standing with bandolier, peak hat, holding a crop....Brief letter on rear in pencil and ink. .2) Postcard photo, black & white, soldier sitting, wearing a cap, background clear. .3) Postcard photo, sepia tone, same as .2) but with brief note on rear in pen and pencil. .4) Postcard photo, black & white, portrait of a soldier in great coat and peak cap. .5) Postcard photo, black & white, three rows of soldiers, 24 in total in front of a building. .6) Postcard photo, black & white, 17 soldiers on horseback lined up in a row, trees in background. .7) Postcard photo, sepia tone, portrait of two soldiers in slouch hats. .8) Postcard photo, sepia tone, portrait of two soldiers without hats. .9) Postcard photo, colour, eagle at top, centre has oval frame with soldier centre, American, brown background, writing at bottom. .10) Photo, black & white, soldier standing with bandolier, peak hat, holding a crop. ...The collection revolve around Laurence Edward (Larry) O'Connor No.2508, enlisted 2.4.1917 in 21st Reinforcements, 13th Light Horse, embarked for England 21.11.1917. .1) On rear "Heap of Love 7 Kisses, In the best of health Larry". Another address on rear in "2515 TRP I.H. Westaway 18 Kinkorra road Hawthorn Vic" enlisted 3.8.1917 21st Reinforcements 13th L.H. Regt. embarked 21.11.1917 for England. .2), .3) & .4) All are "Larry O'Connor" on rear of .3) "8.11.17 To Mrs Ryan with best wishes from Linnie" .5) on front written in pencil "Uncle Larry" with arrow pointing to him. on rear "to Linnie with Love from Larry Dec 23.12.1918". across the top "??? Belgium " .7) On rear "To Linnie with best wishes Larry" "Taken in Glasgow June 28.6.1918" Larry is on the left of photo. .8) On the rear in pen "Your aff brother Larry" "Taken in Glasgow June 28.6.1918" Larry is on the left of photo. .9) One rear in pen - letter to "Dear Sister France Oct 23/1918" signed off "Your affectionate brother Larry". .10) Photo is Laurence (Larry) O'Connor..1) Postcard photo, black & white, two men on horseback, trees in the background. Brief letter on rear in pencil and ink. .2) Postcard photo, black & white, soldier sitting, wearing a cap, background clear. .3) Postcard photo, sepia tone, same as .2) but with brief note on rear in pen and pencil. .4) Postcard photo, black & white, portrait of a soldier in great coat and peak cap. .5) Postcard photo, black & white, three rows of soldiers, 24 in total in front of a building. .6) Postcard photo, black & white, 17 soldiers on horseback lined up in a row, trees in background. .7) Postcard photo, sepia tone, portrait of two soldiers in slouch hats. .8) Postcard photo, sepia tone, portrait of two soldiers without hats. .9) Postcard photo, colour, eagle at top, centre has oval frame with soldier centre, American, brown background, writing at bottom. .10) Photo, black & white, soldier standing with bandolier, peak hat, holding a crop.photographs, postcards, larry, 13th lh -
 Sunshine and District Historical Society Incorporated
Photograph - Maidstone Police Station Ballarat Road Cnr Short Street 1956 Photographs
... The station served Maidstone and Braybrook during the peak years of public housing expansion. Both the Ballarat Road and Short Street police station buildings are now private residences...The station served Maidstone and Braybrook during the peak years of public housing expansion. Both the Ballarat Road and Short Street police station buildings are now private residences Locals recall it as the place where many residents obtained their driver’s licences in the 1960s–1970s. ...The earliest Maidstone Police Station operated on Ballarat Road, address later confirmed as 130 Ballarat Road. Heritage discussions note that the station moved around the corner into Short Street in 1956. It is possible the Ballarat Road building was extended at the rear, facing Short Street, and the operational entrance shifted. The station served Maidstone and Braybrook during the peak years of public housing expansion. Both the Ballarat Road and Short Street police station buildings are now private residencesLocals recall it as the place where many residents obtained their driver’s licences in the 1960s–1970s.5358.01 - Maidstone Police Station Ballarat Road Cnr Short Street 1956 Photo 01.jpg 5358.02 - Maidstone Police Station Ballarat Road Cnr Short Street 1956 Photo 01.jpgmaidstone police station, ballarat road, maidstone -
 Bendigo Military Museum
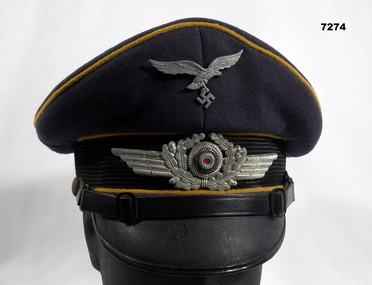
Headwear - CAP, PEAKED
... Bottom has black leather peak with a black buckled leather strap. Inside lined with black satiny material. ...Bottom has black leather peak with a black buckled leather strap. Inside lined with black satiny material. ...German peaked hat worn by members of Luftwaffe Flight crews WW2 Circa 1939-45. Is in an NCO pattern and noted as yellow Waffenfabre.Dark blue peaked hat. Top part is dark blue felt with orange edging and emblem of silver eagle carrying a Swaztika. Middle band black cotton material with emblem of silver laurel wreath surrounding a small silver button with blue inner circle and red dot and wings coming out from each side. Bottom has black leather peak with a black buckled leather strap. Inside lined with black satiny material. A clear plastic diamond and a black leather band.No inscription on size inside.peaked cap, ww2, german uniform -
 Bendigo Military Museum
Photograph - POSTCARD, PHOTOGRAPHIC, WW1, C.1916
... .1) Postcard sepia tone, soldier sitting on a chair, slouch hat, 3 stripes on arm (Sgt) - rear has text in purple indelible pencil, dated and addressed. .2) Postcard sepia tone, 4 soldiers 2 standing & 2 sitting, 2 have Sgt stripes, 1 Cpl 2 stripes - rear has text same as .1) .3) Postcard sepia tone, soldier sitting with peak cap and 3 Sgt stripes - rear has same as .1) .2)...It appears that these photos were taken at "Vignacourt" in the studio of Louis and Antoinette Thuillier where the famous Glass Plate negatives were found and produced in "The Lost Diggers" by Ross Coulthart. postcards photos McQuie All three, "France 24.11.1916 - On Active service" .1) Postcard sepia tone, soldier sitting on a chair, slouch hat, 3 stripes on arm (Sgt) - rear has text in purple indelible pencil, dated and addressed. .2) Postcard sepia tone, 4 soldiers 2 standing & 2 sitting, 2 have Sgt stripes, 1 Cpl 2 stripes - rear has text same as .1) .3) Postcard sepia tone, soldier sitting with peak cap and 3 Sgt stripes - rear has same as .1) .2) Photograph POSTCARD, PHOTOGRAPHIC, WW1 ...The 3 letters are all written by C.J.C. McQuie MM to his Mother and Father. Refer Cat No 9680P for his service history. .1) Soldier is McQuie MM. .2) Standing left is McQuie, on the right is possibly Cpl Percy George Houghton. sitting on left is Sgt Edward William Cobbledick, on his right Pte "Nurse " Mu............ .3) Sgt E.W. Cobbledick. Cpl Houghton No 1977 enlisted 6.1.1915 age 21 years in 5th reinforcements 6th Bn, embarked 17.4.1915, discharged 20.4.1919 with the rank of Sgt. Sgt Cobbledick No 3706 enlisted 29.7.1915 in 12th reinforcements 6th Bn, embarked 23.11.1916, KIA 10.12.1916 less than 3 weeks after this photo was taken. It appears that these photos were taken at "Vignacourt" in the studio of Louis and Antoinette Thuillier where the famous Glass Plate negatives were found and produced in "The Lost Diggers" by Ross Coulthart. .1) Postcard sepia tone, soldier sitting on a chair, slouch hat, 3 stripes on arm (Sgt) - rear has text in purple indelible pencil, dated and addressed. .2) Postcard sepia tone, 4 soldiers 2 standing & 2 sitting, 2 have Sgt stripes, 1 Cpl 2 stripes - rear has text same as .1) .3) Postcard sepia tone, soldier sitting with peak cap and 3 Sgt stripes - rear has same as .1) .2)All three, "France 24.11.1916 - On Active service"postcards, photos, mcquie -
Frankston RSL Sub Branch
Hat, WRAAC
... A light green half hat band with a rising pointed peak at the front is affixed to the hat with black elastic. ...A light green half hat band with a rising pointed peak at the front is affixed to the hat with black elastic. ...Standard issue Australian WRAAC service dress hat worn during the 1980 to 1990 period. This hat has a split brim in dark green, turned down at the front and up at the rear, and a three-panel crown in light green. A light green half hat band with a rising pointed peak at the front is affixed to the hat with black elastic. The internal sweat band line is lined with black velveteen and the remainder of the inside of the crown with green nylon. A maker's label is sewn to the crown of the inside, giving the size and date of manufacture..headgear, headwear, women, army, 1980s, 1980 to 1990 -
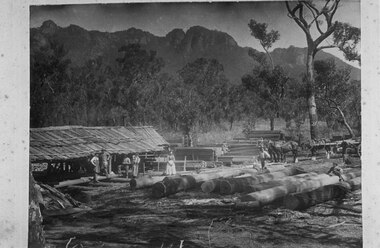 Halls Gap & Grampians Historical Society
Photograph - B/W, C 1908
... There is bush with rocky peaks rising behind in the background....There is bush with rocky peaks rising behind in the background. Photograph B/W ...Thomas E Walter's mill near the Chimney Pots. The people in the photo (left to right) are: a UK mill worker, another UK mill worker, Ralph Walter, Marian A Walter holding daughter Gwen Walter, Elsie Walter, Eva May Walter (child sitting on logs) next toThomas E Walter, Cecil "Reg" Walter (child sitting on logs) and Edgar Walter by the wagon. The photo was taken in the Grampians on the Glenelg River road (near the current site of the helipad).The photo shows a rough open sided shed with sawn logs beside it. There is a yard containing large logs in the foreground. There are three men and two women, one holding a child, standing in front of the shed. A young girl girl is sitting on one of the logs towards the back, right and a man is standing beside her. A young boy is sitting on the logs near the front, right. A fifth man stands to the right of the photo, beside a wagon full of logs pulled by a team of horses. There is bush with rocky peaks rising behind in the background.timber industries, logging, sawmilling -
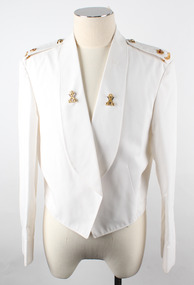 Warrnambool RSL Sub Branch
Dress Jacket Army Reserve, Fletcher Jones & Staff, 1998
... Short white jacket with wide front lapels epaulets at the shoulders and a small V shaped downward peak at the back. The sleeves have a stitched over section at the cuff with a point in line with the shoulder. ...J10129 OW W Short white jacket with wide front lapels epaulets at the shoulders and a small V shaped downward peak at the back. The sleeves have a stitched over section at the cuff with a point in line with the shoulder. ...This jacket is part of the dress uniform of a Major in the Army Reserve. Major Bernard Farley who owned this jacket wore it to official functions in the Mess dining room. He served in this capacity from 1998-2001.Bernard also served in the RAAF for a number of years.This jacket has significance as it is typical of dress requirements which were worn to official Army functions.Short white jacket with wide front lapels epaulets at the shoulders and a small V shaped downward peak at the back. The sleeves have a stitched over section at the cuff with a point in line with the shoulder. On each epaulet from the collar edge side there is a brass coloured button with the Rising Sun in low relief and on the lower edge of the epaulet a brass coloured crown with red nsert and a circular shaped badge with the word Australia. There is a badge on each lapel two crossed rifles holding a crown in brass colour over the top of a silver VLabel states ,' Fetcher Jones Victoria 1998 NSN 8405-NIC Name....... Service No......... Polyester / Viscose Dry Cleanable ( A) Warm Gentle Machine Wash Rinse well. Warm iron. ZC785 BR1689 425267911.ZC785 107 R 347 044 05037649 cloth br 1689 17. J10129 OW Wwarrnambool, army reserve, dress jacket -
 Ringwood and District Historical Society
Photograph, Opening Greenwood Park Kindergarten, Ringwood. 10-12-55
... Amanda lived on Loughnan Rd opposite Norwood Primary School and the Peakes lived on Warrandyte Rd opposite the South Eastern corner of the school grounds. ...Amanda lived on Loughnan Rd opposite Norwood Primary School and the Peakes lived on Warrandyte Rd opposite the South Eastern corner of the school grounds. ...Written on back of photograph: "Opening Green Park Kindergarten. Miss Murray-More, a kinder teacher later at Notlen St. Kinder." 25/9/2019 addendum: Further information from Pam Payne - "The children in this photo are (L) to (R): Robyn Peake, Amanda Craig and Judith Peake (the girls were twins). Amanda lived on Loughnan Rd opposite Norwood Primary School and the Peakes lived on Warrandyte Rd opposite the South Eastern corner of the school grounds. All were born in 1954." -
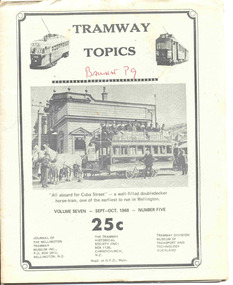 Ballarat Tramway Museum
Magazine, Wellington Tramway Museum, "Tramway Topics", Oct. 1968
... Contains articles on Brisbane trams for Queen Elizabeth Park, Peak Tram, Auckland, Horse trams in Ballarat, Napier, Wellington and News of Museums etc....Contains articles on Brisbane trams for Queen Elizabeth Park, Peak Tram, Auckland, Horse trams in Ballarat, Napier, Wellington and News of Museums etc. ...Yields information primarily about New Zealand tram and bus city systems and what the various NZ Museums were doing at the time. Has an article on Ballarat Horse trams and the conversion to electric.Magazine - Tramway Topics - Vol. 7, No. 5 Sep - Oct 1968 - 28 wax cut stencil duplicated pages with printed centre page of photos and printed covers, which are slightly larger in size than the internal sheets. Published by Wellington Tramway Museum, Tramway Historical Society and Tramway Division of MOTAT jointly - editor J. Wilkinson. Contains articles on Brisbane trams for Queen Elizabeth Park, Peak Tram, Auckland, Horse trams in Ballarat, Napier, Wellington and News of Museums etc.On inside of front cover in black ink "Ballarat Tramway Preservation society Catalogue No. 111". In red ink on front cover "Ballarat p9"trams, tramways, ballarat, wellington, auckland, napier -
 Montmorency–Eltham RSL Sub Branch
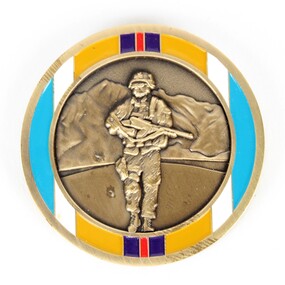
Medal - Commemorative Medallion
... According to the Department of Defence, "the ribbon is khaki representing the dominant ground colour of the terrain, edged with light blue and white stripes representing the sky above the mountains and the snow on the mountain peaks with central stripes of purple and red representing the ADF and the conflict in Afghanistan." ...According to the Department of Defence, "the ribbon is khaki representing the dominant ground colour of the terrain, edged with light blue and white stripes representing the sky above the mountains and the snow on the mountain peaks with central stripes of purple and red representing the ADF and the conflict in Afghanistan." commemoration operation slipper afghanistan australian army middle east international security assistance force This commemorative medallion features the Afghanistan Medal ribbon colours encircling the figure of an ADF member holding a weapon. ...In November 2001 Australian SAS troops joined the war in Afghanistan under the operation name "Operation Slipper." Australia's military contribution to the International Security Assistance Force mission in Afghanistan ended in 2014, making Operation Slipper Australia's longest running operation. According to the Department of Defence, "the ribbon is khaki representing the dominant ground colour of the terrain, edged with light blue and white stripes representing the sky above the mountains and the snow on the mountain peaks with central stripes of purple and red representing the ADF and the conflict in Afghanistan." This commemorative medallion features the Afghanistan Medal ribbon colours encircling the figure of an ADF member holding a weapon. The image is in relief. The reverse features a number of service personnel pictured in front of a vehicle, encircled by the motif of the Australian national flag.commemoration, operation slipper, afghanistan, australian army, middle east, international security assistance force -
 Ballarat Heritage Services
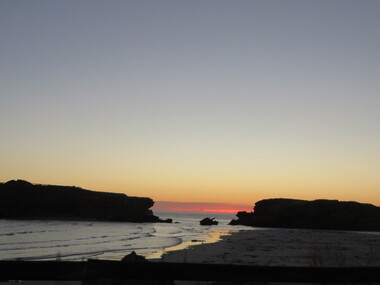
Photograph - Colour, Clare Gervasoni, Sunset Looking Towards Middle Island, Warrnambool, 2016, 24/12/2016
... The Project has been a huge success, with no evidence of fox attacks since the beginning of the Project and a steady increase in penguin colony size from fewer than 10 birds in 2005 to an estimated peak number of 180 penguins in 2013....The Project has been a huge success, with no evidence of fox attacks since the beginning of the Project and a steady increase in penguin colony size from fewer than 10 birds in 2005 to an estimated peak number of 180 penguins in 2013. middle island warrnambool beach sunset maremma little pengion Colour photographs looking towards Middle Island, Warrnambool. ...The Middle Island Maremma Project began in 2006 when there was a sharp decline in the colony size of Little Penguins on Middle Island due to fox predation. Maremma Guardian dogs were trained and placed on Middle Island to protect the penguins from foxes during the breeding season. The Project has been a huge success, with no evidence of fox attacks since the beginning of the Project and a steady increase in penguin colony size from fewer than 10 birds in 2005 to an estimated peak number of 180 penguins in 2013.Colour photographs looking towards Middle Island, Warrnambool.middle island, warrnambool, beach, sunset, maremma, little pengion -
 Melbourne Tram Museum
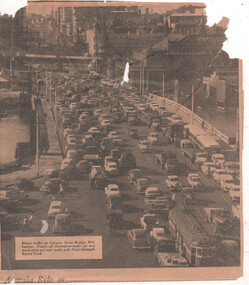
Newspaper - Spencer St bridge, traffic congestion and a hook turn, 1950s
... This hook turn only operated during peak traffic hours and when a policeman was on duty....This hook turn only operated during peak traffic hours and when a policeman was on duty. ...Photo shows extensive traffic congestion on the Spencer St bridge at the north end of Clarendon St South Melbourne, early 1950s, prior to the construction of the King St bridge. In the background is the Fish Market buildings prior to its demolition in 1958 - 1960 (see reference). The two lanes of traffic on the right side of the photo, or east side of the bridge, are queuing to do a hook turn into Lorimer St for Port Melbourne. This hook turn only operated during peak traffic hours and when a policeman was on duty.Yields information about traffic congestion on the Spencer St bridge in the early 1950s and a forgotten hook turn.Newspaper clipping from an unknown publication advertising Courtaulds Aust. Rayon tyres - A UK company who built a factory at Tomago NSW during 1951tramways, hook turns, south melbourne, spencer st bridge, traffic control, traffic congestion -
 Bendigo Historical Society Inc.
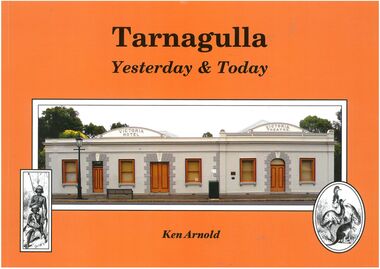
Book - "Tarnagulla. Yesterday and Today.", 2014
... Many large company gold mines employed scores of miners at their peak and many large gold nuggets were found. ...Many large company gold mines employed scores of miners at their peak and many large gold nuggets were found. ...Tarnagulla is a small rural town situated in the heart of the Golden Triangle, central Victoria, Australia. It is a town founded on the excitement and hope of the Victorian Gold rush and quickly developed into a thriving community. Many large company gold mines employed scores of miners at their peak and many large gold nuggets were found. It was a town of enormous wealth for some. Over the years as gold became less plentiful many turned to farming and other pursuits. With a colorful history, Tarnagulla today is a quiet town with a population of only a few hundred. "Tarnagulla. Yesterday and Today" written by Ken Arnold. Foreword by Ken Arnold. A collection of both color and black and white photographs, with each photo labelled. Published in Australia by Crown Castleton Publishers in 2014. Orange soft cover book. Color photo on front cover and multiple color photos on back cover. Title printed in black. Book contains forward and a brief history of Sandy Creek on page 3. All other pages contain photographs with little text - just photo identification. 32 pp.tarnagulla, mining -
 Warrnambool and District Historical Society Inc.
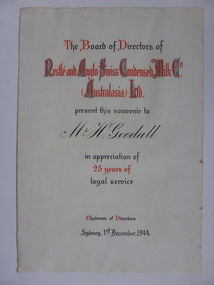
Document, Certificate Mr H Goodall, 1944
... The company came to Warrnambool in 1907 and purchased 17 acres at Dennington and a new dairy plant was established by 1911. At its peak it employed 600 people and processed 55000 gallons daily in the milk condensery which is a process whereby much of the water content is drawn from the milk and sugar is added making a product which has a long shelf life and because it is processed at low temperature the milk maintains much of its vitamin content....The company came to Warrnambool in 1907 and purchased 17 acres at Dennington and a new dairy plant was established by 1911. At its peak it employed 600 people and processed 55000 gallons daily in the milk condensery which is a process whereby much of the water content is drawn from the milk and sugar is added making a product which has a long shelf life and because it is processed at low temperature the milk maintains much of its vitamin content. ...This certificate was awarded in appreciation of 25 years service to the Nestle Company which operated a dairy factory at Dennington in Warrnambool. The company came to Warrnambool in 1907 and purchased 17 acres at Dennington and a new dairy plant was established by 1911. At its peak it employed 600 people and processed 55000 gallons daily in the milk condensery which is a process whereby much of the water content is drawn from the milk and sugar is added making a product which has a long shelf life and because it is processed at low temperature the milk maintains much of its vitamin content.A certificate which links a local person to a long and well known industry in Warrnambool and the Western district.Cream soft card certificate with red and black text.Mr H Goodall. Nestle and Anglo Swiss Condensed Milk Co Australasia Ltd. dated 1st December 1944. The signature of the Chairman of directors is unreadable.warrnambool, nestle dennington, h goodall -
 Kiewa Valley Historical Society
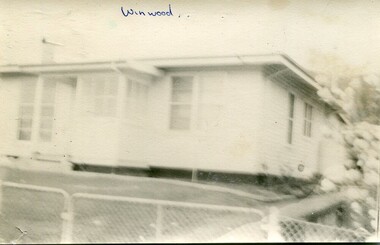
Photographs- Original S.E.C.V. home designs in Mt Beauty – Set of 6 black and white photographs
... The townships of Mount Beauty and Bogong Village were constructed by the Victorian State Electricity Utility Commission (SEC) from the 1930’s to the 1950’s to house workers on the Kiewa Hydro Electric Scheme. At its peak the Kiewa Scheme employed around 4000 people. ...Kiewa Valley Historical Society Mount Beauty Information Centre 31 Bogong High Plains Rd Mt Beauty high-country The townships of Mount Beauty and Bogong Village were constructed by the Victorian State Electricity Utility Commission (SEC) from the 1930’s to the 1950’s to house workers on the Kiewa Hydro Electric Scheme. At its peak the Kiewa Scheme employed around 4000 people. ...The townships of Mount Beauty and Bogong Village were constructed by the Victorian State Electricity Utility Commission (SEC) from the 1930’s to the 1950’s to house workers on the Kiewa Hydro Electric Scheme. At its peak the Kiewa Scheme employed around 4000 people. Although the towns were built as temporary accommodation for the workers and their families, many stayed and even retired there after the scheme had finished. The Bright Council, now the Alpine Shire took over the control of the township in 1960 and today Mount Beauty is one of the most complete company towns in Victoria.The SECV provided several standard designs for the housing of workers and management in Mt Beauty. At the completion of the scheme the housing was retained and Mount Beauty now exists as one of the best examples of a company town in Victoria.There are many examples of the original houses remaining around the town. This is significant as the houses were only built as temporary accommodation and still remain functional after over 60 or more years of use.Set of 6 black and white photographs of original SECV temporary house designs in Mt Beauty.Written in blue ink on front of photos 1. Winwood 2. Winwood 3. K Type 4. K Type 5. English Precut 6. Cube mt beauty houses, secv housing -
 Port Melbourne Historical & Preservation Society
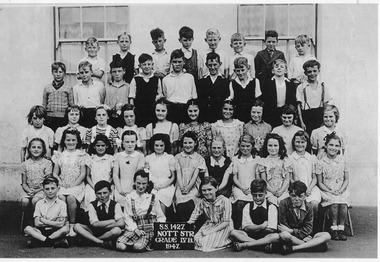
Photograph - Nott Street School Grade 4b 1947
... Names provided by Fred Nicholson 2/12/2025 and identified on image 5051a Fred Nicholson; Ian Greenwood; Ian Arrowsmith; Andrew Campbell; Lloyd Peak; John May; Arthur Stockon; Billy White; Victor Trevellyn; Ted Huglin; David Clark; Ian Donald; Billy Murray; Claude ?...Port Melbourne Historical & Preservation Society Port Melbourne Town Hall 333 Bay Street Port Melbourne melbourne Names provided by Fred Nicholson 2/12/2025 and identified on image 5051a Fred Nicholson; Ian Greenwood; Ian Arrowsmith; Andrew Campbell; Lloyd Peak; John May; Arthur Stockon; Billy White; Victor Trevellyn; Ted Huglin; David Clark; Ian Donald; Billy Murray; Claude ? ...Names provided by Fred Nicholson 2/12/2025 and identified on image 5051a Fred Nicholson; Ian Greenwood; Ian Arrowsmith; Andrew Campbell; Lloyd Peak; John May; Arthur Stockon; Billy White; Victor Trevellyn; Ted Huglin; David Clark; Ian Donald; Billy Murray; Claude ?; David Watterson; June Elsum; (married as Mrs Hansen); Fay Taylor; Olga Marsh; Miller ?; Elva Knight; Shirley Gay; Norma Kelly; Helen Agar; Andrew Jackson; Frank Stark; Denise Miller; George Bennett; Eric Wade.Photograph (digital) Nott Street School Grade 4b 1947education - primary schools, nott street -
 Ithacan Historical Society
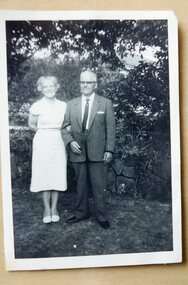
Photograph, Speros and Ivy Kostopoulos, 1950
... He was a foundation member of the IPS in 1916, the same year he married Ivy Peak. In partnership with his brother Othon Kostopulos he ran successful cafe businesses in the CBD and St Kilda. ...He was a foundation member of the IPS in 1916, the same year he married Ivy Peak. In partnership with his brother Othon Kostopulos he ran successful cafe businesses in the CBD and St Kilda. ...Speros Kostopoulos first arrived in Australia in 1900, returning to Greece to serve in the 1912-1913 Balkan wars and then returning to Australia. He was a foundation member of the IPS in 1916, the same year he married Ivy Peak. In partnership with his brother Othon Kostopulos he ran successful cafe businesses in the CBD and St Kilda. He later purchased a poultry farm in what is now the suburb of Chadstone. When the farm was eventually subdivided, Ithaca Court was named after Speros' birthplace and Ivydene Court (incorrectly listed as Ipydene) after his wife Ivy. A black and white photograph of a lady and man standing in a garden.kostopulos, kostos -
 Puffing Billy Railway
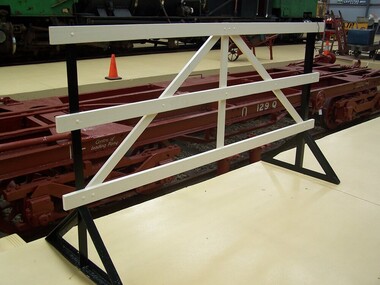
Platform Barrier, Victorian Railways
... Railway Platform Barrier Crowd control on railway platforms was a necessity during peak times. At times it may have been necessary to direct passengers to a certain exit or from a certain entrance on a railway platform. ...Puffing Billy Railway 1 old monbulk road Belgrave yarra-valley-and-the-dandenong-ranges Railway Platform Barrier Crowd control on railway platforms was a necessity during peak times. At times it may have been necessary to direct passengers to a certain exit or from a certain entrance on a railway platform. ...Railway Platform Barrier Crowd control on railway platforms was a necessity during peak times. At times it may have been necessary to direct passengers to a certain exit or from a certain entrance on a railway platform. Where able, on occasions, two trains may have to use the one platform to ensure trains depart efficiently. To ensure the public entrain on the correct train it could be necessary to divide the platform by using a platform barrier. The barriers made of wood and steel were easily moved by platform staff and provided a substantial barrier on the railway platform. Historic - Victorian Railways - Railway Platform BarrierRailway platform Barrier made of timber and steelLength Overall: 7' 6 9/16" ( 2300 mm ) Width: 2' 5 15/16" ( 760 mm ) Height: 4' 1 5/8" ( 1260 mm ) railway platform barrier, victorian railways, puffing billy -
 Bendigo Military Museum
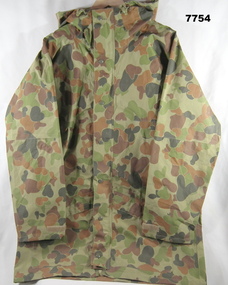
Uniform - JACKET, WORK DRESS - ARMY, Australian Defence Industries, 2008
... Gore-Tex fabric for wet weather. Hood with peak and elastic drawstring with plastic lock clip. ...Gore-Tex fabric for wet weather. Hood with peak and elastic drawstring with plastic lock clip. ...DCPU (Disruptive Pattern Camouflage Uniform) Work dress jacket - Colours light to dark green through to light to dark brown. Gore-Tex fabric for wet weather. Hood with peak and elastic drawstring with plastic lock clip. Plastic/metal two ended zipper and metal press studs - front fastening. Two front pockets with loop and hook (Velcro) fasteners. Two interior nylon mesh pocket with zipper. Sleeves at wrist - loop and hook adjustable strap. White colour polyester fabric manufacturers label on front zipper. Manufacturers information on label - black ink print. Label 1 "GSSM/www.gssm.com.au/MAR 2008/O/N 248007/ N/S/N 8415 - 66 - 145- 7093/ SIZE:L/ CHEST: 100-110CM /NAME/SERVICE" "CARE INSTRUCTIONS/ MACHINE WASHABLE: 40c/ DO NOT BLEACH/ DO NOT SPIN DRY/ DO NOT WRING/HAND TO DRY/ LIGHT/ COOL IRON/ FABRIC CONTENT/ FACE/LINER: 100% POLYESTER/ LAMINATE: PTFE" Label 2. "BATCH NO./5301011". uniform, army, work dress, dpcu -
 Bendigo Military Museum
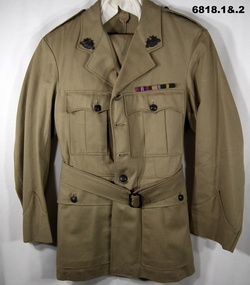
Uniform - SUMMER UNIFORM WITH PEAK CAP, 1939-45
... Button up fly buttons - Khaki Bakelite. 3. Peak cap, Australian leather strap with Infantry Corps Badge....Uniform SUMMER UNIFORM WITH PEAK CAP. ...Maj. R.M. Shadforth1. THIS IS AN OFFICER'S PATTERN KHAKI JACKET. IT HAS FOUR POCKETS. IT HAS A 50MM WIDE BELT OF SAME MATERIAL. THE BUTTONS ARE DARKENED. THE BUTTON MOTIF IS AUSTRALIAN MILITARY FORCES. ON THE COLLARS ARE DARKENED RISING SUN BADGES, ON THE EPPAULETTES ARE THE RANK BADGES OF A LT.COLONEL. There is a semi detached ribbon Bar on the left breast - War Medal 1939-45. Australian Service Medal, Efficiency Decoration. 2. Trousers, long Khaki, same material as jacket. Button up fly buttons - Khaki Bakelite. 3. Peak cap, Australian leather strap with Infantry Corps Badge.Jacket - on the label inside jacket is docket “3198, Jan 13 1942”. Factory No. “2853”. Name “Maj. R.M. Shadforth”. uniform, 38th batt, shadforth, passchendaele barracks trust -
 Bendigo Military Museum
Headwear - CAP, PEAKED
... Top one centimetre black leather, next 9 cm green felt attached to firm backing and bottom peak again black leather. Metal studs on side with black leather buckled strap going around the back. ...Top one centimetre black leather, next 9 cm green felt attached to firm backing and bottom peak again black leather. Metal studs on side with black leather buckled strap going around the back. ...World War 2 German Police Hat (Schutzpolizei) of an NCO pattern for the Munich District.Hard round peaked cap. Top one centimetre black leather, next 9 cm green felt attached to firm backing and bottom peak again black leather. Metal studs on side with black leather buckled strap going around the back. Attached to back is a large golden emblem of an eagle with wings spread, sitting on a shield with a Swaztika on it and gold laurel leaves coming off to the side. Mounted on the top at back is a silver oval shaped object with red markings. Lining on inside of hat is dark brown leather.german uniform, police hat, ww2 -
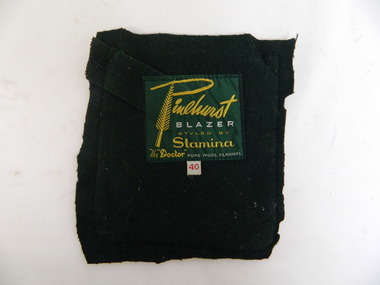 Kiewa Valley Historical Society
School Blazer Pocket Badge
... Inside the frame is a stitched picture with a light blue sky, royal blue mountains with white peaks and a white curved path leads towards the mountains with light green 'paddocks' either side. ...Inside the frame is a stitched picture with a light blue sky, royal blue mountains with white peaks and a white curved path leads towards the mountains with light green 'paddocks' either side. ...Mt Beauty Higher Elementary School commenced in 1953 as the need for a secondary school grew with the increase in population due to the Kiewa Hydro Scheme. It became the Mt Beauty High School in 1964. The blazer was worn as part of the winter uniform.Historical: Education in Mt Beauty commenced relatively late so there was less of a tradition. The decision to adopt a uniform is of interest to compare with other schools and the times.Pure wool dark green flannel pocket cut out from a Mt Beauty High School blazer. Emblem is machine stitched and has a yellow wattle decoration outside a yellow frame. Across the top of the frame in yellow 'High School", across the bottom of the frame "Mount Beauty", the 2 sides of the frame are hollow. Inside the frame is a stitched picture with a light blue sky, royal blue mountains with white peaks and a white curved path leads towards the mountains with light green 'paddocks' either side. Inscription on back in yellow and white.Pinehurst / Blazer (in white) / Styled by Stamina / The "Doctor" / Pure Wool Flannel (in white) blazer, school, high school, uniform, mt beauty, emblem, education, clothing, winter