Showing 721 items matching "glass plates"
-
 Bendigo Military Museum
Photograph - PHOTOGRAPH, FRAMED, post 21.7.1998
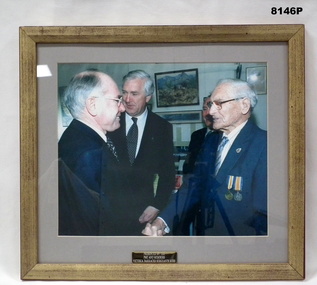
Photo L to R/ John Howard Prime Minister of Australia shaking hands with John Henry Lockett, in the background is Mr Bruce Reid MHR and behind Jack is Kevin Lockett Jacks son. This photo was taken in the Billiard room of the Soldiers Memorial Institute Pall Mall Bendigo on 21 7.1998 when Jack was presented with the French Legion of Honour by the French Ambassador Dominique Giraud. Refer Cat No's 8143, 8144 & 8145.10PFramed photograph of Jack Lockett Aged 107 with the Australian Prime Minister Mr John Howard. Photograph: colour photograph of 2 persons shaking hands with 2 persons in background. Frame: timber with brushed gold coloured paint glass front. Mount: mid-grey colour cardboard. Label plate: gold colour metal bottom centre. Back of frame: Handwriting red ink.Label plate: engraved print. "PRESENTED BY THE / PMC AND MEMBERS/ VICTORIA BARRACKS SERGEANTS MESS" smi, smirsl, photograph, lockett -
 Bendigo Military Museum
Print - PRINT, AATTV FRAMED, Post 1970
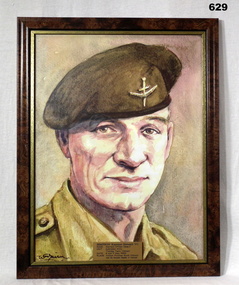
... edge glass, gold metal look name plate glued to glass at lower... frame, with gold inner edge glass, gold metal look name plate ...Ray Simpson VC, DCM. Refer 630 for his service history, WW2, Korea, Malaya, Vietnam. This portrait came as an extra to a large framed print of Australia’s 96 at the time Victoria Cross winners.Dark brown marbled effect timber frame, with gold inner edge glass, gold metal look name plate glued to glass at lower edge. Coloured print of a water colour painting of soldier RAYENE STEWART SIMPSON in uniform. Black print on gold name plate: SIMPSON Rayene Stewart VC Rank Warrant Officer Class II Unit: Australian Army Training Team: Vietnam Date: 6 and 11 May 1969 Place: Kontum Province, South Vietnam (now the Socialist Republic of Vietnam)portraits, illustrations-watercolour, aattv, vc -
 Bendigo Military Museum
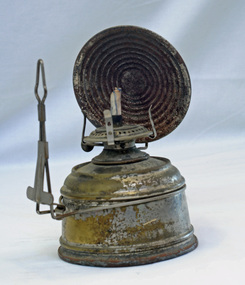
Photograph - Printing Box, post WWI
The print box belonged to Jack Grinton No1043, 38th Batt AIF. This one he used after the war to print photos from his negatives. He originally spent many nights in his hut in England prior to France developing his own photos. Part of the Grinton collection which included hundreds of negatives and developed photos that he took during the war. Refer Cat No 1280 for service details. Refer 1317P, 1320P. Wooden framed photo print box with glass pane in centre. Rear has wooden plate with felt backing to hold negatives. Two brass plates hold back plate in. Inside is one negative of a boy in a garden.photography, accessories -
 Federation University Historical Collection
Album, Newspaper Clippings Scrap Book on Henry Sutton
... plate glass... Mechanics' Institute W.G. Shepperd cooper's reading room plate glass ...Henry Sutton is a talented world-wide accepted inventor with inventions relating to the telephone, photography, wireless, cars, motorcycles, and bicycles as well as many more inventions. Henry was also one of four brothers that ran the Sutton's Music Store after the death of their Father Richard Sutton. Henry Sutton taught Applied Electricity at the Ballarat School of Mines in 1883 to 1886. Several folders of newspaper articles relating to Henry Sutton. henry sutton, mining companies, hugo brunn, main road, ballarat east, sutton music seller, plank road, richard sutton, flutina, halophone, inventions, instruments, all saints mining company, phillipson jeweller, ballaarat mechanics' institute, w.g. shepperd, cooper's reading room, plate glass, concertina, r.h. sutton music warehouse, organ harmonium, ballarat temperance hall, fire, accordian, musical instruments, st paul's anglican church, bakery hill, military side-drums, ballarat volunteer rangers fife band, shops, street broadcasting, complete music store, concord piano, gramaphone, alfred sutton, walter sutton, fred sutton, e. gordon.jones, astor radio, centenary dinner, jeffrey sutton, music stool, orguinette, harp, chilver wilson benefit, collard and collard, w.h. figgis, hydraulic lift, sturt street, mary sutton, advertisements, sutton's cycle agency, a. leslie sutton, -
 J. Ward Museum Complex
Tool - Measuring Scales
The traditional scale consists of two plates or bowls suspended at equal distances from a fulcrum. One plate holds an object of unknown mass (or weight), while known masses are added to the other plate until static equilibrium is achieved and the plates level off, which happens when the masses on the two plates are equal. Medication given to patients at both Aradale Mental Hospital and J Ward had their does measured using these weights and scales - and some evidence of residue remains.The scales are in excellent condition and a good example of medical equipment used in Aradale Mental Hospital and J Ward. Measuring scales for medications Timber construction with glass lid Small crack along the left hand side of scales Two drawers contain four weights in ounces Case painted in black lacquer Metal hinges and three brass knobs (one missing from right lower drawer) Small piece of folded butcher paper in left hand drawer No manufacturer markings or serial numberspsychiatric history, mental health, aradale mental hospital, j ward -
 Flagstaff Hill Maritime Museum and Village
Surgical Container, mid 29th century
... , stainless steel surgical equipment, plated goods and glass-washing...: silverware, stainless steel surgical equipment, plated goods ...This stainless steel surgical contain with lid was amongst the medical and surgical equipment used by Dr. W.R. Angus in his medical practice. The steel for the containter was made by Paramount and the container maunfactured by K.G. Luke of Fitzroy North in Melbourne, Australia. (Sir) Kenneth Luke was born in Port Melbourne and had a very successful business that grew from small beginnings in 1921 in the metal and silverware business “making an ever-increasing range of products: silverware, stainless steel surgical equipment, plated goods and glass-washing machines.” K. G. Luke (Australasia) Ltd was registered as a public company in 1953. During World War 2 Kenneth Luke became an honorary advisor to the Australian Department of Supply and Shipping. He was also an administrator for Football in Victoria. This container was donated to Flagstaff Hill Maritime Village by the family of Doctor William Roy Angus, Surgeon and Oculist. It is part of the “W.R. Angus Collection” includes historical medical equipment, surgical instruments and material once belonging to Dr Edward Ryan and Dr Thomas Francis Ryan, (both of Nhill, Victoria) as well as Dr Angus’ own belongings. The Collection’s history spans the medical practices of the two Doctors Ryan, from 1885-1926 plus that of Dr Angus, up until 1969. ABOUT THE “W.R.ANGUS COLLECTION” Doctor William Roy Angus M.B., B.S., Adel., 1923, F.R.C.S. Edin.,1928 (also known as Dr Roy Angus) was born in Murrumbeena, Victoria in 1901 and lived until 1970. He qualified as a doctor in 1923 at University of Adelaide, was Resident Medical Officer at the Royal Adelaide Hospital in 1924 and for a period was house surgeon to Sir (then Mr.) Henry Simpson Newland. Dr Angus was briefly an Assistant to Dr Riddell of Kapunda, then commenced private practice at Curramulka, Yorke Peninsula, SA, where he was physician, surgeon and chemist. In 1926, he was appointed as new Medical Assistant to Dr Thomas Francis Ryan (T.F. Ryan, or Tom), in Nhill, Victoria, where his experiences included radiology and pharmacy. In 1927 he was Acting House Surgeon in Dr Tom Ryan’s absence. Dr Angus had become engaged to Gladys Forsyth and they decided he further his studies overseas in the UK in 1927. He studied at London University College Hospital and at Edinburgh Royal Infirmary and in 1928, was awarded FRCS (Fellow from the Royal College of Surgeons), Edinburgh. He worked his passage back to Australia as a Ship’s Surgeon on the on the Australian Commonwealth Line’s T.S.S. Largs Bay. Dr Angus married Gladys in 1929, in Ballarat. (They went on to have one son (Graham 1932, born in SA) and two daughters (Helen (died 12/07/1996) and Berenice (Berry), both born at Mira, Nhill ) According to Berry, her mother Gladys made a lot of their clothes. She was very talented and did some lovely embroidery including lingerie for her trousseau and beautifully handmade baby clothes. Dr Angus was a ‘flying doctor’ for the A.I.M. (Australian Inland Ministry) Aerial Medical Service in 1928 . Its first station was in the remote town of Oodnadatta, where Dr Angus was stationed. He was locum tenens there on North-South Railway at 21 Mile Camp. He took up this ‘flying doctor’ position in response to a call from Dr John Flynn; the organisation was later known as the Flying Doctor Service, then the Royal Flying Doctor Service. A lot of his work during this time involved dental surgery also. Between 1928-1932 he was surgeon at the Curramulka Hospital, Yorke Peninsula, South Australia. In 1933 Dr Angus returned to Nhill and purchased a share of the Nelson Street practice and Mira hospital (a 2 bed ward at the Nelson Street Practice) from Dr Les Middleton one of the Middleton Brothers, the current owners of what previously once Dr Tom Ryan’s practice. Dr Tom and his brother had worked as surgeons included eye surgery. Dr Tom Ryan performed many of his operations in the Mira private hospital on his premises. He had been House Surgeon at the Nhill Hospital 1902-1926. Dr Tom Ryan had one of the only two pieces of radiology equipment in Victoria during his practicing years – The Royal Melbourne Hospital had the other one. Over the years Dr Tom Ryan had gradually set up what was effectively a training school for country general-practitioner-surgeons. Each patient was carefully examined, including using the X-ray machine, and any surgery was discussed and planned with Dr Ryan’s assistants several days in advance. Dr Angus gained experience in using the X-ray machine there during his time as assistant to Dr Ryan. When Dr Angus bought into the Nelson Street premises in Nhill he was also appointed as the Nhill Hospital’s Honorary House Surgeon 1933-1938. His practitioner’s plate from his Nhill surgery is now mounted on the doorway to the Port Medical Office at Flagstaff Hill Maritime Village, Warrnambool. When Dr Angus took up practice in the Dr Edward and Dr Tom Ryan’s old premises he obtained their extensive collection of historical medical equipment and materials spanning 1884-1926. A large part of this collection is now on display at the Port Medical Office at Flagstaff Hill Maritime Village in Warrnambool. In 1939 Dr Angus and his family moved to Warrnambool where he purchased “Birchwood,” the 1852 home and medical practice of Dr John Hunter Henderson, at 214 Koroit Street. (This property was sold in1965 to the State Government and is now the site of the Warrnambool Police Station. and an ALDI sore is on the land that was once their tennis court). The Angus family was able to afford gardeners, cooks and maids; their home was a popular place for visiting dignitaries to stay whilst visiting Warrnambool. Dr Angus had his own silk worm farm at home in a Mulberry tree. His young daughter used his centrifuge for spinning the silk. Dr Angus was appointed on a part-time basis as Port Medical Officer (Health Officer) in Warrnambool and held this position until the 1940’s when the government no longer required the service of a Port Medical Officer in Warrnambool; he was thus Warrnambool’s last serving Port Medical Officer. (Masters of immigrant ships arriving in port reported incidents of diseases, illness and death and the Port Medical Officer made a decision on whether the ship required Quarantine and for how long, in this way preventing contagious illness from spreading from new immigrants to the residents already in the colony.) Dr Angus was a member of the Australian Medical Association, for 35 years and surgeon at the Warrnambool Base Hospital 1939-1942, He served with the Australian Department of Defence as a Surgeon Captain during WWII 1942-45, in Ballarat, Victoria, and in Bonegilla, N.S.W., completing his service just before the end of the war due to suffering from a heart attack. During his convalescence he carved an intricate and ‘most artistic’ chess set from the material that dentures were made from. He then studied ophthalmology at the Royal Melbourne Eye and Ear Hospital and created cosmetically superior artificial eyes by pioneering using the intrascleral cartilage. Angus received accolades from the Ophthalmological Society of Australasia for this work. He returned to Warrnambool to commence practice as an ophthalmologist, pioneering in artificial eye improvements. He was Honorary Consultant Ophthalmologist to Warrnambool Base Hospital for 31 years. He made monthly visits to Portland as a visiting surgeon, to perform eye surgery. He represented the Victorian South-West subdivision of the Australian Medical Association as its secretary between 1949 and 1956 and as chairman from 1956 to 1958. In 1968 Dr Angus was elected member of Spain’s Barraquer Institute of Barcelona after his research work in Intrasclearal cartilage grafting, becoming one of the few Australian ophthalmologists to receive this honour, and in the following year presented his final paper on Living Intrasclearal Cartilage Implants at the Inaugural Meeting of the Australian College of Ophthalmologists in Melbourne In his personal life Dr Angus was a Presbyterian and treated Sunday as a Sabbath, a day of rest. He would visit 3 or 4 country patients on a Sunday, taking his children along ‘for the ride’ and to visit with him. Sunday evenings he would play the pianola and sing Scottish songs to his family. One of Dr Angus’ patients was Margaret MacKenzie, author of a book on local shipwrecks that she’d seen as an eye witness from the late 1880’s in Peterborough, Victoria. In the early 1950’s Dr Angus, painted a picture of a shipwreck for the cover jacket of Margaret’s book, Shipwrecks and More Shipwrecks. She was blind in later life and her daughter wrote the actual book for her. Dr Angus and his wife Gladys were very involved in Warrnambool’s society with a strong interest in civic affairs. He had an interest in people and the community They were both involved in the creation of Flagstaff Hill, including the layout of the gardens. After his death (28th March 1970) his family requested his practitioner’s plate, medical instruments and some personal belongings be displayed in the Port Medical Office surgery at Flagstaff Hill Maritime Village, and be called the “W. R. Angus Collection”. The stainless steel container is significant for its association with business man Sir Kenneth Luke and his manufacturing factory K.G. Luke Pty Ltd. and early and successful Melbourne business. The container is also significant for because of its association with the W.R. Angus Collection. This collection is significant for still being located at the site it is connected with, Doctor Angus being the last Port Medical Officer in Warrnambool. The collection of medical instruments and other equipment is culturally significant, being an historical example of medicine from late 19th to mid-20th century. Dr Angus assisted Dr Tom Ryan, a pioneer in the use of X-rays and in ocular surgery. Stainless steel, round surgical container with lid, part of the W.R. Angus Collection. Stamped into base “STAINLESS / STEEL / BY / PARAMOUNT / K G LUKE / MELB / 58”flagstaff hill, warrnambool, shipwrecked coast, flagstaff hill maritime museum, maritime museum, shipwreck coast, flagstaff hill maritime village, great ocean road, dr w r angus, dr ryan, surgical instrument, t.s.s. largs bay, warrnambool base hospital, nhill base hospital, mira hospital, flying doctor, surgical container, medical equipment, surgical equipment, k.g. luke pty. ltd. melbourne, paramount stainlett steel australia -
 Flagstaff Hill Maritime Museum and Village
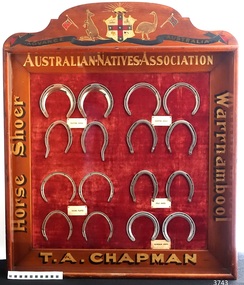
Memorabilia - Horseshoe Case, 1906 – 1907
The horseshoes in this purpose-built display case were made by Thomas Alfred Chapman in 1906-1907. Chapman operated a blacksmith’s shop in Mortlake Rd, Purnim, about 15 mins drive from Warrnambool. Chapman made this horseshoe case especially for the 3rd Exhibition of Australian Manufacturers and Products, held in the Exhibition Building in Melbourne, which was organised and promoted by the Australian Natives Association (ANA). Reference is made to the horseshoe case in the Exhibition’s Souvenir Catalogue of 1907 on page 85, under the heading 'In the Machinery Section the following exhibits are also shown … 'CHAPMAN, T.A. , Woolsthorpe, via Warrnambool, Case of Horseshoes'. The Australian Natives’ Association (ANA) were a non-partisan and non-sectarian, friendly society founded in Melbourne, Australia in April 1871. It was set-up for the benefit of Australian-born white men, and membership was restricted exclusively to that group. Men of other races including the Chinese and Indigenous people were not allowed to join. The ANA had relatively progressive views on women (for the time) and attracted suffragists seeking support for their cause, and in 1894, the ANA advocated for women’s enfranchisement. Although, white women were only admitted as members from 1964. The organisation was most prominent in Victoria and sought to shape Australia’s national identity and was a training ground for businessmen, trade unionists and politicians including many of Australia’s early prime ministers such as Edmund Barton, Alfred Deakin, James Scullin and Francis Forde, and the first Australian-born governor-general, Isaac Isaacs, was a member. By 1910 it had developed into a nationwide association with real political and social influence, and members would participate in many activities. The ANA lobbied strongly for anti-Chinese legislation and were an ardent believer of colonial unification. Its mission and efforts are largely credited for the successful referendums that resulted in Federation of the six Australian colonies into a new nation, the association’s most important legacy. The ANA was also a supporter of trade protection, and were a staunch advocate of the first act of Australia's new parliament, the Immigration Restriction Act 1901 (cth) or commonly known as the White Australia Policy, which became one of the central pillars of Australian nationalism in the 20th-century. The ANA campaigned against the Australian Federal Government's new immigration policy after the Second World War (non-British immigration from southern and central Europe) in order to maintain a 'white Australia', and resisted changes when the Labor government during the 1970s fully dismantled and abandoned the White Australia Policy. The ANA merged with Manchester Unity Independent Order of Oddfellows, in 1993 to become Australian Unity Ltd. The display case of horseshoes changed hands several times, going from its maker Thomas Chapman to his mother then various other members of his family. The case was also displayed at the Lee Family’s butcher shop at 188 Liebig St Warrnambool, and in the Purnim Hotel during the Warrnambool May Races. In the late 1950s the horseshoe case went to Thomas’s son, Brian. He was a Master Farrier and completed his apprenticeship at Flemington Racecourse, and in Warrnambool he owned a blacksmith business at the Warrnambool Racecourse Grounds. Brian later operated a blacksmith’s at Flagstaff Hill, where his customers would bring their horses to be shod. Brian passed away in August 2017. The horseshoe case is significant as an example of trades in the early 20th century in Western Victoria, Australia. It is also significant as an example of horseshoes from the early 20th century. The horseshoe display case is also significant for its association with the Australian Exhibition of 1907, showcasing Australian produce and manufacturing to the world. The horseshoe display case is locally significant for its association with local families, essential businesses and community events. Display case of homemade horseshoes. Wooden case with glass front containing 16 horse shoes grouped in sets, each set with a label: Made 1906-1907 for Australian Exhibition of 1907 by Thomas Alfred Chapman of Warrnambool. The case contains (a) complete chrome set each of Trotting Shoes, Hunting Shoes and Racing Plates, and (b) one pair of Hind Polo Shoes and one pair of Front Aluminium Shoes. The wooden frame has gold lettering on each side proclaiming “Australian Natives Association, T.A. Chapman, horse shoer, Warrnambool” and is topped by a painted Australian coat of arms. Gold lettering on frame, in the order of top/bottom/ left/right “AUSTRALIAN.NATIVES.ASSOCIATION / T.A. CHAPMAN / Horse Shoer / Warrnambool”flagstaff hill, warrnambool, shipwrecked coast, maritime museum, shipwreck coast, horseshoe display case 1906-1907, chromed set of trotting shoes 1906-1907, chrome set of hunting shoes 1906-1907, chrome set of racing plates 1906-1907, pair of hind polo shoes 1906-1907, pair of front aluminium shoes 1906-1907, australian exhibition 1907, australian natives association (ana), t.a. chapman horse shoer warrnambool, thomas alfred chapman, brian chapman, brian “snacks” chapman, blacksmith warrnambool, warrnambool may races, warrnambool racecourse, purnim hotel, lee family’s butcher shop warrnambool -
Glenelg Shire Council Cultural Collection
Functional object - Barograph, n.d
Port of Portland Collection A barograph is a barometer that records the barometric pressure over time in graphical form. This instrument is also used to make a continuous recording of atmospheric pressure.Wooden case, glass sided (front and ends). Steel handle on top (brass plated) used from circa 1950's.port of portland, maritime, barograph -
 Seaworks Maritime Museum
Spirit Level
long wooden instrument with sealed glass tube containing liquid. With metal plate with moon and star design and writing.Attached tag, written in pencil: "SPIRIT LEVEL/ PWO 1488.1" Metal plate: "A MATHIESON & SON/ 21 C/ GLASGOW & EDINBURGH" written with white pen: "PWO 1488.1" -
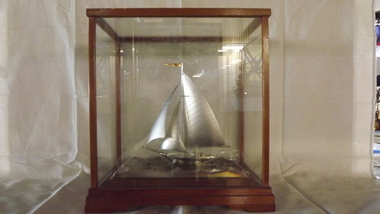 Seaworks Maritime Museum
silverplated shipmodel
Model of silver-plated ship, housed in a glass and wood display case.Plaque: ‘silver plated by TAKEHIKO’ Bottom edge: PMA0342gifts -
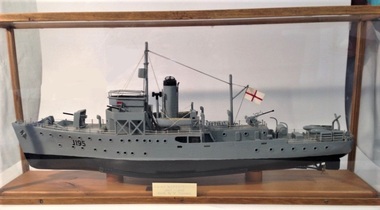 Montmorency–Eltham RSL Sub Branch
Unknown - Scale model HMAS Maryborough (1)
Model of the ship served on by W Thomson during WWII.Scale model of the HMAS Maryborough that was operated by the Australian Navy during WWII.Grey and black painted plastic and wood scale model of the Bathurst class HMAS Maryborough (1940 to 1946) minesweeper (commonly known as corvettes) mounted in a wooden frame glass sided and top case. It has cotton rigging with metal anchor chains. An inscribed metal plate is located on the front glass side. The upper of the model is painted grey, and the bottom black. J195 is painted in black lettering on the bow of the model.J195 H.M.A.S Maryborough 1940 - 1946 Made by W. Thomsonmodel, hmas maryborough, bathurst class, minesweeper, corvette -
 Mission to Seafarers Victoria
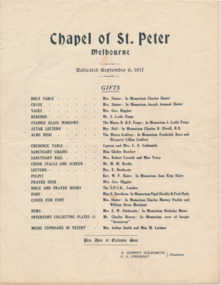
Flyer - List, Gifts, Chapel of St Peter, 1917
The St Peter chapel was furnished thanks to donations of supporters of the Mission. Some were donated for the previous temporary chapel at the Sidney Street site and some are lost. - Holy Table (altar): donated by Mrs Shuter, in Memoriam of Charles Shuter - Cross: - Vases (lost) - Stained Glass Windows: donated by Misses Edith and Ruby Forge, in Memoriam J. Leslie Forge - Altar Lectern - Alms Dish: donated by the Godfrey sisters in Memoriam of their parents - Credence Table: donated by - Sanctuary Chairs: donated by Miss Gladys Hawkey - Sanctuary Rail - Choir Stalls and Chancel Screen - Lectern (donated in 1909) - Pulpit (donated in 1907) - Prayer Desk (a plaque to Goldsmith) - Bible and Prayer Books - Font - Cover for Font - Pews - Offertory Collection Plates (lost) - Music Cupboard in Vestry (lost) The document lists all the gifts donated by generous supporters of the Mission in 1917. The chapel was built during World War 1 as. memorial to the merchant seamen lost during the war. These items are still in the chapel today.A4 document on cream colour paper, wording in black ink.gifts, chapel of st peter, flinders street, mission to seafarers, mission to seamen, gladys amy hawkey (1886-1974), reverend alfred gurney goldsmith, gifts-1917, amelia shuter nee lord, beatrice elizabeth higgins (nee shuter), charles shuter -
 Mission to Seafarers Victoria
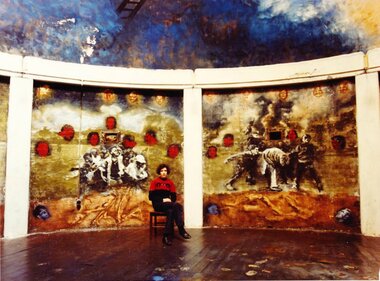
Photograph - Photograph serie, Digital copies, Louise Hearman, 1988
Artist Louise Hearman visited the Mission on the 15th of September 2011 and brought photographs in colour of her artwork painted in 1987/88 in the Norla Dome. She shared some background information about how she created the artwork: Louise arranged with O'Brien Glass to have the glass panes donated to replace the steel plates once covering the skylight. She painted the entire ceiling of the Dome precariously balancing on scaffolding. The walls were made as canvas panels and then put in place. She angled some of them to create openings so when you entered the Dome you were totally encased in her work.Louise Hearman is a Melbourne born artist and Archibald Prize winner. Hearman first came to public notice in 1987/88 when she spent a year painting the mural in the Norla Dome. The premises of the Mission also served as her studio at that time.Series of 7 colour photographs scannedlouise hearman, exhibitions, cultural events, norla dome, 1988, cottage, flinders street, melbourne, elephant room -
 Greensborough Historical Society
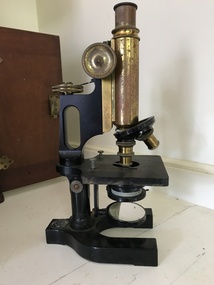
Microscope, Bausch & Lomb Optical Co, Bausch and Lomb microscope, 1912c
Bausch & Lomb were a prominent manufacturer of optical glass and instruments founded in 1853, which commenced making microscopes in 1876. Entered into joint venture with Saegmuller and alliance with Zeiss 1890s - 1903, now global manufacturer of eye products and pharmaceuticals. Possibly used in Australia as a laboratory microscope 1930-1950s.Brass monocular 3 lens (16 mm, 4 mm) laboratory microscope in cedar stained wooden box with key lock and carry handle, with glass specimen slides Plate on base: Bausch & Lomb Optical Co. USA, Logo B L Z S (Bausch Lomb Saegmuller Zeiss), Donald Ross & Co Ltd [Distributor/Agent]microscope -
 Glenelg Shire Council Cultural Collection
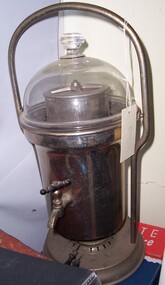
Functional object - Samovar, 1800s
... Nickle-plate smovar/perculator with glass domed lid... teapot Russian container tea making Nickle-plate smovar ...Part of Birmingham Collection, donated by the Family of Misses Mary and Edith Maude Graham of 4 Blair Street, Portland.Nickle-plate smovar/perculator with glass domed lid with hand. Tap in front. Sits on metholated spirits burner. Metal handle.birmingham collection, samovar, teapot, russian, container, tea making -
 Greensborough Historical Society
Commemorative Plate, Wading Pool Greensborough glass dish, 1940s
... . Wading Pool Greensborough glass dish Commemorative Plate ...Plates such as this were a souvenir of a trip or holiday. Greensborough was a popular picnic destination in the mid 20th Century and this style of souvenir would have been a popular purchase. The Greensborough pool in the Plenty River was opened in the 1930s, so the plate was manufactured after this.Photograph laid on glass dish, cut glass edge."Wading Pool Greensborough" overlaid on photograph. Price written on back "2/9"greensborough swimming pool, plenty river, wading pool greensborough -
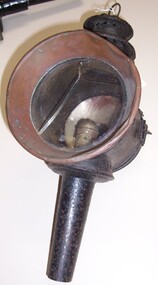
Glenelg Shire Council Cultural Collection
Functional object - Lamp, c. 1854
Iron with octagonal sides, folding wire handle, glass sides. Burner incomplete. Painted semi-gloss black. Burner painted flat gold.Front: Prices Patent Candle Company/ Government Immigrant Ship Lanthorn No 3610/ Registered July 5 1854 (brass plate) Back: (no inscriptions)ss lanthorn, lantern, ships light -
 Glenelg Shire Council Cultural Collection
Equipment - Carriage Lamp, 1890-1900
Sheet tin, glass and copper carriage lantern with glass front and red bull's-eye back. Mounted on cyclindrical handle. Round framed glass is hinged with copper hood. Painted black.Front: Brandy Bros Co/Manufacturer/422/Elizabeth St/Melbourne (embossed brass plate, wick base) -
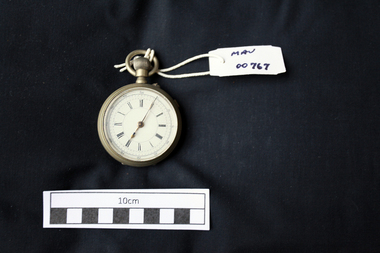 City of Moorabbin Historical Society (Operating the Box Cottage Museum)
Watches, pocket watch, c1900
A pocket watch is a watch that is made to be carried in a pocket, as opposed to a wristwatch, which is strapped to the wrist.. They were the most common type of watch from their development in the 16th century until wristwatches became popular after World War I The first stem-wind and stem-set pocket watches were sold during the Great Exhibition in London in 1851 and the first owners of these new kinds of watches were Queen Victoria and Prince Albert. Stem-wind, stem-set movements are the most common type of watch-movement found in both vintage and modern pocket watches.In 1857 the American Watch Company in Waltham, Massachusetts introduced the Waltham Model 57, the first to use interchangeable parts which cut the cost of manufacture and repair. Most Model 57 pocket watches were in a coin silver. Watch manufacture was becoming streamlined; the Japy family of Schaffhausen, Switzerland, led the way in this, and soon afterwards the newborn American watch industry developed much new machinery, so that by 1865 the American Watch Company (afterwards known as Waltham) could turn out more than 50,000 reliable watches each year.This silver plated pocket watch with an open glass face has black roman numerals on a white dial , gold hour hands and a blue second hand. The winding stem is at 12 o’clock and has a metal ring for attachment to a chain. Back: of case ; a shield inside 2 circleswatches, brighton, cheltenham, moorabbin, bentleigh, early settlers, pioneers -
4th/19th Prince of Wales's Light Horse Regiment Unit History Room
Board, Wine Glass Coasters, K W Baker ?, abt 1980
Rectangular wooden board, with felt backed recesses for three wine and one port glass. For use as RSM set at formal dinners.Donation plate: Presented to 4/19 PWLH Sgts Mess By WO1 K W Baker Nov 1980 -
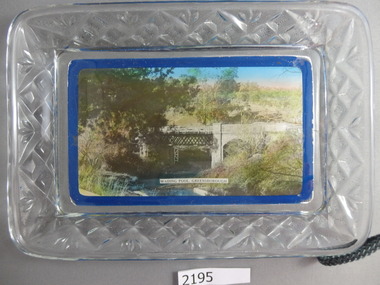
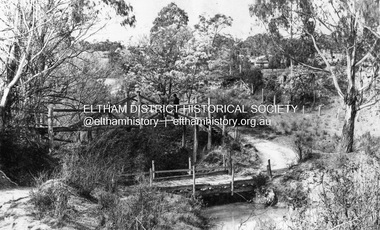 Eltham District Historical Society Inc
Negative - Photograph, Diamond Creek, Eltham. Old Diamond Street Bridge
... Glass Plate Negative... Diamond Street Bridge Eltham Eltham Railway Station Glass Plate ...Copy of Rose Series Postcard P. 4314. (The Rose Stereograph Company) Shows two bridge crossings over the Diamond Creek in Diamond Street, Eltham. The upper pedestrian crossing provided continual access for foot traffic during times of flood. The railway came to Eltham in 1901, the Eltham Railway Station is visible in the distance as well as a wooden bodied Tait (Red Rattler) First Class train carriage. The Tait train was first introduced in 1910 as a steam locomotive hauled carriage and in 1919 electric motor carriages were introduced however the line to Heidelberg was not electrified till 1921 and to Eltham in April 1923. The Railway General Store on Main Road is visible beyond the station and was built by Luther Haley in 1902. It was the first shop in the present day shopping centre. It was later known as lloyd's stopre (1917-1920) followed by a succession of six other owners until purchased by Eric Staff in 1939. George Rose founded the Rose Stereograph Company in 1880 and was joined by Herbert (Bert) Cutts in the early 20th Century. The pair formed a lifetime working partnership and strong personal friendship. Assisted by George’s two sons, Herbert George and Walter, and later by Neil Cutts, the Rose Stereograph Company continued its operations for more than 140 years. The company was initially built on stereographs, but as cinema took over and stereographs fell out of fashion, the Rose Stereograph Company developed Australia’s first commercially viable photographic postcard business. Specialising in postcards of iconic historical moments and significant landmarks, The Rose Stereograph Company became a staple of the Australian travel industry.This photo forms part of a collection of photographs gathered by the Shire of Eltham for their centenary project book,"Pioneers and Painters: 100 years of the Shire of Eltham" by Alan Marshall (1971). The collection of over 500 images is held in partnership between Eltham District Historical Society and Yarra Plenty Regional Library (Eltham Library) and is now formally known as 'The Shire of Eltham Pioneers Photograph Collection.' It is significant in being the first community sourced collection representing the places and people of the Shire's first one hundred years.Digital image 4 x 5 inch B&W Negdiamond creek, diamond street bridge, eltham, eltham railway station, glass plate negative, lloyd's general store, postcard, railway station, railway store, rose series postcard, rose stereograph company, shire of eltham pioneers photograph collection, staffs general store, tait train, travel -
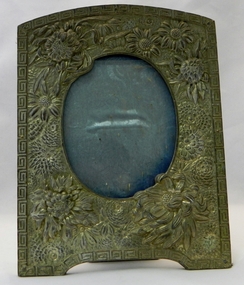 Kiewa Valley Historical Society
Frame - Photograph
This photograph frame with its decorative floral and Greek patterned boarder was typical of the early 1900's when photography was in the hands of the professional artist. It was in a period before the "instant" photo and required a dark room and processing liquids for development. It was therefor in a time when photographs were "shot" only at important events be they family or public occasions.This photograph frame holds and protects, part of a very significant occasion, the 90th birthday photograph of the matriarch of one of the founding families within the Kiewa Valley. The frame therefore has historical significance.This gold painted aluminium photograph frame has a glass (broken) pane within a formed inlay and two swivel clip toggles. These are installed to allow the photograph to be securely positioned within the correct alignment of the the frame.The metal front plate has seven rivets holding the cloth covered cardboard back frame to the metal front cover. The front part of the frame has sculptured wild flowers and is boarded with a Greek "key" pattern. Half way on the back panel is a rectangular swiveled stabiliser flap. See also KVHS 0093.photograph frame early 1900's, the roper family -
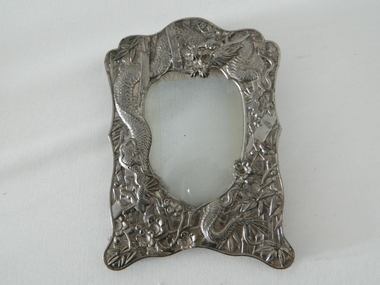 Kiewa Valley Historical Society
Frame Photograph, circa early 1900s
This photograph frame with its decorative dragon and bamboo shoots was typical of the early 1900's when photography was in the hands of the professional artist. It was in a period before the "instant" photo and required a dark room and processing liquids for development. It was therefor in a time when photographs were "shot" only at important events, be they family or public occasions. Good quality picture frames such as this item were a part of the "reverence" of photographs per se.This photograph frame holds and protects, part of a very significant occasion, the 90th birthday photograph of the matriarch of one of the founding families within the Kiewa Valley. The frame therefore has historical significance.This silver painted aluminium photograph frame has a glass front pane within a formed inlay and a formed inlay at the back. The anchor points, at the back, for securing toggles are in place but not the toggles. These toggles were installed to allow the photograph to be securely positioned within the correct alignment of the the frame.The metal front plate has seven rivets holding the cloth covered cardboard back frame to the metal front cover. The front part of the frame has sculptured dragon and wild bamboo shoots and is boarded with a plain border pattern. The back panel to secure the photo and hold the stabiliser flap is missing. See also KVHS 0092 for a more complete frame.photograph frame early 1900's, the roper family -
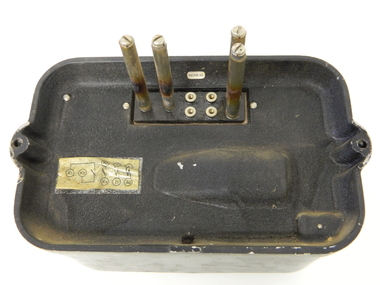 Kiewa Valley Historical Society
Relay Protection Instrument, Circa 1950's
This protection relay apparatus (a large electrical fuse), which permits the easy monitoring and disconnection of faulty electrical apparatus connected to the large SEC Victoria Hydro Scheme's electrical power producing generators. These generators are powered by the hydro force of "stored" water at a higher altitude. The establishment of both the NSW and Victorian Hydro Schemes was achieved from the early 1900's to the 1960's. At this point in time the need for additional power sources to quench both an industrial and domestic demand for electricity was purely an economic and not and environmental (carbon reduction) factor. This hydro scheme was instigated by "the Government of the day" as a bold move and was the major force of the World War II refugee and "technical" workforce inclusion of skilled and unskilled migration into the Australian environment. Although this mass "invasion" of workers with families was thought of in some circles as intrusive, the expansion of population post war years and its integration into the Australian rural sector, produced the multi- lingual multi-cultural diversity of later years.This protection relay is very significant to the Kiewa Valley as its use was introduced during the Kiewa Hydro Scheme. Although only a small apparatus it was part of the explosion of human resources into the valley. This influx of population transformed the region from that of a basically quiet rural region to one which evolved into both an industrial and a larger residential community. This evolution in the valley created a change, not only in the "physical" landscape but also the socio-economic expansion which permitted other "tourist" based industries into the valley.This protection relay unit has a black painted metal shell with four copper enclosed "prongs" fastened to the rear of the housing(from a bake-lite plate) . Between these "prongs" are four "empty" points allowing additional "screw on" bases. The front glass enclosed meter and recorder allows for the identification and automatic disconnection of any faulty equipment connected to the main power generator. This equipment acts similarly to a modern day circuit breaker found on the electrical circuit boards of residential homes.On the top section of the front panel "ASEA" to the left "Made in Sweden" and to the right "Frabrique en Suede" below this "RIS" below this a graph and next to it two columns of numbers and a pointer for each setkiewa hydro electricity scheme, victorian state electricity commission, relays, generators -
 4th/19th Prince of Wales's Light Horse Regiment Unit History Room
Portrait, Major General John Keatly Forsyth CMG, 1920 (estimated)
Major-General John K Forsyth CMG raised 1st Light Horse Brigade. The men of the 4th Light Horse Regiment regarded him as their first CO, although technically he was not, and always referred to him as 'Dad". He did not officially assume command of the 4th until it reached Egypt, effective from 13 December 1914.Framed portrait of Maj Gen John Keatly Forsyth CMG, Commanding Officer 4th Light Horse Regiment. Hanging in glass case with display including his riding crop and fly whisk.Brass plate inscribed: Major General J K Forsyth CMG DSO 1st CO 4th LH REGT 1st AIF Artist's signature not legible: E L P????world war 1, 4th light horse, general forsyth, portraits -
4th/19th Prince of Wales's Light Horse Regiment Unit History Room
Photograph, Australian Lighthorseman, abt 1915
Large black & white photograph of mounted Australian Lighthorseman. Soldier is wearing WW1 uniform, with 4 Light Horse colour patch. He is holding aq .303" rifle. Photo is in wooden frame with glass front On brass plate: "No 1008 Tpr E H T Cross C Squadron 4th L H Regt" Nothing written on backtrooper cross, 4th light horse -
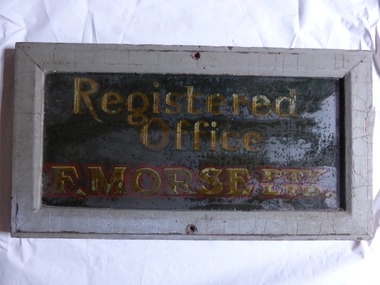 Warrnambool and District Historical Society Inc.
Book, Registered Office E Morse, Early 20th century
This plate comes from the Registered Office of F. Morse Pty Ltd. The name ‘Morse’ has been associated with the local Warrnambool transport industry for more than 100 years from the horse-drawn era to the advent of motorized transport. Frederick Morse was the son of Henry Morse, a teacher at The Grange, Hamilton and at Grasmere in the early 1870s. In 1883 Frederick Morse started business in Fairy Street as a coach builder in a partnership known as Robinson and Morse and in 1891 he set up a business on his own, the Victoria Carriage Works in Lava Street with branches in Port Fairy and Koroit. By the 1890s he was employing 27 people and winning State awards for his Abbot buggies. By the 1920s the Morse business had moved to motorized transport, expanding over the years to car dealerships, caravans, panel works and reconditioning and truck building with the subsidiary businesses of Morsmilk and Morsbearings (both later sold).This plate is of strong significance as a memento of a business in Warrnambool that has been prominent in the local transport industry for 120 years. It is also a memento of the Morse family, notable 19th century settlers in the town and important in local community affairs since that time. This is a wooden frame with a glass front. The frame is painted a grey colour and has holes at the top and bottom for affixing the frame to a wall or door. Behind the glass the words ‘Registered Office F. Morse Pty Ltd’ are painted or incised on to a wooden slab. The words are in yellow and red paint. The frame is a little chipped and the inside of the glass is somewhat blotchy and stained. ‘Registered Office’ ‘F. Morse Pty Ltd’ frederick morse, robinson and morse, morse & co., history of warrnambool, coach building in warrnambool, automotive industry in warrnambool -
 Orbost & District Historical Society
trinket box
Small cut glass rectangular trinket box with gold-plated engraved lid and raised leaf and flower. Flower is amethyst with scotch thistle.trinket-box glass-technology glassware costume-accessories jewelry -
 Orbost & District Historical Society
lantern, circa 1890
This item is an example of a lighting device used before electricity and battery power were widespread.A small brass Elfin Reflector Night kerosene lantern with a reflector plate at the back. A handle runs around the middle. It has a small canvas wick. The glass is missing.On top of fuel tank-ELFIN REFLECTOR NIGHT LAMP On back-MADE IN U.S.A. BY EDWARD MILLER & CO USA On wicker winder (left) -E. MILLER -CO.U.S.A.lamp lantern kerosene oil lighting miller-edward -
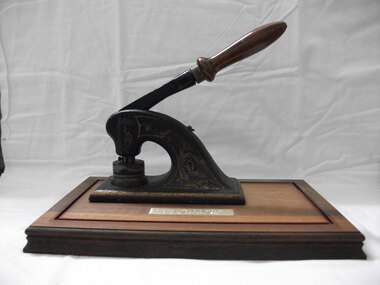 Cheese World Museum
Company Seal, Warrnambool Cheese & Butter Factory Co.Ltd. Original Company Seal, c1890
The seal was used in the Warrnambool Cheese & Butter Factory Co Ltd office for stamping legal documents. It is not known when it became obsolete and housed in a glass case for safekeeping.The Seal is historically significant as it relates to the formation of the WCBF in 1888 and used for legal documents. Until 2013 the Warrnambool Cheese & Butter Factory was the only remaining independently owned butter factory in Victoria. The company was taken over by Canadian company Saputo in 2013. It is artistically significant as the surface of the arm of this functional cast iron Seal features a gold design. The seal is made of black painted cast iron. The flat base has a gold-painted border. The curved iron arm to which a wooden handle is attached has a swirling scroll pattern on the side. The seal component consists of a round base and a round iron stamp attached to the handle mechanism. The seal is housed in a glass case with a small name plate at the front.Name plate: Warrnambool Cheese & Butter Factory Co Ltd 'Original Company Seal'allansford, warrnambool cheese & butter factory company ltd, company seals, office equipment