Showing 662 items matching "illegal"
-
 Flagstaff Hill Maritime Museum and Village
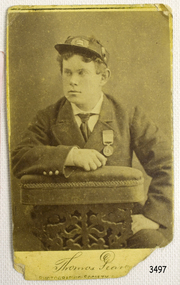
Photograph, late 19th century
Loch Ard was bound for Melbourne in 1878 loaded with passengers and cargo when it ran into a rocky reef at the base of Mutton Bird Island, near Port Campbell. Of the 54 crew members and passengers on board, only two survived: an apprentice, Tom Pearce and a young woman passenger, Eva Carmichael, who lost all of her family in the tragedy. The wreck of Loch Ard still lies at the base of Mutton Bird Island and much of the cargo has been salvaged. Some was washed up into what is now known as Loch Ard Gorge following the shipwreck. Cargo and artefacts have also been illegally salvaged over many years before protective legislation was introduced. The photograph is significant for its association with the wreck of the Loch Ard. This wreck has been protected as a Historic Shipwreck since 11 March 1982, under the Commonwealth Historic Shipwrecks Act (1976) Flagstaff Hill’s collection of artefacts from Loch Ard is significant for being one of the largest collections of artefacts from this shipwreck in Victoria. It is significant for its association with the shipwreck, which is on the Victorian Heritage Register. The collection is significant because of the relationship between the objects, as together they have a high potential to interpret the story of the Loch Ard. The Loch Ard collection is archaeologically significant as the remains of a large international passenger and cargo ship. The Loch Ard collection is historically significant for representing aspects of Victoria’s shipping history and its potential to interpret sub-theme 1.5 of Victoria’s Framework of Historical Themes (living with natural processes). The collection is also historically significant for its association with the Loch Ard, which was one of the worst and best known shipwrecks in Victoria’s history. The Loch Ard collection meets the following criteria for assessment: Criterion A: Importance to the course, or pattern, of Victoria’s cultural history. Criterion B: Possession of uncommon, rare or endangered aspects of Victoria’s cultural history. Criterion C: Potential to yield information that will contribute to an understanding of Victoria’s cultural history. Black and White photoghrap of Thomas Pearce. Taken by the Photographic Society of Victoria. Registered copyright July 24th 1878. Reverse has printed maker’s information and a white adhesive label with hand writing on it.Label has hand writing “F-Ph 55/2-74” Printed green text “PHOTOGRAPHIC / SOCIETY OF VICTORIA / MELBOURNE / REGISTERED COPYRIGHT / JULY 24th 878” and “NONE ARE GENUINE UNLESS WITH / SIGNATURES THUS” and “PRESIDENT / VICE PRESIDENT / SECRETARY” flagstaff hill, warrnambool, shipwrecked coast, flagstaff hill maritime museum, maritime museum, shipwreck coast, flagstaff hill maritime village, great ocean road, loch line, loch ard, captain gibbs, eva carmichael, tom pearce, glenample station, mutton bird island, loch ard gorge, photoghrap, thomas pearce, photographic society of victoria, loch ard shipwreck -
 Flagstaff Hill Maritime Museum and Village
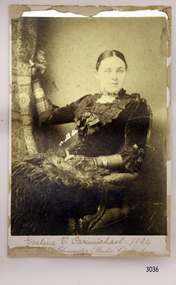
Photograph, late 1800's
Miss Eva Carmichael is one of two survivors of the Loch Ard shipwreck.. Loch Ard was bound for Melbourne in 1878 loaded with passengers and cargo when it ran into a rocky reef at the base of Mutton Bird Island, near Port Campbell. Of the 54 crew members and passengers on board, only two survived: an apprentice, Tom Pearce and a young woman passenger, Eva Carmichael, who lost all of her family in the tragedy. The wreck of Loch Ard still lies at the base of Mutton Bird Island and much of the cargo has been salvaged. Some was washed up into what is now known as Loch Ard Gorge following the shipwreck. Cargo and artefacts have also been illegally salvaged over many years before protective legislation was introduced. The photograph is significant for its association with the wreck of the Loch Ard. This wreck has been protected as a Historic Shipwreck since 11 March 1982, under the Commonwealth Historic Shipwrecks Act (1976) Flagstaff Hill’s collection of artefacts from Loch Ard is significant for being one of the largest collections of artefacts from this shipwreck in Victoria. It is significant for its association with the shipwreck, which is on the Victorian Heritage Register. The collection is significant because of the relationship between the objects, as together they have a high potential to interpret the story of the Loch Ard. The Loch Ard collection is archaeologically significant as the remains of a large international passenger and cargo ship. The Loch Ard collection is historically significant for representing aspects of Victoria’s shipping history and its potential to interpret sub-theme 1.5 of Victoria’s Framework of Historical Themes (living with natural processes). The collection is also historically significant for its association with the Loch Ard, which was one of the worst and best known shipwrecks in Victoria’s history. The Loch Ard collection meets the following criteria for assessment: Criterion A: Importance to the course, or pattern, of Victoria’s cultural history. Criterion B: Possession of uncommon, rare or endangered aspects of Victoria’s cultural history. Criterion C: Potential to yield information that will contribute to an understanding of Victoria’s cultural history. Photograph of Miss Eva Carmichael sitting on a chair holding a curtain. Text below photograph is partly unreadable but gives the name of the photographic studio. A printed on the back "County of Gloucester Studio Cheltenham" with the address and other informaion.Reverse has crest that includes “PRIZE MEDALIST PARIS EXHIBIT’N 1867” Printed text “No. …………” “COUNTY OF GLOUCESTER STUDIO / 20a / PROMENADE VILLAS / CHELTENHAM” and “Autotype Prints or Permanent Porcelain enlargements can be made from this plate” flagstaff hill, warrnambool, shipwrecked-coast, flagstaff-hill, flagstaff-hill-maritime-museum, maritime-museum, shipwreck-coast, flagstaff-hill-maritime-village, photograph of miss eva carmichael, eva carmichael, loch ard shipwreck, county of gloucester studio -
 Warrnambool and District Historical Society Inc.
Flag, HAMS Warrnambool, 2005
This is a souvenir pennant of the H.M.A.S. Warrnambool, named after the City of Warrnambool in Victoria. This ship was the second of that name. The first H. M.A.S. Warrnambool, launched in 1941, was one of 60 Bathurst-class corvettes commissioned by the Australian Government. It was involved in mine clearance work in the Great Barrier Reef after World War Two. The mines had been laid by the Australian Government during the war to protect Australian waters. In 1947 the first H.M.A.S. Warrnambool was sunk by one of these mines and lies on the ocean floor off Cockburn Reef in northern Queensland. The second H.M.A.S. Warrnambool was commissioned in 1981 and was a Fremantle-class patrol boat assisting in capturing illegal fishing boats and participating in military exercises in Australian waters. In 2005 the second H.M.A.S. Warrnambool was decommissioned after 24 years’ service. This pennant is important as a souvenir of the H.M.A.S Warrnambool, a ship that had obvious links with the City of Warrnambool. In 2005 the Mayor of Warrnambool, Glenys Phillpot, attended the decommissioning of this ship at Darwin and brought back several souvenirs of the ship. This is a triangular-shaped pennant made of dark blue felt material. It has stitching at the straight edge with two tabs for attaching the pennant to a pole or post. The pennant has a badge of yellow, black and white tonings printed or stamped on to the felt. The badge includes a white unicorn, a stylized ship and crown, a boomerang and two other implements and the motto, ‘Protect and Avenge’. The words, ‘H.M.A.S. Warrnambool’ are printed on the pennant in yellow. ‘H.M.A.S. Warrnambool’h.m.a.s. warrnambool, history of warrnambool -
 Phillip Island Conservation Society Inc.
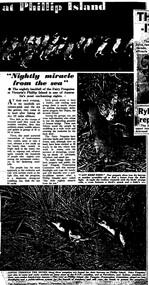
Work on paper - Photocopy of newspaper cutting, (part obscured) "at Phillip Island/Nightly Miracle/from the sea", November 20, 1957
The general public was fascinated by the nightly 'Penguin Parade' on Phillip Island. Many articles have been written about the birds and the Penguin Parade attraction since the 1930s. So many people spent their summer holidays on Phillip Island in one of the many guest houses, then caravan parks and holiday homes and a visit to the Penguin Parade by them and their visitors was very common during their holidays. Articles tended to be a mix of basic penguin behavior information and anthropomorphic descriptions. Accompanying photographs were almost invariably taken by flashlight (now illegal), or of penguins taken from their burrows during daylight hours for photo opportunities. This article, written in the 1950s, describes the management of the Penguin Parade at that time as being run by the Penguin Preservation Committee. This was before the Phillip Island Council took over running the Penguin Parade. The article provides evidence of the level of knowledge about Phillip Island's Little/Fairy Penguins at this time. (1957)single full-page magazine article, black ink on white paper. Photocopied from original, so photos appear as black and white.little penguins, fairy penguins, eudyptula minor, phillip island penguin parade, dorothy vernon, penguin rookery, penguin behaviour, phillip island tourist attractions -
 Australian Nursing & Midwifery Federation
1998 Australian federal election campaign material by Victorian Trades Hall focusing on industrial relations, 1998
Owned by long-time Australian Nursing and Midwifery Federation (Victorian Branch) Professional Officer Catherine Hutchings.1998 federal election campaign material by Victorian Trades Hall. Full colour bi-fold brochure, using images depicting 1998 Australian waterfront dispute. Text on front: 'Welcome to John Howard's Australia. In 1996, John Howard promised that under his industrial relations laws, 'no worker would be worse off'. In 1998, his government cheered on the illegal sacking of 2000 workers. His laws have changed our system from one of fairness and decency to a system that encourages conflict and division. John Howard's laws are undermining Australian wages and working conditions by attacking unions, encouraging individual contracts and dismantling the award system and the Industrial Relations Commission. On October 3rd [1998], use your vote wisely Your job may depend on it.' Text on rear: 'Five Facts About Industrial Relations Under John Howard Workers have lost award conditions and legal protections. Australian wages are being undermined by individual contracts and non-union agreements. Companies can use corporate law to sack workforces and not pay wages owed. Workers have been sacked because they belong to a Union. Conflict and Division in the workforce has increased. On October 3rd [1998], use your vote wisely. Your job may depend on it.'victoria, australia, john howard, liberal party, 1998 federal election, protest, industrial relations, unions, trade unions, trades hall, carlton, politics, political history, waterfront dispute, events, labour history, solidarity -
 Stawell Historical Society Inc
Photograph, "Schoolers" Homestead at Lake Lonsdale 1866
Schoolers Homestead Lake Lonsdale. Part of a collection of Photographs by Mr. O.G. Armstrong as commissioned by the Shire of Stawell for the Inter-colonial and Paris Exhibition in Melbourne in 1866. Similar Photo Scoullar station Rosehill Cat No 3888 G.F. Scoullar originally from Canada, according to W.G. Sharply in his 1930 Stawell Borough History, was a member of the Stawell Shire Council 1870-1888 and president 1875-1876. Maynard Ord in Stawell Past and Present says G.F. Scoullar, M. Brinkman and one other, took up small pieces of land fronting Lake Lonsdale. The owners of the Squatting Run, presumably Ledcourt, charged them with illegal occupation. They were heavily fined at Pleasant Creek Court, or in default gaol. As they could not afford the fine, some friends raise the money. Note re the spelling of ‘Schooler’. Variations in local records are ‘Schoullar’ and ‘Scoullar’. stawell education -
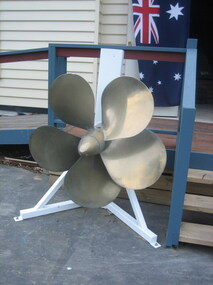 Running Rabbits Military Museum operated by the Upwey Belgrave RSL Sub Branch
Propeller from HMAS Bayonet, Walkers Ltd
Bayonet was one of 20 Attack class patrol boats built for the Royal Australian Navy between 1967 and 1969 by Walkers Ltd of Maryborough Qld . In the 1960s, Australia became more closely involved in events in the Asia-Pacific region. This led to improved surveillance and control of our enormous coastline, especially the northern approaches. Patrol boats controlled illegal fishing, smuggling and immigration, search and rescue, and occasional inshore survey work. Her hull is steel and the superstructure is aluminium. It is armed for small-scale encounters, with one 40-mm Bofors gun and two 0.5-inch Browning machine guns to fire warning shots across the bow of a suspect vessel. She was 32.6 m long and 6.1 m wide, 150 tons, powered by two paxman diesel engines and capable of about 24 knots. . A sister ship featured in the popular ABC-TV series Patrol Boat. The Bayonet conducted patrol duties around Australian waters until her scuttling by defence maritime services on 21 September 1999 in 82 m of water off Torquay in Victoria. propeller, hmas bayonet -
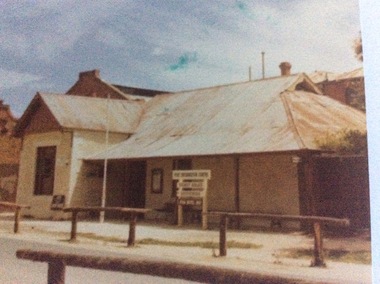 Port of Echuca
Colour photograph, 1979
The Star Hotel was built in 1863 as a private dwelling, by James Shackell who owned the Bond Store, next door. It was a small house consisting of only a couple of rooms. In 1867 Joseph Salomon bought the house and converted it into a hotel. He built an underground bar to "deal with the peculiarities of the Echuca climate". It was called 'The Shades'. In 1890 Jane Pygall bought the hotel, which was described by the Riverine Herald as having ' three parlours, seven bedrooms, underground bar, kitchen, bathroom, outhouses, small stables, and entrance from two streets." She changed the name to The Esplanade Hotel. In 1890 it was de-licensed along with many hotels in Echuca. It had been a very popular drinking place for all the wharf workers, who continued to to drink illegally in the underground bar. It was then that the escape tunnel to the laneway was built , so the drinkers could escape the Police raids. For many years it was a private dwelling, or an office. In 1973 the City of Echuca bought the Star Hotel and resored it. At the time this photograph was taken it was the main tourist information centre for the Port of Echuca. It now operates as a hotel, serving meals and providing performance opportunities for musicians.The Star Hotel is very significant in Echuca's history due to its proximity to the Echuca Wharf. It was the closest bar to the wharf. Despite Jane Pygall trying to improve the quality of her clientele, the wharf drinkers preferred to drink at The Star Hotel, as the Bridge Hotel catered for more upmarket clientele. After de-licensing in 1897, the workers continued to drink at The Shades Bar and even put in place elaborate strategies to enable them to drink illegally there. It is now a large eating and entertainment site, and the public are still able to visit 'The Shades Bar'.A coloured photograph of the Star Hotel building in Murray Esplanade. The photograph is taken from the east side of the street. The Shackell's Bond Store can be seen on the left of the photograph. Printed on the back are the words, "This paper manufactured by Kodak". Also on the back is green Port of Echuca stamp. Written across the front of the Bond Store are the words 'World In Wax Museum.' On a sign outside the Star Hotel are the words, "Port Information Centre. Ticket Sales. Souvenirs . Star Hotel 1867."port of echuca, star hotel, shackell, james, salomon, joseph, pygall, jane, esplanade hotel, 1863, underground bar, the shades, de-licensing of echuca hotels -
 Federation University Art Collection
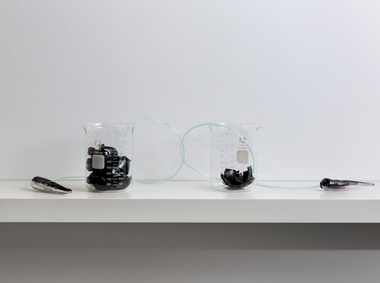
Sculpture - Artwork, 'The More Bones the Better' by Yhonnie Scarce, 2016
Yhonnie SCARCE (1973- ) Born Woomera, South Australia Language group: Kokatha, Southern desert region and Nukunu, Spencer region Yhonnie Scarce works predominantly in glass. She majored in glass withing a Bachelor of Visual Arts (Honours) course at the South Australian School of Art, Adelaide, and holds a Master of Fine Arts from Monash University. One of the first contemporary Australian artists to explore the political and aesthetic power of glass, Scarce describes her work as ‘politically motivated and emotionally driven’. Scarce’s work often references the on-going effects of colonisation on Aboriginal people, In particular her research focus has explored the impact of the removal and relocation of Aboriginal people from their homelands and the forcible removal of Aboriginal children from their families. (https://thisisnofantasy.com/artist/yhonnie-scarce/, accessed 10 September 2018)Artist's Statement 'The More Bones the Better', 2016 Yhonnie Scarce was born in Woomera, SA and belongs to the Kokatha and Nukunu peoples. Scarce embraces a non traditional approach to glass blowing using glass as more than a mere material, acting as a lens and a mirror, Scarce reflects and exposes the tragedies of Australia’s colonisation. She applies the technical rigours of traditional glass blowing techniques in an innovative and unconventional manner. In particular Scarce uses glass to explore the lives and histories of Aboriginal Australians. Hand blown glass is shaped, engraved, painted and smashed to create indigenous fruits and vegetables such as bush bananas, bush plums and long yams symbolic of her peoples culture and traditions. With their elongated, torso-like shapes, they even evoke human bodies. Akin to a gatherer of bush food Scarce creates glass-gatherings of the persecuted. The repetition of brittle ambiguous bodies collected for experimentation and examination conjures the relentless impact of colonisation and the litany of abuses suffered by Aboriginal people. Within her research Scarce encountered a variety of ethnographic studies examining the use of scientific interventions amongst Indigenous cultures. These include Government sanctioned illegal drug testing of children in orphanages and other dubious medical practices amongst indigenous prison inmates. This work metaphorically looks at these situations and poses questions of what might have gone on in such a laboratory. The judge of the 2017 Guirguis New Art Prize (GNAP), Simon Maidment, Senior Curator, Contemporary Art, National Gallery of Victoria said; “The winning work by Yhonnie Scarce captures the sensitivity to materials she displays throughout her artistic practice. The blown and shattered glass elements are a delicate contrast to the shocking and little discussed histories of Aboriginal exploitation and abuse in the name of science in Australia. Engaging this topic, this work is haunting, in the same way those lived and documented experiences continue to haunt the collective unconscious of this country. Yhonnie Scarce’s work, The More Bones the Better 2016, I believe makes an important contribution to the Collection of Federation University Australia and will engage and move diverse audiences with its technical accomplishment, beauty and message. Yhonnie Scarce was born in Woomera SA and belongs to the Kokatha and Nukunu peoples. Scarce embraces a non-traditional approach to glass blowing using her medium as more than a mere material. Applying the technical rigours of traditional glass blowing in an innovative and unconventional manner, Scarce’s glass objects act as a lens and a mirror to reflect and expose the tragedies of Australia’s colonisation and, in particular, explore the lives and histories of Aboriginal Australians. Hand-blown glass is shaped, engraved, painted and smashed to represent indigenous fruits and vegetables such as bush bananas, bush plums and long yams, symbolic of Scarce’s people’s culture and traditions. While these elongated shapes on the one hand represent fruit and vegetables, gathered and grouped as in the gathering of bush food, Scarce’s torso-like bodies and forms are glass ‘gatherings’ representative of the gathering of people. Here, the many brittle bodies act as a metaphor for the collection, experimentation and examinations undertaken by government authorities on Aboriginal communities researched by Scarce. Exposing a variety of ethnographic studies, examining the use of scientific interventions on Indigenous cultures, Scarce also revealed Government sanctioned illegal drug testing of children in orphanages and other dubious medical practices undertaken on indigenous prison inmates. Scarce’s gatherings also reflect the impact of colonisation and the relentless conjuring and litany of abuses suffered by Aboriginal people. The More Bones the Better metaphorically looks at these situations and poses questions of what was undertaken and investigated in these laboratories. guirguis new art prize, yhonnie scarce, glass, aboriginal -
 Flagstaff Hill Maritime Museum and Village
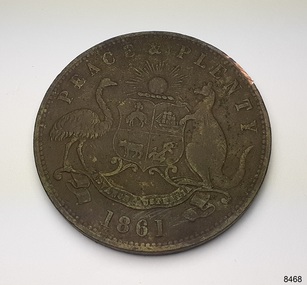
Currency - Coin, Robert Hyde & Co. Shipping Merchants, 1861
The donor (a local resident.) of this coin found this penny token coin in the sand dunes of Lady Bay, Warrnambool, in 2023. The coin could have come from a local shipwreck, passengers, or members of the community. Trade was carried out along the southwest coast of Victoria between Melbourne and Portland, with the Port of Warrnambool receiving passengers and goods by coastal traders, the steamboat that set off from ports every few days. One such vessel was the steamship SS Edina that made her first voyage from Melbourne to Portland in 1863. For around a decade or so in the Gold Rush period in Australia there was a shortage of official government currency. It was acceptable during this time to use token coins minted by local businesses to be used within their store, much like the loyalty and rewards cards that businesses give their customers in modern times. The tokens were also a good way to advertise their wares and details. The first token was introduced in Melbourne in 1848 and were used until 1868, when they became illegal in New South Wales. They were minted in Australia and overseas. The token was issued by Robert Hyde & Co. who traded in second-hand goods such as old clothes, sheets, metal items and glass, which they resold to be re-manufactured, or "recycled".A token such as this one identifies businesses existing in the post-Gold Rush period in Australia. Round copper coin. Penny token coin bearing the Australian Coat of Arms and motto. The coin also has the company's name, location, nature of business and motto. The coin has grooves around the edge. It was made in 1861.OBVERSE: Logo: (Australian Coat of Arms), Motto: "PEACE & PLENTY", Date: 1861 REVERSE: "ROBERT HYDE & CO MELBOURNE", "GENERAL MARINE STORE, SHIPPERS OF RAGS GLASS METALS &.C"flagstaff hill maritime museum and village, warrnambool, great ocean road, shipwreck coast, merchant token, melbourne, token, australian token, trade token, coins, merchants, medal, colonisation, gold rush, robert hyde & co., general marine store, shippers of rags glass metals etc., numismatics, second-hand scrap, scrap goods -
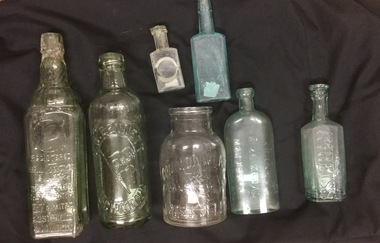 Mont De Lancey
Glass bottles, G.H. Bennett, Bottle no. 6) Between 1884 - 1916
Bottle no. 6) After having worked with Mr Lane at his Exelcior Brewery in Melbourne, George Henry Bennett established his aerated water business in 1884 at 236 Church Street Richmond, in Melbourne. He sold the business in 1916.Seven glass bottles. 1) 1 small clear oblong bottle with circular indentation on front face and a glass stopper. 2) 1 blue-tinged, oblong, glass "Tricopherous" bottle with circular indentation on base and no stopper. 3) 1 pale blue glass bottle with no stopper. 4) 1 squat, clear glass bottle with wide neck and no stopper. 5) 1 large green-tinged glass bottle with no stopper. There are straight and spiralling embossed patterns at the top and on the neck of the bottle. There is a circular indentation on the base. 6) 1 large green-tinged glass bottle with screw-in stopper of unknown material. 7) 1 multi-faceted (8) blue-tinged glass bottle with no stopper.1) None 2) "Tricopherous for the skin and hair" on front face of bottle and "Directions in the pamphlet" on the opposite face. "Barry's on one side panel and "New York" on the other. "C6" inscribed inside the circular indentation on the base and a diagonal glass join across the base of the bottle. 3) "Kruses prize medal magnesia" on front of bottle and "Felton Grimwade & Co. Melbourne" on the back. 4) " Commonwealth Trade Mark Jams & Jellies" surrounding the trader's mark, (a diagonally placed flag/pennant) around the main body of the bottle. "Made in Holland" appears around the base of the bottle. 5) "O.T. Registered. Refilling by others is illegal. This bottle is the property of O.T. Ltd. Australia & London" 6) 2 oval shapes on bottle with "G.H. Bennett Richmond" and two crosses around the outer border and "G.H.B" on the maker's mark (diagonally placed flag/pennant) inside the inner oval. "Please replace the stopper" appears on the other side of the bottle. 7) "A M Reiss" down the front side of the bottle.bottles, containers, beverage storage, food and beverages -
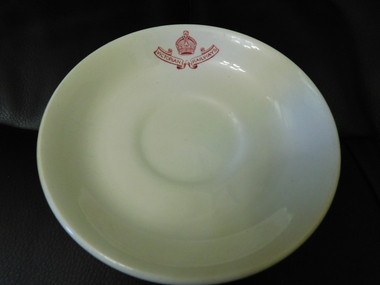 Puffing Billy Railway
Victorian Railways Saucer Plate, May 1954 "5-54" = "month-year"
Victorian Railways Saucer Plate - Red & White Supplier to Victorian railways : Loftus Moran, Melbourne: Mr Loftus Henry Moran was well known in the tea trade. Originally employed by Griffiths Bros Ltd, he started his own business, Loftus Moran Pty Ltd, in 1909 In 1913 he purchased the tea business of McIntyre Bros, and later, that of Steele Bros, and absorbed them in his own company. He had a wide business connection among hotels and guest houses for supplying crockery and other supplies. Ref: DEATH OF MR LOFTUS MORAN (1944, May 27). The Argus (Melbourne, Vic. : 1848 - 1957), p. 4. http://nla.gov.au/nla.news-article11809686 1st Advertisement of the Plates in the papers: CHIPPED CROCKERY. Nothing is more objectionable than chipped crockery--besides its use is illegal. DURALINE Plates, manufactured by The Grindley Hotel Ware Co., are tough as raw-hide. This is why they are used by practically every hotel and institution in Australia. Obtainable only from LOFTUS MORAN PTY. LTD., Hotel Supply Specialists, 131 Queen's Bridge Street, Melbourne South Advertising (29 March 1933, ). The Argus (Melbourne, Vic. ), p. 7. http://nla.gov.au/nla.news-article4726734Historic - Victorian Railways - Refreshment Services crockery - plateCeramic Victorian Railways Saucer Plate - Red & White Victorian Railways ( in Red on fount of plate ) "DURALINE" ( in Black on back of plate ) super Vitrified GRINDLEY HotelWare Co England Loftus Moran Pty Ld Melbourne 5 -54 puffing billy, victorian railways, crockery, plate -
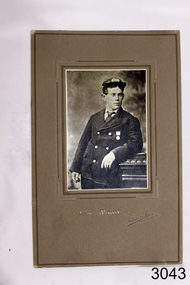 Flagstaff Hill Maritime Museum and Village
Photograph - Portrait, late 19th century
This photograph is of Tom Pearce, one of only 2 survivors from the shipwreck LOCH ARD. Loch Ard was bound for Melbourne in 1878 loaded with passengers and cargo when it ran into a rocky reef at the base of Mutton Bird Island, near Port Campbell. Of the 54 crew members and passengers on board, only two survived: an apprentice, Tom Pearce and a young woman passenger, Eva Carmichael, who lost all of her family in the tragedy. Coleman Jacobs composed the music “The Young Hero Schottische” and dedicated it, by permission, to Mr. Thomas R. (Tom) Pearce. The sheet music was published in 1878 by the Messieurs Roberts, professors of dancing etc. Melbourne. It was on sale for 3/- (3 shillings) and in aid of the “LOCH ARD” fund. [This is Coleman Jacobs’ only surviving musical work Coleman Jacobs, accomplished pianist, musical performer, singer, composer, professor of music and music teacher, was born in 1827 and died on 4 July 1885, aged 58 years. Coleman Jacobs was buried in the Melbourne Cemetery (grave 461, Church of England section).] The wreck of Loch Ard still lies at the base of Mutton Bird Island and much of the cargo has been salvaged. Some was washed up into what is now known as Loch Ard Gorge following the shipwreck. Cargo and artefacts have also been illegally salvaged over many years before protective legislation was introduced. The photograph is significant for its association with the wreck of the Loch Ard. This wreck has been protected as a Historic Shipwreck since 11 March 1982, under the Commonwealth Historic Shipwrecks Act (1976) Flagstaff Hill’s collection of artefacts from Loch Ard is significant for being one of the largest collections of artefacts from this shipwreck in Victoria. It is significant for its association with the shipwreck, which is on the Victorian Heritage Register. The collection is significant because of the relationship between the objects, as together they have a high potential to interpret the story of the Loch Ard. The Loch Ard collection is archaeologically significant as the remains of a large international passenger and cargo ship. The Loch Ard collection is historically significant for representing aspects of Victoria’s shipping history and its potential to interpret sub-theme 1.5 of Victoria’s Framework of Historical Themes (living with natural processes). The collection is also historically significant for its association with the Loch Ard, which was one of the worst and best known shipwrecks in Victoria’s history. The Loch Ard collection meets the following criteria for assessment: Criterion A: Importance to the course, or pattern, of Victoria’s cultural history. Criterion B: Possession of uncommon, rare or endangered aspects of Victoria’s cultural history. Criterion C: Potential to yield information that will contribute to an understanding of Victoria’s cultural history. Photograph of Mr Tom Pearce dressed in a uniform with a medal pinned on it. Standing with his arm resting on a masonry pillar.flagstaff hill, warrnambool, shipwrecked coast, flagstaff hill, flagstaff hill maritime museum, maritime museum, shipwreck coast, flagstaff hill maritime village, loch ard shipwreck, tom pearce, thomas r pearce, eva carmichael, mutton bird island, loch ard survivor, loch ard hero, coleman jacobs, the young hero schottische, photograph of tom pearce -
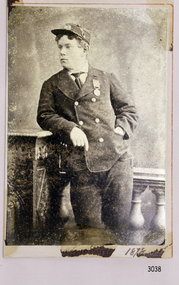 Flagstaff Hill Maritime Museum and Village
Photograph - Portrait, late 19th century
This photograph is of Tom Pearce, one of only 2 survivors from the shipwreck LOCH ARD. Loch Ard was bound for Melbourne in 1878 loaded with passengers and cargo when it ran into a rocky reef at the base of Mutton Bird Island, near Port Campbell. Of the 54 crew members and passengers on board, only two survived: an apprentice, Tom Pearce and a young woman passenger, Eva Carmichael, who lost all of her family in the tragedy. Coleman Jacobs composed the music “The Young Hero Schottische” and dedicated it, by permission, to Mr. Thomas R. (Tom) Pearce. The sheet music was published in 1878 by the Messieurs Roberts, professors of dancing etc. Melbourne. It was on sale for 3/- (3 shillings) and in aid of the “LOCH ARD” fund. [This is Coleman Jacobs’ only surviving musical work Coleman Jacobs, accomplished pianist, musical performer, singer, composer, professor of music and music teacher, was born in 1827 and died on 4 July 1885, aged 58 years. Coleman Jacobs was buried in the Melbourne Cemetery (grave 461, Church of England section).] The wreck of Loch Ard still lies at the base of Mutton Bird Island and much of the cargo has been salvaged. Some was washed up into what is now known as Loch Ard Gorge following the shipwreck. Cargo and artefacts have also been illegally salvaged over many years before protective legislation was introduced. The photograph is significant for its association with the wreck of the Loch Ard. This wreck has been protected as a Historic Shipwreck since 11 March 1982, under the Commonwealth Historic Shipwrecks Act (1976) Flagstaff Hill’s collection of artefacts from Loch Ard is significant for being one of the largest collections of artefacts from this shipwreck in Victoria. It is significant for its association with the shipwreck, which is on the Victorian Heritage Register. The collection is significant because of the relationship between the objects, as together they have a high potential to interpret the story of the Loch Ard. The Loch Ard collection is archaeologically significant as the remains of a large international passenger and cargo ship. The Loch Ard collection is historically significant for representing aspects of Victoria’s shipping history and its potential to interpret sub-theme 1.5 of Victoria’s Framework of Historical Themes (living with natural processes). The collection is also historically significant for its association with the Loch Ard, which was one of the worst and best known shipwrecks in Victoria’s history. The Loch Ard collection meets the following criteria for assessment: Criterion A: Importance to the course, or pattern, of Victoria’s cultural history. Criterion B: Possession of uncommon, rare or endangered aspects of Victoria’s cultural history. Criterion C: Potential to yield information that will contribute to an understanding of Victoria’s cultural history. Photograph of Mr Tom Pearce dressed in a uniform with a medal pinned on it. Standing with his arm resting on a masonry pillar. Reverse has piece of tape centre top and bottom. Also has printed maker’s information. Printed by the Photographic Society of Victoria, Melbourne.Printed green text “PHOTOGRAPHIC / SOCIETY OF VICTORIA / MELBOURNE / REGISTERED COPYRIGHT / JULY 24th 1878” and “NONE ARE GENUINE UNLESS WITH / SIGNATURES THUS” and “PRESIDENT / VICE PRESIDENT / SECRETARY” flagstaff hill, warrnambool, shipwrecked coast, flagstaff hill maritime museum, maritime museum, shipwreck coast, flagstaff hill maritime village, loch ard shipwreck, tom pearce, thomas r pearce, eva carmichael, mutton bird island, loch ard survivor, loch ard hero, coleman jacobs, the young hero schottische, photograph of tom pearce -
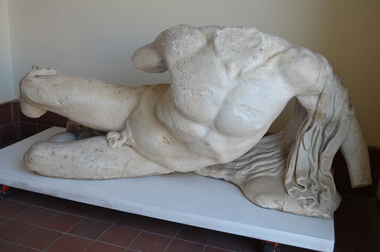 Federation University Historical Collection
Sculpture - Plaster Replica (from original by Pheidias, 438 BCE-432 BCE), The river god Ilissos (possibly), c 1920 (from original 438 BCE-432 BCE)
This ‘heroic size’ reclining figure is a copy made from one of The Parthenon Sculptures currently housed at The British Museum, and thought to represent the river-god Ilissos. This piece was part of the Ballarat Technical Art School's collection of reference for art studies, and became affectionately known as 'Hercules' by subsequent student cohorts. The cast was likely made by Brucciani and Co. London, and part of a consignment delivered to the School during the 1920s. This cast replicates one of a number of relics acquired by Thomas Bruce, seventh Earl of Elgin and ambassador to Turkey, (Lord Elgin) in Athens in the early 19th century. (Hence, these works were sometimes collectively referred to as the Elgin Marbles). Ownership of the artefacts, once part of the 2,500-year-old Parthenon temple, is disputed by Greece. It maintains that Elgin removed them illegally while the country was under Turkish occupation as part of the Ottoman Empire. The items were sold to the British Museum in 1816 and have remained there ever since. The original "Ilissos" was located on the west pediment of the Parthenon in Greece, and was created in c435 BC. It is unknown if the statue was in position or had already fallen when removed from the Parthenon by Elgin. The Royal Academy London also holds a copy of this plaster cast. The Ballarat Technical Art School boasted a well-stocked Antique Room replete with plaster copies of classical, Renaissance and Gothic sculptural examples, which were used as drawing props by students. The school inherited some casts from its predecessor institutions, and further consignments were purchased during the 1920s, including full length, bust and relief figures, as well as dozens of ornamental and architectural casts. Unfortunately, much of the collection was lost or destroyed in the late 1950s.Quality examples of heroic sized plaster replicas are now rare, as many plaster collections were destroyed or lost when the copy of antique examples fell out of favour with art schools.Plaster cast used during Drawing classes at the Ballarat Technical Arts School. It is likely a headless depiction of the river god Ilissos.hercules, ballarat technical art school, elgin marbles, plaster, plaster cast, figure of a river god, parthenon marbles, ilissos, copy, drawing the human figure from cast, drawing from the antique, visual arts -
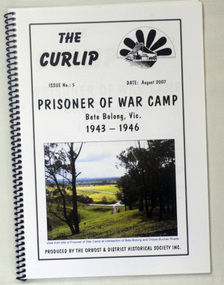 Orbost & District Historical Society
book, The Curlip - P.O.W.Camp Bete Bolong, Vic. 1943-1946, August 2007
This is Issue No. 5 of "The Curlip". The magazine is a compilation of research from a trip by the Orbost & District Historical Society to Bete Bolong. The Bete Bolong Prisoner of War Camp was located on the south side of the Buchan - Orbost Rd. From November 1943 to November 1945, Italian prisoners of war were based at Bete Bolong, cultivating maize, peas, beans and other vegetables on local farms. Unlike other 'farming' prisoners of war, those at Bete Bolong did not live with the farming families, but at a Prisoner of War Control Centre on Crown land overlooking the Snowy River Flats. About fifty Italian prisoners lived at the centre, along with an Australian Military Force staff of approximately seven people. The prisoners were driven to and from the farms each day. Three of them apparently simply swam across the river to work. They worked a six day week, with Sundays off. Although they were provided with rations, both prisoners and staff maintained vegetable and flower gardens. They were also skilled at cooking 'anything' they could catch, and at making illegal "grappa". Very few of the Italians were experienced farm workers. Some of them used their skills to make things for the families they worked for; a cabinet-maker made furniture , a cobbler made shoes, etc. They interacted with the local community and, although they were not supposed to go within one kilometre of town, some were found at local dances on Saturday nights. As recreation the prisoners were allowed to walk along the road to the west of the camp. Local people from both sides of the river could hear them sing as they walked. The prisoners also helped to construct an 'ant bed' tennis court on a property adjacent to the centre. Although now overgrown, the site of the tennis court can still be discerned as a flat area above the site of the centre. (ref./vhd.heritagecouncil.vic.gov.au)This item is a useful reference tool on the history of the Prisoner of War Camp at Bete Bolong, Orbost.A spiral bound book with a clear plastic cover. On the front is a coloured photograph of a view from the site of the P.O.W. camp at the intersection of Bete Bolong and Buchan Roads at Bete Bolong. Above is the title "Prisoner of War Camp Bete Bolong, Vic. 1943-1946" in black print on a white background. p.o.w.-camp-orbost ww11 bete-bolong -
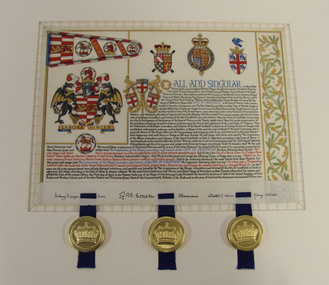 Glen Eira City Council History and Heritage Collection
Letters Patent, Letters Patent for the Grant of Arms to the City of Caulfield presented on 1st May, 1977, 01/05/1977
Glen Eira has a long history of association with various heraldic forms. From its early years the municipality of Caulfield had used the armorial bearings of the Caulfield Family (the Charlemonts of Castle Caulfield) to represent the roads board and later the town and city. In 1969 Caulfield City Council began planning to apply for an official coat of arms for the City. In 1974 Horace Hall, a Balwyn North resident and member of the Heraldry Society in London advised Council that the current usage was illegal, and that the Houston family, current owners of the Caulfield Arms could take legal action against Council for 'usurping their arms'. Mr Hall was commissioned to develop new heraldry for the City, and in conjunction with J. P. Brooke Little at the College of Arms, London, he prepared an acceptable design for Caulfield's Coat of Arms. The Council paid an additional sum to have a standard painted on the Letters Patent and the municipality's new coat of arms was drawn up in June 1975. The Coat of Arms retains a number of heraldic elements from the original Caulfield family insignia, including the dragons, the colours and the elements of the shield. The newly registered coat of arms and Letters Patent document for the granting of arms was presented at a civic service to mark the granting of armorial ensigns and the city banner to the City of Caulfield on the 1st May 1977. Significant elements of the coat of arms granted by these Letters Patent are as follows: The motto 'Labore Vinces' translates to 'By our labours we will conquer'. The helmet represents the rank of the owner. Public authorities are granted an esquire's helmet. The brickwork on the crest is a recognised emblem of local government. The Letters Patent also display a banner and a badge, both official symbols of the City of Caulfield. The badge, which is displayed on the banner as well as on its own, features a bridled horse. This represents the importance of racing, the Caulfield racecourse and the Caulfield cup to the municipality. These letters patent officially proclaim the granting of the coat of arms to the City of Caulfield. They are highly significant to the City of Glen Eira as they are the primary document that signifies the official and ceremonial heraldic powers of the Coat of Arms of the City of Caulfield. Mounted Letters Patent illuminated document for the Grant of Arms to the City of Caulfield presented on 1st May, 1977. Hand written and hand painted on cream coloured parchment using different coloured inks, mainly black, blue, red and gouache and gold paint. The bottom edge is folded up over itself approx. 45mm revealing the flesh side of the parchment, which displays black ink signatures and three sets of two horizontal slits that hold three blue ribbon. The ribbons support three wax seals in round, gold coloured metal cases held by the wax through slots in the casing. Although covered by the cap top, each wax seal within displays a different flag emblem with a crown on top, surrounded by a ring of text (difficult to read), noted when the cases were opened during conservation treatment. See attached transcription.arms, symbol, heraldry, glen eira, council, caulfield -
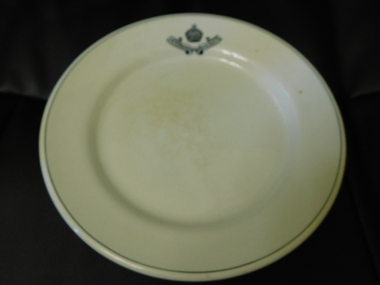 Puffing Billy Railway
Bread Plate, Victorian Railways Black & White, June 1953 "6-53" = "month-year"
Victorian Railways Bread Plate - Black & White Maker : W H Grindley & Co (Ltd) Earthenware manufacturer at the Newfield Pottery and then the Woodfield Pottery, Tunstall, Stoke-on-Trent The company was founded at the Newfield Pottery in 1880 by William Harry Grindley (princliple partner) and Mr Turner (the '& Co.') They produced Earthenware and Ironstone China - particularly for the Canadian, United States, South American and Australian markets. In 1891 the company moved to the Woodfield Pottery, Woodland Street, Tunstall. In 1960 the business was purchased by Alfred Clough Ltd. In 1978 renamed Grindley of Stoke (ceramics) Ltd. Federated Potteries Co. Ltd. took them over in 1982 and in 1988 the business was re-purchase by W. H. Grindley. 1991 saw the company in the hands of the receivers. and the same year they were taken over by Woodlands Pottery. DURALINE (trade mark) printed mark used by Grindley Hotel Ware Co Ltd c.1930's onwards The Number i.e "6-53" = "month-year" Supplier to Victorian railways : Loftus Moran, Melbourne: Mr Loftus Henry Moran was well known in the tea trade. Originally employed by Griffiths Bros Ltd, he started his own business, Loftus Moran Pty Ltd, in 1909 In 1913 he purchased the tea business of Mcintyre Bros, and later' that of Steele Bros, and absorbed them in his own company. He had a wide business connection among hotels and guest houses for supplying crockery and other supplies. Ref: DEATH OF MR LOFTUS MORAN (1944, May 27). The Argus (Melbourne, Vic. : 1848 - 1957), p. 4. http://nla.gov.au/nla.news-article11809686 1st Advertisement of the Plates in the papers: CHIPPED CROCKERY. Nothing is more objectionable than chipped crockery--besides its use is illegal. DURALINE Plates, manufactured by The Grindley Hotel Ware Co., are tough as raw-hide. This is why they are used by practically every hotel and institution in Australia. Obtainable only from LOFTUS MORAN PTY. LTD., Hotel Supply Specialists, 131 Queen's Bridge Street, Melbourne South Advertising (29 March 1933, ). The Argus (Melbourne, Vic. ), p. 7. http://nla.gov.au/nla.news-article4726734Historic - Victorian Railways - Refreashment Services crockery - plateceramic Victorian Railways Bread Plate - Black & White Victorian Railways ( in black on fount of plate ) "DURALINE" ( in Black on back of plate ) super Vitrified GRINDLEY HotelWare Co England Loftus Moran Pty Ld Melbourne 8 -53puffing billy, victorian railways, crockery, plate -
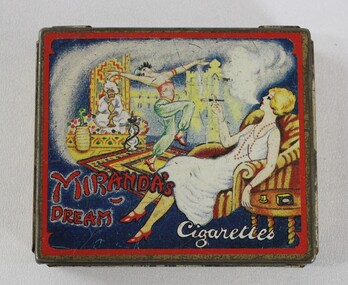 Wodonga & District Historical Society Inc
Functional object - Haeusler Collection Mid-Century 'Miranda's Dream Cigarettes' Tobacco Tin, Dodo Designs
The Wodonga Historical Society Haeusler Collection provides invaluable insight into life in late nineteenth and early twentieth century north east Victoria. The collection comprises manuscripts, personal artefacts used by the Haeusler family on their farm in Wodonga, and a set of glass negatives which offer a unique visual snapshot of the domestic and social lives of the Haeusler family and local Wodonga community. The Haeusler family migrated from Prussia (Germany) to South Australia in the 1840s and 1850s, before purchasing 100 acres of Crown Land made available under the Victorian Lands Act 1862 (also known as ‘Duffy’s Land Act’) in 1866 in what is now Wodonga West. The Haeusler family were one of several German families to migrate from South Australia to Wodonga in the 1860s. This tobacco tin is one of the many objects in the Haeusler Collection that provides insight into life in early to mid-twentieth century Wodonga, and Australia more broadly. Smoking in the first half of the twentieth century was incredibly common in Australia and other western countries. In 1945, more than three out of every four men and one in every four women were regular smokers. While rates of smoking decreased over the next two decades due to observations and research regarding the links between smoking and illness, an increase in tobacco use was documented after the advent of television as people were bombarded with advertisements for cigarettes. These advertisements, much like the image on the Haeusler Collection 'Miranda's Dream Cigarettes' Tobacco Tin, depicted smoking as sophisticated and glamorous, distracting consumers from the serious health risks associated with smoking. Orientalist depictions of Middle East were common in tobacco advertising in the West in the first half of the twentieth century, an attempt to associate cigarettes with the supposed sensuality and mystery of the Orient. There have been significant changes in both legislation and popular perceptions of smoking in Australian society since the manufacture and consumption of 'Miranda's Dream Cigarettes'. In 1992 the Tobacco Advertising Prohibition Act was introduced, making it illegal in Australia to publish or broadcast messages that encourage people to start or continue smoking. In 2011 the Australian government also introduced plain packaging laws to reduce the appeal and promotion of tobacco products, and make health warnings more effective. This item has well documented provenance and a known owner. It forms part of a significant and representative historical collection which reflects the local history of Wodonga. It contributes to our understanding of domestic and family life in early twentieth century Wodonga, as well as providing interpretative capacity for themes including local history and social history. A tobacco tin with a coloured illustration of a woman in stylish 1920s-1930s dress sitting in an armchair smoking a cigarette, while watching an Orientalist scene featuring a belly dancer and a snake charmer wearing a turban. Branding on the lid of tin: "Miranda's Dream Cigarettes"cigarettes, tobacco, smoking, cigarette tin, haeusler, haeusler collection, wodonga -
 Eltham District Historical Society Inc
Photograph, Peter Pidgeon, Grave of Charlotte Amelia Taylor, Lillian Jane Taylor and Robert David Taylor, Eltham Cemetery, 5 April 2021
Robert David Taylor was a farmer who lived in Eltham all his life and died in 1934 at the age of 76. Mr and Mrs Bowman lived in York Street; Taylor was their neighbour. In 1933 he subdivided his land, the plan showing a proposed Grey Street flanked by residential blocks for sale. Mrs Bowman bought one: her family would be able to walk through it and along Grey Street to Henry Street, thus providing quicker access to the railway station. But Taylor retained ownership of Grey Street itself. He fenced it off at each end and charged the Bowmans with trespass when they used it. The matter went to Court. The ruling was that Mrs Bowman could use Grey Street, as she owned land in it, but her husband could not. (Taylor also accused the Bowmans of having broken the fences, but could not prove it.) Taylor had wanted to subdivide his land in 1914. Plans were submitted to Council and were approved, but the subdivision did not proceed. In 1919, Taylor doctored the plans to make it appear that a totally different subdivisional arrangement had been approved. The Titles Office immediately detected fraud, and the Crown charged Taylor with forgery and counterfeiting. But charges were later dropped (reason not recorded). He was an Eltham Shire Councillor between 1911 and 1920. In 1920, Council charged him with illegally felling 91 eucalyptus trees in Eltham Park (60% of them in a healthy condition), presumably to be sold as firewood. He was imprisoned pending trial. Taylor claimed that he had acquired from another man the right to remove timber and sued the Council for wrongful prosecution. The case eventually went to the State Full Court, with judgement given in favour of Council, on the grounds that any right acquired by Taylor covered only the removal of logs and refuse, not sound green timber. And his position as Councillor precluded him from acquiring the right anyway. Robert David Taylor was also a Trustee of the Wesleyan Church owned land at Lot 20 Henry Street, originally purchased in January 1855 for a chapel and from which David and Catherine Clark first ran their private school, the forerunner of the Eltham Primary School. The land was sold in November 1901 to the Hope of Eltham Tent No. 195 Victoria District Independent Order of Rechabites, for which his brother William John Taylor was a Trustee and became the home of the Eltham Rechabite Hall. In December 1921 it was again sold, this time to the community for use as the Eltham Public Hall, Robert David Taylor being a member of the Committee.Born Digitaleltham cemetery, gravestones, charlotte amelia taylor, eltham district historical society, heritage excursion, lillian jane taylor, richard pinn, robert david taylor -
 Eltham District Historical Society Inc
Document - Property Binder, 672 Main Road, Eltham
Flyer, Neville Emerson Pty Ltd, for sale Wingrove Cottage. Shire of Eltham Heritage Study, nd but post 1989: Wingrove Cottage. Note: June 1997 re Judy David, descendant of Mr Wingrove. Note: 2 September 2003: Greg Johnson description of building. Statement 2 September 2003 from Francis Percival (Jock) Read of memories of Wingrove Cottage. Copy letter 21 October 2002 from Value Creating Environments (recent purchasers of Wingrove site) to John Karageorge Planning and Building Services Nillumbik Shire re planned work; also attachment re possible site development. Newspaper article: Diamond Valley Leader, 23 October 2002, Angry crowd stops demolition, photograph of part demolition. Letter 30 December 2002 from Stephen Coleriro Acting Manager Planning and Building Services Nillumbik Shire re consultation on illegal demolition works at Wingrove Cottage. Letter 24 February 2003 from Allom Lovell & Associates to John Karageorge Shire of Nillumbik commenting on Wingrove Cottage work. Newspaper article: Diamond Valley Leader, 17 September 2003, Court orders restoration at cottage. Newspaper article: Diamond Valley Leader, 25 February 2004, Health vision for Eltham's 1800s home, Wingrove Cottage will be restored as health and wellness centre if plans approved. Newspaper article: Diamond Valley Leader, 7 July 2004, 1850s bricks in debris, Jim Cummane owner ordered to prepare conservation plan, photograph of site and Harry Gilham president Eltham District Historical Society. Newspaper article: Diamond Valley Leader, 1 December 2004, Cottage heritage plan crucial to sale success, site to be sold, photograph of Wingrove Cottage. Letter 14 April 2005 from Gaye Van Donkelaar Planning and Building Services Nillumbik Shire to Russell Yeoman Eltham District Historical Society re meeting of key stakeholders 27 April 2005. Newspaper article: Diamond Valley Leader, 28 March 2007, Cottage work on hold, recent purchasers Cameron Construction restored Cottage, open as photographic studio, applied for permit to build office and 7 homes on site. Letter 13 August 2007 from Senior Registrar VCAt to Eltham District Historical Society enclosing VCAT order re application for 672 Main Road. Letter 24 August 2007 from Colin Bowden Planning and Development Consultants to VCAT enclosing response prepared by O'Brien Traffic for VCAT. Letter 14 February 2007 from Jeremy Livingstone Planning and Building Services Nillumbik Shire, invitation to review re planning application.main road, eltham, property, houses, wingrove cottage -
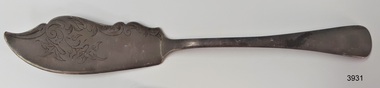 Flagstaff Hill Maritime Museum and Village
Domestic object - Butter Knife, Barker Brothers, Ca. 1885-1895
This butter or cheese knife is a decorative example of electroplated cutlery that had become an affordable alternative to more expensive silver cutlery in the late 1800s to early 1900s. The knife has stamp marks in the back of its handle that are a combination of letters and symbols used by British silversmiths to identify their workmanship. The design and type of this knife was not normally used by everyday people but rather those of a higher social class with time and money to have a particular decorative knife to serve butter or cheese. The marks on the handle tell that it was made of nickel silver, and electroplated with superior quality Stirling silver. The Barker Brothers of Birmingham made the knife between 1885 and 1907, but most likely before 1895. It was made for the British, or British colonial, people, connected with a government department such as the navy or defence. This story may be slightly inaccurate, as some silversmiths added extra ‘pseudo marks’ to their wares to disguise the quality. THE MARKS and their meaning – - ‘A1’ The silver used in electroplating this knife was the highest level, ‘superior quality’, measured in grams of silver per table spoon or table fork, with ‘A1’ being 2 2/3 grams, and ‘D’ being 0 1/2 grams of silver. - ‘BB’ The Baker Brothers used these initials from 1885 to 1907. - ‘[crown symbol]’ – This symbol is used for Sterling silver but this knife is a metal alloy. The crown is also the town mark of Sheffield (appointed by the Sheffield Assay Office) but this knife was made in Birmingham, which has the town mark of an anchor. The Barker Brothers may have added the crown mark to this electroplated silverware as a ‘pseudo hallmark’, leading the buyer to think that it was actual Sterling silver. The use of pseudo hallmarks by electroplaters of the Victorian era was common practice but it was illegal. In 1895 the unlawful practice was seen as imitating the Sheffield Silver Mark and the law was firmly applied to eradicate the deception, so items with this mark probably date before 1895. - [EPNS] Electro Plated Nickel Silver, called nickel silver or German silver, is a metal alloy that usually combines copper, nickel and zinc (60 percent copper, 20 percent nickel, 20 percent zinc). It has a silver-white appearance and is sometimes referred to as ‘white ware’. It does not contain any silver but is often used as a base for electroplating, when the item is covered with a thin layer of silver to give it the polished appearance of pure silver. It became popular in the late 19th and early 20th century as an affordable substitute for sterling silver. - Broad Arrow - an official stamp that indicates it was once the property of Britain government, either in Britain or one of its colonies, and used in the defence force. In Great Britain, from an 1875 government act, it was, and still, is a crime to forge or wrongfully use, the broad arrow symbol. The BARKER BROTHERS of Birmingham - Barker Brothers were one of the earlies firms of Birmingham silversmiths, established in 1801 by Mary Barker. They became Barker & Creed, then William and Matthias Barker, then from 1885 they were the Barker Brothers. They were operating in Paradise Street in 1871 until in 1903 they moved to Unity Works, Constitution Hill, in Birmingham. The firm also had a showroom at 292 High Holborn, London, from the early 1900s to the 1980s. In 1907 the firm became Barker Brothers Silversmiths Ltd, then in the 1960s they merged with Ellis & Co, becoming Barker Ellis Silver Co. Ltd. In 1979 they were registered in USA as Ellis & Co., Barker Ellis, and Ellis Barker. The business went into administration in 1992, after almost 200 years of production. The firm advertised as specialists in electroplating, and used the trademarks BRITANOID, UNITY PLATE and THE HYGENIA.This knife is historically significant, dated from 1885 to 1907 but most likely pre-1895, and made by the longstanding Birmingham silversmiths, the Barker Brothers, established in 1801. The knife is an example of decorative flatware used by people of ’class’. It also has the broad arrow stamp, connecting it to the British government, in particular the ordinance department. The stamp also connects it to other items in our collection with that stamp. It may have been connected to pre-Federation government organisations and officials such as the army Garrison, government naval vessel, police, lighthouse keepers, harbour masters. The knife is the only example of its kind in our collection, being a decorative silver butter or cheese knife, made by the Barker Brothers of Birmingham. Butter knife, or cheese knife, electroplated nickel silver (EPNS). Upper blade edge has decorative shape and engraved motifs, lower blade edge is bevelled to a cutting edge, and narrow plain handle flares out to a wide, rounded end. Maker’s marks are stamped on the reverse. Made by Barker Brothers of Birmingham in the late-19th century. Stamps: “flagstaff hill, warrnambool, maritime village, maritime museum, flagstaff hill maritime museum & village, shipwreck coast, great ocean road, butter knife, cheese knife, electroplate, electro plate, nickel silver, nickel alloy, alloy composition, copper nickel zinc, german silver, epns, barker brothers, birmingham, london, silversmiths, victorian era, 19th century, a1, bb, crown inside square, broad arrow, flatware, tableware, cutlery, cutler, dining utensils, eating utensils, superior quality, pseudo hallmark, stirling silver, silver-white metal, mary barker, barker & creed, william barker, matthias barker, barker brothers silversmiths, barker ellis silver co, ellis & co, barker ellis, ellis barker, britanoid, unity plate, the hygenia, british, colonial, government use, defence department use, naval use, knife, serving knife -
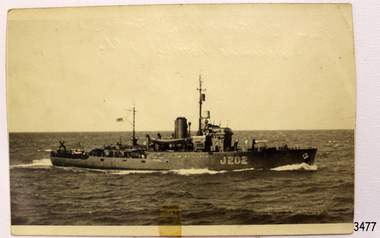 Flagstaff Hill Maritime Museum and Village
Photograph - Vessel, Steam Ship, H.M.A.S. Warrnambool J202, Between 1941-1947
This photograph is connected to the first HMAS Warrnambool (J202), which was one of 60 Bathurst class corvette vessels built during World War II by Mort's Dock & Engineering Co Ltd of Sydney under the commission of the Royal Australian Navy (RAN). It was the namesake of the City of Warrnambool in Victoria. The armed minesweeper was 57 metres long and could had a complement of 85 personnel. Its armament included 1 × 4 inch Mk XIX gun, 1 × 40 mm Bofors AA gun (installed later), 3 × 20 mm Oerlikon guns (1 later removed), machine guns and depth charge chutes and throwers. It was launched in Sydney in May, 1941. The HMAS Warrnambool began service with patrols off Bass Strait in 1941. In December the ship docked in Warrnambool Harbour and the crew marched in a parade along Timor Street. The ship’s crew received a donation of 110 books from the Warrnambool Patriotic Fund, and a plaque of the City of Warrnambool’s Coat of Arms presented by the Mayor, Cr. John R Astbury. In September 1942 a Dutch East Indies family, Samuel and Annie Jacob and seven of their eight children, was rescued by the HMAS Warrnambool and evacuated to Darwin. The family settled in Melbourne, then in 1944 Samuel tragically died. After the war ended the family was threatened with deportation under Australia’s Immigration Restriction Act 1901 (known also as the White Australia policy). Annie married her landlord, John O’Keefe but was still issued a deportation order in 1949. The family appealed to the High Court and the case became famous for being the first successful legal challenge to the Act. The HMAS Warrnambool was in Darwin during the time it was bombed, attacked by the Japanese while rescuing 73 crew from a merchant vessel that had also been attacked. The ship was involved in several other rescues and carried troops to New Guinea. Other events included escort and patrol duties on Australia's east coast, then at Fremantle and back to Darwin. When the Japanese surrendered on September 11, 1945, at the end of World War II, the ship was at Timor. It performed mine clearance work around the Solomon Islands and New Guinea after the war. On 13th September 1947 the ship was sent to lead a flotilla at the Great Barrier Reef, off the Queensland coast. The mission was to clear the defensive British mines that were laid during1941-43 to protect Australia’s boarders. The HMAS Warrnambool hit a mine near Cockburn Reef, exploded and sank shortly afterwards. One of the 70 or so men on board was killed at the time and thirty-two men were badly injured; three of these also lost their lives. The four deceased were Victorian seamen. The wounded men were transferred by boats to the nearby HMAS Swan II, where the Swan’s and the Warrnambool’s doctors cared for them. The HMAS Swan II took the survivors to Cairns, and from there the men were flown by RAAF to either Brisbane or Sydney hospitals. The HMAS Warrnambool was the only RAN ship to be sunk by a mine, and the four who lost their livers were the last naval casualties from World War II. The ship’s wartime service was recognised by three honours. In May 1948 a number of items were recovered by Navy divers from the wreck of HMAS Warrnambool. The items included the ship’s bell (inscribed HMAS Warrnambool 1941) and the round plaque with the Seal of the Warrnambool City Council. In 1949 the plaque was returned to the Council, and the bell was donated to the Australian War Memorial. Further objects were recovered by the new owners of the wreck, Southern Cross Diving and Salvage, in 1972-75. A memorial plaque, honouring the memories of all those who served on the HMAS Warrnambool until is sunk on September 13 1947, was erected in Warrnambool on September 13, 1995. NOTE: (1)- The second HMAS Warrnambool (FCPB204), also the namesake of the City of Warrnambool, was built in 1980 in Cairns, one of fifteen Fremantle Class Patrol Boats ordered by the RAN. It was just over 41 metres long with a compliment of 22 personnel. It patrolled Australia’s northern waters for illegal fishing vessels. This vessel was decommissioned in 2005. (2)- There was also a steam and sail ship named the S.S. Warrnambool, built in 1892 in London and broken up in 1926.This photograph is significant for its association with Royal Australian Navy and its vessel, HMAS Warrnambool (j202). The HMAS Warrnambool played a nationally significant role in overturning Australia’s Immigration Restriction Act 1901 (colloquially known as the White Australia policy). The ship rescued, and brought to Australia, Samuel and Annie Jacob and their family after they evacuated Dutch East India. The family was threatened with deportation and made the first successful appeal to High Court regarding that Act. The HMAS Warrnambool has - Local significance for being the namesake of the City of Warrnambool - Local significance, having docked in Warrnambool Harbour - Local significance, the crew having paraded in Timor Street, Warrnambool - State significance for its first patrol being in Bass Strait. - National significance, being present in Timor at the Japanese surrender - National significance as part of Australia’s defence force history, being one of only four Bathurst class corvettes lost while in Australian service, the only Bathurst class corvette lost after World War II, the only RAN vessel to be sunk by a mine, and associated with the last four Navy deaths of WWIIBlack and white photograph of vessel H.M.A.S. Warrnambool J202 on an open sea. The identifying number is painted on the hull. The ship is flying a white ensign. A lifeboat is suspended near the centre of the ship. Figures can be seen on deck. Hand written inscription on the reverse side. On ship's hull "J202" On reverse of photo "From P.O. FRED MATTHEWS. 23378. R.A.N." "MARIBYRNONG MAIDSTON RSL" "H.M.A.S. WARRNAMBOOL"flagstaff hill, warrnambool, shipwrecked-coast, flagstaff-hill, flagstaff-hill-maritime-museum, maritime-museum, shipwreck-coast, flagstaff-hill-maritime-village, photograph, h.m.a.s. warrnambool, maritime village, maritime museum, shipwreck coast, mort's dock & engineering co ltd, hmas warrnambool, hmas warrnambool i, hmas warrnambool j202, hmas swan ii, j202, world war ii, bathurst class corvette, royal australian navy, ran, sydney built ship, bass strait patrol, sea mine patrol, mine sweeper, mine clearance, navy divers, great barrier reef, cockburn reef, southern cross diving and salvage, warrnambool city council, cr j r astbury, mayor j r astbury, warrnambool patriotic fund, seal, coat of arms, ship’s bell, hmas warrnambool 1941, shipwreck by sea mine 1947, sea rescue, life saving, lifesaving, sinking ship, sunk ship, immigration restrictions act 1901, white australia policy, samuel and annie jacob, john o'keere, minesweeper -
 Flagstaff Hill Maritime Museum and Village
Photograph
HISTORY OF THE LOCH ARD The LOCH ARD belonged to the famous Loch Line which sailed many ships from England to Australia. Built in Glasgow by Barclay, Curdle and Co. in 1873, the LOCH ARD was a three-masted square rigged iron sailing ship. The ship measured 262ft 7" (79.87m) in length, 38ft (11.58m) in width, 23ft (7m) in depth and had a gross tonnage of 1693 tons. The LOCH ARD's main mast measured a massive 150ft (45.7m) in height. LOCH ARD made three trips to Australia and one trip to Calcutta before its final voyage. LOCH ARD left England on March 2, 1878, under the command of Captain Gibbs, a newly married, 29 year old. She was bound for Melbourne with a crew of 37, plus 17 passengers and a load of cargo. The general cargo reflected the affluence of Melbourne at the time. On board were straw hats, umbrella, perfumes, clay pipes, pianos, clocks, confectionary, linen and candles, as well as a heavier load of railway irons, cement, lead and copper. There were items included that intended for display in the Melbourne International Exhibition in 1880. The voyage to Port Phillip was long but uneventful. At 3am on June 1, 1878, Captain Gibbs was expecting to see land and the passengers were becoming excited as they prepared to view their new homeland in the early morning. But LOCH ARD was running into a fog which greatly reduced visibility. Captain Gibbs was becoming anxious as there was no sign of land or the Cape Otway lighthouse. At 4am the fog lifted. A man aloft announced that he could see breakers. The sheer cliffs of Victoria's west coast came into view, and Captain Gibbs realised that the ship was much closer to them than expected. He ordered as much sail to be set as time would permit and then attempted to steer the vessel out to sea. On coming head on into the wind, the ship lost momentum, the sails fell limp and LOCH ARD's bow swung back. Gibbs then ordered the anchors to be released in an attempt to hold its position. The anchors sank some 50 fathoms - but did not hold. By this time LOCH ARD was among the breakers and the tall cliffs of Mutton Bird Island rose behind the ship. Just half a mile from the coast, the ship's bow was suddenly pulled around by the anchor. The captain tried to tack out to sea, but the ship struck a reef at the base of Mutton Bird Island, near Port Campbell. Waves broke over the ship and the top deck was loosened from the hull. The masts and rigging came crashing down knocking passengers and crew overboard. When a lifeboat was finally launched, it crashed into the side of LOCH ARD and capsized. Tom Pearce, who had launched the boat, managed to cling to its overturned hull and shelter beneath it. He drifted out to sea and then on the flood tide came into what is now known as LOCH ARD Gorge. He swam to shore, bruised and dazed, and found a cave in which to shelter. Some of the crew stayed below deck to shelter from the falling rigging but drowned when the ship slipped off the reef into deeper water. Eva Carmichael had raced onto deck to find out what was happening only to be confronted by towering cliffs looming above the stricken ship. In all the chaos, Captain Gibbs grabbed Eva and said, "If you are saved Eva, let my dear wife know that I died like a sailor". That was the last Eva Carmichael saw of the captain. She was swept off the ship by a huge wave. Eva saw Tom Pearce on a small rocky beach and yelled to attract his attention. He dived in and swam to the exhausted woman and dragged her to shore. He took her to the cave and broke open case of brandy which had washed up on the beach. He opened a bottle to revive the unconscious woman. A few hours later Tom scaled a cliff in search of help. He followed hoof prints and came by chance upon two men from nearby Glenample Station three and a half miles away. In a state of exhaustion, he told the men of the tragedy. Tom returned to the gorge while the two men rode back to the station to get help. By the time they reached LOCH ARD Gorge, it was cold and dark. The two shipwreck survivors were taken to Glenample Station to recover. Eva stayed at the station for six weeks before returning to Ireland, this time by steamship. In Melbourne, Tom Pearce received a hero's welcome. He was presented with the first gold medal of the Royal Humane Society of Victoria and a £1000 cheque from the Victorian Government. Concerts were performed to honour the young man's bravery and to raise money for those who lost family in the LOCH ARD disaster. Of the 54 crew members and passengers on board, only two survived: the apprentice, Tom Pearce and the young woman passenger, Eva Carmichael, who lost all of her family in the tragedy. Ten days after the LOCH ARD tragedy, salvage rights to the wreck were sold at auction for £2,120. Cargo valued at £3,000 was salvaged and placed on the beach, but most washed back into the sea when another storm developed. The wreck of LOCH ARD still lies at the base of Mutton Bird Island. Much of the cargo has now been salvaged and some was washed up into what is now known as LOCH ARD Gorge. Cargo and artefacts have also been illegally salvaged over many years before protective legislation was introduced. One of the most unlikely pieces of cargo to have survived the shipwreck was a Minton porcelain peacock - one of only nine in the world. The peacock was destined for the Melbourne International Exhibition in 1880. It had been well packed, which gave it adequate protection during the violent storm. Today, the Minton peacock can be seen at the Flagstaff Hill Maritime Museum in Warrnambool. From Australia's most dramatic shipwreck it has now become Australia's most valuable shipwreck artefact and is one of very few 'objects' on the Victorian State Heritage Register. Flagstaff Hill’s collection of artefacts from LOCH ARD is significant for being one of the largest collections of artefacts from this shipwreck in Victoria. It is significant for its association with the shipwreck, which is on the Victorian Heritage Register (VHR S417). The collection is significant because of the relationship between the objects, as together they have a high potential to interpret the story of the LOCH ARD. The LOCH ARD collection is archaeologically significant as the remains of a large international passenger and cargo ship. The LOCH ARD collection is historically significant for representing aspects of Victoria’s shipping history and its potential to interpret sub-theme 1.5 of Victoria’s Framework of Historical Themes (living with natural processes). The collection is also historically significant for its association with the LOCH ARD, which was one of the worst and best known shipwrecks in Victoria’s history. Photograph of Loch Ard Gorge. Photograph taken some distance from the Gorge. Three men in the Gorge and outlines of steps can be seen. Right hand side of the photograph is written "Loch Ard Gorge"flagstaff hill, warrnambool, shipwrecked coast, flagstaff hill maritime museum, maritime museum, shipwreck coast, flagstaff hill maritime village, great ocean road, loch line, loch ard, captain gibbs, eva carmichael, tom pearce, glenample station, mutton bird island, loch ard gorge, photograph of loch ard gorge, photograph -
 Flagstaff Hill Maritime Museum and Village
Painting
HISTORY OF THE LOCH ARD The LOCH ARD belonged to the famous Loch Line which sailed many ships from England to Australia. Built in Glasgow by Barclay, Curdle and Co. in 1873, the LOCH ARD was a three-masted square rigged iron sailing ship. The ship measured 262ft 7" (79.87m) in length, 38ft (11.58m) in width, 23ft (7m) in depth and had a gross tonnage of 1693 tons. The LOCH ARD's main mast measured a massive 150ft (45.7m) in height. LOCH ARD made three trips to Australia and one trip to Calcutta before its final voyage. LOCH ARD left England on March 2, 1878, under the command of Captain Gibbs, a newly married, 29 year old. She was bound for Melbourne with a crew of 37, plus 17 passengers and a load of cargo. The general cargo reflected the affluence of Melbourne at the time. On board were straw hats, umbrella, perfumes, clay pipes, pianos, clocks, confectionary, linen and candles, as well as a heavier load of railway irons, cement, lead and copper. There were items included that intended for display in the Melbourne International Exhibition in 1880. The voyage to Port Phillip was long but uneventful. At 3am on June 1, 1878, Captain Gibbs was expecting to see land and the passengers were becoming excited as they prepared to view their new homeland in the early morning. But LOCH ARD was running into a fog which greatly reduced visibility. Captain Gibbs was becoming anxious as there was no sign of land or the Cape Otway lighthouse. At 4am the fog lifted. A man aloft announced that he could see breakers. The sheer cliffs of Victoria's west coast came into view, and Captain Gibbs realised that the ship was much closer to them than expected. He ordered as much sail to be set as time would permit and then attempted to steer the vessel out to sea. On coming head on into the wind, the ship lost momentum, the sails fell limp and LOCH ARD's bow swung back. Gibbs then ordered the anchors to be released in an attempt to hold its position. The anchors sank some 50 fathoms - but did not hold. By this time LOCH ARD was among the breakers and the tall cliffs of Mutton Bird Island rose behind the ship. Just half a mile from the coast, the ship's bow was suddenly pulled around by the anchor. The captain tried to tack out to sea, but the ship struck a reef at the base of Mutton Bird Island, near Port Campbell. Waves broke over the ship and the top deck was loosened from the hull. The masts and rigging came crashing down knocking passengers and crew overboard. When a lifeboat was finally launched, it crashed into the side of LOCH ARD and capsized. Tom Pearce, who had launched the boat, managed to cling to its overturned hull and shelter beneath it. He drifted out to sea and then on the flood tide came into what is now known as LOCH ARD Gorge. He swam to shore, bruised and dazed, and found a cave in which to shelter. Some of the crew stayed below deck to shelter from the falling rigging but drowned when the ship slipped off the reef into deeper water. Eva Carmichael had raced onto deck to find out what was happening only to be confronted by towering cliffs looming above the stricken ship. In all the chaos, Captain Gibbs grabbed Eva and said, "If you are saved Eva, let my dear wife know that I died like a sailor". That was the last Eva Carmichael saw of the captain. She was swept off the ship by a huge wave. Eva saw Tom Pearce on a small rocky beach and yelled to attract his attention. He dived in and swam to the exhausted woman and dragged her to shore. He took her to the cave and broke open case of brandy which had washed up on the beach. He opened a bottle to revive the unconscious woman. A few hours later Tom scaled a cliff in search of help. He followed hoof prints and came by chance upon two men from nearby Glenample Station three and a half miles away. In a state of exhaustion, he told the men of the tragedy. Tom returned to the gorge while the two men rode back to the station to get help. By the time they reached LOCH ARD Gorge, it was cold and dark. The two shipwreck survivors were taken to Glenample Station to recover. Eva stayed at the station for six weeks before returning to Ireland, this time by steamship. In Melbourne, Tom Pearce received a hero's welcome. He was presented with the first gold medal of the Royal Humane Society of Victoria and a £1000 cheque from the Victorian Government. Concerts were performed to honour the young man's bravery and to raise money for those who lost family in the LOCH ARD disaster. Of the 54 crew members and passengers on board, only two survived: the apprentice, Tom Pearce and the young woman passenger, Eva Carmichael, who lost all of her family in the tragedy. Ten days after the LOCH ARD tragedy, salvage rights to the wreck were sold at auction for £2,120. Cargo valued at £3,000 was salvaged and placed on the beach, but most washed back into the sea when another storm developed. The wreck of LOCH ARD still lies at the base of Mutton Bird Island. Much of the cargo has now been salvaged and some was washed up into what is now known as LOCH ARD Gorge. Cargo and artefacts have also been illegally salvaged over many years before protective legislation was introduced. One of the most unlikely pieces of cargo to have survived the shipwreck was a Minton porcelain peacock - one of only nine in the world. The peacock was destined for the Melbourne International Exhibition in 1880. It had been well packed, which gave it adequate protection during the violent storm. Today, the Minton peacock can be seen at the Flagstaff Hill Maritime Museum in Warrnambool. From Australia's most dramatic shipwreck it has now become Australia's most valuable shipwreck artefact and is one of very few 'objects' on the Victorian State Heritage Register. Flagstaff Hill’s collection of artefacts from LOCH ARD is significant for being one of the largest collections of artefacts from this shipwreck in Victoria. It is significant for its association with the shipwreck, which is on the Victorian Heritage Register (VHR S417). The collection is significant because of the relationship between the objects, as together they have a high potential to interpret the story of the LOCH ARD. The LOCH ARD collection is archaeologically significant as the remains of a large international passenger and cargo ship. The LOCH ARD collection is historically significant for representing aspects of Victoria’s shipping history and its potential to interpret sub-theme 1.5 of Victoria’s Framework of Historical Themes (living with natural processes). The collection is also historically significant for its association with the LOCH ARD, which was one of the worst and best known shipwrecks in Victoria’s history. Painting of The Loch Ard oil on board depicting wreck. It shows stormy sea and coastline in background. Ship appears to be capsized.flagstaff hill, warrnambool, shipwrecked coast, flagstaff hill maritime museum, maritime museum, shipwreck coast, flagstaff hill maritime village, great ocean road, loch line, loch ard, captain gibbs, eva carmichael, tom pearce, glenample station, mutton bird island, loch ard gorge, painting -
 Flagstaff Hill Maritime Museum and Village
Photograph
HISTORY OF THE LOCH ARD The LOCH ARD belonged to the famous Loch Line which sailed many ships from England to Australia. Built in Glasgow by Barclay, Curdle and Co. in 1873, the LOCH ARD was a three-masted square rigged iron sailing ship. The ship measured 262ft 7" (79.87m) in length, 38ft (11.58m) in width, 23ft (7m) in depth and had a gross tonnage of 1693 tons. The LOCH ARD's main mast measured a massive 150ft (45.7m) in height. LOCH ARD made three trips to Australia and one trip to Calcutta before its final voyage. LOCH ARD left England on March 2, 1878, under the command of Captain Gibbs, a newly married, 29 year old. She was bound for Melbourne with a crew of 37, plus 17 passengers and a load of cargo. The general cargo reflected the affluence of Melbourne at the time. On board were straw hats, umbrella, perfumes, clay pipes, pianos, clocks, confectionary, linen and candles, as well as a heavier load of railway irons, cement, lead and copper. There were items included that intended for display in the Melbourne International Exhibition in 1880. The voyage to Port Phillip was long but uneventful. At 3am on June 1, 1878, Captain Gibbs was expecting to see land and the passengers were becoming excited as they prepared to view their new homeland in the early morning. But LOCH ARD was running into a fog which greatly reduced visibility. Captain Gibbs was becoming anxious as there was no sign of land or the Cape Otway lighthouse. At 4am the fog lifted. A man aloft announced that he could see breakers. The sheer cliffs of Victoria's west coast came into view, and Captain Gibbs realised that the ship was much closer to them than expected. He ordered as much sail to be set as time would permit and then attempted to steer the vessel out to sea. On coming head on into the wind, the ship lost momentum, the sails fell limp and LOCH ARD's bow swung back. Gibbs then ordered the anchors to be released in an attempt to hold its position. The anchors sank some 50 fathoms - but did not hold. By this time LOCH ARD was among the breakers and the tall cliffs of Mutton Bird Island rose behind the ship. Just half a mile from the coast, the ship's bow was suddenly pulled around by the anchor. The captain tried to tack out to sea, but the ship struck a reef at the base of Mutton Bird Island, near Port Campbell. Waves broke over the ship and the top deck was loosened from the hull. The masts and rigging came crashing down knocking passengers and crew overboard. When a lifeboat was finally launched, it crashed into the side of LOCH ARD and capsized. Tom Pearce, who had launched the boat, managed to cling to its overturned hull and shelter beneath it. He drifted out to sea and then on the flood tide came into what is now known as LOCH ARD Gorge. He swam to shore, bruised and dazed, and found a cave in which to shelter. Some of the crew stayed below deck to shelter from the falling rigging but drowned when the ship slipped off the reef into deeper water. Eva Carmichael had raced onto deck to find out what was happening only to be confronted by towering cliffs looming above the stricken ship. In all the chaos, Captain Gibbs grabbed Eva and said, "If you are saved Eva, let my dear wife know that I died like a sailor". That was the last Eva Carmichael saw of the captain. She was swept off the ship by a huge wave. Eva saw Tom Pearce on a small rocky beach and yelled to attract his attention. He dived in and swam to the exhausted woman and dragged her to shore. He took her to the cave and broke open case of brandy which had washed up on the beach. He opened a bottle to revive the unconscious woman. A few hours later Tom scaled a cliff in search of help. He followed hoof prints and came by chance upon two men from nearby Glenample Station three and a half miles away. In a state of exhaustion, he told the men of the tragedy. Tom returned to the gorge while the two men rode back to the station to get help. By the time they reached LOCH ARD Gorge, it was cold and dark. The two shipwreck survivors were taken to Glenample Station to recover. Eva stayed at the station for six weeks before returning to Ireland, this time by steamship. In Melbourne, Tom Pearce received a hero's welcome. He was presented with the first gold medal of the Royal Humane Society of Victoria and a £1000 cheque from the Victorian Government. Concerts were performed to honour the young man's bravery and to raise money for those who lost family in the LOCH ARD disaster. Of the 54 crew members and passengers on board, only two survived: the apprentice, Tom Pearce and the young woman passenger, Eva Carmichael, who lost all of her family in the tragedy. Ten days after the LOCH ARD tragedy, salvage rights to the wreck were sold at auction for £2,120. Cargo valued at £3,000 was salvaged and placed on the beach, but most washed back into the sea when another storm developed. The wreck of LOCH ARD still lies at the base of Mutton Bird Island. Much of the cargo has now been salvaged and some was washed up into what is now known as LOCH ARD Gorge. Cargo and artefacts have also been illegally salvaged over many years before protective legislation was introduced. One of the most unlikely pieces of cargo to have survived the shipwreck was a Minton porcelain peacock - one of only nine in the world. The peacock was destined for the Melbourne International Exhibition in 1880. It had been well packed, which gave it adequate protection during the violent storm. Today, the Minton peacock can be seen at the Flagstaff Hill Maritime Museum in Warrnambool. From Australia's most dramatic shipwreck it has now become Australia's most valuable shipwreck artefact and is one of very few 'objects' on the Victorian State Heritage Register. Flagstaff Hill’s collection of artefacts from LOCH ARD is significant for being one of the largest collections of artefacts from this shipwreck in Victoria. It is significant for its association with the shipwreck, which is on the Victorian Heritage Register (VHR S417). The collection is significant because of the relationship between the objects, as together they have a high potential to interpret the story of the LOCH ARD. The LOCH ARD collection is archaeologically significant as the remains of a large international passenger and cargo ship. The LOCH ARD collection is historically significant for representing aspects of Victoria’s shipping history and its potential to interpret sub-theme 1.5 of Victoria’s Framework of Historical Themes (living with natural processes). The collection is also historically significant for its association with the LOCH ARD, which was one of the worst and best known shipwrecks in Victoria’s history. Photograph of Loch Ard Gorge c1900flagstaff hill, warrnambool, shipwrecked coast, flagstaff hill maritime museum, maritime museum, shipwreck coast, flagstaff hill maritime village, great ocean road, loch line, loch ard, captain gibbs, eva carmichael, tom pearce, glenample station, mutton bird island, loch ard gorge, photograph of loch ard gorge, photograph -
 Flagstaff Hill Maritime Museum and Village
Calendar
HISTORY OF THE LOCH ARD The LOCH ARD belonged to the famous Loch Line which sailed many ships from England to Australia. Built in Glasgow by Barclay, Curdle and Co. in 1873, the LOCH ARD was a three-masted square rigged iron sailing ship. The ship measured 262ft 7" (79.87m) in length, 38ft (11.58m) in width, 23ft (7m) in depth and had a gross tonnage of 1693 tons. The LOCH ARD's main mast measured a massive 150ft (45.7m) in height. LOCH ARD made three trips to Australia and one trip to Calcutta before its final voyage. LOCH ARD left England on March 2, 1878, under the command of Captain Gibbs, a newly married, 29 year old. She was bound for Melbourne with a crew of 37, plus 17 passengers and a load of cargo. The general cargo reflected the affluence of Melbourne at the time. On board were straw hats, umbrella, perfumes, clay pipes, pianos, clocks, confectionary, linen and candles, as well as a heavier load of railway irons, cement, lead and copper. There were items included that intended for display in the Melbourne International Exhibition in 1880. The voyage to Port Phillip was long but uneventful. At 3am on June 1, 1878, Captain Gibbs was expecting to see land and the passengers were becoming excited as they prepared to view their new homeland in the early morning. But LOCH ARD was running into a fog which greatly reduced visibility. Captain Gibbs was becoming anxious as there was no sign of land or the Cape Otway lighthouse. At 4am the fog lifted. A man aloft announced that he could see breakers. The sheer cliffs of Victoria's west coast came into view, and Captain Gibbs realised that the ship was much closer to them than expected. He ordered as much sail to be set as time would permit and then attempted to steer the vessel out to sea. On coming head on into the wind, the ship lost momentum, the sails fell limp and LOCH ARD's bow swung back. Gibbs then ordered the anchors to be released in an attempt to hold its position. The anchors sank some 50 fathoms - but did not hold. By this time LOCH ARD was among the breakers and the tall cliffs of Mutton Bird Island rose behind the ship. Just half a mile from the coast, the ship's bow was suddenly pulled around by the anchor. The captain tried to tack out to sea, but the ship struck a reef at the base of Mutton Bird Island, near Port Campbell. Waves broke over the ship and the top deck was loosened from the hull. The masts and rigging came crashing down knocking passengers and crew overboard. When a lifeboat was finally launched, it crashed into the side of LOCH ARD and capsized. Tom Pearce, who had launched the boat, managed to cling to its overturned hull and shelter beneath it. He drifted out to sea and then on the flood tide came into what is now known as LOCH ARD Gorge. He swam to shore, bruised and dazed, and found a cave in which to shelter. Some of the crew stayed below deck to shelter from the falling rigging but drowned when the ship slipped off the reef into deeper water. Eva Carmichael had raced onto deck to find out what was happening only to be confronted by towering cliffs looming above the stricken ship. In all the chaos, Captain Gibbs grabbed Eva and said, "If you are saved Eva, let my dear wife know that I died like a sailor". That was the last Eva Carmichael saw of the captain. She was swept off the ship by a huge wave. Eva saw Tom Pearce on a small rocky beach and yelled to attract his attention. He dived in and swam to the exhausted woman and dragged her to shore. He took her to the cave and broke open case of brandy which had washed up on the beach. He opened a bottle to revive the unconscious woman. A few hours later Tom scaled a cliff in search of help. He followed hoof prints and came by chance upon two men from nearby Glenample Station three and a half miles away. In a state of exhaustion, he told the men of the tragedy. Tom returned to the gorge while the two men rode back to the station to get help. By the time they reached LOCH ARD Gorge, it was cold and dark. The two shipwreck survivors were taken to Glenample Station to recover. Eva stayed at the station for six weeks before returning to Ireland, this time by steamship. In Melbourne, Tom Pearce received a hero's welcome. He was presented with the first gold medal of the Royal Humane Society of Victoria and a £1000 cheque from the Victorian Government. Concerts were performed to honour the young man's bravery and to raise money for those who lost family in the LOCH ARD disaster. Of the 54 crew members and passengers on board, only two survived: the apprentice, Tom Pearce and the young woman passenger, Eva Carmichael, who lost all of her family in the tragedy. Ten days after the LOCH ARD tragedy, salvage rights to the wreck were sold at auction for £2,120. Cargo valued at £3,000 was salvaged and placed on the beach, but most washed back into the sea when another storm developed. The wreck of LOCH ARD still lies at the base of Mutton Bird Island. Much of the cargo has now been salvaged and some was washed up into what is now known as LOCH ARD Gorge. Cargo and artefacts have also been illegally salvaged over many years before protective legislation was introduced. One of the most unlikely pieces of cargo to have survived the shipwreck was a Minton porcelain peacock - one of only nine in the world. The peacock was destined for the Melbourne International Exhibition in 1880. It had been well packed, which gave it adequate protection during the violent storm. Today, the Minton peacock can be seen at the Flagstaff Hill Maritime Museum in Warrnambool. From Australia's most dramatic shipwreck it has now become Australia's most valuable shipwreck artefact and is one of very few 'objects' on the Victorian State Heritage Register. Flagstaff Hill’s collection of artefacts from LOCH ARD is significant for being one of the largest collections of artefacts from this shipwreck in Victoria. It is significant for its association with the shipwreck, which is on the Victorian Heritage Register (VHR S417). The collection is significant because of the relationship between the objects, as together they have a high potential to interpret the story of the LOCH ARD. The LOCH ARD collection is archaeologically significant as the remains of a large international passenger and cargo ship. The LOCH ARD collection is historically significant for representing aspects of Victoria’s shipping history and its potential to interpret sub-theme 1.5 of Victoria’s Framework of Historical Themes (living with natural processes). The collection is also historically significant for its association with the LOCH ARD, which was one of the worst and best known shipwrecks in Victoria’s history. Calendar printed by Terang Express for December 1923 with picture of Loch Ard Gorge and survivors of wreck and also story of the episode. Has some large tears in it.flagstaff hill, warrnambool, shipwrecked coast, flagstaff hill maritime museum, maritime museum, shipwreck coast, flagstaff hill maritime village, great ocean road, loch line, loch ard, captain gibbs, eva carmichael, tom pearce, glenample station, mutton bird island, loch ard gorge, calendar, terang express -
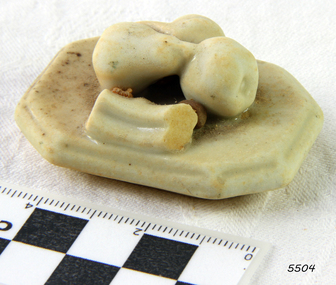 Flagstaff Hill Maritime Museum and Village
Lid
Ref: LA 2 29 274 HISTORY OF THE LOCH ARD The LOCH ARD belonged to the famous Loch Line which sailed many ships from England to Australia. Built in Glasgow by Barclay, Curdle and Co. in 1873, the LOCH ARD was a three-masted square rigged iron sailing ship. The ship measured 262ft 7" (79.87m) in length, 38ft (11.58m) in width, 23ft (7m) in depth and had a gross tonnage of 1693 tons. The LOCH ARD's main mast measured a massive 150ft (45.7m) in height. LOCH ARD made three trips to Australia and one trip to Calcutta before its final voyage. LOCH ARD left England on March 2, 1878, under the command of Captain Gibbs, a newly married, 29 year old. She was bound for Melbourne with a crew of 37, plus 17 passengers and a load of cargo. The general cargo reflected the affluence of Melbourne at the time. On board were straw hats, umbrella, perfumes, clay pipes, pianos, clocks, confectionary, linen and candles, as well as a heavier load of railway irons, cement, lead and copper. There were items included that intended for display in the Melbourne International Exhibition in 1880. The voyage to Port Phillip was long but uneventful. At 3am on June 1, 1878, Captain Gibbs was expecting to see land and the passengers were becoming excited as they prepared to view their new homeland in the early morning. But LOCH ARD was running into a fog which greatly reduced visibility. Captain Gibbs was becoming anxious as there was no sign of land or the Cape Otway lighthouse. At 4am the fog lifted. A man aloft announced that he could see breakers. The sheer cliffs of Victoria's west coast came into view, and Captain Gibbs realised that the ship was much closer to them than expected. He ordered as much sail to be set as time would permit and then attempted to steer the vessel out to sea. On coming head on into the wind, the ship lost momentum, the sails fell limp and LOCH ARD's bow swung back. Gibbs then ordered the anchors to be released in an attempt to hold its position. The anchors sank some 50 fathoms - but did not hold. By this time LOCH ARD was among the breakers and the tall cliffs of Mutton Bird Island rose behind the ship. Just half a mile from the coast, the ship's bow was suddenly pulled around by the anchor. The captain tried to tack out to sea, but the ship struck a reef at the base of Mutton Bird Island, near Port Campbell. Waves broke over the ship and the top deck was loosened from the hull. The masts and rigging came crashing down knocking passengers and crew overboard. When a lifeboat was finally launched, it crashed into the side of LOCH ARD and capsized. Tom Pearce, who had launched the boat, managed to cling to its overturned hull and shelter beneath it. He drifted out to sea and then on the flood tide came into what is now known as LOCH ARD Gorge. He swam to shore, bruised and dazed, and found a cave in which to shelter. Some of the crew stayed below deck to shelter from the falling rigging but drowned when the ship slipped off the reef into deeper water. Eva Carmichael had raced onto deck to find out what was happening only to be confronted by towering cliffs looming above the stricken ship. In all the chaos, Captain Gibbs grabbed Eva and said, "If you are saved Eva, let my dear wife know that I died like a sailor". That was the last Eva Carmichael saw of the captain. She was swept off the ship by a huge wave. Eva saw Tom Pearce on a small rocky beach and yelled to attract his attention. He dived in and swam to the exhausted woman and dragged her to shore. He took her to the cave and broke open case of brandy which had washed up on the beach. He opened a bottle to revive the unconscious woman. A few hours later Tom scaled a cliff in search of help. He followed hoof prints and came by chance upon two men from nearby Glenample Station three and a half miles away. In a state of exhaustion, he told the men of the tragedy. Tom returned to the gorge while the two men rode back to the station to get help. By the time they reached LOCH ARD Gorge, it was cold and dark. The two shipwreck survivors were taken to Glenample Station to recover. Eva stayed at the station for six weeks before returning to Ireland, this time by steamship. In Melbourne, Tom Pearce received a hero's welcome. He was presented with the first gold medal of the Royal Humane Society of Victoria and a £1000 cheque from the Victorian Government. Concerts were performed to honour the young man's bravery and to raise money for those who lost family in the LOCH ARD disaster. Of the 54 crew members and passengers on board, only two survived: the apprentice, Tom Pearce and the young woman passenger, Eva Carmichael, who lost all of her family in the tragedy. Ten days after the LOCH ARD tragedy, salvage rights to the wreck were sold at auction for £2,120. Cargo valued at £3,000 was salvaged and placed on the beach, but most washed back into the sea when another storm developed. The wreck of LOCH ARD still lies at the base of Mutton Bird Island. Much of the cargo has now been salvaged and some was washed up into what is now known as LOCH ARD Gorge. Cargo and artefacts have also been illegally salvaged over many years before protective legislation was introduced. One of the most unlikely pieces of cargo to have survived the shipwreck was a Minton porcelain peacock - one of only nine in the world. The peacock was destined for the Melbourne International Exhibition in 1880. It had been well packed, which gave it adequate protection during the violent storm. Today, the Minton peacock can be seen at the Flagstaff Hill Maritime Museum in Warrnambool. From Australia's most dramatic shipwreck it has now become Australia's most valuable shipwreck artefact and is one of very few 'objects' on the Victorian State Heritage Register. Flagstaff Hill’s collection of artefacts from LOCH ARD is significant for being one of the largest collections of artefacts from this shipwreck in Victoria. It is significant for its association with the shipwreck, which is on the Victorian Heritage Register (VHR S417). The collection is significant because of the relationship between the objects, as together they have a high potential to interpret the story of the LOCH ARD. The LOCH ARD collection is archaeologically significant as the remains of a large international passenger and cargo ship. The LOCH ARD collection is historically significant for representing aspects of Victoria’s shipping history and its potential to interpret sub-theme 1.5 of Victoria’s Framework of Historical Themes (living with natural processes). The collection is also historically significant for its association with the LOCH ARD, which was one of the worst and best known shipwrecks in Victoria’s history. Lid from child's tea set. Porcelain. Lid has small chip and some slight iron stains. Recovered from the wreck of the Loch Ard. Artefact reg No LA/16.flagstaff hill, warrnambool, shipwrecked-coast, flagstaff-hill, flagstaff-hill-maritime-museum, maritime-museum, shipwreck-coast, flagstaff-hill-maritime-village -
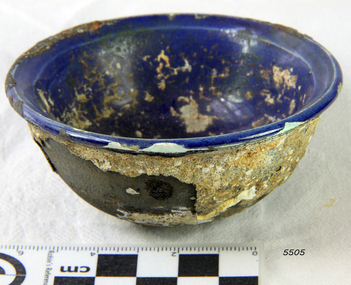 Flagstaff Hill Maritime Museum and Village
Deflector
HISTORY OF THE LOCH ARD The LOCH ARD belonged to the famous Loch Line which sailed many ships from England to Australia. Built in Glasgow by Barclay, Curdle and Co. in 1873, the LOCH ARD was a three-masted square rigged iron sailing ship. The ship measured 262ft 7" (79.87m) in length, 38ft (11.58m) in width, 23ft (7m) in depth and had a gross tonnage of 1693 tons. The LOCH ARD's main mast measured a massive 150ft (45.7m) in height. LOCH ARD made three trips to Australia and one trip to Calcutta before its final voyage. LOCH ARD left England on March 2, 1878, under the command of Captain Gibbs, a newly married, 29 year old. She was bound for Melbourne with a crew of 37, plus 17 passengers and a load of cargo. The general cargo reflected the affluence of Melbourne at the time. On board were straw hats, umbrella, perfumes, clay pipes, pianos, clocks, confectionary, linen and candles, as well as a heavier load of railway irons, cement, lead and copper. There were items included that intended for display in the Melbourne International Exhibition in 1880. The voyage to Port Phillip was long but uneventful. At 3am on June 1, 1878, Captain Gibbs was expecting to see land and the passengers were becoming excited as they prepared to view their new homeland in the early morning. But LOCH ARD was running into a fog which greatly reduced visibility. Captain Gibbs was becoming anxious as there was no sign of land or the Cape Otway lighthouse. At 4am the fog lifted. A man aloft announced that he could see breakers. The sheer cliffs of Victoria's west coast came into view, and Captain Gibbs realised that the ship was much closer to them than expected. He ordered as much sail to be set as time would permit and then attempted to steer the vessel out to sea. On coming head on into the wind, the ship lost momentum, the sails fell limp and LOCH ARD's bow swung back. Gibbs then ordered the anchors to be released in an attempt to hold its position. The anchors sank some 50 fathoms - but did not hold. By this time LOCH ARD was among the breakers and the tall cliffs of Mutton Bird Island rose behind the ship. Just half a mile from the coast, the ship's bow was suddenly pulled around by the anchor. The captain tried to tack out to sea, but the ship struck a reef at the base of Mutton Bird Island, near Port Campbell. Waves broke over the ship and the top deck was loosened from the hull. The masts and rigging came crashing down knocking passengers and crew overboard. When a lifeboat was finally launched, it crashed into the side of LOCH ARD and capsized. Tom Pearce, who had launched the boat, managed to cling to its overturned hull and shelter beneath it. He drifted out to sea and then on the flood tide came into what is now known as LOCH ARD Gorge. He swam to shore, bruised and dazed, and found a cave in which to shelter. Some of the crew stayed below deck to shelter from the falling rigging but drowned when the ship slipped off the reef into deeper water. Eva Carmichael had raced onto deck to find out what was happening only to be confronted by towering cliffs looming above the stricken ship. In all the chaos, Captain Gibbs grabbed Eva and said, "If you are saved Eva, let my dear wife know that I died like a sailor". That was the last Eva Carmichael saw of the captain. She was swept off the ship by a huge wave. Eva saw Tom Pearce on a small rocky beach and yelled to attract his attention. He dived in and swam to the exhausted woman and dragged her to shore. He took her to the cave and broke open case of brandy which had washed up on the beach. He opened a bottle to revive the unconscious woman. A few hours later Tom scaled a cliff in search of help. He followed hoof prints and came by chance upon two men from nearby Glenample Station three and a half miles away. In a state of exhaustion, he told the men of the tragedy. Tom returned to the gorge while the two men rode back to the station to get help. By the time they reached LOCH ARD Gorge, it was cold and dark. The two shipwreck survivors were taken to Glenample Station to recover. Eva stayed at the station for six weeks before returning to Ireland, this time by steamship. In Melbourne, Tom Pearce received a hero's welcome. He was presented with the first gold medal of the Royal Humane Society of Victoria and a £1000 cheque from the Victorian Government. Concerts were performed to honour the young man's bravery and to raise money for those who lost family in the LOCH ARD disaster. Of the 54 crew members and passengers on board, only two survived: the apprentice, Tom Pearce and the young woman passenger, Eva Carmichael, who lost all of her family in the tragedy. Ten days after the LOCH ARD tragedy, salvage rights to the wreck were sold at auction for £2,120. Cargo valued at £3,000 was salvaged and placed on the beach, but most washed back into the sea when another storm developed. The wreck of LOCH ARD still lies at the base of Mutton Bird Island. Much of the cargo has now been salvaged and some was washed up into what is now known as LOCH ARD Gorge. Cargo and artefacts have also been illegally salvaged over many years before protective legislation was introduced. One of the most unlikely pieces of cargo to have survived the shipwreck was a Minton porcelain peacock - one of only nine in the world. The peacock was destined for the Melbourne International Exhibition in 1880. It had been well packed, which gave it adequate protection during the violent storm. Today, the Minton peacock can be seen at the Flagstaff Hill Maritime Museum in Warrnambool. From Australia's most dramatic shipwreck it has now become Australia's most valuable shipwreck artefact and is one of very few 'objects' on the Victorian State Heritage Register. Flagstaff Hill’s collection of artefacts from LOCH ARD is significant for being one of the largest collections of artefacts from this shipwreck in Victoria. It is significant for its association with the shipwreck, which is on the Victorian Heritage Register (VHR S417). The collection is significant because of the relationship between the objects, as together they have a high potential to interpret the story of the LOCH ARD. The LOCH ARD collection is archaeologically significant as the remains of a large international passenger and cargo ship. The LOCH ARD collection is historically significant for representing aspects of Victoria’s shipping history and its potential to interpret sub-theme 1.5 of Victoria’s Framework of Historical Themes (living with natural processes). The collection is also historically significant for its association with the LOCH ARD, which was one of the worst and best known shipwrecks in Victoria’s history. Small Porcelain Heat Deflector from a kero lamp,deflector is blue inside. Outside has some encrustation. Artefact reg no LA/15. Recovered from the wreck of the Loch Ard.flagstaff hill, warrnambool, shipwrecked coast, flagstaff hill maritime museum, maritime museum, shipwreck coast, flagstaff hill maritime village, great ocean road, loch line, loch ard, captain gibbs, eva carmichael, tom pearce, glenample station, mutton bird island, loch ard gorge, porcelain heat deflector, heat deflector -
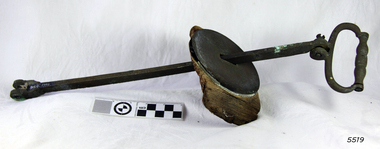 Flagstaff Hill Maritime Museum and Village
Pump
HISTORY OF THE LOCH ARD The LOCH ARD belonged to the famous Loch Line which sailed many ships from England to Australia. Built in Glasgow by Barclay, Curdle and Co. in 1873, the LOCH ARD was a three-masted square rigged iron sailing ship. The ship measured 262ft 7" (79.87m) in length, 38ft (11.58m) in width, 23ft (7m) in depth and had a gross tonnage of 1693 tons. The LOCH ARD's main mast measured a massive 150ft (45.7m) in height. LOCH ARD made three trips to Australia and one trip to Calcutta before its final voyage. LOCH ARD left England on March 2, 1878, under the command of Captain Gibbs, a newly married, 29 year old. She was bound for Melbourne with a crew of 37, plus 17 passengers and a load of cargo. The general cargo reflected the affluence of Melbourne at the time. On board were straw hats, umbrella, perfumes, clay pipes, pianos, clocks, confectionary, linen and candles, as well as a heavier load of railway irons, cement, lead and copper. There were items included that intended for display in the Melbourne International Exhibition in 1880. The voyage to Port Phillip was long but uneventful. At 3am on June 1, 1878, Captain Gibbs was expecting to see land and the passengers were becoming excited as they prepared to view their new homeland in the early morning. But LOCH ARD was running into a fog which greatly reduced visibility. Captain Gibbs was becoming anxious as there was no sign of land or the Cape Otway lighthouse. At 4am the fog lifted. A man aloft announced that he could see breakers. The sheer cliffs of Victoria's west coast came into view, and Captain Gibbs realised that the ship was much closer to them than expected. He ordered as much sail to be set as time would permit and then attempted to steer the vessel out to sea. On coming head on into the wind, the ship lost momentum, the sails fell limp and LOCH ARD's bow swung back. Gibbs then ordered the anchors to be released in an attempt to hold its position. The anchors sank some 50 fathoms - but did not hold. By this time LOCH ARD was among the breakers and the tall cliffs of Mutton Bird Island rose behind the ship. Just half a mile from the coast, the ship's bow was suddenly pulled around by the anchor. The captain tried to tack out to sea, but the ship struck a reef at the base of Mutton Bird Island, near Port Campbell. Waves broke over the ship and the top deck was loosened from the hull. The masts and rigging came crashing down knocking passengers and crew overboard. When a lifeboat was finally launched, it crashed into the side of LOCH ARD and capsized. Tom Pearce, who had launched the boat, managed to cling to its overturned hull and shelter beneath it. He drifted out to sea and then on the flood tide came into what is now known as LOCH ARD Gorge. He swam to shore, bruised and dazed, and found a cave in which to shelter. Some of the crew stayed below deck to shelter from the falling rigging but drowned when the ship slipped off the reef into deeper water. Eva Carmichael had raced onto deck to find out what was happening only to be confronted by towering cliffs looming above the stricken ship. In all the chaos, Captain Gibbs grabbed Eva and said, "If you are saved Eva, let my dear wife know that I died like a sailor". That was the last Eva Carmichael saw of the captain. She was swept off the ship by a huge wave. Eva saw Tom Pearce on a small rocky beach and yelled to attract his attention. He dived in and swam to the exhausted woman and dragged her to shore. He took her to the cave and broke open case of brandy which had washed up on the beach. He opened a bottle to revive the unconscious woman. A few hours later Tom scaled a cliff in search of help. He followed hoof prints and came by chance upon two men from nearby Glenample Station three and a half miles away. In a state of exhaustion, he told the men of the tragedy. Tom returned to the gorge while the two men rode back to the station to get help. By the time they reached LOCH ARD Gorge, it was cold and dark. The two shipwreck survivors were taken to Glenample Station to recover. Eva stayed at the station for six weeks before returning to Ireland, this time by steamship. In Melbourne, Tom Pearce received a hero's welcome. He was presented with the first gold medal of the Royal Humane Society of Victoria and a £1000 cheque from the Victorian Government. Concerts were performed to honour the young man's bravery and to raise money for those who lost family in the LOCH ARD disaster. Of the 54 crew members and passengers on board, only two survived: the apprentice, Tom Pearce and the young woman passenger, Eva Carmichael, who lost all of her family in the tragedy. Ten days after the LOCH ARD tragedy, salvage rights to the wreck were sold at auction for £2,120. Cargo valued at £3,000 was salvaged and placed on the beach, but most washed back into the sea when another storm developed. The wreck of LOCH ARD still lies at the base of Mutton Bird Island. Much of the cargo has now been salvaged and some was washed up into what is now known as LOCH ARD Gorge. Cargo and artefacts have also been illegally salvaged over many years before protective legislation was introduced. One of the most unlikely pieces of cargo to have survived the shipwreck was a Minton porcelain peacock - one of only nine in the world. The peacock was destined for the Melbourne International Exhibition in 1880. It had been well packed, which gave it adequate protection during the violent storm. Today, the Minton peacock can be seen at the Flagstaff Hill Maritime Museum in Warrnambool. From Australia's most dramatic shipwreck it has now become Australia's most valuable shipwreck artefact and is one of very few 'objects' on the Victorian State Heritage Register. Flagstaff Hill’s collection of artefacts from LOCH ARD is significant for being one of the largest collections of artefacts from this shipwreck in Victoria. It is significant for its association with the shipwreck, which is on the Victorian Heritage Register (VHR S417). The collection is significant because of the relationship between the objects, as together they have a high potential to interpret the story of the LOCH ARD. The LOCH ARD collection is archaeologically significant as the remains of a large international passenger and cargo ship. The LOCH ARD collection is historically significant for representing aspects of Victoria’s shipping history and its potential to interpret sub-theme 1.5 of Victoria’s Framework of Historical Themes (living with natural processes). The collection is also historically significant for its association with the LOCH ARD, which was one of the worst and best known shipwrecks in Victoria’s history. Part of a pump system. Has been attached to a piece of wood. Possibly a cistern plunger. From the Loch Ard.flagstaff hill, warrnambool, shipwrecked coast, flagstaff hill maritime museum, maritime museum, shipwreck coast, flagstaff hill maritime village, great ocean road, loch line, loch ard, captain gibbs, eva carmichael, tom pearce, glenample station, mutton bird island, loch ard gorge, pump system, pump