Showing 873 items
matching bogie
-
 Puffing Billy Railway
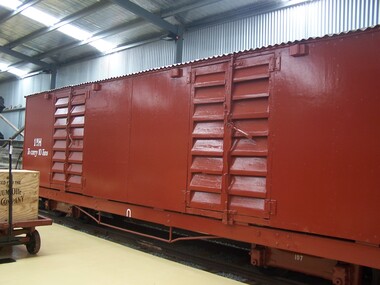
1 NH, Powder & General Goods Van, June 1910
V.R. Powder & General Goods Van NH1 Gauge 2'6" The NH Powder and Goods van was built in 1910. Its purpose was to carry explosives and general goods, Originally classed as NPH. There were two compartments: a 10ft 8¾ inch (3,270 mm) section for explosives and a 13 ft 7 in (4,140 mm) section for general goods. The sides, ends and doors were covered in sheet metal. With the closing of the mines at Walhalla the need to carry explosives ended and both compartments were used for general goods. The doors were replaced with NU type louvre doors for ventilation. NH1 Covered Truck Service History : NPH NPH 1 was built and issued to traffic June 1910. It was a bogie boxvan set up for general goods and the transportation of explosives. It could carry 6 tons of goods and 4 tons of explosives. No doubt the van was stationed on the Moe - Walhalla line. Walhalla was a gold mining town and the rail line had been built from Moe to provide a faster means of transportation than bullock teams from the sailing boats from Melbourne to Port Albert/Sale via Heyfield. In 1911 the van was converted to all goods transport and recoded to NH. NH The van was fitted with autocouplers in 1928. It was scrapped in 1954. By 1968, the vehicle body had been found and was placed into the Museum at Menzies Creek. Body donated to the Puffing Billy Preservation Society. Vehicle Length 25 feet 2 inches ( 7671 mm) Coupled Length 27 feet 4 inches (8330 mm) Width 6 feet 3 inches (1905 mm) Weight 7 tons Capacity 10 tons Built 1910 Number Built 1 In use - Static displayHistoric - Victorian Railways - narrow gauge rolling stock - Powder & General Goods Van Victorian Heritage Register (VHR) Number H2187 Puffing Billy Locomotives and Rolling Stock Collection1 NH - Powder & General Goods Van Made of Timber - wood, wrought iron and metal sheet There were two compartments: a 10ft 8¾ inch (3,270 mm) section for explosives and a 13 ft 7 in (4,140 mm) section for general goods. The sides, ends covered in sheet metal with NU type louvre doors for ventilation. NH1 To carry 10 tonspuffing billy, powder & general goods van nh1, nh1, powder & general goods van, victorian railways, narrow gauge rolling stock -
 8th/13th Victorian Mounted Rifles Regimental Collection
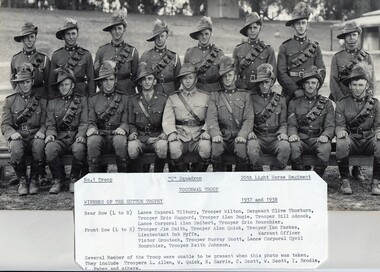
Photograph - Tocumwal Troop trophy winners
No 1 Troop C Squadron 20th Light Horse Regiment drawn from the farming community of Tocumwal, personified the strength of citizen soldiering in rural Victorian and Southern NSW in the period following World War One and especially in the years immediately prior to the second World War. Building on the strength and enthusiasm of the Tocumwal Troop other Troops were raised at Finley, Berigan and Jerilderie. The Tocumwal Troop won the coveted Hutton Trophy in 1937 and 1938, defeating crack Troops from other States. The 20th Light Horse (Victorian Mounted Rifles) was raised in 1920 as part of the 3rd Cavalry Brigade, 2nd Cavalry Division, Citizen Military Forces, with Headquarters at Seymour and depots along the Goulburn Valley from Mansfield to Tocumwal in southern NSW. In December 1941, 20th Light Horse (Victorian Mounted Rifles) converted from horse to mechanised, initially as 20th Motor Regiment. In 1943 the Regiment was deployed to Merauke, Dutch New Guinea. Upon its return in April 1945, the Regiment was redesignated 20th Pioneer Battalion. It was disbanded following the end of the war. 20th Light Horse was the only light horse regiment to serve overseas in WWII.This is one of a collection of photographs featuring a Light Horse regiment drawn from rural and regional Victoria in the period immediately prior to mobilisation for World War 2 (1939-1945).Black and white photograph of 17 men in Light Horse uniform posed in two ranks, being the winning Troop in the Hutton Trophy 1937 and 1938" No.1 Troop C Squadron, 20th Light Horse Regiment. Tocumwal Troop. Winner of the Hutton Trophy 1937 and 1938.Rear Row ( L to R ) Lance Corporal Tilbury, Trooper Wilton, Sergeant Clive Thorborn, Trooper Eric Huggard, Trooper Alan Bogie, Trooper Bill Adcock, Lance Corporal Alan Smibert, Trooper Eric Bourchier. Front Row ( L to R )Trooper Jim Smith, Trooper Alan Quick,Trooper Ian Parkes, Lieutenant Bob Fyffe, ( unknown ),Warrant Officer Victor Groutsch, Trooper Murray Scott, Lance Corporal Cyril Bourchier, Trooper Keith Johnson. Several members of the Troop were unable to be present when this photo was taken.They include Troopers L. Allen, W. Quick, N. Harris, C. Scott, W. Scott, I. Brodie, K. Farley and others. "hutton, trophy, tocumwal, 20th, light horse, militia -
 Ballarat Tramway Museum
Photograph - Black & White Photograph/s - set of 3, State Electricity Commission of Victoria (SECV), Sept. 1971?
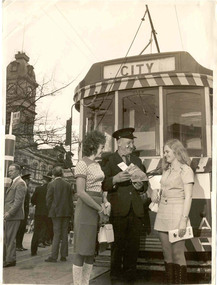
Set of three black and white photographs taken at the time of the launch of the four postcard set of the trams, shortly before closure. See also Reg. item 1699, SEC News - similar photo to that of 1863.2 used on the front cover of the Oct. 1971 issue, which detailed:- "SEC News", house magazine of the State Electricity Commission of Victoria, October 1971 issue, No. 150, following closure of the SEC Ballarat tramways. Has front cover photo of Lew Walker (Ballarat Motorman) receiving a kiss from Glenda Martin and Janice Greed (left), in front of a bogie tram with the town hall in the background. - see Reg Item 1699 and btm1699i1" 1863.1 - above details, with Lew holding the post card set. Note Mr. L. Denmead standing by the tram stop pole. 1863.2 - photo similar to that at 1699i1, but with Mr. Denmead approach crews on the left hand side. 1863.3 - above, but with Lew Walker standing in cab door and the two ladies, looking up at the driver. Has Post Office tower in background. Assumed photos taken by SEC Photographer. See Reg. item 1699trams, tramways, ballarat, postcards, sec news, closure -
 Ballarat Tramway Museum
Photograph - Black & White Photograph/s, The Courier Ballarat, mid to late 1970's
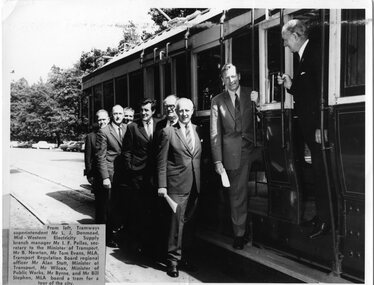
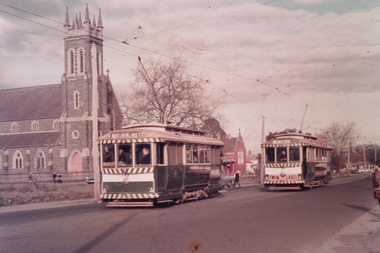
Black and white photograph of a Ministerial / government inspection party boarding a bogie tram at Gardens Loop. Attached to the bottom left hand corner of the photo is part of a cutting from the Courier, giving the name of the people boarding the tram. Photograph and cutting undated - possibly late 1960's. Attachment with a piece of 'sticky tape' On rear of photograph is a Ballarat Courier Copyright stamp. Name of people in photograph are given as: Tramways Superintendent - Mr. L. J. Denmead, Mid-Western Electricity Supply branch manager, Mr. I. F. Pellas, Secretary to the Minister of Transport, Mr. B. Newton Mr. Tom Evans MLA Transport Regulation Board, regional officer, Mr. Alan Stott Minister of Transport, Mr. Wilcox, Minster of Public Works, Mr Byrne Mr. Bill Stephen, MLA. Note: Murray Byrne was Minister of Public Works from June 1970 until August 1972. This would narrow down the photo to between June 1970 and September 1971 and probably in 1970. (Research note from Peter Winspur 14-12-2012). From the shadows etc, probably late 1970, very early 1971.On rear of photograph, in black ink is stamped "Ballarat Courier / Press Photograph / - copyright -"trams, tramways, closure, ballarat, gardens loop, ministerial visit, transport -
 Ballarat Tramway Museum
Photograph - Digital image Set of 20, 16/04/1972 12:00:00 AM
Set of 20 digital images of Bendigo Tramways, of the last running day of the Eaglehawk to Quarry Hill line 16 April 1972, .1 - No. 24 outbound to Eaglehawk .2 - No. 3? at Manchester Loop .3 - No. 24 outbound to Eaglehawk .4 - bogie tram crossing the rail over bridge from Eaglehawk .5 - No. 18 in View St .6 - No. 24 outbound to Eaglehawk .7 - No 18 at Eaglehawk with destination roll being changed, and shopping centre in the background. .8 - No. 24 crossing the railway overbridge, going to Eaglehawk .9 - No. 3 outbound to Eaglehawk .10 - No. 24 crossing the railway overbridge, going to Eaglehawk .11 - No. 3 and 24 crossing at Long Gully .12 - No. 18 at Eaglehawk with Leo A Hughes photographer building in the background and a CFA truck passing the tram. Tram SEC roof advertisement and a banner for "German -?- Circus" at Eaglehawk and dates. .13 - No. 3 inbound on the Eaglehawk line. .14 - No. 18 outbound to Eaglehawk .15 - ditto .16 - No. 18 at Eaglehawk terminus with the Mechanics Institute in the background. .17 - No. 24 at the Eaglehawk terminus .18 - No 24 at the intersection with Taylor St .19 - No. 24 at the Eaglehawk terminus .20 - dittotrams, tramways, bendigo, eaglehawk, long gully, manchester loop, tram 24, tram 18, tram 3 -
 Ballarat Tramway Museum
Slide - 35mm slide/s - set of 10, Campbell Duncan, Jan. 1971
Set of 10 Ferraniacolor slides - cardboard mounts taken on either 10/1/71 or 16/1/71. .1 - Birney No. 30, Golden Square line, inbound near Cathedral with car yard in background. .2 - ditto, with Cathedral gardens in background. .3 - single trucker, with two SEC roof adverts, entering Nolan St enroute to North Bendigo. Shows the driver sitting in a side on shot. A 4 square store in the background, with a fading advert for "Peeled Tomatoes". .4 - No. 6 turning from Nolan St into McCrae St with 4 square store in background. .5 - No. 26 at Quarry Hill with cemetery in background. .6 - No. 6 at the North Bendigo Terminus .7 - No. 26 outbound to Eaglehawk on the Railway Overbridge, Mt Korong Road. .8 - No. 17 (inbound to City and Quarry Hill) and another bogie crossing at a loop on the Eaglehawk line. Both trams have SEC roof adverts. The driver of the outbound car is boarding the tram. Based on .9, it is No. 3 at Long Gully. .9 - No. 3 waiting at Long Gully Loop . .10 - No. 26 at Quarry Hill terminus, with destination of Eaglehawk.In ink on slide: .1 - "1/2 mile out on Golden Square line - 10/1/71 (Sun)." .2 - "1/2 mile out on Golden Square line - 10/1/71" .3 - "Has just rounded curve near lake Weeroona on North Bendigo line - 10/1/71 (Sun)." .4 - "16/1/71" .5 - " 10/1/71 (Sun)." .6 - "North Bendigo terminus, 16/1/71 (Sat)" .7 - "10/1/71 (Sun) c 3pm" .8 - "Cross Eaglehawk line - 10/1/71 (Sun)." .9 - "Jackson St Loop on E'Hk line awaiting up - 10/1/71 " .10 - "Quarry Hill terminus Bendigo - - 10/1/71"tramways, trams, bendigo, golden square, high st, nolan st, north bendigo, quarry hill, long gully, railway bridge, tram 30, tram 6, tram 26, tram 17, tram 3 -
 Puffing Billy Railway
Victorian Railways 2'6" Transporter wagon 129Q, 1926
The Q class were introduced as bogie flatwagons in the 1870's. Large Q wagons as shown were built to the 1920's In the early 1900's, some Q wagons were modified for Pintsch Gas traffic with a small pump motor cabin at one end and a tank for carrying the gas. Other conversions for traffic were as required. Examples were: sheet glass, skeletal underframes between workshops In 1926 the railways built two narrow gauge Garratt locomotives. As normal wagons were unsuitable for moving these locomotives a special skeletal wagon was built. The engines were split into units for transportation. It featured axle bearings and boxes from steam engines, had hinged buffers that could drop out of the way during loading/unloading. It also featured 'strap' rail along the deck. The wagon was Q 129. This wagon was also available for general narrow gauge rolling stock. Q wagons were numbered from 1 to 136. Service History: *Q 129.VA - 1/ 6/1926 NWS Built new H/brake & drop buffers. For traffic of Narrow Guage stock 31/ 1/1931 NWS Into Workshops - 16/ 6/1931 NWS Out of Workshops (50 days) 6/11/1931 NWS Into Workshops - 27/11/1931 NWS Out of Workshops (22 days) 24/ 8/1936 NWS Into Workshops - 10/ 9/1936 NWS Out of Workshops (18 days) 27/11/1936 NWS Into Workshops - 26/ 2/1937 NWS Out of Workshops (Light repairs) circa 1960 - Photograph SL20 p32, loaded with 7NA / /1975 - Photograph #393 / /1976 - Photograph #553, #554 19/ 3/1979 - Condemned - 10/ 4/1979 - Off Register - 10/ 4/1979 - Sold (to) ETR, Belgrave / /1989 EME Body [GRE]. [SXC]: 29/3/92, MEL127E5, Puffing Billy at station Historic - Victorian Railways - Transporter wagon used to carry and transfer 2' 6" Narrow gauge rolling stock over Victorian broad gauge (1,600 mm (5 ft 3 in) main lines to the narrow gauge lines. Q 129 was unique, it was built to transport narrow gauge locomotives. Transporter Wagon made of Steel and wrought Iron129Q129q, puffing billy, transporter wagon -
 Ballarat Tramway Museum
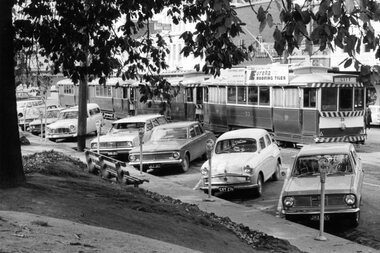
Photograph - Digital image Set of 8, George Coop, 1968 - 1970
Yields information about the City Loop area and its operation. Eight (8) Digital images taken by George Coop during the period 1968 - 1970, of trams at the City Loop. .1 - 33, 17 and two other single truckers parked in the loop with motor vehicles and parking meters. No. 33 has an Eureka Roofing Tile Advert. .2 - 28? passing two track workers cleaning the west end points with a bogie car and three single truckers in the loop. In the background are Patersons and Dickins Food Store. .3 - No. 12 parked at the east end of the loop, hard up against the tram in front. Shows the Section Insulator. .4 - As for .1, front on photo with the destination of City and a "Pay as You Enter". The Dickins sign can be seen. .5 - as for .2, No. 35 leads the queue. Has the Woolworths Big W store in the background. .6 - view from the rear (12, 30, 17) with No. 33 being driven out of the loop. .7 - View from the rear, 33 has moved out of view. Has the T&G (Temperance and General) building in the view. .8 - No. 31 moves over the points at the west end of the loop. The tram has the Destination of Gardens via Drummond North, a Twin Lakes advert and a SEC Electric Cooking Advert.trams, tramways, city loop, sturt st, trackwork, overhead, tram 33, tram 17, tram 26, tram 12, tram 35, tram 31 -
 Ballarat Tramway Museum
Photograph - Digital image Set of 16, George Coop, 1968 - 1970
Yields information about the Depot and how equipment was provided in the depot and some of the tramcars.Sixteen Digital images taken by George Coop during the period 1968 - 1970, of SEC trams at the Depot and workshops in Wendouree Parade. .1 - 36 in depot with chain block, chains, jacks and other equipment in the view. .2 - view of the inspection pit on 4 road with the large jack in the pit. .3 - 39 on "0" road - photo has been "framed" with a blue line. .4 - 26 in the paint and wood shop area of the workshops. .5 - 43 in the depot. .6 - 42 and the 1 road pit. .7 - ditto, with a window cleaner - photo has been "framed" with a blue line. .8 - 35 and 36 .9 - roof top view - photo has been "framed" with a blue line. .10 - 27 and many spare wheels in the view, along with jacks. .11 41 and other trams showing the pit, spare parts and equipment - photo has been "framed" with a blue line. .12 18 at the front of the depot. .13 View of a 22E bogie with autumn leaves .14 - as for .4, - photo has been "framed" with a blue line. .15 - Scrubber car on "0" road and lots of autumn leaves. .16 - View of the depot view with 39 on "0" road and 18 on "3" road. trams, tramways, depot, workshops, scrubber tram, tram 36, tram 27, tram 41, tram 18, tram 39, scrubber, tram 39, tram 26, tram 43, tram 42, tram 35, tram 36 -
 Ballarat Tramway Museum
Document - List, State Electricity Commission of Victoria (SECV), Details of Ballarat Trams - marked up
Demonstrates the source of the tramcars for both Ballarat. Gives details on equipment, sizes and seating capacity of the tramcars as at August 1964 with hand written notes about the acquisition and disposal of some of the tramcars.Printed List of trams and their details for Ballarat Trams ( similar to item 3430.1), dated 5-September-1966, titled "Numbers and Particulars of Trams". Handwritten notes have been made for the acquisition dates for the tramcar and disposal details of the vehicle along the top edge. 3430 - Ballarat - typed carbon copy - two sheets, were taped together. Gives details of where purchased from , date of purchase, type, body builder, seating capacity, overall length, overall height, overall width, condition of tram, trolley base, Lightning arrester, controller make and type, Truck Maker and type, type of truck, axle type, wheel base, axle diameter, motors type and maker, Motor horsepower, Armature bearings, suspension bearings, gear teeth, Air compressor make and type, Brake Valves make and type, Governor make and type, Weight in tons and details of advertising space in racks. At base has typed (original) list of trams of the two types, single truckers and bogie trams. List of trams includes the scrubber and No. 20 which was scrapped prior to system closure. Handwritten notes have been made for the Acquisition dates for the tramcar and disposal details of the vehicle along the top edge.tramcars, ballarat, sec, disposal, sale of trams, acquisitions -
 Ballarat Tramway Museum
Photograph - Illustration/s, Ballarat Views, 1950's mid
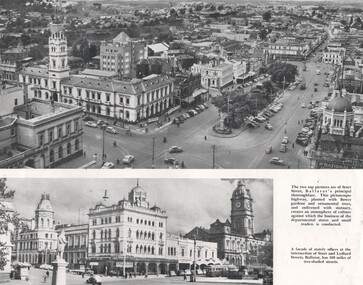
Single sheet of printed paper, collected from a magazine (p59/60) with two black and white photos of Ballarat and one colour of Bendigo. Photo 1 - 260mm long x 122mm high, photo of north east Ballarat from Town Hall, looking out to Black Hill. Photo similar to Reg. No. 102, but buildings on corner of Grenville and Bridge St has a Plume sign instead of a Mobilgas Ad. This indicates early to mid 1950's. One tram in loop in one in Bridge St. Also has a "Neptune" sign in photograph. Photo 2 - 195mm long x 75mm high - from north east corner of Sturt and Lydiard Sts looking towards Town Hall and Craig's Hotel. Photo includes SEC bogie at tram stop and the front end of bus travelling east in Sturt St. Photo 3 - 230mm long x 156mm high - colour printed photo of Pall Mall, Bendigo from west side (by Post Office), looking towards the Shamrock Hotel. Photo includes signs for "COR Motor Spirit", "Tanox Paint" and the rear of a Bendigo to Huntly bus. See item Reg. No. 102trams, tramways, ballarat, bendigo, pall mall, oil companies -
 Ballarat Tramway Museum
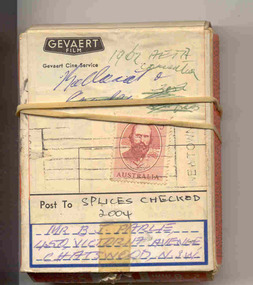
Film - Movie Film & Box, Gevaert, 1962
Yields information in movie film format of Ballarat trams in 1962, a enthusiast tour, how the system operated and was used by people., Yields information in movie film format of Ballarat trams in 1962, a enthusiast tour, how the system operated and was used by people.Movie film - 8mm, approx. 2.5mins, with green leader strip on a plastic reel, within a Gevaert film cardboard box, with a Harvin Film Laboratory, Marrickville NSW label and address to B.J. Parle, Chatswood and a 5d stamp. Titled "Ballarat 1962 AETA Convention". Has been transferred to DVD - see Reg item 4100 as Segment No. 5. Filmed and made by Ben Parle. Also transferred to DVD by Rod Cook Oct. 2015, via Roger Greenwood for use in his DVD, "The City of Ballarat Trams, Gardens & Gold" of 2016. See Reg Item 6883. Synopsis: based on time - Black and White film Title "Ballarat 1962 AETA Convention" 0:00 40 Sturt St, outbound 0:27 Bogie tram in Sturt St, inbound 0:39 No. 41, turning from Sturt into Drummond St. Nth 0:58 No. 37, turning from Sturt St, north track back into Drummond St Sth, 18 in the rear. 1:26 No. 18 departing Sebastopol and bouncing along. 1:46 No. 18 and 37 crossing Albert St Sebastopol 2:10 No. 18 and 37 arriving Grey St loop 2:33 endWritten labels giving title information on outside of box.trams, tramways, ballarat, drummond st, sturt st, sebastopol, tram 18, tram 37, tram 40 -
 Melbourne Tram Museum
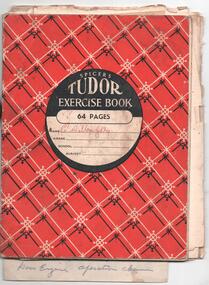
Document - Notebook, Charlie Willoughby, personal notes on tramcar maintenance, operations, recovery etc of C. Willoughby, late 1950's to early 1960's
Exercise book with personal notes on tramcar maintenance, operations, recovery etc of C. Willoughby in a Spicers Tudor Exercise book - 64 pages with arithmetical tables on the rear cover. Topics covered: Rail Grinder - details on how to operate and maintain it North Fitzroy Dick Kerr, Clyde, K35 and RC2 Controller sequences and diagrams - notes on testing and faults Buzzer wiring diagrams Maintenance of trams interiors and rooves - items to be checked for Line Breakers Lighting Circuits Compressors Trolley poles etc Air operated doors Re-railing of Maximum Traction trams - 22E ditto for equal wheel bogies ditto when split points Use of false trucks Derailments on the Royal Park line Electrical equipment faults Adjusting Trolley Poles heights and tension Notes on truck types and braking Brake diagram summary, giving specifications and a list of relevant drawings Forms for the insulation testing of the Rail Grinders Checking motor leads and electrical equipment - written on the rear of a St Patrick's Day Procession notice for 1962. Advice from Neil Elfick, 23/6/2018 knew him when the Running Shed Foreman at Kew Depot.trams, tramways, tramcars, faults, controllers, 22e trucks, derailments, accidents, royal park, grinder, notices and information, st patricks day -
 Melbourne Tram Museum
Album - Charles Craig - part 1 of 2, 1950s to 1970s
Photo - see pdf file for further information. Number Brief Description CC1 S178 at Elsternwick level crossing track works CC2 Building East Preston Depot 1955 CC3 Camberwell depot – post WW2 – lots of trams and a black cat CC4 W2 584 and SW6 958 northbound – Chapel St and Brighton Road CC5 W2 357 – southbound, Chapel St Brighton Road CC6 Pascoe Vale Road, Raceday working – note the signal CC7 The Preston Workshops - The Argus, post WW2, 223, 647 et al CC8 923 or is it 922 being built at Preston – The Argus photo - CC8A 832 being positioned onto trucks at Preston after an overhaul – Argus Photo – see also CC306 CC9 Footscray depot` CC10 W5 797 in St Kilda Road during track works – 1950s CC11 W2 457 at Kew Post Office CC12 Wellington Parade – W2 432, 492 and 337 – special event CC13 Swan St line up of trams – football? Or other special event – Sinclair’s bus on the right side. CC14 W2 630 being washed at a depot – The Argus photo CC15 Royal Park line at Flemington Road – W2 355 and W5 786 CC16 Nicholson St track construction from a tram cab CC17 T181 on tour at Gordon St CC18 T181 on Maribyrnong Bridge CC19 Ditto at River St just off bridge CC20 As for CC18 CC21 At Raleigh Rd CC22 T181 at Footscray depot CC23 Track construction, Nicholson, just north of Gertrude CC24 Commissioning overhead Bourke St tram 988 CC25 Queens Parade – 997 and 994 CC26 Swapping trolley wheel to skid – commissioning CC27 Track construction in Gertrude St CC28 985 in Queens Parade running special CC29 997 in Queens Parade CC30 1033 at North Fitzroy – AETA Special CC31 Bourke St at Elizabeth St – has passengers on board CC32 W6 985, 996 Queens Parade, Mk 3 bus 333 CC33 As above CC34 Showing construction at Nicholson & Gertrude – Bourke St CC35 W2 223 on Burnley temporary bridge – VR track expansion CC36 W5 823 – ditto CC37 Tram on old bridge prior to removal CC38 W2 433 on temporary bridge with new bridge beams and old track CC39 Looking down showing temporary single track – Swan St CC40 Tait train passing under tram bridge CC41 SW6 on single line – off loading CC42 W2 547 at City Road Junction CC43 City Road Jtn – 1969 – 596 and 771 CC44 City Road Jtn – 1969 – 596 and 771 (same as CC45 438 in Flinders St CC46 355 somewhere CC47 552 somewhere CC47A 364 at Preston Workshops? CC48 W2 334 on Traverser – Preston Workshops CC49 Wellington pade – large line up of trams, c1950 925, and 611 CC50 W2 493 Franklin st – advertising for Savings Certificates CC51 Possibly 551 with advertising for fund raising for Blind institute CC52 249 at Hawthorn – Riversdale Junction – with a Tally Ho and Village Fair Aux. board CC53 MMTB Postcard of 511 CC54 Wattle Park terminus with Single line warning sign CC55 Wattle Park Duplication CC56 36 at Domain Junction – 833 CC57 36 at Domain Junction CC58 36 at Domain Junction with 810 and 833 CC59 36 in Swanston by Flinders St Station CC60 36 in Spencer St at A’Beckett CC61 36 crossing Collins St CC62 36 crossing Collins St CC63 36 northbound in St Kilda Road with Shrine in background CC64 36 northbound in Swanston St at Flinders St CC65 Postcard – Ballarat 36 in Domain Road CC66 Postcard - Stampshow – Hawthorn Horse tram CC67 Postcard - Stampshow – Peace cable tram CC68 Postcard - 1041 and cable car set 1 at Preston CC69 Postcard - Colins & Elizabeth – greetings from old Melbourne CC70 Postcard - Cable car set at Preston CC71 Postcard - Twentyman’s cable cars CC72 Postcard - Nu-color-vue – horse tram 256 CC73 Cable car set – Market & Flinders CC74 Cable trams at Twentymans’ in their shed CC75 Cable tram track at Bourke & Spencer prior to removal CC76 Cable tram bogie at Preston Workshops – used as a dolly CC77 Cable trams at Twentymans’ CC78 Postcard - Valentines – Bourke looking west from Swanston CC79 Postcard - Rose 3938 – Bourke at Swanston – the Leviathan building CC80 Postcard - Valentines – Elizabeth St looking south from Collins – No. 19 CC81 Postcard - Rose P4765 – Bourke St Melbourne CC82 Postcard - Rose 4090 – cable tram passing Parliament house CC83 Postcard - Valentines – GPO Elizabeth St CC84 Interior of cable trailer with clothing on a set CC85 Elizabeth St looking north CC86 Cigarette card - Collins St No. 41- WD HO Wills CC87 Postcard - Rialto building with cable set CC88 Postcard - Valentines - Swanston at Flinders looking north CC89 CC90 Q 150 Hanna St – dated on rear CC91 176 turning – photo ex Alan Jungworth CC92 161 on Princes Bridge – minimum fare 4d sign and Inspector CC93 459 at Point Ormond CC94 158 at Gordon St – side on view CC95 X 217 in Swanston St CC96 X 217 in Swanston St with an East Brighton destination CC97 T177 CC98 T177 Peel St – no destination roll – being transferred? CC99 X1 462 in Glenhuntly Road to Point Ormond CC100 X1 462 in Glenhuntly Road to Elsternwick Rly Station CC101 X1 462 in Glenhuntly Road to Point Ormond CC102 Q 150 Hanna St CC103 190 at Camberwell Depot CC104 T182 at Footscray CC105 X1 466 and W2 at Footscray CC106 190 at Camberwell Depot CC107 X1 467 Barkly St Footscray CC108 X2 679 turning into William St from La Trobe St CC109 X2 677 Glenhuntly Road with Point Ormond Destination CC110 Postcard T180 CC111 Postcard format – X1 467 on a truck – see also CC178 CC112 Postcard format – X1 467 at Wantirna South CC113 Q200 and SW6 896 at Thornbury – has labels on rear CC114 T177, Ballarat Road – has labels on rear CC115 T178 at Point Ormond CC116 Postcard X1 465 and 466 CC117 Postcard – X2 676 CC118 Postcard – TMSV X2 217 CC119 810 on temporary bridging – 24-12-67 CC120 W2 575 – Queens Parade junction in, still temporary bridging, substation under construction CC121 Forming Queens Parade Junction base slab CC122 W2 596 prior to tramway works – all tracks still in position CC123 It’s a mass of reinforcing – bridging being formed CC124 Looking north with substation being built CC125 Looking east with some rather tight curves, Wellington St still in use CC126 SW6 958 ex Wellington St with all tracks and signal box and buildings. CC127 Victoria Pde at Gisborne looking east – at least 4 cars CC128 SW6 893? With dash canopy lights and SW6 862 and a man with a newspaper CC129 SW6 894 on the S curves, with tram in Wellington St CC130 Similar photo CC131 W2 564 turning into Wellington St – the concrete tracks are not that old CC132 W2 552 running out of Wellington St CC133 W5 732 from Fitzroy St into St Kilda Road with next iteration in position – very wonky CC134 W5 764 turning into Fitzroy St CC135 SW6 947 turning from Wellington St CC136 W2 586 running out of High St CC137 W2 500 turning into Wellington St CC138 W2 543 in Wellington St inbound CC139 L103 with St Kilda Junction destination, and a tower truck on right CC140 Workmen – new track in Queensway in use CC141 Ditto CC142 L103 in Queensway, and another car in bound CC143 Looking east along Wellington St which has been taken out of use. Also a MMTB Roller CC144 W5 824 and a W2 and all types of wobbly temporary track CC145 W2 354 to High St CC146 Sw6 947 on the S bends CC147 W2 500 looking north – tram on the S bends CC148 SW6 896 leaving the S bend CC149 W2 357 and a MMTB City bus with trees/gardens on the side CC150 W5 817 Elliot Ave – see also CC302 CC151 W2 552 – note the large trolley bridge CC152 W2 550 at depot or workshops CC153 1B truck CC154 SW2 432 CC155 W2 155 at Glenhuntly CC156 SW6 937 on AETA tour? CC157 X2 677 on Footscray service – Ballarat Rd? CC158 W2 641 – High St Kew? CC159 SW6 847 – Power St Hawthorn CC160 Simpson St – big line up CC161 W2 546 truck No. 1? CC162 W2s at Glenhuntly depot CC163 No. 15 truck under 899 CC164 206 and other junk at Preston Workshops CC165 W in Swanston St Melbourne – Rose series card CC166 Y1 613 Batman Ave?? or William St at Collins CC167 Tram plans CC168 X 217 Swanston St – see also 95 and 96 CC169 217 in Swanston St – same as 95 CC169A 192 in St Kilda Road at Princes bridge CC170 192 in St Kilda Road at Princes bridge CC171 Bendigo 3 arriving Malvern depot – being unloaded CC172 Ditto CC173 T180 at a depot CC174 X1 463 wheel set CC175 C30 – dog car side view – close up CC176 C30 dog car CC177 206 and 30 at Preston Workshops CC178 X1 467 on a truck – see CC111 also CC179 42 CC180 42 at a depot, no destination box CC181 W2 556 1A type truck CC182 Flinders St Station – Rose Series CC183 W7 1035 Spring – Nicholson St CC184 W7 1022 MMTB Post Card CC185 Adelaide 178 – has on rear – R. Lilburn 4/82 CC186 Adelaide 175 – has on rear – R. Lilburn 4/82 CC187 Y1 610 on AETA tour CC188 Y1 610 on AETA tour with large group – Point Ormond CC189 AETA display – has GH55-32 in pencil on rear CC190 AETA display – has GH55-29 in pencil on rear CC191 Y1 610 on AETA tour with large group – Point Ormond CC192 VR 53 at Footscray CC193 VR cars 40 and 34 at Elwood wash dock CC194 W7 1024 as the 1970 Christmas tram CC195 Geelong – loading a set of 22E trucks CC196 Geelong 10 and 23 running an AETA special CC197 Geelong – AETA special CC198 Geelong 7 at Junction CC199 Geelong 10, in the city CC200 Geelong 33 with Belmont destination CC201 Geelong 15 Eastern Park destination 29-3-1948 CC202 Geelong 23 at Railway Station – 29-3-1948 CC203 Geelong 23 at Railway Station – 29-3-1948 CC204 Geelong – loading a bogie tram CC205 Geelong – loading a bogie tram CC206 Geelong 40 – loaded on truck CC207 Geelong 40 – on jacks CC208 Geelong 40 on jacks – 19 behind CC209 Geelong 38 with two workers on either side CC210 – 214 Australian Historic Tramways stamp folder and set CC215 Bendigo 17 at depot – has dup JBS on rear CC216 Bendigo 20, 29 bogie and straight sill car at Charing Cross CC217 Bendigo one man bogie Pall Mall CC218 Bendigo – Bogie 23, other cars and welding truck at depot CC219 Bendigo 7 with Quarry Hill destination CC220 Bendigo 21 with Lake Weerona destination CC221 ESCo 18 Ballarat CC222 Ballarat bogie 22 on AETA special CC223 Ditto CC224 Ballarat 34 at Stones Corner – R Lilburn CC225 Ballarat 15 in Bridge St – R Lilburn CC226 Ballarat 40 at Gardens – R Lilburn CC227 Ballarat 37 running out of depot – R Lilburn CC228 Postcard – Valentines – Sturt St with loaded horse tram trailer CC229 AETA Geelong tram tour ticket – 29-3-1948 CC230 Postcard – Geelong – Valentine 2114 – T&G building CC231 Postcard – PMTT ! – High St Malvern CC232 Postcard – Empire – Glenferrie Road, Malvern at Wattletree Rd CC233 Postcard Y469, MMTB CC234 Postcard Z2 Spring St CC235 Postcard – Z1 MMTB CC236 Postcard – Stamp Show W1 431 CC237 Postcard – Stamp show B2005 CC238 Postcard – Stamp show W6 982 CC239 Postcard – Valentines 1264 – Johnstone Park with tram in distance CC240 Postcard – Rose 10711 – Swanston and Lonsdale – Hospital and W232 CC241 Postcard – Rose 4827 – Fitzroy St St Kilda W2 362 and 548 CC242 Postcard – Valentines – 939 – St Kilda War Memorial, W and a R? CC243 Postcard – Valentines – 572 – St Kilda War Memorial, W 413 and 140? CC244 Postcard – Valentines – 938 – Uper and Lower Esplanade – L 104 CC245 Postcard – St Kilda Rd at Princes Bridge Y1 and W CC246 Postcard – Biscay BG82 – W5 814 - CC247 Postcard – Biscay 796112 – Bourke St looking west CC248 Postcard – Biscay 796109 – Bourke St looking east CC249 Postcard – Biscay 2AUS58 – Z5 Bourke St CC250 Postcard – Biscay BG 249 – Swanston St CC251 Postcard – National View – St Kilda Rd – shrine and Prince Henrys W2 405 CC252 Postcard – Nu color vue – 11 ML 156 – St Kilda Rd CC253 Postcard – Nu color vue – 11 ML 153 – Swanston St CC254 Postcard – Nu Color vue – Collins St 442 CC255 Postcard – Pitt card – Adelaide – H 364 at Victoria St CC256 Postcard – SPER L/P 154 CC257 Postcard – BTMS – 550 CC258 Postcard – SPER – Brisbane 295 CC259 Adelaide 131 at Burnside – has R Lilburn on card, c1911 CC260 Adelaide 194 CC261 Adelaide 235, with two crew, The News photo CC262 Rockhampton, outside post office – has source of photo details CC263 Sydney – 2086 and 2062 arriving Circular Quay CC264 Sydney – P class – Pitt St? CC265 Sydney – 1610 at Circular Quay CC266 Brisbane 99 and 468 CC267 Sydney with bridge behind CC268 Steam tram Paramatta Park – 103 CC269 Sydney – Museum Station =- Elizabeth St CC270 Sydney – weed burner 137S at a loop Demonstrates the work of Charles Craig in photography and collection of prints.Assembled album in a black presentation folder of 270 photographs from the Charles Craig Collection - 86 sleeves - part 1 of 2. All photographs have been scanned and placed on the Museum's G drive. A list of all photographs with details where possible has been compiled. Victorian Provincial, Launceston, Hobart and Sydney tram photos have been transferred to other Museums, image files retained.melbourne, tramways, tramcars, trams, charles craig, st kilda junction, trackworks -
 Ballarat Tramway Museum
Book, State Electricity Commission of Victoria (SECV), Instructions or Rules to Motormen, post 1945
Handmade book with light green covers made from a cut file holder with brown paper glued on the inside, containing 39 typed (original) sheets of paper giving Instructions or Rules to Motormen. Has five page index, then 34 pages, with 104 rules or instructions, covering Tramcar Equipment (electrical), location of faults, tramcar braking, failure of the mechanical brakes, tramcar emergency braking, automatic braking, automatic electric signals and general instructions for Ballarat. The brown paper appears to have been placed on the outside, as it is cut and glued on the inside of the book. Individual sheets held into the book with a metal clip. On the rear of the book, a small piece of cardboard has been glued over the back of the metal strip. Notes mentions bogie trams, so therefore post 1945. Gives details of route electric signals, use of doors on the trams relevant to the central median strip. On page 4, has hand drawn diagram showing the motors in series and parallel. On page 8 has a hand drawn diagram showing the car lighting circuit arrangements. Has been folded in the middle so as to store in pockets of a coat. Images show .1 - book, .2 - inside front cover and index sheet, .3 - hand made drawing - car lighting circuit. See Destination Eaglehawktrams, tramways, secv rules, rules, motormen, conductors -
 Ballarat Tramway Museum
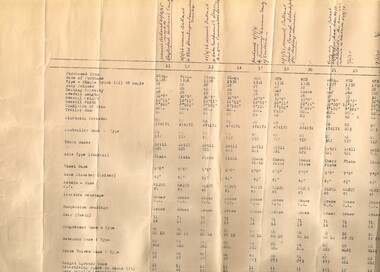
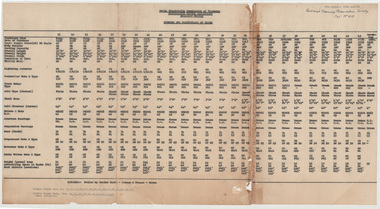
Document - List, State Electricity Commission of Victoria (SECV), "Numbers and Particulars of Trams" - Ballarat, 5/08/1964
Yields information about the dimensions and equiipment on Ballarat Tramcars operated by the SEC.Typed List of tramcars and their details for Ballarat dated 5-August-1964, titled "Numbers and Particulars of Trams". Prepared by Les Denmead, typed by PB. Ballarat - typed carbon copy - two sheets, are taped together. Gives details of where purchased from , date of purchase, type, body builder, seating capacity, overall length, overall height, overall width, condition of tram, trolley base, Lightning arrester, controller make and type, Truck Maker and type, type of truck, axle type, wheel base, axle diameter, motors type and maker, Motor horsepower, Armature bearings, suspension bearings, gear teeth, Air compressor make and type, Brake Valves make and type, Governor make and type, Weight in tons and details of advertising space in racks. At base has typed (original) list of trams of the two types, single truckers and bogie trams. List of trams includes the scrubber and No. 20 which was scrapped prior to system closure. See also 8721 and 8722 for other versions - different dates and 8690 for a Bendigo list. Note: Framed copies of both Ballarat and Bendigo are held in the depot. Some changes have been made to the tramcars since the preparation of this sheet and there are some errors and differences. See also Reg Item 6879 for an annotated version.In black ink, top right hand corner - "Ballarat Tramway Preservation Society Cat No. 613"tramcars, ballarat, equipment, lists, data -
 Ballarat Tramway Museum
Photograph - Digital image Set of 20, Dec. 1970
Set of 20 digital images of Bendigo Tramways December 1970 by Stuart Lodington. .1 - Bendigo track gang renewing a joint, McCrae St, with welding truck alongside and Birney No. 29. .2 - No. 5 at Quarry Hill terminus? .3 - No. 24 at the depot .4 - No. 2 on the Quarry Hill line .5 - No. 5 approaching the Eaglehawk terminus .6 - No. 29? at the Golden Square Terminus with Bill Rodda's Golden Square hotel in the background. .7 - No. 3 inbound on the Quarry Hill line. .8 - trams crossing on the Eaglehawk line, through the window of one tram. .9 - side on view of a B23D controller in a bogie tram .10 - No. 5 at the Eaglehawk terminus .11 - No. 21 at No. 21 crossing on the Golden Square line. No. 29 showing special, No.21 - North Bendigo, Fire Station Loop? .12 - No. 29 and another tram - near work site? .13 - interior view from Birney looking at the front of another tram parked behind. .14 - No. 29, No. 6 crossing at .15 - No. 6, showing special at Charing Cross. .16 - No. 5 and another tram at North Bendigo on a Special .17 - No. 28 at Charing Cross .18 - No. 5 on Special at a Loop on the Eaglehawk line .19 - No. 28, and two other trams at the Myrtle St Loop .20 - No. 18 showing Quarry Hill and two other trams on View St.trams, tramways, bendigo, trackwork, mccrae st, depot, quarry hill, eaglehawk, golden square, controllers, north bendigo, view st, tram 29, tram 5, tram 24, tram 2, tram 3, tram 6, tram 28, tram 18 -
 Ballarat Tramway Museum
Photograph - Digital image Set of 10, Tony Smith, 5/09/1971 12:00:00 AM
Yields information about Ballarat Tramways and trams prior to the closure of the tramway system.Set of 10 digital images of Ballarat trams prior to closure, scanned from original slides by Tony Smith, 1971 prior to closure of the system. This set of slides, possibly on the last weekend of Mt Pleasant services - closure took place on 5/9/1971. .1 - 13 outbound in Barkly St, Mt Pleasant - with another single trucker and the Ballarat Fire Station in the background. .2 - Bogie tram and single trucker at Grant St Loop. Has the Mobile service station on the right hand side. Note the family sitting on the steps of a house on the left side watching proceedings. .3 - 14 (Mt Pleasant) and 39 ditto. .4 - 27? and 39 crossing at the Morrison St loop. .5 - 14 and another single trucker at Mt Pleasant terminus. Has the corner store in the background with adverts for Robur Tea, Womens Weekly and Coca Cola. .6 - 39 and two single truckers at the Mt Pleasant terminus. .7 - View looking south along Ripon St from Mair St, with power station buildings on the right hand side. Shows the power distribution poles on the street. .8 - Scrubber tram on 0 road with tennis court alongside. .9 - 40 running special in Wendouree Parade, near the Haddon St intersection. .10 - 40 turning from Macarthur St into Drummond St Nth.trams, tramways, mt pleasant, barkly st, grant st, victoria park, sturt st west, ripon st, view st, depot, wendouree parade, drummond st nth, macarthur st, closure, tram 14, tram 39, tram 13, tram 26, tram scrubber, 40 -
 Melbourne Tram Museum
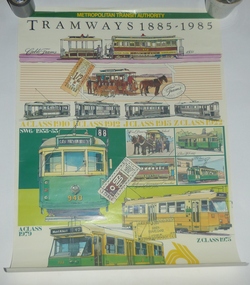
Poster, Metropolitan Transit Authority (MTA), "Tramways 1885 - 1985", "Railways 1854 - 1985" "Buses 1925 - 1985", 1985
Set of three transport posters issued by the Metropolitan Transit Authority, in 1985 featuring trams, trains and buses. See also Reg Item 151 for a laminated version of the tramways poster. .1 - Poster titled "Tramways 1885 - 1985" featuring drawings of cable tram set with a bogie trailer (472), horse drawn tram black and white drawings of A, F, J and S class trams, though the last one printed with a Z. SW6 940, horse, U 205, W2 348, Z 223 and A 233. Has two Metropolitan Transit Authority tram tickets and an Inner Travel Card, with the MTA logo in the bottom right hand corner. .2 - Poster titled "Railways 1854 - 1985", featuring drawings of the first train for Hobsons Bay Railway Company, various trains, staff drawings, Tait, Harris, Hitachi and Comeng trains with a first class all lines tick, Collingwood Edmondson and a Metro and Travel cards. Has part of the suburban train map. .3 - Poster titled "Buses 1925 - 19856", featuring drawings of 1925 MMTB Tilling Stevens, Munitions, Thornycroft, Leyland, double deck buses, AEC Regal Mk 3, Mk 6, 1975 Leyland, 1977 Volvo and MAN buses, along with a Day Tripper and other travel card tickets.trams, tramways, posters, melbourne, mmtb, mta, tram & bus services, buses, railways, tilling stevens, thornycroft, leyland, aec, volvo, man -
 Ballarat Tramway Museum
Book, City of Ballaarat, "Mayors Special Report Ballarat Tramways", Sep. 1971
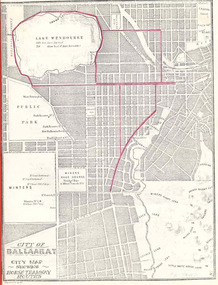
Historically significant for at the time it demonstrated aspects of the evolution of Ballarat Tramways and yields information about the formation of the tramways, the Councils viewpoint and has a strong association with the Mayor of the time.Twenty two page book, produced by photocopying, side stapled and bound with a red plastic binding, titled "Mayor's Special Report Ballarat Tramways", dated 20 September 1971 for presentation to the City of Ballaarat Council Meeting 27 Sept. 1971 and signed by the Mayor, J.A.Chisholm. Note pages 18 and 19 have been reversed. Comprises: Page 1 - map (image 1829i1) - of Ballarat (Ballaarat) showing the horse tram routes in red (appear to have been drawn in with a red pencil). Note the Sebastopol route terminates at Rubicon St. Page 3 - letter to the City Councillors from the Mayor Page 4 - Outline of the "The Ballarat Tramway System" Pages 5 - 7 - Conditions for tendering the horse tram system within the City of Ballarat" Pages 8 - 11 - Specifications and Agreement for the Ballaarat Tramways (horse trams). pages 12 - 19 - Memorandum of Agreement with the British Insulated Wire Company (later ESCo) Page 20 - Copy of letter from the Secretary of the SEC to the Minister of Fuel and Power, dated 10 Sept. 1971 advising of the formal abandonment of the Ballarat and Bendigo tramway systems. Page 21 - five photos (image 1829i3) of trams in Ballarat, including the bogie tram decorated for the Queens visit, courtesy of Mr. L. J. Denmead, Tramways Superintendent. Page 22 - Plan (image 1829i2) of Ballarat Bus Services, showing route numbers, destinations and existing tramway routes. 3rd copy added 16/7/2010trams, tramways, city of ballaarat, mayor's reports, ballaarat tramway company, british insulated wire company, esco, bus services, sec -
 Ballarat Tramway Museum
Photograph - Digital image Set of 20, 16/04/1972 12:00:00 AM
Set of 22 digital images of Bendigo Tramways, of the last running day of the Eaglehawk to Quarry Hill line 16 April 1972, .1 - No. 3 and 24 crossing at Long Gully .2 - No. 3 turning at the Cricket ground, Barnard and View Sts, inbound to the City and Quarry Hill .3 - No. 3 in bound to the City and Quarry Hill, Long Gully area .4 - No. 18 inbound to the City and Quarry Hill crossing the railway bridge from Eaglehawk. .5 - Manchester Loop .6 - No. 18 inbound to the City and Quarry Hill crossing the railway bridge from Eaglehawk. .7 - No. 18 about to enter Jobs Gully Loop .8 - No. 3 about to turn at the Cricket ground, Barnard and View Sts inbound to the City and Quarry Hill .9 - No. 3 turning at the Cricket ground, Barnard and View Sts, inbound to the City and Quarry Hill .10 - No. 18 at Eaglehawk terminus with the Mechanics Institute in the background. .11 - No. 3 in bound, Ironbark area. .12 - No. 3 at Long Gully Loop .13 - No. 3 outbound to Eaglehawk. .14 - No. 18 at Eaglehawk with German circus banner on tram .15 - No. 18 on the Eaglehawk line at Jobs Gully Loop .16 - No. 24 outbound to Eaglehawk at Taylor St .17 - No. 18 inbound to the City and Quarry Hill crossing the railway bridge from Eaglehawk. .18 - No. 3 at Manchester Loop .19 - No. 18 at Eaglehawk terminus .20 - No. 18 at Eaglehawk with German circus banner on tram .21 - bogie tram at Long Gully Loop. .22 - No. 24 outbound to Eaglehawk at Taylor Sttrams, tramways, bendigo, eaglehawk, long gully, jobs gully, manchester loop, tram 24, tram 18, tram 3 -
 Melbourne Tram Museum
Document - Folder with papers, Melbourne & Metropolitan Tramways Board (MMTB), "Notices to Staff", 1924 - 1944
Light grey card folder manufactured by the Roneo Printing Works of Rumford England with the file title "Fire Switches, glued to the top of the folder on the inside back cover. Contains many memos from the MMTB Traffic Managers, Depot Managers about the arrangements for the visit of the Royal Highnesses the Duke and Duchess of York in April 1927. Also contains memo re cable tram arrangements for this event from Port Melbourne depot, arrangements for Christmas holidays and other holidays from about 1924 to 1944, including a map of the procession and printed programs by the Government Printer. Documents either typed or hand written. Other documents include (Sample only): Camberwell extra for December 1944 Shopping Week Memos re traffic arrangements and shunting of trams for the 8 hour day procession Tables for Cable car operations from Port Melbourne depot 5/7/1925 Handwritten car timetables Costs associated with the royal visit Proposed service arrangements for Coburg Lines Christmas and New Year 1929 Cuttings regarding shopping hours for 1929-1930 Football posters - special trams - 1931 and 1932 All Night services - destination rolls to specific bogie trams Memos regarding cancelling of leave in Dec. 1941 Memos regarding services to Fisherman's bend and factory hours - 1941 - 42 Holiday loading returns for Southern System - 1941 Memo re timing of trams from city terminus account 3KZ Christmas Eve Choral festivaltrams, tramways, mmtb, port melbourne depot, notices and information, cable trams, holiday arrangements, royal visit, timetables, world war 2, football, all night services -
 Melbourne Tram Museum
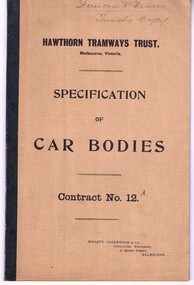
Document - Specification, McCarty Underwood & Co, "Hawthorn Tramways Trust Specification of Car Bodies Contract No. 12", 1915
1579.1 - Bound specification - 20 sheets - stapled within brown paper covers and sealed with black tape on the left hand side. Titled "Hawthorn Tramways Trust Specification of Car Bodies Contract No. 12". Gives the General conditions of the contract, specifications and forms for tendering. Prepared by McCarty Underwood & Co. Consulting Engineers 31 Queen St Melbourne. Contains completed tender forms, prices and some minor initialled alterations to the tender. The document is the HTT or Trusts copy of the tender and it has been signed by Duncan and Fraser and the HTT and on the rear sheet has the seal of the Trust. Gives prices and dates for delivery of 10 bogie and 9 combination (4 wheel) tramcar bodies. .2 - letter - typed on quarto paper - from Duncan & Fraser dated 13/4/1915 - advising that they had posted their tender document and questioning the type of "Ash" timber to be used. Has been endorsed on the left hand margin as item G referred to in the tender document. .3 - letter - typed on quarto paper - from Duncan & Fraser dated 13/4/1915 - advising that they had instructed the National Bank of Australasia to hand you the fixed deposit, but it had been sent to Adelaide in error. Letter enclosed the deposit receipt. .4 - Receipt on pre-printed receipt paper with a South Australian Government duty stamped impressed into the paper on the right hand edge, with an adhesive strip on the rear of the left hand side. Dated 26 May 1916 - received from the Hawthorn Tramways Trust the Fixed Deposit and interest.On the top cover in ink or pencil "Duncan & Fraser / Tramcar contract / Trusts Copy"trams, tramways, htt, hawthorn, duncan fraser, tramcars, bogie trams -
 Puffing Billy Railway
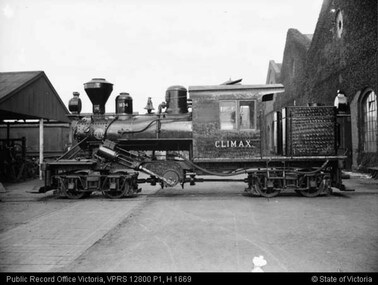
Climax - Geared Steam Locomotive No. 1694, 1928
Climax geared locomotive No. 1694 in active service on special occasions - stored at Emerald Station A Miraculous Survivor Climax locomotive No.1694 is a miraculous survivor of a rare breed of steam locomotive. For about 100 years from the mid-1850s sawn timber was carted from Victorian sawmills to the nearest railway station by timber tramway. These tramways were generally very rough, steeply graded, sharply curved, and of narrow gauge. Many had wooden rails, and horses provided haulage. The better ones used steam locomotives. In all about fifty steam locomotives are known to have worked on Victorian timber tramways. These locomotives were usually somewhat peculiar - made to cope with arduous, rough conditions, rather than speed. Climax locomotive No.1694 is the only one of these locomotives to survive intact. It was built in 1928 by the Climax Manufacturing Company, Corry, Pennsylvania, USA, for the Forests Commission of Victoria. The distinctive feature of the Climax locomotive is that the cylinders do not directly connect to the driving wheels. Instead they drive a cross shaft near the centre of the locomotive. From there the drive is transmitted to the small driving wheels through rotating shafts, universal joints, and bevel gears. The driving wheels are mounted in two four-wheel bogies so that they can easily follow sharp curves in the track. None of these features are found in normal steam locomotives. The result is a locomotive that is extremely powerful for its size, and that will cope with sharp curves and steep grades with ease. But this is at the cost of speed, Climax locomotive No.1694 is just about flat-out at 13 km/h (8 mph). Climax Locomotive Built in 1928 for the Forests Commission of Victoria and painted all-over black with the name CLIMAX painted on the sides of the cab in white block letters, this locomotive was issued to the Tyers Valley tramway which branched off the Moe to Walhalla line at Collins Siding. This locomotive was withdrawn from service in 1949 following the closure of the tramway and in 1950 it travelled from Tyers Junction to Collins Siding to Erica where it remained stored until 1965. Loaned to the Puffing Billy Preservation Society for its Steam Museum, it was taken to Menzies Creek in 1965 where it remained until 1982 when the Emerald Tourist Railway Board bought it and transferred it to Belgrave for restoration. It was returned to service for special use on the Belgrave to Gembrook line in 1988 painted in its original all-over black livery, except that the word “Climax” on the sides of the cab was now painted in the style of the Climax Manufacturing Co., a style that this locomotive had never carried.Historical - Industrial railway - Forests Commission of Victoria, Timber Logging Climax Locomotive Climax geared Steam locomotive made of steel and wrought iron Climax 1694climax locomotive works, climax, geared steam locomotive, puffing billy, climax locomotive no. 1694, steam locomotive -
 Puffing Billy Railway
203 NQR - Open Medium Truck, 5/12/1913
The NQRs were the standard Medium open goods wagon. Generally the sides and ends were removable thus providing a totally flat truck. Three long drop-down doors formed the sides thus allowing easy loading and unloading. 218 of these goods vehicles were built between 1898 and 1914 ? numbered 1 - 218. Originally, these wagons carried the code letter R as they were built with sides and ends. They later had the R removed. Unlike the Broad Gauge, VR's 2 ft 6 in (762 mm) narrow gauge network never had four-wheeled wagons (aside from a handful of trolleys). Because of this, a single design of open wagon emerged and this was the only type of wagon ever used on these lines. This was the NQR class, a wagon with the same length and loading capacity as a Broad Gauge four-wheeled open wagon to make transferring freight between the gauges easier. The wagons, numbered 1 through 218, were built between 1898 and 1914. The wagons used the same underframe as most other non-locomotives on the VR Narrow Gauge. Letters and numbers were originally painted only on the end bulkheads and doors, both of which could be removed as traffic dictated, and this made wagon identification difficult until the decals were transferred to the underframes of each wagon In the 1910s some NQRs were provided with removable wood and steel frameworks with canvas roof canopies and side curtains, and internal seating to supplement the rest of the passenger stock during busy holiday periods. Puffing Billy has re-created these for emergency capacity. Five more NQRs, numbered 219-223, were built between 1990 and 1992 initially for passenger use so were fitted with the removable frames In the 1960s the Puffing Billy Railway added grids in the floor of some to enable them to be used to drop ballast on the track where needed. Vehicle Length 25 feet 2 inches ( 7671 mm) Coupled Length 27 feet 4 inches (8330 mm) Width 6 feet 3 inches (1905 mm) Weight 5 tons Capacity 11 tons Built 1898 - 1915 (1992) Number Built 218 (223) In use 14 To be restored 6 203 NQR at Clematis - Open Medium Truck 203 NQR - Open Medium Truck (11) VR Service History - NQR 203.VA - 5/12/1913 NWS Built new - / /1926 - To NQ 203.VA - NQ 203.VA - / /1973 NWS Stored minus bogies, NR4/73 Puffing Billy Service History or Notes Untrafficable at ClematisHistoric - Victorian Railways - Narrow Gauge Rolling Stock - NQR Open Medium Truck 203 NQR at Clematis - Open Medium Truck made of Steel and metal203 NQRpuffing billy railway, pbr, rolling stock , ? nqr - open medium truck, victorian railways -
 Ballarat Tramway Museum
Memorabilia - Scrap book, 1971 to 1975
Inside front cover - reproduction of the Ballarat white on black destination roll by the TMSV c1971 page 1 - Newspaper cutting "Tram Era Ends in Ballarat" from The Courier's special supplement. page 2 - ditto page 3 - blank page 4 - Newspaper cutting from a Melbourne paper - "Last tram to Ballarat" Nine small B&W photos taken during the ARHS TMSV Tram tour 21/8/1971 - see btm5989.1 > 5989.7 page 5 - Seven B&W photos ditto - see btm5990.1 > 5990,7 Murray Views postcard No. 51 of Sturt St, taken at Grenville St - see btm5991i page 6 - Letter from The Ballarat Courier, on letterhead to Ellen enclosing photos of the tram 42 being moved to Zion Congregational Church Sebastopol and one photograph - see btm5992i1 page 7 - one large Courier photo tram 42 at the church and four small black and white photos of the tram 42 at the church - see btm5992i2 to 5992i6 five photos of Ballarat bogie trams - see btm5993i1 to 5993i page 8 - six photos of Ballarat c1970 - see btm5994i1 to btm5994i6. Page 9 - Newspaper clipping of Ballarat 36 in Melbourne and black and white photo of 36 and a decorated advertising tram in Swanston St. See also btm3173. page 10 - TMSV produced listing of Ballarat tramcars dated Feb. 1971 and two illustrations - ESCo 8 and SEC 17 at night. page 11 - blank Page 12 to 18 - newspaper clippings from The Courier's supplement. Page 19 - ditto and Nu-color-vue Ballarat Postcard BT 69 - see Reg Item. btm960i Page 20 to 23 - newspaper clippings from The Courier's supplement. Page 24 - ditto and and Nu-color-vue Ballarat Postcard BT 65 - see Reg Item. btm669i Page 25 - Illustration of No. 27 at the depot with the "1,000,000" miles in Ballarat Banner - Courier Photo - see btm 3316i and Notes written by Keith Kings on the history of No. 27 and the TMSV tour - 29/6/1988. Page 26 and 27 - newspaper clippings from The Courier at the time of the re-opening of the Ballarat trams - BTPS 1975. See Reg Item btm5996i1 and i2. Inside rear cover - ARHS / TMSV tour and photo stop notes for the Farewell Ballarat Tram Tour - 21/8/1971. Ellen Butland - a driver at Kew Depot, 1st women driver at Kew and 5th in the MMTB - via Ron Scholten 2/11/13.Has a strong association with a Melbourne tram driver who assembled the scrap book and series of photos of Ballarat trams at the time of closure. Yields information about the tram operations.Stamford Kiwi School Scrap Book - card covers, 23 sheets, spiral bound, titled "Ballarat", prepared by Ellen Butland of Auckland following the closure of the SEC Ballarat Tramway system. Each page has been scanned. Black and white photos have been separately catalogued - as noted below."Ballarat" in top right hand corner in ink.destination roll, closure, arhs, tours, courier, tourism, zion congregational church, trams, tramways, ballarat -
 Ballarat Tramway Museum
Document - Folder with papers, State Electricity Commission of Victoria (SECV), 1960's
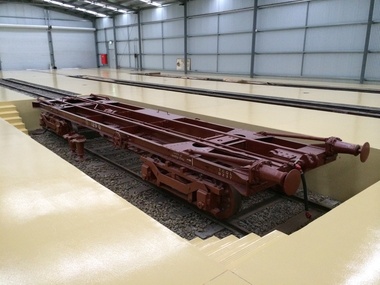
Yields information about the drawings that were used by the depot or workshop staff as reference drawings. Has a strong association with the depot workshop staff. Yields information about equipment on Ballarat tramcars and Signalling.Folder containing 46 blueprints or Dyeline prints of SEC tram equipment drawings. Front of folder made from a cloth back sheet of paper extended to secure to a thick cardboard runner. Rear of folder made from an old tram advertising panel or cardboard sheet, cut to size and secured to a thick cardboard runner with a cloth backing on both sides. Sheets secured with three brass screwed clips. Front cover damaged in bottom right hand corner. Rear cover breaking apart on outside around cloth binding. Heavy dirt marks from “grease” on bottom half of rear cover. Contains 46 drawings which have been individually catalogued and numbered on the rear of each drawing within the folder. Some of the drawings have been folded. Reg Item Micro Film No. Old BTPS No. SEC Drawing No Title 4807 42/4 1 VB4/8103C Westinghouse T1F Controller Main Cylinder Segments. 4867 47/2 2 BA-T8-8128 Westinghouse 225N Motor Case Bolt 4830 22/3 B 3 BA-T7-7666 Half Ball Brake Hanger Link, Driving Wheel, Brill Maximum Traction Truck 22E 4868 44/3A 4 BA-T8-8113 Split Suspension Bearing for Type W225 Motor (Westinghouse) 4869 52/2 5 BA-T8-8158 Contact Tips for G.E. Compressor Controller 4818 52/3 6 BA-T8-8159 GE B-23 Contact Finger Tips for G.E. Type ‘B’ Main Cylinder 4870 6/1 7A BA-T3-6734 Brass Nut for Switch Mechanism 4829 6/2 7B BA-T3-6735 Tongue Clip Link for Switch Mechanism 4871 6/3 7C BA-T3-6736 Fulcrum for Switch Mechanism 4872 6/4 7D BA-T3-6737 Plunger for Switch Mechanism 4832 7/6 8 BA-T3-6754 Pivot for Switch Mechanism No numbers 9 or 10 4873 17/5 11 BA-T7-7639 Detail of Motor Pinion for Brill Cars 4831.2 21/4 B 12 BA-T7-7661A Half Ball Hanger Links – single bogie trucks 4874 21/6 13A BA-T7-7663 Axle Box Inner Spring Driving Wheels Maximum Traction Truck 22E 4875 22/1 13B BA-T7-7664 Axle Box Outer Spring Driving Wheels Maximum Traction Truck 22E 4876 22/2 14 BA-T7-7665 Body Spring Brill Maximum Traction Truck 22E 4830.2 22/3B 15 BA-T7-7666A Half Ball Brake Hanger Link Driving Wheel Brill Maximum Traction Truck 22E 4877 22/4 16 BA-T7-7667 Body Spring, Brush Maximum Traction Truck 22E 4820.2 22/6 A 17 BA-T7-7669 Wear cups for Half Ball Brake Hanger Links, Single & Double Bogie Trucks 4878 50/5 18 BA-T8-8149 Connections of Line Breaker and Ratchet Switch for use with Drum Controller 4879 74/6 19 BA-T13-8757/9 Signal boxes, Back of Panel Wiring and External Connections 4880 45/1 20 BA-T8-8116 Trolley Harp 4806 15/3 21 BA-T7-7625 Equalizing Lever, Fulcrum, Brill 21 E truck 4881 15/5 22 BA-T7-7626A Brake Beam Fulcrum Brill 21E truck 4808 16/1 23 BA-T7-7628 Pinion Remover, GE 201G and GE 202 motors 4882 16/3 24 BA-T7-7630 Spring Posts, Brill 21E Truck 4883 21/3 25 BA-T7-7660 Brake Shoe Holder, Driving Wheel, Maximum Traction Truck Brill 22E 4884 21/5 26 BA-T7-7662 Brake Rod Guide, Single Bogie Trucks 4885 22/5 27 BA-T7-7668 Brake Shoe Holder, Pony Wheel, Maximum Traction Truck Brill 22E 4809 42/2 B 28 BA-T8-8101 Trolley Wheel and Axle 4815 42/1 B 29 BA-T8-8102A Motor Suspension Bearing, GE 202 Motor 4796.2 42/5 30 BA-T8-8104 Connection Diagram WH 225N Motor 4886 42/6 B 31 BA-T8-8105B Motor Suspension Bearing, GE 201 Motor 4797.2 48/6 32 BA-T8-8137 WH T1F Controllers 4816 49/2 33 BA-T8-8138 Connection Diagram GE 202 Motor 4887 49/3 34 BA-T8-8139 Connection Diagram K-36-J Controller 4888 50/3 35 BA-T8-8146 GE K-36-JR Controllers, with line breaker (Connection diagram) 4889 50/6 36 BA-T8-8150 Commutator for Westinghouse 225N Motor 4846 51/1 37 BA-T8-8151A Armature Bearing Lining, Commutator End, Type GE 201G Motor 4813 51/2 38 BA-T8-8152 Armature Winding Diagram Westinghouse 225 Motor 4840.2 51/40 39 BA-T8-8154A Armature Bearing Lining, Pinion End, Type GE201G Motor 4890 51/6 40 BA-T8-8156 Armature Bearing Lining, Pinion End, Type GE202A Motor 4891 52/1 41 BA-T8-8157A Armature Bearing Lining, Commutator End, Type GE202A Motor 4892 64/5 42A BA-T9-8392A Step Hangers, Single and Double Bogie Trucks, Hinged Type 4785.2 64/6B 42B BA-T9-8392/1A Step Hangers, Single and Maximum Traction Trucks, Fixed Type 4812.2 43/1 43 BA-T8-8106B GE K36J Controller, Main Cylinder Segments 4893 50/2 44 BA-T8-8145A GE B23E Controller, Main Cylinder Segments 4816 65/2 45 BA-T9-8394B Door Lock for Motorman’ Cabin Maximum Traction Trucks. 4810 73/3 46 BA-T13-8757 Ballarat Electric Tramways Signalling System, Arrangements & Details of Box.On front cover of folder, "1 - 46"trams, tramways, drawings, ballarat, sec, depot, workshops -
 Ballarat Tramway Museum
Slide - 35mm slide/s - set of 17, Noel Simons, 20/11/1962 12:00:00 AM
Set of 17 transparencies taken on 20/11/1962 on Kodak mounts. 1187.1 - Bendigo No. 2 at the Quarry Hill terminus, showing destination of Quarry Hill. Has Cohns Drinks and Streets Ice Cream ads on dash panel, a SEC 'electric cooking' roof ad and another roof ad. Shows the Y terminus at this location, but tram standing just before it. Overhead in position. 1187.2 - as above, but closer up. 1187.3 - as above, but from the north side, showing cemetery in the background. 1187.4 - Bendigo No.3 at Eaglehawk terminus. Tram showing destination of Quarry Hill. Has the various buildings at Eaglehawk in the background including the Foodland store. Has Streets Ice cream and White Horse Whiskey ads on the dash panel. 1187.5 - Bendigo No. 18 at Garden Gully crossing loop, in bound, with destination of Eaglehawk. Passengers waiting for an Eaglehawk tram at the stop. Has a white horse whiskey ad on dash panel and SEC roof ads. Conductor standing in doorway looking out. 1187.6 - Bendigo No. 7 inbound in Nolan St. at cnr of McCrae St. showing destination of Golden Square. Has Streets Ice cream ad on dash panel and a Castrol Roof ad. 1187.7 - Bendigo No. 19 at the North Bendigo terminus with railway level crossing in background. Tram has a Cohns Drinks ad and an SEC 'Electric Cooking' roof ad. 1187.8 - Bendigo No. 2 at the Quarry Hill terminus, looking back into Bendigo, showing destination of Eaglehawk. 1187.9 - Bendigo No. 21 in McCrae St, near Nolan St outbound for North Bendigo. Photo taken after tram has passed photographer. 1187.10 - Bendigo Nos. 4 and 26 at Charing Cross in View St. with fountain alongside and the Beehive, Ezywalkin Buildings in the background. No. 26 has a Sandhurst Milk and SEC 'Electric Cooking' roof ad. 1187.11 - close up of 22E maximum traction truck and folded footstep. 1187.12 - Bendigo No. 19 at Charing Cross terminus, after tram has passed photographer, showing destination of North Bendigo, with the Beehive building in the background and passengers boarding tram. 1187.13 - Bendigo No. 11, turning from View St. into Pall Mall, showing Special with the conductor holding point bar. Has the Beehive and Ezywalkin Buildings in the background. 1187.14 - No. 7 at Charing Cross terminus, in Pall Mall, bound for Golden Square. Has the Beehive and Ezywalkin buildings in the background and passengers waiting at the tram stop. 1187.15 - No. 18 at the Charing Cross terminus, bound for Eaglehawk. Has the Beehive and Ezywalkin buildings in the background and passengers waiting at the tram stop. Also has the 'Safety Zone' sign in the photograph. 1187.16 - No. 2 at Quarry Hill terminus, night or dusk photo. Tram showing destination of Depot. 1187.17 - No. 26 at Charing Cross, night photo. Tram has destination of Quarry Hill, but is on the line for Eaglehawk. Photo looks along Mitchell St. Also shows Safety Zone sign. Information written on in black ink and date stamped on purple ink. 1187.1 - "No. 2 at Quarry Hill terminus Bendigo" 1187.2 - "No. 2 at Quarry Hill terminus Bendigo" 1187.3 - "No. 2 at Quarry Hill terminus Bendigo" 1187.4 - "No. 3 at Eaglehawk terminus" 1187.5 - "No. 18 in Mt Korong Road, Long Gully at cnr of Havilah Road (Eaglehawk Route)" 1187.6 - "No. 7 in Nolan St. Bendigo, at Cnr of McCrae St., near lake Weeroona, (North Bendigo Route)' 1187.7 - "No. 19 at North Bendigo terminus" 1187.8 - "No. 2 at Quarry Hill terminus" 1187.9 - "No. 21 in McCrae St. Bendigo, near Nolan St. (North Bendigo Route) 1187.10 - "4 and 26 at Alexandra Fountain, Charing Cross Bendigo" 1187.11 - "Truck of Bogie Car, Bendigo Tramways" 1187.12 - "No. 19 in Pall Mall at Charing Cross, Bendigo" 1187.13 - "Birney car No. 11 entering Pall Mall from View St. at Charing Cross Bendigo" 1187.14 - "No. 7 in Pall Mall at Charing Cross, Bendigo" 1187.15 - "No. 18 at Alexandra Fountain, Charing Cross, Bendigo" 1187.16 - "No. 2 at Quarry Hill terminus, Bendigo" 1187.17 - "No. 26 at Alexandra Fountain, Charing Cross, Bendigo" tramways, trams, bendigo, quarry hill, eaglehawk, north bendigo, maximum traction, night photo, tram 2, tram 3, tram 4, tram 7, tram 11, tram 18, tram 19, tram 21, tram 26 -
 Ballarat Tramway Museum
Photograph - Digital image Set of 20, 1971-72
Set of 20 digital images of Bendigo Tramways, 1972 at or before closure while on a tram tour by Stuart Lodington. .1 - No. 29 at the North Bendigo terminus .2 - No. 29 just past the Bendigo end of the double track in High St Eaglehawk, with a BP dealer in the background. .3 - Night photo of No. 18 at a terminus, showing "Eaglehawk" .4 - ditto .5 - Night photo of No. 24 at Eaglehawk with Leo A Hughes Photographer in the background. The Tram has "Johnnie Walker whiskey" roof adverts. .6 - No. 29 outbound in Thunder St with a train passing over the bridge in the background. .7 - view from the front window of a tram on the Eaglehawk line with a large "display event float" in the foreground and tram approaching a crossing loop. .8 - No. 29 at North Bendigo .9 - view of High St Eaglehawk looking east from the terminus, showing the track and centre poles. .10 - No. 29 outbound on the North Bendigo line turning from either Nolan St or Caledonia St, running a special. .11 - No. 7 departing North Bendigo for Golden Square. .12 - No. 3 and 18 at Charing Cross. No. 3 has two SEC roof Advertisements .13 - No. 7 at North Bendigo with the trolley pole being reversed. .14 - No. 24 at Quarry Hill with Northern Terrazzo in the background with the driver alongside .15 - No. 7 and No.6 at Charing Cross with the Beehive buildings in the background. .16 - No. 7 at North Bendigo terminus .17 - ditto .18 - No. 24 at Quarry Hill with Northern Terrazzo in the background with the conductor alongside. .19 - ditto .20 - No. 26 and other bogie tram in View St near Charing Cross with the Armstrong Tyre Service building and signs for Cohn's Drinks and T&G in the view.trams, tramways, bendigo, eaglehawk, quarry hill, golden square, depot, north bendigo, charing cross, tram 29, tram 18, tram 24, tram 3, tram 7, tram 6, tram 26 -
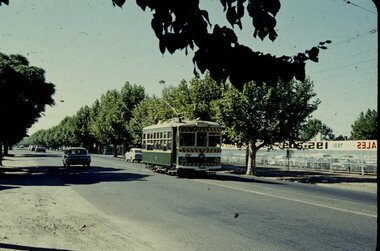
 Ballarat Tramway Museum
Photograph - Digital image Set of 10, Tony Smith, 1971
Yields information about Ballarat Tramways and trams prior to the closure of the tramway system.Set of 10 digital images of Ballarat trams prior to closure, scanned from original slides by Tony Smith, 1971 prior to closure of the system. The following photos have suffered colour change and showing some deterioration - fungal growth. .1 - 13 (Sturt St West) and 27 (Victoria St with Twin Lakes sign) crossing at King St loop with St Alipius church in the background. .2 - 13 (Sturt St West) and 17? (Mt Pleasant) crossing at Parker St loop, with the Ballarat College in the background. .3 - Single trucker, inbound, approaching the Parker St Loop, showing Mt Pleasant. .4 - 30 in Sturt St, descending the hill to Grenville St, with other trams in the background, including Woolworths Big W and the Dickins Store. Also has the 8 hour monument. 30 showing City. .5 - 37 running Special, no passengers, crossing Lydiard St Nth, heading for Grenville St. Has the Titanic bandstand, Mechanics Institute in the background. .6 - 33 and three other single truckers in the City Loop - has the Ballarat Gas Co and other buildings in the background. .7 - 37 showing Special passing 33 and other trams parked in the City Loop. Has Dickins, Ballarat Gas Co, Edmonds, Patersons store in the background. .8 - 17 crossing Lydiard St Nth in Sturt St. 17 has destination of Gardens via Drummond Nth, and a Twin Lakes sign. Includes the T&G sign in the background. .9 - 31, a single trucker and bogie tram crossing at Depot loop, Wendouree Parade - 31 showing Victoria St. .10 - 17 waiting in Gardens Loop, showing Mt Pleasant.trams, tramways, king st, victoria st, sturt st west, sturt st, grenville st, city loop, gardens loop, wendouree parade, tram 13, tram 27, tram 30, tram 37, tram 33, tram 17, tram 31