Showing 153 items matching "fountain hotel"
-
 Bendigo Historical Society Inc.
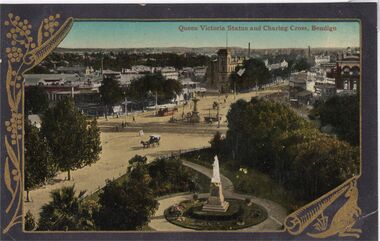
Postcard - CARWARDINE COLLECTION: QUEEN VICTORIA STATUE AND CHARING CROSS BENDIGO
Coloured postcard, grey border embellished with spray of gold wattle left side, and kangaroo in bottom RH corner. Image shows Charing Cross , Alexandra fountain in centre, Queen Victoria statue centre bottom. Horse drawn vehicles on Pall Mall and Charing Cross. City Family Hotel in background. View Point buildings on RH side. Receipt number 355/16Valentine & Sons Melbournebendigo, business, carwardine soap and candles -
 Bendigo Historical Society Inc.
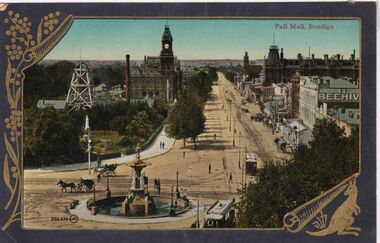
Photograph - CARWARDINE COLLECTION: PALL MALL BENDIGO
Coloured postcard, embellished with wattle left hand side, and kangaroo bottom Rh corner. Image shows Pall Mall, looking northwards. Post Office, Hustler's mine with brick chimney visible on left. Alexandra Fountain in centre bottom, horse drawn vehicles and two trams at Charing Cross. Henderson and Goode Beehive building and Shamrock Hotel on right. Receipt number 355/16bendigo, business, carwardine soap and candle -
 Bendigo Historical Society Inc.
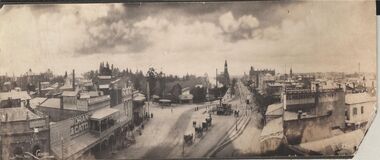
Photograph - CARWARDINE COLLECTION: STREETVIEW CHARING CROSS AND VIEW POINT, BENDIGO
Black and white photo. Image shows Charing Cross and View Point, looking northwards up Pall Mall (taken from City Family Hotel?) View Point businesses evident are : National and Mutual Life; A.M. Armstrong newsagents with 'The Argus popular daily ' on front; Moran and Cato, Warren's View Point Hotel, with two storey veranda ( on side: Cameo Cigarettes). Tram in foreground in View Street approaching fountain. Hustler's Royal Reserve poppet head and chimney on western side of Pall Mall, smoke rising from engine house? Post Office building with clock tower in distance. On RH side of image: written on verandah, Woodrow's Southern Cross Hotel; E.L. Holdsworth Chemist and Shamrock Hotel in distance. Four horse drawn taxis in centre of Charing Cross roadway, near fountain. Receipt number 355/16bendigo, business, carwardine soap and candle -
 Tatura Irrigation & Wartime Camps Museum
Small booklet, Photographs - 38 colour photos taken by Niela Laws
Scenes of visit to Hay NSW by Tatura Historical society members. Local photos include Heritage centre, Hay Railway station, Royal Mail hotel,and Hay Goal museum. There is also a "Dunera" Internees plaque, erected for the 50th Anniversary by the Hay Shire Council.- to mark the arrival from England of 1.984 refugees on the "Dunera" Many joined the AMF on their release from internment and made Australia their homeland.There is also a plaque to commemorate the existence of a POW camp at Hay. The plaque is on a fountain at the Hay racecourseTatura and District Historical society trip to Peppin Heritage centre May 1st 1993. Included in the visit was the Hay Intenment camp and local scenes.dunera, -
 Stawell Historical Society Inc
Photograph, Stawell Main Street Shops from the Anglican Church to Upper Main Street 1998 -- 45 Photos
... , Stawell Club, Cafe Rasuli, Albion Hotel Then Retravision... Commonwealth Bank, Stawell Club, Cafe Rasuli, Albion Hotel ...Main Street Shops Anglican Church to Upper Main Street - 1998Anglican Church , Tubs Video Shop, BRACE Employment Services Pykes Cycles and Sports, Site of R.J. McClure garage, Stawell Town Hall, Methodist Chruch Wesley Centre, Tonkin Motors Holden dealership, Stawell Taxis, Ivan McDonald hairdresser, Holmes Fruiter, Pamala's Hairdresser, Bakery, Stawell Post Office, Fish and Chip Shop, Denis Weily Chemist, Gold Reef Clothing, Overalls Furniture, Commonwealth Bank (State Bank), Stawell Tattslotto, W.P Computers, Pioneer Walk 4 Photos, Site of Max Holme Butcher, Hardings Mensland, Coles/ Fosseys both buildings, George Wilkinson Dentist, Betta Electrics, Gold Reef photgraphics, General Office of N.G.S.C. Classic Shoes, Old Commonwealth Bank, Stawell Club, Cafe Rasuli, Albion Hotel Then Retravision, Fountain, Newton Bros Buther 3 Photos 2 fron one rear, A.N.Z. Bank two views, Stawell Dry Cleaners, Fuller's Insurane Brokers, Reg Seng Pha Solicitor 2 views 1 B/W, Grampian China Art, Clarks Furniture, Unkonown 2 views, Commercial Hotel, O,Driscoll Solicitors, Auto Pro, Chinese Medicine, Westfarmers Dalgety Real Estate, Monaghan's Real Estate, BRACE Employment Services, James Monaghan Solicitor, Stawell Electronics, Old Ambulance Station.stawell -
 Ballarat Tramway Museum
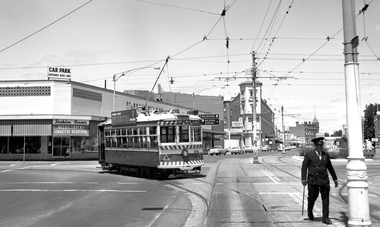
Photograph - Digital image, John Ward, 2/01/1972 12:00:00 AM
Digital image of the Bendigo tram 29 turning from Pall Mall into Mitchell St with the destination of Railway Station. In the background is the Fountain Plaza, advertising Melba Frocks and Gidgette Boutique, the City Family Hotel, Park Lane chicken shop. In the foreground is the Inspector returning the point bar to its holder on a pole. Photo by John Ward 2-1-1972. Slide title "04771 020172 7210-F SECV Birney tram 29 Pall Mall to Mitchell St at High St & View St Charing Cross Bendigo Vic"trams, tramways, bendigo, pall mall, mitchell st, charing cross, tram 29 -
 Ballarat Tramway Museum
Slide - 35mm slide/s, Noel Simons, 21/11/1962 12:00:00 AM
... Hotel and Alexandra Fountain in the background. Tram has..., side on photo, with City Club Hotel and Alexandra Fountain ...Set of 17 transparencies taken on 21/11/1962 on Kodak mounts. 1188.1 - Bendigo No. 11 at Depot Junction McCrae and Arnold St. with driver/conductor changing points. 1188.2 - Bendigo No. 4 at Charing Cross, side on photo, with City Club Hotel and Alexandra Fountain in the background. Tram has Castrol and SEC 'Electric Cooking' ads. 1188.3 - Bendigo No. 4 climbing View St. after tram has passed photographer. Tram has Streets Ice Cream and Cohns Soft Drinks ad on rear dash panel. In the background are the buildings in View St., including the Princess Theatre. Tram has destination of Eaglehawk. 1188.4 - Trams 2 and 4 crossing at the California Gully or Thorpe St Loop. 1188.5 - Bendigo 4 in Mt Korong Road. Tram inbound with destination of Quarry Hill, just leaving Garden Gully Loop. 1188.6 - Bendigo 4 and 17 crossing at the Hayes St. or Iron Bark Gully Loop. No. 17 bound for Eaglehawk, No. 4, Quarry Hill. 17 has two SEC roof ads and a white horse whiskey ad. 1188.7 - No. 17 bound for Eaglehawk, soon after leaving California Gully. Has large mullock heap in background. 1188.8 - Bendigo 2 and 17 crossing at the Thorpe St. or California Gully Loop. Has butchers shop in background. 1188.9 - Bendigo 17 at the Eaglehawk terminus. Has destination of Quarry Hill. In background is the hotel and shops at the terminus, showing ads for "Melbourne Bitter". Tram has two SEC 'Electric Cooking' ads. Driver and conductor about to assist two lady passengers with a pram and baby. 1188.10 - No. 17 at Eaglehawk terminus, awaiting departure. Has Eaglehawk Town Hall and Post Office in background. Tram has a Whitehorse Whiskey ad on the front dash panel. 1188.11 - No. 3 in High St. Eaglehawk, with destination of Eaglehawk. Has the shops on the south side of High St. in the background, including the Eaglehawk fish shop. Tram has two roof ads, one an SEC roof ad, and Cohns Drinks and Streets Ice cream ads on front dash panel. 1188.12 - as above, but after tram has passed photographer. Note the centre of the road poles. 1188.13 - No. 2 outbound for Eaglehawk at the intersection of Mt. Korong Road and the Calder Highway. Photo taken after the tram has passed the photographer. Has an Ampol service station in the background. 1188.14 - No. 11 leaving the Bendigo depot, crossing the bridge, with the Scrubber car in the background. 1188.15 - No. 21 at the North Bendigo terminus. Tram has destination of Golden Square and Cohns drink ad on front dash and two roof ads on side. 1188.16 - No. 11 on Golden Square route, in High St. at intersection with Old High St. 1188.17 - No. 11 at the Golden Square terminus, conductor turning the pole. Hotel on the left side of the photo. Note the road works barrier and red flag behind the tram. Slide has an end of roll mark on the right hand side of the image.Information written on in black ink and date stamped on purple ink. 1188.1 - "Birney car No. 11 in McCrae St. at Cnr of Arnold about to run into depot, Bendigo" 1188.2 - "No. 4 at Alexandra Fountain, Charing Cross Bendigo" 1188.3 - "No. 4 climbing the View St. Hill from Charing Cross, Bendigo (Eaglehawk Route)" 1188.4 - "No. 4 and 2 at Thorpe St. Loop, California Gully" 1188.5 - "No. 4 in Mt Korong Rd., Long Gully, Near Havilah Rd. (Bendigo) (Eaglehawk Route)" 1188.6 - "Nos. 17 and 4 crossing on Hayes St. Loop, Ironbark, Bendigo" 1188.7 - "No. 17 soon after leaving California Gully (Eaglehawk Route)" 1188.8 - "No.2 and 17 crossing on Thorpe St. Loop, California Gully (Eaglehawk Route)" 1188.9 - "No. 17 at Eaglehawk terminus" 1188.10 - "No. 17 at Eaglehawk terminus" 1188.11 - "No. 3 in High St. Eaglehawk" 1188.12 - "No. 3 nearing Eaglehawk terminus" 1188.13 - "No. 2 in Mt. Korong Rd., Ironbark. Calder highway on left (Eaglehawk route) 1188.14 - "Birney car No. 11 leaving Bendigo depot. Scrubber car at rear" 1188.15 - "No. 21 at North Bendigo Terminus" 1188.16 - "Birney car No. 11 in High St. Bendigo at intersection with Old High Street (Golden Square Route)" 1188.17 - "Birney Car No. 11 at Golden Square terminus, High St., Bendigo". tramways, trams, bendigo, depot junction, charing cross, view st., eaglehawk, north bendigo, golden square, tram 2, tram 3, tram 4, tram 11, tram 17, tram 21, tram scrubber -
 Ballarat Tramway Museum
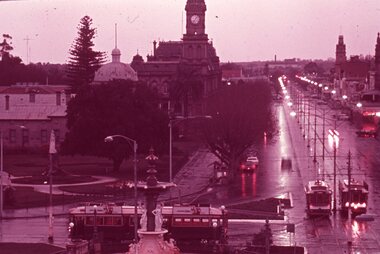
Slide - 35mm slide/s, Noel Simons, Sep. 1971
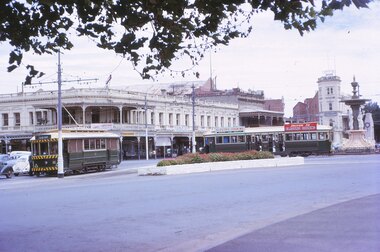
One slide on a Kodak Ready Mount made from the Association of Railway Enthusiast Provincial Tramways film strip, during September 1971 with a group of three trams at Charing Cross at dusk. Taken from an elevated position (the tower in the City Family Hotel) over looking the Alexandra fountain and looking towards the North on a wet evening. Two single truckers (1 possibly No. 6) and one bogie car waiting to proceed."Rainy evening at Charing Cross" in blue ink and "Sept 1971" in purple ink using a hand stamp.tramways, trams, charing cross, bendigo, tram 6 -
 Ballarat Tramway Museum
Slide - 35mm slide/s - set of 24, Noel Simons, 20/05/1971 12:00:00 AM
Set of 24 transparencies taken on 20/5/1971 on Kodak mounts. 1195.1 - Bendigo 19 arriving at Charing Cross en route to North Bendigo with Fountain Plaza and the City Family Hotel in the background. No. 19 has two roof ads for the SEC. -'Electricity better for cooking' and 'Everything's under control in my all electric kitchen' 1195.2 - as above, but standing at the Charing cross stop, with the Beehive Stores and other buildings along the east side of Pall Mall in the background. 1195.3 - No 21 ex Golden Square crossing View St. trackwork in front of No. 25 waiting to depart for Quarry Hill. No.21 has two roof ads (as for No.19 in 1195.1) and No.25 has one SEC roof ad and another. Ezywalkin sign in the background, and Fountain Plaza. 1195.4 - as for 1195.3, but after 21 has arrived and 25 left for Quarry Hill. Has Ezywalkin store and the Beehive store in the background. 1195.5 - No. 5 at the Eaglehawk terminus. Photo taken with a cannon in foreground looking along High St. Eaglehawk. Has shops on the west side of High St. in the background. 1195.6 - No. 5 at the Eaglehawk terminus, close up of the rear of the tram - note tow bar arrangement. Has destination of Quarry Hill. 1195.7-Nos.25 and 5 crossing at the Thorpe St. Loop, California Gully. No. 25 bound for Eaglehawk (has SEC Briquette and electric cooking roof ads) and 5 en route for Quarry Hill with a SEC and Cinzano roof ad. 1195.8 - as for 1195.7, but after trams have passed each other. Has Borough Auto Service building in the background. 1195.9 - No. 5 in Mt Korong Road, towards Bamard Street, photo taken after tram has passed photographer. 1195.10 - No. 30 at the Golden Square terminus with the Milk Bar on the right hand side of the photograph. 1195.11 - No. 30 inbound at Fire Station Loop, High St. Golden Square. Has old fire station in the background. Passengers are boarding the tramcar. 1195.12 - No. 30 in High St, bound for North Bendigo between Vine and Wattle Streets. 1195.13 - No. 5 bound for Eaglehawk waits at Iron Bark Gully Loop, at Hayes St. 1195.14 - No. 5 and No. 2 crossing at Iron Bark Gully Loop. 1195.15 - No. 5 bound for Eaglehawk leaving the Manchester Loop, Long gully. 1195.16 - No. 5 passing William Street, Long Gully en route to Eaglehawk. 1195.17 - No. 5 just before the California Gully Crossing Loop. 1195.18 - Nos. 5 and 26 crossing at California Gully crossing Loop. No. 5 heading to Eaglehawk, 26, Quarry Hill. 1195.19 - No. 5 in High St. Eaglehawk with Bob Moyle's Victoria Hotel and the TAB in the background. 1195.20 - No. 5 in High St. Eaglehawk approaching the terminus. Photo taken after the tram has passed the photographer. Has Foodland store and J. Best Fruit supply in the background, along with Eaglehawk Town Hall. 1195.21 - No. 5 at the Eaglehawk terminus, photo taken along seldom used track along High St. 1195.22 - as for 1195.22 - but at the very end of the track. 1195.23 - No. 5 en route for Quarry Hill climbs High St. Eaglehawk with the Victoria Hotel and Eaglehawk Town Hall in the background. 1195.24 - No. 5 and 25 crossing at Jobs Gully Loop. Note 25 has a black on white destination roll, while No. 5 has a white on black destination roll. Information written on in black ink and date stamped on purple ink. 1195.1 - "No. 19 arrives at Charing Cross Bendigo from Golden Square" 1195.2 - "No. 19 about to leave Charing Cross for North Bendigo" 1195.3 - "No. 25 awaiting departure for Quarry Hill, watches No. 21 arrive at Charring Cross from Golden Square" 1195.4 - "No. 21 on North Bendigo service and No. 25 on Quarry Hill run await departure at Charing Cross" 1195.5 - "No. 5 at Eaglehawk terminus" 1195.6 - "No. 5 at Eaglehawk terminus" 1195.7 - "Nos. 5 and 25 crossing at Thorpe St. Loop, California". 1195.8 - "Nos. 25 and 5 crossing Thorpe St. Loop, California Gully". 1195.9 - "No. 5 descending Mt Korong Rd. towards Bamard St." 1195.10 - "Birney car No. 30 at Golden Square terminus" 1195.11 - "Birney car No. 30 in High Street near Thistle Street (Fire Station Loop)" 1195.12 - "No. 30 in High St. between vine and Wattle Streets" 1195.13 - "No. 25 at Hayes Street Loop Iron Bark". 1195.14 - "Nos. 2 and 5 crossing at Hayes Street Loop Iron Bark" 1195.15 - "No. 5 at Manchester Loop opposite Havilah Road, Long Gully" 1195.16 - "No. 5 passing William Street, Long Gully". 1195.17 - "No. 5 at California Gully" 1195,18 - "Nos. 26 and 5 at Thorpe St. Loop, California Gully". 1195.19 - "No. 5 in High St. Eaglehawk". 1195.20 - "No. 5 approaching Eaglehawk terminus" 1195.21 - "No. 5 at Eaglehawk terminus" 1195.22 - "No. 5 at Eaglehawk terminus" 1195.23 - "No. 5 in High St. Eaglehawk" tramways, trams, bendigo, charing cross, eaglehawk, california gully, golden square, iron bark gully, jobs gully, tram 2, tram 5, tram 19, tram 21, tram 25, tram 26, tram 30 -
 Ballarat Tramway Museum
Slide - 35mm slide/s - set of 32, Noel Simons, 25/02/1971 12:00:00 AM
Set of 31 transparencies taken on 25/2/1972 on Kodak mounts. 1201.1 - Bendigo No. 26 in Bond St. just after leaving Long Gully en route for Quarry Hill. Has Norris Supermarket in background. Has two SEC roof ads. 1201.2 - No. 26 climbing View St. from Charing Cross en route to Eaglehawk. Has ANZ bank and AMOCO service station in background. 1201.3 - as for 1201.3, but after tram has passed photographer. Has buildings west of Mackenzie St. in photograph. 1201.4 - Tram stop and centre of the road pole with two "CARS STOP BY REQUEST" signs mounted on pole at the corner of Mackenzie St. 1201.5 - same position as for 1201.3, but with No. 5 descending the street. 1201.6 - same position as for 1201.2, but with No. 5 descending the street. Photo taken after tram has passed photographer. 1201.7 - No. 7 in Nolan St. from across the park at Lake Weeroona. 1201.8 - No. 7 entering McCrae St from Nolan St. - distant view. Note "TRAM "sign on left hand side under tree and overhead in McCrae St. from former track that once was in this street. 1201.9 - No. 7 in High St. with Cathedral in background. Tram en route to North Bendigo. Note scaffolding around Cathedral main spire area. 1201.10 - No. 7 crossing Bendigo Creek bridge in High St. near Golden Square. Has a Caltex Service station in the background. 1201.11 - No. 7 at Golden Square terminus with Sunburst Fruit Juices and a Peters Ice cream delivery vans alongside. 1201.12 - as for 1201.11 but photo taken from behind tram, with the end of the rails in the photograph. 1201.13 - No. 7 and 21 in Pall Mall at Charing Cross with No. 5 in the background. Taken some distance away from the location. 1201.14 - No. 7 at Golden Square terminus, taken a short distance from the tram terminus. Shows Milk Bar on right hand side and the hotel on the left hand side. Taken from the south side of the roadway. 1201.15 - as from 1201.14 but taken from the north side of the roadway. 1201.16 - No 5 waiting at California Gully loop. Distant photo showing surrounds 1201.17 - No. 5 en route for Quarry Hill crossing No. 26 at California Gully. 1201.18 - No. 26 at Eaglehawk terminus with Eaglehawk Town Hall and Post Office in background. 1201.19 - No. 21 arriving at Charing Cross en route to North Bendigo. Has Alexandra Fountain in the background, ANZ bank RACV building, and other buildings on the north side of Pall Mall or Nolan St. 1201.20 - No. 26 en route for Quarry Hill at Charing Cross, with crew standing by front door. Has Colonial Mutual life building, Armstrong Tyre Service (Firestone) and a sign for Cohns Drinks in the background. 1201.21 - as for 1201.20 but with No. 5 en route to Eaglehawk now in photograph. 1201.22 - No. 26 at Quarry Hill terminus. 1201.23 - No. 26 at Quarry Hill terminus, view of front portion of tram only from a gate at the Bendigo cemetery. 1201.24 - Track at the end of the Quarry Hill line showing the point blades of the former "Y" terminus and the overhead for this. 1201.25 - No. 2 at the Quarry Hill terminus, looking along the former Trackwork. 1201.26 - as for 1201.25 1201.27 - number not used. 1201.28 - Golden Square terminus from some distance from the actual terminus, showing the Warning sign "TRAM" for motorists from the south. No. 7 at the terminus. 1201.29 - No. 7 passing through the Golden Square shopping centre. Numerous cars and pedestrians. Tram en route for North Bendigo. 1201.30 - No. 7 in High St. Golden Square, en route for North Bendigo. Photo taken after tram has passed photographer. 1201.31 - No. 7 in High St. just past Wattle St. with the Cathedral in the background. Tram has two SEC roof ads good side on photo, 'Everything's fine in my all electric kitchen' and 'Electrical cooking - clean, quick, economical'. 1201.32 - No. 7 in High St. nearing Wattle St. Has Cathedral in the background. Photo taken after tram has passed photographer.Information written on in black ink and date stamped on purple ink. 1201.1 - "No. 26 in Bond St just after leaving Long Gully" 1201.2 - "No. 26 climbing View St. from Charing Cross" 1201.3 - "No. 26 ascending View St. from Charing Cross (At Mackenzie St.)" 1201.4 - "View St. & Mackenzie St." 1201.5 - "No. 5 in View St. near Mackenzie St." 1201.6 - "No. 5 in View St. nearing Charing Cross." 1201.7 - "No. 7 in Nolan St. seen from Lake Weeroona Park." 1201.8 - "No. 7 entering McRae St. from Nolan St. Note "TRAM" warning sign on left. 1201.9 - "No. 7 in High St. passing Short St." 1201.10 - "No. 7 crossing Bendigo Creek bridge in High St. near Golden Square." 1201.11 - "No. 7 at Golden Square terminus" 1201.12 - "No. 7 at Golden Square terminus" 1201.13 - "No 7, 21 and 5 at Charing Cross" 1201.14 - "No. 7 at Golden Square terminus" 1201.15 - "No. 7 at Golden Square terminus" 1201.16 - "No 5 waiting at California Gully loop." 1201.17 - "Nos. 5 and 26 crossing at California Gully loop" 1201.18 - "No. 26 at Eaglehawk terminus" 1201.19 - "No. 21 arriving at Charing Cross from Golden Square" 1201.20 - "No. 26 at Charing Cross" 1201.21 - "Nos. 5 and 26 at Charing Cross." 1201.22 - "No. 26 at Quarry Hill terminus" 1201.23 - "No. 26 at Quarry Hill terminus seen through the gates of the Bendigo Cemetery." 1201.24 - "Quarry Hill terminus showing remains for former double track layout abandoned before 1964." 1201.25 - "No. 2 at Quarry Hill terminus" 1201.26 - "No. 2 at Quarry Hill terminus" 1201.28 - "The Southern approach to Golden Square with No. 7 standing at the terminus, "TRAM" warning sign on the left. 1201.29 - "No. 7 passing through Golden Square Shopping Centre" 1201.30 - "No. 7 in High St. Golden Square" 1201.31 - "No. 7 in High St. passing Wattle St." 1201.32 - "No. 7 in High St. nearing Wattle St."tramways, trams, bendigo, bond st., view st., nolan st., high st., eaglehawk, california gully, charing cross, quarry hill, trackwork, tram 2, tram 5, tram 7, tram 21, tram 26 -
 Ballarat Tramway Museum
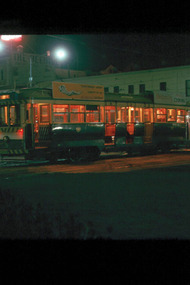
Slide - 35mm slide/s - set of 8, Noel Simons, 25/02/1972 12:00:00 AM
Set of 8 transparencies taken on 25/02/72 on Kodak mounts. 1202.1 - Night photo of Bendigo 5 at Charing Cross, waiting to depart to Quarry Hill. Tram has two SEC roof ads. Has Ezywalkin and the Beehive buildings in the background. 1202.2 - as for 1202.1 1202.3 - as for 1202.1 but further back and 7 and 21 waiting for their runs as well in Pall Mall. 1202.4 - 5 and 2 at Charing Cross, night photo, looking along Mitchell St. with Fountain Plaza on right of photo and Ezywalkin store. 1202.5 - No. 2 at Charing cross, bound for Eaglehawk. Tram has two SEC ads. 1202.6 - No. 26 at Quarry Hill terminus with the cemetery in the background. Tram has two SEC roof ads. 1202.7 - No. 26 in Mitchell St. bound for Eaglehawk, at Wills St. with the Hopetoun Hotel in the background. 1202.8 - as for 1202.6Information written on in blue ink and date stamped on purple ink. 1202.1 - "No. 5 at Charing Cross" 1202.2 - "No 5. at Charing Cross" 1202.3 - "Nos. 7, 21 and 5 at Charing Cross" 1202.4 - "Nos. 5 and 2 at Charing Cross" 1202.5 - "No. 2 at Charing Cross" 1202.6 - "No. 26 at Quarry Hill" 1202.7 - "No. 26 in Mitchell St. opposite Wills St." 1202.8 - "No. 26 at Quarry Hill" tramways, trams, bendigo, night photo, charing cross, quarry hill, mitchell st., tram 2, tram 5, tram 7, tram 21, tram 26 -
 Ballarat Tramway Museum
Slide - 35mm slide/s - set of 25, Noel Simons, 26/02/1972 12:00:00 AM
Set of 25 transparencies taken on 26/2/1972 on Kodak mounts. 1204.1 - Bendigo No. 5 - just arrived at Manchester Loop near Havilah Road, Long Gully. Photo taken after tram has passed photographer. 1204.2 - No. 26 in Backhaus St. Long Gully passing William St, en route to Quarry Hill. Photo taken after tram has passed photographer. 1204.3 - No. 5 climbing the High St. Hill Eaglehawk, heading for Quarry Hill with the buildings on the West side of High St. in the background, including the Eaglehawk Town Hall. 1204.4 - as for 1204.3, but tram close up. 1204.5 - as for 1204.3, but after tram has passed photographer. 1204.6 - No. 5 at intersection of Mt Korong Road Ironbark and Calder Highway, with the AMPOL service 'station in the background. Photo taken after tram has passed photographer. 1204.7 - No. 26 en route to Quarry Hill shortly after leaving Needle Loop, passing William St., Long Gully. 1204.8 - No. 5 at California Gully Loop, picking up a passenger, with the shops at Long Gully in the background. Photo taken after tram has passed photographer. 1204.9 - No. 5 in Long Gully, en route to Quarry Hill. Photo taken after tram has passed photographer. 1204.10 - No. 2 at Eaglehawk terminus with the Eaglehawk Town Hall and Post Office in the background. Tram has two SEC roof ads. 1204.11 - No. 2 at Eaglehawk terminus, close up. 1204.12 - as for 1204.11, but through the park gates. 1204.13 - as for 1204.11, but with tram stop shelters in the foreground and buildings on the West side of High St in the background. 1204.14 - No. 2 in Mt. Korong Rd, midway between California Gully Loop and Needle Loop. Photo taken after tram has passed photographer. 1204.15 - No. 5 in Long Gully, en route to Quarry Hill. 1204.16 - as for 1204.15, but with trams departed loop. Has an ESSO service station in the background. 1204.17 - No. 26 leaves Charing Cross up View St.. Photo taken after tram has passed photographer. Has Armstrong Tyre Service, Cohns Drinks ad on a building and the T&G building in the background. Also Firestone ads on the tyre service building. 1204.18 - No. 5 waits at Charing Cross with the Alexandra Fountain in the background. Tram has two SEC roof ads, 'Everything s fine in my all electric kitchen' and 'Electricity Best for Cooking'. Has RACV, Colonial Mutual Life buildings in the background and the planting areas around Charing Cross gardens in the foreground. 1204.19 - No. 21 en route to North Bendigo arrives at Charing Cross, with passengers waiting to board. No. 5 in the background. In the background is the Fountain Gate Plaza building and the City Family Hotel. 1204.20 - as for 1204.19, but with No. 7 en route to Golden Square. 1204.21 - as for 1204.19, but closer up. 1204.22 - as for 1204.18 1204.23 - No. 25 in Nolan St. near the crossing of Bendigo Creek, running a special tram tour. 1204.24 - No. 25 on a special charter, in Weeroona Ave. at Cnr of Caledonia St. passing the Gas works. 1204.25 - Nos. 25 (showing Golden Square), 7 and 26 at Charing Cross. Has fountain in the background.Information written on in blue ink and date stamped on purple ink. 1204.1 - "No. 5 at Manchester Loop, near Havilah Rd. Long Gully." 1204.2 - "No. 26 in Backhaus St. Long Gully passing William St." 1204.3 - "No. 5 in High St. Eaglehawk." 1204.4 - "No. 5 in High St. Eaglehawk." 1204.5 - "No. 5 in High St. Eaglehawk." 1204.6 - "No. 5 in Mt. Korong Rd., Ironbark, passing Calder Highway Junctn." 1204.7 - "No. 26 shortly after leaving Needle Loop, passing William St., Long Gully. No. 5 cresting hill in distance." 1204.8 - "No. 5 at California Gully Loop." 1204.9 - "No. 5 in Long Gully" 1204.10 - "No. 2 at Eaglehawk terminus." 1204.11 - "No. 2 at Eaglehawk terminus." 1204.12 - "No. 2 at Eaglehawk terminus." 1204.13 - "No. 2 at Eaglehawk terminus." 1204.14 - "No. 2 in Mt. Korong Rd, midway between California Gully Loop and Needle Loop. 1204.15 - "Nos. 2 and 26 crossing at Long Gully." 1204.16 - "No. 26 leaves Long Gully loop for Eaglehawk as No. 2 pulls out of the far end towards Bendigo" 1204.17 - "No. 26 beginning the climb up View St. from Charing Cross." 1204.18 - "No. 5 at Charing Cross." 1204.19 - "No 21 arrives at Charing Cross from Golden Square while No. 5 awaits departure time for Eaglehawk." 1204.20 - "Nos. 7, 21, and 2 (behind which is No. 5) at Charing Cross." 1204.21 - "Nos. 7, 21, and 2 at Charing Cross." 1204.22 - "No. 5 at Charing Cross." 1204.23 - "No. 25 in Nolan St. near Bendigo creek crossing" 1204.24 - "No. 25 in Weeroona Ave. at cnr of Caledonia St." 1204.25 - "Nos. 25, 7, 26 and 2 (behind 26) at Charing Cross."tramways, trams, bendigo, eaglehawk, long gully, california gully, charing cross, north bendigo, tram 2, tram 5, tram 7, tram 21, tram 25, tram 26 -
 Ballarat Tramway Museum
Slide - 35mm slide/s - set of 12, Noel Simons, 28 Feb. 1972
... electric kitchen.' Has the City Family Hotel and the Fountain... electric kitchen.' Has the City Family Hotel and the Fountain Plaza ...Set of 12 transparencies taken on 28/2/1972 on Kodak mounts. 1207.1 - Bendigo 26 and 2 at Charing Cross. 26 en route for Eaglehawk, 2 for Quarry Hill. Has the Colonial Mutual Life, Armstrong Tyre Service, and Australian Mutual Provident Society buildings and a Cohns Drinks ad. in the background. 1207.2 - as for 1207.1 but with Alexandra fountain in the foreground. 1207.3 - No. 2 in Mitchell St. heading for Quarry Hill. Photo taken after tram has passed photographer. Has buildings on either side of Mitchell St. in the background, including the Plaza Theatre. 1207.4 - No. 6 en route for Golden Square departing Charing Cross. Has the RACV and ANZ bank in the background. 1207.5 - No. 2 crossing Pall Mall to enter Charing Cross ex Quarry Hill, with the Fountain Plaza in the background. 1207.6 - No. 6 arriving Charing Cross ex Golden Square with No. 21 alongside. No. 21 has the SEC ad. 'Everything's fine in my all electric kitchen.' Has the City Family Hotel and the Fountain Plaza shopping centre in the background. 1207.7 - No. 5 at Charing Cross en route for Quarry Hill with No. 2 behind. No. 2 has two SEC roof ads, 'Everything s fine in my all electric kitchen' and 'Electricity best for cooking'. RACV building in the background. Tram crews are discussing the day in the front of the tram. 1207. 8 - No. 21 in High St. Bendigo with the Cathedral in the background. No. 21 has two SEC roof ads, 'Everything's fine in my all electric kitchen' and 'Electricity best for cooking'. 1207.9 - No. 6 in High St. Bendigo with the Cathedral in the background. 1207.10 - No. 6 in High St. Bendigo, just past Wattle St. Photo taken after the tram has passed the photographer from within the Highway Car Sales yard. 1207.11 - No. 26 bound for Eaglehawk at the end of the double track in View St., note signal contactors, tram stop and section signs mounted on pole. 1207.12 - No. 26 turning from View St. into Barnard St.Information written on in blue ink and date stamped on purple ink. 1207. 1- "Nos. 26 and 2 at Charing Cross." 1207.2 - "Nos. 26 and 2 at Charing Cross." 1207.3 - "No. 2 in Mitchell St. just after leaving Charing Cross." 1207.4 - "No.6 leaving Charing Cross for Golden Square." 1207.5 - "No. 2 arriving at Charing Cross from Quarry Hill." 1207.6 - "No. 21 waits at Charing Cross as No. 6 arrives from Golden Square." 1207.7 - "No 5 at Charing Cross with No. 2 lurking behind." 1207.8 - "No. 21 in High St. at cnr of Wattle St." 1207.9 - "No. 6 in High St. at cnr of Wattle St." 1207.10 - "No. 6 in High St. between Wattle and Vine Sts." 1207.11 - "No. 26 at end of double track in View St. near Barnard. St. 1207.12 - "No. 26 seen at dusk turning from View St. into Barnard St."tramways, trams, bendigo, charing cross, high st, view st., tram 2, tram 5, tram 6, tram 21, tram 26 -
 Ballarat Tramway Museum
Slide - 35mm slide/s - set of 4, Noel Simons, Apr. 1972
Set of 4 transparencies - copy slides - possibly ARE film strip dated March 1972. 1209.2 and 1209.4 on Kodak Readymount mounts. 1209.1 - Bendigo 5, 6 and 28 on a special tram service in bound to the City on a tour in Caledonia St. about to enter Lucan St, or White Hills Road or Weeroona Ave. (mis match in names in various maps). Gas works in the background. No. 5 has a white disk on the rear of the tram. 1209.2 - Nos 2 and 26 at Charing Cross with the Fountain Plaza in the background. Both trams have the destination of Quarry Hill, though 26 is on the Eaglehawk bound track. 1209.3 - No. 19 at the Golden Square terminus, with the conductor or driver swinging the pole and Billy Rodda's Golden Square hotel in the background. 1209.4 - No. 7 at Fire Station loop, en route to North Bendigo, picking up a passenger with a pram. Part of a set of 20 slides made by the Association of Railway Enthusiast Provincial Tramways film strip. Reference Item 2560 details the ARE Film Strip and provide references to other slides.Information written on in blue ink and date stamped on purple ink. 1209.1 - "Nos 5, 6 and 28 in Caledonia St. about to enter Weeroona Ave." 1209.2 - "Nos 2 and 26 at Charing Cross." 1209.3 - "Swinging the pole on No. 19 at Golden Square Terminus." 1209.4 - "No. 7 inward bound from Golden Square stops at Fire Station Loop."tramways, trams, bendigo, charing cross, golden square, gas works, special trams, tram 2, tram 5, tram 6, tram 7, tram 19, tram 28 -
 Ballarat Tramway Museum
Photograph - Black & White Photograph/s set of 19, Mar. 1972
Set of 19 black and white prints, all 89mm square of Bendigo trams, date machine printed on print is "Mar 1972". 981.1 - Tram 21 at North Bendigo terminus, with level crossing in background. Has destination "Golden Square" and two SEC roof ads. 981.2 - tram 2? at Eaglehawk, with destination "Depot", two SEC roof ads and "Leo A. Hughes Photographer" on side of building in background. 981.3 - tram 2? at Eaglehawk, side on view. 981.4 - tram 26 at Quarry Hill terminus looking back into city. 981.5 - tram 7 en route to North Bendigo at the site of the Bridge St. loop. Has a Peters Ice Cream truck and Sandhurst Fruit Juices truck on right side of photograph. 981.6 - tram 2 at Quarry Hill terminus. 981.7 - tram 2? at one of the loops on the Eaglehawk line, inbound? 981.8 - bogie tram at Charing Cross with fountain in background. Side on view looking south. 981.9 -trams 7 and 21 on Golden Square/North Bendigo line with bogie tram in background, at Charing Cross. Same as item 972. 981.10 - bogie tram at Charing Cross - has buildings in south west corner in background, including Colonial Mutual Life and an advertisement for the Herald newspaper. 981.11 - trams 25, 7 and two other trams at Charing Cross. 981.12 - trams 2 and 26 and three others at Charing Cross. 981.13 - tram 25 at Golden Square terminus, with Rodda's Golden Square Hotel in the background. Tram showing destination of "Nth Bendigo" 981.14 - tram 24, showing "Special" on depot access track. Has two Johnnie Walker roof ads on side. 981.15 - as above, but tram on bridge outside depot. 981.16 - trams 25 and 28 at depot 981.17 - tram 24 showing "Special" on depot access track with a single truck car in background. 981.18 - trams 2 and 26 at Charing Cross. Has advertisements for "Armstrong Tyre Service" and "Cohn's drinks" on buildings in background. 981.19 - Bendigo 2 at location?, about to enter a loop or double track section. Has hotel in background. On rear of each photo in the top left hand corner is a print number 1 to 19 in ink and location notes, generally "Bendigo"trams, tramways, charing cross, bendigo, golden square, quarry hill, tram 2, tram 21, tram 7, tram 24, tram 26 -
 Ballarat Tramway Museum
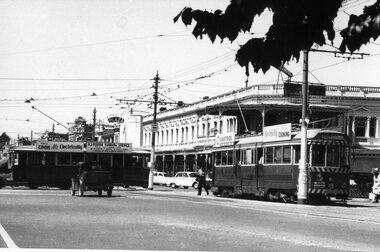
Photograph - Black & White Photograph/s, early 1960's
Black and White print of an aerial view of Bendigo SECV Bendigo tram 18 at Charing Cross terminus for the Eaglehawk route with another bogie tram and two single truck trams in the background. Trams have dash canopy lights, but no large white strip under the drivers windows. Photo not dated but appears to be at during early 1960's. Tram 18 has White Horse Whiskey ad on front dash panel, SEC Roof ads. Numbers of other trams cannot be determined. All trams have roof ads, including SEC ads and a CASTROL ad. Good view of the fountain and buildings on the north east corner. Has Ezywalkin store, City Club Hotel and other buildings. Shows traffic arrangements for cars to do a right turn from Pall Mall into Mitchell St. On a building in Mitchell St. is an advertisement for "ASTOR Radio"trams, tramways, charing cross, bendigo, mitchell st, aerial views, tram 18 -
 Ballarat Tramway Museum
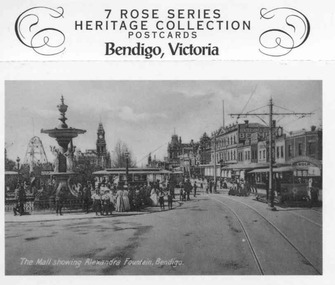
Postcard - Folder set, Rose Stereograph Co, "7 Rose Series Heritage Collection Postcards - Bendigo Victoria", c1990
Set of seven Rose Series Heritage postcards in a strip production featuring Bendigo Victoria. Each black and white postcard features an historic view of Bendigo from older Rose Series or Valentine's postcards and are perforated on the top and bottom so they can be separately used. On the rear of each card are areas for address, stamps, title, Rose logo and copyright note. Each card has been given a new Rose Series Number. On the top of the set of cards is a short history profile on the Rose Stereograph Co. 1. Photo of the Mall showing two ESCo trams, and the Alexandra Fountain with a third tram in the background c1908. Rose series Number 2764. Photo supplied by Rod Aikman - see image btm1662i1. 2. Photo of mining operations , c1900. Rose series Number 2765. Photo supplied by Rod Aikman 3. Image of Pall Mall, Law courts and Post office building. Rose series Number 2766. Photo supplied by Rod Aikman. Was Rose Series P3213. 4. Photo of Mitchell St. looking west from Pall Mall with fountain on right and two ESCo trams c1906.Rose series Number 2767. Photo supplied by Rod Aikman - see image btm1662i2. 5. Photo of Alexandra Fountain - was Valentine Series No. 1393 c1920's. - now Rose Series 2768. 6. Photo of Chinese Dragon "Loong", now Rose Series 2769 c1950 - was P2846. 7. Photo of Williamson Street Bendigo, showing Shamrock Hotel c1920- now Rose Series 2770 - was Valentine's M5710. trams, tramways, bendigo, pall mall, esco, mitchell st. -
 Ballarat Tramway Museum
Slide - 35mm slide/s - set of 13, Peter Moses, 1974
Set of 13 colour slides, 7 on Kodak cardboard mounts and 6 on Agfa colour plastic mounts. .1 - Bendigo Trust, Birney trams 28 and 30 at Central Deborah Mine terminus. No. 30 has a 3BO Roof advertisement. .2 - ditto .3 - ditto with the Central Deborah mine and buildings in the background. .4 - No. 30 inbound in High St. with Sacred Heart Cathedral in the background (spire under construction) .5 - Nos. 30 and 28 crossing at Charing Cross with the Fountain Plaza building and the fountain in the background. .6 - No. 28 north bound in Pall Mall, after leaving Charing Cross with the Shamrock Hotel in the background. .7 - Photo showing track and centre poles in View St. looking west - no overhead. Has AMOCO service station near McKenzie St. .8 - No. 28 taken from cab of No. 30, in McCrae St, at end of double track. .9 - No. 28 turning from McCrae St. into Nolan St. .10 - No. 28 in Nolan St. with Lake Weeroona rowing sheds in the background. .11 - No. 19 in now Tramway Ave (then Arnold St.) running into depot .12 - No. 19 outside Bendigo depot .13 - ditto Slides taken by Peter Moses, during the winter of 1974 (no leaves on the trees).On the rear of all the slides "P. Moses" in black ink. .1 - "1974 Bendigo Central Deborah Mine" in blue ink and in red ink “16”. .2 - "1974 Bendigo two Birney cars / Central Deborah Mine" in blue ink and in red ink “18”. .3 - "1974 Bendigo trams at Central Deborah Mine" in blue ink and in red ink “17”. .4 - "1974 Bendigo High St / tram near Sacred Hearth Cathedral" in blue ink and in red ink “15”. .5 - "1974 Bendigo two Birney cars / Charing Cross" in blue ink and in red ink “20”. .6 - "1974 Bendigo No. 28 Pall Mall" in blue ink and in red ink “8”. .7 - "1974 Bendigo / Old Tramline View St." in black ink and in red ink “5”. .8 - "1974 Bendigo, McRae St. (Pall Mall)" and in red ink "9". .9 - "1974 Bendigo, Lake Weeroona, / tram " and in red ink "10". .10 - "1974 Bendigo, Lake Weeroona" and in red ink “11”. .11 - "1974 Bendigo / Outside depot" and in red ink “24”. .12 - "1974 Bendigo / Outside depot" and in red ink “25”. .13 - "1974 Bendigo / Depot" and in red ink “26”.tramways, trams, bendigo, central deborah, bendigo trust, sacred hearth cathedral, north bendigo, depot, tram 19, tram 28, tram 30 -
 Ballarat Tramway Museum
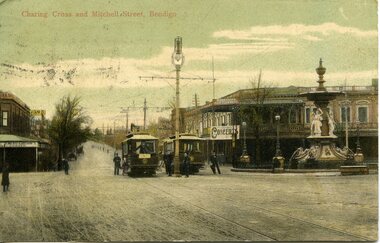
Postcard, Charing Cross Bendigo, 1906
Yields information about postcard printing, Bendigo Charing Cross in 1906 and a person who appears to have collected cards.Printed colour postcard of Charing Cross Bendigo with two trams in the view and crew men standing in front of the trams with buildings, the fountain in the background. Looks along Mitchell St. Title of the postcard is "Charing Cross and Mitchell St, Bendigo". Has in view, R. Curtains City Club Hotel with a "Concerts" sing on it and on the other corner, a building with the name "Gibsons Corner". Note the direction of the trolley poles on the trams, the wrong way around for the direction of the street. On rear of postcard is a message address to Miss Jani Baskin, San Antonio, Texas USA, post marked ex Bendigo 28.9.1906 and Seattle WA, Oct. 2? 1906, with a Victorian stamp and a two Cent (due to postage underpaid) US stamp. Centre divided postcard with spaces marked for correspondence and address. On the left hand edge is "Printed in Germany" trams, tramways, bendigo, mitchell st, charing cross, tram 14, tram 40 -
 Ballarat Tramway Museum
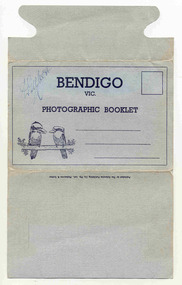
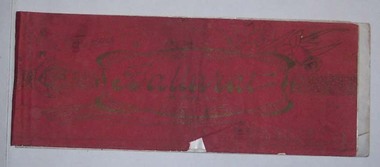
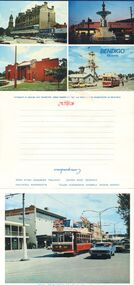
Postcard - Folder set, Valentine & Sons Publishing Co, "Bendigo Photographic Booklet", 1940's
Set of 9 black and white views of Bendigo printed on a folded strip, glued within a light grey colour light weight cardboard folder, titled "Bendigo Photographic Booklet". Booklet printed with an address area with title and kookaburras. Produced by The Valentine Publishing Co. Pty Ltd Melbourne & Sydney The rear has a slit on the rear cover that allowed the folder to be secured. Pictures are: 1. Mitchell St 2. The Lookout Tower 3. Conservatory Gardens 4. Shamrock Hotel 5. The Lake, Upper Reserve 6. The Pall Mall 7. Civic Buildings 8. Soldiers Memorial Hall and Post Office 9. Alexandria Fountain, Bendigo with a single trucker, M class type tram, prior to alterations, but in SEC colour scheme of the mid 1930's Made during 1940, with photographs of the 1930's as well given motor cars in the photo. Has "D. Gilbert" in ink on cover.trams, tramways, bendigo, pall mall, charing cross, mitchell st -
 Ballarat Tramway Museum
Book, Ballarat Litho & Printing Co, "The Picturesque Folio of Ballarat - 'The Modern Athens", 1904
Forty two page book with red covers, titled "The Picturesque Folio of Ballarat - 'The Modern Athens". Sheets have been individually printed both sides, stapled and then glued to the covers. Cover - gives title and printer details First sheet - with a greetings sheet for Good wishes and seasons greetings. Has a printed date of 1905. See Inscriptions. Dated 22/11/1904. Pages 3 - 10 - a historical sketch of Ballarat, compiled by Lieut-Colonel R. W. Williams V.D. Pages 12 - 41 - photos of Ballarat and district - such as: Sturt St The Lakes Post Office - note the trams clock board - taken at corner of Lydiard and Sturt Streets, looking east. The Gardens Queen Victoria Square Lydiard and Sturt St with a horse tram in the photo Victoria Park Eureka Monument The Statues Botanical Gardens Benevolent Asylum Hospital The City Oval - Richards & Co Photograph Fairy Land - the Lake Railway Station with a D class loco waiting for a signal, 3 post home before the level crossing. Has Irwin's Provincial hotel in view. Gong Gong Lake School of Mines and Methodist Church Lake Fountain A Ballarat view - 1853 - 54. View Point Gong Gong reservoir embankment South Star Mine Lal Lal Falls Band & Loch Mine On last page has the logo for the printers - Ballarat Litho & Printing Co, successors to F. W. Niven & Co. 56 and 58 Lydiard St. Ballarat. PDF scan of book added 21/9/2019 as btm3326i.pdfOn first page in black ink " to Chorus? Dodds, from Robert Dodds, and dated 22 Nov 1904.trams, tramways, ballarat, horse trams, sturt st, gardens, railway station, hospital -
 Ballarat Tramway Museum
Slide - 35mm slide/s - set of 3, Eldon Hogan, early 1960's
Set of three Kodak cardboard mounted slides - have handwritten captions and slide numbers - no date, post dash canopy lights but with the largely green front - early 1960's. From the Eldon Hogan collection. Scanned on the Canon scanner at the depot 15/12/1971 at the time of the installation of the scanner. .1 - No. 16 and a bogie car at Charing Cross, early 1960's with the City Club Hotel in the background. .2 - No. 18 at Charing Cross with the destination of Quarry Hill and with the City Club Hotel in the background .3 - No. 25 at the Eaglehawk terminus with two crewmen standing in front of the tram. Tram has the destination of Eaglehawk. The Town Hall in the background has a money raising thermometer for the Olympic Swimming Pool fund..1 - "Trams at Bendigo" .2 - "Trams at Fountain at Bendigo" .3 - "Tram at Eaglehawk" all in penciltramways, trams, bendigo, eaglehawk, charing cross, tram 16, tram 18, tram 25 -
 Ballarat Tramway Museum
Slide - 35mm slide/s - set of 11, Eldon Hogan, mid 1960's to early 1970's
Set of 11 Agfa Plastic mounted slides - from the Eldon Hogan collection - possibly on an ARE Bendigo tours - mid 1960's (black destination rolls) and late 1960's or early 1970's. Scanned on the Canon scanner at the depot 15/12/1971 at the time of the installation of the scanner. .1 - No 18 with Lake Weeroona in the background - possibly at the same time as the tour with No. 18, though showing destination of Charing Cross. .2 - ditto .3 - No. 25 and two following trams on a special tour, note the white disc - Quarry Hill line? .4 - No. 29 on the Eaglehawk line at the Mt. Korong Road and the Calder Highway, with the Ampol Service station in the background. .5 - No. 29 passing Lake Weeroona with Destination of Nth Bendigo - has a Briquettes Roof Advertisement., .6 - No. 26 ditto - with two SEC Roof Advertisements. .7 - No. 24 leaving Charing Cross for Golden Square with The Beehive building, Ezywalkin, Coca Cola and the Fountain Shopping Centre in the background. .8 - No. 29 and a bogie tram at the Golden Square terminus with Golden Square Hotel and Victoria Bitter fence in the background. No. 29 has a SEC Briquettes roof advertisement. .9 - No. 29, with the Cathedral in background. Tram has a SEC Briquettes roof advertisement and destination of Golden Square. .10 - side view of a bogie tram on the Eaglehawk line? Tram has a Electric cooking roof advertisement. Photo has been over exposed. .11 - Single trucker, Violet St with the Central Deborah mine head in the background. Tram has two SEC Electric Cooking roof advertisements. tramways, trams, bendigo, lake weeroona, eaglehawk, golden square, charing cross, central deborah, tram 18, tram 25, tram 29, tram 24 -
 Ballarat Tramway Museum
Photograph - Black & White Photograph/s, 25/09/1961 12:00:00 AM
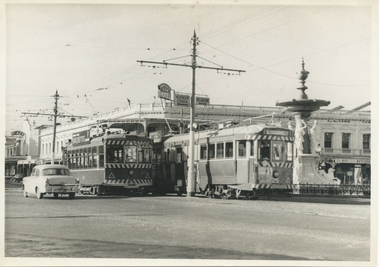
Black and White print contained within the Wal Jack Bendigo and Geelong Album, see Reg Item 5003 for more details. Photo of Birney No. 28 and Bogie tram No. 25 Bendigo, at Charing Cross with the fountain in the background along with the City Club Hotel). No. 28 has the destination of Special and a SEC roof advertisement for Briquettes, No. 25 Eaglehawk? and has a white disk showing a tram following. Note the direction signs on the pole between the tram for Heathcote and Echuca and Melbourne. Photo by Jim Seletto, 25/9/1961. On rear in ink "No. 28 Birney, No. 25 Bogie", Jim Seletto stamp, with date stamp of "25 Sep 1951" and "Bendigo" in red ink.trams, tramways, bendigo, charing cross, birney, tram 25, tram 28 -
 Bendigo Historical Society Inc.
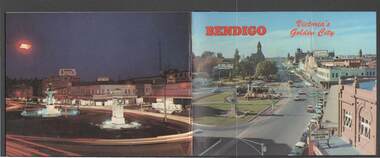
Document - BENDIGO VICTORIA'S GOLDEN CITY TOURISM BROCHURE ?1960S, ?1960s
Bendigo Victoria's Golden City Tourism Brochure Postcards 1960's. Charing Cross and Pall Mall looking north to the Post Office, Central Deborah Gold Mine and Vintage Tram, Chinese Joss House Emu Point Finn Street Bendigo, Charing Cross looking towards the Post Office Pall Mall Bendigo, Bendigo Vintage Tram Pall Mall Bendigo, Royal Tour Tram No. 30 Pall Mall Bendigo, Lake Eppalock at the Bendigo Yacht Club, Dusk Alexandra Fountain Pall Mall Bendigo, Sacred Heart Cathedral From High Street Bendigo, Central Deborah Gold Mine, Shamrock Hotel.bendigo, tourism, postcard -
 Bendigo Historical Society Inc.
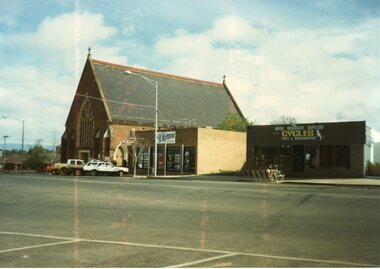
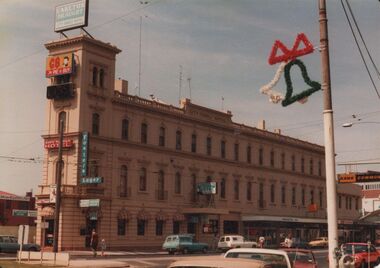
Photograph - BENDIGO HOTEL COLLECTION: CITY FAMILY HOTEL
Colour photograph: image shows City Family Hotel, High Street, Bendigo, opposite Alexandra Fountain. Three storey building, portico over front door facing High Street. Awnings over lower level windows. Carlton Draught and GB Pies sign on front Early 1980's ?.bendigo, hotel, city family hotel -
 Bendigo Historical Society Inc.
Book - BENDIGO: VICTORIA'S GOLDEN CITY
Coloured booklet of various scenes and buildings in and around Bendigo, titled Bendigo Victoria's Golden City. The front cover has a scene of Charing Cross looking towards Pall Mall. Inside the front cover is a very brief history and some Historical Buildings are mentioned. They are: Fortuna, Shamrock Hotel, Gold Mines Hotel, City Hall, Post Office, Law Courts, the Home for the Aged, Sacred Heart Cathedral, St. Paul's, Specimen Cottage, Log Lock-up and the Chinese Joss House. The coloured pictures inside are: The Central Deborah Gold Mine, Fortuna, Miner's Cottage, The Gold Mines Hotel, Victoria Hill, Bendigo Law Courts, Eaglehawk Log Lock-up, Look-out Tower Rosalind Park, Alexandra Fountain - Charing Cross, Conservatory Gardens with Law Courts in background, Inside the Conservatory, Bendigo Home & Hospital for the Aged - Victoria's 'White House', Sacred Heart Cathedral, Chinese Joss House, Chinese Joss House - Interior of the Main Temple, Bendigo Pottery - Potter at work, Bendigo Municipal Offices, Bendigo Institute of Technology at Flora Hill, Mt. Alvernia Hospital, Cobb & Co Coach, R Class Locomotive, Bendigo Tramcar, Lake Weeroona and Lake Eppalock Pumping Station. Some more attractions are mentioned inside the back cover. On the back cover is the Cenotaph - the only scale replica of the Whitehall Cenotaph - and Alexandra Fountain by night.Nucolorvue Productions Pty Ltdbendigo, tourism, photographs of bendigo icons, bendigo - victoria's golden city, fortuna, shamrock hotel, gold mines hotel, city hall, post office, law courts, home for the aged, victoria's 'white house', sacred heart cathedral, st paul's, specimen cottage, log lock-up, chinese joss house, charing cross, cenotaph, alexandra fountain, centra deborah gold mine, army cartographic unit, miner's cottage, harvey town, victoria hill, look-out tower rosalind park, conservatory gardens, conservatory, bendigo pottery, bendigo municipal offices, bendigo institute of technology, mt alvernia hospital, cobb & co coach, r class locomotive, bendigo railway station, bendigo tramcar, lake weeroona, lake eppalock pumping station, art gallery, historical museum eaglehawk, melville's caves, whitehall cenotaph, nucolorvue productins pty ltd, national library of australia -
 Bendigo Historical Society Inc.
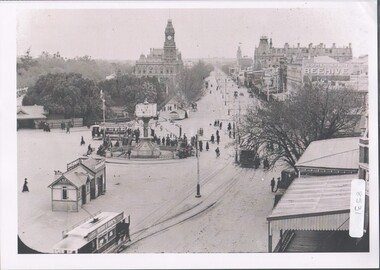
Photograph - LESLIE JOHN BAGUST COLLECTION: CHARING CROSS AND THE MALL, 1940
Leslie John Bagust Collection. Black & White Photo Charing Cross and Pall Mall Bendigo 1940. Alexandra Fountain in the foreground and behind that the Queen Victoria Gardens. Image taken looking west towards the Shamrock Hotel and the Old Post Office. Beside the R.S.L. Soldiers Memorial Hall is the Military Museum. The law Courts are then beside the Old Post Office Gallery.bendigo, tourism, charing cross and pall mall bendigo -
 Bendigo Historical Society Inc.
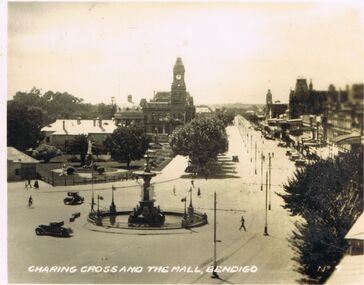
Photograph - Charing Cross and Pall Mall
View of Charing Cross and Pall Mall Bendigo, featuring the Alexandra fountain still under construction. The fountain was jointly funded by the Bendigo Juvenile Industrial Exhibition in 1879, a 500 pound donation by George Lansell and a 700 pound grant from the Sandhurst City Council. The fountain was designed by William Vahland and was opened 5/7/1881. The fountain is 28 feet tall and sits in a 2 feet deep pond that is 50 feet in diameter. It was built with 22 tons of Harcourt granite, cast iron and painted stone.8531 A4 B&W photograph of Charing Cross and Pall Mall, Bendigo, in the late 1800s (prior to automobiles); taken from the City Family Hotel. Photograph shows work underway on the Alexandra Fountain at Charing Cross. Photo shows three trams, pedestrians and some horse drawn vehicles. Pall mall shows Post Office, Shamrock hotel and TAFE towers.charing cross, post office -
 Bendigo Historical Society Inc.
Pamphlet - MERLE HALL COLLECTION: ROSALIND PARK CREATIVE VILLAGE BENDIGO PROJECT PAMPHLET, 1993
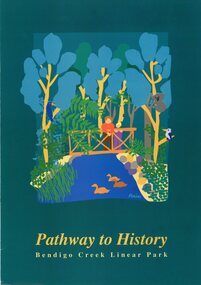
MERLE HALL COLLECTION: ROSALIND PARK CREATIVE VILLAGE BENDIGO PROJECT PAMPHLET Pathway to History Bendigo Creek Linear Park Inside pages - Graphic image of the Linear Park from Alexandra Fountain to the Botanical Gardens, includes Rosalind Park, Golden Dragon Museum, Shamrock Hotel, Bendigo Gas Works, Chinese Joss House, Chinese Tea House, Lake Weroona, Wetlands, White Hill Cemetary and mine sites. On outside pages, cover, historical notes on Bendigo and Notes on the Bendigo Creek Linear Park. Notes on the back cover: A joint project of the City of Greater Bendigo and the Department of planning and development. Production by the Publick Affairs Branch, Department of Planning and Development. Printed in Bendigo June 1993 4360/93.