Showing 157 items
matching we remember
-
 Kiewa Valley Historical Society
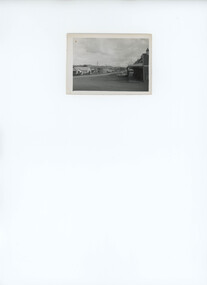
Photos - King Family Collection
... . Then later we moved to 50 Lakeside Ave. I remember we loved living ...The King family lived in Tawonga South where my older brother and sister went to school. We lived over the road from Wally Madison's farm. Later when a house became available, we moved into Valley Avenue, Mt Beauty. This is when I turned 5 and started my schooling. It was a long walk for a 5 year old as I remember. Then later we moved to 50 Lakeside Ave. I remember we loved living there as it was close to the school, footy ground and kindergarten. My father, Ted King, wad a carpenter and was involved in the building of many houses in Mt Beauty which was the home for the workers on the Kiewa Electric Scheme. So as they are part of the history of Mt Beauty I thought they may be useful to you as part of the history. The tennis photos, I vaguely remember Lou Hoad and Ken Rosewell giving exhibition matches in Mt Beauty. I may stand corrected on this, but I do remember my parents who were keen tennis players themselves were most excited at seeing these famous tennis players. As I was only 9 when we left Mt Beauty to live in Dimboola I still remember the shock of leaving a beautiful mountainous county side and arriving in a flat farming land next to a desert and seeing windmills One thing I do remember from school is, once a week (or fortnight) the teacher used to come around with a jar of little white pills, of which we were all to take. I really don't know what they were?? or for?? I also remember being taught to swim in the freezing cold river by a Mrs Smith who wore black bathers and wore her hair in a bun...... ...I am now in my 70s My father used to also carve intricate trays and jewellery boxes in his spare time. I think they were used for tennis trophies. by Diane Werner.x33 photos of small black and white photos of the Tawonga, Tawonga South and Mt Beauty - Photos not labelled but described as follows. See each photo for a possible label. A. Tawonga? B. Mt Beauty taken on the road to Bogong ? C. SEC Works D. Industrial buildings with mountains in the background E. Building site with wooden frame and 3 men F. Buildings with power poles G. Building site with lots of huts H. Buildings under construction I. Group of houses in the distance J. Group of houses in the distance K. Group of people in front of a building L. Group of 8 men sitting on timber planks, corrugated iron at back. M.& N. Building site with floor and upright timbers O. Mountain view with camp site in foreground P.& Q. Buiding site, several houses R.5 men at a building site S. portable building on trailer T & U. Mountain view V. Building site W. Group of men, car and mountains in background X. Cows Y. Pigs Z. 2 men standing next to cars. AA. Football players BB. Man painting a corrugated iron building CC. Football DD. Men in front of a building EE Buildings with mountains in background FF & GG Tennis payersHH & II. Electricity infrastructure -
 Ringwood and District Historical Society
Biography, Ringwood and District Historical Society, Interview notes - short biography on Miss Daisy Paddock, teacher at Ringwood State School, circa 1970s, c.1970s
Single page of notes/interview record of Miss Daisy Paddock, teacher at the Ringwood State School in Greenwood Avenue (now Federation Estate) - Interview write-up by Ringwood History Group.Transcript: "Miss Janet Daisy Paddock She was an extremely well-liked and well-regarded teacher at the old RW State School in Greenwood Ave (Now Federation Estate). She taught between the years of 1927 until 1941, then again after the war from 1951 until final retirement in 1961. In fact she was so liked that her former pupils formed "The 2997 Club" , which met in her honour every year for a meal (and, of course, their guest of honour). 2997 was the RW SS number. In some of her letters about early life in RW, she recalls the RW Mail being produced and printed in a small wooden building in Adelaide St. [Adelaide St is officially no longer on the RW map but it went from the highway nearly to Mullum Creek, between Melbourne St and Warrandyte Road.^ In fact there is an unmarked 100 metres of road that is on the west side of Officeworks that ends in a roundabout at the bottom of Eastland carpark. I don't believe it is exactly in the same position as the old Adelaide Street but it pretty close. That would put the old Mail office in the vicinity of the Maroondah Council service centre in Eastland.] She also recalls that there were nearly a dam on every corner. In fact, I recall in my 1950s/60s childhood that there were still many dams around. As I previously mentioned, with the RW-Mitcham claybelt, there wasn't much top soil and the orange clay is very fine, so when the banks of the dam get wet, it wass very slippery. I often remember playing around in those dams, as most boys did in those days. A friend and I spied an old bath used to water some horses so after some trial and errors we made it waterproof and fashioned a couple of paddles out of wooden fence pailings. The first launch in the local dam was fine and we managed to manouver through the bullrushes into the middle. The only thing that I forgot about was that I had a d<^ that went everywhere with me and, rather than bark from the bank, he swam over to us and tried to get aboard. Bath tubs are not known for their seaworthness and he tipped us all in the drink. Of course the bath sank like a rock. We scrambled on the bank and he added insult to injury when, as all dogs do, gave the usual shake and sprayed us with water. My mind often comes back to one dam right next to the Croydon pub - that provided water to the Magg's orchard - dug in the usual fashion on about 3 metres deep scraped in the local clay, it was at this dam in the early sixties that a young boy drowned. After that we were pretty careful around dams. Going back to Daisy's memories, she recalls that the kids often started late on Monday mornings as Monday was Market Day at RW. They used to watch the stock being herded into the yards and people getting off the steam trains. Her family home was at Gruyere and her father used to drive to RW market and stop midway at the Burnt Bridge hotel and rest the horses. [I suspect that he may have watered other things besides the horses.] They eventually moved to RW in Thanet St. Miss Paddock still remembers the old RW school at the corner of RW St and Whitehorse Road, it was very small so they built the new school in Greenwood Ave. RW had a population of around 2,(K)0 when Daisy became an Assistant Class Five. She used to walk through the open paddocks, surrounded by bush and orchards. She goes on to say that the bush was alive with wildlife and a natural playground for the children. Miss Paddock was a member of the Soroptomist Club in RW (equivalent to Rotary), active in the church and local community. At our archives, we have a plaque that grac^ the entrance to the school, naming it the Miss Daisy Paddock library, in honour of a great woman in our city." -
 Australian Commando Association - Victoria
Book, The Commando: The Life and Death of Cameron Baird, VC, MG
On 22 June 2013, Corporal Cameron Baird was a 2nd Commando Regiment Special Forces soldier when he led his platoon into a known Taliban stronghold to back-up another Australian unit under heavy fire. In the prolonged firefight, Cameron was mortally wounded. In 2014, Cameron's bravery and courage under fire saw him posthumously awarded the 100th Victoria Cross, our highest award possible for bravery in the presence of the enemy. Cameron Baird died how he lived - at the front, giving it his all, without any indecision. He will forever be remembered by his mates and the soldiers he served with in the 2nd Commando Regiment. THE COMMANDO reveals Cameron's life, from young boy and aspiring AFL player, who only missed out on being drafted because of injury, to exemplary soldier and leader. Cameron's story and that of 4RAR and 2nd Commando personifies the courage and character of the men and women who go to war and will show us the good man we have lost. australian special forces, commandos, afghanistan, 2nd commando regiment -
 Ringwood and District Historical Society
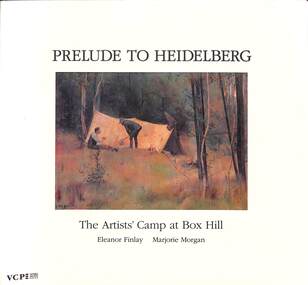
Book, Educational Media Services, Victoria College et al, Prelude to Heidelberg - The Artists' Camp at Box Hill, 1991
Image of a Tom Roberts painting on front of soft covered book titled The Artists' Camp at Box Hill - Eleanor Finlay, Marjorie MorganFOREWORD by William Dargie Kt., C.B.E., FRSA (London) FRAS (NSW) As one born between two worlds I find it difficult to identify wholly with either Australian art of the late 19th and early 20th centuries or the infinitely varied styles of today. At the beginning of the 1930s, when I first began to take any sort of interest in art, I had the natural feeling of youth that anything that had happened thirty to forty years ago was already far down the dark and backward abysm of time. As for today, all that one of my generation can do is to enjoy what is enjoyable and avert one's eyes and close one's ears against the rest. This is the time of life one realizes that distaste, as well as taste can be cultivated. Well, youth repeats itself in each generation and among the young there will always be .some determined and dedicated to the making of new images of the physical world. All artists throughout history have shared this common experience. All have remembered the suddenly-formed friendships, the sketching expeditions and camps, the first exhibitions, the formation of groups, the 'manifestos' - these last to return in later life all too often as embarrassments - but above all, the enthusiasm. 'Bliss was it in that dawn to be alive but to be young was very heaven'. Thus we can be time-travellers back one hundred and six years to that first plein-air camp set up by Roberts, McCubbin and Abrahams on part of David Houston's property at Box Hill. This was indeed the prelude to all that followed: Mentone and the meeting with the young Streeton painting on the rocks, and Heidelberg later. -
 Flagstaff Hill Maritime Museum and Village
Domestic object - Bowl, Late 19th or early 20th Century
The Process of Making Pottery Decorating, Firing, Glazing, Making, Technical There is a rhythm and flow to clay. It can’t be done all at once! Even the making process! It can take weeks to get everything done, especially if you can only work on your pottery once a week! Even though we have three hour classes, it’s often just not enough time! Here is an overview of some of the processes so you have a bit more grasp on some of the technical stuff! Step One – Design There are SO many ideas out there for making stuff in clay! From delicate porcelain jewellery, through to heavy sculptural work and everything in between. Deciding your direction is sometimes not that easy – when you first start, try everything, you will naturally gravitate to the style that you enjoy! The options and variations are endless and can get a wee bit overwhelming too! Check in with me before you start to ensure your ideas will work, what order you might do things, how you could achieve the look you are seeking and any other technical data required! Step Two – Making Clay is thixotropic. This means that as you work with it, the clay first gets sloppier and wetter, before is begins to dry in the atmosphere. For most things, you simply can’t do all parts of the project at once. An example of work order might look like: Get last weeks work out from the shelves Prepare clay for today’s work – roll your clay, prepare balls for throwing, make the first stage of a pinch pot) Clean up last week’s work and put it on the shelf for bisque firing Check that you have any glazing to do – and do enough of it that you will have time to finish your main project Do the next step of your next project – there might be a further step that can’t be complete immediately, in that case, wrap your work well and put onto the shelves. Letting your work rest for a while can really help keep your work clean and professional looking. Many things require bagging under plastic to keep it ready for work the next week – put your name on the outside of the bag so you can find your work easily. We have stickers and markers. Consider how you want to decorate your work – coloured slip can be applied at a fairly wet stage (remembering that it will make your work even wetter!). Trying to apply slip to dry clay won’t work! If you want to do sgraffito – you will need to keep the work leather hard (a state of dryness where you can still work the clay with a little effort and a little water and care). Step Three – Drying Most of the time your work can go into the rack uncovered to let it dry out for the following week. If you want to continue forming or shaping you will need to double bag your work – put your work on a suitable sized bat and put the bat in a bag so the base of the bag is under the bat, then put another bag over the top of the work and tuck the top of the bag under the bat. If you want to trim (or turn) your thrown work the following week, it should also be double bagged. If your work is large, delicate, or of uneven thicknesses, you should lightly cover your work for drying. When considering the drying process, bare in mind the weather, humidity and wind! The hotter and dryer, the faster things dry and work can dry unevenly in the shelves – this can lead to cracking – another time to lightly cover your work for drying. Step Four – Trimming and Cleaning Up Your work is dry! It is called greenware now and it is at it’s most fragile! Handle everything with two hands. I often refer to soft hands – keep everything gentle and with your fingers spread as much as possible. Try to not pick up things like plates too much, and always with both hands! Before your work can be bisque fired it should be “cleaned up”. You work won’t go into the kiln if it has sharp edges – when glazed, sharp edges turn into razor blades! Use a piece of fly wire to rub the work all over – this will scratch a little so be light handed. Use a knife or metal kidney to scrape any areas that require a bit more dynamic treatment than the fly wire offers! Finally, a very light wipe over with a slightly damp sponge can help soften and soothe all of your edges and dags! Trimming thrown work: If you are planning to trim (or turn) your thrown work (and you should be), make sure you bag it well – your work should be leather hard to almost dry for easiest trimming. Use this step to finish the work completely – use a metal kidney to polish the surface, or a slightly damp sponge to give a freshly thrown look. Wipe the sponge around the rim after trimming, and check the inside of the pot for dags! Trimming slip cast work: Usually I will trim the rims of your work on the wheel the following day to make that stage easier, however you will still need to check your work for lumps and bumps. Last but not least – check that your name is still clearly on the bottom of your work. Step Five – Bisque Firing When the work is completely dry it can go into the bisque kiln. The bisque kiln is fired to 1000°C. This process burns off the water in the clay as well as some of the chemically bound water. The structure of the clay is not altered that much at this temperature. Inside the bisque kiln, the work is stacked a little, small bowl inside a larger bowl and onto a heavy plate. Smaller items like decorations or drink coasters might get stacked several high. Consideration is paid to the weight of the stack and shape of the work. A bisque kiln can fire about one and a half times the amount of work that the glaze kiln can fire. The firing takes about 10 hours to complete the cycle and about two days to cool down. Once it has been emptied the work is placed in the glaze room ready for you to decorate! Step Six – Glazing Decorating your work with colour can be a lot of fun – and time consuming! There are three main options for surface treatment at this stage: Oxide Washes Underglazes Glazes Washes and underglazes do not “glaze” the work – It will still need a layer of glaze to fully seal the clay (washes don’t need glaze on surfaces not designed for food or liquid as they can gloss up a little on their own). Underglazes are stable colourants that turn out pretty much how they look in the jar. They can be mixed with each other to form other colours and can be used like water colours to paint onto your work. Mostly they should have a clear glaze on top to seal them. Oxides are a different species – the pink oxide (cobalt) wash turns out bright blue for instance. They don’t always need a glaze on top, and some glazes can change the colour of the wash! The glazes need no other “glaze” on top! Be careful of unknown glaze interactions – you can put any combination of glaze in a bowl or on a plate, but only a single glaze on the outside of any vertical surface! Glazes are a chemical reaction under heat. We don’t know the exact chemicals in the Mayco glazes we use. I can guess by the way they interact with each other, however, on the whole, you need to test every idea you have, and not run the test on a vertical surface! Simply put, glaze is a layer of glass like substance that bonds with the clay underneath. Clay is made of silica, alumina and water. Glaze is made of mostly silica. Silica has a melting point of 1700°C and we fire to 1240°C. The silica requires a “flux” to help it melt at the lower temperature. Fluxes can be all sorts of chemicals – a common one is calcium – calcium has a melting point of 2500°C, however, together they both melt at a much lower temperature! Colourants are metal oxides like cobalt (blue), chrome (green through black), copper (green, blue, even red!), manganese (black, purple and pink) iron (red brown), etc. Different chemicals in the glaze can have dramatic effects. for example, barium carbonate (which we don’t use) turns manganese bright pink! Other elements can turn manganese dioxide brown, blue, purple and reddish brown. Manganese dioxide is a flux in and of itself as well. So, glazes that get their black and purple colours, often interact with other glazes and RUN! Our mirror black is a good example – it mixes really well with many glazes because it fluxes them – causes them to melt faster. It will also bring out many beautiful colours in the glazes because it’s black colouring most definitely comes from manganese dioxide! Glaze chemistry is a whole subject on it’s own! We use commercial Mayco glazes on purpose – for their huge range of colour possibilities, stability, cool interactions, artistic freedom with the ability to easily brush the glazes on and ease of use. We currently have almost 50 glazes on hand! A major project is to test the interactions of all glazes with each other. That is 2,500 test tiles!!!! I’m going to make the wall behind the wheels the feature wall of pretty colours! Step Seven – Glaze (Gloss or sometimes called “Glost”) Firing Most of the time this is the final stage of making your creation (but not always!) The glaze kiln goes to 1240°C. This is called cone 6, or midrange. It is the low end of stoneware temperatures. Stoneware clays and glazes are typically fired at cone 8 – 10, that is 1260 – 1290°C. The energy requirement to go from 1240°C to 1280°C is almost a 30% more! Our clay is formulated to vitrify (mature, turn “glass-like”) at 1240°, as are our glazes. A glaze kiln take around 12 hours to reach temperature and two to three days to cool down. Sometimes a third firing process is required – this is for decoration that is added to work after the glaze firing. For example – adding precious metals and lustres. this firing temperature is usually around 600 – 800°C depending upon the techniques being used. There are many students interested in gold and silver trims – we will be doing this third type of firing soon! After firing your work will be in the student finished work shelves. Remember to pay for it before you head out the door! There is a small extra charge for using porcelain clay (it’s more than twice the price of regular clay), and for any third firing process! Once your work has been fired it can not turn back into clay for millennia – so don’t fire it if you don’t like it! Put it in the bucket for recycling. https://firebirdstudios.com.au/the-process-of-making-pottery/ The bowl is an example of kitchenware used in the 19th century and still in use today.Bowl white ceramic. Crack on side. Badly stained.Backstamp very faint and unable to be read.flagstaff hill, warrnambool, shipwrecked-coast, flagstaff-hill, flagstaff-hill-maritime-museum, maritime-museum, shipwreck-coast, flagstaff-hill-maritime-village, mixing bowl, food preparation, kitchen equipment, ceramic -
 Flagstaff Hill Maritime Museum and Village
Domestic object - Bowl
The Process of Making Pottery Decorating, Firing, Glazing, Making, Technical There is a rhythm and flow to clay. It can’t be done all at once! Even the making process! It can take weeks to get everything done, especially if you can only work on your pottery once a week! Even though we have three hour classes, it’s often just not enough time! Here is an overview of some of the processes so you have a bit more grasp on some of the technical stuff! Step One – Design There are SO many ideas out there for making stuff in clay! From delicate porcelain jewellery, through to heavy sculptural work and everything in between. Deciding your direction is sometimes not that easy – when you first start, try everything, you will naturally gravitate to the style that you enjoy! The options and variations are endless and can get a wee bit overwhelming too! Check in with me before you start to ensure your ideas will work, what order you might do things, how you could achieve the look you are seeking and any other technical data required! Step Two – Making Clay is thixotropic. This means that as you work with it, the clay first gets sloppier and wetter, before is begins to dry in the atmosphere. For most things, you simply can’t do all parts of the project at once. An example of work order might look like: Get last weeks work out from the shelves Prepare clay for today’s work – roll your clay, prepare balls for throwing, make the first stage of a pinch pot) Clean up last week’s work and put it on the shelf for bisque firing Check that you have any glazing to do – and do enough of it that you will have time to finish your main project Do the next step of your next project – there might be a further step that can’t be complete immediately, in that case, wrap your work well and put onto the shelves. Letting your work rest for a while can really help keep your work clean and professional looking. Many things require bagging under plastic to keep it ready for work the next week – put your name on the outside of the bag so you can find your work easily. We have stickers and markers. Consider how you want to decorate your work – coloured slip can be applied at a fairly wet stage (remembering that it will make your work even wetter!). Trying to apply slip to dry clay won’t work! If you want to do sgraffito – you will need to keep the work leather hard (a state of dryness where you can still work the clay with a little effort and a little water and care). Step Three – Drying Most of the time your work can go into the rack uncovered to let it dry out for the following week. If you want to continue forming or shaping you will need to double bag your work – put your work on a suitable sized bat and put the bat in a bag so the base of the bag is under the bat, then put another bag over the top of the work and tuck the top of the bag under the bat. If you want to trim (or turn) your thrown work the following week, it should also be double bagged. If your work is large, delicate, or of uneven thicknesses, you should lightly cover your work for drying. When considering the drying process, bare in mind the weather, humidity and wind! The hotter and dryer, the faster things dry and work can dry unevenly in the shelves – this can lead to cracking – another time to lightly cover your work for drying. Step Four – Trimming and Cleaning Up Your work is dry! It is called greenware now and it is at it’s most fragile! Handle everything with two hands. I often refer to soft hands – keep everything gentle and with your fingers spread as much as possible. Try to not pick up things like plates too much, and always with both hands! Before your work can be bisque fired it should be “cleaned up”. You work won’t go into the kiln if it has sharp edges – when glazed, sharp edges turn into razor blades! Use a piece of fly wire to rub the work all over – this will scratch a little so be light handed. Use a knife or metal kidney to scrape any areas that require a bit more dynamic treatment than the fly wire offers! Finally, a very light wipe over with a slightly damp sponge can help soften and soothe all of your edges and dags! Trimming thrown work: If you are planning to trim (or turn) your thrown work (and you should be), make sure you bag it well – your work should be leather hard to almost dry for easiest trimming. Use this step to finish the work completely – use a metal kidney to polish the surface, or a slightly damp sponge to give a freshly thrown look. Wipe the sponge around the rim after trimming, and check the inside of the pot for dags! Trimming slip cast work: Usually I will trim the rims of your work on the wheel the following day to make that stage easier, however you will still need to check your work for lumps and bumps. Last but not least – check that your name is still clearly on the bottom of your work. Step Five – Bisque Firing When the work is completely dry it can go into the bisque kiln. The bisque kiln is fired to 1000°C. This process burns off the water in the clay as well as some of the chemically bound water. The structure of the clay is not altered that much at this temperature. Inside the bisque kiln, the work is stacked a little, small bowl inside a larger bowl and onto a heavy plate. Smaller items like decorations or drink coasters might get stacked several high. Consideration is paid to the weight of the stack and shape of the work. A bisque kiln can fire about one and a half times the amount of work that the glaze kiln can fire. The firing takes about 10 hours to complete the cycle and about two days to cool down. Once it has been emptied the work is placed in the glaze room ready for you to decorate! Step Six – Glazing Decorating your work with colour can be a lot of fun – and time consuming! There are three main options for surface treatment at this stage: Oxide Washes Underglazes Glazes Washes and underglazes do not “glaze” the work – It will still need a layer of glaze to fully seal the clay (washes don’t need glaze on surfaces not designed for food or liquid as they can gloss up a little on their own). Underglazes are stable colourants that turn out pretty much how they look in the jar. They can be mixed with each other to form other colours and can be used like water colours to paint onto your work. Mostly they should have a clear glaze on top to seal them. Oxides are a different species – the pink oxide (cobalt) wash turns out bright blue for instance. They don’t always need a glaze on top, and some glazes can change the colour of the wash! The glazes need no other “glaze” on top! Be careful of unknown glaze interactions – you can put any combination of glaze in a bowl or on a plate, but only a single glaze on the outside of any vertical surface! Glazes are a chemical reaction under heat. We don’t know the exact chemicals in the Mayco glazes we use. I can guess by the way they interact with each other, however, on the whole, you need to test every idea you have, and not run the test on a vertical surface! Simply put, glaze is a layer of glass like substance that bonds with the clay underneath. Clay is made of silica, alumina and water. Glaze is made of mostly silica. Silica has a melting point of 1700°C and we fire to 1240°C. The silica requires a “flux” to help it melt at the lower temperature. Fluxes can be all sorts of chemicals – a common one is calcium – calcium has a melting point of 2500°C, however, together they both melt at a much lower temperature! Colourants are metal oxides like cobalt (blue), chrome (green through black), copper (green, blue, even red!), manganese (black, purple and pink) iron (red brown), etc. Different chemicals in the glaze can have dramatic effects. for example, barium carbonate (which we don’t use) turns manganese bright pink! Other elements can turn manganese dioxide brown, blue, purple and reddish brown. Manganese dioxide is a flux in and of itself as well. So, glazes that get their black and purple colours, often interact with other glazes and RUN! Our mirror black is a good example – it mixes really well with many glazes because it fluxes them – causes them to melt faster. It will also bring out many beautiful colours in the glazes because it’s black colouring most definitely comes from manganese dioxide! Glaze chemistry is a whole subject on it’s own! We use commercial Mayco glazes on purpose – for their huge range of colour possibilities, stability, cool interactions, artistic freedom with the ability to easily brush the glazes on and ease of use. We currently have almost 50 glazes on hand! A major project is to test the interactions of all glazes with each other. That is 2,500 test tiles!!!! I’m going to make the wall behind the wheels the feature wall of pretty colours! Step Seven – Glaze (Gloss or sometimes called “Glost”) Firing Most of the time this is the final stage of making your creation (but not always!) The glaze kiln goes to 1240°C. This is called cone 6, or midrange. It is the low end of stoneware temperatures. Stoneware clays and glazes are typically fired at cone 8 – 10, that is 1260 – 1290°C. The energy requirement to go from 1240°C to 1280°C is almost a 30% more! Our clay is formulated to vitrify (mature, turn “glass-like”) at 1240°, as are our glazes. A glaze kiln take around 12 hours to reach temperature and two to three days to cool down. Sometimes a third firing process is required – this is for decoration that is added to work after the glaze firing. For example – adding precious metals and lustres. this firing temperature is usually around 600 – 800°C depending upon the techniques being used. There are many students interested in gold and silver trims – we will be doing this third type of firing soon! After firing your work will be in the student finished work shelves. Remember to pay for it before you head out the door! There is a small extra charge for using porcelain clay (it’s more than twice the price of regular clay), and for any third firing process! Once your work has been fired it can not turn back into clay for millennia – so don’t fire it if you don’t like it! Put it in the bucket for recycling. https://firebirdstudios.com.au/the-process-of-making-pottery/ This bowl is an example of kitchenware used in the 19th century and still in use today.Bowl white ceramic plain that has two sets of edging around lip. Inside bowl has plaster designed to look like cooking mixture.flagstaff hill, warrnambool, shipwrecked-coast, flagstaff-hill, flagstaff-hill-maritime-museum, maritime-museum, shipwreck-coast, flagstaff-hill-maritime-village, kitchen equipment, ceramic -
 Flagstaff Hill Maritime Museum and Village
Domestic object - Bowl, J & G Meakin, Late 19th or early 20th Century
The Process of Making Pottery Decorating, Firing, Glazing, Making, Technical There is a rhythm and flow to clay. It can’t be done all at once! Even the making process! It can take weeks to get everything done, especially if you can only work on your pottery once a week! Even though we have three hour classes, it’s often just not enough time! Here is an overview of some of the processes so you have a bit more grasp on some of the technical stuff! Step One – Design There are SO many ideas out there for making stuff in clay! From delicate porcelain jewellery, through to heavy sculptural work and everything in between. Deciding your direction is sometimes not that easy – when you first start, try everything, you will naturally gravitate to the style that you enjoy! The options and variations are endless and can get a wee bit overwhelming too! Check in with me before you start to ensure your ideas will work, what order you might do things, how you could achieve the look you are seeking and any other technical data required! Step Two – Making Clay is thixotropic. This means that as you work with it, the clay first gets sloppier and wetter, before is begins to dry in the atmosphere. For most things, you simply can’t do all parts of the project at once. An example of work order might look like: Get last weeks work out from the shelves Prepare clay for today’s work – roll your clay, prepare balls for throwing, make the first stage of a pinch pot) Clean up last week’s work and put it on the shelf for bisque firing Check that you have any glazing to do – and do enough of it that you will have time to finish your main project Do the next step of your next project – there might be a further step that can’t be complete immediately, in that case, wrap your work well and put onto the shelves. Letting your work rest for a while can really help keep your work clean and professional looking. Many things require bagging under plastic to keep it ready for work the next week – put your name on the outside of the bag so you can find your work easily. We have stickers and markers. Consider how you want to decorate your work – coloured slip can be applied at a fairly wet stage (remembering that it will make your work even wetter!). Trying to apply slip to dry clay won’t work! If you want to do sgraffito – you will need to keep the work leather hard (a state of dryness where you can still work the clay with a little effort and a little water and care). Step Three – Drying Most of the time your work can go into the rack uncovered to let it dry out for the following week. If you want to continue forming or shaping you will need to double bag your work – put your work on a suitable sized bat and put the bat in a bag so the base of the bag is under the bat, then put another bag over the top of the work and tuck the top of the bag under the bat. If you want to trim (or turn) your thrown work the following week, it should also be double bagged. If your work is large, delicate, or of uneven thicknesses, you should lightly cover your work for drying. When considering the drying process, bare in mind the weather, humidity and wind! The hotter and dryer, the faster things dry and work can dry unevenly in the shelves – this can lead to cracking – another time to lightly cover your work for drying. Step Four – Trimming and Cleaning Up Your work is dry! It is called greenware now and it is at it’s most fragile! Handle everything with two hands. I often refer to soft hands – keep everything gentle and with your fingers spread as much as possible. Try to not pick up things like plates too much, and always with both hands! Before your work can be bisque fired it should be “cleaned up”. You work won’t go into the kiln if it has sharp edges – when glazed, sharp edges turn into razor blades! Use a piece of fly wire to rub the work all over – this will scratch a little so be light handed. Use a knife or metal kidney to scrape any areas that require a bit more dynamic treatment than the fly wire offers! Finally, a very light wipe over with a slightly damp sponge can help soften and soothe all of your edges and dags! Trimming thrown work: If you are planning to trim (or turn) your thrown work (and you should be), make sure you bag it well – your work should be leather hard to almost dry for easiest trimming. Use this step to finish the work completely – use a metal kidney to polish the surface, or a slightly damp sponge to give a freshly thrown look. Wipe the sponge around the rim after trimming, and check the inside of the pot for dags! Trimming slip cast work: Usually I will trim the rims of your work on the wheel the following day to make that stage easier, however you will still need to check your work for lumps and bumps. Last but not least – check that your name is still clearly on the bottom of your work. Step Five – Bisque Firing When the work is completely dry it can go into the bisque kiln. The bisque kiln is fired to 1000°C. This process burns off the water in the clay as well as some of the chemically bound water. The structure of the clay is not altered that much at this temperature. Inside the bisque kiln, the work is stacked a little, small bowl inside a larger bowl and onto a heavy plate. Smaller items like decorations or drink coasters might get stacked several high. Consideration is paid to the weight of the stack and shape of the work. A bisque kiln can fire about one and a half times the amount of work that the glaze kiln can fire. The firing takes about 10 hours to complete the cycle and about two days to cool down. Once it has been emptied the work is placed in the glaze room ready for you to decorate! Step Six – Glazing Decorating your work with colour can be a lot of fun – and time consuming! There are three main options for surface treatment at this stage: Oxide Washes Underglazes Glazes Washes and underglazes do not “glaze” the work – It will still need a layer of glaze to fully seal the clay (washes don’t need glaze on surfaces not designed for food or liquid as they can gloss up a little on their own). Underglazes are stable colourants that turn out pretty much how they look in the jar. They can be mixed with each other to form other colours and can be used like water colours to paint onto your work. Mostly they should have a clear glaze on top to seal them. Oxides are a different species – the pink oxide (cobalt) wash turns out bright blue for instance. They don’t always need a glaze on top, and some glazes can change the colour of the wash! The glazes need no other “glaze” on top! Be careful of unknown glaze interactions – you can put any combination of glaze in a bowl or on a plate, but only a single glaze on the outside of any vertical surface! Glazes are a chemical reaction under heat. We don’t know the exact chemicals in the Mayco glazes we use. I can guess by the way they interact with each other, however, on the whole, you need to test every idea you have, and not run the test on a vertical surface! Simply put, glaze is a layer of glass like substance that bonds with the clay underneath. Clay is made of silica, alumina and water. Glaze is made of mostly silica. Silica has a melting point of 1700°C and we fire to 1240°C. The silica requires a “flux” to help it melt at the lower temperature. Fluxes can be all sorts of chemicals – a common one is calcium – calcium has a melting point of 2500°C, however, together they both melt at a much lower temperature! Colourants are metal oxides like cobalt (blue), chrome (green through black), copper (green, blue, even red!), manganese (black, purple and pink) iron (red brown), etc. Different chemicals in the glaze can have dramatic effects. for example, barium carbonate (which we don’t use) turns manganese bright pink! Other elements can turn manganese dioxide brown, blue, purple and reddish brown. Manganese dioxide is a flux in and of itself as well. So, glazes that get their black and purple colours, often interact with other glazes and RUN! Our mirror black is a good example – it mixes really well with many glazes because it fluxes them – causes them to melt faster. It will also bring out many beautiful colours in the glazes because it’s black colouring most definitely comes from manganese dioxide! Glaze chemistry is a whole subject on it’s own! We use commercial Mayco glazes on purpose – for their huge range of colour possibilities, stability, cool interactions, artistic freedom with the ability to easily brush the glazes on and ease of use. We currently have almost 50 glazes on hand! A major project is to test the interactions of all glazes with each other. That is 2,500 test tiles!!!! I’m going to make the wall behind the wheels the feature wall of pretty colours! Step Seven – Glaze (Gloss or sometimes called “Glost”) Firing Most of the time this is the final stage of making your creation (but not always!) The glaze kiln goes to 1240°C. This is called cone 6, or midrange. It is the low end of stoneware temperatures. Stoneware clays and glazes are typically fired at cone 8 – 10, that is 1260 – 1290°C. The energy requirement to go from 1240°C to 1280°C is almost a 30% more! Our clay is formulated to vitrify (mature, turn “glass-like”) at 1240°, as are our glazes. A glaze kiln take around 12 hours to reach temperature and two to three days to cool down. Sometimes a third firing process is required – this is for decoration that is added to work after the glaze firing. For example – adding precious metals and lustres. this firing temperature is usually around 600 – 800°C depending upon the techniques being used. There are many students interested in gold and silver trims – we will be doing this third type of firing soon! After firing your work will be in the student finished work shelves. Remember to pay for it before you head out the door! There is a small extra charge for using porcelain clay (it’s more than twice the price of regular clay), and for any third firing process! Once your work has been fired it can not turn back into clay for millennia – so don’t fire it if you don’t like it! Put it in the bucket for recycling. https://firebirdstudios.com.au/the-process-of-making-pottery/This bowl was made by renowned pottery company J & G Meakin of England. The firm was established in the mid-1800's. The bowl is an example of kitchenware used in the 19th century and still in use today.Bowl; white ceramic, round and tapering inwards towards base. Made by J and G Meakin England.On base, 'Ironstone China Reg SOL 391413' with symbolflagstaff hill, flagstaff hill maritime museum and village, warrnambool, maritime museum, maritime village, great ocean road, shipwreck coast, mixing bowl, food preparation, j & g meakin, pottery, stoke-on-trent, kitchen equipment, ceramic -
 Marysville & District Historical Society
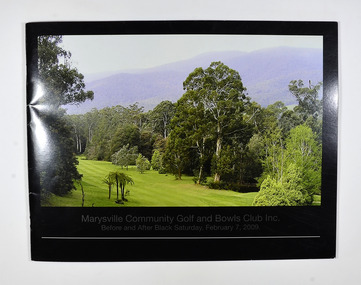
Book - Paperback booklet, Elizabeth Mary Amos, Marysville Community Golf and Bowls Club Inc.-Before and After Black Saturday, February 7, 2009, 2011
... Liesfield and remember the happy times we enjoyed together. You... Liesfield and remember the happy times we enjoyed together. You ...This book was created to document through photographs, the history of the Marysville Community Golf and Bowls Club both before and after the Black Saturday Bushfire of 7th February, 2009.Front cover has a photograph taken of one of the greens at the Marysville Community Golf Course. Back cover has a photograph of a red toadstool.non-fictionThis book was created to document through photographs, the history of the Marysville Community Golf and Bowls Club both before and after the Black Saturday Bushfire of 7th February, 2009.marysville community golf and bowls club, golf, bowls (game), marysville, black saturday bushfires, 2009, wildfires, victoria, history -
 Marysville & District Historical Society
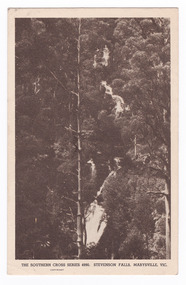
Postcard (item) - Black and white postcard, Stevenson Falls, Marysville, Vic, 1930
... ,/ I don't suppose you/ remember, but we used/ to walk up... here,/ I don't suppose you/ remember, but we used/ to walk up ...A postcard in a series produced by the Rose Stereograph Company in Victoria, Australia.A black and white photograph of Steavenson Falls, Marysville, Victoria. The Steavenson Falls is named after the Victorian Assistant Commissioner of Roads and Bridges, John Steavenson, who arrived in Victoria in the early 1860s. At 84 metres high, Steavenson Falls is Victoria's tallest cascading waterfall. The falls are split into roughly five cascades, with the last of these plunging into a small, picturesque rock pool. This postcard was produced by the Rose Stereograph Company as a souvenir of Marysville.THE SOUTHERN CROSS SERIES 4990./ COPYRIGHT/ STEVENSON FALLS, MARYSVILLE, VIC. POST CARD. Correspondence/ Address Mt. Kitchener House/ Marysville Dear Dad,/ I'm having a/ great time up here,/ I don't suppose you/ remember, but we used/ to walk up to see these/ falls when you were up/ here with me. I hope you/ like being at No. 6./ However, it won't be/ much longer now - I'll/ be home on Saturday./ Love to you all,/ Marjoriemarysville, victoria, waterfalls, stevenson falls, steavenson falls, southern cross series, 4990, postcard, souvenir, john steavenson -
 Marysville & District Historical Society
Book - Paperback booklet, Elizabeth Mary Amos, Marysville Community Golf and Bowls Club Inc.-Before and After Black Saturday, February 7, 2009, 2011
... Liesfield and remember the happy times we enjoyed together. You... Liesfield and remember the happy times we enjoyed together. You ...This book was created to document through photographs, the history of the Marysville Community Golf and Bowls Club both before and after the Black Saturday Bushfire of 7th February, 2009.Front cover has a photograph taken of one of the greens at the Marysville Community Golf Course. Back cover has a photograph of a red toadstool.non-fictionThis book was created to document through photographs, the history of the Marysville Community Golf and Bowls Club both before and after the Black Saturday Bushfire of 7th February, 2009.marysville community golf and bowls club, golf, bowls (game), marysville, black saturday bushfires, 2009, wildfires, victoria, history -
 Federation University Historical Collection
Booklet, Extra Muros, 1947, 1947
Each year World War One and World War Two veteran, and Ballarat Teachers' College Principal addressed the College community for ANZAC Day. The following are excerpts of his 1947 address. "...But we should do more than remember, and instead of pausing once a year for this purpose is should be our aim to remember daily - every day should be an Anzac Day so that we shall be inspired to take stock of ourselves if we are tryig to be worthy of almidst 100,000 dead who died to keep this country free to progress nobly towards a worthy goal, What are we dong about it? As a body of teachers er should be particulalrly concerned, as in our hands largely the growth of the children lies. In the schools we can do much in our work of every day to develop right standards and a better outlook amongst the children it is our privilege to teach. We can successfully teach the three "R's" but if this is all we do then we have failed. Is should be our aim, living in the spirit of those who gace so much, to dedicate ourselfes to the work of teaching young people how to live; to train them gently in ethical standards of conduct; to take responsibility; to live through the operation with otherts; to be prepared to give service without thought of personal gain; to realise to the full all that is best in them for the good of all. What we should do and how it is to be done is difficult to descibe, but if we ourselves have taught something of the Anzac Sprit we shall not fail. In particular, we shold take care of the orphan and th child of the disabled soldier. We should explore all avenues to see what that these children get every opportunity for higher education. As far as it lies in our power we should see that these children do not suffer - thus the legacy of war is ours. In a few months you will be going out to your schools. You will have young children around you. Let you arims be high. Try to live worthily and let your little community be the better and the finer for your coming. If you achiec somethig of thise then 100,000 shall nit have died in vain." Blue soft covered, stapled booklet named 'Extra Muros', the magazine of the Ballarat Teachers College, ANZAC Day. The contents include: The Year's Sport, J. Arthur Rank; Music; Dingo Blood; Anzac Day 1947; History of Sport; J. Arthur Rank Named images include: staff and students; Sports Committee; Social Committee; Student Council; Magazine Committee' Daylesford Camp; Anglesea Camp; Grampians Camp; Exies, College staff and students;A number of authorgraps are written into the back page. ballarat teachers' college, ellwood, lord, robinson, tozer, connelly, pattenden, collins, blake, faulds, sunderland, miller, bryan, yeo, frank lord, lindsay w. harley, lindsay w. harley, anzac day -
 Federation University Historical Collection
Document, History of the Ballarat Technology Park, Oakbank
The Ballarat Technology Park is associated with Federation University Australia. The first stage commenced on 03 August 1989 when the first sod was turned by Hon, David White, Minister for Industry, Technology and Resources. John Beaumont was the Director of the Ballarat Technology Research and Development Park in 1989.Twenty items relating to the History of the Ballarat Technology Park as collected by John Parkin. .1) Handwritten notes by John Parkin on the history of the Ballarat Technology Park .2) Letter from A.E. Helyar (Shire of Buninyong Secretary), 08 March 1988 .3) Shire of Buninyong Minutes 07 June 1988 .4) Development of High Technology Activity by Jack Barker .5) Definition of a Technology Park by Derek Woolley .6) Shire of Buninyong minutes 28 June 1988 .7) Shire of Buninyong minutes 19 July 1988 .8) Invitation to a reception to commemorate the inauguration of the Ballarat Technology Park (John Parkin) by Shire of Buninyong President Cr Judith Coull to be held on 03 August 1989. .9) Invitation to a reception to the Ballarat Technology Park (John Beaumont) .10) Ballarat Courier article 04 August 1989 .11) Draft letter to Professor Geoffrey Blainey from John Parkin .12) Letter to the Editor from John Parkin, 18 December 2000 .13) University of Ballarat Development Appeal, 04 November 1994 .14 & .15) Invitation to installment dinner to celebrate the installation of Professor Geoffrey Blainey as Chancellor of the University of Ballarat to be held in the Union Building (now Albert Coates Building), Mt Helen campus .16) Letter to the editor from John Parkin .17) Letter from John Beaumont, 25 November 1994 .18) Invitation to the opening of the ISSC Southern Region Data Centre to be held on 24 November 1995. .19) Letter from Barry Traynor, 13 December 1995 .20) Planning Scheme information relating to the LaTrobe Research and Development Zone. .1) 2nd May 2005 History of Technology Park (I.T. centre) The history of the Technology Park started back in the mid-1980s. At the time I was a Buninyong Shire Councilor and as such I was Buninyong's representative on the then Ballarat Development Committee. At one of our meetings we received a request for information on a suitable site for a technology park. The requirements were for a site adjacent to a tertiary institution, secluded for security purposes and large enough to contain such a development. The next morning I contacted our Shire Engineer at the time, Newell Barrett and we drove around the area we both agreed that the current site was the most suitable we saw to meet the requirements. At the time it was owned by George Morrison. however the original enquiry to the B.D.C. came to nothing but the Shire Council and the B.D.C. decided to investigate the possibility of the site becoming a technology Park and information was collected. At about this time Mr Morrison put the property on the market and it was bought by a Ballarat builder, Mr John Beaumont, with the idea of developing it as a residential area. Council then arranged a meeting with Messrs Morrison and Beaumont to discuss the matter. I remember Mr Morrison saying he did not care what was done with it he just wanted to sell it and move down to the coast. Mr Beaumont, on the other hand, said he wasn't ready to retire yet and the idea interested him. As a result a committee consisting of the B.C.A.E., B.D.C. and Buninyong Shire Council (and Mr Beaumont) was formed to plan the development and rezone the area to technology park. It was previously zoned residential land and would seem to have been suitable for sub-division and residential development - its close proximity to the College being a major factor in its favour. The point of this is if Mr Beaumont had insisted on pursuing his original plan and had opposed the rezoning, I am quite confident he would have won an appeal at the A.A.T . (Administrative Appeals Tribunal - forerunner of V.C.A.T.) and the I.T. centre would not have got off the ground and the area would be covered with houses. But Mr Beaumont did go into the project with enthusiasm and the first stage was commenced on the 3rd August 1989 when the first sod was turned by Hon. David White, the Minister for Industry, Technology and resources (See the Courier 4th August 1989) Mr Beaumont went overseas to study similar parks and look for tenants. Unfortunately government did not support the project as they have now and apparently Mr Beaumont was ahead of his time for the private sector so Mr Beaumont could not continue the development and the site eventually passed to the College. I personally think more could have been done ... The work done by the Buninyong Shire Council and Ballarat Development Committee seems to have been forgotten as according to the Courier December 21, 2000 we are told the Park opened in 1995 as a joint venture between the City and the University. As a former Councillor said to me on the day "What happened to the plaque David White unveiled in 1989!" If there is any other information you want, please contact me. You may use my file for reference. Kind regards John Parkin PS I always felt a bit guilty that I encouraged John Beaumont and he was left in the lurch. ballarat technology park, parkin, john parkin, helyar, barker, woolley, shire of buninyong, beaumont, blainey, geoffrey blainey, southern region data centre, greenhill enterprise centre, stan jeffrey, jeffrey, john beaumont, david white -
 Flagstaff Hill Maritime Museum and Village
Domestic object - Plate
The Process of Making Pottery Decorating, Firing, Glazing, Making, Technical There is a rhythm and flow to clay. It can’t be done all at once! Even the making process! It can take weeks to get everything done, especially if you can only work on your pottery once a week! Even though we have three hour classes, it’s often just not enough time! Here is an overview of some of the processes so you have a bit more grasp on some of the technical stuff! Step One – Design There are SO many ideas out there for making stuff in clay! From delicate porcelain jewellery, through to heavy sculptural work and everything in between. Deciding your direction is sometimes not that easy – when you first start, try everything, you will naturally gravitate to the style that you enjoy! The options and variations are endless and can get a wee bit overwhelming too! Check in with me before you start to ensure your ideas will work, what order you might do things, how you could achieve the look you are seeking and any other technical data required! Step Two – Making Clay is thixotropic. This means that as you work with it, the clay first gets sloppier and wetter, before is begins to dry in the atmosphere. For most things, you simply can’t do all parts of the project at once. An example of work order might look like: Get last weeks work out from the shelves Prepare clay for today’s work – roll your clay, prepare balls for throwing, make the first stage of a pinch pot) Clean up last week’s work and put it on the shelf for bisque firing Check that you have any glazing to do – and do enough of it that you will have time to finish your main project Do the next step of your next project – there might be a further step that can’t be complete immediately, in that case, wrap your work well and put onto the shelves. Letting your work rest for a while can really help keep your work clean and professional looking. Many things require bagging under plastic to keep it ready for work the next week – put your name on the outside of the bag so you can find your work easily. We have stickers and markers. Consider how you want to decorate your work – coloured slip can be applied at a fairly wet stage (remembering that it will make your work even wetter!). Trying to apply slip to dry clay won’t work! If you want to do sgraffito – you will need to keep the work leather hard (a state of dryness where you can still work the clay with a little effort and a little water and care). Step Three – Drying Most of the time your work can go into the rack uncovered to let it dry out for the following week. If you want to continue forming or shaping you will need to double bag your work – put your work on a suitable sized bat and put the bat in a bag so the base of the bag is under the bat, then put another bag over the top of the work and tuck the top of the bag under the bat. If you want to trim (or turn) your thrown work the following week, it should also be double bagged. If your work is large, delicate, or of uneven thicknesses, you should lightly cover your work for drying. When considering the drying process, bare in mind the weather, humidity and wind! The hotter and dryer, the faster things dry and work can dry unevenly in the shelves – this can lead to cracking – another time to lightly cover your work for drying. Step Four – Trimming and Cleaning Up Your work is dry! It is called greenware now and it is at it’s most fragile! Handle everything with two hands. I often refer to soft hands – keep everything gentle and with your fingers spread as much as possible. Try to not pick up things like plates too much, and always with both hands! Before your work can be bisque fired it should be “cleaned up”. You work won’t go into the kiln if it has sharp edges – when glazed, sharp edges turn into razor blades! Use a piece of fly wire to rub the work all over – this will scratch a little so be light handed. Use a knife or metal kidney to scrape any areas that require a bit more dynamic treatment than the fly wire offers! Finally, a very light wipe over with a slightly damp sponge can help soften and soothe all of your edges and dags! Trimming thrown work: If you are planning to trim (or turn) your thrown work (and you should be), make sure you bag it well – your work should be leather hard to almost dry for easiest trimming. Use this step to finish the work completely – use a metal kidney to polish the surface, or a slightly damp sponge to give a freshly thrown look. Wipe the sponge around the rim after trimming, and check the inside of the pot for dags! Trimming slip cast work: Usually I will trim the rims of your work on the wheel the following day to make that stage easier, however you will still need to check your work for lumps and bumps. Last but not least – check that your name is still clearly on the bottom of your work. Step Five – Bisque Firing When the work is completely dry it can go into the bisque kiln. The bisque kiln is fired to 1000°C. This process burns off the water in the clay as well as some of the chemically bound water. The structure of the clay is not altered that much at this temperature. Inside the bisque kiln, the work is stacked a little, small bowl inside a larger bowl and onto a heavy plate. Smaller items like decorations or drink coasters might get stacked several high. Consideration is paid to the weight of the stack and shape of the work. A bisque kiln can fire about one and a half times the amount of work that the glaze kiln can fire. The firing takes about 10 hours to complete the cycle and about two days to cool down. Once it has been emptied the work is placed in the glaze room ready for you to decorate! Step Six – Glazing Decorating your work with colour can be a lot of fun – and time consuming! There are three main options for surface treatment at this stage: Oxide Washes Underglazes Glazes Washes and underglazes do not “glaze” the work – It will still need a layer of glaze to fully seal the clay (washes don’t need glaze on surfaces not designed for food or liquid as they can gloss up a little on their own). Underglazes are stable colourants that turn out pretty much how they look in the jar. They can be mixed with each other to form other colours and can be used like water colours to paint onto your work. Mostly they should have a clear glaze on top to seal them. Oxides are a different species – the pink oxide (cobalt) wash turns out bright blue for instance. They don’t always need a glaze on top, and some glazes can change the colour of the wash! The glazes need no other “glaze” on top! Be careful of unknown glaze interactions – you can put any combination of glaze in a bowl or on a plate, but only a single glaze on the outside of any vertical surface! Glazes are a chemical reaction under heat. We don’t know the exact chemicals in the Mayco glazes we use. I can guess by the way they interact with each other, however, on the whole, you need to test every idea you have, and not run the test on a vertical surface! Simply put, glaze is a layer of glass like substance that bonds with the clay underneath. Clay is made of silica, alumina and water. Glaze is made of mostly silica. Silica has a melting point of 1700°C and we fire to 1240°C. The silica requires a “flux” to help it melt at the lower temperature. Fluxes can be all sorts of chemicals – a common one is calcium – calcium has a melting point of 2500°C, however, together they both melt at a much lower temperature! Colourants are metal oxides like cobalt (blue), chrome (green through black), copper (green, blue, even red!), manganese (black, purple and pink) iron (red brown), etc. Different chemicals in the glaze can have dramatic effects. for example, barium carbonate (which we don’t use) turns manganese bright pink! Other elements can turn manganese dioxide brown, blue, purple and reddish brown. Manganese dioxide is a flux in and of itself as well. So, glazes that get their black and purple colours, often interact with other glazes and RUN! Our mirror black is a good example – it mixes really well with many glazes because it fluxes them – causes them to melt faster. It will also bring out many beautiful colours in the glazes because it’s black colouring most definitely comes from manganese dioxide! Glaze chemistry is a whole subject on it’s own! We use commercial Mayco glazes on purpose – for their huge range of colour possibilities, stability, cool interactions, artistic freedom with the ability to easily brush the glazes on and ease of use. We currently have almost 50 glazes on hand! A major project is to test the interactions of all glazes with each other. That is 2,500 test tiles!!!! I’m going to make the wall behind the wheels the feature wall of pretty colours! Step Seven – Glaze (Gloss or sometimes called “Glost”) Firing Most of the time this is the final stage of making your creation (but not always!) The glaze kiln goes to 1240°C. This is called cone 6, or midrange. It is the low end of stoneware temperatures. Stoneware clays and glazes are typically fired at cone 8 – 10, that is 1260 – 1290°C. The energy requirement to go from 1240°C to 1280°C is almost a 30% more! Our clay is formulated to vitrify (mature, turn “glass-like”) at 1240°, as are our glazes. A glaze kiln take around 12 hours to reach temperature and two to three days to cool down. Sometimes a third firing process is required – this is for decoration that is added to work after the glaze firing. For example – adding precious metals and lustres. this firing temperature is usually around 600 – 800°C depending upon the techniques being used. There are many students interested in gold and silver trims – we will be doing this third type of firing soon! After firing your work will be in the student finished work shelves. Remember to pay for it before you head out the door! There is a small extra charge for using porcelain clay (it’s more than twice the price of regular clay), and for any third firing process! Once your work has been fired it can not turn back into clay for millennia – so don’t fire it if you don’t like it! Put it in the bucket for recycling. https://firebirdstudios.com.au/the-process-of-making-pottery/Ceramics have evolved over thousands of years.White earthenware dinner plate. Crazing evident all over.Backstamped ‘Made in England S LTD’flagstaff hill, warrnambool, shipwrecked-coast, flagstaff-hill, flagstaff-hill-maritime-museum, maritime-museum, shipwreck-coast, flagstaff-hill-maritime-village, ceramics, tableware -
 Flagstaff Hill Maritime Museum and Village
Domestic object - Plate, Johnson Bros
The Process of Making Pottery Decorating, Firing, Glazing, Making, Technical There is a rhythm and flow to clay. It can’t be done all at once! Even the making process! It can take weeks to get everything done, especially if you can only work on your pottery once a week! Even though we have three hour classes, it’s often just not enough time! Here is an overview of some of the processes so you have a bit more grasp on some of the technical stuff! Step One – Design There are SO many ideas out there for making stuff in clay! From delicate porcelain jewellery, through to heavy sculptural work and everything in between. Deciding your direction is sometimes not that easy – when you first start, try everything, you will naturally gravitate to the style that you enjoy! The options and variations are endless and can get a wee bit overwhelming too! Check in with me before you start to ensure your ideas will work, what order you might do things, how you could achieve the look you are seeking and any other technical data required! Step Two – Making Clay is thixotropic. This means that as you work with it, the clay first gets sloppier and wetter, before is begins to dry in the atmosphere. For most things, you simply can’t do all parts of the project at once. An example of work order might look like: Get last weeks work out from the shelves Prepare clay for today’s work – roll your clay, prepare balls for throwing, make the first stage of a pinch pot) Clean up last week’s work and put it on the shelf for bisque firing Check that you have any glazing to do – and do enough of it that you will have time to finish your main project Do the next step of your next project – there might be a further step that can’t be complete immediately, in that case, wrap your work well and put onto the shelves. Letting your work rest for a while can really help keep your work clean and professional looking. Many things require bagging under plastic to keep it ready for work the next week – put your name on the outside of the bag so you can find your work easily. We have stickers and markers. Consider how you want to decorate your work – coloured slip can be applied at a fairly wet stage (remembering that it will make your work even wetter!). Trying to apply slip to dry clay won’t work! If you want to do sgraffito – you will need to keep the work leather hard (a state of dryness where you can still work the clay with a little effort and a little water and care). Step Three – Drying Most of the time your work can go into the rack uncovered to let it dry out for the following week. If you want to continue forming or shaping you will need to double bag your work – put your work on a suitable sized bat and put the bat in a bag so the base of the bag is under the bat, then put another bag over the top of the work and tuck the top of the bag under the bat. If you want to trim (or turn) your thrown work the following week, it should also be double bagged. If your work is large, delicate, or of uneven thicknesses, you should lightly cover your work for drying. When considering the drying process, bare in mind the weather, humidity and wind! The hotter and dryer, the faster things dry and work can dry unevenly in the shelves – this can lead to cracking – another time to lightly cover your work for drying. Step Four – Trimming and Cleaning Up Your work is dry! It is called greenware now and it is at it’s most fragile! Handle everything with two hands. I often refer to soft hands – keep everything gentle and with your fingers spread as much as possible. Try to not pick up things like plates too much, and always with both hands! Before your work can be bisque fired it should be “cleaned up”. You work won’t go into the kiln if it has sharp edges – when glazed, sharp edges turn into razor blades! Use a piece of fly wire to rub the work all over – this will scratch a little so be light handed. Use a knife or metal kidney to scrape any areas that require a bit more dynamic treatment than the fly wire offers! Finally, a very light wipe over with a slightly damp sponge can help soften and soothe all of your edges and dags! Trimming thrown work: If you are planning to trim (or turn) your thrown work (and you should be), make sure you bag it well – your work should be leather hard to almost dry for easiest trimming. Use this step to finish the work completely – use a metal kidney to polish the surface, or a slightly damp sponge to give a freshly thrown look. Wipe the sponge around the rim after trimming, and check the inside of the pot for dags! Trimming slip cast work: Usually I will trim the rims of your work on the wheel the following day to make that stage easier, however you will still need to check your work for lumps and bumps. Last but not least – check that your name is still clearly on the bottom of your work. Step Five – Bisque Firing When the work is completely dry it can go into the bisque kiln. The bisque kiln is fired to 1000°C. This process burns off the water in the clay as well as some of the chemically bound water. The structure of the clay is not altered that much at this temperature. Inside the bisque kiln, the work is stacked a little, small bowl inside a larger bowl and onto a heavy plate. Smaller items like decorations or drink coasters might get stacked several high. Consideration is paid to the weight of the stack and shape of the work. A bisque kiln can fire about one and a half times the amount of work that the glaze kiln can fire. The firing takes about 10 hours to complete the cycle and about two days to cool down. Once it has been emptied the work is placed in the glaze room ready for you to decorate! Step Six – Glazing Decorating your work with colour can be a lot of fun – and time consuming! There are three main options for surface treatment at this stage: Oxide Washes Underglazes Glazes Washes and underglazes do not “glaze” the work – It will still need a layer of glaze to fully seal the clay (washes don’t need glaze on surfaces not designed for food or liquid as they can gloss up a little on their own). Underglazes are stable colourants that turn out pretty much how they look in the jar. They can be mixed with each other to form other colours and can be used like water colours to paint onto your work. Mostly they should have a clear glaze on top to seal them. Oxides are a different species – the pink oxide (cobalt) wash turns out bright blue for instance. They don’t always need a glaze on top, and some glazes can change the colour of the wash! The glazes need no other “glaze” on top! Be careful of unknown glaze interactions – you can put any combination of glaze in a bowl or on a plate, but only a single glaze on the outside of any vertical surface! Glazes are a chemical reaction under heat. We don’t know the exact chemicals in the Mayco glazes we use. I can guess by the way they interact with each other, however, on the whole, you need to test every idea you have, and not run the test on a vertical surface! Simply put, glaze is a layer of glass like substance that bonds with the clay underneath. Clay is made of silica, alumina and water. Glaze is made of mostly silica. Silica has a melting point of 1700°C and we fire to 1240°C. The silica requires a “flux” to help it melt at the lower temperature. Fluxes can be all sorts of chemicals – a common one is calcium – calcium has a melting point of 2500°C, however, together they both melt at a much lower temperature! Colourants are metal oxides like cobalt (blue), chrome (green through black), copper (green, blue, even red!), manganese (black, purple and pink) iron (red brown), etc. Different chemicals in the glaze can have dramatic effects. for example, barium carbonate (which we don’t use) turns manganese bright pink! Other elements can turn manganese dioxide brown, blue, purple and reddish brown. Manganese dioxide is a flux in and of itself as well. So, glazes that get their black and purple colours, often interact with other glazes and RUN! Our mirror black is a good example – it mixes really well with many glazes because it fluxes them – causes them to melt faster. It will also bring out many beautiful colours in the glazes because it’s black colouring most definitely comes from manganese dioxide! Glaze chemistry is a whole subject on it’s own! We use commercial Mayco glazes on purpose – for their huge range of colour possibilities, stability, cool interactions, artistic freedom with the ability to easily brush the glazes on and ease of use. We currently have almost 50 glazes on hand! A major project is to test the interactions of all glazes with each other. That is 2,500 test tiles!!!! I’m going to make the wall behind the wheels the feature wall of pretty colours! Step Seven – Glaze (Gloss or sometimes called “Glost”) Firing Most of the time this is the final stage of making your creation (but not always!) The glaze kiln goes to 1240°C. This is called cone 6, or midrange. It is the low end of stoneware temperatures. Stoneware clays and glazes are typically fired at cone 8 – 10, that is 1260 – 1290°C. The energy requirement to go from 1240°C to 1280°C is almost a 30% more! Our clay is formulated to vitrify (mature, turn “glass-like”) at 1240°, as are our glazes. A glaze kiln take around 12 hours to reach temperature and two to three days to cool down. Sometimes a third firing process is required – this is for decoration that is added to work after the glaze firing. For example – adding precious metals and lustres. this firing temperature is usually around 600 – 800°C depending upon the techniques being used. There are many students interested in gold and silver trims – we will be doing this third type of firing soon! After firing your work will be in the student finished work shelves. Remember to pay for it before you head out the door! There is a small extra charge for using porcelain clay (it’s more than twice the price of regular clay), and for any third firing process! Once your work has been fired it can not turn back into clay for millennia – so don’t fire it if you don’t like it! Put it in the bucket for recycling. https://firebirdstudios.com.au/the-process-of-making-pottery/Ceramics have evolved over thousands of years.A white earthenware side plate with a gadroon edge. Has water marks and chips on front.‘Johnson Bros England Reg No 15587’flagstaff hill, warrnambool, shipwrecked-coast, flagstaff-hill, flagstaff-hill-maritime-museum, maritime-museum, shipwreck-coast, flagstaff-hill-maritime-village, johnson bros, ceramics, tableware -
 Flagstaff Hill Maritime Museum and Village
Domestic object - Plate, Alfred Meakin
The Process of Making Pottery Decorating, Firing, Glazing, Making, Technical There is a rhythm and flow to clay. It can’t be done all at once! Even the making process! It can take weeks to get everything done, especially if you can only work on your pottery once a week! Even though we have three hour classes, it’s often just not enough time! Here is an overview of some of the processes so you have a bit more grasp on some of the technical stuff! Step One – Design There are SO many ideas out there for making stuff in clay! From delicate porcelain jewellery, through to heavy sculptural work and everything in between. Deciding your direction is sometimes not that easy – when you first start, try everything, you will naturally gravitate to the style that you enjoy! The options and variations are endless and can get a wee bit overwhelming too! Check in with me before you start to ensure your ideas will work, what order you might do things, how you could achieve the look you are seeking and any other technical data required! Step Two – Making Clay is thixotropic. This means that as you work with it, the clay first gets sloppier and wetter, before is begins to dry in the atmosphere. For most things, you simply can’t do all parts of the project at once. An example of work order might look like: Get last weeks work out from the shelves Prepare clay for today’s work – roll your clay, prepare balls for throwing, make the first stage of a pinch pot) Clean up last week’s work and put it on the shelf for bisque firing Check that you have any glazing to do – and do enough of it that you will have time to finish your main project Do the next step of your next project – there might be a further step that can’t be complete immediately, in that case, wrap your work well and put onto the shelves. Letting your work rest for a while can really help keep your work clean and professional looking. Many things require bagging under plastic to keep it ready for work the next week – put your name on the outside of the bag so you can find your work easily. We have stickers and markers. Consider how you want to decorate your work – coloured slip can be applied at a fairly wet stage (remembering that it will make your work even wetter!). Trying to apply slip to dry clay won’t work! If you want to do sgraffito – you will need to keep the work leather hard (a state of dryness where you can still work the clay with a little effort and a little water and care). Step Three – Drying Most of the time your work can go into the rack uncovered to let it dry out for the following week. If you want to continue forming or shaping you will need to double bag your work – put your work on a suitable sized bat and put the bat in a bag so the base of the bag is under the bat, then put another bag over the top of the work and tuck the top of the bag under the bat. If you want to trim (or turn) your thrown work the following week, it should also be double bagged. If your work is large, delicate, or of uneven thicknesses, you should lightly cover your work for drying. When considering the drying process, bare in mind the weather, humidity and wind! The hotter and dryer, the faster things dry and work can dry unevenly in the shelves – this can lead to cracking – another time to lightly cover your work for drying. Step Four – Trimming and Cleaning Up Your work is dry! It is called greenware now and it is at it’s most fragile! Handle everything with two hands. I often refer to soft hands – keep everything gentle and with your fingers spread as much as possible. Try to not pick up things like plates too much, and always with both hands! Before your work can be bisque fired it should be “cleaned up”. You work won’t go into the kiln if it has sharp edges – when glazed, sharp edges turn into razor blades! Use a piece of fly wire to rub the work all over – this will scratch a little so be light handed. Use a knife or metal kidney to scrape any areas that require a bit more dynamic treatment than the fly wire offers! Finally, a very light wipe over with a slightly damp sponge can help soften and soothe all of your edges and dags! Trimming thrown work: If you are planning to trim (or turn) your thrown work (and you should be), make sure you bag it well – your work should be leather hard to almost dry for easiest trimming. Use this step to finish the work completely – use a metal kidney to polish the surface, or a slightly damp sponge to give a freshly thrown look. Wipe the sponge around the rim after trimming, and check the inside of the pot for dags! Trimming slip cast work: Usually I will trim the rims of your work on the wheel the following day to make that stage easier, however you will still need to check your work for lumps and bumps. Last but not least – check that your name is still clearly on the bottom of your work. Step Five – Bisque Firing When the work is completely dry it can go into the bisque kiln. The bisque kiln is fired to 1000°C. This process burns off the water in the clay as well as some of the chemically bound water. The structure of the clay is not altered that much at this temperature. Inside the bisque kiln, the work is stacked a little, small bowl inside a larger bowl and onto a heavy plate. Smaller items like decorations or drink coasters might get stacked several high. Consideration is paid to the weight of the stack and shape of the work. A bisque kiln can fire about one and a half times the amount of work that the glaze kiln can fire. The firing takes about 10 hours to complete the cycle and about two days to cool down. Once it has been emptied the work is placed in the glaze room ready for you to decorate! Step Six – Glazing Decorating your work with colour can be a lot of fun – and time consuming! There are three main options for surface treatment at this stage: Oxide Washes Underglazes Glazes Washes and underglazes do not “glaze” the work – It will still need a layer of glaze to fully seal the clay (washes don’t need glaze on surfaces not designed for food or liquid as they can gloss up a little on their own). Underglazes are stable colourants that turn out pretty much how they look in the jar. They can be mixed with each other to form other colours and can be used like water colours to paint onto your work. Mostly they should have a clear glaze on top to seal them. Oxides are a different species – the pink oxide (cobalt) wash turns out bright blue for instance. They don’t always need a glaze on top, and some glazes can change the colour of the wash! The glazes need no other “glaze” on top! Be careful of unknown glaze interactions – you can put any combination of glaze in a bowl or on a plate, but only a single glaze on the outside of any vertical surface! Glazes are a chemical reaction under heat. We don’t know the exact chemicals in the Mayco glazes we use. I can guess by the way they interact with each other, however, on the whole, you need to test every idea you have, and not run the test on a vertical surface! Simply put, glaze is a layer of glass like substance that bonds with the clay underneath. Clay is made of silica, alumina and water. Glaze is made of mostly silica. Silica has a melting point of 1700°C and we fire to 1240°C. The silica requires a “flux” to help it melt at the lower temperature. Fluxes can be all sorts of chemicals – a common one is calcium – calcium has a melting point of 2500°C, however, together they both melt at a much lower temperature! Colourants are metal oxides like cobalt (blue), chrome (green through black), copper (green, blue, even red!), manganese (black, purple and pink) iron (red brown), etc. Different chemicals in the glaze can have dramatic effects. for example, barium carbonate (which we don’t use) turns manganese bright pink! Other elements can turn manganese dioxide brown, blue, purple and reddish brown. Manganese dioxide is a flux in and of itself as well. So, glazes that get their black and purple colours, often interact with other glazes and RUN! Our mirror black is a good example – it mixes really well with many glazes because it fluxes them – causes them to melt faster. It will also bring out many beautiful colours in the glazes because it’s black colouring most definitely comes from manganese dioxide! Glaze chemistry is a whole subject on it’s own! We use commercial Mayco glazes on purpose – for their huge range of colour possibilities, stability, cool interactions, artistic freedom with the ability to easily brush the glazes on and ease of use. We currently have almost 50 glazes on hand! A major project is to test the interactions of all glazes with each other. That is 2,500 test tiles!!!! I’m going to make the wall behind the wheels the feature wall of pretty colours! Step Seven – Glaze (Gloss or sometimes called “Glost”) Firing Most of the time this is the final stage of making your creation (but not always!) The glaze kiln goes to 1240°C. This is called cone 6, or midrange. It is the low end of stoneware temperatures. Stoneware clays and glazes are typically fired at cone 8 – 10, that is 1260 – 1290°C. The energy requirement to go from 1240°C to 1280°C is almost a 30% more! Our clay is formulated to vitrify (mature, turn “glass-like”) at 1240°, as are our glazes. A glaze kiln take around 12 hours to reach temperature and two to three days to cool down. Sometimes a third firing process is required – this is for decoration that is added to work after the glaze firing. For example – adding precious metals and lustres. this firing temperature is usually around 600 – 800°C depending upon the techniques being used. There are many students interested in gold and silver trims – we will be doing this third type of firing soon! After firing your work will be in the student finished work shelves. Remember to pay for it before you head out the door! There is a small extra charge for using porcelain clay (it’s more than twice the price of regular clay), and for any third firing process! Once your work has been fired it can not turn back into clay for millennia – so don’t fire it if you don’t like it! Put it in the bucket for recycling. https://firebirdstudios.com.au/the-process-of-making-pottery/Ceramics have evolved over thousands of years.Earthenware dessert plate, cream colour. Made by Alfred Meakin, England. Backstamped ‘Alfred Meakin England’. flagstaff hill, warrnambool, shipwrecked-coast, flagstaff-hill, flagstaff-hill-maritime-museum, maritime-museum, shipwreck-coast, flagstaff-hill-maritime-village, alfred meakin, ceramics, earthenware, kitchenware -
 Flagstaff Hill Maritime Museum and Village
Domestic object - Jug
The Process of Making Pottery Decorating, Firing, Glazing, Making, Technical There is a rhythm and flow to clay. It can’t be done all at once! Even the making process! It can take weeks to get everything done, especially if you can only work on your pottery once a week! Even though we have three hour classes, it’s often just not enough time! Here is an overview of some of the processes so you have a bit more grasp on some of the technical stuff! Step One – Design There are SO many ideas out there for making stuff in clay! From delicate porcelain jewellery, through to heavy sculptural work and everything in between. Deciding your direction is sometimes not that easy – when you first start, try everything, you will naturally gravitate to the style that you enjoy! The options and variations are endless and can get a wee bit overwhelming too! Check in with me before you start to ensure your ideas will work, what order you might do things, how you could achieve the look you are seeking and any other technical data required! Step Two – Making Clay is thixotropic. This means that as you work with it, the clay first gets sloppier and wetter, before is begins to dry in the atmosphere. For most things, you simply can’t do all parts of the project at once. An example of work order might look like: Get last weeks work out from the shelves Prepare clay for today’s work – roll your clay, prepare balls for throwing, make the first stage of a pinch pot) Clean up last week’s work and put it on the shelf for bisque firing Check that you have any glazing to do – and do enough of it that you will have time to finish your main project Do the next step of your next project – there might be a further step that can’t be complete immediately, in that case, wrap your work well and put onto the shelves. Letting your work rest for a while can really help keep your work clean and professional looking. Many things require bagging under plastic to keep it ready for work the next week – put your name on the outside of the bag so you can find your work easily. We have stickers and markers. Consider how you want to decorate your work – coloured slip can be applied at a fairly wet stage (remembering that it will make your work even wetter!). Trying to apply slip to dry clay won’t work! If you want to do sgraffito – you will need to keep the work leather hard (a state of dryness where you can still work the clay with a little effort and a little water and care). Step Three – Drying Most of the time your work can go into the rack uncovered to let it dry out for the following week. If you want to continue forming or shaping you will need to double bag your work – put your work on a suitable sized bat and put the bat in a bag so the base of the bag is under the bat, then put another bag over the top of the work and tuck the top of the bag under the bat. If you want to trim (or turn) your thrown work the following week, it should also be double bagged. If your work is large, delicate, or of uneven thicknesses, you should lightly cover your work for drying. When considering the drying process, bare in mind the weather, humidity and wind! The hotter and dryer, the faster things dry and work can dry unevenly in the shelves – this can lead to cracking – another time to lightly cover your work for drying. Step Four – Trimming and Cleaning Up Your work is dry! It is called greenware now and it is at it’s most fragile! Handle everything with two hands. I often refer to soft hands – keep everything gentle and with your fingers spread as much as possible. Try to not pick up things like plates too much, and always with both hands! Before your work can be bisque fired it should be “cleaned up”. You work won’t go into the kiln if it has sharp edges – when glazed, sharp edges turn into razor blades! Use a piece of fly wire to rub the work all over – this will scratch a little so be light handed. Use a knife or metal kidney to scrape any areas that require a bit more dynamic treatment than the fly wire offers! Finally, a very light wipe over with a slightly damp sponge can help soften and soothe all of your edges and dags! Trimming thrown work: If you are planning to trim (or turn) your thrown work (and you should be), make sure you bag it well – your work should be leather hard to almost dry for easiest trimming. Use this step to finish the work completely – use a metal kidney to polish the surface, or a slightly damp sponge to give a freshly thrown look. Wipe the sponge around the rim after trimming, and check the inside of the pot for dags! Trimming slip cast work: Usually I will trim the rims of your work on the wheel the following day to make that stage easier, however you will still need to check your work for lumps and bumps. Last but not least – check that your name is still clearly on the bottom of your work. Step Five – Bisque Firing When the work is completely dry it can go into the bisque kiln. The bisque kiln is fired to 1000°C. This process burns off the water in the clay as well as some of the chemically bound water. The structure of the clay is not altered that much at this temperature. Inside the bisque kiln, the work is stacked a little, small bowl inside a larger bowl and onto a heavy plate. Smaller items like decorations or drink coasters might get stacked several high. Consideration is paid to the weight of the stack and shape of the work. A bisque kiln can fire about one and a half times the amount of work that the glaze kiln can fire. The firing takes about 10 hours to complete the cycle and about two days to cool down. Once it has been emptied the work is placed in the glaze room ready for you to decorate! Step Six – Glazing Decorating your work with colour can be a lot of fun – and time consuming! There are three main options for surface treatment at this stage: Oxide Washes Underglazes Glazes Washes and underglazes do not “glaze” the work – It will still need a layer of glaze to fully seal the clay (washes don’t need glaze on surfaces not designed for food or liquid as they can gloss up a little on their own). Underglazes are stable colourants that turn out pretty much how they look in the jar. They can be mixed with each other to form other colours and can be used like water colours to paint onto your work. Mostly they should have a clear glaze on top to seal them. Oxides are a different species – the pink oxide (cobalt) wash turns out bright blue for instance. They don’t always need a glaze on top, and some glazes can change the colour of the wash! The glazes need no other “glaze” on top! Be careful of unknown glaze interactions – you can put any combination of glaze in a bowl or on a plate, but only a single glaze on the outside of any vertical surface! Glazes are a chemical reaction under heat. We don’t know the exact chemicals in the Mayco glazes we use. I can guess by the way they interact with each other, however, on the whole, you need to test every idea you have, and not run the test on a vertical surface! Simply put, glaze is a layer of glass like substance that bonds with the clay underneath. Clay is made of silica, alumina and water. Glaze is made of mostly silica. Silica has a melting point of 1700°C and we fire to 1240°C. The silica requires a “flux” to help it melt at the lower temperature. Fluxes can be all sorts of chemicals – a common one is calcium – calcium has a melting point of 2500°C, however, together they both melt at a much lower temperature! Colourants are metal oxides like cobalt (blue), chrome (green through black), copper (green, blue, even red!), manganese (black, purple and pink) iron (red brown), etc. Different chemicals in the glaze can have dramatic effects. for example, barium carbonate (which we don’t use) turns manganese bright pink! Other elements can turn manganese dioxide brown, blue, purple and reddish brown. Manganese dioxide is a flux in and of itself as well. So, glazes that get their black and purple colours, often interact with other glazes and RUN! Our mirror black is a good example – it mixes really well with many glazes because it fluxes them – causes them to melt faster. It will also bring out many beautiful colours in the glazes because it’s black colouring most definitely comes from manganese dioxide! Glaze chemistry is a whole subject on it’s own! We use commercial Mayco glazes on purpose – for their huge range of colour possibilities, stability, cool interactions, artistic freedom with the ability to easily brush the glazes on and ease of use. We currently have almost 50 glazes on hand! A major project is to test the interactions of all glazes with each other. That is 2,500 test tiles!!!! I’m going to make the wall behind the wheels the feature wall of pretty colours! Step Seven – Glaze (Gloss or sometimes called “Glost”) Firing Most of the time this is the final stage of making your creation (but not always!) The glaze kiln goes to 1240°C. This is called cone 6, or midrange. It is the low end of stoneware temperatures. Stoneware clays and glazes are typically fired at cone 8 – 10, that is 1260 – 1290°C. The energy requirement to go from 1240°C to 1280°C is almost a 30% more! Our clay is formulated to vitrify (mature, turn “glass-like”) at 1240°, as are our glazes. A glaze kiln take around 12 hours to reach temperature and two to three days to cool down. Sometimes a third firing process is required – this is for decoration that is added to work after the glaze firing. For example – adding precious metals and lustres. this firing temperature is usually around 600 – 800°C depending upon the techniques being used. There are many students interested in gold and silver trims – we will be doing this third type of firing soon! After firing your work will be in the student finished work shelves. Remember to pay for it before you head out the door! There is a small extra charge for using porcelain clay (it’s more than twice the price of regular clay), and for any third firing process! Once your work has been fired it can not turn back into clay for millennia – so don’t fire it if you don’t like it! Put it in the bucket for recycling. https://firebirdstudios.com.au/the-process-of-making-pottery/The form of the jug has been in use for many centuries.Stoneware jug. Two tone brown glaze with pierced lip behind spout. Spout chipped.None.flagstaff hill, warrnambool, shipwrecked-coast, flagstaff-hill, flagstaff-hill-maritime-museum, maritime-museum, shipwreck-coast, flagstaff-hill-maritime-village, jug, ceramic jug -
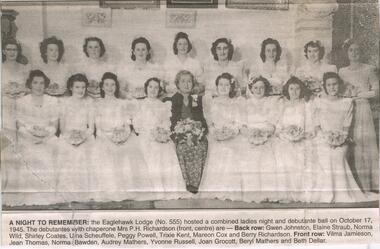 Bendigo Historical Society Inc.
Newspaper - JENNY FOLEY COLLECTION: A NIGHT TO REMEMBER
Bendigo Advertiser '' The way we were'' from Monday, September 2, 2002. A night to remember: the Eaglehawk Lodge (No 555) hosted a combined ladies night and debutante ball on October 17, 1945. The debutantes with chaperone Mrs P. H. Richardson (front centre) are - Back row: Gwen Johnston, Elaine Strub, Norma Wild, Shirley Coates, Una Scheuffele, Peggy Powell, Trixie Kent, Mareon Cox and Berry Richardson. Front row: Vilma Jamieson, Jean Thomas, Norma Bawden, Audrey Mathers, Yvonne Russell, Joan Grocott, Beryl Mathers and Beth Dellar. The clip is in a folder.newspaper, bendigo advertiser, the way we were -
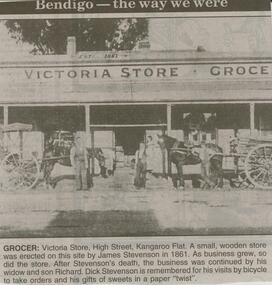 Bendigo Historical Society Inc.
Newspaper - JENNY FOLEY COLLECTION: GROCER
Bendigo Advertiser ''The way we were'' from 2000. Grocer: Victoria Store, High Street, Kangaroo Flat. A small, wooden store was erected on this site by James Stevenson in 1861. As business grew, so did the store. After Stevenson's death, the business continued by his widow and son Richard. Dick Stevenson is remembered for his visits by bicycle to take orders and his gifts of sweets in a paper ''twist''. The clip is in a folder.newspaper, bendigo advertiser, the way we were -
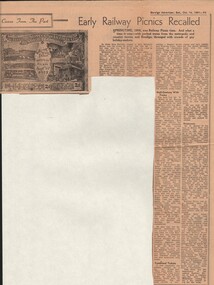 Bendigo Historical Society Inc.
Document - BASIL MILLER COLLECTION: TRAMS, RAILWAY PICNICS, c1961
Newspaper clipping. Bendigo Advertiser. Saturday October 14, 1961. Early Railway Picnics Recalled. Article includes photo of souvenir tram ticket number 3588. Springtime, 1905 was Railway picnic time. And what a time it was - with packed trains from the metropolis and country towns, and Bendigo, thronged with the crowds of gay holiday-makers. Souvenir ticket belongs to rear Mrs. A. Bolitho, 5 Webster Street, Bendigo, issued by Electric Supply Coy. Of Victoria Ltd., Bendigo Tramways. Railway Picnic September 16, 1905. The ticket belong to Mrs Bolitho's father, the late Mr J H P Ellis, who lived in McIntyre Street. Post card size, printed in sepia on cream, bears photographs of the power house, engine room, a tram (we presume one of the first models) and the boiler room. Down the sides are listed cemetery, railway station, Rodney St, Charing Cross, through to California Gully Bridge and Eaglehawk. The fare was 2d. On the back a Beehive advertisement. 'Half-Century With Trams' is a history as remembered by Mr W J Evans of Mt. Korong Road, California Gully. 'Boisterous' is a history as remembered by Mr W Bolton of the firm of Bolton Bros. recalled the early picnics as 'boisterous' affairs. 'riff-raff' used to gather at Spencer St Station, arriving in Bendigo-after having spent the night drinking. The picnicers certainly had a right royal time in those early days. Railway Picnic was also boronia time, Mr Bolton said - and bunches of fragrant West Australian borania were sold on the streets. Bolton Bros always printed the tram tickets in Bendigo in those early years. A report in the 'Bendigonian' of the 1903 Railway Picnic period told that 20 special trams came to Bendigo on Saturday morning, September 15, 1903. Railway Picnic Committee: J Southern, Mrs Tait, Mrs Hudson, Mrs Fitzpatrick, Cr J H Curnow, Sir John Quick and many members of parliament. Fare from Melbourne costing 5/ for a day return, or 7/6 for the week.organization, business, bendigo trams -
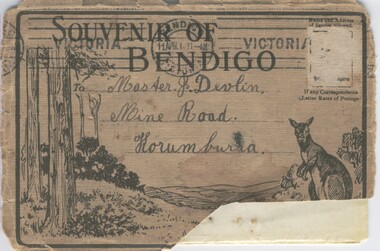 Bendigo Historical Society Inc.
Photograph - UNKNOWN FAMILY COLLECTION: PHOTOGRAPH
Postcard - Souvenir of Bendigo - Black and white. 15 assorted pictures of Bendigo. Card addressed to Master J.Devlin, Mine Road, Korumburra. Written 'Dear Cobber Jack, we have not wrote for a long time. How is all the family getting on. Where is bill brown now and would you send me billie maroners adress if you know it remember me to all the old mates. I remain your old mate. Willie White, writ street, Back.place, bendigo, picturesque views of bendigo., bendigo views. -
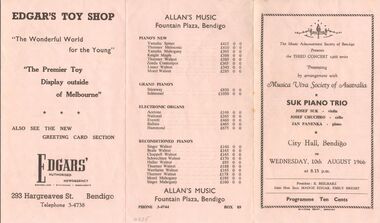 Bendigo Historical Society Inc.
Document - SUK PIANO TRIO, CITY HALL, 10 August, 1966
Suk Piano Trio, City Hall, Bendigo. Wednesday, 10th August 1966 at 8.15 pm. The Music Advancement Society of Bendigo Presents the Third Concert 1966 series Presenting by arrangement with Musica Viva Society of Australia. Josef Suk - Violin, Josef Chuchro - Cello, Jan Panenka - Piano. President: E Beilharz. Joint Hon. Secs. Madge Edgar, Emily Bright. Programme Ten Cents. Dates To Remember, Forthcoming Concerts. Friday, 9th September - Lecture by Graham Bartle, Saturday, 17th September - Melbourne Chorale (Mr. Val Pyers, cond.) Fred Morgan - Recorder Consort. Advertisements: Alma Val, Killians Walk, Bendigo. Edgars' Toys/Newsagency, Hargreaves St., Bendigo. Allan's Music, Fountain Plaza, Bendigo. (Allan's Music add is still in pounds shillings and pence, tho we had changed to dollars and cents)Boltons Print., Bendigoprogram, music, music advancement society bendigo, suk piano trio, city hall, bendigo. august 1966. music advancement society of bendigo third concert 1966 series musica viva society of australia. josef suk - violin, josef chuchro - cello, jan panenka - piano. president: e beilharz. joint hon. secs. madge edgar, emily bright. programme ten cents. forthcoming concerts september - lecture by graham bartle, september - melbourne chorale (mr. val pyers, cond.) fred morgan - recorder consort. advertisements: alma val, edgars' toys/newsagency, allan's music -
Mount Evelyn History Group
Queen's visit, We Did But See Her Passing By; The 1954 Royal Visit Through Lilydale, 2004
The Queen's journey through Lilydale and district during her Australian tour, 1954Queen Elizabeth II and the Duke of Edinburgh passed through Lilydale by train 6 March 1954 on their way to Warburton. Residents along the route turned out to see the royal couple. The royal visit made such an impression that it is still vividly remembered six decades later. Stapled booklet with white cover; b&w photo of floral banner 'Lilydale' with group of men and women In ink on front cover: 'Donated to Mt Evelyn History Group by Anthony McAleer 23/5/09' Mt Evelyn History Group stamp on front cover.queen elizabeth, lilydale, warburton, royal tour, royal train -
Coal Creek Community Park & Museum
Music Sheets, Violin Music Sheets
6144.1 to 19 - A selection of 1st violin music sheets, all have been numbered by the previous owner; 19 sheets in total S1 - The Cute Little Things You Do S2 - In A Cafe On The Road To Calais S3 - Beautiful Love S4 - Toodle-oo So Long Goodbye S5 - Do You Believe in Love at Sight S6 - My World Begins and Ends With You S7 - Look Here Comes a Rainbow S8 - Lights Of Paris S9 - When You Hear This Song Remember Me S10 - All The World Will Smile Again After Tomorrow S11 - Underneath The Summer Moon S12 - Congorilla S13 - Rackety Ray S14 - Throw A Little Salt On The Blue Birds Tail S15 - Around You S16 - Gypsy Hearts S17 - Home Folks Violin___ 6G - I Don't Know Why 8G - When We Are Together -
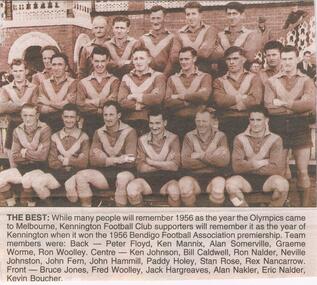 Bendigo Historical Society Inc.
Newspaper - JENNY FOLEY COLLECTION: THE BEST
Bendigo Advertiser "The way we were" from Saturday, November 13, 2004. The best: while many people will remember 1956 as the year the Olympics came to Melbourne, Kennington Football Club supporters will rememberit as the year of Kennington winning the Bendigo Football Association premiership. Team members were: Back - Peter Floyd, Ken Mannix, Alan Somerville, Graeme Worme, Ron Woolley. Centre - Ken Johnson, Bill Caldwell, Ron Nalder, Neville Johnston, John Fern, John Hammill, Paddy Holey, Stan Rose, Rex Nancarrow. Front - Bruce Jones, Fred Woolley, Jack Hargreave, Alan Nakler, Eric Nalder, Kevin Boucher.newspaper, bendigo advertiser, the way we were -
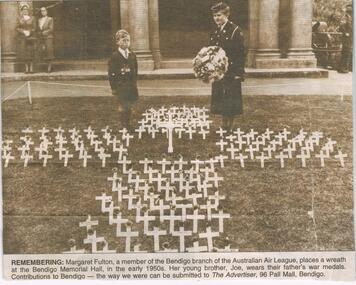 Bendigo Historical Society Inc.
Newspaper - JENNY FOLEY COLLECTION: REMEMBERING
Bendigo Advertiser "The way we were" from Saturday, April 16, 2005. Remembering: Margaret Fulton, a member of the Bendigo branch of the Australian Air League, places a wreath at the Bendigo Memorial Hall, in the early 1950s. Her young brother, Joe, wears their father's war medals.newspaper, bendigo advertiser, the way we were -
 Bendigo Historical Society Inc.
Newspaper - LONG GULLY HISTORY GROUP COLLECTION: BENDIGO'S CENTURY VOLUME THREE: 1920 - 1929
Newspaper supplement titled Bendigo's Century Volume Three: 1920 - 1929. Front page has a photo of The Duke and Duchess of York visit to Bendigo, 1927. Each year has heading of Who's Who, Weather, Sport and Business. First years are 1910 - 1919 titled The way we were. 1920 is titled Prince hailed. 1921 - City racks up a milestone. 1922 - Furore erupts. 1923 - Felons escape from city gaol. 1924 - Bid to finish RSL memorial. 1925 - Foul odour over sewerage plan. 1926 - Lest we forget Bendigo's fallen. 1927 - Royal Visit captures city. 1928 - Four shot in farm tragedy. 1929 - Billie's trip to remember.bendigo, history, long gully history group, the long gully history group - bendigo's century - volume three: 1920 - 1929, bendigo advertiser, duke and duchess of york, cr e m vains, r putnam, a j taylor, j h jackson, w crowley, sandhurst football club, george lansell, st peter's church, bendigo junior technical school, prince of wales, unity mine, mr w wilson, badak tin mining syndicate, mr t w ortonmr h scarborough, mr raleigh, general sir w r birdwood, the soldiers' memorial committee, bendigo city council, rsl memorial hall, captain g c wilson, lietenant r j parer, lieutenant j c mcintosh, cr j p carolin, h k morris, e a morris, turf tavern hotel, rev donald baker, all saints' pro--cathedral, keck's nursery, bendigo amalgamated goldfields, rising sun hotel, leanne mcdonnell, most rev john mccarthy, sir john quick, prime minister billy hughes, state rivers and water supply commission, diptheria, edna stevens, bendigo railway workshops, watson sustenance fund, sir joseph cook, dr lanza, bendigo amalgamated goldfields, bendigo benevolent asylum, miner's phthisis, bendigo gas company, electric light company, bendigo sewerage authority, commonwealth bank, cr curnow, the earl of stradbroke, dame nellie melba, princess theatre, lt-col g hurry, h sw lawson, countess of stradbroke, clunes woollen mills, girton college, mrs polglaise, mrs kennedy, gold discovery memorial, cr m g giudice, victorian co-operative freezing company, bendigo brick and tile company, mr lawson, soldiers' memorial, windermere hotel, toni riley pharmacy, bendigo gaol, mr a a dunstan mla, new red white and blue mine, claude de vere, walter osborne, sir john and lady quick, jonathan smalley, bendigo advertiser, st paul's bells, mr t cambridge, epsom public hall, bendigo school of mines, major lansell, mr h s w lawson, cr david andrew, colonel hurry, mr s bruce, bendigo sewerage authority, eppalock weir scheme, bendigo football league, r s l memorial, major g v lansell, lempriere, mr s m bruce, sandhurst hotel, market square, big hill tunnel, bendigo football league, bendigo united cricket club, south bendigo rex, sacred heart cathedral, hercules mine, gillies, aids & appliance shop, anne caudle centre, fizelle & mulqueen, south new moon mine, bendigo sewerage authority, mr a a kelley, epsom sewerage works, white hills botanical gardens, mr j sternberg mlc, bendigo book of remembrance, bendigo football league, senator general drake-brockman, captain dyett, school of mines, handschin and romus, hanro (aust.) bendigo knitting mills, charles handschin, farmers' union, andrew sunstan mla, country progressive party, john allan, captain g j c dyett, eahlehawk ufs dispensary, data fundamentals, the duke and duchess of york, the hercules mine, cr j a michelsen, lansell family, bendigo agricultural society, huntly shire council, bendigo creek trust, south african war memorial, cr j h curnow, st paul's church of england diamond jubilee, bendigo chamber of commerce, bendigo freezing works, bendigo pottery, bendigo trotting club, new red white and blue mine, the conservatory, cr e g batchelder, hercules mine, billie rigby, bendigo railway station, travellers' aid society, eppalock weir, the state rivers and water supply commission, bendigo railway workshops, frank grove, cr curnow, electric supply company, state electricity commission, australian aero club, bendigo preserving company, jardine, busbridge, feeman, mr h pearce, bfl, fred wood -
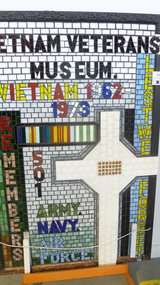 National Vietnam Veterans Museum (NVVM)
Model - Mosaic, Mosaic panel
Black framed board. Large white cross. Coloured tilesVietnam Veterans Museum - Vietnam 1962-1973. Remembering 501 Army, Navy and Air force. Lest We Forgetmosaic panel -
The Foundling Archive
Remembrance Day oral history collection 2014, 2014
This oral history collection consists of 20 interviewees, and over 25 hours of interview. Here, participants were asked to think about their own personal connection to war or conflict - whether it be through direct personal experience or through through own personal heritage. We asked the participants to reflect on their reasons for remembering and forgetting aspects of the experience of war in order to better understand the nature of commemoration. -
 City of Ballarat
Artwork, other - Public Artwork, Nathan Curnow, Little Bridge by Nathan Curnow, 2018
It's encouraging to see my city using poetry in such a public way. The park itself is a humble one, which suits these little poems perfectly. If you're ever in town come and take a seat for a while. The poem 'Little Bridge' by Nathan Curnow was commissioned as part of a placemaking project in Little Bridge Street Pocket Park, Ballarat in 2018. The Park was redesigned to include more passive surveillance, and improved amenity to increase community safety in the area. The poem is engraved onto seating to provide a rest and point of interest space in the small park. Six seats featuring an engraved poemPut it all down and take a seat/ Pull out a snack from your shopping/ Listen to the trumpeter busking a tune/ With every visit this park is growing/ Killing time takes real devotion/ Stare at the flags and masts of your town/ And the buses come rolling down Bakery Hill/ It may be cold but we lean to the sun/ If you feel like a square of the Eureka flag/That’s hopelessly lost and tattered/ Remember you’re as precious as a corner-piece/ We search for you first to get started/ There is something big on Little Bridge/ Not a beanstalk that leads to a giant/ But another day in the life of Ballarat/ All of this gold at the surface poetry, little bridge street, ballarat -
 Robin Boyd Foundation
Functional object - Cookware, Revere Ware
Robin Boyd developed a close friendship with the founder of the Bauhaus in Weimar Germany, Walter Gropius, who had moved to the USA in the 1930s. Through this connection, Boyd was invited to be the Massachusetts Institute of Technology (MIT) Bemis Professor at the School in the North American academic year 1956-7. During this time, the Boyds purchased this set of Revere kitchenware, which carries the prized "Process Patent" maker's mark on the thick copper bases. Mandie Boyd recalls: "I don’t remember a lot of cooking going on in them, if any, as they were a pain to clean but looked fabulous hanging on the wall absolutely gleaming. We would all check our hair and make up in them."A set of Revere Ware Saucepans and Frying Pans. A set of four Revere Ware copper clad, stainless steel saucepans with lids and black handles and hanging rings. A set of three Revere Ware copper clad, stainless steel pans with black handles and hanging rings. The largest flat one has no lid. Saucepans: largest 175mmx140mm, smallest 120mmx180mm. Frying Pans: largest 350mmx10mm, smallest 80mmx50mm.Revere Ware company engraving. Made under process patent #2363973. 'Revere Ware 1801' 'Patent # 22726091'revere, revereware, revere ware, cookware, walsh st kitchenware, robin boyd, ohm2022, ohm2022_10