Showing 1146 items matching "west side"
-
 Ringwood and District Historical Society
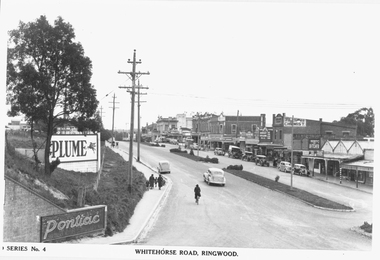
Photograph, Maroondah Highway Central, Ringwood. Whitehorse Road looking west from Warrandyte Road. c1930's
Black and white photograph (2 copies)Inscribed on photograph: "Series No 4. Whitehorse Road, Ringwood. Image shows shops on north side of road from Warrandyte Road railway bridge to Ringwood Street. -
 Ringwood and District Historical Society
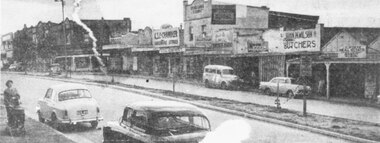
Photograph, Maroondah Highway Central, Ringwood. Main Street shops looking west from Warrandyte Road, c1950's
Newspaper clipping of black and white photograph.Image shows shops on north side of Whitehorse Road between Warrandyte Road and Adelaide Street. -
 Ballarat Tramway Museum
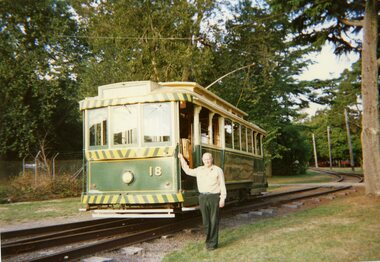
Photograph - Colour Photograph/s - set of 12, Jenny Puls, 13/03/1996 12:00:00 AM
Set of twelve colour photographs of the derailment of Tram No. 18 on the depot fan (2 and 3 road points) on 13 March 1996. Included within the cataloguing sheet are a copy of the report to the traffic manager and the envelope from Frank Puls. Photographs by Jenny Puls, on Kodak paper. The report is a photocopy of the original held by the Traffic Manager. .1 - Frank standing by No. 18 .2 - No. 1 end showing derailed wheel .3 - From the south side .4 - Close up photo showing marks on rail from the wheel. .5 - From the north side .6 - Dave Macartney locating jacks .7 - Looking west towards the depot .8 - From the northside during rerailing .9 - Alan Snowball holding towbar with 661 in the background .10 - 18 and 661 .11 - Being coupled to No. 38 .12 - Being towed back on with Alan Snowball observing. On rear of each photo in stamped in black ink "13 March 1996"accidents, btm, derailments, depot fan, tram 18, tram 661, tram 38 -
 Ringwood and District Historical Society
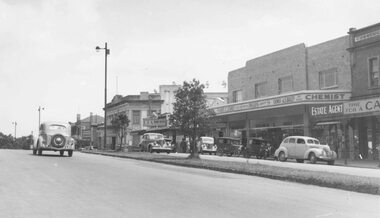
Photograph, Maroondah Highway Central, Ringwood. Looking west from near Adelaide Street, c1948
Black and white photograph (2 copies)Image shows shops on north side of Whitehorse Road towards Town Hall. -
 Ballarat Tramway Museum
Sign - Timetable Board - Gardens Loop via Sturt St West, State Electricity Commission of Victoria (SECV), 1960's
Timetable board giving first and last trams, weekdays, Sat and Sun. To 'City' with mounting holes, lettered on one side only, reverse side painted black, located at Gardens Loop, via Sturt St. sign. Some over painting on sign of former service times. See SECV Timetables. Demonstrates a SECV timetable signs that were located at various points on the tram system,Sheet metal sign, black background, white letters, painted.ballarat trams, timetable boards, secv street furniture -
 Melbourne Tram Museum
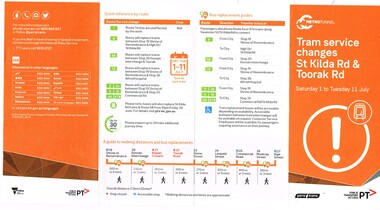
Pamphlet, Public Transport Victoria (PTV), "Tram service changes St Kilda Rd & Toorak Rd", Jun. 2017
.1 - Pamphlet - four fold - DL side four colour printed on off-white paper, titled "Tram service changes St Kilda Rd & Toorak Rd", advising intending passengers of the work between 1/7/2017 and 11/7/2017 to connect route 8 at Toorak Road West into St Kilda road the closure of the route via Park and Domain Road. Has a map, list of service changes, bus replacement guides and contact information. Has the logos of Metro Tunnel, Yarra Trams and PTV. .2 Pamphlet, printed and cut for use in trams around passenger hanging rails, titled "St Kilda Rd Tram and Bus service changes - Saturday 1 to Tuesday 11 July" - details bus replacement services and tram stops. Related to the main pamphlet - see image Set of five digital images taken at stop 25, Park St advising of the route diversion, replacement services and stop closure and two protest posters on fences nearby the stop about the Metro Tunnel project trucks using the local streets and the closure of the Park St / Domain Road tram line. .2 Pamphlet, printed and cut for use in trams around passenger hanging rails, titled "St Kilda Rd Tram and Bus service changes - Saturday 1 to Tuesday 11 July" - details bus replacement services and tram stops. Related to the main pamphlet.trams, tramways, park st, domain junction, metro tunnel, toorak rd, st kilda rd, tramway construction -
 Melbourne Tram Museum
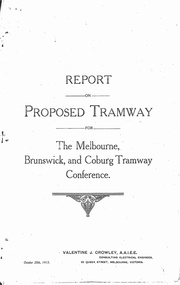
Document - Photocopy, Valentine J. Crowley Consulting Engineer, "Report on Proposed Tramway for The Melbourne, Brunswick and Coburg Tramway Conference", Original 1915
Photocopy - Report - 12 pages - titled "Report on Proposed Tramway for The Melbourne, Brunswick and Coburg Tramway Conference", prepared by Valentine J. Crowley Consulting Engineer Oct. 25, 1915. Looks at the construction of a tramway Flinders St along Queen St, to Royal Park, to Sussex St and Gaffney Road, West Coburg for the Melbourne Brunswick and Coburg Tramways Trust. Looks at the route and length of track in detail, route, administration, population, construction, permanent way, overhead lines, feeders, rolling stock, timetable, capital cost, alterations to services, expenditure for year and conclusion. Has a map of the proposed route. Included with the document is a plan of the MBCTT lines, overwritten in ball point pen with street names dated Dec. 1919. Photocopy made from original documents - has been stapled along the side in three places.trams, tramways, mbctt, maps, new tramway, west coburg, queen st, royal park -
 Melbourne Tram Museum
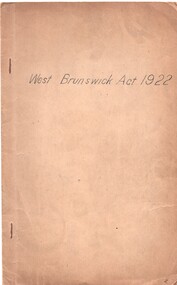
Document - Personal Papers, Victorian Parliament, "West Brunswick Act 1922", 1922
Folder - brown card cover, stapled with a copy of the Victorian Act of Parliament No. 3243 that authorised the construction of the Electric tramway to West Brunswick (East Coburg line). Dated 21/12/1922."H. S. McComb" written on the top right hand corner in ink, underlining of various words in red ink and two sets of hand written notes on the right hand side of page 3.trams, tramways, tramways, acts of parliament, mmtb, east coburg, construction -
 Melbourne Tram Museum
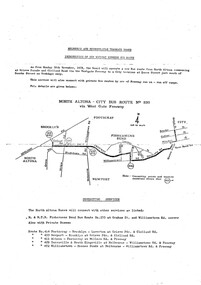
Document - Timetable/s, Notice, Melbourne & Metropolitan Tramways Board (MMTB), "Introduction of new Weekday Express Bus Service - North Altona - City Bus Route No. 232", Nov. 1978
Photocopy onto a foolscap double sided, of the introduction of a new bus service along the West Gate Freeway - 20/11/1978 - titled "Introduction of new Weekday Express Bus Service - North Altona - City Bus Route No. 232". Shows a map of the service, details of connecting services, stopping places, fares and timetable.trams, tramways, buses, timetables, north altona, route 232 -
 Melbourne Tram Museum
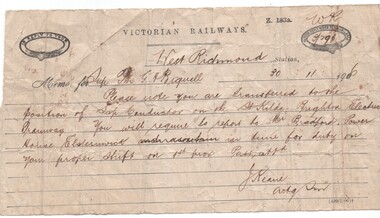
Document - Memorandum, Victorian Railways, Victorian Railways Memorandum, dated 30-11-1906 re St Kilda tramway, 30/11/1906 12:00:00 AM
Victorian Railways Memorandum, dated 30-11-1906 on VR printed form Z 183a, advising Porter (?) G. H. Biquell (?) that he had been transferred to the position of Conductor on the St Kilda Brighton Electric Tramway from 1/12. He was to report to Mr. Bradford at the Power Station, Elsternwick. Signed by J. Keane Acting Station Master West Richmond station. Has been completed using a form with a perforated edge on the left hand side.trams, tramways, victorian railways, st kilda brighton, conductors, personnel, elwood -
 Melbourne Tram Museum
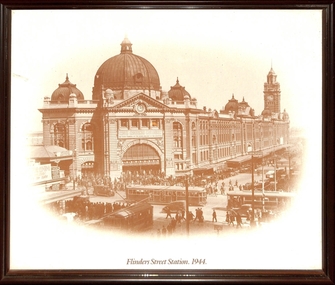
Photograph - Framed Photographs, Malvern Framing Gallery, "Flinders Street Station 1944", late 1920s
Taken from St Paul's Cathedral steps. Has a small part of the Princes Bridge Station building on the left hand side. The Swanston St canopy of Flinders St station has the words "Cross Crossings Cautiously". A W class tram is northbound while an S or T class tram is southbound while another single trucker is west bound to Spencer St in Flinders St. The trams in the photo were used prior to 1944. All W class trams were converted to W2 class prior to 1944 and the single trucker westbound had been scrapped by then. Photo dated late 1920s.Yields information about the intersection of Flinders and Swanston Sts late 1920s.Reproduced photograph, sepia-toned titled "Flinders St Railway Station 1944' in a brown wooden frame with a gold line, paper backed with a cotton hanging strip. On rear in ink at the top - "Donated to Hawthorn Tram Museum Feb. 19th 2012 Ron Scholten"trams, tramways, melbourne, flinders st station, w class, s class -
 Melbourne Tram Museum
Negative - Set of 8, Travis Jeffrey, Jun. 1960
1. B&W negative of tram 468 in Ballarat Rd Footscray. Tram has destination Explosives Factory. Driver stepping down from cab and passenger walking from tram to kerb. 2. B&W negative of tram 468 in Ballarat Rd at Gordon St Footscray. Tram has destination Railway Station. Tram shelter shown in front of Powell Hotel. 3. B&W negative of tram 468 in Gordon St Footscray. Tram has destination Railway Station. Tram is shown at corner of River St on wrong side of road, so appears to be ready for shunting. 4. B&W negative of tram 468 at Ordnance Factory West Maribyrnong. Tram has destination Ordnance Factory. W2 454 is in background. 5. B&W negative of tram 468 in River St Footscray. Tram has destination Explosives Factory. 6. B&W negative of tram 468 in Raleighs Rd West Maribyrnong. Tram has destination Explosives Factory. Tram is shunting. 7. B&W negative of tram 468 in Somerville Rd Footscray. Tram has destination Russell St. Tram is shown with driver and female conductor posing for photographer. 8. B&W negative of tram 468 at Ordnance Factory West Maribyrnong. Tram has destination Explosives Factory. 2nd unidentified Tram is shown in background. Female conductor walking the trolley pole around. NOTE: - dates are not as marked on some photo envelopes recorded below as the Footscray closed March 1961.1. Paper folder that contained the negative had "NR30A" written in red ink, "F9" written in pencil, "20A" written in blue ink, and date stamped 11 Jun 1960. On rear, dates stamped 26 Sep 1962 (twice). 2. Paper folder that contained the negative had "NR36A" written in red ink, "F8" in pencil, "26A" in blue ink, and date stamped 11 Jun 1960. On rear, dates stamped 26 Sep 1962 and 6 Oct 1962. 3. Paper folder that contained the negative had "NR47A" written in red ink, "F10" in pencil, "37A" in blue ink, and date stamped 23 Sep 1961. 4. Paper folder that contained the negative had "NR32A" written in red ink, "F14" in pencil, "22A" in blue ink, and date stamped 11 Jun 1960. On rear, dates stamped 26 Sep 1962 and 6 Oct 1962. 5. Paper folder that contained the negative had "NR54A" written in red ink, "F15" written in pencil, "44A" written in blue ink, and date stamped 28 Sep 1961. On rear, dates stamped 26 Sep 1962 and 6 Oct 1962. 6. Paper folder that contained the negative had "NR56A" written in red ink, "F13" in pencil, "46A" in blue ink, and date stamped 28 Sep 1961.2. 7. Paper folder that contained the negative had "NR64A" and "NR105A" written in red ink, "F11" in pencil, "64A" in green ink, and date stamped 1 Jan 1963. On rear, date stamped 26 Sep 1962. 8. Paper folder that contained the negative had "NR62A" written in red ink, "F12" in pencil, "52A" in blue ink, "damaged" in purple ink, and date stamped 11 Jun 1960.trams, tramways, x1 class, footscray, ballarat rd, gordon st, ordnance factory, somerville rd, trolley poles, crews, drivers, conductors, tram 468, tram 454 -
 Melbourne Tram Museum
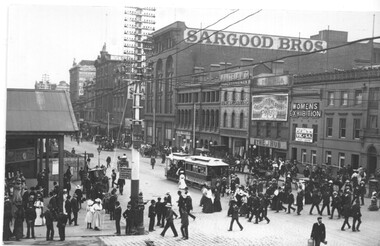
Photograph - Black and white - Flinders St, looking west from Swanston St, c1905
Photograph of Flinders St looking east from Swanston St - shows the entrance to Flinders St station prior to the construction of the current building. In the view are one cable tram, many pedestrians and some horse-drawn vehicles. A hoarding on the left hand side possibly indicates work is underway on the new station building. A sign on the pole advises that cable trams went to Spencer St for a penny and for 3d to Port Melbourne or South Melbourne. In the background are buildings for Sargood Bros, Thomas Whitelaw Home Decorators, The Hub, a sign on the Young & Jackson Hotel advertising a Women's Exhibition. There is a telephone pole line on the south side of Flinders St.Yields information about Flinders St, c1905.Black and white photograph on paper.In pencil on rear "163 OB"trams, tramways, cable trams, flinders st, flinders st station -
 Melbourne Tram Museum
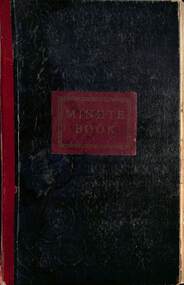
Document - Minute book - Cable tram operational history notes and records, Melbourne & Metropolitan Tramways Board (MMTB), up to 1930
Compiled by an unknown person as a record book of cable tram operational tickets or fare history for each location with general notes and some notes on electric trams. Pages 1 to 23 and pages 123 and 124 - General history of cable and electric trams with notes on tickets, trams, buses, events, and operational management. Compiled through to 26/10/1930, with some loose notes about the final closure of the cable tram system. For each cable tram car house (depot), Power House or Winding house, or route, notes on tickets, dates, rope speed, fares, replacement electric services or buses. Richmond Fitzroy Fitzroy and South Melbourne line Victoria St Clifton Hill Nicholson St Exhibition (route or line) Brunswick Royal Park Carlton Prahran Toorak' Queensberry St North Carlton Esplanade with details on bus services Windsor St Kilda (Brighton Road) North Melbourne West Melbourne' South Melbourne Port Melbourne' Northcote Kew (horse) Elsternwick (electric) At rear of book is four page document that gives information on the electric tram system, routes, cable. fares and first and last services for each line. Mid 1920s as the West Coburg service noted. Yields information Melbourne cable tram fares, ticket issuing and general history of the MMTB.Book - heavy card covers with paper imitation leather finish with red tape on left hand side and labelled "Minute Book", bound with 8 sewn sections, approx 200 foolscap pages, ruled sheets, numbered in pencil from 1 to 124 used to record information in ink.tramways, cable trams, fares, tickets, electric trams, melbourne, mmtb -
 Melbourne Tram Museum
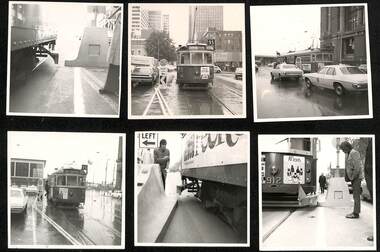
Document - Report, Melbourne & Metropolitan Tramways Board (MMTB), "Interim Report - Nicholson Street Safety Bars", 1978c, 1973
Report and photographs of various mechanisms to identify and check clearances for Safety Zones on tramways. .1 - Report - 4 pages stapled in top left hand corner - titled "Interim Report - Nicholson Street Safety Bars", dated 20/6/1978 signed by R. G. Vanselow. Describes the work involved in providing a type of "jiggle bars" leading up to the safety zone. Many photographs of the various types of safety zone marks were included within the folder. The photos of 912 are related to the clearance testing carried out during 1973 for the Z class. See also Reg Item 480? .2 - tram 912 fitted with a wooden device to measure clearances - with a concrete safety zone being checked. .3 - tram 1040 in Bourke St with a Safety Zone sign on the left - King St? .4 - tram and traffic at the Bourke St terminus. .5 - not used. .6 - tram 1000 at ditto on a wet day .7 - as for .2 .8 - ditto .9 - ditto .10 - side on view of W2 447 with a concrete prow fitted with a set of flashing lights. .11 - to .15 - series of large prints of enlarged 35mm negatives of night testing of safety zone sign taken at South Melbourne Depot and in St Kilda Road. .16 Bourke St - looking west at Russell St? with caption "prow replacing type 2 (Hairpin sign) with both original (white) and new MCC (Yellow) line marking on approach". .17 - Bourke St - looking west at Kings St and caption "Prow replacing type 2 (Hairpin sign) with original line marking on approach. .16 and .17 taken on Polaroid Instamatic cameras.Some of the photos have captions written on the rear.trams, tramways, tram stops, bourke st, safety zone, testing, z class, safety, tram 912, tram 1040, tram 1000, tram 447 -
 Melbourne Tram Museum
Map, Melbourne & Metropolitan Tramways Board (MMTB), Set of 15 tram route maps, 1977 to 1979
Series of 15 colour route maps for various tram lines or groups of tram lines for the MMTB. Some have the Transport Information Centre telephone printed on them, others have a label stuck on. Some are finished with a plastic laminate finish on either one or both sides. Show the major cross streets, parks, schools, other tram routes, major stop numbers and railway lines. Two copies of each held unless noted otherwise. .1 - Mont - Albert City - R11/77, shows routes 43. 47. 45. 44 .2 - Malvern, East Malvern, Carnegie and East Brighton Tram Routes (from St Kilda Junction) - R1/79 - shows routes 5, 3, 67, 66, 61, 62 and 64. .3 - Swanston St tram guide - R1/79 - lists all routes and route numbers that branch or cross Swanston St between Grattan St and St Kilda Junction. .4 - St Kilda Rd Tram Routes R12/77 - details South Melbourne Beach, route 1 and route 2 and St Kilda Beach routes 15, 16 and 55 otherwise shows were the various routes branch off St Kilda Road. Copy 1 has "P14909" in pencil in the bottom right hand corner. .5 - Kew - St Kilda Beach - R1/79 - Route 69. .6 - Footscray - Moonee Ponds - R3/81 - Route 82 .7 - Flinders St tram routes - R5/78 - North Balwyn, East Burwood, routes 48, 40, 41, Hartwell, 28, 74 and 75 .8 - William St tram routes - Route 55, 56 and 63 - South Melbourne Depot and Domain. copy 2 has "P14913" in bottom right hand corner. .9 - Toorak Camberwell and Glen Iris tram routes with Camberwell Junction and Malvern Town Hall, R1/79, routes 8, 7, 6, 72 and 73 shown. .10 - Swanston St tram routes - R12/77 - shows all the Swanston St routes, including East Coburg and Moreland. .11 - Bourke St tram routes - R4/77 - East Brunswick Blyth St and East Preston Tyler St and intermediate routes, routes 95, 96, 97, 90, 89 and 88. .12 - as for .11, dated 1/85, showing extension to La Trobe University - has Metropolitan Transit logo. Only 1 copy held. Also shows route 92 and 87. .13 - Batman Ave tram routes - R9/77 - Wattle Park, North Richmond and Prahran - routes 70, 71, 78 and 79. .14 - City route guide - R9/77 - showing all route numbers and destinations that passed through the CBD. .15 - Elizabeth St tram routes - R12/77 - Essendon Airport, West Maribyrnong, North Coburg lines, routes 50, 58, 60, 54, 57, 52. 49, 59, 18, 20 and 19. Copy 1 has "P14905" in pencil in bottom left hand corner.trams, tramways, maps, route guide, route numbers, routes, mont albert, route 43, route 47, route 45, route 44, route 42, malvern burke rd, east preston, carnegie, east brighton, south caulfield, route 5, route 3, route 67, route 62, route 64, route 66, glenhuntly tram depot, swanston st, st kilda rd, south melbourne beach, st kilda beach, route 1, route 2, route 15, route 16, route 55, kew- cotham road, route 69, route 79, route 82, footscray, moonee ponds, flinders st, north balwyn, kew, east burwood, burwood, hartwell, richmond, route 48, route 40, route 41, route 28, route 74, route 75, route 56, route 63, william st, west coburg, toorak, camberwell, glen iris, malvern town hall, route 72, route 73, route 7, route 8, bourke st, route 6, route 95, route 96, route 97, route 90, route 89, route 89, east preston, east brunswick, la trobe university, clifton hill, route 92, route 87, route 70, route 71, route 78, route 79, north richmond, prahran, wattle park, essendon airport, west maribyrnong, north coburg, route 50, route 58, route 60, route 54, route 57, route 52, route 49, route 59, route 18, route 20, route 19, batman ave -
 Melbourne Tram Museum
Map, Melbourne & Metropolitan Tramways Board (MMTB), Set of 8 bus route maps, 1977 to 1979
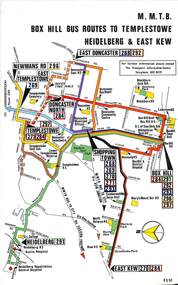
Series of colour route maps for various bus or groups of tram lines for the MMTB. Some have the Transport Information Centre telephone printed on them, others have a label stuck on. Some are finished with a plastic laminate finish on either one or both sides. Show the major cross streets, parks, schools, other tram routes, major stop numbers and railway lines. .1 - Box Hill bus routes to Templestowe - R38/82, Heidelberg and East Kew, includes Doncaster, Shoppingtown and Newmans Road. .2 - Clifton Hill - R2/79 - Elsternwick, Point Ormond and St Kilda Junction .3 - Footscray, Sunshine, Deer Park, Nth Altona, Fishermen's Bend, Highpoint and Williamstown Road - R2/79. .4 - Bulleen - City - Port Melbourne - Garden City Bus Route, including Kew, Collingwood - R6/78 .5 - City - Warrandyte and East Doncaster including Newmans Road, Templestowe, East Doncaster, Donvale, Shopping town, and Kew. R3/82. .6 - West Heidelberg, La Trobe University, Northland - R3/81 .7 - Box Hill, Ringwood to East Doncaster and Warrandyte, Park Orchards, North Blackburn R3/82. .8 - Geelong - Herne Hill, Rollins Road, Donnybrook Rd, North Shore and Corio Villagetrams, tramways, maps, route guide, route numbers, routes, buses, box hill, templestowe, doncaster, east kew, heidelberg, clifton hill, point ormond, elsternwick, footscray, sunshine, deer park, north altona, fishermen's bend, highpoint, williamstown rd, bulleen, kew, collingwood, port melbourne, garden city, warrandyte, donvale, la trobe university, northland, ringwood, park orchards, mitcham, blackburn, geelong -
 Melbourne Tram Museum
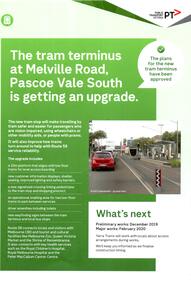
Pamphlet, Public Transport Victoria (PTV), "The tram terminus at Melville Road, Pascoe Vale South is getting an upgrade.", Nov. 2019
Pamphlet - single A4 double sided sheet printed on heavy paper, titled "The tram terminus at Melville Road, Pascoe Vale South is getting an upgrade." Provides information on the provision of a new terminal arrangement at West Coburg and the Melville Road terminus including the provision of a platform stop.trams, tramways, melville rd, tram stops, west coburg -
 Melbourne Tram Museum
Negative, Wal Jack, 1940
Black and white negative, by Wal Jack, of a cable tram set, trailer 568 waiting to enter the terminus at Bourke St, c1940. Tram has the destination of Spencer with the trailer having the side destinations of Northcote and Smith St. Note the lady with an overcoat and suitcase on the right side of the photo. In the background is the Peoples Palace, Hudson's Stores, advertising Alsatian paints, Dockers Revelite paints, tools, Shell products. Also St. Augustine's Parish church and the West Melbourne police station watch house.trams, tramways, cable trams, bourke st, tram 568 -
 Melbourne Tram Museum
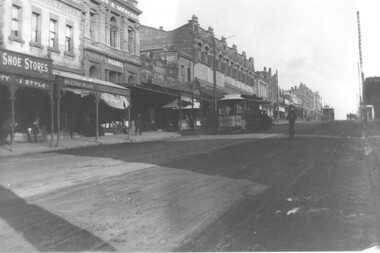
Photograph - Bourke St from William St looking west - cable trams, c1910
Photograph shows the view from William St looking west along Bourke St. Has two cable tram sets in the view, along with on the south side of Bourke Street the former St. James Building, Gollin & Company Building, then over King Street, Bourke Street West Police Station, McLean Bros. & Rigg Ironmongery & Hardware Store, (later Hudon's Store) and the Tramways Head Office Building. On the northside of Bourke Street is the Massey-Harris Building, John Connell & Co. Pty Ltd "Gresham House" and over King Street, H.V. McKay Harvester's Sunshine Head Office. Also in the distance is the Spencer Street Railway Station buildings. The Archway visible through the St. James Building led into the former Lt. James Street. Yields information about Bourke Street between 1909 and 1913Photograph - sepia toned on A4 sheetHas TMSV Sales stamp on rear.trams, bourke st, william st, cable trams, tramways, tram 402, st. james building -
 Melbourne Tram Museum
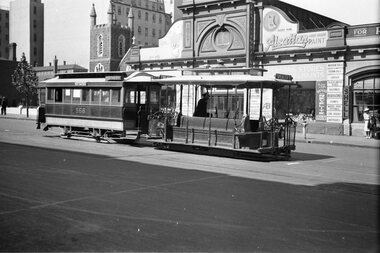
Photograph, Cable tram 41 Bridge Road Richmond, c1900
The photograph shows cable, trailer 41 climbing the Bridge Road hill just west of Waltham Steet bound for the city. A second cable set can be seen in the distance, bound for Hawthorn Bridge. Nearly all of the buildings on this south side of Bridge Road remain today including the former Forbes and Sons building. Photo possibly dated c1900.Yields information about cable trams in Bridge Road Richmond and associated buildings.Photograph, black and white, plain papertrams, tramways, cable tram, bridge road, tram 41, richmond -
 Melbourne Tram Museum
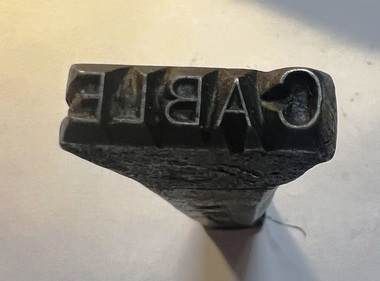
Tool - Name stamp or punch - "Cable", W Willis & Co
Manufactured tool for use by one of the Melbourne cable tram operators, most likely the Melbourne Tramway and Omnibus Co, to stamp leather satchels and other items that had to be marked. See item 7678 for a "RICHMOND" stamp. Was extensively used given the deformation at the top of the punch.Demonstrates a steel tool to stamp markings onto leather or other objectsTool - forged steel and hardened to stamp the word "CABLE". Has manufacturer's name and location on the sides stamped in,"Makers W Willis & Co, Collins St West Melbourne" stamped in on the sides.tools, mtoco, stamps, metal stamp, tramways, cable trams -
 Melbourne Tram Museum
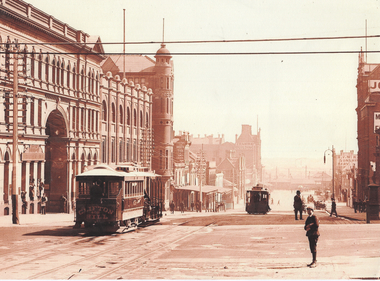
Postcard, VSM, "Collins Street Melbourne (looking west), c1908
Image shows a view of Collins St looking west from near Russell st looking towards Swanston St. Has two cable trams in the view. Has the offices of The Argus and the Australasian newspapers in the view on the left side of the card. On the outside of the building are boards with extracts of the newspaper and people viewing them. The card has the name of 'VSM Melbourne" and that it was printed in Prussia.Yields information about Collins St c1908 and the nature of dress of the many people in the photo and The Argus building.Colour postcard - Divided back, titled "Collins Street Melbourne (looking west)", date stamped in two places "Melbourne 10-3-08"In pencil 2E collins st, postcards, cable trams, the argus -
 Melbourne Tram Museum
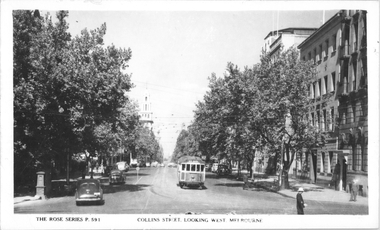
Postcard, Rose Stereograph Co, "Collins Street looking west, Melbourne", late 1930s
Rose Series postcard No. P 591, titled "Collins Street looking west, Melbourne" with W2 class tram No. 637 (Kew Depot, route 47) eastbound at Spring Street, about to turn into Macarthur Street. There is a policeman on point duty and a man walking across to the tram. On the left-hand side is a safety zone post. On the bottom left hand of the photo is a letter box or receiving pillar.Yields information about Collins St late 1930s.Postcard - printed real photograph with Rose Stereograph Co. name on the rear.tramways, trams, w2 class, tram 627, collins st, route 47, spring st -
 Melbourne Tram Museum
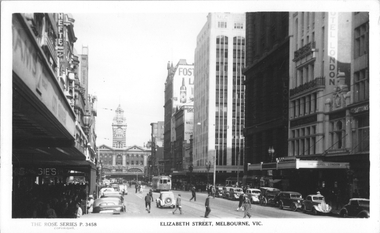
Postcard, Rose Stereograph Co, "Elizabeth Street Melbourne", late 1930s
Rose Series postcard No. P 3458, titled "Elizabeth Street Melbourne" looking south from near Little Collins St with Flinders Street station in the background. Has W5 class tram No. 700 (North Melbourne, route 50) northbound. Another two trams are at the Flinders Street terminus and a W2 (route 47) can be seen in Collins Street waiting for the traffic light. A horse-drawn cart is parked outside the Hotel London and an Ice Cart can be seen on the left-hand side of the photograph. The new MLC building is on the south west corner of Collins and Elizabeth Streets. It was demolished in the late 1960'sYields information about Elizabeth Street late 1930s.Postcard - printed real photograph with Rose Stereograph Co. name on the rear.tramways, trams, elizabeth st, w5 class, tram 700, flinders st station, route 50 -
 Melbourne Tram Museum
Postcard, Rose Stereograph Co, "A delightful view across the River Yarra, Melbourne"
Rose Series postcard No. P 10147, titled "A delightful view across the River Yarra, Melbourne" showing a view from the south bank of the Yarra across to Flinders St station, the signal gantries at the west end of the platforms, the station buildings and some of the other buildings on the skyline. A St Kilda bound dog box (swing door) set is in platform 10 awaiting departure.Yields information Flinders St station from the south side of the river.Postcard - printed real photograph with Rose Stereograph Co. name on the rear.flinders st station, signals, yarra river, railways, electric trains -
 Melbourne Tram Museum
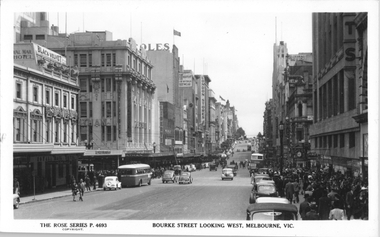
Postcard, Rose Stereograph Co, "Bourke Street Looking West, Melbourne", late 1940s
Rose Series postcard No. P 4693, titled "Bourke Street Looking West, Melbourne". Photo taken from the north side of Bourke St between Swanston St and Russell St. Has a number of double decker and single deck buses in the view. A W2 class tram is waiting on the south side of Bourke Street in Swanston Street. Photo late 1940s. The former cable tram tracks remain in the street. the Foys Department store is on the right. Yields information about the eastern end of Bourke St in the late 1940s.Postcard - printed real photograph with Rose Stereograph Co. name on the rear.tramways, trams, bourke st, buses, mmtb buses, leyland, td5c class, w2 class, swanston st -
 Melbourne Tram Museum
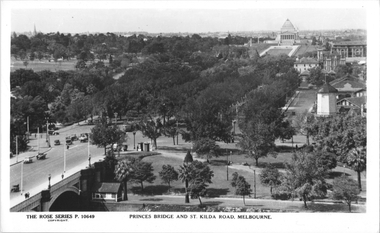
Postcard, Rose Stereograph Co, "Princes Bridge and St Kilda Road Melbourne", late 1930s
Rose Series postcard No. P 10649, titled "Princes Bridge and St Kilda Road Melbourne", looking south from Flinders St station clock tower showing Princess Bridge and St. Kilda Road with a W2 class tram in the view at the intersection of City Road to the west and Alexandra Avenue to the east. In the background is the Shrine of Remembrance. To the west of St. Kilda Road running in parallel from City Road to Mafra Street is Sloss Street, it was removed in the late 1960' for the construction of the National Arts Center. The former "Green Mill" dance hall built in 1926 become the "Forty Club" in 1933 and evolved to being the "Trocadero Palais" by the late 1930's can be seen on the right of the photo. The road on the south side of the Yarra River, at the bottom of the photo, is Riverside Avenue. Yields information about St Kilda Road, late 1930s.Postcard - printed real photograph with Rose Stereograph Co. name on the rear.trams, shrine of remembrance, st kilda road, princes bridge, w2 class, tramways -
 Melbourne Tram Museum
Postcard, Rose Stereograph Co, "Collins Street Melbourne", c1929
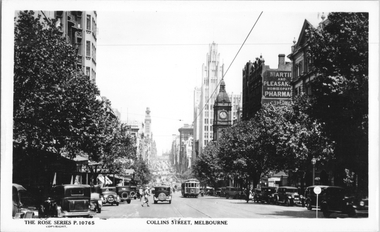
Rose Series postcard No. P 10765, titled "Collins Street, Melbourne" looking west from Russell Street. Has many trams in view, including tram 333 which does not have a route number box, though the one on the left side of the road does. This tram was fitted with a route number box during Nov. 1929. In the far background can be seen chimney stacks of the gas works. There is a sign for Martin and Pleasant, Homeopathic Pharmacy.Yields information about Collins St c1929Postcard - printed real photograph with Rose Stereograph Co. name on the rear.trams, collins st, w2 class, gas works, tramways, tram 333 -
 Melbourne Tram Museum
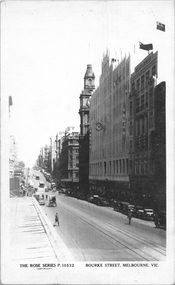
Postcard, Rose Stereograph Co, "Bourke Street Melbourne", c1935
Rose Series postcard No. P 10532 titled "Bourke Street Melbourne", looking west from near Swanston Street. Has two cable trams in the far distance. The Myer Emporium building is shown along with the GPO. A building crane can be seen on the left side of the photograph where Diamond House is under construction for Dunklings which was completed in 1936.Yields information about Bourke Street c1935Postcard - printed real photograph with Rose Stereograph Co. name on the rear.trams, tramways, cable trams, bourke st