Showing 189 items
matching kidney-weed
-
 Eltham District Historical Society Inc
Journal - Newsletter, Nillumbik Shire Council, Nillumbik News, October 2000
October 2000 articles include: Safer roads for the Shire Eltham Festival program announced Commercial Place design released 2000-2003 Council Plan Released National Reconciliation Framework Living and Learning Centres More Playgrounds Susan St Pavilion completed Study to plan for BMX/skate track Wattle Glen Township Strategy Community Weed Control Program Count Koala Day Environment Centre proposed for Edendale Farm Open Space Strategy findings Neighbourhood Character Study and Residential Design Guidelines Friends groups Clean Drains – Living Creeks, National Water Week Nillumbik Shire Council Cultural Plan 2000-2005 adopted 2001 Alan Marshall Short Story Award Artists’ Open Studios program Kangaroo Ground Tower Advisory Committee Environment leaders at Eltham North primary Dollars saved by regular road maintenance Regional Road upgrades Rural roads grading program Stormwater Management Plan Locality boundary update council newsletters, nillumbik news, nillumbik shire council -
 Royal Australasian College of Surgeons Museum and Archives
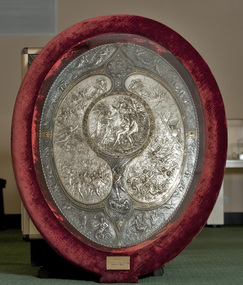
Plaque - Shield, Elkington & Co, Milton Shield, 1867
The Milton Shield was given to the College in 1968 by the eminent Sydney surgeon Conrad Blakemore (1898-1976), whose family had owned it for almost 100 years. There are three known examples of this Shield in Australia. They are electrotype reproductions made by Elkington & Co. of an original created by Léonard Morel-Ladeuil between 1864 and 1866, and exhibited in Paris at the Exposition Universelle of 1867. The original is made of silver and damascened iron, measures 880mm by 630mm, and is now in the Victoria & Albert Museum in London.There are three known examples of this Shield in Australia. They are electrotype reproductions made by Elkington & Co. of an original created by Léonard Morel-Ladeuil between 1864 and 1866, and exhibited in Paris at the Exposition Universelle of 1867. The original is made of silver and damascened iron, measures 880mm by 630mm, and is now in the Victoria & Albert Museum in London.The Shield is oval in shape, and is divided into several fields, each of which shows a different scene. The entire surface is covered in floral and animal decoration, and patterns. A cable moulding runs around the outer edge. The College’s Shield is set in a heavy timber frame bordered with red velvet and glazed.The central area is circular, depicting the archangel Raphael telling the story of the war in Heaven to Adam and Eve in the Garden of Eden. Immediately below this is the figure of the archangel Michael trampling on the defeated Satan. At the bottom of the shield are two figures representing Sin and Death. On either side of the central circle is a kidney-shaped field, the one on the left showing the army of the rebel angels assaulting Heaven, and on the right the fall of the rebel angels. At the top of the Shield are figures of cherubim and seraphim. The name of the Shield derives from the scenes on it, illustrating episodes from Paradise Lost by John Milton (1608-1674). Presented by Conrad Blackmoremilton shield, conrad blakemore, 1968, léonard morel-ladeuil -
 Eltham District Historical Society Inc
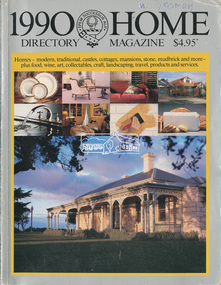
Magazine - Magazine Article, Rosscorp Pty Ltd, 1990 Home Directory Magazine, 1990
Articles featuring local Eltham mudbrick houses designed by Robert Marshall, Alistair Knox, etc and landscape bush gardens by Gordon Ford • “At Home with the Browns”, pp114-116 ‘Cherrytrees’, home of Margaret and Neil Brown, originally built in 1917 for eminent Collins Street surgeon, Dr. Kent-Hughes. • “The Mud Brick homes of Eltham”, pp148-149 References to Alistair Knox and Robert Marshall • “Mudbrick Collecting”, pp150-155 Features a Robert Marshall designed home built by Barry Wild and Geoff Williams • “Mudbrick sophistication”, pp156-158 Features a Robert Marshall designed home with Gordon Ford landscape garden • “It grew like topsy”, pp160-162 originally designed by Alistair Knox then extended upon • “A love of the environment”, pp163-164 Features artist and local Councillor Jenni Mitchell’s mudbrick cottage designed by Bohdan (Danny) Kuzyk with influences of Alistair Knox • “Build your own muddy”. Pp165-167 • “Pioneer of bush gardens; Gordon Ford and his no mowing no weeding approach”, pp174-177 robert marshall, alistair knox, gordon ford, mudbrick, margaret brown, neil brown, cherrytrees, dr kent-hughes, eltham, barry wild, geoff williams, jenni mitchell, bohdan (danny) kuzyk, bush gardens -
 Wooragee Landcare Group
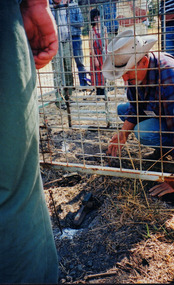
Photograph, 3rd April 2004
Wooragee Landcare, since its establishment in 1998, has organised a series of events and activities in order to promote weed and pest control, provide assistance and knowledge to landholders and ensure sustainability and protection of natural vegetation. This photograph was taken on the 3rd April 2004 as part of an event called "Spotlight on Fox", organised by the Wooragee Landcare Group. It was addressed to all landholders in the area and involved practical demonstration of techniques suitable for integrated fox control. Camille Velesky, who is illustrated in the photograph, was the presenter; he is a specialist in fox behaviour and has worked for 27 years on pest control. Under the Catchment and Land Protection Act 1994 (CaLP Act) foxes are declared as established pest animals and landowners have the responsibility to take reasonable steps to protect their land from established pest animals. The most commonly used management techniques are baiting, shooting, guard animals, fencing, trapping, canid pest ejectors, above-ground harbour removal, property hygiene and fumigation. Trapping, due to the significant suffering and distress that causes to foxes, has significant animal welfare implications and should be avoided if there is another suitable alternative. The photograph is an example of the type of events and activities organised by Wooragee Landcare to educate and inform local residents and landholders on the most suitable techniques for integrated fox control. Wooragee Landcare, abiding by its mission statement, promotes best land management strategies and ensures sustainability through collaboration with local community and council agencies.Portrait coloured photograph printed on gloss paper. Reverse: WAN NA 0ANA2N0 NNN+ 1 8743/ [PRINTED] (No.10)/256/spotlight on fox, wooragee landcare group, integrated fox control, camille velesky, fox behaviour, pest control, catchment and land protection act 1994, calp act, established pest animals, baiting, guard animals, fencing, trapping, trap setting demonstration, weed and pest control, sustainability, natural vegetation, fox dens, fumigation, animal welfare -
 University of Melbourne, Burnley Campus Archives
Album - Colour slides, Miscellaneous Burnley
Garden views, newly planted Melaleuca styphelioides, Garden view "BHC". "Spear Thistle Flowers". "Orchard Weed Control Terbacil?" "Feeding Hay to Merino X" "Baleo? Lucerne." 1. "Glasshouse Display." 2. Fitzroy Gardens excursion? 3. "Rose Pruning Day." 4. "Cut Flowers" growing in the Orchard. "B.H.C. Gardens" Jan 8? 5. Sequoia sempervirens & Jacaranda. 7. Student spraying in the Orchard. 8. Poly tunnel. 6, 10. Inside a greenhouse. 9. Sign "Plant Science Laboratory Lecture Room 5 →". Poly tunnel Jan? 11. Student Representative Council? 12. an unreadable sign near the Plant Research Institute. 13. Plant Research Institutue. 14. Students in Class.15. "Citrus Burnley Orchard. 16. " Student being taught how to lay irrigation pipe (Burnley?) Students in class . 17, 18..Students in Science Laboratory. 19, 20. a student on a ride-on-mower in the Gardens "Burnley" 21. Tap in the ground - irrigation?garden views, bhc, weed control, merino, lucerne, glasshouses, displays, fitzroy gardens, flowers, jacaranda, nurseries, equipment, spraying, poly tunnel, plant science laboratory, plant research institute, irrigation pipe, mower, melaleuca styphelioides, spear thistle, orchard, greenhouse, rose pruning day, greenhouses, students in class, students working outside -
 Numurkah & District Historical Society
Isolation Ward Medical Displays - overview
Shelf One – North End of Isolation Ward 1 x slipper enamel bedpan 1 x enamel pan with spout 1 x stainless steel bedpan 1 x stainless steel urinal 2 x ceramic urinals 1 x ceramic bowl Shelf Two – North end of Isolation Ward 1 x small enamel kidney dish 2 x slipper ceramic bedpans 1 x enamel wash-bowl & jug Shelf Three – North end of Isolation Ward 1 X dry Steriliser Shelf Four – North end of Isolation Ward 1 X steam Steriliser Shelf One – South end of Isolation Ward 1 x nurse’s dictionary Domestic Medical Practice Book Doctor and Specialist Book Aids to Gynaecological Nursing Book Foundations of Anatomy & Physiology Book 2 x thermometers 1 x stainless steel swab bowl 1 x ophthalmoscope 1 x stainless bowl & bandages 1 x scissors/ tweezers kit 1 x large operating scissors & 1 x operating tweezers 1 x camode pot 1 x sigmoidoscope 3 x plessors Shelf Two – South end of Isolation Ward 1 x ceramic jug Kaarimba Ladies Auxiliary History of Num. Dist. Health Nursing Certificates & Notebooks – Winifred Smith Shelf Three – South end of Isolation Ward Nursing Certificates & Notebooks – Winifred Smith Shelf Four – South end of Isolation Ward 1 x white enamel bucket 1 x enamel bowl Glass Cabinet: Premature Babies Book Handbook of Paediatrics Various health brochures 1 x enamel potty, dry liners, nappy pins 1 x infant welfare leather case 2 x breast pump 2 x dippers Medical Items placed around the room 1 x kidney dish with syringes & bandage 1 x stethoscope 1 x catheters 1 x oxygen tubing 1 x hospital bed (pre-dates 1950’s eg from local private hospital) 1 x operating table and 1 x theatre stool (original Numurkah Hospital 1950’s) 1 x heart table 1 x dental chair, mouthwash dish & stand 3 x wooden crutches 1 x early dentist chair 1 x Infant Welfare Centre sign hospital, medical equipment -
 Bendigo Historical Society Inc.
Book - BENDIGO SALEYARDS COLLECTION: CITY OF BENDIGO PURCHASE REQUISITION
Blue duplicate Purchase Requisition Book dated 21/1/92 to 29/7/92.Cover has crocodile pattern and blue cloth tape on the spine. Tape on inside front cover. Items in the book include electrical work/repairs, stationary and office supplies and equipment, branding fluid, hardware, welding, dog food, screenings and spreading and checking scale. Blue duplicate pages and white originals. Last pages have This book is cancelled S? written across it. Back cover is missing. Two loose pages in the book. One is a duplicate For All Bull Cattle Colour, dated 3/2/92 for silver and yellow branding fluid. The other is a V/Line Freight Consignment Note dated 5/2/92. Purchase Requisition book with a red and cream patterned book with a red tape spine and blue pages. Saleyards is written in balck texta on the front of the red spine. Book is dated from 24/8/90 to 8/1/92. Requisitions signed by J M Crimmins and J Richmond. Requisitions were for electrical work, plumbing supplies, office materials, branding fluid, dog food, sheep dip, weed killer, repairs to yards, tools, printing, hay, and repairs to truck wash.bendigo, council, cattle markets, bendigo saleyards collection - city of bendigo purchase requisition, hume & iser, brb electrical, boltons bros, d walker pty otd, all bull albury, bearing & industrial supplies, midland irrigation, watson & crane, ray t thompson, golden triangle communications, blue line office supplies, allweld construction, toledo scales, david bolton, dalgety farmers, j m crimmins, rodger wrigley, dookie college, b p bury, ron dixon, beaurepaires tyers, steven hyde, bendigo scale co, d g walker pty ltd, reece, midland ir, bendigo engineering -
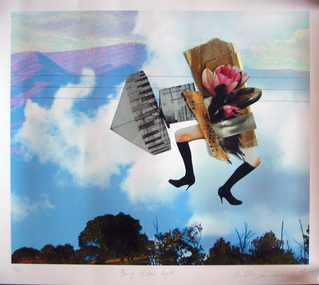 Federation University Art Collection
Work on paper - Photocollage, 'Being Ultra Light' by Rochelle Summerfield
Rochelle SUMMERFEILD Born Sydney, Australia This item is part of the Federation University Art Collection. The Art Collection features over 2000 works and was listed as a 'Ballarat Treasure' in 2007.Artists Statement: I am based in Northern NSW. My art practice is deeply influenced by my connections and experiences with the rivers and habitat where I live. Through drawing, paint, collage and digital media my work explores human relationships with riparian environments. Every day I see the undeniable beauty of our rivers as well as the ecological suffering of these riparian landscapes. Historical practices of land clearing, water politics and weed infestation put tremendous pressure on the Australian ecology. Disrupting traditional art forms, I combine them with new technologies to reveal some of the complexities behind human relationships with nature. With bold collagist experimentation, I combine numerous mediums to expose the small revelations between media. These juxtapositions open up the possibilities of reinventing different ways of being with the natural environment. Like the layers in my work, the issues surrounding our riverine environments are multifaceted and complex and begin with individual choices. I want to direct people’s attention to our rivers, to love, appreciate and reconnect with the natural environment. Human experience with nature is a fundamental part of our sense of self, health and well-being as well as community connection. (https://rochellesummerfield.com/about/, accessed 10 June 2020)art, artwork, rochell summerfield, printmaking, print council of australia -
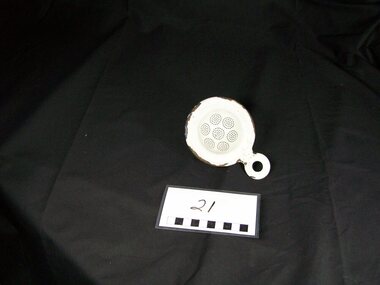 Blacksmith's Cottage and Forge
Strainer, Tea, 1920 (estimated); Approx. 1920
A tea strainer is a type of strainer that is placed over or in a teacup to catch tea leaves. When tea is brewed in the traditional manner in a teapot, the tea leaves are not contained in teabags, but rather are freely suspended in the water. As the leaves themselves may be distasteful, it is usual to filter them out with a tea strainer. Strainers usually fit into the top of the cup to catch the leaves as the tea is poured. Some deeper tea strainers can also be used to brew single cups of tea, much as teabags or brewing baskets are used - the strainer full of leaves is set in a cup to brew the tea, and then removed, along with the spent tea leaves, when the tea is ready to drink. By using a tea strainer in this way, the same leaves can be used to brew multiple cups. Tea strainer use declined in the 20th century with mass production of the tea bag, but is still preferred among connoisseurs who claim that keeping the leaves packed in a bag, rather than freely circulating, inhibits diffusion. Many assert that inferior ingredients, namely dust quality tea, are often used in tea bags. Tea strainers are usually either sterling silver, stainless steel, or china. Strainers often come in a set, with the strainer part and a small saucer for it to sit in between cups. Tea strainers in themselves have often been turned into artistic masterpieces of the silver- and goldsmith's craft, as well as rarer specimens of fine porcelain. Brewing baskets (or infusing baskets) resemble tea strainers, but are more typically put in the top of a teapot to contain the tea leaves during brewing. There is no definitive boundary between a brewing basket and a tea strainer, and the same tool might be used for both purposes. Tea strainers are also used by patients trying to pass a kidney stone. The patient urinates through the strainer, thereby ensuring that, if a stone is passed, it will be caught for evaluation and diagnosis. Source: www.wikipedia.net This item has historical significance in the evolution of Tea drinking.The Strainer being needed if a cup of tea was to be poured without tea leaves being present in the tea liquid.As Tea bags have been introduced into everyday life tea strainers are an item of the past. This particular tea strainer was an item for everyday useage.White enamel tea strainer, round in shape with flange edges, 7 small circle areas of perforations in the concave area of the utensil, a small perforated handle (same material) at one outer area of the item.domestic, kitchen, food, preparation, white, enamel, tea, strainer, beverage, perforated, utensil, round, flanges, leaves -
 University of Melbourne, Burnley Campus Archives
Album, Jan Chamberlain, Friends of Burnley Gardens Achievement Book, 2000
camellia planting ceremony, kay hirst, a w jessep, dorothy jessep, tom kneen, andrew smith, camellia japonica 'a w jessep', camellia japonica' dorothy jessep', friends of burnley gardens, fobg, sir rupert hamer, open gardens scheme, ellis stones rock garden, ellis stones, australian plants society, grasslands project, 150th birthday celebration, pruning day 2000, planting ellis stones rockery 2000, summer house, shelter shed, native garden, herb garden, grey garden, orchard, field station, bulb bed, working bee, twilight working bee, ikebana exhibition -
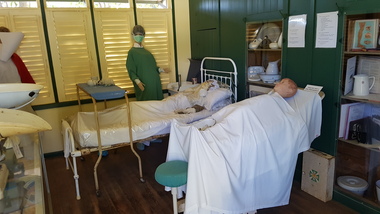
 Royal District Nursing Service (now known as Bolton Clarke)
Photograph - Digital image, Barry Sutton, c.1930
In 1930 the Society were pioneers in opening an Ante-Natal Clinic at the Melbourne District Nursing Society (MDNS) After-Care Home, setting a high standard with equipment, keeping records and providing leaflets with instructions in how to keep healthy during pregnancy, what complications to look for, and what to do when labour commenced. This image was taken in the Ante-Natal Clinic and shows some of the equipment used at that time and the uniforms worn by Trained nurses (Sisters) in the 1930s. Melbourne District Nursing Society (MDNS) was founded in 1885 and only nurses who had trained in a Hospital Training School and were fully qualified were employed by the Society. It commenced with one Trained nurse (Nurse), and another employed six months later; both walking amid the slums of inner Melbourne administering nursing care to the sick poor. The Society decided to commence a Midwifery Service and Nurse Fowler, who had previously worked for the Society, was re-employed as their first Trained Midwife. She began home births in August 1893 giving some Ante Natal care, taking midwifery bundles and providing clothes for the babe and mother as needed. Following birth, she gave Post-natal care to the mother and babe twice a day for three days and then daily for a week, and longer if required. She resigned after twelve months and Nurse Wilkie was appointed to the position. As well as walking, the Nurses used Public transport in the limited areas it ran, though a taxi was used by the Nurses and Midwife in emergencies and at night. As the Society expanded it rented premises until it was able to purchase it's own Nurses Home at 39 Victoria Parade, Collingwood in 1914. The Society were pioneers in recognizing the need for premises where patients too ill to be in their own home, but not ill enough to go to hospital, was needed. Land was procured next to No. 39, and the Society built the After-Care Home at 45 Victoria Parade, for these patients, and for patients from Hospitals. It was opened in July 1926 and the name of the Society then became ‘Melbourne District Nursing Society and After-Care Home’ (‘Hospital’ from 1934) The Ante-Natal Clinic at the Melbourne District Nursing Society After-Care Home was opened on the 23rd of September 1930 and MDNS Midwifery patients were encouraged to attend. Prior to the opening of the clinic Ante-natal care was not considered important, but within a short time 100 percent of MDNS Midwifery patients were attending. During 1934 the Women’s Welfare Clinic, including at the time a very controversial Family Planning Clinic, the first of its kind in Australia, was opened to support women at risk following multiple and difficult pregnancies. The Clinic gave advice on birth-control and was attended by their own patients at first, but then accepted patients from Melbourne public hospitals until their own clinics were opened.Digital image showing a Doctor and three Melbourne District Nursing Society (MDNS) Sisters attending a patient in the Ante-Natal Clinic at the After Care Hospital. In the forefront is a set of scales standing on the floor, behind which is the lady lying on a wooden framed bed with the base slightly raised at the top end supporting a white pillow and the lady's head. The lady has short dark hair and her frock can be seen to her waist; the rest of her body is covered by a white sheet and dark coloured blanket. Behind her and to the right of the image, are two Sisters wearing dark coloured long sleeved uniforms which have a belt and white collar; they are both wearing white veils over their short dart hair. To their left is a Doctor who has short dart wavy hair and is looking down at the lady. He is wearing a long white gown and has a stethoscope in his ears with the other end held in his right hand. To his left is another Sister who is wearing a white veil over her dark curled hair, and is wearing a long white gown. In the rear between the Doctor and Sister a hand basin can be seen. On the far left of the picture a trolley with two cloth covered shelves can be seen; a basin and squat bottle sits on the top shelf and kidney dish on the lower one. Behind this, part of a window can be seen.after- care hospital, 45 victoria parade collingwood, melbourne district nursing society (1885-1957), ante-natal clinic, after-care home, mdns midwifery, rdns, royal district nursing service -
 Coal Creek Community Park & Museum
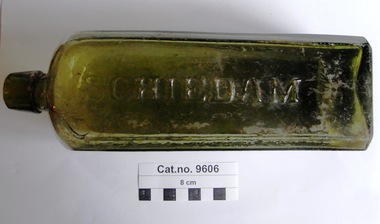
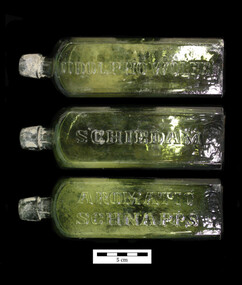
Bottle, glass, c. 1859 - c.1941
TROVE : Argus (Melbourne, Vic. : 1848 - 1957), Monday 17 January 1859, page 7 TO the PHYSICIANS of AUSTRALIA -WOLFE'S SCHIEDAM AROMATIC SCHNAPPS, A superlative Tonic, Diuretlc, Anti-Dyspepsic and invi-gorating Cordial,-This medical diet-drink is manufactured soley by the proprietor at his distillery, in Schiedam, in Holland, expressly for medicinal purposes. It Is the pure tincture of junlper, distilled from the best barley that can be selected in Europe at any cost. It is flavored and medicated, not by the common harsh berry, but by the choice botanical variety of tho aromatic Italian juniper berry, whose more vinous ex-tract is distilled and rectified with its spirituous sol-vent. and thus it becomes a concentrated tincture of exquisite flavor and aroma, altogether transcendant in Its cordial and medicinal properties to any alcoholic stimulant now in use In the world. It has been submitted to all the first chemists and physicians in the United States, who endorse it over their own signatures as one of tho great essentials of the materia medica. It is now proscribed with great success In gravel, grout, rheumatism, obstruction of the bladder and kidneys, dyspepsia, whether acute or chronic, in general debility, sluggish circulation of the blood, inadequate assimilation of food, and exhausted energy, are acknowledged by the whole medical faculty and attested in their highest written authorities. Put up in quart and pint bottles, enveloped In yellow paper, with tho proprietor's name on tho bottle-, cork, and label. For sale by all the respectable druggists and merchants. UDOLPHO WOLFE WILKINSON BROTHERS and Co., sole agents for Australia. Depots at Melbourne and Sydney. TROVE : Age (Melbourne, Vic. : 1854 - 1954), Wednesday 19 November 1941, page 4 WOLFE'S Aromatic SCHNAPPS Wolfe's Schnapps is now distilled in Australia from the original formula of Udolpho Wolfe. It remains, as before, a beverage of unique medicinal properties — Appetising, Re-freshing, , Stimulat-ing — as good for women as for men. -Wolfe's 'Schnapps for j your health's sake FOR VICTORY-buy War Bonds Now . W.B.157.13 Olive green glass bottle, square in section, slightly tapering toward the base, text embossed on three sides, circular ring embossed in shallow pontil shaped impression on base.Side 1 : UDOLPHO WOLFE'S'. Side 2 : 'SCHIEDAM'. Side 3 : 'AROMATIC SCHNAPPS'.schnapps, schiedam, gin -
 Kew Historical Society Inc
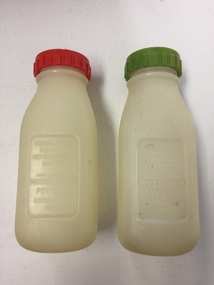
Container - Model Dairy Plastic Milk Bottles, Model Dairy, c.1960
This pair of milk bottles, produced for the Model Dairy in Cotham Road, Kew, were donated by Vik Sabaliauskas. They belonged to his father who worked at Model Dairy in the 1950s and 1960s. Vik wrote about his father: "As for my father, his whole life story is interesting. He was part of the big immigration program after WW2. He was a displaced person in Germany like lots of others who came out looking for a new life. Our family name is actually SABALIAUSKAS which is of Lithuanian descent. My Dad was also named Vik (Viktoras). He was known as Big Vik and I was little Vik. He arrived in Australia in 1947 and then did his 2 years of work organised by the Government and then he came to Melbourne. We lived in Tyler St Preston and he rode his pushbike to and from Kew every working day for years. In my estimation that was about 13 kms for about 6 or 7 years. Imagine that happening today. Freezing Winter mornings and hot Summer afternoons. His English was poor but he had a great work ethic like all European immigrants. His duties related to maintaining and operating all the machines. One story that he told me about was that after I was born (in 1959) he made friends with one of the drivers who delivered milk to the dairy. He asked him to get a container of milk from the farmer everyday which was just for me. I remember going to the Model Dairy Family Christmas parties which were always well patronised. I also remember visiting him in the PANCH Hospital (Bell Street Preston) where he was treated for kidney stones caused by drinking very creamy milk. He wasn't happy when he was told by the doctor to cut back on milk. My Dad was one month short of his 95th birthday when he died and he lived a pretty healthy life." (2019)Kew was a major milk producing district in the Nineteenth and early Twentieth centuries, with three major dairy farms lining the Yarra between Studley Park in the west and Burke Road in the east. In addition to these dairy producers, there were also a number of accredited dairy retailers in the suburb. The largest and most enduring of these was the Model Dairy founded by the Kew pioneer James Venn Morgan. Milk bottles that include the name of the producer or retailer are historically significant as they represent a period in Kew's history before the mass production of milk in the second half of the Twentieth Century. A number of these named bottles have the additional attribute of rarity.Pair of plastic milk bottles, designated on the front as to be used in the refigerator on on picnics. One bottle has a red screw on lid and the other a green lid. The bottles are semi-transparent. [The record also includes a photograph of Vic Sabaliauskas, provided by his son. The photograph dates from the period when he was employed at the Model Dairy].Impressed on the front of both bottles: "Unbreakable picnic and refrigerator bottle made expressly for Model Dairy Pty Ltd Cotham Rd Kew"dairies - kew, model dairy - cotham road - kew (vic) -
 City of Moorabbin Historical Society (Operating the Box Cottage Museum)
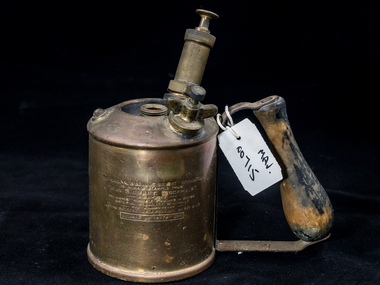
Tools, Blowtorch 'Sievert', 20thC
A blowtorch or blowlamp is a fuel-burning tool used for applying flame and heat to various applications, usually metalworking. Early blowlamps used liquid fuel, carried in a refillable reservoir attached to the lamp. Modern blowtorches are mostly gas-fuelled. The blowlamp is of ancient origin and was used as a tool by gold and silversmiths. They began literally as a "blown lamp", a wick oil lamp with a mouth-blown tube alongside the flame. This type of lamp, with spirit fuel, continued to be in use for such small tasks into the late 20th century. In 1882, a new vaporizing technique was developed by Carl Richard Nyberg in Sweden, and the year after, the production of the Nyberg blow lamp started. It was quickly copied or licensed by many other manufacturers. Carl Richard Nyberg (May 28, 1858, – 1939) was the founder of Max Sievert’s Lödlampfabrik, then one of the largest industries in Sundbyberg, Sweden. After school he started working for a jeweller and later he moved to Stockholm and worked with various metalworks. 1882 and set up a workshop at Luntmakargatan in Stockholm making blowtorches. However the business didn't work well because it took too long to both manufacture and sell them. In 1886 he met Max Sievert (1849 - 1913) at a country fair and Sievert became interested in Nyberg's blowtorch and started selling it. In 1922 the company was sold to Max Sievert who continued to own it until 1964 when it was bought by Esso. The blowtorch is commonly used where a diffuse high temperature naked flame heat is required but not so hot as to cause combustion or welding: soldering, brazing, softening paint for removal, melting roof tar, or pre-heating large castings before welding such as for repairing. It is also common for use in weed control by controlled burn methods, melting snow and ice from pavements and driveways in cold climate areas, road repair crews may use a blowtorch to heat asphalt or bitumen for repairing cracks in preventive maintenance. It is also used in cooking; one common use is for the creation of the layer of hard caramelised sugar in a crème brûlée. A brass blowtorch, 'Sievert' with a wooden handleSIEVERTtools, blow torches, blow lamps, welding, brazing, jewellery, cookery, soldering, nyberg carl, sievert max, stockholm, sweden, spirit fuel, kerosene, gas fuel, moorabbin, bentleigh, cheltenham, market gardeners, pioneers, early settlers, plumbing, carpenters, -
 Federation University Historical Collection
Booklet, J.A. Hoskin & Son, Ballarat School of Mines Students' Magazine, 1945, 1945
List of Full Course Students' 1945, Editorial, Editor's Notes, News and Notes, End of the War 1939-1945, Obituary, The Literary Society, The Chemical Nature of Women, Fumes from the Lab, Forests - Our Asset and Responsibility, Arts & Crafts Gossip, Sports, Commercial Notes, The Junior TechsMaroon cover with, blue, green and gold lettering, soft covered magazine of 72 pages including advertisements. Artwork Mr Calder - By Eda Woodfield Miss Williams - By Ruth Mole Basil - By Beatrice Burgess Roy - By Eda Woodfield Mac - By Gweneth Speirs Joll - By Marjorie Gray Doug - By Ruth Mole View from the cutters hut - By Marion Beckwith Mr Fairbank - By Ruth Mole Perc - By Ruth Mole Peter - By Eda Woodfield Fritz - By Joan Walter On the track to the cutter's hut - By Joan Walter The cutter's hut - By Ruth Mole Gertie - By Marjorie Gray Bombhead - By Ruth Mole Gwen - By Francis Duffy Marje - By Ruth Mole David - By Joan Walter Skeeter - By Joan Walter Ewan - By Ruth Mole Blue - By Neville Reeve Stanley - By Joan Walter George - By Joan Walter Vic - By Beatrice Burgess Gladys - By Eda Woodfield Olwyn - By Beatrice Burgess Valda - By Beatrice Burgess Betty - By Eda Woodfield June - By Eda Woodfield Stella - By Beatrice Burgess Verna - By Eda Woodfield Valerie - By Eda Woodfield June - By Beatrice Burgess Dorothy - By Joan Walter Beryl - By Joan Walter Noreen - By Ruth Mole Pat - By Joan Walter Valma - By Eda Woodfield Graham - By Gweneth Speirs Johnny - By Joan Walter Charlie - By Beatrice Burgess Raynor - By Marjorie Gray George - By Marjorie Gray Darkie - By Ruth Mole Duck - By Beatrice Burgess Robert - By Ruth Mole William - By Gweneth Speirs Basil - By Joan Walter Wilson - By Joan Walter Schoolbeck - By Ruth Mole Duck Weed - By Eda Woodfield Bas - By Beatrice Burgess Albert - By Ruth Mole ballarat school of mines, magazine, g. curtis, p. edmonds, kevin j. whiter, david t. coburn, peter j. wilson, john k. leicht, douglas d.g. dean, frank d. daykin, grace lawry, p. maloney, j. mckenzie, percival d. fisher, stanley s. parker, beatrice e. burgess, roy e. mawby, roma sudoltz, peter h. marxsen, lois reynolds, robert j. mckenzie, w. coad, marion a. beckwith, john g. procter, gweneth. speirs, neville f. reeve, dr pound, c. fairbank, f. g. procter, jeanette perkins, john w. jolly, m. berlyn, c. g. fairbank, bill f. carroll, marjorie gray, f. n. reeve, joan waller, winifred m. beckwith, isobel murfett, frank daykin, joy martin, max coward, jack henderson, joe wilkinson, alan wilson, muriel harland, m. fogarty, sylvia williams, t. r. thomas, john p. l. gibbs, t. mccartney, a. s. richards, p. crosby, h. middlin, mr cornell, lois kinnersley, margaret murrell, ouida worthington, i. murfett, ruby gladman, john m. blainey, mina gallie, miss darby, p. moloney, v. eva, lester w. roffey, robert f. swales, john e. ambrosio, mr hillman, neville r. morton, basil j. marshall, lloyd lehmann, lindsay s. pattenden, john middlin, alfred e. temby, a. hyett, willaim g. young, kingsley r. bremmer, william j. hewitt, geoffrey f. stevens, n. black, lucy cooper, valma overall, evelyn ditchfield, b. lancaster, miriam horsey, lorraine saunders, n. hoffman, audrey fry, robert j. murell, colin a. bell, ewan c. jones, d. powell, william j. llewllyn, kenneth s. lindsay, nola dridan, patricia gleeson, winifred stevens, mary cummins, b. sherritt, alison johnson, b. conway, b. vallins, k. dowall, m. grinham, k. eberhard, c. lea, k. george, a. coad, c. eltringham, w. allan, m. silvey, f. jacobson, l. clifton, r. sargent, w. caldow, g. pyke, g. bergin, k. dean, r. bennett, k. hoffman, a. kerr, h. sealey, d. mcconville, p. nunn, d. halson, l. frichot, g. smith, m. mcdonald, w. hon, r. irving, l. drake, c. gedye, g. jukes, a. new, a. smith, k. weybury, c. wilson, p. banfield, a. hughes, g. yeoman, eda woodfield, francis duffy -
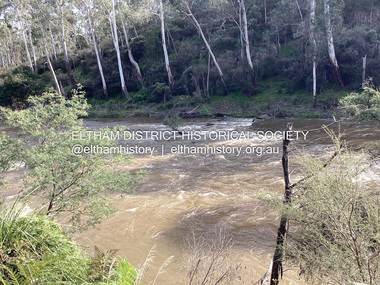 Eltham District Historical Society Inc
Photograph, Fay Bridge, Ancient Eel trap on the Yarra River at Laughing Waters, Eltham - pre-dating European settlement, 6 September 2023
Laughing Waters is the name for a stretch of the Yarra Valley Parklands consisting of river flats and hilly riparian bushland. With Birrarung (Yarra River) flowing through, Laughing Waters has been an important gathering place for thousands of years. For the Wurundjeri, ‘Garambi Baan’ (the name for Laughing Waters in Woi wurrung) is an important site for growing and harvesting food. Significantly, Wurundjeri iuk (eel) traps remain at Garambi Baan to this day. The Wurundjeri Woi Wurrung People take their name from the Woi wurrung language word ‘wurun’ meaning the Manna Gum (Eucalyptus viminalis) which is common along ‘Birrarung’ (Yarra River), and ‘djeri’, the grub which is found in or near the tree. Wurundjeri are the ‘Manna Gum People’ and their Ancestors have lived on this land for millennia. The site on the Yarra River near the former Morrison property Killeavey was given a language name in 2015 at the instigation of Wurundjeri Elder, Dave Wandin. Garambi Baan means “laughing waters” in the traditional language, Woi wurrung. The site at Warrandyte was rediscovered by Campbell Beardsell OAM in 2007 and is one of only a few known remaining iuk (eel) traps on Country once found the length of the Birrarung (Yarra) and the Maribyrnong. Original Indigenous aquacultural infrastructure was dismantled, taken away from sites and used to build houses, fords and roads by Europeans. The difficult and restricted access to this site is thought to be one of the reasons for its survival. The iuk trap is located within lands managed by Parks Victoria. The Narrap team in partnership with Parks Victoria and Acacia Land Management have been improving the native vegetation with a program of woody weed removal, exclusion fencing and revegetation. Importantly, the team have restored the trap’s infrastructure and have demonstrated its effectiveness.” References: Wurundjeri Woi Wurrung Cultural Heritage Aboriginal Corporation - Laughing Waters. (2023, September 3). Retrieved from https://inplace.org.au/laughing-waters/ GARAMBI BAAN LAUGHING WATERS RESIDENCY CENTRE 2020 2024 Strategic Plan, Nillumbik Shire Council (2023, September 3). Retrieved from https://www.nillumbik.vic.gov.au/files/assets/public/minutes-and-agendas/2020/09-sep/15-sep-cm/ocm.177-20-attachment-1-laughing-waters-arts-program_1.pdffay bridge collection, eel trap, laughing waters, yarra river, wurundjeri woi wurrung, garambi baan, 2023-09-06 -
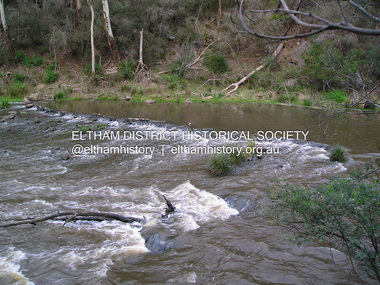 Eltham District Historical Society Inc
Photograph, Fay Bridge, Ancient Eel trap on the Yarra River at Laughing Waters, Eltham - pre-dating European settlement, 16 May 2015
Laughing Waters is the name for a stretch of the Yarra Valley Parklands consisting of river flats and hilly riparian bushland. With Birrarung (Yarra River) flowing through, Laughing Waters has been an important gathering place for thousands of years. For the Wurundjeri, ‘Garambi Baan’ (the name for Laughing Waters in Woi wurrung) is an important site for growing and harvesting food. Significantly, Wurundjeri iuk (eel) traps remain at Garambi Baan to this day. The Wurundjeri Woi Wurrung People take their name from the Woi wurrung language word ‘wurun’ meaning the Manna Gum (Eucalyptus viminalis) which is common along ‘Birrarung’ (Yarra River), and ‘djeri’, the grub which is found in or near the tree. Wurundjeri are the ‘Manna Gum People’ and their Ancestors have lived on this land for millennia. The site on the Yarra River near the former Morrison property Killeavey was given a language name in 2015 at the instigation of Wurundjeri Elder, Dave Wandin. Garambi Baan means “laughing waters” in the traditional language, Woi wurrung. The site at Warrandyte was rediscovered by Campbell Beardsell OAM in 2007 and is one of only a few known remaining iuk (eel) traps on Country once found the length of the Birrarung (Yarra) and the Maribyrnong. Original Indigenous aquacultural infrastructure was dismantled, taken away from sites and used to build houses, fords and roads by Europeans. The difficult and restricted access to this site is thought to be one of the reasons for its survival. The iuk trap is located within lands managed by Parks Victoria. The Narrap team in partnership with Parks Victoria and Acacia Land Management have been improving the native vegetation with a program of woody weed removal, exclusion fencing and revegetation. Importantly, the team have restored the trap’s infrastructure and have demonstrated its effectiveness.” References: Wurundjeri Woi Wurrung Cultural Heritage Aboriginal Corporation - Laughing Waters. (2023, September 3). Retrieved from https://inplace.org.au/laughing-waters/ GARAMBI BAAN LAUGHING WATERS RESIDENCY CENTRE 2020 2024 Strategic Plan, Nillumbik Shire Council (2023, September 3). Retrieved from https://www.nillumbik.vic.gov.au/files/assets/public/minutes-and-agendas/2020/09-sep/15-sep-cm/ocm.177-20-attachment-1-laughing-waters-arts-program_1.pdffay bridge collection, 2015-05-16, eel trap, laughing waters, yarra river, wurundjeri woi wurrung, garambi baan -
 Coal Creek Community Park & Museum
Bottle, glass, Between 1859-1941
TROVE : Argus (Melbourne, Vic. : 1848 - 1957), Monday 17 January 1859, page 7 TO the PHYSICIANS of AUSTRALIA -WOLFE'S SCHIEDAM AROMATIC SCHNAPPS, A superlative Tonic, Diuretic, Anti-Dyspepsic and invigorating Cordial. This medical diet-drink is manufactured soley by the proprietor at his distillery, in Schiedam, in Holland, expressly for medicinal purposes. It is the pure tincture of juniper, distilled from the best barley that can be selected in Europe at any cost. It is flavored and medicated, not by the common harsh berry, but by the choice botanical variety of the aromatic Italian juniper berry, whose more vinous extract is distilled and rectified with its sphirituous solvent, and thus it becomes a concentrated tincture of exquisite flavor and aroma, altogether transcendent in Its cordial and medicinal properties to any alcoholic stimulant now in use In the world. It has been submitted to all the first chemists and physicians in the United Slates, who endorse it over their own signatures as one of tho great essentials of the materia medica. It is now proscribed with great success In gravel, grout, rheumatism, obstruction of the bladder and kidneys, dyspepsia, whether acute or chronic, in general debility, sluggish circulation of the blood, inadequate assimilation of food, and exhausted energy, are acknowledged by the whole medical faculty and attested in their highest written authorities. Put up in quart and pint bottles, enveloped In yellow paper, with the proprietor's name on the bottle-, cork, and label. For sale by all the respectable druggists and merchants. UDOLPHO WOLFE WILKINSON BROTHERS and Co., sole agents for Australia. Depots at Melbourne and Sydney. TROVE : Farmer and Settler (Sydney, NSW : 1906 - 1955), Tuesday 30 March 1915, page 2 TRADING WITH UDOLPHO WOLFE. At the Sydney summons court on Wednesday morning, Laurence Edward Moss and Lawrence David Phillips were charged with having attempted to trade with the enemy by means of a letter addressed and posted to Udolpho Wolfe Company, Hamburg, Germany. There was a second information alleging that on or about December 7 last they attempted to trade with the enemy by means of a cable addressed and trans-mitted to Wolsey, New York. At the request of Mr. Campbell, K.C., who appeared for the defence, an adjournment to April 7 -was granted. Bail was allowed, each in £200, with a surety in £200. TROVE : Age (Melbourne, Vic. : 1854 - 1954), Wednesday 19 November 1941, page 4 WOLFE'S Aromatic SCHNAPPS Wolfe's Schnapps is now distilled in Australia from the original formula of Udolpho Wolfe. It remains, as before, a beverage of unique medicinal properties — Appetising, Refreshing, , Stimulating — as good for women as for men. -Wolfe's 'Schnapps for your health's sake FOR VICTORY-buy War Bonds Now . W.B.157.13 Olive green glass bottle for stopper seal, square in section, slightly tapering toward base, text embossed on three sides, circular ring embossed inside impressed circle on base.Side 1. : 'UDOLOPHO WOLF'S'. Side 2 : 'SCHIEDAM'. Side 3 : 'AROMATIC SCHNAPPS'. Base : an embossed ring inside a round impressed into the square base.schnapps, schiedam, gin, udolpho wolfe -
 Flagstaff Hill Maritime Museum and Village
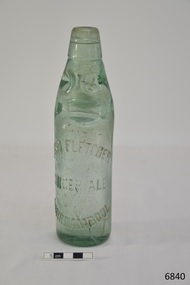
Container - Bottle, c. 1905
This bottle once contained John Fletcher’s ginger cordial. It was found in August 2014 in the sand dunes at Levy's Point, near McKinnon's quarry, Warrnambool. ABOUT JOHN FLETCHER of WARRNAMBOOL John Fletcher Cordial (or Beverage) Co . Warrnambool, supplied cordial and aerated drinks to the Western district of Victoria. John Fletcher was named as a cordial manufacturer in the Warrnambool Standard of June 13th 1895, when he attended a Publican’s Association meeting. Mr John Fletcher, aerated water and cordial manufacturer of Koroit Street Warrnambool, had a summary of his factory printed in a short article in the Advocate, Melbourne, in February 1901. The article said “one of the most complete plants outside the metropolis … spacious … well appointed …old-established business … noted for the excellence of the quality … a trial [of the beverage] is solicited.” John Fletcher and Harold Caffin, trading as J.S. Rowley & co cordial manufacturers in 1903; were prosecuted in September 1903 when the Board of Health found an analysed sample of Raspberry Vinegar to contain coal tar colouring, which could be injurious to health, particularly to the kidneys. The factory was still in operation in December 1924, when sadly, Mr S. Fletcher, who was carrying bottles of aerated water at Mr John Fletcher’s cordial factory, sustained an eye injury when one of the bottles burst. Later the eye had to be removed at the Warrnambool Base Hospital. ABOUT CODD BOTTLES During the mid-to-late 1800s there were many inventions to keep the fizz in carbonated drinks such as ginger ale, soda water and fruit drinks. Hiram Codd, an English engineer invented a successful process that he patented as “Codd’s patented globe stopper bottle” in 1872. The Codd-neck bottle (commonly called Codd or marble bottle) is manufactured in two parts. The body of the bottle is cast in two sections. At the time of joining the sections a glass marble and rubber seal are inserted into the neck section. The lip is then applied to the top of the bottle. The Codd bottle is filled upside down as the pressure of the gas from the carbonated liquid holds the marble up and out of the way. When the bottle stands upright the gas pushes the marble up against the washer, creating a firm seal to keep the fizz inside. The bottle is opened by pushing the marble down firmly to allow some of the gas to escape. The marble drops down and is caught in a depression formed in the neck. When the bottle is tilted to pour or drink the liquid the marble rests in a dimple. Some have said that the bottle as a character, the shape having a face with its mouth keeping the marble out of the drink and eyes that catch the marble so that it doesn’t roll into the mouth of the drinker. The Codd bottle was expensive to produce and children loved to destroy the marbles to play with the marbles inside. Many shops and factories added a deposit to the cost of buying the drink to encourage children to return the bottles rather than break it for the marble. Codd bottles are still being produced in India and Japan for soft drinks. A Codd bottle with the same markings as this one is valued on today’s Australian auction sites from $35 - $75 AUD. Bottle, aqua/green glass, with glass marble inside. John Fletcher's Ginger Ale, Warrnambool. Container is often called a "Codd neck bottle", “marble bottle” or “Codd’s patent bottle”. Bottle made by Dobson. Inscription on bottle and base. c. 1905Marks moulded into glass; "JOHN FLETCHER / GINGER ALE / WARRNAMBOOL" and “DOBSON” and on base “G”. flagstaff hill, warrnambool, shipwrecked coast, flagstaff hill maritime museum, maritime museum, shipwreck coast, flagstaff hill maritime village, great ocean road, codd bottle, codd neck bottle, marble bottle, ginger beer bottle, john fletcher soft drinks, warrnambool soft drinks and cordials, john fletcher cordial (or beverage) co ., codd neck bottle, glass stopper bottle, hiram codd, antique bottle, harold caffin, john fletcher -
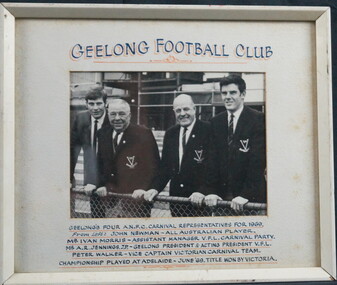 Geelong Football Club
Photograph of Geelong Football Club's Four A.N.F.C. Carnival Representatives, 1969
Championship played at Adelaide in June 1969, Title won by Victoria. Peter Walker Born: 12/06/1942 From: Beeac Height: 183cm Weight: 76kg Natural kicking foot: Right Guernsey number: 34 First senior match: Round 3, 1960 v Fitzroy at the Brunswick Street Oval After taking time to settle at senior level, he found his rightful place on the half-back line. Once he gained confidence, he became a champion, dashing player who could mark above taller opponents and swing Geelong into attack instantly with fine disposal. His duels with Darrel Baldock of St Kilda were outstanding during the 1960s. He always played the game fairly and followed coaches’ instructions to the letter. Total Brownlow Medal votes: 32 Premiership team selection: 1963 Captain: 2 matches (1969) Club Best & Fairest: 1965 Runner-up in club B&F count: 1963 Third in club B&F count: 1967 Fifth in club B&F count: 1968, 1969 Eighth in club B&F count: 1964 (equal) GFC Hall of Fame inductee (2002) GFC Life Membership (1968) Career span: 1960-69; 1971 Total matches: Premiership 159, Interstate 9 Total goals: Premiership 1, Interstate 0 Finals matches: 15 Finals goals: 0 Last senior match: Round 11, 1971 v Richmond at Kardinia Park Died: 08/07/2010 John ‘Sam’ Newman Born: 22/12/1945 From: Geelong Grammar Height: 189cm Weight: 94kg Natural kicking foot: Right Guernsey number: 17 First senior match: Round 3, 1964 v Fitzroy at the Brunswick St Oval The champion ruckman/forward-pocket/back-pocket became a valuable centre half-forward late in his career. He was a magnificent high mark and a great handball exponent. His ability to maneuver his body into correct position at ruck contests and in marking duels was equal to that of Graham Farmer. He worked hard to overcome severe kidney and ankle injuries to play 300 matches for Geelong in a magnificent 17-season span. Total Brownlow Medal votes: 85 Captain: 41 matches (1974-75) Club Best & Fairest: 1968, 1975 Runner-up in club B&F count: 1974 Third in club B&F count: 1965, 1970, 1976 Fourth in club B&F count: 1969 Fifth in club B&F count: 1973, 1979 Seventh in club B&F count: 1967, 1977 All Australian selection: 1969 GFC Team of the 20th Century selection (back pocket) GFC Hall of Fame inductee (2002) GFC Hall of Fame Legend GFC Life Membership (1971) Career span: 1964-80 Total matches: Premiership 300, Night/Pre-Season Series 4, Interstate 8 Total goals: Premiership 110, Night/Pre-Season Series 4, Interstate 1 Finals matches: 12 Finals goals: 4 Last senior match: Second Semi Final, 1980 v Richmond at Waverley Park Information provided by Mr Col Hutchinson GFC HistorianWhite painted wooden frame with glass front. White mounting card surrounds the photograph. Black and white photograph of John 'Sam' Newman, Ivan Morris, A.R. Jack Jennings and Peter Walker standing in front of a wire fence. Above on the mounting card states "GEELONG FOOTBALL CLUB" and the supporting text below provides context for the photograph. Wire on the back for hanging.peter walker, john newman, sam newman, ivan morris, a.r. jack jennings -
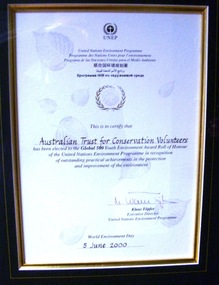 Conservation Volunteers
Award: Honour Roll, United Nations Environment Program (UNEP) - 1 June 2000 - The UNEP announced that the Australian Trust of Conservation Volunteers of Australia (ATCV), has been elected to the prestigious ranks of its Global 500 Roll of Honour for outstanding contributions to the protection of the environment, Award:United Nations Environment Program (UNEP) - 1 June 2000 - UNEP announced today that the ATCV has been elected to the prestigious ranks of its Global 500 Roll of Honour for outstanding contributions to the protection of the environment
THE AUSTRALIAN TRUST OF CONSERVATION VOLUNTEERS, ONE OF 14 INDIVIDUALS AND ORGANIZATIONS, TO RECEIVE UNITED NATIONS ENVIRONMENT AWARD NAIROBI, 1 June 2000 - The United Nations Environment Programme (UNEP) announced today that the Australian Trust of Conservation Volunteers of Australia (ATCV), has been elected to the prestigious ranks of its Global 500 Roll of Honour for outstanding contributions to the protection of the environment. ATCV is one of 14 individuals and organizations to receive this honour in 2000. Founded in 1982, ATCV is a national, not-for-profit community organization, whose mission is to attract and manage a force of volunteers in practical conservation projects for the betterment of the Australian environment. ATCV completes more than 4000 week-long conservation projects in urban, regional and remote areas of Australia each year. Activities range from bush regeneration, tree planting, seed collection, endangered species protection, weed control, flora and fauna surveys, walking trail construction, fencing, environmental monitoring and the protection of world heritage areas. ATCV community participation has resulted in more than 1.8 million trees being planted in 1999, and in more than 7.3 million trees planted over the past 10 years. Community involvement totalled 200,000 project days in 1999 and more than 700,000 days since 1989. To encourage the involvement of young people, ATCV developed and manages the federal government-funded programme Green Corps. Green Corps is a six-month traineeship for 17 to 20 year-olds, which incorporates conservation projects and accredited training. Since 1997, more than 4,000 trainees have completed the Green Corps programme. ATCV is a founding member of the International Conservation Alliance, which brings together organizations working in conservation volunteering, and is a member of the World Conservation Union (IUCN). " The award will be presented in Adelaide, Australia, at the World Environment Day ceremonies on 4 June 2000. World Environment Day, which is celebrated in some 120 countries around the world on 5 June, was established by the United Nations General Assembly in 1972 to focus global attention and action on environmental issues. Some 701 individuals and organizations, in both the adult and youth categories, have been honoured since UNEP launched the Global 500 award in 1987. Among prominent past winners are: French Marine explorer Jacques Cousteau; Sir David Attenborough, producer of environmental television programmes; Gro Harlem Brundtland, former Prime Minister of Norway; Anil Aggarwal, the prominent environmentalist from India; Ken Saro-Wiwa, the environmental and human rights activist from Nigeria who was executed for leading the resistance of the Ogoni People against the pollution of their Delta homeland; the World Wide Fund for Nature (WWF), Jimmy Carter, former President of the United States; Jane Goodall of the United Kingdom whose research on wild chimpanzees and olive baboons provided insight into the lives of non-human primates; and the late Chico Mendes, the Brazilian rubber tapper who was murdered during his fight to save the Amazon forest. To forge global links and to implement ideas, which can contribute to a more sustainable future, a network of all Global 500 laureates has been formed. Information about this unique network can be obtained at http://www.global500.org. The winners of UNEP's Global 500 Roll of Honour are members of a broad and growing environmental movement that is flourishing around the world. They have taken the path that most of us hesitate to take for want of time or caring," says UNEP's Executive Director, Klaus Toepfer. "In honouring the Global 500 laureates, UNEP hopes that others will be inspired by their extraordinary deeds."Certificatecva, conservation volunteers, conservation volunteers australia, conservation volunteers new zealand, colin jackson, better earth, environmental conservation, volunteers, volunteering, corporate volunteering, education – environmental, carbon footprint, climate change, ballarat, safety, training, partnerships, victoria, vic, nsw, queensland, act, australian capital territory, nt, northern territory, western australia, wa, south australia, sa, tasmania, new zealand, california conservation corps, atcv, unep, unep honour roll, united nations environment program -
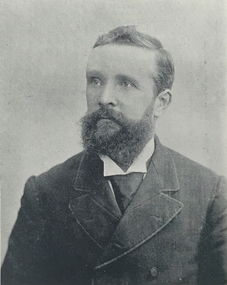 Old Colonists' Association of Ballarat Inc.
Photograph - Image, Edward Grose
"DEATH Of MR EDWARD GROSE. General and sincere regret will be felt at the announcement of the death of Mr Edward Grose, formerly one of the proprietors of The Ballarat Star. The sad event took place at the late gentleman's residence, Raglan street north, at 2 p.m. yesterday, in the presence of the members of the family, who were hastily summoned to his bedside on the previous night. Mr Grose had been in indifferent health for several years past, but he was always able to attend to business, and up till a fortnight ago, when he took to his bed, suffering from a severe affection of the kidneys and bronchitis, it was generally considered by those who knew him that he had many years of life before him. Notwithstanding, however, the unremitting attention of Dr Hardy and of Drs Woinsraki and Hudson, who were called in in consultation, be gradually became worse, until a few days ago his case was considered almost hopeless. Mr Grose was highly esteemed amongst a large circle of friends in Ballarat and district for his integrity of character and urbanity of manner, and the news of his death will come as a surprise to the many who knew him and were acquainted with his active and energetic temperament. In 1847 Mr Grose’s parents left Plymouth, England, for Australia, and on the voyage Mr Grose was born. His father, Mr. Thos. Bolitho Grose, who lived to celebrate the fiftieth anniversary of his wedding, and died only recently, landed at Adelaide, and was connected for some time with the famous Burra Burra copper mines in South Australia. In 1851, when the Victorian goldfields were discovered, he came to the colony and engaged in mining in Ballarat and Creswick, and at the Mount Alexander, now Castlemaine, field with varying success. Ultimately he brought his wife and two sons to Ballarat, and in 1857 returned to Creswick. In 1862 Mr Edward Grose was apprenticed to the late Mr John Francis to learn printing at the Creswick Advertiser office. The late Mr F. N. Martin then purchased the paper, and on the 1st January, 1871, Mr Grose was admitted into partnership. In July, 1884, Messrs Martin and Grose purchased The Ballarat Star, which they conjointly conducted until a few months ago, when the partnership was dissolved and Mr Martin retired from business. Shortly afterwards Mr Grose also retired, having re-sold his interest to the present proprietors. While resident at Creswick Mr Grose identified himself with all local matters, and was at different times president of the hospital committee, a vice-president and member of the council of the School of Mines, chairman of the local Cemetery Trust, and a prominent member of the Creswick Horticultural Society, while he took an active interest in all charitable institutions. In March, 1873, Mr Grose was married by the late Rev. Robert Kennedy to Miss Robina Orr, the third daughter of the late Mr Archibald Fulton Orr, formerly of Johnstone, Renfrewshire, Scotland, brother of the well-known and popular sportsman, Mr Robert Orr, of this city. Our Creswick correspondent writes:— Much regret was expressed here this evening concerning the lamentable death of Mr Edward Grose. The late Mr Grose had lived the best part of his life in Creswick, where he took an active part in almost every institution in the town, and was greatly respected by all. With the late Mr F. N. Martin, he brought the Advertiser to a high standard, and the fact of the two gentlemen who played such an important part in local history dying within two months of each other has been a subject of considerable and regretful comment. The relatives of the late gentlemen may derive some comfort from the knowledge that they have the entire sympathy of the people of Creswick in their very sad trouble.” The funeral of the deceased will take place on Sunday, leaving his late residence, Raglan street north, at 1 o’clock, for the place of interment, the Creswick Cemetery." {Ballarat Star, 02 July 1897}Photographic portrait of Edward Grose, member of the Old Colonists Association of Ballarat. He was manager of the Ballarat Star. In March 1873 he married Robina Orr, daughter of Archibald Fulton Orr, at Mount Bolton.edward grose, old colonists' association of ballarat, old colonists' club -
 University of Melbourne, Burnley Campus Archives
Document - Personal files, Andrew Smith's Files, 1981-2022
cactus, cacti, clematis, orchard redevelopment, r. hall, geoff olive, pruning garden, field station, vcah, university of melbourne, burnley, jill kellow, field station redevelopment, field nursery, student gardens, turfgrass, grassy woodland, chris findlay, phil tulk, grasslands, herbaceous border, car park, native garden, restoration native garden, john rayner, hilda kirkhope rockery, herb garden, rainforest garden redevelopment, plant lists, shady walk, salvia, trees, tai-haku cherry, tree management, tree lists, david aldous, grey border -
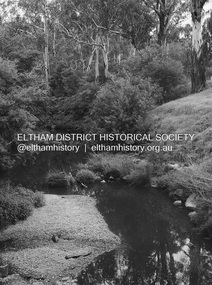 Eltham District Historical Society Inc
Photograph - Digital Photograph, Alan King, Diamond Creek, Barak Bushlands, Eltham, 2008
A habitat corridor and it strengthens the community. Published: Nillumbik Now and Then / Marguerite Marshall 2008; photographs Alan King with Marguerite Marshall.; p185 Barak Bushlands lie west of the Diamond Creek on the corner of Falkiner Street and busy, noisy Main Road. They form part of an important habitat corridor linking the Yarra River to the Kinglake National Park.1 Manna Gums, tawny frogmouths and platypuses are some of the indigenous plants and animals that have made their home there. The bushlands are the result of more than nine years of hard work by the local community with the Nillumbik Council, to transform a degraded flood plain into this refuge of natural beauty. In 1997, shortly after moving into the new Riverside Estate on Falkiner Street, Eltham, several residents noticed the sorry state of the Diamond Creek and surrounding area. Part of it was used as a cow paddock and although small patches of vegetation survived, the area was infested with weeds, rabbits, rubbish and drainage from the housing estate. At various times the 4.4 hectares had been used as a market garden and for shire stock piles. The residents began to restore the area by revegetating land along the Diamond Creek. In 1998 they established the Friends of the Diamond Creek Falkiner Street Reserve2 and 35 families joined from the 90-house Estate. Carolyn Mellor, as the Friends’ Land Manager, undertook a four-year horticulture course to guide this massive project for a volunteer organisation. Since 1999, she has been the Friends’ President. In 1999 the Friends urged the Nillumbik Council to undertake a feasibility study into establishing a wetland system and urban forest. Work began in 2002 with Nillumbik Council funding the project, supplemented by government grants. The Friends also received grants from Melbourne Water and Parks Victoria. Aided by the Friends and other community members, the Council created the Barak Bushlands consisting of a forest, a wetland, a bridge, a path and open space. The beautiful wetland treats most of the estate’s stormwater runoff. Storm water is filtered through plants in the wetland ponds then is released slowly into the billabong, before flowing into the Diamond Creek. The wetland also helps to minimise flooding and the improved water quality provides a flora and fauna habitat. The Friends and other volunteers planted more than 27,000 plants, more than one third of which they grew from seeds they collected at Lower Eltham and Wingrove Parks. Eltham High School students planted thousands of these through a Year Eight program introduced for this purpose. Other groups who assisted were: Green Corps, local Scouts and Guides – 2nd Montmorency, 1st Diamond Creek and 1st Eltham Cub Packs, Eltham College students, Eltham East Primary School, Landcare members, Eltham Lions Club and the Eltham Baptist Church. To maintain enthusiasm for the mammoth task, the Friends and other volunteers ‘adopted’ trees to water and wrote their names on the stakes. In 2004, to recognise the area’s original occupiers, the reserve was named Barak Bushlands. William Barak, who lived from 1824 to 1903, was the last chief of the Yarra Yarra tribe of the Wurundjeri-willam people. Traces of these original inhabitants remain in scar trees (bark sections removed to make a shield or canoe). That same year the Friends’ group was a finalist in the prestigious Federal Government, Banksia Environmental Awards. The Friends have also participated in Clean Up Australia, removing tonnes of rubbish and regularly testing the billabong, wetland and creek, for pollutants. For years the Friends, together with the Australian Platypus Conservancy, have tagged, measured and checked the health of platypuses from the Diamond and Mullum Mullum Creeks. With Latrobe University the Friends have conducted night walks to view owls, possums, bats and sugar gliders. Challenges for the council and the Friends continue with a large rabbit population, some vandalism, weed eradication and maintenance. However, thanks to this community effort, locals can now escape confined urban living on small blocks of land and enjoy the beauty of indigenous plants and animals. Working together has also strengthened the local community,This collection of almost 130 photos about places and people within the Shire of Nillumbik, an urban and rural municipality in Melbourne's north, contributes to an understanding of the history of the Shire. Published in 2008 immediately prior to the Black Saturday bushfires of February 7, 2009, it documents sites that were impacted, and in some cases destroyed by the fires. It includes photographs taken especially for the publication, creating a unique time capsule representing the Shire in the early 21st century. It remains the most recent comprehenesive publication devoted to the Shire's history connecting local residents to the past. nillumbik now and then (marshall-king) collection, barak bushlands, diamond creek (creek), eltham -
 Flagstaff Hill Maritime Museum and Village
Domestic object - Bowl, Late 19th or early 20th Century
The Process of Making Pottery Decorating, Firing, Glazing, Making, Technical There is a rhythm and flow to clay. It can’t be done all at once! Even the making process! It can take weeks to get everything done, especially if you can only work on your pottery once a week! Even though we have three hour classes, it’s often just not enough time! Here is an overview of some of the processes so you have a bit more grasp on some of the technical stuff! Step One – Design There are SO many ideas out there for making stuff in clay! From delicate porcelain jewellery, through to heavy sculptural work and everything in between. Deciding your direction is sometimes not that easy – when you first start, try everything, you will naturally gravitate to the style that you enjoy! The options and variations are endless and can get a wee bit overwhelming too! Check in with me before you start to ensure your ideas will work, what order you might do things, how you could achieve the look you are seeking and any other technical data required! Step Two – Making Clay is thixotropic. This means that as you work with it, the clay first gets sloppier and wetter, before is begins to dry in the atmosphere. For most things, you simply can’t do all parts of the project at once. An example of work order might look like: Get last weeks work out from the shelves Prepare clay for today’s work – roll your clay, prepare balls for throwing, make the first stage of a pinch pot) Clean up last week’s work and put it on the shelf for bisque firing Check that you have any glazing to do – and do enough of it that you will have time to finish your main project Do the next step of your next project – there might be a further step that can’t be complete immediately, in that case, wrap your work well and put onto the shelves. Letting your work rest for a while can really help keep your work clean and professional looking. Many things require bagging under plastic to keep it ready for work the next week – put your name on the outside of the bag so you can find your work easily. We have stickers and markers. Consider how you want to decorate your work – coloured slip can be applied at a fairly wet stage (remembering that it will make your work even wetter!). Trying to apply slip to dry clay won’t work! If you want to do sgraffito – you will need to keep the work leather hard (a state of dryness where you can still work the clay with a little effort and a little water and care). Step Three – Drying Most of the time your work can go into the rack uncovered to let it dry out for the following week. If you want to continue forming or shaping you will need to double bag your work – put your work on a suitable sized bat and put the bat in a bag so the base of the bag is under the bat, then put another bag over the top of the work and tuck the top of the bag under the bat. If you want to trim (or turn) your thrown work the following week, it should also be double bagged. If your work is large, delicate, or of uneven thicknesses, you should lightly cover your work for drying. When considering the drying process, bare in mind the weather, humidity and wind! The hotter and dryer, the faster things dry and work can dry unevenly in the shelves – this can lead to cracking – another time to lightly cover your work for drying. Step Four – Trimming and Cleaning Up Your work is dry! It is called greenware now and it is at it’s most fragile! Handle everything with two hands. I often refer to soft hands – keep everything gentle and with your fingers spread as much as possible. Try to not pick up things like plates too much, and always with both hands! Before your work can be bisque fired it should be “cleaned up”. You work won’t go into the kiln if it has sharp edges – when glazed, sharp edges turn into razor blades! Use a piece of fly wire to rub the work all over – this will scratch a little so be light handed. Use a knife or metal kidney to scrape any areas that require a bit more dynamic treatment than the fly wire offers! Finally, a very light wipe over with a slightly damp sponge can help soften and soothe all of your edges and dags! Trimming thrown work: If you are planning to trim (or turn) your thrown work (and you should be), make sure you bag it well – your work should be leather hard to almost dry for easiest trimming. Use this step to finish the work completely – use a metal kidney to polish the surface, or a slightly damp sponge to give a freshly thrown look. Wipe the sponge around the rim after trimming, and check the inside of the pot for dags! Trimming slip cast work: Usually I will trim the rims of your work on the wheel the following day to make that stage easier, however you will still need to check your work for lumps and bumps. Last but not least – check that your name is still clearly on the bottom of your work. Step Five – Bisque Firing When the work is completely dry it can go into the bisque kiln. The bisque kiln is fired to 1000°C. This process burns off the water in the clay as well as some of the chemically bound water. The structure of the clay is not altered that much at this temperature. Inside the bisque kiln, the work is stacked a little, small bowl inside a larger bowl and onto a heavy plate. Smaller items like decorations or drink coasters might get stacked several high. Consideration is paid to the weight of the stack and shape of the work. A bisque kiln can fire about one and a half times the amount of work that the glaze kiln can fire. The firing takes about 10 hours to complete the cycle and about two days to cool down. Once it has been emptied the work is placed in the glaze room ready for you to decorate! Step Six – Glazing Decorating your work with colour can be a lot of fun – and time consuming! There are three main options for surface treatment at this stage: Oxide Washes Underglazes Glazes Washes and underglazes do not “glaze” the work – It will still need a layer of glaze to fully seal the clay (washes don’t need glaze on surfaces not designed for food or liquid as they can gloss up a little on their own). Underglazes are stable colourants that turn out pretty much how they look in the jar. They can be mixed with each other to form other colours and can be used like water colours to paint onto your work. Mostly they should have a clear glaze on top to seal them. Oxides are a different species – the pink oxide (cobalt) wash turns out bright blue for instance. They don’t always need a glaze on top, and some glazes can change the colour of the wash! The glazes need no other “glaze” on top! Be careful of unknown glaze interactions – you can put any combination of glaze in a bowl or on a plate, but only a single glaze on the outside of any vertical surface! Glazes are a chemical reaction under heat. We don’t know the exact chemicals in the Mayco glazes we use. I can guess by the way they interact with each other, however, on the whole, you need to test every idea you have, and not run the test on a vertical surface! Simply put, glaze is a layer of glass like substance that bonds with the clay underneath. Clay is made of silica, alumina and water. Glaze is made of mostly silica. Silica has a melting point of 1700°C and we fire to 1240°C. The silica requires a “flux” to help it melt at the lower temperature. Fluxes can be all sorts of chemicals – a common one is calcium – calcium has a melting point of 2500°C, however, together they both melt at a much lower temperature! Colourants are metal oxides like cobalt (blue), chrome (green through black), copper (green, blue, even red!), manganese (black, purple and pink) iron (red brown), etc. Different chemicals in the glaze can have dramatic effects. for example, barium carbonate (which we don’t use) turns manganese bright pink! Other elements can turn manganese dioxide brown, blue, purple and reddish brown. Manganese dioxide is a flux in and of itself as well. So, glazes that get their black and purple colours, often interact with other glazes and RUN! Our mirror black is a good example – it mixes really well with many glazes because it fluxes them – causes them to melt faster. It will also bring out many beautiful colours in the glazes because it’s black colouring most definitely comes from manganese dioxide! Glaze chemistry is a whole subject on it’s own! We use commercial Mayco glazes on purpose – for their huge range of colour possibilities, stability, cool interactions, artistic freedom with the ability to easily brush the glazes on and ease of use. We currently have almost 50 glazes on hand! A major project is to test the interactions of all glazes with each other. That is 2,500 test tiles!!!! I’m going to make the wall behind the wheels the feature wall of pretty colours! Step Seven – Glaze (Gloss or sometimes called “Glost”) Firing Most of the time this is the final stage of making your creation (but not always!) The glaze kiln goes to 1240°C. This is called cone 6, or midrange. It is the low end of stoneware temperatures. Stoneware clays and glazes are typically fired at cone 8 – 10, that is 1260 – 1290°C. The energy requirement to go from 1240°C to 1280°C is almost a 30% more! Our clay is formulated to vitrify (mature, turn “glass-like”) at 1240°, as are our glazes. A glaze kiln take around 12 hours to reach temperature and two to three days to cool down. Sometimes a third firing process is required – this is for decoration that is added to work after the glaze firing. For example – adding precious metals and lustres. this firing temperature is usually around 600 – 800°C depending upon the techniques being used. There are many students interested in gold and silver trims – we will be doing this third type of firing soon! After firing your work will be in the student finished work shelves. Remember to pay for it before you head out the door! There is a small extra charge for using porcelain clay (it’s more than twice the price of regular clay), and for any third firing process! Once your work has been fired it can not turn back into clay for millennia – so don’t fire it if you don’t like it! Put it in the bucket for recycling. https://firebirdstudios.com.au/the-process-of-making-pottery/ The bowl is an example of kitchenware used in the 19th century and still in use today.Bowl white ceramic. Crack on side. Badly stained.Backstamp very faint and unable to be read.flagstaff hill, warrnambool, shipwrecked-coast, flagstaff-hill, flagstaff-hill-maritime-museum, maritime-museum, shipwreck-coast, flagstaff-hill-maritime-village, mixing bowl, food preparation, kitchen equipment, ceramic -
 Flagstaff Hill Maritime Museum and Village
Domestic object - Bowl
The Process of Making Pottery Decorating, Firing, Glazing, Making, Technical There is a rhythm and flow to clay. It can’t be done all at once! Even the making process! It can take weeks to get everything done, especially if you can only work on your pottery once a week! Even though we have three hour classes, it’s often just not enough time! Here is an overview of some of the processes so you have a bit more grasp on some of the technical stuff! Step One – Design There are SO many ideas out there for making stuff in clay! From delicate porcelain jewellery, through to heavy sculptural work and everything in between. Deciding your direction is sometimes not that easy – when you first start, try everything, you will naturally gravitate to the style that you enjoy! The options and variations are endless and can get a wee bit overwhelming too! Check in with me before you start to ensure your ideas will work, what order you might do things, how you could achieve the look you are seeking and any other technical data required! Step Two – Making Clay is thixotropic. This means that as you work with it, the clay first gets sloppier and wetter, before is begins to dry in the atmosphere. For most things, you simply can’t do all parts of the project at once. An example of work order might look like: Get last weeks work out from the shelves Prepare clay for today’s work – roll your clay, prepare balls for throwing, make the first stage of a pinch pot) Clean up last week’s work and put it on the shelf for bisque firing Check that you have any glazing to do – and do enough of it that you will have time to finish your main project Do the next step of your next project – there might be a further step that can’t be complete immediately, in that case, wrap your work well and put onto the shelves. Letting your work rest for a while can really help keep your work clean and professional looking. Many things require bagging under plastic to keep it ready for work the next week – put your name on the outside of the bag so you can find your work easily. We have stickers and markers. Consider how you want to decorate your work – coloured slip can be applied at a fairly wet stage (remembering that it will make your work even wetter!). Trying to apply slip to dry clay won’t work! If you want to do sgraffito – you will need to keep the work leather hard (a state of dryness where you can still work the clay with a little effort and a little water and care). Step Three – Drying Most of the time your work can go into the rack uncovered to let it dry out for the following week. If you want to continue forming or shaping you will need to double bag your work – put your work on a suitable sized bat and put the bat in a bag so the base of the bag is under the bat, then put another bag over the top of the work and tuck the top of the bag under the bat. If you want to trim (or turn) your thrown work the following week, it should also be double bagged. If your work is large, delicate, or of uneven thicknesses, you should lightly cover your work for drying. When considering the drying process, bare in mind the weather, humidity and wind! The hotter and dryer, the faster things dry and work can dry unevenly in the shelves – this can lead to cracking – another time to lightly cover your work for drying. Step Four – Trimming and Cleaning Up Your work is dry! It is called greenware now and it is at it’s most fragile! Handle everything with two hands. I often refer to soft hands – keep everything gentle and with your fingers spread as much as possible. Try to not pick up things like plates too much, and always with both hands! Before your work can be bisque fired it should be “cleaned up”. You work won’t go into the kiln if it has sharp edges – when glazed, sharp edges turn into razor blades! Use a piece of fly wire to rub the work all over – this will scratch a little so be light handed. Use a knife or metal kidney to scrape any areas that require a bit more dynamic treatment than the fly wire offers! Finally, a very light wipe over with a slightly damp sponge can help soften and soothe all of your edges and dags! Trimming thrown work: If you are planning to trim (or turn) your thrown work (and you should be), make sure you bag it well – your work should be leather hard to almost dry for easiest trimming. Use this step to finish the work completely – use a metal kidney to polish the surface, or a slightly damp sponge to give a freshly thrown look. Wipe the sponge around the rim after trimming, and check the inside of the pot for dags! Trimming slip cast work: Usually I will trim the rims of your work on the wheel the following day to make that stage easier, however you will still need to check your work for lumps and bumps. Last but not least – check that your name is still clearly on the bottom of your work. Step Five – Bisque Firing When the work is completely dry it can go into the bisque kiln. The bisque kiln is fired to 1000°C. This process burns off the water in the clay as well as some of the chemically bound water. The structure of the clay is not altered that much at this temperature. Inside the bisque kiln, the work is stacked a little, small bowl inside a larger bowl and onto a heavy plate. Smaller items like decorations or drink coasters might get stacked several high. Consideration is paid to the weight of the stack and shape of the work. A bisque kiln can fire about one and a half times the amount of work that the glaze kiln can fire. The firing takes about 10 hours to complete the cycle and about two days to cool down. Once it has been emptied the work is placed in the glaze room ready for you to decorate! Step Six – Glazing Decorating your work with colour can be a lot of fun – and time consuming! There are three main options for surface treatment at this stage: Oxide Washes Underglazes Glazes Washes and underglazes do not “glaze” the work – It will still need a layer of glaze to fully seal the clay (washes don’t need glaze on surfaces not designed for food or liquid as they can gloss up a little on their own). Underglazes are stable colourants that turn out pretty much how they look in the jar. They can be mixed with each other to form other colours and can be used like water colours to paint onto your work. Mostly they should have a clear glaze on top to seal them. Oxides are a different species – the pink oxide (cobalt) wash turns out bright blue for instance. They don’t always need a glaze on top, and some glazes can change the colour of the wash! The glazes need no other “glaze” on top! Be careful of unknown glaze interactions – you can put any combination of glaze in a bowl or on a plate, but only a single glaze on the outside of any vertical surface! Glazes are a chemical reaction under heat. We don’t know the exact chemicals in the Mayco glazes we use. I can guess by the way they interact with each other, however, on the whole, you need to test every idea you have, and not run the test on a vertical surface! Simply put, glaze is a layer of glass like substance that bonds with the clay underneath. Clay is made of silica, alumina and water. Glaze is made of mostly silica. Silica has a melting point of 1700°C and we fire to 1240°C. The silica requires a “flux” to help it melt at the lower temperature. Fluxes can be all sorts of chemicals – a common one is calcium – calcium has a melting point of 2500°C, however, together they both melt at a much lower temperature! Colourants are metal oxides like cobalt (blue), chrome (green through black), copper (green, blue, even red!), manganese (black, purple and pink) iron (red brown), etc. Different chemicals in the glaze can have dramatic effects. for example, barium carbonate (which we don’t use) turns manganese bright pink! Other elements can turn manganese dioxide brown, blue, purple and reddish brown. Manganese dioxide is a flux in and of itself as well. So, glazes that get their black and purple colours, often interact with other glazes and RUN! Our mirror black is a good example – it mixes really well with many glazes because it fluxes them – causes them to melt faster. It will also bring out many beautiful colours in the glazes because it’s black colouring most definitely comes from manganese dioxide! Glaze chemistry is a whole subject on it’s own! We use commercial Mayco glazes on purpose – for their huge range of colour possibilities, stability, cool interactions, artistic freedom with the ability to easily brush the glazes on and ease of use. We currently have almost 50 glazes on hand! A major project is to test the interactions of all glazes with each other. That is 2,500 test tiles!!!! I’m going to make the wall behind the wheels the feature wall of pretty colours! Step Seven – Glaze (Gloss or sometimes called “Glost”) Firing Most of the time this is the final stage of making your creation (but not always!) The glaze kiln goes to 1240°C. This is called cone 6, or midrange. It is the low end of stoneware temperatures. Stoneware clays and glazes are typically fired at cone 8 – 10, that is 1260 – 1290°C. The energy requirement to go from 1240°C to 1280°C is almost a 30% more! Our clay is formulated to vitrify (mature, turn “glass-like”) at 1240°, as are our glazes. A glaze kiln take around 12 hours to reach temperature and two to three days to cool down. Sometimes a third firing process is required – this is for decoration that is added to work after the glaze firing. For example – adding precious metals and lustres. this firing temperature is usually around 600 – 800°C depending upon the techniques being used. There are many students interested in gold and silver trims – we will be doing this third type of firing soon! After firing your work will be in the student finished work shelves. Remember to pay for it before you head out the door! There is a small extra charge for using porcelain clay (it’s more than twice the price of regular clay), and for any third firing process! Once your work has been fired it can not turn back into clay for millennia – so don’t fire it if you don’t like it! Put it in the bucket for recycling. https://firebirdstudios.com.au/the-process-of-making-pottery/ This bowl is an example of kitchenware used in the 19th century and still in use today.Bowl white ceramic plain that has two sets of edging around lip. Inside bowl has plaster designed to look like cooking mixture.flagstaff hill, warrnambool, shipwrecked-coast, flagstaff-hill, flagstaff-hill-maritime-museum, maritime-museum, shipwreck-coast, flagstaff-hill-maritime-village, kitchen equipment, ceramic -
 Flagstaff Hill Maritime Museum and Village
Domestic object - Bowl, J & G Meakin, Late 19th or early 20th Century
The Process of Making Pottery Decorating, Firing, Glazing, Making, Technical There is a rhythm and flow to clay. It can’t be done all at once! Even the making process! It can take weeks to get everything done, especially if you can only work on your pottery once a week! Even though we have three hour classes, it’s often just not enough time! Here is an overview of some of the processes so you have a bit more grasp on some of the technical stuff! Step One – Design There are SO many ideas out there for making stuff in clay! From delicate porcelain jewellery, through to heavy sculptural work and everything in between. Deciding your direction is sometimes not that easy – when you first start, try everything, you will naturally gravitate to the style that you enjoy! The options and variations are endless and can get a wee bit overwhelming too! Check in with me before you start to ensure your ideas will work, what order you might do things, how you could achieve the look you are seeking and any other technical data required! Step Two – Making Clay is thixotropic. This means that as you work with it, the clay first gets sloppier and wetter, before is begins to dry in the atmosphere. For most things, you simply can’t do all parts of the project at once. An example of work order might look like: Get last weeks work out from the shelves Prepare clay for today’s work – roll your clay, prepare balls for throwing, make the first stage of a pinch pot) Clean up last week’s work and put it on the shelf for bisque firing Check that you have any glazing to do – and do enough of it that you will have time to finish your main project Do the next step of your next project – there might be a further step that can’t be complete immediately, in that case, wrap your work well and put onto the shelves. Letting your work rest for a while can really help keep your work clean and professional looking. Many things require bagging under plastic to keep it ready for work the next week – put your name on the outside of the bag so you can find your work easily. We have stickers and markers. Consider how you want to decorate your work – coloured slip can be applied at a fairly wet stage (remembering that it will make your work even wetter!). Trying to apply slip to dry clay won’t work! If you want to do sgraffito – you will need to keep the work leather hard (a state of dryness where you can still work the clay with a little effort and a little water and care). Step Three – Drying Most of the time your work can go into the rack uncovered to let it dry out for the following week. If you want to continue forming or shaping you will need to double bag your work – put your work on a suitable sized bat and put the bat in a bag so the base of the bag is under the bat, then put another bag over the top of the work and tuck the top of the bag under the bat. If you want to trim (or turn) your thrown work the following week, it should also be double bagged. If your work is large, delicate, or of uneven thicknesses, you should lightly cover your work for drying. When considering the drying process, bare in mind the weather, humidity and wind! The hotter and dryer, the faster things dry and work can dry unevenly in the shelves – this can lead to cracking – another time to lightly cover your work for drying. Step Four – Trimming and Cleaning Up Your work is dry! It is called greenware now and it is at it’s most fragile! Handle everything with two hands. I often refer to soft hands – keep everything gentle and with your fingers spread as much as possible. Try to not pick up things like plates too much, and always with both hands! Before your work can be bisque fired it should be “cleaned up”. You work won’t go into the kiln if it has sharp edges – when glazed, sharp edges turn into razor blades! Use a piece of fly wire to rub the work all over – this will scratch a little so be light handed. Use a knife or metal kidney to scrape any areas that require a bit more dynamic treatment than the fly wire offers! Finally, a very light wipe over with a slightly damp sponge can help soften and soothe all of your edges and dags! Trimming thrown work: If you are planning to trim (or turn) your thrown work (and you should be), make sure you bag it well – your work should be leather hard to almost dry for easiest trimming. Use this step to finish the work completely – use a metal kidney to polish the surface, or a slightly damp sponge to give a freshly thrown look. Wipe the sponge around the rim after trimming, and check the inside of the pot for dags! Trimming slip cast work: Usually I will trim the rims of your work on the wheel the following day to make that stage easier, however you will still need to check your work for lumps and bumps. Last but not least – check that your name is still clearly on the bottom of your work. Step Five – Bisque Firing When the work is completely dry it can go into the bisque kiln. The bisque kiln is fired to 1000°C. This process burns off the water in the clay as well as some of the chemically bound water. The structure of the clay is not altered that much at this temperature. Inside the bisque kiln, the work is stacked a little, small bowl inside a larger bowl and onto a heavy plate. Smaller items like decorations or drink coasters might get stacked several high. Consideration is paid to the weight of the stack and shape of the work. A bisque kiln can fire about one and a half times the amount of work that the glaze kiln can fire. The firing takes about 10 hours to complete the cycle and about two days to cool down. Once it has been emptied the work is placed in the glaze room ready for you to decorate! Step Six – Glazing Decorating your work with colour can be a lot of fun – and time consuming! There are three main options for surface treatment at this stage: Oxide Washes Underglazes Glazes Washes and underglazes do not “glaze” the work – It will still need a layer of glaze to fully seal the clay (washes don’t need glaze on surfaces not designed for food or liquid as they can gloss up a little on their own). Underglazes are stable colourants that turn out pretty much how they look in the jar. They can be mixed with each other to form other colours and can be used like water colours to paint onto your work. Mostly they should have a clear glaze on top to seal them. Oxides are a different species – the pink oxide (cobalt) wash turns out bright blue for instance. They don’t always need a glaze on top, and some glazes can change the colour of the wash! The glazes need no other “glaze” on top! Be careful of unknown glaze interactions – you can put any combination of glaze in a bowl or on a plate, but only a single glaze on the outside of any vertical surface! Glazes are a chemical reaction under heat. We don’t know the exact chemicals in the Mayco glazes we use. I can guess by the way they interact with each other, however, on the whole, you need to test every idea you have, and not run the test on a vertical surface! Simply put, glaze is a layer of glass like substance that bonds with the clay underneath. Clay is made of silica, alumina and water. Glaze is made of mostly silica. Silica has a melting point of 1700°C and we fire to 1240°C. The silica requires a “flux” to help it melt at the lower temperature. Fluxes can be all sorts of chemicals – a common one is calcium – calcium has a melting point of 2500°C, however, together they both melt at a much lower temperature! Colourants are metal oxides like cobalt (blue), chrome (green through black), copper (green, blue, even red!), manganese (black, purple and pink) iron (red brown), etc. Different chemicals in the glaze can have dramatic effects. for example, barium carbonate (which we don’t use) turns manganese bright pink! Other elements can turn manganese dioxide brown, blue, purple and reddish brown. Manganese dioxide is a flux in and of itself as well. So, glazes that get their black and purple colours, often interact with other glazes and RUN! Our mirror black is a good example – it mixes really well with many glazes because it fluxes them – causes them to melt faster. It will also bring out many beautiful colours in the glazes because it’s black colouring most definitely comes from manganese dioxide! Glaze chemistry is a whole subject on it’s own! We use commercial Mayco glazes on purpose – for their huge range of colour possibilities, stability, cool interactions, artistic freedom with the ability to easily brush the glazes on and ease of use. We currently have almost 50 glazes on hand! A major project is to test the interactions of all glazes with each other. That is 2,500 test tiles!!!! I’m going to make the wall behind the wheels the feature wall of pretty colours! Step Seven – Glaze (Gloss or sometimes called “Glost”) Firing Most of the time this is the final stage of making your creation (but not always!) The glaze kiln goes to 1240°C. This is called cone 6, or midrange. It is the low end of stoneware temperatures. Stoneware clays and glazes are typically fired at cone 8 – 10, that is 1260 – 1290°C. The energy requirement to go from 1240°C to 1280°C is almost a 30% more! Our clay is formulated to vitrify (mature, turn “glass-like”) at 1240°, as are our glazes. A glaze kiln take around 12 hours to reach temperature and two to three days to cool down. Sometimes a third firing process is required – this is for decoration that is added to work after the glaze firing. For example – adding precious metals and lustres. this firing temperature is usually around 600 – 800°C depending upon the techniques being used. There are many students interested in gold and silver trims – we will be doing this third type of firing soon! After firing your work will be in the student finished work shelves. Remember to pay for it before you head out the door! There is a small extra charge for using porcelain clay (it’s more than twice the price of regular clay), and for any third firing process! Once your work has been fired it can not turn back into clay for millennia – so don’t fire it if you don’t like it! Put it in the bucket for recycling. https://firebirdstudios.com.au/the-process-of-making-pottery/This bowl was made by renowned pottery company J & G Meakin of England. The firm was established in the mid-1800's. The bowl is an example of kitchenware used in the 19th century and still in use today.Bowl; white ceramic, round and tapering inwards towards base. Made by J and G Meakin England.On base, 'Ironstone China Reg SOL 391413' with symbolflagstaff hill, flagstaff hill maritime museum and village, warrnambool, maritime museum, maritime village, great ocean road, shipwreck coast, mixing bowl, food preparation, j & g meakin, pottery, stoke-on-trent, kitchen equipment, ceramic -
 Flagstaff Hill Maritime Museum and Village
Domestic object - Plate
The Process of Making Pottery Decorating, Firing, Glazing, Making, Technical There is a rhythm and flow to clay. It can’t be done all at once! Even the making process! It can take weeks to get everything done, especially if you can only work on your pottery once a week! Even though we have three hour classes, it’s often just not enough time! Here is an overview of some of the processes so you have a bit more grasp on some of the technical stuff! Step One – Design There are SO many ideas out there for making stuff in clay! From delicate porcelain jewellery, through to heavy sculptural work and everything in between. Deciding your direction is sometimes not that easy – when you first start, try everything, you will naturally gravitate to the style that you enjoy! The options and variations are endless and can get a wee bit overwhelming too! Check in with me before you start to ensure your ideas will work, what order you might do things, how you could achieve the look you are seeking and any other technical data required! Step Two – Making Clay is thixotropic. This means that as you work with it, the clay first gets sloppier and wetter, before is begins to dry in the atmosphere. For most things, you simply can’t do all parts of the project at once. An example of work order might look like: Get last weeks work out from the shelves Prepare clay for today’s work – roll your clay, prepare balls for throwing, make the first stage of a pinch pot) Clean up last week’s work and put it on the shelf for bisque firing Check that you have any glazing to do – and do enough of it that you will have time to finish your main project Do the next step of your next project – there might be a further step that can’t be complete immediately, in that case, wrap your work well and put onto the shelves. Letting your work rest for a while can really help keep your work clean and professional looking. Many things require bagging under plastic to keep it ready for work the next week – put your name on the outside of the bag so you can find your work easily. We have stickers and markers. Consider how you want to decorate your work – coloured slip can be applied at a fairly wet stage (remembering that it will make your work even wetter!). Trying to apply slip to dry clay won’t work! If you want to do sgraffito – you will need to keep the work leather hard (a state of dryness where you can still work the clay with a little effort and a little water and care). Step Three – Drying Most of the time your work can go into the rack uncovered to let it dry out for the following week. If you want to continue forming or shaping you will need to double bag your work – put your work on a suitable sized bat and put the bat in a bag so the base of the bag is under the bat, then put another bag over the top of the work and tuck the top of the bag under the bat. If you want to trim (or turn) your thrown work the following week, it should also be double bagged. If your work is large, delicate, or of uneven thicknesses, you should lightly cover your work for drying. When considering the drying process, bare in mind the weather, humidity and wind! The hotter and dryer, the faster things dry and work can dry unevenly in the shelves – this can lead to cracking – another time to lightly cover your work for drying. Step Four – Trimming and Cleaning Up Your work is dry! It is called greenware now and it is at it’s most fragile! Handle everything with two hands. I often refer to soft hands – keep everything gentle and with your fingers spread as much as possible. Try to not pick up things like plates too much, and always with both hands! Before your work can be bisque fired it should be “cleaned up”. You work won’t go into the kiln if it has sharp edges – when glazed, sharp edges turn into razor blades! Use a piece of fly wire to rub the work all over – this will scratch a little so be light handed. Use a knife or metal kidney to scrape any areas that require a bit more dynamic treatment than the fly wire offers! Finally, a very light wipe over with a slightly damp sponge can help soften and soothe all of your edges and dags! Trimming thrown work: If you are planning to trim (or turn) your thrown work (and you should be), make sure you bag it well – your work should be leather hard to almost dry for easiest trimming. Use this step to finish the work completely – use a metal kidney to polish the surface, or a slightly damp sponge to give a freshly thrown look. Wipe the sponge around the rim after trimming, and check the inside of the pot for dags! Trimming slip cast work: Usually I will trim the rims of your work on the wheel the following day to make that stage easier, however you will still need to check your work for lumps and bumps. Last but not least – check that your name is still clearly on the bottom of your work. Step Five – Bisque Firing When the work is completely dry it can go into the bisque kiln. The bisque kiln is fired to 1000°C. This process burns off the water in the clay as well as some of the chemically bound water. The structure of the clay is not altered that much at this temperature. Inside the bisque kiln, the work is stacked a little, small bowl inside a larger bowl and onto a heavy plate. Smaller items like decorations or drink coasters might get stacked several high. Consideration is paid to the weight of the stack and shape of the work. A bisque kiln can fire about one and a half times the amount of work that the glaze kiln can fire. The firing takes about 10 hours to complete the cycle and about two days to cool down. Once it has been emptied the work is placed in the glaze room ready for you to decorate! Step Six – Glazing Decorating your work with colour can be a lot of fun – and time consuming! There are three main options for surface treatment at this stage: Oxide Washes Underglazes Glazes Washes and underglazes do not “glaze” the work – It will still need a layer of glaze to fully seal the clay (washes don’t need glaze on surfaces not designed for food or liquid as they can gloss up a little on their own). Underglazes are stable colourants that turn out pretty much how they look in the jar. They can be mixed with each other to form other colours and can be used like water colours to paint onto your work. Mostly they should have a clear glaze on top to seal them. Oxides are a different species – the pink oxide (cobalt) wash turns out bright blue for instance. They don’t always need a glaze on top, and some glazes can change the colour of the wash! The glazes need no other “glaze” on top! Be careful of unknown glaze interactions – you can put any combination of glaze in a bowl or on a plate, but only a single glaze on the outside of any vertical surface! Glazes are a chemical reaction under heat. We don’t know the exact chemicals in the Mayco glazes we use. I can guess by the way they interact with each other, however, on the whole, you need to test every idea you have, and not run the test on a vertical surface! Simply put, glaze is a layer of glass like substance that bonds with the clay underneath. Clay is made of silica, alumina and water. Glaze is made of mostly silica. Silica has a melting point of 1700°C and we fire to 1240°C. The silica requires a “flux” to help it melt at the lower temperature. Fluxes can be all sorts of chemicals – a common one is calcium – calcium has a melting point of 2500°C, however, together they both melt at a much lower temperature! Colourants are metal oxides like cobalt (blue), chrome (green through black), copper (green, blue, even red!), manganese (black, purple and pink) iron (red brown), etc. Different chemicals in the glaze can have dramatic effects. for example, barium carbonate (which we don’t use) turns manganese bright pink! Other elements can turn manganese dioxide brown, blue, purple and reddish brown. Manganese dioxide is a flux in and of itself as well. So, glazes that get their black and purple colours, often interact with other glazes and RUN! Our mirror black is a good example – it mixes really well with many glazes because it fluxes them – causes them to melt faster. It will also bring out many beautiful colours in the glazes because it’s black colouring most definitely comes from manganese dioxide! Glaze chemistry is a whole subject on it’s own! We use commercial Mayco glazes on purpose – for their huge range of colour possibilities, stability, cool interactions, artistic freedom with the ability to easily brush the glazes on and ease of use. We currently have almost 50 glazes on hand! A major project is to test the interactions of all glazes with each other. That is 2,500 test tiles!!!! I’m going to make the wall behind the wheels the feature wall of pretty colours! Step Seven – Glaze (Gloss or sometimes called “Glost”) Firing Most of the time this is the final stage of making your creation (but not always!) The glaze kiln goes to 1240°C. This is called cone 6, or midrange. It is the low end of stoneware temperatures. Stoneware clays and glazes are typically fired at cone 8 – 10, that is 1260 – 1290°C. The energy requirement to go from 1240°C to 1280°C is almost a 30% more! Our clay is formulated to vitrify (mature, turn “glass-like”) at 1240°, as are our glazes. A glaze kiln take around 12 hours to reach temperature and two to three days to cool down. Sometimes a third firing process is required – this is for decoration that is added to work after the glaze firing. For example – adding precious metals and lustres. this firing temperature is usually around 600 – 800°C depending upon the techniques being used. There are many students interested in gold and silver trims – we will be doing this third type of firing soon! After firing your work will be in the student finished work shelves. Remember to pay for it before you head out the door! There is a small extra charge for using porcelain clay (it’s more than twice the price of regular clay), and for any third firing process! Once your work has been fired it can not turn back into clay for millennia – so don’t fire it if you don’t like it! Put it in the bucket for recycling. https://firebirdstudios.com.au/the-process-of-making-pottery/Ceramics have evolved over thousands of years.White earthenware dinner plate. Crazing evident all over.Backstamped ‘Made in England S LTD’flagstaff hill, warrnambool, shipwrecked-coast, flagstaff-hill, flagstaff-hill-maritime-museum, maritime-museum, shipwreck-coast, flagstaff-hill-maritime-village, ceramics, tableware -
 Flagstaff Hill Maritime Museum and Village
Domestic object - Plate, Johnson Bros
The Process of Making Pottery Decorating, Firing, Glazing, Making, Technical There is a rhythm and flow to clay. It can’t be done all at once! Even the making process! It can take weeks to get everything done, especially if you can only work on your pottery once a week! Even though we have three hour classes, it’s often just not enough time! Here is an overview of some of the processes so you have a bit more grasp on some of the technical stuff! Step One – Design There are SO many ideas out there for making stuff in clay! From delicate porcelain jewellery, through to heavy sculptural work and everything in between. Deciding your direction is sometimes not that easy – when you first start, try everything, you will naturally gravitate to the style that you enjoy! The options and variations are endless and can get a wee bit overwhelming too! Check in with me before you start to ensure your ideas will work, what order you might do things, how you could achieve the look you are seeking and any other technical data required! Step Two – Making Clay is thixotropic. This means that as you work with it, the clay first gets sloppier and wetter, before is begins to dry in the atmosphere. For most things, you simply can’t do all parts of the project at once. An example of work order might look like: Get last weeks work out from the shelves Prepare clay for today’s work – roll your clay, prepare balls for throwing, make the first stage of a pinch pot) Clean up last week’s work and put it on the shelf for bisque firing Check that you have any glazing to do – and do enough of it that you will have time to finish your main project Do the next step of your next project – there might be a further step that can’t be complete immediately, in that case, wrap your work well and put onto the shelves. Letting your work rest for a while can really help keep your work clean and professional looking. Many things require bagging under plastic to keep it ready for work the next week – put your name on the outside of the bag so you can find your work easily. We have stickers and markers. Consider how you want to decorate your work – coloured slip can be applied at a fairly wet stage (remembering that it will make your work even wetter!). Trying to apply slip to dry clay won’t work! If you want to do sgraffito – you will need to keep the work leather hard (a state of dryness where you can still work the clay with a little effort and a little water and care). Step Three – Drying Most of the time your work can go into the rack uncovered to let it dry out for the following week. If you want to continue forming or shaping you will need to double bag your work – put your work on a suitable sized bat and put the bat in a bag so the base of the bag is under the bat, then put another bag over the top of the work and tuck the top of the bag under the bat. If you want to trim (or turn) your thrown work the following week, it should also be double bagged. If your work is large, delicate, or of uneven thicknesses, you should lightly cover your work for drying. When considering the drying process, bare in mind the weather, humidity and wind! The hotter and dryer, the faster things dry and work can dry unevenly in the shelves – this can lead to cracking – another time to lightly cover your work for drying. Step Four – Trimming and Cleaning Up Your work is dry! It is called greenware now and it is at it’s most fragile! Handle everything with two hands. I often refer to soft hands – keep everything gentle and with your fingers spread as much as possible. Try to not pick up things like plates too much, and always with both hands! Before your work can be bisque fired it should be “cleaned up”. You work won’t go into the kiln if it has sharp edges – when glazed, sharp edges turn into razor blades! Use a piece of fly wire to rub the work all over – this will scratch a little so be light handed. Use a knife or metal kidney to scrape any areas that require a bit more dynamic treatment than the fly wire offers! Finally, a very light wipe over with a slightly damp sponge can help soften and soothe all of your edges and dags! Trimming thrown work: If you are planning to trim (or turn) your thrown work (and you should be), make sure you bag it well – your work should be leather hard to almost dry for easiest trimming. Use this step to finish the work completely – use a metal kidney to polish the surface, or a slightly damp sponge to give a freshly thrown look. Wipe the sponge around the rim after trimming, and check the inside of the pot for dags! Trimming slip cast work: Usually I will trim the rims of your work on the wheel the following day to make that stage easier, however you will still need to check your work for lumps and bumps. Last but not least – check that your name is still clearly on the bottom of your work. Step Five – Bisque Firing When the work is completely dry it can go into the bisque kiln. The bisque kiln is fired to 1000°C. This process burns off the water in the clay as well as some of the chemically bound water. The structure of the clay is not altered that much at this temperature. Inside the bisque kiln, the work is stacked a little, small bowl inside a larger bowl and onto a heavy plate. Smaller items like decorations or drink coasters might get stacked several high. Consideration is paid to the weight of the stack and shape of the work. A bisque kiln can fire about one and a half times the amount of work that the glaze kiln can fire. The firing takes about 10 hours to complete the cycle and about two days to cool down. Once it has been emptied the work is placed in the glaze room ready for you to decorate! Step Six – Glazing Decorating your work with colour can be a lot of fun – and time consuming! There are three main options for surface treatment at this stage: Oxide Washes Underglazes Glazes Washes and underglazes do not “glaze” the work – It will still need a layer of glaze to fully seal the clay (washes don’t need glaze on surfaces not designed for food or liquid as they can gloss up a little on their own). Underglazes are stable colourants that turn out pretty much how they look in the jar. They can be mixed with each other to form other colours and can be used like water colours to paint onto your work. Mostly they should have a clear glaze on top to seal them. Oxides are a different species – the pink oxide (cobalt) wash turns out bright blue for instance. They don’t always need a glaze on top, and some glazes can change the colour of the wash! The glazes need no other “glaze” on top! Be careful of unknown glaze interactions – you can put any combination of glaze in a bowl or on a plate, but only a single glaze on the outside of any vertical surface! Glazes are a chemical reaction under heat. We don’t know the exact chemicals in the Mayco glazes we use. I can guess by the way they interact with each other, however, on the whole, you need to test every idea you have, and not run the test on a vertical surface! Simply put, glaze is a layer of glass like substance that bonds with the clay underneath. Clay is made of silica, alumina and water. Glaze is made of mostly silica. Silica has a melting point of 1700°C and we fire to 1240°C. The silica requires a “flux” to help it melt at the lower temperature. Fluxes can be all sorts of chemicals – a common one is calcium – calcium has a melting point of 2500°C, however, together they both melt at a much lower temperature! Colourants are metal oxides like cobalt (blue), chrome (green through black), copper (green, blue, even red!), manganese (black, purple and pink) iron (red brown), etc. Different chemicals in the glaze can have dramatic effects. for example, barium carbonate (which we don’t use) turns manganese bright pink! Other elements can turn manganese dioxide brown, blue, purple and reddish brown. Manganese dioxide is a flux in and of itself as well. So, glazes that get their black and purple colours, often interact with other glazes and RUN! Our mirror black is a good example – it mixes really well with many glazes because it fluxes them – causes them to melt faster. It will also bring out many beautiful colours in the glazes because it’s black colouring most definitely comes from manganese dioxide! Glaze chemistry is a whole subject on it’s own! We use commercial Mayco glazes on purpose – for their huge range of colour possibilities, stability, cool interactions, artistic freedom with the ability to easily brush the glazes on and ease of use. We currently have almost 50 glazes on hand! A major project is to test the interactions of all glazes with each other. That is 2,500 test tiles!!!! I’m going to make the wall behind the wheels the feature wall of pretty colours! Step Seven – Glaze (Gloss or sometimes called “Glost”) Firing Most of the time this is the final stage of making your creation (but not always!) The glaze kiln goes to 1240°C. This is called cone 6, or midrange. It is the low end of stoneware temperatures. Stoneware clays and glazes are typically fired at cone 8 – 10, that is 1260 – 1290°C. The energy requirement to go from 1240°C to 1280°C is almost a 30% more! Our clay is formulated to vitrify (mature, turn “glass-like”) at 1240°, as are our glazes. A glaze kiln take around 12 hours to reach temperature and two to three days to cool down. Sometimes a third firing process is required – this is for decoration that is added to work after the glaze firing. For example – adding precious metals and lustres. this firing temperature is usually around 600 – 800°C depending upon the techniques being used. There are many students interested in gold and silver trims – we will be doing this third type of firing soon! After firing your work will be in the student finished work shelves. Remember to pay for it before you head out the door! There is a small extra charge for using porcelain clay (it’s more than twice the price of regular clay), and for any third firing process! Once your work has been fired it can not turn back into clay for millennia – so don’t fire it if you don’t like it! Put it in the bucket for recycling. https://firebirdstudios.com.au/the-process-of-making-pottery/Ceramics have evolved over thousands of years.A white earthenware side plate with a gadroon edge. Has water marks and chips on front.‘Johnson Bros England Reg No 15587’flagstaff hill, warrnambool, shipwrecked-coast, flagstaff-hill, flagstaff-hill-maritime-museum, maritime-museum, shipwreck-coast, flagstaff-hill-maritime-village, johnson bros, ceramics, tableware -
 Flagstaff Hill Maritime Museum and Village
Domestic object - Plate, Alfred Meakin
The Process of Making Pottery Decorating, Firing, Glazing, Making, Technical There is a rhythm and flow to clay. It can’t be done all at once! Even the making process! It can take weeks to get everything done, especially if you can only work on your pottery once a week! Even though we have three hour classes, it’s often just not enough time! Here is an overview of some of the processes so you have a bit more grasp on some of the technical stuff! Step One – Design There are SO many ideas out there for making stuff in clay! From delicate porcelain jewellery, through to heavy sculptural work and everything in between. Deciding your direction is sometimes not that easy – when you first start, try everything, you will naturally gravitate to the style that you enjoy! The options and variations are endless and can get a wee bit overwhelming too! Check in with me before you start to ensure your ideas will work, what order you might do things, how you could achieve the look you are seeking and any other technical data required! Step Two – Making Clay is thixotropic. This means that as you work with it, the clay first gets sloppier and wetter, before is begins to dry in the atmosphere. For most things, you simply can’t do all parts of the project at once. An example of work order might look like: Get last weeks work out from the shelves Prepare clay for today’s work – roll your clay, prepare balls for throwing, make the first stage of a pinch pot) Clean up last week’s work and put it on the shelf for bisque firing Check that you have any glazing to do – and do enough of it that you will have time to finish your main project Do the next step of your next project – there might be a further step that can’t be complete immediately, in that case, wrap your work well and put onto the shelves. Letting your work rest for a while can really help keep your work clean and professional looking. Many things require bagging under plastic to keep it ready for work the next week – put your name on the outside of the bag so you can find your work easily. We have stickers and markers. Consider how you want to decorate your work – coloured slip can be applied at a fairly wet stage (remembering that it will make your work even wetter!). Trying to apply slip to dry clay won’t work! If you want to do sgraffito – you will need to keep the work leather hard (a state of dryness where you can still work the clay with a little effort and a little water and care). Step Three – Drying Most of the time your work can go into the rack uncovered to let it dry out for the following week. If you want to continue forming or shaping you will need to double bag your work – put your work on a suitable sized bat and put the bat in a bag so the base of the bag is under the bat, then put another bag over the top of the work and tuck the top of the bag under the bat. If you want to trim (or turn) your thrown work the following week, it should also be double bagged. If your work is large, delicate, or of uneven thicknesses, you should lightly cover your work for drying. When considering the drying process, bare in mind the weather, humidity and wind! The hotter and dryer, the faster things dry and work can dry unevenly in the shelves – this can lead to cracking – another time to lightly cover your work for drying. Step Four – Trimming and Cleaning Up Your work is dry! It is called greenware now and it is at it’s most fragile! Handle everything with two hands. I often refer to soft hands – keep everything gentle and with your fingers spread as much as possible. Try to not pick up things like plates too much, and always with both hands! Before your work can be bisque fired it should be “cleaned up”. You work won’t go into the kiln if it has sharp edges – when glazed, sharp edges turn into razor blades! Use a piece of fly wire to rub the work all over – this will scratch a little so be light handed. Use a knife or metal kidney to scrape any areas that require a bit more dynamic treatment than the fly wire offers! Finally, a very light wipe over with a slightly damp sponge can help soften and soothe all of your edges and dags! Trimming thrown work: If you are planning to trim (or turn) your thrown work (and you should be), make sure you bag it well – your work should be leather hard to almost dry for easiest trimming. Use this step to finish the work completely – use a metal kidney to polish the surface, or a slightly damp sponge to give a freshly thrown look. Wipe the sponge around the rim after trimming, and check the inside of the pot for dags! Trimming slip cast work: Usually I will trim the rims of your work on the wheel the following day to make that stage easier, however you will still need to check your work for lumps and bumps. Last but not least – check that your name is still clearly on the bottom of your work. Step Five – Bisque Firing When the work is completely dry it can go into the bisque kiln. The bisque kiln is fired to 1000°C. This process burns off the water in the clay as well as some of the chemically bound water. The structure of the clay is not altered that much at this temperature. Inside the bisque kiln, the work is stacked a little, small bowl inside a larger bowl and onto a heavy plate. Smaller items like decorations or drink coasters might get stacked several high. Consideration is paid to the weight of the stack and shape of the work. A bisque kiln can fire about one and a half times the amount of work that the glaze kiln can fire. The firing takes about 10 hours to complete the cycle and about two days to cool down. Once it has been emptied the work is placed in the glaze room ready for you to decorate! Step Six – Glazing Decorating your work with colour can be a lot of fun – and time consuming! There are three main options for surface treatment at this stage: Oxide Washes Underglazes Glazes Washes and underglazes do not “glaze” the work – It will still need a layer of glaze to fully seal the clay (washes don’t need glaze on surfaces not designed for food or liquid as they can gloss up a little on their own). Underglazes are stable colourants that turn out pretty much how they look in the jar. They can be mixed with each other to form other colours and can be used like water colours to paint onto your work. Mostly they should have a clear glaze on top to seal them. Oxides are a different species – the pink oxide (cobalt) wash turns out bright blue for instance. They don’t always need a glaze on top, and some glazes can change the colour of the wash! The glazes need no other “glaze” on top! Be careful of unknown glaze interactions – you can put any combination of glaze in a bowl or on a plate, but only a single glaze on the outside of any vertical surface! Glazes are a chemical reaction under heat. We don’t know the exact chemicals in the Mayco glazes we use. I can guess by the way they interact with each other, however, on the whole, you need to test every idea you have, and not run the test on a vertical surface! Simply put, glaze is a layer of glass like substance that bonds with the clay underneath. Clay is made of silica, alumina and water. Glaze is made of mostly silica. Silica has a melting point of 1700°C and we fire to 1240°C. The silica requires a “flux” to help it melt at the lower temperature. Fluxes can be all sorts of chemicals – a common one is calcium – calcium has a melting point of 2500°C, however, together they both melt at a much lower temperature! Colourants are metal oxides like cobalt (blue), chrome (green through black), copper (green, blue, even red!), manganese (black, purple and pink) iron (red brown), etc. Different chemicals in the glaze can have dramatic effects. for example, barium carbonate (which we don’t use) turns manganese bright pink! Other elements can turn manganese dioxide brown, blue, purple and reddish brown. Manganese dioxide is a flux in and of itself as well. So, glazes that get their black and purple colours, often interact with other glazes and RUN! Our mirror black is a good example – it mixes really well with many glazes because it fluxes them – causes them to melt faster. It will also bring out many beautiful colours in the glazes because it’s black colouring most definitely comes from manganese dioxide! Glaze chemistry is a whole subject on it’s own! We use commercial Mayco glazes on purpose – for their huge range of colour possibilities, stability, cool interactions, artistic freedom with the ability to easily brush the glazes on and ease of use. We currently have almost 50 glazes on hand! A major project is to test the interactions of all glazes with each other. That is 2,500 test tiles!!!! I’m going to make the wall behind the wheels the feature wall of pretty colours! Step Seven – Glaze (Gloss or sometimes called “Glost”) Firing Most of the time this is the final stage of making your creation (but not always!) The glaze kiln goes to 1240°C. This is called cone 6, or midrange. It is the low end of stoneware temperatures. Stoneware clays and glazes are typically fired at cone 8 – 10, that is 1260 – 1290°C. The energy requirement to go from 1240°C to 1280°C is almost a 30% more! Our clay is formulated to vitrify (mature, turn “glass-like”) at 1240°, as are our glazes. A glaze kiln take around 12 hours to reach temperature and two to three days to cool down. Sometimes a third firing process is required – this is for decoration that is added to work after the glaze firing. For example – adding precious metals and lustres. this firing temperature is usually around 600 – 800°C depending upon the techniques being used. There are many students interested in gold and silver trims – we will be doing this third type of firing soon! After firing your work will be in the student finished work shelves. Remember to pay for it before you head out the door! There is a small extra charge for using porcelain clay (it’s more than twice the price of regular clay), and for any third firing process! Once your work has been fired it can not turn back into clay for millennia – so don’t fire it if you don’t like it! Put it in the bucket for recycling. https://firebirdstudios.com.au/the-process-of-making-pottery/Ceramics have evolved over thousands of years.Earthenware dessert plate, cream colour. Made by Alfred Meakin, England. Backstamped ‘Alfred Meakin England’. flagstaff hill, warrnambool, shipwrecked-coast, flagstaff-hill, flagstaff-hill-maritime-museum, maritime-museum, shipwreck-coast, flagstaff-hill-maritime-village, alfred meakin, ceramics, earthenware, kitchenware