Showing 269 items matching "golden north"
-
 Ballarat Tramway Museum
Slide - 35mm slide/s - set of 17, Noel Simons, 20/11/1962 12:00:00 AM
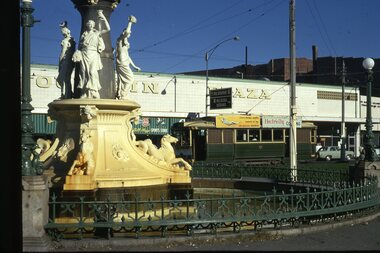
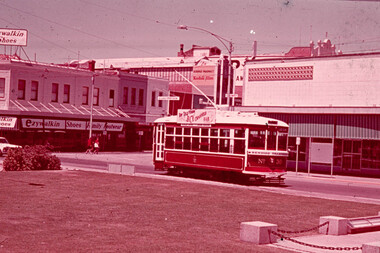
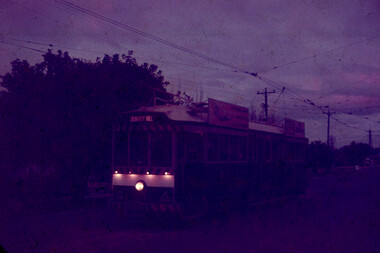
Set of 17 transparencies taken on 20/11/1962 on Kodak mounts. 1187.1 - Bendigo No. 2 at the Quarry Hill terminus, showing destination of Quarry Hill. Has Cohns Drinks and Streets Ice Cream ads on dash panel, a SEC 'electric cooking' roof ad and another roof ad. Shows the Y terminus at this location, but tram standing just before it. Overhead in position. 1187.2 - as above, but closer up. 1187.3 - as above, but from the north side, showing cemetery in the background. 1187.4 - Bendigo No.3 at Eaglehawk terminus. Tram showing destination of Quarry Hill. Has the various buildings at Eaglehawk in the background including the Foodland store. Has Streets Ice cream and White Horse Whiskey ads on the dash panel. 1187.5 - Bendigo No. 18 at Garden Gully crossing loop, in bound, with destination of Eaglehawk. Passengers waiting for an Eaglehawk tram at the stop. Has a white horse whiskey ad on dash panel and SEC roof ads. Conductor standing in doorway looking out. 1187.6 - Bendigo No. 7 inbound in Nolan St. at cnr of McCrae St. showing destination of Golden Square. Has Streets Ice cream ad on dash panel and a Castrol Roof ad. 1187.7 - Bendigo No. 19 at the North Bendigo terminus with railway level crossing in background. Tram has a Cohns Drinks ad and an SEC 'Electric Cooking' roof ad. 1187.8 - Bendigo No. 2 at the Quarry Hill terminus, looking back into Bendigo, showing destination of Eaglehawk. 1187.9 - Bendigo No. 21 in McCrae St, near Nolan St outbound for North Bendigo. Photo taken after tram has passed photographer. 1187.10 - Bendigo Nos. 4 and 26 at Charing Cross in View St. with fountain alongside and the Beehive, Ezywalkin Buildings in the background. No. 26 has a Sandhurst Milk and SEC 'Electric Cooking' roof ad. 1187.11 - close up of 22E maximum traction truck and folded footstep. 1187.12 - Bendigo No. 19 at Charing Cross terminus, after tram has passed photographer, showing destination of North Bendigo, with the Beehive building in the background and passengers boarding tram. 1187.13 - Bendigo No. 11, turning from View St. into Pall Mall, showing Special with the conductor holding point bar. Has the Beehive and Ezywalkin Buildings in the background. 1187.14 - No. 7 at Charing Cross terminus, in Pall Mall, bound for Golden Square. Has the Beehive and Ezywalkin buildings in the background and passengers waiting at the tram stop. 1187.15 - No. 18 at the Charing Cross terminus, bound for Eaglehawk. Has the Beehive and Ezywalkin buildings in the background and passengers waiting at the tram stop. Also has the 'Safety Zone' sign in the photograph. 1187.16 - No. 2 at Quarry Hill terminus, night or dusk photo. Tram showing destination of Depot. 1187.17 - No. 26 at Charing Cross, night photo. Tram has destination of Quarry Hill, but is on the line for Eaglehawk. Photo looks along Mitchell St. Also shows Safety Zone sign. Information written on in black ink and date stamped on purple ink. 1187.1 - "No. 2 at Quarry Hill terminus Bendigo" 1187.2 - "No. 2 at Quarry Hill terminus Bendigo" 1187.3 - "No. 2 at Quarry Hill terminus Bendigo" 1187.4 - "No. 3 at Eaglehawk terminus" 1187.5 - "No. 18 in Mt Korong Road, Long Gully at cnr of Havilah Road (Eaglehawk Route)" 1187.6 - "No. 7 in Nolan St. Bendigo, at Cnr of McCrae St., near lake Weeroona, (North Bendigo Route)' 1187.7 - "No. 19 at North Bendigo terminus" 1187.8 - "No. 2 at Quarry Hill terminus" 1187.9 - "No. 21 in McCrae St. Bendigo, near Nolan St. (North Bendigo Route) 1187.10 - "4 and 26 at Alexandra Fountain, Charing Cross Bendigo" 1187.11 - "Truck of Bogie Car, Bendigo Tramways" 1187.12 - "No. 19 in Pall Mall at Charing Cross, Bendigo" 1187.13 - "Birney car No. 11 entering Pall Mall from View St. at Charing Cross Bendigo" 1187.14 - "No. 7 in Pall Mall at Charing Cross, Bendigo" 1187.15 - "No. 18 at Alexandra Fountain, Charing Cross, Bendigo" 1187.16 - "No. 2 at Quarry Hill terminus, Bendigo" 1187.17 - "No. 26 at Alexandra Fountain, Charing Cross, Bendigo" tramways, trams, bendigo, quarry hill, eaglehawk, north bendigo, maximum traction, night photo, tram 2, tram 3, tram 4, tram 7, tram 11, tram 18, tram 19, tram 21, tram 26 -
 Ballarat Tramway Museum
Slide - 35mm slide/s, Noel Simons, 21/11/1962 12:00:00 AM
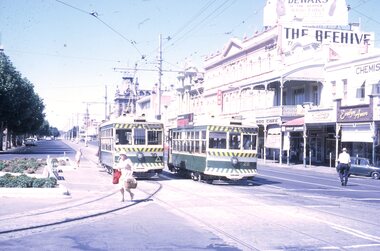
... Junction Charing Cross View St. Eaglehawk North Bendigo Golden ...Set of 17 transparencies taken on 21/11/1962 on Kodak mounts. 1188.1 - Bendigo No. 11 at Depot Junction McCrae and Arnold St. with driver/conductor changing points. 1188.2 - Bendigo No. 4 at Charing Cross, side on photo, with City Club Hotel and Alexandra Fountain in the background. Tram has Castrol and SEC 'Electric Cooking' ads. 1188.3 - Bendigo No. 4 climbing View St. after tram has passed photographer. Tram has Streets Ice Cream and Cohns Soft Drinks ad on rear dash panel. In the background are the buildings in View St., including the Princess Theatre. Tram has destination of Eaglehawk. 1188.4 - Trams 2 and 4 crossing at the California Gully or Thorpe St Loop. 1188.5 - Bendigo 4 in Mt Korong Road. Tram inbound with destination of Quarry Hill, just leaving Garden Gully Loop. 1188.6 - Bendigo 4 and 17 crossing at the Hayes St. or Iron Bark Gully Loop. No. 17 bound for Eaglehawk, No. 4, Quarry Hill. 17 has two SEC roof ads and a white horse whiskey ad. 1188.7 - No. 17 bound for Eaglehawk, soon after leaving California Gully. Has large mullock heap in background. 1188.8 - Bendigo 2 and 17 crossing at the Thorpe St. or California Gully Loop. Has butchers shop in background. 1188.9 - Bendigo 17 at the Eaglehawk terminus. Has destination of Quarry Hill. In background is the hotel and shops at the terminus, showing ads for "Melbourne Bitter". Tram has two SEC 'Electric Cooking' ads. Driver and conductor about to assist two lady passengers with a pram and baby. 1188.10 - No. 17 at Eaglehawk terminus, awaiting departure. Has Eaglehawk Town Hall and Post Office in background. Tram has a Whitehorse Whiskey ad on the front dash panel. 1188.11 - No. 3 in High St. Eaglehawk, with destination of Eaglehawk. Has the shops on the south side of High St. in the background, including the Eaglehawk fish shop. Tram has two roof ads, one an SEC roof ad, and Cohns Drinks and Streets Ice cream ads on front dash panel. 1188.12 - as above, but after tram has passed photographer. Note the centre of the road poles. 1188.13 - No. 2 outbound for Eaglehawk at the intersection of Mt. Korong Road and the Calder Highway. Photo taken after the tram has passed the photographer. Has an Ampol service station in the background. 1188.14 - No. 11 leaving the Bendigo depot, crossing the bridge, with the Scrubber car in the background. 1188.15 - No. 21 at the North Bendigo terminus. Tram has destination of Golden Square and Cohns drink ad on front dash and two roof ads on side. 1188.16 - No. 11 on Golden Square route, in High St. at intersection with Old High St. 1188.17 - No. 11 at the Golden Square terminus, conductor turning the pole. Hotel on the left side of the photo. Note the road works barrier and red flag behind the tram. Slide has an end of roll mark on the right hand side of the image.Information written on in black ink and date stamped on purple ink. 1188.1 - "Birney car No. 11 in McCrae St. at Cnr of Arnold about to run into depot, Bendigo" 1188.2 - "No. 4 at Alexandra Fountain, Charing Cross Bendigo" 1188.3 - "No. 4 climbing the View St. Hill from Charing Cross, Bendigo (Eaglehawk Route)" 1188.4 - "No. 4 and 2 at Thorpe St. Loop, California Gully" 1188.5 - "No. 4 in Mt Korong Rd., Long Gully, Near Havilah Rd. (Bendigo) (Eaglehawk Route)" 1188.6 - "Nos. 17 and 4 crossing on Hayes St. Loop, Ironbark, Bendigo" 1188.7 - "No. 17 soon after leaving California Gully (Eaglehawk Route)" 1188.8 - "No.2 and 17 crossing on Thorpe St. Loop, California Gully (Eaglehawk Route)" 1188.9 - "No. 17 at Eaglehawk terminus" 1188.10 - "No. 17 at Eaglehawk terminus" 1188.11 - "No. 3 in High St. Eaglehawk" 1188.12 - "No. 3 nearing Eaglehawk terminus" 1188.13 - "No. 2 in Mt. Korong Rd., Ironbark. Calder highway on left (Eaglehawk route) 1188.14 - "Birney car No. 11 leaving Bendigo depot. Scrubber car at rear" 1188.15 - "No. 21 at North Bendigo Terminus" 1188.16 - "Birney car No. 11 in High St. Bendigo at intersection with Old High Street (Golden Square Route)" 1188.17 - "Birney Car No. 11 at Golden Square terminus, High St., Bendigo". tramways, trams, bendigo, depot junction, charing cross, view st., eaglehawk, north bendigo, golden square, tram 2, tram 3, tram 4, tram 11, tram 17, tram 21, tram scrubber -
 Ballarat Tramway Museum
Slide - 35mm slide/s - set of 4, Noel Simons, Apr. 1967
Set of 2 slides made from the Association of Railway Enthusiast Provincial Tramways film strip, possibly during April 1967. 1192.1 and 1192.3 mounted in Kodak Ready Mounts. The others in plain white mounts. Slides dated Dec. 1968. 1192.1 - No. 21 out bound to Golden Square in High St., between Wattle and Vine Streets. Photo taken after tram has passed photographer. Has a sign for "Reid's Furnituorium" in the background. 1192.2 - Bendigo No. 28 dressed up as Myers Christmas tram, passing the Post Office and Courts in Pall Mall. 1192.3 - Bendigo No. 23 at Needle Loop en route to Eaglehawk. Tram has two SEC roof ads, one "Electric Cooking" and the other "Everything fine in my all electric kitchen". 1192.4 - Bendigo scrubber parked at the end of the main depot lead, alongside the depot office buildings.Details in blue ink, date hand stamped in purple ink. 1192.1 - "No. 21 heads along High St for Golden Square between Wattle and Vine Streets." 1192.2 - "Birney No. 28 in Christmas Garb, traverses Pall Mall en route to North Bendigo". 1192.3 - "No. 23 at Needle Loop on its run to Eaglehawk". 1192.4 - "Scrubber car at Bendigo Depot".tramways, trams, north bendigo, bendigo, bridge st loop, depot, tram 21, tram 23, tram 28, tram scrubber -
 Ballarat Tramway Museum
Slide - 35mm slide/s - set of 24, Noel Simons, 20/05/1971 12:00:00 AM
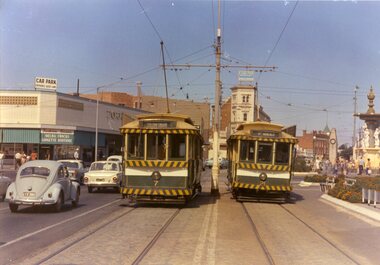
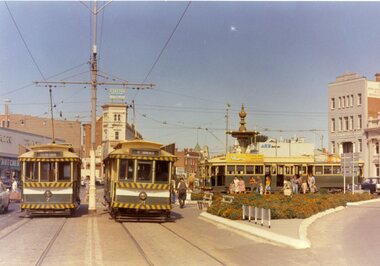
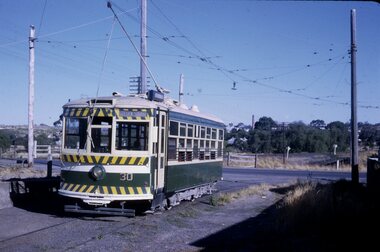
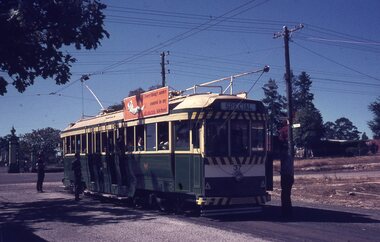
Set of 24 transparencies taken on 20/5/1971 on Kodak mounts. 1195.1 - Bendigo 19 arriving at Charing Cross en route to North Bendigo with Fountain Plaza and the City Family Hotel in the background. No. 19 has two roof ads for the SEC. -'Electricity better for cooking' and 'Everything's under control in my all electric kitchen' 1195.2 - as above, but standing at the Charing cross stop, with the Beehive Stores and other buildings along the east side of Pall Mall in the background. 1195.3 - No 21 ex Golden Square crossing View St. trackwork in front of No. 25 waiting to depart for Quarry Hill. No.21 has two roof ads (as for No.19 in 1195.1) and No.25 has one SEC roof ad and another. Ezywalkin sign in the background, and Fountain Plaza. 1195.4 - as for 1195.3, but after 21 has arrived and 25 left for Quarry Hill. Has Ezywalkin store and the Beehive store in the background. 1195.5 - No. 5 at the Eaglehawk terminus. Photo taken with a cannon in foreground looking along High St. Eaglehawk. Has shops on the west side of High St. in the background. 1195.6 - No. 5 at the Eaglehawk terminus, close up of the rear of the tram - note tow bar arrangement. Has destination of Quarry Hill. 1195.7-Nos.25 and 5 crossing at the Thorpe St. Loop, California Gully. No. 25 bound for Eaglehawk (has SEC Briquette and electric cooking roof ads) and 5 en route for Quarry Hill with a SEC and Cinzano roof ad. 1195.8 - as for 1195.7, but after trams have passed each other. Has Borough Auto Service building in the background. 1195.9 - No. 5 in Mt Korong Road, towards Bamard Street, photo taken after tram has passed photographer. 1195.10 - No. 30 at the Golden Square terminus with the Milk Bar on the right hand side of the photograph. 1195.11 - No. 30 inbound at Fire Station Loop, High St. Golden Square. Has old fire station in the background. Passengers are boarding the tramcar. 1195.12 - No. 30 in High St, bound for North Bendigo between Vine and Wattle Streets. 1195.13 - No. 5 bound for Eaglehawk waits at Iron Bark Gully Loop, at Hayes St. 1195.14 - No. 5 and No. 2 crossing at Iron Bark Gully Loop. 1195.15 - No. 5 bound for Eaglehawk leaving the Manchester Loop, Long gully. 1195.16 - No. 5 passing William Street, Long Gully en route to Eaglehawk. 1195.17 - No. 5 just before the California Gully Crossing Loop. 1195.18 - Nos. 5 and 26 crossing at California Gully crossing Loop. No. 5 heading to Eaglehawk, 26, Quarry Hill. 1195.19 - No. 5 in High St. Eaglehawk with Bob Moyle's Victoria Hotel and the TAB in the background. 1195.20 - No. 5 in High St. Eaglehawk approaching the terminus. Photo taken after the tram has passed the photographer. Has Foodland store and J. Best Fruit supply in the background, along with Eaglehawk Town Hall. 1195.21 - No. 5 at the Eaglehawk terminus, photo taken along seldom used track along High St. 1195.22 - as for 1195.22 - but at the very end of the track. 1195.23 - No. 5 en route for Quarry Hill climbs High St. Eaglehawk with the Victoria Hotel and Eaglehawk Town Hall in the background. 1195.24 - No. 5 and 25 crossing at Jobs Gully Loop. Note 25 has a black on white destination roll, while No. 5 has a white on black destination roll. Information written on in black ink and date stamped on purple ink. 1195.1 - "No. 19 arrives at Charing Cross Bendigo from Golden Square" 1195.2 - "No. 19 about to leave Charing Cross for North Bendigo" 1195.3 - "No. 25 awaiting departure for Quarry Hill, watches No. 21 arrive at Charring Cross from Golden Square" 1195.4 - "No. 21 on North Bendigo service and No. 25 on Quarry Hill run await departure at Charing Cross" 1195.5 - "No. 5 at Eaglehawk terminus" 1195.6 - "No. 5 at Eaglehawk terminus" 1195.7 - "Nos. 5 and 25 crossing at Thorpe St. Loop, California". 1195.8 - "Nos. 25 and 5 crossing Thorpe St. Loop, California Gully". 1195.9 - "No. 5 descending Mt Korong Rd. towards Bamard St." 1195.10 - "Birney car No. 30 at Golden Square terminus" 1195.11 - "Birney car No. 30 in High Street near Thistle Street (Fire Station Loop)" 1195.12 - "No. 30 in High St. between vine and Wattle Streets" 1195.13 - "No. 25 at Hayes Street Loop Iron Bark". 1195.14 - "Nos. 2 and 5 crossing at Hayes Street Loop Iron Bark" 1195.15 - "No. 5 at Manchester Loop opposite Havilah Road, Long Gully" 1195.16 - "No. 5 passing William Street, Long Gully". 1195.17 - "No. 5 at California Gully" 1195,18 - "Nos. 26 and 5 at Thorpe St. Loop, California Gully". 1195.19 - "No. 5 in High St. Eaglehawk". 1195.20 - "No. 5 approaching Eaglehawk terminus" 1195.21 - "No. 5 at Eaglehawk terminus" 1195.22 - "No. 5 at Eaglehawk terminus" 1195.23 - "No. 5 in High St. Eaglehawk" tramways, trams, bendigo, charing cross, eaglehawk, california gully, golden square, iron bark gully, jobs gully, tram 2, tram 5, tram 19, tram 21, tram 25, tram 26, tram 30 -
 Ballarat Tramway Museum
Slide - 35mm slide/s - set of 2, Noel Simons, 20/05/1971 12:00:00 AM
Set of 2 slides mounted in Kodak Ready Mounts. Slides dated 20 May 1971. 1196.1 - Bendigo No. 21 arriving at Charing Cross from Golden Square with the Alexandria Fountain in the foreground. In the background is the Fountain Plaza building. Tram has 2 SEC roof ads. 1196.2 - No. 30 at Charing Cross from North Bendigo. On a pole in front of the tram are two signs "All cars stop here" in white printing on a red background and "Cars Stop by Request" in white lettering on a black background.1196.1 - "No. 21 passing Alexandra Fountain on arrival at Charing Cross from Golden Square" 1196.2 - "No. 30 at Charing Cross"tramways, trams, charing cross, bendigo, alexandra fountain, tram stops, tram 21, tram 30 -
 Ballarat Tramway Museum
Slide - 35mm slide/s - set of 13, Noel Simons, 24/05/1971 12:00:00 AM
Set of 13 transparencies taken on 24/5/1971 on Kodak mounts. 1200.1 - No. 7 en route to Golden Square turning from Bridge St. into Nolan St. Photo taken after tram has passed photographer. Tram has a briquettes roof ad. 1200.2 - No. 21 in McCrae St. just before Nolan St. Photo taken after tram has passed photographer. 1200.3 - No. 7 in Nolan St at corner with McCrae St. Passenger boarding tram at a tram stop. 1200.4 - No 7 turning from Nolan into McCrae St. with Golden Fleece service station in background. 1200.5 - No. 7 in Thunder St en route to North Bendigo. Photo taken after tram has passed photographer. 1200.6 - No. 5 en route to Eaglehawk just after leaving Needle Loop between Long Gully and California Gully. 1200.7 - No. 5 at the start of the double track in High St. Eaglehawk. 1200.8 - No. 5 at Eaglehawk terminus showing "Depot" with Leo A Hughes Photographer advertisement on building in background. 1200.9 - No. 5 at Eaglehawk terminus. Has two SEC roof ads 'Everything's fine in my all electric kitchen' and 'Electricity best for cooking'. 1200.10 - No. 5 at Eaglehawk terminus, with canon, war memorial outside Town Hall and Leo A Hughes Photographer advertisement on building in background. 1200.11 - No. 5 in McCrae St. about to enter Arnold St. and depot. Tram showing depot, has driver changing points. 1200.12 - No. 5 in Arnold St. Photo taken looking up the centre of the access track - shows the overhead at depot junction. 1200.13 - Depot entrance with signage at depot entrance and depot building in background.Information written on in black ink and date stamped on purple ink. 1200.1 - "No. 7 entering Nolan St. from Bridge St." 1200.2 -"No. 21 in McRae St. about to turn into Nolan St." 1200.3 - "No. 7 in Nolan St. at corner of McRae St." 1200.4 - "No. 7 turning from Nolan St. into McRae St." 1200.5 - "No. 7 in Thunder St. just after turning from Caledonia St." 1200.6 - "No. 5 just after leaving Needle Loop between Long Gully and California Gully. 1200.7 - "No. 5 in High St. Eaglehawk at start of double track." 1200.8 - "No. 5 at Eaglehawk terminus" 1200.9 - "No. 5 at Eaglehawk terminus" 1200.10 - "No. 5 at Eaglehawk terminus."\ 1200.11 - "No. 5 in McCrae St. about to enter Arnold St." 1200.12 - "No. 5 in Arnold St." 1200.13 - "Entrance to Bendigo Tram Depot, No. 5 running into shed."tramways, trams, bendigo, mccrae st, north bendigo, california gully, eaglehawk, depot, tram 5, tram 7, tram 21 -
 Ballarat Tramway Museum
Slide - 35mm slide/s - set of 32, Noel Simons, 25/02/1971 12:00:00 AM
Set of 31 transparencies taken on 25/2/1972 on Kodak mounts. 1201.1 - Bendigo No. 26 in Bond St. just after leaving Long Gully en route for Quarry Hill. Has Norris Supermarket in background. Has two SEC roof ads. 1201.2 - No. 26 climbing View St. from Charing Cross en route to Eaglehawk. Has ANZ bank and AMOCO service station in background. 1201.3 - as for 1201.3, but after tram has passed photographer. Has buildings west of Mackenzie St. in photograph. 1201.4 - Tram stop and centre of the road pole with two "CARS STOP BY REQUEST" signs mounted on pole at the corner of Mackenzie St. 1201.5 - same position as for 1201.3, but with No. 5 descending the street. 1201.6 - same position as for 1201.2, but with No. 5 descending the street. Photo taken after tram has passed photographer. 1201.7 - No. 7 in Nolan St. from across the park at Lake Weeroona. 1201.8 - No. 7 entering McCrae St from Nolan St. - distant view. Note "TRAM "sign on left hand side under tree and overhead in McCrae St. from former track that once was in this street. 1201.9 - No. 7 in High St. with Cathedral in background. Tram en route to North Bendigo. Note scaffolding around Cathedral main spire area. 1201.10 - No. 7 crossing Bendigo Creek bridge in High St. near Golden Square. Has a Caltex Service station in the background. 1201.11 - No. 7 at Golden Square terminus with Sunburst Fruit Juices and a Peters Ice cream delivery vans alongside. 1201.12 - as for 1201.11 but photo taken from behind tram, with the end of the rails in the photograph. 1201.13 - No. 7 and 21 in Pall Mall at Charing Cross with No. 5 in the background. Taken some distance away from the location. 1201.14 - No. 7 at Golden Square terminus, taken a short distance from the tram terminus. Shows Milk Bar on right hand side and the hotel on the left hand side. Taken from the south side of the roadway. 1201.15 - as from 1201.14 but taken from the north side of the roadway. 1201.16 - No 5 waiting at California Gully loop. Distant photo showing surrounds 1201.17 - No. 5 en route for Quarry Hill crossing No. 26 at California Gully. 1201.18 - No. 26 at Eaglehawk terminus with Eaglehawk Town Hall and Post Office in background. 1201.19 - No. 21 arriving at Charing Cross en route to North Bendigo. Has Alexandra Fountain in the background, ANZ bank RACV building, and other buildings on the north side of Pall Mall or Nolan St. 1201.20 - No. 26 en route for Quarry Hill at Charing Cross, with crew standing by front door. Has Colonial Mutual life building, Armstrong Tyre Service (Firestone) and a sign for Cohns Drinks in the background. 1201.21 - as for 1201.20 but with No. 5 en route to Eaglehawk now in photograph. 1201.22 - No. 26 at Quarry Hill terminus. 1201.23 - No. 26 at Quarry Hill terminus, view of front portion of tram only from a gate at the Bendigo cemetery. 1201.24 - Track at the end of the Quarry Hill line showing the point blades of the former "Y" terminus and the overhead for this. 1201.25 - No. 2 at the Quarry Hill terminus, looking along the former Trackwork. 1201.26 - as for 1201.25 1201.27 - number not used. 1201.28 - Golden Square terminus from some distance from the actual terminus, showing the Warning sign "TRAM" for motorists from the south. No. 7 at the terminus. 1201.29 - No. 7 passing through the Golden Square shopping centre. Numerous cars and pedestrians. Tram en route for North Bendigo. 1201.30 - No. 7 in High St. Golden Square, en route for North Bendigo. Photo taken after tram has passed photographer. 1201.31 - No. 7 in High St. just past Wattle St. with the Cathedral in the background. Tram has two SEC roof ads good side on photo, 'Everything's fine in my all electric kitchen' and 'Electrical cooking - clean, quick, economical'. 1201.32 - No. 7 in High St. nearing Wattle St. Has Cathedral in the background. Photo taken after tram has passed photographer.Information written on in black ink and date stamped on purple ink. 1201.1 - "No. 26 in Bond St just after leaving Long Gully" 1201.2 - "No. 26 climbing View St. from Charing Cross" 1201.3 - "No. 26 ascending View St. from Charing Cross (At Mackenzie St.)" 1201.4 - "View St. & Mackenzie St." 1201.5 - "No. 5 in View St. near Mackenzie St." 1201.6 - "No. 5 in View St. nearing Charing Cross." 1201.7 - "No. 7 in Nolan St. seen from Lake Weeroona Park." 1201.8 - "No. 7 entering McRae St. from Nolan St. Note "TRAM" warning sign on left. 1201.9 - "No. 7 in High St. passing Short St." 1201.10 - "No. 7 crossing Bendigo Creek bridge in High St. near Golden Square." 1201.11 - "No. 7 at Golden Square terminus" 1201.12 - "No. 7 at Golden Square terminus" 1201.13 - "No 7, 21 and 5 at Charing Cross" 1201.14 - "No. 7 at Golden Square terminus" 1201.15 - "No. 7 at Golden Square terminus" 1201.16 - "No 5 waiting at California Gully loop." 1201.17 - "Nos. 5 and 26 crossing at California Gully loop" 1201.18 - "No. 26 at Eaglehawk terminus" 1201.19 - "No. 21 arriving at Charing Cross from Golden Square" 1201.20 - "No. 26 at Charing Cross" 1201.21 - "Nos. 5 and 26 at Charing Cross." 1201.22 - "No. 26 at Quarry Hill terminus" 1201.23 - "No. 26 at Quarry Hill terminus seen through the gates of the Bendigo Cemetery." 1201.24 - "Quarry Hill terminus showing remains for former double track layout abandoned before 1964." 1201.25 - "No. 2 at Quarry Hill terminus" 1201.26 - "No. 2 at Quarry Hill terminus" 1201.28 - "The Southern approach to Golden Square with No. 7 standing at the terminus, "TRAM" warning sign on the left. 1201.29 - "No. 7 passing through Golden Square Shopping Centre" 1201.30 - "No. 7 in High St. Golden Square" 1201.31 - "No. 7 in High St. passing Wattle St." 1201.32 - "No. 7 in High St. nearing Wattle St."tramways, trams, bendigo, bond st., view st., nolan st., high st., eaglehawk, california gully, charing cross, quarry hill, trackwork, tram 2, tram 5, tram 7, tram 21, tram 26 -
 Ballarat Tramway Museum
Slide - 35mm slide/s - set of 25, Noel Simons, 26/02/1972 12:00:00 AM
Set of 25 transparencies taken on 26/2/1972 on Kodak mounts. 1204.1 - Bendigo No. 5 - just arrived at Manchester Loop near Havilah Road, Long Gully. Photo taken after tram has passed photographer. 1204.2 - No. 26 in Backhaus St. Long Gully passing William St, en route to Quarry Hill. Photo taken after tram has passed photographer. 1204.3 - No. 5 climbing the High St. Hill Eaglehawk, heading for Quarry Hill with the buildings on the West side of High St. in the background, including the Eaglehawk Town Hall. 1204.4 - as for 1204.3, but tram close up. 1204.5 - as for 1204.3, but after tram has passed photographer. 1204.6 - No. 5 at intersection of Mt Korong Road Ironbark and Calder Highway, with the AMPOL service 'station in the background. Photo taken after tram has passed photographer. 1204.7 - No. 26 en route to Quarry Hill shortly after leaving Needle Loop, passing William St., Long Gully. 1204.8 - No. 5 at California Gully Loop, picking up a passenger, with the shops at Long Gully in the background. Photo taken after tram has passed photographer. 1204.9 - No. 5 in Long Gully, en route to Quarry Hill. Photo taken after tram has passed photographer. 1204.10 - No. 2 at Eaglehawk terminus with the Eaglehawk Town Hall and Post Office in the background. Tram has two SEC roof ads. 1204.11 - No. 2 at Eaglehawk terminus, close up. 1204.12 - as for 1204.11, but through the park gates. 1204.13 - as for 1204.11, but with tram stop shelters in the foreground and buildings on the West side of High St in the background. 1204.14 - No. 2 in Mt. Korong Rd, midway between California Gully Loop and Needle Loop. Photo taken after tram has passed photographer. 1204.15 - No. 5 in Long Gully, en route to Quarry Hill. 1204.16 - as for 1204.15, but with trams departed loop. Has an ESSO service station in the background. 1204.17 - No. 26 leaves Charing Cross up View St.. Photo taken after tram has passed photographer. Has Armstrong Tyre Service, Cohns Drinks ad on a building and the T&G building in the background. Also Firestone ads on the tyre service building. 1204.18 - No. 5 waits at Charing Cross with the Alexandra Fountain in the background. Tram has two SEC roof ads, 'Everything s fine in my all electric kitchen' and 'Electricity Best for Cooking'. Has RACV, Colonial Mutual Life buildings in the background and the planting areas around Charing Cross gardens in the foreground. 1204.19 - No. 21 en route to North Bendigo arrives at Charing Cross, with passengers waiting to board. No. 5 in the background. In the background is the Fountain Gate Plaza building and the City Family Hotel. 1204.20 - as for 1204.19, but with No. 7 en route to Golden Square. 1204.21 - as for 1204.19, but closer up. 1204.22 - as for 1204.18 1204.23 - No. 25 in Nolan St. near the crossing of Bendigo Creek, running a special tram tour. 1204.24 - No. 25 on a special charter, in Weeroona Ave. at Cnr of Caledonia St. passing the Gas works. 1204.25 - Nos. 25 (showing Golden Square), 7 and 26 at Charing Cross. Has fountain in the background.Information written on in blue ink and date stamped on purple ink. 1204.1 - "No. 5 at Manchester Loop, near Havilah Rd. Long Gully." 1204.2 - "No. 26 in Backhaus St. Long Gully passing William St." 1204.3 - "No. 5 in High St. Eaglehawk." 1204.4 - "No. 5 in High St. Eaglehawk." 1204.5 - "No. 5 in High St. Eaglehawk." 1204.6 - "No. 5 in Mt. Korong Rd., Ironbark, passing Calder Highway Junctn." 1204.7 - "No. 26 shortly after leaving Needle Loop, passing William St., Long Gully. No. 5 cresting hill in distance." 1204.8 - "No. 5 at California Gully Loop." 1204.9 - "No. 5 in Long Gully" 1204.10 - "No. 2 at Eaglehawk terminus." 1204.11 - "No. 2 at Eaglehawk terminus." 1204.12 - "No. 2 at Eaglehawk terminus." 1204.13 - "No. 2 at Eaglehawk terminus." 1204.14 - "No. 2 in Mt. Korong Rd, midway between California Gully Loop and Needle Loop. 1204.15 - "Nos. 2 and 26 crossing at Long Gully." 1204.16 - "No. 26 leaves Long Gully loop for Eaglehawk as No. 2 pulls out of the far end towards Bendigo" 1204.17 - "No. 26 beginning the climb up View St. from Charing Cross." 1204.18 - "No. 5 at Charing Cross." 1204.19 - "No 21 arrives at Charing Cross from Golden Square while No. 5 awaits departure time for Eaglehawk." 1204.20 - "Nos. 7, 21, and 2 (behind which is No. 5) at Charing Cross." 1204.21 - "Nos. 7, 21, and 2 at Charing Cross." 1204.22 - "No. 5 at Charing Cross." 1204.23 - "No. 25 in Nolan St. near Bendigo creek crossing" 1204.24 - "No. 25 in Weeroona Ave. at cnr of Caledonia St." 1204.25 - "Nos. 25, 7, 26 and 2 (behind 26) at Charing Cross."tramways, trams, bendigo, eaglehawk, long gully, california gully, charing cross, north bendigo, tram 2, tram 5, tram 7, tram 21, tram 25, tram 26 -
 Ballarat Tramway Museum
Slide - 35mm slide/s - set of 23, Noel Simons, 26/02/1972 12:00:00 AM
Set of 23 transparencies taken on 26/2/1972 on Kodak mounts. 1205.1 - Bendigo No. 25 on a special tour at Fire Station Loop, en route to Golden Square. 1205.2 - No. 21 and 25 crossing at Fire Station Loop, note photographers on the ground. No. 21 bound for North Bendigo. 1205.3 - as for 1205.3, but with trams departing loop and fire station in the background. 1205.4 - No. 25 at Golden Square Hotel with 'Rodda's Golden Square Hotel' in the background. Tram on a special tour, but showing destination of North Bendigo. 1205.5 - as for 1205.4 - but showing special. Has the end of the track in the photograph. 1205.6 - Nos. 7 and 25 (on a special tour) crossing at Myrtle St. Loop. 1205.7 - No. 7 leaving Myrtle St. loop with the mine poppet head in the background. Photo taken after tram has passed photographer. (Print made of this slide 10/2001 for use in the Gold Gold Gold exhibition of 10/2001 - See Reg. item 1979. 1205.8 - No. 25 entering depot. Tram showing 'special'. Tennis court on right has players. Photo taken after tram has passed photographer. 1205.9 - No. 24 (showing 'special') and No. 20 (showing 'Long Gully') at Bendigo Depot. 1205.10 - No. 24 on a special charter, leaving Bendigo depot. Tram has two 'Johnnie Walker' roof ads. 1205.11 - Bendigo depot with 29, 25 and a bogie car inside the depot doors. 1205.12 - As for 1205.11, but with 28 and 29. 1205.13 - No. 24 standing at front entrance of Bendigo depot with No. 20 in the background. 1205.14 - No. 24 running out into McCrae St showing special, with conductor on front step. 1205.15 - No. 24 in Caledonia St. at corner of Thunder St with the Gasworks in the background. 1205.16 - No. 5 en route for Quarry Hill at Charing cross with No. 26 (en route for Eaglehawk) about to arrive. Has former crossover at this location in the foreground. Has the Ezywalkin building in the background. 1205.17 - No. 5 and 26 at Charing Cross, with the Alexandra Fountain in the foreground and the Beehive and Ezywalkin buildings in the background. No.26 has two SEC roof ads. 1205.18 - Charing Cross looking along Pall Mall with trams 7 and 21 and 26 in the picture. 1205.19 - Charing Cross, with 21 departing for Golden Square and No. 5 heading for Quarry Hill. Has the Ezywalkin and the Beehive buildings in the background. 1205.20 - as for 1205.19, but a few moments later. Adjacent pole has a "NO ROAD" letter in reflectors vertically. 1205.21 - Charing Cross with Nos. 25, 21, 26 and 7, looking south from Pall Mall end. 1205.22 - No. 24 crossing Mitchell St. en route for Golden Square, showing 'special' with the Beehive and Ezywalkin buildings in the background. 1205.23 - Charing Cross with Nos. 24, 21 and 7 in the photo and Fountain Plaza in the background. Print of 1205.7 - stored in box D1.Information written on in blue ink and date stamped on purple ink. 1205.1 - "No. 25 at Fire Station Loop High Street, Golden Square." 1205.2 - "Nos. 25 and 21 crossing at Fire Station Loop, near Golden Square." 1205.3 - "Nos. 25 and 21 crossing at Fire Station Loop, near Golden Square." 1205.4 - "No. 25 at Golden Square terminus." 1205.5 - "No. 25 at Golden Square terminus." 1205.6 - "Nos. 7 and 25 crossing at Myrtle St. Loop." 1205.7 - "No. 7 leaving Myrtle St. Loop." 1205.8 - "No 25, entering Bendigo Depot." 1205.9 - "Nos. 20 and 24 at Bendigo Depot." 1205.10 - "No. 24 at Bendigo Depot." 1205.11 - "Nos. 25 and 29 at Bendigo Depot." 1205.12 - "Birney cars 29 and 28 at Bendigo Depot." 1205.13 - "No. 24 (with 20 beyond) at Bendigo Depot." 1205.14 - "No. 24 entering McCrae St. from Arnold St." 1204.15 - "No. 24 in Caledonia St. at cnr of Thunder St." 1204.16 - "No. 5 waits at Charing Cross as No. 26 arrives from Quarry Hill. Note remains of crossover abandoned on relocation in 1965." 1204.17 - "Nos. 5 and 26 at Charing Cross." 1204.18 - "Nos. 26, 7 and 21 at Charing Cross (No. 5 just visible behind No. 26)." 1204.19 - "No. 21 leaves Charing Cross for Golden Square as No. 5 starts off for Quarry Hill." 1204.20 - "No. 21 swings onto the single track Golden Square line as No. 5 heads into Mitchell St. towards Quarry Hill." 1204.21 - "Nos. 25, 21 and 26 watch No. 7 arrive at Charing Cross from Golden Square." 1204.22 - "No. 24 at Charing Cross crossing Mitchell St." 1204.23 - "Nos. 24, 21 and 7 at Charing Cross."tramways, trams, bendigo, golden square, myrtle st., fire station, depot, charing cross, tram 5, tram 7, tram 20, tram 21, tram 24, tram 25, tram 28, tram 29 -
 Ballarat Tramway Museum
Slide - 35mm slide/s - set of 6, Noel Simons, 28 Feb. 1972
Set of 6 transparencies taken on 28/2/1972 on Kodak mounts. 1206.1 - Bendigo No. 5 at Hayes St. Loop, en route for Quarry Hill. 1206.2 - No. 5 at Garden Gully Loop, Mt. Korong road, Ironbark. en route to Quarry Hill. Note the water column in the background. 1206.3 - No. 5 in View St. Bendigo, with the Commodore Motel in the background. 1206.4 - No. 6 en route for Golden Square in Fire Station loop, with the fire station building in the background. Photo taken after tram has passed photographer. 1206.5 - No. 6 in High St., running through Golden Square Shopping Centre, en route for Golden Square. Photo taken after tram has passed photographer. 1206.6 - No. 6 arriving at Charing Cross, bound for North Bendigo, with the City Family Hotel, ANZ bank and the Cenotaph (war memorial) in the background.Information written on in blue ink and date stamped on purple ink. 1206.1 - "No. 5 at Hayes Loop, Ironbark." 1206.2 - "No. 5 at Garden Gully Loop, Mt. Korong road, Ironbark." 1206.3 - "No. 5 in View St. just after start of double track near Barnard St." 1206.4 - "No. 6 in High St. at Fire Station loop." 1206.5 - "No. 6 in High St. running through Golden Square shopping centre." 1206.6 - "No. 6 arriving at Charing Cross from Golden Square."tramways, trams, bendigo, hayes st. loop, garden gully loop, view st., golden square, charing cross, tram 5, tram 6 -
 Ballarat Tramway Museum
Slide - 35mm slide/s - set of 4, Noel Simons, Apr. 1972
Set of 4 transparencies - copy slides - possibly ARE film strip dated March 1972. 1209.2 and 1209.4 on Kodak Readymount mounts. 1209.1 - Bendigo 5, 6 and 28 on a special tram service in bound to the City on a tour in Caledonia St. about to enter Lucan St, or White Hills Road or Weeroona Ave. (mis match in names in various maps). Gas works in the background. No. 5 has a white disk on the rear of the tram. 1209.2 - Nos 2 and 26 at Charing Cross with the Fountain Plaza in the background. Both trams have the destination of Quarry Hill, though 26 is on the Eaglehawk bound track. 1209.3 - No. 19 at the Golden Square terminus, with the conductor or driver swinging the pole and Billy Rodda's Golden Square hotel in the background. 1209.4 - No. 7 at Fire Station loop, en route to North Bendigo, picking up a passenger with a pram. Part of a set of 20 slides made by the Association of Railway Enthusiast Provincial Tramways film strip. Reference Item 2560 details the ARE Film Strip and provide references to other slides.Information written on in blue ink and date stamped on purple ink. 1209.1 - "Nos 5, 6 and 28 in Caledonia St. about to enter Weeroona Ave." 1209.2 - "Nos 2 and 26 at Charing Cross." 1209.3 - "Swinging the pole on No. 19 at Golden Square Terminus." 1209.4 - "No. 7 inward bound from Golden Square stops at Fire Station Loop."tramways, trams, bendigo, charing cross, golden square, gas works, special trams, tram 2, tram 5, tram 6, tram 7, tram 19, tram 28 -
 Ballarat Tramway Museum
Slide - 35mm slide/s set of 7, Noel Simons, 1972
... of Mitchell St. in the background. 1212.3 - No. 7 (North Bendigo... (North Bendigo) and 29 (Golden Square) crossing. Actual location ...Set of 7 transparencies undated on PAKON mounts - appear to be early 1970's. 1212.1 - No. 18 about to enter the Long Gully loop with ESSO service station on the right hand side. 1212.2 - No. 6 in Mitchell Street bound for Charing Cross. Tram has destination of "Rly Station". Has buildings on the east side of Mitchell St. in the background. 1212.3 - No. 7 (North Bendigo) and 29 (Golden Square) crossing. Actual location? 1212.4 - "No 6 showing 'SPECIAL' at Eaglehawk terminus. Has the Foodland store and Fruit shop in the background. 1212.5 - No. 19 at Eaglehawk terminus, on the extension to the normal Eaglehawk terminus. Tram has showing 'Eaglehawk'. Tram has two SEC roof ads. 1212.6 - No. 25 and another Bogie car at Quarry Hill terminus on last day. 1212.7 - No. 18 and 29 at Quarry Hill terminus. No.. 18 showing 'Quarry Hill' - has two SEC roof ads 'Electric Cooking - Matchless' and 'Everything's fine in my all electric kitchen' and No. 29 has a briquettes roof ad.Information typed onto a white label stuck on the slide. 1212.1 - "No. 18 at Long Gully" 1212.2 - "No. 6 in Mitchell Street." 1212.3 - "7 and 29 Lake View Hotel" 1212.4 - "No. 6 at Eaglehawk" 1212.5 - "No. 19 at Eaglehawk Term." 1212.6 - "Last cars Quarry Hill." 1212.7 - "18 & 29 Quarry Hill"tramways, trams, bendigo, long gully, mitchell st., eaglehawk, quarry hill, last tram, tram 6, tram 7, tram 18, tram 19, tram 25, tram 29 -
 Ballarat Tramway Museum
Photograph - Colour Photograph/s, 1960's
Colour postcard size print of an SEC Bendigo trams 7 and 21 at Charing Cross. Printed on AGFA paper. Photo taken during last years of Bendigo. Trams have dash canopy lighting and large white strip under the driver's windows. Tram 21 showing "North Bendigo" and 7 showing "Golden Square" destinations. Photo has Cenotaph, fountain and buildings on the south east corner of Mitchell St and Pall Mall in background.bendigo, pall mall, charing cross, tram 7, tram 21 -
 Ballarat Tramway Museum
Photograph - Colour Photograph/s, 1960's
Colour postcard size print of an SEC Bendigo trams 7 and 21 at Charing Cross with two bogie trams by fountain. Printed on AGFA paper. Photo taken during last years of Bendigo. Trams have dash canopy lighting and large white strip under the driver's windows. Tram 21 showing "North Bendigo" and 7 showing "Golden Square" destinations. Taken at same time as 971. Photo has Cenotaph, fountain and buildings on the south side Charing Cross in the background, including ANZ bank and RACV office.bendigo, pall mall, charing cross, tram 7, tram 21 -
 Ballarat Tramway Museum
Memorabilia - Scrap Book, Neville Gower, Nov. 1992 to June 1997
Scrap Book - with printed cardboard covers - titled scrap book on outside and reproductions of newspaper clippings printed onto covers, 64 pages off white paper. Scrap book compiled by Neville Gower from Nov. 1992 to June 1997. Primarily consists of newspaper clippings glued to the pages involving the Ballarat Tramway Museum. Also contained are other items of relevant interest, such as BTM brochures. Pages number in pencil by Warren Doubleday 2/2001. Where relevant some items contained in this book have been separately catalogued to enable easier reference. Some items were already in the collection and are thereby reference with their registered number. Also contains registered items 1659, 1654 and 1655. Page Description of item 1 Newspaper clipping - 9/11/1992 - Reg. item No. 1105 Newspaper cutting - "New Life for old tram" - Courier 6/11/1992, p7 forthcoming recommissioning of Horse tram No. 1 at depot on Saturday. Gives details of horse tram and some notes on horse trams. 2 Newspaper cutting -"Where is this tram now", BTPS seeking information on the whereabouts of a former ESCo tram, photo taken in Sept. 1971 - See Reg. No. 1651 - Courier Heritage column 19/1/1993 Newspaper cutting "Collector enjoys his postcards of the past", Courier Heritage column 26/1/1992, about Andrews Kabia's collection of postcards. Has a photo of Bridge St. with a tram, c1950's. 3 Reg Item No. 1659 - Newspaper cutting - "SEC offers historic lake property for sale" 20/2/1993. Postcard - Sovereign Hill reproduction - purchased 2/1993, of Bridge St., looking west. Postcard - Sovereign Hill reproduction - purchased 2/1993, of Bridge St looking east - See Item No. 841 and image i4. Newspaper clipping of BTPS advertisement for 1993 Begonia Festival - Courier 3/3/1993. 4 Newspaper clipping "BUCpower on track" Courier 15/5/1993 - Ballarat University College tram pulling challenge to other schools. Has photo of BUC team lined up in front of No. 26. Ballarat Vintage tram brochures - 2 No. - Reg. Item 294.1 5 Lake Wendouree Caravan Park brochure - c1993 - colour photo of No. 26 at St. Aidans Drive. Registered item No. 1654 Newspaper clipping - "Horse drawn transport heritage" (11/5/1993) 6 Newspaper clipping - Courier 28/6/1993 - "New tramways video shows early Ballarat" - launch of BTM/BTPS video, sales details, quotes R.Gilbert. Has head on photo of No. 40 in Sturt St. showing Sebastopol. Postcard of four scenes of Ballarat, Steve Parish production, featuring BTM No. 27 in Wendouree Parade. Postcard - BTM issue - July 1993 - of three trams - see Reg. Item No. 1657. Separate copy of the cutting re video added 29-3-2016 from donation of Lil Butler - see image i3. 7 Postcard - Ballarat Victoria featuring 9 views of Ballarat, first one is of 27 in SEC late 1960's colour scheme in Wendouree Parade, operated by BTPS. - purchased July 1993. Postcard - Ballarat Vic Aust. - featuring four view of Ballarat, fourth one is of BTM 14 at crossing loop - purchased July 1993. Newspaper clipping - Courier 2/8/1993 "Tram Plan too costly" - quoting Dave Macartney about the costs of bringing trams Ballarat to Ballarat - took costly. Also quotes Ballarat Tourist Assoc. Secretary - Brian Whykes and Peter Hiscock of Sovereign Hill. 8 Newspaper clipping - Courier 28/7/1993 - "Major changes planned for lake" (page 1) and "Lake area changes proposed - Plan to narrow Wendouree Parade" - controlling traffic speed in parade. Newspaper clipping - Courier 21/9/1993 - "Council adopts strategy for lake traffic" - control of traffic in Wendouree Parade. 9 Newspaper clipping - Courier 3/8/1993 - "Lake changes will turn tourists away" - letter from R.A. Nelson about Wendouree Parade traffic control. Newspaper clipping - Courier 3/8/1993 - Council plan for Wendouree Parade - not one way traffic. Newspaper clipping - Courier 31/7/1993 - "Lake traffic strategy raises questions" - letter from L. Holloway. Newspaper clipping - Courier 8/8/1993 - "Strategy will improve access" - letter from Cr. Janet Dale. Newspaper clipping - Courier 15/9/1993 -"City defers action on Lake changes" - traffic plans deferred. 10 Newspaper clipping - Courier 31/8/1993 - "Plans threaten Lake amenities" letter from L. Holloway. Copy of letter from Warren Doubleday, Engineering Manager of BTPS to Andrew O'Brien and Associates re traffic study - dated 26/4/1993. 11 page 2 of above letter. 12 Letter from Jim W. Bell of the Golden City Paddle Steamer Museum Society to Neville Gower forwarding a copy of a submission to the Rotary Club of Ballarat South, in which they mentioned a extension of the tramline around Lake Wendouree. Newspaper clipping - Courier 30/9/1993 - "City's plans to narrow lake road dropped". 13 Poster from the Ballarat Tourist Association - for "Days of Discovery" 14-15 August 1993. Lists "Ballarat Historic Tramways" as one of the attractions. Loose item - Invitation from the "Golden City Paddle Steamer Society" to join as a member. 14 Newspaper clipping - Courier - 9/9/1993 - about the BTPS calling for nominations and forthcoming AGM Newspaper clipping - Courier - 18/9/1993 - about the BTPS launching a new book - "Ballarat's Heritage Tramway" - Stephen Butler holding a copy, with No. 12 in the background. Story by Lorrie Brown. (Image of this cutting added 28/3/2011) 15 Newspaper clipping - Courier 23/9/1993 - Reg. Item No. 1108 and 1109. Newspaper clipping - Courier - undated - c late 1993 - of SES challenging other people to a tram pulling competition in forthcoming Begonia Festival. Has photo of group pulling horse tram No. 1 with Frank Puls looking on. 27 in the background. Story by Dennis Torpy. 16 & 17 -copy of brochure (see Item 1108 for launch details) about Lake Wendouree, its history, ecology, wildlife and other attractions, including a drawing of the lake and locations. Printing sponsored by McDonalds. Produced by City of Ballaarat. 18 Newspaper clipping - Courier 30/10/1993 - review of book titled "Watch for Trams", published by Kangaroo Press . Has a photo of a Melbourne cable car set in Sydney Road Brunswick with bogie trailer. 19 Newspaper clippings - In Retrospect section of The Courier 30/7/1994 - 100 years ago - first shipment of electric light equipment for Ballarat in three weeks 30/7/1994 - 25 years ago - Retirement of Dan Irvin as tram depot foreman 17/9/1994 - 25 years ago - Council asking for abandonment of Ballarat trams 3/12/1994 - 25 years ago - hiring of trams by Jewish Youth group for convention 8/7/1995 - 100 years ago - construction of line along the south side of Sturt St between Ripon and Pleasant - related to horse tramways. 15/7/1995 - 100 years ago - Courier reporting completion of above tram line. 18/10/1994 - 40 years ago - retirement of H. W. Preston, former driver and first person to drive an electric tram over the line from Rubicon St. to Sebastopol. Newspaper clipping - Courier 31/12/1993 - School holidays supplement - and free travel voucher for Ballarat Tramways. 20 Newspaper clipping - Courier 4/1/1994 - Reg. item 1655 - "David Kellett's life on the trams" Newspaper clippings - In Retrospect section of The Courier 25/6/1994 - 50 years ago - raising of funds for patriotic appeal by Sylvia Mitchell - conductress 2/7/1994 - 50 years ago - Mayor the City of Maryborough complaining about Treasure Tram in Maryborough and raising funds for patriotic appeal. 21 Newspaper clipping - Courier 4/8/1994 about Transport Minister Alan Brown offering Ballarat surplus trams at a Ballarat Chamber of Commerce AGM. Newspaper clipping - Courier 6.8.1994 - Seaton Ashton in a column about the tram offer of Alan Brown and suggesting a line around the Lake. Newspaper clipping - Courier 6/9/1994 - Reg. Item 1132 Newspaper clipping - Courier 20/9/1994 - Reg Item 1117. 22 Newspaper clipping - Courier 5/10/1994 - Reg Item 1121 23 BTPS pamphlet (brochure) for tramway - see Reg. Item 300.1 24 Newspaper Clipping - Courier 16/3/1995 - advertising feature - Golden City Paddle Steam restored to service on Lake Wendouree and associated Gill Boat shed. Two separate items. 25 Newspaper Clipping - Courier 3/1/1995 - "Rosella searches for memorabilia" - heritage column - Lorrie Brown - has postcard photo of an ESCo tram turning from Sturt St into Lydiard St. North, taken from Post Office. Newspaper clipping - In Retrospect section of The Courier - 7/2/1995 - "Trams revived" - about opening of BTPS tramway, 20 years ago. 26 Newspaper clipping - Courier - 28/6/1995 - Inside/Out column written by Kim Quinlan - Interview with Peter Hiscock. Mentions that he is passionate about the restoration of tramways to Ballarat. 27 - Newspaper clipping - Courier - 3/6/1995 - item about Sunday Trading in Ballarat - Peters Hiscock saying entertainment needed and possibility of tramways in Ballarat. Quotes Warren Doubleday in item. Has photo of Peter Hiscock on steps of No. 27 - Photo by Ian Wilson. Part of front cover of "This month in Ballarat", July 1995, which has a photo of BTM No. 27. 28 Cutting from July 1995 Royalauto magazine - featuring a picture report by Ron Warren on the AETM museum at St Kilda. 29 Newspaper clipping - Courier - 27/7/1995 - about plan to improve Botanical Gardens, extension of tram tracks to Sturt St. Editorial Opinion column 28/7/1995 about the Botanical Gardens and extension of tramway. 30 Newspaper clipping - Courier - 18/8/1995 - "Public Views invited on Strategy Plan" - item by Angela Barlow, about CBD development in Ballarat. Mentions reinstatement of trams in Ballarat. Letter to Editor - 21/8/1995 - "Who asked for Lake Changes" - A. Simpson of Ballarat - questioning possible changes to the Botanical Gardens. 31 Newspaper clipping - Courier - 9/8/1995 - "City Plans to spend $67m in three years - pages 1 and 2 of Courier - notes reinstatement of "tramway communications" 32 - Brochure by City of Ballarat Central Business Area of the Strategy Plan for area - includes possible developments, - notes reinstatement of trams to provide a linkage mechanism between Bridge St and Central Square shopping area - dated August 1995. Newspaper clipping - Courier - 22/11/1995 - item by Ian Haberfield about the endorsement of the strategy plan for the CBD or CBA strategy plan. 33 Newspaper clipping - Courier - 24/11/1995 - letter to the Editor - about CBA strategy plans - by C. McDonald and noting a tramway to Sovereign Hill. Newspaper clipping - Courier - 4/10/1995 - Reg. item 1104. Newspaper clipping - Courier - 29/11/1995 - "Discussion on final gardens plan tonight" - Ian Haberfield - Gardens Masterplan - draft - notes tramway extensions Newspaper clipping - Courier - 30/11/1995 - "First look at Masterplan" for gardens, item by Andrew Lang. 34 Newspaper clipping - Courier - 19/9/1995 - School Holiday fun supplement advert page - includes an advertisement by the BTM noting operation of Horse tram on 1/10/1995. 35 Newspaper clipping - Courier - 12/12/1995 - Reg item 1450.1 Newspaper clipping - Courier - 11/12/1995 - Reg item 1449 Newspaper clipping - Courier - 1/11/1995 - "New face for City" item by Ian Haberfield - Ballarat Central area plan - quotes Chief Commissioner Vern Robson. 36 Newspaper clipping - Courier - 5/12/1995 - Reg item 1444 37 Newspaper clipping - Courier - 8/11/1995 - Reg item 1446 Newspaper clipping - Courier - 9/12/1995 - Reg item 1447.2 37A Newspaper clipping - Courier - 16/12/1995 - Reg Item 1452.1 and .2 Newspaper clipping - Courier - 23/12/1995 - Reg Item 1448 Newspaper clipping - Courier - 16/12/1995 - Reg Item 1453 Newspaper clipping - Courier - 21/12/1995 - "Railway shops would hurt CBD - letter to Editor from David Peile, about the proposal for a shopping centre at the railway station. 37B Newspaper clipping - Courier - 16/12/1995 - column by the Commissioner - Vern Robson, including a note about the BTM and its members and the work it does. Newspaper clipping - Courier - 28/12/1995 - Reg Item 1455 38 Newspaper clipping - Courier - 22/1/1996 - Reg Item 1456 Newspaper clipping - Courier - 27/1/1996 - Reg Item 1463 Newspaper clipping - Courier - 25 Years ago - suggesting retention of tram line by Brown Hill Progress Association around Lake Wendouree - no date. 39 Newspaper clipping - Courier - 27/1/1996 - Reg Item 1464 Newspaper clipping - Courier - 24/1/1996 - Reg Item 1457 40 Newspaper clipping - Courier - 19/2/1996 - Reg Item 1472 Newspaper clipping - Courier - 31/1/1995 - Reg Item 1468 Newspaper clipping - Courier - 30/1/1996 - Reg Item 1467 Newspaper clipping - Courier - 3/1996 - 50 years ago - Retirement of SEC office manager Mr. W. K. J. Dunstan. Newspaper clipping - Courier - 4/5/1996 - 25 years ago - replacement of trams mooted - announcement by Transport Regulation Board. 41 Newspaper clipping - Courier - 24/2/1996 - Reg Item 1473 Newspaper clipping - Courier - 6/4/1996 - 25 years ago - Brown Hill Progress Association seeking support for retention of trams around Lake Wendouree. Newspaper clipping - Courier - 18/5/1996 - 50 years ago - announcement that tram services would be curtailed as from next Monday due to power restrictions. 42 Newspaper clipping - Courier - 5/4/1996 - "Tram Study Close" - Ken Hill reporting that Peter Hiscock saying that study for tramway should get a go ahead within the next three months. Newspaper clipping - Courier - 26/2/1996 - Reg Item 1475. 43 Fax of newspaper clipping 18/5/1996 - of Reg Item 1493 - item fading. 44 Newspaper clipping - Courier - 8/3/1996 - Reg Item 1126 and 1494.1 Envelope, letter and newsletter from Labor Senator Barney Cooney regarding the 1996 Federal Election. Envelope has a photo reproduction of tram 14. 45 Newspaper clipping - Courier - 24/4/1996 - Reg Item 1496 Newspaper clipping - Courier - 17/9/1996 - "Tram submission lodged" - lodging grant application with Tourism Victoria for support for study. Newspaper clipping - Courier - 27/57/1996 - 25 years ago - about the hijacking of the tram in Barkly St. shortly before closure. Newspaper clipping - Courier - 9/11/1996 - 50 years ago - construction of a shelter at corner of Sturt and Drummond St. for tram passengers. Newspaper clipping - Courier - 22/11/2996 - editorial opinion - regarding roofing of mall and possibility of the return of trams. 46 Newspaper Clipping - Courier - 2/10/1996 - Reg Item 826 Newspaper Clipping - Courier - 11/12/1996 - "Live wires scare after bus hits pole" - item by Elise Sullivan, about a bus backing into a tramway pole in Wendouree Parade and breaking it. 47 Newspaper Clipping - Courier - letter from P.Kervarec - undated - c12/1996 - about Eureka Stockade area and removal of tram tracks. Newspaper Clipping - Courier - 16/11/1996 - Reg Item 1499 Newspaper Clipping - Courier - 24/1/1997 - Reg Item 1459 Newspaper Clipping - Courier - 21/9/1996 - 25 years ago - about Council decision for BTPS tram depot. 48 Newspaper Clipping - Courier - 16/1/1997 - Reg Item 1506 Newspaper Clipping - Courier - 10/1/1997 - "Hiscock wants hard facts to back tram sentiment" - discussing results of a survey of Ballarat residents and future studies. Newspaper Clipping - Courier - 11/1/1997 - Eureka Column - about trams coming back and a boon for car panel beaters. Newspaper Clipping - Courier - 11/1/1997 - 50 years ago - Council meeting and granting of fare concessions to children on trams and buses. Newspaper Clipping - Courier - 11/1/1997 -letter - "Keeping rail gates a matter of desire" 49 Newspaper Clipping - Courier - 10/1/1997 - Editorial - "A great idea but can we afford trams" - about the various studies and care should be taken. Newspaper Clipping - Courier - 10/1/1997 - cartoon - "Easy tram funding" - by Burns. Newspaper Clipping - Courier - 9/1/1997 - Reg item 1503 50 Newspaper Clipping - Courier - 7/1/1997 - Reg Item 1502 Newspaper Clipping - Courier - 13/1/1997 - Reg item 1504 51 Newspaper Clipping - Courier - 4/1/1997 - Reg item 1501 Newspaper Clipping - Courier - 14/1/1997 - Reg Item 1505 52 Horse Tram No. 1 pamphlet - Reg Item 1656 53 Newspaper Clipping - Courier - 3/2/1997 - "Sovereign Hill plans to re-invent itself" - report by Seaton Ashton on Sovereign's Hill's future planning. Newspaper clipping - Courier - 30/1/1997 - Reg item 1509 Newspaper clipping - Courier - letter from M. Buret of Wendouree suggest that Cobb and Co coaches be run in Ballarat. 54 - Newspaper Clipping - Courier - 5/2/1997 - "City decides in close vote to keep rail gates" - article on Lydiard St. North Railway Gates - article by Ian Haberfield. 55 - Newspaper Clipping - Ballarat News - 11/6/1997 - Reg Item 605. Image of Numerous - hand written notes of date etc on many of the cuttings.trams, tramways, newspaper clippings, scrap book, ballarat revival, btm, btps -
 Ballarat Tramway Museum
Slide - 35mm slide/s - set of 4, Peter Moses, Jan. 1969
... , Jan. 1969. .1 - Trams 30 and 28 travelling to North Bendigo... Bendigo, Jan. 1969. .1 - Trams 30 and 28 travelling to North ...Set of four colour slides taken at Charing Cross Bendigo, Jan. 1969. .1 - Trams 30 and 28 travelling to North Bendigo and Golden Square respectively. Has the Beehive building in the background, along with W.M.I. Jones Chemist, Evelyn Amor shop, Dewars Whiskey rooftop advertisement. 28 has a SEC Briquettes roof advertisement. .2 - As above but with the front or bogie tram in the photo. Also has A. G. Treloar Optician's shop. Kodak cardboard mount slide, taken by Peter Moses, Jan. 1969. .3 - Close up photo of Birney No. 30, with 28 in the background. .4 - No. 28 leaving for Golden Square with the Plaza building, the Cenotaph, and the City Family Hotel in the background. Kodak cardboard mount slide, taken by Peter Moses, Jan. 1969.On the rear of all the slides "P. Moses" in black ink .1 - "Bendigo Charing Cross" and in red ink "19" .2 - "Bendigo three trams / Charing Cross" and in red ink "21" .3 - "Bendigo" and in red ink "23" .4 - "Bendigo Charing Cross" and in red ink "14". tramways, trams, bendigo, tram 28, tram 30 -
 Ballarat Tramway Museum
Slide - 35mm slide/s - set of 3, Peter Moses, Jan. 1969
Set of two colour slides taken at the North Bendigo terminus and another in Pall Mall, Bendigo, Jan. 1969. .1 - No. 30 at North Bendigo terminus - has destination "Golden Square" .2 - Interior view of Birney tram with crew members numbers 22, 29 and three seated passengers. .3 - View of Pall Mall looking north from the tram stop - has the Shamrock Hotel in the distance and other buildings on the east side of the street, including a 3BO (Bendigo radio) sign. Kodak cardboard mount slide, taken by Peter Moses, Jan. 1969.On the rear of all the slides "P. Moses" in black ink .1 -"Bendigo / North Bendigo terminus" in blue ink, and in red ink “12” .2 - " Jan 1969 Bendigo / Inside Brill car" in blue ink .3 - "Bendigo Pall Mall" in black ink and in red ink “7”.tramways, trams, bendigo, north bendigo, birney, tram crews, pall mall, tram 30 -
 Ballarat Tramway Museum
Photograph - Black & White Photograph/s, 1880's
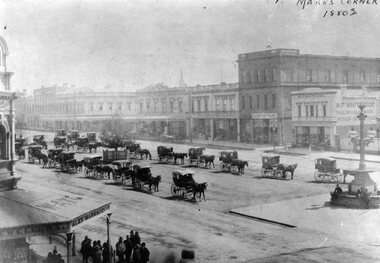
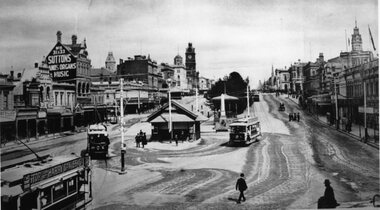
Yields information about the streetscape of Sturt St prior to the formation of the Sturt St median strip, shows horse cabs and buildings on the north side of the street.Black and White copy photograph of a Gold Museum photograph - Sturt St - Marks Corner, 1880's, prior to the formation of the median strip. Has many horse drawn cabs in the centre median strip. Buildings in image - and other shops. Collected by Alan Bradley from the Gold Museum early 1980's. Used in The Golden City and its Tramways - page 11.tramways, trams, sturt st, marks corner -
 Ballarat Tramway Museum
Slide - 35mm slide/s - set of 15, Eldon Hogan, 20/08/1971 12:00:00 AM
Set of 15 35mm Agfa colour blue and white plastic mount slide - of a private tour using No. 37 in Ballarat, on 28/8/1971 (WAD photo collection has one photo of the tram on tour on that date.) No. 37 has an SEC roof advertisement, 'Everything is under control in my all electric kitchen". Photo Eldon Hogan Scanning errors on .9, which have resulted in distortions. 3038.1 - At Lydiard St North terminus. .2 - Sturt St, near Doveton St with Town Hall and Myers Store in background. .3 - At the Sebastopol terminus, with the Sebastopol Royal Mail Hotel in the background. .4 - with the service car behind No. 37. .5 - ditto .6 - crossing Albert St, near Ophir St. .7 - northbound along Albert St .8 - Turning from North Side of Sturt St at Hospital Corner into Drummond St Sth, with Shell service station in background at Hospital Corner. .9 - Using the Dawson St crossing, with the Golden City Hotel in the background. .10 - ditto .11 - Grant St. loop, Barkly St, Mt Pleasant, 39 crossing in bound service car. .12 - ditto with 37 in the picture. .13 - 37 at Mt. Pleasant Terminus .14 - 37, 39 and another single trucker at Grant St. loop .15 - ditto High Res image of i13 added 8/5/2019 from Peter Lambert.tramways, trams, lydiard st nth, sebastopol, albert st, sturt st, dawson st, mt pleasant, grant st, barkly st, tram 37, tram 39 -
 Ballarat Tramway Museum
Photograph - Black & White Photograph/s, c1907
Yields information the operation of horse trams in Sebastopol, the condition of the streets at the time, the nature of the buildings and streetscape.Black and White photograph of a north bound tram in Albert St Sebastopol. The tram has just crossed Albert St and is approaching Bridge St. Note the streetscape, the open drains and shopping strip. The tram has a roof advertisement for Havelock tobacco as does the Grocer shop in the background. See Reg Item 1090 for another copy of this photograph, with Christmas Greetings along the top edge. Used in "The Golden City and its Tramways", page 32, credited to Harris House of Photography. Hi Res image added 16-12-2015. See The Golden City and its Tramwaystramways, trams, albert st, horse trams, sebastopol -
 Ballarat Tramway Museum
Photograph - Black & White Photograph/s, 1913
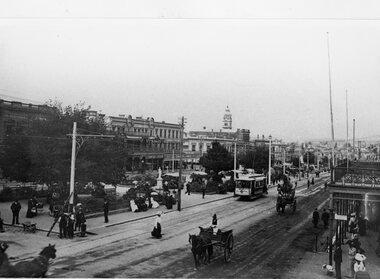
Yields information the streetscape at the bottom of Sturt St, near Grenville St, the ESCo shelter and how the trams used the track, though in this case, the same tram appears three times.Black and White copy photograph of a photograph of the Grenville tram terminus, in Sturt St, featuring the buildings on either side of Sturt St. Has the ESCo shelter at the bottom of the street, which dates from 1907 (Page 49 of "The Golden City and its tramways"). Note that a weighing machine appears to be on the north side of the shelter. The photograph features three trams, that appear to be the same tram, No. 5. It has a "Stop tram at Harry Davies" roof advertisement sign. Also features the "Sutton Pianos organs and music" sign. Also a number of people crossing the street.tramways, trams, sturt st, grenville st, bridge st, esco, tram 5 -
 Ballarat Tramway Museum
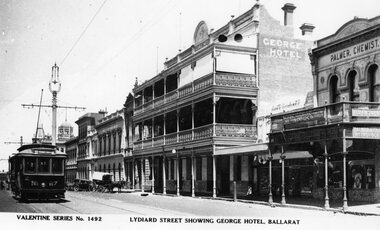
Photograph - Black & White Photograph/s and Digital Image, Valentine & Sons Publishing Co, "Lydiard Street showing George Hotel Ballarat", 1931
View of the early 1930's of No. 27 inbound in Lydiard St Nth. Valentine series No. 1492, with caption "Lydiard Street showing George Hotel, Ballarat". See page 59 of The Golden City and its Tramways and for the photo itself. Photo shows the wooden centre poles, street lighting, tram 27 in ESCo colour scheme, buildings on the west side of Lydiard St North, including the George Hotel, A.M.Palmer & Co Chemist, Wm Hiscock Dentist and other buildings. A horse drawn cart and two motor cars parked at the kerb. See item 8983 for the actual postcard. 3893.1 - Digital image from the Wal Jack Ballarat Album of the same photograph. Wal album notes date the photograph as 1931.Image i2 for the rear of the postcard, Image i3 for high res scan of the postcard. Copy negative image i4 added 3-5-2020.Yields information about Lydiard St Nth in the 1930's, the centre poles, traffic and the appearance of the trams.Black and White copy photograph of a Valentine Series postcard.tramways, trams, esco, lydiard st nth, george hotel, tram 27 -
 Ballarat Tramway Museum
Slide - 35mm slide/s - set of 2, Theo Dunstan, May. 1973
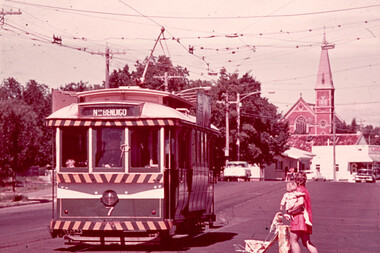
Set of two 35mm slides, square format mounted in a "Kodak " cardboard slide mount with Kodak logos and printing of No. Bendigo No. 25 at the Central Deborah terminus with buildings in background and North Bendigo terminus with the driver standing alongside the front of the tram. No. 25 painted in the Bendigo Trust / ESCo livery. Tram has the destination of Golden Square. Taken May 1973 or earlier.Has date of "May 73" and "18" "19" stamped onto the slide. 3245.1 - "Tourist tram at Deborah Mine Bendigo" in blue ink. 3245.2 - Tourist tram at Joss House, Bendigo".tramways, trams, bendigo, tram 25 -
 Ballarat Tramway Museum
Pamphlet, Australian Labor Party, "Ballarat Must Retain its Public Transport", May. 1970
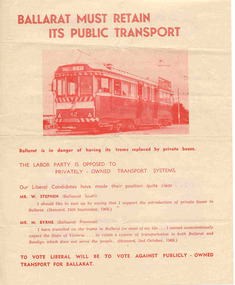
Political pamphlet, published by the Australian Labor Party for the Saturday May 30, 1970 state election titled "Ballarat Must Retain its Public Transport". Printed in red ink on off white art paper, features Ballarat 42 crossing Albert St Sebastopol. Gives quotes from Liberal members supportive of private transport in Ballarat. On rear gives five points of the Labor party why private transport should be kept, and photos of the candidates for Ballarat South (Ted Cullen), Ballarat Province (The Hon Jack Jones) and Ballarat North (Kevin Flynn). See Alan Bradley, Trams of the Golden City - from the draft - "During the campaign for the State election of May 30, 1970 the Labor Party and tramways union campaigned for the retention of “public transport” by voting labor. But the Bolte Government was returned, all four Ballarat Liberal members held their seats, and most importantly the Government won a majority in the Upper House." trams, tramways, ballarat, public transport, elections, alp, labor party -
 Ballarat Tramway Museum
Slide - 35mm slide/s, Bob Wilson, Mar. 1972
White cardboard mount, 35mm slide, from the Association of Railway Enthusiast's film strip titled "Provincial Tramway Film Strip" of Bendigo No. 7 inbound in High St. Tram has the destination of North Bendigo and is entering the Fire Station Loop. Has Golden Square Uniting Church in background. The film strip notes (Reg. Item 2560), provided the following caption details: "Despite their age and decrepitude the provincial trams provided a useful service to the end. Here No. 7 inbound from "GOLDEN SQUARE" waits for a Mother and infant to board while a pair of juvenile eyes watch from the front window. Mar. '72 (Bob Wilson)" See image btm2584p.tif for high level scan of image. Stamped on base of slide "11793" and written in ink on top edge "No. 8 Golden Square line Bendigo"tramways, trams, are, film strip, high st, fire station loop, passengers, tram 7 -
 Ballarat Tramway Museum
Slide - 35mm slide/s, Bob Wilson, Dec. 1972
White cardboard mount, 35mm slide, from the Association of Railway Enthusiast's film strip titled "Provincial Tramway Film Strip" of a Bendigo Trust Birney tram, December 1972 at Charing Cross, outbound to the mine. Tram painted in the Bendigo Trust colour scheme and is fitted with a Bendigo Television BCV roof advertisement. "For Television BCV Channel 8 & 11" and underneath the roof advertisement a route sign "Gold Mine - Joss House". Photo has the Ezywalkin store in the background, Fountain Plaza in the foreground. The film strip notes (Reg. Item 2560), provided the following caption details: "The Bendigo Trust operates a tourist service over the former "NORTH BENDIGO" and part of the "GOLDEN SQUARE" lines using severally visually restored cars, such as Birney No. 30 at Charing Cross - Dec ' 72 (Bob Wilson) See image btm2598p.tif for high level scan of image. Stamped on base of slide "11808" and written in ink on top edge "No. 30 Charing Cross"tramways, trams, are, film strip, charing cross, bendigo trust, tram 30 -
 Ballarat Tramway Museum
Slide - 35mm slide/s - set of 5, 1970's
Series of five 35mm slides in a yellow colour "Peter Fox Collins St. Melbourne" cardboard mounts, of view of Bendigo trams. Each slide along the top edge has the details while the bottom edge, has a number in the details area. 2599.1 - No. 9420, No. 24 at Quarry Hill - photo at dusk, poor quality, has surface damage all over slide. 2599.2 - No. 9421, ditto 2599.3 - No. 10132, No. 19 in Bendigo Trust operation colours at intersection of McCrae St & Nolan St, some surface damage around the top and bottom edges. Has Gillies Pies roof advertisement. Tram has destination of North Bendigo. 2599.4 - No. 10133, No. 25, High St, south of Charing Cross - some surface damage around the top and bottom edges. Tram has roof advertisements for "Gas" and "Myers". Has destination of Joss House 2599.5 - No. 10134, No. 19, Pall Mall, some slight surface damage. Tram has destination of Golden Square and has a roof advertisement for Sandhurst Milk and one other company. In blue ink on each slide; number as above in bottom edge. 2599.1 and .2 - "No. 24 Quarry Hill" 2599.3 & .5 - "No. 19 Nth Bendigo" 2599.4 - "No. 25 Nth Bendigo"tramways, trams, bendigo, pall mall, bendigo trust, nolan st, tram 24, tram 19, tram 25 -
 Ballarat Tramway Museum
Slide - 35mm slide/s, Travis Jeffrey, c1962
Agfa plastic mount (blue base, white cover) with a photo of Bendigo 29 at the North Bendigo terminus. Photo taken from the level crossing, looking across to the new housing estate, then under construction. Tram has the destination of Golden Square and has a SEC Briquettes roof advertisement."BES 14" in penciltramways, trams, bendigo, north bendigo, tram 29 -
 Ballarat Tramway Museum
Slide - 35mm slide/s, Travis Jeffrey, c1962
Agfa plastic mount (blue base, white cover) with a photo of Bendigo No. 24 at Golden Square terminus. Tram has destination of North Bendigo. On the front dash panel is advertisement for Cohns Soft drinks and Streets Ice Cream. Roof advertisements for SEC, Electric Cooking and another one. Note empty advert racks on the left hand side of the tramcar."BES 22" in penciltramways, trams, bendigo, golden square, tram 24 -
 Ballarat Tramway Museum
Slide - 35mm slide/s, Travis Jeffrey, c1962
Agfa plastic mount (blue base, white cover) with a photo of Bendigo No. 24 in the crossing loop at Myrtle St. loop. Tram has destination of North Bendigo. On the front dash panel is advertisement for Cohns Soft drinks and Streets Ice Cream. Roof advertisements for SEC, Electric Cooking and another one."BES 23" in penciltramways, trams, bendigo, golden square, myrtle st, tram 24