Showing 254 items matching "railway trucks"
-
 Otway Districts Historical Society
Photograph, Les Ogden, Locomotive 14A taking water at 10 mile tank, 1960-61
By 1960/61 all the factors operating against a narrow gauge railway were in place for the Colac-Beech Forest line. As well as using a 2-6-2 Tank engine over 60 years old, 14A, the train by this stage only had a louvre van, two NQ trucks and a guard's van to bring to Colac. It was very near the end.Locomotive 14A and a mixed goods trucks taking water at 10 mile tank in c.1960=61. The driver controlling the water is W. Brady while the fireman, Les Ogden, peers into the smoke box. B/W.colac; beech forest; ten mile creek; locomotive 14a; w. brady; l. ogden; railway; -
 Otway Districts Historical Society
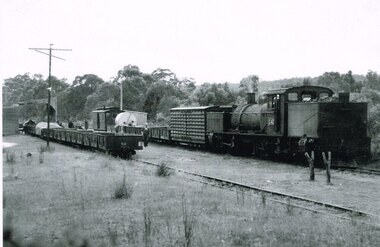
Photograph, Brucker, Locos 5A and 14A at Colac siding, c.1930, c.1930
Locomotives 5A and 14A on a siding at Colac with a boy standing in front. In the background an engine shed and goods sheds, while on the left hand side a louvre van and NQ truck. B/W.colac: beech forest; railway; loco 5a; loco 14a; -
 Otway Districts Historical Society
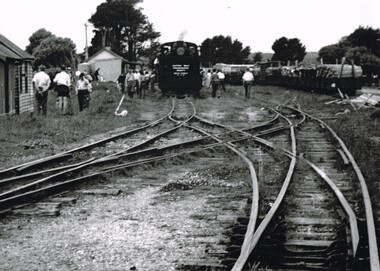
Photograph, Ray Jude, Beech Forest showing the delta crossover, 1959, 21 November 1959
On 21 November 1959 yet another special train was run, this time on a G41 engine showing the sign "Puffing Billy Preservation Society, Beech Forest, 25-11-59", with eight NBH excursion carriages and a guard's van. The train stopped at Beech Forest where people removed themselves and wandered around the station. Mixed goods wagons loaded with wood and louvred van rest in the background. Note the delta or 'scissors' crossover between lines in the centre of the picture.B/W. Beech Forest Railway Station with a G41 locomotive, showing the sign "Puffing Billy Preservation Society, Beech Forest, 25-11-59" on track number one, mixed goods trucks on track number three, passengers throughout, and the delta or scissors crossover line, at 21 November 1959.beech forest; railways; -
 Otway Districts Historical Society
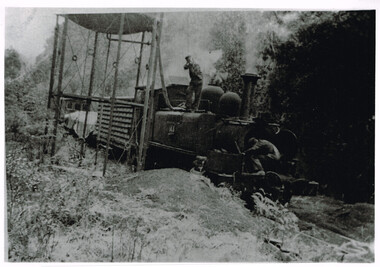
Photograph, Gellibrand Ballast Siding, c.1920
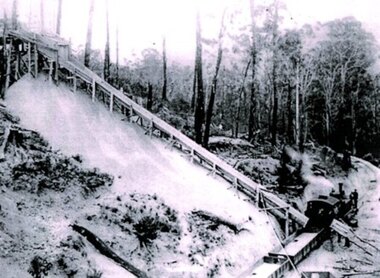
During construction of the railway in 1901 a ballast siding was originally opened 4.5 km south of Barongarook but the ballast proved inferior and a new ballast siding was opened 4 km south of Gellibrand to provide material for track construction. A spur siding, with points facing Beech Forest and a capacity for six trucks, was cut into the side of a slope. Above this was erected a loading bin and chute. This stone was of durable quality so the siding continued in commission after 1902 for periodic track re-ballasting. By the mid-1920s Victoria Railways found it more economic to use ballast from elsewhere so the siding was closed by 1925 and the rails lifted.B/W. Gellibrand Ballast Siding loading ballast down the slope, with five workmen watching at the base.gellibrand; ballast; railways; -
 Otway Districts Historical Society
Photograph, Beech Forest: NA locomotive taking coal, c.1955
To a dead end spur at Beech Forest station a locomotive depot was provided with a coal stage, ash pit and water tank as part of the original facilities of the station. Coal was transported from Colac by rail and hand-shovelled up onto the stage from an NQ truck positioned alongside. Twin water columns on the stage ends enabled two NA class or both ends of a Garratt locomotive to take water simultaneously. Beneath the trestle was the ash pit.B/W. 200mm x 271mm. An NA locomotive on trestles taking coal at Beech Forest. A child watches.beech forest; railways; coal stage; na locomotive; -
 Otway Districts Historical Society
Photograph, R. Preston, Kawarren: Down goods with G42 shunting, 1955, 14 December 1955
Originally known as Loves River it became Kawarren station on 16 June 1902. It consisted of a loop siding and combined office and passenger shelter. Goods loading was sawn timber (brought in on four tramways operating between 1905 and 1939), firewood, charcoal and limestone. In 1920 the limestone company built a store shed and a covered loading area at the terminus to assist operations. The company also requested the siding to be extended by three metres, which Victorian Railways did in the same year. This gave the loop a capacity of 21 trucks. Around 2,000 tonnes per year of limestone traffic kept the station busy until trade ceased in 1957. A postal motor started in October 1938, Kawarren being a point where the postal motor and trains were permitted to cross.B/W. G42 with a Down goods train at Kawarren on 14 December 1955. On No.2 Road empty NQR wagons proceeding to get filled at a covered lime loading operation. A three workmen are checking aspects of the train while a group appear to be clustered at the guard's van around an NKS motor trolley.kawarren; railways; limestone; timber; charcoal; -
 Otway Districts Historical Society
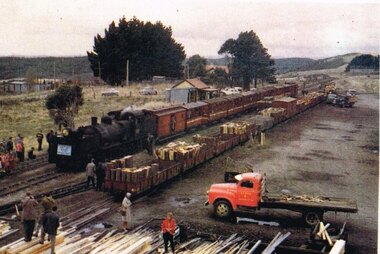
Photograph, Peter Ralph, G42 with "Bye Bye Beechie" special train, 24 March 1962
On 24 March 1962 the special train marking the closure of the Colac-Beech forest railway line was again put on by the Australian Railway Historical Society, this time called the "Bye-Bye Beechie". It had G42 as the locomotive, eight NBH excursion carriages with NC guard's vans at either end, pulling a crowd of keen passengers. Special excursion trains until mid-1962.Colour. G42 locomotive inscribed "Australian Railway Historical Society, Bye-Bye Beechie, 24-3-62", an NC guard's van, eight NBH excursion carriages and another NC guard's van on No.2 Road at Beech Forest Railway Station, with dismounted passengers all around. On No.4 Road a number of loaded or semi-loaded NQR wagons and an NUU louvre van, with a truck, a car, and a van at the end of the row. A parked red truck in the foreground is next to a timber stack.beech forest: railways; "bye bye beechie";, beech forest: railways; "bye bye beechie"; -
 Otway Districts Historical Society
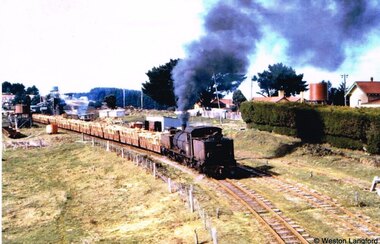
Photograph, Langford, Weston, Beech Forest: Goods trail departing for Colac, 1961, 9 August 1961
The Garratts were approaching 35 years of age and needed constant repairs to keep them in service, the other rolling stock was between 45 and 60 years old, the track was generally in poor condition, and the amount of traffic offering was only a faction of that carried previously and came from one station, Beech Forest. A further sign of decay was in the transfer of goods between the gauges. Where eight or nine men had worked full-time transferring between gauges only one man was seen by 1960, with several other men hired on the basis of '$2 a truck', assuming they could be found. In 1961 VR announced its intention to close the line which it did on 30 June 1962. Colour. On 9 August 1961 a G42 locomotive and goods train departing for Colac with the coal stage on the left, the saw mill and Gangers Shed on the right, and houses in the right background.. beech forest; railways; -
 Otway Districts Historical Society
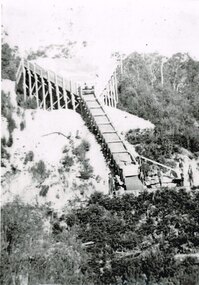
Photograph, Victorian Railways, Gellibrand ballast pit siding, c.1902
In 1902 a ballast siding was opened 4 km south of Gellibrand to provide materials for track construction. A spur siding with a capacity for six trucks was cut into the side of a slope. Above this was erected a loading bin and chute. The stone proved to be of durable quality so the siding continued after 1902 for periodic track re-ballasting works. The points were set for the main line and spiked shut when the siding was not in use. By the mid-1920s the Victorian Railways found it more economic to use ballast from Penshurst, so the siding was closed by 1925 and the rails lifted.B/W. Gellibrand ballast pit siding at 19 miles (30.6 km) south of Colac. gellibrand; gellibrand siding; railways; -
 Otway Districts Historical Society
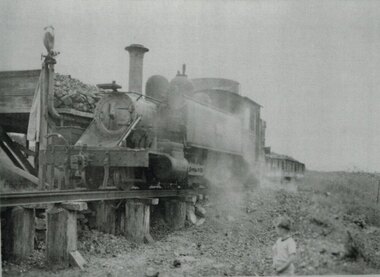
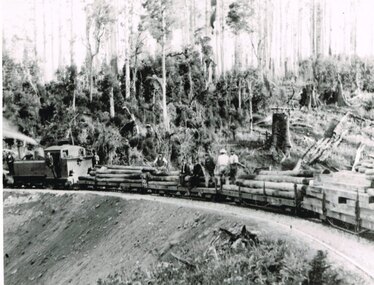
Photograph, Victorian Railways, Timber from Beech Forest, c.1910
B/W. An NA-class engine pulling laden timber trucks around a curve with one man leaning out of the engine, two men standing outside at either end of the locomotive, and five men astride the trucks.beech forest; railways; -
 Otway Districts Historical Society
Photograph, Victorian Railways, Gellibrand Ballast Siding, c.1902, c.1902
In 1902 a ballast siding was opened 4km south of Gellibrand to provide materials for track construction. A spur siding, with points facing Beech Forest and a capacity for six trucks, was cut into the side of a slope. Above this was erected a loading bin and chute. The stone proved to be of durable quality so the siding continued in commission after 1902 for track re-ballasting work. By the mid-1920s Victorian Railways found it more economic to use ballast from Penshurst, so the siding was closed by 1925 and the rails lifted.Photograph; B/W. Gellibrand Ballast Loading Sitegellibrand; ballast; railways; siding; -
 Ballarat Tramway Museum
Slide - 27 mm sq slide/s - set of 3, Andrew Howlett, Lydiard St North level crossing, March 1969?
Yields information about the Lydiard St Nth line, the level crossing and the terminus.Set of three Colour slides, Kodak white cardboard mount, developed Mar 1969 of No. 37 .1 - while running a special crossing at the Lydiard St North level crossing at the Railway Station. Has the Reid's Coffee Palace and Railway Station in the background. .2 - No. 37 and a single trucker carrying a "Trotting at Bray Raceway" auxiliary board, at the Lydiard St North terminus. Has the shelter on the right-hand side. .3 - No. 37 waiting at the terminus. See Reg Items 7675, 7678, 7681, 7684, 7686, 7705 and 7713.ballarat, tramways, trams, lydiard st nth, railway station, shelters, level crossings, tram 37 -
 Ballarat Tramway Museum
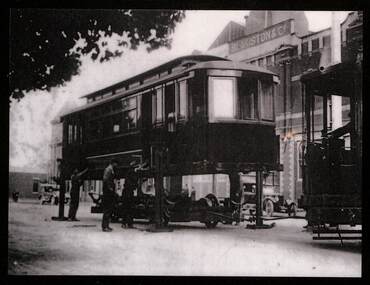
Photograph - Geelong tram body being fitted with a truck or wheelset
Provides information on how a tramcar body was fitted with a wheelset or truck (Brill Radiax EB1 type). Lifted on the jacks after delivery by a horse drawn jinker from the Railway Station (See Reg Item 8321) The wheel set is being pushed under the tramcar by another tramcar. Once fitted the tramcar would have been towed back into the depot and the motors etc connected. Has the Blakiston & Co. building in the background. Yields information about how tramcar bodies were lifted outside the Geelong tram depot in Brougham St in order to be made operational. Copy photograph on black plastic type backing with black edges of a Pengelley Adelaide built tramcar body on jacks being fitted with a truck or wheel set.geelong, tramways, pengelley, tram bodies, brill radiax truck, brougham st, trams -
 Ballarat Tramway Museum
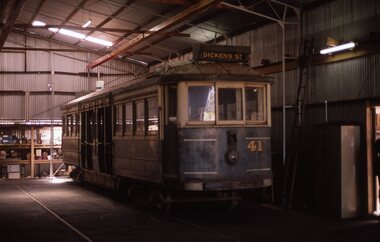
Slide - Set of 6 COTMA 2000 Visit to MTPA Haddon, David Verrier, 22-11-2000
Set of six slides taken during the 2000 COTMA Conference visit to the Melbourne Tramcar Preservation Association depot on 22-11-2022 1 - Victorian Railways tram 41 awaiting reconstruction. 2 - W2 357 on the MTPA Depot fan 3 - W3 663 and W4 670 on the depot fan 4- Overall site view from near the entry 5 - MTPA Tower Truck and Mk III bus No. 592 at Haddon 6 - Notice and tramcar allocation boardDemonstrates part of the COTMA Conference 2000 activities.Set of six Kodak colour slides - white plastic mountEach slide has details written on it.ballarat, specials, cotma, mtpa, haddon, tram 41, tram 670, tram 663, mk iii bus, bus 592, tower wagons -
 Ballarat Tramway Museum
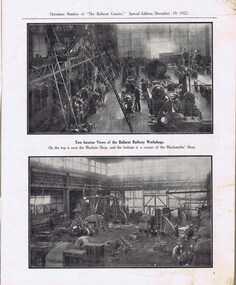
Newspaper, The Courier Ballarat, The Courier, Christmas Number, 1922, Special Issue, Dec. 1922
Yields information about Ballarat, it businesses, identifies and its locations or environs through photos and advertisements and articles.The body of the "Christmas Number of the Ballarat Courier, Special Edition - December 1922" = coves missing. See attached listing with worksheet for summary of contents. Contains many advertisement for local business houses, photos and fiction and articles , pages 3 - 94 still existing, stapled. Notes on contents of Christmas Number of The Ballarat Courier Special edition, December 19, 1922. Photos Ballarat Association Cricket Team, winners Country championship - 1922 and photo of dinner at Sth Melb. Town Hall by VCA. - p83 Ballarat Golf club, Arch of Victoria and Club House - p63, 65 Ballarat Imperial Football club - league premier- 1922 - p19 Ballarat Miners Turf Club - showing stands and office bearers - p43 Ballarat North Golf Club - p67 Ballarat Town hall - p87 Ballarat Turf Club Office bearers and race finish - p45 Ballarat Yacht club - opening day and yacht race - p89 Black Hill Progress Association, - members and scenes - p33 Eureka Monument - p79 Finish of a race at Miners RC - p45 Head of the Lake and St. Patrick's the winning crew - p47 1.ake Wendouree - boating on (Gardens side - p] 1 Lake Wendouree, rowing and club houses - p28 Lal Lal waterfalls - p61 Lydiard St. View - Railway Station, Cemetery gates, Mining Exchange, Post Office and Banks - p71 National Federation Conference - 1922 - p39 South city Football club, Ballarat Assoc. Premiers 1922 - p25 Sturt and Lydiard St - top photo Town Hall and T&G building, with ESCo tram (pencil note "Tram No- 3 - Peckham Truck" written in - p75. Bottom photo, looking south from Town Hall. The Western Oval during a football match - p23 Victorian Farmers Union Conference, Ballarat 1922 - p37 Victorian Railway photos of various scenes around Victoria: Pages 3, 5, 7, 55, 59 Views of Victoria Park - p91 VR Ballarat Railway Workshops - p9 Advertisements on even numbered pages, featuring in particular: Ballarat Motor Garage - with photos - p88 C.A.V. Willard - storage battery service Stn - p76 with photo. CA Mitaxa - Builder - includes photos of new homes - p38 Coles & Pullham - stock sales - with photos - p86 ESCo - p70 Geo E. Dibble, machinery merchant - includes photos - p26 Geo. Waller - asphalt and carrier - photos of work and buildings Hanrahan's of Ballarat - Garage and stables - p30 J.L.Ridings - dentists, - photos of surgery p14 Longhurst's Bakeries - Mair and Yuille St. Includes Photos. - P84 Preston Motors, Melbourne - The Maxwell Sep Morse - Motor and Carriage builders - photo - p78 St. Patrick's College - photos of students and buildings - p46 State Savings Bank of Vic. - p20 T-J. Brown house remover and general carrier, photo of traction engines - p90 T.J.Haymes - Wallpaper etc. - p33 The Ballarat Co-Op Distribution Society - includes photos - p44 The Hupmobile - McLean Richards Motors - p22 Wallace Butter Factor - p82 Articles Black Hill Progress Association - p35 Damaged pages - cut outs clippings etc. Page 17/18 - top half bottom 1/3 of page 21/22 Pages: 9, 70, 71, 75, 87 and 90 imaged. Record reviewed and images of some of the pages added 10-9-2013p74. Note re tram 33.trams, tramways, ballarat, commerce, ballarat business, sports, science, esco -
 Ballarat Tramway Museum
Magazine, Shennan Publishing & Publicity, "Special 12th Anniversary Issue" - Truck & Bus Transportation - July 1948, 1948
Yields information about Australian transport history, transport at the time of publication and the development of buses and the Ansett organisation.Large format 208 page , July 1948 issue of Truck and Bus Transportation with colour cover, fold out and advertisements, colour printing, articles on buses, trucks, cable trams, Australian Transport, personnel in industry, Ansett, executives - special 12 the anniversary issue. See photocopy of title and contents pages with item notes. Notes on Truck & Bus Transportation - Special Anniversary Issue - July 1948, with particular relevance to BTM Archives Advertisements: White Bus Co - similarity to the US PCC Tram - inside front cover Ansett's and Ansair - p131 AC buses - p162 Articles: Has Australia's Railways Reach the Doldrums? - p38 Modem Street Transit Authorities Announce Development Policy - p42 (includes photos of Sydney, Adelaide Glenelg H class, Bourke St, trams etc, being replaced by buses) These were the Events that made our Headlines (war years - photos included - p61 Riding the Rattlers behind Horses, Ropes and Billies - cable trams, horse and steam trams p66. - demise of Melbourne cable cars. Tracing the development of the Motor Bus in Aust. - p73. Australian Transport Administrations - whose , photos, responsibilities, liquid fuel control (petrol rationing), Australian Road Transport Associations, executives etc. - pl16 onwards Ansett organisation - p 1 72 onwards trams, tramways, trucks, buses, cable trams, road transport -
 Ballarat Tramway Museum
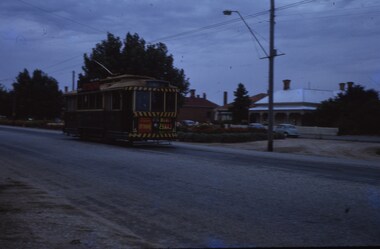
Slide - 35mm slide/s, Feb. 1963
Single truck SEC tram outward bound in Victoria St., could be 26, slide underexposed, taken just before Eureka line railway bridge, looking to southwest.'Tram Victoria St. Ballarat Feb 1963' in blue inktramways, trams, victoria st, eureka, twin lakes, tram 26 -
 Ballarat Tramway Museum
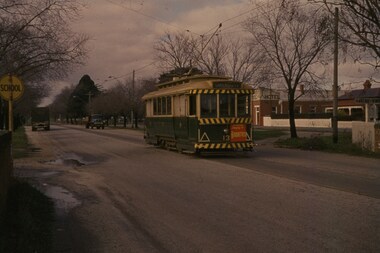
Slide - 35mm slide/s, Wal Jack, 26/06/1962 12:00:00 AM
Tram 13 approaching Victoria St. terminus, taken from Buninyong railway overbridge, with 13 travelling away from photographer. Two trucks in background. Tram has been fitted with lights, but not the larger white strip. Taken on 26.6.62. With Meagher's Hotel in background.'SEC Ballarat, No. 13, Victoria St, near terminus, Ballarat East, 26-6-62' in blue ink, and on reverse side, 'W.Jack photo' in blue ink.tramways, trams, victoria st., tram 13 -
![Workers, horses and drays in Burwood Road [Hawthorn]](/media/collectors/550653872162f11fb04854aa/items/661f4c86ac7f9cfd1fd6c658/item-media/661f4d6bac7f9cfd1fd722a1/item-fit-380x285.jpg) Kew Historical Society Inc
Kew Historical Society IncPhotograph - Workers, horses and drays in Burwood Road [Hawthorn], E.J. Dower, 1913
One of a series of photographs, taken by Edgar James Dower in the second decade of the twentieth century. Born and raised in Olinda, his family later moved to Surrey Hills. He worked as an adult as a clerk in the city office of the Metropolitan Gas Company, and in his role as a 'collector', he was able to photograph scenes including the construction of tramlines and associated buildings in Kew, Hawthorn, Camberwell and Surrey Hills. Later he established a real estate agency with his brother - the E.J. Dower Real Estate Agency, Dandenong Office.The image is an historically significant record of the development of transport infrastructure which was used to connect Victorians in the first two decades of the twentieth century. This development resulted from increases in population and the consequent extension of Melbourne's suburbs. The photographs, both individually and collectively, richly detail the labour of workers and the tools and machinery used to create and extend Melbourne's tram network in the years preceding and during World War 1.Digital copy of an original mounted photograph depicting construction workers, horses and drays Hawthorn. The intense activity involved collecting materials for transport to the construction site in Cotham Road, Kew. Annotated recto: "Unloading trucks of metal for Kew Electric Tram Line in Cotham Road / At Hawthorn Railway Siding" Annotated verso: "Taken by E.J.D. / 1913"theme --- travelling by tram, theme -- connecting victorians by transport and communications, cotham road -- kew (vic.), trams -- kew (vic.), hawthorn railway station -
 Kew Historical Society Inc
Photograph - Filling in the Outer Circle Railway cutting at East Kew, 1939
W.D. Vaughan (Kew's Civic Century, 1960, pp.195-6) quotes Council Minutes of 1938 and 1939 to record that: "After protracted negotiations between the Council, the Railways Department and the Tramways Board agreement was reached in June, 1938, for the filling of the railway cutting at the Harp Junction and shifting tram tracks to the High Street alignment ... The Outer Circle railway land from Princess Street to Park Crescent was purchased by the Kew Council in October, 1939, for 2,750 [pounds]. The land from Park Crescent to High Street was leased for 1 [pound] per annum. Considerable work was done in levelling the embankments to the original surface level."Important and rare photograph of the period, showing major works by Kew Council in Kew East working on a significant piece of urban infrastructure.Small, original black and white positive (photograph) showing workers and vehicles filling in the tracks of the former Outer Circle railway at East Kew. In the background is the metal bridge with brick piers, adjacent to the Harp Junction. The bridge crossed the cutting, linking the two parts of High Street. Behind the tip truck, painted on the side with the name 'Fowler Quarries' [located Keilor Road, North Essendon], one can see shops [including T.G. Garroway, Cash Grocer] in High Street. What appears to be the City of Kew Steamroller is immediately in front of the bridge. A group of passers-by watch from the bridge and from the road. Annotation in pencil on verso: "Filling in Outer Circle line at High St East Kew prior to straightening High St. (c. Feb 1930?)outer circle railway, railway cuttings, harp junction, high street -- kew east -
 Sunbury Family History and Heritage Society Inc.
Photograph, Wheat silo
The wheat silo was erected on railway land on the west side of the railway line at Sunbury from approx 1970s - 1980s. It served as a grain storage provision for the local cereal farmers.The former CFA depot which was in Evans Street. With the expansion of the shopping centre the silo was dismantled to provide commercial development on the west side of the railway line.The wheat silo is a reminder of past agricultural industries that were carried out in Sunbury.A non-digital photograph of two trucks and a crane dismantling a metal wheat silo, which has been standing in an open area. A CFA pavilion is visible in the distance.wheat storage, silos, sunbury railway station, evans street -
 Sunbury Family History and Heritage Society Inc.
Photograph, 13 April 2000
In 2000 work commenced on the further development of railway land on the west side of Sunbury station for the construction of commercial and entertainment facilities. Prior to this time the land had been undeveloped and was often used to accommodate visiting circus troupes. Cereal storage silos also occupied this area for some time. The development of this area has been a reflection of the rapid expansion of settlement within Sunbury and surrounding areas that occurred during the early years of the twentieth century.A coloured photograph of a fenced off area undergoing development with earthmoving equipment and trucks in operation and some commercial buildings visible in the middle distance.sunbury railway station -
 Truganina Explosives Reserve Preservation Society Inc (TERPS)
Digitised Oral History – Truganina Explosives Reserve - Tape 7 Cliff Gibson, 2018
... Bill Grant James Mullins 2 foot gauge tramway explosives trucks ...The interviews were recorded in 2000 by Bronwen Gray and Alan Young for the production of Unreserved, Stories from Truganina Explosives Reserve, animated stories from past residents, workers and interested people of the Reserve (subject to copyright 2004). Cliff Gibson, a Williamstown resident, discusses the handling and shipping of explosives in the Port of Melbourne between 1863 to 1962 and the establishment, development and history of Truganina Explosives Reserve. In the interview he mentions the names of the Lighters and Ships used to transport the explosives to and from the Truganina Explosives Reserve. A primary source of information on memories of the Truganina Explosives Reserve and Altona,Victoriaexplosives, lighter, sailing lighters, the brig martha, deer park, australian chemical company, nobel explosives company, ici, james scott and company, jacks magazine, william wardell, george thomas chirnside, 1897, 1901, pier, bill grant, james mullins, 2 foot gauge tramway, explosives trucks, explosive magazines, railway explosives vans, queen street, richard rendle holten, ports and harbours, the lighter truganina, the lighter george stone, rose, mary jane, tarniet, derrimut, boonah, deutgam, naval dockyards williamstown, charlie curry, powder barges, cargo net, alma doepel, huia, wongalla, joseph sims, argonaut, maryland, pirie, lady isobel, taranui, point wilson, failee, captain dyson, hector pirie -
 Canterbury History Group
Photograph - Canterbury Road from Bradshaws Garage looking west, 1950, 1950
Black and white photograph of Canterbury Road looking to the west from the front of Bradshaws Garage 1950canterbury, canterbury road, canterbury post office, railway crossings, railway gates, signal boxes, vintage cars, trucks -
 Wodonga & District Historical Society Inc
Functional object - Rail fish plate from Cudgewa Line, 1930 - 1960s
Cudgewa Line -The Cudgewa railway line opened in stages between 1889 and 1921. The first section from Wodonga to Huon opened on 10 September 1889. It was extended to Bolga on 18 July 1890, Tallangatta on 24 July 1891, Shelley on 13 June 1916 (the highest station in Victoria), Beetomba on 10 April 1919 and Cudgewa on 5 May 1921. The line had 1 in 30 grades and trestle bridges that have been heritage listed. In 1919, the line was used to carry materials for the construction of Hume Weir, and three years later a spur line connecting Ebden to the weir was opened. In the 1960s, Cudgewa became the railhead of materials for the Snowy Mountains Scheme. The last passenger service from Wodonga to Tallangatta ran on 30 September 1961. The turntable and passenger platform at Cudgewa were abolished in 1976. This fish plate came from the rails of the Cudgewa Line at Gordon Roy's hut which was situated behind Perry's Stump Hotel outside Wodonga. The hut was used as an office with the points lever outside to switch trucks to different tracks on the Bandiana and Cudgewa lines.This item is significant as it was part of the railway line to Cudgewa which played an important role in North east Victoria carrying freight during the construction of the Hume Weir and the Snowy Mountains Scheme.A section of flat plate. These plates were used in pairs to connect the ends of adjacent rails in railway track. victorian railways, cudgewa rail line, railway components -
 Wodonga & District Historical Society Inc
Photograph - Fred Rochow Railways Collection - Cudgewa - As most railwaymen knew it, C. 1950s - 1960s
The Fred Rochow Railways Collection incorporates photos related to the operation of the Wodonga Railway Station including different types of trains and railways staff C. 1930 – 1990. It was donated to the Wodonga Historical Society by Fred Rochow, a railwayman who spent many years based in Wodonga. He joined the Victorian Railways on 17th June l947 and retired in 1988. For some time, he was a member of the Australian Federated Union of Locomotive Enginemen and served a term as a member of the Trades Hall Council. He had an extensive knowledge of the struggles that took place to achieve better conditions for railway workers. Fred worked for many years as a fireman and then worked his way up the ranks to driver, experiencing many changes from the days of steam locomotives through to diesel trains, locomotives and even the modern XPT train. He worked throughout Victoria at different stages of his career, with his final working years focused on the northeast of Victoria and the Albury to Melbourne line. After his retirement, Fred continued to share his love of steam miniature trains with the community.This collection has local and statewide significance as it captures images of trains, locomotives and personnel who operated the railway services in Wodonga and throughout Northeast Victoria. The railways played a critical role in opening up Victoria and connecting Australia for trade, business, social communication and transport.The space on the left was storage space for machinery for the Snowy Mountains Hydro Electric Scheme. A special train was used to cart wide loads such as turbines, and trucks were made for widening when required. Equipment was loaded onto trains t the docks in Melbourne. Cudgewa Line -The Cudgewa railway line opened in stages between 1889 and 1921. The first section from Wodonga to Huon opened on 10 September 1889. It was extended to Bolga on 18 July 1890, Tallangatta on 24 July 1891, Shelley on 13 June 1916 (the highest station in Victoria), Beetomba on 10 April 1919 and Cudgewa on 5 May 1921. In 1919, the line was used to carry materials for the construction of Hume Weir, and three years later a spur line connecting Ebden to the weir was opened. In the 1960s, Cudgewa became the railhead of materials for the Snowy Mountains Scheme. The last passenger service from Wodonga to Tallangatta ran on 30 September 1961 The turntable and passenger platform at Cudgewa were abolished in 1976.railways wodonga, fred rochow, cudgewa station, snowy mountains hydro electric scheme -
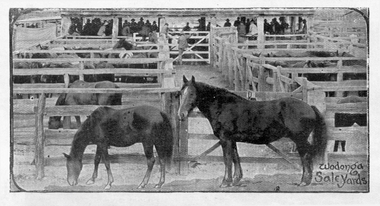 Wodonga & District Historical Society Inc
Photograph - Horse Sales at Wodonga Saleyards
The sale of stock in Wodonga goes back to its earliest history with yards being operated on the site now occupied by Elgin's Hotel and the Centro Shopping Centre, located close to the railways. Horse sales were an important part of the history of the Wodonga Saleyards. Horses were bred in north-east Victoria for the Indian Market, and records show that a truck load of horses left Wodonga Station in 1875. Campbell & Sons commenced selling horses at the Elgin Street site in 1895 and they conducted regular sales in association with Younghusband Ltd. Campbell & Sons was a Melbourne-based company, which eventually merged with Wright Stephenson & Co. Wodonga and Towong Sentinel of Friday 3rd March 1899 reported “Buyers attended from Bendigo, Ballarat, Calcutta, Madras, Singapore, The Islands, Gippsland, Dandenong, and Melbourne. Indian remounts brought up to £32 10s, draughts to £25, medium draughts to £18, town hacks and harness horses to £32, buggy pairs to £65, and light weedy sorts to £5.” After World War II, large numbers of mainly Clydesdale working horse teams were driven to Wodonga for sale. The March horse sale was the biggest and most important event of the year with overall yardings of 1,000 horses sold over two or even three days. It was a very busy period. All the horses were put through the ring singly, usually by Felix Grundy and generally caught and mouthed by Harold Boon, Andy Elliot or Toy Mulqueeney. The majority of the horses sold were trucked by rail from Wodonga. With developments in technology and the changing role of the horse in modern society, the sale of horses dwindled although horse sales at Wodonga continued until the early 1980s.These items are significant because they represent an important industry in Wodonga's past as a major centre of livestock sales in Victoria.Photographic images of horses on sale at Wodonga Saleyards.wodonga saleyards, horse sales wodonga -
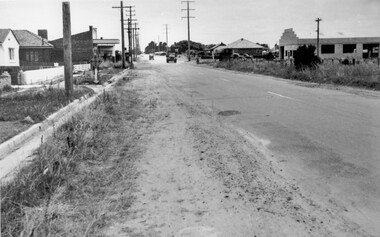 City of Kingston
Photograph - Black and white, c. 1950
While the road is sealed, there is evidence of potholes that have been filled, and the wide, gravel shoulder has long grass running into the gutter of the nature strip. On the other side of the road, extremely long grass can be seen growing on the side of the road. There is a truck visible on the road, which indicates the rural nature of the Cheltenham community in the 1950s.This image is one of many in the collections that focuses on the railway or roads. The development of roads and the railway was crucial to the ongoing development of the area. Black and white photograph of the intersection of Warrigal and Centre Dandenong roads, Cheltenham. On the left hand side is a small sign warning of a cross roads intersection. Housing and shops line the road.Handwritten in blue ink on reverse: 219 Handwritten in red ink on reverse: 80%cheltenham, roads, suburbs -
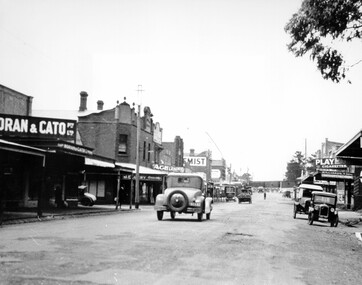 City of Kingston
Photograph - Black and white, c. 1925
This image explores the relationship between the train lines and community development. Cheltenham's retail centre is connected to the train station.Black and white image of Charman Road, Cheltenham, depicting a car and truck travelling toward the level crossing near the train station. There is another car already waiting at the crossing gates. Cars are parked on either side of the road along a shopping strip.Black printed text on a white round sticker adhered to the reverse: 141 Handwritten in red ink on reverse: 50% Black typed text on a white strip of paper adhered to reverse: Charman Road, Cheltenham / circa late 1920's/early 1930's / $50 reproduction fee applies Blue ink stamped on reverse: COPYRIGHT / Public Transport Corporation / For re-ordering photographs / Please quote negative ADV 485 / Enquiries C/- PTC Photographic Unit / Telephone switchboard 619 1111cheltenham, trains, railway, railway crossing, shopping strip, cars -
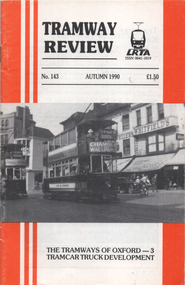 Ballarat Tramway Museum
Magazine - Report, N. F. Henley, "Tramcar Truck Development", 1990
Contains an article that looks at the development of the four wheel Brill 21E in regard to the engineering aspects. Written by N. F Henley with drawings of the various concepts and history of the Brill truck. See item 7384 for s similar article on the Brill 22E truck.Yields information about the development of the Brill 21E truck which is used on some of the BTM trams.Magazine 40 pages, centre stapled, Tramway Review published by the Light Railway Transit Association, Autumn 1990.trams, tramways, bogies, trucks, brill trucks, brill 21e