Showing 2680 items
matching year 2
-
 Glen Eira Historical Society
Document - Banks in Caulfield
This file contains two items. 1. A hand written list of branches of the English, Scottish and Australian Bank Limited and its merger the Australia and New Zealand Banking Group Limited, undated and author unknown. The list records the opening dates of branches in Carnegie, Caulfield East, Caulfield South, Elsternwick, Glen Huntly, Murrumbeena, Ormond, Garden Vale, Caulfield and Caulfield West encompassing years from 1886 to 1927, listing also the merger of the two banks as being in 1970 as well as 1852 as being the founding year of the English, Scottish, and Australian Bank Limited. 2. Three identical Elsternwick State Savings Bank withdrawal slips, from the 1910s. All three are blank, and include brief directions for filling in the slip typed at the bottom. Also included on the slip is a decorative illustration.banks, banks mergers, bank deposits, bank withdrawals, documents, banking, pass books, business and finance, annual reports, bank equipment, commercial equipment, bank branches, carnegie, carnegie koornang road 86, caulfield east, caulfield east derby road 9, caulfield south, caulfield south glen huntly road 790, elsternwick, elsternwick glen huntly road 324, elsternwick glen huntly road 426, glen huntly, glen huntly glen huntly road 1173, murrumbeena, murrumbeena murrumbeena road 59, ormond, ormond north road, ormond north road 553, garden vale, caulfield, caulfield west, caulfield hawthorn road 242, commercial establishments, the state savings bank of victoria, the state savings bank of victoria elsternwick branch, the english scottish and australian bank limited, the australian and new zealand bank limited, the australian and new zealand banking group limited -
Glen Eira Historical Society
Document - ANZAC DAY/REMEMBRANCE DAY
This file contains 3 items: 1/1 photocopy of Order of Service for City of Caulfield ‘Civic Memorial Service’ held on 25th April (Anzac Day) year unknown, at Caulfield Park with mayor of Caulfield presiding. 2/1 file note by Peta Darke on 15/04/2014 noting that the date for item 1 was 25/04/1920. 3/1 original Order of Service program for ‘ANZAC Memorial Civic Service’ Sunday 16/04/2000.city of caulfield, caulfield park, caulfield town hall, balaclava road, hawthorn road, mayor, wharington w.a. cr, phillips w.a. rev, hanson captain, illingworth a.e. rev, reeves duncan rev, langley canon rev, butcher t.w. rev, robertson j.k. rev, thompson a.r. rev, religious establishments, churches, choirs, clergy, rites and ceremonies, city of glen eira, anzac, councillors, guards, ceremony, hymns, prayers, martens veronika cr, mclean tom, mclean thomas, murphy pat, murphy patrick, caulfield rsl sub-branch, carnegie rsl sub-branch -
 Glen Eira Historical Society
Album - Album page, St Stephen's Presbyterian Church, Balaclava Road, Circa 1972
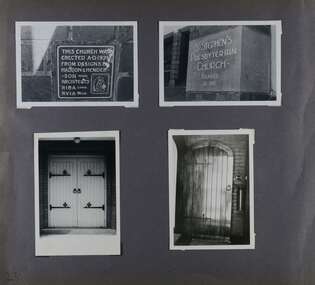
This photograph is part of the Caulfield Historical Album 1972. This album was created in approximately 1972 as part of a project by the Caulfield Historical Society to assist in identifying buildings worthy of preservation. The album is related to a Survey the Caulfield Historical Society developed in collaboration with the National Trust of Australia (Victoria) and Caulfield City Council to identify historic buildings within the City of Caulfield that warranted the protection of a National Trust Classification. Principal photographer thought to be Trevor Hart, member of Caulfield Historical Society. Most photographs were taken between 1966-1972 with a small number of photographs being older and from unknown sources. All photographs are black and white except where stated, with 386 photographs over 198 pages. From: Glen Eira Heritage Management Plan (1996) by Andrew Ward and Associates In 1905, the land was vacant in Balaclava Road, north side, from Kooyong Road east to the right of way, except for one house. A block of this land was acquired by the Presbyterian community and a timber church erected there in 1910. In time, a larger church was required. After several years of fund raising led by George Kinross, a new red brick St Stephen's church was built in 1926 to the design of architects Haddon and Henderson. George Currie was the builder and the cost of construction was £5,100.From: Glen Eira Heritage Management Plan (1996) by Andrew Ward and Associates: St Stephens has architectural importance as a noteworthy example of a Gothic Transitional design in the Arts and Crafts eclectic manner (see Stylistic Typology in National Trust's Historic Church's Study}. The facade treatment successfully combines Christian symbols with Gothic forms in the Arts and Crafts mode (comparable with Haddon's Presbyterian Church, Malvern (1906) and Haddon and Henderson's Oakleigh Church (1928). It is locally important as an example of Robert Haddon's work in Caulfield, where he also lived (4 Glenferrie St q.v.).Page 25 of Photograph Album - four black and white photographs of St Stephen's Presbyterian Church, with two photographs in landscape mode across the top showing information about who designed the building in one and showing the church name and year founded in the other; and two in portrait mode in the bottom section showing 2 different heavy wooden doors.Hand written: 25 [bottom left]trevor hart, caulfield north, balaclava road, george kinross, haddon and henderson, george currie, st stephen's, 1900's, 1920's, gothic transitional, christian symbols, arts and crafts, robert haddon, stylistic typology, gothic, presbyterian church, architects, red brick, doors, memorials -
Clunes Museum
Memorabilia - MEDALLION
Metal medallion issued by S J Cooper, Mayor of Borough of Clunes to commemorate the 60th year of the reign of Queen Victoria of EnglandObverse: 2 images of Queen Victoria one at inauguration in 1837 and one current 1897 with 60th Reign of Queen Victoria 1837-1897 stamped into the medallion Reverse: Australian Coat of Arms with Borough of Clunes S J Cooper Mayor stamped into the medallion medallion, queen victoria, s j cooper mayor -
 Ringwood and District Historical Society
Document, Ringwood Bowls Club- Receipts issued to Mr McCaskill for monies paid for subscriptions and donations in 1931, 1934, 1945
Standard format receipts (3). 30027a: Receipt dated 29/9/1931 for Membership subscription of £2-2-0 from Mr McCaskill to Ringwood Bowling Club for year ending 31/7/1032. . 30027b: Receipt dated 6/1/1934 for donation of £2 from Mr McCaskill to Ringwood Bowling Club for electric lawn mower. . 30027c: Receipt dated 22/8/1945 for (a)- Membership subscription of £3-3-0 from Mr McCaskill to Ringwood Bowling Club for 1945/46 year. (b)- Payment of £3-3-0 by Mr McCaskill to Ringwood Bowling Club for 'Whole of Roller Levy'.Total receipt amount £6-6-0. -
 National Vietnam Veterans Museum (NVVM)
Photograph, Photo Collage of Australian Involvement
Framed photo collage of Australian involvement in Vietnam.In the centre of the collage there is a bronze plaque wich reads: VIETNAM The Vietnam War was a military conflict that occurred in Vietnam, Laos and Cambodia from 1959 to 30 April 1975. The was was fought between the communist North vietnam, supported by its communist allies, and the government of South Vietnam, supported by the united States and other member nations of the Southeast Asia Treaty Organization (SEATO) The United States entered the war to prevent a communist takeover of South Vietnam as part of their wider strategy of containment. Military advisors arrived beginning n 1950. U.S. involvemeny escalated in the early 1960s and combat units were deployed beginning in 1965. Invollvement peaked in 1968 at the time of the Tet Offensive. Despite a peace treaty signed by all parties in january 1973, fighting continued. In response to the anti-war movement, the U.S. Congress passed the Case-Church Amendment in June 1973 prohibiting furtherdirect U.S. military intervention without Congressional authorization yet the U.S.was still heavily invested in the war until 1975, when North Vietnam captured Saigon. North and South Vietnam were reunified the following year. The war exacted a huge human cost in terms of facilities, including 3 to 4 million Vietnamese from both sides, 1.5 to 2 million Laotians and Cambodians, and 58,159 U.S. soldiers. AUSTRALIAN INVOLVEMENT: For a decade from 1962 to 1972, Australian forces were actively involved in the bitter war that tore Vietnam apart. they served with distinction, and in battles such as the decisive Battle of Long Tan they proved that they were more than a match for the Viet Cong.photo collage, australian involvement, southeast asia treaty organization (seato), tet offensive, u.s. congress, battle of long tan, saigon -
Glen Eira Historical Society
Document - North Rd, 391 -391A, Caulfield South
Auction Notice of property (2 Flats) Caulfield, North Rd nos. 391 – 391a. Includes brief details of each flat. Also includes payment terms. Perhaps 1960’s. Year of auction not known but estimated from Collins 100 years calendar to be calendar no.5 for year 1959.hardie a.o. rev, toilets, caulfield south, business & finance, hardie a.o. mrs, laundries, auctioneers, hardie a.t., hot water service, real estate agents, flats, auctions, bambra rd, tennis courts, garages (private), booran rd -
 Federation University Historical Collection
Postcard - black and white, Kemmel, France, c1916
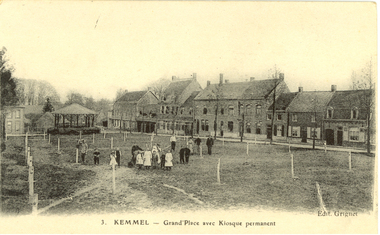
Holmes Family WW1 memorabilia Kemmel village is around six miles south-west of Ypres. Located just to the north of the village centre is Kemmel Chateau Military Cemetery. The cemetery was established early in the war, in December 1914, taking its name from Kemmel Chateau which stood to the rear of the cemetery location. The chateau at certain stages in the war housed an Advanced Dressing Station (ADS), and the cemetery continued to be used until March 1918, when Kemmel was taken by the Germans. Although it was retaken later on that year, both the cemetery and the chateau suffered from shelling with the chateau being destroyed. In total there are 1,135 First World War soldiers buried here, all but three being identified. In addition, located in a row on the left by the entrance are 21 Second World War burials. http://www.ww1battlefields.co.uk/flanders/kemmel.html, accessed 11/07/2014)Two black and white postcards showing Kemmel, France. .1) Grand'Place avec Kiosque permanent .2) Le Belvedere et le Moulinchatham-holmes family collection, kemmel, france, world war one, postcard -
 Northern District School of Nursing. Managed by Bendigo Historical Society Inc.
Photograph - Child Oral Examination, 1963
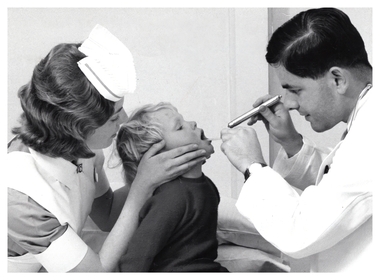
The Northern District School of Nursing opened in 1950 to address the issues around nurse recruitment, training and education that had previously been hospital based. The residential school was to provide theoretical and in-house education and practical training over three years. The students would also receive practical hands-on training in the wards of associated hospitals. The Northern District School of Nursing operated from Lister House, Rowan Street, Bendigo. It was the first independent school of nursing in Victoria and continued until it closed in 1989.School 57 - Oral examination of a child. A male doctor is holding a penlight and spatula to examine a child's mouth with assistance from a third year nurse who supports the child's head. From the rear of the photo is written: Nr Adeline McKenzie School 57 P.T.S. 13/2/1963, Dr J. ? Zammitt ? MD, Martin Washington, the Bendigo Photographer.nurse training, ndsn, lister house, school 57 -
 Melbourne Tram Museum
Document - Personal Papers, Melbourne & Metropolitan Tramways Board (MMTB), "Mr Murdoch", 25/02/1920 12:00:00 AM
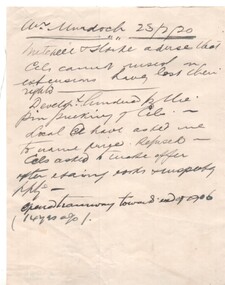
Hand written memo on plain paper, dated 25/2/20, titled "Mr Murdoch", possibly commenting on rights of Councils regarding authorisation. Needs a review. Provides the opening year for NMETLtrams, tramways, councils, nmetl -
 Peninsula Grammar
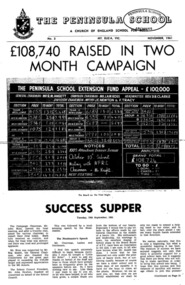
Newsletter, Peninsula Grammar (formerly known as the Peninsula School), The Peninsula School Gazette, November, 1961
The Gazette was a newsletter of Peninsula Grammar (formerly the Peninsula School) used to communicate to families of students and to highlight events, activities and achievements.Black and white printed newsletter, 6 pages.non-fictionThe Gazette was a newsletter of Peninsula Grammar (formerly the Peninsula School) used to communicate to families of students and to highlight events, activities and achievements.newsletters, foundation -
 Peninsula Grammar
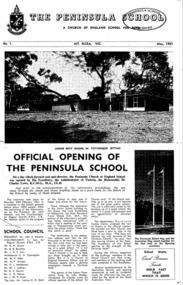
Newsletter, The Peninsula School Gazette, August, 1961
The Gazette was a newsletter of Peninsula Grammar (formerly the Peninsula School) used to communicate to families of students and to highlight events, activities and achievements.Black and white printed newsletter, 6 pages.non-fictionThe Gazette was a newsletter of Peninsula Grammar (formerly the Peninsula School) used to communicate to families of students and to highlight events, activities and achievements.newsletters, foundation -
 Flagstaff Hill Maritime Museum and Village
Book - Historical maritime, Terang Express, Loch Ard Gorge, 1954
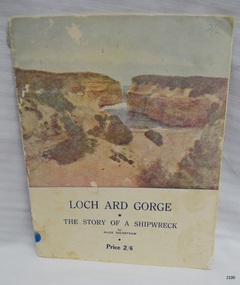
HISTORY OF THE LOCH ARD The LOCH ARD belonged to the famous Loch Line which sailed many ships from England to Australia. Built in Glasgow by Barclay, Curdle and Co. in 1873, the LOCH ARD was a three-masted square rigged iron sailing ship. The ship measured 262ft 7" (79.87m) in length, 38ft (11.58m) in width, 23ft (7m) in depth and had a gross tonnage of 1693 tons. The LOCH ARD's main mast measured a massive 150ft (45.7m) in height. LOCH ARD made three trips to Australia and one trip to Calcutta before its final voyage. LOCH ARD left England on March 2, 1878, under the command of Captain Gibbs, a newly married, 29 year old. She was bound for Melbourne with a crew of 37, plus 17 passengers and a load of cargo. The general cargo reflected the affluence of Melbourne at the time. On board were straw hats, umbrella, perfumes, clay pipes, pianos, clocks, confectionary, linen and candles, as well as a heavier load of railway irons, cement, lead and copper. There were items included that intended for display in the Melbourne International Exhibition in 1880. The voyage to Port Phillip was long but uneventful. At 3am on June 1, 1878, Captain Gibbs was expecting to see land and the passengers were becoming excited as they prepared to view their new homeland in the early morning. But LOCH ARD was running into a fog which greatly reduced visibility. Captain Gibbs was becoming anxious as there was no sign of land or the Cape Otway lighthouse. At 4am the fog lifted. A man aloft announced that he could see breakers. The sheer cliffs of Victoria's west coast came into view, and Captain Gibbs realised that the ship was much closer to them than expected. He ordered as much sail to be set as time would permit and then attempted to steer the vessel out to sea. On coming head on into the wind, the ship lost momentum, the sails fell limp and LOCH ARD's bow swung back. Gibbs then ordered the anchors to be released in an attempt to hold its position. The anchors sank some 50 fathoms - but did not hold. By this time LOCH ARD was among the breakers and the tall cliffs of Mutton Bird Island rose behind the ship. Just half a mile from the coast, the ship's bow was suddenly pulled around by the anchor. The captain tried to tack out to sea, but the ship struck a reef at the base of Mutton Bird Island, near Port Campbell. Waves broke over the ship and the top deck was loosened from the hull. The masts and rigging came crashing down knocking passengers and crew overboard. When a lifeboat was finally launched, it crashed into the side of LOCH ARD and capsized. Tom Pearce, who had launched the boat, managed to cling to its overturned hull and shelter beneath it. He drifted out to sea and then on the flood tide came into what is now known as LOCH ARD Gorge. He swam to shore, bruised and dazed, and found a cave in which to shelter. Some of the crew stayed below deck to shelter from the falling rigging but drowned when the ship slipped off the reef into deeper water. Eva Carmichael had raced onto deck to find out what was happening only to be confronted by towering cliffs looming above the stricken ship. In all the chaos, Captain Gibbs grabbed Eva and said, "If you are saved Eva, let my dear wife know that I died like a sailor". That was the last Eva Carmichael saw of the captain. She was swept off the ship by a huge wave. Eva saw Tom Pearce on a small rocky beach and yelled to attract his attention. He dived in and swam to the exhausted woman and dragged her to shore. He took her to the cave and broke open case of brandy which had washed up on the beach. He opened a bottle to revive the unconscious woman. A few hours later Tom scaled a cliff in search of help. He followed hoof prints and came by chance upon two men from nearby Glenample Station three and a half miles away. In a state of exhaustion, he told the men of the tragedy. Tom returned to the gorge while the two men rode back to the station to get help. By the time they reached LOCH ARD Gorge, it was cold and dark. The two shipwreck survivors were taken to Glenample Station to recover. Eva stayed at the station for six weeks before returning to Ireland, this time by steamship. In Melbourne, Tom Pearce received a hero's welcome. He was presented with the first gold medal of the Royal Humane Society of Victoria and a £1000 cheque from the Victorian Government. Concerts were performed to honour the young man's bravery and to raise money for those who lost family in the LOCH ARD disaster. Of the 54 crew members and passengers on board, only two survived: the apprentice, Tom Pearce and the young woman passenger, Eva Carmichael, who lost all of her family in the tragedy. Ten days after the LOCH ARD tragedy, salvage rights to the wreck were sold at auction for £2,120. Cargo valued at £3,000 was salvaged and placed on the beach, but most washed back into the sea when another storm developed. The wreck of LOCH ARD still lies at the base of Mutton Bird Island. Much of the cargo has now been salvaged and some was washed up into what is now known as LOCH ARD Gorge. Cargo and artefacts have also been illegally salvaged over many years before protective legislation was introduced. One of the most unlikely pieces of cargo to have survived the shipwreck was a Minton porcelain peacock - one of only nine in the world. The peacock was destined for the Melbourne International Exhibition in 1880. It had been well packed, which gave it adequate protection during the violent storm. Today, the Minton peacock can be seen at the Flagstaff Hill Maritime Museum in Warrnambool. From Australia's most dramatic shipwreck it has now become Australia's most valuable shipwreck artefact and is one of very few 'objects' on the Victorian State Heritage Register. Flagstaff Hill’s collection of artefacts from LOCH ARD is significant for being one of the largest collections of artefacts from this shipwreck in Victoria. It is significant for its association with the shipwreck, which is on the Victorian Heritage Register (VHR S417). The collection is significant because of the relationship between the objects, as together they have a high potential to interpret the story of the LOCH ARD. The LOCH ARD collection is archaeologically significant as the remains of a large international passenger and cargo ship. The LOCH ARD collection is historically significant for representing aspects of Victoria’s shipping history and its potential to interpret sub-theme 1.5 of Victoria’s Framework of Historical Themes (living with natural processes). The collection is also historically significant for its association with the LOCH ARD, which was one of the worst and best known shipwrecks in Victoria’s history. Book, Loch Ard Gorge: The Story of a Shipwreck by Alice Goldstraw. First published 1948, Third printing November 1954. Inscription inside front cover in blue pen, signed by the author. Soft covered book containing the story of the wreck of the Loch Ard, written in poetry. Each page has a decorative border. One page has photographs, black and white, of people and the Loch Ard Gorge cavesInside front cover, script in blue ink "To Mrs Slade, with kind regards, from Alice Goldstraw"flagstaff hill, warrnambool, shipwrecked coast, flagstaff hill maritime museum, maritime museum, shipwreck coast, flagstaff hill maritime village, great ocean road, loch line, loch ard, captain gibbs, eva carmichael, tom pearce, glenample station, mutton bird island, loch ard gorge, the story of a shipwreck, book, alice goldstraw, terang express press, loch ard gorge whipwreck, ship loch ard -
 Federation University Historical Collection
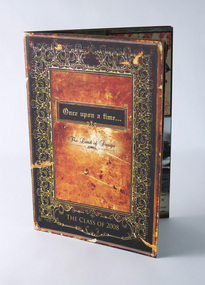
Booklet - Catalogue, Once upon a time… The Land of Design, Advanced Diploma of Arts (Graphic Design), 2008
Storybook/fairytale themed promotion of student work on completion of the two-year Advanced Diploma of Arts (Graphic Design) course at University of Ballarat, 2008. Page one features student names and photographs, plus "character" names. Pages 2-3 fairytale map. Subsequent pages include folio examples, one student per double page spread. Inside back cover notes sponsors, Sovereign Press and The Image Company. Teaching staff for duration of the two-year course listed as: James Baker, Peter Lambert, Jill Hyatt, Ben Sanders, Travis Price, Sam Harmer, Trevor Tagliabue, Alister Heighway, Sarah Lloyd. Promotional catalogue for graduating students of the University of Ballarat (TAFE), Advanced Diploma of Arts (Graphic Design). 32-page + 4-page cover saddle-stitched booklet. Full colour offset throughout.university of ballarat, federation university, graphic design, tafe, advanced diploma, arts academy, camp street campus -
 Federation University Historical Collection
Booklet - 'Zine-style Catalogue, Design Alliance vs Visual Villains, Advanced Diploma of Arts (Graphic Design), 2007
Comic-book style promotion featuring students completing the two-year Advanced Diploma of Arts (Graphic Design) course at University of Ballarat, 2007. Inside front cover features student names and photographs, plus "character" names. Pages feature student folio pieces. 16pp saddle-stitched full colour offset throughout.Promotional catalogue for graduating students of the University of Ballarat (TAFE), Advanced Diploma of Arts (Graphic Design). 16pp saddle-stitched booklet, full colour offset throughout.diploma of graphic design (2 years), university of ballarat, federation university, graphic design, tafe, advanced diploma, arts academy, camp street campus -
 Federation University Historical Collection
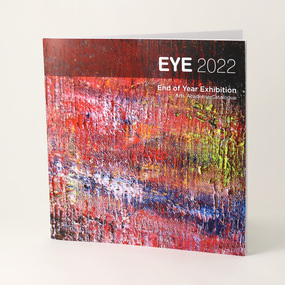
Booklet - Exhibition catalogue, EYE, End of Year Exhibition, Arts Academy Catalogue, 2022
Pages feature student works, contacts and artist statements. Introduction by Associate Professor Richard Chew, Director, Arts Academy, Institute of Education, Arts and Community. Notes a return to face-to-face teaching. Catalogue includes students from Diploma of Graphic Design (9), Advanced Diploma of Graphic Design (4), Bachelor of Visual Art (6), Bachelor of Communication Design (2), Graduate Diploma of Ceramics (4), Bachelor of Fine Art (2). Publication design by Angas Dorsett, Jack Trevey, Ashleigh Freeman, Susan Stanley and Jason Grace. Last page lists acknowledgements of staff and supporters. Inside back cover lists sponsors.Catalogue to accompany the Federation University, Bachelor of Visual Arts graduate exhibition, 2022. 48 page + 4 page cover, saddle-stitched book, full colour throughout.federation university, visual arts, graphic design, arts academy, camp street campus, exhibition, eye -
 Federation University Historical Collection
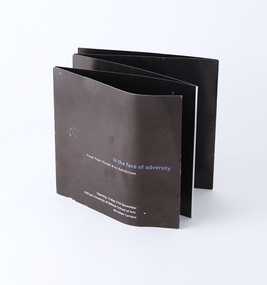
Document - Invitation, In the face of adversity, Final Year Visual Arts Exhibition, 1998
The exhibition opened on Friday 27 November 1998 at 6.00pm. Work was exhibited in the studio spaces in the School of Arts (Visual Arts) building at Mt Helen Campus (incorrectly labelled as Mt Clear on this document). The opening speaker was Peter Stitt. Given dimensions, this was possibly an insert for a CD ROM (compact disc) of student work.10pp concertina fold brochure promoting opening of University of Ballarat, final year student art exhibition. Offset printed in 2 PMS colours (black and metallic blue). Features a photograph of graduating class, and a list of graduates and their study areas. Also a list of sponsors and prizes.ballarat university college, buc, ballarat college of advanced education, bcae, university of ballarat, ub, federation university, visual art, painting, multi-discipline, graphic design, print making, ceramics, drawing., mt helen campus -
Mission to Seafarers Victoria
Letter - Correspondence, 1949
Quinn CollectionTwo-page letter written on two sheets of buff-coloured paper (0815.a1-2). Letter is headed Liddesdale Avenue, Frankston and dated 9/07/49. The pale brown envelope (0815.b), addressed to Mr Allan Quinn at the shipping office in Stockholm, has been re-addressed several times. It bears three Australian stamps. The four post-marks are indistinct. Letter commences 'My dear Allen......'and concludes '...Trusting to see you later on in the year. From your loving Dad.'letters-from-abroad, quinn, 1949 -
 Flagstaff Hill Maritime Museum and Village
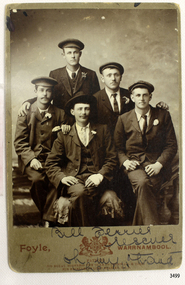
Postcard - People, Bill Ferrier - rescuer, 11th November, 1905
The postcard shows a photograph of William Ferrier, the 25-year-old Warrnambool fisherman from South Warrnambool whose rescue of two sailors from the wrecked La Bella made him an overnight National hero, quoted as “one of the most heroic rescues in Victoria’s shipwreck history”. The La Bella was wrecked on 10th November 1905 and the photograph was taken on the next day. In the photograph, William Ferrier is seated in the centre, with four of the five survivors beside him: (from left to right) Leonard Robertson, R. Payne, Oscar Rosenholme and Jack Noake. The photograph was taken by Foyle Photography Studio in Warrnambool, originally owned by James Charles Foyle. He previously had a photographic studio in Melbourne 1882 1887, then opened “Foyle’s Photo Card Studios” in Liebig St, Warrnambool. James Foyle died on 13th July 1905 and his son and daughter, Charles and Lilian Foyle continued on with the business until 1945. This photograph was most likely taken by either Charles or Lilian Foyle. The story of William Ferrier’s brave act follows on below … The ship from which the sailors were rescued was the three-masted, iron and steel barquentine the La Bella, built in Norway in 1893. She was one of two iron and steel ships by Johan Smith, the company was one of the leading shipping families in Tvedestrand, Norway. She was significant to Norwegian shipping, being one of only 27 iron and steel ships ever built in Norway. She was registered in New Zealand and engaged from 1902 in inter-colonial trading of timber in the Pacific, between New Zealand and Australia and was often in Port Phillip Bay, Victoria. On 5th October 1905, the twelve-year-old La Bella left Lyttleton, New Zealand carrying a cargo of timber bound for Warrnambool, Australia. She was manned by a crew of twelve: the Master, (Captain Mylius, previously 1st Mate of La Bella, appointed Captain to La Bella on 6th February 1903) 2 Mates, Cook, six able seamen, one ordinary seaman and a boy. Bad weather en route caused her to shelter at Burnie on Tasmania's North West coast. On November 10th, the 37th day of her journey, La Bella approached Warrnambool. Captain Mylius steered her towards Lady Bay Channel in heavy south-west seas and evening mist. He ordered the helmsman to steer for the light. As the ship came round, a tremendous sea struck her on the port quarter, causing her to breach broadside in a northwesterly direction into breakers. The helm was brought round twice more, but each time heavy seas broke over her, the third time throwing the La Bella on to a submerged reef in Lady Bay now known as La Bella Reef (about 100 yards from the Warrnambool breakwater). The sea was so rough that it even wrenched a one-and-a-half ton anchor from its fastenings and into the sea. As Captain Mylius headed to the steel wheelhouse, intending to send up a rocket flare, a huge sea slammed the steel door into him (resulting in massive bruising front and back) Despite his injuries he still managed to set off a blue light, which he held up in his hands. La Bella’s lifeboats were filled with seawater and broke up on their chocks. The blue light was the first indication to people on the shore that there was a ship in distress. The Harbour Master, Captain Roe (who lived in the Harbour Master’s House opposite Flagstaff Hill), organised a group of volunteers to crew the lifeboat because the trained crew was unavailable; the crewmen were working on a steamer in Port Fairy at the time. He then poured oil onto the water to try and smooth the sea. At around 11 pm three of the crew took shelter in the steel forecastle but the sea crashed into it and broke it up. While the rest of the crew and onlookers watched helplessly in the moonlight the bodies were washed away into the sea, never to be seen again. Some of the crew lashed themselves to the weather rail to keep from being washed away. Watson, the ordinary seaman, became tangled in the rigging lines and was too weak to move, so the 2nd Mate, Robertson, put a line onto him so that he wouldn’t wash off. Around 11 pm three of the crew were unconscious from exhaustion. The situation on La Bella was becoming dangerous. The 2nd Mate moved to the ‘house’ and soon afterwards the ship slipped in the heavy sea. The lashings of the 1st Mate and the ‘boy’ Denham had kept them safe until about 2 am when they were washed overboard; no one was able to help. One by one, the exhausted crew were being washed overboard, too weak to hold on any longer. During the night the La Bella had broken into two and the deckhouse ran out towards the sea. Two more men drowned when trying to reach the lifeboat. By sunrise, the only survivors of the twelve were the Master, 2nd Mate and three seamen. Early in the morning, Captain Roe used the rocket apparatus on shore to try and shoot a line to the ship for a safer rescue but each attempt fell short of the target. Several attempts were made by the lifeboat to rescue the stricken sailors, but the rough conditions made this difficult for the boat to get close enough to the ship and the lifeboat had to return to shore. During a final attempt to reach the ship Captain Mylius ordered his men to jump into the sea. Leonard Robertson, 2nd mate, jumped and swam towards the lifeboat, taking hold of the boat hook offered to him. Oscar Rosenholme managed to reach the boat floating on a piece of timber from the ship’s load and a third survivor, Noake, also made the boat. Along with the lifeboat rescue crew, 25-year-old William Ferrier rowed his small dingy through the heavy seas and managed to rescue the Captain, whom he landed on the breakwater. Ferrier then returned to the ship to attempt a final rescue, losing his oars and rowlocks into the high sea. Using just a spare paddle he skulled towards the La Bella, reaching her stern in time to cut loose the lone surviving sailor, Payne, from the lashing that held him to the ship; the terrified sailor dropped from the ship and into the dingy. Shortly after the last man was rescued, the La Bella was lifted by a huge wave and crashed back down on the reef; she broke up and sank. The ordeal had lasted ten hours. The survivors were taken to the nearby Bay View Hotel and gratefully received warm food and clothing, medical attention and a place to sleep. In the following days, an unidentified body of a young person had washed ashore; it was either Watson or Denham. The body was buried in the Warrnambool cemetery with an appropriate gravestone and inscription. William Ferrier became a national hero as news of the daring rescue spread. In recognition of his bravery in the two daring rescues, he was awarded the Silver Medal for Bravery by the Royal Humane Society and was honoured in the letter from the Prime Minister and the Parliament of the Commonwealth, telegrams and a cheque for £20 from the Governor-General, over £150 subscribed by the public, including Warrnambool and district and readers of The Argus, and a gold medal from the Glenelg Dinghy Club of South Australia. Ferrier’s rescue efforts are one of the most heroic in Victoria’s shipwreck history. (William Ferrier’s son, Frank, received a similar award almost fifty years later when he helped rescue four members of the crew on the yacht Merlan after it ran on to a reef near the Point Lonsdale Lighthouse. ) The wreck of La Bella now lies on her port side in 13 metres of sheltered water inside the reef she struck. The bow section is relatively intact and part of the stern has drifted north-easterly towards the mouth of the Hopkins River. The reef the La Bella struck now bears its name. Those five rescued from the La Bella were Captain George Mylius, Leonard Robertson (2nd Mate, 21 years old), R. Payne, Oscar Rosenholme and Jack Noake. Those seven who lost their lives were Mr Coulson (1st mate), Charles Jackman (cook) Gustave Johnson, Pierre Johann and Robert Gent (all able seamen), Harry Watson (ordinary seaman) and Jack Denham (ship’s boy), Captain Mylius was found guilty of careless navigation; he had sailed into the bay without the services of a pilot. His Master Certificate was suspended for twelve months. Later he was also charged with manslaughter of one of the crew who had died when the La Bella was wrecked but found not guilty. The event’s adverse publicity and damage to his career took a toll on his health and he died of a heart attack six months after the wreck; he was only thirty-seven. His body was buried in the Melbourne General Cemetery. The La Bella was “the best documented of all sailing ships owned in New Zealand”. Her record books, ship logs, correspondence and supporting papers are still available. At the time of the tragedy, she was owned by Messers David C.Turnbull and Co. of Timaru, New Zealand timber merchants and shipping agents, who had purchased her on 13th December 1901. A detailed account of the last journey of La Bella can be read in “Leonard Robertson, the Whangaroa & La Bella” written by Jack Churchouse, published in 1982 by Millwood Press Ltd, Wellington, NZ. As well as this postcard, Flagstaff Hill’s La Bella Collection includes a photograph of the wrecked La Bella, a brass rail holder and the letter from the Prime Minister and other Members of Parliament that was sent to William Ferrier to commend him for his bravery. Some 15 – 17 ships are believed to have sunk in Lady Bay, but only two have been discovered on the seafloor; the “La Bella” and the “Edinburgh Castle”. Both wrecks are popular diving sites and are preserved as significant historical marine and marine archaeological sites. This postcard is part of the La Bella Collection and is significant at both a local and state level. Its connection to the La Bella shipwreck and the rescue of five survivors highlights the dangers of Victoria’s Shipwreck Coast. The photograph of William Ferrier and four of the five survivors demonstrates the bravery of ordinary Australians who risked their lives to save victims of shipwrecks along the coast. The postcard is significant to the history of Warrnambool as it portrays William Ferrier, a local fisherman whose descendants continue to live in the area. It highlights the way of life of people who lived in coastal towns in 19th century Victoria and the effects of shipwrecks upon them. The postcard connects to the congratulatory letter which was sent to William Ferrier by the Prime Minister and Government of Australia and demonstrates the importance they attached to his efforts for Victoria and to Australia. The postcard is also an example of the photography of Foyle Photographers who were in the town of Warrnambool from the late 1800’s. Charles and Lillian Foyle took over the business when their father James died in 1905. Lillian Foyle is significant as the first woman photographer in Warrnambool. It is not known whether Charles of Lillian took this photograph. This postcard is significant because of its association with the sailing ship “La Bella”. The “La Bella” is of local and state and national significance. It is one of the only two shipwrecks discovered in Lady Bay, Warrnambool, out of the 15-17 shipwrecks in the bay. Sepia photograph of William (Bill) Ferrier (seated in the middle), heroic rescuer of two crew members of the La Bella, wrecked at Warrnambool. The photograph is a postcard and shows five men dressed formally in suits and hats. Printed below the photograph are the name and place of the photographer, a royal crest and the details of two patrons of the photographer. Also below the photograph are some handwritten words in black pen. On the back of the postcard is a handwritten message in the same writing as the front.Printed on the front of the card is “Foyle, WARRNAMBOOL” “PATRONS: / HIS ROYAL HIGHNESS THE DUKE OF CORNWALL & YORK. / HIS EXCELLENCY LORD BRAS_ EY, R.O.B.” Handwritten on the front of the card is “Bill Ferrier / rescuer / Oh my hero _ _ _ “ Handwritten on the back of the card is a message. “La Bella” Wrecked off W.Bool Breakwater Nov. 1906 (_ _ _ _ show night) Payne Noake Rosenholme Robertson and Capt Mylius (saved) (moonlight bright) Watson (_ _ _ _ boy) Richwoud [possibly Richmond] drowned” and signed “Desdewoua [possibly Desdemona] Slogos”la bella, foyle, william ferrier, bill ferrier, lady bay, 1905, 10th november 1905, 11th november 1905, parliament of the commonwealth, royal humane society medal, flagstaff hill, warrnambool, shipwrecked coast, flagstaff hill maritime museum, maritime museum, shipwreck coast, flagstaff hill maritime village -
 Bendigo Military Museum
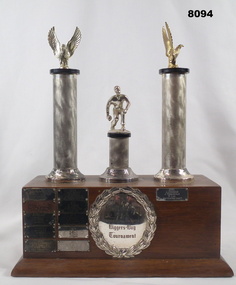
Memorabilia - TROPHY, BOWLS, RSL DIGGERS DAY, C.1971
Each plaque has 4 names on being the winning team for that year. The plaques start 1971 and the last 1981. The Bendigo RSL Sub Branch conducted a Diggers Day Bowls as far back as 1953.Trophy, brown wood rectangular base shape with 3 pillars on top of metallic construction, all are round shape, 2 have a depiction of a bird on top with outstretched wings, the centre shorter one has a depiction of a man playing bowls. The base has a central plaque with a wreath around engraved in the middle. On the left of the base are 10 x small plaques engraved with names on, 1 x small plaque on the right of the base.On centre plaque, "Presented by R.H. Trethewey MLA - Perpetual Trophy - Diggers Day Tournament". Example plaque, "1977 - H. Tobin - W. Smith - P. Weymouth - J. Cruse"brsl, smirsl, diggers day, bowls -
 Ballarat Tramway Museum
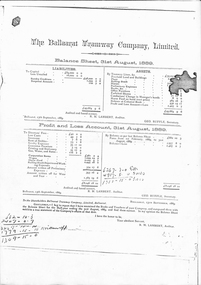
Document - Photocopies, Public Records Office of Victoria, BTCo Financial Reports, 1994
Photocopies of the half yearly financial reports for the Ballaarat Tramway Company Limited, giving details of the Balance sheets, the Profit and Loss statement and the Auditors reports (first three only) for the periods 31/8/1889 to 31/8/1890 (three number) and 28 Feb 1897 to 31 August 1902. Photocopies arranged by Alan Bradley c 1990 from files of Company Records held in the Public Records Office of Victoria. Item Year 1250.1 - 8/1889 1250.2 - 2/1890 1250.3 - 8/1890 1250.4 - 2/1897 1250.5 - 8/1897 1250.6 - 2/1898 1250.7 - 2/1899 1250.8 - 8/1899 1250.9 - 2/1900 1250.10 - 8/1900 1250.11 - 2/1901 1250.12 - 8/1901 1250.13 - 2/1902 1250.14 - 8/1902* All reports single page and formally typeset and printed. *1250.14 - Profit and loss account hand copied and type following being missed in the photocopying by the PROV. Rest of statement, typed and copied over two pages.trams, tramways, annual reports, ballaarat tramway company, horse trams, financial statements -
Mission to Seafarers Victoria
Letter - Correspondence, 20/12/1952
Quinn CollectionA three page letter written on three sheets of unlined, buff-coloured paper (0908.a1-3). Letter is headed 542 Jersey Street, San Francisco, phone AJ 2-0309 and dated 20/12/52. The matching envelope (0908.b) is addressed to Mr Allen [sic] Quinn. It has been re- addressed from C/- Australia House, The Strand, London, England to 8 Gloucester Walk, W8. Written in the top left hand corner is N Cowley, 542 Jersey St. S.F. Calif. Below this is a purple post office 'Returned To Sender From San Francisco Postage Due.' stamp . This is partially obscured by one of the five three-cent postage stamps placed across the top and down the right hand side of the envelope. 'Air Mail' is written diagonally across the lower left hand corner. On the back is a partially legible postmark dated 2 January 1953. The postmark on the front is illegible. Letter commences "Dear Allen [sic]...." and concludes "...Merry Xmas and Happy New Year from Pat, Darline, Allen and Norman your Yavla Swenska Shipmate,"letters-from-abroad, allan quinn, london, norm cowley -
Mission to Seafarers Victoria
Letter - Correspondence, 16/07/1952
Allan has finished his photography course and passed the exams.. Eleven of his photos were exhibited in the end of year exhibition and one of them, a portrait of an Indian girl, received a gold star award. Quinn CollectionA pale blue self-folding letter (0901.a1) headed 8 Gloucester Walk, London W 8 and dated 16/07/52. Letter is written in green ink. It is addressed to Mrs K Hayes, 14 Fitzroy Street, St Kilda, Victoria, Australia. It is postmarked Paddington W 2. Return address is Allan Quinn, 8 Gloucester Walk, London W 8. letters-from-abroad, allan quinn, alette andersen, london 1952, vera south, musical 'south pacific', mary martin, pat and barry hannon, covent garden, margot fonteyn, frank sedgman -
 Northern District School of Nursing. Managed by Bendigo Historical Society Inc.
Photograph - School 70 - 3 First Year Nurses simulating examination of ear - Senior Demonstration Room
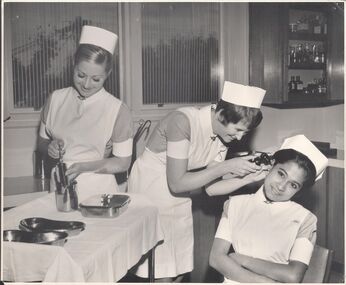
The Northern District School of Nursing opened in 1950 in to address the issues around nurse recruitment, training and education that had previously been hospital based. The residential school was to provide theoretical and in-house education and practical training over three years. The students would also receive practical hands-on training in the wards of associated hospitals. The Northern District School of Nursing operated from Lister House, Rowan Street, Bendigo. It was the first independent school of nursing in Victoria and continued until it closed in 1989.2 Black and White photos - 1 Nurse sitting 1 Nurse bending forward with medical instrument in her hand. Remaining nurse has syringe in her hand standing at table. Medical instruments and table and bottles in cupboard at back right hand side2 photos both have names and inscriptions on back of photosnurse training, nurses uniform, nursing history -
 Flagstaff Hill Maritime Museum and Village
Letter - William Ferrier, 14th November 1905
The letter to William Ferrier of South Warrnambool from the Prime Minister and the Parliament of the Commonwealth recognised the significance of William’s brave and courageous lifesaving act to the people of Australia; “They all feel that your conduct was worthy of the best deeds done by British sailors in the past and they are proud to know that Australia can produce such as you.” The story of that brave rescue follows on below … The ship from which the sailors were rescued was the three-masted, iron and steel barquentine the La Bella, built in Norway in 1893. She was one of two iron and steel ships by Johan Smith, The company was one of the leading shipping families in Tvedestrand, Norway. She was significant to Norwegian shipping, being one of only 27 iron and steel ships ever built in Norway. She was registered in New Zealand and engaged from 1902 in inter-colonial trading of timber in the Pacific, between New Zealand and Australia and was often in Port Phillip Bay, Victoria. On 5th October 1905, the twelve-year-old La Bella left Lyttleton, New Zealand carrying a cargo of timber bound for Warrnambool, Australia. She was manned by a crew of twelve: the Master, (Captain Mylius, previously 1st Mate of La Bella, appointed Captain to La Bella on 6th February 1903) 2 Mates, Cook, six able seamen, one ordinary seaman and a boy. Bad weather en route caused her to shelter at Burnie on Tasmania's North West coast. On November 10th, the 37th day of her journey, La Bella approached Warrnambool. Captain Mylius steered her towards Lady Bay Channel in heavy south-west seas and evening mist. He ordered the helmsman to steer for the light. As the ship came round, a tremendous sea struck her on the port quarter, causing her to breach broadside in a north-westerly direction into breakers. The helm was brought round twice more, but each time heavy seas broke over her, the third time throwing the La Bella on to a submerged reef in Lady Bay now known as La Bella Reef (about 100 yards from the Warrnambool breakwater). The sea was so rough that it even wrenched a one-and-a-half ton anchor from its fastenings and into the sea. As Captain Mylius headed to the steel wheelhouse, intending to send up a rocket flare, a huge sea slammed the steel door into him (resulting in massive bruising front and back) Despite his injuries he still managed to set off a blue light, which he held up in his hands. La Bella’s lifeboats were filled with seawater and broke up on their chocks. The blue light was the first indication to people on the shore that there was a ship in distress. The Harbour Master, Captain Roe (who lived in the Harbour Master’s House opposite Flagstaff Hill), organised a group of volunteers to crew the lifeboat because the trained crew was unavailable; the crewmen were working on a steamer in Port Fairy at the time. He then poured oil onto the water to try and smooth the sea. At around 11 pm three of the crew took shelter in the steel forecastle but the sea crashed into it and broke it up. While the rest of the crew and onlookers watched helplessly in the moonlight the bodies were washed away into the sea, never to be seen again. Some of the crew lashed themselves to the weather rail to keep from being washed away. Watson, the ordinary seaman, became tangled in the rigging lines and was too weak to move, so the 2nd Mate, Robertson, put a line onto him so that he wouldn’t wash off. Around 11 pm three of the crew were unconscious from exhaustion. The situation on La Bella was becoming dangerous. The 2nd Mate moved to the ‘house’ and soon afterwards the ship slipped in the heavy sea. The lashings of the 1st Mate and the ‘boy’ Denham had kept them safe until about 2 am when they were washed overboard; no one was able to help. One by one, the exhausted crew were being washed overboard, too weak to hold on any longer. During the night the La Bella had broken into two and the deckhouse ran out towards the sea. Two more men drowned when trying to reach the lifeboat. By sunrise, the only survivors of the twelve were the Master, 2nd Mate and three seamen. Early in the morning, Captain Roe used the rocket apparatus on shore to try and shoot a line to the ship for a safer rescue but each attempt fell short of the target. Several attempts were made by the lifeboat to rescue the stricken sailors, but the rough conditions made this difficult for the boat to get close enough to the ship and the lifeboat had to return to shore. During a final attempt to reach the ship Captain Mylius ordered his men to jump into the sea. Leonard Robertson, 2nd mate, jumped and swam towards the lifeboat, taking hold of the boat hook offered to him. Oscar Rosenholme managed to reach the boat floating on a piece of timber from the ship’s load and a third survivor, Noake, also made the boat. Along with the lifeboat rescue crew, 25-year-old William Ferrier rowed his small dingy through the heavy seas and managed to rescue the Captain, whom he landed on the breakwater. Ferrier then returned to the ship to attempt a final rescue, losing his oars and rowlocks into the high sea. Using just a spare paddle he skulled towards the La Bella, reaching her stern in time to cut loose the lone surviving sailor, Payne, from the lashing that held him to the ship; the terrified sailor dropped from the ship and into the dingy. Shortly after the last man was rescued, the La Bella was lifted by a huge wave and crashed back down on the reef; she broke up and sank. The ordeal had lasted ten hours. The survivors were taken to the nearby Bay View Hotel and gratefully received warm food and clothing, medical attention and a place to sleep. In the following days, an unidentified body of a young person has washed ashore; it was either Watson or Denham. The body was buried in the Warrnambool cemetery with an appropriate gravestone and inscription. William Ferrier became a national hero as news of the daring rescue spread. In recognition of his bravery in the two daring rescues, he was awarded the Silver Medal for Bravery by the Royal Humane Society and was honoured in the letter from the Prime Minister and the Parliament of the Commonwealth, telegrams and a cheque for £20 from the Governor-General, over £150 subscribed by the public, including Warrnambool and district and readers of The Argus, and a gold medal from the Glenelg Dinghy Club of South Australia. Ferrier’s rescue efforts are one of the most heroic in Victoria’s shipwreck history. (William Ferrier’s son, Frank, received a similar award almost fifty years later when he helped rescue four members of the crew on the yacht Merlan after it ran on to a reef near the Point Lonsdale Lighthouse. ) The wreck of La Bella now lies on her port side in 13 metres of sheltered water inside the reef she struck. The bow section is relatively intact and part of the stern has drifted north-easterly towards the mouth of the Hopkins River. The reef the La Bella struck now bears its name. Those five rescued from the La Bella were Captain George Mylius, Leonard Robertson (2nd Mate, 21 years old), R. Payne, Oscar Rosenholme and Jack Noake. Those seven who lost their lives were Mr Coulson (1st mate), Charles Jackman (cook) Gustave Johnson, Pierre Johann and Robert Gent (all able seamen), Harry Watson (ordinary seaman) and Jack Denham (ship’s boy), Captain Mylius was found guilty of careless navigation; he had sailed into the bay without the services of a pilot. His Master Certificate was suspended for twelve months. Later he was also charged with the manslaughter of one of the crew who had died when the La Bella was wrecked but found not guilty. The event’s adverse publicity and damage to his career took a toll on his health and he died of a heart attack six months after the wreck; he was only thirty-seven. His body was buried in the Melbourne General Cemetery. The La Bella was “the best documented of all sailing ships owned in New Zealand”. Her record books, ship logs, correspondence and supporting papers are still available. At the time of the tragedy, she was owned by Messers David C.Turnbull and Co. of Timaru, New Zealand timber merchants and shipping agents, who had purchased her on 13th December 1901. A detailed account of the last journey of La Bella can be read in “Leonard Robertson, the Whangaroa & La Bella” written by Jack Churchouse, published in 1982 by Millwood Press Ltd, Wellington, NZ. As well as this letter, Flagstaff Hill’s La Bella Collection includes a photograph of the wrecked La Bella, a brass rail holder and a postcard of William Ferrier with four of the survivors. Some 15 – 17 ships are believed to have sunk in Lady Bay, but only two have been discovered on the seafloor; the “La Bella” and the “Edinburgh Castle”. Both wrecks are popular diving sites and are preserved as significant historical marine and marine archaeological sites. This original congratulatory letter sent to William Ferrier by the Prime Minister and Government of Australia demonstrates the importance attached to his efforts for Victoria and to Australia. The letter is part of the La Bella Collection and is significant at both a local and state level. Its connection to the La Bella shipwreck and the rescue of five survivors highlights the dangers of Victoria’s Shipwreck Coast. The letter to William Ferrier from the Australian Government acknowledges the bravery of ordinary Australians who risked their lives to save victims of shipwrecks along the coast. The letter is significant to the history of Warrnambool as it honours William Ferrier, a local fisherman whose descendants continue to live in the area. It highlights the way of life of people who lived in coastal towns in 19th century Victoria and the effects of shipwrecks upon them. The letter connects to the postcard of William Ferrier with four of the five rescued crew, the photograph of the wreck of the La Bella and the artefact from the wreck, the rail holder. This letter is significant because of its association with the sailing ship “La Bella”. The “La Bella” is of local and state and national significance. It is one of the only two shipwrecks discovered in Lady Bay, Warrnambool, out of the 15-17 shipwrecks in the bay. Letter to William Ferrier of South Warrnambool from the Prime Minister and Members of Parliament commending him on his bravery. The printed letterhead includes a coat of arms in the top centre and the official address. The letter is very neatly hand written in black pen and includes 4 signatures of Members of Parliament. The rectangular paper is cream coloured with some yellow/brown discolouring. It has the letterhead on the right hand side of it and the written letter begins below the letterhead. The paper has been folded so that the right side becomes the cover page of the letter. The writing is continued onto the inside right hand page of the folded paper and the writing ends here. There is more recent writing on the bottom right hand corner of the back page. The paper has been officially folded in half a total 3 times and there is heavy discolouration on the sections that form the front and back of the folded letter. There is a 4th fold line that is less pronounced that the other folds and would make the paper the size to fit into a pocket. At several fold creases the paper has worn through. The edges of the paper have minor tears. The printed coat of arms is that of the House of Representatives. Underneath is printed “The Parliament of the Commonwealth, / Parliament House / Melbourne”. The hand written, letter is dated “14th November, 1905” and addressed to “Mr. William Ferrier / South Warrnambool” The letter begins “The Speaker, the Prime Minister and Members of the Ministry and its supporters, the Leader and Members of the Opposition, the Leader and Members of the Labour Party, being all the Members of the House of Representatives of the Federal Parliament of Australia” … It continues “desire to express to you their appreciation of your bravery in skulling out to the wreck of the “La Bella” at Warrnambool on Saturday, 11th November, 1905, and recovering therefrom two of the crew who were in imminent danger of their lives. They all feel that your conduct was worthy of the best deeds done by British sailors in the past and they are proud to know that Australia can produce such as you.” The letter is “Signed on behalf of the Members – Speaker (Frederick Holder ), Deputy Leader of the Opposition (Joseph Cook ), Prime Minister (Alfred Deakin), Leader of the Labour Party ( J.C. Watson)” On the back of the letter is blue ink handwriting “OWNER / G. FERRIER / TO. BE. PHOTOGRAPHED / 27-4-76”la bella, william ferrier, bill ferrier, lady bay, 1905, 10th november 1905, 11th november 1905, parliament of the commonwealth, prime minister, australian government, new zealand, flagstaff hill, warrnambool, shipwrecked coast, flagstaff hill maritime museum, maritime museum, shipwreck coast, flagstaff hill maritime village -
 Flagstaff Hill Maritime Museum and Village
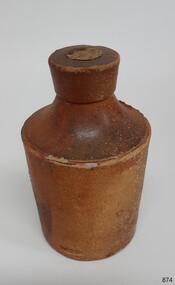
Container - Ink Bottle, Royal Doulton, 1853-1878
The ink bottle was made by the Royal Doulton company which began as a partnership between John Doulton, Martha Jones, and John Wattis an English ceramic and home accessories manufacturer founded in 1815. Operating initially in Vauxhall, London, it later moved to Lambeth, In1882 it opened a factory in Burslem, Stoke on Trent, in the centre of English pottery. The business specialised in making salt-glazed stoneware articles, including utilitarian or decorative bottles, jugs and jars, much of it intended for inns and pubs. The backbone of the business was a wide range of utilitarian wares, mostly stoneware's, including storage jars, tankards and the like, and later extending to pipes for drains, lavatories and other bathroom ceramics. From 1853 to 1902 its wares were marked Doulton & Co., then from 1902, when a royal warrant was given, wares were marked Royal Doulton. The company always made some more decorative items, initially still mostly stoneware, and from the 1860s the firm made considerable efforts to get a reputation for design, in which it was largely successful, as one of the first British makers of art pottery. Initially, this was done through artistic stoneware made in Lambeth, but in 1882 the firm bought a Burslem factory, which was mainly intended for making bone china table wares and decorative items. History of the Loch Ard: The Loch Ard got its name from ”Loch Ard” a loch that lies to the west of Aberfoyle, and the east of Loch Lomond. It means "high lake" in Scottish Gaelic. The vessel belonged to the famous Loch Line which sailed many vessels from England to Australia. The Loch Ard was built in Glasgow by Barclay, Curdle and Co. in 1873, the vessel was a three-masted square-rigged iron sailing ship that measured 79.87 meters in length, 11.58 m in width, and 7 m in depth with a gross tonnage of 1693 tons with a mainmast that measured a massive 45.7 m in height. Loch Ard made three trips to Australia and one trip to Calcutta before its fateful voyage. Loch Ard left England on March 2, 1878, under the command of 29-year-old Captain Gibbs, who was newly married. The ship was bound for Melbourne with a crew of 37, plus 17 passengers. The general cargo reflected the affluence of Melbourne at the time. Onboard were straw hats, umbrellas, perfumes, clay pipes, pianos, clocks, confectionery, linen and candles, as well as a heavier load of railway irons, cement, lead and copper. There were other items included that were intended for display in the Melbourne International Exhibition of 1880. The voyage to Port Phillip was long but uneventful. Then at 3 am on June 1, 1878, Captain Gibbs was expecting to see land. But the Loch Ard was running into a fog which greatly reduced visibility. Captain Gibbs was becoming anxious as there was no sign of land or the Cape Otway lighthouse. At 4 am the fog lifted and a lookout aloft announced that he could see breakers. The sheer cliffs of Victoria's west coast came into view, and Captain Gibbs realised that the ship was much closer to them than expected. He ordered as much sail to be set as time would permit and then attempted to steer the vessel out to sea. On coming head-on into the wind, the ship lost momentum, the sails fell limp and Loch Ard's bow swung back towards land. Gibbs then ordered the anchors to be released in an attempt to hold their position. The anchors sank some 50 fathoms - but did not hold. By this time the ship was among the breakers and the tall cliffs of Mutton Bird Island rose behind. Just half a mile from the coast, the ship's bow was suddenly pulled around by the anchor. The captain tried to tack out to sea, but the ship struck a reef at the base of Mutton Bird Island, near Port Campbell. Waves subsequently broke over the ship and the top deck became loosened from the hull. The masts and rigging came crashing down knocking passengers and crew overboard. When a lifeboat was finally launched, it crashed into the side of Loch Ard and capsized. Tom Pearce, who had launched the boat, managed to cling to its overturned hull and shelter beneath it. He drifted out to sea and then on the flood tide came into what is now known as Lochard Gorge. He swam to shore, bruised and dazed, and found a cave in which to shelter. Some of the crew stayed below deck to shelter from the falling rigging but drowned when the ship slipped off the reef into deeper water. Eva Carmichael a passenger had raced onto the deck to find out what was happening only to be confronted by towering cliffs looming above the stricken ship. In all the chaos, Captain Gibbs grabbed Eva and said, "If you are saved Eva, let my dear wife know that I died like a sailor". That was the last Eva Carmichael saw of the captain. She was swept off the ship by a huge wave. Eva saw Tom Pearce on a small rocky beach and yelled to attract his attention. He dived in and swam to the exhausted woman and dragged her to shore. He took her to the cave and broke the open case of brandy which had washed up on the beach. He opened a bottle to revive the unconscious woman. A few hours later Tom scaled a cliff in search of help. He followed hoof prints and came by chance upon two men from nearby Glenample Station three and a half miles away. In a complete state of exhaustion, he told the men of the tragedy. Tom then returned to the gorge while the two men rode back to the station to get help. By the time they reached Loch Ard Gorge, it was cold and dark. The two shipwreck survivors were taken to Glenample Station to recover. Eva stayed at the station for six weeks before returning to Ireland by steamship. In Melbourne, Tom Pearce received a hero's welcome. He was presented with the first gold medal of the Royal Humane Society of Victoria and a £1000 cheque from the Victorian Government. Concerts were performed to honour the young man's bravery and to raise money for those who lost family in the disaster. Of the 54 crew members and passengers on board, only two survived: the apprentice, Tom Pearce and the young woman passenger, Eva Carmichael, who lost her family in the tragedy. Ten days after the Lochard tragedy, salvage rights to the wreck were sold at auction for £2,120. Cargo valued at £3,000 was salvaged and placed on the beach, but most washed back into the sea when another storm developed. The wreck of Lochard still lies at the base of Mutton Bird Island. Much of the cargo has now been salvaged and some items were washed up into Lochard Gorge. Cargo and artefacts have also been illegally salvaged over many years before protective legislation was introduced in March 1982. One of the most unlikely pieces of cargo to have survived the shipwreck was a Minton majolica peacock- one of only nine in the world. The peacock was destined for the Melbourne 1880 International Exhibition. It had been well packed, which gave it adequate protection during the violent storm. Today the Minton peacock can be seen at the Flagstaff Hill Maritime Museum in Warrnambool. From Australia's most dramatic shipwreck, it has now become Australia's most valuable shipwreck artifact and is one of very few 'objects' on the Victorian State Heritage Register.An early utilitarian stoneware item made by a well-known company that specialised in making salt-glazed items that later earned a reputation for making stoneware art objects. Of additional significance is that it was recovered from the wreck of the Loch Ard. A shipwreck that is of additional significance as it is registered on the Victorian Heritage Register ( S 417). Flagstaff Hill has a varied collection of artefacts from Loch Ard and its collection is significant for being one of the largest accumulations of artefacts from this notable Victorian shipwreck of which the subject items are a small part. The collections objects give us a snapshot of how we can interpret the story of this tragic event. The collection is also archaeologically significant as it represents aspects of Victoria's shipping history that allows us to interpret Victoria's social and historical themes of the time. Through is associated with the worst and best-known shipwreck in Victoria's history. Salt glazed stoneware ink bottle, large capacity, tapered lip and body, two-tone brown with some encrustation on surface, still sealed with cork. Inscription in clay. Recovered from the wreck of the LOCH ARD.Stamped into clay "DOULTON LAMBETH"flagstaff hill, warrnambool, flagstaff hill maritime museum, shipwreck coast, flagstaff hill maritime village, great ocean road, loch line, loch ard, captain gibbs, eva carmichael, tom pearce, glenample station, mutton bird island, loch ard gorge, ink bottle, bulk ink bottle, writing accessory, stationery, stoneware, doulton lambeth, royal doulton, writing equipment -
National Vietnam Veterans Museum (NVVM)
Book, Year of the horse - Vietnam: 1st Air C (softcover) (Copy 2)
vietnam war, 1961-1975 - personal narratives - american -
 Kiewa Valley Historical Society
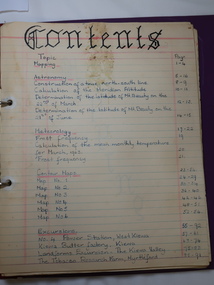
Folder - School exercise book
Students used folders to store and present their work that was added to throughout the year. Pencils and ink were used to write and draw with cutouts from newspapers etc. and occasionally a typewriter was used.Lorraine Smith was a student at Mt Beauty in 1963. This book gives an insight on topics studied and presented during her year of schooling.Plastic purple folder with 2 rings to hold each page. The contents list 91 pages.school book -
 Bendigo Military Museum
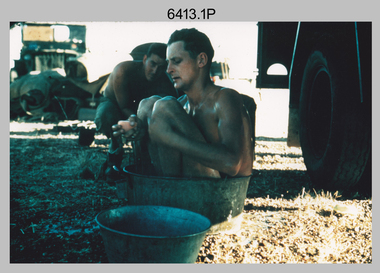
Photograph - Royal Australian Survey Corps Surveyors in the Field – North Queensland, 1958
This is a set of seven photographs of surveyors and support staff in the field undertaking duties in North Queensland in 1958. The surveyors were employed in the establishment of mapping and geodetic control. In this era surveyors used theodolites to observe horizontal and vertical angles and chains to measure base line distances between survey stations. Bob Skitch shown in photos .4P to .6P was in the 2nd year of his career in the Australian Army. He achieved the rank of Lieutenant Colonel and his last appointment was the CO of the Army Survey Regiment from 1976 to 1980. The annotation on the back of photo .5P ‘Black foreground is where Bob Skitch boiled billy and started a grass fire’.This is a set of seven photographs of surveyors and support staff in the field undertaking duties in North Queensland in 1958. The photographs were printed on photographic paper and are part of the Army Survey Regiment’s Collection. The photographs were scanned at 300 dpi. .1) - Photo, colour, 1958. Surveyor in Nth QLD enjoying a bath. L to R: Don Cocker, Bob Thompson. .2) - Photo, colour, 1958. Don Cocker surveyor in Nth QLD, enjoying a bath. .3) - Photo, colour, 1958. Surveyors Nth QLD undertaking survey observations, using MRA1 tellurometer to measure base-line distances. L to R: Len Davies, Lou Sommer, John Van De Graff. MRA1 was covered to stop overheating. .4) - Photo, colour, 1958. Surveyors south of Richmond, QLD digging holes for the erection of a Bilby observation tower. L to R: John Van De Graff, Bob Skitch, Kev Moody, Mal Hayes, Don Gray .5) - Photo, colour, 1958. Surveyors south of Richmond, QLD erecting a Bilby observation tower. L to R: Tom Royle, Bob Skitch (on ground level), Mal Hayes. .6) - Photo, colour, 1958. Surveyors south of Richmond, QLD erecting a Bilby observation tower. L to R: Tom Royle, Bob Skitch, Mal Hayes, Jim McGill (on ground level). .7) - Photo, colour, 1958. Surveyors south of Richmond, QLD undertaking survey measurements from a Bilby observation tower..1P to .7P annotated on back – personnel names, the year and the location. Annotated on back of .5P ‘Black foreground is where Bob Skitch boiled billy and started a grass fire’.royal australian survey corps, rasvy, army survey regiment, asr, army svy regt, fortuna, surveying -
 Bendigo Military Museum
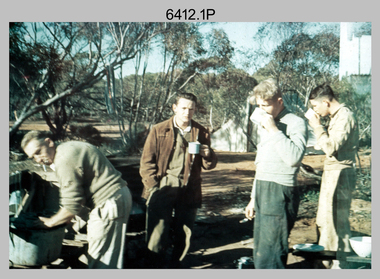
Photograph - Royal Australian Survey Corps Surveyors in the Field – Victoria, 1956 - 1958
This is a set of two photographs of surveyors and support staff in the field undertaking tasks in Victoria 1956 – 1958. The surveyors were employed in the establishment of mapping and geodetic control. In this era surveyors used theodolites to observe horizontal and vertical angles and chains to measure base line distances between survey stations. This is a set of 23 photographs of surveyors and support staff in the field undertaking duties in Victoria 1956 – 1958. The photographs were printed on photographic paper and are part of the Army Survey Regiment’s Collection. The photographs were scanned at 300 dpi. .1) - Photo, colour, 1956. Surveyors enjoying a tea break. L to R: Tom Gilbert (cook), Barry Broad, Tony Slattery, John Van De Graff. Taken at Boonoonar, a locality south of Mildura. .2) - Photo, colour, 1958. Surveyors taking a break from driving. L to R: Leo Bub, Bob Thompson. Taken at Puckapunyal..1P to .2P annotated on back – personnel names, the year and the location. royal australian survey corps, rasvy, army survey regiment, asr, army svy regt, fortuna, surveying