Showing 386 items matching "trams 1972"
-
 Ballarat Tramway Museum
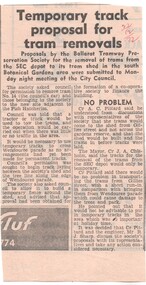
Newspaper, The Courier Ballarat, "Temporary track proposal for tram removals", 22/12/1972 12:00:00 AM
... Newspaper clipping from The Courier, 22/12/1972 about the proposal of the BTPS for the removal of trams from the SEC depot to its tram shed in Botanical Gardens being presented to the City of Ballaarat. ...Ballarat Tramway Museum South Gardens Reserve Wendouree Parade Ballarat Ballarat goldfields Trams tramways BTPS Track Laying New Depot date in red ink of "22/12/72" in top right hand corner. Newspaper clipping from The Courier, 22/12/1972 about the proposal of the BTPS for the removal of trams from the SEC depot to its tram shed in Botanical Gardens being presented to the City of Ballaarat. ...Newspaper clipping from The Courier, 22/12/1972 about the proposal of the BTPS for the removal of trams from the SEC depot to its tram shed in Botanical Gardens being presented to the City of Ballaarat. Notes removal of tramcar 14, temporary fence around shed, construction of a short temporary line to Wendouree Parade and formation of a Co-operative to finance the construction of the building. Mentions Mayor Cr. J. Chisholm, Cr. A. Pittard and the City Engineer, Mr. R. Sharp.date in red ink of "22/12/72" in top right hand corner.trams, tramways, btps, track laying, new depot -
 Ballarat Tramway Museum
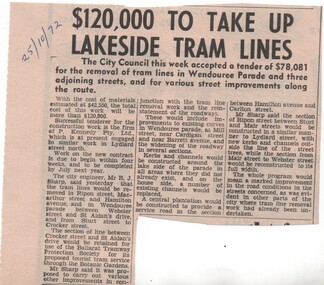
Newspaper, The Courier Ballarat, "$120,000 to take up lakeside tram lines", 25/10/1972 12:00:00 AM
... Newspaper clipping from The Courier, 25/10/1972 about the acceptance of a tender of $78,081 for the removal of tram lines in Wendouree Parade and three adjoining streets. ...Ballarat Tramway Museum South Gardens Reserve Wendouree Parade Ballarat Ballarat goldfields Trams tramways BTPS Track Removal Wendouree Parade date in blue ink of "25/10/72" in top left hand corner. Newspaper clipping from The Courier, 25/10/1972 about the acceptance of a tender of $78,081 for the removal of tram lines in Wendouree Parade and three adjoining streets. ...Newspaper clipping from The Courier, 25/10/1972 about the acceptance of a tender of $78,081 for the removal of tram lines in Wendouree Parade and three adjoining streets. Cost of materials supplied estimated to be more $42,550, giving a total of more than $120,000. Contractor - P. Kennedy Pty Ltd. Various roadworks to be undertaken detailed in the article by Mr. Sharp, City Engineer. Mentions retention of tramway track for the BTPS (given as the Ballarat Tramway Protection Society)date in blue ink of "25/10/72" in top left hand corner.trams, tramways, btps, track removal, wendouree parade -
 Ballarat Tramway Museum
Newspaper, The Courier Ballarat, "Tram Society puzzled by response", 13/12/1972 12:00:00 AM
... 1972, with the BTPS Vice President Mr. M. Calnin expressing puzzlement at the official and public response to the Society's efforts to establish its tourist tram route near Wendouree Parade. ...Ballarat Tramway Museum South Gardens Reserve Wendouree Parade Ballarat Ballarat goldfields Trams tramways BTPS Trackwork Museum Establishment date in blue ink of "13/12/72" in top area of cutting. Newspaper clipping from The Courier, 13/12/1972, with the BTPS Vice President Mr. ...Newspaper clipping from The Courier, 13/12/1972, with the BTPS Vice President Mr. M. Calnin expressing puzzlement at the official and public response to the Society's efforts to establish its tourist tram route near Wendouree Parade. He contrasted this to the enthusiasm in Bendigo. Also mentions the development of Sovereign Hill. Notes track laying work underway this weekend.date in blue ink of "13/12/72" in top area of cutting.trams, tramways, btps, trackwork, museum establishment -
 Ballarat Tramway Museum
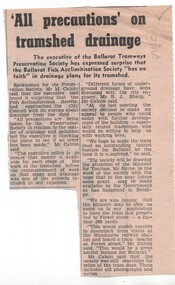
Newspaper, The Courier Ballarat, "All precautions on tram shed drainage", 14/11/1972 12:00:00 AM
... Newspaper clipping from The Courier, 14/11/1972 about Mr Maurie Calnin for the BTPS expressing surprise that the Fish Acclimatisation Society had approached the City Council with its worries about drainage from the shed. Notes discussion with Mr. Sharp, the City Engineer and the hope that it would be able to have the tram...Ballarat Tramway Museum South Gardens Reserve Wendouree Parade Ballarat Ballarat goldfields Trams tramways BTPS Fish Hatchery Drainage date in pencil of "14/11/72" in top right hand corner of cutting. Newspaper clipping from The Courier, 14/11/1972 about Mr Maurie Calnin for the BTPS expressing surprise that the Fish Acclimatisation Society had approached the City Council with its worries about drainage from the shed. ...Newspaper clipping from The Courier, 14/11/1972 about Mr Maurie Calnin for the BTPS expressing surprise that the Fish Acclimatisation Society had approached the City Council with its worries about drainage from the shed. Notes discussion with Mr. Sharp, the City Engineer and the hope that it would be able to have the tram line saved to Forest St. to enable passengers to disembark at Wendouree Railway Station.date in pencil of "14/11/72" in top right hand corner of cutting.trams, tramways, btps, fish hatchery, drainage -
 Ballarat Tramway Museum
Document - Photocopy, Neville Gower, " Mayor's Report 1972-1973" and "1979", Jul. 1997
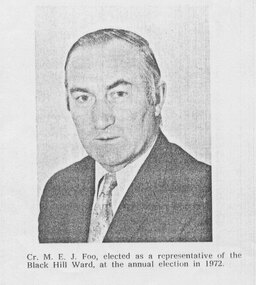
... Ballarat Tramway Museum South Gardens Reserve Wendouree Parade Ballarat Ballarat goldfields Trams tramways City of Ballaarat Councillors Melton Foo Civic History Details of the photocopy in pencil on the top edge. 1636.1 - Photocopy of part of City of Ballaarat's Mayor's Report for 1972- 1973. ...1636.1 - Photocopy of part of City of Ballaarat's Mayor's Report for 1972- 1973. Originals held in the Ballarat Library. One page covering notes on the Councillors and the election of Cr. Melton Foo, who was the President of the Ballarat Tramway Museum, prior to the election. Has a photograph of Cr. Foo. An item on the page as well are notes on the banking arrangements of the City of Ballaarat. 1636.2 - Photocopy of part of the City of Ballaarat's Mayor's Report for 1979 - photograph of Cr. Foo as the Mayor and the Mayoress, Mrs. Foo. 1636.3 - ditto, but the Introduction to the Report, written by Melton Foo as the Mayor.Details of the photocopy in pencil on the top edge.trams, tramways, city of ballaarat, councillors, melton foo, civic history -
 Ballarat Tramway Museum
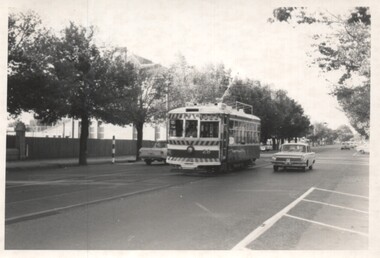
Photograph - Black & White Photograph/s, Neville Gower, 16/04/1972 12:00:00 AM
... No ads in advertising racks on top of tram. On Kodak paper. On 16/4/1972. Reimaged 17/7/2019 both front and back....No ads in advertising racks on top of tram. On Kodak paper. On 16/4/1972. Reimaged 17/7/2019 both front and back. ...Black & White photograph of Bendigo No. 18, travelling along Pall Mall with Post Office in background and motor cars in foreground, with white marker on front of tram, with 'Depot' showing. No ads in advertising racks on top of tram. On Kodak paper. On 16/4/1972. Reimaged 17/7/2019 both front and back.'2nd last tram back from Eaglehawk / Note markers as used in Bendigo' on rear of photographtrams, tramways, bendigo, pall mall, post office , tram 18 -
 Ballarat Tramway Museum
Photograph - Black & White Photograph/s - set of 2, Neville Gower, 16/04/1972 12:00:00 AM
... Bendigo running out for the last day 'Grand Parade' showing special - front 3/4 view. 338.2 - as above, but after tram has past photographer, has church hall in background. Both on Kodak paper. Taken on 16/4/1972....Bendigo running out for the last day 'Grand Parade' showing special - front 3/4 view. 338.2 - as above, but after tram has past photographer, has church hall in background. Both on Kodak paper. Taken on 16/4/1972. ...338.1 - Black & White photograph of No. 28 in McCrae St. Bendigo running out for the last day 'Grand Parade' showing special - front 3/4 view. 338.2 - as above, but after tram has past photographer, has church hall in background. Both on Kodak paper. Taken on 16/4/1972.On rear in black ink on both photos 'Going out for last time, for SEC to partake in Grand Parade'trams, tramways, bendigo, closure, birney, mccrae , tram 28 -
 Ballarat Tramway Museum
Document - Photocopy, Neville Gower, " Mayor's Report 1972-1973", Jul. 1997
... 1972- 1973. Originals held in the Ballarat Library. One page covering roads and bridges and reconstruction of streets following removal of trams. ...Ballarat Tramway Museum South Gardens Reserve Wendouree Parade Ballarat Ballarat goldfields Trams tramways City of Ballaarat Trams Railways Civic History Photocopy of part of City of Ballaarat's Mayor's Report for 1972- 1973. ...Photocopy of part of City of Ballaarat's Mayor's Report for 1972- 1973. Originals held in the Ballarat Library. One page covering roads and bridges and reconstruction of streets following removal of trams. Includes photos of part of Wendouree parade at View Point. Image added 18-12-2016trams, tramways, city of ballaarat, trams, railways, civic history -
 Ballarat Tramway Museum
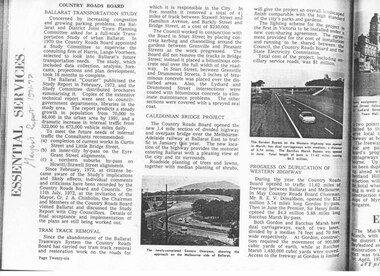
Document - Photocopy, Neville Gower, "Mayor's Report 1971-1972", Jul. 1997
... Seven pages covering trams, railways, closure of tram system, Ballarat transportation study, Caledonian bridge project, duplication of Western Highway, PMG/telephone system, with many photos of Ballarat's trams. "Mayor's Report 1971-1972" Document Photocopy Neville Gower ...Yields information about the City of Ballaarat the time of the Mayor's report to the City Council, about the events, industry, transport and other issues within the City.Photocopy of part of City of Ballaarat's Mayor's Report for 1970 - 1971. Originals held in the Ballarat Library. Seven pages covering trams, railways, closure of tram system, Ballarat transportation study, Caledonian bridge project, duplication of Western Highway, PMG/telephone system, with many photos of Ballarat's trams.trams, tramways, city of ballaarat, trams, railways, civic history -
 Ballarat Tramway Museum
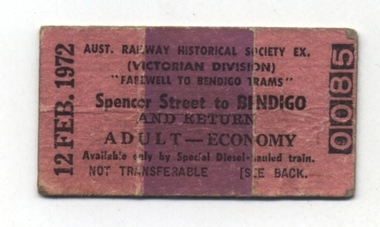
Ephemera - Ticket/s, Victorian Railways (VR), ARHS tour to Farewell Bendigo, 1972
... Trams tramways ARHS TMSV Tickets Closure Edmondson pasteboard railway ticket, No. 0085, dated 12 Feb. 1972, for use on an ARHS tour to Farewell Bendigo prior to the closure of the system. ...Has a strong association with the tours to mark the closure of the Bendigo Tramway system and Graeme Breydon.Edmondson pasteboard railway ticket, No. 0085, dated 12 Feb. 1972, for use on an ARHS tour to Farewell Bendigo prior to the closure of the system. Ticket base is pink with a thick purple stripe, which is printed in landscape format. Ticket number in reverse. Adult - Economy, available on the day of travel only and on the special train. On the rear of the ticket is the reserved seat and carriage number. Ticket used by Graeme Breydon on the day of the tour. See History of the Object for further details. Two copies held. trams, tramways, arhs, tmsv, tickets, closure -
 Ballarat Tramway Museum
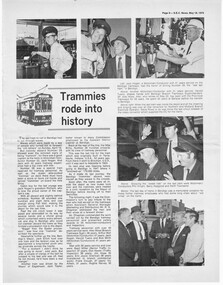
Magazine, State Electricity Commission of Victoria (SECV), "Trammies rode into history", May. 1972
... Magazine cutting from the SEC News May 18, 1972, page 9, titled "Trammies rode into history", about the closure of the SEC operated Bendigo tramways April 1972. Features photographs of tram crews, shutting down the power supply and notes on the tramcars and the closure event itself. ...Ballarat Tramway Museum South Gardens Reserve Wendouree Parade Ballarat Ballarat goldfields Trams tramways Bendigo Closure Crews Magazine cutting from the SEC News May 18, 1972, page 9, titled "Trammies rode into history", about the closure of the SEC operated Bendigo tramways April 1972. ...Magazine cutting from the SEC News May 18, 1972, page 9, titled "Trammies rode into history", about the closure of the SEC operated Bendigo tramways April 1972. Features photographs of tram crews, shutting down the power supply and notes on the tramcars and the closure event itself. trams, tramways, bendigo, closure, crews -
 Ballarat Tramway Museum
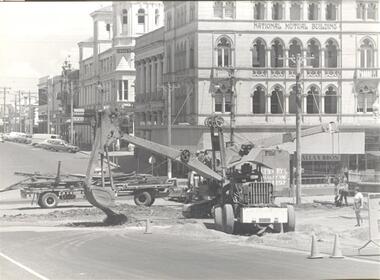
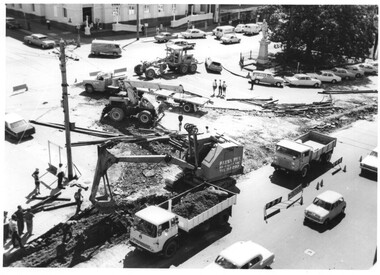
Photograph - Digital image, track removal at the corner of Sturt and Lydiard Sts, early 1972
... Ballarat Tramway Museum South Gardens Reserve Wendouree Parade Ballarat Ballarat goldfields Yields information about the track removal during early 1972 at the corner of Sturt and Lydiard Streets and the equipment used. Trams tramways Road Works Track Removal Lydiard St North Digital image (and copy print) of track removal at the corner of Sturt and Lydiard Sts, Feb. 1972 with the National Mutual and other buildings in the background. ...Yields information about the track removal during early 1972 at the corner of Sturt and Lydiard Streets and the equipment used.Digital image (and copy print) of track removal at the corner of Sturt and Lydiard Sts, Feb. 1972 with the National Mutual and other buildings in the background. Has a "dragline" type excavator, crane and truck carrying rails in the photograph. Possibly originally a Courier Photograph. See Reg Item 2214 for work at this intersection 2/2/1972. From the Victoria Collections website - sourced by Ron Scholten July 2014.trams, tramways, road works, track removal, lydiard st north -
 Ballarat Tramway Museum
Document - Photocopy, Wal Jack, "History of Ballarat Tramways - 1887 - 1953", 1953
... Trams tramways SEC ESCo Ballarat SEC Horse Trams Tramcars In pencil on the last sheet "The original of the information was loaned to me to have this copy made by Mr. W. L. Edwards of Beverin St Sebastopol 3356 - copy made 23/5/1972. ...Part 1 - Ballarat Horse Trams - notes that much of the details was supplied by the late Inspector James. Part 2 - Electric Trams - gives dates for the withdrawal of the ESCo cars, routes, SEC and extensions, including the Forest City signals. Notes assistance of Mr Hornabrook, Farr, Linaker, Hodgson and Lyons. See also Reg Item 8005 for another copy and a set of A3 size laminated photocopies.Yields information about the history of the Ballarat tramways as researched and known in 1953 by Wal Jack.Photocopy - 11 pages of a typed article or research report on foolscap paper titled "History of Ballarat Tramways - 1887 - 1953", written by Wal Jack. Second copy - Gestetner printed - 10 pages only, from a donation of Ruth Nelson - rescanned with word recognition pdf. Last page scanned and added to this file, but may not be word recognisable.In pencil on the last sheet "The original of the information was loaned to me to have this copy made by Mr. W. L. Edwards of Beverin St Sebastopol 3356 - copy made 23/5/1972. Second - copy some dates on front sheet circled and paragraphs highlighted on other pages.trams, tramways, sec, esco, ballarat, sec, horse trams, tramcars -
 Ballarat Tramway Museum
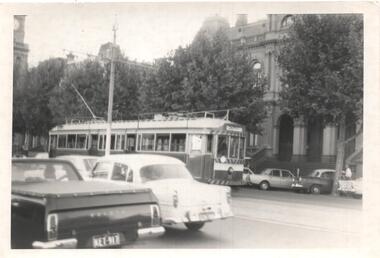
Photograph - Black & White Photograph/s, The Courier Ballarat, Feb. 1972
... Ballarat Tramway Museum South Gardens Reserve Wendouree Parade Ballarat Ballarat goldfields Yields information about the removal of the track at the intersection of Sturt and Lydiard streets in Feb. 1972. Trams tramways Tram Track Removal Sturt St Lydiard St Has the stamp of The Courier on the rear. ...Yields information about the removal of the track at the intersection of Sturt and Lydiard streets in Feb. 1972.Black and white photograph of the removal of track at the intersection of Sturt and Lydiard Streets - used in The Courier, Wednesday 2/2/1972. Shows the traffic arrangement and equipment used to remove the track. See Reg Item 2214.2 for the press cutting.Has the stamp of The Courier on the rear.trams, tramways, tram track removal, sturt st, lydiard st -
 Ballarat Tramway Museum
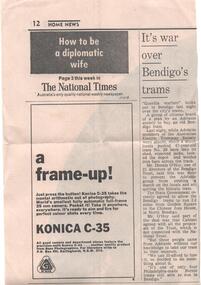
Newspaper, The National Times, "It's war over Bendigo Trams", mid 1972
... Newspaper clipping from The National Times, mid 1972 about the securing of a Birney tram by The Bendigo Trust following the attempt by the Adelaide based Australian Electric Transport Museum (called Tramway Society) to remove the tram. ...Ballarat Tramway Museum South Gardens Reserve Wendouree Parade Ballarat Ballarat goldfields Bendigo Birney AETA Loading Trams Newspaper clipping from The National Times, mid 1972 about the securing of a Birney tram by The Bendigo Trust following the attempt by the Adelaide based Australian Electric Transport Museum (called Tramway Society) to remove the tram. ...Newspaper clipping from The National Times, mid 1972 about the securing of a Birney tram by The Bendigo Trust following the attempt by the Adelaide based Australian Electric Transport Museum (called Tramway Society) to remove the tram. Cutting not dated. Quotes Dennis O'Hoy. This had large political overtones, as the tram had been given to the AETM by the SEC. Another Birney which was rebuilt from a scrapped one by the Trust was later given to the AETM.bendigo, birney, aeta, loading trams -
 Ballarat Tramway Museum
Photograph - Colour Print, Ray Jackson, 1972
... Trams tramways Victory Park Sebastopol tram 18 Colour print of 18 at Victory Park with Merry Christmas in lights on a board fixed to the roof December 1971 or 1972? ...Yields information about tram 18 after it was placed in Victory Park Sebastopol.Colour print of 18 at Victory Park with Merry Christmas in lights on a board fixed to the roof December 1971 or 1972? Colour print has rounded edgestrams, tramways, victory park, sebastopol, tram 18 -
 Ballarat Tramway Museum
Negative - Set of 4, Warren Doubleday, May or June 1972
... Ballarat Tramway Museum South Gardens Reserve Wendouree Parade Ballarat Ballarat goldfields Trams tramways BTPS Trackwork Depot Black and white negative - 4 scanned images - of the laying of the first track inside the BTPS depot - placing sleepers and rail on No. 3 road. May or June 1972 ...Black and white negative - 4 scanned images - of the laying of the first track inside the BTPS depot - placing sleepers and rail on No. 3 road. May or June 1972,trams, tramways, btps, trackwork, depot -
 Ballarat Tramway Museum
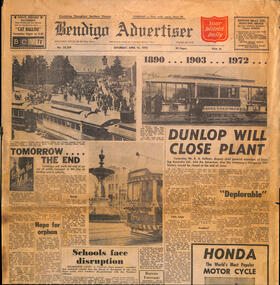
Newspaper, Bendigo Advertiser, "Tomorrow the End", 15/04/1972 12:00:00 AM
... Newspaper clipping from The Bendigo Advertiser 15/4/1972, titled "Tomorrow the End" reporting on the closure the following day of the Bendigo tramway system, Has a short history of the tramway and three photos of trams in Bendigo and the plans for the following day....Ballarat Tramway Museum South Gardens Reserve Wendouree Parade Ballarat Ballarat goldfields Closure Bendigo SEC Newspaper clipping from The Bendigo Advertiser 15/4/1972, titled "Tomorrow the End" reporting on the closure the following day of the Bendigo tramway system, Has a short history of the tramway and three photos of trams in Bendigo and the plans for the following day. ...Newspaper clipping from The Bendigo Advertiser 15/4/1972, titled "Tomorrow the End" reporting on the closure the following day of the Bendigo tramway system, Has a short history of the tramway and three photos of trams in Bendigo and the plans for the following day.closure, bendigo, sec -
 Ballarat Tramway Museum
Newspaper, The Age, "Buses take over in Bendigo", 18/05/1972 12:00:00 AM
... Newspaper clipping from The Age, Thursday May 18, 1972 reporting on the take over of the Bendigo trams by Buses. Has been poorly cut from newspaper, part of a section regarding bus transport in the newspaper. ...Ballarat Tramway Museum South Gardens Reserve Wendouree Parade Ballarat Ballarat goldfields Bendigo Buses Closure Tramways Newspaper clipping from The Age, Thursday May 18, 1972 reporting on the take over of the Bendigo trams by Buses. Has been poorly cut from newspaper, part of a section regarding bus transport in the newspaper. ...Newspaper clipping from The Age, Thursday May 18, 1972 reporting on the take over of the Bendigo trams by Buses. Has been poorly cut from newspaper, part of a section regarding bus transport in the newspaper. Has a photo of Bendigo 7.bendigo, buses, closure, tramways -
 Ballarat Tramway Museum
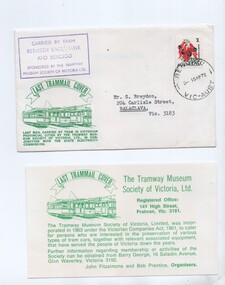
Document - Letter and Envelope, Tramway Museum Society of Victoria (TMSV), 1971
... Envelope - preprinted in dark green ink - titled "Last Trammail Cover" - with a purple stamp in top left hand corner - "Carried by Tram between Eaglehawk and Bendigo / Sponsored by the Tramway Museum Society of Victoria Ltd.", in top right hand corner - 6c Australia stamp, featuring Sturt's Desert Rose and a Post Office Cancellation stamp "Ballarat 15 April 1972". ...Ballarat Tramway Museum South Gardens Reserve Wendouree Parade Ballarat Ballarat goldfields Trams tramways TMSV Bendigo SEC Tramcars Envelope - preprinted in dark green ink - titled "Last Trammail Cover" - with a purple stamp in top left hand corner - "Carried by Tram between Eaglehawk and Bendigo / Sponsored by the Tramway Museum Society of Victoria Ltd.", in top right hand corner - 6c Australia stamp, featuring Sturt's Desert Rose and a Post Office Cancellation stamp "Ballarat 15 April 1972". ...Envelope - preprinted in dark green ink - titled "Last Trammail Cover" - with a purple stamp in top left hand corner - "Carried by Tram between Eaglehawk and Bendigo / Sponsored by the Tramway Museum Society of Victoria Ltd.", in top right hand corner - 6c Australia stamp, featuring Sturt's Desert Rose and a Post Office Cancellation stamp "Ballarat 15 April 1972". Env7lope made by Tudor Presseal. Contains a Preprinted card - green ink titled "Last Trammail Cover", headed by TMSV's name, address and details of the TMSV, with the names of the Organisers John Fitzsimons and Bob Prentice along the lower edge. Two copies held - both addressed to Mr. G,. Breydon, 204 Carlisle St, Balaclava Vic 3183. One copy was opened to check the content, the other remains sealed. See Reg Item 2942 for the Ballarat version.trams, tramways, tmsv, bendigo, sec, tramcars -
 Ballarat Tramway Museum
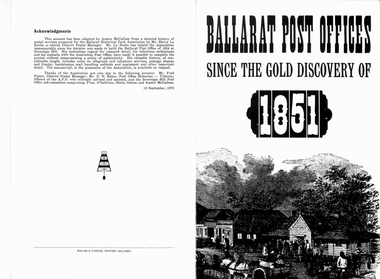
Pamphlet, Ballarat Historical Park Association (Sovereign Hill), "Ballarat Post Offices since the gold discovery of 1851", Sep. 1972
... Trams tramways Post Office Gold Sovereign Hill Pamphlet - 3 folds - printed on semi gloss paper, titled "Ballarat Post Offices since the gold discovery of 1851", outlining the history of the post offices in Ballarat, prepared for the Ballarat Historical Park Association (Sovereign Hill), 12/9/1972. ...Yields information about the postal services in the Ballarat region.Pamphlet - 3 folds - printed on semi gloss paper, titled "Ballarat Post Offices since the gold discovery of 1851", outlining the history of the post offices in Ballarat, prepared for the Ballarat Historical Park Association (Sovereign Hill), 12/9/1972. Details the history of the postal services and deliveries with a background of the establishment of Victoria and Ballarat in particular, centred around the discovery of gold. Includes notes on the construction of the Ballarat post offices and their history. Has the Park Association logo on the rear.trams, tramways, post office, gold, sovereign hill -
 Ballarat Tramway Museum
Photograph - Digital image, John Ward, 1/01/1972 12:00:00 AM
... Photo by John Ward 1 January 1972 Slide title "00890 010172 SEC Birney tram 28 Pall Mall at Williamson St outside Shamrock Hotel Bendigo Vic"...Ballarat Tramway Museum South Gardens Reserve Wendouree Parade Ballarat Ballarat goldfields Trams tramways Bendigo Pall Mall Lake Weeroona tram 28 Digital image of Bendigo 28, with a Lake Weeroona destination, at the corner will Williamson St with the Shamrock Hotel in the background. Has signs for Carlton Draught beer. A Stonemasons signs is next door. Photo by John Ward 1 January 1972 ...Digital image of Bendigo 28, with a Lake Weeroona destination, at the corner will Williamson St with the Shamrock Hotel in the background. Has signs for Carlton Draught beer. A Stonemasons signs is next door. Photo by John Ward 1 January 1972 Slide title "00890 010172 SEC Birney tram 28 Pall Mall at Williamson St outside Shamrock Hotel Bendigo Vic"trams, tramways, bendigo, pall mall, lake weeroona, tram 28 -
 Ballarat Tramway Museum
Photograph - Digital image, John Ward, 1/01/1972 12:00:00 AM
... Photo by John Ward 01-01-1972 Slide title "04759 010172 7208-H SECV bogie tram 18 Pall Mall at Williamson St Bendigo Vic"...Ballarat Tramway Museum South Gardens Reserve Wendouree Parade Ballarat Ballarat goldfields Trams tramways Bendigo Pall Mall North Bendigo tram 18 Digital image of the Bendigo 18 to North Bendigo in Pall Mall at Williamson St with the Shamrock Hotel and the ANZ Bank in the background. Has signs for Stonemasons and Myers in the photo. Photo by John Ward 01-01-1972 ...Digital image of the Bendigo 18 to North Bendigo in Pall Mall at Williamson St with the Shamrock Hotel and the ANZ Bank in the background. Has signs for Stonemasons and Myers in the photo. Photo by John Ward 01-01-1972 Slide title "04759 010172 7208-H SECV bogie tram 18 Pall Mall at Williamson St Bendigo Vic"trams, tramways, bendigo, pall mall, north bendigo, tram 18 -
 Ballarat Tramway Museum
Photograph - Digital image, John Ward, 1/01/1972 12:00:00 AM
... Photo by John Ward 01 - 01- 1972 Slide title "04751 010172 7207-H SECV Birney tram 28 passing bogie tram 2 in Carpenter St on Quarry Hill line Bendigo Vic"...Ballarat Tramway Museum South Gardens Reserve Wendouree Parade Ballarat Ballarat goldfields Trams tramways Bendigo Carpenter St Pinders Loop Quarry Hill tram 28 tram 2 Digital image of the Bendigo 28 crossing No. 2 at Pinders Loop in Carpenter Loop on the Quarry Hill line. No. 28 has the destination of Quarry Hill, while No. 2 Eaglehawk. Photo by John Ward 01 - 01- 1972 ...Digital image of the Bendigo 28 crossing No. 2 at Pinders Loop in Carpenter Loop on the Quarry Hill line. No. 28 has the destination of Quarry Hill, while No. 2 Eaglehawk. Photo by John Ward 01 - 01- 1972 Slide title "04751 010172 7207-H SECV Birney tram 28 passing bogie tram 2 in Carpenter St on Quarry Hill line Bendigo Vic"trams, tramways, bendigo, carpenter st, pinders loop, quarry hill, tram 28, tram 2 -
 Ballarat Tramway Museum
Photograph - Digital image, John Ward, 2/01/1972 12:00:00 AM
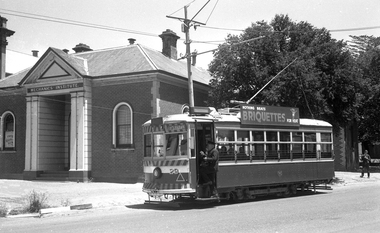
... The driver is boarding the tram after turning the pole. Photo by John Ward 02 - 01- 1972 Slide title "04142 020172 7201-08 SECV Birney single truck tram 29 at terminus Sailors Gully Rd at High Eaglehawk Bendigo Vic"...The driver is boarding the tram after turning the pole. Photo by John Ward 02 - 01- 1972 Slide title "04142 020172 7201-08 SECV Birney single truck tram 29 at terminus Sailors Gully Rd at High Eaglehawk Bendigo Vic" Photograph Digital image John Ward ...Digital image of the Bendigo 29 at the Eaglehawk terminus, with the Mechanics Institute building in the background. The tram has destination of Eaglehawk and a Briquettes roof advert. The driver is boarding the tram after turning the pole. Photo by John Ward 02 - 01- 1972 Slide title "04142 020172 7201-08 SECV Birney single truck tram 29 at terminus Sailors Gully Rd at High Eaglehawk Bendigo Vic"trams, tramways, bendigo, eaglehawk, tram 29 -
 Ballarat Tramway Museum
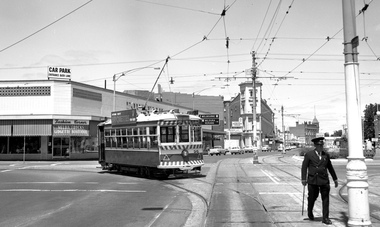
Photograph - Digital image, John Ward, 2/01/1972 12:00:00 AM
... tram 29 turning from Pall Mall into Mitchell St with the destination of Railway Station. In the background is the Fountain Plaza, advertising Melba Frocks and Gidgette Boutique, the City Family Hotel, Park Lane chicken shop. In the foreground is the Inspector returning the point bar to its holder on a pole. Photo by John Ward 2-1-1972...tram 29 turning from Pall Mall into Mitchell St with the destination of Railway Station. In the background is the Fountain Plaza, advertising Melba Frocks and Gidgette Boutique, the City Family Hotel, Park Lane chicken shop. In the foreground is the Inspector returning the point bar to its holder on a pole. Photo by John Ward 2-1-1972 ...Digital image of the Bendigo tram 29 turning from Pall Mall into Mitchell St with the destination of Railway Station. In the background is the Fountain Plaza, advertising Melba Frocks and Gidgette Boutique, the City Family Hotel, Park Lane chicken shop. In the foreground is the Inspector returning the point bar to its holder on a pole. Photo by John Ward 2-1-1972. Slide title "04771 020172 7210-F SECV Birney tram 29 Pall Mall to Mitchell St at High St & View St Charing Cross Bendigo Vic"trams, tramways, bendigo, pall mall, mitchell st, charing cross, tram 29 -
 Ballarat Tramway Museum
Newsletter, Ballarat Tramway Preservation Society (BTPS), "Information for Members and interested parties", Dec. 1972
... Newsletter - "Information for Members and interested parties", December 1972, 3 Gestener printed sheets stapled comprising: 1 - a drawing of tram 40 on a quarto sheet with a some information about the Museum and a tear off form for membership. 2 - Newsletter - green foolscap paper, reporting on work at the depot, publicity, sales, museum display, a Melbourne tram tour, membership (Peter Hill), Incorporation, track removal, and meetings. 3 - a detailed sales sheet, books, photos and a sketch of 17. ...Ballarat Tramway Museum South Gardens Reserve Wendouree Parade Ballarat Ballarat goldfields Museums BTPS Depot Trackwork Membership Sales Drawings Sketches Newsletter - "Information for Members and interested parties", December 1972, 3 Gestener printed sheets stapled comprising: 1 - a drawing of tram 40 on a quarto sheet with a some information about the Museum and a tear off form for membership. 2 - Newsletter - green foolscap paper, reporting on work at the depot, publicity, sales, museum display, a Melbourne tram tour, membership (Peter Hill), Incorporation, track removal, and meetings. 3 - a detailed sales sheet, books, photos and a sketch of 17. ...Newsletter - "Information for Members and interested parties", December 1972, 3 Gestener printed sheets stapled comprising: 1 - a drawing of tram 40 on a quarto sheet with a some information about the Museum and a tear off form for membership. 2 - Newsletter - green foolscap paper, reporting on work at the depot, publicity, sales, museum display, a Melbourne tram tour, membership (Peter Hill), Incorporation, track removal, and meetings. 3 - a detailed sales sheet, books, photos and a sketch of 17. See i1 for a jpg of the sketch. See Reg Item 2230 for an illustration of No. 17 in the same style.museums btps, depot, trackwork, membership, sales, drawings, sketches -
 Bendigo Historical Society Inc.
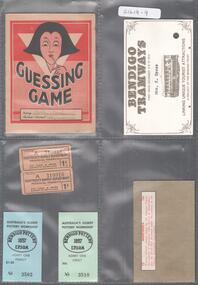
Ephemera - KEN HESSE COLLECTION: TRAM TICKETS, ENTRY TICKETS, INVITATION, GAME
... When opened there are 20 questions on parts of the human anatomy with space for answers. 2) Bendigo Tramways card first issued December 9 & 10 1972 the name Mrs. K. Hesse typed above the picture of a tram. Linking unique tourist attractions, a project of the Bendigo Trust. ...Ken Hesse Tram Tickets 1) Red and white guessing game card in the name of Betty Nankervis giving the correct number of answers:11. When opened there are 20 questions on parts of the human anatomy with space for answers. 2) Bendigo Tramways card first issued December 9 & 10 1972 the name Mrs. ...1) Red and white guessing game card in the name of Betty Nankervis giving the correct number of answers:11. When opened there are 20 questions on parts of the human anatomy with space for answers. 2) Bendigo Tramways card first issued December 9 & 10 1972 the name Mrs. K. Hesse typed above the picture of a tram. Linking unique tourist attractions, a project of the Bendigo Trust. On the back a signature R.F. Lamb(?) 3) Two tickets Electricity supply department provincial tramways, this ticket is issued subject to the by-laws, price 1 penny. 4) Two entry tickets to Bendigo pottery Australia's oldest pottery workshop, one family for $1.40 and one adult for 50centts. 5) Brown paper rectangular box in the middle: Manchuria, twelve different stamps issued by the Japanese puppet government of Manchuria and the north-east provinces under the control of the Chinese Nationalist Government.ken hesse, tram tickets -
 Ballarat Tramway Museum
Slide - 35mm slide/s - set of 3, Eldon Hogan, 16/06/1973 12:00:00 AM
... tram 26 Set of three colour slides of the installation of the wooden overhead support poles at the depot. No. 26 in the background, note the construction of the overhead troughing in the background as well. Date possibly 16 June 1973 - based on the list of dates in the 1972 ...Yields information about the delivery of the installation of the wooden poles around the depot fan in June 1973. Has a strong association with those involved.Set of three colour slides of the installation of the wooden overhead support poles at the depot. No. 26 in the background, note the construction of the overhead troughing in the background as well. Date possibly 16 June 1973 - based on the list of dates in the 1972 - 73 Annual Report. Photographer Eldon Hogan, AGFA Slide, blue plastic with white plastic on reverse. See also Reg Item 4760 for black and white photos.tramways, trams, btps, depot fan, construction, overhead, tram 26 -
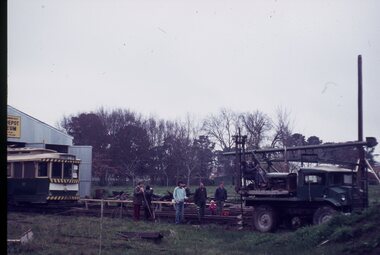
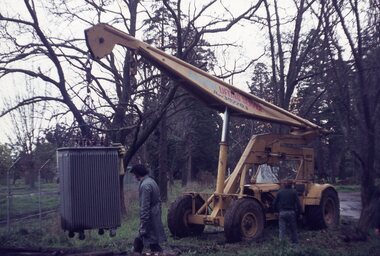 Ballarat Tramway Museum
Slide - 35mm slide/s - set of 8, Eldon Hogan, 16/06/1973 12:00:00 AM
... Tramways trams BTM Construction Overhead Substation Set of eight colour slides of the delivery and dismantling of the transformer to be reworked as the isolating transformer for the depot. Date possibly 16 June 1973 - based on the list of dates in the 1972 ...Set of eight colour slides of the delivery and dismantling of the transformer to be reworked as the isolating transformer for the depot. Date possibly 16 June 1973 - based on the list of dates in the 1972 - 73 Annual Report. Photographer Eldon Hogan, AGFA Slide, blue plastic with white plastic on reverse. See also Reg Item 4761 for black and white photos.tramways, trams, btm, construction, overhead, substation