Showing 633 items
matching destination city
-
 Melbourne Tram Museum
Photograph - Illustration/s, Melbourne & Metropolitan Tramways Board (MMTB), 1978
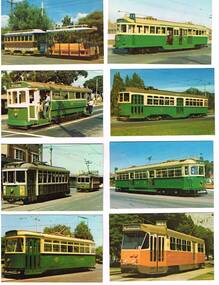
... destination of "City" and route 11. 446.6 - X2 676, showing "Special... destination of "City" and route 11. 446.6 - X2 676, showing "Special ...Set of eight of printed illustrations - postcard size of Melbourne and Metropolitan Tramways Board Tramcars produced in 1978. Separate card for each class of tramcar featured, with notes, statistics, MMTB name. Each card also has printers name and date on back. Not a formal postcard, no place for a stamp. 446.1 - Cable car set (No. 1) - photographed at Preston Workshops 446.2 - T 180 - showing "Special", while on a charter. 446.3 - X1 - 465 with 466 in background. Photographed at Footscray terminus, c1962. 465 has destination of "Ballarat Rd." 446.4 - Y 469 - showing destination of "Wattle Park - Elgar Road", possibly with Wattle Park in background. 446.5 - W2 511, showing destination of "City" and route 11. 446.6 - X2 676, showing "Special". 446.7 - W7 1022 - showing destination "West Preston", route 11, freshly painted. 446.8 - Z1 7 in Victoria Parade, c1975 - has destination of "West Preston - Regent St." and route number "13". 446.9 - L 104 on a route 67 Carnegie. 446.9 added 7/4/15, otherwise two copies of each held. 2nd copy of 446.9 added 28/5/2015. See Reg Item 994 for a packaged set of these photographs..trams, tramways, melbourne, mmtb, tramcars, tram 1, tram 180, tram 465, tram 466, tram 469, tram 511, tram 1022, tram 7, tram 104, z1 class, t class, x1 class, y class, w2 class, w7 class, l class, route 67, route 13, route 11 -
 Melbourne Tram Museum
Magazine, Melbourne & Metropolitan Tramways Board (MMTB), "Metra News", 1980 to 1982
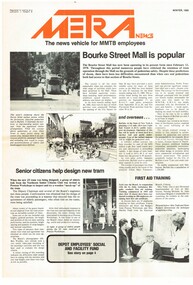
... , follow up on Austerity buses, Norm Cross and Destination City... Cross and Destination City, Profile on Alan Nolan Runningsheds ....0 - Autumn 1980 - Passenger counting, Survey provides data, We lead the way with Z3, Wattle Park, transport in Moscow, Spike Milligan, Melbourne's decorated trams, transporting art, sports, training, and Raymond Stock, Assistant Traffic Manager Revenue .1 - Winter 1980 - Bourke St Mall is popular, Senior citizens help design new tram (Z3), A bus-only lane in Johnstone St., Depot Employees' Social and facility Melbourne. Has a profile on Mr R. C. Drummond, Traffic Manager. .2 - Spring 1980 - Christmas Message, supporting those children with polio in 1938, Trolley buses, Z3 trams being built, use of parafil in overhead, cleaning truck. Has a profile on Ken Hall, Assistant Chief Engineer - Mechanical and Reg Robinson who was the organiser for the 1938 polio event - bus driver / instructor. .3 - Summer 1981 - MMTB involvement with Australia Day pageant, note involvement of TMSV, Bendigo, BTPS 27 (26 Jan. 1981), film on apprentices, tram stop shelters, resilient track work, trolley buses, the supply and systems department including Hawthorn clothing workroom and printing department (photos) and profile on Mr Jerry Compton, Supply and systems department. (Two copies held) .4 - Autumn 1981 - new buildings at Footscray, South Melbourne, trolley buses for Melbourne?, building MAN buses, why join the Tramways Benefit Society, article that looks at the Engineering Branch and profile of John Grigg, Chief Engineer. (Two copies held) .5 - Winter 1981 - New passenger shelters, image of the Elizabeth St shelter proposal, where do old trams go?, "Around the Clock" Emergency Service (item on R10) (See Reg item 1004 for photo), formation of Tramway's Sporting Associations, retirement of Board's driver Peter Savage, bus driving school transferred to Hawthorn, Apprentices and Profile on Bill Sibbison, Depot Manager North Fitzroy. .6 - Spring 1981 - 8 pages - Making of Squizzy Taylor film - Flinders St station, Engineering Amenities at South Melbourne opened, traverser at Preston Workshops, track work - pressing curves at South Melbourne, Conductresses re-union, model tramway at the Royal Show, retirements, sporting association, tramway band, AVM, reducing noise levels, lists Editorial committee. .7 - Summer 1982 - 8 pages - Its Christmas Party time, want to charter a tram or bus?, portable radios, MMTB role in Paraplegic Games, MMTB Architect Gene Marshall retires, photo of WW2 most popular conductresses ball, MMTB Highlights, O-Bahn. Has a profile on Rob Downing - Deputy Chairman. Also Dick Newnham - lift operator at head office, Bob Moffatt - driver turned actor. Also has a follow up on the making of the Squizzy Taylor film "What's wrong with Squizzy" and a photo of the Editorial team and their names. .8 - Autumn 1982 - 8 pages - item on "Taking Melbourne by Storm", photo of Austerity bus 500, Radio Centre, Clifton Pugh tram 504, Essendon Depot (see Reg Item 1005) includes of photos of managers, revenue etc, story on the most popular conductress photo by Win Gibson (see Reg item 180 and 181), new apprentices, John Murdoch model train (Diamond Valley) builder, Sunday vintage tram service (V214) and L class to the zoo. Has a profile on Mr. Peter Saul, Architect. (two copies held) (see image 1178i5 for cover) .9 - Winter 1982 - 8 pages - changes to Doncaster bus - Eastern Free extension, changes to Ministry will affect Board - Steve Crabb, new uniforms, Footscray Depot, apprentice awards, follow up on Austerity buses, Norm Cross and Destination City, Profile on Alan Nolan Runningsheds Engineer, and Mike McLeod MMTB Photographer. (two copies held) .10 - Spring 1982 - book - see Melbourne by tram, Bundoora tramway work, new articulated vehicles (B class trams), Elizabeth St modal interchange shelter, Brunswick depot, demise of the F class bus (Mark VI), profile of Daryl Meade bus engineer, Joe Saccasan carpenter building branch and a list of Jargon. (two copies held).Demonstrates a MMTB employee newsletter, early 1980sMagazine, two colour printed on A2 sheet, folded to A3, "METRA News", published by the MMTB. Each issue unless noted otherwise four pages. Major items listed. Each issue has personnel news, including new staff, promotions, overseas items;trams, tramways, mmtb, z3 class, bourke st, track equipment, overhead, most popular conductress competition, hawthorn depot, clothing, trolley buses, fund raising, footscray, welfare, sale of trams, recovery, r10 vehicle, flinders st, films, radio centre, essendon depot, theatre, transporting art, austerity buses, footscray depot, doncaster, minister for transport, shelters, bundoora, brunswick depot, buses, mont albert, route 42 -
 Ballarat Tramway Museum
Photograph - Digital image Set of 10, Tony Smith, 5/09/1971 12:00:00 AM
... at the City terminus, north side. Tram showing the destination..., with destination of City. Has the Dickins and Woolworths Big W store ...Yields information about Ballarat Tramways and trams prior to the closure of the tramway system.Set of 10 digital images of Ballarat trams prior to closure, scanned from original slides by Tony Smith, 1971 prior to closure of the system. This set of slides, possibly on the last weekend of Mt Pleasant services - closure took place on 5/9/1971. . .1 - 17 at the City terminus, north side. Tram showing the destination of Sebastopol and has a Twin Lakes sign. .2 - 26 at the city terminus, south side with Geommola's Pharmacy and Kodak Film advert and Town Hall in the background. .3 - 43 at the City terminus, north side, with destination of Mt Pleasant. Has a number of men at the tram stop. .4 - 14 leaving Bridge St, crossing Grenville St into Sturt St, with destination of City. Has the Dickins and Woolworths Big W store in the background. .5 - 43 at Mt Pleasant terminus with conductor boarding the tram. Tram has destination of Gardens via Sturt St West. In the background is the corner store with adverts for The Sun, Womens Weekly, Coca Cola and Robur Tea. .6 - 43 and 26 Barkly St, about to arrive at the Grant St loop. Both trams inbound. .7 - 43, 26 and 27 at Grant St loop. .8 - 12 (Lydiard St Nth) and another bogie tram at the city terminus north with the Town Hall in the background. .9 - 39 outbound in Barkly St to Mt Pleasant - note the new bus stop signs on either side of the tram. 10 - 27 (City) and 26 turning from Barkly St into Main St with the Ampol petrol station, a general store advertising Escort cigarettes and The Age in the background . On the right hand side is a fish and chips shop advertising crays and drinks.trams, tramways, sturt st, city, grenville st, bridge st, mt pleasant, barkly st, grant st, main st, closure, tram 17, tram 26, tram 43, tram 14, tram 12, tram 27, tram 39 -
 Ballarat Tramway Museum
Photograph - Digital image Set of 10, Tony Smith, 5/09/1971 12:00:00 AM
... reversed by a "Bounds". Tram has the destination of City Oval. .6... reversed by a "Bounds". Tram has the destination of City Oval. .6 ...Yields information about Ballarat Tramways and trams prior to the closure of the tramway system.Set of 10 digital images of Ballarat trams prior to closure, scanned from original slides by Tony Smith, 1971 prior to closure of the system. This set of slides, possibly on the last weekend of Mt Pleasant services - closure took place on 5/9/1971. . .1 - 30 rounding the curve from Lydiard St Nth to Sturt St. Tram has destination of Sebastopol. IN the background is the Commonwealth bank and the SEC cabinet switch isolator on the corner. .2 - 13 and another single trucker at the City terminus, north side with Racey's store and the SEC offices in the background. 13 has a Twin Lakes sign and the destination of Victoria St. .3 - 26 (Mt Pleasant) and 27 at the city terminus, with many passengers. Has the town hall in the background. .4 - 14 turning from Sturt St into Lydiard St (destination does not appear to be Lydiard St nth - City Oval?) with the ANZ bank in the background. A number of passengers waiting at the tram stop. .5 - 14 in Sturt St west near Pleasant St, at City Oval, with the pole being reversed by a "Bounds". Tram has the destination of City Oval. .6 - 13 west bound (showing Mt Pleasant) at Pleasant and Sturt St, with the VicRoads (CRB) offices and St Peters Anglican church in the background. .7 - 13 and 14 in Sturt St west, opposite City Oval (see .5 and .6) - trams reversing. .8 - 13 and 14 at Grenville St, about to cross into Bridge St from Sturt St. .9 - 14 at ditto - both trams for Mt Pleasant. Has the Patersons furniture store in the background. .10 - 30 eastbound in Sturt St, near Armstrong St with the Crockers store in the background. Tram showing "Special"trams, tramways, sturt st, electrical switching, city oval, lydiard st, pleasant st, grenville st, tram 30, tram 13, tram 26, tram 14 -
 Melbourne Tram Museum
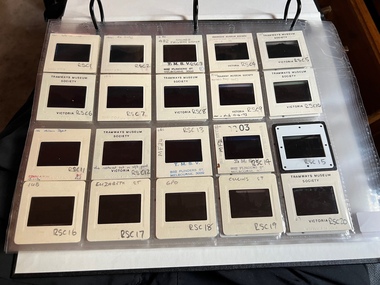
Album - Ron Scholten Slide Collection, Ron Scholten
... , with a supplementary destination board showing “City via Swanston St” RSC78 W2..., with a supplementary destination board showing “City via Swanston St” RSC78 W2 ...Photo - see pdf file for further information. Number Brief Description RSC1 PCC 1041 at the gates of Preston Workshops on a test run without it’s trolley retriever RSC2 PCC 1041 in Glenhuntly Road on Route 67 en route to Carnegie crossing the Railway Gates at Glenhuntly Station RSC3 W2 482 stored at Malvern Depot with Olympic Park on the Destination RSC4 Cable Car Set 64 in Swanston St outside Princess Bridge Station in Bound with open top Double Deck Bus, Trak Motors ? Departing from Flinders St Station RSC5 W3 669 in St George Rd at Sumner St en route to Preston Workshops for scrapping RSC6 Cable Car in Lygon St en route to Carlton RSC7 PCC 1041 turning from St Georges Rd into Miller St to enter Preston Workshops RSC8 Flinders St Station with cable cars RSC9 PCC 1041 in strife on it’s maiden day in service. Trams on route 88 delayed in Queens Parade Clifton Hill RSC10 Flinders St at William St with Cable Cars RSC11 L 104 on the fan of the new shed at Malvern Depot on a TMSV tour RSC12 Cable Set 1 after it’s restoration at Preston Workshops on the fan near the front gate RSC13 X1 466 at a suburban terminus of the Footscray System RSC14 X2 680 at Point Ormond Terminus RSC15 An ex Launceston Tram at the outside terminus of the Penny Royal Complex Tramway in Launceston RSC16 Q 148 at Preston Workshops awaiting disposal RSC17 Elizabeth St with Cable Cars RSC18 Elizabeth and Bourke St corner outside the GPO with cable cars RSC19 Collins St with Cable Cars RSC20 A photo taken from the observation deck of the ICI building showing a view of Parliament house with a w class tram in Nicholson St RSC21 Auburn Horse car with a posed photo of all the tramwaymen employed RSC22 Cheltenham Double Deck Horsecar with a full load of passengers RSC23 City of Northcote cable trailer 3 at a terminus RSC24 City of Northcote Cable cars passing in High St Northcote RSC25 St Kilda Rd at Princes Bridge with Cable Cars RSC26 Flinders St with Cable Cars RSC27 Cable Cars RSC28 Bourke St looking towards Elizabeth St from Queen St RSC29 Cable cars in Bourke St at Elizabeth St looking East RSC30 Cable cars in Elizabeth St at the terminus at Flinders St RSC31 Cable cars in Bourke St at Swanston St looking west RSC32 Cable cars in Swanston St at Flinders St looking North RSC33 Cable cars in Collins St near Russell St RSC34 Cable cars in Elizabeth St at Bourke St RSC35 Cable cars in Collins St at Elizabeth St RSC36 Cable Cars in Swanston St at Flinders St RSC37 Cable cars in Collins St RSC38 Cable Cars RSC39 Cable cars in St Kilda Rd near Princes Bridge RSC40 Cable cars in Collins St East of Swanston St RSC41 Cable cars in Spring St outside Parliament house RSC42 K 92 in M&MTB Chocolate and cream livery but with a P&MTT Destination box on Route 14 RSC43 Thornbury depot viewed from Miller St and St Georges rd. Two W2 class cars are laying over between the peaks RSC44 Z3 201 in Met Livery passes D1 3510 in new M Tram livery. A Staff member in uniform stands in the doorway. Dandenong Rd RSC45 D1 3530 advertising Heinekin Super Golf on Route 55 in Royal Park RSC46 D1 3504 in M Tram livery on the reserved track in Matthews Ave near Essendon Airport showing Route 81 Travancore . I suspect it is a private enthusiasts charter due to the Malvern W class run number in the rear windscreen RSC47 D1 3504 on Route 64 in Dandenong Rd in M Tram Livery RSC48 D1 3504 in M Tram Livery at Airport West Terminus RSC49 D1 3504 in M Tram Livery in Union Rd outside the Showgrounds RSC50 D1 3504 at West Maribyrnong Terminus in M Tram Livery RSC51 D1 3503 in M Tram Livery in Malvern Depot RSC52 SW6 960 and VR 53 in Harbour Esplanade for the NMEL&T Co Centenary RSC53 Hawthorn Tramways Trust 32 in Harbour Esplanade for the NMEL&T Co Centenary RSC54 VR 53 & B 2042 in Harbour Esplanade for the NMEL&T Co Centenary RSC55 VR 53 & C 3016 in Harbour Esplanade for the NMEL&T Co Centenary RSC56 NMEL&T Co 13 usually V214 in Harbour Esplanade for the NMEL&T Co Centenary RSC57 NMEL&T Co 13 usually V214 at Preston Workshops for the NMEL&T Co Centenary RSC58 Hawthorn Tramways Trust Lettering on HTT 32 in Harbour Esplanade for the NMEL&T Co Centenary RSC59 Hawthorn Tramways Trust 32 in Harbour Esplanade for the NMEL&T Co Centenary RSC60 Hawthorn Tramways Trust 32in Harbour Esplanade for the NMEL&T Co Centenary RSC61 Hawthorn Tramways Trust 32 in Harbour Esplanade for the NMEL&T Co Centenary RSC62 NMEL&T Co 13 usually V214 at Preston Workshops for the NMEL&T Co Centenary RSC63 W2 516 and another on route 59 wait to shunt at Essendon Airdrome Terminus as W2 571 on route 49 departs. This was the last day of operation. RSC64 Australia’s First Electric Tram at Box Hill with Tramwaymen including H J Hilton who is in the centre RSC65 W2 484 en route to St Kilda Junction and another wait for passengers after a race meeting at Caulfield Racecourse RSC66 X1 463 on the Footscray system en route to Russell St RSC67 Geelong 35 on Chilwell Route, Formerly HTT 13, M&MTB 119, then Bendigo 1 and Ballarat 37 RSC68 P&MTT 4 on Opening Day of the system in Glenferrie Rd RSC69 Bendigo 6 in McCrae St near the Depot end route to North Bendigo RSC70 P&MTT 4 in Glenferrie on opening day of the System RSC71 Scrubber 3 stripped and awaiting scrapping at Preston Workshops RSC72 Scrubber 4 at South Melbourne Depot RSC73 Q 191 & 139 at Preston Workshops awaiting scrapping RSC74 Rail Grinder 3 at Preston Workshops as purchased from Sydney RSC75 Y 469 waits to shunt at Wattle Park Terminus as Y1 613 departs on driver training duties RSC76 VR 53 on the outside roads at Essendon Depot RSC77 W5 796 with three doors and square windows running out of Brunswick Depot in Cameron St, with a supplementary destination board showing “City via Swanston St” RSC78 W2 258 on the wheel grinder road at Brunswick depot RSC79 X2 676 on a TMSV tour, W5 817 & 836 & VR 53 on the open roads at Essendon Depot RSC80 PCC 1041 on test, passes W71035 in High St Preston RSC81 D1 class production number 7 as delivered on test in Matthews Ave RSC82 W2 383 on route 5 turning from the reserved track in Dandenong Rd into St Kilda Rd at St Kilda Junction RSC83 Z3 204 as advertising tram for Vodaphone Grand Prix running into Malvern Depot new shed RSC84 Z1 4 on test in St Georges Rd RSC85 PCC 1041 on Route 96 in Burke St near Exhibition St RSC86 Z1 3 without numbers on test turning from Miller St in St Georges Rd RSC87 Track components stored in Coldblo Rd at Malvern Depot with Z class cars adjacent RSC88 D1 3501 in M Tram Livery on Route 55 in Peel St at Franklin St RSC89 C 3001 in Yarra Trams Livery Porto 018 & D13502 in M Tram Livery on Display in Harbourside Esplanade RSC90 D1 class tram production number 7, in as delivered condition on test in Matthews Ave RSC91 D1 3503 inside Malvern Depot RSC92 SW6 955 and W6 974 in St Kilda at City Rd at Dusk RSC93 Freight Car 19 at Preston Workshops in green Livery RSC94 Rail Grinder 3 in green Livery at South Melb Per Way Yard RSC95 A SW6 class car on route 50 shunting at Elizabeth St Terminus at night, taken from Flinders St Station RSC96 W2 588 & 435 in St Kilda Rd at Batman Ave RSC97 Y1 613 in service at Wattle Park Terminus RSC98 W2 588 in Wellington Parade en-route to the City with a Grand Final Load of passengers followed closely by 384 RSC99 W2 558 on a MCG Footy Special entering the Simpson St sidings RSC100 W3 657 & an L Class in the new shed at Malvern Depot RSC101 Y1 613 in St Kilda Rd on an enthusiasts tour in St Kilda Rd south of St Kilda jun RSC102 Y1 613 on an enthusiasts tour in Clarendon St with the two extra tracks on the Viaduct under construction RSC103 W6 976 on the fan of the new shed at Malvern Depot RSC104 W7 1024 as an advertising car for Bank of NSW at the route 1 terminus at South Melb Beach RSC105 PCC 980 on route 96 in Nicholson St near North Fitzroy Depot RSC106 SW6 890 with dash canopy lighting in Market St on the opening day of William St Services RSC107 W2 444 with big numbers heads a line of footy specials in Simpson St Sidings RSC108 Cable Cars in Elizabeth St RSC109 NMEL&T co 2 with a trailer outside the power station in Mount Alexander Rd RSC110 Alf Twentyman’s cable car set in his Northcote backyard RSC111 Cable Cars in Queens Parade Clifton Hill RSC112 Cable cars in Collins St outside the Townhall RSC113 PCC 1041 at Carnegie terminus RSC114 Cable cars in Elizabeth St RSC115 Cable cars in Collins St near Swanston St RSC116 HTT 19 turns from Riversdale Rd into Camberwell Rd at Camberwell Junction RSC117 W1 419 official builders photo of first car of the class RSC118 Cable car with a full load of passengers RSC119 W1 422 illuminated for the visit of T.R.H. The Duke and Duchess of York RSC120 PCC 1041 in strife on it’s maiden day in service. Trams on route 88 delayed in Queens Parade Clifton Hill RSC121 Bendigo birney in Finn St near North Bendigo terminus RSC122 SW6 in St Kilda Rd at Domain Rd at night RSC123 All 3 of Alf Twentyman’s cable cars in his Northcote backyard RSC124 Cable trailer 256 being unloaded into the shed at Bylands RSC125 Cable grip car 1 being removed from the Melbourne Museum RSC126 Alf Twentyman's cable cars in his Northcote Backyard RSC127 Alf Twentyman's cable cars in his Northcote Backyard RSC128 Alf Twentyman's cable cars in his Northcote Backyard RSC129 Alf Twentyman's cable cars in his Northcote Backyard RSC130 W class car in Swanston St at Collins St RSC131 Y1 469, L & W3 on the run out of Glenhuntly Depot on a tour RSC132 W7 1024 as an advertising tram for Bank of NSW at Clifton Hill RSC133 W2 496 on a footy special in Simpson St Sidings RSC134 W2 as originally converted to a test car at Preston Workshops RSC135 W3 667 in Brunswick Depot with Ellen Butland at the controls RSC136 W3 669 on it’s final run at Victoria Prd & Brunswick St RSC137 W2 571 in Wellington Prd at Clarendon St with a Footy Final load of Passengers RSC138 Y1 613 shunts at Spencer St Terminus as X217 waits on Australia Day Pageant RSC139 PCC 1041 on Rt 96 in Burke St outside the Southern Cross Hotel RSC140 890 with accident damage on the outside roads at Preston Workshops c1978 RSC141 535 on Rt 4 at the old St Kilda Jun c1967 RSC142 1041 on Rt 88 turns from Bourke St into Spring St 1973 RSC143 102 on a tour at Albert Park Beach Terminus Feb 1972 RSC144 833, 835 & 834 in the shed at Malvern Depot c1976 RSC145 281 in Wellington Parade on a football very crowded special c1974 RSC146 464 Ballarat Rd 1960 RSC147 181 Explosives Fty - at Footscray Station - July 1960 RSC148 181 Williamstown Road 1960 RSC149 Cable car set at Alf Twentyman’s c1970 RSC150 X 217 at Malvern Depot c1970 RSC151 X1 465 and T181 Footscray Football ground in Barkly St. c1960 RSC152 Scrubber 5 at South Melbourne depot c1960 RSC153 X1 465 Footscray to Russell St, c1960 RSC154 X1 467 Leeds St Footscray 1960 RSC155 PMTT 4 Glenferrie Road, 1910 RSC156 S 164 at Malvern Depot c1970 RSC157 T178 Footscray c1960 RSC158 Cleaner No. 7 at South Melbourne depot c1960 RSC159 Two Y classes at Princes Bridge / Batman Ave mid 1950s RSC160 Swanston St – Nu color vue slide – M142 Demonstrates the work of Ron Scholten in photography, collection and/or production of duplicate slidesAssembled album in a black presentation folder of 160 colour slides, 8 slide sleeves, collected or produced by Ron Scholten. Many are TMSV or Windsor Publications slides. All photographs have been scanned and placed on the Museum's G drive. A list of all photographs with details has been compiled. melbourne, tramways, trams, cable trams -
 Ringwood and District Historical Society
Book, PenFolk Publishing, Busch's Weir, 2019
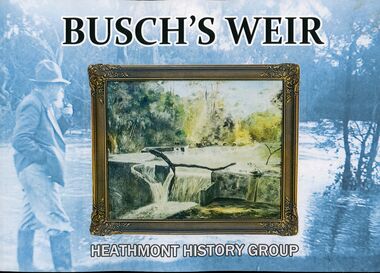
One of several Dandenong Creek marker posts inscriptions: "Busch's Weir was located at this section of the creek between 1930s to 1960s. In the 1930s, German migrant Hermann Otto Busch and his wife Dorothea moved to Bayswater and opened the Waldheim Farm Guest House. Busch built a concrete weir to create a popular swimming and fishing destination. The weir was a thriving attraction until the 1960s. Although little remains, it is fondly remembered by the Heathmont community. City dwellers would retreat to the guesthouse and wander down to Dandenong Creek to enjoy a weekend in the 'country'. Busch's guest house, tea rooms, and weir attracted locals and tourists alike."A private weir on Dandenong Creek Bayswater and Heathmont, 1930s-1967. Landscape layout soft covered book by Heathmont History Group (Ringwood & District Historical Society.Front cover image: A 1956 painting by Hermann Busch of his weir. The publication of this book has been made possible by a financial grant from Melbourne Water, as part of the Enhancing Our Dandenong Creek program. We particularly acknowledge the encouragement and support of Sarah Watkins, Senior Planning Engineer, MW. -
 Warrnambool and District Historical Society Inc.
Booklet - The Ideal City Warrnambool On the Sea, Modern Print, 1940
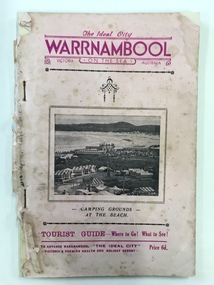
This booklet has been issued in 1940 by the Warrnambool Progress and Tourist Association established in 1927. Warrnambool was the winner of the Sun News Pictorial Quest in 1928, the ‘Ideal City’ and used this title to promote the city. There had been several Tourist Associations in Warrnambool prior to 1927 and all of them promoted Warrnambool as a health resort and an ideal holiday destination with the Sea Baths in Gilles Street and the beach close by. This guide has been produced during World War Two with rationing of petrol and other goods and most people in Victoria would not have been contemplating long and expensive holidays so Warrnambool with its rail service and beach facilities would have been seen as a possible holiday destination. This Warrnambool Tourist Guide is of considerable interest both for its content regarding Warrnambool’s attractions in World War Two and for its 1940s advertisements and photographs. This is a booklet of 33 pages stapled together. It is a Warrnambool Tourist Guide from the 1940s. The pages are mostly white but there are a couple of blue and buff-coloured pages. The cover is pink with mauve and black printed material and a photograph on the front cover of the Warrnambool camping ground on the foreshore. The back cover has become detached. The booklet contains information on the tourist attractions of Warrnambool and district, black and white photographs of buildings, events and scenic spots and advertisements for local businesses. Many of the advertisements also contain photographs of business premises. Front Cover: ‘The Ideal City, Warrnambool On The Sea, , Victoria, Australia, Camping Grounds at the Beach, Tourist Guide – Where to Go! What to See! To Advance Warrnambool, The Ideal City, Victoria’s Premier Health and Holiday Resort, Price 6d.’ tourism in warrnambool, warrnambool, sun news pictorial quest, warrnambool tourist guide, the ideal city -
 Bendigo Military Museum
Map - MAPS, VIETNAM, April 1969
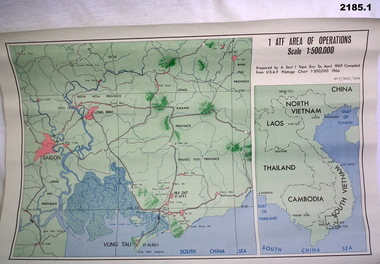
1.) Paper map, colour with black print, scale 1:500,000 area covers Saigon, Long Bin, Nui Dat, Vung Tau. .2) Laminated paper map showing city of Vung Tau with details of tourist destinations, hotels, churches, black & red print, scale 1:12,500 approx.documents - maps - military & tourist, vietnam -
 Glenelg Shire Council Cultural Collection
Document - Blank paper featuring City of Portland Council letterhead, c. 1985
Relates to civic historyCity of Portland Council letterhead. 4 pieces. Black print on white paper, for general correspondence. Logo centre top, contacts either side. 'A Destination of Distinction' - centre, bottom. -
 Kiewa Valley Historical Society
Pamphlet - Bright Tourism, Guide to Bright and District, late 1900s
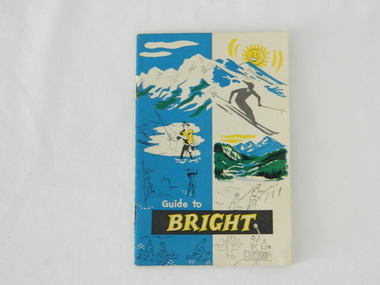
This publication was produced in the early 1950s to provide the growing tourism trade (at this time), to the region with a more detailed overview of the facilities available to tourists of the region's attractions. This brochure is a very efficient and effective promotional publication. The increasing level of self promotion by local business and commerce sectors of the region the more sought after the region became and the greater the ability of the region to grow (non rural based economy). Some of the regions unique facilities and geological structures are well suited to those tourists who live in cities and "flat land" regional bush areas within Australia. This was a period when the average Australian domestic tourist was more able (finance and transport wise) to see more of their country within the short time they had for "holidays". In the late 1900s, however, with the increase to workers' recreational leave and better transportation (fares, ease of travel to overseas destinations) the local tourism numbers from other domestic locations have been steadily declining. From the 1970s onwards, the increased tourism demand from overseas tourists, for better facilities and easier access to these regional facilities, resulted in better transport, accommodation and communication, which has been a boon for all tourism within Australia. In the 21st century the world is becoming smaller and smaller for the international tourist, especially for those from crowded Asian cities. The greater attraction for "open" spaced locations such as this region are becoming a much sought after change of scenery. This pamphlet which targets the tourist, whether either from other Australian regions or the global tourist, is a good example of self promotion by a relatively small local population. This is especially significant because before the "tourist explosion" in the 1950s onward, these regional areas had a more introspective society with greater emphasis to locally established mores and values. The increased interactions with people from other areas and nations, combined with a greater global communication network is affecting those traditionally established mores to produce a some what unique social transformation which is constantly changing from one generation to the next. One important factor which tourism does bring is that it opens up the region to a wider range of people who look to the region for their own lifestyle changes.This pamphlet has a front cover in colour with the major activities in the region sketched depicting : sunshine, snow skiing, trout fishing, mountain climbing, golfing, swimming, alpine views, tennis, lawn bowls and picnics. The back cover is blank. The pamphlet is fastened together by two staples 30mm from top and bottom, and is folded with the cover slightly thicker than the fifteen pages. Thirteen pages have been printed on both sides. The first page has a black and white photograph of the hotel Alpine and the tall brick constructed Clock Tower. There are another five black and white photographs in the pamphlet.on front cover "Guide to BRIGHT"local tourism, regional information booklet, "time" related brochures, alpine local history -
 Kiewa Valley Historical Society
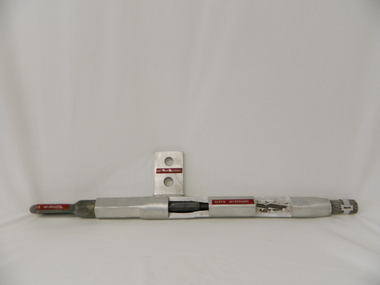
Transmission Line Connector, circa mid to late 1900's
This line connector tool is part of the erecting of electricity cables from the power stations to the ultimate distribution sub stations throughout Victoria. It is used to extend cable length and secure cable to tower points. This type of equipment has been in use in this region since power production commenced in the 1950'sThis connection tool is a vital part in the distribution of hydro produced electricity from its mother power plant to its ultimate destination be it rural towns, industry or city. It has been used in the Kiewa valley and its Alpine regions.This power line connection tool was required to extend the length of the power line and is made up from a "compression sleeve" with its connecting lug and at the other end the suspension eye.Stamped on the compression sleeve "4/7/.1297"sec vic kiewa hydro scheme, alternate energy supplies, alpine population growth -
 Australian National Surfing Museum
Magazine, Australian Surfers Journal, Volume One, Number Four, 1/9/1998 (estimated)
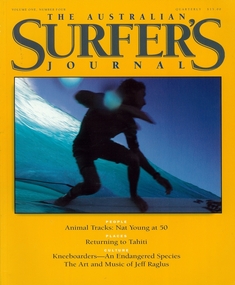
The Australian Surfers Journal was based on The Surfers Journal (USA) and ran for 2 years. This issue contains feature articles on world surfing champion Nat Young, iconic surf destination Tahiti, Kneeboarders and Victorian based surfing artist/musician Jeff Raglus.The Australian Surfers Journal is an iconic Australian surfing magazine which enjoyed a positive reponse from the Australian surfing community during the 1990's. It's feature articles, photographs and editorials were of a high literary standard by world standards.Australian Surfers Journal (Volume One, Number Four, Spring 1998), A4 full colour gloss magazine with cover headings about articles on Nat Young, Tahiti, Kneeboarders and Jeff Raglus. Close up of surfer (Patterson) on backlit aqua wave.Gold cover art featuring Colour photograph (Paul Paterson in Western Australia. Image by Jon Franknat young, australian surfers journal, tahiti, kneeboarders, jeff raglus, drew kampion, gerry lopez, makaha, albert falzon, steven valiere, jason foster -
 Flagstaff Hill Maritime Museum and Village
Poster - Shipping Timetable, Barclay and Fry Ltd. London, Time Table of Australian Sailings, circa 1939
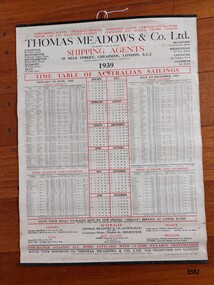
"Freight forwarding" is the arranging of the shipping of goods from their point of origin to their final destination. Freight Forwarders worked as an intermediary between companies that needed to ship products and the shipping and transportation firms that could ensure delivery. A key element of "freight forwarding" was the advice and professional handling of documentation and customs requirements provided. Early "freight forwarders" tended to be innkeepers who forwarded on the luggage of their hotel guests. One of the first "freight forwarding" companies was established by Thomas Meadows in 1836 which made it one of the earliest freight companies in Europe. More reliable rail and steamships were beginning to be used to transport goods and this created a demand for the new "freight forwarding" industry. The combination of railroads and steamships became very important in the late 19th and early 20th century. International shipments became common and freight forwarding that could handle their complexity became an integral part of the manufacturing and shipping landscape. Thomas Meadows & Company Ltd moved to offices in Milk Street, London in 1854 (where they remained until 1969 when they moved out of the city to Leytonstone) and continued in the freight business until 1987 when the company was acquired by Rockwell International Freight. The growth of Thomas Meadows & Company Ltd coincided with the growth and development of the colony of Victoria with an increasing need for the transporting of large numbers of people as well as important goods required by the growing colony - furniture, spirits, food, clothing, agricultural implements, household items etc. In the late 1840's only two or three overseas ships a month visited Melbourne but by late 1852 (after gold was discovered) more than a dozen ships arrived each week. By 1939, Thomas Meadows & Co. Ltd. had offices in Canada, U.S.A., New Zealand, France, Belgium and in Flinders Street Melbourne. This poster was sold by "Smarts Authorised Newsagency" in 1988 in Warrnambool - a business that had been owned by Neil and Shirley Smart at 168 Timor Street, Warrnambool since 1976. Previously it had been "Reed's Newsagency and Book Shop" (a local business established by William Reed circa 1912 and known as "William Reed Bookseller and Stationer"). The original owners, Reed's Newsagency and Bookshop were operating the shop in 1939 which suggests the poster may have been on display (for the information of their customers) in their shop at that time. This poster is significant through its association with Thomas Meadows and Co. Ltd. who is considered to be the founder of the "freight forwarding" industry in the early 19th century. It is an example of advertising used by shipping agents in the mid-19th to early 20th centuries. Its information includes the addresses of the firm's different offices in the U.K. and abroad, ships, shipping lines and ports used and the timetable the vessels were likely to follow. It is also significant through its association with a well known and long standing local Warrnambool business.A 1939 Timetable of "Australian Sailings" produced by the shipping agents Thomas Meadows and Co Ltd. It lists all their ships (plus dates and ports) sailing from the UK to Australia as well as the addresses of their offices in other cities in the U.K., Canada, U.S.A., Australia, New Zealand, France and Belgium. It has three vertical columns depicting (from left to right) January to June sailings, a simple 1939 calendar and their July to December 1939 sailings. The poster is attached on the top and bottom to two thin black metal strips. The top strip has a metal ring with a hole. A stamped label on the back of the poster has the name, telephone number and address of Smarts newsagency plus the date.Front of poster - "FORWARDING AGENTS. INSURANCE BROKERS.PASSENGER AGENTS.CARTAGE CONTRACTORS / MOTOR CAR AND MACHINERY PACKERS.FURNITURE AND GENERALEXPORT PACKERS" "THOMAS MEADOWS & CO Ltd." "ESTABLISHED OVER 100 YEARS" "SHIPPING AGENTS / 35 MILK STREET, CHEAPSIDE, LONDON, E.C.2" "PACKING WAREHOUSES IN LONDON & MANCHESTER" "1939" "TIME TABLE OF AUSTRALIAN SAILINGS" "JANUARY TO JUNE, 1939/ FROM LONDON" "JULY TO DECEMBER, 1939 / FROM LONDON" "HAVE YOUR SMALL PACKAGES SENT BY OUR SPECIAL "SMALLS" SERVICE AT LOWER RATES/RATES TO PORT ONLY OR INCLUDING DELIVERY THROUGHOUT AUSTRALIA" "INSURANCE AGAINST ALL RISKS EFFECTED WITH CLAIMS PAYABLE DESTINATION" "ROUTE YOUR SHIPMENTS VIA THOMAS MEADOWS & CO LTD. FOR PROMPTNESS AND ECONOMY" Stamp on back of poster - "SMART'S AUTHORISED NEWSAGENCY' "168 Timor Street, Warrnambool 3280" "Telephone: (055) 62 2092" "12 DEC 1988" Sticker at bottom - "51"flagstaff hill maritime museum and village, great ocean road, shipping, shipping agents, freight forwarding, freight, shipping time table, thomas meadows & co. ltd., thomas meadows shipping agent, shipping and forwarding agent, smart's newsagency, warrnambool, warrnambool newsagency, chart, poster, smart's authorised newsagency, neil and shirley smart, william reed, reed's newsagency and bookshop -
 City of Moorabbin Historical Society (Operating the Box Cottage Museum)
Photographs, x 3 Black & White Cheltenham Football Club 1909,1913, 1946, 20thC
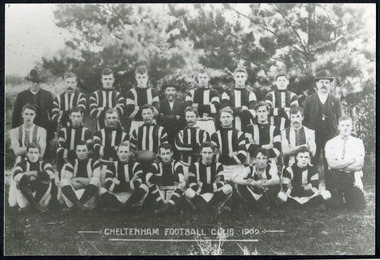
Known as the Rosellas, the early Cheltenham Football Club sides began playing on a regular basis in 1890, and would travel long distances by steam train to play country teams, such as Ballarat where they would arrive at their destination, play the match, socialize then return to the station. Opposition players and supporters would give three hearty cheers on their departure. The Cheltenham home games were played on a paddock on the corner of Park and Charman roads in Cheltenham. In 1907 the Cheltenham progress committee made an application to the board of land works for land in Weatherall Road for recreational service to the public. That application was received and granted, then developed where Cheltenham Recreational Reserve now stands. The land in the early days was virgin bush and the response for voluntary help to clear the area was outstanding. Nearly all the market gardeners in the district along with horses, ploughs, axes, shovels completely cleared the area in three weeks. The Moorabbin council then leveled the playing area and erected a post and rail fence around the ground. Pine tree shrubs were then planted on the west side of the ground. The ground was opened in 1909 and the first Cheltenham side entered in the newly formed Federal Football Association along with seven other foundation members, Mordialloc, Mentone, Moorabbin, Frankston, Glenhuntly, Elsternwick, and Ellindale. The grand final for that year, 1909 was a hard encounter between Cheltenham and Ellindale with Cheltenham coming out victors, thus becoming the inaugural Federal Football Association premiers. Cheltenham went onto win five senior premierships in the Federal Football Association by the end of the 1920s, they won the flags in 1909, 1911, 1913, 1922 and 1925, with the late Percy Woff playing in all 5 premiership sides and was captain in 1922. 1928 saw the start of an outstanding career from our oldest living player Tom Connor. Cheltenham continued to win premierships in the 1920’s and 1930’s with juniors taking out the 1929 and 1933 flags, under the guidance of Woff, and that continued in 1934 when Cheltenham took out the 1st XVIII and 2nd XVIII premierships. Cheltenham produced its only Brownlow medallist in Peter Box who played in the late 1940s, before going to Footscray where he became a champion. The 3rd XVIII went through the season undefeated in 1974 winning the premiership, with Trevor Barker a key player before going to St Kilda the following year. The club won three senior premierships under coach Barry White in 1992, 1993 and 1995. ( from CFNC website 2019) Cheltenham Football Club was formed 1890 and succeeded in winning many Premierships as a member of the Federal Football Association, Outstanding players Peter Box Brownlow Medalist 1956 Footscay VFL, , Trevor Barker and Kevin Roberts St Kilda VFL.3x Black & White photographs of the players in the Australian Rules Cheltenham Football Club 1909, 1913 and 1946 extra photo of Peter Box Folio 10 MAV 01059a) CHELTENHAM FOOTBALL CLUB 1909 Cheltenham Football Club 1909. Back row: A Chandler, committee member; R. Robertson, back-pocket; J. Harris, half back flank; J Adams, ruck and forward-pocked; M. J. Monk, club president; L. Woff, back-pocket; W. Adams, ruck and back-pocket; P. Woff, rover and forward-pocket; A Monk, committee member. Middle row: W. Hore, back pocket and ruck; A. Towns, half-forward flank; W. Carson, full back; F. Andrews, captain-half forward flank; H. Butler, centre half back; J. Warburton, centre half-forward; A. Slater, half-back flank; F. Fisher, half-forward flank; C. Sherwood, trainer. Front Row: G Gouldthorpe, wing; H. King, full-forward; W. Johnston, ruck and forward-pocket; P Spears, rover and forward-pocket; F. Bichl, wing; A. Bichl. rover and forward-pocket; F. Butler, centre player. Courtesy, Lionel Seal. ( from CFC website 2019) b) CHELTENHAM 1913 PREMIERS c) CHELTENHAM -1946 / Back row - J. Fisher, G.Corrigan, N.Hocking, F.Virtue, R.Craven, L.Baker, M.Blundell / 2nd Row - J.Phillips, T.Connor, E.Hawkins, A.Blakely, G.Baker, A.Dark, J.Barker, D.Craven, J.Pickering, P.Cameron,/ W.Hicks, G.Hoskings, R.Beihl, A.Hubbard, R.Kier, C.Russell. / Front Row - Clark Taylor, J.Slade, N.Niel, J.Brooks, T,Butler, H.Hosking, C.Hacusler, E.Hornibrook, W.Briggs, B.Russell, L.Biehl, / W Ripponcheltenham football club, australian rules football, victorian football association, victorian football league, smith j l; smith mary ann, stanley helen, , chaff cutter, horse drawn carts, toll gates brighton, motor cars 1900, steam engines, early settlers, bentleigh, parish of moorabbin, city of moorabbin, county of bourke, moorabbin roads board, shire of moorabbin, henry dendy's special survey 1841, were j.b.; bent thomas, o'shannassy john, king richard, charman stephen, highett william, ormond francis, maynard dennis, market gardeners, vineyards, orchards, cheltenham, two acre village, holloway josiah,, woff percy, connor tom, box peter, barker trevor, white barry, browlow charles, -
 City of Moorabbin Historical Society (Operating the Box Cottage Museum)
Leaflet, advertising ink-blotter, c1960
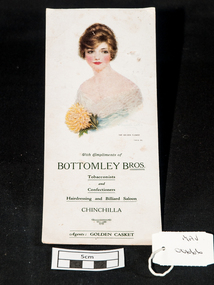
In the 1960's the general prosperity in Australia enabled City of Moorabbin citizens to travel interstate and overseas to tourist destinations for holidays. This is a souvenir from Queensland. c1960 Fountain pens were used by most people prior to the mass production of ‘BIC’ Biros that no longer need blotting paper to dry the ink.An example of 1960's advertising and a piece of used blotting paper that shows its function for drying Fountain Pen inkAn advertising leaflet with ink -blotting paper backing. c 1950. Coloured photograph of a lady promoting a business for Hairdressing and Billiard Saloon in Chinchilla, QueenslandFront is : Colour picture of the bust of a lady with Coiffed head and holding a yellow flower / THE GOLDEN FLOWER / THE O CO / With Compliments of/ BOTTOMLEY BROS/ Tobacconists / and / Confectioners/ Hairdressing and Billiard Saloon / CHINCHILLA / Agents : GOLDEN CASKET Back is : used pink blotting papermoorabbin, bentleigh, ormond, cheltenham, holidays, travel, tourists, fountain pens, bic biros, -
 Bendigo Historical Society Inc.
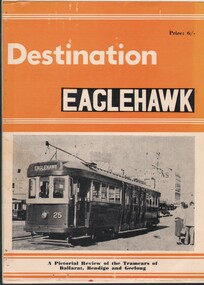
Book - HARRY BIGGS COLLECTION: DESTINATION EAGLEHAWK, 1965
... by Traction Publications, P. O. box 438 Canberra City ACT 1965.... Published by Traction Publications, P. O. box 438 Canberra City ACT ...Book. Harry Biggs Collection. A pictorial review of the tramcars of Ballarat, Bendigo and Geelong. Poorly bound book of the history of tramcars of Ballarat, Bendigo and Geelong. Compiled by K. S. Kings. Edited by J. Richardson. Published by Traction Publications, P. O. box 438 Canberra City ACT 1965. Destination series No 42. Price 6/-.organisation, union, transport, harry biggs collection, trams of ballarat, bendigo and geelong. -
 City of Ballarat
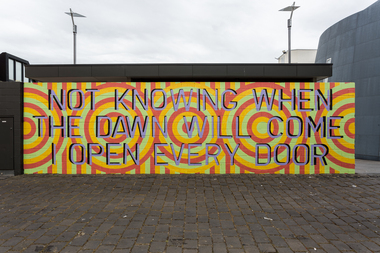
Artwork, other - Public Artwork - Temporary, Briony Galligan, Open Every Door by Briony Galligan
“The painted works are very intricate to make as I work in various sized brush strokes to make the images appear hand-drawn" This artwork by artwork by Briony Galligan was installed from Friday 20th November 2020 to 1 November 2021. Open Every Door consists of two wall paintings, each will remain at the site for 6 months, and a website publication. In April 2021 Briony installed the second artwork A Lover not a Fighter. Each abstract wall painting references queer histories and art makers, as well as abstract drawings made by Deakin’s Spiritualist contemporaries, such as Georgiana Haughton (1814-1884). The work was part of a City of Ballarat annual commission program to create temporary public artworks in Alfred Deakin Place, Ballarat. The artwork featured on a prominent site near the Art Gallery of Ballarat Annex. Currently a destination for art lovers and students from Federation University’s Arts Academy, Alfred Deakin Place is actively programmed as a space for new and innovative, contemporary public art. painted wall -
 Ballarat Heritage Services
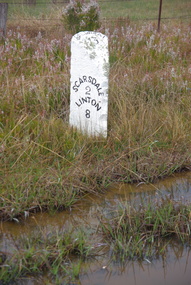
Photograph, LJ Gervasoni, Scarsdale/Linton Milepost (or Milestone), 20-06/2009
Stone mileposts dating from the 1870s are found on the Glenelg Highway. Stone and iron mileposts are now a rarity, and have remanining markers have become a tourist attaction in many smaller towns with remnant markers. The stone mileposts on the Glenelg Highway are listed on the Victorian Heritage Reigister as being significant to the State of Victoria. Their primary purpose is to inform the travelling public of distances and directions to various destinations. The stone milepost in the current City of Ballarat are located on the Glenelg Highway (between Ballarat and Scarsdale), Smythes Creek and Delacombe, and have been registered by Heritage Victoria, (HO155) Other stone mileposts are located In Golden Plains Shire at Smythesdale (Victorian Heritage Register H1701) Metrication in Australia caused former mile markers to be gradually replaced with 10 km markers on highways and country roads, which are referred to as "kilometre plates".Colour photograph of a stone mile post on between Ballarat, Scarsdale and Lintonmilepost, mile post, scarsdale, linton, ballarat, mile marker, stone milepost, milestone -
 City of Ballarat Libraries
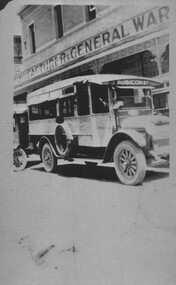
Photograph - Card Box Photographs, Omnibus, Ballarat circa 1925
Omnibus is from Bowd Bus Lines. This one is on the Sebastopol Line, red bus with the destination of Rubicon Street.bus, omnibus, vehicle, bowd bus lines, sebastopol, work -
Moorabbin Air Museum
Photograph (Item) - ANSETT pictures misc. Staff and promotional functions, Early Airport pics, Tourist destinations and Capital cities
... functions, Early Airport pics, Tourist destinations and Capital ... -
 Ballarat Tramway Museum
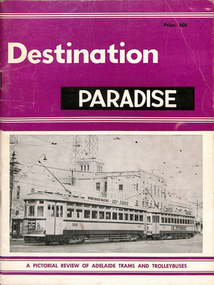
Book, Roger Wheaton, "Destination Paradise", 1968, 1975
... in the two cities. "Destination Paradise" Book Roger Wheaton Jack ...8065.1 - Book - 36 pages + card coves, printed on gloss paper, centre stapled, with two colour covers (purple and black) titled "Destination Paradise", providing details of the Adelaide and Port Adelaide tramcars or rolling stock. Published by Traction Publications, in 1968, written by Roger Wheaton edited by Jack Richardson. Provides details on the trams that operated in the two cities. Has a list of tramway and railway books on the rear cover. 8065.2 - Book - 52 pages + card cover, printed on matt paper, centre stapled, with two colour covers (purple and black) titled "Destination Paradise", providing details of the Adelaide and Port Adelaide tramcars or rolling stock including tramcar builders Duncan and Fraser, Pengelley, Holden, J A Lawton and the MTT itself.. Published by Traction Publications, in 1975, compiled by Roger Wheaton. Provides details on the trams that operated in the two cities. .1 - Has "K.Stodden 15-10-68" and .2 "K Stodden 1-2-75" in ink on first page.trams, tramways, adelaide, mtt, port adelaide, depot, tramcars, tramcar construction -
 Ballarat Tramway Museum
Photograph - Black & White Photograph/s, 1950's
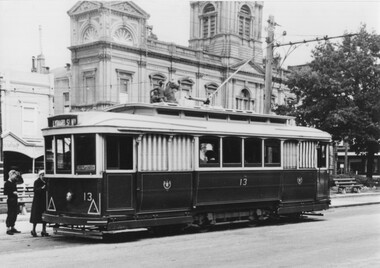
Yields information about the appearance and use of a single truck car in Sturt St during the 1950's.Black and White photograph of Ballarat 13 in Sturt St at the City stop, Lydiard St. The tram has the destination of Lydiard St and a "Pay as You Enter" sign with the Town Hall in the background. Photo during the 1950's.On rear in ink "PMTT J 76 - Ball 19 Bend 7" and stamped "TMSV Sales"trams, tramways, sturt st, city, lydiard st, town hall, tram 13 -
 Ballarat Tramway Museum
Negative, Wal Jack, mid 1940's
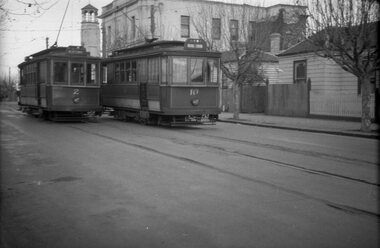
Negative and Digital images of the Wal Jack Geelong Negative file of Geelong trams 2 and 10 crossing at the Retreat Rd loop in Pakington St, just north of Aphasia St. Tram 2 - has destination of Newtown and 10, East. In the background is 271 Pakington St - City of Newtown and Chilwell offices, in 2020, a Residential property. Photo mid 1940's. trams, tramways, geelong, pakington st, aphasia st, tram 2, tram 10 -
 Ballarat Tramway Museum
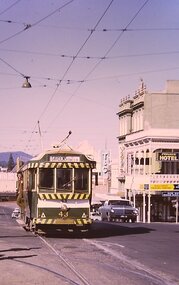
Photograph - Digital image, W. J. Llewelyn, 1/01/1970 12:00:00 AM
Yields information about the intersection of Sturt and Lydiard St.Digital images of tram 43 crossing Lydiard St in Sturt St, with destination of Gardens via Sturt St West. Has the T&G sign, Mechanics Institute and the Unicorn Hotel in the view. Photo by Chris Phillips. Image dated 1/1/1970 - to be confirmed. trams, tramways, sturt st, lydiard st, city, tram 43 -
 Ballarat Tramway Museum
Photograph - Digital image Set of 7, Chris Phillips, early 1960's
Yields information about tramway operations in Sturt St c1970.Set of 7 digital images of trams in Sturt St, c1970 - Photos by Chris Phillips. .1 - No. 26, in bound near Armstrong St - destination of Mt Pleasant St. Has the Commercial Bank of Australia building in the background - CBC .2 - No. 26 in bound to City, near Hospital Corner. .3 - No. 17 near the Doveton St intersection, has a roof advert "Make Bliss Not Love". Has the State Savings Bank, CAGA Finance, CBC bank buildings in the background. .4 - No. 12 in bound with the destination of Gardens via Sturt St West, at the corner of Dawson and Sturt St. Shows the tram stop. Has the R. E. Hayden Real Estate building in the background. .5 - No. 39 inbound at Hospital corner. .6 - No. 39 at the City terminus with the Post Office in the background. .7 - No. 43 outbound to the Gardens Via Sturt St west near Drummond St. Has the Marshall battery centre, Morris Ellis & Sons, Pope Mowers and The Ballarat Modern Diary in the background. Also a sign for AWA car radio.trams, tramways, sturt st, hospital corner, doveton st, dawson st, tram stops, tram 26, tram 17, tram 12, tram 39 -
 Ballarat Tramway Museum
Photograph - Digital image, Chris Phillips, Mar. 1969
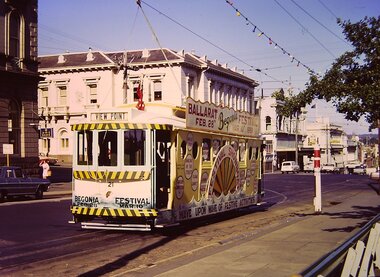
Yields information about the tram decorated for the Ballarat Begonia Festival featuring a paddle wheel for the 1969 festival.Digital image of No. 21 decorated for the 1969 Begonia Festival, using the Festival Showboat theme, at the City terminus with the Post Office in the background. The tram has the destination of View Point. The ANZ bank is on the corner. Note the colour lights at the tram stop.trams, tramways, sturt st, city, begonia festival, decorated trams, tram 21 -
 Ballarat Tramway Museum
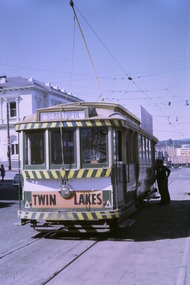
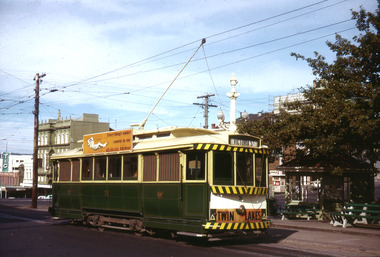
Photograph - Digital Image, Peter Knife, Tram 31 Sturt St for Victoria St, 10/5/1969
Digital image of Tram 31 Sturt St - destination Victoria St at the City tram stop - Sturt and Lydiard Sts, Tram has adverts for the SEC and Twin Lakes. In the background is the tram stop shelter. Photo by Peter Knife 10/5/1969.Yields information about Ballarat's trams in May 1969.Digital image of a colour slide.tramways, tramcars, ballarat, tram 31, twin lakes, sturt st, shelters -
 Ballarat Tramway Museum
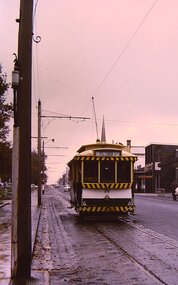
Photograph - Digital Image, Peter Knife, Tram 17 westbound in Sturt St at Lydiard St, 24/7/1971
Digital image of Tram 17 westbound in Sturt St at Lydiard St with the destination of Gardens via Sturt St West. In the background is the Cooks Private Hotel, the Ballarat Mechanics Institute, T&G, Patersons and Dickens food store. There are no trams in the City Loop. In the foreground is the curve for trams travelling from Lydiard St into Sturt St. Photo by Peter Knife 24/7/1971.Yields information about tram operations in Ballarat, some two months before closure of the SEC operated tram system.Digital image of a colour slide.tramways, tramcars, ballarat, tram 17, sturt st -
 Ballarat Tramway Museum
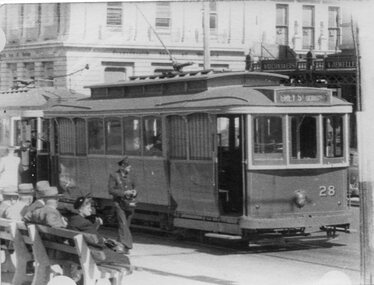
Photograph - Tram 28 -City Centre, 11/1/1954
Photograph of Ballarat 28 and 40 at City Centre, south side of Sturt St at Lydiard St, 11/1/1954. The tram has the destination of "Grey St Sebastopol", A Conductor is walking alongside the tram, and several passengers waiting on the seats. In the background are the Commonwealth Bank and the National Mutual building. Photographer unknownYields information about SEC tramway operations.Black and white photograph on plain paperHas details of photograph and date on rear and number "1108"ballarat, sturt st, lydiard st, commonwealth bank, tram 28, tram 40 -
 Ballarat Tramway Museum
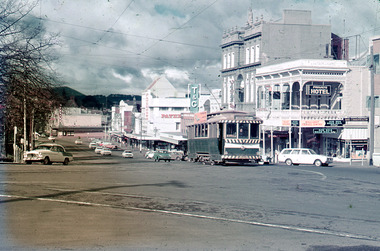
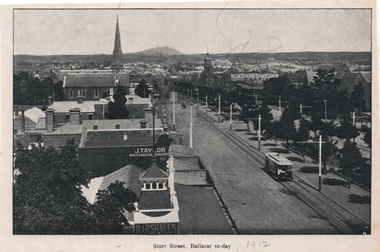
Photograph - Illustration, "Sturt Street Ballarat to-day", c1905/6
Set of two views from an illustrated publication on Ballarat. 1 - Illustration - "Sturt Street Ballarat to-day" looking east from the City Fire station along Sturt St with an ESCo tram eastbound. The destination sign is mounted on the dash panel indicating c1905/1906. In the view are Ballarat's Buildings, Mount Warrenheip, J Taylor Redhouse Bakery, and on the bottom edge a sign for Marshall's. 2 - Illustration - Post Office Ballarat, to-day - with an ESCo tram turning from Sturt St into Lydiard St North, with the Post Office in the view along with many pedestrians and some horse drawn vehicles. See also item 6245 for a postcard of the same view.Yields information about Ballarat and city views in 1905/1906.Illustration cut from a magazine or publication - set of two - back to backThe second image has "1912" in pencil along the bottom edge.ballarat, illustrations, sturt st, esco, post office, lydiard st nth