Showing 463 items matching "route 5"
-
 Melbourne Tram Museum
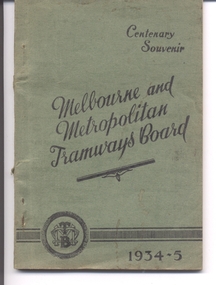
Book, Melbourne & Metropolitan Tramways Board (MMTB), "Centenary Souvenir - Melbourne and Metropolitan Tramways Board - 1934-5", 1935
Book - five sections - 80 pages, side stapled, glued within light green card covers with title "Centenary Souvenir - Melbourne and Metropolitan Tramways Board - 1934-5". Has an introduction, a preface that gives a brief history of the tramway system in Melbourne, 20 buildings and points on interest in Melbourne and how to get there, with sketches by Clive Fink, a list of electrified routes and a cable routes at the time with details of terminals and points of interest along the route. Printed by The Mail Publishers, 264 Barkly St Footscray. See Related documents for a route listing. See Reg Item 79 for a reprint version of 1967. 2nd copy added 29-8-2015 - donation of Ian Bryant. 3rd copy from the McComb Collection added 30-12-2016. Copy 4 donated by Kevin Tiernay - 11-06-2022 Pdf copy added 5/5/2019 as image i2 and images i2 to i4 removed.Has "19" in red ink on inside title page, Copy 3 - has H. S. McComb in pencil along the top of the front cover.trams, tramways, mmtb, melbourne, routes, cable trams -
 Melbourne Tram Museum
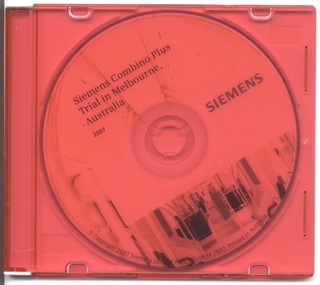
Film - Compact Diskette with video, Siemens, "Siemens Combino Plus Trial In Melbourne 2007", 2007
DVD made by Siemens as part of the demonstration visit of Combino Plus, C008 during 2007. Features interviews with passengers, views along the Melbourne - Kew via St Kilda Road route, lots of city views and night running, St Kilda foreshore, Balaclava Road. Length of production 5:06 minutes.trams, tramways, siemens, combino, melbourne, tram c008 -
 Melbourne Tram Museum
Photograph - Black & White Photograph/s and colour print, Melbourne & Metropolitan Tramways Board (MMTB), 1975
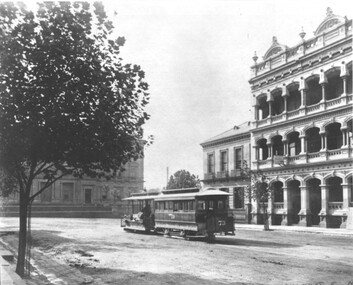
... Colour print of Z1 in Gisborne St, Melbourne, Thursday 8/5... on the Rear Colour print of Z1 in Gisborne St, Melbourne, Thursday 8/5 ...Colour print of Z1 in Gisborne St, Melbourne, Thursday 8/5/1975, outbound, route 10 to West Preston Regent St. MMTB Photograph Two copies held 119.1 - black and white version the same photograph - added 23/8/2013.119 - On rear in ink "Thursday 8th May 1975", 119.1 - has the MMTB stamp on the Reartrams, tramways, z class, gisborne st, mmtb, tram 1 -
 Melbourne Tram Museum
Magazine, Yarra Trams, "The Pantograph", 2007 to 2010
1 - Issue 1 - March 2007 - with photo of the Police Tram (2109) - Welcome message from the CEO Dennis Cliche, Good Friday appeal, Burwood highway works, new sub-stations at Coburg, Royal Park, Brunswick depot, Camberwell depot, East Preston, Essendon, Bundy Clock, Glenhuntly, Kew Depot, Malvern, Southbank,, Safety, events, Lunar Festival .2 - issue 2 - June 2007 - 18 pages, Malvern Depot (a green depot), Paul Matthews profile, trackwork at Glen Huntly and Essendon depots, Depot news, Joyce Barry tribute, Hawthorn depot museum, fund raising. .3 - issue 3 - Octr. 2007 - 16 pages - fund raising - Melbourne city romp, Des Davies retirement, CPR rescue of a collapsed driver, depot news, retirements and a chemical and fire incident on the Vermont South line. .4 - issue 4 - Jan. 2008 - 12 pages - fundraising, family events, depot news, retirements, TramTracker Jake .5 - issue 11 - Winter 2010 - 16 pages - St Kilda Road Superstops, Michel Mason - CEO, Malvern depot centenary, Transformation, new maps on trams, fundraising, the leadership team, depot news, uniforms, South Caulfield Junction upgrade. .6 - 20 pages issue 12, Summer 2010, published soon after Keolis took over operations of Yarra Trams. The first 10 pages, look at Trams on the Fringe, Feedback, Football trams, staff matters, and features a story on page 10 of the Hawthorn Tram Depot museum and Driver Shaun McCarthy wearing the brown uniform in front of tram 1041. Fully Scanned. The second ten pages are reversed (upside down) and titled "Le Pantographer", featuring a Bordeaux tram on the cover. Provides details of Keolis operations such as Lyon, Bordeaux, Lille, Le Mans, Caen, Angers, Dijon and other operations. .7 - issue 6 - Spring 2008 - Meerkats, fleet operations, training, Art Alive, Kew depot - new inspection pits, Long Lay Malvern, Did You Know campaign, and looking for Cricket players - part scanned. .8 - issue 13 - Autumn 2011 - Michel Masson CEO, visit of French Media, Ron Scholten Retirement, photo of Geoff Dean of Camberwell, - part scanned. .9 - issue 5 - June 2008 - Tram works Swanston and Flinders, tram 111, cricket .10 - issue 8 - Autumn 2009 - Good Friday appeal, public transport ombudsman, Malvern centenary, my friend Mike .11 - issue 9 - Spring 2009 - Chris Cairns safety campaign, route 48, Myki, Tramtracker, Jake.Demonstrates Yarra tram staff newslettersEleven issues of Yarra Tram's internal newsletter "The Pantograph", all A4, center stapled. Issues not fully scanned, unless noted.trams, tramways, keolis, yarra trams, fohtd, hawthorn, uniforms, coburg, substation, royal park, burwood highway, fund raising, bundy clock, environment, glenhuntly depot, essendon depot, malvern depot, south caulfield, tram 2109, tram 84, route 48, tram 111, good friday -
 Melbourne Tram Museum
Book, Melbourne & Metropolitan Tramways Board (MMTB), "MMTB Cable and Electric Tramways and Motor Omnibuses - Sections and Fares", Jul. 1937
Taupe coloured cloth covered book, 44 pages + covers and end pages, "MMTB Cable and Electric Tramways and Motor Omnibuses Sections and Fares" dated July 1937 and authorised by S. M Richardson. Details the various section stages and fares for each cable, electric trams and motor omnibuses, General instructions, concession fares. Has an index to routes. No photos of the various passes. Consists of one section, sewn with end papers part of the covers. 2nd copy added 5/5/2019 from donation of Barry Brooks ex Bob Prentice Collection. Images revised - jpgs retained and pdf added.trams, tramways, tickets, fares, sections, passes, cable trams, buses -
 Melbourne Tram Museum
Photograph - Set of 11 Colour Print/s, Bill Davis, mid 1980's to 1990
Set of 11 colour prints of Melbourne trams and locations during the mid 1980's to 1990, Photos not well focused. .1 - Group of four trams outside Malvern depot No. 2 shed. W7 1018 in Benetton clothing advertising livery March 1990 to early 1991. Along with 987, 876, 853. .2 - side on view of 1018. .3 - similar to .1 .4 - 1027, outbound, Princes Bridge with Arts Centre in the background. .5 - 1012, inbound ditto .6 - 929 inbound Swanston St, with Linea Hairdressing in the background. .7 - 885, outbound Swanston St, with Flinders St Station in the background. .8 - 847, ditto, between Collins and Flinders St, with Triple FM radio Ad. .9 - 913, ditto inbound. .10 - 897, at the Latrobe St terminus, Spencer St, with J. Wilson removalists advertisement on the front of the tram. Tram running route 9. .11 - ditto with the William Angliss College in the background. Features advertisements on trams for: Spring Valley drinks, Bank of Melbourne, Triple FM Radio, UDL drinks, Benetton, J. Wilson Removalists. All printed on Kodak paper.trams, tramways, ptc, malvern depot, swanston st, latrobe st, tram 1018, tram 1027, tram 987, tram 876, tram 853, tram 1012, tram 929, tram 885, tram 847, tram 913, tram 897 -
 Melbourne Tram Museum
Document - List, Melbourne & Metropolitan Tramways Board (MMTB), "MMTB Route Numbers - Tram Routes - Commencing as from Sunday, 1st November 1970", Oct. 1970
Six page foolscap printed (Gestetner?) document titled "MMTB Route Numbers - Tram Routes - Commencing as from Sunday, 1st November 1970", listing all routes. Introduced numbers with "3" and stopped the use of letters, eg "4D". Provides information on amalgamated routes, route numbers to be shown when running in and out of depots, city termini to depot, and to city from depots. Pages 5 and 6 provide a list of bus route numbers. For the previous listing see Rec Number 1424. Second copy added 30-1-2017trams, tramways, mmtb, ptc, buses, route numbers, routes -
 Melbourne Tram Museum
Leisure object - Cardboard Model Tram, Ministry of Transport, mid 1970's?
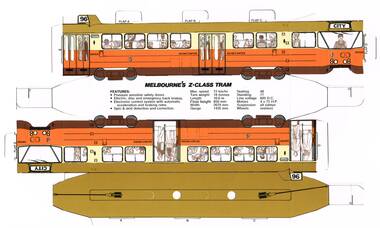
Cardboard, punched out, folding model tram - Melbourne Z class tram No. 5, has specification details on the base. Showing route 96. Probably produced by the Ministry of Transport mid 1970's. See also Reg Items 381 and 382 for a MMTB bus and a VicRail Silver Train. Two further examples found in cabinets added 14-11-2015 and added to the folder - both are complete sheets of card.trams, tramways, models, z class -
 Melbourne Tram Museum
Slide - Set of 6, Warren Doubleday, 9/03/1970 12:00:00 AM
Set of 6 Colour slides- Anscochrome plastic mount taken on 9-3-1970 of the shunting of trams for the Moomba Parade in Sturt St and City Road, prior to the deviation of the tracks to go around the Arts Centre. .1 - W2 631 in turning into City Road from Sturt St .2 - W2 629 turning from St Kilda Road, in to City Road .3 - W2 639 and 550 in Sturt St .4 - W2 550 - route 64, City in Sturt St .5 - W2 629,SW6 898 and 322, Sturt St. .6 - W2 641, 387 and others Sturt St.Has slide number written on itemtrams, tramways, city road, sturt st, moomba, parades, st kilda road, w2 class, tram 611, tram 629, tram 639, tram 550, tram 898, tram 322, tram 641, tram 387 -
 Ballarat Tramway Museum
Document, State Electricity Commission of Victoria, "Tramways - Provincial City Operations", 15/9/1954
Report, or Memorandum on SECV internal paper, from the Acting Engineer Manager to the Commerical Manager, dated 18/2/1955, titled "Tramways - Provincial City Operations". Looks at various ways of cutting the loss on tramway operations in all the three Provincial cities. Includes discussions on Fares and the income, headways, one-man operation, route abandonments, including parallel bus operations, Geelong branch lines, payloads, feeder buses in Geelong, Rosters in particular broken time or broken shifts, light traffic economics. Signed by K L Murray.Yields information about the internal discussions and considerations of the SECV to cut the tramway losses in all three Provincial cities,Document or report, 5 foolscap sheets, carbon copy, stapled in top left hand corner. Draft copy (7 pages) also held.tramways, state electricity commission of victoria, geelong, tramcars, secv, operations, passenger services, ballarat, bendigo, rosters, closure, buses -
 Melbourne Tram Museum
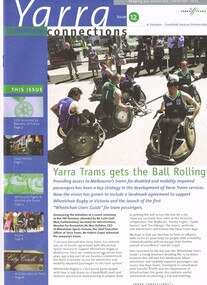
Magazine, Yarra Trams, "Yarra Connections", Dec. 2003
Demonstrates a Yarra Trams staff newsletter..1 - Magazine - 8 pages, full colour, centre stapled, printed on recycled paper, titled "Yarra Connections Issue 12, December 2003", published by Yarra Trams. Notes the launch of the "Wheelchair users guide" for tram passenger, Yarra Trams support for Wheelchair Rugby, planning for Vermont South extension, French award for CEO, Hubert Guyot, photo exhibition featuring employees by Georgia Metaxas, Boroondara residents and Travelsmart, Metlink Team Tigers Basketball, Ikea store in Richmond, pram friendly trams, feedback and return of W class trams to route 30. New track maintenance vehicle -"scrubber truck". .2 - Letter on Yarra Trams letterhead, addressed to Ron Wilson of Orange Grove Bayswater, signed by Paul Matthews Marketing Manager forwarding a copy of the magazine to Ron, noting highlights. Gives address details. .3 - Magazine - as for .1 - issue 1 dated October 1999 with a forward by the CEO Steve Macdonald , Camberwell depot, Deputy CEO Hubert Guyot, new logo designs, reduction in tram stops, tennis trams, family day, Docklands route 70 extension and competition. .4 - magazine - 3 fold A4 - issue 9, dated Nov. 2002, Notes the construction of Route 109, W class, St Vincent's Plaza, Gordon Atkins, Docklands tram services, explorer program, Feedback, Line Officers, Corporate Report and Melbourne Museum tram. .5 - magazine - issue 11 - August 2003 - 8 pages - opening of Box Hill line, Harry the Wombat, trams in the press, Welcome to Dennis Cliche, B class seating trial, Metlink, Docklands, trial information at tram stops (early TramTracker) project and route 75. .6 - magazine issue 13 - April 2004 - Australian Open tram service, Collins and Spencer Superstop, tram services, feedback, Metlink, Channel 10 - The Secret life of us, PTC Cricket Squad. .7 - issue 8 - April 2002 - Grand Prix, Box Hill update, Citadis update, Collins and Spring superstop, Australia Open, Fare Evastion and track joints. 8 - issue 10, undated - Australian Open tennis, Eurotram comes to Melbourne, Docklands joins the City Circle, route 109, Box Hill extension and what is a substation.trams, tramways, yarra trams, w class, disability services, vermont south, awards, metlink, route 30, camberwell depot, docklands, route 70, st vincent's plaza, line officers, box hill, route 109, b class, superstops, cricket, tennis, tramtracker, route 75, city circle -
 National Vietnam Veterans Museum (NVVM)
Photograph, Gibbons, Denis, Great Hung Vuong Day Road Race
Denis Gibbons (1937 – 2011) Trained with the Australian Army, before travelling to Vietnam in January 1966, Denis stayed with the 1st Australian Task Force in Nui Dat working as a photographer. For almost five years Gibbons toured with nine Australian infantry battalions, posting compelling war images from within many combat zones before being flown out in late November 1970 after sustaining injuries. The images held within the National Vietnam Veterans Museum make up the Gibbons Collection. A black and white photograph of a Group photo of the placed runners in the 5000 metre footrace from the market place at Long Dien. The race was run on the Vietnamese National DayTHE GREAT HUNG VUONG DAY ROAD RACE - 15th APRIL 1970: Hung Vuong Day, 15th April 1970, the Vietnamese National Day commemorating the events of the birth of the Vietnamese Race, is on of the most important festivals of the Vietnamese Memorabilia. The placed contestant athletics in the 5000 metre foot race from the market place at Long Dien, south east of Nui Dat, the 1st Australian Task force Base, along national Route 23 to the town square at Baria (Phuoc Le), the Phuoc Tuy Province Capital. The multi coloured shirts of the various contestants, from the numerous military and civilian units in the province and the Australian Task Force looked out of place in the war zone. It took 17 minutes, 5 seconds for the outright winner to get to the finish, a strapping young SAS soldier, Trooper John Thurgar, from Scone, N.S.W. of the 1st Special Air Service Squadron, one of the Australian contestants. The first prize, silver cup, was presented to Trooper Thrugar by Colonel Tu, The Province Chief, Colonel Peter Falkland, the 1st Australian Task Force Deputy Commander presented the first Vietnamese contestant across the finish line with a silver cup. In all there were trophies for the first siz places by the Vietnamese and the "visitors", SAS took the first three Australian/New Zealand places whilst the last three came from other 1st Australian Task Force Units, the first prize for each of the individual winners was a large silver cup, for the next five runners up, by the Australians there was a smaller silver cup, for the Vietnamese first place there was a silver cup the same size as for the Australian, outright, winner, while the next five Vietnamese runners up received a parcel of clothing and towels.photograph, 1st sas sqn, baria, phuoc tuy province, vietnamese national day, gibbons collection catalogue, great hung vuong day road race, trooper john thurgar, national route 23, nui dat, long dien village, col tu, col peter falkland, 1st special air squandron, the province chief, 1st australian task force, 3390, royal regiment of australian artillery, denis gibbons -
 Melbourne Tram Museum
Document - Notice to Passengers, Melbourne & Metropolitan Tramways Board (MMTB), "Replacement of Footscray - Moonee Ponds Bus Service by a Tram", 27/4/1954
Notice to Passengers titled "Replacement of Footscray - Moonee Ponds Bus Service by a Tram", about the opening of the section between Gordon Road and Wests Road from Sunday 2/5/1954. Provides details of the first and last trams, sections and fares and services to the Explosives Factory. Dated 27/4/1954, signed F G Wraith as Manager.Yields information about the opening of the connection between Gordon St and Wests Road.Notice - printed on foolscap size paper with handwritten initials in top left hand corner.Has "Rigaldi" in pencil.tramways, new tramways, route 82, footscray, explosives factory -
 Bendigo Military Museum
Photograph - 4th Field Survey Squadron ANZAC Day Parade. Adelaide, SA, 1994
This is a set of 14 photographs of 4th Field Survey Squadron personnel parading through the streets of the Adelaide CBD on ANZAC Day, on the 25th of April 1994. The march concluded at the Cross of Sacrifice in Pennington Gardens East followed by the ANZAC Day Service of Remembrance. See items 6565.32P and 6567.11P for more photos taken during ANZAC Day, 1994.This is a set of 14 photographs of 4th Field Survey Squadron personnel parading through the streets of the Adelaide CBD on ANZAC Day, on the 25th of April 1994. The colour photographs are on 35mm negative film and are part of the Army Survey Regiment’s Collection. The photographs were scanned at 96 dpi. .1) - Photo, colour, 1994. Unit right wheeling on the parade route. L to R: CPL Brett Parkin, SPR Mark Linwood, SPR Mark Sinderberry, SPR Greg Richards, SPR Matt Arnold, unidentified, SSGT Pat ‘Fuji’ Drover, unidentified (x4), SPR Chris Pearse. .2) - Photo, colour, 1994. Unit right wheeling on the parade route. Officers L to R: OC MAJ Peter Demaine, unidentified, CAPT Rob Gray, unidentified, CAPT Tony Stephens. Markers L to R: CPL Brett Parkin, SPR Mark Linwood. .3) - Photo, colour, 1994. Unit marches along the parade route. L to R: unidentified (x2), SPR Chris Pearse, SPR Mark McInerney, unidentified (x2), SGT Paul Baker, CPL Dick Crawford, unidentified, SSGT John ‘Shep’ Shephard, unidentified, CPL Steve Wegener, unidentified Warrant Officer, CPL Jeremy Archer, unidentified Warrant Officer. .4) - Photo, colour, 1994. Eyes right as unit passes dignitaries on the dais. L to R: unidentified officers (x2), CAPT Tony Stephens. Markers L to R: CPL Brett Parkin, SPR Mark Sinderberry, remainder unidentified. .5) - Photo, colour, 1994. Eyes right as unit passes dignitaries on the dais. L to R: OC MAJ Peter Demaine, CAPT Rob Gray, unidentified officers (x2), unidentified, Marker: SPR Mark Linwood. .6) - Photo, colour, 1994. Unit marches along the parade route. .7) - Photo, colour, 1994. Unit marches along the parade route. L to R: SPR Daryl Miller, CPL Steve Wegener, unidentified, WO2 Peter Hammer (background), CPL Jeremy Archer, unidentified Warrant Officers (x2). .8) - Photo, colour, 1994. Unit marches along the parade route. L to R: unidentified (x2), SPR Chris Pearse, SPR Mark McInerney, unidentified (x2), SGT Paul Baker, CPL Dick Crawford, SSGT John ‘Shep’ Shephard. .9) - Photo, colour, 1994. Unit marches along the parade route. Officers L to R: CAPT Rob Gray, unidentified (x2), CAPT Tony Stephens. .10) - Photo, colour, 1994. Unit marches along the parade route. Officers L to R: OC MAJ Peter Demaine, CAPT Rob Gray, unidentified (x2), unidentified soldier, Marker: SPR Mark Linwood. .11) & .12) - Photo, colour, 1994. Unit marches along the parade route. .13) & .14) - Photo, colour, 1994. Other units march along the parade route..1P to .14P – There are no personnel identified. ‘1994 ANZAC DAY’ annotated on negatives sleeve.royal australian survey corps, rasvy, 4 fd svy sqn -
 Ballarat Tramway Museum
Administrative record, Electric Supply Co. of Vic (ESCo), "One Man Cars", 11/1919
Set of records and items concerning the operation of one-man trams in Ballarat by the Electric Supply Co of Victoria, The North Melbourne Electric Tramways and Lighting Co (NMETL) and Bendigo trams. Comprises: 1 - Notes on Ballarat One Man Fare Box Cars - fares, tokens, style of trams, fare boxes, headways, and issues. The second page has operational statistics, insurance, and routes operated - dated 8/11/1919. 2 - Motorman's Daily Record Fare Box Car - small card 3 - Adjustment of Fares form 4 - Daily Report of Cars Inspected form 5 - Report of Accident or Unusual Occurance form 6 - Driver's Running Journal form 7 - Car Mileage form 8 - Driver's and Conductor's Cash Statement form 9 - Fare Box Cash Statements 10 - Colour pencil sketch plan view of front of tramcar 11 - two sheets "Cars in Service and Headway" - Keilor Road Route and River Route - NMETL 12 - Letter re times of a reported journey or trip and passenger numbers in Bendigo - pick up, numbers and running times for a Bendigo route - evening trip with a one-man tram. Yields information about the operation of fare box and one man trams in Ballarat, including notes on NMETL and Bendigo operations.Manila folder marked "One Man Cars" containing 12 items of various sizes with some folded to fit the folder. All pinned with a brass clip.tramways, trams, esco, one-man trams, forms, tokens, nmetl, bendigo -
 Ballarat Tramway Museum
Administrative record - Geelong, State Electricity Commission of Victoria, "Disposal of Rolling Stock", 5/1961
List details the disposal or dispersal of the Geelong Tram fleet following closure in 1956. Prepared by the Ballarat office of the SEC and dated 11/5/1961. Lists the tram number, type of tram, date received by Geelong, Transferred or sold to, last trip route, date of its last trap and total mileage in Geelong. Notes the three trams sold to Mr Jullien who as a dealer on sold them and "ultimate placement unknown"Demonstrates a typed list of the sale or dispersal of tramcars ex Geelong.Carbon Copy of a typed document on a large folio sheet.tramways, state electricity commission of victoria, geelong, tramcars, sale of trams, tram disposal, secv -
 Melbourne Tram Museum
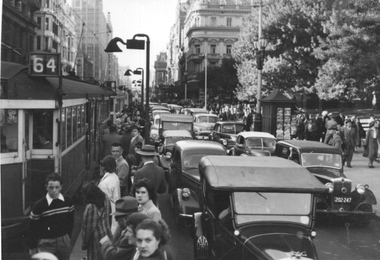
Photograph - Safety Zone Flinders and Swanston, The Herald, Jan. 1954
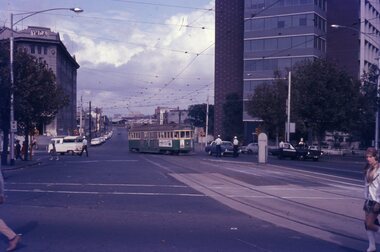
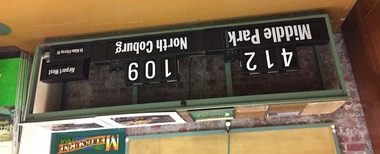
Black and white photograph showing a crowded Safety Zone at the Swanston St stop for Flinders St. Has at least five trams in the view and shows how passengers could read route numbers as to their tram - can see routes 64, 8, 7 and 6 with possibly a 5 at the end of the line . Note the loudspeakers used by Inspectors to advise passengers of the trams and to stand clear when the trams were ready to depart. There is a wide variety of motor cars in the view. Photo by the Herald Sun 1/1954. A cropped version of this photo was used on page 4 of the January 1957 issue of Electric Traction - Courtesy of the City Development Association. Yields information about Melbourne tram route numbers and how they could be seen by passengers at safety zones.Photograph with hand written notes on rear and stamps on the rear.In ink "No. 5 - Cr Flinders and Swanston Streets, Jan 1954" and The Herald Sun copyright stamp.trams, tramways, swanston st, safety zone, route number boxes -
 Flagstaff Hill Maritime Museum and Village
Vehicle - Tip Dray, Prior to 1930s
A Dray is a type of dead axle wagon that was used to transport heavy loads or objects. They had a flat level floor and while some had no sides, others had box bodies and sides. Tip Drays (also known as Tip Carts, Muck Cart, Scotch Cart, Tumbrel or Putt in different parts of England) were smaller than other drays as their loads were heavy and usually only pulled by one horse. Their basic design included two wheels, a tipping body and shafts. The Tip Dray has a unique mechanism that allows the top to tip backwards to tip the load out of the back of the dray. The tipper was activated by a handle at the front allowing the driver to operate it while still having control over the horse. A Tip Dray was an indispensable piece of equipment in the days before tractors and mechanical trucks. They were used by farmers and carters to transport hay, rocks, bricks, gravel and rubbish etc. and because they were useful for dumping loads, they were favoured for use in road and railway construction. A photo in the collection of the Lorne Historical Society shows a tipping dray being used during the construction of the Great Ocean Road. They were part of the daily street traffic in towns and cities around Australia from the early days of settlement. In Australia in the early 1900's, carters began to join unions to protect their jobs and pay. N.S.W. had a "Trolley, Draymen and Carters Union", Queensland had a "Tip Dray Men's Association" and in W. A. the "Top Dray Driver's Union" had a "cessation of work" in 1911 when they were fighting for an increase in their day's wages. In 1910 a meeting of Tip Carters was held in Geelong at the Trades Hall to discuss the formation of a union (The Geelong Tip Dray Carters) which was a success and a schedule of rates for all carting, whether by contract or day labor, was fixed. By 1912 they had "labelled" more than 50 drays and had representatives on the "Trades Hall and Eight Hours Committee". By the mid 1930's and early 1940's, tip drays were being superseded by mechanical trucks and utes. However tip drays continued to be used in some circumstances. They were a practical solution to the problem of petrol rationing during W. W. 2. It was noted in a letter to the editor in the "Sunshine Advocate" in 1938 that a positive argument for continued use of Tip Drays for rubbish collection related to the idea that a horse drawn vehicle involved with lots of stops and starts at different houses (very like a milkman's delivery route) often involved the horse "driving itself" while the driver picked up the rubbish - something a motor truck was unable to do! Another article written in August 1935 and published in the Age in a parliamentary report into the rubber industry noted "tip drays had almost disappeared and in their place, metal was carted in 5 ton motor trucks" but the report went on to say that as a part of the Government relief work (during the Great Depression) the Government had "to some extent reintroduced the tip drays so that a greater number of men would be employed". This particular tip dray was owned by Mr. Oswald (Jack) Bourke. He used it to deliver dry goods from Sunbury to the Queen Victoria Market in Melbourne several times a week in the 1930's and then (between 1945 and 1962) Mr. Bourke used it on the garbage round in Springvale Victoria for the Springvale Council. The Council owned three drays and the "No. 3" painted on this dray is in recognition of its original number. After the death of Mr. Bourke in 1990, one of Mr. Bourke's sons (Andy) found the dray in a shed and restored it. The sign writing on the back and side panels were added during the restoration. This Tipping Dray is a significant example of a horse drawn vehicle that was used by workers from the early days of white settlement through to the 1940's and even into the early 1960's. It was used in a range of "working class" occupations - road construction, railway construction, carting goods, rubbish collection etc. and would have been found in cities, country towns and on farms.A wooden and metal tipping dray with a box body and four sides. It has two iron and wooden wheels (with 14 spokes), two wooden shafts and a metal tipping mechanism. The back panel folds down to allow loads to be dumped out. It is painted in green and cream with sign writing on one of the sides and on the front and back panels. It features decorative painted lines and designs in burgundy, cream and light blue on most of the wooden parts. The tipping mechanism is on the front of the dray's left side and consists of a metal pin secured with a metal ring, and a lever.Front of dray - "No. 3" Side of dray - "A. & M. BOURKE / Contractors / LONGWARRY" Back of dray - "G.T. ANDREWS / QUEEN VICTORIA MARKET - Stand C23 / Phone DANDENONG 225"flagstaff hill maritime museum and village, warrnambool, shipwreck coast, tipping dray, dray, tip dray, tip cart, vehicles, horse drawn vehicle, springvale council, jack bourke, muck cart, scotch cart, tumbrel, putt, box body, oswald bourke, sunbury, queen victoria market, melbourne, no. 3 -
 Bendigo Military Museum
Souvenir - ANZAC DAY MARCH 1919, C.1919
Item in the collection relating to C.J.C. McQuie MM, refer Cat No 9680P for his service details. The March as per cover was held on 25th April 1919 in London. The program gives full details of the days events which include 5,000 troops from the 5 Australian Diviisions, Light Horse Division, Artilley, 18 PDR Battery all led by the General Officers of the Divisions on Horse back. The route taken over 12 streets, at Mansion House the Lord Mayor will take the Salute, the Prince of Wales to take a Salute at Australia House, secretary for War Winston Churchill and members of the Army Council, Australian Airmen will fly over in 14 Aircraft. After a luncheon in the Egyptian Hall for 350 of the men plus distinguished guests, evening will be a reception at Australia House for 1,500 guests held by the Riight Honorable Andrew and Mrs Fisher.Program, paper folded, front cover in all blue print, inside is all black print, rear page is clear.program, anzac, 1919, mcquie -
 Melbourne Tram Museum
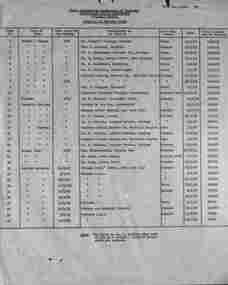
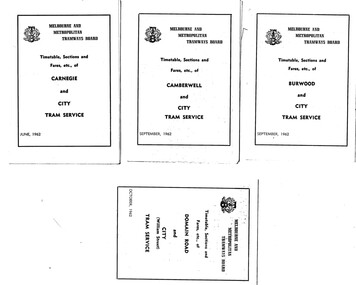
Ephemera - Timetable, Melbourne & Metropolitan Tramways Board (MMTB), Set of 30 MMTB tram timetables, 1962
Demonstrates a set of MMTB 1962 timetables.Set of 30 MMTB tram timetables, folded sheets, 4 fold, providing timetables for specific routes, day of week giving information on tram times at the terminus, sections and fares, running times. Some signed by W. J. Richards as Acting Traffic Manager, or R. C. Drummond as Traffic Manager. Route Numbers not given on cover, generally given on inside. Where a All night service was applicable, shown as well. .1 - Burwood - City - 9/1962 .2 - Camberwell - City - 9/1962 .3 - Carnegie - City - 6/1962 .4 - Domain Rd - City - 10/1962 .5 - East Brighton - City - 6/1962 .6 - East Coburg - city - 9/1962 .7 - East Malvern - Darling Rd - City 27/5/1962 .8 - East Preston - City - 11/1962 .9 - Essendon Aerodrome - City - July 1962 .10 - Essendon (Matthews Ave) - City - 7/1962 .11 - Glen Iris - City - 8/1962 .12 - Hawthorn - Spencer St - 7/1962 .13 - Kew Cotham Rd - St Kilda Beach - 8/1962 .14 - Malvern Burke Rd - City - 8/1962 .15 - Mont Albert - City - 7/1962 .16 - Moreland - City - 9/1962 .17 - West Coburg - City 7/1962. .18 - North Balwyn - Spencer St - 7/1962 .19 - North Coburg - City - 6/1962 - has Sunday only Fawkner Railway station service on rear - 6/1962 .20 - North Richmond - Prahran and St Kilda Beach - 7/1962 .21 - Northcote (via St Georges Rd) - City - 7/1962 .22 - Prahran - City - 7/1962 .23 - South Melbourne and St Kilda Beach - City - 6/1962 .24 - St Kilda Beach - City - - 9/1962 .25 - Toorak - City - 8/1962 .26 - Wattle Park - Elgar Rd - City - 9/1962 .27 - West Maribyrnong - City - 7/1962 .28 - West Preston - City - 6/1962 .29 - West Coburg - City - 10/1962 ,30 - East Preston - City - 7/1962Some have "Robert Wilson" stamp on the covers.trams, tramways, timetables, tickets, fares, mmtb, all night services -
 St Vincent's Hospital Melbourne Archives
Album - Agnes McLean photograph album, Souvenir St Vincent's Melbourne, the foundation stone new wing 1928
Images in the album are related to the laying of the foundation stone of St Vincent's new wing in 1928 as well as the royal visit of the Duke and Duchess of York in 1927. A loose newspaper clipping contained in the album titled "Fitzroy's Welcome" provides information on the royal visit which extended into Fitzroy, Collingwood and Richmond. A minute photo on page 18 of the album shows an image of the royal yacht. Album contents and descriptions written: Page 1, Mother Mary Aikenhead foundress of the Sisters of Charity. Page 2, Mother Mary Berchmans foundress of St Vincent's. Page 3, The Papal Legate Cardinal Cerretti XX1X eucharistic congress laying of the foundation stone SVHM1928. Page 4, His Grace the Archbishop of Melbourne the most Rev Daniel Mannix 1928. Page 5, The stand from which the cardinal addressed the meeting. Page 6, En route to "Stand" SVH. Page 7, The stone ready to be blessed. Page 8, The Cardinal going to bless the stone. Page 9, The blessing of the stone. Page 10, Listening to the Cardinal. Page 11, The mallet and the trowel used. Page 12, The stone is well and truly laid, Page 13, Via the enclosure. Page 14, St V's nurses. Page 15, The Subway. Page 16, En route to Reception Hall. Page 17, The Reception Hall. Page 18, The Stage Garlands, CLC students entertained. Page 19, Royal visit His RH the Duke of York. Page 20, The Duchess of York. Page 21, The living check. Page 22, The guard of honour SVH nurses. Page 23, Fire station en fete opposite SVH. Page 24, Victoria Parade for a Royal Visit.Each page has script style black ink descriptions of the photograph.archbishop daniel mannix, mother mary berchmans daly, cardinal bonaventura cerretti, duke of york, duchess of york, mother mary aikenhead, st vincent's hospital melbourne, nurses, victoria parade, eastern hill fire station., tunnels, brenan hall -
 Melbourne Tram Museum
Photograph - Black and white - cable tram Collins and Spring Sts
Photo of a cable tram set - at the corner of Collins St and Spring St. The saloon trailer is No. 73. The grip car is yet to be fitted with stanchions on its sides and does not have roof mounted destination signs on either vehicle. The trailer car is in the original company livery. In the background are the Victorian Government Treasury Building along with No. 1 and 5 Collins St, the facades of which remain in Collins St. Photo possibly soon after the cable line opened on 2-10-1886.Yields information about cable trams in Collins St and the buildings on the corner of Spring and Collins Sts. Set of two Black and white photographs on paper."Collins St E M" in bottom right hand corner. On rear of second print "No letterboard on dummy, Dummy clerestory in letter stained colour route glass panels. No signwriting on trailer aprons. Name of MTOC on side splashboard of trailer ? route name." Has the stamp of "Tyrrell's Pty Ltd," on rear and number "8" in top right hand corner and number "42-22".trams, tramways, cable trams, collins st, tram 73, spring st -
 Bendigo Historical Society Inc.
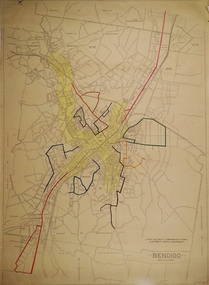
Map - BENDIGO BUS ROUTES, 1934 - 1958 ?
Map: Bendigo bus Routes, State Electricity Commission of Victoria, Electricity Supply Department. Printed on the bottom right hand corner F.E.B 23-12-47 , R.L.A. 5-9-58, 19-9-34, 27-11-37. 4 Mapsmap, bendigo, transport, state electricity commission, bendigo bus routes -
 Geoffrey Kaye Museum of Anaesthetic History
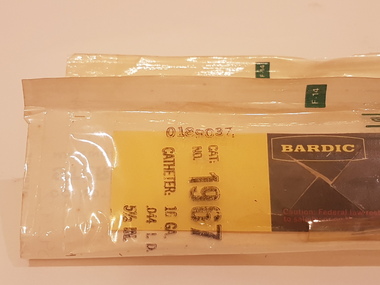
Equipment - Cannula placement set, Bardic, c. 1980
Cholera swept a deadly path through Europe in 1832. Irish physician, William O’Shaughnessy, proposed treating patients with saline infusions and Dr Thomas Latta of Leith, successfully applied the treatment. The intravenous route is the fastest way to deliver fluids and medications through the body. Today, fluid therapy is one of the most widespread interventions in acute medicine. Clear plastic strip adhered to white paper backing, forming a sealed packet containing a cardboard backing board, with a cannula attached.Stamped in black ink on 3929.1: CAT: / NO. 1966 / CATHETER: 14 GA. / .058 I.D. / 5 1/2 IN. / 0182037 Stamped in black ink on 3929.2: CAT: / NO. 1967 / CATHETER: 16 GA. .044 I.D. / 5 1/2 IN. / 0189037intravenous, cannula, fluid therapy, william o'shaughnessy, thomas latta -
 Ballarat Tramway Museum
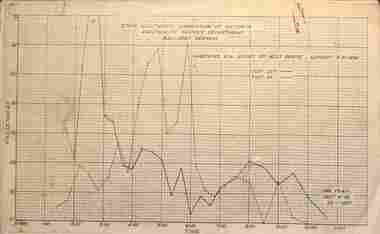
Administrative record - Set of 18 Ballarat - Passenger graphs, State Electricity Commission of Victoria (SECV), 1956 - 1957
Set of 18 graphs showing route, date, passenger numbers by time: 1 - Gardens via Sturt St West - Sunday 5-2-1956 2 - Gardens via Drummond St North - Sunday 5-2-1956 3 - Victoria St - Sunday 5-2-1956 4 - Mt Pleasant - Sunday 5-2-1956 5 - Gardens via Sturt St West - Sunday 26-8-1956 6 - Gardens via Drummond St North - Sunday 26-8-1956 7 - Victoria St - Sunday 26-8-1956 8 - Mt Pleasant - Sunday 26-8-1956 9 - Lydiard St Nth - Sebastopol - Sunday - August 1956 10 - ditto - Feb. 1956 11 - Sunday Operation - average no. of passengers carried all routes, Sundays Nov. 1955 to Oct. 1956 12 - Sebastopol route - Sunday 6-1-1957 13 - Lydiard St Nth route - Sunday 6-1-1957 14 - Gardens via Sturt St West - Sunday 6-1-1957 15 - Gardens via Drummond St Nth - Sunday 6-1-57 16 - Victoria St - Sunday 6-1-1957 17 - Mt Pleasant - Sunday 6-1-1957 18 - Average Number of passengers per trip - Sunday 6-1-1957 Demonstrates the SECV Ballarat office work to understand Sunday passenger numbers. May have been part of a move to consider ceasing operations on Sundays.Printed graphs on foolscap paper set of 18.All have the SEC Drawing Office stamp and dated on the rear.tramways, statistics, passenger services, reports, ballarat, sunday services -
 Ballarat Tramway Museum
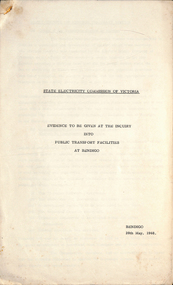
Document - Report, State Electricity Commission of Victoria (SECV), "Evidence to be given at the inquiry into Public Transport Facilities at Bendigo", May. 1968
Details the history of the Bendigo system, take over by the SEC and the conditions of that take over by the SEC, reconstruction, financial losses incurred by the SEC, decline in passengers, its suitability, condition of the infrastructure and rolling stock. Its unsuitability to extend, effectiveness of the Geelong conversion, ability of private bus operators, tramway employees, methods of abandonment, tram tracks, overhead and impact on the electricity supply system. Has a table showing the income and losses and population from 1935 to 1967, a coloured graphical presentation of tramway statistics, sheet of Fares and Charges for Ballarat. Attached to the rear of the document was an advertisement for Ballarat Tramways fare sections (See Reg Item 8039) See item 9835 for the Ballarat report dated April 1968. At the rear of the second copy is drawing VX4/2/1 showing bus and tram routes in Bendigo and VD6/144A for Geelong. See Reg Item 8046 for a separate map which may have been part of this report.Yield information and demonstrates the SEC's attitude to trams in Bendigo and their finances.Report 15 Foolscap sheets, duplicated and three attachments, was stapled in the top left hand corner, titled "Evidence to be given at the inquiry into Public Transport Facilities at Bendigo" Presented 28/5/1968. Two copies held.trams, tramways, reports, closure, bendigo, history, buses, submissions -
 Melbourne Tram Museum
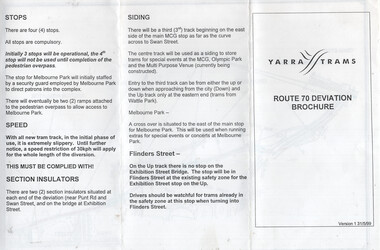
Document, Yarra Trams, "Route 70 Deviation Brochure", 5/1999
Document issued to crews at the time of the opening of the Batman Ave Deviation in June 1999. Pamphlet dated 31/5/1999. Wikipedia Reference for the route dates the use from 6/6/1999. Has a map, notes on the tram stop, speed, section insulators and the siding. Published by Yarra Trams.Demonstrates a Yarra Trams pamphlet at the time of the relocation of route 70 from the Batman Ave terminus to its operation via Flinders St and the Exhibition St bridge.Document - or pamphlet - titled "Route 70 Deviation Brochure" - A4 sheet, 3 fold DL.tramways, route 70, yarra trams, new tramways, batman ave, new track -
 Federation University Historical Collection
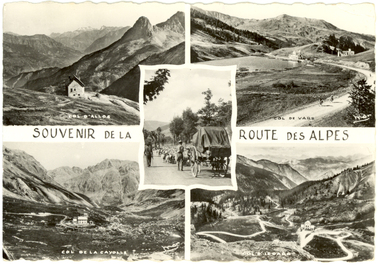
Postcard - black and white, MAR, Le Route Des Alpes, c1920
Black and white photographic postcard showing 5 views including Col D'Allos, Col, de Vars, Col dela la Cayolle and Col D'oeoarochatham-holmes family collection, alps, france -
 Melbourne Tram Museum
Photograph - Set of 10 - various trams Preston Workshops, Norm Cross, mid 1970s
Set of 10 colour prints by Norm Cross of trams at Preston Workshops or St George's Road. 1 - Sleeper transport 15W 2 - ditto 3 - W2 class 243 on No. 17 road, pending an 02 overhaul. 4 - W2 327 on dolly trucks at Preston Workshops 5 - W2 class tram 337 Preston Workshops 6 - W2 355 Preston Workshops 7 - W2 380 in the Yard at Hawthorn Depot 8 - W2 567 on a traverser at Preston Workshops. 9 - W2 248 Preston Workshops after a 03 overhaul or repainting 10 - W2 333 St George's Road - route 10Yields information about various W2 class cars at Preston Workshops, mid 1970sSet of 10 colour prints with rounded corners.trams, tramways, tram 15w, tram 243, tram 327, preston workshops, w2 class, tram 337, tram 355, tram 380, tram 567, tram 248, tram 333 -
 Melbourne Tram Museum
Functional object - Tramcar component, C. Brose Wuppertal Germany, Set of destination indicator equipment that was fitted to Z3 and A class trams, c1985
Set of destination indicator equipment that was fitted to Z3 and A class trams. Each item consists of various electronic parts contained within a metal case that could have been cabled together. Equipment manufactured by (Carl) C. Brose of Wuppertal Germany and maintained by Font Electronics of Melbourne - some items have the manufacturers details on them along with the details of the maintenance company and serial numbers etc. Photo .1 - shows the set of equipment as placed on display in the training room. .1 - set of two route number boxes, three individual controlled blinds, driven by a motor and control gear. Has a Fluro light fitted internally. See images .2 to .5 .2 - Small side destination indicator, with driven blind, electronic equipment with motor on the underside of the box - for use in Z class trams - see images .6 to .9 .3 - as for .2, but with motor mounted right side, used in A class trams, see images .10 to .12 .4 - set of two control panels with selection equipment for selecting the destination (by number) and route number with indicators and start button - see image .13 to 14 .5 - set of two long main rolls indicators, with control gear and Fluro light internally, driven by an internal electric motor - see images 17 and 18 .6 - set of two linking mechanism for the various boxes with large cables cut off for each of the four tram boxes. Would have been control panel item .4 - see image 15 and 16. See e-mail from Simon dated 17/11/2014. See reg Item 4617 for a small side destination roll.trams, tramways, destination indicators, a class, z3 class, transport equipment