Showing 598 items
matching north road station
-
 Ballarat Tramway Museum
Slide - 35mm slide/s - set of 11, Noel Simons, 23/10/1965 12:00:00 AM
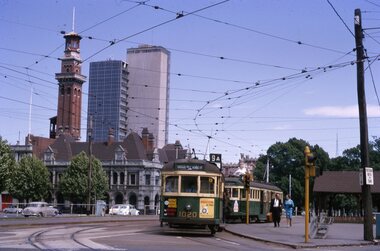
Set of 11 Kodachrome transparencies taken on 23/10/1965 in Melbourne. 1178.1 - W7 1020 (on route 9A, Northcote via St Georges Road) with a W2 536 (Deepdene) behind at the corner of Victoria Parade and Brunswick St. East Melbourne or Fitzroy. Has Eastern Hill fire station and ICI building in background. 1020 has front dash panel ads for Queens Bridge Motors and Bridgestone tyres. 1178.2 - W5 759 (route 19, North Coburg) and W5 807 in Elizabeth St. Melbourne at the intersection of Bourke St. with the State Savings Bank building in the background. 759 has side ads, one of which is for CASTROL. 1178.3 -SW6 903 crossing Brunswick St. in Victoria Parade, Fitzroy bound for Deepdene, route 45. Photo taken after tram has passed photographer. 1178.4 - W7 1019 (route 96, East Brunswick Blyth St.) and W7 1010 (route 88 East Preston) in Nicholson St at intersection with Victoria Parade. A Herald newspaper truck is alongside 1019. 1178.5 - W7 1040 (route 96, East Brunswick Blyth St.) in Nicholson St at intersection with Albert St. Has Princess Theatre in the background. (High res scan added 26/10/2008 - copy to FOHTD) .1178.6 - W6 974 (route 89 East Preston Bell St.) in Bourke St. about to turn into Spring St. Has buildings on the south side of Bourke St in background, including Southern Cross Hotel. Note trees in tubs and red phone box by Windsor Hotel. 1178.7 - as for same location as 1178.6 - SW6 967 (route 96) and W6 971 (inbound - route 90 - City Spencer St.) 967 has Lucas ad on front dash. 1178.8 - W7 1013 (route 88 East Preston) photographed from W6 991 in Bourke St at corner of Russell St. Has Normans corner store, Treadways and Foys in background. 1178.9 - W2 553 (route 1 East Coburg) at the corner of Elizabeth St and Bourke St. Has the Leviathan, Roger David and Ezywalkin shops in the background. 1178.10 - W6 991 (route 88) and W7 (route 96) in Bourke St. at corner with Elizabeth St. Photo taken from the GPO steps. 991 has ads for BIC pens and CASTROL. In background are the State Savings Bank, Halls Books and McEwans shops. 1178.11 - Line up of north bound trams (3 +) lead by W2 449and southbound in Elizabeth St at corner of Collins St. Has Flinders St. station building in the background. Hi -res image of .10 added 22-12-2018All have date stamp of "23 Oct 1965" in purple ink. All black ink unless otherwise noted. 1178.1 - "W7 1020 turning into Brunswick St. from Victoria parade, East Melbourne (followed by W2 536) 1178.2 - "W5 799 and 807 in Elizabeth St. Melbourne at cnr. of Bourke St." 1178.3 - "SW6 903 entering reserved track in Victoria Parade, East Melbourne" 1178.4 - "W7 1019 and 1010 in Nicholson St. East Melbourne at Victoria Pde intersection" 1178.5 - "W7 1040 Melbourne's last tram (to date) in Nicholson St. at Albert St. intersection." 1178.6 - "W6 974 in Bourke St. Melbourne, about to turn into Spring St." 1178.7 - "W6 971 entering Bourke St. from Spring St. Melbourne, passes SW6 967 outward bound for East Brunswick" 1178.8 - "W7 1013 (seen from W6 991) in Bourke St. Melbourne crossing Russell St." 1178. 9 -"W2 553 in Elizabeth St. Melbourne at cnr of Bourke St." 1178.10 - "W6 991 and W7 1005 in Bourke St. Melbourne at cnr of Elizabeth St." 1178.11 - "W2 449 leads a line of Peak hour cars along Elizabeth St. Melbourne (at Collins St. corner)"tramways, trams, melbourne, victoria parade, nicholson st., brunswick st., bourke st, elizabeth st, tram 1020, tram 536, tram 799, tram 807, tram 903, tram 1019, tram 1010, tram 1040, tram 974, tram 967, tram 971, tram 1013, tram 553, tram 991, tram 1005, tram 449 -
 Ballarat Tramway Museum
Slide - 35mm slide/s, Noel Simons, 21/11/1962 12:00:00 AM
Set of 17 transparencies taken on 21/11/1962 on Kodak mounts. 1188.1 - Bendigo No. 11 at Depot Junction McCrae and Arnold St. with driver/conductor changing points. 1188.2 - Bendigo No. 4 at Charing Cross, side on photo, with City Club Hotel and Alexandra Fountain in the background. Tram has Castrol and SEC 'Electric Cooking' ads. 1188.3 - Bendigo No. 4 climbing View St. after tram has passed photographer. Tram has Streets Ice Cream and Cohns Soft Drinks ad on rear dash panel. In the background are the buildings in View St., including the Princess Theatre. Tram has destination of Eaglehawk. 1188.4 - Trams 2 and 4 crossing at the California Gully or Thorpe St Loop. 1188.5 - Bendigo 4 in Mt Korong Road. Tram inbound with destination of Quarry Hill, just leaving Garden Gully Loop. 1188.6 - Bendigo 4 and 17 crossing at the Hayes St. or Iron Bark Gully Loop. No. 17 bound for Eaglehawk, No. 4, Quarry Hill. 17 has two SEC roof ads and a white horse whiskey ad. 1188.7 - No. 17 bound for Eaglehawk, soon after leaving California Gully. Has large mullock heap in background. 1188.8 - Bendigo 2 and 17 crossing at the Thorpe St. or California Gully Loop. Has butchers shop in background. 1188.9 - Bendigo 17 at the Eaglehawk terminus. Has destination of Quarry Hill. In background is the hotel and shops at the terminus, showing ads for "Melbourne Bitter". Tram has two SEC 'Electric Cooking' ads. Driver and conductor about to assist two lady passengers with a pram and baby. 1188.10 - No. 17 at Eaglehawk terminus, awaiting departure. Has Eaglehawk Town Hall and Post Office in background. Tram has a Whitehorse Whiskey ad on the front dash panel. 1188.11 - No. 3 in High St. Eaglehawk, with destination of Eaglehawk. Has the shops on the south side of High St. in the background, including the Eaglehawk fish shop. Tram has two roof ads, one an SEC roof ad, and Cohns Drinks and Streets Ice cream ads on front dash panel. 1188.12 - as above, but after tram has passed photographer. Note the centre of the road poles. 1188.13 - No. 2 outbound for Eaglehawk at the intersection of Mt. Korong Road and the Calder Highway. Photo taken after the tram has passed the photographer. Has an Ampol service station in the background. 1188.14 - No. 11 leaving the Bendigo depot, crossing the bridge, with the Scrubber car in the background. 1188.15 - No. 21 at the North Bendigo terminus. Tram has destination of Golden Square and Cohns drink ad on front dash and two roof ads on side. 1188.16 - No. 11 on Golden Square route, in High St. at intersection with Old High St. 1188.17 - No. 11 at the Golden Square terminus, conductor turning the pole. Hotel on the left side of the photo. Note the road works barrier and red flag behind the tram. Slide has an end of roll mark on the right hand side of the image.Information written on in black ink and date stamped on purple ink. 1188.1 - "Birney car No. 11 in McCrae St. at Cnr of Arnold about to run into depot, Bendigo" 1188.2 - "No. 4 at Alexandra Fountain, Charing Cross Bendigo" 1188.3 - "No. 4 climbing the View St. Hill from Charing Cross, Bendigo (Eaglehawk Route)" 1188.4 - "No. 4 and 2 at Thorpe St. Loop, California Gully" 1188.5 - "No. 4 in Mt Korong Rd., Long Gully, Near Havilah Rd. (Bendigo) (Eaglehawk Route)" 1188.6 - "Nos. 17 and 4 crossing on Hayes St. Loop, Ironbark, Bendigo" 1188.7 - "No. 17 soon after leaving California Gully (Eaglehawk Route)" 1188.8 - "No.2 and 17 crossing on Thorpe St. Loop, California Gully (Eaglehawk Route)" 1188.9 - "No. 17 at Eaglehawk terminus" 1188.10 - "No. 17 at Eaglehawk terminus" 1188.11 - "No. 3 in High St. Eaglehawk" 1188.12 - "No. 3 nearing Eaglehawk terminus" 1188.13 - "No. 2 in Mt. Korong Rd., Ironbark. Calder highway on left (Eaglehawk route) 1188.14 - "Birney car No. 11 leaving Bendigo depot. Scrubber car at rear" 1188.15 - "No. 21 at North Bendigo Terminus" 1188.16 - "Birney car No. 11 in High St. Bendigo at intersection with Old High Street (Golden Square Route)" 1188.17 - "Birney Car No. 11 at Golden Square terminus, High St., Bendigo". tramways, trams, bendigo, depot junction, charing cross, view st., eaglehawk, north bendigo, golden square, tram 2, tram 3, tram 4, tram 11, tram 17, tram 21, tram scrubber -
 Ballarat Tramway Museum
Slide - 35mm slide/s - set of 24, Noel Simons, 20/05/1971 12:00:00 AM
Set of 24 transparencies taken on 20/5/1971 on Kodak mounts. 1195.1 - Bendigo 19 arriving at Charing Cross en route to North Bendigo with Fountain Plaza and the City Family Hotel in the background. No. 19 has two roof ads for the SEC. -'Electricity better for cooking' and 'Everything's under control in my all electric kitchen' 1195.2 - as above, but standing at the Charing cross stop, with the Beehive Stores and other buildings along the east side of Pall Mall in the background. 1195.3 - No 21 ex Golden Square crossing View St. trackwork in front of No. 25 waiting to depart for Quarry Hill. No.21 has two roof ads (as for No.19 in 1195.1) and No.25 has one SEC roof ad and another. Ezywalkin sign in the background, and Fountain Plaza. 1195.4 - as for 1195.3, but after 21 has arrived and 25 left for Quarry Hill. Has Ezywalkin store and the Beehive store in the background. 1195.5 - No. 5 at the Eaglehawk terminus. Photo taken with a cannon in foreground looking along High St. Eaglehawk. Has shops on the west side of High St. in the background. 1195.6 - No. 5 at the Eaglehawk terminus, close up of the rear of the tram - note tow bar arrangement. Has destination of Quarry Hill. 1195.7-Nos.25 and 5 crossing at the Thorpe St. Loop, California Gully. No. 25 bound for Eaglehawk (has SEC Briquette and electric cooking roof ads) and 5 en route for Quarry Hill with a SEC and Cinzano roof ad. 1195.8 - as for 1195.7, but after trams have passed each other. Has Borough Auto Service building in the background. 1195.9 - No. 5 in Mt Korong Road, towards Bamard Street, photo taken after tram has passed photographer. 1195.10 - No. 30 at the Golden Square terminus with the Milk Bar on the right hand side of the photograph. 1195.11 - No. 30 inbound at Fire Station Loop, High St. Golden Square. Has old fire station in the background. Passengers are boarding the tramcar. 1195.12 - No. 30 in High St, bound for North Bendigo between Vine and Wattle Streets. 1195.13 - No. 5 bound for Eaglehawk waits at Iron Bark Gully Loop, at Hayes St. 1195.14 - No. 5 and No. 2 crossing at Iron Bark Gully Loop. 1195.15 - No. 5 bound for Eaglehawk leaving the Manchester Loop, Long gully. 1195.16 - No. 5 passing William Street, Long Gully en route to Eaglehawk. 1195.17 - No. 5 just before the California Gully Crossing Loop. 1195.18 - Nos. 5 and 26 crossing at California Gully crossing Loop. No. 5 heading to Eaglehawk, 26, Quarry Hill. 1195.19 - No. 5 in High St. Eaglehawk with Bob Moyle's Victoria Hotel and the TAB in the background. 1195.20 - No. 5 in High St. Eaglehawk approaching the terminus. Photo taken after the tram has passed the photographer. Has Foodland store and J. Best Fruit supply in the background, along with Eaglehawk Town Hall. 1195.21 - No. 5 at the Eaglehawk terminus, photo taken along seldom used track along High St. 1195.22 - as for 1195.22 - but at the very end of the track. 1195.23 - No. 5 en route for Quarry Hill climbs High St. Eaglehawk with the Victoria Hotel and Eaglehawk Town Hall in the background. 1195.24 - No. 5 and 25 crossing at Jobs Gully Loop. Note 25 has a black on white destination roll, while No. 5 has a white on black destination roll. Information written on in black ink and date stamped on purple ink. 1195.1 - "No. 19 arrives at Charing Cross Bendigo from Golden Square" 1195.2 - "No. 19 about to leave Charing Cross for North Bendigo" 1195.3 - "No. 25 awaiting departure for Quarry Hill, watches No. 21 arrive at Charring Cross from Golden Square" 1195.4 - "No. 21 on North Bendigo service and No. 25 on Quarry Hill run await departure at Charing Cross" 1195.5 - "No. 5 at Eaglehawk terminus" 1195.6 - "No. 5 at Eaglehawk terminus" 1195.7 - "Nos. 5 and 25 crossing at Thorpe St. Loop, California". 1195.8 - "Nos. 25 and 5 crossing Thorpe St. Loop, California Gully". 1195.9 - "No. 5 descending Mt Korong Rd. towards Bamard St." 1195.10 - "Birney car No. 30 at Golden Square terminus" 1195.11 - "Birney car No. 30 in High Street near Thistle Street (Fire Station Loop)" 1195.12 - "No. 30 in High St. between vine and Wattle Streets" 1195.13 - "No. 25 at Hayes Street Loop Iron Bark". 1195.14 - "Nos. 2 and 5 crossing at Hayes Street Loop Iron Bark" 1195.15 - "No. 5 at Manchester Loop opposite Havilah Road, Long Gully" 1195.16 - "No. 5 passing William Street, Long Gully". 1195.17 - "No. 5 at California Gully" 1195,18 - "Nos. 26 and 5 at Thorpe St. Loop, California Gully". 1195.19 - "No. 5 in High St. Eaglehawk". 1195.20 - "No. 5 approaching Eaglehawk terminus" 1195.21 - "No. 5 at Eaglehawk terminus" 1195.22 - "No. 5 at Eaglehawk terminus" 1195.23 - "No. 5 in High St. Eaglehawk" tramways, trams, bendigo, charing cross, eaglehawk, california gully, golden square, iron bark gully, jobs gully, tram 2, tram 5, tram 19, tram 21, tram 25, tram 26, tram 30 -
 Ballarat Tramway Museum
Slide - 35mm slide/s - set of 6, Noel Simons, 28 Feb. 1972
Set of 6 transparencies taken on 28/2/1972 on Kodak mounts. 1206.1 - Bendigo No. 5 at Hayes St. Loop, en route for Quarry Hill. 1206.2 - No. 5 at Garden Gully Loop, Mt. Korong road, Ironbark. en route to Quarry Hill. Note the water column in the background. 1206.3 - No. 5 in View St. Bendigo, with the Commodore Motel in the background. 1206.4 - No. 6 en route for Golden Square in Fire Station loop, with the fire station building in the background. Photo taken after tram has passed photographer. 1206.5 - No. 6 in High St., running through Golden Square Shopping Centre, en route for Golden Square. Photo taken after tram has passed photographer. 1206.6 - No. 6 arriving at Charing Cross, bound for North Bendigo, with the City Family Hotel, ANZ bank and the Cenotaph (war memorial) in the background.Information written on in blue ink and date stamped on purple ink. 1206.1 - "No. 5 at Hayes Loop, Ironbark." 1206.2 - "No. 5 at Garden Gully Loop, Mt. Korong road, Ironbark." 1206.3 - "No. 5 in View St. just after start of double track near Barnard St." 1206.4 - "No. 6 in High St. at Fire Station loop." 1206.5 - "No. 6 in High St. running through Golden Square shopping centre." 1206.6 - "No. 6 arriving at Charing Cross from Golden Square."tramways, trams, bendigo, hayes st. loop, garden gully loop, view st., golden square, charing cross, tram 5, tram 6 -
 Ballarat Tramway Museum
Slide - 35mm slide/s - set of 4, Noel Simons, Apr. 1972
Set of 4 transparencies - copy slides - possibly ARE film strip dated March 1972. 1209.2 and 1209.4 on Kodak Readymount mounts. 1209.1 - Bendigo 5, 6 and 28 on a special tram service in bound to the City on a tour in Caledonia St. about to enter Lucan St, or White Hills Road or Weeroona Ave. (mis match in names in various maps). Gas works in the background. No. 5 has a white disk on the rear of the tram. 1209.2 - Nos 2 and 26 at Charing Cross with the Fountain Plaza in the background. Both trams have the destination of Quarry Hill, though 26 is on the Eaglehawk bound track. 1209.3 - No. 19 at the Golden Square terminus, with the conductor or driver swinging the pole and Billy Rodda's Golden Square hotel in the background. 1209.4 - No. 7 at Fire Station loop, en route to North Bendigo, picking up a passenger with a pram. Part of a set of 20 slides made by the Association of Railway Enthusiast Provincial Tramways film strip. Reference Item 2560 details the ARE Film Strip and provide references to other slides.Information written on in blue ink and date stamped on purple ink. 1209.1 - "Nos 5, 6 and 28 in Caledonia St. about to enter Weeroona Ave." 1209.2 - "Nos 2 and 26 at Charing Cross." 1209.3 - "Swinging the pole on No. 19 at Golden Square Terminus." 1209.4 - "No. 7 inward bound from Golden Square stops at Fire Station Loop."tramways, trams, bendigo, charing cross, golden square, gas works, special trams, tram 2, tram 5, tram 6, tram 7, tram 19, tram 28 -
 Ballarat Tramway Museum
Album - Photo Album, Newstar, 1960s to 1970's
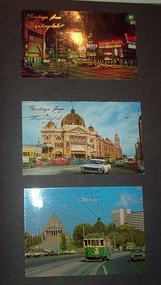
Photographic album containing 39 Colour postcards of Melbourne trams. The album consists of 30 leaves of dark grey heavy paper with three creases on left hand side of sheet, bound into a heavy bluey grey folder, embossed in gold 'Scrap Book" and bound with bluey grey string with two holes. The cover has been embossed with a the blue grey in swirls. Inside of back cover is a white label, "A New Star Product", with a please ask for No. with "425" stamped on. Postcards have been glued into the album. Entries have been kept to a single line - cards are able to be dated from buildings, whether the trams have marker lights, types of motor cars and general Melbourne history. Image files in page number order. Image 15 is of book. All taken with a electronic camera. Page 1 - Night photo - Flinders and Swanston St. - with "Greetings from Huntingdale" embossed in gold. Flinders St. station, with "Greetings from Huntingdale" embossed in gold. (post 1972 ) St. Kilda road with the Shrine of Remembrance in the background and W2 453 inbound on route 6. (post 1974) Page 2 - Bourke St, looking from Parliament House westwards, with Z8 inbound - after 13/8/1975 on route 89. Bourke St, looking east from Queen St., night photo, early 1970's. Princes Bridge looking towards Flinders St. Station Page 3 - Flinders St. Station, from Princes Gate buildings, - Photo E. Ludwig, John Hinde Studios. Bourke St. from Queen St, looking east, late 1960's - all W's. - W7 1026 east bound on route 88. Flinders St and Swanston St. corner, from Princes Bridge - night photo - W5 756 northbound route 15. Page 4 - W2 584 inbound route 64, St. Kilda Road and Nolan St., late 1960s - photograph. Princes Bridge, looking over Yarra River to the east. (pre Concert Hall) St. Kilda Road, with Shine of Remembrance in background, W2 303 inbound route 4D, mid 1960's. Page 5 - Flinders and Swanston St, W2 530 outbound route 8, early 1970's. Swanston and Collins St., W2 596 westbound in Collins St. City Square built - 1st version. (post 1972) St Kilda Road, with Shine in background, W2 298 and others, route 8 and 72. (post 1972) Page 6 - Flinders and Swanston St., W2, inbound route 5 on a wet evening. (mid 1970's) W2 515 outbound, Collins St., late 1960's, with Town Hall in background. (early 1970's, prior to lights) Collins St. looking west at Russell St with W2 637outbound route 42, early 1960's. Page 7 - Swanston St looking south at Little Bourke, W2's 373 route 67 and 374?(route 5), southbound, early 1970's Flinders St. Station, looking west in Flinders St., early 1970's, at dusk. Melbourne Town Hall with City Square from the North West (early 1970's) Page 8 - Bourke St looking east from Queen St. with W7 1005 inbound on route 96 - early 1970's. Bourke St. looking west from Exhibition St. with W6 976 outbound on route 95 - early 1970's. Swanston St. looking south from Lonsdale, with W2 484 on route 64, W2 228 and W2 364 in photo - early 1970's. Page 9 - Swanston looking south from north of Lonsdale St with many tramcars in photo - mid 1970's. St Kilda Road, with Shrine in background, W2 345 outbound route 4, SW6 913 inbound route 4 - prior to 1970. St Kilda Road, with Shrine in background, with trams in photo - early 1970's. (Photo loose in album - National View postcard by Murfett Ltd. Aust.) Page 10 - Postcard - TMSV? of 1041 and cable car set at Preston Workshops. 1041 in Bourke St., looking east from Queen St. - early 1970's - 1974? Collins St. looking east from Elizabeth St. with W2 253 inbound route 11, and W2 224 outbound - rout 47, early 1970's Page 11 - TMSV Postcard, X217 in Dandenong Road with L class in background. Shrine of Remberance from BP building, looking towards the city with St. Kilda Road on the left. Princes Gate and Flinders St. from the SEC buildings in Flinders St. looking south east - mid 1960's. Page 12 - Swanston St. at Flinders St. looking north at dusk. Flinders St. station at Swanston St with trams crossing at intersection - late 1960's Flinders St. station with W2 327 outbound. Page 13 - Temporary City Square at Collins and Swanston St. with tramcars at intersection. Wellington Parade (Mugs Alley), looking towards the City, with W2 546 inbound on route 38 - mid to late 1960's. Page 14 - Swanston St. looking south, at Lonsdale St, W2 432 inbound route 7 - late 1960's or early 1970's. Partly loose in album - National View postcard by Murfett Ltd. Aust. trams, tramways, photo album, melbourne, postcards -
 Ballarat Tramway Museum
Book, Metropolitan Transit Authority (MTA), "Light Rail Transit System - Inner Area North-South Link", c1986
Sixteen page book, A4 portrait format, saddle stapled, titled "Light Rail Transit System - Inner Area North-South Link", published by the Metropolitan Transit Authority detailing the conversion of the former heavy electric suburban railway lines to St Kilda and Port Melbourne to electric trams or Light Rail. Has foreword by Tom Roper, Minister for Transport, Describes the proposed system, vehicles, development of articulated vehicles (2001, 2002), interchange with rail services, travel times and a map showing the proposed route, including a possible extension along Mitford St. and Broadway to Glenhuntly Road. Has a number of artists impressions of the vehicles at Station Pier and South Melbourne station. Includes colour photographs of the vehicles, conductors and photos of other light rail systems in Hanover and Amsterdam. Published c1986.trams, tramways, melbourne, light railways, mta, st kilda, port melbourne, articulated trams -
 Ballarat Tramway Museum
Document - Report, Melbourne and Metropolitan Tramways Board (MMTB), MMTB Reports 1979 to 1981, 1980 to 1982
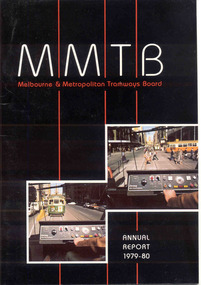
Three copies of the Annual report of the MMTB for the years end 1980, 1981 and 1982 3953.1 - "Annual Report 1979-80" - white gloss paper with colour card covers with 36 pages, gloss, on inside giving details of the MMTB Board, Officers, Operations report, schedule of debenture, investments, Auditors reports, record of Annual traffic receipts, passengers, miles etc, tram and bus routes operated, statistical information, graphs and photographs. Photos include; Z 117 in Bourke St, Z 31 Burwood terminus, new safety tower wagon, Z118 in Bourke St, W2 528 High St Kew, reconstruction of High St Kew, Z3 120, cable and electric trams at Flemington Bridge, Z3 117, fitting trams to bogies at Preston workshops, Queens Bridge roundabout, MAN bus, Burwood substation, Z111 in Bourke St and Z's enter Elizabeth St service and Z3 129 on rear cover at night. 3953.2 - "Annual Report 1980-81" - white gloss paper with colour card covers with 36 pages, on inside giving details of the MMTB Board, Officers, Operations report, schedule of debenture, investments, Auditors reports, record of Annual traffic receipts, passengers, miles etc, tram and bus routes operated, statistical information, graphs and photographs. Photos include; image of Park St, Domain Road Jtn before changes, Museum station entrance, Flinders and Swanston St, CDB City Ring bus service, Swanston St, Westgate bus route, Park St, new substation, Swanston and Flinders St, Flinders land, and give way to buses pulling out of stops. 3953.2 - "Annual Report 1981-82" - white gloss paper with colour card covers with 36 pages, on inside giving details of the MMTB Board, Officers, Operations report, schedule of debenture, investments, Auditors reports, record of Annual traffic receipts, passengers, miles etc, tram and bus routes operated, statistical information, graphs and photographs. Photos include images of a z class crossing the Maribyrnong bridge, Footscray bus workshops, track renewals, a wedding at Wattle Park, a W2 arriving at Museum Station, Clifton Hill interchange, buses, Z class in Elizabeth St (Nos 158 and 43), Z89 in Mt Alexander Road North Essendon and a W2 loaded on a truck for New Zealand.3951.1 - has Graeme Breydon's address stamp on front cover., 3951.2 - ditto, 3951.3 - ditto and on inside of front cover., 3951.6 - "G. Breydon" in pencil on front cover and pencil comments on balance sheet., 3951.7 - dittotrams, tramways, mmtb, melbourne, annual reports, operations, trackwork -
 Ballarat Tramway Museum
Postcard, SEC Geelong Tram No. 34
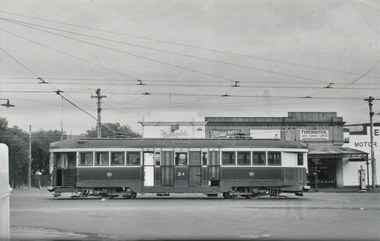
Yields information about the Melbourne N class trams and their use on Provincial systems.Black and white photograph, printed on a postcard back format of SEC Geelong Tram No. 34, side on view (later Bendigo 2) in Melbourne Road, North Geelong between Shannon St and Victoria St. Information provided by Dave O'Neil in an email to Warren Doubleday 26/11/2013 - see pdf file. Photo taken mid 1950's. Has in the background Marigold Cafe?, Minerita ?, Typewriter Sales and Service and a service station with a Shell petrol pump in view. On the rear in ink and pencil "City / N Class / HTT 20, MMTB 126, Geel 34 Bend 2"trams, tramways, geelong, melbourne road, north, tram 35 -
 Ballarat Tramway Museum
Album - Photo Album, c1970
Set of 16 photos of Ballarat tram system taken 1970c on a tour by an unknown Qld based person.Photo album containing 16 colour prints. Photo album has heavy card covers, covered in black textured plastic containing 12 clear plastic photo sleeves held with a white comb binder. Photos of Ballarat prior to closure, c1970. Photographer unknown. Donated by Peter Hyde of Brisbane Tramway Museum to BTM 3/2/2010, from a deceased estate. Photos apparently taken on a tram tour. .1 - No. 42 and a single trucker inbound in Sturt St. .2 - taken from tram ascending Bakery St hill in Victoria St. .3 - End of No. 42, with the destination "Haddon St via Drummond Nth" .4 - No. 11 and 42 in Lydiard St Nth, near the railway station. No. 11 showing special. .5 - photo of three people on the tour. .6 - Trams reversing at the Victoria St terminus .7 - ditto .8 - 11, 42 and 12? in Lydiard St North by railway station. .9 - Three trams at Sebastopol terminus. .10 - View in Albert St Sebastopol looking north along the track on the side of the road. .11 - View of the tram crossing in Albert St. .12 - 27 and 42 crossing Albert St Sebastopol. .13 - View of Albert St from the tram, north of the crossing looking at the reserved track 14. - Lydiard St North looking south .15 - 42 at the railway level crossing. .16 - View south of the railway level crossing, three trams, with passengers alighting.trams, tramways, ballarat, albert st, sebastopol, victoria st, sturt st, lydiard st nth, railway crossing -
 Ballarat Tramway Museum
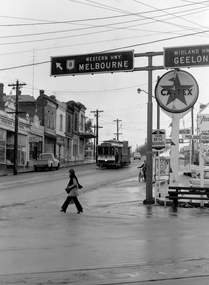
Photograph - Digital image, 1970s
Yields information about the Bakery Hill Victoria St and the Caltex Service Station.Digital image, black and white, of No. 26 descending Bakery Hill to Stone's Corner, Victoria and Main St with the Caltex service station in the foreground. Has a lady with slacks walking across the road and a boy wheeling a bike down the footpath. Note the Highway direction signs and service station signage. O'Brien Motors and a book and record shop on the north side Bakery Hill Victoria St. shops. See Reg 4603 for the subsequent photo at this location. Photo taken by Peter Bruce 1970's and 1971, prior to the closure of the Ballarat tramway system. Peter's Title of image: "No. 26 Bridge and Vic1"trams, tramways, victoria st, main st, stones corner, bakery hill, tram 26 -
 Ballarat Tramway Museum
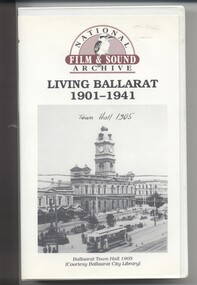
Film - Video cassette tape and box, Chris Long, "Living Ballarat 1901 - 1941", 1990
Yields information through movie films of the 1960's of Ballarat trams operating in the streets of Ballarat and has a strong association with the maker - National Film and Sound Archives and Chris Long.Video cassette in a plastic case, titled "Living Ballarat - 1901 - 1941, National Film and Sound Archive (1990)". See Reg item 4519 for the DVD version. The DVD was made by Peter Winspur using this tape. Transferred to the Hard Drive 11/1/2010- AV Files - dB text/AV Files/Reg Item 4519/Video_TS (at 12/1/2010) Copyright provisions - National Film and Sound Archive - segments may not be used without their permission, viewing only. Synopsis: based on time - 0.00 - intro, 1901 film, Melbourne, first film in Ballarat, Royal visit to Ballarat, Boer War Monument, first feature length film in Ballarat. 2.50 - Bridge St and Sturt St scenes, filmed from a flat truck pushed by an electric tram, including No. 11 going to City Oval to Lydiard St. 5.00 - Sturt St Military parade, with trams in background and tram running alongside. 6.54 - scene of Alfred Hall and films. 7.32 - scene on Lake Wendouree and paddle steamer - Living Ballarat film - Pathe's Ballarat Gazette local film unit, football ground scene. a children's beauty competition, tree planting at Macarthur St state school, 1911 Ballarat Show, unveiling of the Boer War statue name plates, Lake Wendouree 1912. 13.22 - St Patricks David Pde with trams in the background. 14.24 - Ballarat Kennel club dog show. 15.50 - Royal visit in 1920, Arch of victory opening 17.48 - Day at Macarthur St state school and tree plantation 20.55 - Bakery Hill - Stones Corner with tram tracks, cars, little trams, Sturt St with a tram leaving Grenville St, ESCo 9 turning from Lydiard St to run down to Grenville St. 22.15 - Ballarat Show, Coliseum Hall, 1925, races, machinery shows, boxing troupe. 25.20 - Botanic Gardens Gates, Lake Wendouree area. 25.30 - Gem Picture travelling show - film 26.16 - Formal visit of English pressman to Ballarat, 1925, Botanic Gardens, Eureka Stockade, Avenue of Honor, Moorabool Reservoir. 29.15 - 1927 Fed Govt doco of Ballarat, Black Hill, 1927 Home to Ballarat Festival, Ballarat Commemorative song, Craigs Hotel, Ballarat Post Office, tram centre poles in Lydiard St, tram climbing Sturt St, Town Hall, tram at Lydiard St terminus coursing, 8, Sturt St, view of ESCo Sebastopol car leaving Grenville St, Selkirks Brickworks, the Welcome nugget, Peter Lalor statue, Eureka stockade, sewerage plant, modern housing, Sturt St west, water supply - golf club, the High School, the orphanage, fine homesteads around Ballarat, Lake Wendouree. 41.00 Opening of the Ballarat Aerodrome. 43.11 - Depression work and leading into radio broadcasting - 3BA open 1930, typewriters, radio transmission equipment, radio aerials, boys listening to crystal sets 47.50 - Bluebirds Children session tour to the Gardens, mentions the BTPS, trams 13, 3? and 14 carrying visitors arriving and getting off and picnic. 48.50 - expansion of 3BA transmitter capacity 51.30 - 1934 visit of the Duke of Gloucester - visit to the Lucas factory, views of the work floor and the factory history and then South St band competition at the Showgrounds. 55.10 - South St Music Festivals, Coliseum and fire. 56.25 - Ballarat Floral Festival March 1938 - Victorian Railways arch of welcome. 57.25 - segment in the shot of 12 and 19? in Sturt St 57.45 - colour segment of the festival, 58.39 - Grenville St tram shelter, Bridge St, Sturt St, arches, Main Road, Council Road Roller, Victoria St, Eureka Stockade Reserve, Botanic Gardens, setting up the flowers, wax papers. 1.01.48 - decorated tram, north side of Sturt St, details of the materials used, Crockers. 1.03.20 - Hospital Fund Raising Gala Day - March 1938, special trains arriving Ballarat Railway Station, fund raising procession, pageant at the Showgrounds, fly past. 1.07.35 - 1939 Summer, motor cycle races at Learmonth, City Oval fire brigade demonstrations, Ballarat (East) Fire Station decorated for the 1939 Floral Festival with tram in the background and No. 29, Floral Tram and others. 1.09.25 - July 1914 - Ballarat at War parade, troops. 1.10.10 - credits. Box has images of a tram and town hall on the front and details of the contents on the rear and who made it etc. See images for details. ballarat, 3ba, floral tram, royal visit, buildings, esco -
 Otway Districts Historical Society
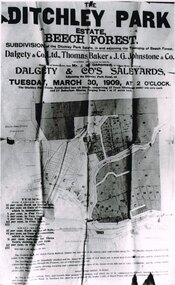
Photograph, Knox Collection, Sale of the Ditchley Park Estate, Beech Forest, 1908
Commercial realities and bushfires caused the Beech Forest community to re-establish itself around the railway station, away from Gardner Hill. This caused John W. Gardner to subdivide his land on the north side of the railway station. One subdivision was created near the Ditchley railway station on the old racecourse site, and another of 25 allotments forming what became Southorn Street. There were very few takers for these lots nor any buyers for the Ditchley subdivision.Photocopy. 260mm x 159mm. An advertisement for the sale of the Ditchley Park Estate, Beech Forest. Under instructions from Mr. J.W. Gardner Dalgety & Co. Ltd. will sell the subdivision of the Ditchley Park Estate on Tuesday, March 30, 1909, at 2 o'clock. A map of Beech Forest township and the Ditchley Park Estate is attached, as are the terms of sale and a description of the area.. beech forest; ditchley park; land sale; advertisment; -
 Otway Districts Historical Society
Photograph, Brucker, Powneys Cutting being excavated, c.1902, c.1902
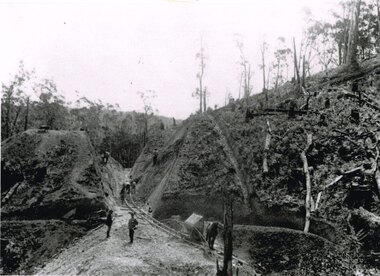
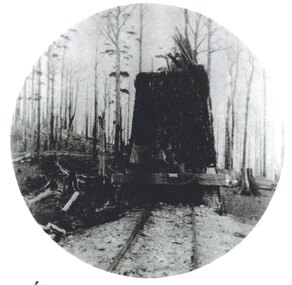
Because of the vast quantity of piles for harbour works Pettit Bros. of Geelong arranged for an addition siding to be installed at Ferguson on the north side of the station in 1913. They then laid a tramway in a northerly direction along the original alignment of Charley's Creek road to the top of Powneys Cutting, 1.8 km from Ferguson, where a log winch was sited. This powerful winch hauled carefully selected piles from the north-west. Jim Facey and Jim, Ted and Tom Cashin formed a partnership to log an area along the Charley's Creek Road six kilometres from Ferguson, operating full-time from 1934. After leasing three Crown sites and cutting them out the partners shifted logging operations to Powneys farm, which they had purchased, and laid a log trail into the farm. The old road reserve was also purchased, and the log tram continued along the road reserve for one kilometre to Powneys Cutting. Logs were winched up to the tramline and despatched to the mill along the falling grade of the road.B/W. 201mm x 268mm. Powneys Cutting being excavated by four men, two men on either side of the slope, and a horse at the end of the line, in c.1902.ferguson; powneys cutting; tramways; powneys farm; pettit; jim facey; jim cashin; ted cashin; tom cashin; charley's creek road; -
 Otway Districts Historical Society
Photograph, R. Preston, Kawarren: an UP goods train, 1958, 14 December 1958
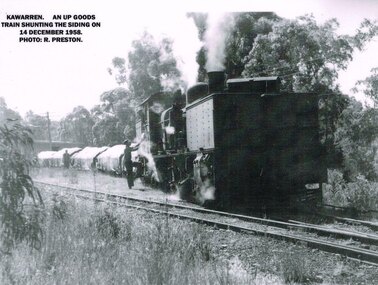
Kawarren was an early timber and limestone loading point. Timber was shipped in by Watson and Facey, Condon Brothers, and Coppock, amongst others, some of which had tramways up to 6.5 km long to the station. Bushfires roared through the area in 1939 and made the area unworkable. An outcrop of limestone existed near Kawarren but it was not until the railway was built that it became workable. 360 metres north of Kawarren station two then three kilns were erected, and later a shed and covered area over a short length of the rail siding in order to prevent rain damage to the lime while it was being loaded. Sluicing was introduced, and the tramway was extended further when the quarry ate deeper into the hillside. Limestone traffic of around 2,000 tonnes each year kept the station busy until the trade ceased in 1957.B/W. On the 14 December 1958 at Kawarren an UP goods train shunts on the siding. A man is talking to the engine driver while another man approaches the engine.kawarren; railways; timber; lime; -
 Otway Districts Historical Society
Photograph, Crowes: Terminus of the railway line, 1911
The terminus of the railway, and the southern-most station on the Australian mainland, was Crowes, approximately 2 kilometres from Lavers Hill. The line ended at "The Black Stump". Crowes was designed as a fully functioning terminus and received a complete instalment of facilities. The site was laid out with three roads plus a dead end siding for a locomotive shed and ash pit. Goods sheds, a platform and livestock ramps catered for freight loadings, while on the north side was a station office, waiting room, parcels shed and passenger shelter. Three departmental residences were also provided. The resident Station Master was withdrawn in November 1916 and the station closed with the line on 10 December 1954.Photograph. Terminus of the Colac-Crowes at Crowes.crowes; terminus; "the black stump"; -
 Bayside Gallery - Bayside City Council Art & Heritage Collection
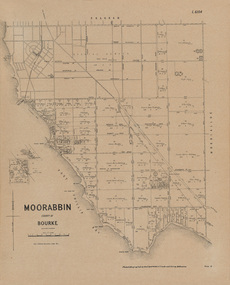
Map, Department of Crown Lands and Survey et al, Moorabbin, County of Bourke, Government Roads, 1920
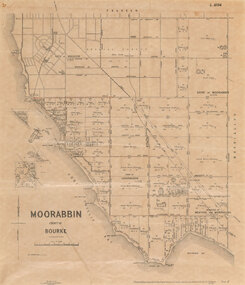
The cadastral map of the Parish of Moorabbin in Victoria (L.6104) shows parish boundaries and land ownership 1920 when Sandringham was a Town. The government roads have been coloured in red pencil.moorabbin, county of bourke, map, plan, land subdivision, land titles, foreshores, hampton, beaumaris, highett, cheltenham, department of lands and survey, land owners, cartographic material, brighton, sandringham, town of sandringham, government roads -
 Bayside Gallery - Bayside City Council Art & Heritage Collection
Map, Department of Crown Lands and Survey, Moorabbin, County of Bourke, c. 1918
The cadastral map of the Parish of Moorabbin in Victoria (L.6104) shows parish boundaries and land ownership c. 1918 when Sandringham was a Borough.moorabbin, county of bourke, map, plan, land subdivision, land titles, foreshores, sndringham, hampton, beaumaris, highett, cheltenham, department of lands and survey, land owners, cartographic material, borough of sandringham, brighton -
 Kew Historical Society Inc
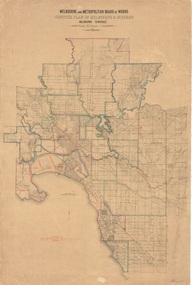
Plan, Melbourne & Metropolitan Board of Works : Contour Plan of Melbourne & Suburbs : Melbourne Sewage, 1894
The Melbourne and Metropolitan Board of Works (MMBW) plans were produced from the 1890s to the 1950s. They were crucial to the design and development of Melbourne's sewerage and drainage system. This plan forms part of a large group of MMBW plans and maps that was donated to the Society by the Mr Poulter, City Engineer of the City of Kew in 1989. Within this collection, thirty-five hand-coloured plans, backed with linen, are of statewide significance as they include annotations that provide details of construction materials used in buildings in the first decade of the 20th century as well as additional information about land ownership and usage. The copies in the Public Record Office Victoria and the State Library of Victoria are monochrome versions which do not denote building materials so that the maps in this collection are invaluable and unique tools for researchers and heritage consultants. A number of the plans are not held in the collection of the State Library of Victoria so they have the additional attribute of rarity.Digital copy of an original MMBW plan. This contour plan shows the area identified by the MMBW for purposes of drainage and sewerage in 1894. The suburbs represented extend from Williamstown in the west to Bulleen in the east, and from Preston in the north, south to Sandringham. Suburbs are outlined in coloured ink. Red lines indicate main and branch sewers in existence at the beginning of 1894 in central and inner Melbourne. These extended as far as Williamstown and Brighton, but not yet as far as Kew, where sewering did not commence until 1901. Contour lines show the topography, which was important for indicating the fall of the land for the laying of sewers and drainage channels. Kew appears to be fairly undeveloped at this date except for railway lines and stations (the Kew and Outer Circle lines), main roads, the Kew Lunatic Asylum Reserve and Studley Park. However, the contour plan does not accurately represent the density of settlement, nor the large number of houses, which were being built in Kew and other suburbs from the 1850s to the land boom of the late 1880’s and early 1890’s. This plan is part of a large and historically significant group of MMBW plans and maps that was donated to the Society by the Mr Poulter, City Engineer of the City of Kew in 1989.mmbw contour plan of melbourne and suburbs, melbourne and metropolitan board of works, melbourne sewage, cartography -
 Kew Historical Society Inc
Photograph - Former Kew Court House : High Street elevation, 1996
A civic campaign for new public offices developed in Kew in the 1880s. After much deliberation, the location chosen was the junction of Bulleen and Cotham Roads. The buildings were designed by George Watson and John Henry Harvey, architects within the Department of Public Works (Victoria). Building was commenced in 1887, and after one year, the buildings were opened. The Post Office was transferred to the new Commonwealth Government in 1901. The Police Station and Court House, sold by the Victorian Government to the City of Boroondara in 2007, are now a community cultural centre and performing arts venue.The buildings were listed on the Victorian Heritage Register Register (HO885) in 1991. They are historically and architecturally significant to the State of Victoria because Watson and Harvey's designs exhibit diversity in integrating civil offices, they accommodate the apex of road junctions, and they demonstrate a departure from the contemporaneously favoured High Victorian Classical to the Queen Anne style in the design of civic buildings.Exterior view of the north facing red brick facade of the former Court House and Police Station in High Street, Kew.kew court house, public offices -- kew (vic), kew police station -
 Kew Historical Society Inc
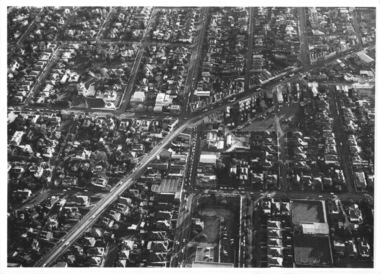
Photograph - Kew Junction, Herald & Weekly Times, 1962
This is an aerial oblique image looking north. It shows Kew Junction before construction of VicRoads (Country Roads Board), Murphy's (Leo's) supermarket, and office towers. It also shows a building on the land now known as the Raoul Wallenberg Reserve, the Kew Municipal Offices in Walpole Street, and St Paul's School for the Blind in Fernhurst Grove, and Kew Bowling Club in Wellington Street.An aerial photograph of Kew Junction, showing the intersection of High Street South, Studley Park Road, Princess Street, High Street and Denmark Street. A number of buildings, now demolished can be identified in the photo, including Jellis’ Bakeries on the corner of Princess Street and Studley Park Road." Annotation on reverse: "Kew Historical Society from Mr L. H. Chinner".kew junction, aerial photograph (kew), oblique aerial, st paul's school for the blind, kew municipal offices, high street kew, studley park road, kew war memorial, kew post office, kew police station, kew court house, high street south, kew, wellington street kew, denmark street kew -
 Kew Historical Society Inc
Photograph, Stuart Tompkins Studio, Electricity Supply Poles, Warrigal Road, Holmesglen, 1965
Research provided by Stuart Tompkins Studio, Box Hill, into alternatives for median strip street lighting to be used in Burke Road, Kew. The photographers identified variants in different suburbs appropriate to Kew's needs. The series from which the photograph is drawn provides a snapshot by a commercial photographic studio of each named vicinity in 1965 as well as providing examples of public works infrastructure being commissioned by local government in the 1960s. The photos originally formed part of the Engineering Department's files in the City of Kew before being donated to the kew Historical Society.Electricity Supply Poles, Warrigal Road, Holmesglen, 1965. Stuart Tompkins Studio provided this photograph for the Kew City Council. The photograph of Warrigal Road, north of Holmesglen looking north depicts wooden poles with bracket light fittings. These were the same as those proposed for Kew, except the lights and fittings were not to be 350 watt. Mercury lamps were preferred. [There are three copies of this photograph in the Collection.] Typed inscription on reverse: "Electricity Supply Poles. Photographed for Kew City Council 8/2/65. No.3 Warrigal Road - North of Holmesglen looking north. Wooden poles with bracket fittings same as those proposed for Kew except lights and fittings are not for 250 watt c. c. mercury lamps proposed. Wooden pole 3' up 11 3/4" dia." Studio stamp: "Stuart Tompkins Studio. 547 Station Street, Box Hill. WX1439."stuart tompkins studio, warrigal road (holmesglen) 1965, street lighting -
 Kew Historical Society Inc
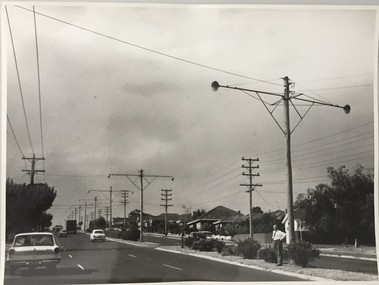
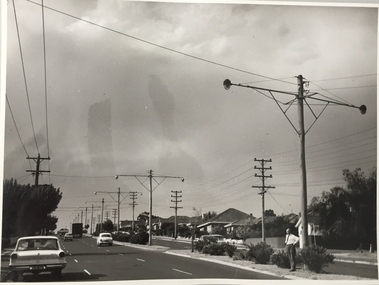
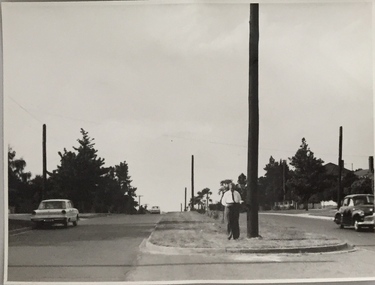
Photograph, Stuart Tompkins Studio, Electricity Supply Poles, North Road, Ormond, 1965
Research provided by Stuart Tompkins Studio, Box Hill, into alternatives for median strip street lighting to be used in Burke Road, Kew. The photographers identified variants in different suburbs appropriate to Kew's needs.The series from which the photograph is drawn provides a snapshot by a commercial photographic studio of each named vicinity in 1965 as well as providing examples of public works infrastructure being commissioned by local government in the 1960s. The photos originally formed part of the Engineering Department's files in the City of Kew before being donated to the kew Historical Society.Electricity Supply Poles, North Road, Ormond, 1965. Electricity supply poles photographed for the Kew City Council by Stuart Tompkins Studio. The photograph of North Road, Ormond west of Jasper Road, looking east depicts wooden poles carrying two lamps in a median strip and with two on each side alternately. It was noted that the supply wires were from one side only. The poles were described as 3′ above ground and 11.25″ in diameter. The plan was to use this approach for Burke Road, Kew. [There are three copies of this photograph in the Collection.] Typed inscription on reverse: "Electricity Supply Poles. Photographed for Kew City Council 8/2/65. No.1 North Road - Ormond, west of Jasper Road, looking east. Wooden poles carrying two lamps in median strip and two on each side alternately just as is proposed for Burke Road, Kew. Supply wires from one side only. Poles 3' above ground 11 1/4" dia." Studio stamp: "Stuart Tompkins Studio. 547 Station Street, Box Hill. WX1439."stuart tompkins studio, street lighting, south road (moorabin) 1965, public infrastructure -- city of kew, city of kew -- engineer's department -
 Kew Historical Society Inc
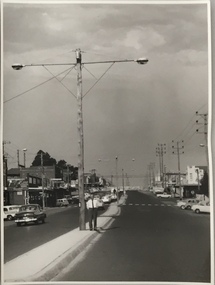
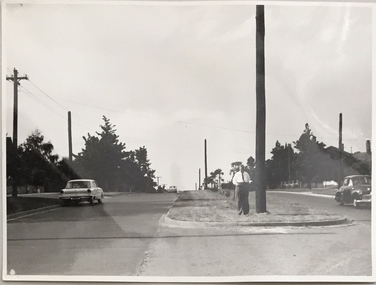
Photograph, Stuart Tompkins Studio, Electricity Supply Poles, North Road, Ormond, 1965
Research provided by Stuart Tompkins Studio, Box Hill, into alternatives for median strip street lighting to be used in Burke Road, Kew. The photographers identified variants in different suburbs appropriate to Kew's needs.The series from which the photograph is drawn provides a snapshot by a commercial photographic studio of each named vicinity in 1965 as well as providing examples of public works infrastructure being commissioned by local government in the 1960s. The photos originally formed part of the Engineering Department's files in the City of Kew before being donated to the kew Historical Society.Electricity Supply Poles, North Road, Ormond, 1965. Electricity supply poles photographed for the Kew City Council by Stuart Tompkins Studio. The photograph of North Road, Ormond west of Jasper Road, looking east depicts wooden poles carrying two lamps in a median strip and with two on each side alternately. It was noted that the supply wires were from one side only. The poles were described as 3′ above ground and 11.25″ in diameter. The plan was to use this approach for Burke Road, Kew. [There are three copies of this photograph in the Collection.] Typed inscription on reverse: "Electricity Supply Poles. Photographed for Kew City Council 8/2/65. No.1 North Road - Ormond, west of Jasper Road, looking east. Wooden poles carrying two lamps in median strip and two on each side alternately just as is proposed for Burke Road, Kew. Supply wires from one side only. Poles 3' above ground 11 1/4" dia." Studio stamp: "Stuart Tompkins Studio. 547 Station Street, Box Hill. WX1439."stuart tompkins studio, street lighting, south road (moorabin) 1965 -
 Kew Historical Society Inc
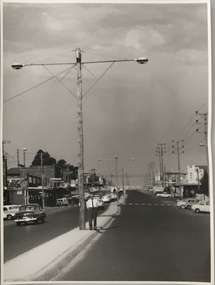
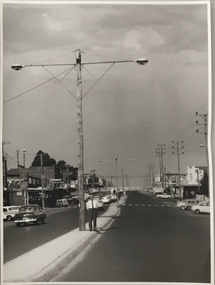
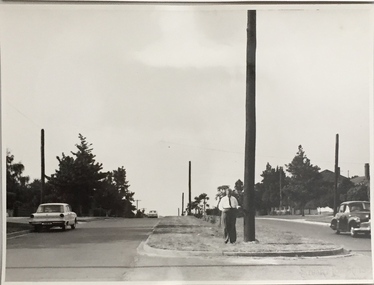
Photograph, Stuart Tompkins Studio, Electricity Supply Poles, Burke Road, Kew, 1965
Research provided by Stuart Tompkins Studio, Box Hill, into alternatives for median strip street lighting to be used in Burke Road, Kew. The photographers identified variants in different suburbs appropriate to Kew's needs.The series from which the photograph is drawn provides a snapshot by a commercial photographic studio of each named vicinity in 1965 as well as providing examples of public works infrastructure being commissioned by local government in the 1960s. The photos originally formed part of the Engineering Department's files in the City of Kew before being donated to the kew Historical Society.Electricity Supply Poles, Burke Road, Kew, 1965. This photograph of Burke Road, Kew was taken just north of Kilby and Doncaster Roads looking north. Stuart Tompkins Studio provided the photograph for the Kew City Council. In the photograph are a number of electricity supply poles that have been erected in the median strip, in addition to some new poles on each footpath. The nearest wooden pole is stated to be 13.5″ in diameter. The electricity poles in Burke Road required Kew Council to investigate comparable designs in other Melbourne municipalities. [There are three copies of this photograph in the Collection.] Typed inscription on reverse: "Electricity Supply Poles. Photographed for Kew City Council 8/2/65. No.5 Burke Road - Kew, just north of Kilby and Doncaster Roads looking north. Some of seven poles already erected in median strip. Shows also some new poles erected on each footpath. Nearest wooden pole 13 1/2" dia." Studio stamp: "Stuart Tompkins Studio. 547 Station Street, Box Hill. WX1439."stuart tompkins studio, street lighting, south road (moorabin) 1965 -
 Kew Historical Society Inc
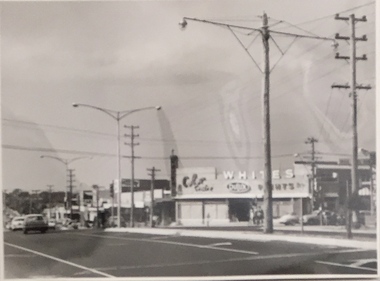
Photograph, Stuart Tompkins Studio, Electricity Supply Poles, Warrigal Road, Ashwood, 1965
Research provided by Stuart Tompkins Studio, Box Hill, into alternatives for median strip street lighting to be used in Burke Road, Kew. The photographers identified variants in different suburbs appropriate to Kew's needs.The series from which the photograph is drawn provides a snapshot by a commercial photographic studio of each named vicinity in 1965 as well as providing examples of public works infrastructure being commissioned by local government in the 1960s. The photos originally formed part of the Engineering Department's files in the City of Kew before being donated to the kew Historical Society.Electricity Supply Poles, Warrigal Road, Ashwood, 1965. Stuart Tompkins Studio provided this photograph for the Kew City Council. The photograph, taken at the intersection of Warrigal Road and High Street South, Ashwood looks north along High Street Road. The intent of the photograph was to provide the Council with models of electricity supply poles. In the photo, wooden and steel poles can be seen in the median strip. The photograph also includes the shops bordering High Street Road during this period. [There are three copies of this photograph in the Collection.]. Typed inscription on reverse: "Electricity Supply Poles. Photographed for Kew City Council 8/2/65. No.4 Warrigal Road - Ashwood. South of High Street Road looking north. Wooden and steel poles with different brackets in median strip." Studio stamp: "Stuart Tompkins Studio. 547 Station Street, Box Hill. WX1439."electric light poles, public works -- 1960s, civic infrastructure -- 1960s