Showing 7670 items
matching road building
-
 Ringwood and District Historical Society
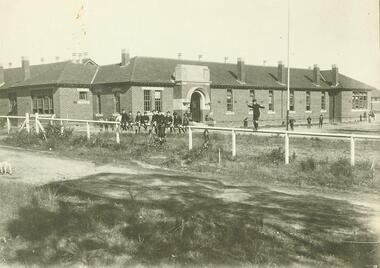
Photograph, Ringwood State School early class photographs. 1898 to1977
Sepia photographs (25) with negatives."Written on back of photograph" Ringwood Primary School 1922 - Building in Greenwood Ave -
 Flagstaff Hill Maritime Museum and Village
Functional object - Ship's Wheel, 1871 or earlier
... Warrnambool great-ocean-road The ship building company E. & A. Sewall ...The ship building company E. & A. Sewall, from Bath, Maine, USA, built many ships that had wheels with the same decorative, starburst pattern on them as this particular wheel segment, including the Eric the Red. The wheel was manufactured by their local Bath foundry, Geo. Moulton & Co. and sold to the Sewall yard for $100, according to the construction accounts of the vessel. Eric the Red was a wooden, three masted clipper ship. She had 1,580 tons register and was the largest full-rigged ship built at Bath, Maine, USA in 1871. She was built and registered by Arthur Sewall, later to become the partnership E. & A. Sewall, and was the 51st ship built by this company. The annually-published List of Merchant Vessels of the U.S. shows that Bath was still the home port of Eric the Red in 1880. The vessel was named after the Viking discoverer, Eric the Red, who was the first European to reach the shores of North America (in 980AD). The ship Eric the Red at first traded in coal between America and Britain, and later traded in guano nitrates from South America. In 1879 she was re-metalled and was in first class condition. On 10th June 1880 (some records say 12th June) Eric the Red departed New York for Melbourne and then Sydney. She had been commissioned by American trade representatives to carry a special cargo of 500 exhibits (1400 tons) - about a quarter to a third of America’s total exhibits - from America for the U.S.A. pavilion at Melbourne’s first International Exhibition. The exhibits included furniture, ironmongery, wines, chemicals, dental and surgical instruments, paper, cages, bronze lamp trimmings, axles, stamped ware, astronomical and time globes, samples of corn and the choicest of leaf tobacco. Other general cargo included merchandise such as cases of kerosene and turpentine, brooms, Bristol's Sarsaparilla, Wheeler and Wilson sewing machines, Wheeler’s thresher machine, axe handles and tools, cases of silver plate, toys, pianos and organs, carriages and Yankee notions. The Eric the Red left New York under the command of Captain Z. Allen (or some records say Captain Jacques Allen) and 24 other crew including the owner’s son third mate Ned Sewall. There were 2 saloon passengers also. On 4th September 1880 the ship had been sailing for an uneventful 85 days and the voyage was almost at its end. Eric the Red approached Cape Otway in a moderate north-west wind and hazy and overcast atmosphere. Around 1:30am Captain Allen sighted the Cape Otway light and was keeping the ship 5-6 miles offshore to stay clear of the hazardous Otway Reef. However he had badly misjudged his position. The ship hit the Otway Reef about 2 miles out to sea, south west of the Cape Otway light station. Captain Allen ordered the wheel to be put ‘hard up’ thinking that she might float off the reef. A heavy sea knocked the man away from the wheel, broke the wheel ropes and carried away the rudder. The sea swamped the lifeboats, the mizzenmast fell, with all of its rigging, then the mainmast fell and the ship broke in two. Some said that the passenger Vaughan, who was travelling for his health and not very strong, was washed overboard and never seen again. The ship started breaking up. The forward house came adrift with three of the crew on it as well as a longboat, which the men succeeded in launching and keeping afloat by continually bailing with their sea boots. The captain, the third mate (the owner’s son) and others clung to the mizzenmast in the sea. Then the owner’s son was washed away off the mast. Within 10 minutes the rest of the ship was in pieces, completely wrecked, with cargo and wreckage floating in the sea. The captain encouraged the second mate to swim with him to the deckhouse where there were other crew but the second mate wouldn’t go with him. Eventually the Captain made it to the deckhouse and the men pulled him up. At about 4:30am the group of men on the deckhouse saw the lights of a steamer and called for help. At the same time they noticed the second mate and the other man had drifted nearby, still on the spur, and pulled them both onto the wreck. The coastal steamer Dawn was returning to Warrnambool from Melbourne, its sailing time different to its usual schedule. Cries were heard coming from out of the darkness. Captain Jones sent out two life boats, and fired off rockets and blue lights to illuminate the area. They picked up the three survivors who were in the long boat from Eric the Red. Two men were picked up out of the water, one being the owner’s son who was clinging to floating kerosene boxes. At daylight the Dawn then rescued the 18 men from the floating portion of the deckhouse, which had drifted about 4 miles from where they’d struck the reef. Shortly after the rescue the deckhouse drifted onto breakers and was thrown onto rocks at Point Franklin, about 2 miles east of Cape Otway. Captain Jones had signalled to Cape Otway lighthouse the number of the Eric the Red and later signalled that there was a wreck at Otway Reef but there was no response from the lighthouse. The captain and crew of the Dawn spent several more hours searching unsuccessfully for more survivors, even going back as far as Apollo Bay. On board the Dawn the exhausted men received care and attention to their needs and wants, including much needed clothing. Captain Allen was amongst the 23 battered and injured men who were rescued and later taken to Warrnambool for care. Warrnambool’s mayor and town clerk offered them all hospitality, the three badly injured men going to the hospital and others to the Olive Branch Hotel, then on to Melbourne. Captain Allen’s leg injury prevented him from going ashore so he and three other men travelled on the Dawn to Portland. They were met by the mayor who also treated them all with great kindness. Captain Allen took the train back to Melbourne then returned to America. Those saved were Captain Z. Allen (or Jacques Allen), J. Darcy chief mate, James F. Lawrence second mate, Ned Sewall third mate and owner’s son, John French the cook, C. Nelson sail maker, Clarence W. New passenger, and the able seamen Dickenson, J. Black, Denis White, C. Herbert, C. Thompson, A. Brooks, D. Wilson, J. Ellis, Q. Thompson, C. Newman, W. Paul, J. Davis, M. Horenleng, J. Ogduff, T. W. Drew, R. Richardson. Four men had lost their lives; three of them were crew (Gus Dahlgreen ship’s carpenter, H. Ackman steward, who drowned in his cabin, and George Silver seaman) and one a passenger (J. B. Vaughan). The body of one of them had been found washed up at Cape Otway and was later buried in the lighthouse cemetery; another body was seen on an inaccessible ledge. Twelve months later the second mate James F. Lawrence, from Nova Scotia, passed away in the Warrnambool district; an obituary was displayed in the local paper. The captain and crew of the Dawn were recognised by the United States Government in July 1881 for their humane efforts and bravery, being thanked and presented with substantial monetary rewards, medals and gifts. Neither the ship, nor its cargo, was insured. The ship was worth about £15,000 and the cargo was reportedly worth £40,000; only about £2,000 worth had been recovered. Cargo and wreckage washed up at Apollo Bay, Peterborough, Port Campbell, Western Port and according to some reports, even as far away as the beaches of New Zealand. The day after the wreck the government steam ship Pharos was sent from Queenscliff to clear the shipping lanes of debris that could be a danger to ships. The large midship deckhouse of the ship was found floating in a calm sea near Henty Reef. Items such as an American chair, a ladder and a nest of boxes were all on top of the deckhouse. As it was so large and could cause danger to passing ships, Captain Payne had the deckhouse towed towards the shore just beyond Apollo Bay. Between Apollo Bay and Blanket Bay the captain and crew of Pharos collected Wheeler and Wilson sewing machines, nests of boxes, bottles of Bristol’s sarsaparilla, pieces of common American chairs, axe handles, a Wheelers’ Patent thresher and a sailor’s trunk with the words “A. James” on the front. A ship’s flag-board bearing the words “Eric the Red” was found on the deckhouse; finally those on board the Pharos had the name of the wrecked vessel. During this operation Pharos came across the government steamer Victoria and also a steamer S.S. Otway, both of which were picking up flotsam and wreckage. A whole side of the hull and three large pieces of the other side of the hull, with some of the copper sheathing stripped off, had floated on to Point Franklin. Some of the vessels yards and portions of her masts were on shore. The pieces of canvas attached to the yards and masts confirmed that the vessel had been under sail. The beach there was piled with debris several feet high. There were many cases of Diamond Oil kerosene, labelled R. W. Cameron and Company, New York. There were also many large planks of red pine, portions of a small white boat and a large, well-used oar. Other items found ashore included sewing machines (some consigned to ‘Long and Co.”) and notions, axe and scythe handles, hay forks, wooden pegs, rolls of wire (some branded “T.S” and Co, Melbourne”), kegs of nails branded “A.T. and Co.” from the factory of A. Field and Son, Taunton, Massachusetts, croquet balls and mallets, buggy fittings, rat traps, perfumery, cutlery and Douay Bibles, clocks, bicycles, chairs, a fly wheel, a cooking stove, timber, boxes, pianos, organs and a ladder. (Wooden clothes pegs drifted in for many years). There seemed to be no personal luggage or clothing. The Pharos encountered a long line, about one and a half miles, of floating wreckage about 10 miles off land, south east of Cape Otway, and in some places about 40 feet wide. It seemed that more than half of it was from Eric the Red. The ship’s crew rescued 3 cases that were for the Melbourne Exhibition and other items from amongst the debris. There were also chairs, doors, musical instruments, washing boards, nests of trunks and fly catchers floating in the sea. Most of the goods were saturated and smelt of kerosene. A section of the hull lies buried in the sand at Parker River Beach. An anchor with chain is embedded in the rocks east of Point Franklin and a second anchor, thought to be from Eric the Red, is on display at the Cape Otway light station. (There is a photograph of a life belt on the verandah of Rivernook Guest House in Princetown with the words “ERIC THE RED / BOSTON”. This is rather a mystery as the ship was registered in Bath, Maine, USA.) Parts of the ship are on display at Bimbi Park Caravan Park and at Apollo Bay Museum. Flagstaff Hill Maritime Village also has part of the helm (steering wheel), a carved wooden sword (said to be the only remaining portion of the ship’s figurehead; further research is currently being carried out), a door, a metal rod, samples of wood and a medal for bravery. Much of the wreckage was recovered by the local residents before police and other authorities arrived at the scene. Looters went to great effort to salvage goods, being lowered down the high cliff faces to areas with little or no beach to collect items from the wreckage, their mates above watching out for dangerous waves. A Tasmanian newspaper reports on a court case in Stawell, Victoria, noting a man who was caught 2 months later selling tobacco from the wreckage of Eric the Red. Some of the silverware is still treasured by descendants of Mr Mackenzie who was given these items by officials for his help in securing the cargo. The gifts included silver coffee and tea pots, half a dozen silver serviette rings and two sewing machines. The wreck and cargo were sold to a Melbourne man who salvaged a quantity of high quality tobacco and dental and surgical instruments. Timbers from the ship were salvaged and used in the construction of houses and sheds around Apollo Bay, including a guest house, Milford House (since burnt down in bushfires), which had furniture, fittings and timber on the dining room floor from the ship. A 39.7 foot long trading ketch, the Apollo, was also built from its timbers by Mr Burgess in 1883 and subsequently used in Tasmanian waters. It was the first attempt at ship building in Apollo bay. In 1881 a red light was installed about 300 feet above sea level at the base of the Cape Otway lighthouse to warn ships when they were too close to shore; It would not be visible unless a ship came within 3 miles from it. This has proved to be an effective warning. The State Library of Victoria has a lithograph in its collection depicting the steamer Dawn and the shipwrecked men, titled. "Wreck of the ship Eric the Red, Cape Otway: rescue of the crew by the Dawn". “The Eric the Red is historically significant as one of Victoria's major 19th century shipwrecks. (Heritage Victoria Eric the Red; HV ID 239) The wreck led to the provision of an additional warning light placed below the Cape Otway lighthouse to alert mariners to the location of Otway Reef. The site is archaeologically significant for its remains of a large and varied cargo and ship's fittings being scattered over a wide area. The site is recreationally and aesthetically significant as it is one of the few sites along this coast where tourists can visit identifiable remains of a large wooden shipwreck, and for its location set against the background of Cape Otway, Bass Strait, and the Cape Otway lighthouse.“ (Victorian Heritage Database Registration Number S239, Official Number 8745 USA) Segment of a ship's wheel, or helm, from the wreck of the sailing ship Eric the Red. The wheel part is an arc shape from the outer rim of the wheel and is made up of three layers of timber. The centre layer is a dark, dense timber and is wider than the two outer layers, which are less dense and lighter in colour. The wheel segment has a vertically symmetrical, decorative copper plate inlaid on the front. The plate has a starburst pattern; six stars decorate it, each at a point where there is a metal fitting going through the three layers of timber to the rear side of the wheel. On the rear each of the six fittings has an individual copper star around it. The edges of the helm are rounded and bevelled, polished to a shine in a dark stain. Around each of the stars, front and back, the wood is a lighter colour, as though the metal in that area being polished frequently. The length of the segment suggests that it has probably come from a wheel or helm that had ten spokes. (Ref: F.H.M.M. 16th March 1994, 239.6.610.3.7. Artefact Reg No ER/1.)flagstaff hill, warrnambool, shipwrecked-coast, flagstaff-hill, flagstaff-hill-maritime-museum, maritime-museum, shipwreck-coast, flagstaff-hill-maritime-village, ship's-wheel, eric-the-red, helm, shei's wheel, ship's steering wheel -
 Flagstaff Hill Maritime Museum and Village
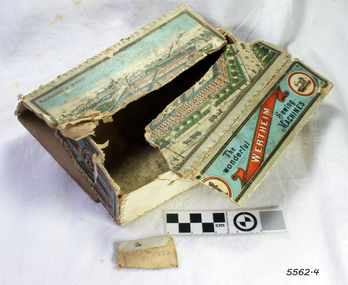
Container - Box, Joseph Wertheim, ca. 1891
This Wertheim Sewing Machine accessory box was donated with twelve accessories, the instruction book and the receipt for the purchase of a Wertheim sewing machine. the box's construction includes a coloured printed label and strong stitching on the joins of the edges. The receipt was written on July 23rd 1891 by the Wertheim distributor in Melbourne, Hugo Wertheim. His business was the Wertheim Sewing Machine and Hapsburg Piano Depot, trading at 173 Williams Street, Melbourne. The purchaser was Mrs Burrowes from Burrumbeet, Victoria, a district northwest of Ballarat. She paid £6-6 (six pounds and six shillings) in cash. The receipt was signed by H. Wertheim and the other signatory looks like John A. Cherry. Hugo Wertheim (1854-1919) was an agent for his father’s cousin Joseph Wertheim, a well-established sewing machine manufacturer in Germany. He was born in Lispenhausen, Germany, and migrated to Melbourne in October 1875, where he opened a merchandising business at 39 Flinders Lane East. He returned to Germany in 1885 to marry Joseph Wertheim's daughter Sophie Emilie. The couple came back to Melbourne, and Hugo quickly established a substantial business selling sewing machines, bicycles, pianos and other mechanical devices, under brands such as Wertheim, Electra, Planet, Griffin and Hapsburg. He exhibited at agricultural shows and in 1901 at the Pan American Exposition, Buffalo, United States of America. One of his staff was O. C. Beale, who later set up his own piano business in New South Wales. Hugo continued to own 25 per cent of one of Beale's companies, which became Wertheim's Queensland business. In 1908 Hugo Wertheim opened a piano factory in Richmond, Melbourne, aiming to produce 2000 pianos and player pianos a year, predominantly using Australian materials. In laying the foundation stone, Prime Minister Alfred Deakin observed that “few men with such opportunities for a life of ease would have embarked on such an enterprise” Hugo died of chronic hepatitis in 1919 at his home in South Yarra. His eldest son, Herbert Joseph (1886-1972), continued the business. The piano factory closed in 1935, becoming a Heinz food processing plant and in 1955, GTV Channel 9 studios and offices. The Wertheim Sewing Machine Company – Joseph Wertheim (1804–1899) founded the company in 1868 in Frankfurt, Germany. At this time Joseph was the Frankfurt city delegate for the Democratic Party. At its height, the Wertheim factory employed approximately 650 workers. The company used a trademark of a dwarf holding a hammer which is known to have been used until at least 1925, however in 1909 a Star of David was also registered. In 1870 a Wertheim subsidiary was formed in Barcelona, Spain. The business imported and sold complete machines, including the English Jones machine. Locals began calling the sewing machines “las rapidas”, and the business became known as “las casa de las rapidas”. In 1915 production began of a totally manufactured Spanish Wertheim machine. Wertheim in Germany continued manufacturing machines until 1932 when the Wertheim family fled to Spain. Despite converting to Christianity from Judaism, they feared the political unrest in Germany during that time. Wertheim Spain became Rapida SA and was then the sole manufacturer of the Wertheim machines. The factory was managed by Karl Wertheim under the alias Carlos Vallin. The box is part of a donation that connected to domestic life in 1891 during the Victorian era. It is significant for connecting the Melbourne distributor of Wertheim sewing machines, Hugo Wertheim, to Victoria’s northwest district where the purchaser lived. It is also significant for connecting the Melbourne distributor to the importing of goods from the well-known German manufacturer of early domestic sewing machines, Joseph Wertheim.Cardboard box, rectangular, with coloured printed labels. The top of the box has a city scene on it, depicting buildings, factories and figures. Made by Wertheim Sewing Machine Co. of Germany. The Box has been sewn around the edges. There is a handwritten pencil inscription on one of the sides (difficult to decipher)."Manufactured in Germany" "WERTHEIM" "The Wonderful Sewing Machines" Handwritten "Ste - - - B - - - - Wbool"flagstaff hill, flagstaff hill maritime museum and village, warrnambool, maritime museum, maritime village, great ocean road, shipwreck coast, wertheim, sewing machine, victorian era, sewing machine accessories, sewing machine instructions, wertheim instruction book, wertheim sewing machine and hapsburg piano depot, 23-7-1891, £6 6/-, mrs burrowes, burrumbeet, h. wertheim, wertheim sewing machines, hand-stitched box, accessory box, domestic machines, dressmaking, home industry, fashion -
 Flagstaff Hill Maritime Museum and Village
Marble Tile, circa 1878
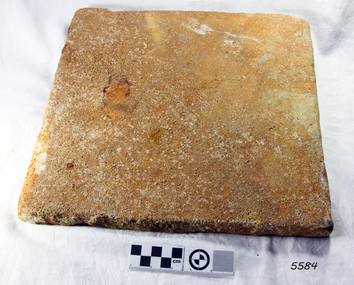
The artefact is a white marble tile raised from the wreck of the LOCH ARD (1878). The cargo manifest of the sunken vessel has the entry “Marble £400”. This is placed directly following the entry “Glass (604 cases)”. This conjunction suggests the marble tile was originally part of a consignment intended for use in a ‘high end’ residential or public building project in the gold and wool rich Colony of Victoria. Traditionally, white or cream marble was imported into Britain from the Mediterranean region of Europe, where beds of sedimentary limestone (calcium and magnesium carbonate) had been buried over a long geological period of time. Deep in the earth’s crust, it had been subjected to immense pressures and high temperatures, sufficient to completely re-crystallise the original deposits. Marble beds began as layers of sediment at the bottom of ancient tropical seas, forming from the skeletal remains of calcareous fossils, shell, and coral fragments. The metamorphic process of prolonged compression and heating recrystallised this skeletal material, destroying all signs of the original sedimentary fabric. The resulting ‘true’ marbles of, for example, White Carrara (Tuscany, Italy), Verdi (green) Antico (Thessaly, Greece), and Rouge (red) Languadoc (Carcassone, France), were highly prized in classical decoration (sculpture and friezes) and architecture (temples and arches). Marble was found in nineteenth century Australia, but in small, uneconomic deposits, not suitable for commercial quarrying. The comparative expense of imported marble restricted its use in colonial buildings to carved fireplaces and mantel pieces, or outdoor ornaments such as fountains, statuary and grave stones. If Carrara marble floor tiles were used, they were used sparingly, as an arresting feature in entrance halls for instance. However, most prominent private and public construction used timber flooring, waxed or ‘japanned’, with carpet runners and rugs (for example the Austin’s Barwon Park Mansion, 1871), or laid tessellated and ceramic tiles of baked clay infused with colour (for example the Chirnside’s Werribee Park Mansion, 1878). HISTORY OF THE LOCH ARD The LOCH ARD belonged to the famous Loch Line which sailed many ships from England to Australia. Built in Glasgow by Barclay, Curdle and Co. in 1873, the LOCH ARD was a three-masted square rigged iron sailing ship. The ship measured 262ft 7" (79.87m) in length, 38ft (11.58m) in width, 23ft (7m) in depth and had a gross tonnage of 1693 tons. The LOCH ARD's main mast measured a massive 150ft (45.7m) in height. LOCH ARD made three trips to Australia and one trip to Calcutta before its final voyage. LOCH ARD left England on March 2, 1878, under the command of Captain Gibbs, a newly married, 29 year old. She was bound for Melbourne with a crew of 37, plus 17 passengers and a load of cargo. The general cargo reflected the affluence of Melbourne at the time. On board were straw hats, umbrella, perfumes, clay pipes, pianos, clocks, confectionary, linen and candles, as well as a heavier load of railway irons, cement, lead and copper. There were items included that intended for display in the Melbourne International Exhibition in 1880. The voyage to Port Phillip was long but uneventful. At 3am on June 1, 1878, Captain Gibbs was expecting to see land and the passengers were becoming excited as they prepared to view their new homeland in the early morning. But LOCH ARD was running into a fog which greatly reduced visibility. Captain Gibbs was becoming anxious as there was no sign of land or the Cape Otway lighthouse. At 4am the fog lifted. A man aloft announced that he could see breakers. The sheer cliffs of Victoria's west coast came into view, and Captain Gibbs realised that the ship was much closer to them than expected. He ordered as much sail to be set as time would permit and then attempted to steer the vessel out to sea. On coming head on into the wind, the ship lost momentum, the sails fell limp and LOCH ARD's bow swung back. Gibbs then ordered the anchors to be released in an attempt to hold its position. The anchors sank some 50 fathoms - but did not hold. By this time LOCH ARD was among the breakers and the tall cliffs of Mutton Bird Island rose behind the ship. Just half a mile from the coast, the ship's bow was suddenly pulled around by the anchor. The captain tried to tack out to sea, but the ship struck a reef at the base of Mutton Bird Island, near Port Campbell. Waves broke over the ship and the top deck was loosened from the hull. The masts and rigging came crashing down knocking passengers and crew overboard. When a lifeboat was finally launched, it crashed into the side of LOCH ARD and capsized. Tom Pearce, who had launched the boat, managed to cling to its overturned hull and shelter beneath it. He drifted out to sea and then on the flood tide came into what is now known as LOCH ARD Gorge. He swam to shore, bruised and dazed, and found a cave in which to shelter. Some of the crew stayed below deck to shelter from the falling rigging but drowned when the ship slipped off the reef into deeper water. Eva Carmichael had raced onto deck to find out what was happening only to be confronted by towering cliffs looming above the stricken ship. In all the chaos, Captain Gibbs grabbed Eva and said, "If you are saved Eva, let my dear wife know that I died like a sailor". That was the last Eva Carmichael saw of the captain. She was swept off the ship by a huge wave. Eva saw Tom Pearce on a small rocky beach and yelled to attract his attention. He dived in and swam to the exhausted woman and dragged her to shore. He took her to the cave and broke open case of brandy which had washed up on the beach. He opened a bottle to revive the unconscious woman. A few hours later Tom scaled a cliff in search of help. He followed hoof prints and came by chance upon two men from nearby Glenample Station three and a half miles away. In a state of exhaustion, he told the men of the tragedy. Tom returned to the gorge while the two men rode back to the station to get help. By the time they reached LOCH ARD Gorge, it was cold and dark. The two shipwreck survivors were taken to Glenample Station to recover. Eva stayed at the station for six weeks before returning to Ireland, this time by steamship. In Melbourne, Tom Pearce received a hero's welcome. He was presented with the first gold medal of the Royal Humane Society of Victoria and a £1000 cheque from the Victorian Government. Concerts were performed to honour the young man's bravery and to raise money for those who lost family in the LOCH ARD disaster. Of the 54 crew members and passengers on board, only two survived: the apprentice, Tom Pearce and the young woman passenger, Eva Carmichael, who lost all of her family in the tragedy. Ten days after the LOCH ARD tragedy, salvage rights to the wreck were sold at auction for £2,120. Cargo valued at £3,000 was salvaged and placed on the beach, but most washed back into the sea when another storm developed. The wreck of LOCH ARD still lies at the base of Mutton Bird Island. Much of the cargo has now been salvaged and some was washed up into what is now known as LOCH ARD Gorge. Cargo and artefacts have also been illegally salvaged over many years before protective legislation was introduced. One of the most unlikely pieces of cargo to have survived the shipwreck was a Minton porcelain peacock - one of only nine in the world. The peacock was destined for the Melbourne International Exhibition in 1880. It had been well packed, which gave it adequate protection during the violent storm. Today, the Minton peacock can be seen at the Flagstaff Hill Maritime Museum in Warrnambool. From Australia's most dramatic shipwreck it has now become Australia's most valuable shipwreck artefact and is one of very few 'objects' on the Victorian State Heritage Register. The wreck of the LOCH ARD is of State significance — Victorian Heritage Register S417 Flagstaff Hill’s collection of artefacts from LOCH ARD is significant for being one of the largest collections of artefacts from this shipwreck in Victoria. It is significant for its association with the shipwreck, which is on the Victorian Heritage Register (VHR S417). The collection is significant because of the relationship between the objects, as together they have a high potential to interpret the story of the LOCH ARD. The LOCH ARD collection is archaeologically significant as the remains of a large international passenger and cargo ship. The LOCH ARD collection is historically significant for representing aspects of Victoria’s shipping history and its potential to interpret sub-theme 1.5 of Victoria’s Framework of Historical Themes (living with natural processes). The collection is also historically significant for its association with the LOCH ARD, which was one of the worst and best known shipwrecks in Victoria’s history. A square marble tile retrieved from the wreck of the LOCH ARD. Most of its surface is covered by a thin layer of limestone and marine growth encrustation that is stained rust-red. The tile is ‘rough-worked’, cut to shape and size, but not smoothed or polished. There is a companion tile in similar condition in the Flagstaff Hill collection. From visual observation of the original surface (at low magnification) the tile appears to be of white Carrara-type marble.flagstaff hill, warrnambool, shipwrecked coast, flagstaff hill maritime museum, maritime museum, shipwreck coast, flagstaff hill maritime village, great ocean road, loch line, loch ard, captain gibbs, eva carmichael, tom pearce, glenample station, mutton bird island, loch ard gorge, white marble, marble tile, carrara marble, imported marble, colonial architecture, victorian building materials -
 Flagstaff Hill Maritime Museum and Village
Marble Tile, circa 1878
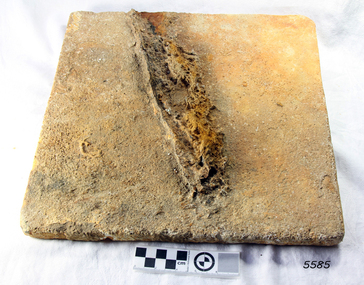
The artefact is a white marble tile raised from the wreck of the LOCH ARD (1878). The cargo manifest of the sunken vessel has the entry “Marble £400”. This is placed directly following the entry “Glass (604 cases)”. This conjunction suggests the marble tile was originally part of a consignment intended for use in a ‘high end’ residential or public building project in the gold and wool rich Colony of Victoria. Traditionally, white or cream marble was imported into Britain from the Mediterranean region of Europe, where beds of sedimentary limestone (calcium and magnesium carbonate) had been buried over a long geological period of time. Deep in the earth’s crust, it had been subjected to immense pressures and high temperatures, sufficient to completely re-crystallise the original deposits. Marble beds began as layers of sediment at the bottom of ancient tropical seas, forming from the skeletal remains of calcareous fossils, shell, and coral fragments. The metamorphic process of prolonged compression and heating recrystallised this skeletal material, destroying all signs of the original sedimentary fabric. The resulting ‘true’ marbles of, for example, White Carrara (Tuscany, Italy), Verdi (green) Antico (Thessaly, Greece), and Rouge (red) Languadoc (Carcassone, France), were highly prized in classical decoration (sculpture and friezes) and architecture (temples and arches). Marble was found in nineteenth century Australia, but in small, uneconomic deposits, not suitable for commercial quarrying. The comparative expense of imported marble restricted its use in colonial buildings to carved fireplaces and mantel pieces, or outdoor ornaments such as fountains, statuary and grave stones. If Carrara marble floor tiles were used, they were used sparingly, as an arresting feature in entrance halls for instance. However, most prominent private and public construction used timber flooring, waxed or ‘jappaned’, with carpet runners and rugs (for example the Austin’s Barwon Park Mansion, 1871), or laid tessellated and ceramic tiles of baked clay infused with colour (for example the Chirnside’s Werribee Park Mansion, 1878). HISTORY OF THE LOCH ARD The LOCH ARD belonged to the famous Loch Line which sailed many ships from England to Australia. Built in Glasgow by Barclay, Curdle and Co. in 1873, the LOCH ARD was a three-masted square rigged iron sailing ship. The ship measured 262ft 7" (79.87m) in length, 38ft (11.58m) in width, 23ft (7m) in depth and had a gross tonnage of 1693 tons. The LOCH ARD's main mast measured a massive 150ft (45.7m) in height. LOCH ARD made three trips to Australia and one trip to Calcutta before its final voyage. LOCH ARD left England on March 2, 1878, under the command of Captain Gibbs, a newly married, 29 year old. She was bound for Melbourne with a crew of 37, plus 17 passengers and a load of cargo. The general cargo reflected the affluence of Melbourne at the time. On board were straw hats, umbrella, perfumes, clay pipes, pianos, clocks, confectionary, linen and candles, as well as a heavier load of railway irons, cement, lead and copper. There were items included that intended for display in the Melbourne International Exhibition in 1880. The voyage to Port Phillip was long but uneventful. At 3am on June 1, 1878, Captain Gibbs was expecting to see land and the passengers were becoming excited as they prepared to view their new homeland in the early morning. But LOCH ARD was running into a fog which greatly reduced visibility. Captain Gibbs was becoming anxious as there was no sign of land or the Cape Otway lighthouse. At 4am the fog lifted. A man aloft announced that he could see breakers. The sheer cliffs of Victoria's west coast came into view, and Captain Gibbs realised that the ship was much closer to them than expected. He ordered as much sail to be set as time would permit and then attempted to steer the vessel out to sea. On coming head on into the wind, the ship lost momentum, the sails fell limp and LOCH ARD's bow swung back. Gibbs then ordered the anchors to be released in an attempt to hold its position. The anchors sank some 50 fathoms - but did not hold. By this time LOCH ARD was among the breakers and the tall cliffs of Mutton Bird Island rose behind the ship. Just half a mile from the coast, the ship's bow was suddenly pulled around by the anchor. The captain tried to tack out to sea, but the ship struck a reef at the base of Mutton Bird Island, near Port Campbell. Waves broke over the ship and the top deck was loosened from the hull. The masts and rigging came crashing down knocking passengers and crew overboard. When a lifeboat was finally launched, it crashed into the side of LOCH ARD and capsized. Tom Pearce, who had launched the boat, managed to cling to its overturned hull and shelter beneath it. He drifted out to sea and then on the flood tide came into what is now known as LOCH ARD Gorge. He swam to shore, bruised and dazed, and found a cave in which to shelter. Some of the crew stayed below deck to shelter from the falling rigging but drowned when the ship slipped off the reef into deeper water. Eva Carmichael had raced onto deck to find out what was happening only to be confronted by towering cliffs looming above the stricken ship. In all the chaos, Captain Gibbs grabbed Eva and said, "If you are saved Eva, let my dear wife know that I died like a sailor". That was the last Eva Carmichael saw of the captain. She was swept off the ship by a huge wave. Eva saw Tom Pearce on a small rocky beach and yelled to attract his attention. He dived in and swam to the exhausted woman and dragged her to shore. He took her to the cave and broke open case of brandy which had washed up on the beach. He opened a bottle to revive the unconscious woman. A few hours later Tom scaled a cliff in search of help. He followed hoof prints and came by chance upon two men from nearby Glenample Station three and a half miles away. In a state of exhaustion, he told the men of the tragedy. Tom returned to the gorge while the two men rode back to the station to get help. By the time they reached LOCH ARD Gorge, it was cold and dark. The two shipwreck survivors were taken to Glenample Station to recover. Eva stayed at the station for six weeks before returning to Ireland, this time by steamship. In Melbourne, Tom Pearce received a hero's welcome. He was presented with the first gold medal of the Royal Humane Society of Victoria and a £1000 cheque from the Victorian Government. Concerts were performed to honour the young man's bravery and to raise money for those who lost family in the LOCH ARD disaster. Of the 54 crew members and passengers on board, only two survived: the apprentice, Tom Pearce and the young woman passenger, Eva Carmichael, who lost all of her family in the tragedy. Ten days after the LOCH ARD tragedy, salvage rights to the wreck were sold at auction for £2,120. Cargo valued at £3,000 was salvaged and placed on the beach, but most washed back into the sea when another storm developed. The wreck of LOCH ARD still lies at the base of Mutton Bird Island. Much of the cargo has now been salvaged and some was washed up into what is now known as LOCH ARD Gorge. Cargo and artefacts have also been illegally salvaged over many years before protective legislation was introduced. One of the most unlikely pieces of cargo to have survived the shipwreck was a Minton porcelain peacock - one of only nine in the world. The peacock was destined for the Melbourne International Exhibition in 1880. It had been well packed, which gave it adequate protection during the violent storm. Today, the Minton peacock can be seen at the Flagstaff Hill Maritime Museum in Warrnambool. From Australia's most dramatic shipwreck it has now become Australia's most valuable shipwreck artefact and is one of very few 'objects' on the Victorian State Heritage Register. HISTORY OF THE LOCH ARD The LOCH ARD belonged to the famous Loch Line which sailed many ships from England to Australia. Built in Glasgow by Barclay, Curdle and Co. in 1873, the LOCH ARD was a three-masted square rigged iron sailing ship. The ship measured 262ft 7" (79.87m) in length, 38ft (11.58m) in width, 23ft (7m) in depth and had a gross tonnage of 1693 tons. The LOCH ARD's main mast measured a massive 150ft (45.7m) in height. LOCH ARD made three trips to Australia and one trip to Calcutta before its final voyage. LOCH ARD left England on March 2, 1878, under the command of Captain Gibbs, a newly married, 29 year old. She was bound for Melbourne with a crew of 37, plus 17 passengers and a load of cargo. The general cargo reflected the affluence of Melbourne at the time. On board were straw hats, umbrella, perfumes, clay pipes, pianos, clocks, confectionary, linen and candles, as well as a heavier load of railway irons, cement, lead and copper. There were items included that intended for display in the Melbourne International Exhibition in 1880. The voyage to Port Phillip was long but uneventful. At 3am on June 1, 1878, Captain Gibbs was expecting to see land and the passengers were becoming excited as they prepared to view their new homeland in the early morning. But LOCH ARD was running into a fog which greatly reduced visibility. Captain Gibbs was becoming anxious as there was no sign of land or the Cape Otway lighthouse. At 4am the fog lifted. A man aloft announced that he could see breakers. The sheer cliffs of Victoria's west coast came into view, and Captain Gibbs realised that the ship was much closer to them than expected. He ordered as much sail to be set as time would permit and then attempted to steer the vessel out to sea. On coming head on into the wind, the ship lost momentum, the sails fell limp and LOCH ARD's bow swung back. Gibbs then ordered the anchors to be released in an attempt to hold its position. The anchors sank some 50 fathoms - but did not hold. By this time LOCH ARD was among the breakers and the tall cliffs of Mutton Bird Island rose behind the ship. Just half a mile from the coast, the ship's bow was suddenly pulled around by the anchor. The captain tried to tack out to sea, but the ship struck a reef at the base of Mutton Bird Island, near Port Campbell. Waves broke over the ship and the top deck was loosened from the hull. The masts and rigging came crashing down knocking passengers and crew overboard. When a lifeboat was finally launched, it crashed into the side of LOCH ARD and capsized. Tom Pearce, who had launched the boat, managed to cling to its overturned hull and shelter beneath it. He drifted out to sea and then on the flood tide came into what is now known as LOCH ARD Gorge. He swam to shore, bruised and dazed, and found a cave in which to shelter. Some of the crew stayed below deck to shelter from the falling rigging but drowned when the ship slipped off the reef into deeper water. Eva Carmichael had raced onto deck to find out what was happening only to be confronted by towering cliffs looming above the stricken ship. In all the chaos, Captain Gibbs grabbed Eva and said, "If you are saved Eva, let my dear wife know that I died like a sailor". That was the last Eva Carmichael saw of the captain. She was swept off the ship by a huge wave. Eva saw Tom Pearce on a small rocky beach and yelled to attract his attention. He dived in and swam to the exhausted woman and dragged her to shore. He took her to the cave and broke open case of brandy which had washed up on the beach. He opened a bottle to revive the unconscious woman. A few hours later Tom scaled a cliff in search of help. He followed hoof prints and came by chance upon two men from nearby Glenample Station three and a half miles away. In a state of exhaustion, he told the men of the tragedy. Tom returned to the gorge while the two men rode back to the station to get help. By the time they reached LOCH ARD Gorge, it was cold and dark. The two shipwreck survivors were taken to Glenample Station to recover. Eva stayed at the station for six weeks before returning to Ireland, this time by steamship. In Melbourne, Tom Pearce received a hero's welcome. He was presented with the first gold medal of the Royal Humane Society of Victoria and a £1000 cheque from the Victorian Government. Concerts were performed to honour the young man's bravery and to raise money for those who lost family in the LOCH ARD disaster. Of the 54 crew members and passengers on board, only two survived: the apprentice, Tom Pearce and the young woman passenger, Eva Carmichael, who lost all of her family in the tragedy. Ten days after the LOCH ARD tragedy, salvage rights to the wreck were sold at auction for £2,120. Cargo valued at £3,000 was salvaged and placed on the beach, but most washed back into the sea when another storm developed. The wreck of LOCH ARD still lies at the base of Mutton Bird Island. Much of the cargo has now been salvaged and some was washed up into what is now known as LOCH ARD Gorge. Cargo and artefacts have also been illegally salvaged over many years before protective legislation was introduced. One of the most unlikely pieces of cargo to have survived the shipwreck was a Minton porcelain peacock - one of only nine in the world. The peacock was destined for the Melbourne International Exhibition in 1880. It had been well packed, which gave it adequate protection during the violent storm. Today, the Minton peacock can be seen at the Flagstaff Hill Maritime Museum in Warrnambool. From Australia's most dramatic shipwreck it has now become Australia's most valuable shipwreck artefact and is one of very few 'objects' on the Victorian State Heritage Register. The wreck of the LOCH ARD is of State significance — Victorian Heritage Register S417 Flagstaff Hill’s collection of artefacts from LOCH ARD is significant for being one of the largest collections of artefacts from this shipwreck in Victoria. It is significant for its association with the shipwreck, which is on the Victorian Heritage Register (VHR S417). The collection is significant because of the relationship between the objects, as together they have a high potential to interpret the story of the LOCH ARD. The LOCH ARD collection is archaeologically significant as the remains of a large international passenger and cargo ship. The LOCH ARD collection is historically significant for representing aspects of Victoria’s shipping history and its potential to interpret sub-theme 1.5 of Victoria’s Framework of Historical Themes (living with natural processes). The collection is also historically significant for its association with the LOCH ARD, which was one of the worst and best known shipwrecks in Victoria’s history. A square marble tile retrieved from the wreck of the LOCH ARD. Most of its surface is covered by a thin layer of limestone and marine growth encrustation that is stained rust-red. There is a piece of corroded iron encrusted at an oblique angle on the tile’s rear face. The tile is ‘rough-worked’, cut to shape and size, but not smoothed or polished. There is a companion tile in similar condition in the Flagstaff Hill collection. From visual observation of the original surface (at low magnification) the tile appears to be of white Carrara-type marble.flagstaff hill, warrnambool, shipwrecked coast, flagstaff hill maritime museum, maritime museum, shipwreck coast, flagstaff hill maritime village, great ocean road, loch line, loch ard, captain gibbs, eva carmichael, tom pearce, glenample station, mutton bird island, loch ard gorge, white marble, marble tile, carrara marble, colonial architecture, victorian building materials -
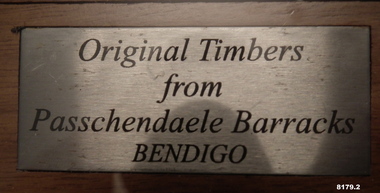 Bendigo Military Museum
Furniture - TABLES, MEETING ROOM BDRSL, Red Dog Furniture, Post 2008
The centre Timbers under the glass tops came from the old Passchendaele Barracks building in Mollison Street Bendigo. The old building dated back to 1916. The building Depot was closed down and dismantled with the unit based there moved out to the new “Multi User Depot in Junortoun”. The tables were made in Bendigo and placed in the new Meeting Room of the Bendigo District RSL in Havilah Road which was named “Kokoda Room”. In another round of renovations to the Club the two tables were placed in the Soldier's Memorial Museum Pall Mall now Bendigo Military Museum. One was placed in the old Meeting room which at that time was part of the Museum, the second was placed in the old kitchen which had been converted into an BDRSL Office. With more renovations the two tables were returned to the Bendigo District RSL in a new meeting room. The two computer insets for cabling was then put into the tables. .1) .2) Two tables solid construction brown stain colour, the top has in inset of Timbers narrow a lighter brown stain laying across the width dimension, a glass top sits over these Timbers level with the heavy outside frame. Each table has an inset centre to accomodate computer cabling. There is a small plaque on each table.On the small plaques, “ Original Timbers from Passchendaele Barracks Bendigo”.brsl, smirsl, bdrslinc -
 Bendigo Military Museum
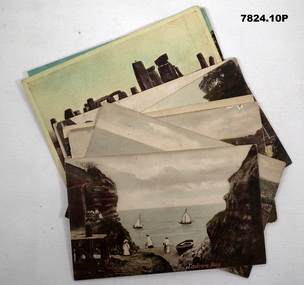
Postcard - POSTCARD, ASH, U.K, F. Frith and Co, c. WW1
Cards collected by R.H. Baron when visiting his Uncle who lived near the village of ASH, UK. c.Nov 1918. Part of the "Robert H. Baron", No. 3596 and Cooper Collections. See Catalogue No. 1981P for details of Baron's service.1. Coloured photograph of a street featuring building including a Post Office. 2. Coloured photograph of a house fronting a gravel road. 3. Sepia toned photograph of a gravel road, vegetation and trees. 4. Sepia toned photograph of a row of houses fronting a gravel road. 5. Sepia toned photograph of a row of houses. Man standing next to a horse and cart. Large pond in foreground. 6. Sepia toned photograph of a row of houses. Man standing next to a horse and cart. Large pond in foreground. 7. Sepia toned photograph of a river with boats moored on bank. Buildings on far side of river. 8. Sepia toned photograph of a row of houses fronting a road. 9. Sepia toned photograph featuring people on a wharf. Row of houses in back ground.1. Pinewood Post Office, Ash. Handwritten in faded black ink on back: 'This is the road Uncle lives in. he live just about opposite the cross (or house in middle) I made on the card, Bob'. 2. York House, Ash. Handwritten in black ink on back: 'Just near my Uncle's place in Ash, Bob.' 3. Fox Hills, Ash. Handwritten in faded black ink on back: 'Letter from R.H. Baron to his brother Freddy - no date.' 4. Ash Common, Victoria Hall, etc. Handwritten in faded black ink on back: ' Of course you will know Ash as you have wrote it bit when writing to Uncle, Bob'. 5. Ash Village & Pond: Handwritten in faded black ink on back: 'This is Ash Village - is about 1 mile from where Uncle lives. Bob.' 6. Ash Village and Pond: Handwritten in faded black ink on back: 'Letter to Elsie from R.H. Baron - no date.' 7. Ash Vale. The Wharf. Handwritten in faded black ink on back: 'Letter to Elsie from R.H. Baron - no date.' 8. Ash Vale. The Wharf. Handwritten in faded black ink on back: 'Partial letter to R.H. Baron's brother - c.Armistice Day. 9. Ash Vale. Handwritten in faded black ink on back: 'Another view of Ash, Bob.'robert h. baron, cooper collection, postcards, ash uk, ww1 -
 Bendigo Military Museum
Postcard - POSTCARD - CODFORD AIF CAMP, UK, c1918
... Black and white photograph featuring three buildings... buildings fronting a gravel road. Two signs appear in the foreground ...Photograph of AIF Codford Camp No. 7. R.H. Baron was stationed here in 1918 during WW1. He later transferred to Herdcott Camp. Part of the Robert H. Baron (No. 3596) and Cooper Collections. See Catalogue No. 1981P for details of Baron's service.Black and white photograph featuring three buildings fronting a gravel road. Two signs appear in the foreground. One is labelled 'No. 7 Camp', the other taller one is labelled 'Salvation Army Rest Hut'. A tree lined hill is in the background.On back, handwritten in black ink: 'Dear Mother, this is the entrance to our camp, the 3rd hut down on the outside is our hut, Robert H. Baron.robert h. baron, cooper collection, postcard, codford aif camp -
 Bendigo Military Museum
Postcard - POSTCARD - LONDON 1919, J Beagles & Co Ltd, c1919
Series of postcards, featuring Australian Troops who participated in the Victory Parade through London after WW1 on 3rd May, 1919.1. Troops marching past Australia House in London. Spectators lining the route. 2. Column of mounted troops and horse drawn artillery. Large monument in right background. Spectators lining the route. 3. Troops in uniform with arms shouldered marching along road. Spectators lining the route. 4. Troops in uniform with arms shouldered, marching along the road. Man in uniform on right is taking the salute. Uniformed police officer on right. 5. Troops in uniform with arms shouldered marching along road. Man in uniform on bottom right hand side taking the salute. Battle honours of troops attached to building in background. robert h. baron, cooper collection, postcard, london, ww1, victory parade, australian troops -
 Bendigo Military Museum
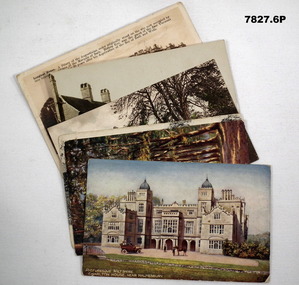
Postcard - POSTCARDS, PHOTOGRAPHIC, VARIOUS U.K, c. WW1
Postcards collected by R.H. Baron while on leave in England during WW1. Part of the "Robert H. Baron" (No. 3596) and Cooper Collections. See Catalogue No. 1981P for details of Baron's service. 1. Coloured coastal scene featuring yachts, beach goers and cliffs. People are standing on a pebbled beach. 2. Coloured coastal scene featuring cliffs and ocean. 3. Coloured coastal scene featuring beach, bathing machines, cliffs and town buildings. 4. Coloured coastal scene featuring beach with boats and town buildings. 5. Sepia toned photograph featuring houses. Stream running in front of house. Footpath between stream and house. 6. Coloured street scene featuring houses fronting a gravel road. 7. Black and white photograph of a street scene featuring buildings, pedestrians and horse drawn transport. 8. Sepia toned photograph of a street scene. Right side lined with houses. Single pedestrian on footpath. 9. Coloured scene featuring standing stones. 10. Coloured photograph of a ruined building overgrown with vegetation.1. Ladram Bay. 2. Ladram Bay. 3. Budleigh Salterton from East. 4. Budleigh Salterton from West. 5. Budleigh Salterton, Cottages at the Granery, 6. Budleigh Salterton, West Terrace. 7. High St. Budleigh Salterton. 8. Budleigh Salterton, Station Road. 9. Stonehenge. 10. Abbey Ruins, Waverley. robert h. baron, cooper collection, postcards, ww1 -
 Bendigo Military Museum
Postcard - POSTCARD, VARIOUS, cWW1
... of a row of buildings fronting an unsealed road. 6. Sepia toned... photograph of a row of buildings fronting an unsealed road. 6. Sepia ...Each postcard features handwritten anecdotes and letters to various people in R.H. Baron's family. Baron was a band member. Part of the "Robert H. Baron" (No. 3596) and Cooper Collections. See Catalogue No. 1981P for details of Baron's service.1. Coloured drawing of a Stately house with motor car, people and a horse in foreground. 2. Coloured drawing of a couple walking through an avenue of trees. 3. Black and white photograph of a church with square tower. 4. Coloured photograph of a mill building and adjacent body of water. 5. Black and white photograph of a row of buildings fronting an unsealed road. 6. Sepia toned photograph of a large stately three storey house.1. Handwritten in black ink on back: 'Letter to Doris written by R.H. Baron - dated 14 July 1918'. Picturesque, Wiltshire, Charlton House, near Malmsbury. 2. Picturesque Wiltshire Avenue, Savernake Forest. Handwritten in black ink on back: 'Letter to R.H. Baron's sisters and brothers.' 3. St. Mary's Church, Motcombe, Dorset. Handwritten in black ink on back: 'We played at a service at this church last Sunday night (1/12/18), Bob xxx' 4. Worplesdan, Rickford Mill, Handwritten in black ink on back: ' Letter to Alf from R.H. Baron.' 5. Crown Inn, etc. Hartley Row. Handwritten in black ink on back. 'Anecdote signed by Bob (R.H. Baron)'. 6. Longleat House. Handwritten in black ink on back; 'We were playing at a dance at this place a few weeks ago. We had a splendid time. It is near Bath, Bob'.robert h. baron, cooper collection, postcards, ww1 -
 Bendigo Military Museum
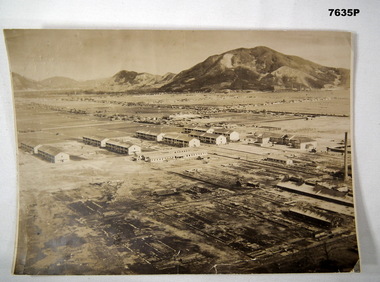
Photograph - RAAF BARRACKS BOFU JAPAN, RAAF, 1946
Item is part of the BCOF Association Collection, refer Cat No 7625This is a large black and white photo. In the background are mountains. On right side of the photo, are some factories with tall chimneys. The middle ground is flat. It shows housing alongside roads. The foreground shows 10 major double storey buildings and three rows of single storey buildings The foreground, left bottom of the picture shows darkened devastated area. A solo tall chimney is on the right side.On rear - “81 fighter..... Occupation Forces. RAAF Camp (Barracks) Bofu, Japan 1946. This was previously a camp for Kamakazi pilots”ww2, bcof, japan -
 Bendigo Military Museum
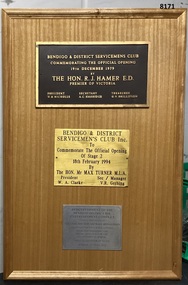
Plaque - BDSC, BDRSLINC REDEVELOPEMENT, C.1979, 1994, 2014
The Bendigo & District Servicemen's Club became the Bendigo District RSL Sub Branch Inc in the year 2000 hence the difference in the name titles on the plaques. Refer Cat No 8073PLight coloured timber frame with 3 plaques different colours, shapes and sizes. 1. Top plaque re the opening of the Bendigo & District Servicemen's Club in Havilah Road Bendigo on 19.12.1979. 2. Centre plaque re stage 2 re development of the above building on 18.12.1994. 3. Bottom plaque re the re development of the Bendigo District RSL Entertainment Complex on 27.7.2014.brsl, smirsl, bdsc, bdrslinc, plaques -
 Bendigo Military Museum
Photograph - PHOTOGRAPH - FRAMED WW1, Wayne Eels, C.2008/2009
The Grinton Collection. War damaged town or city. Refer Cat No, 1280 for Jack Grintons service details.Photograph framed. Photograph - black and white photograph on paper, depicting a landscape of damaged and shattered buildings and rubble with a road and a vehicle in the foreground. Frame - timber, light varnish finish, Perspex front, cardboard backing."Group 2: Burden of War". "H. War Damage".framed accessories, camera on the somme, 38th bn, grinton, ww1, war damage -
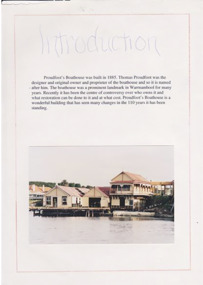
 Warrnambool and District Historical Society Inc.
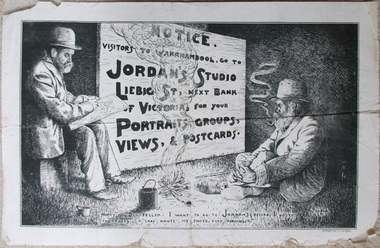
Poster - Jordan Studios, 1906
This is a 1906 advertising poster for the photographic business, Jordan Studios, Liebig Street, Warrnambool. This business was established in 1890 by Joseph Jordan, an Englishman who had been in the British Army in India. He erected the Jordan Studios building (94 Liebig Street) in 1901. Joseph’s son, Arthur, was also a photographer and artist. He photographed and sketched Wilmot (Abraham) several times and used one of these sketches as a basis for this advertising poster. It was well-known at the time that Wilmot was always willing to pose for photographs or drawings. Wilmot (Corwhorong), called ‘the last of his tribe’, was a member of the Tooram group associated with the Kirrae tribe. He spent the early part of his life at the Allan ‘Tooram’ property and was later at the Murray Warrnambool home, ‘Waikato’. He died in 1916 and is buried in the Warrnambool CemeteryThis advertising poster is of considerable importance as it is an interesting example of advertising by a photographer at the beginning of the 20th century. It is also important because it advertises Jordan Studios, one of the most significant photographic businesses in Warrnambool’s history. It also is an example of Arthur Jordan’s artistic abilityThis is large advertising sheet of paper featuring a black and white sketch of the aborigine, Wilmot and Arthur Jordan, the artist/photographer. Jordan is seated and is sketching Wilmot who is sitting cross-legged. The sketch includes a mug, a billy can, a fire and a humorous caption. The edges of the sheet are somewhat tattered. ‘Notice. Visitors to Warrnambool, go to Jordan’s Studio, Liebig St, next Bank of Victoria, for your Portraits, Groups, Views and Postcards’ ‘Hurry up, old feller, I want to go to Jordan’s before I go to the races. A lady wants my photo very pertickler’ ‘Jordan ‘06’ jordan studios, arthur jordan, wilmot, warrnambool, corwhorong, advertising, liebig street -
 Warrnambool and District Historical Society Inc.
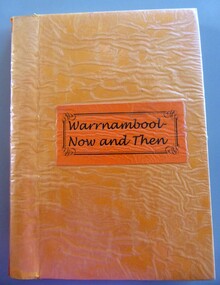
Album - Geitz Warrnambool Now and Then Book 1, 2005
These photographs have been produced by an amateur photographer, John Geitz, and show photographs of Warrnambool streets and buildings from 1990 to 2005 alongside photographs of a similar nature taken many years before. This is intended to show the historical changes that have taken place over the yearsThese photographs are very useful for display and research as they show the changing nature of the Warrnambool cityscape and add considerably to our collection of late 20th century and early 21st century photographs of Warrnambool.This is a bound folder with a yellow cover and an orange title label, containing 86 pages of photographs and photocopies of photographs Photographs have been pasted on to buff-coloured paper Front Title ‘Warrnambool Now and Then’john geitz, warrnambool streets 1990, warrnambool streets 2005, warrnambool photographs -
 Warrnambool and District Historical Society Inc.
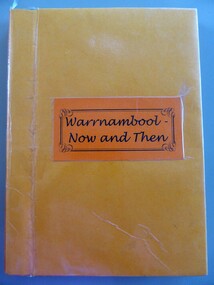
Album - Geitz Warrnambool Now and Then Book 2, 2005
These photographs have been produced by an amateur photographer, John Geitz, and show photographs of Warrnambool streets and buildings from 1990 to 2005 alongside photographs of a similar nature taken many years before. This is intended to show the historical changes that have taken place over the years.These photographs are very useful for display and research as they show the changing nature of the Warrnambool cityscape and add considerably to our collection of late 20th century and early 21st century photographs of WarrnamboolThis is a bound folder with a yellow cover and an orange title label, containing 85 pages of photographs and photocopies of photographs. Photographs have been pasted on to buff-coloured paper. Front title – ‘Warrnambool – Now and Then’warrnambool now and then, john geitz photographs -
 Warrnambool and District Historical Society Inc.
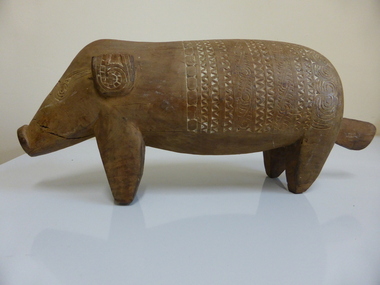
Artefact, Wooden Pig
Oral tradition suggests that this pig came from Papua/New Guinea and was probably in the old Warrnambool Museum which was situated in the Mechanics Institute Building and closed in the 1960s (site of Warrnambool Library today). Illustrations have been found of similar carved pigs originating from the Sepik River area (Tambanum Village) of Papua/New Guinea and of similar items collected early in the 20th century. It is known that the old Museum had a considerable collection of South Sea Islands material but those items appear to have been mainly collected from the Fiji area. If the possible provenance of this item (Papua/New Guinea and old Museum) can be proved then it is a significant item as an example of an indigenous carving which may be more than 60 years old. The pig is very important in Papua/New Guinea as a source of food and a barter/currency item. Otherwise, with provenance not established, the item is useful for displayA brown coloured pig carved out of wood with several cracks on rear and front leg. White coloured incisions on snout, back and ears in patterns reminiscent of Pacific Island indigenous carvings. One ear broken and mended and the other with the top piece missing. Incised with patterns as described abovewarrnambool, old warrnambool museum, papua/new guinea culture -
 Warrnambool and District Historical Society Inc.
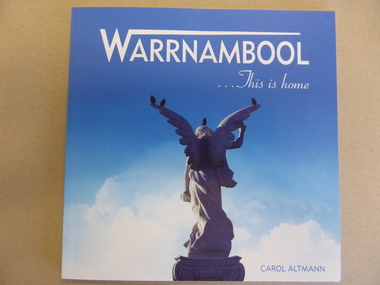
Book, Warrnambool This is Home, 2014
The compiler of this book, Carol Altmann, was born in Warrnambool and worked as a journalist for some years. She is the author of two other books and co-founder of the online magazine, Bluestone Magazine. ‘Warrnambool -This is home’ contains colour photographs of people and places that are favourites with the local residents. Some of them, such as the Aquarium, are no longer existing. This book is of some importance as it records the people and buildings that are well-known in the city and evoke fond memories for both those who live in the city and those who have moved away. As such, it is an important social and historical recordThis is a paper back book of 64 pages. The cover has a blue background with an image of the angel from the War Memorial on the front cover and a photograph of the author, Carol Altmann on the back cover. The pages are bound with glue and contain colour photographs of places in Warrnambool and an accompanying text for each. Front cover: ‘Warrnambool – This is home, Carol Altmann’ Back Cover: Biographical details of Carol Altmann carol altmann, warrnambool this is my home -
 Warrnambool and District Historical Society Inc.
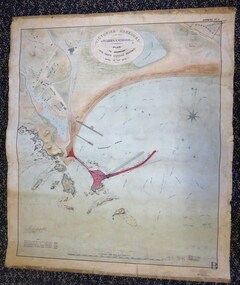
Map - Warrnambool Port 1879, 1879
The port facilities in Warrnambool Bay were in constant use from the first years of Warrnambool’s settlement but there were also difficulties for the shipping trade – a small and unsafe anchorage, the lack of loading facilities and little natural protection from the southerly gales. From the 1870s on there was local agitation for some sort of Breakwater to be built and an Andrew Kerr design was approved by the Warrnambool Council but no funds were made available from the Victorian Government. Throughout the 1870s the building of a Breakwater was a major political issue in the district with preliminary work being funded and started in 1874. In 1879 the Government agreed to a further inspection of the area and an official report. Sir John Coode (1816-1892) was commissioned to make this report. He had come to Australia in 1872 to advise on harbour construction. Coode recommended a 1800 feet long Breakwater and wharf connected to the shore and it was this proposal that the plan described herein and drawn up in 1879 was to accompany. The original plan was eventually modified because of the cost and a Breakwater was completed in 1890 under the direction of the engineer, Arthur Dudley Dobson, with extensions early in the 20th century. This plan is of great interest as it shows in simple graphic form the original plans proposed by Sir John Coode for the Warrnambool Breakwater. It is therefore of great historical importance. The Breakwater was not the maritime success that it was hoped it would be but it is today a significant feature of our foreshore. This is a Plan drawn up in 1879 by Victorian Harbours to accompany Sir John Coode’s Report on the proposed Warrnambool Breakwater. The chart detail is hand-drawn and hand-tinted on canvas with the names of places, geographical and marine features and local points of interest added in print. The edges of the chart are rubbed and the chart is somewhat faded and dirty but the main colours of red, green and brown are still clearly discernible. The title of the plan is printed in an oval inset at the top of the chart. The plan shows two possible Breakwater designs, one from the Borough Surveyor (Andrew Kerr?) and one from Sir John Coode.Victorian Harbours Warrnambool Plan to accompany Sir John Coode’s report Dated 28th Feby 1879 warrnambool breakwater, andrew kerr, sir john coode, arthur dudley dobson, warrnambool, warrnambool harbour, warrnambool history, warrnambool beach -
 Warrnambool and District Historical Society Inc.
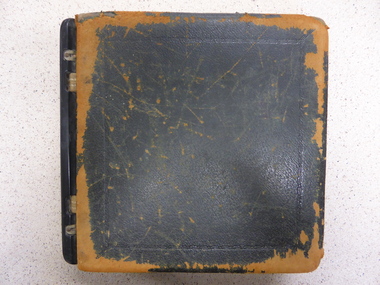
Ledger, Mortgagee
This ledger appears to have been a mortgage document held by the law firm of Mackay Taylor and Co. with the evidence for this the presence of two loose sheets of paper in the ledger with that firm’s letterhead. Mackay Taylor was established in 1893 with the merger of the firms of George Sutherland Mackay and James Fletcher, independent practising lawyers at the time. The new firm became Fletcher and Mackay and later changed to Mackay and Taylor when J. McD. Taylor became a partner in the 1920s and the business was at 131 Kepler Street, with a new building erected in the late 1920s. The legal business closed in the 1990s with the mortgage section of the firm becoming Mackay Taylor Securities in 1990 (later Southern Securities). The ledger was recovered when the building was being cleared out and Percy Eccles, a real estate agent, handed it to the Warrnambool and District Historical SocietyThis ledger has considerable significance as an example of a law firm’s business activities in the mid 20th century. It also contains personal details of loans made to Warrnambool and district people and could be useful for research, with limited and supervised access to researchers because of the sensitive nature of the material contained therein.Ledger with leather covers and straps and metal sides; black covers are very worn leather alphabet tabs; handwritten entries for mortgagees and mortgagors and vendors and purchasers, 1938-1962; 3 loose sheetsKalamazoo Loose Leaf Books, 10/1/1938warrnambool, george sutherland mackay -
 Warrnambool and District Historical Society Inc.
Report, W'bool Woollen Mill Co Ltd, 1945
This is a document showing the state of the accounts in 1944-5 of the Warrnambool Woollen Mill, a significant commercial business in Warrnambool for several decades that was well-known nationally, particularly during World War Two. The Warrnambool Woollen Mill operated in South Warrnambool off McDonald Street from 1910 to 2001 and produced mainly woollen blankets and flannels. Some of the old Woollen Mill buildings today are heritage-listed. The item shows that there was a reduced turnover in 1944-5 because of fewer Government contracts but the company was still making a profit. The Federal Government was a major buyer of Warrnambool Woollen Mill products with the factory supplying blankets for the Armed Forces in World War Two.This is an important document which forms part of a larger collection of Warrnambool Woollen Mill material in the archives of the Warrnambool and District Historical Society. The Warrnambool Woollen Mill was a major industry in Warrnambool , employing at its peak several hundred people and it was a significant building in the city, with the social and economic ramifications connected to a major business in a regional centre. The document shows the state of the business during World War Two.This is a document of 14 pages produced for the Warrnambool Woollen Mill Company Limited by Edward V. Nixon & Partners, Chartered Accountants, Melbourne, a Report and Comparative Accounts for the years ended 30th September 1944 and 30th September 1945. The cover is grey-coloured light cardboard bound with a paper adhesive. The report covers five pages and the financial statements nine pages. The material is typed.The report is signed Edwin V. Nixon & Partners and the financial reports are initialled E.V.N. & P. warrnambool, warrnambool woollen mill, warrnambool woollen mill report 1944-45 -
 Warrnambool and District Historical Society Inc.
Book, Letter book, Early 20th century
This letter book (1910-1922) was found in the old Mackay Taylor building in Kepler Street. The Secretary of the Presbytery of Mortlake in the early 1900s was George Mackay who established his legal business in 1891 and merged with the business of James Fletcher in 1893 to form Fletcher and Mackay. In the 1920s J. Taylor joined the business which was known from then on as Mackay and Taylor and this firm existed until the 1990s. George Mackay was prominent in Warrnambool civic and community affairs and was Secretary of St. John’s Presbyterian Church for many years. The Presbytery of Mortlake was an administrative district committee established in 1862 and included the Presbyterian churches of Port Fairy, Tower Hill, Wangoom, Allansford, Warrnambool, Woodford, Hexham, Caramut, Mortlake and Terang. The committee consisted of the local ministers, some elders and other church representatives and met monthly or quarterly to discuss church business that affected the region.This letter book is of some significance as it indicates the type of business carried out by a district church council – properties, missions, individual church problems etc. It also shows the community work of George Mackay, a prominent Warrnambool resident at the time, and the book contains his signature many times over. The book will be of interest to researchers. This is a ledger with dark blue binding and binding reinforcements on the spine and corners. The inside covers are lined with thick paper in a mottled blue, black and white coloured pattern. There are 249 pages of copies of letters written, some typed, some handwritten. Front cover: Label with typed title ‘Presbytery of Mortlake’ Spine:’ Letter Book’, ‘Mortlake Presby’. presbytery of mortlake, george mackay, warrnambool -
 Warrnambool and District Historical Society Inc.
drinking glass: Eckers Hotel
The glass comes from Eckers Hotel (Dooleys/Taylors/Eckers Hotel), once a well-known hotel in Warrnambool (on the east side of Liebig Street, between Lava and Koroit Streets). It was established by James Dooley in 1875 and closed in 1962. Joseph Ecker, who changed the name to 'Eckers' in 1913, was the licensee from 1910 to 1932. The name 'Eckers' was retained until the hotel closed. Eckers Hotel had a fine reputation as a comfortable and well-managed hotel and many sporting meetings were held there. The hotel building was demolished and the site today is occupied by an estate agency.This item has social significance significance as a glass with an inscription of a Warrnambool hotel (Eckers) and retained by a patron (Harry Heathcote, a local Warrnambool man) when the hotel closed. A drinking vessel made of clear glass. It is cracked from top to bottomWarrnambool, 'Eckers Hotel' Map of Australia with 'A.H.A' inscribed inside and the number '7' underneatheckers hotel warrnambool, joseph eckers, warrnambool -
 Warrnambool and District Historical Society Inc.
Book, Woolsthorpe Primary School and Woolsthorpe Soldier Settlement
History of the Woolsthorpe Primary School and Woolsthorpe Soldier SettlementThis is a soft-cover book with a blue and buff- coloured front cover featuring photographs of the Woolsthorpe Primary School and the Woolsthorpe War Memorial. The back cover has photographs of the R.S.L. Badge and the Woolsthorpe Primary School. It has 160 pages. non-fictionHistory of the Woolsthorpe Primary School and Woolsthorpe Soldier Settlementwarrnambool, woolsthorpe, soldier settlement -
 Warrnambool and District Historical Society Inc.
Album - Family photo album, Photograph album, Circa 1954
This album shows a collection of photographs some of which are labelled as Munster Services Club. Some show the Bookshop at the TOC H building. There are photos of soldiers in parade drills and in training exercises as well as social events. One is labelled D Craven & Rab, Munster 1954. Another is labelled London bus 2 RTR Munster. The 2 RTR was a tank regiment in the British Army and was stationed at the Swinton Barracks in Munster from 1952-1959. There are also a number of loose photos showing local scenes such as London Bridge and Needle Rock at Childers Cove. Others depict floats in a parade showing Peace Woollen Mill. Others are small postcards of MaryBorough and Brisbane Queensland. There is also a photograph of the Nestanglo basketball team, Victorian champions circa 1940’s. This collection of photographs has limited local relevance as there is limited provenance. However it depicts quite well the activities of the RTR and their activities in Munster in the post WW era.Brown and fawn snake skin patterned card cover with fawn cord binding. Photographs written in gold on front cover. Pages are brown card. Photographs are black and white.Munster Services Club.warrnambool, swinton barracks munster, munster services club 1952-1959, 2rtr munster -
 Warrnambool and District Historical Society Inc.
Album, Warrnambool and District 1886 Western Hotel, 1886
This album contains a number of local coastal and seascapes including Thunder Point, views of local streets such as Liebig and Fairy streets, panorama views of the town from Manse Hill and Booval Hill and the Botanic Gardens. Buildings included are Cramond and Dickson, St Joseph’s Church, the saleyards. The book itself would have been used by patrons of the Western Hotel when J Fox was licensee, from 1880 until 1887. The hotel had been operating since 1870 when William O’Brien applied for a publican’s license for the house on the corner of Timor and Kepler Streets with five sitting rooms and eight bedrooms. The stone building was designed by Andrew Kerr and built by Williams & Co. The Western Hotel was also the booking office for Cobb and Co Coaches which operated until the railway came to town in 1890. This album has historical significance on different levels. Firstly the photographs provide a view of Warrnambool in the late 19th century. The photos are aesthetically and artistically significant. Many of the buildings in the streetscapes are still recognizable. Secondly the Western Hotel has occupied a prominent site within the CBD for nearly 150 years. It has links to Cobb & Co, an important part of early Australian transport. Large hard covered album. Dark green cover with title in red rectangle on front cover. Text in gold lettering. A variety of photographs mounted on card.Chuck Photo Ballarat on front cover. Small cutting pasted inside front cover, reads as follows,” Will and Estates. Joseph Fox, late of Grosvenor Street, Balaclava who died on 29th July by his will of 11th August 1915 left 3737pounds real estate and 2342 pounds personality to relatives. warrnambool, warrnambool history, warrnambool photographs of the past, western hotel photographs -
 Warrnambool and District Historical Society Inc.
Work on paper - Project, Proudfoot's Boat House, Late 20th century
Proudfoots’ Boathouse was built in 1885 by Thomas Proudfoot and has remained an important historic building in Warrnambool to this day. In the late 20th century the original buildings were lifted and renovated and a new building constructed in front. This material on Proudfoot’s boathouse will be of considerable use for researchers on the buildings, especially the detail on the 1990s renovations and additions.This is a Warrnambool Secondary College school assignment (Claire Isaac) about Proudfoot’s Boathouse in Warrnambool. There are twelve unnumbered typed papers on white paper (A4 size) and five loose newspaper cuttings. The typed pages are outlined in red. Included are black and white photographs (copies) and colour photographs.proudfoot’s boathouse, claire isaac -
 Warrnambool and District Historical Society Inc.
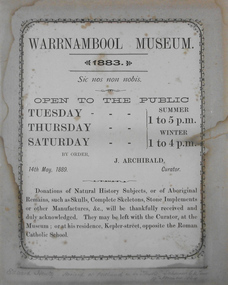
Administrative record - Advertising item, Warrnambool Museum 1883, 1889
This card was produced in 1889 to advertise the Warrnambool Museum which was shifted in April 1889 from its original site in the Mechanics Institute in Liebig Street to the old Warrnambool courthouse in Timor Street. ( This building no longer exists.) The Museum remained in Timor Street until 1912 when it went back to the Mechanics Institute until its closure in 1963. The Museum was founded in 1883 by the retired Police Inspector Joseph Archibald. The card shows that the museum was open three afternoons per week and was asking for donations. The pencil writing at the bottom of the card is Joseph Archibald's writing. This card is of considerable significance as it is an original document and an important memento of the old Warrnambool Museum, a much loved institution in Warrnambool for 80 years.A piece of light card with a decorative border and black lettering. It is torn on the edges and water stained. The base has been cut for its insertion into another folder. There is pencil writing at the bottom of the card, WARRNAMBOOL MUSEUM 1883 Edward Henty arrived at Portland in the " Thistle" schooner 68 tons 19th November 1834warrnambool museum, mechanics institute, warrnambool courthouse -
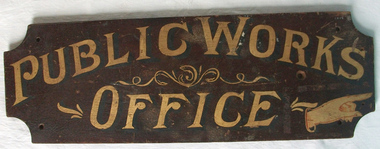 Warrnambool and District Historical Society Inc.
Sign - Public Works Office
... building government accommodation and fit out of buildings... Street (south of Merri St) Warrnambool great-ocean-road This sign ...This sign points has two different messages. The first states Public Works Office, which was operational in Victoria between 1855 and 1987 dealt with many aspects of the states infrastructure. It had many different reponsibilities and roles from building government accommodation and fit out of buildings, licences for unused roads and water ways, main roads and bridges, ports and harbour,and water supplies. Much of this work was managed through local offices such as the one at Warrnambool. The sign on the reverse which states Witnesses Waiting Room relates to the court house which is where this sign originated.The Warrnambool court house was built in 1870-71 by the Victorian Public Works department and it is possible that this sign relates to that period.It is one of a number of public buildings built in the period 1870-1890 including the Police station and stables and police quarters, the Post Office and drill Hall , all in the same vicinity. This building reflects the growth of the town and also the importance it held at the time from a state level. The building while no longer used as a court house is a building of significance to Warrnambool as well as to the state of Victoria, being one of six around the state which were built in free classical style. This sign denotes the waiting room for witnesses which was situated on the western side of the building.A tangible link which provides historical and social significance to Warrnambool.Rectangular wooden sign with rounded corners. There is text on both sides painted in gold paint with shadow in black. One side is a darker brown stain . There are screw holes in each corner.and one hole on left middle of sign. Rounded edge on one side.Side 1:Witnesses Waiting Room Side 2:Public Works Office.warrnambool, warrnambool court house, public works department warrnambool