Showing 156 items
matching railway squares
-
 National Wool Museum
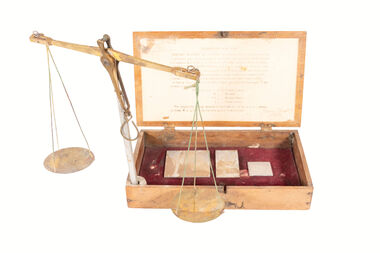
Instrument - Scales, 1880-1898
At the time of sale, the last of the Hirst family to work in the mill located in Geelong gave Donald (donor Bruce's father) Doherty a set of scales that had been used by several generations of Hirsts and adapted by them over time for specific use in their mill. These Scales were saved from waste and being thrown away at the time of sale to remain in use in the industry in the hands of someone who knew how to use them. The scales were used in calculating the weight of cloth and simultaneously calculating the amount of yarn required to weave it following the instructions printed within the box. The box bears the signatures of two Hirst family members, one being Lewis Hirst dated at 1898. The original brass pole has been replaced with a replica metal somewhere throughout the years after the brass pole broke through use. Hirst was brought by McKendrick in the 1960s and these scales sat for 12 months as part of the 12 month "cooling off" period. The scales were then handed to Donald rather than being disposed of.Scales used for weighing and calculating weight and thread count of textile samples. Originated from Godfrey Hirst Mills in Geelong. Writing describes how to utilise scales. Scales are made from brass, pole for holding scales once brass now replaced with metal pole. Scales held inside wooden box with black text in ink depicting use of scales on paper located inside and outside of box.Outside of box. Wording: APPARTUS for TESTING the WEIGHT per YARD of CLOTHS & COUNT of YARN from a small SAMPLE. -------------------------------------------------------------------------------------------------------------------------------------------------- Indispensable to Manufactures, Merchants & handling Woollen, Worsted, Cotton, Linen, Jute, Hemp, Flannel, Felt, Army, Navy, Police, Railway, Sail & other Cloths -------------------------------------------------------------------------------------------------------------------------------------------------- USED IN GOVERNMENT DEPARTMENTS -------------------------------------------------------------------------------------------------------------------------------------------------- The apparatus consists of Scales, Weights, 1, 2 & 4 sq. inch Cutting Templates & Book of Tables --------------------------------------------------------------------------------------------------------------------------------------------------By weighing a small Sample the accurate Weight in Ounces of a yard of Cloth any width from 18 to 64 inches, the Weight per Square Metre in Grams, the Counts* of Warp and Weft, and the approximate length of full & short ends of pieces of fabrics, [without unrolling and measuring for stocktaking & other purposes] can be ascertained without any Calculation --------------------------------------------------------------------------------------------------------------------------------------------------Price in United Kingdom, 25s., Carriage Paid. Price to Canada & U.S.A. $6.75 do. H. Lord. 10, And Place, Bradford, England. --------------------------------------------------------------------------------------------------------------------------------------------------*When ordering, state on what system you base your YARN COUNTS. Inside of box. Wording: DIRECTIONS FOR USE --------------------------------------------------------------------------------------------------------------------------------------------------TESTING WEIGHT OF CLOTHS. Place sample to be tested on a piece of cardboard, put a Cutting Template on it, cut card and cloth round template with scissors and weigh it according to instructions given in Book of Tables. TESTING FOR YARN COUNTS. Cut out 1 square inch of cloth, draw out wrap or weft threads, according to which is being tested, and the number of inches so drawn, that balance respective weight is the approximate Count. The same rule holds good when number of inches are drawn from a bobbin. In testing from the cloth, allowance has to be made for loss or gain in the process of manufacture. Weight marked C is for Cotton Counts " " W " " Worsted " " " WS " " Woollen Skeins " " L " " Linen Counts. The weights for testing samples of cloth are 20, 10, 10, 5, 3, 2, 1, grains in brass & '5, '3, '2, '1 [tenths of a grain] in aluminium. Inside of box. Signtures, handwritten: Bottom right: Lewis Hirst !898 Top Left (Smudge ?) W Hirst !935godfrey hirst, hirst family, textile design, textile creation -
 Whitehorse Historical Society Inc.
Article, Plum site set for redevelopment, 2001
A proposal for a 1162 square metre office on the former Blue Moon Fruit Co-operative Ltd site on Railway Road . Approved by Whitehorse council.A proposal for a 1162 square metre office on the former Blue Moon Fruit Co-operative Ltd site on Railway Road was approved by Whitehorse council.A proposal for a 1162 square metre office on the former Blue Moon Fruit Co-operative Ltd site on Railway Road . Approved by Whitehorse council.blue moon fruit co-operative ltd, railway road blackburn -
 Whitehorse Historical Society Inc.
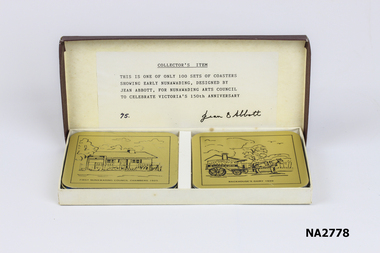
Domestic object - Coasters, c1986
Coaster showing 'Pannam's Store 1900' is historically incorrect as Pannam did not come to Vermont until c1934. It appears that it was known as 'Vermont Store' in 1900.Boxed set of six square coasters with rounded edges. Gilded alloy surface etched with black line graphics featuring scenes of early of the former municipality of Nunawading. Each coaster is backed with blue foam/felt. Rectangular presentation box with maroon colour lid - label inside.On each coaster-:|Pannam's Store, Vermont 1900|First Nunawading Council Chambers 1925|Backhouse's Dairy 1920|Nunawading Coat of Arms 1872|Blackburn Railway Crossing 1882|Schwerkolt Cottage Pump 1864|On label is typed 'Collector's Item. This is one of only 100 sets of coasters showing early Nunawading, designed by Jean Abbott, for Nunawading Arts Council to celebrate Victoria's 150 anniversary'|Written in ink '75'. Signature in ink 'jean Abbott'.civic mementoes, souvenirs, domestic items, table setting -
 Ballarat Tramway Museum
Slide - 35mm slide/s - set of 5, Noel Simons, 19/11/1962 12:00:00 AM
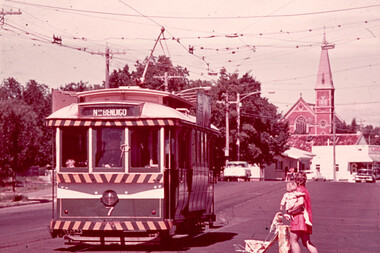
Set of 5 transparencies taken on 19/11/1962 on Kodak mounts. 1186.1 - Bendigo 21 bound for Golden Square at Charing Cross with The Beehive buildings and shops in Pall Mall in the background. Trams has an ad for Cohns drinks on front bumper, SEC Best for Cooking roof ad. and Mamouney's furniture roof ad. Two women passengers boarding. 1186.2 - Bendigo 26 crossing Pall Mall from Mitchell St. bound for Eaglehawk with "Ezywalkin" shop in background. Tram has an SEC 'Electric Cooking' roof ad and a 'Streets Ice cream' ad on front dash. 1186.3 - Bendigo 7 arriving at the Charing Cross stop, bound for North Bendigo. Has a Huttons dash panel ad, a Castrol roof ad. Buildings as for 1186.1. Passengers waiting at the stop. 1186.4 - Bendigo 19 leaving Charing Cross for Golden Square with City Club Hotel alongside and other buildings as for 1186.1 in the background. Tram has Briquettes ad on front dash and SEC 'Electric Cooking' roof ad. 1186.5 - Bendigo 21in High St. at corner of Short St. heading for Charing Cross. Destination half way between Depot and Railway Station. Tram has ads for Cohns Drinks on dash panel, SEC 'Cook with Electricity' and a Sandhurst Milk roof ads.Information written on in black ink and date stamped in purple ink. 1186.1 - "No. 21 in Pall Mall at Charing Cross, Bendigo" 1186.2 - "No. 26 arriving at Alexandra Fountain, Charing Cross, Bendigo" 1186.3 - "No. 7 in Pall Mall at Charing Cross, Bendigo" 1186.4 - "No. 19 in High St., Bendigo, leaving Charing Cross for Golden Square" 1186.5 - "No. 21 in High St. Bendigo, at corner of Short St." tramways, trams, bendigo, charing cross, pall mall, high st., tram 7, tram 19, tram 21, tram 26 -
 Ballarat Tramway Museum
Slide - 35mm slide/s - set of 17, Noel Simons, 20/11/1962 12:00:00 AM
Set of 17 transparencies taken on 20/11/1962 on Kodak mounts. 1187.1 - Bendigo No. 2 at the Quarry Hill terminus, showing destination of Quarry Hill. Has Cohns Drinks and Streets Ice Cream ads on dash panel, a SEC 'electric cooking' roof ad and another roof ad. Shows the Y terminus at this location, but tram standing just before it. Overhead in position. 1187.2 - as above, but closer up. 1187.3 - as above, but from the north side, showing cemetery in the background. 1187.4 - Bendigo No.3 at Eaglehawk terminus. Tram showing destination of Quarry Hill. Has the various buildings at Eaglehawk in the background including the Foodland store. Has Streets Ice cream and White Horse Whiskey ads on the dash panel. 1187.5 - Bendigo No. 18 at Garden Gully crossing loop, in bound, with destination of Eaglehawk. Passengers waiting for an Eaglehawk tram at the stop. Has a white horse whiskey ad on dash panel and SEC roof ads. Conductor standing in doorway looking out. 1187.6 - Bendigo No. 7 inbound in Nolan St. at cnr of McCrae St. showing destination of Golden Square. Has Streets Ice cream ad on dash panel and a Castrol Roof ad. 1187.7 - Bendigo No. 19 at the North Bendigo terminus with railway level crossing in background. Tram has a Cohns Drinks ad and an SEC 'Electric Cooking' roof ad. 1187.8 - Bendigo No. 2 at the Quarry Hill terminus, looking back into Bendigo, showing destination of Eaglehawk. 1187.9 - Bendigo No. 21 in McCrae St, near Nolan St outbound for North Bendigo. Photo taken after tram has passed photographer. 1187.10 - Bendigo Nos. 4 and 26 at Charing Cross in View St. with fountain alongside and the Beehive, Ezywalkin Buildings in the background. No. 26 has a Sandhurst Milk and SEC 'Electric Cooking' roof ad. 1187.11 - close up of 22E maximum traction truck and folded footstep. 1187.12 - Bendigo No. 19 at Charing Cross terminus, after tram has passed photographer, showing destination of North Bendigo, with the Beehive building in the background and passengers boarding tram. 1187.13 - Bendigo No. 11, turning from View St. into Pall Mall, showing Special with the conductor holding point bar. Has the Beehive and Ezywalkin Buildings in the background. 1187.14 - No. 7 at Charing Cross terminus, in Pall Mall, bound for Golden Square. Has the Beehive and Ezywalkin buildings in the background and passengers waiting at the tram stop. 1187.15 - No. 18 at the Charing Cross terminus, bound for Eaglehawk. Has the Beehive and Ezywalkin buildings in the background and passengers waiting at the tram stop. Also has the 'Safety Zone' sign in the photograph. 1187.16 - No. 2 at Quarry Hill terminus, night or dusk photo. Tram showing destination of Depot. 1187.17 - No. 26 at Charing Cross, night photo. Tram has destination of Quarry Hill, but is on the line for Eaglehawk. Photo looks along Mitchell St. Also shows Safety Zone sign. Information written on in black ink and date stamped on purple ink. 1187.1 - "No. 2 at Quarry Hill terminus Bendigo" 1187.2 - "No. 2 at Quarry Hill terminus Bendigo" 1187.3 - "No. 2 at Quarry Hill terminus Bendigo" 1187.4 - "No. 3 at Eaglehawk terminus" 1187.5 - "No. 18 in Mt Korong Road, Long Gully at cnr of Havilah Road (Eaglehawk Route)" 1187.6 - "No. 7 in Nolan St. Bendigo, at Cnr of McCrae St., near lake Weeroona, (North Bendigo Route)' 1187.7 - "No. 19 at North Bendigo terminus" 1187.8 - "No. 2 at Quarry Hill terminus" 1187.9 - "No. 21 in McCrae St. Bendigo, near Nolan St. (North Bendigo Route) 1187.10 - "4 and 26 at Alexandra Fountain, Charing Cross Bendigo" 1187.11 - "Truck of Bogie Car, Bendigo Tramways" 1187.12 - "No. 19 in Pall Mall at Charing Cross, Bendigo" 1187.13 - "Birney car No. 11 entering Pall Mall from View St. at Charing Cross Bendigo" 1187.14 - "No. 7 in Pall Mall at Charing Cross, Bendigo" 1187.15 - "No. 18 at Alexandra Fountain, Charing Cross, Bendigo" 1187.16 - "No. 2 at Quarry Hill terminus, Bendigo" 1187.17 - "No. 26 at Alexandra Fountain, Charing Cross, Bendigo" tramways, trams, bendigo, quarry hill, eaglehawk, north bendigo, maximum traction, night photo, tram 2, tram 3, tram 4, tram 7, tram 11, tram 18, tram 19, tram 21, tram 26 -
 Ballarat Tramway Museum
Slide - 35mm slide/s, Noel Simons, 21/11/1962 12:00:00 AM
Set of 6 transparencies taken on 21/11/1962 on Kodak mounts. 1189.1 - Bendigo No.11 at Quarry Hill terminus. Photo taken looking in along the route. Tram has destination of North Bendigo. 1189.2 - No. 21 in Pall Mall bound for North Bendigo. Tram has roof ads for Mamouney's furniture and SEC. In the background are the National Bank building, Dad and Dave's Cafe and the Beehive Buildings and the London Pharmacy. 1189.3 - No. 2 in Mitchell St, just after crossing over railway bridge. Photo taken after tram has passed photographer. Has what appears to be an SEC road works crew in the background. Has destination of Quarry Hill. 1189.4 - No. 17 climbing Mitchell St. on the start of the single track section, just before crossing the railway bridge. Has destination of Quarry Hill and the large Maples building sign in the background. 1189.5 - as for 1189.4 but after tram has passed photographer. Has an Ilford film roof ad and an SEC roof ad. Railway bridge in the background. 1189.6 - No. 21 at Charing Cross with passengers boarding. Tram has destination of North Bendigo and roof ads for SEC 'Electric Cooking' and Sandhurst Milk. In background are the buildings on the south side of High St. Also has a SEC worker in white overalls sweeping the track.Information written on in black ink and date stamped on purple ink. 1189.1 - "Birney car No. 11 in High St. Bendigo at Golden Square terminus" 1189.2 - "No. 21 in Pall Mall Bendigo near Charing Cross" 1189.3 - "No. 2 in Mitchell St. Bendigo, just after crossing bridge over railway line (Quarry Hill route)" 1189.4 - "No. 17 in Mitchell St. Bendigo, climbing the hill the bridge over the railway line. (Quarry Hill route)" 1189.5 - "No. 17 in Mitchell St., Bendigo approaching bridge over Railway line (Quarry Hill route)" 1189.6 - "No. 21 at Charing Cross, Bendigo"tramways, trams, bendigo, golden square, pall mall, mitchell st., quarry hill, tram 2, tram 11, tram 17, tram 21 -
 Ballarat Tramway Museum
Slide - 35mm slide/s - set of 4, Noel Simons, Apr. 1967
Set of 2 slides made from the Association of Railway Enthusiast Provincial Tramways film strip, possibly during April 1967. 1192.1 and 1192.3 mounted in Kodak Ready Mounts. The others in plain white mounts. Slides dated Dec. 1968. 1192.1 - No. 21 out bound to Golden Square in High St., between Wattle and Vine Streets. Photo taken after tram has passed photographer. Has a sign for "Reid's Furnituorium" in the background. 1192.2 - Bendigo No. 28 dressed up as Myers Christmas tram, passing the Post Office and Courts in Pall Mall. 1192.3 - Bendigo No. 23 at Needle Loop en route to Eaglehawk. Tram has two SEC roof ads, one "Electric Cooking" and the other "Everything fine in my all electric kitchen". 1192.4 - Bendigo scrubber parked at the end of the main depot lead, alongside the depot office buildings.Details in blue ink, date hand stamped in purple ink. 1192.1 - "No. 21 heads along High St for Golden Square between Wattle and Vine Streets." 1192.2 - "Birney No. 28 in Christmas Garb, traverses Pall Mall en route to North Bendigo". 1192.3 - "No. 23 at Needle Loop on its run to Eaglehawk". 1192.4 - "Scrubber car at Bendigo Depot".tramways, trams, north bendigo, bendigo, bridge st loop, depot, tram 21, tram 23, tram 28, tram scrubber -
 Ballarat Tramway Museum
Slide - 35mm slide/s - set of 20, Noel Simons, 21/05/1971 12:00:00 AM
Set of 20 transparencies taken on 21/5/1971 on Kodak mounts. 1197.1 - Bendigo No. 5 en route to Eaglehawk at Creeth St Long Gully. Tram has a SEC roof ad and Cinzano roof ad. 1197.2 - No 5 approaching Needle Loop between Long Gully and California Gully. On left hand side is the City of Bendigo sign, indicating city boundary. 1197.3 - As for 1197.2 but actually entering loop. Photo taken after tram has passed photographer. 1197.4 - No. 26 bound for Eaglehawk descending the railway bridge near Eaglehawk, at Jobs Gully. 1197.5 - as for 1197.4, but after crossing bridge, now ascending a hill. Photo taken after tram has passed photographer. 1197.6 - No. 26 climbing High St. hill Eaglehawk, nearing end of Double track, bound for Quarry Hill. Shows centre of the road poles. 1197.7 - As for 1197.6, with tram entering single track section. Photo taken after tram has passed photographer. Has a BP service station in the background. 1197.8 - No. 26 (bound for Quarry Hill) crossing No. 17 (Eaglehawk) at Job's Gully Loop. 1197.9 - No. 17 climbing railway bridge at Job's Gully, en route to Eaglehawk. Photo taken after tram has passed photographer. 1197.10 - No.26 bound for Quarry Hill, leaving Long Gully Loop? Has the Creeth St. church in l197.l in the far background. Photo taken after tram has passed photographer. 1197.11 - Tramway Point work at the northern end of Long Gully Loop. 1197.12 - No. 17 en route for Quarry Hill turning into View St. from Bamard St. Tram has SEC roof ads "Everything fine in my all electric Kitchen' and 'Electric Cooking is Matchless'. 1197.13 - as for 1197.12, but tram has turned into View St and about to enter the double line track. Photo taken after tram has passed photographer. 1197.14 - No. 21 enters Nolan St after turning from MacRae St. en route to Bendigo. Note sign on its own post noting tram turns "Beware Tram Turns" and stop sign on adjacent pole "Trams stop on Request". No. 21 has two SEC roof ads. 1197.15 - No. 21 in Nolan St. after turning from Bridge St. (White Hills Road). Note signal light for Bridge St. loop on pole corner of street. Photo taken after tram has passed photographer. 1197.16 - No. 2 bound for Eaglehawk at unknown location. 1197.17 - Tram stop sign on a pole "CARS STOP BY REQUEST" 1197.18 - No. 5 in Carpenter St.? en route to Quarry Hill. 1197.19 - No. 28 has just arrive at Golden Square terminus, passengers are disembarking and the trolley pole is being turned. Golden Square Hotel in the background. 1197.20 - No. 28 at Golden Square terminus. Has a "Nothing beats Briquettes for hear roof ad. Information written on in black ink and date stamped on purple ink. 1197.1 - "No. 5 at Creeth St. Long Gully" 1197.2 - "No. 5 approaching Needle Loop between Long Gully and California Gully" 1197.3 - "No. 5 at Needle Loop between Long Gully and California Gully" 1197.4 - "No. 26 crossing railway bridge at Job's Gully near Eaglehawk" 1197.5 - "No. 26 just after crossing railway bridge at Job's Gully near Eaglehawk/ 1197.6 - "No. 26 in High St. Eaglehawk" 1197.7 - "No. 26 at end of double track in High St. Eaglehawk" 1197.8 - "Nos. 26 and 17 crossing at Job's Gully Loop" 1197.9 - "No. 17 crossing railway bridge at Job's Gully near Eaglehawk". 1197.10 - "No. 26 at Long Gully" 1197.11 - 'Northern end of points at Long Gully Loop". 1197.12 - "No. 17 turning into View St. from Bamard St. Bendigo". 1197.13 -'No. 17 at beginning of double track in View St. after leaving Bamard St. Bendigo. 1197.14 - "No. 21 enters Nolan St. from MacRae St. Bendigo." 1197.15 - "No. 21 in Nolan St. Bendigo just after leaving White Hills Road." 1197.16 - "No. 2" 1197.18 - "No. 5" 1197.19 - "Birney car No. 28 at Golden Square Terminus" 1197.20 "Birney car No. 28 at Golden Square Terminus" tramways, trams, bendigo, long gully, railway bridge, jobs gully, trackwork, nolan st, quarry hill, tram stops, golden square, tram 2, tram 5, tram 17, tram 21, tram 26, tram 28 -
 Ballarat Tramway Museum
Slide - 35mm slide/s - set of 4, Noel Simons, Apr. 1972
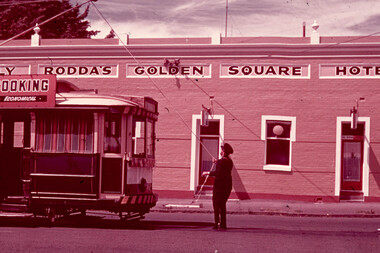
Set of 4 transparencies - copy slides - possibly ARE film strip dated March 1972. 1209.2 and 1209.4 on Kodak Readymount mounts. 1209.1 - Bendigo 5, 6 and 28 on a special tram service in bound to the City on a tour in Caledonia St. about to enter Lucan St, or White Hills Road or Weeroona Ave. (mis match in names in various maps). Gas works in the background. No. 5 has a white disk on the rear of the tram. 1209.2 - Nos 2 and 26 at Charing Cross with the Fountain Plaza in the background. Both trams have the destination of Quarry Hill, though 26 is on the Eaglehawk bound track. 1209.3 - No. 19 at the Golden Square terminus, with the conductor or driver swinging the pole and Billy Rodda's Golden Square hotel in the background. 1209.4 - No. 7 at Fire Station loop, en route to North Bendigo, picking up a passenger with a pram. Part of a set of 20 slides made by the Association of Railway Enthusiast Provincial Tramways film strip. Reference Item 2560 details the ARE Film Strip and provide references to other slides.Information written on in blue ink and date stamped on purple ink. 1209.1 - "Nos 5, 6 and 28 in Caledonia St. about to enter Weeroona Ave." 1209.2 - "Nos 2 and 26 at Charing Cross." 1209.3 - "Swinging the pole on No. 19 at Golden Square Terminus." 1209.4 - "No. 7 inward bound from Golden Square stops at Fire Station Loop."tramways, trams, bendigo, charing cross, golden square, gas works, special trams, tram 2, tram 5, tram 6, tram 7, tram 19, tram 28 -
 Ballarat Tramway Museum
Photograph - Black and White photograph/s - mounted set of 2', John Phillips, late 1960's or early 1970's
Yields information about the vicinity of the Victoria St terminus and the bridge over the Buninyong Railway line.Black and White photograph mounted on heavy cardboard backing. Photo of Ballarat No. 31, just after leaving Victoria St. terminus, late 1960's or early 1970s crossing over the Eureka siding railway bridge. Taken by John Phillips. Tram has destination of Gardens via Sturt St. West, Twin Lakes advertisement on the front. In the background is Meagher's Hotel with Abbots Lager and Victoria Bitter sign. On the bridge is graffiti "Smash US Imperialism". On the Ballarat side of the bridge is a sign directing travellers to the "Eureka Caravan Park". Has 6 Velcro dots on rear and marks where mounting devices have been removed on the rear. Note image scanned in two runs through a scanner, resulting in the shading in the image file. .1 - Second copy with 4 black Velcro squares and 4 dots on rear - wider view on the right hand side with an additional pole - not scanned.trams, tramways, victoria st, eureka, twin lakes, tram 31 -
 Ballarat Tramway Museum
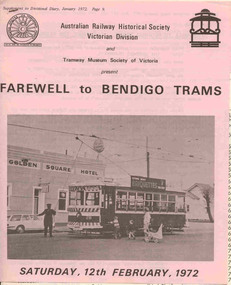
Ephemera - Tour Notes, Victorian Railways et al, "Farewell to Bendigo Trams", Jan. 1972
Set of 5 documents for the "Farewell to Bendigo Trams" tour conducted by the ARHS Vic Div and the TMSV, first scheduled for Sat. 12/2/1972, but delayed to Sat. 4/3/1972 due to SECV Power restrictions on the day. 3277.1 - documents 1 to 3 stapled in top left hand corner. 1. Tour circular, printed on pink paper with a photo of No. 28 at Golden Square terminus. Has logos of ARHS Vic Div and TMSV, part missing - used for booking. Gives details of the purpose of the tour, approx. times, refreshments, a booklet and fares. Organiser Victor Isaacs and Neil Morrow Booking Officer. Printed on foolscap paper in landscape format 2. Victorian Railways S Circular, or special train notice, S.224/72, single page giving train schedules, loads, motive power, carriage numbers and tickets. Signed by J.C. Crute as Chief Traffic Manager. Dated 19/1/1972. Printed on foolscap paper. 3. Ticket circular printed on quarto paper giving times of departure and arrival back, noting its express run to Melbourne. 3277.2 - documents 4 to 5, stapled in top left hand corner. 4. Set of two sheets, one printed on foolscap card paper, the other on foolscap paper, giving a graph of the tram workings, showing the special trams (tours A and B) overlain with the Saturday timetable. Dated 4/3/1972. 5. Victorian Railways S Circular, or special train notice, S.435/72, single page giving train schedules, loads, motive power, carriage numbers and tickets. Signed by J.C. Crute as Chief Traffic Manager. Dated 11/2/1972. Printed on foolscap paper. Noted that the special train of 12/2/1972 is cancelled "Due to SECV Restrictions". Has return train timetabled for 2 hours and five minutes. (Additional copies of item 4 - graph on one sheet only and item 5 - added 3/10/2007 - ex Graeme Breydon materials) 3277.3 - Welcome Aboard Circular - red foolscap paper, giving train time summary, photostops, arrangements in Bendigo, Bendigo line history and tram tours. Images of document added 27-08-12.arhs, special trains, bendigo, tmsv, timetables -
 Ballarat Tramway Museum
Book, Ballarat Litho & Printing Co, "The Picturesque Folio of Ballarat - 'The Modern Athens", 1904
Forty two page book with red covers, titled "The Picturesque Folio of Ballarat - 'The Modern Athens". Sheets have been individually printed both sides, stapled and then glued to the covers. Cover - gives title and printer details First sheet - with a greetings sheet for Good wishes and seasons greetings. Has a printed date of 1905. See Inscriptions. Dated 22/11/1904. Pages 3 - 10 - a historical sketch of Ballarat, compiled by Lieut-Colonel R. W. Williams V.D. Pages 12 - 41 - photos of Ballarat and district - such as: Sturt St The Lakes Post Office - note the trams clock board - taken at corner of Lydiard and Sturt Streets, looking east. The Gardens Queen Victoria Square Lydiard and Sturt St with a horse tram in the photo Victoria Park Eureka Monument The Statues Botanical Gardens Benevolent Asylum Hospital The City Oval - Richards & Co Photograph Fairy Land - the Lake Railway Station with a D class loco waiting for a signal, 3 post home before the level crossing. Has Irwin's Provincial hotel in view. Gong Gong Lake School of Mines and Methodist Church Lake Fountain A Ballarat view - 1853 - 54. View Point Gong Gong reservoir embankment South Star Mine Lal Lal Falls Band & Loch Mine On last page has the logo for the printers - Ballarat Litho & Printing Co, successors to F. W. Niven & Co. 56 and 58 Lydiard St. Ballarat. PDF scan of book added 21/9/2019 as btm3326i.pdfOn first page in black ink " to Chorus? Dodds, from Robert Dodds, and dated 22 Nov 1904.trams, tramways, ballarat, horse trams, sturt st, gardens, railway station, hospital -
 Ballarat Tramway Museum
Slide - 35mm slide/s, Bob Wilson, May. 1972
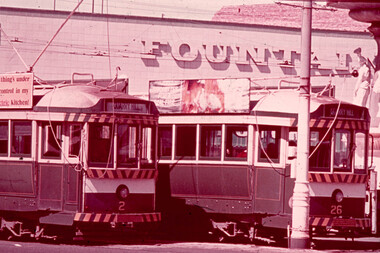
White cardboard mount, 35mm slide, from the Association of Railway Enthusiast's film strip titled "Provincial Tramway Film Strip" of Bendigo bogie tramcars Nos. 2 and 26 at Charing Cross, with the Fountain Plaza building in the background. Both trams have the destination of "Quarry Hill" No. 26 has the older type of destination roll and is fitted with a SEC Briquettes roof advertisement. The film strip notes (Reg. Item 2560), provided the following caption details: "The hub of the Bendigo system was at Charing Cross, where the "Quarry HILL" - "EAGLEHAWK "and "'GOLDEN SQUARE" - "NORTH BENDIGO" routes crossed at right angles. It was customary for trams for all four routes to meet at the CROSS. Here cars 2 & 26 (showing a wrong dest- -ination) meet by the fountain. -Mar '72 (Bob Wilson)" See image btm2580p.tif for high level scan of image. Stamped on base of slide "11789" and written in ink on top edge "No. 2 & 26 Charing Cross Bendigo"tramways, trams, are, film strip, charing cross, bendigo, tram 2, tram 26 -
 Ballarat Tramway Museum
Slide - 35mm slide/s, Ray Marsh, Sept. 1971
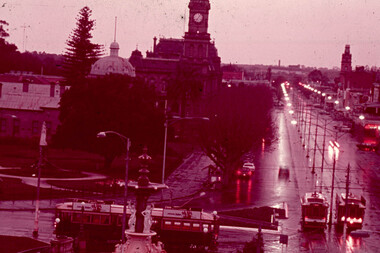
White cardboard mount, 35mm slide, from the Association of Railway Enthusiast's film strip titled "Provincial Tramway Film Strip" of the Charing Cross area on a rainy evening at sunset. Features three trams, Pall Mall and the Bendigo Post Office building. The film strip notes (Reg. Item 2560), provided the following caption details: "A rainy evening sees a pair of single truckers on "GOLDEN SQUARE" - "NORTH BENDIGO" line meeting an outbound "EAGLEHAWK" car at the Cross. Sept. '71 (Ray Marsh)" See image btm2581p.tif for high level scan of image. Stamped on base of slide "11790" and written in ink on top edge "Charing Cross Bendigo"tramways, trams, are, film strip, charing cross, bendigo, pall mall, night photo -
 Ballarat Tramway Museum
Slide - 35mm slide/s, Dave Macartney, Dec. 1968
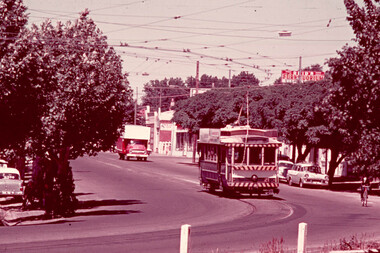
White cardboard mount, 35mm slide, from the Association of Railway Enthusiast's film strip titled "Provincial Tramway Film Strip" of Bendigo No. 21 in High St (Calder Highway), near Short St, outbound to Golden Square. Photo taken after the tram has passed the photographer. Has Reid's Furntuorium sign in the background. The film strip notes (Reg. Item 2560), provided the following caption details: "The "GOLDEN SQUARE" line followed the Calder Highway toward Melbourne for a couple of miles. Here, 21 is outbound not far from Charing Cross - Dec '68 (Dave Macartney)" See image btm2583p.tif for high level scan of image. Stamped on base of slide "11792" and written in ink on top edge "21 on Golden Square"tramways, trams, are, film strip, high st, golden square, tram 21 -
 Ballarat Tramway Museum
Slide - 35mm slide/s, Bob Wilson, Mar. 1972
White cardboard mount, 35mm slide, from the Association of Railway Enthusiast's film strip titled "Provincial Tramway Film Strip" of Bendigo No. 7 inbound in High St. Tram has the destination of North Bendigo and is entering the Fire Station Loop. Has Golden Square Uniting Church in background. The film strip notes (Reg. Item 2560), provided the following caption details: "Despite their age and decrepitude the provincial trams provided a useful service to the end. Here No. 7 inbound from "GOLDEN SQUARE" waits for a Mother and infant to board while a pair of juvenile eyes watch from the front window. Mar. '72 (Bob Wilson)" See image btm2584p.tif for high level scan of image. Stamped on base of slide "11793" and written in ink on top edge "No. 8 Golden Square line Bendigo"tramways, trams, are, film strip, high st, fire station loop, passengers, tram 7 -
 Ballarat Tramway Museum
Slide - 35mm slide/s, Graham Evans, Mar. 1972
White cardboard mount, 35mm slide, from the Association of Railway Enthusiast's film strip titled "Provincial Tramway Film Strip" of a crew member reversing the pole of Bendigo No. 19 at the Golden Square terminus with the Golden Square hotel in the background. The film strip notes (Reg. Item 2560), provided the following caption details: ""Swinging the pole" was a ritual performed every time a single trucker reversed direction. Here No. 19 is dealt with at "GOLDEN SQUARE" - Mar '72 (Graham Evans)" See image btm2585p.tif for high level scan of image. Stamped on base of slide "11794" and written in ink on top edge "No. 19 Golden Square Bendigo"tramways, trams, are, film strip, golden square, trolley poles, crews, tram 19 -
 Ballarat Tramway Museum
Photograph - Black & White Photograph/s - set of 32, Eldon Hogan, 4/06/1965 12:00:00 AM
Yields information about a 1924 Jelbart Engine manufacturing display in Sturt St and the street scene and peoples clothing at the time.Set of 32 black and white photographs of an Association of Railway Enthusiasts tour to Bendigo and trams 4/7/1965. The photos are not necessarily in photographic order. .1 - 30 on the Eaglehawk terminal track, beyond the normal terminus. .2 - 30 & 29 High St Eaglehawk. .3 - ditto with a poppet head in the background. .4 - 30 at one of the crossing loops .5 - 30 at Eaglehawk terminus extension .6 - ditto. .7 - ditto .8 - cleaning out the track .9 - showing the location of the track at Eaglehawk terminus and its extension .10 - cleaning out track .11 - a portable shed adjacent to the track .12 - A view of the two Birneys travelling in the empty country. .13 - ditto .14 - 19 and 18 at Golden Square .15 - Bendigo tram depot - creek crossing .16 - Scrubber at the depot .17 - 28 and 19 at the North Bendigo terminus .18 - 18 and 30 on the Golden Sq line .19 - 28 and 19 at the North Bendigo terminus .20 - ditto. .21 - 28 and 19 near the depot entry. .22 - 28 and 30 Pall Mall .23 - 28 at North Bendigo .24 - 17 and 19 and 6 at Quarry Hill .25 - 28 and 30 Mitchell St .26 - 19, 6 and 21 Quarry Hill .27 - 19 and 6 Quarry Hill .28 - 28 and 6 at the depot entry .29 - ditto .30 - 18 and 30, Golden Sq line .31 - 25 at depot .32 - 6 and 19 Charing Cross. Photographer Eldon Hogan. Printed on Kodak Paper .33 - roll of negatives of some of the above photos - stored in box 83 as well. trams, tramways, are, bendigo, eaglehawk, quarry hill, golden square, north bendigo, tram 30, tram 29, tram 28, tram 6, tram 19, tram 25, tram 17, tram 18 -
 Ballarat Tramway Museum
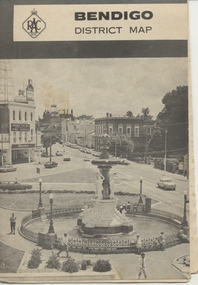
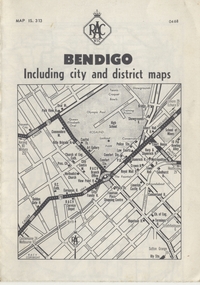
Map, Royal Automobile Club of Victoria, "Bendigo District Map - RACV", c1971
Printed street map titled "Bendigo District Map", published by the RACV, showing the central part of Bendigo, Bendigo Outlets, streets, principal attractions, Bendigo and district maps and information, and a list of sporting and entertainment facilities. Has the tram lines shown dotted, only shows the full extent of the Golden Square line. The main map has the number "0171" in the bottom left hand corner, indicating the publication date.in ink on the Bendigo Outlet map, "3/4" along bottom edge.trams, tramways, map, bendigo, racv, railways -
 Ballarat Tramway Museum
Map, Royal Automobile Club of Victoria, "Bendigo Including city and district maps - RACV", c1968
Printed street map titled "Bendigo Including city and district maps", published by the RACV, showing the central part of Bendigo on the front cover, Bendigo Outlets and notes on the city itself. Has the tram lines shown dotted, only shows the full extent of the Golden Square line. Inside has a district road map. The front cover has the number "0468" in the bottom left hand corner, indicating the publication date.in ink on the Bendigo Outlet map, has various notes showing the location of crossing loops on and off the map and the location of the tram depot itself.trams, tramways, map, bendigo, racv, railways -
 Ballarat Tramway Museum
Photograph - Digital image Set of 20
Set of 20 digital images of Bendigo Tramways, 1972 at or before closure while on a tram tour by Stuart Lodington. .1 - No. 28 and 5 at Eaglehawk terminus .2 - No. 28 leaving Charing Cross and travelling into View St with Armstrong Type Service building in background and Firestone Advertisements. .3 - No. 29 with Eaglehawk Town Hall and Post Office in background. .4 - No. 26 and 29 at start of double track, High St Eaglehawk .5 - No. 29 leaving Eaglehawk with shops in the background, Foodland, J. Bests .6 - No. 29 and 23 crossing Manchester Loop with Manchester Arms Hotel in the background and an old poppet head. .7 - No. 29 at ditto with poppet head in the background. .8 - No. 28 and two other trams at the Quarry Hill terminus. .9 - No. 29 in High St Bendigo with the Cathedral and Golden Gate Hotel in the background. .10 - No. 3 with destination Eaglehawk, in bound Carpenter St? .11 - No. 29 following a single trucker through a loop or the end of the double track near the depot. .12 - No. 23?, at Eaglehawk terminus, with Eaglehawk Town Hall in the background. .13 - Birney tram crossing the bridge at the Depot entrance - No. 29 .14 - No. 29 on the Eaglehawk line? .15 - as for .13 .16 - No. 29 entering the depot. .17 - No. 23, inbound from Eaglehawk, at Jobs Gully Loop with the railway overbridge in the background. .18 - No. 28 and two other trams (see also Reg Item 4982) for the same tram tour at Myrtle St. Loop. .19 - No. 21 with North Bendigo on the destination approaching the Golden Square terminus. .20 - No. 7 at Golden Square terminustrams, tramways, bendigo, eaglehawk, quarry hill, golden square, depot, tram 5, tram 29, tram 28, tram 26, tram 23, tram 7, tram 21 -
 Ballarat Tramway Museum
Photograph - Digital image Set of 20, 1971-72
Set of 20 digital images of Bendigo Tramways, 1972 at or before closure while on a tram tour by Stuart Lodington. .1 - No. 7 at Golden Square terminus .2 - ditto .3 - No. 26 in bound on the Eaglehawk line with a crossing loop behind. .4 - Birney crossing the bridge by the tram depot. .5 - No. 29 running a special on the Eaglehawk line with a HBA billboard in the background. .6 - No. 29 with a driver walking in front of the tram at the above location. .7 - No. 29 on the Eaglehawk line .8 - ditto waiting for a tram at Manchester Loop with poppet head in the background. .9 - No. 29 on the Eaglehawk line .10 - Eaglehawk Town Hall at night. .11 - No. 7 at the depot junction in McCrae St, with Golden Square destination. .12 - No. 29 with the Camp Hotel Eaglehawk in the background. Also a Newsagent with The Sun, The Bendigo Advertiser and The Age signs on the building, High St .13 - No. 29 Mt Korong Rd, with the railway overbridge in the background. .14 - interior photo of Birney tram roof .15 - interior view of controls of Birney at Eaglehawk .16 - No. 29 outbound at the Depot Junction McCrae St. .17 - No. 18 at the Eaglehawk terminus .18 - close up view of No. 29 front. .19 - No. 29 in Nolan St, crossing the bridge, outbound. .20 - No. 18 at the Eaglehawk terminus with the Eaglehawk Town Hall, Post Office in the background. Has a circus banner on the side.trams, tramways, bendigo, eaglehawk, quarry hill, golden square, depot, mccrae st, nolan st, tram 7, tram 26, tram 29, tram 18 -
 Ballarat Tramway Museum
Photograph - Black & White Photograph/s - set of 2, Wal Jack, 28/02/1962 12:00:00 AM
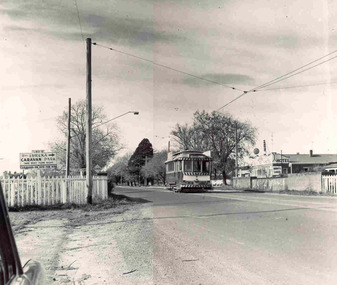
Yields information about Bendigo trams, the Golden Square route in the early 1960's prior to fitting dash canopy lighting.Black and white print of the Ballarat Scrubber tram, at the Bell Street loop, 28/2/1962, Photo by Wal Jack. Two copies. Photo print courtesy of Port Dock Railway Museum, now the National Railway Museum. See worksheet 4311 for letter and details of prints sent to Bill Scott, 19/10/2001. Any photo credit to mention NRM Collection. .1 - same photograph with Doug Colquhoun stamp on rear - see image i2..1 - On rear of copy 1"SEC Ballarat / Scrubber car /Bell St loop / 28/2/62 2125 / Wal Jack " In the top right hand corner "74)" .2 - On rear has Douglas Colquhoun stamp with photograph details - see image i2 trams, tramways, scrubber tram, bell st, tram scrubber -
 Ballarat Tramway Museum
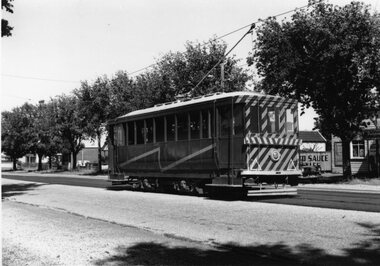
Photograph - Black & White Photograph/s, Doug Colquhoun, 25/04/1960 12:00:00 AM
Yields information about one of Geelong's trams.Black and white print of Bendigo No. 20, enroute to Golden Square. Photo by Doug Colquhoun 25/4/1960. Two copies. Trams has a front dash advertisement for Hutton's hams and roof advertisements for D. J. Osborn Plumbing Service and Bendigo Motor Co. Photo print courtesy of Port Dock Railway Museum, now the National Railway Museum. See worksheet 4311 for letter and details of prints sent to Bill Scott, 19/10/2001. Any photo credit to mention NRM Collection.On rear of copy 1"SEC Bendigo / 20 / Golden Square / 25/5/60 2121 / D A Colquhoun " Copy 2 "DAC" in ink, bottom right hand corner.trams, tramways, bendigo, golden square, tram 20 -
 Ballarat Tramway Museum
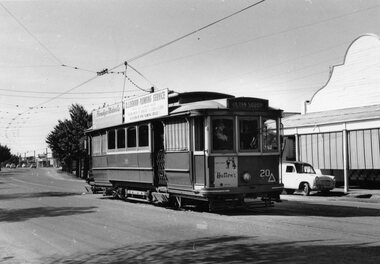
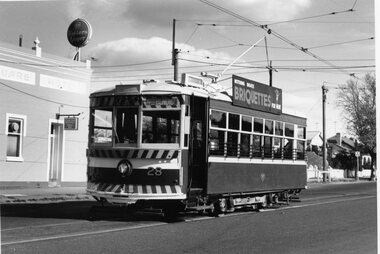
Photograph - Black & White Photograph/s, Doug Colquhoun, 16/05/1971 12:00:00 AM
Yields information about Bendigo's trams in the early 1970's and the Eaglehawk terminus.Black and white print of Bendigo 28 at the Golden Square terminus. Two copies. Photo by Doug Colquhoun, 16/5/1971. Trams has the destination of Nth Bendigo and roof advertisements for Briquettes. Also has the Golden Square hotel in the background. Photo print courtesy of Port Dock Railway Museum, now the National Railway Museum. See worksheet 4311 for letter and details of prints sent to Bill Scott, 19/10/2001. Any photo credit to mention NRM Collection.On rear of copy 1 "SEC Bendigo / 28 /Golden Square / 16/5/71 4187 / D.A. Colquhoun" . Copy 2 "DAC" in ink, bottom right hand corner.trams, tramways, golden square, tram 28 -
 Ballarat Tramway Museum
Slide - 35mm slide/s - set of 10, Campbell Duncan, Jan. 1971
Set of 10 Ferraniacolor slides - cardboard mounts taken on either 10/1/71 or 16/1/71. .1 - Birney No. 30, Golden Square line, inbound near Cathedral with car yard in background. .2 - ditto, with Cathedral gardens in background. .3 - single trucker, with two SEC roof adverts, entering Nolan St enroute to North Bendigo. Shows the driver sitting in a side on shot. A 4 square store in the background, with a fading advert for "Peeled Tomatoes". .4 - No. 6 turning from Nolan St into McCrae St with 4 square store in background. .5 - No. 26 at Quarry Hill with cemetery in background. .6 - No. 6 at the North Bendigo Terminus .7 - No. 26 outbound to Eaglehawk on the Railway Overbridge, Mt Korong Road. .8 - No. 17 (inbound to City and Quarry Hill) and another bogie crossing at a loop on the Eaglehawk line. Both trams have SEC roof adverts. The driver of the outbound car is boarding the tram. Based on .9, it is No. 3 at Long Gully. .9 - No. 3 waiting at Long Gully Loop . .10 - No. 26 at Quarry Hill terminus, with destination of Eaglehawk.In ink on slide: .1 - "1/2 mile out on Golden Square line - 10/1/71 (Sun)." .2 - "1/2 mile out on Golden Square line - 10/1/71" .3 - "Has just rounded curve near lake Weeroona on North Bendigo line - 10/1/71 (Sun)." .4 - "16/1/71" .5 - " 10/1/71 (Sun)." .6 - "North Bendigo terminus, 16/1/71 (Sat)" .7 - "10/1/71 (Sun) c 3pm" .8 - "Cross Eaglehawk line - 10/1/71 (Sun)." .9 - "Jackson St Loop on E'Hk line awaiting up - 10/1/71 " .10 - "Quarry Hill terminus Bendigo - - 10/1/71"tramways, trams, bendigo, golden square, high st, nolan st, north bendigo, quarry hill, long gully, railway bridge, tram 30, tram 6, tram 26, tram 17, tram 3 -
 Ballarat Tramway Museum
Slide - 35mm slide/s - set of 20, Eldon Hogan, 22/05/1971 12:00:00 AM
Set of 20 35mm Agfa colour blue and white plastic mount slide - featuring photos taken during an Association of Railway Enthusiasts Tour by Eldon Hogan. Folder had the date "22/5/1971" on it. Scanned on the Canon scanner at the depot 15/12/2005 at the time of the installation of the scanner. .1 - No. 25 in Nolan St with Lake Weeroona in the background. .2 - Three Birneys at the Depot junction, 30 and 29 with Conoles Hotel, McCrae St in the background. .3 - No. 5 in front of the Shamrock Hotel, Pall Mall .4 - No. 29 in front of the Shamrock Hotel with Stonemasons sign in the background. .5 - No. 18 ditto .6 - No. 30 and another Birney at the Quarry Hill terminus .7 - No. 24 southbound High St at the Violet St intersection with a "Mine Open" sign in the foreground and the Cathedral in the background. .8 - No. 19 at the Golden Square terminus, with the Golden Square Hotel in the background. .9 - No. 29 - side on view, North Bendigo line? Thunder St? .10 - No. 30 crossing the railway overbridge, inbound from Eaglehawk with a number of photographers in the foreground. .11 - No. 29? ditto .12 - No. 5 outbound - side on view, Thunder St, North Bendigo line? .13 - No. 29 and 30 at the intersection of High St and Brazier St with Church or School hall in the background. .14 - ditto .15 - ditto .16 - No. 25 and the two Birneys at the Eaglehawk terminus. .17 - No. 29 and two other trams at ditto .18 - No. 30 and 19 adjacent to the Lake View Hotel, McCrae St .19 - No. 5 and 25 crossing on the Eaglehawk Line, Ironbark? .20 - No. 29 at Quarry Hilltramways, trams, bendigo, lake weeroona, pall mall, golden square, eaglehawk, quarry hill, tram 25, tram 30, tram 29, tram 5, tram 18, tram 19, tram 24, tram 25 -
 Ballarat Tramway Museum
Slide - 35mm slide/s - set of 11, Eldon Hogan, mid 1960's to early 1970's
Set of 11 Agfa Plastic mounted slides - from the Eldon Hogan collection - possibly on an ARE Bendigo tours late 1960's or early 1970's with No. 18 Scanned on the Canon scanner at the depot 15/12/1971 at the time of the installation of the scanner. .1 - No 18 at Golden Square terminus with Billy Rodda's Golden Square Hotel in the background. .2 - ditto and the Victoria Bitter fence alongside the hotel. .3 - ditto and another single trucker. .4 - No. 18 at the Fire Station Loop, Golden Square line, with destination of Railway Station. .5 - No. 18 passing the Central Deborah mine, Violet St. Tram has a Briquette advertisement on the roof - the flaming briquettes. .6 - Another bogie tram at ditto. .7 - No. 18 and No. 6 crossing McCrae St loop near the depot junction? .8 - ditto .9 - No. 18 and a single trucker at the North Bendigo terminus. .10 - ditto .11 - with the single trucker leaving.tramways, trams, bendigo, golden square, central deborah, north bendigo, mccrae st, tram 18, tram 6 -
 Ballarat Tramway Museum
Slide - 35mm slide/s - set of 11, Eldon Hogan, mid 1960's to early 1970's
Set of 11 Agfa Plastic mounted slides - from the Eldon Hogan collection - featuring an ARE tour with Nos. 21, 29 and 25 to Bendigo, mid 1960's. Scanned on the Canon scanner at the depot 15/12/1971 at the time of the installation of the scanner. .1 - four trams at Charing Cross - includes 19 and 25. .2 - 21 and 25 at the depot junction. .3 - 21 and 29 Quarry Hill route? .4 - 29 ditto .5 - 24 at Golden Square terminus - photo taken from the city side - note all the little shops and buildings on the left hand side of the photograph. .6 - 29, 21 and 25 at Eaglehawk .7 - 29 - side on view - Eaglehawk line? .8 - ditto with 21 .9 - 29 - North Bendigo line? - side on view .10 - 29 and 21 - vacant paddocks - Eaglehawk line .11 - 29 crossing the railway overbridge, Eaglehawk line, in bound. Trams have SEC roof advertisements. tramways, trams, bendigo, eaglehawk, charing cross, golden square, tram 21, tram 29, tram 25, tram 19 -
 Otway Districts Historical Society
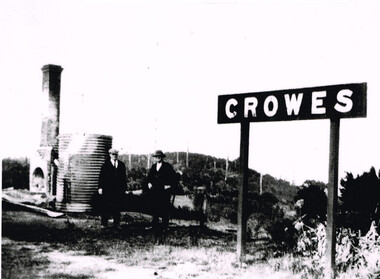
Photograph, Brucker, Crowes after the 1919 fires, 1919
The 1919 bushfire was the worst the area suffered. The fire struck on Saturday afternoon on the 15th February. It destroyed the station at Lavers Hill and Crowes, departmental residences at Lavers Hill and Weeaproinah, the overhead bridges at Beech Forest and Wimba, and damaged the track at various points along the line so that two locomotives became temporarily marooned at Beech Forest.. By the following Tuesday a daily fire relief train had begun operation. By the following Sunday a special train loaded with army tents travelled through to Lavers Hill and deposited most of its consignment there because little remained of this sizeable settlement. An outsider would have had difficulty in picking the place. The letters of the Lavers Hill station nameboard had been burnt although the metal letters survived, and one of the local wags had rearranged them to read "LIARS HELL". By the 1920s water trains were being used to help fight fires, a simple NQR open wagon loaded with the standard 1500 litre square iron water tank.B/W. Crowes station sign, the remains of a chimney, galvanised iron sheet and a water tank, and two men gazing at the camera. Note in the background the clear felling of the timber.crowes; lavers hill; beech forest; weeaproinah; wimba; railways; bushfire;