Showing 1146 items matching "west side"
-
 Bacchus Marsh & District Historical Society
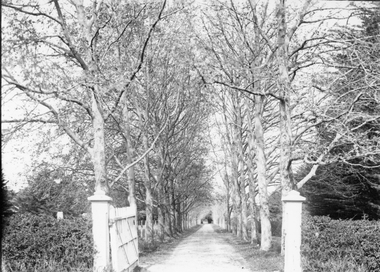
Photograph, Osage Orange Avenue Taverner Street Bacchus Marsh
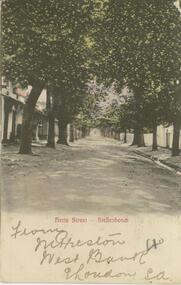
A.C. (Arthur Charles) Simon a pioneer orchardist in the Bacchus Marsh district planted this avenue of Osage orange trees in about 1883, creating an imposing entrance to his property from Taverner Street. Simon also believed that the trees on his orchard property would provide a protective shelter for his other plants. Osage orange trees (Maclura pomifera) are a small deciduous tree or large shrub, native to the south-central United States. It usually grows to about 8 to 15 metres high. The distinctive fruit, a multiple fruit that resembles an immature orange, is roughly spherical in shape, about 8 to 15 centimetres in diameter, and turns bright yellow-green in the autumn. A. C. Simon is believed to have imported the Osage orange seeds from America around the 1860s and later used them to plant the trees depicted in this image. The date of this image is not certain but it probably shows the trees around the 1900s or 1910s. The avenue of trees was known for many years in Bacchus Mars as 'Simons Avenue', and were featured in a Rose series postcard dating from around 1900-1920. The remnants of this avenue or grove of trees can be seen on some of the properties on the north side of Taverner Street Bacchus Marsh and along the Werribee River west of the FIsken Street bridge.The Bacchus Marsh Heritage Study of 1995 described the Osage Orange Tree avenue as being of regional historical significance as a landscaping practice, pioneering of its type, It was also described as of local significance as a well-known landmark due to it be being represented on widely distributed post cards which depicted scenes of Bacchus Marsh in the early part of the twentieth century. This early photographic image is evidence of this social and cultural significance.A black and white photograph print mounted on mounting board showing an avenue of Osage orange trees. trees, osage orange trees, simon family bacchus marsh, arthur charles simon 1833-1924, orchardists -
 Federation University Historical Collection
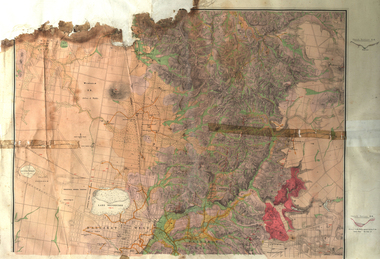
Map, Ballarat Goldfield, c1898
This map shows geological features, suggests the last basalt flow, and includes alotments and names of Mining Companies. Although this map has no date on it the Ballarat Industrial School is used for dating purposed. The Ballarat Industrial School ran from 1869-1879, but the term Ballarat Industrial School Reserve was still in use in 1898 and possibly beyond.Geological Map of Ballarat with 3 holes in the left hand side. The map indicates the position of Lake Wendouree, Township of Warrenheip, Ballarat East, Industrial School Reserve, Winters Swamp, Police Paddock, Wyndholm Premptive Right (Salton and Waldie), Black Hill, Vale Park Reserve, Pennyweight Hill, Little Bendigo, Black Swamp Lead, monte Christo Reef, Chinaman's Gully, Miners Rest, Pincotts Dam, Northumberland Gully. It also show the following goldmining companies: City of Ballarat, Kohinor, Hand and Band, Great North West, Northern Junction, Kneeshaw, Rossers Freehold, Silurial.ballarat, warrenheip, lake wendouree, ballarat east, winters swamp, winter swamp, wyndholm premptive right, cemetery, vale park reserve, little bendigo, kneeshaw co., industrial school reserve, kirks dam, pincotts dam, black hill, wombat hill, dead horse gully, miners rest, mt rowan, salton and waldie, rose hill co, great north west no 1, rose's freehold co, hand and band co, police reserve, police paddock, mount rowan, ballarat industrial school reserve, market reserve, winter's swamp, kneeshar co, monte cristo line of reef, chinaman's gully or black snake, milkmaid's gully, ballarat gold field, bakery hil lead, old gravel pits lead, golden point lead, eureka lead, miner's rest, yarrowee creek, leigh creek, black swamp lead, yorkshire reef, nil desperandum reef, cockatoo lead, hit or miss gully, herbert werner frederick de nully, pennyweight hill, esmond's lead, ash's lead, nightingale lead, john bull gully, gladstone reef, whitehorse reef, petticoat creek, pincott's dam, frenchman's gully, tim's crushing plant, jenkin's gully, california gully, drake's creek, sulton and waldie, ballarat undustrial school, ballarat & mariborough railway -
 Ballarat Tramway Museum
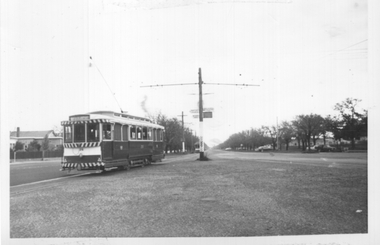
Photograph - Pleasant St - at Sturt St West, late 1960s
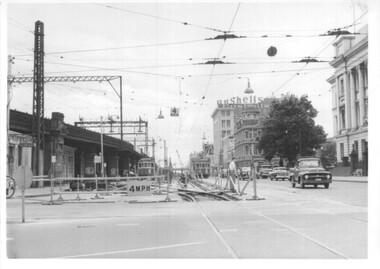
The two photographs show trams crossing at the intersection of Sturt St and Pleasant Street. The first photograph shows tram 26 waiting for the second tram (No. 18, carrying a side advertising banner) in Sturt St west while the second photograph shows them passing each other. Shows the area with a pole supporting two bracket arms at this area. The intersection is now a traffic light-controlled intersection. Photo late 1960s. Photographer unknown.Yields information about the intersection of Sturt St and Pleasant St and tram operations.Set of two black and white photographs plain back.trams, tramways, sturt st, sturt st west, pleasant st, tram 26, tram 18 -
 Ballarat Tramway Museum
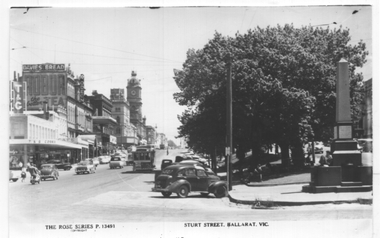
Postcard, Rose Stereograph Co, "Sturt Street, Ballarat", c1960
Postcard - titled "Sturt St Ballarat Vic" showing the view along the south side of Sturt St from Grenville St looking west. Has tram No. 12 in the view, part way fitted with dash canopy lighting - c1960. In the view are the 8-hour monument, the T&G building, the Mechanics Institute advertising Davies Bread and Robur Tea, the Odeon Theatre, the National Mutual building, and the Town Hall. Yields information the buildings, buildings and scene along Sturt St from Grenville St.Postcard printed by Kodak and a copy photograph of Rose Stereograph Co. postcard, No P 13491 with trimming marks along the top edge.ballarat, trams, tramways, sturt st, town hall, tram 12 -
 Warrnambool and District Historical Society Inc.
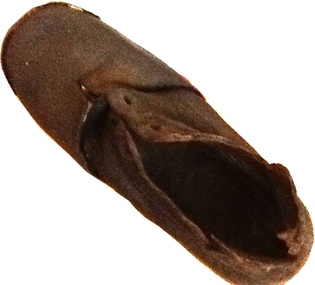
Footwear - Child's boot, 1940s
This small shoe (or boot) was found at Rosebrook, a small settlement between Warrnambool and Port Fairy, after the 1946 Western District floods. These floods are regarded as the worst in the history of European settlement in the Western District. At least five lives were lost, many small settlements and towns were isolated resulting in food shortages, onion and potato crops were ruined, 20 bridges were destroyed or damaged, roads were swept away, hundreds of farm animals perished and road and rail services were disrupted. The floods were the result of a very high rainfall in five successive days (658 points of rain in one 24 hours) and there was more flooding a week after the first major impact of the rains. A link to a major weather event in the South west.This is a small child’s brown shoe made of leather with a lace-up upper part (no laces) and a leather sole. The sides of the upper part of the shoe have broken away at the edges. As the shoe has been water-logged (it was found after the 1946 Western District floods) it has become hard and brittle. warrnambool, rosebrook western district floods, 1946, 1940's shoe -
 Flagstaff Hill Maritime Museum and Village
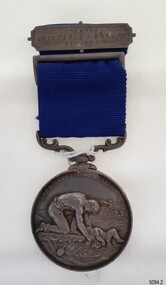
Award - Medal, ca. 1872
This medal is the Liverpool Shipwreck and Humane Society’s “Bramley-Moore medal for saving life at sea 1872”. The Society was formed in 1839. In 1872 Mr John Bramley-Moore donated £500 on condition that the medal have the specific inscription above on its reverse. The Bramley Morre medal was first awarded in 1874 and records show that since that time only one gold medal has been awarded, twenty-two silver medals and seventeen bronze medals, the last being in 1945. This Bromley-Moore medal was awarded to Peter Carmody for his bravery in saving lives on the Newfield shipwreck. The Newfield was a three-masted iron and steel barque, built in Dundee, Scotland, in 1889 by Alexander Stephen and Sons. It was owned by the Newfield Ship Company in 1890 and later that year It was registered in Liverpool to owners Brownells and Co. The Newfield left Sharpness, Scotland, on 28th May 1892 with a crew of 25 under the command of Captain George Scott and on 1st June left Liverpool. She was bound for Brisbane, Australia, with a cargo of 1850 tons of fine rock salt, the main export product of Sharpness. At about 9pm on 28th August 1892, in heavy weather, Captain Scott sighted, between heavy squalls, the Cape Otway light on the mainland of Victoria but, due to a navigational error (the ship’s chronometers were wrong), he assumed it to be the Cape Wickham light on King Island, some 40 miles south. He altered his course to the north, expecting to enter Bass Strait. The ship was now heading straight for the south west Victorian coast. At about 1:30am the Newfield ran aground on a reef about 100 yards from shore and one mile east of Curdie’s Inlet, Peterborough. The ship struck heavily three times before grounding on an inner shoal with 6 feet of water in the holds. Rough sea made the job of launching lifeboats very difficult. The first two lifeboats launched by the crew were smashed against the side of the ship and some men were crushed or swept away. The third lifeboat brought eight men to shore. It capsized when the crew tried to return it to the ship for further rescue The rescue was a difficult operation. The Port Campbell Rocket Crew arrived and fired four rocket lines, none of which connected with the ship. Peter Carmody, a local man, volunteered to swim about one mile off shore to the ship with a line to guide the fourth and final lifeboat safely to shore. He was assisted by James McKenzie and Gerard Irvine. Seventeen men survived the shipwreck but the captain and eight of his crew perished. The Newfield remained upright on the reef with sails set for a considerable time as the wind slowly ripped the canvas to shreds and the sea battered the hull to pieces. The Marine Board inquiry found the wreck was caused by a "one man style of navigation" and that the Captain had not heeded the advice of his crew. According to Jack Loney ‘… when the drama was over . . the Newfield was deserted except for the Captain’s dog and two pigs.’ Peter Carmody was awarded the Bramley-Moore medal by the Liverpool Shipwreck and Humane Society for Saving Life at Ssea, which he received by mail on January 21st 1893. The medal and a letter of congratulations were donated to Flagstaff Hill Maritime Museum by Peter Carmody’s grand-daughter Norma Bracken and her son Stuart Bracken on 25th May 2006. The Medal and Letter of Congratulations join other items in the Newfield collection.The Carmody Medal recognises the bravery of Peter Carmody in risking his life to rescue crew members of the Barque Newfield when it was wrecked near Curdies Inlet in August 1892. The ‘Bramley-Moore medal for saving life at sea, 1872’ was presented by the Liverpool Shipwreck and Humane Society. The medal and accompanying letter have local and international historic significance as they demonstrate both the difficulties associated with navigation and the dangers of shipping along the South West Coast of Victoria in the 19th century and the medal’s association with the Liverpool Shipwreck and Humane Society and John Bramley-Moore, who provided £500 to found the Bramley-Moore medal. The medal is socially significant. It emphasises the importance of Peter Carmody in rescuing victims of shipwrecks with little thought for his own safety. The medal reminds us of the importance of local people to Victoria’s maritime history. The Carmody Medal and Humane Society letter were in the Carmody family until they were presented to Flagstaff Hill Maritime Village, by the grand-daughter and great-grandson of Peter Carmody, on the 25th May 2006. The medal is significant for its complete provenance recorded in the donation documentation. The medal is in very good condition and relatively rare with only 22 silver medals awarded between 1874 and 1945. The Carmody Medal and letter add a human element to the story of the shipwrecks. They give life and significance to the Newfield, its victims and its artefacts. Bramley-Moore medal from the Liverpool Shipwreck and Humane Society, awarded to Peter Carmody. The round,silver medal is attached to a looped blue ribbon by a decorative, swivelling silver connector. The top of the ribbon has a silver pin bar threaded through it. The obverse of the medal has a design of a man kneeling on a floating part of a wreck. He is rescuing a child from the sea. There is a manned boat in the distance rescuing someone from the sea. In the far background there is a sailing ship. The top third of the medal has an inscription around it. The reverse shows a long-legged hen cormorant with extended wings holding an olive branch in its beak. The bird is surrounded by a wreath of oak leaves made from two branches. There is an inscription between the design and the rim that goes all the way around the circumference. There is a name engraved around the edge of the medal. The medal in embedded in a purple velvet panel that rests inside a brown, leather-covered case. The lid of the case has a gold embossed emblem in the cemtre. Both the lid and base have a rectangular gold border. The lid is attached to the base with two brass hinges. The base has a brass push-button catch. The box is lined with padded cream silk. The lining inside the lid has a gold emblem in the centre.The obverse has the words "LORD, SAVE US, WE PERISH". The reverse has the words "BRAMLEY-MOORE MEDAL FOR SAVING LIFE AT SEA" and "1872". Around the edge of the medal are the words "PETER CARMODY, FOR HAVING BEEN MAINLY INSTRUMENTAL IN RESCUING THE CREW OF THE BARQUE NEWFIELD, AUG 29 1892" The pin bar has the words “LIVERPOOL SHIPWRECK & HUMANE SOCIETY” written across it. The gold embossed emblem on the lid of the box has the words in the centre "SHIPWRECK AND …. …. ….FOUNDED 1839" The gold emblem on the cream silk lining has the words “BY APPOINTMENT ELKINGTON & CO” printed on it.medal, shipwrecked coast, flagstaff hill, flagstaff hill maritime museum, maritime museum, flagstaff hill maritime village, shipwreck coast, warrnambool, peter, peter carmody, carmody, bramley moore, newfield, liverpool shipwreck and humane society, 1892, 28 august 1892, august 1892, port campbell, bravery, shipwreck, rescue, nineteenth century, ship, curdie s river, victorian shipwrecks, barque, stuart bracken, norma bracken, gerard irvine, james mckenzie -
 Bendigo Historical Society Inc.
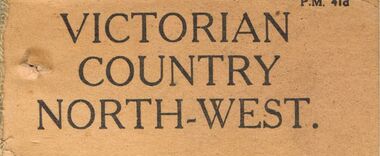
Memorabilia - AUSTRALIA POST AREA SORTING TICKETS:
BHS CollectionAustralia Post Area Sorting Tickets: A bunch (50)? Of Australian Post sorting tickets. Printed in black ink on pink paper is * Victorian Country North-West P.M. 41d*. Hole left side for attaching individual tickets to mail. Box 625government, federal, post office, australia post. north west country. -
 Lakes Entrance Historical Society
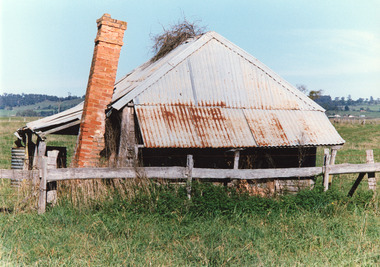
Photograph, 1994 c
Also second identical copyColour photograph of an iconic old building about a kilometre west of Bruthen, on the south side of the Bairnsdale / Bruthen Road, Victoriabuildings, local history -
 Bacchus Marsh & District Historical Society
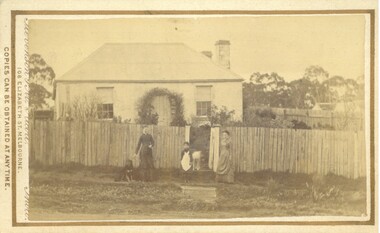
Photograph, Cottage Stamford Hill Bacchus Marsh 1883
Stamford Hill is on the western side of Bacchus Marsh. Main Street which runs in an East to West direction through the town runs directly up Stamford Hill. The precise location of the house or cottage in this image has not been identified and it appears to have been demolished. The identities of the two women and one girl in the picture are unknown.Small sepia unframed photograph on card with gold border framing photograph. Housed in the album, 'Photographs of Bacchus Marsh and District in 1883 by Stevenson and McNicoll'. The image shows a frontal view of a cottage. The cottage is behind a high timber fence but most of the cottage can be seen. Two young women are standing in front of the fence facing the camera. Standing between them is a young girl. A dog sits beside one of the women. Another dog stands in the gateway behind the girl.On the front: Stevenson & McNicoll. Photo. 108 Elizabeth St. Melbourne. COPIES CAN BE OBTAINED AT ANY TIME. On the back: LIGHT & TRUTH inscribed on a banner surmounted by a representation of the rising sun. Copies of this Portrait can be had at any time by sending the Name and Post Office Money Order or Stamps for the amount of order to STEVENSON & McNICOLL LATE BENSON & STEVENSON, Photographers. 108 Elizabeth Street, MELBOURNE stevenson and mcnicoll 1883 photographs of bacchus marsh and district, houses bacchus marsh -
 Ringwood and District Historical Society
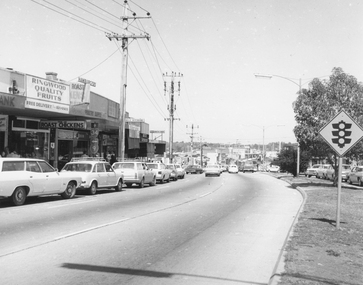
Photograph, Maroondah Highway Central, Ringwood. Shops on south side of road looking west, 1972
... Maroondah Highway Central, Ringwood. Shops on south side of... hall - looking west - 1972". Black and white photograph ...Black and white photographWritten on back of photograph: "Shops opposite old town hall - looking west - 1972". -
 Ballarat Tramway Museum
Album - Postcards & Photographs - Vic Solomons and others - Australian Tramways, Vic Solomons, 2023
Contains 184 images of postcards and photographs collected primarily by Vic Solomons of Sydney, with others from the collection of Wal Jack and Warren Doubleday. Covers almost all of Australia's tramway systems. 1 Post Card Hay St Perth Looking East No 3 Unknown Perth 2 Post Card Cars 30 & 90 both on Route 19 pass in Barrack St looking South Perth WA 1935.02.18 Perth 3 Post Card Hay St Looking East Perth WA Unknown Perth 4 Post Card William St Perth WA Unknown Perth 5 Post Card Perth from Shaftsbury Hotel Unknown Perth 6 Post Card Hay St Perth WA Looking East Unknown Perth 7 Post Card Barrack St Perth Unknown Perth 8 Post Card Murray Views No 3 High St Showing Town Hall Fremantle WA Unknown Fremantle 9 Post Card High St Fremantle WA Unknown Fremantle 10 Post Card View of Bolder City Golden Mile in the Background (Section No 1) 1908.08.20 Kalgoolie 11 Post Card Hannan St Kalgoolie 1900.08.19 Kalgoolie 12 Post Card Hannan St Kalgoolie WA (No 2) Unknown Kalgoolie 13 Post Card Intersection Hannan & Maritana Sts Kalgoolie WA Unknown Kalgoolie 14 Post Card Hannan St Kalgoolie Unknown Kalgoolie 15 Post Card Lane Street Bolder City Unknown Kalgoolie 16 Post Card Hobart Double Deck Tram Unknown Hobart 17 Post Card Macquarie St Hobart Unknown Hobart 18 Photo Liverpool Street Hobart Unknown Hobart 19 Photo Hobart 21 Unknown Hobart 20 Photo Hobart 14 in Elizabeth St Hobart Unknown Hobart 21 Post Card Macquarie St Hobart Unknown Hobart 22 Post Card Macquarie St Hobart Tas Unknown Hobart 23 Photo Double Decker Tram 3 at G.P.O. Hobart Tas No 31 Unknown Hobart 24 Post Card Double Decker Tram 19 Hobart Tas A B Series No 24 Unknown Hobart 25 Photo Hobart Municipal Tramways Tas No 95 Unknown Hobart 26 Post Card Elizabeth St Hobart Unknown Hobart 27 Post Card Elizabeth St Hobart Unknown Hobart 28 Post Card Elizabeth St Hobart Unknown Hobart 29 Post Card Elizabeth St Hobart Tas Unknown Hobart 30 Post Card HMT 21 with crew at Beach Road Terminus Unknown Hobart 31 Post Card HMT 9 & another with crew at Beach Road Terminus. Front cover photo of Destination GPO 1921.01.00 Hobart 32 Post Card Cascade Road and Mount Wellington Hobart Unknown Hobart 33 Post Card Elizabeth St Hobart Unknown Hobart 34 Post Card Elizabeth St Hobart Unknown Hobart 35 Post Card Elizabeth St Hobart 1915.04.07 Hobart 36 Post Card Macquarie St Hobart Tas Unknown Hobart 37 Post Card Macquarie St showing Post Office Hobart 1908.03.12 Hobart 38 Post Card Hobart Municipal Tramways 21 Unknown Hobart 39 Post Card Elizabeth St Hobart Tas Unknown Hobart 40 Post Card Liverpool Street Hobart Unknown Hobart 41 Post Card Electric Tram Launceston Tas 446 W J Little Photo 1919.02.08 Launbceston 42 Post Card Launceston Tram no 3 1911.08.30 Launbceston 43 Post Card Launceston Tram no 3 passes tram No 1 Unknown Launbceston 44 Post Card Tram 6 at Trevallyn a popular suburb Launceston Tasmania Unknown Launbceston 45 Post Card Tram 7 at Trevallyn Road Terminus Launceston Tasmania Unknown Launbceston 46 Post Card Tram 4 in Brisbane St Launceston Unknown Launbceston 47 Post Card Tram 9 in Brisbane St Launceston Tasmania Unknown Launbceston 48 Post Card Camerom Street Launceston Tasmania Unknown Launbceston 49 Post Card Murray Views No 15 Jetty Road Glenelg Terminus 1962-02-08 Adelaide 50 Post Card Bay Tram at Jetty Road Terminus Glenelg SA Unknown Adelaide 51 Post Card Tram 3 in King William Street Adelaide S Aust Unknown Adelaide 52 Post Card Valentine Series No 3065 The Old Horse Tram Victor Harbour Unknown Victor Harbour 53 Post Card Bourke Street Melbourne with Cable Car Looking East 1904.04.25 Melbourne 54 Post Card Opening of New Electric Tramway Elsternwick 1913-11-13 Melbourne 55 Post Card Cable trams in Clarendon St Sth Melb Unknown Melbourne 56 Post Card Pall Mall from Charing Cross Bendigo Unknown Bendigo 57 Post Card Tram 4 & 7 pass at The Fountain and Mitchell Street Bendigo Vic Rose Series P 3198 Unknown Bendigo 58 Post Card M&MTB 133 at Charing Cross bound for Eaglehawk Bendigo Vic Murray Views No 45 Unknown Bendigo 59 Post Card Pall Mall Bendigo Vic Unknown Bendigo 60 Post Card Charing Cross & Mitchell St Bendigo Trams passing 1919.00.00 Bendigo 61 Post Card Pall Mall Looking East Unknown Bendigo 62 Post Card Electric Trams and City Hotel Bendigo Vic Unknown Bendigo 63 Post Card Moorabool Street Geelong V 23 Unknown Geelong 64 Post Card Murray Views No 3 Moorabool Street Geelong Vic Unknown Geelong 65 Post Card The Rose Series P 2487 Ryrie Street Geelong Vic Unknown Geelong 66 Post Card Southern Cross Series 2696 Ryrie Stret Geelong Vic Unknown Geelong 67 Post Card The Rose Series P 1490 Ryrie Street Geelong Vic 1920-03-04 Geelong 68 Post Card Valentine Series No 1568 Lower Sturt Street Ballarat Unknown Ballarat 69 Post Card Rose Series P 1710 Sturt Street Ballarat Victoria Unknown Ballarat 70 Post Card Sturt Street Ballarat Victoria Unknown Ballarat 71 Post Card Horse Tram In Sturt Street Ballarat 1905.11.10 Ballarat 72 Post Card Sturt Street Ballarat Looking North-West Unknown Ballarat 73 Post Card Shoppes Square Sturt Street Ballarat Looking North Unknown Ballarat 74 Post Card Junction Sturt and Lydiard Streets Ballarat 1909-09-01 Ballarat 75 Post Card The Electric Supply Co Souvenir Tram Ticket No 3085of the opening of Electric System August 18 1905 1905.08.18 Ballarat 76 Post Card Sturt Street Ballarat Victoria 1907.11.25 Ballarat 77 Post Card Off to the Gardens Electric Tram Ballarat Unknown Ballarat 78 Post Card Sturt Street Ballarat 1907.04.16 Ballarat 79 Post Card Sturt Street Ballarat Looking East Electric tram with Double Deck Trailer 1911.04.17 Ballarat 80 Post Card Sturt Street Ballarat Looking East Unknown Ballarat 81 Post Card Sturt Street Ballarat Looking West 1911.03.01 Ballarat 82 Post Card Town Hall and Sturt Street Ballarat Unknown Ballarat 83 Post Card Lydiard Street Ballarat 1906.11.23 Ballarat 84 Post Card Looking North along Adelaide Street from George Street Brisbane Sidues Series No 764 Unknown Brisbane 85 Post Card Looking South along Queen Street from the Creek Street Intersection Brisbane Qld Sirues Series No 1379 Unknown Brisbane 86 Post Card George Street from near Supreme Court Brisbane Unknown Brisbane 87 Post Card Queen and Eagle Streets Brisbane 1907.07.04 Brisbane 88 Post Card Queen Street showing His Majesty’s Theatre Brisbane Unknown Brisbane 89 Post Card Queen Street Treasury Building 1908.01.20 Brisbane 90 Post Card G P O and Queen Street Brisbane Unknown Brisbane 91 Post Card Queen Street Brisbane Looking from Wharf Street Unknown Brisbane 92 Post Card Customs House Brisbane 1905.02.16 Brisbane 93 Post Card Queen St Brisbane 1905.09.16 Brisbane 94 Post Card Queen St Brisbane 1907.11.19 Brisbane 95 Post Card Treasury Buildings Brisbane Unknown Brisbane 96 Post Card Queen and Eagle Streets Brisbane Unknown Brisbane 97 Post Card The Valley Corner Brisbane Unknown Brisbane 98 Post Card Brisbane Queen Street opposite General Post Office Unknown Brisbane 99 Post Card North Quay and Milton Beach Brisbane Q Unknown Brisbane 100 Post Card Victoria Bridge Brisbane South Side 1907.08.14 Brisbane 101 Post Card Victoria Bridge Brisbane Unknown Brisbane 102 Post Card Breakfast Creek Bridge Brisbane Q Unknown Brisbane 103 Post Card Melbourne Street Station South Brisbane Queensland Unknown Brisbane 104 Post Card General Post Office Queen Street Brisbane 1955.09.23 Brisbane 105 Post Card Customs House Brisbane 1904.11.04 Brisbane 106 Post Card Queen St Brisbane 1919.11.00 Brisbane 107 Post Card Queen St Brisbane Sidues Series No 627 Unknown Brisbane 108 Post Card Creek Street Brisbane Queensland Unknown Brisbane 109 Post Card Customs House and Garden Reach Brisbane Queensland 1910.00.08 Brisbane 110 Post Card Queen and Creek Streets Brisbane 1909.06.07 Brisbane 111 Post Card Queensland National Bank andd Queen Street Brisbane Queensland Unknown Brisbane 112 Post Card Queen Street and Treasury Buildings Brisbane 0000.09.07 Brisbane 113 Post Card Queen Street showing “Courier” Buildings Brisbane Unknown Brisbane 114 Post Card Intersection George & Roma Streets Brisbane Q 1916.05.11 Brisbane 115 Post Card Adelaide Street Brisbane Q Unknown Brisbane 116 Post Card G P O Queen Street Brisbane Q Unknown Brisbane 117 Post Card Treasury Building Brisbane 1906.03-20 Brisbane 118 Post Card Queen and Eagle Streets Brisbane 1907.02.01 Brisbane 119 Post Card Queen St Brisbane Unknown Brisbane 120 Post Card Queen St Brisbane Q Unknown Brisbane 121 Post Card Victoria Bridge Brisbane 1906.07.30 Brisbane 122 Post Card An Unusual View showing Head of Queen Street Victoria Bridge & South SideSuburbs Brisbane Q Unknown Brisbane 123 Post Card Petries Bight Brisbane Q Unknown Brisbane 124 Post Card South End Victoria Bridge Brisbane Q Unknown Brisbane 125 Post Card Customs House Brisbane Unknown Brisbane 126 Post Card Photo of toastrack car circa 1910 Unknown Brisbane 127 Post Card Treasury Buildings Brisbane Unknown Brisbane 128 Post Card East Street Rockhampton with Steam Tram & trailer Unknown Rockhampton 129 Post Card Post Office Rockhampton with steam tram Unknown Rockhampton 130 Post Card East Street Rockhampton with Steam Trams Rose Series P 7154 Unknown Rockhampton 131 Post Card William Street Rockhampton Rose Series P 7156 Unknown Rockhampton 132 Post Card Central East Street Rockhampton Q with Steam Trams Unknown Rockhampton 133 Photo Sturt St Ballarat Unknown Ballarat 134 Photo Bridge Street Ballarat Unknown Ballarat 135 Post Card George St Sydney Unknown Sydney 136 Post Card Elizabeth St Sydney Unknown Sydney 137 Post Card Railway Square Unknown Sydney 138 Post Card Sydney Harbor Bridge - pending receipt 139 Post Card Kings Cross - Mowbray Series with description on rear from C Roy G Field Unknown Sydney 140 Post Card Kings Cross - Mowbray Series with description on rear from C Roy G Field Unknown Sydney 141 Post Card Central Railway Station Sydney - Rose Series P6033 1954-01-26 Sydney 142 Post card William Street Darlinghurst looking towards City - Rose Series P6602 unknown Sydney 143 Post Card Circular Quay Sydney - Rose Series P6680 Unknown Sydney 144 Post Card View at Manly NSW - Rose Series B1003 Unknown Sydney 145 Post Card Hunter St Newcastle NSW - Rose Series P7843 Unknown Newcastle 146 Post Card Bank Corner Newcastle NSW - Mowbray Series No. 155 Unknown Newcastle 147 Post Card Hunter St Newcastle NSW Unknown Newcastle 148 Post Card Criterion Hotel Hunter St Newcastle NSW Unknown Newcastle 149 Photo Horse tram at Newtown Station 1894 to 1898 - PTC photo c1894 Newtown 150 Photo Steam tram motor No 3 at Railway Square 1879 1879 Sydney 151 Photo Railway steam tram c1900 with a horse drawn double deck bus c1900 Sydney 152 Photo Steam motor 5A and doubled deck bus Unknown Sydney 153 Photo Steam motor 53A with detail notes on rear 1922 Sydney 154 Photo Cable tram set at Milsons Point ferry terminal c1900 Sydney 155 Photo Early Sydney electric car - Ocean St - Rose Bay Unknown Sydney 156 Photo George St looking souoth c1905 c1905 Sydney 157 Photo Tram 165 at Circular Quay Unknown Sydney 158 Photo Tramcar ferry or transporter at The Spit Unknown Sydney 159 Photo tram 882 George St at Marti Place, 1937 1937 Sydney 160 Photo Tram 826 Railway Sq area Unknown Sydney 161 Photo Railway Sq in background, Broadway with double decker bus and toastrack car late 1930s Sydney 162 Photo Coupled St Pitt St? - photo Ben Parle Feb. 1950 Sydney 163 Photo Electric tram No. 2 - North Sydney with side trolley pole running Unknown Sydney 164 Photo George St - Horden's Corner Unknown Sydney 165 Photo George St at Martin Place c1920 Sydney 166 Photo Castlereagh St Sydney c1928 c1928 Sydney 167 Photo Railway Sqare c1920 c1920 Sydney 168 Photo Darling St Countereweight Unknown Sydney 169 Photo Trolley bus depot Unknown Sydney 170 Photo Trolley bus No. 14 Unknown Sydney 171 Photo Newcastle Railway Station with steam tram - Wharf Road?? Unknown Newcastle 172 Photo High St West Maitland - steam tram Unknown Maitland 173 Photo High St West Maitland - steam tram Unknown Maitland 174 Post Card Argent St near tram terminal Broken Hill NSW c1900 Broken Hill 175 postcard Argent St looking south Broken Hill - with Ken Magor's notes on rear Unknown Broken Hill 176 Photo Toronto - steam tram 61A Unknown Toronto 177 Photo 124A trial run 1911? Sutherland - Cronulla line 1911 Sutherland 178 Photo 103A at a tram stop Unknown Sydney 179 Photo Cable tram set at Crows Nest terminus grip car 12, trailer 22 Unknown Sydney 180 Photo Cable tram Queens Square Sydney 1903 Sydney 181 Photo cars 2078 and 2077 Chatswood late 1950s Sydney 182 Photo car 1877 Balmain area late 1950s Sydney 183 Photo Trolley bus - Rockdale destination Late 1950s Sydney 184 Photo Broken Hill steam tram - motor 18A North Tram Unknown Broken Hill 185 Photo Millars Point Sydney NSW - ferry/tram interchange, unknown Sydney All items imaged including the rear or back where there was writing of information. All files stored on the Museum's Photo Collections directory. Demonstrates through the medium of many images, Australian tramway systems and Ballarat's place in them.Album - heavy card covers, plastic lined with postcard or 6x4 photo sleeves.australia, tramways, postcards, photographs, steam trams, horse trams, cable trams, trolley buses -
 Melbourne Tram Museum
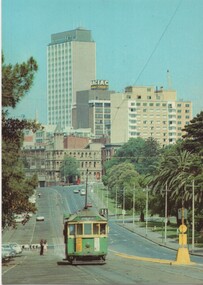
Postcard - National View, Nucolorvue Publishing, Wellington Parade Melbourne, early 1970's
One of a series of postcards published by National View by Murfett Publishers Australia. Has the details on the rear with place for a stamp, address etc, and logo. Shows W2 546 (Spencer St Route 38), possibly about to pick up passengers at the Jolimont Road Stop. At the time Wellington Parade was effectively a one-way street with extensive car parking on the south side. Shows a Safety Zone on the north side of the tram tracks. Has the CRA building, the hotel on the corner of Flinders and Spring St that was demolished for Shell House. See Reg Item 3555 for a later view by the same company.Yields information about the appearance of Wellington Parade, Jolimont, mid to late 1970's.Postcard - National View - plain edges, Wellington Parade looking west towards the CBD. Card No. P-1014-2w2 class, postcard, souvenir, wellington parade, route 38, tram 546, national view -
 Melbourne Tram Museum
Photograph - Yarra River from Flinders St Station clock tower, Town and Country Journal, 1909
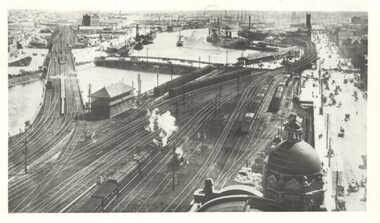
Photos show the Yarra river and the shipping turning basin that was used prior to the construction of the Spencer St bridge. In the view are are steam hauled suburban trains, Flinders St A signal box, Queensbridge, and the wharves on either side of the river. The viaduct was expanded to four tracks in 1915. Yields information about Yarra River, Flinders St railway station yards and shipping,Set of two photographs looking west from the Flinders St Station clocktower. over the Yarra River and station yards.On rear of both prints in ink: 1 – Melbourne - West from clock tower on Flinders St station - “Town and Country Journal 21/7/1909” Copy neg Mark Plummer collections ex late John Alfred collection. .2 - Melbourne, Looking west along Flinders St from clocktower of Flinders St station. Copy neg Mark Plummer collections ex late John Alfred collection. Has “T&C 20/12/09” in pencil on rear. bridges, flinders st station, yarra river, wharves, railways, signal boxes, queens bridge, shipping -
 Melbourne Tram Museum
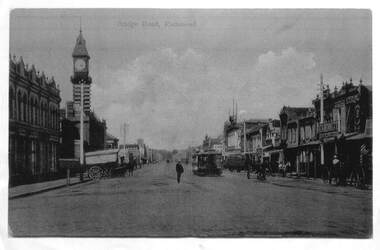
Photograph - Enlargement of a postcard, Bridge Road Richmond, c1900
The first image shows the shops on either side of Bridge Road with horse drawn carts and one cable tram. The second image from the Town Hall tower, shows two cable tram sets, the narrowing of the road. Has in the view Guddon & Selleck Auction House and Property Exchange also advertising Commercial Union Assurance Co. and George Stirling and Sons store.Yields information about Bridge Road, c1900Set of two A3 enlargements of postcards 1 - Looking east along Bridge Road from near Church St 2 - Bridge Road Richmond - from Town Hall looking westcable trams, tramways, richmond, bridge road, -
 Old Gippstown
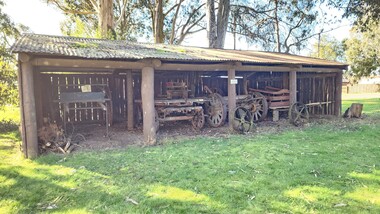
Building - Shed
Built at Old Gippstown from secondhand materials during the 1970sRectangular-shaped timber shed, with a corrugated iron roof. It has a back and two side walls, while the front is open for access.shed, old gippstown, west gippsland, gippsland, gippsland heritage park, goldfields, coal mine, victorian era, moe, historical village, bushy park, old gippstown heritage park, latrobe valley, farm shed, latrobe city council, gunaikurnai -
 Ballarat Tramway Museum
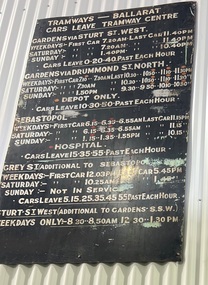
Sign - Timetable Board, State Electricity Commission of Victoria (SECV), 1940's?
Metal sheet- black background, painted with white lettering and coloured(orange and red) symbols, some scratches and white or light blue paintbrush out markings and dribbles- reverse is style of sign in item No.22. Gives times of first and last cars, the frequency for each route and Grey St. and Sturt West additional services. On reverse side has a more modern timetable, see item No. 22. ballarat trams, timetable boards, secv, street furniture -
 Bendigo Historical Society Inc.
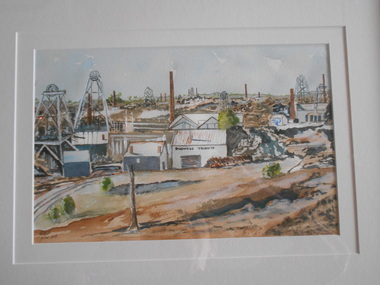
Painting - JOHN HALL COLLECTION: DEVONSHIRE GROUP OF MINES
... from LH side ' Duchess Tribute, West United Devonshire, Phoenix... on side of shed. Mine dam in immediate foreground in front of mine ...BHS CollectionWatercolour by John Hall. Gold frame, cream mount board. Painting shows a minescape with many poppet heads and chimneys in middleground. Mine building in foreground has 'Duchess Tribute' written on side of shed. Mine dam in immediate foreground in front of mine buildings. On back of frame, written on copy of image that painting was taken from: 'Devonshire Group of Mines, Snob's Hill and Mungo Mines in background. Written across bottom from LH side ' Duchess Tribute, West United Devonshire, Phoenix, Duchess of Edinburgh, United Devonshire, South Devonshire.'John Hall, Eaglehawkbendigo, mining, duchess tribute -
 Bendigo Historical Society Inc.
Photograph - MINING IN BENDIGO COLLECTION: MINING PHOTOGRAPHS
BHS CollectionFolded paper with copies of photos of mines and various mining buildings. On the front is a view from New Chum Hill, looking south in 1890's. Pictured is the Lazarus Crushing Plant and boiler house, Lansell's '222'. Amd the new Chum Mines in the background. On the inside at the top is the New Chum Railway, Golden Square. Pictured is the mine and its buildings, two chimneys, two large wood stacks and other mines in the background. On the left, a man is standing on the side of the railway line beside the mine. The next picture is the United Hustlers and Redan Mine, west of Comet Hill State School, Sandhurst Road. It shows the mine and its buildings, chimney, ore bins, mullock heap and tramway. The middle picture is the Central Deborah, Violet Street, near Bendigo Creek, Golden Square. It shows the poppet legs, buildings and some machinery behind the large building. The large building has eight ventilators in the roof. The buildings are made of corrugated iron. The bottom left picture is the Deborah Mine, Quarry Hill. The picture shows the poppet legs on the hilltop, the buildings beside it, a square chimney behind the poppet legs and some vegetation and a peppercorn tree in the foreground. The far building also has ventilators in the roof. The picture on the right is underground at 1000 feet level in the Deborah Mine. Pictured are three men with a rock drill. On the back, at the top is a picture of a First Motion Winding Engine at Deborah - later at Central Deborah. The picture shows the engine and driver. The middle picture is the South New Moon Mine, Eaglehawk - leading mine in State in 1903. The picture shows the poppet legs, buildings, chimney and a high tramway. In the foreground is a dam. The bottom picture is Victoria Hill looking south to New Chum Hill. In the foreground is Lansell's '180' Mine and Ballerstedt's Open Cut and in the background are the 'New Chum and Victoria', 'Old Chum' and the 'North Old Chum'.photo, mining in bendigo, mining photographs, lazarus crushing plant, lansell's 222, new chum mines, new chum railway, united hustlers and redan mine, comet hill state school, central deborah, deborah mine, first motion winding engine, south new moon mine, lansell's 180, ballerstedt's open cut, new chum and victoria, old chum, north old chum, square chimney -
 Melbourne Tram Museum
Photograph - Set of 12 - construction of King St overpass in Flinders St, 1959
Photos show the construction of King St overpass in Flinders St which was part of the project to construct a bridge over the Yarra River and provide a new southern outlet road between the city and eventually St Kilda Junction. The overpass construction was commenced in 1959 with tramway works first commencing. It was demolished in 2005. 1 - looking west at Market St. 2 - looking east from Spencer and Flinders St with the railway viaduct behind. 3 - Tram lines diverted onto the new overpass. Note the hand-powered overhead tower on the left behind the compressor. 4 - Tracks partially diverted. 5 - Looking east at Spencer and Flinders St with a Dunlop tyre truck in the view. 6 - prior to the diversion onto the new bridge. 7 - Looking east near William St. with W2 451 (Route 48, North Balwyn) in the view. 8 - Bridge works near King St. Original tracks still in use. 9 - Looking east prior to the introduction of the temporary tracks on the south side of the new overpass. 10 - SW6 852 and a W2 on new overpass trackwork - old trackwork being demolished. 11 - Cross over at Spencer St in Flinders St, prior to change over. 12 - Looking west at Flinders and Spencer St with SW6 853 turning into Spencer St.Yields information about the construction of the King St overpass in Flinders St during 1959.Set of 12 black and white prints of the construction of the King St overpass in Flinders St.trams, tramways, flinders st, king st overpass, construction, bridges, w2 class, sw6 class, tram 451, tram 853, tram 852 -
 Stawell Historical Society Inc
Photograph, “The Sycamores” Driveway entrance Gates
Entrance gates to “The Sycamores” Driveway. A show place on Concongella from mid 1860's. "The Sychmores" where William Osmand lived. Osmand's "Sycamores" was in a secluded block of the eastern side of the creek along which was planted pine and cypress trees. He built a comfortable house and line the carriage way with Sycamores. Osmand was on the of the men who made money in the Stawell reefs mines. "The Sycamores" has been owned by the West family since c 1920. Black & white photograph (2 copies) of an entrance gateway with an avenue of deciduous trees.concongella -
 Bendigo Historical Society Inc.
Document - Hustlers, Sheepshead and Deborah lines of reef
Albert Richardson was a mining historian who wrote widely on the mines of the Bendigo Goldfield. The park opposite the Goldmines Hotel in Marong Road, is named in his honour. Five page document, hand written by Albert Richardson on lined foolscap and edited with cross-outs and insertions, . The mines along the Hustlers line of reef and the Sheepshead line of reef are described. Mines listed on Hustlers line of reef: Fortuna Hustlers (1888 - 1913), shaft 2,240 feet at rear of Buckell and Jeffrey's offices; Royal Hustlers Reserve No. 2 - two shafts 'City" 860 feet, now covered by R.S.L. building Pall Mall, steel poppet legs 60 ft high and 'Park Shaft" at rear of Camp Hill School, 1,775 feet, steel poppet legs 60 feet high; Hustlers Hill Group first worked by Jonathan Harris in 1853 and bounded by Valentine, Anderson and Ironbark Creek to the north and Milroy Street to the east, one of first areas worked for quartz reefing. It with Garden Gully line west and Victoria Hill Ironbark, formed by far the richest cross section of the Bendigo Goldfield. Great Extended Hustlers (1865-1921) close to intersection of Anderson Street and Hustlers Road, mullock heap against road and shored up around shaft, steel poppet legs now at Wattle Gully mine, Chewton, large winding machine, air compressor south of shaft and 36 head crushing battery. Hustlers Reef (Old Hustlers) and Hustlers Reef No. 1, two shafts, main 2,210 feet, about 220 yards east of Moran Street and against Fenton Street. , No. 1 shaft 1,140 feet and about 155 yards east of Moran Street. Lansell's Comet, Lightining Hill line, 2.100 feet, on Comet Hill approx 70 yards west of Holmes Road, near Comet Creek, steel poppet legs. United Hustlers and Redan (1876-1918), main Redan, 1,830 feet about 155 yards west of Sandhurst Roead, in line with Comet Hill State School, this hill known as Redan Hill. North, or New Hustlers, once known as Agnew Hustlers, wooden poppet legs, south side, Kneebone Street, Eaglehawk. Derby line, Johnson's No. 3, South Johnson's (east shaft of Collman and Tacchi) 439 feet on west wide of Woods Street, south of Wetherall Street. Paddy's Gully Line, south to north, some shafts - Lansell's 'Sandhurst" ('Needle") Eaglehawk Road shaft 2,425 feet, about 50 yards east of Needle Loops, a brick square sided chimney with Cleopatra Needle top. British American, 789 feet, just south of Holdsworth Road. Collman and Tacchi, main shaft 2,588 feet, 60 yards west of Eaglehawk Road, California Gully. Deborah Line of Reef, The Deborah (1932-1954) shaft 2.017 feet, west of Adams Road and south of Abel Street, Quarry Hill. North Deborah (1937 - 1954) shaft 1,151 feet, Breen Street, Quarry Hill, steel poppet legs. Central Deborah (1939-1954) shaft 1,347 feet Sheepshead line of reef, Lansell's South Red, White and Blue, shaft 2,124 feet, north east of Bellevue Road and 220 yards east of Adams Road. The New Red, White and Blue Consolidated (Big Blue) main shaft 2,416 feet. Lansell's Bendigo Battery 105 head, north of 'Big Blue" on his freehold lease, commenced crushing on 24th February 1895. After closing was erected as the Showground's Industrial Hall, July 1926. North Red, White and Blue, burnt down February 1926, new company 1934, closed 1938. Document is part of the Albert Richardson Collection of Bendigo mining history. bendigo, gold mining, deborah line of reef, sheepshead line of reef, hustlers line of reef, royal hustlers reserve mine, hustlers hill group of mines, great extended hustlers, hustlers reef no. 1, lightning hill line, old comet, collman and tacchi, lansell's comet, north deborah, central deborah, dhrrpdhrsf linr og trrg, new red, white and blue consolidated mine, big blue, lansell's bendigo battery, north red, white and blue mine, albert richardson collection -
Port Melbourne Historical & Preservation Society
Photograph - Various photos related to John James GILCHRIST, John Gilcrist, 1940s - 1950s
From John Gilcrist via Janet Bolitho13 photos from John GILCHRIST showing his father, John James GILCHRIST, at Station Pier and Princes Pier, a view from the Shrine of Remembrance, Centenary Bridge, and his father and mother, Eileen Mary GILCHRIST at their home at 16 McCormack Street Port Melbourne .01 - Princes Pier, Taroona, Port Hobart .02 - View from Shrine overlooking Albert Park Lake .03 - Between piers .04 - Princes Pier at night .05 - From Station Pier West finger pier .06 - House at 16 McCormack Street. (No. 12 McCormack Street also shown) .07 - Centenary Bridge1949-50 .08 - Outside 16 McCormack Street, showing Singer car. (Nos. 22, 24 & 26 McCormack Street also shown) .09 - John and Eileen Gilcrist in backyard .10 - South side of house at 16 McCormack Street .11 - South side of house at 16 McCormack Street .12 - Photo of Edwards Park .13 - East side of house at 16 McCormack Street Refer also to hand drawn plan of house and outbuildings at catalogue no. 2763piers and wharves - station pier, piers and wharves - princes pier, built environment, transport - roads, mccormack street, john gilchrist, john james gilchrist, mary eileen gilchrist -
 Lakes Entrance Historical Society
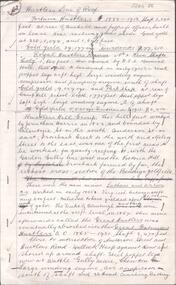
Photograph - The Entrance, 1924c
Black and white photograph showing view from Jemmys Point of the entrance, with wooden piers, PWD houses and works buildings at New Works. West end of Bullock Island on left side of photo, bathing boxes and some trees on island, some rock groyne work at the entrance. Lakes Entrance Victoriapiers, islands, houses -
 Lakes Entrance Historical Society
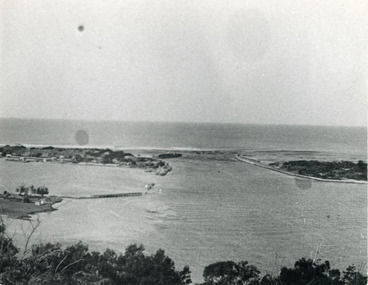
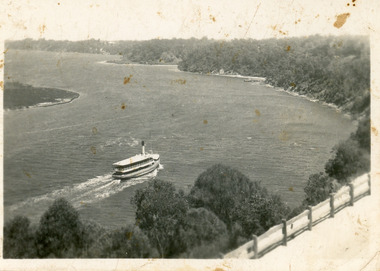
Photograph - S.S. Gippsland, 1920c
Black and white photograph showing S S Gippsland in Reeves Channel, sailing west towards Metung, taken from Jemmys Point and showing Snake Island and end of Rigby Island and hummocks on far side of Hopetoun Channel in background. Lakes Entrance Victoria waterways, ships and shipping -
 Lakes Entrance Historical Society
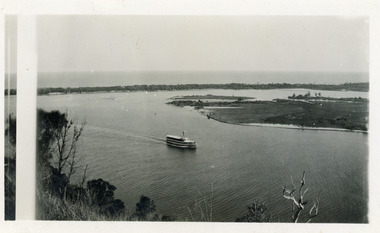
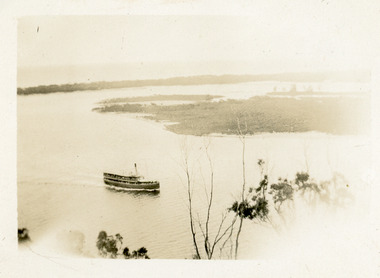
Photograph - S.S. Gippsland, 1920c
Black and white photograph showing S S Gippsland in Reeves Channel, sailing west towards Metung, taken from Jemmys Point and showing Snake Island and end of Rigby Island and hummocks on far side of Hopetoun Channel in background. Lakes Entrance Victoria waterways, ships and shipping -
 Lakes Entrance Historical Society
Photograph - S.S. Gippsland, 1920c
Black and white photograph showing S S Gippsland in Reeves Channel, sailing west towards Metung, taken from Jemmys Point and showing Snake Island and end of Rigby Island and hummocks on far side of Hopetoun Channel in background. Lakes Entrance Victoria waterways, ships and shipping, islands -
 Warrnambool and District Historical Society Inc.
Booklet - Booklet Collection: City of Warrnambool Tourist Guides, Collett, Bain and Gaspar, Warrnambool
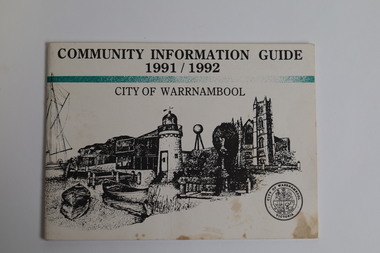
This is a collection of sixteen tourist guides dating from the mid 1970's to 2013. These contain listings of businesses, accommodation, eateries and events in Warrnambool and district. They also include maps of Warrnambool and surrounds, advertising and photographs of various attractions. While mainly covering Warrnambool a small number of the guides cover the South West Region. These directories have mainly been published by the Warrnambool City Council and are a selection of the types of information provided to visitors at the Tourist information centre during this time period.These tourist guides give snapshots of the City of Warrnambool for the years covered and will be useful for research.[.1] An 8 page paper booklet with black printing and a black & white photo of the pond at the Botanical Gardens on the front cover. [.2] two photocopied A4 black and white pages from the book "On the Trail" K Winser 1956 (Main Roads of Australia) [.3] A trifold colour brochure with a stylised map of the coast on the yellow and blue front cover. The inside has stylised colour drawings on Warrnambool attractions. The rear cover has coloured photographs of bush, Liebig Street and Fletcher Jones gardens [.4] A trifold black and white brochure with a black line drawing of a whale on the front cover. [.5] A trifold white card with mauve printing. The front cover has a line drawing of the former Timor Street post office and a map of businesses and landmarks in Timor Street. The reverse side contains a brief history of Warrnambool. [.6] A 98 page stapled booklet with a foreword by Vanda Savill. There are 4 pages of coloured photographs. The remainder are black and white photographs. The front cover is purple with white writing in the lower third. There is an outline of the coast and five colour photographs of district attractions. The inside middle page has a map of the Western wonderland region. The content covers towns in this area. Content relating to Warrnambool is in the last six pages. [.7] Twelve loose photocopied black and white pages. The front cover has the Warrnambool Premier Town 1988-1991 logo and a photo of a Southern Right Whale and calf. The bottom right hand corner has a Standard Warrnambool logo. [.8] 44 page booklet printed with blue ink. The staples have been removed. The glossy front cover has blue printing with a coloured photo of Flagstaff Hill Maritime Village pond. The centre pages has a fold out map of the City of Warrnambool. The rear cover has photos of The Twelve Apostles and Hopkins Falls. [.9] 4 loose photocopied pages with Warrnambool Library and Corangamite Regional Library Service Warrnambool City Library black ink stamps. The front page line drawing illustrations of Warrnambool attractions [.10] A single sheet of glossy white paper folded in half to make four pages. The front page has a Warrnambool premier town logo 1979-1982 and blue printing and a visitor survey. [.11] A conference pack of light card folded to make a pocket containing three brochures, a shipwreck coast tourist directory and a Australian Heritage Parks Association conference program dated 24 to 27 May 1992. The front cover of the pack has green writing over a stylised upward arrow. There is a City of Warrnambool logo in the top right hand corner and two film strips diagonally across the cover containing photographs of Warrnambool. The rear cover has a coloured Warrnambool Premier Town logo. [.12] A 63 page stapled booklet with coloured photographs of Warrnambool. The front cover has black writing on white background. There is a coloured photograph of Flagstaff Hill in the middle of the cover and a Warrnambool City and Visit Victoria logos on the lower edge. The middle pages has a coloured of the city of Warrnambool with an inset map of Allansford. [.13] A single large sheet of white paper folded in ten to make a brochure. The front cover has black printing. The rear cover has a purple ink stamp for the City of Warrnambool Tourist Information Centre. When folded out the reverse side has a green, grey and white map of the South West Region of Victoria. [.14] A 48 page colour booklet on glossy paper. The front cover has white writing on a blue background and includes photographs of the Twelve Apostles, the Promenade walk, Flagstaff Hill and a southern right whale's tail. The rear cover has photographs of The Twelve apostles, a passenger train from Melbourne passing the Lake Pertobe playground, and a rural scene. There is white writing and a white Warrnambool City logo on a blue background. The centre pages have a stylised green and blue map of the city of Warrnambool. [.15] A 48 page colour booklet on glossy paper. The front cover has white writing over colour photographs of two people at a lookout, Flagstaff Hill, three southern right whales and a child at the Lake Pertobe playground. The lower edge has blue upper case writing on a white background. The rear cover has a colour photograph of the Twelve Apostles. The lower white border on the rear covers has a a blue and green City of Warrnambool logo and blue writing. The centre pages have a stylised green and blue map of the city of Warrnambool. [.16] A 64 page colour booklet on glossy paper. The front cover has black writing on a black background and there is a photograph of a southern right whale's tail. The lower edge has the Warrnambool City and Visit Victoria Logos. The centre pages have maps of Warrnambool and surrounds. [.1] This week in Warrnambool Vol 2 No. 5 Thurs 1st Feb. For the time of your life [.2] Warrnambool Way [.3] Warrnambool The Holiday Host on the South West Coast with compliments City of Warrnambool and Warrnambool Chamber of Commerce [.4] MMI Insurance presents Whales Giants of the Deep Whale Watcher's Logbook Warrnambool [.5] Warrnambool History began in Timor Street [.6] Western Wonderland Tourist Association [.7] A Premier Arrow Tour of Warrnambool Victoria's Premier Town Australia's Southern Right Whale Nursery [.8] Warrnambool The Heart of Victoria's Great Southwest Visitor's Handbook [.9] What to see in Warrnambool Victoria's Premier City 1979-1982 [.10] Win a Free Holiday & $200 Cash in Victoria's Premier Town [.11] Advancing Warrnambool together! [.12] Great Ocean Road Warrnambool Official Visitor Guide [.13] Tourist guide to the South West Region Victoria All it needs is you [.14] Warrnambool visitor guide 2005 the great ocean road experience attractions accommodation entertainment dining [.15] Warrnambool Visitor Guide 2006 the great ocean road experience Attractions Accommodation Entertainment Dining [.16] Official Visitors' Guide Warrnambool Victoria Australia Discover the Great Ocean Road warrnambool, warrnambool tourist guides -
 Bendigo Historical Society Inc.
Photograph - MATCHETT'S CORNER
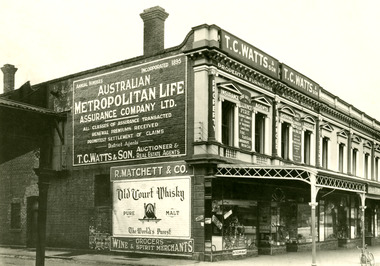
John Matchett was born in Corbrackey, Ireland in 1828. His Wholesale and Family Grocers started in 1857. It was on the Corner of Hargreaves and Edward Streets, Bendigo. It was known as the BELFAST STORES, HARGREAVES-STREET WEST SANDHURST. After his death in1903, Robert Matchett carried on the Grocery and Produce Business.Black and white photograph on grey board. Row of brick 2 storey shops with verandas over footpath. Windows on second story have columns each side and curved and painted pediments over. On back of photograph is written: Matchett's Corner at Bath Lane end of City Club Hotel. Block of buildings at Charing Cross. Demolished - replaced by Fountain Plaza block. In image, many advertisements. On F BR 'Frank A Jeffrey Photo - Bendigo'. Circular stamp 'Royal Historical Society of Victoria - Bendigo Branch'. In image 'TC Watts and Son' , 'Property and Furniture Auction Rooms', Australian - Metropolitan Life Assurance Company Ltd', R Matchett and Co - Grocers - Wine and Spirit Merchants', 'Old Court Whisky'. Pin hole in each corner, brown stain (spilled liquid) on image.Frank A Jeffreybendigo matchetts, john mattchett -
 Bendigo Historical Society Inc.
Postcard - Alice McGregor Postcard Collection, 1900 - 1920
Alice McGREGOR Born: 1908; unknown parents. Possibly adopted by the Salter family? Electoral Roll 1936: Highland Terrace Kangaroo Flat. Alice Mary Salter and William Robert Salter living together; presumed to be sister and brother. William Robert Salter was killed in a MVA in Bendigo in 1937 aged 26. In Victoria in 1938, Alice Mary Salter married James Thomas McGregor (born Victoria 1917, died Victoria 1983, buried Fawkner Cemetery) Lived: 1968; 22 Wade Street Golden Square Alice McGregor Died: 1999 aged 91 at Anne Caudle Centre, Bendigo Buried: Kangaroo Flat Cemetery See additional research. Postcard Album of Alice McGregor contained 86 post cards.Postcard Album of Alice McGregor containing 86 post cards. See 1400 Colour photo of Herte Street, Stellenbosch, South Africa. Tree lined avenue with houses either side. Addressed to Miss A. Stapleton, Arcade, Bendigo, Victoria, Australia Sender - M. Preston, West Bank, East London, S.A. Stamp date Sept. 28, 1905 postcard, collector, alice mcgregor -
 Ballarat Tramway Museum
Photograph - Tram 34 - Bakery Hill, Ken Winney, 12/1949
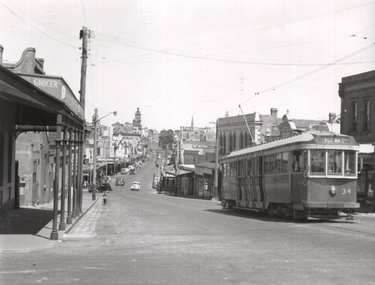
Photograph shows SEC Ballarat tram No. 34 climbing Bakery Hill in Victoria St. The photo is taken at Humpffray St looking west. There is a Grocer on the left hand side of the photo. Photo by I K Winney of Sydney, 12/1949.Yields information about the view looking west along Victoria St from Humpffray St during 1949.Black and white photograph with photographers details on rear."Bogie No. 34 (ex MMTB C class) en route to Victoria St. Ballarat city area in background. 12/1949, I K Winneytramcars, tram 34, victoria st, bakery hill