Showing 3301 items matching "finals."
-
 Flagstaff Hill Maritime Museum and Village
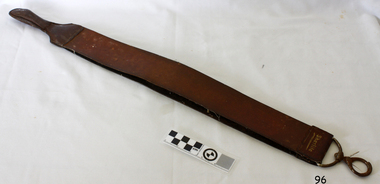
Domestic object - Razor Strop, circa 1922
A razor strop such as this one was used to sharpen and polish straight-edged razors. This particular design has a swivel hook with a locking clip that allows for movement as the strop is being used. This strop is branded "Sherlite". On May 5th, 1922 the Commonwealth officially accepted and advertised the Trade Mark Application of Thomas Sherry of Victoria, for the Trade Mark of "Sherlite" to be used under the heading of "Leather, Skins unwrought and Wrought”. Thomas Sherry’s application was to use the word “Sherlite” for detachable soles made of rubberised leather. Straight razors and cut-throat razors were the major tools for shaving before the safety razor was invented in the 1880s and even today specialist shaving shops still sell straight razors. Along with the razor, the process of shaving would commonly involve lathering up shaving soap with a shaving brush that had boar bristles. Men could own several razors and rotate them through the week and some shops sold the razors in a set, a razor for each day of the week. Straight razors could require stropping more than once during the shaving of a heavy beard, and stropping would also be performed at the end of each shave. Honing would only be performed two or three times a year, preserving the blade's edge. A lot of skill was needed to hone and strop the blades of these early razors and the methods to do so were a large part of the curriculum in Barber colleges. The razor would be sharpened on a grinding wheel then honed on sharpening stone and finally finished using a strop. Straight edge razors would usually be sold unfinished and that process would be completed by the customer. A razor strop, usually made from leather, thick canvas, or light timber, would be used to straighten and polish the straight razor for shaving. Strops could also be used to polish other blades such as knives, small metal tools, and chisels. Sometimes an abrasive polishing compound is also used to give a mirror finish. Some strops, such as this one in our Collection, are designed to be used while hanging from a nail or peg, while others are handheld. The person using the strop would draw the spine of the blade down along the strop with the blade following, without putting any pressure on the blade. At the end of the stroke, rotate the blade over its spine then draw the spine along the strop again so that the edge moves away from the top. The finer grade of leather strap is used to give the final finish.Razor strop, leather, and metal. Sherlite brand, double straps: two straps of different grade leather joined at ends with metal fittings. Stropping faces; sharpening surface is stained red and finishing surface is stained black. One end has a padded, bulbous-shaped leather grip handle, the other end has a metal, swivel hook hanger. Inscriptions painted in gold on leather at the hook end.Razor strop, leather and metal. Sherlite brand, double straps: two straps of different grade leather joined at ends with metal fittings. Stropping faces; sharpening surface is stained red and finishing surface is stained black. One end has padded, bulbous shaped leather grip handle, the other end has metal, swivel hook hanger. Inscriptions printed in gold on leather at hook end.Printed gold lettering stamped “Sherlite”flagstaff hill, warrnambool, shipwrecked coast, flagstaff hill maritime museum, maritime museum, shipwreck coast, flagstaff hill maritime village, great ocean road, shaving leather, shaving accessory, barber’s equipment, barber shop razor strop, razor strop, straight razor, razor and knife sharpener, sherlite razor strop, personal effects, toiletries, thomas sherry -
 Flagstaff Hill Maritime Museum and Village
Photograph, post 1889
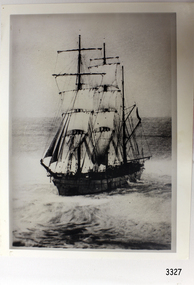
The photograph shows the three-masted iron and steel bark "Newfield" sailing in open seas. It event would have been between 1889-1892 during the ship's working life. ABOUT THE NEWFIELD The Newfield was a three-masted iron and steel barque, built in Dundee, Scotland, in 1889 by Alexander Stephen and Sons. It was owned by the Newfield Ship Company in 1890 and later that year It was registered in Liverpool to owners Brownells and Co. The Newfield left Sharpness, Scotland, on 28th May 1892 with a crew of 25 under the command of Captain George Scott and on 1st June left Liverpool. She was bound for Brisbane, Australia, with a cargo of 1850 tons of fine rock salt, the main export product of Sharpness. At about 9pm on 28th August 1892, in heavy weather, Captain Scott sighted, between heavy squalls, the Cape Otway light on the mainland of Victoria but, due to a navigational error (the ship’s chronometers were wrong), he assumed it to be the Cape Wickham light on King Island, some 40 miles south. He altered his course to the north, expecting to enter Bass Strait. The ship was now heading straight for the south west Victorian coast and at about 1:30am ran aground on a reef about 100 yards from shore and one mile east of Curdie’s Inlet, Peterborough. The ship struck heavily three times before grounding on an inner shoal with 6 feet of water in the holds. Rough sea made the job of launching lifeboats very difficult. The first two lifeboats launched by the crew were smashed against the side of the ship and some men were crushed or swept away. The third lifeboat brought eight men to shore. It capsized when the crew tried to return it to the ship for further rescue The Port Campbell rocket crew arrived and fired four rocket lines, none of which connected with the ship. A local man, Peter Carmody, volunteered to swim one mile to the ship with a line to guide the fourth and final lifeboat safely to shore. Seventeen men survived the shipwreck but the captain and eight of his crew perished. One of the men, apprentice William McLeod, was rescued by local woman Margaret E. MacKenzie. The Newfield remained upright on the reef with sails set for a considerable time as the wind slowly ripped the canvas to shreds and the sea battered the hull to pieces. The Marine Board inquiry found the wreck was caused by a "one man style of navigation" and that the Captain had not heeded the advice of his crew. According to Jack Loney ‘… when the drama was over . . the Newfield was deserted except for the Captain’s dog and two pigs.’ Flagstaff Hill Maritime Museum has several artefacts that have been salvaged from the wreck. The report from SHP documented the following in regards to the Newfield collection: Flagstaff Hill’s collection of artefacts from the Newfield is of historical and archaeological significance at a State level, because of its association with the shipwreck, which is on the Victorian Heritage Register. The collection is significant because of its relationship between the objects. The Newfield collection is archaeologically significant as it is the remains of an international cargo ship. The Newfield collection is historically significant for representing aspects of Victoria’s shipping history and its potential to interpret sub-theme 1.5 (Living with natural processes). The collection is also historically significant for its association with the shipwreck. Black and white photograph of the three-masted sailing ship “Newfield” in the open sea, sails unfurled. The ship was built in 1859 by Alexander Stephen and Sons Limited of Dundee, Scotland. flagstaff hill, warrnambool, shipwrecked-coast, flagstaff-hill, flagstaff-hill-maritime-museum, maritime-museum, shipwreck-coast, flagstaff-hill-maritime-village, barque newfield, photograph, 1880s sailing ship -
 Flagstaff Hill Maritime Museum and Village
Photograph - Ship Crew, 1889-1892
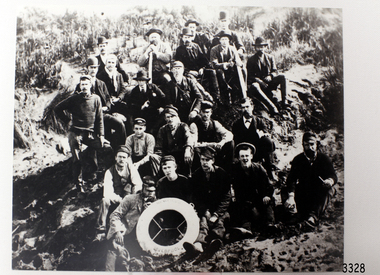
This black and white photograph shows the crew of the barque Newfield. They are pictured seated on a grassy slope and rock, a lifebuoy from the Newfield, Liverpool, resting on the men in the front row. The men are formally dressed, some with bowler hats, a bow tie and pipe, rather than in their sailing uniforms. ABOUT THE NEWFIELD The Newfield left Sharpness, Scotland, on 28th May 1892 with a crew of 25 under the command of Captain George Scott and on 1st June left Liverpool. She was bound for Brisbane, Australia, with a cargo of 1850 tons of fine rock salt, the main export product of Sharpness. At about 9pm on 28th August 1892, in heavy weather, Captain Scott sighted, between heavy squalls, the Cape Otway light on the mainland of Victoria but, due to a navigational error (the ship’s chronometers were wrong), he assumed it to be the Cape Wickham light on King Island, some 40 miles south. He altered his course to the north, expecting to enter Bass Strait. The ship was now heading straight for the south west Victorian coast. At about 1:30am the Newfield ran aground on a reef about 100 yards from shore and one mile east of Curdie’s Inlet, Peterborough. The ship struck heavily three times before grounding on an inner shoal with 6 feet of water in the holds. Rough sea made the job of launching lifeboats very difficult. The first two lifeboats launched by the crew were smashed against the side of the ship and some men were crushed or swept away. The third lifeboat brought eight men to shore. It capsized when the crew tried to return it to the ship for further rescue The rescue was a difficult operation. The Port Campbell Rocket Crew arrived and fired four rocket lines, none of which connected with the ship. Peter Carmody, a local man, volunteered to swim about one mile off shore to the ship with a line to guide the fourth and final lifeboat safely to shore. He was assisted by James McKenzie and Gerard Irvine. Seventeen men survived the shipwreck but the captain and eight of his crew perished. The Newfield remained upright on the reef with sails set for a considerable time as the wind slowly ripped the canvas to shreds and the sea battered the hull to pieces. The Marine Board inquiry found the wreck was caused by a "one man style of navigation" and that the Captain had not heeded the advice of his crew. According to Jack Loney ‘… when the drama was over . . the Newfield was deserted except for the Captain’s dog and two pigs.’ Peter Carmody was awarded the Bramley Moore medal by the Liverpool Shipwreck and Humane Society for Saving Life at Ssea, which he received by mail on January 21st 1893. Flagstaff Hill’s collection of artefacts from the Newfield is significant for its association with the shipwreck Newfield, which is listed on the Victorian Heritage Registry. The collection is significant because of the relationship between the objects. The Newfield collection is archaeologically significant as the remains of an international cargo ship. The Newfield collection is historically significant for representing aspects of Victoria’s shipping history and its association with the shipwreck. The Letter accompanying the Medal for Bravery awarded to Peter Carmody is significant because the attempt to save lives is associated with the shipwreck Newfield. Black and white photograph of the crew of the sailing ship “Newfield”. The men in formal dress are seated on rocky slope with the ship’s lifebuoy showing the name “NEWFIELD, LIVERPOOL”. Photograph taken 1889-1892 flagstaff hill, warrnambool, shipwrecked-coast, flagstaff-hill, flagstaff-hill-maritime-museum, maritime-museum, shipwreck-coast, flagstaff-hill-maritime-village, newfield, photograph, crew of the newfield, 19th century sailing ship, peterborough, cape otway, medal for bravery -
 City of Moorabbin Historical Society (Operating the Box Cottage Museum)
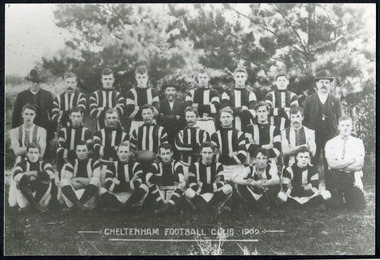
Photographs, x 3 Black & White Cheltenham Football Club 1909,1913, 1946, 20thC
Known as the Rosellas, the early Cheltenham Football Club sides began playing on a regular basis in 1890, and would travel long distances by steam train to play country teams, such as Ballarat where they would arrive at their destination, play the match, socialize then return to the station. Opposition players and supporters would give three hearty cheers on their departure. The Cheltenham home games were played on a paddock on the corner of Park and Charman roads in Cheltenham. In 1907 the Cheltenham progress committee made an application to the board of land works for land in Weatherall Road for recreational service to the public. That application was received and granted, then developed where Cheltenham Recreational Reserve now stands. The land in the early days was virgin bush and the response for voluntary help to clear the area was outstanding. Nearly all the market gardeners in the district along with horses, ploughs, axes, shovels completely cleared the area in three weeks. The Moorabbin council then leveled the playing area and erected a post and rail fence around the ground. Pine tree shrubs were then planted on the west side of the ground. The ground was opened in 1909 and the first Cheltenham side entered in the newly formed Federal Football Association along with seven other foundation members, Mordialloc, Mentone, Moorabbin, Frankston, Glenhuntly, Elsternwick, and Ellindale. The grand final for that year, 1909 was a hard encounter between Cheltenham and Ellindale with Cheltenham coming out victors, thus becoming the inaugural Federal Football Association premiers. Cheltenham went onto win five senior premierships in the Federal Football Association by the end of the 1920s, they won the flags in 1909, 1911, 1913, 1922 and 1925, with the late Percy Woff playing in all 5 premiership sides and was captain in 1922. 1928 saw the start of an outstanding career from our oldest living player Tom Connor. Cheltenham continued to win premierships in the 1920’s and 1930’s with juniors taking out the 1929 and 1933 flags, under the guidance of Woff, and that continued in 1934 when Cheltenham took out the 1st XVIII and 2nd XVIII premierships. Cheltenham produced its only Brownlow medallist in Peter Box who played in the late 1940s, before going to Footscray where he became a champion. The 3rd XVIII went through the season undefeated in 1974 winning the premiership, with Trevor Barker a key player before going to St Kilda the following year. The club won three senior premierships under coach Barry White in 1992, 1993 and 1995. ( from CFNC website 2019) Cheltenham Football Club was formed 1890 and succeeded in winning many Premierships as a member of the Federal Football Association, Outstanding players Peter Box Brownlow Medalist 1956 Footscay VFL, , Trevor Barker and Kevin Roberts St Kilda VFL.3x Black & White photographs of the players in the Australian Rules Cheltenham Football Club 1909, 1913 and 1946 extra photo of Peter Box Folio 10 MAV 01059a) CHELTENHAM FOOTBALL CLUB 1909 Cheltenham Football Club 1909. Back row: A Chandler, committee member; R. Robertson, back-pocket; J. Harris, half back flank; J Adams, ruck and forward-pocked; M. J. Monk, club president; L. Woff, back-pocket; W. Adams, ruck and back-pocket; P. Woff, rover and forward-pocket; A Monk, committee member. Middle row: W. Hore, back pocket and ruck; A. Towns, half-forward flank; W. Carson, full back; F. Andrews, captain-half forward flank; H. Butler, centre half back; J. Warburton, centre half-forward; A. Slater, half-back flank; F. Fisher, half-forward flank; C. Sherwood, trainer. Front Row: G Gouldthorpe, wing; H. King, full-forward; W. Johnston, ruck and forward-pocket; P Spears, rover and forward-pocket; F. Bichl, wing; A. Bichl. rover and forward-pocket; F. Butler, centre player. Courtesy, Lionel Seal. ( from CFC website 2019) b) CHELTENHAM 1913 PREMIERS c) CHELTENHAM -1946 / Back row - J. Fisher, G.Corrigan, N.Hocking, F.Virtue, R.Craven, L.Baker, M.Blundell / 2nd Row - J.Phillips, T.Connor, E.Hawkins, A.Blakely, G.Baker, A.Dark, J.Barker, D.Craven, J.Pickering, P.Cameron,/ W.Hicks, G.Hoskings, R.Beihl, A.Hubbard, R.Kier, C.Russell. / Front Row - Clark Taylor, J.Slade, N.Niel, J.Brooks, T,Butler, H.Hosking, C.Hacusler, E.Hornibrook, W.Briggs, B.Russell, L.Biehl, / W Ripponcheltenham football club, australian rules football, victorian football association, victorian football league, smith j l; smith mary ann, stanley helen, , chaff cutter, horse drawn carts, toll gates brighton, motor cars 1900, steam engines, early settlers, bentleigh, parish of moorabbin, city of moorabbin, county of bourke, moorabbin roads board, shire of moorabbin, henry dendy's special survey 1841, were j.b.; bent thomas, o'shannassy john, king richard, charman stephen, highett william, ormond francis, maynard dennis, market gardeners, vineyards, orchards, cheltenham, two acre village, holloway josiah,, woff percy, connor tom, box peter, barker trevor, white barry, browlow charles, -
 Victorian Interpretive Projects Inc.
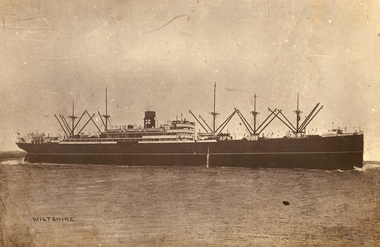
Photograph - Digital, Troopship Wiltshire, 1918, c1918
The HMAT A18 Wiltshire (1912-1922) weighed 10,390 tons with an average cruise speed of 13.5 knots or 25.00 kmph. Described as a refrigerated steamship it was b uilt 1912 by John Brown, Clydebank for the Federal S N Co Ltd, London and was propelled by a twin screw, quadruple expansion engine 2 x 4 cylinders each 6500 hp. Owned by the Commonwealth & Dominion Line Ltd, London, it was leased by the Commonwealth until 2 October 1917. It embarked from Egypt on 2 February 1918. On 18 October 1914 at Melbourne embarked the 4th Light Horse Regiment (Victoria) A, B & C squadron & their Machine Gun Section, the 2nd Field Ambulance (Victoria) First Division. The disembarked the 4th Light Horse Regiment in Egypt on 10 December 1914. On 01 November 1914 The Wiltshire assembled with the first convoy at King George's Sound, Albany Western Australia in transporting the first detachment of the Australian and New Zealand Imperial Expeditionary Forces. It completed nine transport voyages from Australia commencing 18 October 1914 until final voyage from Sydney 9th November 1918. During that time The Wiltshire carried the 4th Field Artillery Brigade (Victoria) 2nd Division Artillery and their 1st Reinforcements, 1st Division Ammunition Column 1st Division Artillery 4th Reinforcements, thirty-four Infantry Battalion Reinforcements, the 10th, 11th & 12th Field Artillery Battery (Victoria) 4th Field Artillery Brigades, the 4th Brigade Ammunition Column 4th Field Artillery Brigade, the 1st Siege Artillery Brigade 15th Reinforcements, the 4th Light Horse Regiment (Victoria) A, B & C squadron & their Machine Gun Section, six Light Horse Brigade Reinforcements, the 1st Veterinary Section (New South Wales) 11th Reinforcements, the 1st Mobile Veterinary Section (New South Wales) 1st Division 11th Reinforcements, the 2nd Mobile Veterinary Section (Victoria, New South Wales) 2nd Division 11th Reinforcements, the 1st Cyclist Battalion (New South Wales and Queensland) 3rd Reinforcements, the 2nd Field Ambulance (Victoria) First Division & Medical Officers. After the conclusion of World War One is was wrecked Rosalie Bay, Great Barrier Island New Zealand 31 May 1922 on passage London for Dunedin. Onboard was a crew of 103 plus 1 stowaway, and 10,000 ton of general cargo. No lives lost and is now a well frequented 'Dive' wrecksite. (http://www.flotilla-australia.com/hmat.htm#A18)Photographic postcard of the troopship Wiltshire out at sea.world war one, world war, wiltshire, troop ship, mmm -
 Federation University Art Collection
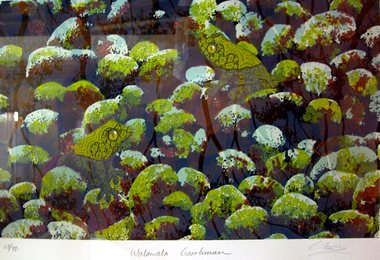
Work on paper - Printmaking - Silkscreen, Lin Onus, 'Walawala Garrkman' by Lin Onus, 2001
Lin ONUS (1948-1996) Language: Wiradjuri / Yorta Yorta Lin Onus played a pivotal role in the recognition of Aboriginal art as an expression of a contemporary and dynamic living culture. Prior to his premature death at just 47 years of age he was a prominent, strident, yet non-confrontational agent in renegotiating the history of colonial and Aboriginal Australia. His father, Bill Onus, was the founder of the Aboriginal Advancement League in Victoria and a prominent maker of artefacts in Melbourne. As a young Koori growing up, Lin lived in a cultural environment that included exposure to visiting Aboriginal artists, including Albert Namatjira. He began his artistic life assisting his father in decorating artifacts, went on to develop skills working with metal and painting with air brush as a panel beater; and by 1974 he was painting watercolors and photo-realist landscapes. In the 1970's he completed a set of paintings on the first Aboriginal guerrilla fighter Mosquito, which holds pride of place on the walls of the Advancement League in Melbourne, to this day. Lin Onus was a largely self-taught artist. Particularly important in his development was his visits to Garmedi (Arnhem Land) starting in 1986. Jack Wunuwun, the Yolngu artist, introduced him into the Murrungun-Djinang clan and gave him permission to use some of traditional images in his paintings. His cultural education on the Aboriginal side was also provided by visits to Cummeragunja with his father, and stories told by his uncle Aaron Briggs, known as 'the old man of the forest' who gave him his Koori name - Burrinja, meaning 'star'. They would sit on the banks of the Murray River within view of the Barmah Forest, Lin's spiritual home, the subject of many of his later paintings and his final resting place. Lin's father had been of the Yorta Yorta people from the Barmah Forest country, and Lin also used images from this area in his paintings. The images in his works include haunting photorealist portrayals of the Barmah red gum forests of his father's ancestral country, and the use of rarrk cross-hatching-based based painting style that he learned (and was given permission to use when in Arnhemland). His painting Barmah Forest won Canberra's national Aboriginal Heritage Award in 1994. (http://www.cooeeart.com.au/aboriginal_artist/lin_onus/A, accessed 18 May 2015) This item is part of the Federation University Art Collection. The Art Collection features over 1000 works and was listed as a 'Ballarat Treasure' in 2007.Framed limited edition silkscreen.Signed 'Onus' lower right (posthumously by Tiriki Onus) Edition 68/80art, artwork, lin onus, onus, printmaking, screenprint, aboriginal, dreaming, frogs, available -
 Melton City Libraries
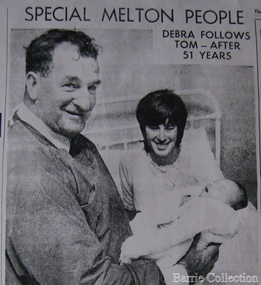
Newspaper, Special Melton People, 1971
"Hannah ‘Grannie’ Wattsis one of Melton’s mostcelebrated and cherished pioneers. Born in Ireland in 1831, Hannah immigrated to Australia with her husband George Byrns in 1854. Moving to Melton, they built a wattle and daub hut home where they lived with their four children until George was tragically killed in 1860. Unusually for the time, Hannah purchased land in her own name in the Melton township in 1863. Later that same year she married William Watts and together they moved to Toolern Vale and built a bluestone and mud brick home. It is believed that while travelling to Australia, Hannah assisted the ship surgeon and demonstrated a natural aptitude for the tasks assigned to her. When she was living in Melton she assisted other women in an unofficial capacity as neighbourhood midwife, while also working on her farm and raising her six children. By 1887, however, her reputation as a midwife had grown to such an extent that she was able to establish her own practice. William Watts died in 1874, but Hannah remained in Toolern Vale for the next twenty years. In 1894, she moved into the Melton township and built Lynch Cottage on the corner of Yuille and Sherwin streets, near Toolern Vale Creek. There she assisted in the births of hundreds of Melton residents, as well as the laying out of the deceased. Meticulous in her record keeping, Hannah Watts recorded the details of a total of 442 births between the years 1886 and 1921. Lynch Cottage was officially registered as a private hospital in 1911 and Hannah was listed in the Victorian Register of Midwives in 1917. Hannah Watts died on 21 October 1921, a few months after she assisted with the delivery of her final baby, Thomas Watts Minns. She was 90 years old. Hannah was buried in Melton Cemetery and mourned by the Melton community. Her obituary in the Gisborne Gazette is a testament to how beloved she was by the people she served: ... while in the absence of medical aid residents looked to Grannie as their doctor, philosopher and friend. Hundreds, in fact we might say thousands of people held the deceased in veneration ... A woman of great energy and determination combined with superior intelligence, Grannie conquered difficulties that would have made many falter... Today Grannie Watts is remembered by her descendants and by many locals in the City of Melton. Created in 1985, Hannah Watts Park honours Grannie Watts’ pioneering work for the health and wellbeing of hundreds of Meltonians. Not only is the park a fitting tribute to the memory of an outstanding citizen, it also continues to provide today’s residents and visitors with a space to walk, relax, gather and celebrate in Melton" .Tom Minns holding Debra Wain, first hospital baby to be born In Melton since 1921. Article featured in the Herald. Mother Rhonda Wain is featured in the photo too. local identities, local significant events -
 Flagstaff Hill Maritime Museum and Village
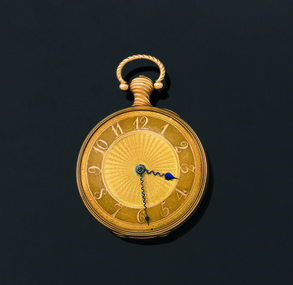
Instrument - Fob watch, 1814
Watchmaker History: James McCabe was born in 1748. He was the son of Patrick McCabe, a notable watchmaker from Lurgan in County Armagh, Ireland. James McCabe immigrated to London in 1775 and established his business in Bells Building, Fleet Street, on 2nd April 1781. He was made an Honorary Freeman of the Clockmakers Company. The House of McCabe was renowned for the sheer variety of its designs, and the creativity and prestige of its manufacture were celebrated and revered by owners worldwide. These pieces remain highly collectable today and fetch increasingly higher prices at auction houses worldwide. Watch association with the Loch Ard: The watch was saved from the sea when discovered on the body of Mrs Rebecca Carmichael from Dublin and handed to Eva Carmichael, the only family member to survive the fatal wreck of the Loch Ard on 1st June 1878. Eva gifted the watch to her husband, Thomas Achilles Townsend when they married in 1884; his name is engraved on the rear movement cover. The watch was held by the family until 2011 when they decided to bring the watch, to Australia for auction. At this time the watch was in the possession of Eva Carmichael's grandson, Robert Townsend. Given its connection with the Loch Ard shipwreck, it was purchased at auction by Flagstaff Hill Maritime Village on 25th October 2011 to add to its Loch Ard collection and is currently referred to as the Carmichael watch. It is now on display alongside the Minton Peacock, which also survived the Loch Ard shipwreck, and other artefacts from the collection. James McCabe was originally a Belfast watchmaker who had moved his business to London. At the time James McCabe was much esteemed for producing fine watches and clocks, especially for export to India. Only the best watches were inscribed “James McCabe” and many with highly decorated cases were intended for the Indian market. Contemporary newspaper accounts of the watch's discovery echoed a Carmichael family tradition that the watch had been intended as a gift from the City of Dublin to King George IV to mark his planned visit to the city in 1821, however, there is no evidence to support this theory. Dr Evory Carmichael, according to some accounts, bought this watch from a nobleman for about £100 at some point and so it travelled with him on his final fateful journey to Australia. Today we can only guess at the actions of Mrs Carmichael in the chaos and darkness of the pre-dawn shipwreck. Perhaps the two items that were found on her body, the watch and a locket, were items that reminded her of those she held most dear, her husband and her family. When Mrs Carmichael's body was washed ashore the watch was found secreted in the waistband of her dress. In its own right the watch is of artistic and monetary value and is a rare and beautiful object depicting watch making in the early 19th century. It is a historically significant object in it’s own right and there is additional importance, surviving a significant event in the maritime history of Victoria. The wreck of the Loch Ard, Victoria's greatest maritime disaster has also been declared an event of National Significance because of its strong connection to Australia's immigration and maritime history. The watch, together with the Loch Ard Peacock, make up the two most significant shipwreck artefacts in Australia. Both of these items are of great social significance to not only local people but the wider Australian community. Funding for the watches purchase came from six local trusts and one anonymous citizen and is now on permanent display. Both these artefacts symbolise and helps to interpret the stories of survival along the Shipwreck Coast. Fob Watch, known as the "Carmichael Watch" or the "Loch Ard Watch". 1814 fob pocket watch belonging to the Carmichael family, recovered from the wreck of the Loch Ard. Fob watch (or pocket watch)and winding key, made by James McCabe and Son, of Cornhill, London. The watch is in excellent condition and its design is decorative and intricate. The gold face is covered by glass. The gold rear cover is hinged over a silver inner cover that includes the winding hole. The watch has a knob with a swinging ring from which it can be hung. The dial of the gold watch face is textured and has raised Arabic numerals and every minute is marked around the perimeter by a dot, with the 5-minute dots slightly larger. The numerals and dots are a different coloured gold than the rest of the face. The centre of the face has a wavy pattern fanning out to the base of the numerals. The hour and minute hands are of a dark colour. The stems of the hands are a wavy shape and finish with spade shaped tips; the tip of the hour hand is larger than that of the minute hand. The hour hand reaches to the base of the numerals and the minute hand is long enough to rest between the minute dots. The back of the watch is decorated with a detailed design on a textured gold background. The design is embossed in coloured metals; gold, silver, greenish-gold and pink. In the centre is a dove resting on leaves of a pot plant that sits on a silver circular base. Another dove is flying above it, and their beaks touch together. On the right of the base of the pot plant is a dog resting on its hind legs, body facing away from the plant and head twisted around to look at the birds. On the sides of this design and meeting at the base are sprigs of leaves and buds. Around this central design is a rope-like border. Around the perimeter of the case is a border of leaves and budding stems. The inside of this cover has embossed hallmarks, numbers and etched markings indicating that the watch is 18 carat gold, made by James McCabe, assayed in London in 1814 and the case may have been made by Daniel Willmott, case maker. The silver inner workings cover has a full name beautifully engraved on it. There is a winding hole that accesses a square-ended lever for the key to fit over. The handle of the watch is a twisted gold knob with a hollow ‘D’-shaped swinging ring attached to the end of it. This knob also has a hallmark.On the silver inner workings cover “Thomas Achilles Townshend” is engraved, underscored by a thin, delicately decorated line. On the gold handle is the logo of a crown with “18”’ next to it. Inside the gold rear case is stamped “DW’. Under that is etched “JAN 77 II”. Underneath this are 3 logos; a logo “leopard, crowned”’, a logo “ crown on top of 18”, and a logo “T”. Under these 3 symbols is part of a stamp that could possibly be “IMC”. Under this is “ ’ 5 9 4 ”. Other numbers, symbols and letters are etched into this case including “15001”, “2/5/19”. Others are difficult to read.warrnambool, shipwrecked coast, shipwreck coast, flagstaff hill, flagstaff hill maritime museum, flagstaff hill maritime village, maritime museum, shipwrecked artefact, shipwreck artefact, carmichael, townshend, townsend, carmichael watch, loch ard watch, pocket watch, loch ard, 1st june 1878, james mccabe, thomas walker, robert townshend, loch ard gorge, great ocean road, victoria., memorial headstone -
 Eltham District Historical Society Inc
Document - Folder, Skipper, Matchem
Matcham Skipper was born in New Zealand in 1921 to Lena and Mervyn Skipper. The family returned to Australia. After Mervyn met Justus Jorgensen; they moved to live at Montsalvat. Matcham married Myra Gould; he became a sculptor and jewellery maker. Contents Newspaper photograph: "The artist at work - Matcham Skipper in his studio at Montsalvat", The Australian, 10 August 1966. Matcham Skipper working on a metal artwork. Photocopy of photograph: Matcham Skipper c1970. Magazine article: "Matcham Skipper - knockabout genius", POL vol.4 no.12 (~1972). Biography of Matcham Skipper. Magazine photograph: "Skipper and his home. He helped to lay the bricks", no source or date. Magazine photograph: "Matcham Skipper, of Eltham, works on his sculpture of Leda and the Swan, which will be presented to this year's winner of the David Jones fashion award", no source or date. Newspaper article: "Ageless quality before fashion", Diamond Valley News, 19 December 1883. Matcham Skipper included in exhibition of jewellers at Eltham Gallery. Newspaper photograph: "Mr Matchem Skipper puts the finishing touhes to the steel mandala yesterday", no source or date. Newspaper article: "Metallic influence of Renaissance sculptor", Diamond Valley News, ~1982. Biography of Matcham Skipper. Newspaper article: "A Matcham Skipper monologe", The Age Saturday Extra, 31 August 1985. Matcham Skipper's year in Italy. Newspaper article: "Office regalia", Diamond Valley News, 14 August 1990. Presentation of Eltham Shire mayoral chain made by Matcham Skipper. Newspaper article: "Old flicks on big screen", no source, 2004. Exhibition of Matcham Skipper's photographs "The Arnham Land Portraits" to accompany screening of Tim Burstall films. Newspaper article: "No match for Skipper", Diamond Valley News, 3 November 2010. Matcham Skipper's sculpture of a boy "Young man awakening" for Eltham Cemetery Trust. Newspaper article: "Final salute to Skipper", Diamond Valley Leader, 2 March 2011. Death of Matcham Skipper. Newspaper death and funeral notices: Matcham Skipper, so source or date. Newspaper article: "Remembering Matcham", Diamond Valley Leader, 9 March 2011. Funeral of Matcham Skipper at Montsalvat. Letter Eltham District Historical Society to Sigmund Jorgensen, 13 March 2011, seeking copies of eulogies given by Sigmund Jorgensen and Clio Skipper at funeral of Matcham Skipper. Letter Sigmund Jorgensen to Eltham District Historical Society, 21 March 2011, enclosing edited version of the eulogy with illustrations of work of Matcham Skipper. Newspaper obituary: "Eltham art colony's knockabout genius", The Age 31 March 2011. Obituary of Matcham Skipper. Newspaper clippings, A4 photocopies, etcmatcham skipper, myra skipper nee gould, marcus skipper, adam skipper, damion skipper, montsalvat, lena skipper, mervin skipper, justus jorgensen, karel zoubek, david jones fashion awards, eltham gallery, gerd bahmann, heidi wild, gilliam hillman, sonia skipper, pietrasanta, luigitommasi fonderia d'arte, peter graham, bob mclellan, thelma mclellan, tim burstall, the prize (film), the arnham land portraits exhibitio, eltham cemetery trust, jenardiy zabenko, craig macdonald, "young man awakening" sculpture, sigmund jorgensen, sue thomas, simon skipper, helen skipper, glen tomasetti, sandy kilpatrick, clio (sarah) tomasetti, raphael kilpatrick, alan marshall, alistair knox, clifton pugh, tony raunic, rita wooley, erasmus toscano, maurice toscano, mervyn garnham skipper -
 Bendigo Military Museum
Photograph - Continuous Indoor Cricket World Record Attempt, Seymour, Victoria, 1986
This is a set of 12 photographs of Army teams from the Army Survey Regiment, Bendigo and the Army School of Transport, Puckapunyal attempting a world record playing indoor cricket, at Seymour Victoria from the 31st of January to the 5th of February 1986. The following article appeared on the back page of the ARMY Newspaper on Thursday 6th of March 1986. 'INDOOR CRICKET RECORD SMASHED. ARMY TEAMS from Puckapunyal and Bendigo recently played indoor cricket for 124 hours to set a new world record. The two eight-man teams, from Army School of Transport and Army Survey Regiment, broke the 120 hour record set by Corrimal High School, NSW earlier this year. Organiser of the event, Capt Marty Alsford of AST told ARMY the teams had played 107 games, scoring 15,000 runs in their chase for the record. "The rules allowed a five-minute rest break every hour which could be accrued, so we played for 64 hours straight then had a five hour sleep. "When everybody got up and went straight back into the game with no grumbling, I knew we had the record," Capt Alsford said. The event was held at the Seymour Indoor Cricket Centre, an iron-roofed building with no air-conditioning, and all players had to battle the effect of the stifling heat in addition to fatigue. One player dropped out through exhaustion, but this did not prejudice the record attempt as the rules permitted each team to lose a player who cannot return to the game nor be replaced. The Army teams' effort are now awaiting recognition by the Guinness Book of Records. During the marathon event, the soldiers raised money for Legacy, through sponsorships and a raffle. At the time ARMY went to press, the final figure was not available.’ Army Survey Regiment Routine Orders Part 1 Issue No 16/86 Notices on Page 7 stated: ‘World Record Indoor Cricket. 1. Congratulations to the following members for their successful attempt on the Guinness Book of Records, Record for continuous playing of indoor cricket: John Whaling, Peter Ball, Brenton McDonald, Per Andersen, John Anderson, Brian Fauth, Brett McAllister and Daryl South. 2. Our team, playing a team from Army School of Transport at Seymour played continuous Indoor Cricket for 124 hours, beating the existing record by 4 hours. During that time the two teams amassed a total in excess of 16,000 runs. 3. Congratulations also to Peter Ball for picking up the Trophy for the most outstanding player during the record attempt.’This is a set of 12 photographs of Army teams from Bendigo and Puckapunyal attempting a world record playing indoor cricket, at Seymour Victoria in February 1986. The photographs were printed on photographic paper and are part of the Army Survey Regiment’s Collection. The colour photographs were scanned at 300 dpi. .1) - Photo, colour, 1986, L to R: John ‘Junior’ Whaling, Marty Alsford. Background L to R: Peter Ball, unidentified, John ‘Flash’ Anderson. .2) - Photo, colour, 1986, L to R: John ‘Junior’ Whaling, unidentified, Peter Ball. .3) to .7) - Photo, colour, 1986, unidentified participants. .8) - Photo, colour, 1986, L to R: unidentified, Peter Ball, Brett McAllister, John ‘Junior’ Whaling. .9) - Photo, colour, 1986, L to R: unidentified, John ‘Flash’ Anderson, Brian Fauth, unidentified, Peter Ball, unidentified (x2). .10) - Photo, colour, 1986, Army School of Transport (red & white uniform) - back row L to R: unidentified (x4), front row L to R: unidentified (x3), Marty Alsford. Army Survey Regiment (dark green uniform) - back row L to R: Brett McAllister, John ‘Flash’ Anderson, Brian Fauth, Per Andersen, front row L to R: John ‘Junior’ Whaling, Daryl South, Brenton McDonald, Peter Ball. .11) & .12) - Photo, colour, 1986, Army Survey Regiment (dark green uniform) - back row L to R: Peter Ball, Per Andersen, Brett McAllister, Brian Fauth, front row L to R: Brenton McDonald, John ‘Flash’ Anderson, Daryl South, John ‘Junior’ Whaling..1P to .12P –No personnel are identified. ‘Attempt at World Record for Indoor Cricket 31 Jan - 5 Feb 1986’ annotated on cover sleeve.royal australian survey corps, rasvy, army survey regiment, army svy regt, fortuna -
 Warrnambool and District Historical Society Inc.
Documents, Childer's Cove, 1920-1940's
Childers Cove is situated about 15 ks east of Warrnambool in the area known as Mepunga. It is named after the shipwreck of 'The Children.The documents relate to the running of the Childer's Cove Progress Association. There are a number of social activities including gymkhanas, racing meetings, making of roads and improving with planting trees There are many names which are still familiar with the area nearly 100 years later, including Wallace, McDowall, Burleigh, Murnane, Bonnett, Abraham Laidlaw Keogh Holloway and Palmer. Some of the meetings were held at the Mepunga South School with others held at Eckers Hotel Warrnambool and some at the race course. Fundraising events were held also from athletic meetings and district school children's races. This collection of papers is representative of many small communities around Australia where people came together and worked to improve their community facilities. It therefore has strong social and historic significance.This is a collection of papers most of which relate to the Childer's Cove Progress Association. Included are: .1 Minute Book/ Exercise book Childer's Cove Progress Association.May 1928-1932 .2 Minute Book/ Exercise book Childer's Cove Progress Association. 1924-1926 .3 Letter from Warrnambool Football Club 1930. .4 Account Archibald MacFarlane & Co March 1929 .5 Western District Racing Association Oct 1929. .6 Federal Taxation Dep Re Entertainment Tax 11/02/1930 .7 Chief Secretary Office re Racing Permits March 1923. .8-.9 Warrnambool Standard Invoices Jan 1930's .10 Archibald MacFarlane & Co Jan 1930. .11 Chief Office for Stamp Duties 12/02/1928 .12 Flyer - Childer's Cove Progress Association April 17 1926. .13 Flyer- Monster Gymkhana 12/02/ 1927. .14 Handwritten Invoice Charles Palmer Nov 1929. .15 Cheque Book Childer's Cove Progress Association 1929-31. .16 Deposit Book Childer's Cove Progress Association 1932-1942 .17 Bundle of invoices. .1 C J Caddy & Sons.2 Western Ice & Ice Products .3 Department of Lands & Survey Aug 1923 .4 J S Tait re Licence April 1924 .5 Warrnambool Standard31/12/1923 .6 Warrnambool Standard 31/03/1924 .7 Devenish & Co August 1924 .8 Warrnambool Standard 31/06/1924 H J Paynter & Co 03/05/1924 .10 Chief Secretary's Office Melbourne 01/05/1924 with receipt. .11 Permit for a race meeting April 19 1924 .12 Commonwealth of Australia Entertainment Tax 06/09/1924.13 Commonwealth of Australia Entertainment Notice 27/08/01924 .14 Commonwealth of Australia Entertainment Tax notice 12/08/1924 .18 William Ardlie handwritten letter 28/03/1928 .19 Envelope Addressed to W R Abrahams .20 Final notice Handwritten Charles Palmer Jan 1930. .21 Balance Sheet Childer's Cove Racing Club 18/03/1929 .22 H J Paynter & Co Account and receipt 25/02/1930. .23 Raglan Parade Timber Yards Alex Donaldson Feb 1930. .24 The School Paper Feb 1964 No 741 childer's cove, mepunga, childer's cove progress association -
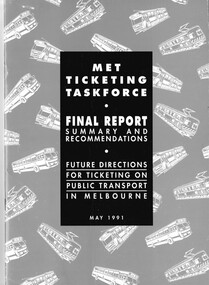 Melbourne Tram Museum
Document - Folder with papers, Minister of Transport, "Met Ticketing Ticketing Development 1990 - 1995", 1990 - 1995
Manila folder with reports on the development of Met Ticket between 1990 and 1995. .1 - "Met Ticketing Taskforce – final Report" - May 1991 - A4 - 20 pages + card cover with letter dated 23 August 1991, providing the report along with 3 page press statement from the Transport Minister Peter Spyker. .2 - Pamphlet – The Met – Fact Sheet – “Automated Ticketing” - four page A4 printed document providing facts about the forthcoming Metcard system - c1994, .3 - Letter from John Prideaux AMWU Rep 16/3/1991 - To John Andrews Met Ticket steering committee - A4 photocopy - regarding the submission to the Met Ticketing Task Force. .4 - 60 page double side document printed on grey paper - Submission to Met Ticketing Task Force 26/10/1990 - Report on the Met Ticketing Union Working Party. Could be missing some sheets. .5 - Memo – John Andrews Trades Hall Liaison Office – to Secretaries – Public Transport Unions with a draft submission (20 pages) dated 12/2/1991. .6 - Met Ticketing Taskforce - Options for a new ticketing system for public transport in Melbourne Dec. 1990 – full detail - 45 pages. .7 - ditto - A summary - 11 pages - Dec. 1990. .8 - Met Ticketing Taskforce - Principles and Introduction to Ticketing Systems – Sept. 1990 - September 1990 - 10 pages. .9 - Letter from Trades Hall – 1/8/1990 - photocopy from John Andrews - Met Ticketing Review = Union Co-ordinating Committee - cc John Prideaux - has John's notes on rear, about the process and who was involved. .10 - Submission to Met Ticketing Task Force 26/10/1990 - Report of the Met Ticketing Union Working Party - combined public transport unions - 26/10/1990 - 60 pages - has notes on rear sheet. .11 - Report of the Met Ticketing Union Working Party - 8 pages. .12 - Working Paper No. 15 prepared for Met Ticketing Taskforce - Met ticketing costings - 24/10/1990 - 4 pages. .13 - Notes on Ticket system discussions - hand written notes, including a diagram of a ticket. .14 - Fax from Martin Gray to Union working party members - meeting times - lists members of the committee. .15 - Pamphlet – The Met – Fact Sheet – “Automated Ticketing” - single page A4 printed document providing facts about the equipment to be fitted to trams - has a drawing showing the equipment location on a tram.Folder with title in black felt pen.trams, tramways, the met, ptc, metcard, tickets, unions -
 Wangaratta RSL Sub Branch
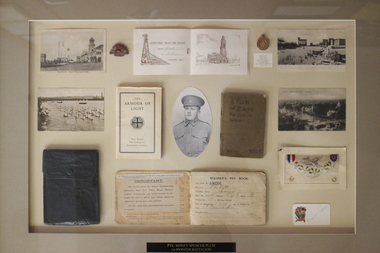
Mixed media - Framed photograph and objects, Pte Sidney Spencer Plum
Collection of personal effects that belonged to Private SIdney Spencer Plum, 3431 1st Pioneer Battalion. SIdney was born on 3/1/1894 at Dockers Plains via Wangaratta. He attended both North Wangaratta and Dockers Plains schools. He was a Blacksmith aged 21 years when he enlisted on 12/6/1915 and embarked on 11/10/1915 on board HMAT Nestor. He was wounded three times and was discharged from the AIF on 16/3/1919. Items include oval photo of Sidney Plum in the centre surrounded by four post cards, one embroidered post card of a dove with an envelope in it's beak with the Union Jack and French flag, a Greetings From The Front" booklet, "The Armour of Light" bible, "A Form of Prayer for open air services" book, Soldier's Pay Book, a "To my dear Mother" card, a black leather pouch, a rising sun badge, round gold medallion. A framed montage of personal items belonging to Private Sydney Spencer PLUM compiled by his family to honour his memory and service. In addition to general military issue the remaining items were most likely purchased whilst on leave in France and England during the first world war. Postcards particularly embroidered postcards were sent home to loved ones and friends.Framed Collection of personal effects - Private Sidney Spencer Plum, 1st Pioneer Battalion. Includes oval photo of Sidney Plum in the centre surrounded by four post cards, one embroidered post card of a dove with an envelope in it's beak with the Union Jack and French flag, a Greetings From The Front" booklet, "The Armour of Light" bible, "A Form of Prayer for open air services" book, Soldier's Pay Book, a "To my dear Mother" card, a black leather pouch, a risen sun badge, round gold coloured medalion. Frame has a donation plaque.Front: Pte Sidney Spencer Plum, 1st Pioneer Battalion. Donated by Max & Hilary (Plum) Ryan and Sylvia Reed (Plum) of Wangarattaa Back: Wangaratta Picture Framers 9 Oct 2003. Also has messages from front postcards; Dear Mother, Just a few lines to let you know that I am alright hoping that you and all the rest is well too. We have had three fogs over here and it is very cold at night. I was picked in Cairo and they had some Turkey Officers an a German spy in gaol there. I wrote to Aunt Nelline. I got two letters from Alf. Maude Saxby hasnt wrote to me since I was up there on final leave. I get the letters quicker. I got Alf photos all right. I will be having Christmas in London. Well I think this is all this. I remain you son Sid. Tell Alf to send me over the Age so I can see how the war is going. I suppose Dad and the rest is busy harvesting now. Glad to hear that you got the photos all right. I think this is all this time from Sid same address as before. Dear Mother, Just a few lines to let you know that I am keeping well hoping that you and every body is the same. We have some great fogs over here, it rained all one night. We had a very good Christmas we got a billy issued to us and it had every thing in it. The Captain of our company gave me a Christmas pudding. All the same I wished I were back in Australia again. I think this is all this time. Yours truely son Sid, 25/12/15plum, sidney, world war 1, postcards, embroidered postcard, soldier's pay book, leather pouch, bible, prayer book, sydney -
 Flagstaff Hill Maritime Museum and Village
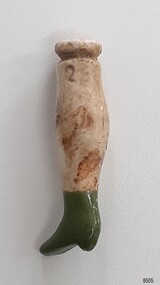
Leisure object - Doll's Leg, circa 1878
This doll's leg was one of a set of artefacts recovered from the shipwreck of the Loch Ard that were donated together. The doll's leg could have been from the ship's cargo or personal effects. Dolls from this era were often made from fabric, which would have quickly deteriorated in the ocean. Ceramic limbs were joined to the body by tightening the fabric around the grooves on the limbs. There are other doll's limbs in our collection that were recovered from the Loch Ard The object is now one of the shipwreck artefacts in Flagstaff Hill’s Mc Culloch Collection, which includes items recovered from the wrecks of the Victoria Tower (wrecked in 1869) and Loch Ard (wrecked in 1878). They were salvaged by a diver in the early 1970s from the southwest coast of Victoria. Advanced marine technology had enabled divers to explore the depths of the ocean and gather its treasures before protective legislation was introduced by the Government. The artefacts were donated to Queensland’s Department of Environment and Heritage Protection (EHP) by a passionate shipwreck lover and their locations were verified by Bruce McCulloch. In 2017 the Department repatriated them to Flagstaff Hill where they joined our vast collection of artefacts from Victoria’s Shipwreck Coast.The Loch Ard: - The three-masted, square-rigged iron ship Loch Ard belonged to the famous Loch Line which sailed many ships from England to Australia. The ship was built in Glasgow in 1873. The Loch Ard made three trips to Australia and one trip to Calcutta before its final voyage. The Loch Ard: - The Loch Ard left England on March 2, 1878, under the command of Captain Gibbs, bound for Melbourne with a crew of 37, plus 17 passengers and a load of cargo. The general cargo included straw hats, umbrellas, perfumes, clay pipes, pianos, clocks, confectionery, linen and candles, as well as a heavier load of railway irons, cement, lead and copper. There were items included that were intended for display in the 1880 Melbourne International Exhibition, including the famous Loch Ard Peacock. On June 1, 1878, Captain Gibbs was expecting to see land but visibility was reduced by fog. As it lifted, the sheer cliffs of Victoria's west coast came much closer than expected. The captain was unable to steer away and the ship struck a reef at the base of Mutton Bird Island, near Port Campbell. The top deck was loosened from the hull, the masts and rigging came down and knocked passengers and crew overboard, and even the lifeboat crashed into the side of the ship and capsized. Of the 54 people on board, only two survived: the apprentice, Tom Pearce and the young woman passenger, Eva Carmichael. The well-packed Minton porcelain peacock also survived, safe inside its crate. Much of the cargo was washed up, smashed and broken, and some was salvaged. Other cargo is still with the wreck at the base of Mutton Bird Island, now protected by Government law. The artefact is an example of cargo or personal items on board a ship in 1878. It provides a reference point for classifying and dating similar items. This artefact is significant for its association with the sailing ship Loch Ard, one of the best-known, and one of the worst, shipwrecks in Victoria’s history. Flagstaff Hill’s collection of artefacts from Loch Ard is significant for being one of the largest collections of artefacts from this shipwreck in Victoria. It is significant for its association with the shipwreck, which is on the Victorian Heritage Register (VHR S417). The collection is significant because of the relationship between the objects, as together they have a high potential to interpret the story of the Loch Ard. The Loch Ard collection is archaeologically significant as the remains of a large international passenger and cargo ship. It is historically significant for representing aspects of Victoria’s shipping history. Doll's leg, cream-coloured ceramic leg with two seams, a flat solid top and a glazed green ankle-length heeled boot. A shallow groove runs around the leg just below the top. An inscription is stamped into the leg below the groove. Recovered from the wreck of the Loch Ard. Inscribed "2"flagstaff hill, warrnambool, maritime village, maritime museum, flagstaff hill maritime museum and village, shipwreck coast, great ocean road, shipwreck artefact, wreck dive, mcculloch collection, bruce mcculloch, loch ard, 1878, loch line, victorian heritage register, sailing ship, captain gibbs, eva carmichael, tom pearce, mutton bird island, loch ard gorge, migrant ship 1878, cargo ship 1878, doll's leg, ceramic doll leg, porcelain doll leg, doll's limb, 1870s doll, 1870's toy, ceramic limb from doll, children's toy, children's recreation, doll's leg with green boot -
 Flagstaff Hill Maritime Museum and Village
Functional object - Lamp Fitting, circa 1878
This gas pipe fitting was one of a group of artefacts in the McCulloch Collection that were recovered from the shipwreck Loch Ard and were donated together. The fitting could have been from the ship's cargo or a ship’s fitting. Lamps from this era were fuelled by gas. There are other gas lamp fittings in our collection that were recovered from the Loch Ard The object is now one of the shipwreck artefacts in Flagstaff Hill’s Mc Culloch Collection, which includes items recovered from the wrecks of the Victoria Tower (wrecked in 1869) and Loch Ard (wrecked in 1878). They were salvaged by a diver in the early 1970s from the southwest coast of Victoria. Advanced marine technology had enabled divers to explore the depths of the ocean and gather its treasures before protective legislation was introduced by the Government. The artefacts were donated to Queensland’s Department of Environment and Heritage Protection (EHP) by a passionate shipwreck lover and their locations were verified by Bruce McCulloch. In 2017 the Department repatriated them to Flagstaff Hill where they joined our vast collection of artefacts from Victoria’s Shipwreck Coast. The Loch Ard: - The three-masted, square-rigged iron ship Loch Ard belonged to the famous Loch Line which sailed many ships from England to Australia. The ship was built in Glasgow in 1873. The Loch Ard made three trips to Australia and one trip to Calcutta before its final voyage. The Loch Ard left England on March 2, 1878, under the command of Captain Gibbs, bound for Melbourne with a crew of 37, plus 17 passengers and a load of cargo. The general cargo included straw hats, umbrellas, perfumes, clay pipes, pianos, clocks, confectionery, linen and candles, as well as a heavier load of railway irons, cement, lead and copper. There were items included that were intended for display in the 1880 Melbourne International Exhibition, including the famous Loch Ard Peacock. On June 1, 1878, Captain Gibbs was expecting to see land but visibility was reduced by fog. As it lifted, the sheer cliffs of Victoria's west coast came much closer than expected. The captain was unable to steer away and the ship struck a reef at the base of Mutton Bird Island, near Port Campbell. The top deck was loosened from the hull, the masts and rigging came down and knocked passengers and crew overboard, and even the lifeboat crashed into the side of the ship and capsized. Of the 54 people on board, only two survived: the apprentice, Tom Pearce and the young woman passenger, Eva Carmichael. The well-packed Minton porcelain peacock also survived, safe inside its crate. Much of the cargo was washed up, smashed and broken, and some was salvaged. Other cargo is still with the wreck at the base of Mutton Bird Island, now protected by Government law. The artefact is an example of cargo or personal items on board a ship in 1878. It provides a reference point for classifying and dating similar items. This artefact is significant for its association with the sailing ship Loch Ard, one of the best-known, and one of the worst, shipwrecks in Victoria’s history. Flagstaff Hill’s collection of artefacts from Loch Ard is significant for being one of the largest collections of artefacts from this shipwreck in Victoria. It is significant for its association with the shipwreck, which is on the Victorian Heritage Register (VHR S417). The collection is significant because of the relationship between the objects, as together they have a high potential to interpret the story of the Loch Ard. The Loch Ard collection is archaeologically significant as the remains of a large international passenger and cargo ship. It is historically significant for representing aspects of Victoria’s shipping history. Brass decorative gas lamp fitting. Two flat arms of different lengths are joined on either side of a fitting that has a fleur-de-lis-like design. The shorter arm has a J-shaped brass pipe fitted to it with a decorative threaded cube joint part way along, and ends with a triangular tap and knob. The longer arm is also J-shaped and ends with a feather design on it. There are remnants of green paint on the cube fittings and the knob. Recovered from the wreck of the Loch Ard.flagstaff hill, warrnambool, maritime village, maritime museum, flagstaff hill maritime museum and village, shipwreck coast, great ocean road, shipwreck artefact, wreck dive, mcculloch collection, bruce mcculloch, loch ard, 1878, loch line, victorian heritage register, sailing ship, captain gibbs, eva carmichael, tom pearce, mutton bird island, loch ard gorge, migrant ship 1878, cargo ship 1878, lamp fitting, gas lamp fitting, ship’s fitting, ship’s lamp, brass lamp fitting, lighting, domestic lighting, ship’s lighting -
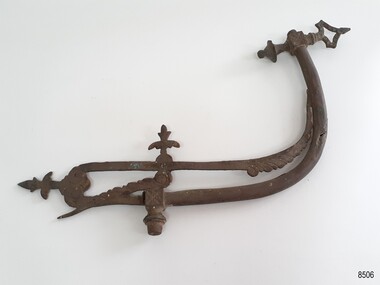
 4th/19th Prince of Wales's Light Horse Regiment Unit History Room
Instrument - Trumpet, Cavalry, Couesnon Cie, 1901 (exact)
The 2nd Light Horse Regiment was raised at Enoggera in Queensland on 18 August 1914. Its recruits came mainly from Queensland but some hailed from the northern rivers district of New South Wales. The 2nd was one of three regiments of the 1st Light Horse Brigade – the first Australian mounted formation raised by Australia during the First World War. The regiment sailed from Brisbane on 25 September and disembarked in Egypt on 9 December. The 2nd Light Horse Regiment deployed to Gallipoli without its horses and landed there on 12 May 1915, joining the New Zealand and Australian Division. It played a defensive role for most of the campaign but did attack the Turkish trenches opposite Quinn’s Post, one of the most contested positions along the ANZAC Line. The first assault wave was mown down and fortunately the officer commanding the attack had the wisdom and courage to call it off. The 2nd was withdrawn from the front line in September and left the peninsula on 18 December. Back in Egypt, the 2nd Light Horse joined the ANZAC Mounted Division. Between January and May 1916, the regiment was deployed to protect the Nile valley from bands of pro-Turkish Senussi Arabs. On 18 May, as part of its parent brigade, it joined the forces defending the Suez Canal. The 1st Light Horse Brigade played a significant role in turning back the Turkish advance on the canal at the battle of Romani on 4 August. In ensuing days the regiments of the brigade participated in the immediate follow-up of the defeated Turks, but were soon withdrawn to rest. The 2nd Light Horse Regiment rejoined the Allied advance across the Sinai in November and was subsequently involved in the fighting to secure the Turkish outposts on the Palestine frontier – Maghdaba on 23 December 1916 and Rafa on 9 January 1917. A stint of protective duty along the line of communications through the Sinai followed. The 2nd’s next major engagement was the abortive second battle of Gaza on 19 April. Gaza finally fell on 7 November, after a wide outflanking move via Beersheba, in which the 1st Light Horse Brigade played a part. With the capture of Gaza, the Turkish position in southern Palestine collapsed. The 2nd Light Horse Regiment participated in the advance to Jaffa that followed, and was then committed to operations to clear and occupy the west bank of the Jordan River. It was involved in the Amman (24–27 February) and Es Salt (30 April–4 May) raids and the repulse of a major German and Turkish attack on 14 July 1918. The final British offensive of the campaign was launched along the Mediterranean coast on 19 September 1918, with the ANZAC Mounted Division taking part in a subsidiary effort east of the Jordan aimed at Amman. Turkey surrendered on 30 October 1918. The 2nd Light Horse Regiment sailed for Australia on 13 March 1919 without their horses, which were either shot or transferred to Indian cavalry units. Events in the daily routine of the soldier were signalled by bugle and trumpet calls. This trumpet is signicant because historically, it was issued to the 2nd Australian Light Horse Regiment in 1912. This Regiment served with distinction in Gallipoli and Palestine in World War 1. It is probable, but not confirmed, that tthe trumpet was used by the Regiment during these operations. Each light horse regiment was divided into four squadrons. Each squadron had a trumpeter sergeant, equipped with a cavalry trumpet, who was employed at the Squadron Headquarters Technically called a cavalry trumpet, this brass instrument can be described as a "simple trumpet" ie. the direct forerunner of the modern valve trumpet. It is in E flat not B flat as is the bugle. Both were carried slung over the player's body by means of green tasselled cords.Crest with inscription: "Exposition Universelle De Paris" with circular logo with inscribed "1900". "Hors Concours Membre De Jury". Logo formed of initials (not deciphered). "Couesnon Cie 94 Rue Dangouleme Paris". Bomb burst type logo with "01" in centre. "W H Paling & Co Ltd Sydney NSW Brisbane" On bell: "Mounted Rifles (2nd ALH)" trumpet, cavalry, musical instrument, 2nd light horse, mounted rifles -
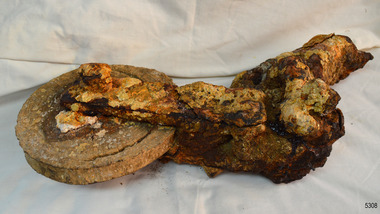 Flagstaff Hill Maritime Museum and Village
Equipment - Block, Alexander Stephen and Sons, 1869
These remains of a block, shackle and wire are from the sailing ship Newfield. This would have been one of the hundreds of blocks and shackles used in the rigging of the vessel. The Newfield was a three-masted iron and steel barque, built in Dundee, Scotland, in 1869 by Alexander Stephen and Sons. It was owned by the Newfield Ship Company in 1890 and later that year It was registered in Liverpool to owners Brownells and Co. The Newfield left Sharpness, Scotland, on 28th May 1892 with a crew of 25 under the command of Captain George Scott and on 1st June left Liverpool. She was bound for Brisbane, Australia, with a cargo of 1850 tons of fine rock salt. On the night of 28 August 1892, the Captain mistook the Cape Otway light for that of Cape Wickham (King Island) and altered tack to the north and east putting the vessel on a collision course with the Victorian coast. At around 3:40 am the Newfield struck rocks about 100 yards from shore, and 5 feet of water filled the holds immediately. The captain gave orders to lower the boats which caused a disorganised scramble for safety among the crew. The starboard lifeboat was cleared for lowering with two seamen and two apprentices in her, but almost as soon as she touched the water she was smashed to bits against the side of the vessel, and only one of the four reached safety ashore, able seaman McLeod. The rough sea made the job of launching lifeboats very difficult. The first two lifeboats launched by the crew were smashed against the side of the ship and some men were crushed or swept away. The third lifeboat brought eight men to shore. It capsized when the crew tried to return it to the ship for further rescue The rescue was a difficult operation. The Port Campbell Rocket Crew arrived and fired four rocket lines, none of which connected with the ship. Peter Carmody, a local man, volunteered to swim about one mile offshore to the ship with a line to guide the fourth and final lifeboat safely to shore. He was assisted by James McKenzie and Gerard Irvine. Seventeen men survived the shipwreck but the captain and eight of his crew perished. The Newfield remained upright on the reef with sails set for a considerable time as the wind slowly ripped the canvas to shreds and the sea battered the hull to pieces. The Marine Board inquiry found the wreck was caused by a "one-man style of navigation" and that the Captain had not heeded the advice of his crew. For his heroic efforts, Peter Carmody was awarded the Bramley-Moore medal by the Liverpool Shipwreck and Humane Society for Saving Life at sea on January 21st 1893. The medal and a letter of congratulations were donated to Flagstaff Hill Maritime Museum by Peter Carmody's granddaughter Norma Bracken and her son Stuart Bracken on 25th May 2006. Flagstaff Hill’s collection of artefacts from the Newfield is significant for its association with the shipwreck Newfield, which is listed on the Victorian Heritage Registry. The collection is additionally significant because of the medal awarded to a local man Peter Carmody. The Newfield collection historically also represents aspects of Victoria's shipping history and its association with the shipwreck.This is what remains of a block, shackle and wire from the wreck of the sailing ship “Newfield”. The object is heavily encrusted. The exterior (cheeks) of the block is missing. The disc of the block has a channel part way around its face, about 2 cm from the edge. Two long, narrow plates are joined onto the centre of the disc’s face with a bolt through the centre. The other ends of the two plates join onto the elbow of the shackle. The elbow of the shackle is also joined onto a rod. At the other end of the rod can be seen the ends of thick wire strands.block, 1893, flagstaff hill, flagstaff hill maritime museum, peter carmody, newfield, 1892, port campbell, shipwreck, ship, victorian shipwrecks, barque, ship wreck, peterborough, sailing ship, 29 august 1892, block and shackle, curdies river, bramley-moore medal -
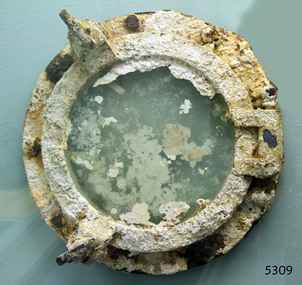 Flagstaff Hill Maritime Museum and Village
Functional object - Porthole, Alexander Stephen and Sons, 1869
This large brass porthole is from the sailing ship Newfield this would have been one of the many port holes in the vessel used for light and ventilation. The Newfield was a three-masted iron and steel barque, built in Dundee, Scotland, in 1869 by Alexander Stephen and Sons. It was owned by the Newfield Ship Company in 1890 and later that year It was registered in Liverpool to owners Brownells and Co. The Newfield left Sharpness, Scotland, on 28th May 1892 with a crew of 25 under the command of Captain George Scott and on 1st June left Liverpool. She was bound for Brisbane, Australia, with a cargo of 1850 tons of fine rock salt. On the night of 28 August 1892, the Captain mistook the Cape Otway light for that of Cape Wickham (King Island) and altered tack to the north and east putting the vessel on a collision course with the Victorian coast. At around 3:40 am the Newfield struck rocks about 100 yards from shore, and 5 feet of water filled the holds immediately. The captain gave orders to lower the boats which caused a disorganised scramble for safety among the crew. The starboard lifeboat was cleared for lowering with two seamen and two apprentices in her, but almost as soon as she touched the water she was smashed to bits against the side of the vessel, and only one of the four reached safety ashore, able seaman McLeod. The rough sea made the job of launching lifeboats very difficult. The first two lifeboats launched by the crew were smashed against the side of the ship and some men were crushed or swept away. The third lifeboat brought eight men to shore. It capsized when the crew tried to return it to the ship for further rescue The rescue was a difficult operation. The Port Campbell Rocket Crew arrived and fired four rocket lines, none of which connected with the ship. Peter Carmody, a local man, volunteered to swim about one mile offshore to the ship with a line to guide the fourth and final lifeboat safely to shore. He was assisted by James McKenzie and Gerard Irvine. Seventeen men survived the shipwreck but the captain and eight of his crew perished. The Newfield remained upright on the reef with sails set for a considerable time as the wind slowly ripped the canvas to shreds and the sea battered the hull to pieces. The Marine Board inquiry found the wreck was caused by a "one-man style of navigation" and that the Captain had not heeded the advice of his crew. For his heroic efforts, Peter Carmody was awarded the Bramley-Moore medal by the Liverpool Shipwreck and Humane Society for Saving Life at sea on January 21st 1893. The medal and a letter of congratulations were donated to Flagstaff Hill Maritime Museum by Peter Carmody's granddaughter Norma Bracken and her son Stuart Bracken on 25th May 2006. Flagstaff Hill’s collection of artefacts from the Newfield is significant for its association with the shipwreck Newfield, which is listed on the Victorian Heritage Registry. The collection is additionally significant because of the medal awarded to a local man Peter Carmody. The Newfield collection historically also represents aspects of Victoria's shipping history and its association with the shipwreck.Heavily encrusted large brass porthole, complete with glass intact object is a circular, thick glass window surrounded by a round brass frame and attached to a round brass porthole frame with 9 bolt holes. This porthole was recovered from the wreck of the NEWFIELD.Nonewarrnambool, peter carmody, newfield, port campbell, shipwreck, nineteenth century, ship, victorian shipwrecks, peterborough, peter ronald, dog screw, newfield porthole, bramley-moore medal, flagstaff hill maritime museum, shipwreck artefact, ship fitting, ship window -
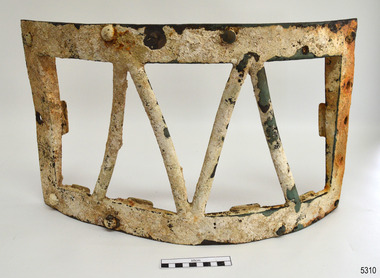 Flagstaff Hill Maritime Museum and Village
Functional object - Skylight frame, Alexander Stephen and Sons, 1869
This skylight frame would have been fitted on the Newfield’s poop deck (or raised deck that forms the roof of a cabin at the aft or rear of the ship). It would have covered and protected a glass pane that allowed light to enter the area below desk. The glass pane from the skylight is missing. The Newfield was a three-masted iron and steel barque, built in Dundee, Scotland, in 1869 by Alexander Stephen and Sons. It was owned by the Newfield Ship Company in 1890 and later that year It was registered in Liverpool to owners Brownells and Co. The Newfield left Sharpness, Scotland, on 28th May 1892 with a crew of 25 under the command of Captain George Scott and on 1st June left Liverpool. She was bound for Brisbane, Australia, with a cargo of 1850 tons of fine rock salt. On the night of 28 August 1892, the Captain mistook the Cape Otway light for that of Cape Wickham (King Island) and altered tack to the north and east putting the vessel on a collision course with the Victorian coast. At around 3:40 am the Newfield struck rocks about 100 yards from shore, and 5 feet of water filled the holds immediately. The captain gave orders to lower the boats which caused a disorganised scramble for safety among the crew. The starboard lifeboat was cleared for lowering with two seamen and two apprentices in her, but almost as soon as she touched the water she was smashed to bits against the side of the vessel, and only one of the four reached safety ashore, able seaman McLeod. The rough sea made the job of launching lifeboats very difficult. The first two lifeboats launched by the crew were smashed against the side of the ship and some men were crushed or swept away. The third lifeboat brought eight men to shore. It capsized when the crew tried to return it to the ship for further rescue The rescue was a difficult operation. The Port Campbell Rocket Crew arrived and fired four rocket lines, none of which connected with the ship. Peter Carmody, a local man, volunteered to swim about one mile offshore to the ship with a line to guide the fourth and final lifeboat safely to shore. He was assisted by James McKenzie and Gerard Irvine. Seventeen men survived the shipwreck but the captain and eight of his crew perished. The Newfield remained upright on the reef with sails set for a considerable time as the wind slowly ripped the canvas to shreds and the sea battered the hull to pieces. The Marine Board inquiry found the wreck was caused by a "one-man style of navigation" and that the Captain had not heeded the advice of his crew. For his heroic efforts, Peter Carmody was awarded the Bramley-Moore medal by the Liverpool Shipwreck and Humane Society for Saving Life at sea on January 21st 1893. The medal and a letter of congratulations were donated to Flagstaff Hill Maritime Museum by Peter Carmody's granddaughter Norma Bracken and her son Stuart Bracken on 25th May 2006. Flagstaff Hill’s collection of artefacts from the Newfield is significant for its association with the shipwreck Newfield, which is listed on the Victorian Heritage Registry. The collection is additionally significant because of the medal awarded to a local man Peter Carmody. The Newfield collection historically also represents aspects of Victoria's shipping history and its association with the shipwreck.Skylight, frame only. The heavily encrusted brass framework has eight bolts around the long side, and four metal bars forming two ‘v’ shapes across the centre. The frame is, slightly concave towards the inner side. The shorter ends of the frame each have a ‘U’ shaped bracket attached in the centre. The shorter ends are wider on one end and taper towards the other end to about a quarter of the thickness. The frame was recovered from the wreck of the NEWFIELD.Noneflagstaff hill maritime museum, newfield ship wreck, alexander stephen & sons, brownells & co, captain george scott, great ocean road ship wreck, peter carmody, bramley-moore medal, liverpool shipwreck and humane society, skylight cover, skylight frame, ship fitting, light cover, newfield -
 Flagstaff Hill Maritime Museum and Village
Handle, c. 1859
This brass handle was found on Sea Elephant Bay beach in King Island, Tasmania, in 1913. The donor identified it as being from the wreck of the Newfield. It would could have been part of the fittings or amongst the cargo on the ship. ABOUT THE "NEWFIELD" The Newfield was a three-masted iron and steel barque, built in Dundee, Scotland, in 1889 by Alexander Stephen and Sons. It was owned by the Newfield Ship Company in 1890 and later that year It was registered in Liverpool to owners Brownells and Co. The Newfield left Sharpness, Scotland, on 28th May 1892 with a crew of 25 under the command of Captain George Scott and on 1st June left Liverpool. She was bound for Brisbane, Australia, with a cargo of 1850 tons of fine rock salt, the main export product of Sharpness. At about 9pm on 28th August 1892, in heavy weather, Captain Scott sighted, between heavy squalls, the Cape Otway light on the mainland of Victoria but, due to a navigational error (the ship’s chronometers were wrong), he assumed it to be the Cape Wickham light on King Island, some 40 miles south. He altered his course to the north, expecting to enter Bass Strait. The ship was now heading straight for the south west Victorian coast and at about 1:30am ran aground on a reef about 100 yards from shore and one mile east of Curdie’s Inlet, Peterborough. The ship struck heavily three times before grounding on an inner shoal with 6 feet of water in the holds. Rough sea made the job of launching lifeboats very difficult. The first two lifeboats launched by the crew were smashed against the side of the ship and some men were crushed or swept away. The third lifeboat brought eight men to shore. It capsized when the crew tried to return it to the ship for further rescue The Port Campbell rocket crew arrived and fired four rocket lines, none of which connected with the ship. A local man, Peter Carmody, volunteered to swim one mile to the ship with a line to guide the fourth and final lifeboat safely to shore. Seventeen men survived the shipwreck but the captain and eight of his crew perished. One of the men, apprentice William McLeod, was rescued by local woman Margaret E. MacKenzie. The Newfield remained upright on the reef with sails set for a considerable time as the wind slowly ripped the canvas to shreds and the sea battered the hull to pieces. The Marine Board inquiry found the wreck was caused by a "one man style of navigation" and that the Captain had not heeded the advice of his crew. According to Jack Loney ‘… when the drama was over . . the Newfield was deserted except for the Captain’s dog and two pigs.’ Flagstaff Hill Maritime Museum has several artefacts that have been salvaged from the wreck. A report from SHP documented the following in regards to the Newfield collection: Flagstaff Hill’s collection of artefacts from the Newfield is of historical and archaeological significance at a State level, because of its association with the shipwreck, which is on the Victorian Heritage Register. The collection is significant because of its relationship between the objects. The Newfield collection is archaeologically significant as it is the remains of an international cargo ship. The Newfield collection is historically significant for representing aspects of Victoria’s shipping history and its potential to interpret sub-theme 1.5 (Living with natural processes). The collection is also historically significant for its association with the shipwreck. The Newfield collection meets the following criteria for assessment: Criteria A: Importance to the course, or pattern, of Victoria’s cultural history Criteria B: Possession of uncommon, rare or endangered aspects of Victoria’s cultural history Criteria C: Potential to yield information that will contribute to an understanding of Victoria’s cultural history Ornate brass handle, round plates each end, each with 4 round fixing holes. Found washed up on Sea Elephant Bay beach, King Island 1913, identified by donor as being from the wreck of the Newfield.flagstaff hill, warrnambool, shipwrecked-coast, flagstaff-hill, flagstaff-hill-maritime-museum, maritime-museum, barque newfield, shipwreck-coast, flagstaff-hill-maritime-village, ornate handle, sailing ship fitting, sea elephant bay, king island -
 Melbourne Legacy
Document, List of Members of Intermediate Legacy Club when it Ceased Operations on 20/2/1974. ILC4
A list of the 40 final members of the Intermediate Legacy Club when it ceased operating in 1974. Background: The ILC was formed in 1929 (or 1930 according to the newsletter article). The idea of the club sprang from those boys who had outgrown the Junior Legacy Club. In the early days it fielded a lacrosse team and it was this that mainly held the members together. Enthusiasm wained after a few years as it lacked a solid objective. The answer came from one of its members and in 1938 they founded the Don Esses Club. This was a club for the children of incapacitated ex-servicemen which met every Thursday night at 7.30 run by the ILC members. The name came from the signallers' code Disabled Servicemen's Sons. During the second world war 80% of the members of the ILC enlisted in the services. Leaving only 8 members that could not join due to ill health or reserved occupations. They continued the Don Esses and whatever aid they could to Legacy. ILC members had always helped Legacy where possible including being camp leaders or camp staff, with the annual demonstrations, and coffee stalls at the ANZAC dawn service. Post second world war some ILC members were nominated into Legacy, others drifted away in civil occupations. It was found difficult to recruit new blood into the ILC and eventually membership waned when the boys from the Don Esses clubs found other youth activities to join. The ILC ceased to meet regularly in the mid fifties. However a strong comradeship still existed between members and they would meet in one anothers homes. Members were always ready to help the senior Legacy Club in any way in their power and still helped at Christmas parties and summer camps. ILC was a service rendering organisation and was self governing. Non-sectarian and non-political, the members were ex-junior legatees over 18 years of age. After serving in World War 2 members were eligible to become members of Legacy. Was in a folder of material collated about the ILC by an early archive committee. Names on the list were: HA Ackerley, JW Alsope (dec), KG Bartils, JWL Belsey, E Brown (dec), JW Bush, J Coade, R Cumming, J Ferguson, CC Fisher, WJ Gilmore (dec), EJD Graham (dec), RE Harding, KA Hatherly, AT Henderson, KT Herron, JW Hocking, Frank C Holliday, JA Holloway, Fred Hollingsworth, HA Hollingsworth, C Jorgensen, C Julian (dec), KS King, G Lake, AV Lawson (dec), JV Lawson, Jimmy M MacGregor, CL MacMillan, A McNaughton (dec), W McNaughton, HG Metcalfe, WG Needham (dec), JE Pilbeam, RC Rickards, RHW Rimmer (dec), Norman A Smith, JM Suggett, GE Todd, BF Wood.An important list of the final members of the Intermediate Legacy Club. The ILC was active from 1930 to 1974.White foolscap paper with black type of a list of 40 members of the ILC in 1974.Handwritten in red pen 'ILC4' which was part of the an early archive numbering system.ilc, membership, junior legatee -
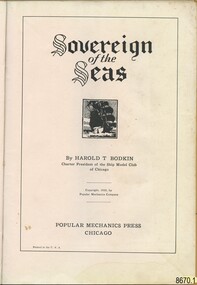 Flagstaff Hill Maritime Museum and Village
Book - "Sovereign of the Seas" book or manual for the ship model hobby enthusiast, Harold T. Bodkin, 1933, "Sovereign of the Seas", Popular Mechanics Press
Jim (James Bernard) Williams, who was the owner of this manual, was a long-time resident of Warrnambool having the opportunity to work at two notable historical businesses of the town. The first, Cramond & Dickson a drapier store established around 1852-1855 and which remained a store that traded under the same name for the longest in Victoria, before it closed its doors in 1974. The second business was Fletcher Jones a highly successful textile and clothing Australian business. Some of Jim’s spare time was devoted to the model ship making which would conjure up many fascinating stories of maritime history. In addition to Jim witnessing the tail end of ships at port in Warrnambool, his "father was as sea captain and operated his vessel in Bass Strait coastal trade between Tasmania and Victoria". The intricately detailed model made by Jim is full of precise detail. The manual and the blueprints held by Flagstaff Hill Maritime Village also reflect the intricate process and devotion to the task completed by Jim. The history of the shipwreck and maritime stories of the Victorian Southwest coast surrounding Warrnambool would have continued to inspire his passion. Three photos of the model and Jim, like the photo of Harold T. Bodkin in the manual, attest to the enthusiasm and enjoyment that was gained by him through this hobby. The manual opens to a photo of “Mr. Harold T. Bodkin adding finishing touches to model of the “Sovereign of the Seas”. The “Forward to Reader” which is on the next page is written by “E. R. HAAN, Technical Editor, Popular Mechanics Magazine. The forward explains the methodology used to achieve the fine detail that is part of the body of the model, by “applying imitation carvings”, and is cited as “a museum type of model”. The following page “Blueprints and Craftmats on the ‘Sovereign of the Seas’” discusses the availability of a set of blueprints to purchase separately. Followed by a description of the moulding process for the “miniature carvings”. “Historical Notes of Interest on the “Sovereign of the Seas (1637)” follow on the next page. The manual is divided into the following parts from pages 8 to 71: “Part I – Shaping the Hull/Part II – The Rudder, Quarter Galleries and Gunports/Part III Wales, Gunport Covers and Initial Ornamentation/Part V – Beakhead Decoration, Bulkhead and Rails, Etc./Part VI Carvings, Lanterns, Knights, Bitts and Painting/Part VII – Details of Mast Construction/Part VIII – Standing Rigging/Part IX – Running Rigging and Final Details. All of these instructions include photographs and detailed graphs. Then instructions on “How to Read and Use Ship-Model Drawings”, “The Shop-Model Maker’s Tools”, and “Simplified Ship-in-a-Bottle”. This is finished off with “Helpful Hints….” And numerous pages of advertising. Some adverts include aids for completing the “Sovereign of the Seas” model. Part I uses blue and black ink to illustrate a dramatic picture of the “Sovereign”, otherwise all print is in black ink on buff paper. This book in significant to the collection as it was donated along with other tools and blueprints which have been used by the donor of the "Sovereign of the Seas" model ship. It also connects with the wider community in that it is related to historical maritime interest and the donor, Jim Williams is also connected to other significant retail and manufacturing businesses of the past in Warrnambool. This manual has been covered with brown paper, including an extra strip for the spine. The front has a watermark at the top middle, some pencilled compass circles segmented into eight parts across the area and a small amount of script writing. The back also has the same type of compass circles and some other small shapes. There are also grease marks. The cover has a patina adding to variations of colour to the paper indicative of the book being handled often. The title page reads “Sovereign of the Seas” in an Old English font. This is followed by a lithograph print around 1 inch square of a ship at full sale. By HAROLD T. BODKIN/Charter President of the Ship Model Club of Chicago/Copyright, 1933, By Popular Mechanics Company/POPULAR MECHANICS PRESS/CHICAGO/Printed in the U.S.A. By HAROLD T. BODKIN/Charter President of the Ship Model Club of Chicago/Copyright, 1933, By Popular Mechanics Company/POPULAR MECHANICS PRESS/CHICAGO/Printed in the U.S.A.flagstaff hill, warrnambool, shipwrecked coast, flagstaff hill maritime museum, maritime museum, shipwreck coast, flagstaff hill maritime village, great ocean road, model ship, vessel sovereign of the seas, jim williams, james bernard williams, the forth tasmania, freda williams, heather williams, phyllis bowditch, fletcher jones staff 1936, 17th century sailing ship, cramond and dickson, sovereign of the seas, royal sovereign, sovereign, charles 1, fletcher jones, warrnambool breakwater -
Glen Eira Historical Society
Ephemera - Caulfield Cricket Club
This file contains two items. A menu and programme for Caulfield Cricket Club. Includes handwritten list of names of office-bearers and printed list of sponsors. Thirty-four newspaper clippings on Caulfield Cricket Club. “Haviland, Pritchard give Caulfield Boost”, cutting from Caulfield Port Phillip Leader, 21/12/2010 on recent match. “Daron Cruickshank Shows His Class” cutting from Caulfield Port Phillip Leader 11/01/2011 on Daron Cruickshank from Trinidad-Tobago who whit 111 not out in recent match for Caulfield against Ormond. “Century Lifts Monds, Another Ton For Hansen” cutting from Caulfield Port Phillip Leader on 01/02/2011 on recent centuries by Michael Hansen of Ormond in matches. “Fields Take Minor Premiership” cutting from Caulfield Port Phillip Leader 08/03/2011 on forthcoming match of Elsternwick against Coburg. “Richo’s Century Puts Caulfield in Driver’s Seat” cutting from Caulfield Port Phillip Leader 15/03/2011 on Shaun Richardson’s 160 for Caulfield against Brunswick in a recent match. “Caulfield Up for Challenge” by Brad Beitzel cutting from Caulfield Port Phillip Leader 22/03/2011 on forthcoming match against Coburg. “Fielders Work For It. Sliver of Hope Going Into Day Two” by Paul Amy, cutting from Caulfield Port Phillip Leader 29/03/2011 on recent match of Caulfield against Malvern. Photograph, cutting from Caulfield Port Phillip Leader 05/04/2011 of batsman Matt Lawrence who had announced his retirement, pictured with unnamed wicket-keeper. “‘Grub’ will be missed” cutting from Caulfield Port Phillip Leader 12/04/2011. Obituary of Tony Sheehan who represented Caulfield in 170 matches. “Caulfield Goes in to Bat Early” cutting from Caulfield Port Phillip Leader 03/05/2011 on recent recruits Adam Warren and Rob Bartlett for forthcoming season. “South Caulfield on Top” cutting from Caulfield Port Phillip Leader 01/11/2011 on prospects of South Caulfield Club and recent matches. “Monds Break Duck” cutting from Caulfield Port Phillip Leader 31/01/2012 on recent win by Ormond Club. “Help To Put Cancer Fund in the Pink” article from the Caulfield Port Phillip Leader dated 07/02/2012 concerning the Caulfield South Cricket Club’s participation in Pink Stumps Day in order to raise funds for cancer research. “Premier Cricket” by Brad Beitzel, cutting from Caulfield Port Phillip Leader 14/02/2012 on recent watches of local clubs. “Damiano’s Three Tons A record” by Brad Beitzel, cutting from Caulfield Port Phillip Leader 28/02/2012 on batting record of Ricky Damiano. “Caulfield Digs In. Baldry Leads Lower Order Fight Against Malvern” by Paul Amy, cutting from Caulfield Port Phillip Leader 13/03/2012 on undefeated season of Caulfield club and future match. “Fields Bound For Glory. Rugged Day for Elsty” by Brad Beitzel cutting from Caulfield Port Phillip Leader 20/03/2012 on success of Caulfield Club. “Fielders Perfect Finish. Golden Summer Capped by Premiership” by Brad Beitzel cutting from Caulfield port Phillip Leader 27/03/2012 on undefeated season of Caulfield Club. “Caulfield Leaders Pay Hospital Visit to Club Stalwart. That Was For ‘Morro’” by Paul Amy cutting from Caulfield Port Phillip Leader 02/03/2012 on visit to ill Brian Morrison. “Caulfield Hearts Heavy After Death of Club Legend ‘Morro’” by Paul Amy cutting from Caulfield Port Phillip Leader 10/04/2012 on death of Brian Morrison. “Big Send Off For Legend ‘Morro’” cutting from Caulfield Port Phillip Leader 17/04/2012 on funeral of Brian Morrison. “Cricket Season to Commence” clipping from unnamed journal or magazine, hand dated 10/12 on new cricket season. “Christiansen Cracks Ton in Elsternwick Victory”, cutting from Glen Eira Port Phillip Leader 30/10/2012 on century by Cam Christiansen in match against Malvern. “Harwood Hits Hard to Set test For Caulfield” by Paul Amy cutting from Glen Eira Port Phillip Leader 13/11/2012 on performance of Shane Harwood in match against Melton. “ ‘Richo’ To The Rescue” by Paul Amy cutting from Glen Eira Port Phillip Leader 11/12/2012 on performance of Shaun Richardson in match against Williamstown. “Victorian Turf Cricket Association South Poised for Outright Win Against Bernies” cutting from Glen Eira Port Phillip Leader 29/01/2013 on match between South Caulfield and St. Bernards. “Tough Chase Awaits Caulfield” cutting from Glen Eira Port Phillip Leader 22/01/2013 on prospects of Caulfield Club. “Stateswide Twenty 20 Cup. South Caulfield Gets The Chance To Play At the MCG” photocopy of article in Glen Eira Port Phillip Leader 12/02/2013 that the team is to play in the MCG in finish of Twenty 20 Competition. “Nurse to the rescue for Wiaks” by Paul Amy cutting from Glen Eira Port Phillip Leader 19/02/2013 on century by Harry Nurse in match against Yarraville. “VTCA South Caulfield Crowned Twenty 20 Champion” cutting from Glen Eira Port Phillip Leader 12/03/2013 on win by South Caulfield in state wide Twenty 20 Cup. “Sub-District Cricket Finals. Caulfield Up Agianst Melton and Weather” cutting from Glen Eira Port Phillip Leader 19/03/2013 on semi-final match between Caulfield and Elsternwick. “Cricket Championship Team” photograph cutting from Glen Eira Port Phillip Leader 09/04/2013 of Championship Caulfield Club with thirteen players named in caption. “Cricket High Hopes for Scholarship Winner” cutting from Glen Eira Port Phillip Leader 16/04/2013 on cricket scholarship for Adam Cosgrove, aged twelve.caulfield cricket club, ormond cricket club, elsternwick cricket club, south caulfield cricket club, north caulfield glenhuntly cricket club, malvern cricket club, sheehan tony, damiano ricky, oakleigh cricket club, morrison brian, little harold, christiansen cam, harwood shane, richardson shaun, murrumbeena cricket club, carnegie cricket club, mcg, melbourne cricket grounds, nurse harry, reilly geoff, shipley colin, jacobs bill, lahiff tommy, haviland james, pritchard heath, cruickshank daron, hansen michael, lawrence matt, warren adam, baldry leigh, vtca, twenty 20 club, cosgrove adam, cricket, cricket clubs, cricketers, sporting clubs, sports -
 University of Melbourne, Burnley Campus Archives
Document - Personal files, Andrew Smith's Files, 1981-2022
cactus, cacti, clematis, orchard redevelopment, r. hall, geoff olive, pruning garden, field station, vcah, university of melbourne, burnley, jill kellow, field station redevelopment, field nursery, student gardens, turfgrass, grassy woodland, chris findlay, phil tulk, grasslands, herbaceous border, car park, native garden, restoration native garden, john rayner, hilda kirkhope rockery, herb garden, rainforest garden redevelopment, plant lists, shady walk, salvia, trees, tai-haku cherry, tree management, tree lists, david aldous, grey border -
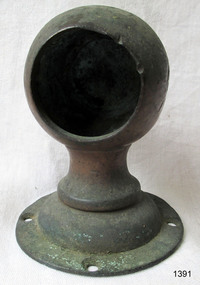 Flagstaff Hill Maritime Museum and Village
Functional object - Rail holder, About 1893, when the ship was made
This brass rail holder fixture would have been used to hold the end of a rail in place. There is no information as to where the fitting or rail would have been placed on the ship; sailing ships had many brass fittings. It was recovered from the wreck of the La Bella, which lies at the bottom of the Warrnambool Harbour. Some 15 ships are believed to have been wrecked in Lady Bay, but only two have been discovered on the sea floor; the La Bella and the Edinburgh Castle. Both wrecks are popular diving sites and are preserved as significant historical marine and marine archaeological sites. The story of the final voyage of the La Bella is summarised as follows … The ship from which the sailors were rescued was the three-masted, iron and steel barquentine the La Bella, built in Norway in 1893. She was one of two iron and steel ships by Johan Smith, the company being one of the leading shipping families in Tvedestrand, Norway. She was significant to Norwegian shipping, being one of only 27 iron and steel ships ever built in Norway. She was registered in New Zealand and engaged from 1902 in inter-colonial trading of timber in the pacific, between New Zealand and Australia and was often in Port Phillip Bay, Victoria. On 5th October, 1905, the twelve year old La Bella left Lyttleton, New Zealand carrying a cargo of timber bound for Warrnambool, Australia . She was manned by a crew of twelve: the Master, (Captain Mylius, previously 1st Mate of La Bella, appointed Captain to La Bella on 6th February 1903) 2 Mates, Cook, six able seamen, one ordinary seaman and a boy. . Bad weather en route caused her to shelter at Burnie on Tasmania's North West coast. On November 10th, the 37th day of her journey, La Bella approached Warrnambool. Captain Mylius steered her towards Lady Bay Channel in heavy south-west seas and evening mist. He ordered the helmsman to steer for the light. As the ship came round, a tremendous sea struck her on the port quarter, causing her to breach broadside in a north-westerly direction into breakers. The helm was brought round twice more, but each time heavy seas broke over her, the third time throwing the La Bella on to a submerged reef in Lady Bay now known as La Bella Reef (about 100 yards from the Warrnambool breakwater). The sea was so rough that it even wrenched a one-and-a-half ton anchor from its fastenings and into the sea. As Captain Mylius headed to the steel wheelhouse, intending to send up a rocket flare, a huge sea slammed the steel door into him (resulting in massive bruising front and back) Despite his injuries he still managed to set off a blue light, which he held up in his hands. La Bella’s lifeboats were filled with sea water and broke up on their chocks. The blue light was the first indication to people on shore that there was a ship in distress. The Harbour Master, Captain Roe (who lived in the Harbour Master’s House opposite Flagstaff Hill), organised a group of volunteers to crew the lifeboat because the trained crew was unavailable; the crewmen were working on a steamer in Port Fairy at the time. He then poured oil onto the water to try and smooth the sea. At around 11pm three of the crew took shelter in the steel forecastle but the sea crashed into it and broke it up. While the rest of the crew and onlookers watched helplessly in the moonlight the bodies were washed away into the sea, never to be seen again. Some of the crew lashed themselves to the weather rail to keep from being washed away. Watson, the ordinary seaman, became tangled in the rigging lines and was too weak to move, so the 2nd Mate, Robertson, put a line onto him so that he wouldn’t wash off. Around 11pm three of the crew were unconscious from exhaustion. The situation on La Bella was becoming dangerous. The 2nd Mate moved to the ‘house’ and soon afterwards the ship slipped in the heavy sea. The lashings of the 1st Mate and the ‘boy’ Denham had kept them safe until about 2am when they were washed overboard; no one was able to help. One by one, the exhausted crew were being washed overboard, too weak to hold on any longer. During the night the La Bella had broken into two and the deckhouse ran out towards the sea. Two more men drowned when trying to reach the lifeboat. By sunrise the only survivors of the twelve were the Master, 2nd Mate and three seamen. Early in the morning Captain Roe used the rocket apparatus on shore to try and shoot a line to the ship for a safer rescue but each attempt fell short of the target. Several attempts were made by the lifeboat to rescue the stricken sailors, but the rough conditions made this difficult for the boat to get close enough to the ship and the lifeboat had to return to shore. During a final attempt to reach the ship Captain Mylius ordered his men to jump into the sea. Leonard Robertson, 2nd mate, jumped and swam towards the lifeboat, taking hold of the boat hook offered to him. Oscar Rosenholme managed to reach the boat floating on a piece of timber from the ship’s load and a third survivor, Noake, also made the boat. Along with the lifeboat rescue crew, 25 year old William Ferrier rowed his small dingy through the heavy seas and managed to rescue the Captain, whom he landed on the breakwater. Ferrier then returned to the ship to attempt a final rescue, losing his oars and rowlocks into the high sea. Using just a spare paddle he skulled towards the La Bella, reaching her stern in time to cut loose the lone surviving sailor, Payne, from the lashing that held him to the ship; the terrified sailor dropped from the ship and into the dingy. Shortly after the last man was rescued, the La Bella was lifted by a huge wave and crashed back down on the reef; she broke up and sank. The ordeal had lasted ten hours. The survivors were taken to the nearby Bay View Hotel and gratefully received warm food and clothing, medical attention and a place to sleep. In the following days an unidentified body of a young person was washed ashore; it was either Watson or Denham. The body was buried in the Warrnambool cemetery with an appropriate gravestone and inscription. William Ferrier became a national hero as news of the daring rescue spread. In recognition of his bravery in the two daring rescues he was awarded the Silver Medal for Bravery by the Royal Humane Society and was honoured in the letter from the Prime Minister and the Parliament of the Commonwealth, telegrams and a cheque for £20 from the Governor General, over £150 subscribed by the public, including Warrnambool and district and readers of The Argus, and a gold medal from the Glenelg Dinghy Club of South Australia. Ferrier’s rescue efforts are one of the most heroic in Victoria’s shipwreck history. (William Ferrier’s son, Frank, received a similar award almost fifty years later, when he helped rescue four members of the crew on the yacht Merlan, after it ran on to a reef near the Point Lonsdale Lighthouse. ) The wreck of La Bella now lies on her port side in 13 metres of sheltered water inside the reef she struck. The bow section is relatively intact and part of the stern has drifted north-easterly towards the mouth of the Hopkins River. The reef the La Bella struck now bears its name. Those five rescued from the La Bella were Captain George Mylius, Leonard Robertson (2nd Mate, 21 years old), R. Payne, Oscar Rosenholme and Jack Noake. Those seven who lost their lives were Mr Coulson (1st mate), Charles Jackman (cook) Gustave Johnson, Pierre Johann and Robert Gent (all able seamen), Harry Watson (ordinary seaman) and Jack Denham (ship’s boy), Captain Mylius was found guilty of careless navigation; he had sailed into the bay without the services of a pilot. His Master Certificate was suspended for twelve months. Later he was also charged with manslaughter of one of the crew who had died when the La Bella was wrecked, but found not guilty. The event’s adverse publicity and damage to his career took a toll on his health and he died of a heart attack six months after the wreck; he was only thirty-seven. His body was buried in the Melbourne General Cemetery. The La Bella was “the best documented of all sailing ships owned in New Zealand”. Her record books, ship logs, correspondence and supporting papers are still available. At the time of the tragedy, she was owned by Messers David C.Turnbull and Co. of Timaru, New Zealand timber merchants and shipping agents, who had purchased her on 13th December 1901. A detailed account of the last journey of La Bella can be read in “Leonard Robertson, the Whangaroa & La Bella” written by Jack Churchouse, published in 1982 by Millwood Press Ltd, Wellington, NZ. Some 15 – 17 ships are believed to have sunk in Lady Bay, but only two have been discovered on the seafloor; the “La Bella” and the “Edinburgh Castle”. Both wrecks are popular diving sites and are preserved as significant historical marine and marine archaeological sites. As well as this letter, Flagstaff Hill’s La Bella Collection includes a photograph of the wrecked La Bella, a brass rail holder and a postcard of William Ferrier with four of the survivors. This original congratulatory letter sent to William Ferrier by the Prime Minister and Government of Australia demonstrates the importance attached to his efforts for Victoria and to Australia. The letter is part of the La Bella Collection and is significant at both a local and state level. Its connection to the La Bella shipwreck and the rescue of five survivors highlights the dangers of Victoria’s Shipwreck Coast. The letter to William Ferrier from the Australian Government acknowledges the bravery of ordinary Australians who risked their lives to save victims of shipwrecks along the coast. The letter is significant to the history of Warrnambool as it honours William Ferrier, a local fisherman whose descendants continue to live in the area. It highlights the way of life of people who lived in coastal towns in 19th century Victoria and the effects of shipwrecks upon them. The letter connects to the postcard of William Ferrier with four of the five rescued crew, the photograph of the wreck of the La Bella and the artefact from the wreck, the rail holder. This item is significant because of its association with the sailing ship “La Bella” . the “La Bella” is of local and state and national significance. It is one of the only two shipwrecks discovered in Lady Bay, Warrnambool, out of the 15-17 shipwrecks in the bay. Brass rail holder from the wreck "La Bella". This rail holder would have been used as a fitting for the end of a rail. It is made up of two parts and looks a little like a goblet in shape. The top is a hollow spherical shape with a circular hole cut out on one side, into which the end of a round rail would fit. There are two gouge marks close to each other on one side of the hole, about one centimetre apart, at 1 and 2 o’clock position. The sphere has a hollow pipe-like stem with a screw thread turned into the outside of the lower section and the bottom of the stem has been flared out after having the base fitted. The base is round and has a mound in the centre. The edge has four evenly spaced fixture holes around its edge. The metal shows signs of pitting and has mild encrustation. The fitting of the base is loose, allowing it to swivel in a complete circle. The top of the sphere is rough and has a dent in it. Underneath the base there is verdigris; some has flaked off and reveals a bright golden colour underneath. rail holder, brass rail holder, la bella, lady bay, norway, 1893, new zealand, captain mylius, william ferrier, flagstaff hill, warrnambool, shipwrecked coast, flagstaff hill maritime museum, maritime museum, shipwreck coast, flagstaff hill maritime village -
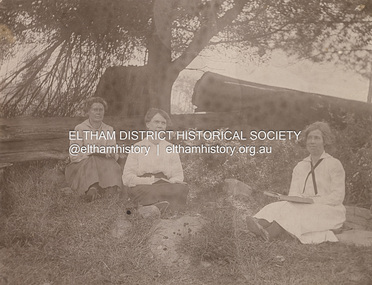 Eltham District Historical Society Inc
Photograph, Elizabeth Shillinglaw in middle, possibly sister Mary on right, c.1925
Elizabeth (Lizzie) Ann Shillinglaw born August 15, 1879 at Bundoora, Victoria was the fith child of Phillip Shillinglaw and Sarah Ann (nee Kidd). She commenced school at Eltham State School No. 209 (Register No. 391) in 1883 at age 3 years, her final year being 1892. She was engaged to a local Eltham lad who enslisted in the First World War and presented her with a gold ring with Lizzie inscribed on it. He never returned from war and Lizzie never married. Lizzie was quite involved with the local Methodist church where father Phillip was a Lay Preacher. She also had a dress making business in Smitrh Street, Collingwood. At the time of her father's death in 1914 she was living at 18 Stanley Street, Richmond. She returned to Wattle Brae in Eltham where she and her unmarried sisters, Mary and Ada and brother Ernest Samuel continued to live. Mary Shillinglaw born November 5, 1880 at Bundoora, Victoria was the sixth child of Phillip Shillinglaw and Sarah Ann (nee Kidd). She commenced school at Eltham State School No. 209 (Register No. 423) in 1885 at age 4 years. Mary did not marry and spent most of her life at Wattle Brae (Shillinglaw Cottage). In his Will, Phillip Shillinglaw provided that any of his unwed sisters would be able to live at Wattle Brae, rent free. When Eltham Shire Council aquired the property in 1963 to build new Shire Offices, both Mary and her sister Lizzie (also unmarried) were still living at the cottage. Council paid for the women to relocate. Mary moved to Elizabeth House, a nursing home in Ivanhoe but found it very hard to adapt to her new surroundings and living consdtions. She died there only a few months after departing Eltham on October 29, 1963 at age 83 years. Lizzie died June 28, 1972 at age 93 years. Post Card printed on back with photographer's details: W. Mason & Co., 144 Bridge Road, Richmond. W. Mason & Co. operated from this adress from 1903-c.1932 POSTCARD 1905-1940s Like the carte-de-visite, postcards enjoyed a collecting craze by large numbers of people, and were often kept in albums through which the interested visitor could browse. Postcards were posted or exchanged in huge numbers. Postal authorities in Australia only allowed the private printing of postcards from 1898. At this time the back of the card was reserved for the address and postage stamp, and the front was used for the message and a picture. In 1902 British authorities allowed a "divided back", so that the left side could be used for the message, the right side for the address and stamp, and the whole of the front was devoted to the picture. France followed suit in 1904, Germany and Australia in 1905, and the United States in 1907. - Frost, Lenore; Dating Family Photos 1850-1920; Valiant Press Pty. Ltd., Berwick, Victoria 1991marg ball collection, postcard, 1925, elizabeth (lizzie) ann shillinglaw (1879-1972), elizabeth docherty (nee shillinglaw 1861-1942)*, mary ann shillinglaw (1880-1963), reading -
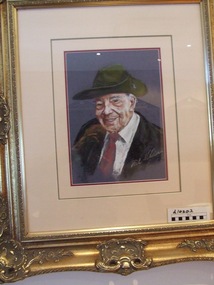 Waverley RSL Sub Branch
Painting Roy Longmore, RoyLongmore
Longmore set aside his life as a farm-hand in Geelong, Victoria, when he enlisted in the Australian Imperial Force at age 21. Private (Pte) Roy Longmore, 3rd Reinforcements, 21st Battalion, of Bannockburn, Victoria enlisted on 13 July 1915; and he embarked from Melbourne aboard HMAT Anchises on 26 August 1915.[2] After training in Egypt, was sent to the Battle of Gallipoli where he was a tunnel digger with the 2nd Division, burrowing underneath the Turkish positions and laying mines. After evacuation from Turkey, he fought at Pozières, Armentières, and Villers-Bretonneux.[1] He was wounded three times in France and was momentarily given up for dead when he was shot as the Armistice in November 1918, approached. He later recalled, "We were patrolling in a gully when suddenly half a dozen Germans appeared over a hill armed with machine guns and opened fire. Jerry riddled me, knocking me flat on my back, and the last I heard was 'Longy's had it, they got him.'" Fortunately, his fellow soldiers saw him move and rescued him.[3] Lance Sergeant (LSgt) and returned to Australia on 16 March 1919 as a member of the 2nd Pioneer Battalion.[2] Civilian life[edit] After returning to Australia in 1919, his injuries made returning to farm work impossible, so he drove a taxi in Melbourne. Another change caused by the war was more telling. Before, he had hunted rabbits; but he later explained that when he returned home, he no longer had an appetite for firing at anything alive.[3] Longmore married and had one son, Eric.[1] The one-time LSgt Longmore died peacefully in his sleep at a Burwood Nursing Home aged 107 on 21 June 2001. He was the second last Anzac to die.[2] At his death, Australia honored him one final time with a state funeral.[3] Australian "legend"[edit] In 2000, Longmore was recognized as one of the "Australian Legends." His name and photograph were honored as part of an annual series of commemorative postage stamps issued by Australia Post since 1997. The stamps commemorate living Australians "who have made lifetime contributions to the development of Australia's national identity and character".[4] Longmore lived to fully enjoy this honor.[3] Longmore's 45-cent Legend stamp displays the soldier's portrait as a young man, photographed just prior to his departure for Gallipoli. Formal photographs of the other two ANZAC centenarians complete this stamp set. In addition, a fourth stamp features the 1914-15 star medal which was presented to all those who fought in campaigns during those war years.[5] These stamps, designed by Cathleen Cram of the Australia Post Design Studio, commemorate the story of events and people shaping contemporary Australia.[6] The Longmore stamp honors him as an individual and as a representative of all 68,000 soldiers at Gallipoli whose actions affected Australia's evolving self-image.[7] http://en.wikipedia.org/wiki/Roy_LongmoreFramed painting of Roy Longmore wooden frame glass fronted -
 Flagstaff Hill Maritime Museum and Village
Tool - Plane, 1819-1901
A moulding plane is a specialised plane used for making the complex shapes found in wooden mouldings that are used to decorate furniture or other wooden objects. Traditionally, moulding planes were blocks of wear-resistant hardwood, often beech or maple, which were worked to the shape of the intended moulding. The blade or iron was likewise formed to the intended moulding profile and secured in the body of the plane with a wooden wedge. A traditional cabinetmakers shop might have many, perhaps hundreds, of moulding planes for the full range of work to be performed. Large crown mouldings required planes of six or more inches in width, which demanded great strength to push and often had additional peg handles on the sides, allowing the craftsman's apprentice or other workers to pull the plane ahead of the master who guided it. Company History: The Holtzapffel dynasty of tool and lathe makers was founded in Long Acre, London by a Strasbourg-born turner, Jean-Jacques Holtzapffel, in 1794. The firm specialized in lathes for ornamental turning but also made a name for its high-quality edge and boring tools. Moving to London from Alsace in 1792, Jean-Jacques worked initially in the workshop of the scientific-instrument maker Jesse Ramsden, Anglicizing his name to John Jacob Holtzapffel. In 1794 he set up a tool-making partnership in Long Acre with Francis Rousset and they began trading under the name of John Holtzapffel. From 1804 he was in partnership with the Mannheim-born Johann Georg Deyerlein until the latter died in 1826, trading under the name Holtzapffel & Deyerlein. Holtzapffel sold his first lathe in June 1795, for £25-4s-10d, an enormous price at the time. All of Holtzapffel's lathes were numbered and by the time he died in 1835, about 1,600 had been sold. The business was located at 64 Charing Cross, London from 1819 until 1901 when the site was required "for building purposes". The firm then moved to 13 and 14 New Bond Street and was in premises in the Haymarket from 1907 to 1930. John's son, Charles Holtzapffel (1806–1847) joined the firm in 1827, at around which time the firm became known as Holtzapffel & Co. Charles continued to run the business after his father's death. He wrote a 2,750-page treatise entitled Turning and Mechanical Manipulation, published in 1843 which came to be regarded as the bible of ornamental turning. The final two volumes were completed and published after his death by his son, John Jacob Holtzapffel (1836–1897). When Charles Holtzapffel died in 1847 his wife Amelia ran the business until 1853. John Jacob II, the son of Charles and Amelia, was head of the firm from 1867 until 1896. A nephew of John Jacob II, George William Budd (1857–1924) became head of the firm in 1896. His son John George Holtzapffel Budd (1888–1968) later ran the business. By the early twentieth century, ornamental turning was going out of fashion, and the firm sold its last lathe in 1928. A vintage tool made by a well-known firm made for firms and individuals that worked in wood. The tool was used before routers and spindle moulders came into use after World War ll, a time when to produce a decorative moulding for a piece of furniture or other items this had to be accomplished by hand using one of these types of planes. A significant item from the mid to late 19th century that today is quite rare and sought after by collectors. It gives us a snapshot of how furniture was made predominately by hand and with tools that were themselves hand made shows the craftsmanship used to make such a unique item. Moulding Plane Holtzaffel 64 Charing & Owner J Heath 9/16" marked opposite endflagstaff hill, warrnambool, shipwrecked-coast, flagstaff-hill, flagstaff-hill-maritime-museum, maritime-museum, shipwreck-coast, flagstaff-hill-maritime-village, plane moulding, plane, j heath -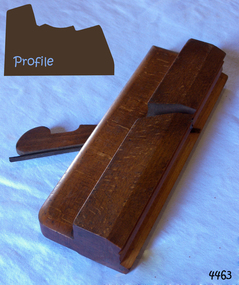
 Melbourne Legacy
Document - Speech, Foundation Day Address 1977. Legacy It's Beginnings. Past President Legatee Kem Kemsley
An article from the Bulletin including the text an address by Legatee Kem Kemsley at a Legacy event on 4 October 1977. He discusses the beginnings of Legacy. He starts with Legatee Savige's tip to Hobart and Sir John Gellibrand's Remembrance Club. Then a meeting of the 24th Battalion at Phair's Hotel in 1923 and the men there agreeing to start a similar club, he mentions Sandy Lowe as a member at the meeting in 1977 that was at the initial meeting in 1923. He also mentions other at that initial meeting were Savige, Frank Selleck, Ted Pittard, Bob Irving, and 'Babe' Norman. He relates the approach made to Sir John Monash to be the first president. It was when Savige was in Frank Meldrum's dentist chair that the plan was hatched for Meldrum, (who was playing tennis with Monash's son-in-law, Gershon Bennett), to approach Monash to be president. It shows the nature of relations between high ranking ex servicemen. Instead Monash suggested Colonel Harold Cohen. Initially Legacy was founded with 'one person from each profession or business who will represent that profession until such time as the Club has established itself on a wider basis.' For example there were 'two solicitors - Downing and Armstrong, Meldrum as dentist, George Worboys as plumber, Dr Gardener as the eye specialist, Doolan and Goodchild as Surveyors, Fred Wickham of the Premier's department who was regarded as very important, Baker from Myer's Emporium, Joynt from the printing world and Blackett the architect.' He also mentions a Police Strike and General Monash set up a special constabulary force. Cohen, Kemsley and many of the early legatees answered the call to help keep peace. By December 1923 there were 54 members of the new Legacy club. The name was under consideration as the Tasmanian club was called Remembrance Club. Pip Powell nominated the name of Legacy to be submitted for consideration, but it was Frank Selleck who moved the formal resolution. The speech mentions that Sir Gellibrand was appointed Patron of Legacy and later Monash and Sir Harry Chauvel were chosen. Frank Doolan posed the question 'what does Legacy really mean?' and focus changed toward widows and children. Citing some slightly different dates to those in a later speech about the start of Legacy (at 02029) he says it was July 1926 that they met with widows and a couple of weeks later 142 boys were to attend Anzac House for a Literary and Debating class. Ballarat and Geelong had formed clubs by 1925 and Legatee Hilmer Smith was transferred with his work to Sydney and started a Legacy Club there in 1926. The first Conference was held in November 1926. The first Government House Christmas party for children was held in 1926, when the Governor General of Australia was still residing there. His final words were about his war experiences and relates a speech made by Legatee Brian Armstrong on 28th February 1961 (02502) that also spoke of the area around the Pozieres Windmill that was part of the battle of the Somme in July/August 1916, where so many of the early legatees fought.. The article was part of an album of past presidents from 1965 to 1989. The folder included biographical details and obituaries, eulogies and death notices of prominent Legatees. The items have been catalogued separately.A record of a speech made by Legatee Kem Kemsley a past president of Legacy about events in the early days of Legacy. The information was collected to record the lives of prominent legatees in a folder.Photocopy of 5 pages from Bulletin on an address by Legatee Kem Kemsley in 1977.Bulletin 4.10.77. Page No 3, 4, 5, 6 and 7.past presidents, speech, foundation day, kem kemsley, sir john monash, pozieres, somme